

Page 1

Page 2

For a large-print version of this guide, or for product-related questions,
visit us online at:
www.motorola.com/cordless
Or phone us at:
•1-800-353-2729 U.S.A.
•1-800-461-4575 Canada
•1-888-390-6456 TTY (Text Telephone)
Copyright © 2005 Motorola, Inc.
All rights reserved. No part of this publication may be reproduced in any form or by any means or used to
make any derivative work (such as translation, transformation or adaptation) without written permission from
Motorola, Inc.
Motorola reserves the right to revise this publication and to make changes in content from time to time
without obligation on the part of Motorola to provide notification of such revision or change. Motorola
provides this guide without warranty of any kind, either implied or expressed, including but not limited to, the
implied warranties of merchantability and fitness for a particular purpose. Motorola may make improvements
or changes in the product(s) described in this manual at any time.
MOTOROLA, and the Stylized M Logo, are registered in the U.S. Patent and Trademark Office. All other
product or service names are the property of their respective owners.
Page 3
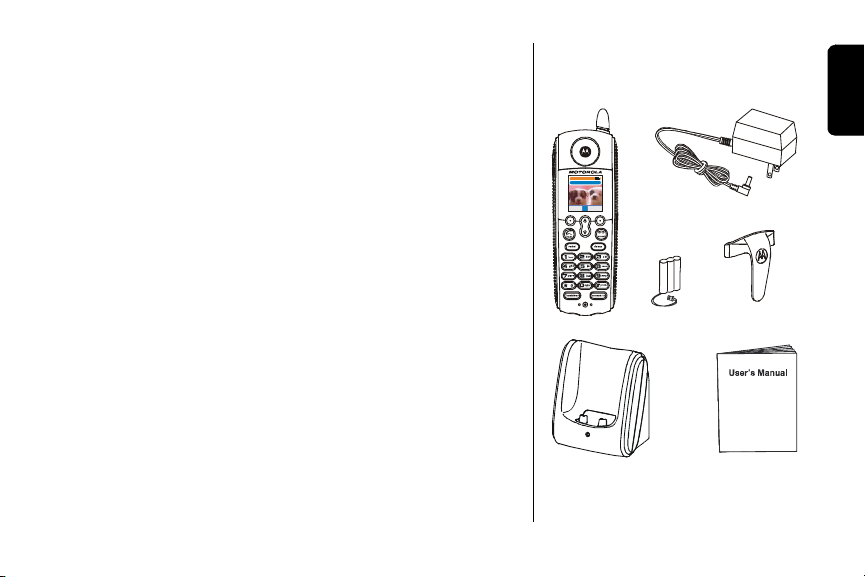
Welcome
Congratulations on your purchase of a Motorola SD4502
series telephone. Take a moment to ensure that your
purchase includes each of the items pictured.
Product registration is an important step toward enjoying
your new Motorola product. Registering helps us facilitate
warranty service, and permits us to contact you should
your Motorola product require an update or other service.
Registration is not required for warranty coverage. To
register your product online, visit:
https://broadbandregistration.motorola.com
Product registration is not available in Canada.
Please retain your original dated sales receipt for your
records. For warranty service of your Motorola Product,
you will need to provide a copy of your dated sales receipt
to confirm warranty status.
1:16 pm
Handset 1
Phonebk cid Menu
Welcome
i
Page 4

Handset Overview
1 Volume Controls
2 LCD Display
3 Left and Right Soft Keys
4 Up and Down Scroll
5 Phone On/Flash
6 Redial list of the last 5 numbers dialed
7 Switch from upper to lower case letters
8 Turn on Handset Speakerphone
9 Microphone
10 Connect to other registered devices
11 Removes Last Number Entered/Entries in
Phonebook/Caller ID List
12 End Call/Cancel Function
13 Headset/Earphone Jack (2.5 mm connector)
14 Handset Antenna, Ringer and Voicemail
Message Indicator
ii
14
1
1:16 pm
Handset 1
2
Menu
3
4
5
6
7
8
9
Phonebk cid
13
12
11
10
Page 5

Handset Charger Overview
Welcome
Charge LED
iii
Page 6

Table of Contents
Welcome . . . . . . . . . . . . . . . . . . . . . . . . . . . . . . . . . . i
Handset Overview . . . . . . . . . . . . . . . . . . . . . . . . . ii
Handset Charger Overview . . . . . . . . . . . . . . . . . .iii
Important Safety Instructions . . . . . . . . . . . . . . . viii
Getting Started . . . . . . . . . . . . . . . . . . . . . . . . . . . . .1
Battery Safety Instructions . . . . . . . . . . . . . . . . . . .1
Charging the Handsets . . . . . . . . . . . . . . . . . . . . .3
Handset Display Screens . . . . . . . . . . . . . . . . . . . .4
Main Display Screen . . . . . . . . . . . . . . . . . . . . .4
Main Menu Display Screen . . . . . . . . . . . . . . . .5
Using the Handset Display . . . . . . . . . . . . . . . . .5
Using the Soft Keys . . . . . . . . . . . . . . . . . . . . . .6
Using the Navigation Key . . . . . . . . . . . . . . . . . .6
Setting Up . . . . . . . . . . . . . . . . . . . . . . . . . . . . . . . . .7
Registering Your Handset . . . . . . . . . . . . . . . . . . . 7
iv
Page 7

Setting the Display Setup Options . . . . . . . . . . . . 8
Setting the Display Contrast . . . . . . . . . . . . . . . 9
Setting the Menu Color . . . . . . . . . . . . . . . . . . . 9
Ringer Options . . . . . . . . . . . . . . . . . . . . . . . . 10
Setting the Ring Tone and Ring Volume . . . . . . . .11
Setting Key Beeps On or Off . . . . . . . . . . . . . . . 12
Naming a Handset . . . . . . . . . . . . . . . . . . . . . . . 13
Setting Touch Tone or Pulse Dialing . . . . . . . . . . 17
Using Your SD4502 . . . . . . . . . . . . . . . . . . . . . . . . 18
Making a Call from the Handset . . . . . . . . . . . . . 18
Answering/Ending a Call . . . . . . . . . . . . . . . . . . 19
Adjusting the Volume During a Call . . . . . . . . . . 19
Making a Call Using the Speakerphone . . . . . . . 20
Switching Between the Handset
and Speakerphone . . . . . . . . . . . . . . . . . . . . . . . 20
Muting a Call . . . . . . . . . . . . . . . . . . . . . . . . . . . . 21
Placing a Call on Hold . . . . . . . . . . . . . . . . . . . . 21
Redialing a Number . . . . . . . . . . . . . . . . . . . . . . 21
v
Page 8

Finding a Lost or Misplaced Handset . . . . . . . . . .22
Saving a Number in the Phonebook . . . . . . . . . .23
Private Phonebooks . . . . . . . . . . . . . . . . . . . . .23
Shared Phonebooks . . . . . . . . . . . . . . . . . . . . .23
Adding a New Entry . . . . . . . . . . . . . . . . . . . . . 24
Adding Numbers to the Phonebook
from Redial . . . . . . . . . . . . . . . . . . . . . . . . . . . .24
Calling a Number from the Phonebook . . . . . .26
Editing a Phonebook Entry . . . . . . . . . . . . . . . .26
Deleting a Phonebook Entry . . . . . . . . . . . . . . .27
Inserting Pauses in a Number . . . . . . . . . . . . .27
Using Caller ID . . . . . . . . . . . . . . . . . . . . . . . . .28
Reviewing Caller ID Call List . . . . . . . . . . . . . .28
Using Automated Dialing . . . . . . . . . . . . . . . . .29
Advanced Features . . . . . . . . . . . . . . . . . . . . . . . .30
Conference Calling . . . . . . . . . . . . . . . . . . . . . . .31
Using the Intercom . . . . . . . . . . . . . . . . . . . . . . . .32
Intercom Setup . . . . . . . . . . . . . . . . . . . . . . . . .32
Handset to Handset Intercom . . . . . . . . . . . . . .33
vi
Page 9

Transferring a Call from One Handset to Another 34
Unannounced Transfer . . . . . . . . . . . . . . . . . . 34
Announced Transfer . . . . . . . . . . . . . . . . . . . . 34
Using the Handset as a Walkie Talkie . . . . . . . . 35
Monitoring a Room . . . . . . . . . . . . . . . . . . . . . . . 36
Room Monitoring with the SD4504 Wireless
Camera (Optional) . . . . . . . . . . . . . . . . . . . . . . . 37
openLCR™ Option . . . . . . . . . . . . . . . . . . . . . . . 38
FCC Information . . . . . . . . . . . . . . . . . . . . . . . . . 40
Industry Canada (IC) Information . . . . . . . . . . . . 44
Motorola Limited Warranty. . . . . . . . . . . . . . . . . . 48
vii
Page 10

Important Safety Instructions
Follow these safety precautions when using your cordless
phone to reduce the risk of fire, electric shock and injury
to persons or property:
To reduce the risk of fire and shock:
1. Keep all slits and openings of the phone
unblocked. Do not set the phone on a heating
register or over a radiator. Ensure that proper
ventilation is provided at the installation site.
2. Do not use while wet or while standing in water.
3. Do not use this product near water (for example,
near a bath tub, kitchen sink, or swimming pool).
4. Do not allow anything to rest on the power cord.
Place the power cord so that it will not be
walked on.
5. Never insert objects of any kind into the product
slits, as that may result in fire or shock.
6. Unplug this product from the wall outlet before
cleaning. Do not use liquid cleaners or aerosol
cleaners. Use a damp cloth for cleaning.
viii
Page 11

7. Do not disassemble this product. If service or
repair work is required, contact the Motorola
address found in the back of this user guide.
8. Do not overload wall outlets and extension cords.
9. Avoid using during an electrical storm. Use a surge
protector to protect the equipment.
10. Do not use this cordless phone to report a gas
leak, especially if you are in the vicinity of the gas
line.
Unplug this cordless phone immediately from
an outlet if:
• The power cord or plug is damaged or frayed.
• Liquid has been spilled into the product.
• The product has been exposed to rain or water. Do not
retrieve the handset or base until after you have unplugged the power and phone from the wall. Then retrieve the unit by the unplugged cords.
• The product has been dropped or the cabinet has
been damaged.
• The product exhibits a distinct change in performance.
Important Safety Instructions
ix
Page 12

Installation Guidelines
1. Read and understand all instructions and save
them for future reference.
2. Follow all warnings and instructions marked on
the product.
3. Do not install this product near a bath tub, sink,
or shower.
4. Operate this phone using only the power source
that is indicated on the marking label. If you are
unsure of the power supply to your home, consult
your dealer or local power company.
5. Do not place this product on an unstable cart,
stand, or table. This product may fall, causing
serious damage to the product.
6. Adjust only those controls that are covered by the
operating instructions. Improper adjustment of
other controls may result in damage and will often
require extensive work to restore the product to
normal operation.
7. Clean this product with a soft, damp cloth. Do not
use chemicals or cleaning agents.
x
Page 13

8. Use only the power supply that came with this
unit. Using other power supplies may damage
the unit.
9. Because cordless phones operate on electricity,
you should have at least one phone in your
home that isn’t cordless, in case the power in
your home goes out.
10.To avoid interference to nearby appliances, do
not place the base of the cordless phone on or
near a TV, microwave oven, refrigerator, or VCR.
Important Safety Instructions
xi
Page 14

Getting Started
Battery Safety Instructions
• Do not burn, disassemble, mutilate, or puncture the
battery. The battery contains toxic materials that could
be released, resulting in injury.
• Caution: There is a risk of explosion if you replace the
battery with an incorrect battery type. Use only the
battery that came with your phone or an authorized
replacement recommended by the manufacturer.
• Keep batteries out of the reach of children.
• Remove batteries if storing over 30 days.
• Do not dispose of batteries in fire, which could result in
explosion.
• The rechargeable batteries that power this product
must be disposed of properly and may need to be
recycled. Refer to your battery’s label for battery type.
Contact your local recycling center for proper disposal
methods.
1
Page 15

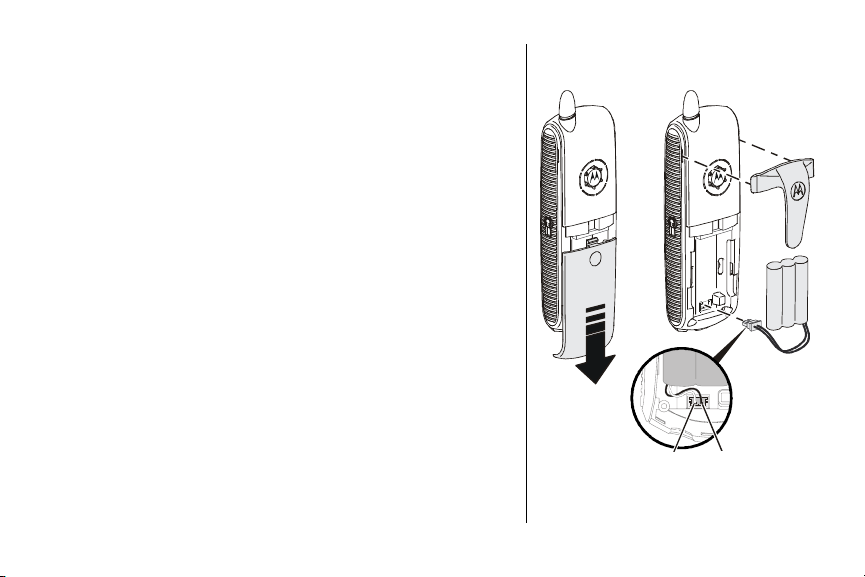
Installing the Batteries
1 Remove any stickers from the battery door if present.
2 Press on the indentation on the battery door, and slide
downwards to remove.
3 Plug connector into the receptacle, and insert the
battery into the compartment. (Make sure that the
black wire is on the right hand side to ensure
proper connection.)
4 Replace the battery door.
5 Attach the optional belt clip.
Getting Started
BlackRed
2
Page 16
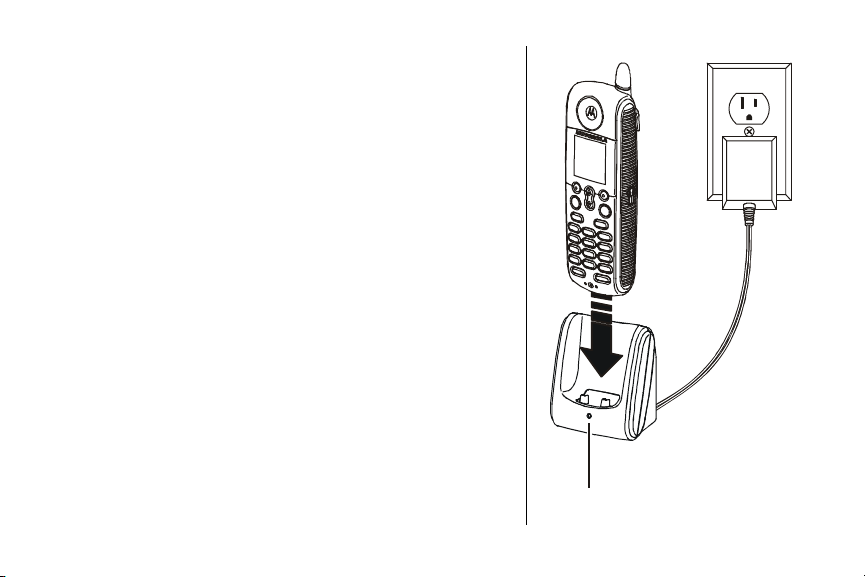
Setting Up the Charging Base
Your expansion handset does not require a phone line;
just charge the battery, and register it to the base. To set
up your Motorola Expansion Handset:
1 Plug the power cord into the back of the
charging base.
2 Plug the power cord into an electric outlet.
Charging the Handsets
Place the handset in the charging base. The LED is solid
red when the handset is charging.
Note: The initial battery charging time for your new
handset is at least 12 hours.
3
Charge LED
Page 17

Handset Display Screens
The handset display, soft keys, and navigation keys
are used to select the various features and functions
of the handset. This section describes how to use
these components so you can set up
your preferences.
For step-by-step instructions on setting personal
preferences, see “Setting Up.”
Main Display Screen
1 Time
2 Name of handset
3 Display wallpaper
4 Left softkey
5 Up/down scroll softkey
6 Right softkey
7 Battery meter
8 Ringer on/off icon
Main Display Screen
1:16 pm
1
Handset-D(4)
2
3
4
Phonebk cid Menu
Getting Started
8
7
6
5
4
Page 18

Main Menu Display Screen
1 Time
2 Menu screen name
3 Menu selection
4 Menu selection icon
5 Left softkey
6 Up/down scroll softkey
7 Right softkey
Using the Handset Display
The main display:
When the handset is not in use, the color display
screen goes black.
Note: Caller ID information is supplied only if you
subscribe to Caller ID service from your local
phone company.
5
1:16 pm
1
2
3
4
5
Select
Menu
Phonebook
Recent calls
Ringer
Monitor roo m
Wal kie-t alkie
Exit
7
6
Page 19

When the handset speakerphone is on, V displays.
The menu display:
In a menu display, points to the currently selected
item, and b indicates there are more items above
and below the currently selected item.
Using the Soft Keys
Two soft keys are used to select the functions
shown above them on the display. The functions
change as you move from one screen to the next. In
this guide, soft key functions are shown as the
function name. For example, if a step instructs you
to “press MENU,” do so by pressing the softkey below
MENU.
Using the Navigation Key
The navigation key is used to scroll up and down
through menu items, lists of settings, Caller ID and
redial lists, and the phonebook.
Left
soft key
Scroll key
1:16 pm
Handset 1
Phon ebk cid
Getting Started
Menu
Right
soft key
6
Page 20

Setting Up
Registering Your Handset
You can register up to 8 devices (handsets, cameras, or
Cell Docks) to a base unit.
To register your new handset:
1 Press the right soft key to select Menu.
2 Scroll to Register.
3 Press SELECT.
4 Press and hold PAGE button on base unit until the
base beeps.
Note: If you exceed the registration limit of 8 devices, the
handset display reads Unable to Register.
7
Page 21

Personalizing Your Handset
Personalize your new handset by setting the wallpaper,
contrast, menu color, selecting unique ring tones,
adjusting the ring volume for day and night time, and
assigning a name to distinguish one handset
from another.
Setting the Display Setup Options
To select a new wallpaper image:
1 Press the right soft key to select Menu.
2 Scroll to Display Setup.
3 Press Select.
4 Scroll to and select Set Wallpaper.
5 Press the scroll key to view the wallpaper selections.
6 Press Change to select the desired setting.
7 Press Done to save the setting and exit the feature.
Setting Up
8
Page 22

Setting the Display Contrast
1 Press the right soft key to select Menu.
2 Scroll to Display Setup.
3 Press Select.
4 Scroll to and select Set Contrast.
5 Press the scroll key to lighten or darken the display
screen.
6 Press OK to save the desired setting.
Setting the Menu Color
1 Press the right soft key to select Menu.
2 Scroll to Display Setup.
3 Press Select.
4 Scroll to and select Menu Color.
5 Press the scroll keys to view the color options.
6 Press OK to select the desired setting.
9
Page 23

Ringer Options
Follow the steps listed to set one ring tone for incoming
calls, and another ring tone for numbers stored in your
phonebook. (You must have Caller ID service to use this
feature)
The Ringer option has five submenus:
• Day Volume: ringer volume - factory default 6:00 AM to
9:00 PM (off, low, medium, high)
• Night Volume: Ringer volume - factory default 9:00 PM
to 6:00 AM (off, low, medium, high)
• Ringer Tone: 15 musical ring tones
• Phonebook Tone: 15 musical ring tones
• Key Beeps: On, Off, Link to Ringer
Link To Ringer Feature
When selected, your key
beeps and ringer volume
will correspond to your
ringer settings. If you select
Night Volume/low, your key
beeps and ringer volume
are low between 9:00 PM
and 6:00 AM.
Setting Up
10
Page 24

Setting the Ring Tone and Ring Volume
1 Press Menu.
2 Scroll to Ringer.
3 Press Select.
4 Scroll through list of options (Day Volume, Night
Volume, Ringer Tone, etc.).
5 Select desired option.
6 Press Change. Each tone/volume plays as you
press Change.
7 Stop at desired tone/volume to set.
8 Press Done.
9 Press Exit to return to Standby Screen or press
scroll keys to view different menu options.
11
RINGER SUBMENU OPTIONS
Day Volume:
6:00 AM to 9:00 P M (off, low,
medium, high)
Night Volume:
9:00 PM to 6:00 A M (off, low,
medium, high)
Ringer Tone
Phonebook Tone
Key Beeps
Ringer volume from
Ringer volume from
15 ring tones
:
15 ring tones
:
On, O ff, Link to Ringer
:
Page 25

Setting Key Beeps On or Off
1 Press Menu.
2 Scroll to Ringer.
3 Press Select.
4 Scroll to Key beeps.
5 Press Change to view options (Off, On, Link to
Ringer*). Stop at the desired option.
6 Press Done to save changes.
7 Press Exit to return to Standby Screen.
* The Link to Ringer feature means the key beeps will
sound according to your ringer settings.
Setting Up
12
Page 26

Naming a Handset
When you register a handset, it is assigned a default
name of Handsets(X). The X represent the list of devices
registered to the base unit (e.g., Handset(1), Camera(2),
etc.). The number assigned at registration remains part of
the name (e.g., Handset(1)).
1 Press Menu.
2 Scroll to Namehandset.
3 Press SELECT.
4 Use DELETE
of cursor.
5 Enter new name using keypad (up to12 characters).
The flashing underline shows cursor position.
13
to backspace and erase characters to left
Page 27

The chart below shows how many times to press each
button on the handset to enter letters and special
characters (e.g., Press 7 three times to enter R). Use the
up and down scroll keys to backspace to make
corrections.
Note: To shift from upper to lower case letters,
press *.
Number of Presses
Button
1 space – * , 1
2ABC ( 2
3DEF) 3
4GH I #4
5JKL/ 5
6MNO ‘ 6
7PQRS7
8TUV?8
9WXYZ 9
1 2 3 4 5
Setting Up
14
Page 28

Setting Date and Time
If you subscribe to Caller ID service, the date and time set
automatically with the next incoming call. Use the
following steps to manually set the date and time.
1 Press Menu.
2 Scroll to Date/Time.
3 Press Select.
4 Enter the time (2 digits required for both hour and
minutes, use leading 0 for 1-digit values).
5 Press AM/PM to set AM or PM mode (Only for 12-hour
clock user).
6 Scroll to the next field.
7 Press Change to switch time format (12 or 24 hour
clock).
15
Page 29

8 Scroll to next field.
9 Press Change to select date format (MM/DD, DD/MM).
10 Scroll to next field.
11 Enter the current date.
12 Press Done.
13 Press Exit to return to Standby Screen.
Setting the Language Option
1 Press Menu.
2 Scroll to Language.
3 Press Select.
4 Press Change until desired language is listed.
5 Press Done.
6 Press Exit to return to the Standby Screen.
Setting Up
16
Page 30

Setting Touch Tone or Pulse Dialing
Your phone is set for touch tone dialing. Do not change
the setting unless touch tone service is not available in
your area.
1 Press Menu.
2 Scroll to Tone/Pulse.
3 Press Select.
4 Press Change to switch between Tone and Pulse.
5 Press Done.
6 Press Exit to return to the Standby Screen.
17
Page 31

Using Your SD4502
Making a Call from the Handset
Press A. When you hear the dial tone, dial the number.
OR
Enter the phone number, then press
number appears on the display before it is dialed. Use the
DELETE to make corrections.
During a call, a timer on the display shows the amount of
time on the call.
A. The phone
Using Your SD4502
Note:
If you use DSL, please use
the filtering devices
provided by your DSL
service company to
prevent interference. If
interference does occur,
please contact your DSL
service provider.
18
Page 32

Answering/Ending a Call
Press A to answer an incoming call. Press ON or
Handsfree to answer using the speakerphone.If you have
call waiting service, press
A to answer the second call.
Adjusting the Volume During a Call
Press the top button to make caller’s voice louder, and the
bottom button to make voice softer.
When you are not on a call, use the volume keys to
change the day (6 am–9 pm) or night (9 pm–6 am)
ringer volume.
19
Louder
Softer
1:16 pm
Handset 1
Phonebk cid Menu
Page 33

Making a Call Using the Speakerphone
1 Press HANDSFREE.
2 Dial the number.
Note: For optimal speakerphone quality, when using the
handset, make sure the belt clip is on. This raises the
handset up so it is not lying flat (the speakerphone is on
the back of the handset). Pressing Handsfree while in the
Phonebook, Caller ID Redial lists, automatically turns on
the speakerphone and dials the number. Placing your
handset in the cradle while on the speakerphone will not
end your call.
Switching Between the Handset and Speakerphone
Press HANDSFREE to toggle between handset and
speakerphone.
Using Your SD4502
20
Page 34

Muting a Call
Press MUTE. To unmute the call, press UNMUTE.
Placing a Call on Hold
1 Press HOLD.
2 To return to the call, press UNHOLD or A. When a call
is on hold, the intercom features are available.
Redialing a Number
To redial the most recently dialed number:
1 Press
2 Press
To redial one of the last 5 numbers you dialed:
1 Press Redial.
2 Scroll to desired number.
3 Press
21
A.
REDIAL.
A or Handsfree.
Page 35

Finding a Lost or Misplaced Handset
Press PAGE on the base unit.
All handsets registered to the base unit beep.
Press
B, EXIT or OK on a handset to stop paging that
handset, or press PAGE on the base unit to stop paging
all handsets.
Using Your SD4502
22
Page 36

Saving a Number in the Phonebook
Storing numbers in the phonebook makes it easy to dial
numbers you call frequently. You can enter numbers
directly into the phonebook or add them from the caller ID
or redial list. You can save numbers in the private or
shared phonebook.
Private Phonebooks
The private phonebook is unique to each handset and is
not accessible by other handsets. Each private
phonebook stores up to 50 names and numbers.
Shared Phonebooks
Your ability to access a shared phonebook, from your
handset depends on the model of the base, the handset
model, and accessories. Additionally, the number of
names and numbers you can store in a shared
phonebook depends on the model number of the base
and accessory.
23
Page 37

Adding a New Entry
1 Press PHONEBK.
2 Press select at
NEW ENTRY option.
3 Enter the name up to 11 characters. Use delete to
backspace and erase characters to the left of the
blinking cursor.
4 Scroll down. The
NUMBERS option appears.
5 Enter the number up to 24 characters.
6 Press
7 Press
DONE.
EXIT once to enter a new entry, or press EXIT
twice to return to the standby menu.
Adding Numbers to the Phonebook from Redial
1 Press REDIAL. The display shows the last numbers
you dialed, with the most recent number at the top.
2 Scroll to the number you want to save.
3 Press
4 Select the
STORE.
PRIVATE or SHARD phonebook.
Using Your SD4502
24
Page 38

Enter the name (up to 11 characters). Press DELETE to
backspace and erase characters to the left of the blinking
cursor.
5 Scroll down. The phone number displays in the
Number field.
6 Press
7 Press
DONE.
EXIT once to return to the redial list, or press
EXIT twice to return to the standby menu.
To modify the number,
8 Press Delete to backspace and erase characters to
left of blinking cursor.
9 Press Done when entry is correct to save.
Note: You can also store a number in the phonebook
from the Caller ID list.
25
Page 39

Calling a Number from the Phonebook
1 Press Phonebk.
2 Scroll to entry you want to call.
3 Press
A or Handsfree.
Editing a Phonebook Entry
1 Press Phonebk.
2 Scroll to entry you want to edit.
3 Press Options.
4 Scroll to Edit.
5 Press Select. Use Delete to backspace and erase
characters to the left of the blinking cursor.
6 Scroll down to move to phone number field.
7 Modify number.
8 Press Done.
Using Your SD4502
26
Page 40

Deleting a Phonebook Entry
1 Press Phonebk.
2 Scroll to the entry you want to delete.
3 Press Options.
4 Scroll to Delete.
5 Press Select.
Inserting Pauses in a Number
At the position where you want to insert a pause, press
and hold # until P appears. When you call a number with a
pause, the phone waits 3 seconds before transmitting the
next digits in the dialing sequence. This is useful, for
example, when you have to dial 9 to get a dial tone or for
going into a voicemail system.
27
Page 41

Using Caller ID
Note: You must subscribe to caller ID service from your
local telephone company to use the caller ID features of
your phone.
If you subscribe to Caller ID service, the caller’s name
and/or number are displayed when you receive an
incoming call. If no Caller ID information was sent from
the phone company, or you do not subscribe to Caller ID
service, the display shows Incoming Call.
Reviewing Caller ID Call List
The handset can hold up to 40 caller ID records.
1 Scroll to enter recent calls list. Most recent call
listed first.
2 Scroll to review more calls.
3 Press
A to call selected number.
Using Your SD4502
28
Page 42

Using Automated Dialing
You can retrieve previously entered information from the
phone book (such as a PIN or credit card number) during
a phone call without have to re-enter additional numbers.
1 While on a call, scroll to the entry that you want
to recall.
2 Press DIAL.
3 Repeat steps 1 and 2 as many times as necessary to
complete your transaction.
Note: This function is useful when using automated
response systems. For example, you could access your
bank account by dialing the bank’s telephone number and
entering your account number (using automated dialing),
and your PIN (using automated dialing).
29
Page 43

Advanced Features
Many of the advance features require at least two
handsets registered to the base unit.
You can expand your phone system by adding Motorola
SD4500 Series expansion accessories (up to a total of 8
devices). Expansion handsets do not require connection
to a phone line. Place the handset and its charging base
anywhere a standard electrical outlet is available.
With multiple handsets, you can:
•
Conference call
•
Talk handset to handset on the intercom
•
Set up handsets to automatically answer
intercom calls
•
Transfer calls from one handset to another
•
Monitor a room
•
Use 2 handsets as walkie talkies
Advanced Features
To order expansion devices, call:
1-800-461-4575 in Canada
1-888-390-6456 TTY
(Text Telephone)
On the Web:
www.motorola.com/cordless
30
Page 44

Conference Calling
If one handset is already on a call, the display on other
handsets registered to the same base unit shows
Line in use.
Once a second handset is added to the call, the display
on all handsets shows On conference.
To connect a second handset to a call:
1 Press
2 To join a conference call, press
3 To disconnect from the conference call, press
31
A or DELETE on the second handset.
either or both handsets.
A from the base unit.
B on
Page 45

Using the Intercom
Intercom Setup
You can setup a handset or base unit to automatically
answer an intercom page after 1 or 3 rings. All
are set to
setting using the steps below.
1 Press MENU
2 Scroll to Intercom Setup.
3 Press SELECT.
4 Scroll to the desired answering option.
5 Press SELECT.
6 Press
No Auto Answer
at the factory.
Change the factory
B to return to the standby screen, or to scroll
to a different menu option.
handsets
Advanced Features
OPTIONS
No Auto Answer - the handset
does not automatically answer
an intercom page.
After 1 Ring or After 3 Rings;
the handset automatically
answers and turns on the
speakerphone after 1 or 3 rings.
32
Page 46

Handset to Handset Intercom
Note: The Connect to button automatically pages the
base unit if there is only one handset registered.
1 Press CONNECT TO.
2 Scroll to the desired handset.
3 Press PAGE.
4 Press OK answer the page. The first handset to
respond is connected.
5 Press EXIT or
No Answer. (If there is no answer the page
automatically ends after two minutes.)
6 Press B to end the page.
33
B to stop the page. The handset reads
Page 47

Transferring a Call from One Handset
to Another
Unannounced Transfer
1 Press HOLD.
2 Press Handsfree.
3 Scroll to the handset you want to transfer the call to
and press PAGE.
4 Press
Announced Transfer
1 Follow steps 1 through 3 above.
2 Press OK to answer the page. You can now speak with
3 Press UNHOLD. The call is transferred to the other
4 Press
B to hang up. The call is transferred to the
other handset
the person on the other handset.
handset and all three individuals are on the call.
B to hang up the second handset.
Advanced Features
34
Page 48

Using the Handset as a Walkie Talkie
The walkie talkie feature lets you talk handset to handset.
This feature works even when the handsets are out of
range of the base unit. You must complete steps 1 and 2
for both handsets to use walkie-talkie mode.
1 Press MENU.
2 Scroll to Walkie Talkie.
3 Press SELECT.
4 Press Handsfree on one of the handsets.
5 Press the number on the handset keypad that
corresponds to the handset you want to use with the
walkie talkie feature. (For example, if the handset you
want to talk to is named Kitchen(2), press 2 on the
keypad.)
6 Press OK to answer the page.
7 Press B to end the walkie talkie session.
35
Note:
When a handset is in
walkie talkie mode,
you cannot make or
receive phone calls.
Page 49

Monitoring a Room
Room monitoring allows you to place a handset in a room
and listen to the sounds in that room from another
handset. (If you have a SD4504 Wireless Camera, you
can also see the activities in the room you are
monitoring.)
1 Place a handset in the room to be monitored. (This is
the sending handset.)
2 Scroll to and select Menu on the sending handset. The
display reads, HANDSET(X) Ready to Monitor Room.
3 Press CONNECT TO on the handset you want to listen
from. (This is the receiving handset.)
The display list the all devices registered to the
base unit.
4 Scroll to the listing for the sending handset.
Notes:
answer an incoming
call, the monitoring
feature is turned off.
You can also use
the base unit for
monitoring by
following the same
instructions from
the base unit.
If you
Advanced Features
36
Page 50

5 Press the softkey PAGE. The receiving handsets beeps,
and the display reads, Monitoring HANDSET(X) Vol-X.
6 Press HANDSFREE on the receiving handset to use the
intercom to listen to activity.
7 To turn off monitoring, press
B on either handset.
Room Monitoring with the SD4504 Wireless Camera (Optional)
Motorola’s SD4504 Wireless Camera transmits sound
and video to your color handset.
1 Place your camera in the room you wish to monitor.
2 Press CONNECT TO on your handset.
3 Scroll to and select the Camera entry from the list of
registered devices
4 Press the softkey View.
You can now see and hear activity in the room.
37
Page 51

openLCR™ Option
You can download additional ring tones and purchase
services with openLCR.
1 Go to the openLCR website at www.openLCR.com.
2 Click on Ringtone.
3 Click on Search& Listen.
4 Select any song.
openLCR and the openLCR logo are the trademarks of
openLCR.com Inc.
Advanced Features
38
Page 52

Deregistering Handsets
Caution:
unit and render your cordless telephone system
inoperable until at least one handset is reregistered to the
base unit.
1 Delete or listen to all voice mail messages, if
2 Press B on the base unit and all handsets.
3 Press and hold down PAGE on the base unit until the
4 Press and hold down PAGE again until the IN USE
5 Quickly and fully press and release PAGE again.
6 Press OK to begin the registration process or
39
You will deregister all handsets from the base
necessary, to clear the IN USE/Voice Mail indicator
.
IN USE indicator begins to flash slowly, then release.
indicator begins to flash quickly, then release PAGE.
“Please register handset” displays.
press EXIT.
Page 53

FCC Information
This equipment complies with Parts 15 and 68 of the FCC rules and the requirements
adopted by the Administrative Council for Terminal Attachments (ACTA).
A plug and jack used to connect this equipment to the premises wiring and telephone network
must comply with applicable FCC Part 68 rules and requirements adopted by the ACTA. A
compliant telephone cord and modular plug is provided with this product. It is designed to be
connected to a compatible modular jack that is also compliant. See installation instructions for
details.
Notification of Local Telephone Company
On the bottom of this equipment is a label that contains, among other information, a product
identifier in the form US:AAAEQ##TXXXX. You must, upon request, provide this information
to your telephone company.
The digits represented by ## in the product identifier indicate the Ringer Equivalency Number
(REN) for this equipment. The REN is useful in determining the number of devices you may
connect to your telephone line and still have all of these devices ring when your telephone
number is called. In most (but not all) areas, the sum of the RENs of all devices connected to
one line should not exceed 5. To be certain of the number of devices you may connect to your
line as determined by the REN, contact your local telephone company.
40
Page 54

Note:
• This equipment may not be used on coin service provided by the telephone company.
• Connection to party line service is subject to state tariffs. Contact the state public utility
commission, public service commission or corporation commission for information.
• If your home has specially wired alarm equipment connected to the telephone line, ensure
the installation of this cordless phone does not disable your alarm equipment. If you have
questions about what will disable alarm equipment, consult your telephone company or a
qualified installer.
• Notice must be given to the telephone company upon permanent disconnection of your
telephone from your line.
• The FCC requires that you connect your cordless telephone to the nationwide telephone
network through a modular telephone jack (USOC RJ11C/RJ11W or RJ14C/RJ14W).
Rights of the Telephone Company
Should your equipment cause trouble on your line which may harm the telephone network,
the telephone company shall, where practicable, notify you that temporary discontinuance of
service may be required.
Where prior notice is not practical and the circumstances warrant such action, the telephone
company may temporarily disconnect service immediately. In case of such temporary
discontinuance, the telephone company must:
• Promptly notify you of such temporary discontinuance
• Afford you the opportunity to correct the situation
41
Page 55

• Inform you of your right to bring a complaint to the Commission pursuant to procedures set
forth in Subpart E of Part 68, FCC Rules and Regulations.
The telephone company may make changes in its facilities, equipment, operations, or
procedures that could affect the operation of the equipment. If this happens, the telephone
company will provide advance notice in order for you to make necessary modifications to
maintain uninterrupted service.
Interference Information
This device complies with Part 15 of the FCC Rules. Operation is subject to the following two
conditions:
This device may not cause harmful interference.
This device must accept any interference received, including interference that may cause
undesired operation.
This equipment has been tested and found to comply with the limits for a Class B digital
device, pursuant to Part 15 of the FCC Rules. These limits are designed to provide
reasonable protection against harmful interference in a residential installation.
This equipment generates, uses, and can radiate radio frequency energy and, if not installed
and used in accordance with the instructions, may cause harmful interference to radio
communications. However, there is no guarantee that interference will not occur in a
particular installation.
42
Page 56

If this equipment does cause harmful interference to radio or television reception, which can
be determined by turning the equipment on and off, the user is encouraged to try to correct
the interference with one or more of the following measures:
• Reorient or relocate the receiving antenna (that is, the antenna for the radio or television
that is "receiving" the interference).
• Reorient or relocate and increase the separation between the telecommunications
equipment and the receiving antenna. Connect the telecommunications equipment into an
outlet on a circuit different from that to which the receiving antenna is connected.
If these measures do not eliminate the interference, please consult your dealer or an
experienced radio/television technician for additional suggestions. Also, the Federal
Communications Commission has prepared a helpful booklet, "How to Identify and Resolve
Radio/TV Interference Problems." This booklet is available from the U.S. Government
Printing Office, Washington, D.C. 20402. Please specify stock number 004-000-00345-4
when ordering copies.
The FCC requires this product to be serviced only by Motorola or its authorized service agents.
CAUTION / WARNING: Changes or modifications not expressly approved by Motorola could
void not only the user's authority to operate the equipment, but also the
limited warranty.
Hearing Aid Compatibility
This telephone system meets the FCC standards for hearing aid compatibility.
43
Page 57

Industry Canada (IC) Information
This equipment meets the applicable Industry Canada (IC) radio and terminal equipment
technical specifications. This is confirmed by the certification/registration number found on
the label on the bottom of the base unit. The abbreviation IC before the certification/
registration number only signifies that registration was performed based on a Declaration of
Conformity and that the Industry Canada technical specifications were met. It does not imply
that Industry Canada approved the equipment. The term “IC:” before the certification/
registration number only signifies that the Industry Canada technical specifications were met.
The Ringer Equivalency Number (REN) for this equipment is located on the FCC/IC label on
the telephone base unit. The REN is useful in determining the maximum number of devices
you may connect to your telephone line and still have all of these devices ring when your
telephone number is called. The sum of the RENs of all devices connected to one line may
not exceed 5.
Before installing this cordless phone, you should make sure that it is permissible to be connected
to the facilities of the local telecommunications company. The equipment must be installed using
an acceptable method of connection. In some cases, the telecommunications company’s inside
wiring associated with a single line individual service may be extended by means of a certified
connector assembly (telephone extension cord). You should be aware that compliance with the
above conditions may not prevent degradation of service in some situations.
The plug and jack used to connect this equipment to the premises wiring and telephone
network must comply with the rules and requirements in Industry Canada’s CS-03. A
compliant telephone cord and modular plug is provided with this product. It is designed to be
connected to a compatible modular jack that is also compliant.
44
Page 58

For your protection, ensure that the electrical ground connections of the power utility,
telephone lines, and internal metallic water pipe system, if present, are connected together.
This precaution may be particularly important in rural areas.
You should not attempt to make such connections yourself. Contact the appropriate electrical
inspection authority or an electrician, as appropriate.If your home has specially wired alarm
equipment connected to the telephone line, ensure the installation of this cordless phone
does not disable your alarm equipment. If you have questions about what will disable alarm
equipment, consult your telephone company or a qualified installer.
Repairs
Repairs to this equipment should be made by an authorized Canadian maintenance facility
designated by Motorola. Any repairs or alterations made by the consumer, or any
malfunctions of this equipment, may give the telecommunications company cause to request
that you disconnect the equipment, and may void the limited warranty.
Privacy
Privacy of communications may not be ensured when using this telephone. Other devices,
including other cordless telephones, may interfere with the operation of this cordless phone or
cause noise during operation. Units without code access may be accessed by other radio
communications devices.
Hearing Aid Compatibility
This telephone system meets Industry Canada standards for hearing aid compatibility.
45
Page 59

Interference Information
This device complies with Industry Canada’s RSS-210. Operation is subject to the following
two conditions:
(1) This device may not cause harmful interference; and
(2) This device must accept any interference received, including interference that may cause
undesired operation.
This equipment has been tested and found to comply with the limits for a Class B digital
device, pursuant to Industry Canada’s ICES-003. These limits are designed to provide
reasonable protection against harmful interference in a residential installation.
This equipment generates, uses, and can radiate radio frequency energy and, if not installed
and used in accordance with the instructions, may cause harmful interference to radio
communications. However, there is no guarantee that interference will not occur in a
particular installation.
If this equipment does cause harmful interference to radio or television reception, which can
be determined by turning the equipment on and off, the user is encouraged to try to correct
the interference with one or more of the following measures:
• Reorient or relocate the receiving antenna (that is, the antenna for radio or television that
is “receiving” the interference).
• Reorient or relocate and increase the separation between the telecommunications
equipment and the receiving antenna.
46
Page 60

• Connect the telecommunications equipment into an outlet on a circuit different from that to
which the receiving antenna is connected.
If these measures do not eliminate the interference, please consult your dealer or an
experienced radio/television technician for additional suggestions.
Industry Canada publishes several publications to assist consumers with solving interference
problems, which are available from its offices or from its web site (strategis.gc.ca).
47
Page 61

Motorola Limited Warranty
Motorola Limited Warranty
for Consumer Products, Accessories, and Software Purchased in the United States or Canada
What Does this Warranty Cover?
Subject to the exclusions contained below, Motorola, Inc. warrants its cordless telephones
("Products"), Motorola-branded or certified accessories sold for use with these Products
("Accessories"), and Motorola software contained on CD-ROMs or other tangible media and
sold for use with these Products ("Software") to be free from defects in materials and
workmanship under normal consumer usage for the period(s) outlined below. This limited
warranty is a consumer's exclusive remedy, and applies as follows to new Motorola Products,
Accessories and Software purchased by consumers in the United States or Canada, which are
accompanied by this written warranty:
Products and Accessories as defined above, unless otherwise provided for below. Length of
coverage: one (1) year from the date of purchase by the first consumer purchaser of the
product unless otherwise provided for below.
• Decorative Accessories and Cases. Decorative covers, bezels, PhoneWrap®covers and
cases. Length of coverage: limited lifetime warranty for the lifetime of ownership by the first
consumer purchaser of the product.
48
Page 62

• Products and Accessories that are Repaired or Replaced. Length of coverage: The
balance of the original warranty or for ninety (90) days from the date returned to the
consumer, whichever is longer.
• Software. Applies only to physical defects in the media that embodies the copy of the
software (e.g. CD-ROM, or floppy disk). Length of coverage: ninety (90) days from the date
of purchase.
Exclusions
Normal Wear and Tear. Periodic maintenance, repair and replacement of parts due to normal
wear and tear are excluded from coverage.
Batteries. Only batteries whose fully charged capacity falls below 80% of their rated capacity
and batteries that leak are covered by this limited warranty.
Abuse & Misuse. Defects or damage that result from: (a) improper operation, storage, misuse
or abuse, accident or neglect, such as physical damage (cracks, scratches, etc.) to the surface
of the product resulting from misuse; (b) contact with liquid, water, rain, extreme humidity or
heavy perspiration, sand, dirt or the like, extreme heat, or food; (c) use of the Products or
Accessories for commercial purposes or subjecting the Product or Accessory to abnormal
usage or conditions; or (d) Acts of God or nature, or other acts which are not the fault of
Motorola, are excluded from coverage.
Use of Non-Motorola Products and Accessories. Defects or damage that result from the
use of Non-Motorola branded or certified Products, Accessories, Software or other peripheral
equipment are excluded from coverage.
Unauthorized Service or Modification. Defects or damages resulting from service, testing,
adjustment, installation, maintenance, alteration, or modification in any way by someone other
than Motorola, or its authorized service centers, are excluded from coverage.
49
Page 63

Altered Products. Products or Accessories with (a) serial numbers or date tags that have
been removed, altered, or obliterated; (b) broken seals or that show evidence of tampering; (c)
mismatched board serial numbers; or (d) nonconforming or non-Motorola housings, or parts,
are excluded from coverage.
Communication Services. Defects, damages, or the failure of Products, Accessories or
Software due to any communication service or signal you may subscribe to or use with the
Products, Accessories or Software is excluded from coverage.
Software Embodied in Physical Media. No warranty is made that the software will meet your
requirements or will work in combination with any hardware or software applications provided
by third parties, that the operation of the software products will be uninterrupted or error free,
or that all defects in the software products will be corrected.
Software NOT Embodied in Physical Media. Software that is not embodied in physical
media (e.g. software that is downloaded from the internet), is provided "as is" and without
warranty.
Who is Covered
This warranty extends to the first end-user purchaser, only.
What will Motorola Do?
Motorola, at its option, will at no charge repair, or replace any Products, Accessories or
Software that does not conform to this warranty. We may use functionally equivalent
reconditioned/refurbished/pre-owned or new Products, Accessories or parts. No data,
software or applications added to your Product, Accessory or Software, including but not
limited to personal contacts, games and ringer tones, will be reinstalled. To avoid losing such
data, software and applications please create a back up prior to requesting service.
50
Page 64

How to Get Warranty Service or Other Information
In the USA, call: In Canada, call:
1-800-353-2729 1-800-461-4575
TTY 1-888-390-6456 TTY 1-888-390-6456
For accessories and software, please call the telephone number designated above for the
product with which they are used. You will receive instructions on how to ship the Products,
Accessories or Software, at your expense, to a Motorola Authorized Repair Center. To obtain
service, you must include: (a) a copy of your receipt, bill of sale or other comparable proof of
purchase; (b) a written description of the problem; (c) the name of your service provider, if
applicable; (d) the name and location of the installation facility (if applicable), (e) your
telephone number; and most importantly, your return mailing address on the outside of the
returned unit.
What Other Limitations Are There?
ANY IMPLIED WARRANTIES, INCLUDING WITHOUT LIMITATION THE IMPLIED
WARRANTIES OF MERCHANTABILITY AND FITNESS FOR A PARTICULAR PURPOSE,
SHALL BE LIMITED TO THE DURATION OF THIS LIMITED WARRANTY, OTHERWISE THE
REPAIR, OR REPLACEMENT AS PROVIDED UNDER THIS EXPRESS LIMITED
WARRANTY IS THE EXCLUSIVE REMEDY OF THE CONSUMER, AND IS PROVIDED IN
LIEU OF ALL OTHER WARRANTIES, EXPRESS OF IMPLIED. IN NO EVENT SHALL
MOTOROLA BE LIABLE, WHETHER IN CONTRACT OR TORT (INCLUDING
NEGLIGENCE) FOR DAMAGES IN EXCESS OF THE PURCHASE PRICE OF THE
PRODUCT, ACCESSORY OR SOFTWARE, OR FOR ANY INDIRECT, INCIDENTAL,
SPECIAL OR CONSEQUENTIAL DAMAGES OF ANY KIND, OR LOSS OF REVENUE OR
51
Page 65

PROFITS, LOSS OF BUSINESS, LOSS OF INFORMATION OR DATA, SOFTWARE OR
APPLICATIONS OR OTHER FINANCIAL LOSS ARISING OUT OF OR IN CONNECTION
WITH THE ABILITY OR INABILITY TO USE THE PRODUCTS, ACCESSORIES OR
SOFTWARE TO THE FULL EXTENT THESE DAMAGES MAY BE DISCLAIMED BY LAW.
Some states and jurisdictions do not allow the limitation or exclusion of incidental or
consequential damages, or limitation on the length of an implied warranty, so the above
limitations or exclusions may not apply to you. This warranty gives you specific legal rights,
and you may also have other rights that vary from state to state or from one jurisdiction to
another.
Laws in the United States and other countries preserve for Motorola certain exclusive rights
for copyrighted Motorola software such as the exclusive rights to reproduce and distribute
copies of the Motorola software. Motorola software may only be copied into, used in, and
redistributed with, the Products associated with such Motorola software. No other use,
including without limitation disassembly of such Motorola software or exercise of the
exclusive rights reserved for Motorola, is permitted.
Motorola Limited Warranty
52
Page 66

Pour une copie imprimée en grand format de ce manuel, ou pour des
questions relatives au produit, consultez notre site Web :
www.motorola.com/cordless
ou appelez-nous aux numéros :
•1-800-353-2729 aux États-Unis
•1-800-461-4575 au Canada
•1-888-390-6456 ATS (téléphone textuel)
Copyright © 2005 Motorola, Inc.
Tous droits réservés. Aucune partie de ce guide ne peut être reproduite sous quelque forme ou par quelque
procédé que ce soit, ni utilisée pour tout travail dérivé (traduction, modification ou adaptation) sans l'accord
écrit de Motorola, Inc.
Motorola se réserve le droit de revoir ce guide et d'en modifier le contenu de temps à autre sans obligation
de notifier de telles révisions ou modifications. Motorola fournit ce guide sans aucune garantie implicite ni
explicite, y compris mais sans s'y limiter les garanties implicites de qualité marchande ou d'adaptation à un
usage particulier. Motorola peut apporter des améliorations ou des modifications au(x) produit(s) décrit(s)
dans ce manuel à tout moment.
MOTOROLA et le logo M stylisé sont des marques déposées au U.S. Patent and Trademark Office. Tous les
autres noms de produits ou de services sont la propriété de leurs détenteurs respectifs.
Page 67

Bienvenue
Félicitations ! Vous venez de faire l’acquisition d’un
téléphone Motorola de la série SD4502. Prenez le temps de
vérifier que votre emballage contient bien chacun des
éléments illustrés.
L'enregistrement du produit est une démarche importante
pour apprécier pleinement votre nouveau produit Motorola.
L'enregistrement nous aide à faciliter le service de garantie,
et nous permet de vous contacter si votre produit Motorola a
besoin d'une mise à jour ou d'un autre service.
L'enregistrement n'est pas nécessaire pour la couverture de
la garantie. Pour enregistrer votre produit sur Internet,
consultez notre site Web :
https://broadbandregistration.motorola.com
L'enregistrement du produit n'est pas disponible au Canada.
Veuillez conserver votre reçu original indiquant la date
d’achat du produit. Pour obtenir le service couvert par la
garantie pour votre produit Motorola, vous devrez fournir une
copie du reçu indiquant la date d’achat du produit afin de
confirmer l’état de la garantie.
1:16 pm
Handset 1
Phonebk cid Menu
Bienvenue
i
Page 68

Vue d'ensemble du combiné
1 Réglages du volume
2 Écran LCD
3 Touches programme gauche et droite
4 Navigation Haut/Bas
5 Combiné allumé/Flash
6 Liste des 5 derniers numéros composés
7 Changement majuscules/minuscules
8 Activer le haut-parleur du combiné
9 Microphone
10 Connexion à d'autres appareils enregistrés
11 Effacement du dernier numéro composé/Entrées de
répertoire/Liste des ID d'appelant
12 Raccrocher/Fonction Annuler
13 Prise casque/écouteur (connecteur de 2,5 mm)
14 Antenne du combiné, sonnerie et témoin de
messagerie vocale
ii
14
1
1:16 pm
Handset 1
2
Menu
3
4
5
6
7
8
9
Phonebk cid
13
12
11
10
Page 69

Vue d'ensemble du chargeur de combiné
DEL témoin de charge
Charge LED
Bienvenue
iii
Page 70

Table des matières
Bienvenue. . . . . . . . . . . . . . . . . . . . . . . . . . . . . . . . . i
Vue d'ensemble du combiné . . . . . . . . . . . . . . . . . ii
Vue d'ensemble du chargeur de combiné . . . . . . .iii
Instructions importantes sur la sécurité . . . . . . viii
Préliminaires. . . . . . . . . . . . . . . . . . . . . . . . . . . . . . .1
Consignes de sécurité relatives aux batteries . . . .1
Chargement des combinés . . . . . . . . . . . . . . . . . .4
Écrans d'affichage des combinés . . . . . . . . . . . . .5
Écran principal . . . . . . . . . . . . . . . . . . . . . . . . . .5
Écran du menu principal . . . . . . . . . . . . . . . . . . . 6
Utilisation de l'affichage du combiné . . . . . . . . .6
Utilisation des touches programme . . . . . . . . . .7
Utilisation de la touche de défilement . . . . . . . . .7
Configuration . . . . . . . . . . . . . . . . . . . . . . . . . . . . . .8
Enregistrement de votre combiné . . . . . . . . . . . . .8
iv
Page 71

Configuration des options d'affichage . . . . . . . . . 9
Réglage du contraste de l'affichage . . . . . . . . 10
Réglage de la couleur du menu . . . . . . . . . . . 10
Options de sonnerie . . . . . . . . . . . . . . . . . . . . .11
Réglage du timbre et du volume de sonnerie . . . 12
Activation et désactivation des timbres
des touches . . . . . . . . . . . . . . . . . . . . . . . . . . . . 13
Attribution d'un nom à un combiné . . . . . . . . . . . 14
Numérotation par tonalité ou par impulsions . . . 18
Utilisation du SD4502 . . . . . . . . . . . . . . . . . . . . . . 20
Appel avec un combiné . . . . . . . . . . . . . . . . . . . 20
Réponse et fin d'un appel . . . . . . . . . . . . . . . . . . 21
Réglage du volume pendant un appel . . . . . . . . 21
Appel en utilisant le haut-parleur . . . . . . . . . . . . 22
Basculement entre combiné et haut-parleur . . . . 22
Mise en sourdine d’un appel . . . . . . . . . . . . . . . . 23
Mise en attente d’un appel . . . . . . . . . . . . . . . . . 23
Recomposition d’un numéro . . . . . . . . . . . . . . . . 23
v
Page 72

Recherche d’un combiné égaré . . . . . . . . . . . . . .24
Enregistrement d’un numéro dans le
répertoire . . . . . . . . . . . . . . . . . . . . . . . . . . . . . . .25
Annuaires privés . . . . . . . . . . . . . . . . . . . . . . . . 25
Annuaires partagés . . . . . . . . . . . . . . . . . . . . .25
Ajout d'une entrée . . . . . . . . . . . . . . . . . . . . . . 26
Ajout de numéros dans le répertoire à partir
de la recomposition . . . . . . . . . . . . . . . . . . . . .26
Appel d'un numéro à partir du répertoire . . . . . 28
Modification d’une entrée de répertoire . . . . . .28
Suppression d’une entrée de répertoire . . . . . .29
Insertion de pauses dans un numéro . . . . . . . .29
Utilisation de l’identification de l’appelant . . . . .30
Consultation de la liste d'identification de
l'appelant . . . . . . . . . . . . . . . . . . . . . . . . . . . . .30
Numérotation automatique . . . . . . . . . . . . . . . .31
Fonctions avancées . . . . . . . . . . . . . . . . . . . . . . . .32
Conférence téléphonique . . . . . . . . . . . . . . . . . . .33
vi
Page 73

Utilisation de l’interphone . . . . . . . . . . . . . . . . . . 34
Configuration de l'interphone . . . . . . . . . . . . . 34
Interphone entre combinés . . . . . . . . . . . . . . . 35
Transfert d'un appel depuis un combiné vers
un autre . . . . . . . . . . . . . . . . . . . . . . . . . . . . . . . 36
Transfert sans annonce . . . . . . . . . . . . . . . . . 36
Transfert avec annonce . . . . . . . . . . . . . . . . . 36
Utilisation des combinés en walkie talkie . . . . . . 37
Surveillance d’une pièce . . . . . . . . . . . . . . . . . . . 38
Surveillance d'une pièce avec la caméra sans
fil SD4504 (option) . . . . . . . . . . . . . . . . . . . . . . . 39
Option openLCR™ . . . . . . . . . . . . . . . . . . . . . . . 40
Informations sur Industry Canada (IC) . . . . . . . . 42
Garantie limitée Motorola. . . . . . . . . . . . . . . . . . . 46
vii
Page 74

Instructions importantes
sur la sécurité
Lorsque vous utilisez votre téléphone sans fil, respectez
les consignes de sécurité suivantes pour réduire le risque
d’incendie, de choc électrique, de blessure corporelle ou
de bris de biens :
Pour réduire les risques d'incendie ou de choc
électrique :
1. Gardez toutes les fentes et ouvertures du téléphone
dégagées. Ne placez pas le téléphone au-dessus
d’un appareil de chauffage ou d’un radiateur et
assurez-vous que l’endroit choisi pour l’installation est
suffisamment aéré.
2. N’utilisez pas l’appareil lorsque vous êtes mouillé ou
dans l’eau.
3. N’utilisez pas ce produit près de l’eau (une baignoire,
un évier ou une piscine, par exemple).
4. Ne posez rien sur le câble d’alimentation. Placez le
câble d’alimentation de façon à ne pas marcher
dessus.
viii
Page 75

5. N’insérez jamais d’objets, quels qu’ils soient, dans les
fentes de l'appareil, car cela pourrait entraîner un
incendie ou un choc électrique.
6. Débranchez l'appareil de la prise de courant avant de
le nettoyer. N’utilisez pas de nettoyant liquide ou en
aérosol et utilisez un linge humide pour le nettoyage.
7. Ne démontez pas cet appareil. Si des travaux de
réparation ou d'entretien s’avéraient nécessaires,
contactez Motorola à l’adresse indiquée au verso de
ce guide de l’utilisateur.
8. Ne surchargez pas les prises de courant ou les
rallonges.
9. Évitez d’utiliser le produit pendant un orage. Utilisez
un parasurtenseur pour protéger le matériel.
10. N’utilisez pas le téléphone sans fil pour signaler une
fuite de gaz, notamment si vous êtes à proximité de la
conduite de gaz.
Débranchez immédiatement ce téléphone sans
fil de la prise de courant dans les situations
suivantes :
• lorsque la fiche ou le cordon d'alimentation est endommagé,
• lorsqu'un liquide a été répandu sur le produit,
Instructions importantes sur la sécurité
ix
Page 76

• si l'appareil a été exposé à la pluie ou à l'eau. Ne
touchez pas au combiné ni à la base avant d’avoir
débranché le cordon d’alimentation et le fil téléphoniq ue
de leurs prises. Prenez ensuite l’appareil par les cordons débranchés.
• si l'appareil est tombé ou si le boîtier a été endommagé,
• si le produit a subi une modification de rendement
importante.
Directives d’installation
1. Assurez-vous de lire et de bien comprendre toutes
les directives et conservez-les pour référence future.
2. Respectez toutes les mises en garde et instructions
indiquées sur le produit.
3. N’installez pas ce produit près d’une baignoire, d’un
évier ou d’une douche.
4. Utilisez ce téléphone uniquement à partir de la source
d’alimentation indiquée sur l’étiquette. Si vous n'êtes
pas sûr du type d'alimentation qui équipe votre
domicile, consultez votre fournisseur ou la compagnie
d'électricité concernée.
5. Ne placez pas ce produit sur une table, un stand ou
un chariot instable. Il pourrait être sérieusement
endommagé en cas de chute.
x
Page 77

6. Réglez uniquement les commandes dont il est
question dans les directives d’utilisation. Le réglage
inadéquat des autres commandes peut endommager
le produit et nécessiter un travail important pour
rétablir son fonctionnement normal.
7. Nettoyez ce produit avec un linge doux et humide.
N'utilisez aucun produit chimique ni détergent.
8. Utilisez uniquement le bloc d’alimentation qui
accompagne cet appareil. L’utilisation d’autres blocs
d’alimentation pourrait l’endommager.
9. Puisque les téléphones sans fil fonctionnent à
l’électricité, vous devriez avoir au moins un téléphone
filaire dans votre résidence, au cas où il y aurait une
panne de courant.
10. Pour éviter l’interférence avec des appareils situés à
proximité du téléphone, ne placez pas la base du
téléphone sans fil près d’un téléviseur, d’un four à
micro-ondes, d'un réfrigérateur ou d’un
magnétoscope.
Instructions importantes sur la sécurité
xi
Page 78

Préliminaires
Consignes de sécurité relatives aux batteries
• Evitez de brûler, de démonter, de mutiler ou de percer
la batterie. La batterie contient des substances
toxiques qui pourraient s’en écouler et causer des
blessures.
• Attention : il y a risque d’explosion si vous remplacez
la batterie par un autre type que celui recommandé.
Utilisez seulement la batterie vendue avec votre
téléphone ou une batterie de remplacement autorisée
recommandée par le fabricant du téléphone.
• Maintenez les batteries hors de portée des enfants.
• Retirez les batteries du téléphone si vous le rangez
pendant plus de 30 jours.
• Ne jetez pas les batteries au feu car elles pourraient
exploser.
1
Page 79

• Les batteries rechargeables qui alimentent ce produit
doivent être mises au rebut de la manière appropriée
ou être recyclées. Consultez l’étiquette de la batterie
pour connaître le type de batterie. Contactez votre
centre de recyclage local pour connaître les méthodes
de mise au rebut appropriées.
Préliminaires
2
Page 80
Installation des batteries
1 Retirez tout autocollant du couvercle des batteries le
cas échéant.
2 Appuyez sur l'encoche du couvercle de la batterie et
faites-le glisser vers le bas pour l'enlever.
3 Branchez le connecteur dans sa prise et insérez la
batterie dans son logement. Remarque : assurezvous que le fil noir est bien sur la droite pour que la
connexion soit correcte.
4 Remettez le couvercle de la batterie en place.
5 Fixez la pince de ceinture en option.
Rouge
Noir
BlackRed
3
Page 81

Installation du socle de charge du combiné
Votre combiné additionnel ne nécessite pas de ligne
téléphonique ; chargez simplement la batterie et
enregistrez-le sur la base. Pour installer votre combiné
supplémentaire Motorola :
1 Connectez le cordon d'alimentation à l'arrière du socle
de charge.
2 Branchez le cordon d'alimentation dans une prise
d'alimentation.
Chargement des combinés
Placez le combiné sur son socle de charge. La DEL reste
allumée en ROUGE pendant la charge du combiné.
Remarque : la première fois, le temps de charge de la
batterie du combiné est d'au moins 12 heures.
DEL témoin de charge
Charge LED
Préliminaires
4
Page 82

Écrans d'affichage des combinés
L'affichage, les touches programme et les touches de
navigation du combiné permettent de sélectionner les
différentes options et fonctionnalités du combiné. Ce
chapitre décrit comment utiliser ces éléments afin de
configurer vos préférences.
Pour des instructions pas-à-pas sur la configuration de
vos préférences personnelles, voir Configuration.
Écran principal
1 Heure
2 Nom du combiné
3 Papier peint d'affichage
4 Touche programme gauche
5 Touche programme de défilement haut/bas
6 Touche programme droite
7 Témoin de batterie
8 Icône de sonnerie active/inactive
5
Écran principal
1:16 p m
1
Ha n d se t -D (4 )
2
3
4
Phonebk cid Menu
8
7
6
5
Page 83

Écran du menu principal
1 Heure
2 Nom de l'écran de menu
3 Sélection de menu
4 Icône de sélection de menu
5 Touche programme gauche
6 Touche programme de défilement haut/bas
7 Touche programme droite
Utilisation de l'affichage du combiné
Affichage principal :
Lorsque le combiné n'est pas utilisé, l'écran couleur
devient noir.
Remarque : les informations sur l'identification de
l’appelant vous seront fournies uniquement si vous vous
abonnez au service d'identification de l’appelant auprès
de votre compagnie de téléphone locale.
1:16 p m
1
2
3
4
5
Se l e c t
Menu
Phonebook
Recent calls
Ri n g e r
Monitor room
Wa l k i e - t a l k i e
Ex i t
Préliminaires
7
6
6
Page 84

Lorsque le haut-parleur du combiné est allumé, l'icône V
s'affiche.
Affichage du menu :
Dans l'affichage du menu, le symbole
indique l’élément
sélectionné et le symbole b indique qu’il y a d’autres
éléments au-dessus et au-dessous de l’élément
sélectionné.
Utilisation des touches programme
Deux touches programme permettent de sélectionner les
fonctions qui s'affichent au-dessus d'elles. Les fonctions
changent lorsque vous passez d’un écran à un autre.
Dans ce guide, les fonctions des touches programme sont
indiquées par le nom de la fonction elle-même. Par
exemple, si une étape vous indique « press MENU »
[appuyez sur MENU], vous devez appuyer sur la touche
programme située sous MENU.
Utilisation de la touche de défilement
La touche de défilement permet de faire défiler vers le
haut ou vers le bas les éléments du menu, les listes de
paramètres, les listes des identités d'appelant et de
renumérotation ainsi que le répertoire.
7
Touche
Left
programmable
soft key
de gauche
Défilement
Scroll key
1:16 pm
Hand set 1
Phonebk cid
Menu
Touche
Right
programmable
soft key
de droite
Page 85

Configuration
Enregistrement de votre combiné
Vous pouvez enregistrer jusqu'à 8 appareils (combinés,
caméras ou bases de téléphone portable) sur une base.
Pour enregistrer votre nouveau combiné :
1 Appuyez sur la touche programme de droite pour
sélectionner menu.
2 Défilez jusqu'à Enregistrer.
3 Appuyez sur SÉLECT.
4 Appuyez sur le bouton PAGE de la base et maintenez-
le enfoncé jusqu'à ce qu'elle sonne.
Remarque : si vous dépassez la limite de 8 appareils
enregistrables, l'écran du combiné affiche Enreg. impos.
Configuration
8
Page 86

Personnalisation de votre combiné
Personnalisez votre nouveau combiné en configurant le
papier peint, le contraste et la couleur du menu, en
sélectionnant des sonneries uniques, en réglant le
volume de la sonnerie pour le jour et la nuit et en
attribuant un nom à chaque combiné pour les différencier
les uns des autres.
Configuration des options d'affichage
Pour sélectionner un nouveau papier peint :
1 Appuyez sur la touche programme de droite pour
sélectionner menu.
2 Naviguez jusqu'à Réglage écran.
3 Appuyez sur Sélect.
4 Défilez et sélectionnez Set Wallpaper [Configuration
du papier peint].
5 Appuyez sur la touche de défilement pour afficher les
papiers peints disponibles.
6 Appuyez sur MODIF. pour effectuer la sélection.
9
Page 87

7 Appuyez sur TERMINÉ pour enregistrer le réglage et
quitter cette fonction.
Réglage du contraste de l'affichage
1 Appuyez sur la touche programme de droite pour
sélectionner menu.
2 Naviguez jusqu'à Réglage écran.
3 Appuyez sur SÉLECT.
4 Défilez et sélectionnez Réglage contraste.
5 Appuyez sur la touche de défilement pour éclaircir ou
foncer l'écran d'affichage.
6 Appuyez sur OK pour enregistrer le paramètre
souhaité.
Réglage de la couleur du menu
1 Appuyez sur la touche programme de droite pour
sélectionner menu.
2 Naviguez jusqu'à Réglage écran.
3 Appuyez sur SÉLECT.
4 Défilez et sélectionnez Menu Color [Couleur du menu].
Configuration
10
Page 88

5 Appuyez sur les touches de défilement pour afficher
les options de couleur.
6 Appuyez sur OK pour effectuer la sélection.
Options de sonnerie
Suivez les étapes indiquées pour régler un timbre de
sonnerie pour les appels entrants inconnus et un autre
pour les numéros enregistrés dans votre répertoire.
Remarque : cette option fonctionne uniquement si vous
avez le service d'identification de l'appelant.
L'option de sonnerie a cinq sous-menus :
• Volume quot. : volume de la sonnerie réglé par défaut
en usine de 6h00 à 21h00 (coupé, bas, moyen, haut)
• Volume nuit : volume de la sonnerie réglé par défaut
en usine de 9h00 à 18h:00 (coupé, bas, moyen, haut)
• Timbre sonn. : 15 timbres musicaux
• Timbre rép. : 15 timbres musicaux
• Sons de touche : allumé, éteint, lien sonnerie
11
Fonction Link T o Ringer
[Lier à la sonnerie]
Lorsque cette fonction est
sélectionnée, les sons de
touche et le volume de la
sonnerie correspondent aux
paramètres de votre
sonnerie. Si vous
sélectionnez Volume nuit/
faible, les sons de touche et
le volume de la sonnerie
sont affaiblis entre 21h00 et
6h00.
Page 89

Réglage du timbre et du volume de sonnerie
1 Appuyez sur MENU.
2 Défilez jusqu'à Prog. sonnerie.
3 Appuyez sur SÉLECT.
4 Faites défiler la liste des options (Volume quot.,
Volume nuit, Timbre sonn., etc.).
5 Sélectionnez l'option désirée.
6 Appuyez sur MODIF. Chaque timbre/niveau sonore se
fait entendre lorsque vous sélectionnez MODIF.
7 Arrêtez au réglage voulu de timbre/volume.
8 Appuyez sur TERMINÉ.
9 Appuyez sur SORTIE pour retourner à l'écran de veille
ou appuyez sur les touches de défilement pour voir
d'autres options du menu.
Options du sous-menu
Prog. sonnerie
Volume quot. : vo lum e de la
sonnerie réglé par défaut en
usine de 6:00 AM à 9:00 PM
(coupé, bas, moyen, haut)
Volume nuit : volum e de la
sonnerie réglé par défaut en
usine de 9:00 AM à 6:00 PM
(coupé, bas, moyen, haut)
Timbre sonn. : 15 timbres
musicaux
Timbre rép. : 15 timbres
musicaux
Sons de touche : allum é,
éteint, lien sonnerie
(explication dans cette section)
Configuration
12
Page 90

Activation et désactivation des timbres des touches
1 Appuyez sur MENU.
2 Défilez jusqu'à Prog. sonnerie.
3 Appuyez sur SÉLECT.
4 Défilez jusqu'à Sons de touche.
5 Appuyez sur MODIF. pour afficher les options (Éteint,
Activé, Lier à la sonnerie*). Arrêtez-vous sur l'option
souhaitée.
6 Appuyez sur TERMINÉ pour enregistrer vos
modifications.
7 Appuyez sur SORTIE pour retourner à l'écran de veille.
* La fonction Link to Ringer [Lier à la sonnerie] signifie
que les sons de touche correspondent à la sonnerie
sélectionnée.
13
Page 91

Attribution d'un nom à un combiné
Lorsque vous enregistrez un combiné, il reçoit par défaut
le nom de Combiné(X). La lettre X correspond au nombre
d'appareils enregistrés sur la base (exemples :
Combiné(1), Caméra(2), etc.). Le numéro attribué à
l'enregistrement fait toujours partie du nom (exemple :
Combiné(1)).
1 Appuyez sur MENU.
2 Défilez jusqu'à Nommer combiné.
3 Appuyez sur SÉLECT.
4 Utilisez SUPPRIM
caractères à gauche du curseur.
5 Entrez le nom à l'aide des touches (jusqu'à 12
caractères). La barre de soulignement clignotante
indique la position du curseur.
pour revenir en arrière en effaçant les
Configuration
14
Page 92

Le tableau ci-dessous indique combien de fois vous
devez appuyer sur chaque touche du combiné pour
entrer les lettres et les caractères spéciaux (ex : appuyer
trois fois sur 7 pour la lettre R). Utilisez les touches de
défilement haut et bas pour revenir en arrière et faire des
corrections.
Remarque : pour passer de majuscules en minuscules,
appuyez sur
Touche
1 espace – * , 1
2ABC( 2
3DEF) 3
4GH I #4
5JKL/5
6MNO‘ 6
7PQRS7
8TUV?8
9WXYZ 9
*.
Nombre d’enfoncements
1 2 3 4 5
15
Page 93

Date et heure
Si vous êtes abonné au service d'identification de
l'appelant, la date et l'heure se règlent automatiquement
lors du prochain appel entrant. Effectuez les étapes cidessous pour régler la date et l'heure manuellement.
1 Appuyez sur MENU.
2 Défilez jusqu'à Prog. date/h.
3 Appuyez sur SÉLECT.
4 Saisissez l'heure (deux chiffres sont requis pour
l’heure et deux chiffres pour les minutes ; vous devez
donc faire précéder les valeurs à un chiffre d’un zéro).
5 Appuyez sur AM/PM pour activer le mode AM (matin)
ou PM (soir) (uniquement pour l'horloge de format 12
heures).
6 Défilez vers le champ suivant.
7 Appuyez sur MODIF. pour changer le format de l’heure
(12 heures ou 24 heures).
Configuration
16
Page 94

8 Défilez vers le champ suivant.
9 Appuyez sur MODIF. pour sélectionner le format de la
date (MM/JJ ou JJ/MM).
10 Défilez vers le champ suivant.
11 Entrez la date.
12 Appuyez sur TERMINÉ.
13 Appuyez sur SORTIE pour retourner à l'écran de veille.
Langue
1 Appuyez sur MENU.
2 Défilez jusqu'à Prog. langue.
3 Appuyez sur SÉLECT.
4 Appuyez sur MODIF. jusqu'à la langue souhaitée.
5 Appuyez sur TERMINÉ.
6 Appuyez sur SORTIE pour retourner à l'écran de veille.
17
Page 95

Numérotation par tonalité ou par impulsions
Votre téléphone est réglé en numérotation par tonalité. Ne
modifiez pas ce réglage à moins que le service de
numérotation par tonalité ne soit pas disponible dans
votre localité.
1 Appuyez sur MENU.
2 Faites défiler jusqu’à Ton./Imp.
3 Appuyez sur SÉLECT.
4 Appuyez sur MODIF. pour basculer entre tonalité et
impulsion.
5 Appuyez sur TERMINÉ.
6 Appuyez sur SORTIE pour retourner à l'écran de veille.
Configuration
18
Page 96

19
Page 97

Utilisation du SD4502
Appel avec un combiné
Appuyez sur A. Lorsque vous entendez la tonalité,
composez le numéro.
ou
Saisissez le numéro de téléphone et appuyez sur la
touche
A. Le numéro de téléphone s'affiche à l'écran
avant d'être composé. Pour le corriger, utilisez SUPPRIM.
Pendant l’appel, un compteur s’affiche à l'écran pour
indiquer la durée de l’appel.
Utilisation du SD4502
Remarque :
si vous utilisez l'ADSL,
veuillez utiliser les filtres
fournis par votre
fournisseur d'accès pour
éviter toute interférence. Si
vous constatez des
interférences, veuillez
contacter votre fournisseur
d'accès à Internet.
20
Page 98

Réponse et fin d'un appel
Appuyez sur A pour répondre à un appel entrant.
Appuyez sur ON ou sur Handsfree [Mains-libres] pour
répondre avec le haut-parleur.
Si vous êtes abonné au service d’appel en attente,
appuyez sur
A pour répondre au deuxième appel.
Réglage du volume pendant un appel
Appuyez sur le bouton du haut pour augmenter le volume
en réception ou sur celui du bas pour le diminuer.
Si vous n'êtes pas en ligne, les touches du volume
servent à changer le volume de la sonnerie de jour
(6h00 à 21h00) ou de nuit (21h00 à 6h00).
21
Volume +
Louder
Volume -
Softer
1:16 pm
Handset 1
Phonebk cid Men u
Page 99

Appel en utilisant le haut-parleur
1 Appuyez sur la touche HANDSFREE.
2 Composez le numéro.
Remarque : pour obtenir le meilleur son du haut-parleur
lorsque vous utilisez le combiné, mieux vaut que la pince
de ceinture soit mise. Elle permet de relever le combiné
pour éviter qu'il repose à plat (le haut-parleur se trouve à
l'arrière du combiné). En appuyant sur la touche mainslibres à partir de la liste d’identification de l’appelant, de la
liste de recomposition ou du répertoire, le haut-parleur
s'active et le numéro sélectionné est composé
automatiquement. Poser le combiné sur son support
lorsque le haut-parleur est activé ne met pas fin à l'appel.
Basculement entre combiné et haut-parleur
Appuyez sur la touche HANDSFREE pour passer du
combiné au haut-parleur et inversement.
Utilisation du SD4502
22
Page 100

Mise en sourdine d’un appel
Appuyez sur SOURD. Pour rétablir le son de l’appel,
appuyez sur FIN SOU.
Mise en attente d’un appel
1 Appuyez sur GARDE.
2 Pour revenir à l’appel, appuyez sur
Lorsqu'un appel est en attente, les fonctions
d'interphone sont disponibles.
FIN GAR ou sur A.
Recomposition d’un numéro
Pour recomposer le dernier numéro composé :
1 Appuyez sur A.
2 Appuyez sur la touche
23
REDIAL [Recomposer].
 Loading...