

Page 1
PRO7100™
Radio Móvil
Rádio Móvel
Mobile Radio
Guía del usuario
Manual do usuário
User Guide
contacto
control
Radios Profesionales
Tan Dedicado Como Lo Es Usted
PRO7100
Page 2

CONTENTS
Computer Software Copyrights. . . . . . . . . .iii
Radio Overview . . . . . . . . . . . . . . . . . . . . . 1
Parts of the Radio . . . . . . . . . . . . . . . . . . . .1
Optional Enhanced Keypad
Microphone (RMN4026) . . . . . . . . . . .2
On/Off/Volume Knob . . . . . . . . . . . . . . .3
Channel Selector/Menu Navigation
Buttons . . . . . . . . . . . . . . . . . . . . . . . . 3
LED Indicators . . . . . . . . . . . . . . . . . . . .3
Programmable Buttons . . . . . . . . . . . . .3
Push-to-Talk (PTT) Button. . . . . . . . . . . 6
Microphone . . . . . . . . . . . . . . . . . . . . . .6
Menu Keys. . . . . . . . . . . . . . . . . . . . . . . 6
Use with Enhanced Keypad
Microphone (RMN4026) . . . . . . . . . . .7
LCD Screen . . . . . . . . . . . . . . . . . . . . . .9
Audio Indicators for Programmable
Buttons . . . . . . . . . . . . . . . . . . . . . . . . . . 10
Getting Started . . . . . . . . . . . . . . . . . . . . 11
Turning the Radio On or Off . . . . . . . . . . .11
Adjusting the Volume . . . . . . . . . . . . . . . . 11
Selecting a Zone. . . . . . . . . . . . . . . . . . . . 12
Selecting a Radio Channel . . . . . . . . . . . . 12
Sending a Call . . . . . . . . . . . . . . . . . . . . . 13
Receiving a Call . . . . . . . . . . . . . . . . . . . . 13
CONTENTS
Radio Calls . . . . . . . . . . . . . . . . . . . . . . . 15
Making a Selective Call . . . . . . . . . . . . . . 15
Receiving a Selective Call . . . . . . . . . . . . 15
Sending a Call Alert™ Page. . . . . . . . . . . 16
Receiving a Call Alert Page . . . . . . . . . . . 16
Radio Check. . . . . . . . . . . . . . . . . . . . . . . 17
Sending a Status . . . . . . . . . . . . . . . . . . . 17
Sending a Message . . . . . . . . . . . . . . . . . 18
Receiving a Message . . . . . . . . . . . . . . . . 19
Sending an Emergency Alert . . . . . . . . . . 19
Selective Radio Inhibit . . . . . . . . . . . . . . . 20
Editing a Radio Call List . . . . . . . . . . . . . . 20
Repeater or Talkaround Mode . . . . . . . . . 21
Setting the Power Level . . . . . . . . . . . . . . 21
Name and Call/Message Tone Tagging. . 22
Scan. . . . . . . . . . . . . . . . . . . . . . . . . . . . . 25
Starting or Stopping Scan. . . . . . . . . . . . . 25
Talkback . . . . . . . . . . . . . . . . . . . . . . . . . . 26
Deleting a Nuisance Channel. . . . . . . . . . 26
Restoring a Channel to the Scan List . 26
Editing a Scan List . . . . . . . . . . . . . . . . . . 26
Adding or Deleting Channels
in a Scan List . . . . . . . . . . . . . . . . . . 27
Prioritizing a Channel in a Scan List . . 28
i
English
Page 3

CONTENTS
Setting Priority Channels. . . . . . . . . . . 28
Phone. . . . . . . . . . . . . . . . . . . . . . . . . . . . 31
Making a Phone Call . . . . . . . . . . . . . . . . 31
Modifying the Phone List . . . . . . . . . . . . . 32
Adding an Entry (when using the
enhanced keypad microphone
only) . . . . . . . . . . . . . . . . . . . . . . . . . 32
Deleting an Entry. . . . . . . . . . . . . . . . . 33
Editing an Entry (when using the
enhanced keypad microphone
only) . . . . . . . . . . . . . . . . . . . . . . . . . 34
Editing an Access/Deaccess Code
(when using the enhanced keypad
microphone only) . . . . . . . . . . . . . . . 35
Audio/Tone Settings. . . . . . . . . . . . . . . . 37
Utilities. . . . . . . . . . . . . . . . . . . . . . . . . . . 39
Setting the Time . . . . . . . . . . . . . . . . . . . . 41
Displaying the Time . . . . . . . . . . . . . . . . . 42
Selecting the Display Language. . . . . . . . 42
Safety and Warranty. . . . . . . . . . . . . . . . 43
Safe and Efficient Operation of Motorola
Two-Way Radios . . . . . . . . . . . . . . . . . . 43
Exposure to Radio Frequency
Energy . . . . . . . . . . . . . . . . . . . . . . . 43
Electromagnetic Interference/
Compatibility . . . . . . . . . . . . . . . . . . . . . 44
Operational Warnings . . . . . . . . . . . . . . . 44
Vehicles with an Air Bag. . . . . . . . . . . 44
Potentially Explosive Atmospheres. . . 44
Blasting Caps and Blasting Areas. . . . 45
Mobile Radio Operation and
EME Exposure. . . . . . . . . . . . . . . . . 45
Mobile Antenna Installation. . . . . . . . . 46
Control Station Operation. . . . . . . . . . . . . 46
Limited Warranty . . . . . . . . . . . . . . . . . . . 46
Accessories . . . . . . . . . . . . . . . . . . . . . . 51
Audio . . . . . . . . . . . . . . . . . . . . . . . . . . . . 51
Mounting . . . . . . . . . . . . . . . . . . . . . . . . . 51
Antennas . . . . . . . . . . . . . . . . . . . . . . . . . 52
Control Station . . . . . . . . . . . . . . . . . . . . . 52
English
ii
Page 4

COMPUTER SOFTWARE
COPYRIGHTS
The Motorola products described in this
manual may include copyrighted Motorola
computer programs stored in semiconductor
memories or other media. Laws in the United
States and other countries preserve for
Motorola certain exclusive rights for
copyrighted computer programs including, but
not limited to, the exclusive right to copy or
reproduce in any form the copyrighted
computer program. Accordingly, any
copyrighted Motorola computer programs
contained in the Motorola products described
in this manual may not be copied, reproduced,
modified, reverse-engineered, or distributed in
any manner without the express written
permission of Motorola. Furthermore, the
purchase of Motorola products shall not be
deemed to grant either directly or by
implication, estoppel, or otherwise, any license
under the copyrights, patents or patent
applications of Motorola, except for the normal
non-exclusive license to use that arises by
operation of law in the sale of a product.
CONTENTS
iii
English
Page 5

CONTENTS
Notes
English
iv
Page 6
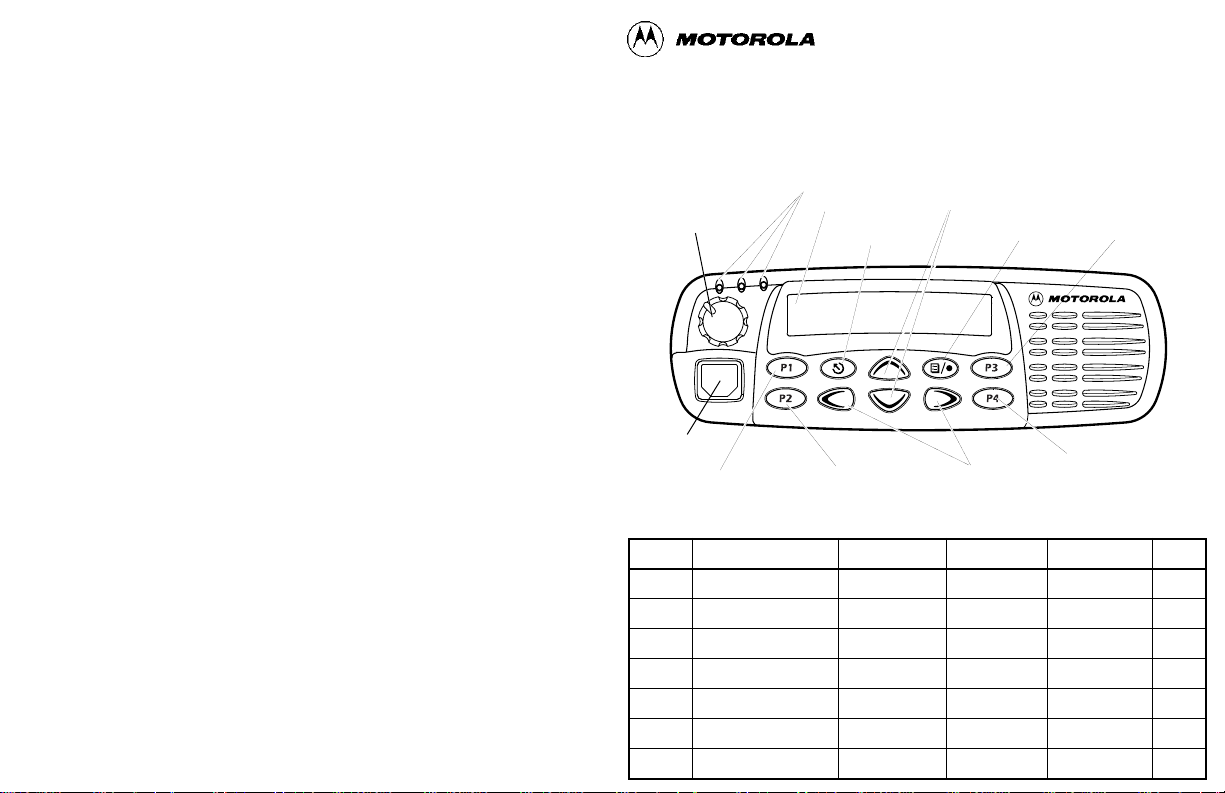
RADIO OVERVIEW
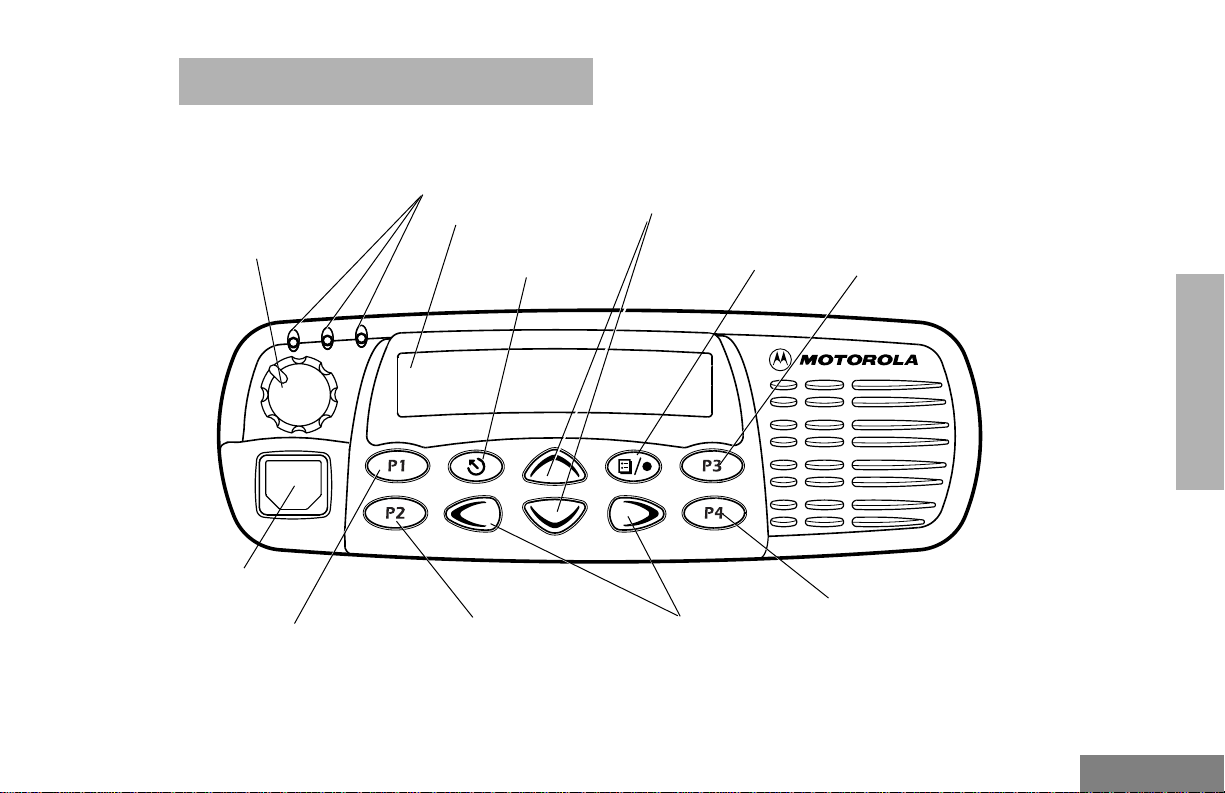
PARTS OF THE RADIO
Red/Yellow/Green
LED Indicators
On/Off/Volume
Knob
Microphone
Jack
Programmable
Button 1 (P1)
(Interchangeable)
Programmable
(Interchangeable)
LCD Screen
Menu Exit/Escape
Button
Button 2 (P2)
Channel Selector/
Menu Navigation Buttons
(Up/Down)
Menu Enter/Select
Button
Editing
Buttons
(Left/Right)
Programmable
Button 3 (P3)
(Interchangeable)
RADIO OVERVIEW
Programmable
Button 4 (P4)
(Interchangeable)
1
English
Page 7
RADIO OVERVIEW
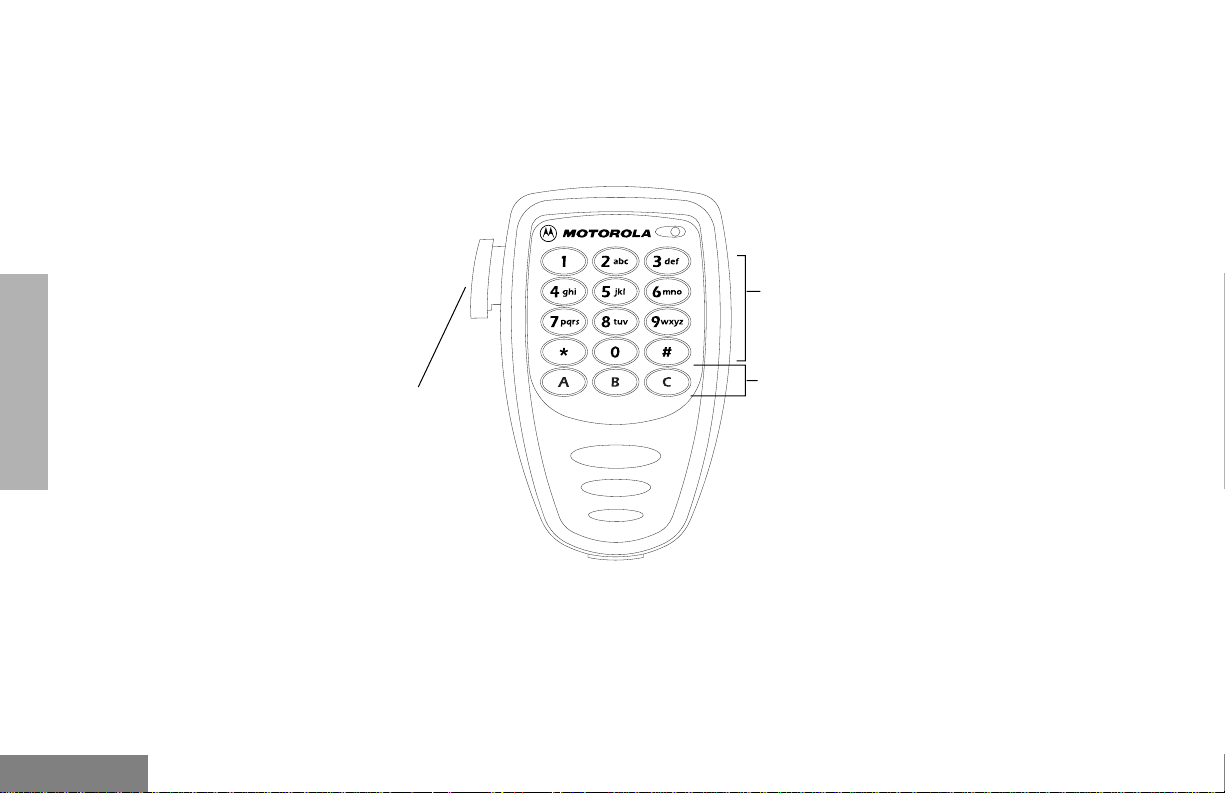
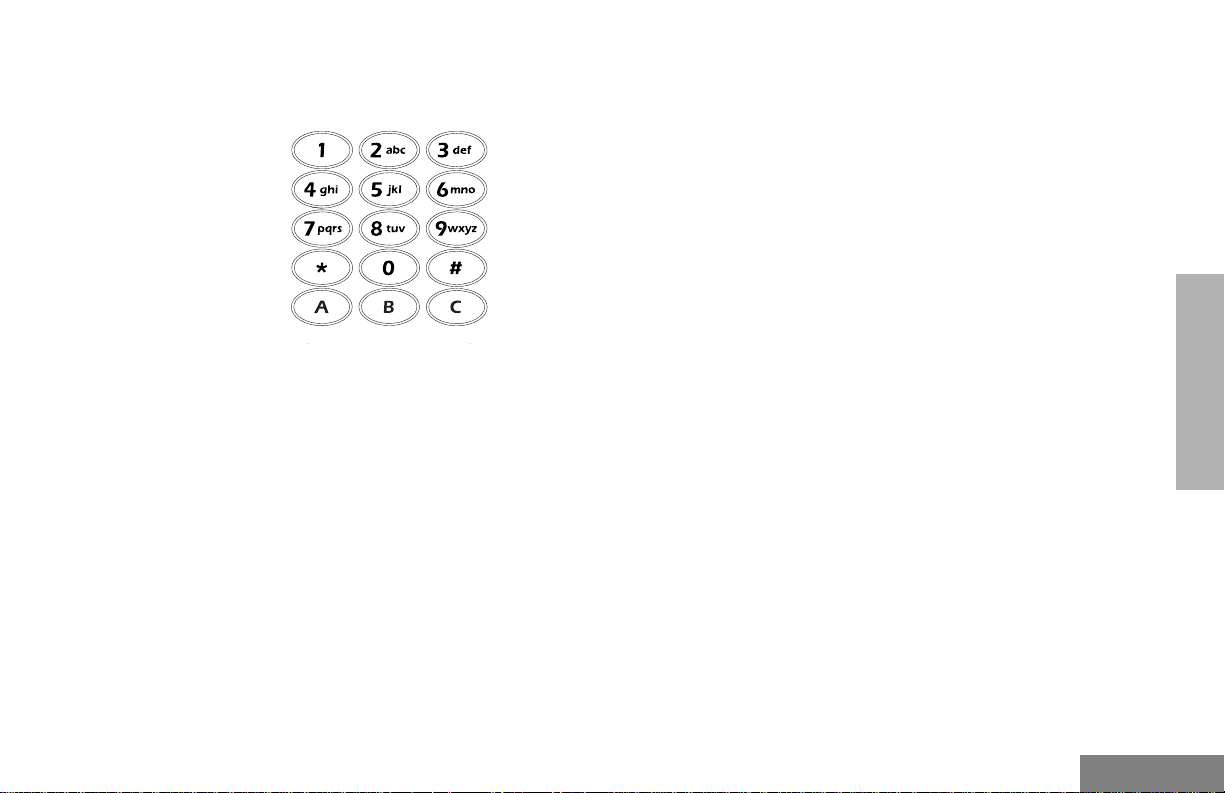
Optional Enhanced Keypad Microphone
(RMN4026)
Your radio may be ordered with an optional
DTMF (Dual-Tone Multi-Frequency)
microphone that has a direct entry keypad.
Push-to-Talk
(PTT) button
This enhanced keypad microphone has three
buttons (A, B, C) below the k e ypad that can be
programmed to conveniently activate select
radio features.
Keypad
Programmable
Buttons
(A, B, C)
FL0830328O
English
2
Page 8

On/Off/Volume Knob
Turns the radio on or off, and adjusts the
radio’s volume.
Channel Selector/Menu Navigation Buttons
y
or
z
Used for channel scrolling. When in menu
mode, used for menu navigation.
LED Indicators
Indicates channel, scan, and monitor status, as
well as receipt of a selective call.
Programmable Buttons
Your radio has several programmable buttons.
Your dealer can program these buttons as
shortcuts to various radio features.
Check with your dealer for a complete list of
functions your radio supports.
Programmable buttons include the
i
, and
buttons (see page 1).
j
g, h
Some buttons can access up to two features,
depending on the type of button press:
•
short press
releasing the programmable buttons
•
long press
programmable buttons for a period of time
(default 1 1/2 seconds or programmed
value)
•
hold down
the programmable buttons while checking
status or making adjustments
A summary of programmable radio features
and corresponding page references appears
beginning on page 4.
In the “Button” column, have y our dealer record
the name of the programmable button next to
the feature that has been programmed to it.
The dealer can use the abbreviations (P1, P2,
,
P3, P4) shown in the radio illustration on
page 1.
Also, where appropriate, have your dealer
indicate whether the button press requires a
short press, a long press, or needs to be held
down.
—quickly pressing and
—pressing and holding the
—pressing and holding down
RADIO OVERVIEW
3
English
Page 9
RADIO OVERVIEW
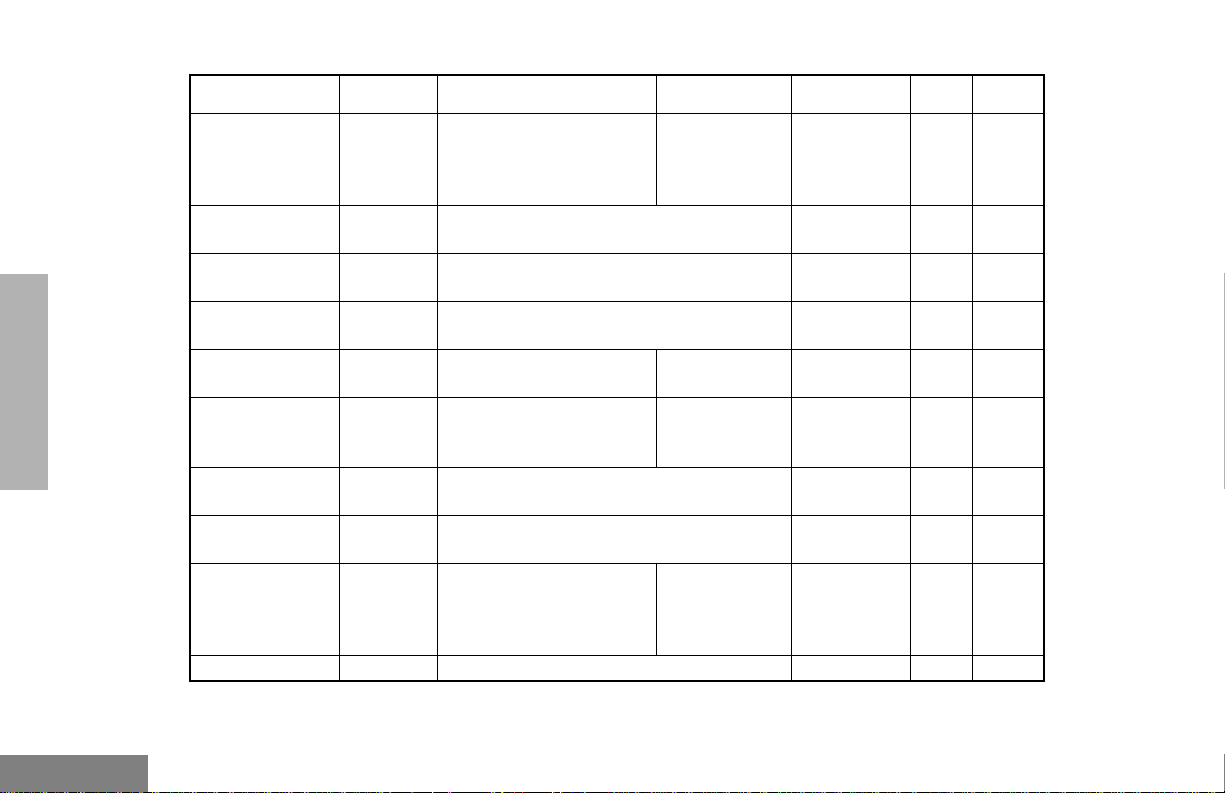
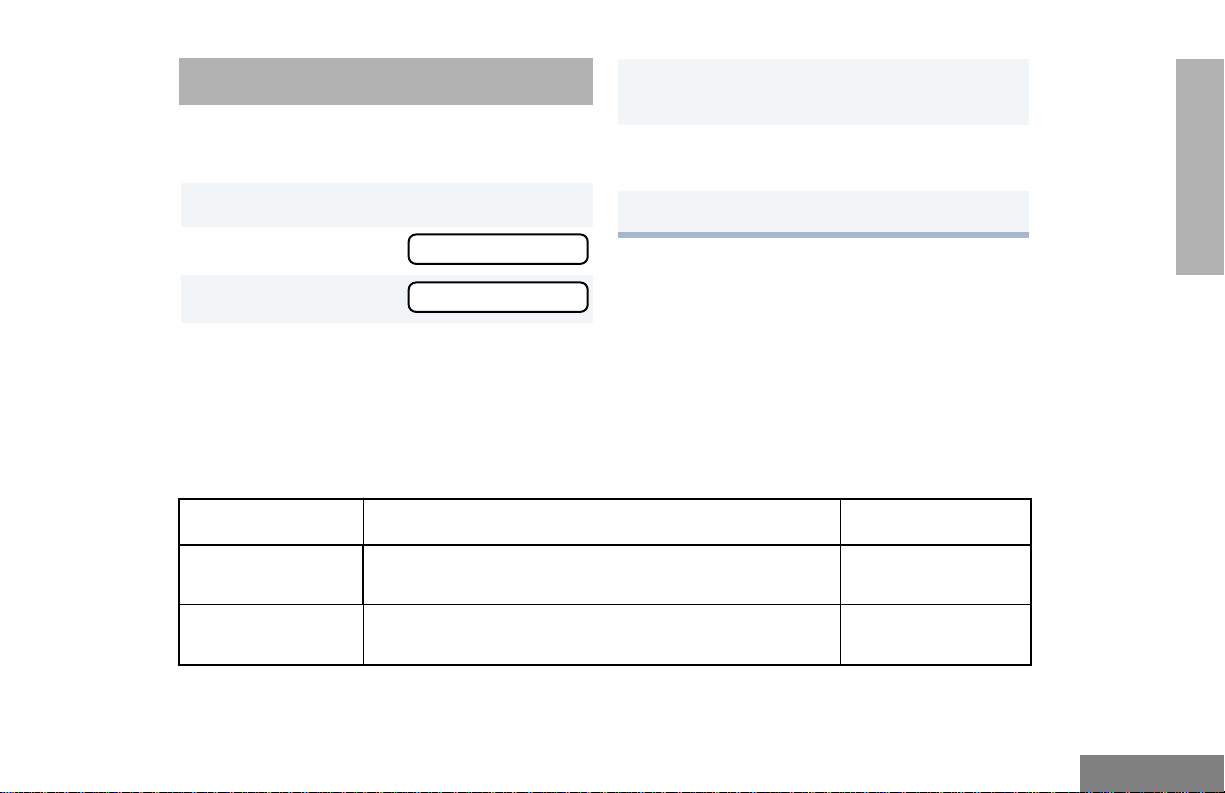
Function Indicator Short Press Long Press
Volume Set — — —
Direct Zone
Access
Home Revert —
Direct Channel
Access
PRTT (Priority
Request-to-Talk)
— Direct entry to zone selection menu.
Takes you directly to a pre-programmed
†
—
—
zone/channel combination.
Toggle the direct access channel feature.
(Enhanced keypad microphone required.)
Sends a priority access
request to the dispatcher.
Cancel
Emergency
E
Initiate Emergency Alert.
Emergency
status.
Power Level
Repeater/
Talkaround
B
J
Toggle transmit power level between High
and Low.
†
Toggle between using a repeater or
transmitting directly to another radio.
Delete a
Scan/Nuisance
Channel Delete
G
Toggle scan on and off.
nuisance
channel while
scanning.
Phone
†
This function is activated by
D
Access Phone Mode.
EITHER
a short OR a long press, but not both.
†
Hold Down
Page Button
Sound a tone
for adjusting
your radio’s
11
volume level.
†
—12
—13
†
—13
—13
—19
—21
†
—21
—25
—31
English
4
Page 10
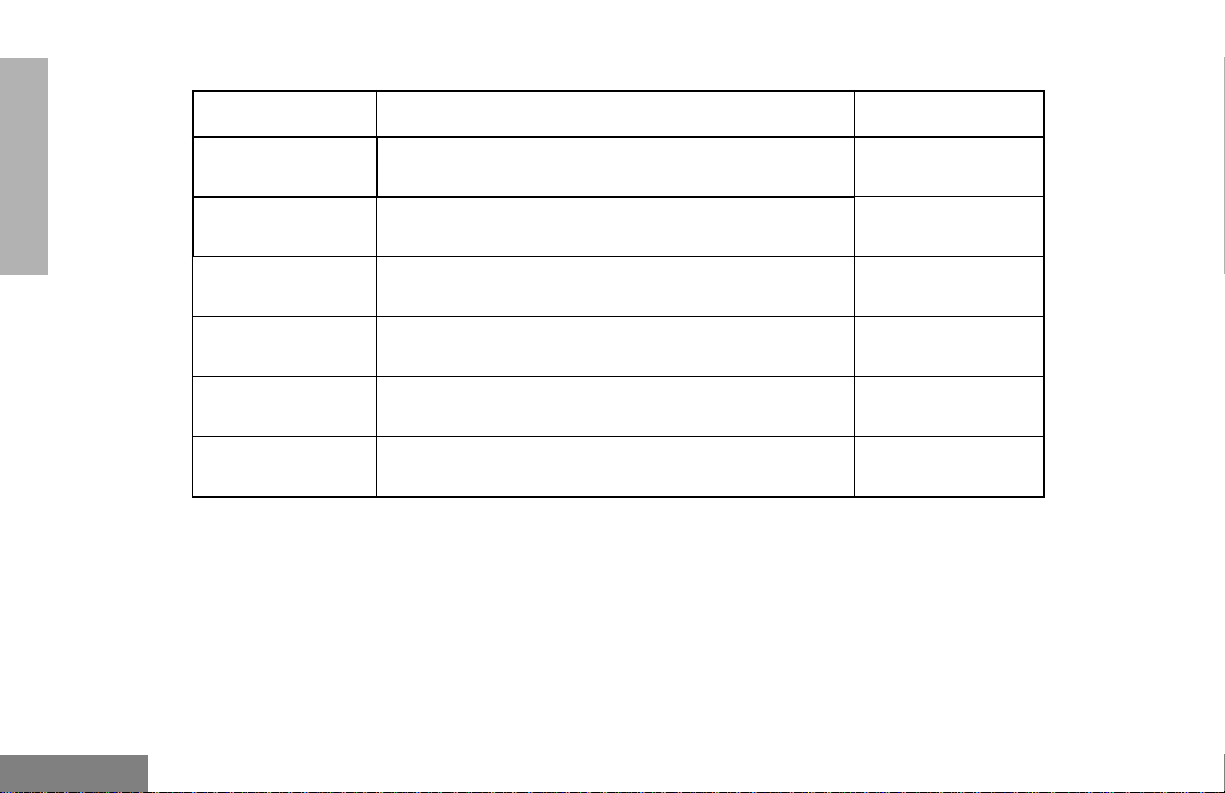
Function Indicator Short Press Long Press
Speed Dial — Access your phone list directly.
†
Toggle silent monitor
Turn on open
squelch
monitor.
Monitor
operation (also turn off
C
open squelch monitor
when it has been
activated).
Hold Down
Page Button
—31
——
Option Board
(if one is
N
installed)
Radio Call — Access the radio call menu.
T oggle betw een activating and deactiv ating
the option board.
†
†
Light — Adjust brightness level (off/low/med/high).
Auxiliary
Control (1/2)
—
Status — Direct entry to the status menu.
One-Touch
Status
—
Message — Direct entry to the message menu.
One-Touch
Message
—
Horn and Lights —
†
This function is activated by
Activates or deactivates a pin on the
accessory connector.
†
(See your dealer.)
†
Immediately sends a preprogrammed
†
status.
†
Immediately sends a preprogrammed
message.
†
T oggles e xternal alarm feature or cancels a
triggered alarm.
EITHER
a short OR a long press, but not both.
†
——
RADIO OVERVIEW
——
†
——
——
——
——
——
——
——
5
English
Page 11

Push-to-Talk (PTT) Button
Press and hold down this button to talk;
release it to listen.
Microphone
Hold the microphone 1 to 2 inches (2.5 to 5
cm) from your mouth, and speak clearly into it.
Menu Keys
Exit
Up
Menu/
Select
tyu
vzw
Left
Down Right
Up Key
Used for channel scrolling. When in Menu
Mode, used for menu navigation.
Right Key
Moves the cursor right or inserts a space when
editing or Zone scrolling.
Left Key
Moves the cursor left or used as a backspace
key when editing or Zone scrolling.
y
w
v
and
Down Key
z
RADIO OVERVIEW
English
Menu/Select Key
Used to enter Menu Mode. When in Menu
Mode, this key is also used to make menu
selections.
Exit Key
Used to move to the pre vious Menu lev el (short
press) or to exit Menu Mode (long press).
6
t
u
Page 12
Use with Enhanced Keypad Microphone
(RMN4026
)
These keys are used to:
• Dial a phone number
• Make a radio call
• Enter information when programming radio
lists
• Directly access preprogrammed features
Each key can generate se v er al diff erent
characters. For example, to enter the character
“C,” press the
2
key three times. (Refer to the
following table .)
RADIO OVERVIEW
7
English
Page 13

RADIO OVERVIEW
Entering Characters Using the Keypad
Number of Times Key is Pressed
1234567891011 12 13 14 15 16 17
Key
0( )<>
0
1&%# *
1
ABC2abc2АБ ВЗабвз
2
DE F3def3ИЙ Кийкл
3
GH I4gh i4ÌÍ ìíîï
4
JKL5 jkl5
5
MN O6mno6СТ УФстуфц
6
PQRS7pqrs7
7
TUV8 tuv8ÙÚ Ûùú
8
WX YZ9wxyz9Y
9
*/+-=
*
Blank
#
#
Space
-.!?’”,; :
y
English
8
Page 14
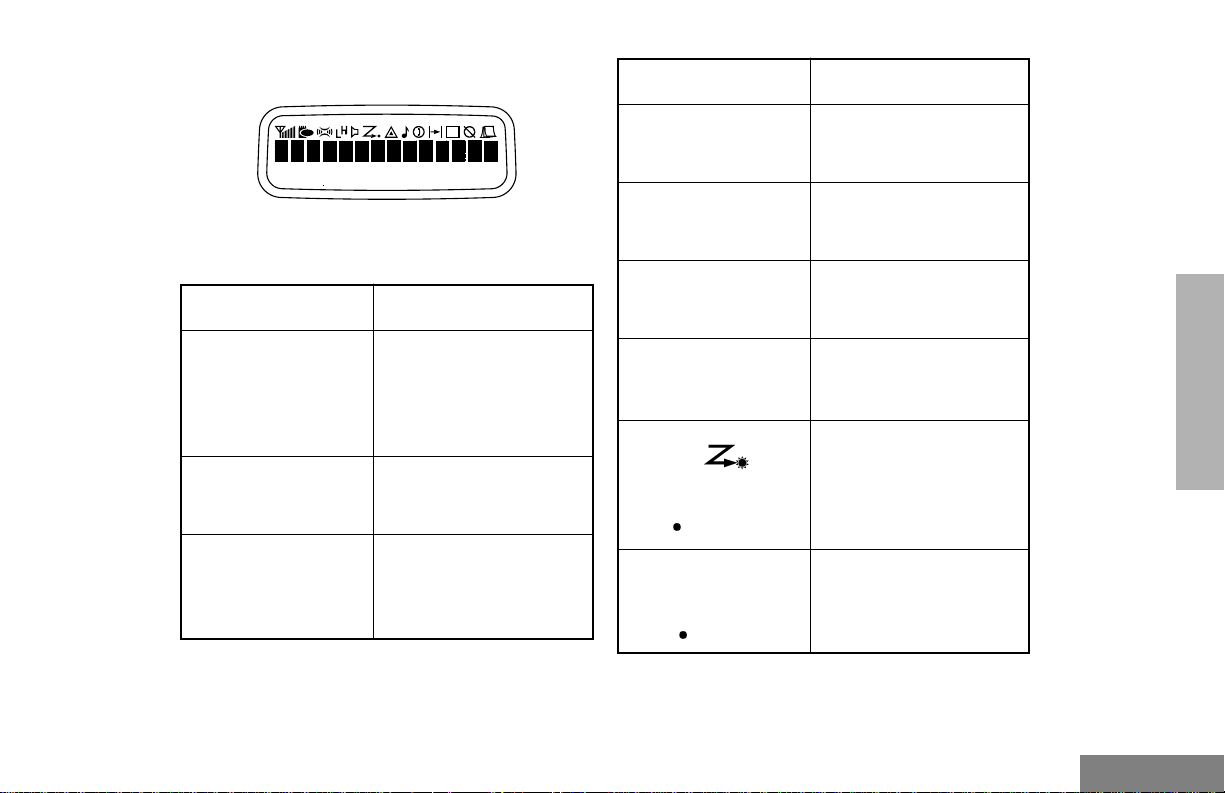
LCD Screen
Symbol Indication
The top screen row displays radio status
information:
Symbol Indication
A
Companding
B
Power Level
C
Carrier Squelch
(CSQ)
The Companding
feature is activated.
When in narrow band,
this feature improves
audio quality.
Low Power “ R “ or High
Pow er “ S “ is activated.
The radio is on a CSQ
channel, monitor is
active, or the
microphone is off-hook.
D
Phone
E
Emergency
F
Call Received
G
Scan
Priority 1 Scan
( flashing)
H
Priority 2 Scan
( steady)
Phone Mode is
selected.
An Emergency Alert is
being sent.
A Selective Call or Call
Alert has been received.
The Scan feature is
active. Flashes when
Scan is suspended.
During Scan, indicates
that the scan has locked
on to a priority 1
channel.
During Scan, indicates
that the scan has locked
on to a priority 2
channel.
RADIO OVERVIEW
9
English
Page 15
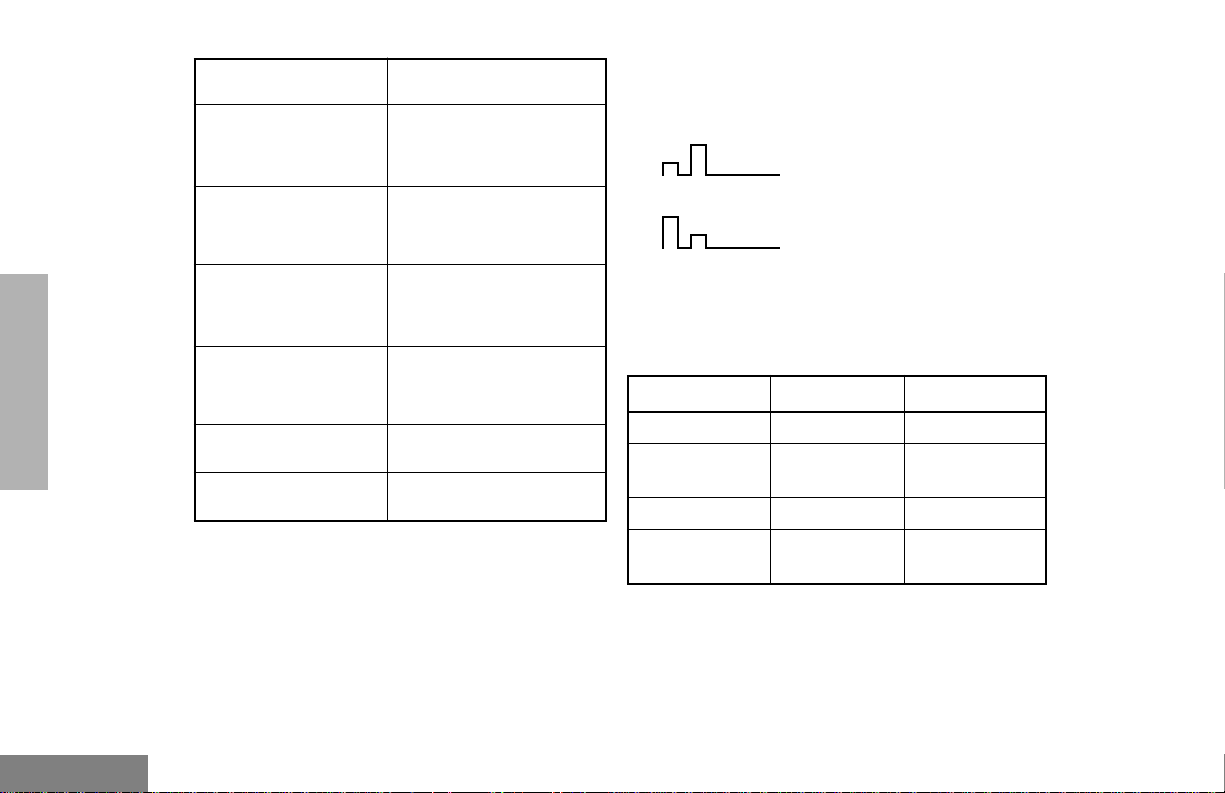
Symbol Indication
J
Talkaround
The radio is not
transmitting through a
repeater.
AUDIO INDICATORS FOR
PROGRAMMABLE BUTTONS
Low-High Tone
RADIO OVERVIEW
English
K
Programming Mode
M
Signal Strength
N
Option Board
Q
L
10
The radio is in Program
List editing mode.
Indicates signal
strength. The more bars,
the stronger the signal.
Option board is enabled.
Not currently assigned.
Not currently assigned.
High-Low Tone
In addition to having associated visual
indicators, some programmable buttons use
tones to indicate one of two modes:
Button Low-High Tone High-Low T one
Scan Start scan Stop scan
Power Level
Option Board Enabled Disabled
Repeater/
Talkaround
High power
selected
Does not use
repeater
Low power
selected
Uses repeater
Page 16

GETTING STARTED
TURNING THE RADIO ON OR OFF
ON OFF
ADJUSTING THE VOLUME
Turn the On/Off/Volume Control knob
clockwise to increase the volume, or
counterclockwise to decrease the volume.
–or–
1 Hold down the Volume Set button (see
page 4). You will hear a continuous tone.
2 Turn the On/Off/Volume Control knob to the
desired volume level.
Push the On/Off/
Volume Control knob
until you hear a click.
If power-up is
successful, you will
hear the Self-Test Pass
Tone.
If the radio fails to
power up, you will hear
the Self-Test Fail
Tone .
Push the On/Off/
Volume Control knob
until you hear a click and
the display clears.
3 Release the Volume Set button.
GETTING STARTED
11
English
Page 17
SELECTING A ZONE
Method 3
GETTING STARTED
A zone is a group of up to 16 channels. Before
you can access a channel in a zone, you must
select the zone in one of three ways:
Method 1
1
u to enter Menu Mode.
ee
2
y or z until
3
u to select
4
y or z until you see the desired zone
name.
5 u to select the zone.
ZZZZoooonnnnee
ZZZZoooonnnnee
ee
Method 2 (if programmed by your dealer [see
pages 4-5]).
1 Press the Direct Zone Access button.
2
y
or
z until you reach the desired zone.
3 u to select the zone.
Press v to select the previous zone. If
pressed while the first zone is selected, the
radio will wrap around to the last zone.
-or-
Press w to select the next zone. If pressed
while the last zone is selected, the radio will
wrap around to the first zone.
SELECTING A RADIO CHANNEL
Your radio offers 128 channels (8 zones of 16
channels each).
Note: Due to government regulations, some
channels may not be programmed.
See your dealer for more information.
There are three ways to select a channel:
Method 1
1 Select the appropriate Zone, if required.
2
y
or
z until you reach the desired
channel, shown on the screen.
English
12
Page 18

Method 2 (if programmed by your dealer [see
pages 4 -5]).
If your system uses the request-to-talk feature,
use the following method to send a call:
1 Press the Home Revert button.
Method 3 (if programmed by your dealer [see
pages 4 -5]).
1 Press the Direct Channel Access button.
2 Enter the desired channel using the enhanced
keypad microphone.
3 u to confirm your selection.
SENDING A CALL
1 Turn your radio on.
2 y or z to select the desired channel.
3 Hold the microphone vertically 1 to 2 inches
(2.5 to 5 cm) from your mouth. Press the PTT
to talk; release it to listen.
1 Turn your radio on.
2 y or z to select the desired channel.
3 Press the PTT (for priority requests to talk, the
PRTT button) and wait f or the talk permit tone.
4 Hold the microphone vertically 1 to 2 inches
(2.5 to 5 cm) from your mouth. Press the PTT
to talk; release it to listen.
5 Release the PTT to listen.
RECEIVING A CALL
1 Turn your radio on.
GETTING STARTED
2 Adjust the radio’s volume if necessary (see
page 11).
3 Select the desired channel.
4 To respond, hold the microphone vertically 1
to 2 inches (2.5 to 5 cm) from your mouth.
Press the PTT to talk; release it to listen.
13
English
Page 19

Notes
GETTING STARTED
English
14
Page 20
RADIO CALLS
SSSSeeeelllleeeeccccttttiiiivvvveeee CCCCaaaallllll
ll
7 Press the PTT to send the call. The radio
sounds a continuous tone.
RADIO CALLS
MAKING A SELECTIVE CALL
You can make a selective call to a particular radio
or group of radios, provided the signaling
protocol supports it.
To make a Selective Call:
1 u to enter Menu Mode.
2 y or z until
3 u to select
4 y or z until
5 u to select
6 y or z to locate the desired ID in the
Radio Call List.
–or–
when using the enhanced keypad microphone
only , enter the ID n umber of the radio y ou want
to call.
RRRRaaaaddddiiiioooo CCCCaaaallllll
RRRRaaaaddddiiiioooo CCCCaaaallllll
SSSSeeeelllleeeeccccttttiiiivvvveeee CCCCaaaallllll
SSSSeeeelllleeeeccccttttiiiivvvveeee CCCCaaaallllll
ll
ll
ll
ll
8 Press the PTT to talk; release it to listen.
9 When finished with the call,
t to return to
–or
–
Hold down t to exit Menu Mode.
RECEIVING A SELECTIVE CALL F
When you receive a selective call:
• You will hear two alert tones.
• The LED Indicator flashes yellow.
• The LCD screen displays F and the
preprogrammed name or ID of the calling
radio, if available.
15
English
Page 21
RADIO CALLS
AAAAcccckkkknnnnoooowwwwlllleeeeddddggggee
ee
NNNNoooo AAAAcccckkkknnnnoooowwwwlllleeeeddddggggee
ee
CCCCaaaallllllll AAAAlllleeeerrrrtt
tt
SENDING A CALL ALERT™ PAGE
You can alert another person by sending a Call
Alert page.
To send a Call Alert page:
1 u to enter Menu Mode.
2 y or z until
3 u to select
RRRRaaaaddddiiiioooo CCCCaaaallllll
RRRRaaaaddddiiiioooo CCCCaaaallllll
ll
ll
8 If the Call Alert page is received,
you will see
If not,
you will see
9 t to return to
–or
–
Hold down t to exit Menu Mode.
English
4 y or z until
5 ) to select
6 y or z to locate the desired ID in the
Radio Call List;
–or
–
when using the enhanced keypad microphone
only , enter the ID number of the r adio you want
to page.
7 Press the PTT to send the page.
You will see
16
CCCCaaaallllllll AAAAlllleeeerrrrtt
CCCCaaaallllllll AAAAlllleeeerrrrtt
CCCCaaaallllllll IIIInnnn PPPPrrrroooogg
tt
tt
RECEIVING A CALL ALERT PAGE
When your radio receives a Call Alert page, it
sounds four alert tones continuously and the
following are displayed until you respond:
the F symbol, and the ID of the calling radio
alternating with
Call Received
.
Press the PTT to answer the page, or press
any other key to clear it.
Note: Your radio will display only the last Call
Alert page received. Also, your radio
gg
will not receive any Selective Calls until
you clear the page.
Page 22
RADIO CHECK
AAAAcccckkkknnnnoooowwwwlllleeeeddddggggee
ee
NNNNoooo AAAAcccckkkknnnnoooowwwwlllleeeeddddggggee
ee
RRRRaaaaddddiiiioooo CCCChhhheeeecccckk
kk
RRRRaaaaddddiiiioooo CCCChhhheeeecccckk
kk
SSSSttttaaaattttuuuuss
ss
SSSSttttaaaattttuuuuss
ss
This feature allows you to determine if a radio
is in range without disturbing the user of the
radio. Radio Check can also be used when
attempts with Selective Call and Call Alert fail.
(This feature is available only if your signaling
protocol supports it.)
To perform a Radio Check:
1 u to enter Menu Mode.
2 y or z until
3 u to select
4 y or z until
5 u to select
6 y or z to locate the desired ID in the
Radio Call List;
–or–
when using the enhanced keypad microphone
only, enter the ID number of the radio you are
checking.
RRRRaaaaddddiiiioooo CCCCaaaallllll
RRRRaaaaddddiiiioooo CCCCaaaallllll
RRRRaaaaddddiiiioooo CCCChhhheeeecccckk
RRRRaaaaddddiiiioooo CCCChhhheeeecccckk
ll
ll
kk
kk
7 Press the PTT.
You will see
8 If the Radio Check is received,
you will see
If not, you will see
9 t to return to
–or–
Hold down t to exit Menu Mode.
CCCCaaaallllllll IIIInnnn PPPPrrrroooogg
gg
SENDING A STATUS
This feature gives you the ability to send a
status update to the base. The status feature
makes more efficient use of the channel
compared to voice transmissions. Status
updates of up to 14 characters may be
programmed by your dealer.
To send a Status:
1 u to enter Menu Mode.
2 y or z until
RADIO CALLS
3 u to select
17
English
Page 23

RADIO CALLS
4 y or z to locate the desired status in
the preprogrammed list.
–or–
when using the enhanced keypad
microphone only,
enter the number of the status you wish to
send.
–or–
if programmed by your dealer (see
pages 4-5),
press the button that has been
preprogrammed for a specific status.
Note: You cannot retransmit the current
status update.
SENDING A MESSAGE
This feature gives you the ability to send and
receive preprogrammed messages. Data
messages make more efficient use of channels
compared to voice transmissions. Messages of
up to 14 characters may be programmed by
your dealer.
To send an electronic (data) message:
1 u to enter Menu Mode.
2 y or z until
3 u to select
4 y or z to locate the desired message in
the preprogrammed list.
–or–
when using the enhanced keypad
microphone only,
enter the number of the message you wish to
send.
–or–
if programmed by your dealer (see
pages 4-5),
press the button that has been
preprogrammed for a specific message.
MMMMeeeessssssssaaaaggggee
MMMMeeeessssssssaaaaggggee
ee
ee
English
18
Page 24

RECEIVING A MESSAGE
When your radio receives a message:
• You will hear two alert tones.
• The yellow LED indicator flashes.
• The LCD screen
displays
alternating with the preprogrammed alias.
Note: If you receive a message that is
programmed into your radio , the displa y
will alternate with the following:
and
MMMMssssgggg RRRReeeecccceeeeiiiivvvveeeedd
MMMMeeeessssssssaaaaggggeeee ####__
NNNNoooo AAAAlllliiiiaaaass
dd
__
ss
SENDING AN EMERGENCY
ALERT E
A priority Emergency Alert can be sent to a
specific radio or dispatch center by pressing:
• A button preprogrammed by your dealer
(see pages 4-5).
• The footswitch
• A pushbutton accessory
Emergency Alerts have priority over all other
calls.
The E symbol will appear on the display when
your radio is in the Emergency Alert state.
An Emergency Alert can be programmed to:
• Show E and sound a tone
–or–
• Show E (Silent Emergency)
–or–
• Activate the microphone so that all activity
can be transmitted (for a predetermined
amount of time). See your dealer for more
information.
To cancel the Emergency Alert, press and hold
down the Emergency button.
RADIO CALLS
19
English
Page 25

RADIO CALLS
SELECTIVE RADIO INHIBIT
Your radio is equipped with a security feature
that can temporarily render the unit inoperative
when an inhibit signal is sent from the base
station.
This feature is commonly used to disable radios:
• In case of theft
• When your vehicle is being serviced
• For system control reasons
Note: When your radio has been disabled by
the base station, all controls will be
inoperative except for the On/Off
button. When the radio is powered up,
the display will
show:
RRRRaaaaddddiiiioooo DDDDiiiissssaaaabbbblllleeeedd
dd
Note: Your radio cannot receive any calls
while you are editing.
To edit a Call List entry:
1 u to enter Menu Mode.
2 y or z until
3 u to select
4 y or z until
5 u to select
6 y or z until
7 u to select
PPPPrrrrooooggggrrrraaaammmm LLLLiiiissssttttssss
PPPPrrrrooooggggrrrraaaammmm LLLLiiiissssttttssss
RRRRaaaaddddiiiiooooCCCCaaaallllllll LLLLiiiisssstt
RRRRaaaaddddiiiiooooCCCCaaaallllllll LLLLiiiisssstt
EEEEddddiiiitttt EEEEnnnnttttrrrryyyy??
EEEEddddiiiitttt EEEEnnnnttttrrrryyyy??
??
??
tt
tt
English
EDITING A RADIO CALL LIST K
The ID numbers in your Radio Call List are
preprogrammed by your dealer. However, you
can edit the names associated with these IDs
using the enhanced keypad microphone. The
K symbol will appear on the display when
you are editing.
20
8 y or z until you locate the desired entry .
9 u to select the entry.
10 Use your keypad to edit the entry (see page 7).
11 u to save your changes.
You will see
EEEEnnnnttttrrrryyyy SSSSaaaavvvveeeedd
dd
Page 26

12 t to return to
RRRRppppttttrrrr////TTTTaaaallllkkkkaaaarrrrnnnndd
dd
RRRRppppttttrrrr////TTTTaaaallllkkkkaaaarrrrnnnndd
dd
–or
–
Hold down t to exit Menu Mode.
EEEEddddiiiitttt EEEEnnnnttttrrrryyyy??
??
2 y or z until
3 u to select
RADIO CALLS
REPEATER OR TALKAROUND J
MODE
Talkaround Mode enables you to communicate
with another radio when either:
• The repeater is not operating.
–or–
• Your radio is out of the repeater’s range but
within communicating distance of another
radio. The J symbol appears on the
display when Talkaround Mode is selected.
To select either Repeater Mode or Talkaround
Mode:
Press the preprogrammed Repeater/
Talkaround button (see page 4) to toggle
between Repeater Mode and Talkaround
Mode.
–or–
1 u to enter Menu Mode.
4 y or z until
or
until
5 u to confirm your selection.
RRRReeeeppppeeeeaaaatttteeeerrrr MMMMooooddddee
TTTTaaaallllkkkkaaaarrrrnnnndddd MMMMooooddddee
ee
ee
SETTING THE POWER LEVEL B
Each channel in your radio has a predefined
transmit power level that can be changed.
• High power ( S )
• Low power ( R )
You can set the power level in two ways:
Method 1
Press the preprogrammed Po wer Level b utton
(see page 4) to toggle between
–or–
Method 2
1 u to enter Menu Mode.
low
and
high
.
21
English
Page 27
RADIO CALLS
2 y or z until
3 u to select
4 y or z until
5 u to select
The display shows the current power level.
6 y or z until
or
until
7 u to confirm the selection.
UUUUttttiiiilllliiiittttiiiieeeess
UUUUttttiiiilllliiiittttiiiieeeess
PPPPoooowwwweeeerrrr LLLLeeeevvvveeeell
PPPPoooowwwweeeerrrr LLLLeeeevvvveeeell
PPPPoooowwwweeeerrrr HHHHiiiigggghhhh??
PPPPoooowwwweeeerrrr LLLLoooowwww??
ss
ss
ll
ll
??
??
NAME AND CALL/MESSAGE TONE
TAGGING
You can program your radio to sound a
particular alert tone when:
• a specific user is calling—name tone
tagging,
• a message is being sent to your radio,
• your radio is receiving a type of radio call—
call tone tagging.
There are seven alert tones to select from.
or
or
To tag a specific user’s name or message:
1 u to enter Menu Mode.
2 y or z until
3 u to select
4 y or z until
or
5 u to select
or
6 y or z until you see the name or
message you want to tag.
7 u to confirm the selection.
8 y or z until you hear one of the seven
tones you want to use for this name or
message.
9 u to confirm the selection.
You will see
or
AAAAuuuuddddiiiioooo////TTTToooonnnneeeess
AAAAuuuuddddiiiioooo////TTTToooonnnneeeess
NNNNaaaammmmeeee TTTToooonnnneeee TTTTaaaagg
MMMMssssgggg TTTToooonnnneeee TTTTaaaagg
NNNNaaaammmmeeee TTTToooonnnneeee TTTTaaaagg
MMMMssssgggg TTTToooonnnneeee TTTTaaaagg
NNNNaaaammmmeeee TTTTaaaagggg SSSSeeeett
MMMMssssgggg TTTToooonnnneeee TTTTaaaagg
ss
ss
gg
gg
tt
gg
gg
gg
English
22
Page 28
10 t to return to
CCCCaaaallllllll TTTToooonnnneeee TTTTaaaagg
gg
or
–or–
Hold down t to exit Menu Mode.
To tag a type of radio call:
1 u to enter Menu Mode.
NNNNaaaammmmeeee TTTToooonnnneeee TTTTaaaagg
MMMMssssgggg TTTToooonnnneeee TTTTaaaagg
gg
gg
9 u to confirm the selection.
You will see
10 t to return to
–or
–
Hold down t to exit Menu Mode.
CCCCaaaallllllll TTTToooonnnneeee TTTTaaaagg
RADIO CALLS
gg
2 y or z until
3 u to select
4 y or z until
5 u to select
6 y or z until you see the call type you
want to tag.
7 u to confirm the selection.
8 y or z until you hear the tone y ou want
to use for this type of call.
AAAAuuuuddddiiiioooo////TTTToooonnnneeeess
AAAAuuuuddddiiiioooo////TTTToooonnnneeeess
CCCCaaaallllllll TTTToooonnnneeee TTTTaaaagg
CCCCaaaallllllll TTTToooonnnneeee TTTTaaaagg
ss
ss
gg
gg
23
English
Page 29

RADIO CALLS
Notes
English
24
Page 30

SCAN
SSSSyyyysssstttteeeemmmm SSSSccccaaaann
nn
Your radio can monitor multiple channels in a
scan list. Your dealer can program up to 16
different channels into each scan list. When
your radio detects activity on a scan list
channel, it will automatically switch to that
channel.
Note: The same channels can be assigned to
different scan lists.
STARTING OR STOPPING SCAN G
The Gsymbol, and the number of the
channel you are transmitting on, will appear on
the display when you start a scan operation.
The green LED indicator blinks during a scan
operation and stops blinking when the radio
switches to a channel.
Note: If you enter Menu Mode while the radio
is scanning, scanning will stop. It will
resume when you exit Menu Mode.
You can start or stop a scan operation either
by:
pressing the preprogrammed Scan button (see
page 4) to start or stop scanning;
–or–
1
) to enter Menu Mode.
2
y or z until
3
) to select
4
y or z until
–or–
5 ) to confirm your selection.
SSSSyyyysssstttteeeemmmm SSSSccccaaaann
SSSSyyyyssss SSSSccccaaaannnn OOOOnnnn??
SSSSyyyyssss SSSSccccaaaannnn OOOOffffffff??
nn
??
??
SCAN
25
English
Page 31
TALKBACK
Restoring a Channel to the Scan List
SCAN
The Talkback feature allo ws y ou to respond to a
transmission while scanning. If a transmission on
a channel is detected while scanning, the radio
will stop on that channel for a preprogrammed
period of time. During this “hangtime” you may
respond by pressing the PTT.
Note: If transmission stops/ceases or if the PTT
is not pressed for a preprogrammed
duration, the radio will continue scanning.
Also, the LED scan indicator stops
blinking while the radio is in hangtime.
DELETING A NUISANCE CHANNEL
If a channel continually generates unwanted calls
or noise (a “nuisance” channel), use the Scan
button to temporarily delete the channel from the
scan list.
Note: Y ou cannot delete a priority channel (see
page 28) or the last remaining channel in
a scan list.
1 While the radio is on the nuisance channel, hold
down the
2 Release the Scan button. The nuisance
channel is deleted.
Scan button until you hear a tone.
To restore a previously deleted channel to the
scan list, restart the scan operation or turn your
radio off and on again.
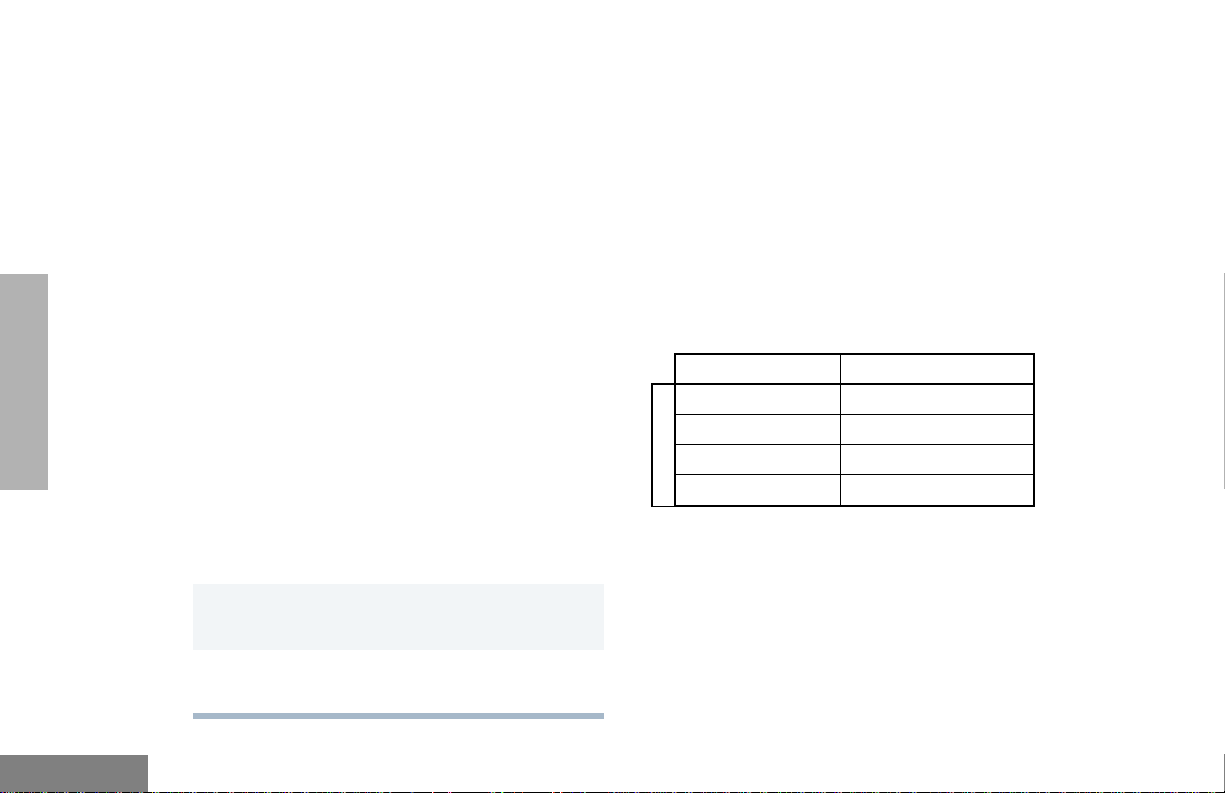
EDITING A SCAN LIST
A scan list is a group of up to 16 channels. Each
channel can have a scan list assigned to it. The
same channel can be included in several scan
lists, and the same scan list can be assigned to
several Channel Selector positions. For
example:
Position 2 Position 14
C
h
a
n
n
e
l
s
When you edit a scan list, you can either add, delete,
or prioritize channels. The K symbol will appear
on the display while you are in edit mode.
Note: Your radio cannot receive any calls while
you are editing a scan list.
11
32
53
611
English
26
Page 32
Adding or Deleting Channels in a Scan List
EEEEnnnnttttrrrryyyy SSSSaaaavvvveeeedd
dd
DDDDeeeelllleeeetttteeee??
??
EEEEnnnnttttrrrryyyy DDDDeeeelllleeeetttteeeedd
dd
To add or delete channels in a scan list:
1
) to enter Menu Mode.
2
y or z until
3
) to select
4
y or z until
5
) to select
6
y or z until
or
until
7 ) to confirm your selection.
8
y or z until you see the channel you
want to add or delete.
Note: You cannot delete the last remaining
channel in a scan list.
9 ) to confirm your selection.
PPPPrrrrooooggggrrrraaaammmm LLLLiiiissssttttss
PPPPrrrrooooggggrrrraaaammmm LLLLiiiissssttttss
SSSSccccaaaannnn LLLLiiiisssstt
SSSSccccaaaannnn LLLLiiiisssstt
AAAAdddddddd EEEEnnnnttttrrrryyyy??
DDDDeeeelllleeeetttteeee EEEEnnnnttttrrrryyyy??
ss
ss
tt
tt
??
??
10 If you added a channel,
you will see
–or–
If you deleted a channel,
you will see
) to confirm the deletion.
You will see
11
( to return to
or
to return to
–or
–
Hold down ( to exit Menu Mode.
AAAAdddddddd EEEEnnnnttttrrrryyyy??
DDDDeeeelllleeeetttteeee EEEEnnnnttttrrrryyyy??
??
??
SCAN
27
English
Page 33

Prioritizing a Channel in a Scan List
Setting Priority Channels
SCAN
You may want to check the activity on one or
two channels more frequently than others. You
can do this by assigning them priority:
Note: Even if there may be activity on a non-
priority channel, your radio will
automatically switch to an active priority
channel and indicate the activity with a
short tone.
Priority Channel
None specified Ch1➠Ch2➠Ch3➠Ch4➠
Channel 2
(Priority 1)
Channel 2
(Priority 1)
Channel 8
(Priority 2)
Scanning Sequence
Ch1
Ch2➠Ch1➠Ch2➠Ch3➠
Ch2➠Ch4➠Ch2➠…Ch1
Ch2➠Ch1➠Ch8➠Ch3➠
Ch2➠Ch4➠Ch8➠…Ch1
Note: You cannot reprioritize a
channel to
1
) to enter Menu Mode.
2
y or z until
3
) to select
4
y or z until
5
) to select
6
y or z until
7
) to select
8
y or z until
or
until
9 ) to select the desired priority level.
10
y or z until you see the channel you
want to prioritize.
Priority 2.
Priority 1
PPPPrrrrooooggggrrrraaaammmm LLLLiiiissssttttss
PPPPrrrrooooggggrrrraaaammmm LLLLiiiissssttttss
SSSSccccaaaannnn LLLLiiiisssstt
SSSSccccaaaannnn LLLLiiiisssstt
EEEEddddiiiitttt PPPPrrrriiiioooorrrriiiittttyyyy??
EEEEddddiiiitttt PPPPrrrriiiioooorrrriiiittttyyyy??
PPPPrrrriiiioooorrrriiiittttyyyy ####1111??
PPPPrrrriiiioooorrrriiiittttyyyy ####2222??
ss
ss
tt
tt
??
??
??
??
English
28
Page 34

11 ) to prioritize that channel.
12
( to return to
–or–
Hold down ( to exit Menu Mode.
EEEEddddiiiitttt PPPPrrrriiiioooorrrriiiittttyyyy??
Note: If you want to reprioritize all channels,
you must first delete each priority
channel from the scan list, and then add
it back.
??
SCAN
29
English
Page 35

SCAN
Notes
English
30
Page 36

PHONE
PPPPhhhhoooonnnnee
ee
4 ) to select
If your radio has access to a telephone system,
you can make a phone call. To do this, your
radio must send an access code to a station
that connects it to a phone line. (Ask your
dealer for more details.) After completing a
call, your radio must send a deaccess code to
hang up.
MAKING A PHONE CALL D
You can make a phone call using the
preprogrammed Phone button (see page 4) or
the radio menu. The D symbol appears on the
display when you are in Phone Mode.
To initiate a phone call:
Press the Phone button.
–or–
Do the following:
1 Switch to the desired channel.
2 ) to enter Menu Mode.
ee
3 y or z until
PPPPhhhhoooonnnnee
5 You will hear a series of tones indicating that
an access code is being sent automatically.
You will also see your access code displayed;
–or–
when using the keypad microphone only,
enter your access code using the keypad.
6 When you hear a dial tone, enter or select a
phone number:
when using the keypad microphone only,
enter the phone number using the keypad.
–or–
y or z to select a number from the phone
list.
–or–
when using the keypad microphone only,
a Press and release the preprogrammed
Speed Dial button (see page 5) to use the
Speed Dial feature.
b Press the key (1 to 8) corresponding to the
number you want to call,
–or–
press “0” if you want to call the last
number dialed.
PHONE
31
English
Page 37

PHONE
Note: To redial the last number dialed (if not
using Speed Dial), do not choose a
number. Proceed to step 7.
Alternatively, if you entered your
access code using the keypad, press
z once to access the last number
dialed; then press and release the
PTT.
7 To end a phone call, do one of the following:
If your radio has the deaccess code
preprogrammed, proceed to step 8.
–or–
Enter the deaccess code using the keypad.
8 Press the Phone button to exit Phone Mode.
–or–
( to exit Phone Mode
ee
and return to
–or–
Hold down ( to exit Menu Mode.
PPPPhhhhoooonnnnee
MODIFYING THE PHONE LIST K
You can modify a phone list in one of the
following ways:
• Add an entry
• Delete an entry
• Edit an existing entry
• Edit an Access/Deaccess code
When you are modifying the phone list, the
K symbol will appear on the display.
Note: Your radio cannot receive any calls
while you are modifying the phone list.
Adding an Entry (when using the enhanced
keypad microphone only)
To add an entry:
1 ) to enter Menu Mode.
2 y or z until
3 ) to select
4 y or z until
PPPPrrrrooooggggrrrraaaammmm LLLLiiiissssttttss
PPPPrrrrooooggggrrrraaaammmm LLLLiiiissssttttss
PPPPhhhhoooonnnneeee LLLLiiiisssstt
ss
ss
tt
English
32
5 ) to select
PPPPhhhhoooonnnneeee LLLLiiiisssstt
tt
Page 38

6 y or z until
AAAAdddddddd EEEEnnnnttttrrrryyyy??
??
PPPPrrrrooooggggrrrraaaammmm LLLLiiiissssttttss
ss
PPPPrrrrooooggggrrrraaaammmm LLLLiiiissssttttss
ss
PPPPhhhhoooonnnneeee LLLLiiiisssstt
tt
PPPPhhhhoooonnnneeee LLLLiiiisssstt
tt
DDDDeeeelllleeeetttteeee EEEEnnnnttttrrrryyyy??
??
DDDDeeeelllleeeetttteeee EEEEnnnnttttrrrryyyy??
??
7 ) to select
You will see
8 Use the keypad to enter the name (see
page 7).
AAAAdddddddd EEEEnnnnttttrrrryyyy??
AAAAdddddddd EEEEnnnnttttrrrryyyy??
EEEEnnnntttteeeerrrr NNNNaaaammmmee
??
??
ee
14
( to return to
–or–
Hold down
(
Deleting an Entry
To delete an entry:
to exit Menu Mode.
9 ) to store the name.
You will see
10 Use the keypad to enter the phone number.
You can also add a dash (press
Pause Indicator (hold down
character on the display changes to a “P”).
11 ) to select the phone number.
12
y
or
z until y ou see the location in the list
where you want to store the phone number.
13 ) to store the phone number.
You will see
EEEEnnnntttteeeerrrr PPPPhhhhoooonnnneeee ##
# until the #
EEEEnnnnttttrrrryyyy SSSSaaaavvvveeeedd
##
w) and a
dd
1 ) to enter Menu Mode.
2 y or z until
3 ) to select
4 y or z until
5 ) to select
6 y or z until
7 ) to select
8 y or z until you see the entry you want
to delete.
PHONE
33
English
Page 39
9 ) to select the entry.
You will see
DDDDeeeelllleeeetttteeee??
??
) again to confirm the deletion.
You will see
10 ( to return to
–or–
Hold down ( to exit Menu Mode.
EEEEnnnnttttrrrryyyy DDDDeeeelllleeeetttteeeedd
DDDDeeeelllleeeetttteeee EEEEnnnnttttrrrryyyy??
dd
??
Editing an Entry (when using the enhanced
keypad microphone only)
To edit an entry:
1 ) to enter Menu Mode.
2 y or z until
PPPPrrrrooooggggrrrraaaammmm LLLLiiiissssttttss
ss
8 y or z until you see the entry you want to
edit.
9 ) to select the entry.
10
y or z until
to edit the name,
–
or–
until
to edit the phone number,
–
or–
until
to edit the location in the phone list.
11 ) to confirm your selection.
12 Use the keypad to edit the entry (see page 7).
–
or–
EEEEddddiiiitttt NNNNaaaammmmeeee??
EEEEddddiiiitttt NNNNuuuummmmbbbbeeeerrrr??
EEEEddddiiiitttt LLLLooooccccaaaattttiiiioooonnnn??
??
??
??
y or z until you see the location where
you want to store the phone number.
PHONE
English
3 ) to select
4 y or z until
5 ) to select
6 y or z until
7 ) to select
34
PPPPrrrrooooggggrrrraaaammmm LLLLiiiissssttttss
PPPPhhhhoooonnnneeee LLLLiiiisssstt
PPPPhhhhoooonnnneeee LLLLiiiisssstt
EEEEddddiiiitttt EEEEnnnnttttrrrryyyy??
EEEEddddiiiitttt EEEEnnnnttttrrrryyyy??
tt
tt
??
??
ss
13 ) to store the information.
14 ( to return to
–
or–
Hold down
(
to exit Menu Mode.
EEEEddddiiiitttt EEEEnnnnttttrrrryyyy??
??
Page 40

Editing an Access/Deaccess Code (when
using the enhanced keypad microphone
only)
To edit an access/deaccess code:
1 ) to enter Menu Mode.
10
y or z to edit another code.
–
or–
Hold down ( to exit Menu Mode.
2 y or z until
3 ) to select
4 y or z until
5 ) to select
6 y or z until
–or–
until
7 ) to select
–
or–
8 Enter the number using the enhanced keypad
microphone.
9 ) to select the entry.
PPPPrrrrooooggggrrrraaaammmm LLLLiiiissssttttss
PPPPrrrrooooggggrrrraaaammmm LLLLiiiissssttttss
EEEEddddiiiitttt CCCCooooddddeeeessss??
EEEEddddiiiitttt CCCCooooddddeeeessss??
AAAAcccccccceeeessssssss CCCCooooddddeeee??
DDDDeeeeaaaacccccccceeeessssssss CCCCooooddddeeee??
AAAAcccccccceeeessssssss CCCCooooddddeeee??
DDDDeeeeaaaacccccccceeeessssssss CCCCooooddddeeee??
ss
ss
??
??
??
??
??
??
PHONE
35
English
Page 41

PHONE
Notes
English
36
Page 42
AUDIO/TONE SETTINGS
You can customize the audio and tone feature
settings on your radio.
5 ) to select the feature. You will see the
feature’s current setting.
6 y or z for available settings. (Refer to the
table below.)
AUDIO/TONE
SETTINGS
1 ) to enter Menu Mode.
2 y or z until
3 ) to select
4 y or z until you see the feature you want
to change. (Refer to the table below.)
AAAAuuuuddddiiiioooo////TTTToooonnnneeeess
AAAAuuuuddddiiiioooo////TTTToooonnnneeeess
ss
ss
7 ) to select the desired setting.
Audio/Tone Settings
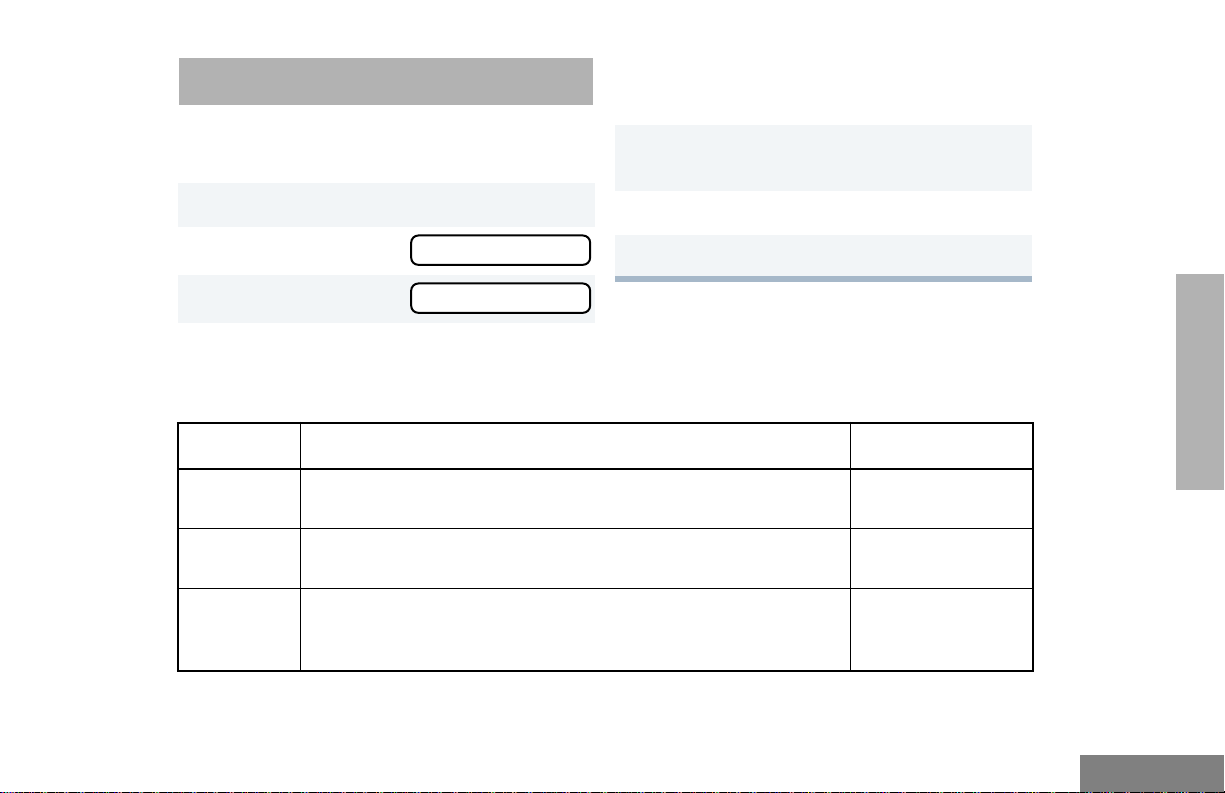
Feature What it Does Settings
Alert Vol Lvl Allows the volume lev el of the audio and the volume level
of the alert tones to be set independently.
Tone Disable Turns all tones on or off. Tones On
Ind Alert Off
Ind Alert On
Tones Off
37
English
Page 43
Audio/Tone Settings
Feature What it Does Settings
SETTINGS
AUDIO/TONE
Name Tone Tag Assigns a specific tone to all calls from a specific user
(see page 22 for details).
Call Tone Tag Assigns a specific tone when receiving a specific type of
radio call (see page 23 for details).
Msg Tone Tag Assigns a specific tone when receiving a specific
message (see page 22 for details).
Escalert Gradually increases the volume of the alarm tones when
a call is not answered.
Companding
(XPand™)
Keypad Tones Turns keypad tones on or off. Tones On
Approximates the same audio quality for 12.5kHz
channels to that of 25kHz channels.
Standard
Alert #1 – #7
Standard
Alert #1 – #7
Standard
Alert #1 – #7
Escalert On
Escalert Off
Compand On
Compand Off
Tones Off
English
38
Page 44
UTILITIES
You can customize some of your radio’s
features by:
4 y or z until you see the feature you want
to change (see table below).
5 ) to select the feature. You will see the
feature’s current setting.
1 ) to enter Menu Mode.
2 y or z until
3 ) to select
UUUUttttiiiilllliiiittttiiiieeeess
UUUUttttiiiilllliiiittttiiiieeeess
ss
ss
6 y or z for available settings.
7 ) to select the desired setting.
Utilities Features
Feature What it Does Settings
Power
Level
Clock Sets the time (see page 41). Set Time
Reminder
Alarm
Changes the power level of the radio to high or low (see page 21). Power High
Power Low
Display Clock
Sets the alarm and turns it on or off (see page 41). Alarm On
Alarm Off
Set Time
UTILITIES
39
English
Page 45
Utilities Features
Feature What it Does Settings
UTILITIES
Language
Selection
Option
board
Software
Ver #
Allows you to select the language displayed on the display. English
Spanish
Portuguese
French
Activates/deactivates the option board installed in your radio. Opt Board On
Opt Board Off
Displays the radio’s software version number.
——
English
40
Page 46
SETTING THE TIME
RRRReeeemmmmiiiinnnnddddeeeerrrr AAAAllllaaaarrrrmm
mm
CCCClllloooocccckk
kk
To set the time:
8 When a setting (e.g., “hour”) is blinking, you
can change it with y
or
z.
1 ) to enter Menu Mode.
2 y or z until
3 ) to select
4 y or z until
–or–
until
Note: You must access the clock menu to
select AM/PM or “24 hr”. This selection
cannot be made from Reminder Alarm
menu.
5 ) to confirm your selection.
6 y or z until
7 ) to select
UUUUttttiiiilllliiiittttiiiieeeess
UUUUttttiiiilllliiiittttiiiieeeess
CCCClllloooocccckk
ss
ss
kk
RRRReeeemmmmiiiinnnnddddeeeerrrr AAAAllllaaaarrrrmm
SSSSeeeetttt TTTTiiiimmmmeeee??
SSSSeeeetttt TTTTiiiimmmmeeee??
??
??
9 w to proceed to the next setting (e.g., from
mm
10
11 ( to return to
Hour
(AM or PM)
Minutes
hour to minutes).
3:05 PM
(AM/PM or 24 hr)
) to save your changes.
or
to return to
–or–
Hold down ( to exit Menu Mode.
UTILITIES
41
English
Page 47

UTILITIES
DISPLAYING THE TIME
To display the time:
1 ) to enter Menu Mode.
2 y or z until
3 ) to select
4 y or z until
5 ) to confirm your selection.
6 y or z until
7 ) to select
UUUUttttiiiilllliiiittttiiiieeeess
UUUUttttiiiilllliiiittttiiiieeeess
CCCClllloooocccckk
DDDDiiiissssppppllllaaaayyyy CCCClllloooocccckkkk??
DDDDiiiissssppppllllaaaayyyy CCCClllloooocccckkkk??
SELECTING THE DISPLAY
LANGUAGE
To select the display language:
ss
ss
kk
??
??
1 ) to enter Menu Mode.
2 y or z until
3 ) to select
4 y or z until
5 ) to confirm your selection.
6 y or z until desired language is
displayed.
UUUUttttiiiilllliiiittttiiiieeeess
UUUUttttiiiilllliiiittttiiiieeeess
LLLLaaaannnngggguuuuaaaaggggeeee SSSSeeeellllcccctt
ss
ss
tt
English
The radio will display the time for a
preprogrammed duration.
8 ( to exit the menu.
42
7 ) to select desired language.
8 ( to exit the menu.
Page 48

SAFETY AND WARRANTY
• European Committee for Electrotechnical
Standardisation (CENELEC):
SAFE AND EFFICIENT OPERATION
OF MOTOROLA TWO-WAY RADIOS
Exposure to Radio Frequency Energy
National and International Standards
and Guidelines
Your Motorola Two-Way Radio, which
generates and radiates radio frequency (RF)
electromagnetic energy (EME), is designed to
comply with the following National and
International Standards and Guidelines
regarding exposure of human beings to radio
frequency electromagnetic energy:
• Federal Communications Commission
Report and Order No. FCC 96-326 (August
1996)
• American National Standards Institute
(C95.1 - 1992)
• National Council on Radiation Protection
and Measurements (NCRP - 1986)
• International Commission on Non-Ionizing
Radiation Protection (ICNRP - 1986)
ENV. 501661 1995 E
ENV. 50166-
2 1995 E
Proceedings
of SC211/8
1996
To assure optimal radio performance and that
human exposure to radio frequency
electromagnetic energy is within the guidelines
set forth in the above standards, always
adhere to the following procedures:
Human Exposure to
Electromagnetic Fields Low
Frequency (0Hz to 10kHz)
Human Exposure to
Electromagnetic Fields High
Frequency (10kHz to
300GHz)
Safety Considerations f or
Human Exposure to E.M.F.s
from Mobile
Telecommunications
Equipment (M.T.E.) in the
Frequency Range
30MHz - 6GHz (E.M.F. Electromagnetic Fields)
SAFETY AND
WARRANTY
43
English
Page 49

ELECTROMAGNETIC
INTERFERENCE/COMPATIBILITY
Note: Nearly every electronic device is
susceptible to electromagnetic
interference (EMI) if inadequately
shielded, designed, or otherwise
configured for electromagnetic
compatibility.
• To avoid electromagnetic interference
and/or compatibility conflicts, turn off your
radio in any facility where posted notices
instruct you to do so. Hospitals or health
care facilities may be using equipment that
is sensitive to external RF energy.
• When instructed to do so, turn off your radio
when on board an aircraft. Any use of a
radio must be in accordance with airline
regulations or crew instructions.
OPERATIONAL WARNINGS
!
!
Vehicles with an Air Bag
Do not place a radio in the area over an air bag
or in the air bag deployment area. Air bags
inflate with great force. If a radio is placed in
the air bag deployment area and the air bag
inflates, the radio may be propelled with great
force and cause serious injury to occupants of
the vehicle.
Potentially Explosive Atmospheres
Turn off your two-way radio when you are in
any area with a potentially explosive
atmosphere, unless it is a radio type especially
qualified for use in such areas (for example,
Factory Mutual or CENELEC approved).
Sparks in a potentially explosive atmosphere
can cause an explosion or fire resulting in
bodily injury or even death.
W A R N I N G
WARRANTY
SAFETY AND
English
44
Page 50

Blasting Caps and Blasting Areas
Mobile Radio Operation and EME Exposure
To avoid possible interference with blasting
operations, turn off your radio when you are
near electrical blasting caps, in a blasting area,
or in areas posted: “Turn off two-way radio.”
Obey all signs and instructions.
Note: The areas with potentially explosive
atmospheres referred to abov e include
fueling areas such as: below decks on
boats; fuel or chemical transfer or
storage facilities; areas where the air
contains chemicals or particles, such
as grain dust, or metal powders; and
any other area where you would
normally be advised to turn off a
vehicle engine. Areas with potentially
explosive atmospheres are often but
not always posted.
To assure optimal radio performance and that
human exposure to radio frequency
electromagnetic energy is within the guidelines
referenced earlier in this document, transmit
only when people inside and outside the
vehicle are at least the minimum distance aw ay
from a properly installed, externally mounted
antenna.
Table 1 lists the minimum distance for several
different ranges of radiated power.
Table 1: Radiated Power and Distance
Radiated Power of
Vehicle-installed
Mobile Tw o-way
Radio
7 to 15 Watts 1 Foot (30.5 cm)
16 to 50 Watts 2 Feet (61 cm)
More than 50 Watts 3 Feet (91.5 cm)
Minimum Distance
From T ransmitting
Antenna
SAFETY AND
WARRANTY
45
English
Page 51

Mobile Antenna Installation
Install the vehicle antenna
external
to the
vehicle and in accordance with:
• The requirements of the antenna
manufacturer/supplier
• Instructions in the Radio Installation Manual
CONTROL STATION OPERATION
When radio equipment is used to operate as a
control station, it is important that the antenna
be installed outside the building and awa y from
places where people may be in close proximity.
LIMITED WARRANTY
MOTOROLA COMMUNICATION PRODUCTS
I. WHAT THIS WARRANTY COVERS AND
FOR HOW LONG:
MOTOROLA INC. (“MOTOROLA”) warrants the
MOTOROLA manufactured Communication
Products listed below (“Product”) against defects
in material and workmanship under normal use
and service for a period of time from the date of
purchase as scheduled below:
PRO7100 Mobile Units Two (2) Years
Product Accessories One (1) Year
WARRANTY
SAFETY AND
English
Note: Refer to Table 1 on page 45 for rated
power and minimum distant values for
transmitting antennas.
46
Motorola, at its option, will at no charge either
repair the Product (with new or reconditioned
parts), replace it (with a new or reconditioned
Product), or refund the purchase price of the
Product during the warranty period provided it is
returned in accordance with the terms of this
warranty. Replaced parts or boards are
warranted for the balance of the original
applicable warranty period. All replaced parts of
Product shall become the property of
MOTOROLA.
Page 52

This express limited warranty is extended by
MOTOROLA to the original end user purchaser
only and is not assignable or transferable to any
other party. This is the complete warranty for the
Product manufactured by MOTOROLA.
MOTOROLA assumes no obligations or liability
for additions or modifications to this warranty
unless made in writing and signed by an officer
of MOTOROLA. Unless made in a separate
agreement between MOTOROLA and the
original end user purchaser, MOTOROLA does
not warrant the installation, maintenance or
service of the Product.
MOTOROLA cannot be responsible in any way
for any ancillary equipment not furnished by
MOTOROLA which is attached to or used in
connection with the Product, or for operation of
the Product with any ancillary equipment, and all
such equipment is expressly excluded from this
warranty. Because each system which may use
the Product is unique, MOTOROLA disclaims
liability for range, coverage, or operation of the
system as a whole under this warranty.
II. GENERAL PROVISIONS:
This warranty sets forth the full extent of
MOTOROLA's responsibilities regarding the
Product. Repair, replacement or refund of the
purchase price, at MOTOROLA’s option, is the
exclusive remedy. THIS WARRANTY IS GIVEN
IN LIEU OF ALL OTHER EXPRESS
WARRANTIES. IMPLIED WARRANTIES,
INCLUDING WITHOUT LIMITATION, IMPLIED
WARRANTIES OF MERCHANTABILITY AND
FITNESS FOR A PARTICULAR PURPOSE,
ARE LIMITED TO THE DURATION OF THIS
LIMITED WARRANTY. IN NO EVENT SHALL
MOTOROLA BE LIABLE FOR DAMAGES IN
EXCESS OF THE PURCHASE PRICE OF THE
PRODUCT, FOR ANY LOSS OF USE, LOSS OF
TIME, INCONVENIENCE, COMMERCIAL
LOSS, LOST PROFITS OR SAVINGS OR
OTHER INCIDENTAL, SPECIAL OR
CONSEQUENTIAL DAMAGES ARISING OUT
OF THE USE OR INABILITY TO USE SUCH
PRODUCT, TO THE FULL EXTENT SUCH MAY
BE DISCLAIMED BY LAW.
SAFETY AND
WARRANTY
47
English
Page 53

WARRANTY
SAFETY AND
III. HOW TO GET WARRANTY SERVICE:
You must provide proof of purchase (bearing the
date of purchase and Product item serial number)
in order to receive warranty service and, also,
deliver or send the Product item, transportation
and insurance prepaid, to an authorized warranty
service location. Warranty service will be
provided by Motorola through one of its
authorized warranty service locations. If you first
contact the company which sold you the Product
(e.g., dealer or communication service provider),
it can facilitate your obtaining warranty service.
IV . WHAT THIS W ARRANTY DOES
NOT COVER:
A Defects or damage resulting from use of the
Product in other than its normal and
customary manner.
B Defects or damage from misuse, accident,
water, or neglect.
C Defects or damage from improper testing,
operation, maintenance, installation,
alteration, modification, or adjustment.
D Breakage or damage to antennas unless
caused directly by defects in material
workmanship.
E A Product subjected to unauthorized
Product modifications, disassemblies or
repairs (including, without limitation, the
addition to the Product of non-Motorola
supplied equipment) which adversely affect
performance of the Product or interfere with
Motorola's normal warranty inspection and
testing of the Product to verify any warranty
claim.
F Product which has had the serial number
removed or made illegible.
G Freight costs to the repair depot.
H A Product which, due to illegal or
unauthorized alteration of the software/
firmware in the Product, does not function in
accordance with MOTOROLA’s published
specifications or the FCC type acceptance
labeling in effect for the Product at the time
the Product was initially distributed from
MOTOROLA.
I Scratches or other cosmetic damage to
Product surfaces that does not affect the
operation of the Product.
J Normal and customary wear and tear.
English
48
Page 54

V. PATENT AND SOFTWARE PRO VISIONS:
MOTOROLA will defend, at its own expense, any
suit brought against the end user purchaser to the
extent that it is based on a claim that the Product
or parts infringe a United States patent, and
MOTOROLA will pay those costs and damages
finally awarded against the end user purchaser in
any such suit which are attributable to any such
claim, but such defense and payments are
conditioned on the following:
A that MOTOROLA will be notified promptly in
writing by such purchaser of any notice of
such claim;
B that MOTOROLA will have sole control of the
defense of such suit and all negotiations for
its settlement or compromise; and
C should the Product or parts become, or in
MOTOROLA’s opinion be likely to become,
the subject of a claim of infringement of a
United States patent, that such purchaser will
permit MOTOROLA, at its option and
expense, either to procure f or such purchaser
the right to continue using the Product or
parts or to replace or modify the same so that
it becomes non-infringing or to grant such
purchaser a credit for the Product or parts as
depreciated and accept its return. The
depreciation will be an equal amount per year
over the lifetime of the Product or parts as
established by MOTOROLA.
MOTOROLA will have no liability with respect to
any claim of patent infringement which is based
upon the combination of the Product or parts
furnished hereunder with software, apparatus or
devices not furnished by MOTOROLA, nor will
MOTOROLA have any liability for the use of
ancillary equipment or software not furnished by
MOTOROLA which is attached to or used in
connection with the Product. The foregoing states
the entire liability of MOTOROLA with respect to
infringement of patents by the Product or any
parts thereof.
Laws in the United States and other countries
preserve for MOTOROLA certain exclusive rights
for copyrighted MO T OROLA software such as the
exclusive rights to reproduce in copies and
distribute copies of such Motorola software.
MOTOROLA software may be used in only the
Product in which the software was originally
embodied and such software in such Product
may not be replaced, copied, distributed,
modified in any way, or used to produce any
derivative thereof. No other use including, without
limitation, alteration, modification, reproduction,
distribution, or reverse engineering of such
MOTOROLA software or exercise of rights in
such MOTOROLA software is permitted. No
SAFETY AND
WARRANTY
49
English
Page 55

license is granted by implication, estoppel or
otherwise under MOTOROLA patent rights or
copyrights.
VI. GOVERNING LAW:
This Warranty is governed by the laws of the
State of Illinois, USA.
WARRANTY
SAFETY AND
English
50
Page 56
ACCESSORIES
Motorola offers a number of accessories to
enhance the productivity of your two-wa y radio .
Many of the available accessories are listed
below. For a complete list, see your Motorola
dealer.
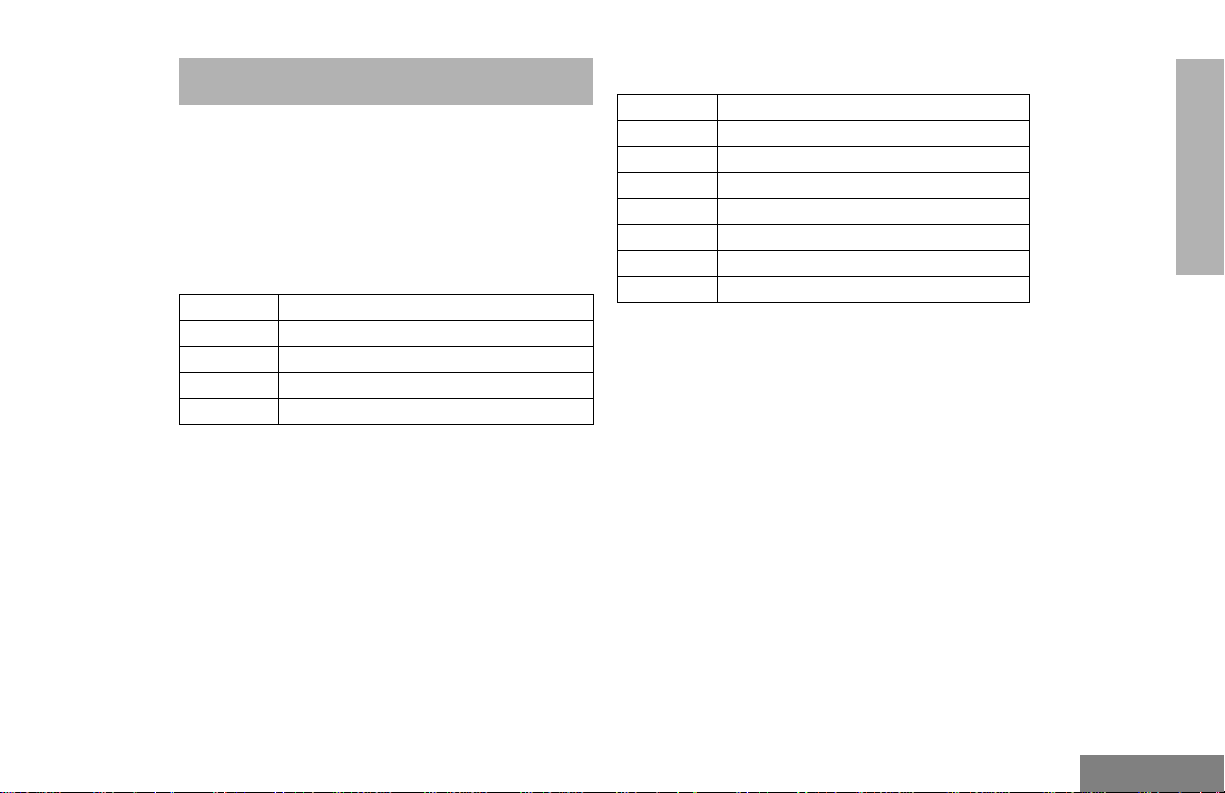
AUDIO
RMN4025 Compact Remote Speaker Microphone
RMN4026 Enhanced Keypad Microphone
RMN4038 Heavy Duty Microphone
RSN4001 External Speaker 13W
HSN8145 External Speaker 7.5W
MOUNTING
ACCESSORIES
GLN7324 Low Profile Trunnion
RLN4780 High Profile Trunnion
HLN8097‘ Removable Slide Mount
RLN4779 Key Lock Mount
RLN4782 DIN Mounting Kit (in dash)
RKN4077 Remote Mount Cable - 3 m
RKN4078 Remote Mount Cable - 5 m
RKN4079 Remote Mount Cable - 7 m
51
English
Page 57
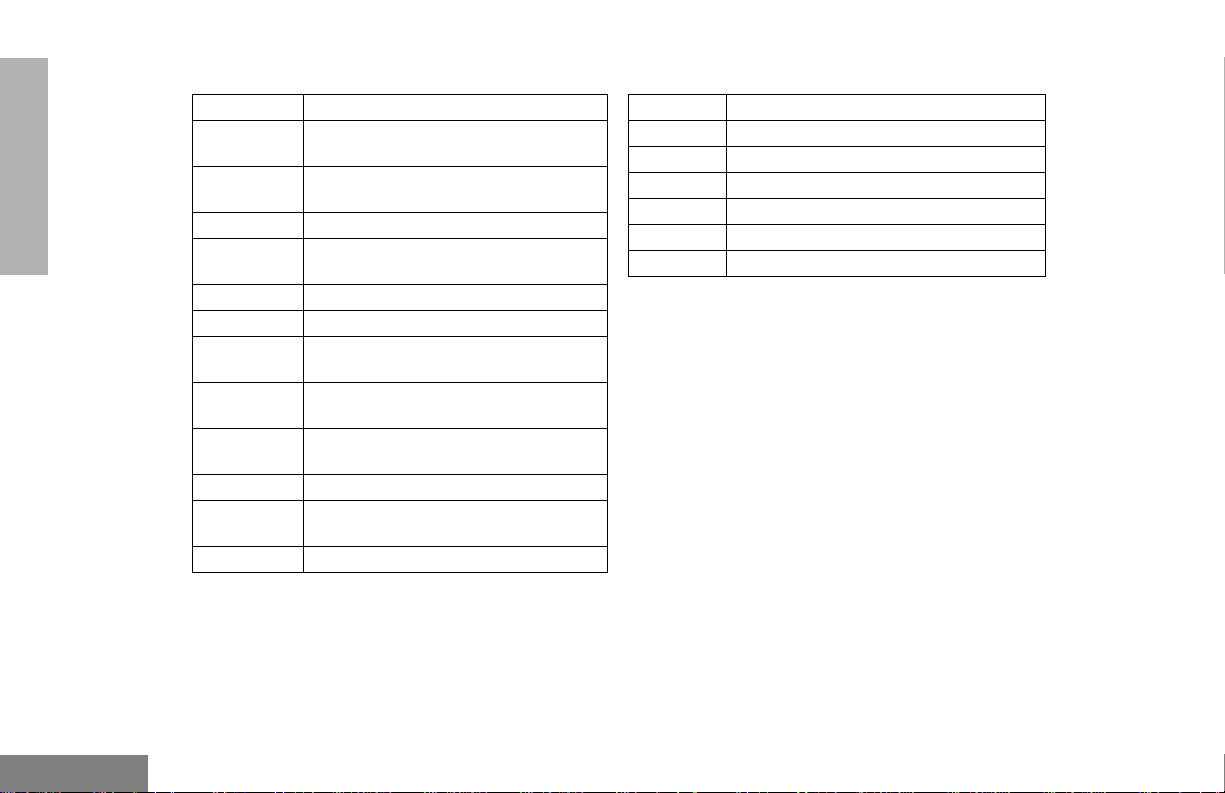
ANTENNAS CONTROL STATION
ACCESSORIES
HAD4006A VHF 136-144 MHz, 1/4 Wave Roof Mount
HAD4007A VHF 146-150.8 MHz, 1/4 Wave Roof
Mount
HAD4008A VHF 150.8-162 MHz, 1/4 Wave Roof
Mount
HAD4009A VHF 162-174 MHz, 1/4 Wave Roof Mount
HAD4014A VHF 146-172 MHz, 3.0dB Gain Roof
Mount
HAE4002A UHF 403-430 MHz, 1/4 Wav e Roof Mount
HAE4003A UHF 450-470 MHz, 1/4 Wav e Roof Mount
HAE4010A UHF 406-420 MHz, 3.5dB Gain Roof
Mount
HAE4011A UHF 450-470 MHz, 3.5dB Gain Roof
Mount
HAE4019A UHF 450-470 MHz, 5dB Gain Roof
Mount
HAE4004A UHF 470-512 MHz, 1/4 Wav e Roof Mount
HAE4012A UHF 470-494 MHz, 3.5dB Gain Roof
Mount
09-02105F01 BNC Connector
GPN6145 Desktop Power Supply 1-25W (EMC)
HPN4002 Desktop Power Supply 1-25W
GPN6149 Desktop Power Supply 25-45W (EMC)
HPN4001 Desktop Power Supply 25-45W
RMN4030 Desktop Microphone
GLN7318 Desktop Tray without Speaker
GLN7326 Desktop Tray with Speaker
Note: A variety of interchangeable buttons
are available for use in the P1-P4
locations on your radio (page 1). See
your dealer for further details.
English
52
Page 58
Sending a Call
1. Turn radio on and select appropriate zone and channel.
2. Press PTT, hold the microphone 1 to 2 inches (2.5 to 5 cm) from your mouth,
and speak clearly into it.
3. Release PTT to listen.
Receiving a Call
1. Turn radio on and adjust volume to the desired level.
2. Select desired channel.
3. To respond to an incoming call, press PTT, hold the microphone 1 to 2 inches
(2.5 to 5 cm) from your mouth, and speak clearly into it.
Deleting a Nuisance Channel During Scanning
1. While radio is on a nuisance channel, hold down preprogrammed Scan button
until you hear a tone.
2. Release Scan button.
Making a Phone Call
1. Press Phone button, or select Phone from the menu.
2. If access code is not displayed, send access code if required.
3. Send phone number in one of the following ways:
• Press and release PTT to send last dialed number.
—or—
• when using an enhanced keypad microphone only, press preprogrammed
Speed Dial button, followed by a keypad key (1–8), to access first nine
numbers in your phone list. (Press PTT if buffered dial.)
—or—
• when using an enhanced keypad microphone only, enter phone number
using the keypad. (Press PTT if buffered dial.)
4. Press PTT, hold the microphone 1 to 2 inches (2.5 to 5 cm) from your mouth,
and speak clearly into it.
Ending a Phone Call
1. Send deaccess code if required.
2. Press preprogrammed Phone button, or press (.
Sending and Cancelling an Emergency Alert
• To activate
• To cancel, press and hold down Emergency button
Emergency Alert
., press preprogrammed Emergency button.
.
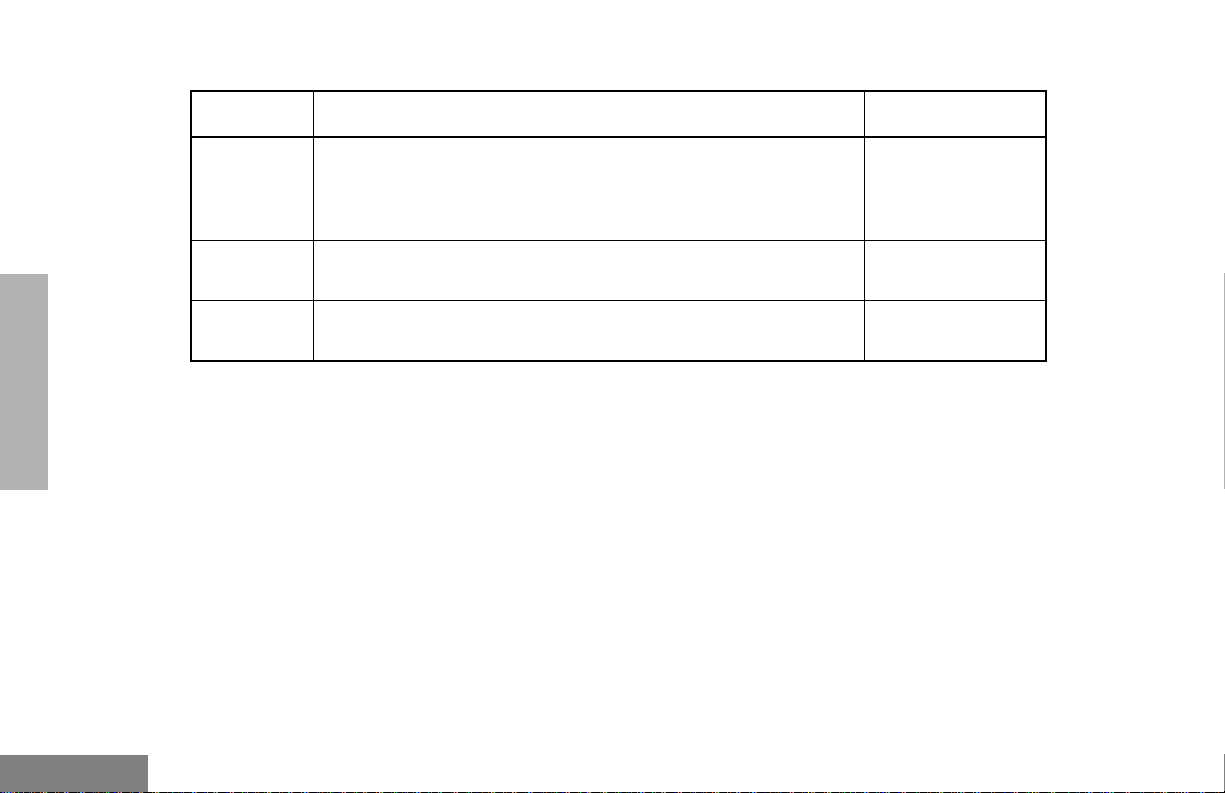
PRO7100™ Quick Reference Card
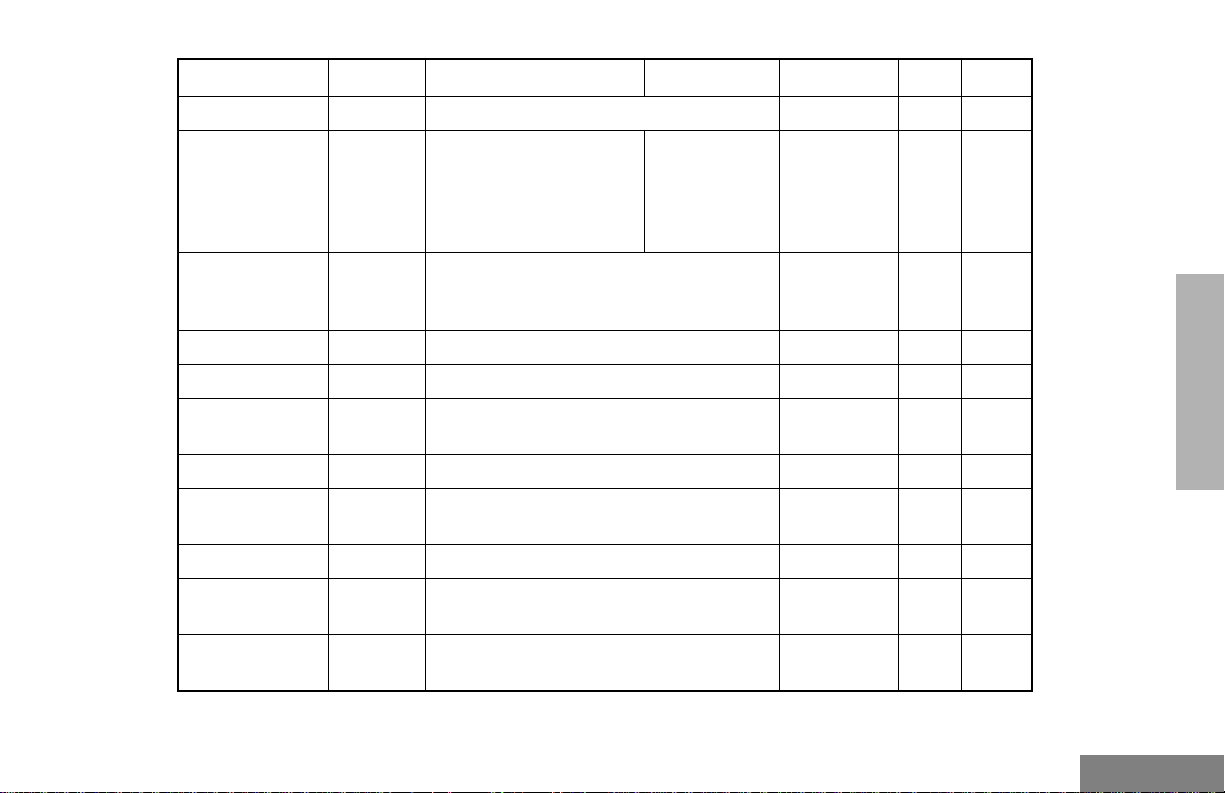
Record the functions for your radio’s programmable buttons in the table
provided below . For further information, see page 4 of this User Guide.
Red/Yellow/Green
LED Indicators
On/Off/Volume
Knob
Microphone
Jack
Programmable
Button 1 (P1)
(Interchangeable)
LCD Screen
Programmable
Button 2 (P2)
(Interchangeable)
Button Function Short Press Long Press Hold Down Page
Channel Selector/
Menu Navigation Buttons
(Up/Down)
Menu Exit/Escape
Button
Menu Enter/Select
Button
Editing
Buttons
(Left/Right)
Programmable
Button 3 (P3)
(Interchangeable)
Programmable
Button 4 (P4)
(Interchangeable)
Page 59
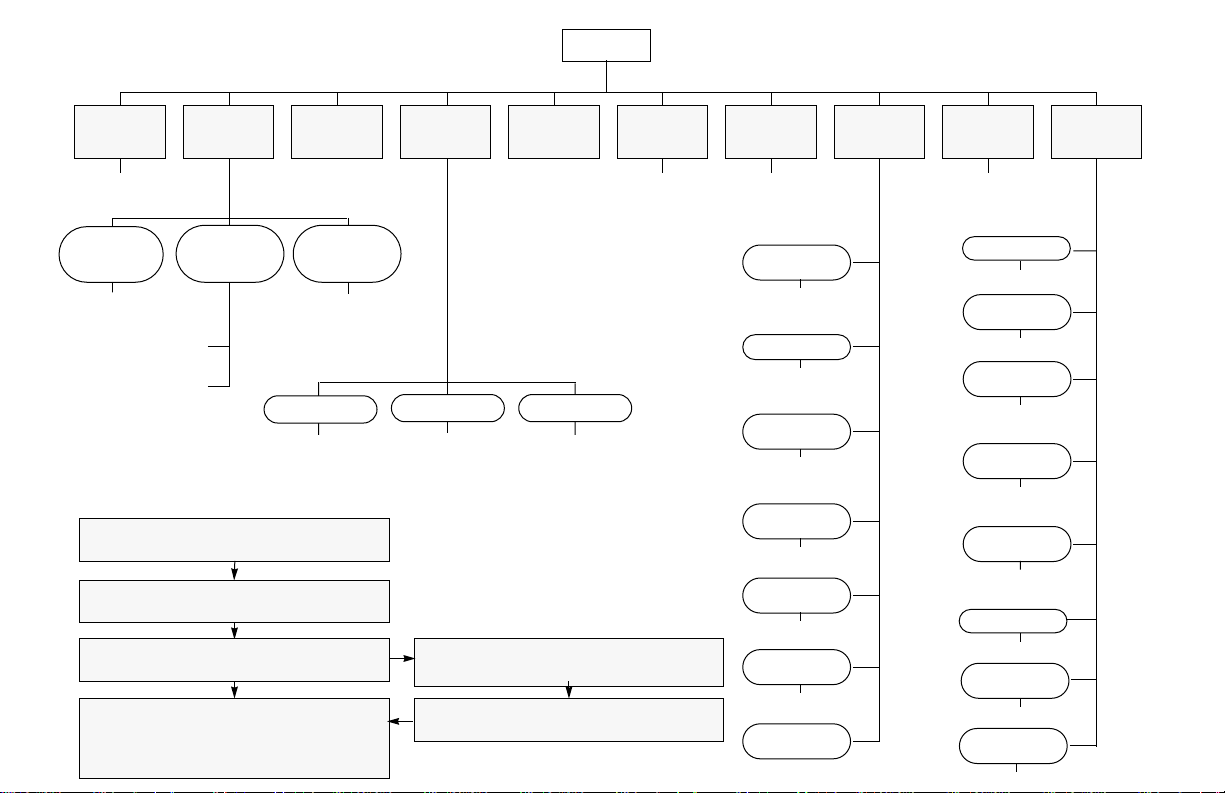
Menu Navigation Chart
(Refer to Menu Navigation guidelines—
lower, left-hand corner of this page)
)
yz
System
Scan
(p. 25)
yz
on/off
RadioCall
List
(p. 20)
edit entry
add/delete
Program
Lists
yz
Scan List
(p. 26)
entry
edit
priority
Phone
(p. 31)
Phone List
(p. 32)
all/delete/edit
entry/edit
codes
Selective Call
select/
enter ID
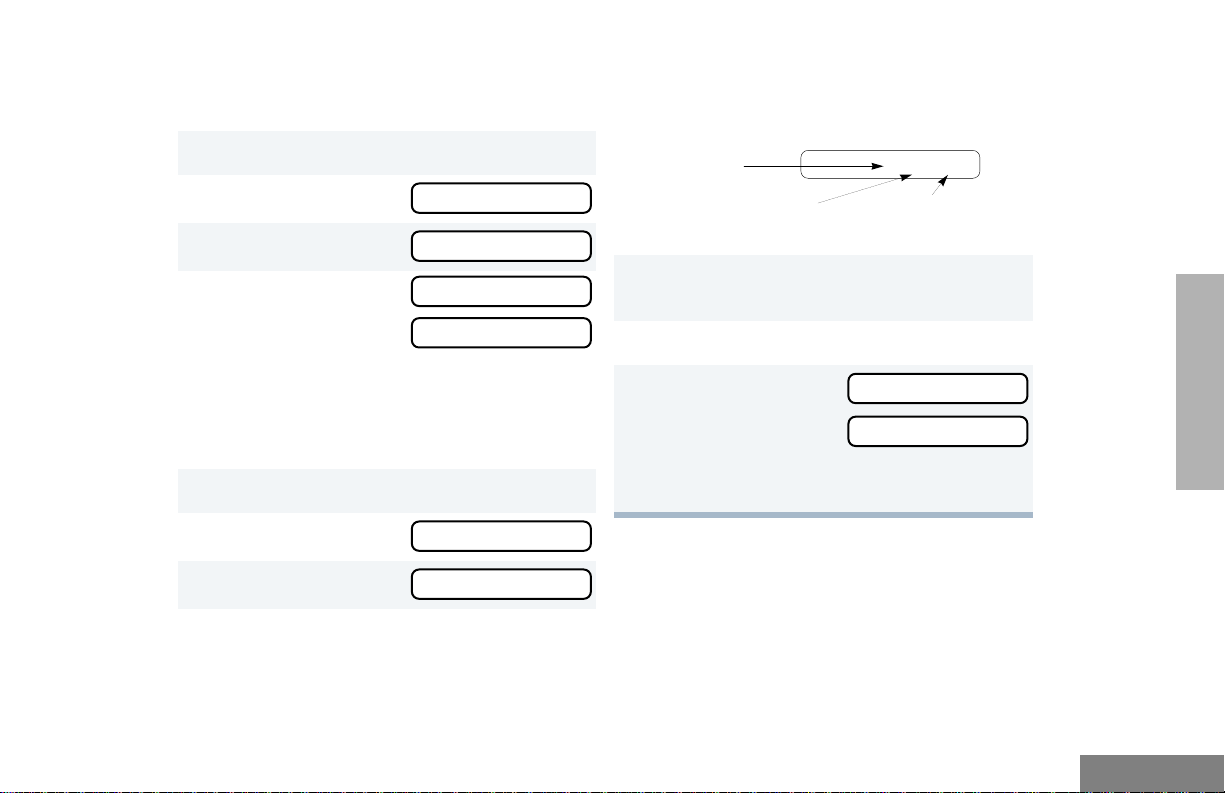
Menu Navigation
) to enter Menu Mode.
y or z to scroll through the list.
) to select Menu item.
( to return to previous menu level
or
—
—
Hold down ( to exit Menu Mode.
Radio
Call
(p. 15)
yz yz yz yz
Call Alert Radio Check
select/
enter ID
y or z to scroll through
) to select sub-menu item.
Zone
(p. 12)
select/
enter ID
sub-list.
Message
select/
select/
enter ID
enter ID
StatusMessage
select/
enter ID
Power
Level
high/low/
auto
Clock
display/
set time
Reminder
Alarm
on/off/
set time
Language
Select
select
Option
Board
on/off
Light
Disable
on/off
Software
Ver #
Utilities
(p. 39)
Rptr/
Talkarnd
(p. 21)
repeater mode/
talkarnd mode
Alert Vol Lvl
on/off
Tone
Disable
on/off
Name Tone
Tag
standard/alert
#1 - #7
Message
Tone/T ag
standard/alert
#1 - #7
Call Tone
Tag
standard/alert
#1 - #7
Escalert
on/off
Companding
on/off
Keypad
Tones
on/off
Audio/
Tones
(p. 37)
Page 60
C
A, Motorola, Radios Profesionales, Serie PRO, PRO7100, Tan Dedicado
Como Lo Es Usted, y Call Alert son marcas de Motorola, Inc.
© 1999 Motorola, Inc. Todos los derechos reservados. Impreso en los
EE.UU.
A, Motorola, R‡dios Profissionais, SŽrie PRO, PRO7100, T‹o Dedicado
Quanto ƒ Voc•, e Call Alert s‹o marcas da Motorola, Inc.
© 1999 Motorola, Inc. Todos os direitos reservados. Impresso nos EUA.
A, Motorola, Professional Radio, PRO Series, PRO7100, As Dedicated As
You Are, and Call Alert are trademarks of Motorola, Inc.
© 1999 Motorola, Inc. All rights reserved. Printed in U.S.A.
*6881091C59*
68P81091C59-0
contacto
control
 Loading...