

Page 1
User Guide
Page 2
Contents
Check it out
Get Started
First look
Insert the SIM and microSD cards
Charge up & power on
Sign in
Connect to Wi-Fi
Navigate your phone
Improve battery life
Learn the basics
Home screen
Help & more
Search
Notifications
Status icons
Volume
Do not disturb
Lock screen
Quick settings
Speak
Direct Share
Picture-in-Picture
Customize your phone
Redecorate your home screen
Choose apps & widgets
Customize sounds & appearance
Discover Moto
Digital wellbeing and parental controls
Apps
Phone
Messages
Chrome™
Camera
Photos
Gmail
Duo
Moto
Calendar
More apps
Google Play
Contacts
Maps
Check it out
Drive
Music, movies, TV & YouTube
Clock
Connect, share & sync
Connect with Wi-Fi
Connect with Bluetooth wireless
Share files with your computer
Share your data connection
Connect with NFC
Print
Sync to the cloud
Use a memory card
Airplane mode
Mobile network
Protect your phone
Screen lock
Your privacy
Screen pinning
Backup & restore
App safety
Data usage
Troubleshoot your phone
Restart or remove an app
Restart your phone
Check for software update
Reset
Stolen phone
Accessibility
Create a shortcut
Make your phone speak
Speak to your phone
Change your phone’s display
Change your phone’s sounds
Get more help
Where is my legal, safety, & regulatory
information?
Service & repairs
Copyright & trademarks
Check it out
When you’re up and running, explore what your phone can do.
Topic Location
Find these fast: Wi-Fi, airplane mode,
flashlight, and more.
Choose new wallpaper, set ringtones, and
add widgets.
Experience crisp, clear photos, movies,
and videos.
Customize your phone to match the way
you use it.
Browse, shop, and download apps.
Keep your info safe. Set up your password
and more.
Ask questions, get answers.
Share your Internet connection.
Tip: View all of these topics on your phone, swipe up
tap
support.
This product meets the applicable national or international RF exposure
considerable safety margin designed to assure the safety of all persons, regardless of
age and health.
Caution: Before using your phone, please read the Legal information. Swipe up
Settings > About phone > Legal information.
Quick settings
Customize your phone
Camera
Moto
Apps
Protect your phone
Speak
Wi-Fi hotspot
from the home screen and
Settings > Help. For FAQs and other phone support, visit www.motorola.com/
guidance (SAR guideline) when used normally against your head or, when worn
or carried, at a distance of 5 mm from the body. The SAR guideline includes a
>
Page 3

Get Started
First look
Let’s get started. We’ll guide you through startup and tell you a bit about your phone’s
features.
Headset Jack
Ultra-wide
Camera
Flash
Laser
Autofocus
Sensor
Main
Camera
Fingerprint
Sensor/
Notification
Light
SIM &
microSD
Card
Slots
Front
Camera
Volume
Buttons
Power
Button
Power button
Your Power button helps in a few ways.
» Power on/o: Press and hold the Power button, then tap Power o. When your
phone is o, press and hold the Power button to turn it on.
» Sleep/Wake up: To conserve battery power and prevent accidental touches, put the
touchscreen to sleep by pressing the Power button. Press it again to wake it up.
» Restart: To restart your phone, press and hold the Power button, then tap Restart.
Tip: To add security to your phone, see Protect your phone.
Volume buttons
To turn volume up or down:
» Ringer volume: Press the buttons when your phone is not ringing. Press the buttons
when your phone is ringing to silence a call.
» Earpiece volume: Press the buttons during a call.
» Music/video volume: Press the buttons during a song or video.
Tip: For more on volume control, see Volume.
Phone hardware buttons: top right are Volume up and down keys, middle right is Power button. Bottom middle is charging port. Top right is headset jack. On screen.
USB-C/Charger
Note: Certain apps and features may not be available in all countries.
Get Started
Page 4
Insert the SIM and microSD cards
Nano SIM
1
2
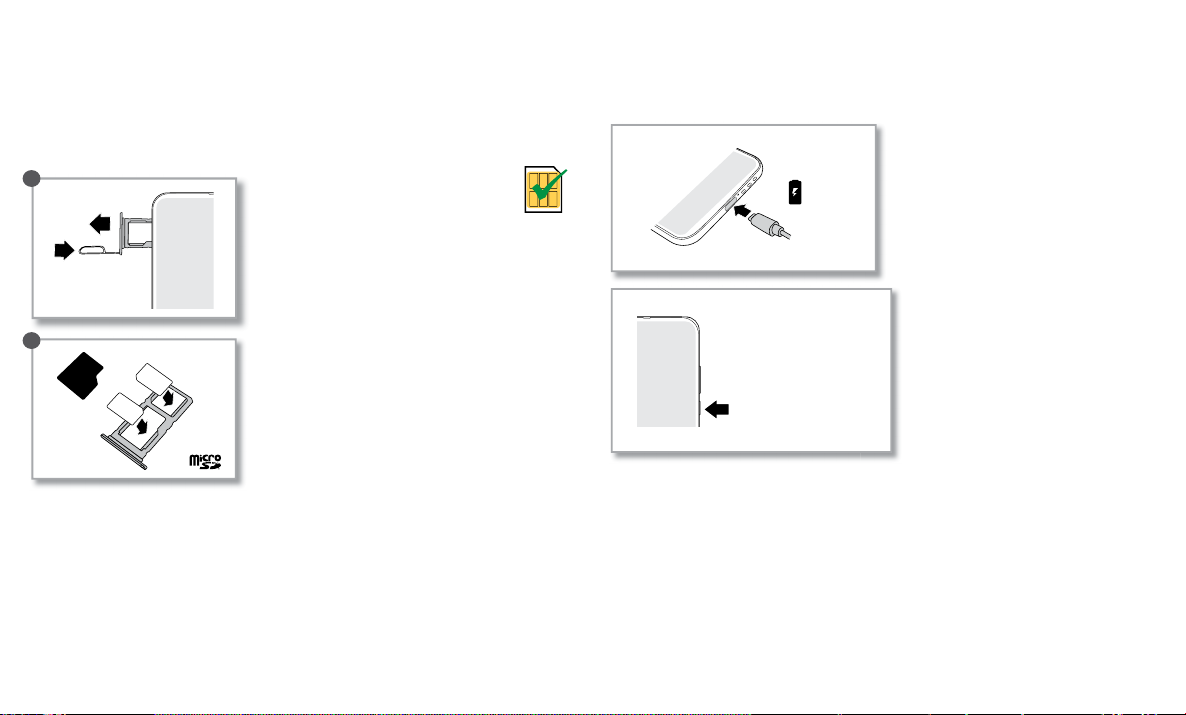
To activate phone service, you might need to insert a SIM card (or two), or this may
have been done for you. You can also add a microSD card, which is optional and sold
separately.
Put in the cards
Caution: Make sure you use the correct size SIM card and don’t cut the SIM card.
1
2
SIM1
or
SIM card insert graphic. The SIM card is inserted in the slot on the left with the clipped corner to the upper left.
SIM2
Charge up & power on
Press and hold the Power button, then follow the prompts to get started.
Note: Your phone supports charging speeds up to 45W when used with a 45W AC
charger and a 5A C2C cable that comply with USB PD 3.0 (PPS).
Charge up.
USB-C
Power on.
Press and hold to turn the
power on/off. Press to turn
the screen on/off.
Charge up and power on graphic. After you charge the phone, press and hold the Power button until the screen lights up.
Get Started
Page 5
Sign in
If you use Gmail™, you already have a Google™ account—if not, you can create an
account during setup. Signing into your Google account lets you access, sync, and
backup your stu. You can see your Google apps, contacts, calendar, photos, and more.
Tips
» To add, edit, or delete accounts, swipe up > Settings > Accounts.
» To set up email accounts, see Gmail.
» For help with your Google account, visit www.google.com/accounts.
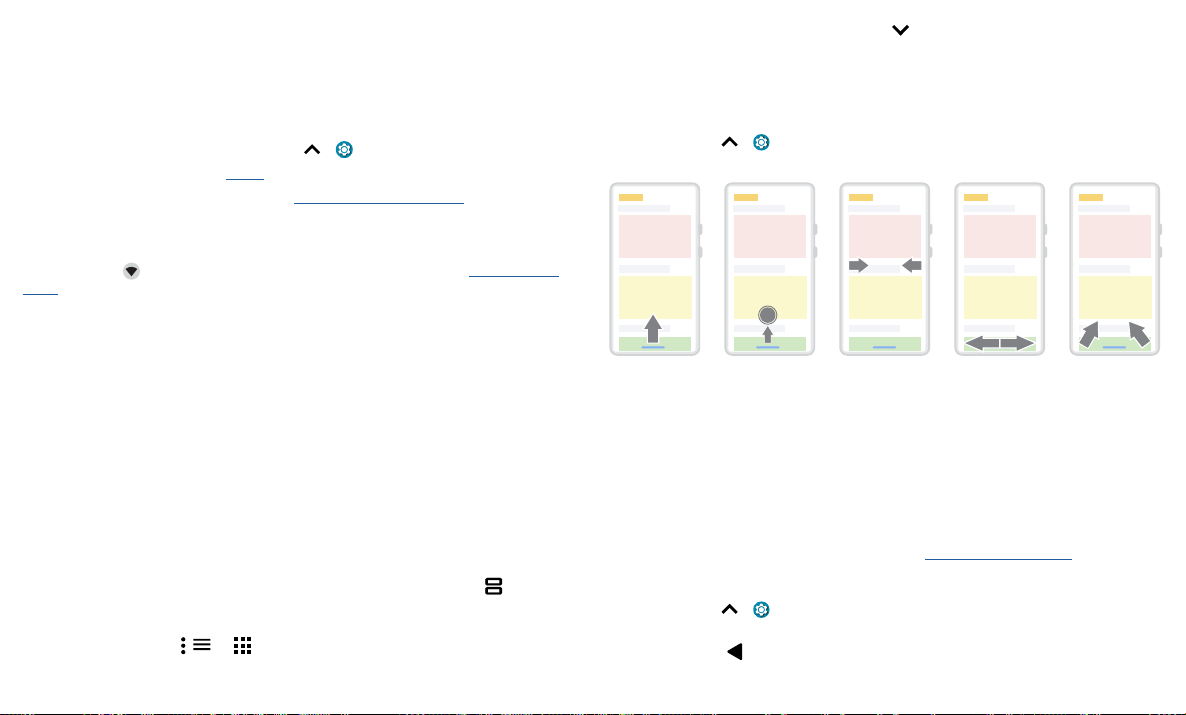
System navigation
Navigate using either gestures or buttons on the screen.
Navigation bar
Find it: Swipe up > Settings > System > Gestures > System navigation > Gesture
navigation
Connect to Wi-Fi
For faster Internet access and to conserve mobile data use, swipe the status bar down.
Touch and hold
Wi-Fi.
Note: This phone supports apps and services that may use a lot of data, so make sure
your data plan meets your needs. Contact your service provider for details.
Navigate your phone
Explore by touch
Find your way around:
» Tap: Choose an icon or option.
» Touch and hold: See more options.
» Drag: Move items on the home screen.
» Swipe: Scroll through lists or between screens.
» Pinch or double-tap: Zoom in and out on websites, photos, and maps.
» Twist: Twist a map with two fingers to rotate it, and pull two fingers down to tilt it.
» Split screen: In Recents, tap the icon at the top of the screen, then tap Split
screen. Not all apps will work in split screen. To close the split screen, drag the
dividing line to the bottom of the screen.
» Menus: When you see , , or , you can tap it to open options for the current
screen.
Get Started
to choose a Wi-Fi network. For full instructions, see Connect with
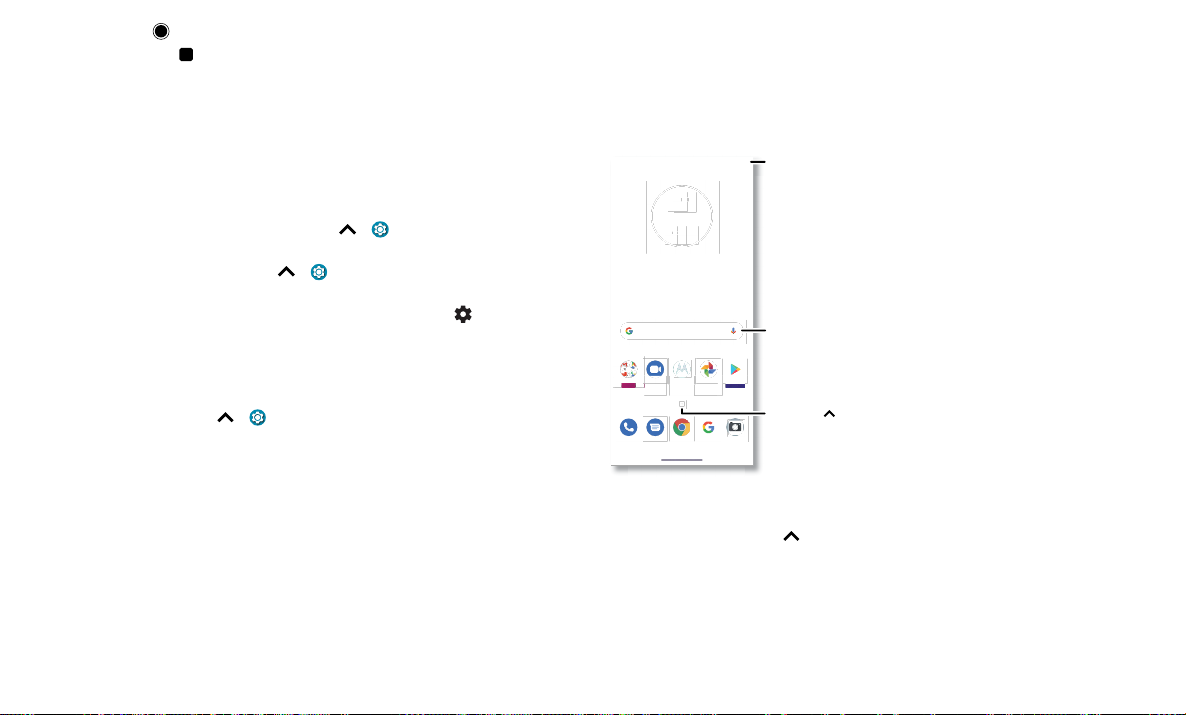
To go to the Home
Navigation bar. To go to the home screen, swipe up from the bottom of the screen. To see your recent apps, swipe up from the bottom and hold. To go back a screen, swipe toward the middle from the left or right edge.
To switch between apps, swipe left or right at the bottom. To launch Google Assistant, swipe up diagonally from a bottom corner.
Navigation buttons
Find it: Swipe up > Settings > System > Gestures > System navigation >
3-button navigation
» Close Keyboard: To close a keyboard, tap .
screen, swipe up
from the bottom
of the screen.
To see your recent
apps, swipe up
from the bottom
and hold.
To go back a
screen, swipe
toward the middle
from the left or
right edge.
To switch between
apps, swipe left or
right at the
bottom.
To launch Google
Assistant, swipe up
diagonally from a
bottom corner.
» Home: Swipe up from the bottom of the screen.
» Recents: Swipe up from the bottom of the screen and hold. Tap an app to reopen it.
Tap the app icon to see app info or split the screen.
» Back: Swipe toward the middle of the screen from the left or right edge.
» Google Assistant: Swipe up diagonally from the bottom corner of the screen to
launch the Google Assistant. Learn more about The Google Assistant™.
» Back: Tap Back to go to the previous screen.
Page 6
» Home: Tap Home to return to the home screen.
°
R
Swipe down for
» Recents: Tap Recents to see your recent apps (or browser tabs), and tap an app
to reopen it. Double tap to quickly switch between your recent apps. To remove an
app from the recent list, swipe it up. To scroll the list, swipe right or left.
Improve battery life
Your phone processes tons of information. Depending on what apps are in use, your
phone may use a lot of power.
When your phone is stationary, not charging, or not in use for a period of time,
unnecessary background processes are shut down to optimize battery life.
» To see what’s using up battery power, swipe up > Settings > Battery > USAGE
DETAILS.
» To help improve battery life, swipe up > Settings > Battery > Battery saver,
and turn it on.
Tip: To quickly open Settings, swipe down on the status bar and tap
Battery Tips
To save even more battery life between charges, you could reduce:
» Widgets that stream information to your home screen, like news or weather.
» Unused accounts: Swipe up > Settings > Accounts.
» Recording or streaming videos or music.
Learn the basics
.
Learn the basics
Home screen
The home screen is what you see when you turn on your phone. From here you can
explore apps and more.
Note: Software updates may change the look of your home screen.
11:35
73°73
11:35
APR
TUE
3
3
MotoDuo
GoogleGoogle
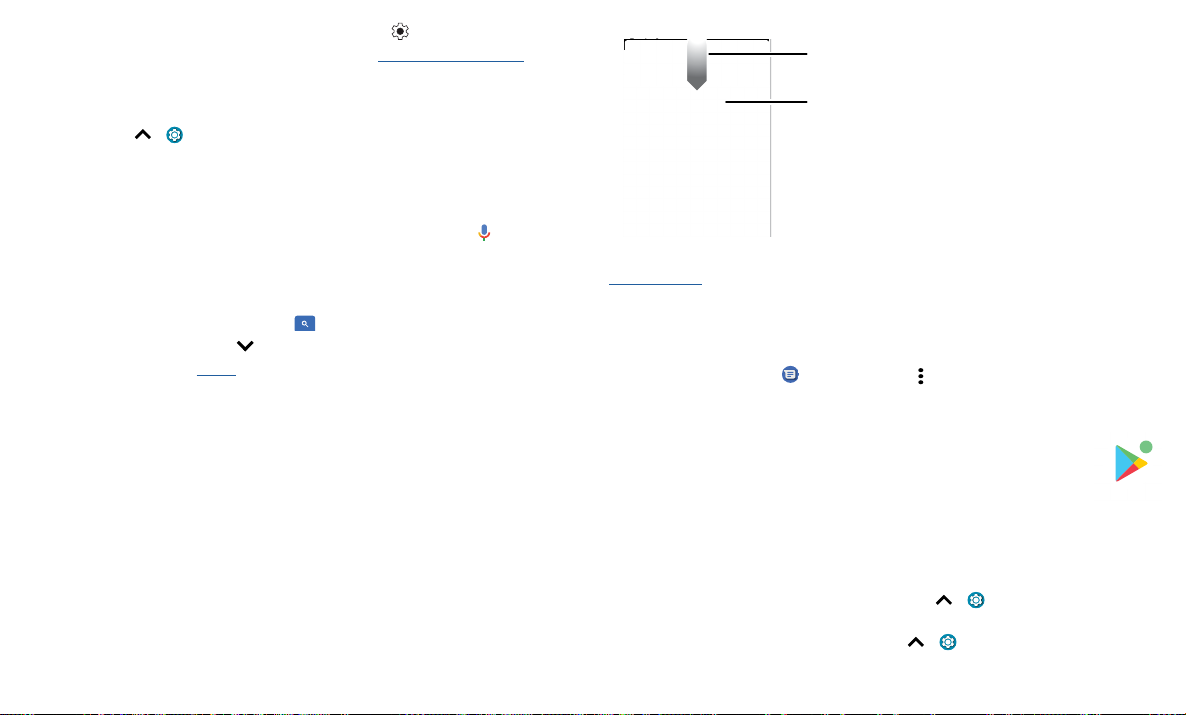
Home screen. In the middle, tap the Google bar to type search options or tap the right hand microphone icon to speak a search. Icons at the top show notifications and phone status icons. Swipe up from center bottom to
get to your apps. App icons along the bottom are commonly used apps: phone, message, Google Chrome, Gallery, and camera.
Photos
Tips
» Open app list: Swipe up to see all your apps.
» Return home: To return to the home screen from any location, swipe up from the
navigation bar.
» Pages: To add a page, drag an app to the right side of the screen until you see a new
page. You can add multiple pages. To see other pages of shortcuts and widgets (if
available), swipe the home screen left.
» Settings: To quickly open common settings, swipe the status bar down. To open
Play Store
notifications and
settings.
Search by typing or
say "Hey Google.”
Swipe up to see
all your apps.
Page 7
more settings, swipe the status bar down again and tap .
T
3
» Customization: To personalize your home screen, see Customize your phone.
Help & more
Learn even more about your phone and get support.
Find it: Swipe up
> Settings > Help
Tip: Some apps have their own help that’s specific to their features. Just tap the menu
inside the app for details.
Search
On the home screen, tap the Google Search box for a text search or tap to search by
voice.
When you type, suggestions appear below the search field:
» To search for a suggestion, tap it.
» To search for text in the search field, tap on the keyboard.
Tip: To close the keyboard, tap .
Note: For voice search, see Speak.
Notifications
At the top of the screen, icons on the left notify you about new messages or events. If
you don’t know what an icon means, swipe the status bar down for details.
Tip: Getting too many notifications? Touch and hold a notification to see which app is
sending them to you. Then you can turn them o.
Learn the basics
ue, Apr
Wed, Dec 4
Android Setup
Finish setting up your phone.
FINISH SETUP
Drive · Anna Pics
1 file uploaded.
Vacation.png
Google · 27°
Manage notifications Clear all
Notifications screen. Swipe down from the top of the home screen to view notifications.
Swipe down to see
your notifications.
Tap a notification to open it,
or choose an option, such as
REPLY.
Tip: Swipe left or right to
remove a notification. Some
notifications show more options when you slide them
halfway.
Tip: To quickly change common settings, swipe the status bar down. For more, see
Quick settings.
Smart reply
See suggestions based on notification content. For example, a text with an address may
show Google Maps as an option.
To turn o Smart reply, tap
Messages > Menu > Settings > Suggestions in chat >
Smart Reply.
App notifications
You may see a notification dot on an app. This app notification, or badge,
tells you the app has an update or an announcement, such as a new email or
a missed call. Touch and hold the app for more information, options, or app
shortcuts.
Notification light (Fingerprint sensor)
Your fingerprint sensor lights up to notify you of incoming calls and messages, as well
as alarms and emergency alerts. It also lights up when you power on and charge.
To define when the notification light is on, swipe up
> Lights.
To change the brightness of the light, swipe up
Lights > Brightness.
> Settings > Sound & lights
> Settings > Sound & lights >
Page 8
Wireless Emergency Alerts (U.S. & some countries)
A
LERTS
WIRELESS
CAPABLE
EMERGENCY
TM
Wireless Emergency Alerts, also known as CMAS or PLAN,
is a U.S. national emergency alert system. Emergency alerts
can pop up to tell you about a national or local crisis. After
you close an alert, you can reopen it by swiping up
Settings > Apps & notifications > Advanced > Wireless
emergency alerts.
Tip: Emergency alerts have a special sound and vibration that is two seconds long,
followed by one second, then another one second.
To choose which types of alerts you receive, swipe up
notifications > Advanced >Wireless emergency alerts. The U.S. and local governments
send these alerts through your service provider. So you will always receive alerts for the
area where you are, and you won’t receive alerts if you’re outside of the U.S.
For more, visit www.ctia.org and search “wireless emergency alerts.”
>
> Settings > Apps &
Status icons
Icons at the top of the screen tell you about phone status:
Status Icons
Network strength Do not disturb
/ Wi-Fi in range/connected Alarm set
/ Bluetooth on/connected
Airplane mode / Battery charging/full
Data Saver on
Volume
Press the side volume buttons up or down to select a ringer volume and see other
controls.
Mute the ringer
or set phone to
vibrate.
Slide the bar to
increase/decrease volume.
Mute the media player.
Show all volume
Volume screen. Press the Volume keys up or down to control the volume for Ring Notification, Media, and Alarm sounds. On screen, change the volume using slide bars.
controls.
Do not disturb
To turn o some or all sounds, swipe the status bar down, and touch and hold Do
not disturb. Select an option:
» See all exceptions: Select whether to hear alarms, media, or touch sounds.
» Restrict notifications: Set if you’d like to see notifications when Do not disturb mode
is on.
» Schedules: Turn on Do not disturb at specific times during the day or night, or sync
with your calendar.
Tip: Create an exception for repeat callers that allows a call to sound from the same
person within a 15 minute period, tap Calls > Allow repeat callers.
Learn the basics
Page 9
Lock screen
11:35
Tue, 3 April
Your touchscreen is on when you need it and o when you don’t.
11:35
Tue, 3 April
Thanks for finding my phone!
Add a lock screen message
for anyone who finds your
phone.
» Screen timeout: To change your timeout (screen locks automatically), swipe up >
Settings > Display > Advanced > Screen timeout.
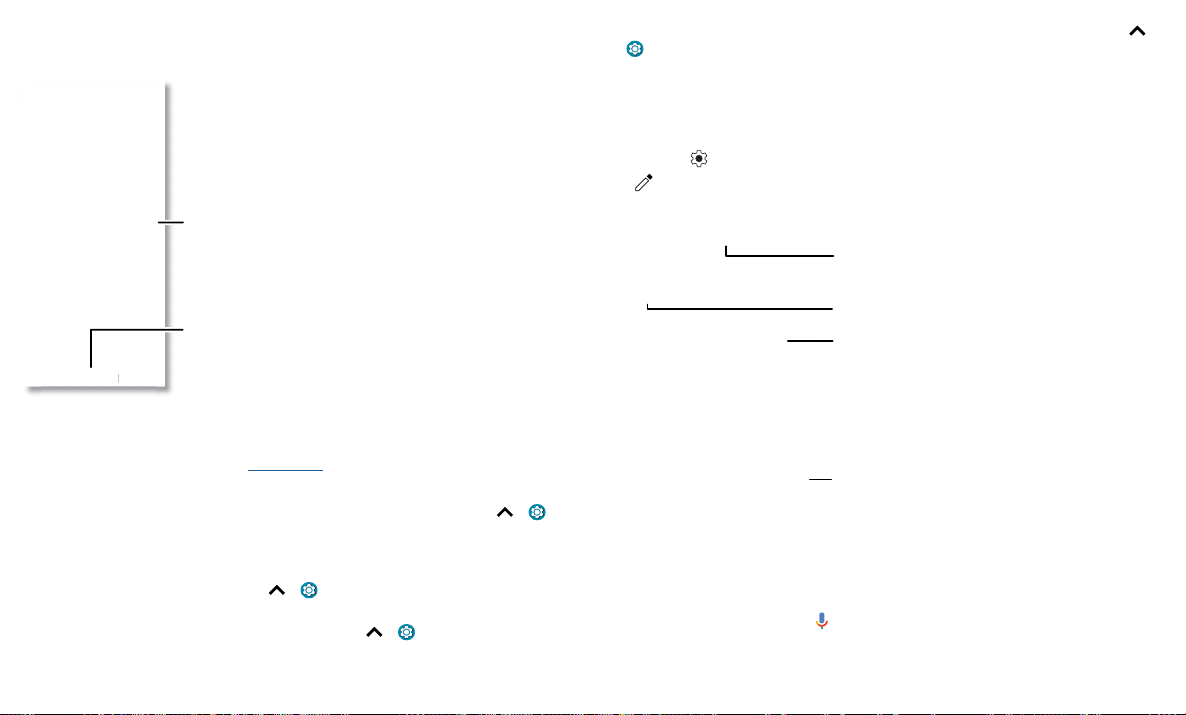
Quick settings
For quick access to Wi-Fi, Bluetooth, Airplane mode, brightness, and other settings,
swipe the status bar or lock screen down. Swipe down again for more settings. Tap an
icon to toggle it on or o. Touch and hold an icon to see more options. For even more
settings, tap
Tap to rearrange your settings and add or remove settings.
.
Set screen brightness.
Your network
Swipe up to unlock
your screen.
Lock screen showing access to voice control in the upper middle. Swipe this screen up to unlock it.
» Screen o and on: Press the Power button to turn the screen o and on.
» Screen lock: To unlock the screen, drag up from the bottom. To apply security to the
lock screen (recommended), see Screen lock.
» Notifications: Double tap a notification in the lock screen to open it.
Tip: To prevent notifications from appearing in the lock screen, swipe up
Settings > Apps & notifications > Notifications > Notifications on lockscreen >
Don’t show notifications.
» Lock screen message: To add a message to your lock screen, such as your name in
case your phone gets lost, swipe up
> Settings > Display > Advanced > Lock
screen display > Lock screen message.
» Dark Theme: To turn on dark theme mode, wipe up > Settings > Display >
Advanced > Dark Theme.
Learn the basics
>
Quick Settings screen that shows options, such as Wi-Fi, Bluetooth, Airplane mode, Location and more. Customizable.
Speak
Google Voice™
Use Google voice commands to tell your phone what you want.
» Use voice to make a call: Tap on the home screen. Then say “Call” and then a
contact name or number. Or, say “Send text.”
Tip: If a contact has more than one number, you can say which number to call (for
Bluetooth Do Not Disturb
Flashlight
Dolby
Auto-rotate
Smart audio
Battery Saver Airplane mode
Mobile data
SIM card
Turn Wi-Fi on/off.
Tap an icon to turn it
on/off. Touch and hold
to see more options.
See all phone settings.
Page 10
example, “Call Joe Black Mobile”).
29
January
29
Fri
10 AM
5 PM
4 PM
3 PM
2 PM
1 PM
12 PM
11 AM
Weekly Project Meeting
Start hangout with Alexis
https://plua.Google.com/hangouts
Pick up snacks for the party
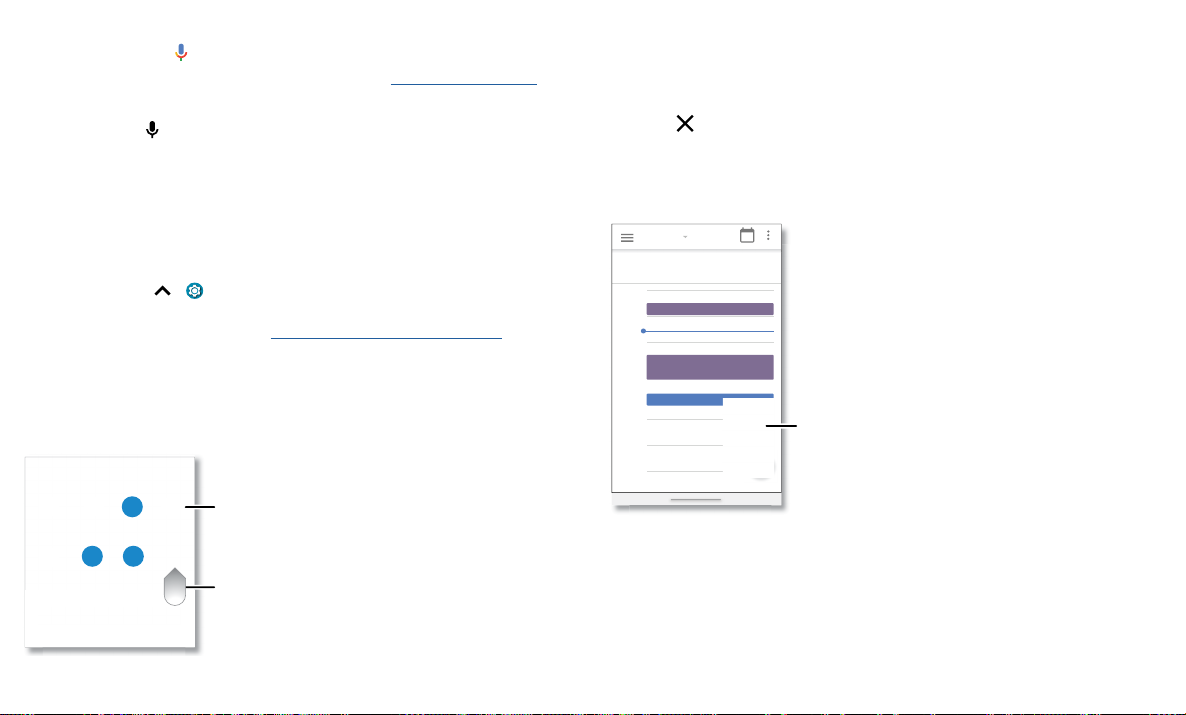
Tap the video twice to
return to it.
» Search by voice: Tap on the home screen to search by voice.
Note: To wake up your phone by saying “Hey Google,” see The Google Assistant™.
Picture-in-Picture
If you’re watching a video, on a video call, or using navigation, and you change screens,
your video continues to play in a small window on your screen.
Voice to text
On a keyboard, tap , then speak your message or search text. You can also speak
punctuation.
The Google Assistant™
Note: This feature may not be available in all languages.
Note: Not all apps support this feature.
To open the Google Assistant, swipe up from the bottom corner of the screen, then
speak or type a command.
You can also say “Hey Google” or “Ok Google” to start the Google Assistant. To turn this
feature on, swipe up
> Settings > Google > Account services > Search, Assistant
& Voice > Voice > Voice Match.
For more on the Google Assistant, visit https://support.google.com/assistant.
Direct Share
In some apps, you can share something directly to a contact, app, or conversation.
Select the share option within an app, then select a contact, choose an app, or type a
name or number to find a contact.
TO Type a name, phone number, or email
Abe
Allie
Create link Shared
Google Direct Share screen. Tap a contact to share an item. Swipe up to get more options.
Learn the basics
K
Anna Medina Kevin Astrid Fanning
N
MichaelMNathan More
Gmail Messages
album
Tap a contact to
share information.
Swipe up for more
share options.
Picture-in-Picture mode. Tap the video to open it on your screen.
» Tap twice to return to it.
» Tap the to close it.
» Swipe up from the bottom of the screen to put the video in a small window.
» Drag video around your screen.
Page 11
Customize your phone
°
R
Redecorate your home screen
Customize your home screen the way you want.
11:35
73°73
11:35
APR
TUE
3
3
Advanced > Auto-rotate screen.
Choose apps & widgets
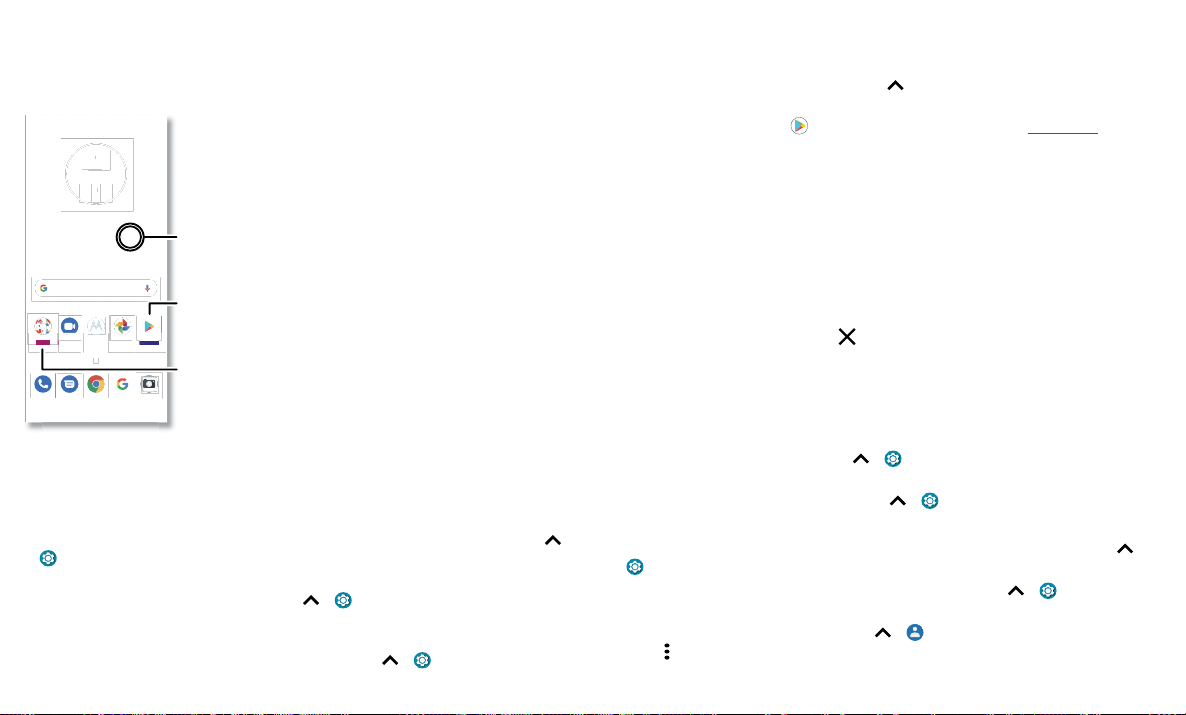
» Add apps to the home screen: Swipe up , touch and hold an app, then drag it to
one of your home screen pages.
» Download new apps: Tap Play Store. For more on apps, see App safety.
» Group apps together: Drag one app onto another. Do it again to add more apps to
the folder. To name the folder, tap it and enter a name below the apps.
» See app options: Touch and hold an app. If the app has quick options (shortcuts),
you’ll see a list.
Touch and hold an empty
spot to change wallpaper.
» Add widgets: Touch and hold an empty spot on the home screen, tap Widgets,
touch and hold a widget, then drag it to your home screen.
» Resize widgets: You can resize some widgets—touch and hold a widget until you feel
Tap a shortcut to open.
Touch and hold to move or
MotoDuo
GoogleGoogle
Photos
delete.
Play Store
Drag shortcuts on top of
each other to make a folder.
a vibration, then release. Drag the white circles at the edges to resize.
» Move or delete widgets and apps: Touch and hold a widget or app and drag it to
another spot, another page, or to
Note: Removing an app from your home screen doesn’t uninstall the app from your
phone.
Customize sounds & appearance
Home screen showing customize options. Touch and hold the home screen to add a widget. Tap an app to open it. Touch and drag it to move or remove it.
» Change your wallpaper: Touch and hold an empty spot on the home screen, then
tap Wallpapers.
» Add a home screen page: Drag an app to the right side of the home screen until a
new page appears. You can add multiple pages.
» Adjust display settings: Adjust brightness, font size, and screen saver. Swipe up >
Settings > Display.
» Switch to dark theme: Change your display to use dark theme, which saves battery
and can be easier on your eyes. Swipe up
> Settings > Display > Advanced >
Dark Theme.
» Rotate: In many apps, the touchscreen switches from portrait to landscape when
you rotate your phone. To turn this on or o, swipe up
Customize your phone
> Settings > Display >
Customize your phone’s sounds and display settings:
» Listen with Dolby sound: Swipe up > Settings > Sound & lights > Advanced
> Dolby Audio.
» Set ringtone and notifications: Swipe up > Settings > Sound & lights.
Tip: Set notification sounds for individual apps within the app’s settings.
» Night Light: Set your screen to turn slightly amber colored at night. Swipe up >
» Add vibrate for calls: To make your phone vibrate, swipe up > Settings >
Sound & lights and tap Vibrate for calls.
» Set a ringtone for a contact: Swipe up > Contacts, tap the contact, then tap
Menu
Remove.
Settings > Display > Night Light.
> Set ringtone.
Page 12
» Change language: Swipe up > Settings > System > Languages & input >
Off
3
t
Ph
S
N
Languages.
» Adjust font size: Swipe up > Settings > Display > Advanced > Font size.
Discover Moto
See Moto to set more custom features, like twisting your wrist twice to quickly open the
camera, making a chopping motion to turn on the flashlight, and placing the phone face
down to silence notifications and calls.
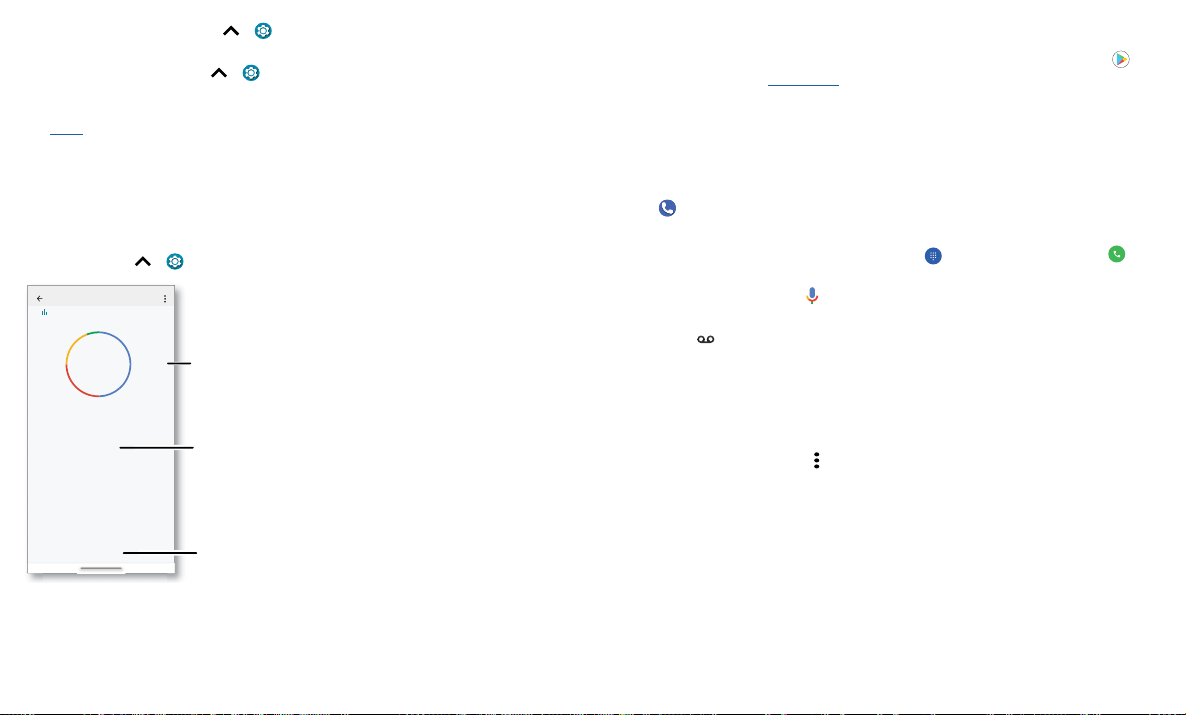
Digital wellbeing and parental controls
Set limits on how much time you spend on your phone, get a bedtime reminder, and
manage notifications.
Find it: Swipe up
Digital Wellbeing & parental co...
Your Digital Wellbeing tools
one
4 minutes
Camera
3 12
Unlocks
WAYS TO DISCONNECT
Dashboard
app timers se
Wind Down
REDUCE INTERRUPTIONS
Manage notifications
Do Not Disturb
Digital wellbeing screen that shows options, such as Do Not Disturb and options for bedtime, app limits, and managing notifications.
To supervise this phone remotely, view and set screen time limits, and add restrictions
to services and apps, tap Set up parental controls.
> Settings > Digital Wellbeing and parental controls
Contacts
Today
ettings
See a breakdown of how
you spend your time on
your phone.
otifications
Limit your app time, set
a bedtime, and more.
Turn on Do Not Disturb.
Apps
Your phone comes ready with some great apps. To find and add more apps, tap Play
Store. To learn more, see App safety.
Phone
Keep in touch by choosing a contact, returning a missed call, or using a voice command
to start a call.
Make a call
Find it: Phone
» Call a contact: To call a contact or recent call, tap the contact name.
» Dial a phone number: To open the dialpad, tap . Enter a number, then tap to
call it.
» Voice dial: To voice dial, tap on the home screen or say “Hey Google”, then say
“Call <name>”.
» Voicemail: appears in the status bar when you have new voicemail. To hear it,
swipe down and tap the notification.
» Make a contact widget: Touch and hold an empty spot on the home screen, tap
Widgets, then touch and hold the Direct dial widget. Drag it to your home screen,
then select the contact. Tap the widget to call the person.
Tip: To enter the international dialing code (+), touch and hold 0. To add a pause or
wait after numbers, tap Menu
.
Apps
Page 13
Search contacts & places
FAVORITES Add
A
Allie Ben Cade
Mobile Mobile Mobile
Favorites
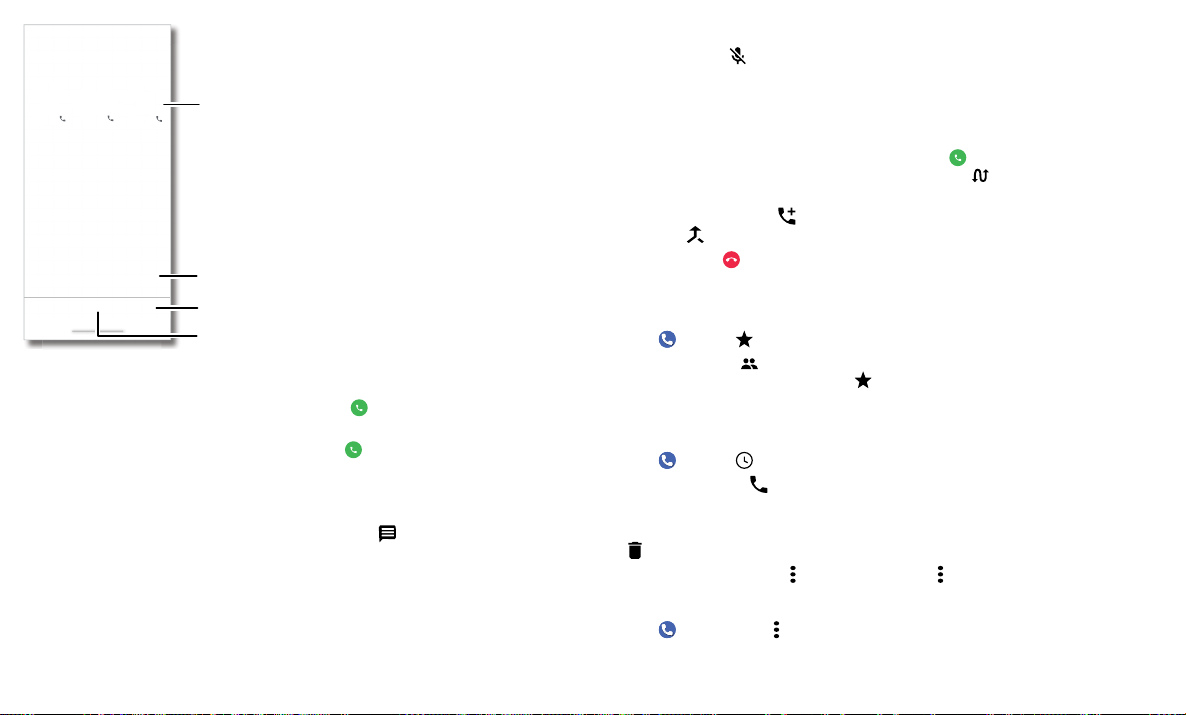
Calls screen and options that show during a call. To find and call a contact, enter a name in the Search field, tap the Contacts tab at the top right, or tap a contact’s image in the middle of the screen. Tap the dialpad at the
middle bottom of the screen to enter a number.
C
B
RecentsContacts
Tap a favorite to call
it.
Dial a number.
See all your contacts.
See recent calls.
Receive a call
» Answer a call: When your phone is locked, swipe up to answer. When the phone
is unlocked, tap ANSWER.
» Ignore a call: When your phone is locked, swipe down to reject the call and send
it to voicemail. When the phone is unlocked, tap DECLINE.
Tip: You can also press the Power button to ignore the call, or press a volume button
to silence the ringer.
» Respond with a text: When your phone is locked, tap , and select a message to
respond.
Note: When you hold your phone to your ear, the touchscreen goes dark to avoid
accidental touches. When you move the phone away from your ear, the screen lights
up again. Don’t use covers or screen protectors (even clear ones) that cover the
proximity sensor above the touchscreen.
During a call
» Mute a call: Tap Mute on the call screen to mute the call. You can hear your caller,
but they can’t hear you.
» Multi-task: While you’re on a call, swipe up from the bottom of the screen to look up
a phone number, address, or open other apps. To reopen the call screen, swipe the
status bar down and tap Ongoing call.
» Answer a second call: To answer a second call, tap Hold and Answer Voice. The
first call is placed on hold. To switch between calls, tap
» 3-way call: To join two calls together, answer the second incoming call while your
first call is active, or tap
hold. Tap
» End a call: Tap .
Merge to join the calls together.
Add call to dial a second call. The first call is placed on
Swap.
Favorites
See all your favorite contacts together.
Find it:
To add favorites, tap
picture (or letter, if no picture) and tap
Phone > Favorites
Contacts, scroll or search to find the contact, then tap the
Favorites.
Recent calls
View your calls (with newest first), and then call, text, or store them:
Find it:
Phone > Recents
» To return a call, tap next to the caller’s name or number.
» To send a text message, store the number, or other options, tap the caller’s picture.
» To remove an entry from the call log, touch and hold the name or number, then tap
Delete.
» To clear the list, tap Menu > Call history > Menu > Clear call history.
Caller ID and spam
Find it: Phone > Menu > Settings > Caller ID & spam
Tap Filter spam calls to prevent suspected spam callers from disturbing you.
Apps
Page 14
Your phone number
SMS
SMS
Find it: Swipe up > Settings > About phone > Phone number
Emergency calls
Your service provider programs one or more emergency phone numbers you can call
under any circumstances, even when your phone is locked. Emergency numbers vary
by country. Your pre-programmed emergency number(s) may not work in all locations,
and sometimes an emergency call cannot be placed due to network, environmental, or
interference issues.
1 Tap Phone (if your phone is locked, drag up from the bottom of the screen to
unlock it, then tap Emergency).
2 Enter the emergency number.
3 Tap to call the emergency number.
Note: Your phone can use location based services (GPS and AGPS) to help emergency
services find you. For more information, swipe up
Advanced > Emergency Location Service.
> Settings > Location >
Messages
Stay in touch with messages and pictures. For tips on using the keyboard, see Use the
keyboard.
Find it:
Messages
» Create: Tap
Start chat
.
» Attach: When you’re typing a message:
• Tap to attach a GIF, share your location, create a voice recording, and more .
• Tap to attach a photo from the gallery or take and attach a new photo.
» Send: Tap
to send the message.
» Reply: Open a conversation, then enter your response in the text box at the bottom
and tap
.
Messages
Gracie Jo
You: Do we need more treats?
Just now
Daniel Lester
You: Lunch tomorrow?
20 min
Astrid Fanning
You: Hey, where are you?
Wed
Change settings.
Search messages.
Swipe left or right to
archive a message.
Apps
Start chat
Message screen showing change and search options in the upper right, a list of previous messages with contacts, and the new message icon in the lower right corner.
Write a new message.
Tips
» Add a contact: In a conversation, touch and hold a message for more options, such
as adding another contact.
Page 15
» Delete thread: To delete a whole thread of messages, touch and hold the thread,
then tap
to delete.
» Save pictures: Touch and hold a picture, and then tap to save it. To see the
picture, swipe up > Photos.
» Voice entry: Tap a text box, then tap on the keyboard.
Tip: If you don’t see on the keyboard, swipe up > Settings > System >
Languages & input > Virtual keyboard > Google voice typing to activate voice entry.
» Turn o notifications: Stuck in a busy conversation? You can turn o notifications.
Tap the thread, then tap Menu
> Details or Group Details > Notifications.
Set your default messaging app
To set your default messaging app, swipe up > Settings > Apps & notifications >
Default apps > SMS app, and select the messaging app to use as the default.
Use the keyboard
When you tap a text box, like in a message or search, you have keyboard options.
» Type or gesture: Enter letters by touching them one at a time. Or, enter a word by
tracing a path through the letters. While you’re typing, word suggestions appear
above the keyboard. Tap one to select it.
» Voice entry: Tap on the touchscreen keyboard, then say what you want to type.
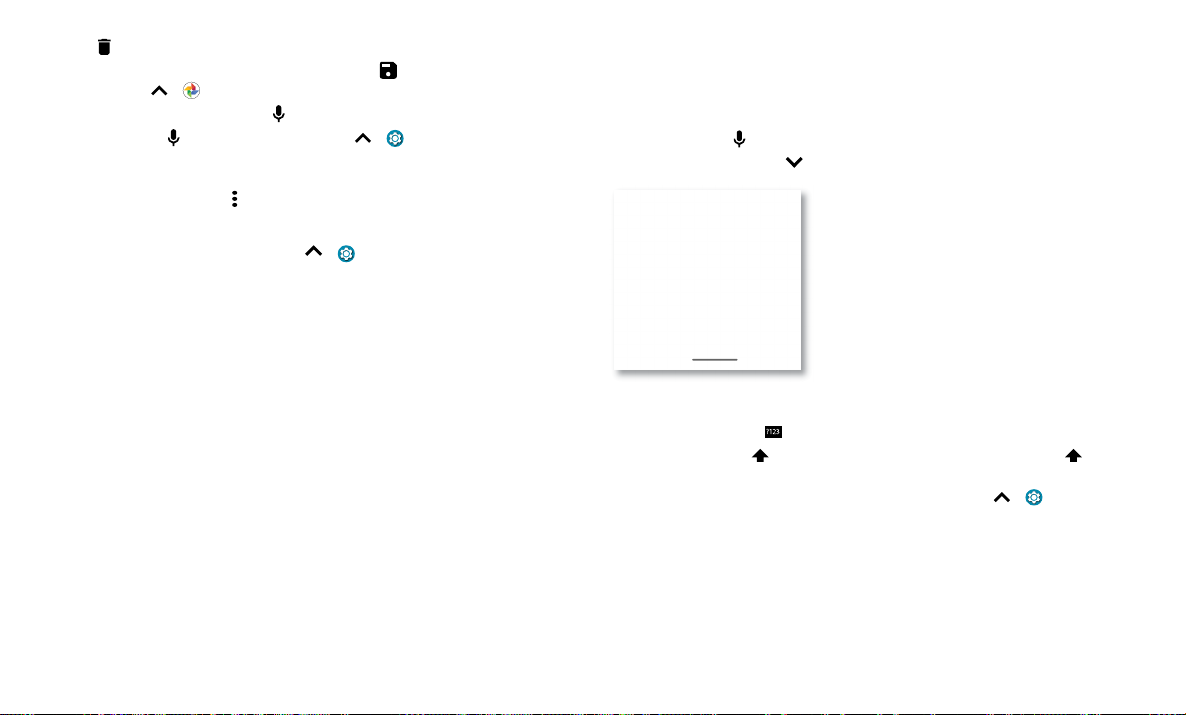
» Close the keyboard: Tap .
See a different
keyboard? It varies by
app. This one is for
texting.
Keyboard screen. Tap the microphone in the top right to speak a message.
» Symbols and numbers: Touch and hold a letter to enter the number at the top of it.
To enter symbols, tap
» Capital letters: Tap for one capital letter. For all capital letters, tap twice
quickly.
» Keyboard options: To customize your keyboard, swipe up > Settings > System
> Languages & input > Virtual keyboard > Gboard.
» Cut, copy and paste: Touch and hold a word to highlight it, tap Cut or Copy. Touch
and hold the location you want to paste the text, and tap Paste.
.
Apps
Page 16
Chrome™
Access the Internet with the Chrome browser app.
Find it:
Or, from the home screen, tap the Google search box and enter or speak text to search.
Note: Your phone uses your Wi-Fi network (or your mobile phone network) to access
the Internet. If you can’t connect, contact your service provider. Your service provider
may charge to surf the web or download data.
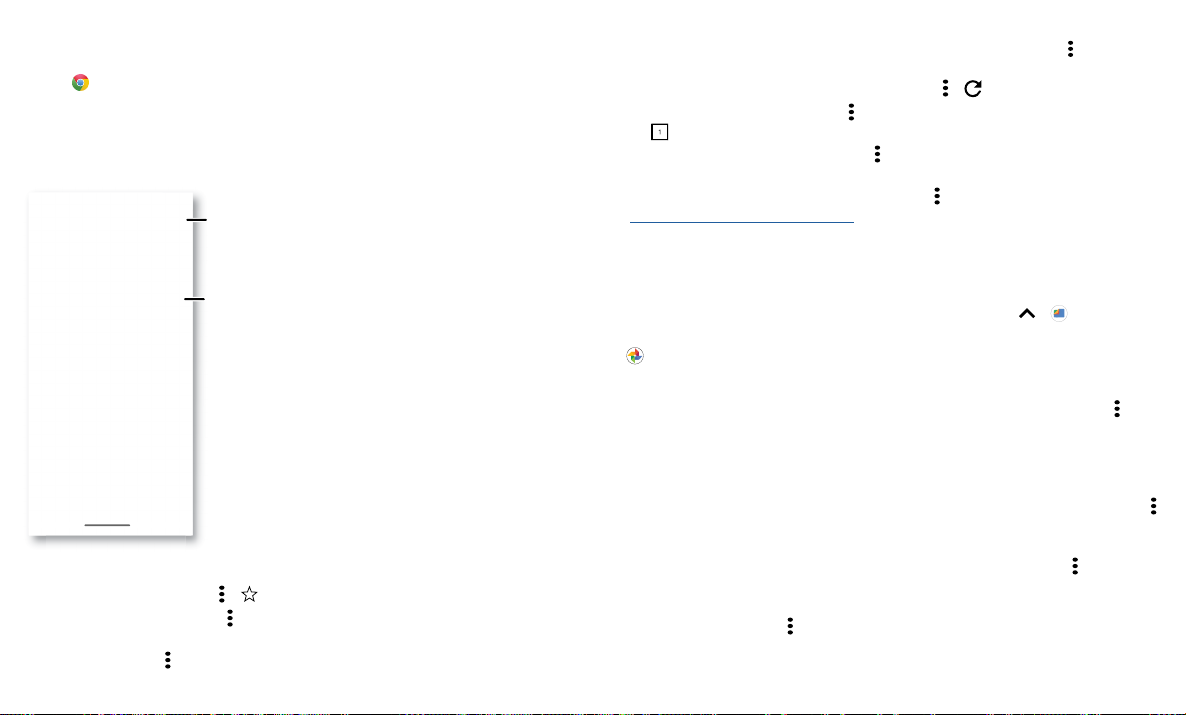
Google Chrome browser showing the options menu in the upper right corner.
Apps
Chrome
11:35
See options.
Free up space
Search or type web address
Facebook YouTube Amazon.co... Wikipedia
ESPN.com Yahoo eBayInstagram
Articles for you Show
Enter text or tap
the microphone
to search.
» Go to a web page: Tap the address bar at the top of a page and enter an address.
» Add a bookmark: Tap Menu > .
» Open a bookmark: Tap Menu > Bookmarks.
» Web page shortcut: To add a web page shortcut to your home screen, go to the web
page and tap Menu
> Add to Home screen.
» Mobile sites: Some websites automatically show you a “mobile” version of their
page—if you want to see the computer version of a website, tap Menu
> Desktop
site.
» Reload: If a page doesn’t load correctly, tap Menu > .
» Tabs: To open a new tab, tap Menu > New tab. To move from one tab to another,
.
tap
» Clear history: In the browser, tap Menu > Settings > Privacy > Clear browsing data.
Then choose history, cache, cookies, and other options.
» Help: For more about Google Chrome, tap Menu > Help & feedback or visit
https://support.google.com/chrome.
Downloads
Warning: Apps downloaded from the web can be from unknown sources. To protect
your phone and personal data from theft, download apps only on Google Play™.
» Files: Tap the download link. To show the file or app, swipe up > Files.
» Pictures: Touch and hold it, then tap Download image. To see the picture, tap
Photos > Albums > Download.
Browser settings
To change your browser security settings, text size, and other options, tap Menu >
Settings.
Safe surfing & searching
Keep track of what your browser and searches show:
» Incognito: To open a tab that won’t appear in your browser or search history, Menu
> New Incognito tab.
» Auto complete: Your browser automatically fills in names and addresses, if you have
entered the same information before. To turn o this feature, tap Menu
Addresses and more > Save and fill addresses.
Tip: Auto complete also fills in payment information, such as a credit card. To turn
o this feature, tap Menu
> Settings > Payment methods > Save and fill payment
methods.
> Settings >
Page 17
» Pop-ups: To stop pop-up windows from opening, tap Menu > Settings > Site
1 X
settings > Pop-ups and redirects, then tap the switch to turn it o.
» Safe browsing: To protect your phone from websites that might be unsafe, tap Menu
> Settings > Sync and Google services > Safe Browsing.
Camera
Take crisp, clear photos with the back or front camera.
Take photos
Find it: Camera
» Take a photo: Tap to take a photo.
» Take a selfie: Tap in the camera screen to switch to the pop-up front camera.
» Zoom: Swipe up or down. (Or pinch two fingers together.)
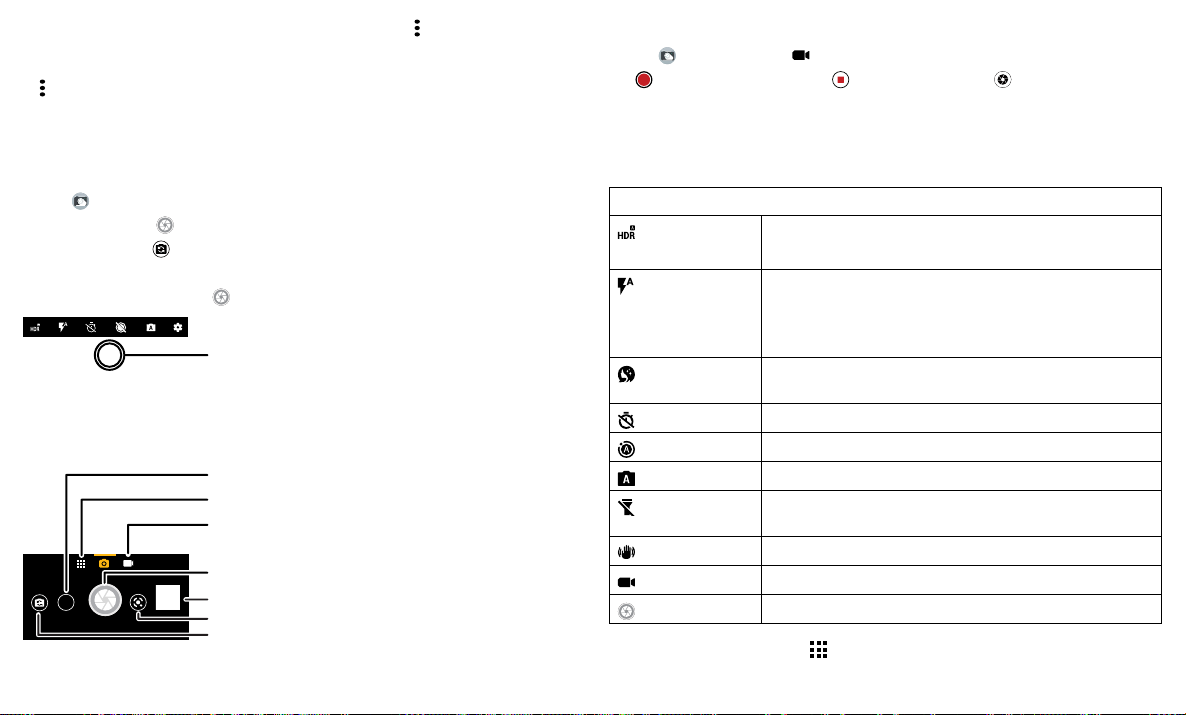
» Multi-shot: Touch and hold to take a burst of photos.
Tap anywhere to change
the focus (rear camera
only) or exposure. Slide
the bar to adjust
brightness.
Ta ke Ultra-wide photo.
See more options.
Switch to video camera.
Ta ke a photo.
See your last picture.
Use Google Lens.
Camera viewfinder screen. Take a photo by pressing the shutter button at the bottom middle, switch to front camera on the lower left. Video camera button is at the bottom right while the options menu is at the extreme
right.
Apps
Switch to front camera.
Record videos
Find it: Camera, then tap
Tap to start recording. Then tap to stop recording. Tap on the screen while
recording to save a photo.
Camera settings
Point, tap, and you’re done, or play with these camera options. You can find these
options along the top of the camera or video screen:
Options
HDR
Flash
Beautify
Timer
Active photos
Auto/Manual
Torch
Stabilization
Video
Photo
To find these options, tap Menu
Turn on HDR (high dynamic range) eect for better pictures
in challenging lighting situations, such as outdoors.
Set to On, O, or Auto. For front facing cameras with flash,
you can also turn the Torch or Flashlight on or o.
Note: For front facing cameras, you may see a flash or a
white screen before the photo is taken.
With the front-facing camera, smooth skin and beautify
faces. Set to Auto, Manual, or O.
Set a timer to 3 or 10 seconds.
Turn on to capture a brief photo in motion of your subject.
Control professional camera settings. Set to Auto or Manual.
In video mode, turn on a flashlight (with the back camera
only).
In video mode, remove some of the shakiness of the video.
Take a video.
Take a photo.
or swipe right on the camera screen:
Page 18
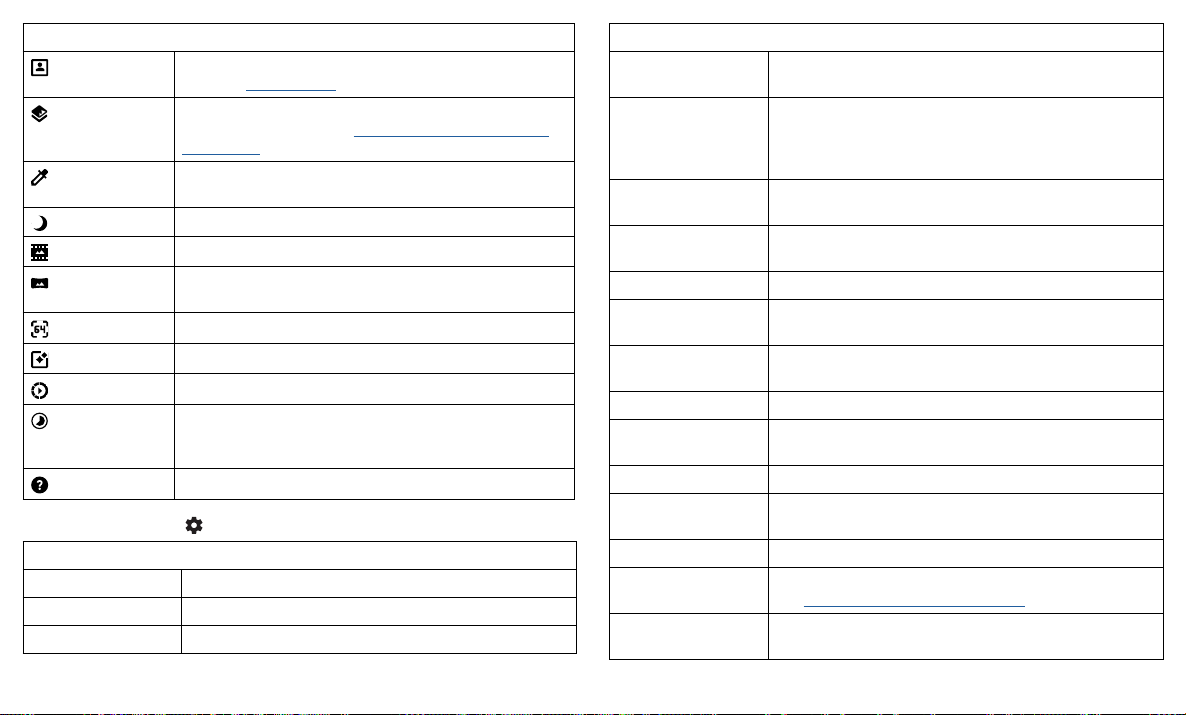
Options
Portrait
Cutout
Take portraits using special enhancements and eects. For
more, see Take portraits.
Cut out the subject in the foreground and replace the
background. For more, see Change or add your portrait’s
background.
Spot color
Pick one color from the viewfinder while everything else
becomes black & white.
Night Vision
Cinemagraph
Panorama
Take photos in low light situations.
Freeze parts of a video for an artistic eect.
Take a wide-angle shot. Use the on-screen guide to slowly
pan while you are taking the photo.
Ultra-Res
Live filter
Slow motion
Timelapse
Take high resolution photos.
Choose a filter to apply to your photo.
Take a video that will play in slow motion.
Take a video using timelapse to make a longer video play
faster. You can set the playback speed as 4x, 8x, 16x, and
32x (times) faster than a regular video.
Help
To find these options, tap
See help for using the camera.
:
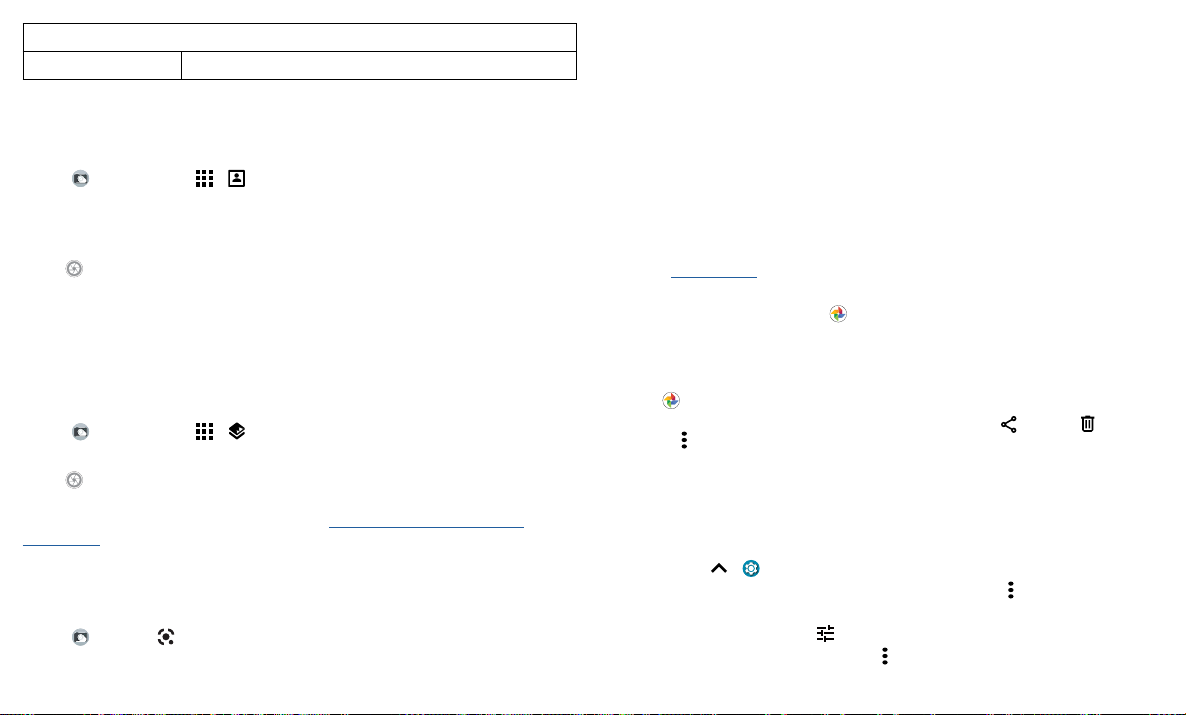
Options
Photo size Set the photo resolution for the camera.
Video size Set the video resolution.
Slow motion size Set the video resolution for a slow motion video.
Options
HDR Turn on HDR (high dynamic range) eect for better pictures
in challenging lighting situations, such as outdoors.
Selfie photo mirror Turn on to take a mirrored selfie. Note that the viewfinder
will not show a mirrored selfie, but the photo will be
mirrored after you take it. (If your phone has Active Photos,
it must be turned o to use this feature.)
Quick capture Twist twice to open or switch between front and back
cameras.
Tap anywhere to
capture
Capture photos or videos by tapping anywhere on the
screen. Zoom by scrolling up or down with one finger.
Shutter sound Turn the shutter sound on or o.
Assistive grid Overlay a grid to help align the subjects in your photos or
videos.
Leveler Take perfectly level photos using a guide line in the
viewfinder.
Watermark Add a watermark or signature to your photos.
Auto Smile Capture Automatically detect smile and take a photo when all of the
subjects (limited to five faces) in the viewfinder are smiling.
Gesture Selfie Show your palm to take a selfie.
Smart Composition Generate an alternate shot that uses the professional
photography rule of thirds.
Shot Optimization Automatically optimize your photos.
Google Lens
Find out more about the things you see in the viewfinder.
See Identify items using Google Lens™.
Storage Choose a storage location for your photos and videos
(Phone or Memory card).
Apps
Page 19
Options
Save location Turn on to tag photos with a location.
Take portraits
You can use the portrait mode to add a blur eect and make portions of your photo
black and white, while keeping the main subject in perfect focus.
Find it:
1 Line up your subjects. The closest subject is prioritized automatically. Tap the screen
2 Slide the bar to increase or decrease the background blur.
3 Tap to take the photo and hold your camera steady.
Tip: For best results, subjects should be 2-6 feet away and not side-by-side. When
photographing people, aim for the waist up.
Camera > Menu > Portrait
to change the focal point.
Take close ups and change the background
Use cutout mode to get a close portrait, cut it out from the background, and replace the
background with something else.
Note: Available when using the back camera only.
Find it:
1 Line up your subject at close range.
2 Tap to take the photo and hold your camera steady.
Tip: When photographing people, aim for the face. After taking the photo, use
the photo editor to change the background. See Change or add your portrait’s
background.
Camera > Menu > Cutout
Identify items using Google Lens™
Search landmarks, products, explore books, identify plants and animals, copy text, scan
barcodes, QR codes, business cards, and more.
Find it:
1 Focus your camera on an object, landmark, or code until a circle appears on the
Apps
Camera >
object in your viewfinder.
2 Tap the circle.
Depending on the object, you can see the details, take an action, or find more
products.
Tip: Focus your camera on a book cover, tap the screen to see the book title and author.
Note: Google Lens may not work in all languages.
Capture your screen
There’s more than one way to capture your phone’s screen.
» Press and hold the Power button and tap Screenshot.
» Press and hold both the Power and the Volume Down buttons at the same time.
» Set up Moto Actions so you can capture screenshots by touching the screen with
three fingertips.
Tip: To see the screen capture, tap
Photos > Albums > Screenshots.
Photos
View, edit & share
Find it: Photos
» View, share, or delete: Tap a thumbnail to open it, then tap to share, to delete,
or Menu for more options.
Tip: To select multiple files, open a folder, touch and hold a photo, then tap others. Or
group photos in an album and share the whole album.
» Zoom: Open a photo in your gallery, then double-tap or drag two fingers apart or
together on the screen.
Tip: Turn your phone sideways for a landscape view. To turn Auto-rotate screen on or
o, swipe up
» Wallpaper or contact photo: Open a picture, then tap Menu > Use as > Wallpaper
or Contact photo.
» Edit: Open a picture, then tap .
» Slideshow: Tap a picture, then tap Menu > Slideshow. To stop the slideshow, tap
> Settings > Display > Advanced > Auto-rotate screen.
Page 20
the screen. To show the slideshow on a television or other device, see Connect, share
& sync.
Tip: For more about Google Photos™, visit https://support.google.com/photos.
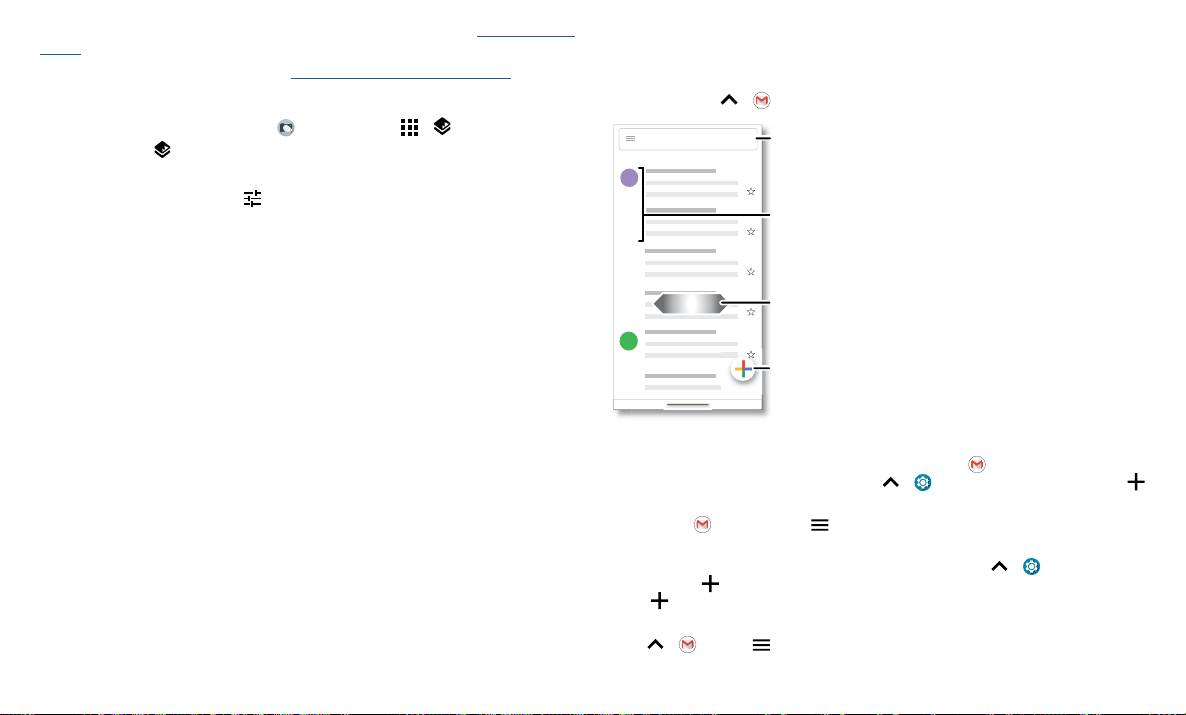
Change or add your portrait’s background
Note: To take a Cutout mode photo, tap Camera > Menu > Cutout.
Cutout photos show
Note: Available when using the back camera only.
1 Tap a cutout photo and tap Edit > Add Background.
2 Select a background image.
3 Tap S ave to save a copy of the photo with your changes.
at the top of the thumbnail.
Gmail
Send and receive email from all of your personal accounts (even if they’re not Gmail
accounts). You can manage your accounts in Gmail and easily switch between them.
Find it: Swipe up
Search mail
Inbox
INBOX
A
B
H
Email screen listing emails for this account. Tap the magnifying icon in the top right to search email. Tap the Pencil icon in the bottom right to start a new email.
» Add Gmail accounts: The first time you turned on your phone, you probably set up
or logged in to your Google account—that sets up the
To add more Google accounts, swipe up
Add account > Google.
Tip: In the
» Add email accounts: The Gmail app manages all of your email accounts. To add
other personal email accounts to the Gmail app, swipe up
Accounts >
Add account > Exchange, and enter details from your IT administrator.
tap
» Change account settings: To change the settings for a Gmail or email account, swipe
> Gmail > > Settings, then tap the account name.
up
> Gmail
Switch accounts.
Apr 22
Apr 22
Touch and hold to choose
multiple messages, then
select an option at the top.
Apr 22
Apr 22
Swipe left or right to
archive a message.
Apr 22
Compose a
new email.
Gmail app for one account.
> Settings > Accounts, then tap
Gmail app, tap > Settings > Add account.
> Settings >
Add account. For Microsoft® Exchange server work email accounts,
Apps
Page 21
» Delete accounts: Swipe up > Settings > Accounts, then tap the account name
and Remove account.
Duo
Sign in with your Google account to make and receive video calls.
Find it: Swipe up
Search contacts
Anna Medina
(555)555-5555
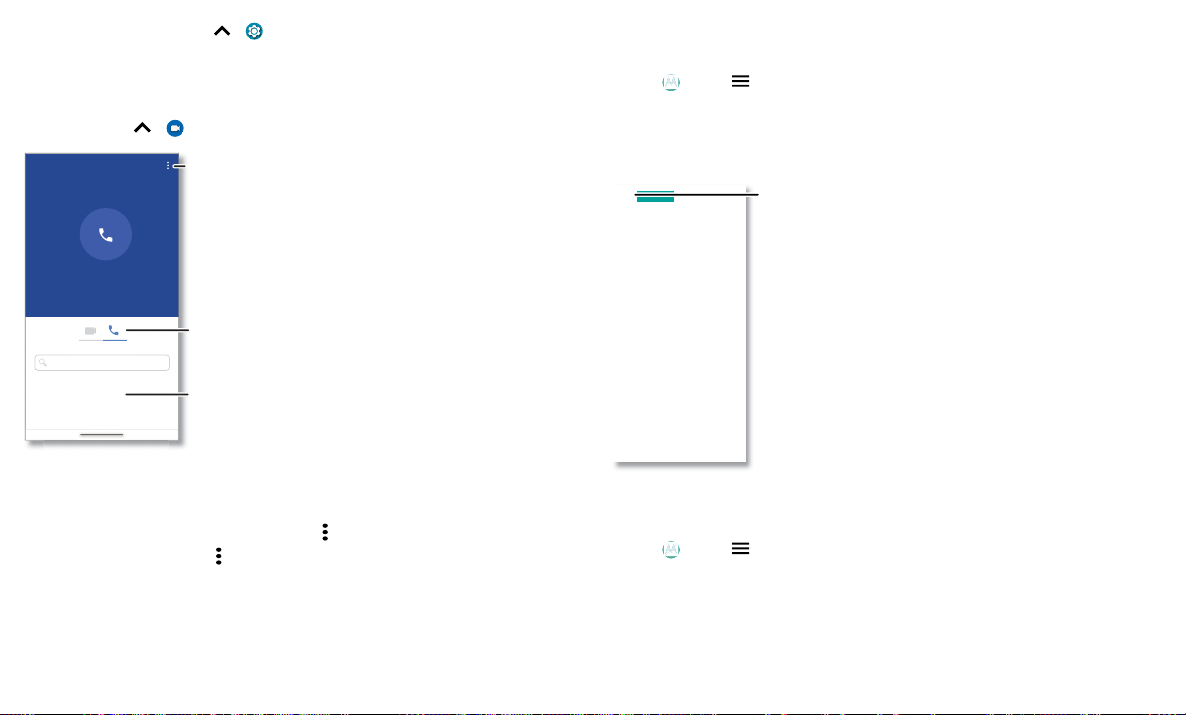
Google Duo screen that can be used to make video and voice calls. Tap the contacts icon to find a contact, or tap LET’S GO to invite friends.
» Start a new video call: Tap the search box, then type or tap a name in your contacts
to start the video call.
» Preview incoming calls: See live video of the caller before you answer. To turn this
o for both the caller and receiver, tap Menu
» Change settings: Tap Menu > Settings to change the vibration setting, block
numbers, and more.
» Call anyone: Duo works across platforms, allowing you to call friends with the Duo
app on any device.
Tip: When on a video call, your phone will automatically switch from cellular network
to Wi-Fi, if available.
Apps
> Duo
View settings.
Switch to video or call.
Choose a contact.
Swipe up to see more
contacts.
> Settings > Knock Knock.
Moto
Explore special features designed to save you time and make your day easier.
Find it:
Note: Your phone may not have all features.
Moto greeting page. Moto application is used to customize your phone.
Moto Actions
Enhance your phone with gestures and actions.
Find it:
Moto >
» Moto Actions: Use gestures as phone shortcuts.
» Moto Display: See your notifications at a glance.
Tap to open Moto
app features,
or swipe up from
the bottom of the
screen.
Moto > > Moto Actions
» Quick Capture: Twist your wrist twice quickly to open the front camera.
» Fast flashlight: Turn the flashlight on/o with two chopping motions.
» Three finger screenshot: Touch and hold the screen with three fingertips to capture
a screenshot.
» Screenshot editor: Edit and share your screenshots.
Page 22
» Flip for DND: Place the phone face down to silence notifications and calls.
» Pick up to silence: Lift the phone to switch incoming calls to vibrate.
» Media controls: Use the volume buttons to change music tracks when the screen is
o.
» Swipe to shrink: Swipe down to the left or right corner to make the screen smaller
for one-handed use.
Moto Display
Moto > > Moto Display
» Peek Display: Battery friendly notifications fade in and out while the screen is o
to show you what’s going on. Tap the switch to turn it on, then tap Peek Display >
Settings to customize gestures and notifications.
Note: Notification display settings can also be set by swiping up
Apps & notifications > Notifications.
Apps
> Settings >
Calendar
See all your events, all in one place.
Find it: Swipe up
March
April 2019
MON
1
Nothing planned. Tap to create.
WED
3
Dentist appointment
4-5 PM
APR 7 - 13
WED
Jennifer’s bihday
10
APR 14 - 20
MON
Tax Day
15
APR 21 - 27
SUN
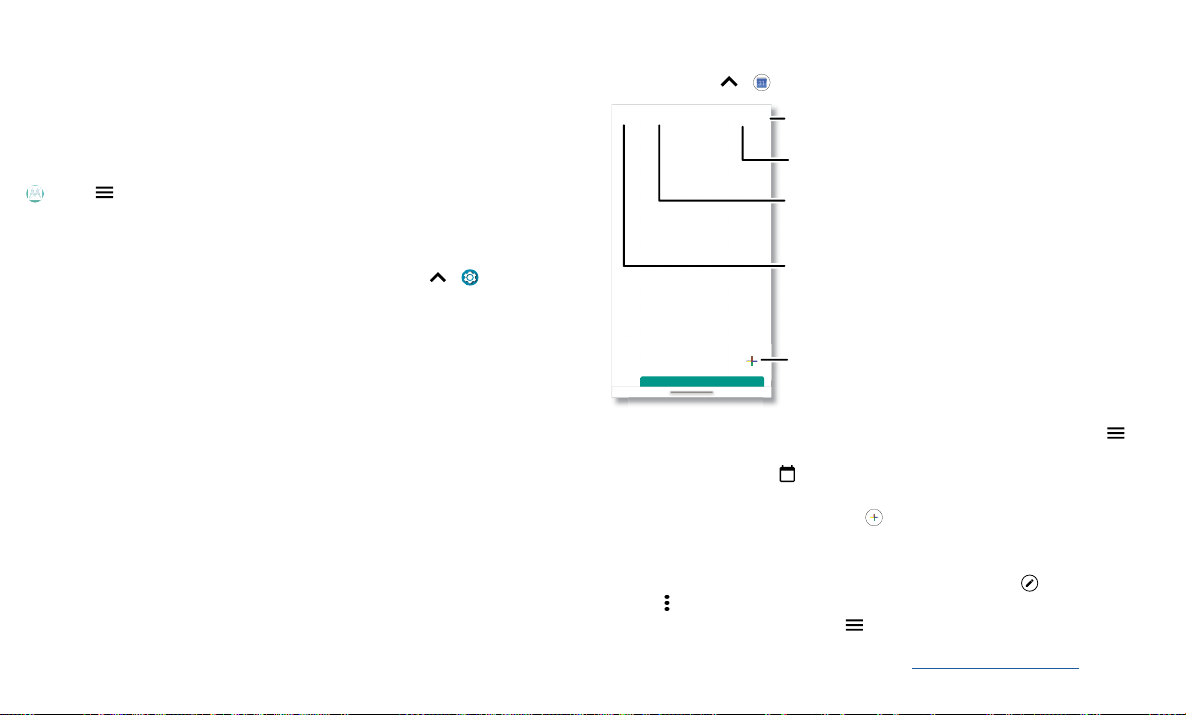
Google Calendar screen with today’s events shown by the hour. Tap the New item icon to add an event.
» Change the view: Tap the month at the top to choose a date to view. Or tap to
choose Schedule, Day, 3 Day, Week, or Month.
» Go to today’s date: Tap at the top. (If you have an appointment that day, you’ll
see a dot in the icon.)
» Add events, reminders, or goals: Tap > Event, Reminder or Goal, enter details,
then tap Save.
Tip: In most views, tap a time on the calendar to enter event details.
» Show, edit, or delete events: Tap an event to open it, then tap to edit it, or tap
Menu > Delete to remove the event.
» Show, hide, or add calendars: Tap , and select which options, such as events,
reminders or other calendars, to show or hide. You can use a computer to add or
remove calendars on your Google account at www.google.com/calendar.
> Calendar
Tap to refresh the
Calendar screen.
Go to today’s date.
Jump to a dierent month.
Change the calendar view, adjust
settings, get help, and more.
Add a new event.
Page 23
Tip: Add a Calendar widget to your home screen. Touch and hold an empty spot on the
home screen, tap Widgets, then touch and hold a calendar widget and drag it to your
home screen.
More apps
Google Play
Google Play is a digital content experience from Google where you can find and enjoy
your favorite music, movies, TV shows, books, magazines, and Android apps and games.
» Download apps: Tap Play Store.
» Log in or open a Google account: Visit www.google.com/accounts.
» Google help: See www.google.com/support.
Contacts
Combine information from your Google contacts and social networks for quick access
to everyone you know.
Tip: You can find most of these features on the
Phone.
Find it: Swipe up
Search contacts
A
A
A Alison
G
L
Alison
Abe
Allie
Anna Medina
Astrid Fanning
Gracie Jo
Lauren
> Contacts
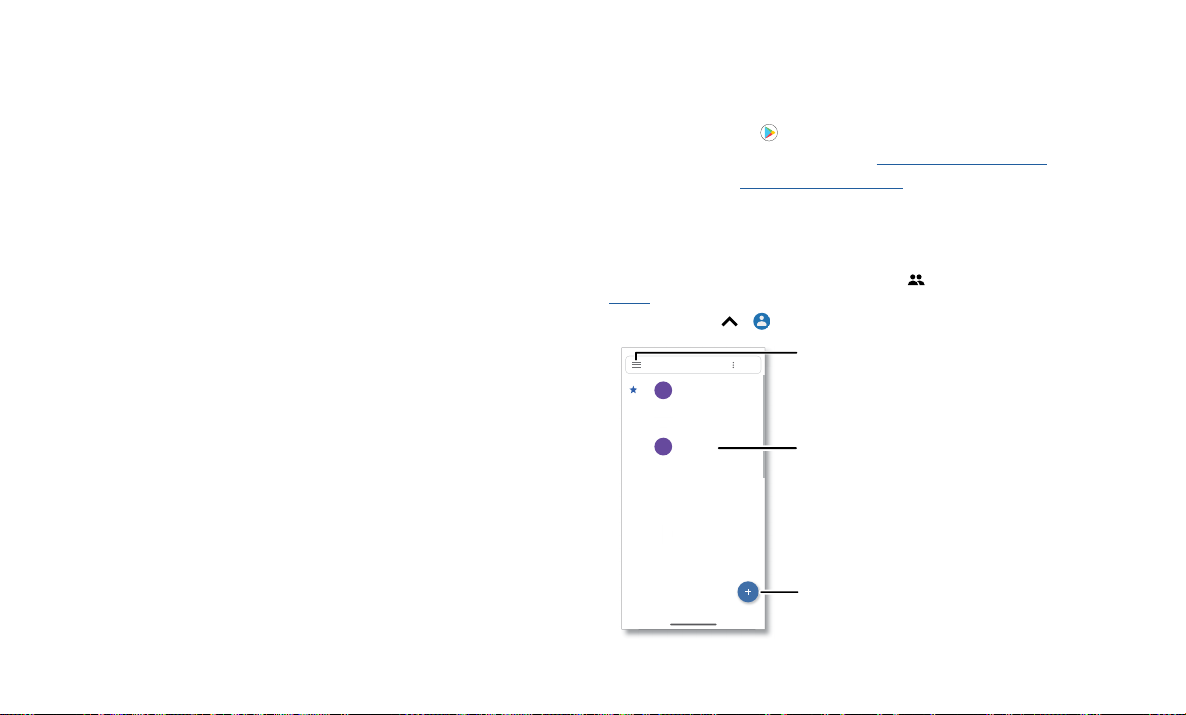
Sort contacts, change
settings, accounts, and
more.
Tap to view contact
information, call, send a
text message, and more.
Add a contact.
Contacts tab in the Phone app. See
More apps
Contacts screen that shows a list of contacts. Scroll bar on the far right to scroll through contacts. Tap the New Contact icon to add a contact.
Page 24
» Add a contact: Tap .
» Edit or delete: Tap a contact, then tap
Edit contact
or tap Menu > Delete.
» Call, text, or email: Tap a contact, then tap an option. (If the contact doesn’t have an
email address, you can set up and use Google Duo.)
» Search contacts: In the Contacts list, tap Search contacts.
Tip: From the home screen, tap the Google search box and enter a contact’s name.
» Share a contact: Tap a contact, then tap Menu > Share to send it in a message or
email, via a Bluetooth connection, or save to Google Drive™.
Tip: Tap a contact, then tap Menu
> Add to Home screen to add a shortcut for the
contact on your home screen.
» Synchronize: On your phone, swipe up > Settings > Accounts, and choose
your Google account. Then tap Account sync > Menu
> Sync now. You can also see
these contacts at www.gmail.com.
» Add your details: To store your user profile, tap > Settings > Your info.
Favorites
Set your most-used contacts as favorites, so you can get to them faster.
» To set a favorite, swipe up > Contacts, select a contact and tap .
» To see your favorites, tap Phone > Favorites.
Get contacts
Get all your contacts in one place.
» To add your social networking contacts, swipe up > Settings > Accounts, then
tap Add account.
» To add your email contacts, see Gmail.
Tip: If you add an Exchange account, you can send messages to your coworkers,
even if you don’t have them stored in your contacts.
» To import contacts from your SIM card (if it didn’t happen automatically), swipe up
> Contacts > Menu > Settings > Import > SIM card. Tap OK to confirm.
» To import contacts from your computer, upload the contacts to your Google account
at http://contacts.google.com. On your phone, swipe up
More apps
> Contacts > Menu
> Settings > Accounts > Automatically sync data. You can also see these contacts at
http://mail.google.com.
For help with transferring contacts, go to www.motorola.com/transfercontacts.
Maps
Find a nearby cafe, get directions or step-by-step GPS voice navigation using Google
Maps™.
Find it: Swipe up
Enter what you want to find in the search bar, or tap
Note: Your map screen may look dierent.
Search here
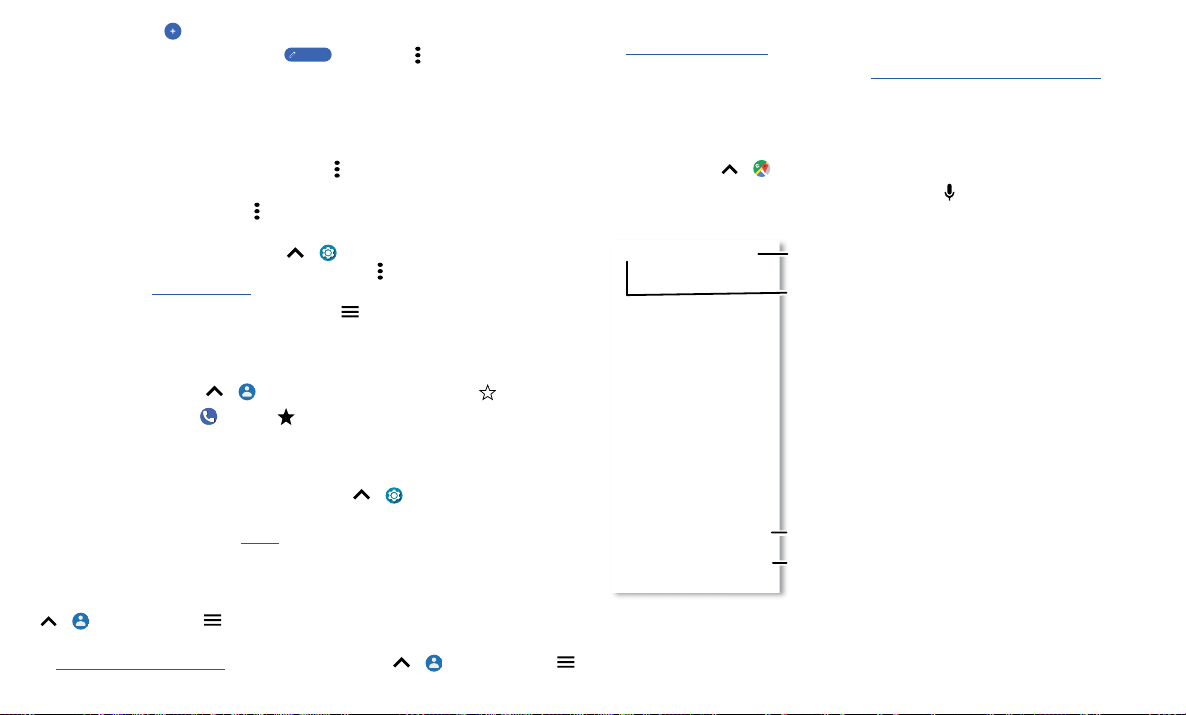
Google Maps screen. Enter an address or search by voice in the search field at the top of the screen.
» Find an address: In the search field, type an address or something you’re looking for,
like “restaurant.” Tap an item to see more, or tap Directions, Call, or Share.
> Maps
Search by voice for
an address or location.
See your places, map
views, settings, help, and
more.
See your current location.
Get directions and
GO
navigation instructions.
to search by voice.
Page 25
» Get directions: Tap GO GO, then enter a place or address.
» Zoom: To zoom in or out, drag two fingers together or apart on the screen.
» Turn and tilt: Rotate two fingers on the map to turn it, or drag up/down to tilt.
» Identify address: Touch and hold a spot on the map to show the nearest address.
» Get map help: Tap > Help.
For more on maps, visit support.google.com/maps.
Drive
Keep all your photos, videos, documents, and more safely in one place—private unless
you choose to share. Available on Google Drive
Find it: Swipe up
» To create a new file or folder, tap .
» To open a file, tap it.
» To edit a document, tap anywhere in the text to begin typing.
> Drive
TM
from all your devices.
Music, movies, TV & YouTube
FM Radio
Find it: Swipe up > FM Radio
Plug in a headset, then use the arrows to tune to a higher/lower frequency station.
Note: Your phone has the Frequency Modulation (FM) broadcast receiver functionality
for reception without data usage. The phone will perform an auto tuning for the radio
channels with the best signal.
YouTube™
Watch videos and podcasts from YouTube users everywhere—or log in to your account
to share your own.
Find it: Swipe up
> YouTube
Clock
Find it: Swipe up > Clock
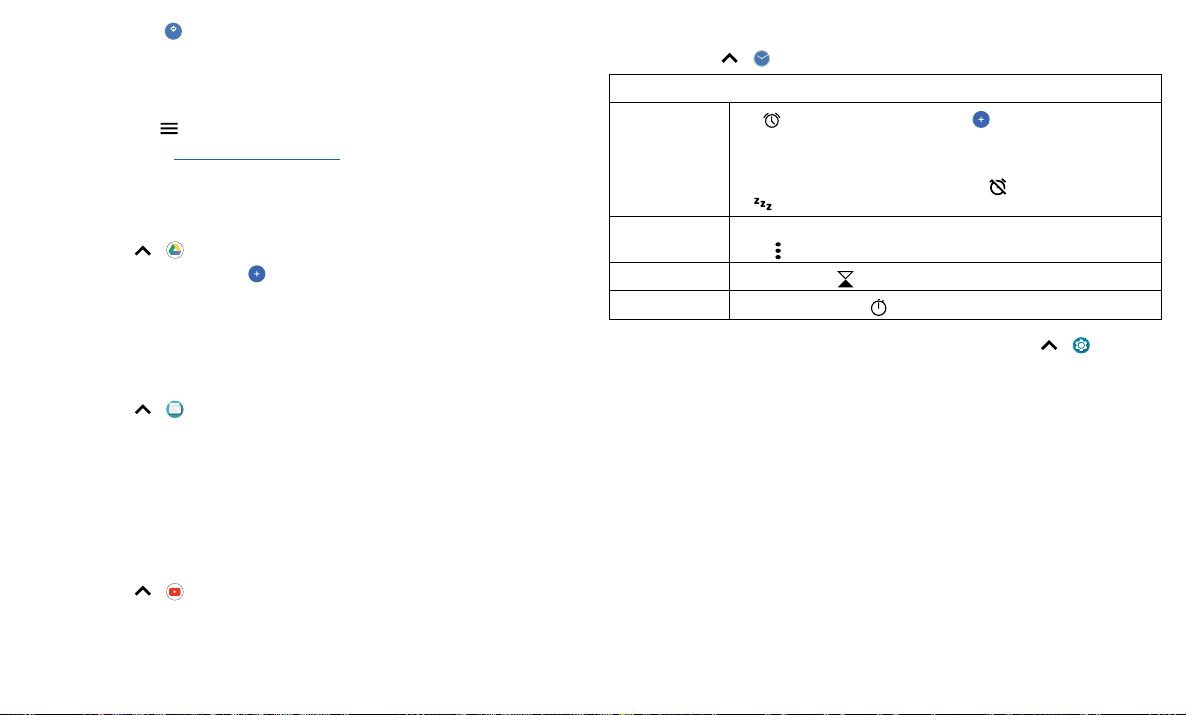
Options
Alarm
Clock To change your alarm volume, snooze delay, or other settings, tap
Timer For a timer, tap
Stopwatch
Tip: To set your current date, time, time zone, and formats, swipe up > Settings >
System > Date & time.
. Tap an alarm to edit it, or tap to add a new alarm.
Tap
Tip: Pressing the volume button up or down sets the volume level
for that alarm.
When an alarm sounds, tap and drag to
to to snooze for ten minutes.
> Settings. For other time zones, tap Home time zone.
Menu
.
For a stopwatch, tap
.
to turn it o, or drag
More apps
Page 26

Connect, share & sync
Connect accessories, computers, networks, and more.
Connect with Wi-Fi
Turn Wi-Fi power on/o
Find it: Swipe up > Settings > Network & internet, then tap the switch to turn it
on
When Wi-Fi is on, your phone automatically reconnects to available networks it has
used before.
Note: You can also turn Wi-Fi on and o in Quick settings.
Connect to networks
To find networks in your range:
1 Swipe up > Settings > Network & internet > Wi-Fi.
2 With Wi-Fi turned on, tap a found network to connect to it. When connected, you’ll
in the status bar.
see
Note: If you see a question mark in the Wi-Fi status indicator , swipe the status bar
down, tap the network, and enter the network’s password.
Wi-Fi hotspot
Your can make your phone a Wi-Fi hotspot to provide portable, convenient Internet
access to other Wi-Fi enabled devices. Your phone turns o Wi-Fi and uses the mobile
network for Internet access. This feature may require an additional subscription service
from your service provider.
Find it: Swipe up
hotspot
Note: These steps may vary depending on your network.
To set up security:
• Hotspot name: Enter a unique name for your hotspot.
• Hide my device: Hide your hotspot from other devices.
> Settings > Network & internet > Hotspot & tethering > Wi-Fi
• Security: Select the type of security you want: None or WPA2-Personal. For
WPA2-Personal, enter a unique password (8 characters) that others will need to
access your Wi-Fi hotspot.
Note: To change your hotspot password or turn o hotspot automatically, tap
Advanced.
Connect with Bluetooth wireless
Turn Bluetooth power on
To turn Bluetooth on, swipe the status bar down and touch . Touch and hold it to
open Bluetooth settings.
Note: Your phone automatically turns on Bluetooth power when you connect to a
paired device.
Tip: To extend battery life or stop connections, turn Bluetooth o when you’re not using
it.
Connect devices
The first time you connect a Bluetooth device, follow these steps:
1 Make sure the device you are pairing with is in discoverable mode (for details, refer to
the guide that came with the device).
2 Swipe up > Settings > Connected devices > Pair new device.
3 With Bluetooth turned on, tap a found device to connect it (if necessary, tap Pair or
enter a passkey like 0000). You can tap
the device will be used for.
When the device connects, the Bluetooth connected indicator
of the screen.
To automatically disconnect or reconnect a device, just turn the device o or on.
Note: Using a mobile device or accessory while driving may cause distraction and may
be illegal. Always obey the laws and drive safely.
Transfer files
» Photos or videos: Open the photo or video, then tap > Bluetooth.
to rename the device and choose what
appears at the top
Connect, share & sync
Page 27

» Contacts: Swipe up > Contacts, tap a person, then tap Menu > Share >
Bluetooth.
Bluetooth tethering
To share your phone’s internet connection via Bluetooth, swipe up > Settings
> Network & internet > Hotspot & tethering and tap the switch to turn on Bluetooth
tethering.
Share files with your computer
Note: Copyright—do you have the right? Always follow the rules. See “Content
Copyright” in the legal and safety information on your phone.
USB
To load music, pictures, videos, documents, or other files from your computer, connect
your phone to your computer with a USB cable. To change the type of USB connection,
swipe the status bar down and tap Android System > USB Preferences > File transfer.
Tip: Make sure to connect the phone to a high power USB port.
Note: The first time you use a USB connection, your computer may indicate that drivers
are being installed. Follow any prompts you see to complete the installation. This may
take a few minutes.
» For Microsoft® Windows®: On your computer, choose Start > Windows Explorer. Your
phone will appear as a connected drive where you can drag and drop files. For more
instructions or driver files, visit www.motorola.com/support.
» For Apple™ Macintosh™: Use Android File Transfer, available at www.android.com/
filetransfer.
Virtual Private Network (VPN)
A VPN lets you access files on a secured network (like an oce network with a firewall).
Contact the network administrator for VPN settings, and any additional apps or
requirements.
To enter VPN settings, swipe up
VPN. Tap
network administrator. Select the VPN name to connect.
Connect, share & sync
to add a new VPN. Choose the type of VPN and enter settings from the
> Settings > Network & internet > Advanced >
Share your data connection
Your computer can access the Internet through your phone’s mobile network—you just
need a USB cable.
Note: Your phone turns o Wi-Fi and uses the mobile network for Internet access. This
feature may require an additional subscription service from your service provider.
1 Connect your phone to your computer using a USB cable.
Note: If your computer is running something older than Microsoft Windows 7 or
Apple Macintosh OSX, it might require special configuration.
2 On your phone, swipe up > Settings, and make sure Wi-Fi is o.
3 In Settings, tap Network & internet > Hotspot & tethering, then tap the USB
tethering.
To stop the connection, tap USB tethering again, then disconnect your phone from
your computer.
Connect with NFC
Note: NFC is not available in all areas or on all models.
Near Field Communication technology lets you instantly share an item on your phone
(like a web link, contact, or a photo) by touching the back of your phone to the back of
another NFC-enabled device.
Find it: Swipe up
NFC
Note: The other device must support NFC, too.
1 Open the screen that contains the item you want to share.
2 Tap > Android Beam.
3 Touch the back of your phone to the back of the other device until you hear a sound.
Mobile payment
You can use a secure payment app to pay for your purchase (where available and
supported).
Look for the NFC logo to confirm that you can make a mobile payment. Touch the
back your phone to the payment device to pay for your purchase. You may need to
> Settings > Connected devices > Connection preferences >
Page 28

authenticate your purchase using your fingerprint or passcode.
Print
To print your photos, documents, and more from your phone, check if your printer’s
manufacture has an app on Google Play. Then swipe up
devices > Connection preferences > Printing to get started.
You can also send your photos, docs, and more to any Android device in your cloud or
to Google Drive. Just download the Cloud Print app from Play Store.
> Settings > Connected
Sync to the cloud
One account with access to everything, everywhere—phone, tablet, computer.
Sync your Google account
When you log in to the same Google account, all devices can get to all the same apps,
movies, books, and music from Google Play—plus you share the same Gmail, Google
Calendar™, and Google Mobile™. To add Google accounts to your phone, swipe up
Settings > Accounts > Add account > Google.
Phone & tablet
Your Android phone and tablet can work together to help you get the most out of both:
» Transfer media and files: Copy files to your phone and transfer them to other
devices—see Transfer files.
» Phone hotspot: If you have a Wi-Fi tablet, turn your phone into a Wi-Fi hotspot to let
your tablet access the Internet anywhere—see Wi-Fi hotspot.
» Bluetooth® accessories: If you have a Bluetooth keyboard or other accessories to use
with your tablet, remember you can use them with your phone too. To connect them,
see Connect with Bluetooth wireless.
card for best results.
Move files from your phone to a memory card
To move files to a microSD card (sold separately):
1 Swipe up > Settings > Storage, then tap the SD card name.
2 Touch and hold a folder or a particular item, then tap Menu > Move to...
Mount or unmount memory card
To mount an microSD card, just put it in your phone (see Insert the SIM and microSD
cards).
To unmount your microSD card (so you can take it out of your phone), swipe up
Settings > Storage. Then tap next to the microSD card name.
Caution: Do not remove a microSD card while your phone is using it or writing files to it.
Airplane mode
>
Use airplane mode to turn o all your wireless connections—useful when flying. Swipe
the status bar down and tap Airplane mode
Note: When you select airplane mode, all wireless services are disabled. You can then
turn Wi-Fi and/or Bluetooth power back on, if permitted by your airline. Other wireless
voice and data services (such as calls and text messages) remain o in airplane mode.
Emergency calls to your region’s emergency number can still be made.
Mobile network
You should not need to change any network settings. Contact your service provider for
help.
To see network settings options, swipe up
Mobile network.
Use a memory card
You can move pictures, videos, audio, and other media files from internal phone storage
to a microSD card (sold separately). You can remove the microSD card and put it in
another device, so you can copy or view the media files on that device. You can also
view the storage space available or erase all content to start fresh.
Note: Your phone supports microSD cards up to 1 TB. Use a Class 10 (or higher)microSD
Connect, share & sync
>
.
> Settings > Network & internet >
Page 29
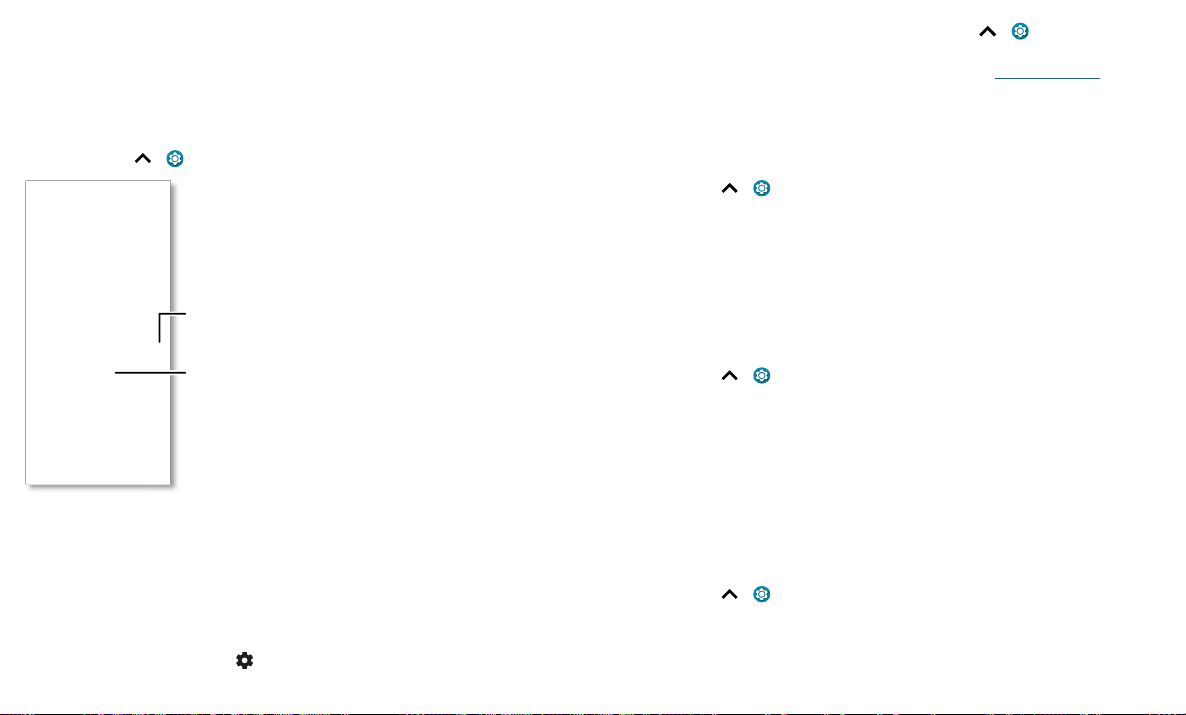
Protect your phone
Make sure your information is protected in case your phone is lost or stolen.
Screen lock
The easiest way to protect your phone is to lock your touchscreen when you are not
using it. You can choose the best method for you to unlock your phone.
Find it: Swipe up
Security
SECURITY STATUS
Google Play Protect
Apps scanned yesterday at 12:00PM
Find My Device
On
Security update
January 1, 2020
Google Play system update
April 1, 2020
DEVICE SECURITY
Screen lock
Pattern
Fingerprint
Smart Lock
Device admin apps
No active apps
Encryption & credentials
Encrypted
Advanced
Trust agents, Screen pinning
Security screen that shows options for locking your phone’s screen.
1 Tap Screen lock and select the lock type:
» None: Turn o the screen lock.
» Swipe: Drag up from the bottom of the screen to unlock.
» Pattern: Draw a pattern to unlock.
» PIN: Enter four to sixteen digits to unlock.
» Password: Enter four to sixteen letters, digits, or symbols to unlock.
2 After setting the lock type, tap for screen lock settings.
Protect your phone
> Settings > Security
Set your screen lock,
then tap to adjust
settings.
Add a fingerprint for
more unlock options.
To change when your touchscreen goes to sleep, swipe up > Settings > Display >
Advanced > Screen timeout.
Note: You can make emergency calls on a locked phone (see Emergency calls). A
locked phone still rings, and you do not need to enter a PIN or password to answer a
call.
Smart lock
Keep your phone unlocked when it’s safe with you.
Find it: Swipe up
» Tap On-body detection to keep your phone unlocked when it’s in motion.
» Tap Trusted places and Trusted devices to add locations and nearby devices that
will keep your phone unlocked.
» Tap Voice Match to access the Google Assistant, email, calendar and more when your
phone is locked.
Unlock with your fingerprint
You can use the fingerprint sensor to unlock your phone.
Find it: Swipe up
Can’t unlock?
If you forget your pattern, PIN, or password, you can enter your Google account email
and password on another device to unlock the phone.
If you don’t have a Google account on your phone, contact your service provider to
have your phone factory reset.
Warning: A factory reset will delete all data on your phone.
Your privacy
Keeping your information safe is important.
Find it: Swipe up
Tap Permission manager to see which apps have permissions to access private
information, such as calendar events, contacts, email, and your location.
Tap an app, then tap one of the apps that have permissions and tap Allow or Deny.
> Settings > Security > Smart Lock
> Settings > Security > Fingerprint
> Settings > Privacy
Page 30

Note: Some apps, such as Map, request your location in order to provide information,
like directions or helping you find a nearby gas station. Turning o permissions may
cause an app not to function correctly.
Passwords
Your phone briefly shows password characters as you type. To turn this o, swipe up
Settings > Privacy > Show passwords.
>
Notifications
Your phone shows notifications even when it’s locked.
To choose which notifications show, swipe up
screen. Tap to show all, none, or only those that are not sensitive.
> Settings > Privacy > Lock
Location
Location services, like GPS, Wi-Fi, mobile networks, and sensors help estimate your
phone’s location.
To see recent location requests and which apps can determine your phone’s location,
swipe up
Allow only while using the app or Deny.
> Settings > Location. Tap App permission, then tap an app. Choose
Screen pinning
Need to keep an important screen handy, like a boarding pass or shopping coupon? Pin
the screen for easy access.
Find it: Swipe up
the switch to turn it on
To pin a screen, swipe up and hold to see recent apps. Tap the icon at the top of the
app and tap
To unpin the screen, swipe up and hold..
> Settings > Security > Advanced > Screen pinning, then tap
Pin.
Backup & restore
Find it: Swipe up > Settings > System > Backup > Back up to Google Drive
Your Google account data is backed up online. If you reset or replace your phone, just
log in to your Google account to restore the contacts, events, and other details you
synced with the account.
To restore your Google Play apps, see Take care of your apps.
App safety
Tip: Choose your apps and updates carefully, as some may impact your phone’s
performance—see Choose carefully.
Apps from Google Play
Get music, movies, books, apps, games, and more.
Find it:
Apps from the Internet
You can get apps from other online app stores using your browser.
Tip: When installing an app, make sure you read the alerts that tell you what information
the app will access. If you don’t want the app to access this information, cancel the
installation, or set strong privacy permissions: swipe up
To let your phone install apps that are not on Google Play, swipe up
Apps & notifications > Advanced > Special app access, then tap Install unknown apps
and choose which apps are allowed to install them.
Choose carefully
Here are a few tips:
Play Store
> Settings > Privacy.
> Settings >
» To help prevent spyware, phishing, or viruses, use apps from trusted sites, like
Play Store.
» Check the app’s ratings and comments before installing. If you doubt the safety of an
app, don’t install it.
» Apps use up memory, data, battery, and processing power—some more than others.
If you’re not happy with how much memory, data, battery or processing power an
app is using, uninstall it.
» Monitor children’s access to apps to help prevent exposure to inappropriate content,
and set limits on phone use: swipe up
parental controls.
> Settings > Digital Wellbeing &
Protect your phone
Page 31
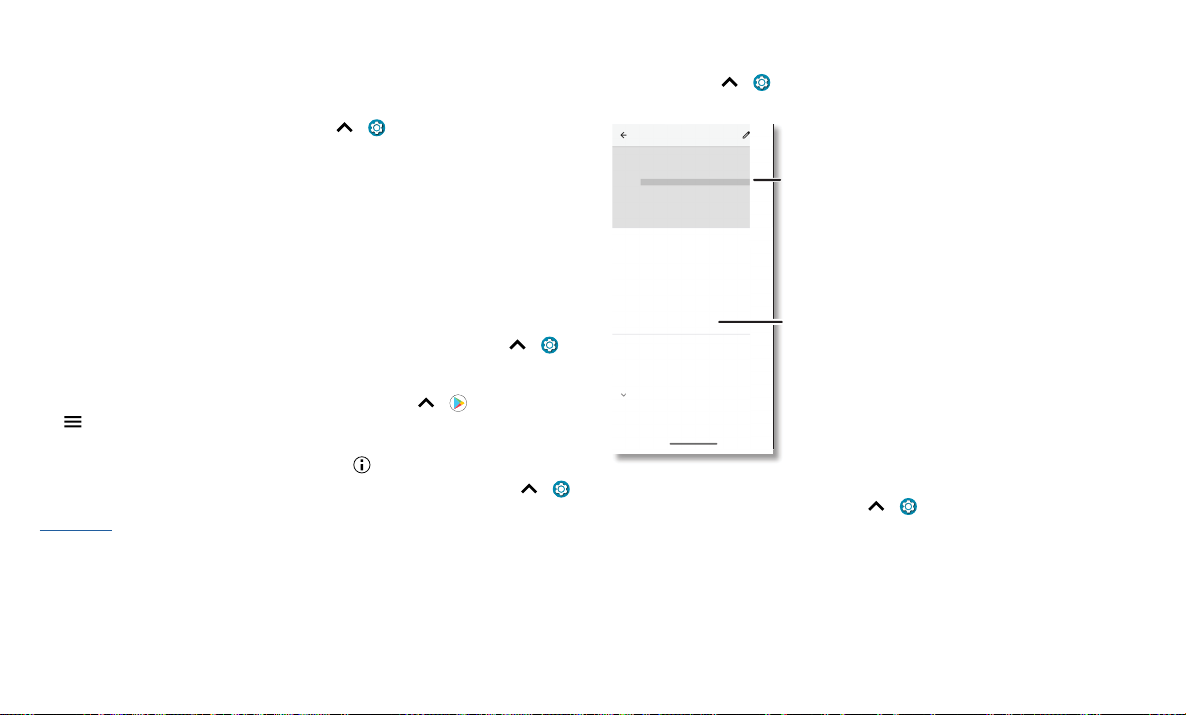
» Certain apps may not provide completely accurate information. Take care, especially
data used for this period.
when it comes to personal health.
Set app permissions
You may be asked for permissions when you use a feature in an app.
To modify the app permissions settings, swipe up
> Settings > Apps &
notifications > Advanced > Permission manager, then tap a feature (such as
microphone) to see which apps have permissions to use it. Tap Allow or Deny to turn
the permission on or o.
Take care of your apps
» Uninstall apps: To remove an app from your phone, touch and drag the app, then
drag it to Uninstall.
To remove an app from the home screen, touch and drag the app, then drag it to
Remove. The app isn’t removed from your phone, just the home screen.
Note: Not all apps can be uninstalled, but they can be disabled.
» Disable/Stop apps: To disable an app or force it to stop running, swipe up >
Settings > Apps & notifications. Tap an app, then tap Disable or Force stop. To
enable it, tap Enable.
» Reinstall apps: To reinstall apps from Google Play, swipe up > Play Store, then
> My apps & games > Library. The apps you’ve used before are listed and
tap
available for download.
» See app details: Touch and hold an app, then tap .
» See app data usage: To show which apps are using the most data, swipe up >
Settings > Network & internet > Mobile network > App data usage. For more, see
Data usage.
Data usage
You can track the amount of data your phone uploads and downloads.
Find it: Swipe up
usage
MOTO
18.35 MB used
0 B
2.00 GB data warning
25 days left
Mobile data
Access data using mobile network
Roaming
Connect to data services when roaming
App data usage
18.35 MB used Dec 11, 2019 - Jan 10, 2020
Data warning & limit
CALLING
Wi-Fi calling
Off
Advanced
Carrier video calling, Access Point Names, Allow..
Data Usage screen. View current billing cycle, data usage and a breakdown of which apps use the most data.
Some apps transfer data in the background when you’re not viewing them—to help
reduce this type of data usage, swipe up
Advanced > Data Saver.
Note: Usage information is provided to help you manage your phone. This may not
match the amounts charged by your service provider, as they’re not measured in the
same way.
> Settings > Network & internet > Mobile network > App data
See the total amount of
2.00 GB
Set a warning and limit
for how much data you
use.
> Settings > Network & internet >
Protect your phone
Page 32

Troubleshoot your phone
Restart or remove an app
If an app locks up your phone as soon as you turn it on, restart in Safe Mode: Press and
hold the Power button. When you see the Power o option, press and hold it. Your
phone restarts with Safe mode in the lower left. Then, try removing the app.
To exit safe mode, restart your phone.
Restart your phone
In the unlikely event that your phone stops responding to touches and button presses,
try a reboot—press and hold the Power button until the screen goes dark and your
phone restarts.
Check for software update
To manually check for updates, swipe up > Settings > System > Advanced >
System updates.
Your phone downloads updates over your Wi-Fi connection (if available) or mobile
network. We recommend that you download updates over a Wi-Fi connection. These
updates can be quite large and may not be available in all countries.
Note: When updating your phone, make sure you have enough battery power to
complete the update.
If the mobile network updates are not available in your country, update using a
computer. On your computer, go to www.motorola.com/update.
Reset
To reset your phone to factory settings and erase all the data on your phone, swipe
> Settings > System > Advanced > Reset options > Erase all data (factory
up
reset).
Warning: All downloaded apps and user data on your phone will be deleted. Data on
the cloud will not be deleted.
Stolen phone
Your phone has Android Device Manager. You can remotely lock or reset your device
to protect your device from thieves. For details, see www.google.com/android/
devicemanager.
Find the IMEI number
You can find the IMEI number by typing *#06# on your phone’s dialpad. Or swipe up
Settings > About phone > IMEI.
>
Note: For service and support, see Get more help.
Troubleshoot your phone
Page 33
Accessibility
See, hear, speak, feel, and use. Accessibility features are there for everyone, helping to
make things easier.
Find it: Swipe up
For more information about your phone’s accessibility features, visit www.motorola.
com/accessibility.
Create a shortcut
Use a gesture to quickly activate an accessibility features on your phone. For more
information, swipe up
Tap Shortcut service and choose an app. When the shortcut is on, press both volume
buttons for three seconds to start the app.
Make your phone speak
Select to speak
Find it: Swipe up > Settings > Accessibility > Select to Speak
Turn on, then slide two fingers up from the bottom of the screen and press
phone reads the screen from top to bottom. To have your phone continue to read even
if you move to another screen, tap Settings > Read in background to turn it on.
TalkBack
Use TalkBack to read your screen out loud—screen navigation, selections, even books.
To turn TalkBack on or o, swipe up
» Ta p something on the screen to hear a description or text readout.
» Double-tap anywhere on the screen to open or activate the last touched item.
» Swipe using two fingers to scroll through lists or between screens.
Text-to-speech output
To set the language, speech rate and pitch of the screen reader, swipe up >
Settings > Accessibility > Text-to-speech output.
> Settings > Accessibility
> Settings > Accessibility > Volume key shortcut.
. Your
> Settings > Accessibility > TalkBack.
Braille
Combine your Braille display with TalkBack for braille and speech feedback.
1 Download the BrailleBack™ app on Google Play (swipe up > Play Store), and
install it on your phone.
2 Swipe up > Settings > Accessibility > BrailleBack.
3 Turn on your Braille display and put it in Bluetooth pairing mode.
4 On your phone, swipe up > Settings > Bluetooth, then tap the switch at the
top to turn it on and scan.
5 Tap the name of your Braille display to pair it with the phone.
TTY (U.S. only)
You can use your phone in TTY mode with standard teletype machines.
Note: Wi-Fi must be turned o.
Tap
Phone > Menu > Settings > Accessibility > TTY mode and select the mode
you need:
» TTY Full: Type and read text on your TTY device.
» TTY HCO: Type on your TTY device and listen to voice replies on your phone’s
speaker.
» TTY VCO: Speak into your phone and read text replies on your TTY device.
Note: You’ll need a cable/adapter to connect your TTY device to the headset jack on
your phone. Refer to your TTY device guide for mode and usage information.
Speak to your phone
Speak a command to turn on an accessibility feature. For example: “Ok, Google, turn on
TalkBack”. For more on voice commands, see Speak.
Change your phone’s display
Display settings & magnification
Get a closer look.
» Change font size: Increase the font size on your screen. Swipe up > Settings >
Accessibility
Page 34
Accessibility > Font size. See also Customize sounds & appearance.
» Change display size: Make the items on the screen larger. Swipe up > Settings
> Accessibility > Display size.
» Pinch to zoom: Pinch to zoom on maps, web pages, and photos—to zoom in, tap the
screen with two fingers and then drag them apart. To zoom out, drag your fingers
together. You can also double-tap to zoom in.
» Screen magnification: Triple-tap the screen for full screen magnification, or triple-
tap and hold to temporarily magnify. Swipe up
Magnification.
» Display brightness: Swipe the status bar down, and drag the slider to set brightness
level. Setting brightness to a high level decreases your phone’s battery life.
» Browser: Choose text size when browsing websites. Swipe up > Chrome >
> Settings > Accessibility. Select Force enable zoom to allow zooming on all
Menu
web pages.
> Settings > Accessibility >
Messages
To make text entry even easier, use features like auto-capitalization, auto-correction, and
more. Swipe up
Gboard > Text correction. Or speak your message. Tap
> Settings > System > Languages & input > Virtual keyboard >
on the keyboard.
Change your phone’s sounds
Calls
When you want to hear who’s calling, assign a unique ringtone to a contact. Swipe up
> Contacts, tap the contact, then tap Menu > Set ringtone.
To end a call by pressing the Power button, swipe up
and tap Power button ends call.
Volume & vibrate
Find it: Swipe up > Settings > Sound & lights
» Drag the volume sliders to set volume levels for your music or videos, alarms, and
ringtones/notifications.
» To make your phone vibrate for incoming calls (even when the ringer is silent), tap
Vibrate for calls.
Tip: Feel a vibration when you tap the screen. Tap Advanced > Touch vibration to turn
it on/o.
> Settings > Accessibility
Accessibility
Page 35

Get more help
Get answers, updates, and info:
» Help is here: Swipe up > Settings > Help to get walk-through tutorials, how-
tos, or FAQs, right on your phone.
» Get more: Get software, FAQs, and more at www.motorola.com/mymotoone.
» Join the conversation: Find us on YouTube, Facebook™, and Twitter.
Where is my legal, safety, & regulatory information?
In order to provide you with better access to this important information, we’ve made
the materials accessible from the phone’s settings menu and on the web. Review these
materials prior to using your device. To access the materials from a connected phone,
go to Settings > About phone > Legal information, and select a topic. To access the
materials on the web, visit www.motorola.com/device-legal.
Service & repairs
If you have questions or need assistance, we’re here to help. Go to www.motorola.com/
support, where you can select from a number of customer care options.
Copyright & trademarks
Motorola Mobility LLC
222 W. Merchandise Mart Plaza
Chicago, IL 60654
www.motorola.com
Certain features, services and applications are network dependent and may not be available in all areas; additional terms,
conditions and/or charges may apply. Contact your service provider for details.
All features, functionality, and other product specifications, as well as the information contained in this guide, are based upon
the latest available information and believed to be accurate at the time of printing. Motorola reserves the right to change or
modify any information or specifications without notice or obligation.
Note: The images in this guide are examples only.
MOTOROLA, the stylized M logo, MOTO, and the MOTO family of marks are trademarks or registered trademarks of Motorola
Trademark Holdings, LLC. LENOVO is a trademark of Lenovo. Google, Android, Google Play and other related marks and
logos are trademarks of Google LLC. microSD Logo is a trademark of SD-3C, LLC. Manufactured with Dolby technologies
under license from Dolby Laboratories. Dolby, Dolby Audio, and the double-D symbol are trademarks of Dolby Laboratories.
All other product or service names are the property of their respective owners.
© 2019 Motorola Mobility LLC. All rights reserved.
Product: motorola one hyper
Manual Number: SSC8C73702-B
Get more help
 Loading...