

Page 1
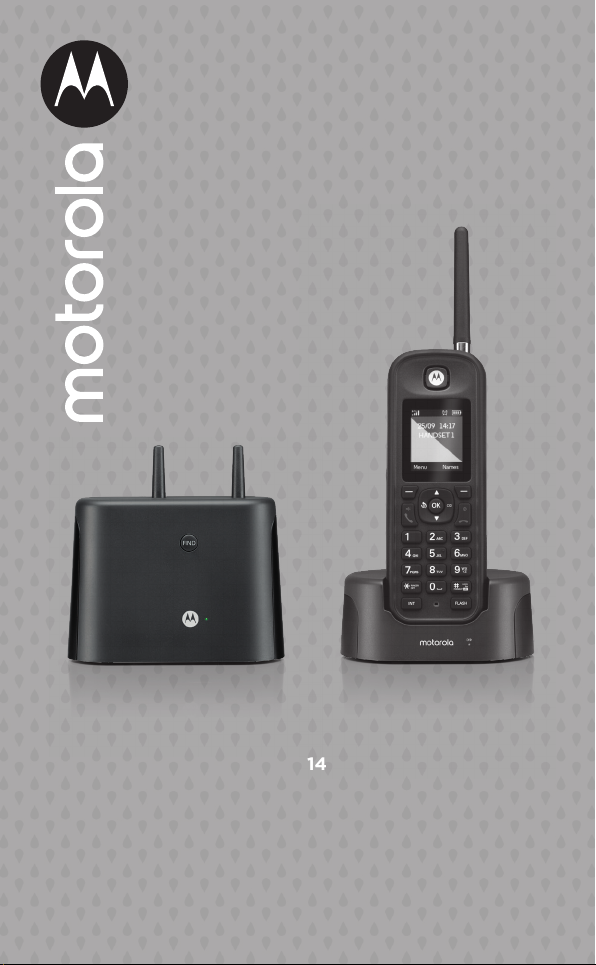
Motorola O2
Digital Cordless Telephone
with Answering Machine
For: O211, O212, O213 and O214
Handset: Motorola O21-HS
Base: Motorola O21-B
Charger: Motorola O21-C
Quick Start Guide
For a full explanation of all features and instructions, please refer
to the User Guide.
Page 2
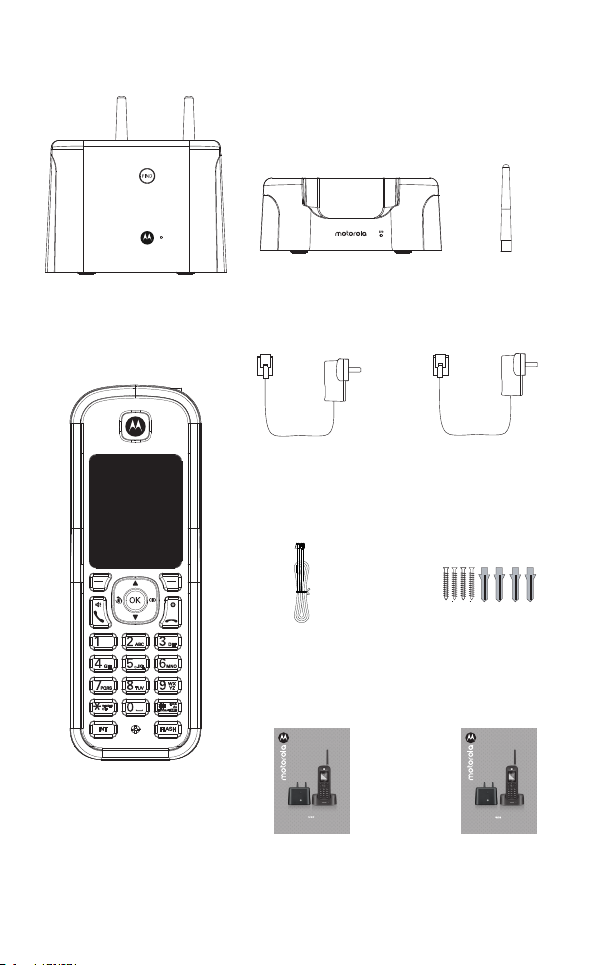
1. What’s in the box
4
e
Base
(Motorola O21-B)
Handset
(Battery pre-installed)
(Motorola O21-HS)
Charger cradle
(Motorola O21-C)
AC power adaptor
for the base
Telephone line
cord
Motorola O2
Digital Cordless Telephone
with Answering Machine
Ideal for outside use
For: O211, O212, O213 and O214
Warning: Charge the handset for 16 hours before use.
AC power adaptor for
the charger cradle
Screws and plugs for
wall mounting
FFoorr:: OO221111,, OO221122,, OO221133 aanndd OO22114
QQuuiicckk SSttaarrtt GGuuiidde
For
a full explanation of all features and instructions,
please refer to the User Guide.
User guide Quick start guide
Antenna
Motorola O2
Digital Cordless Telephone
with Answering Machine
2
Page 3

If you have purchased an O2 multiple pack you will also have the following
additional items:
• Handset with battery pre-installed (Motorola O21-HS)
• Antenna
• Charger cradle (Motorola O21-C)
• AC power adaptor for the charger cradle
• Screws and plugs for wall mounting
3
Page 4

2. Getting started
A. Connecting the base
1. Plug the telephone line cord into the socket marked l on the underside of
the base and the other end of the line cord into the telephone line wall jack.
2. Plug the AC power jack into the socket marked
base and plug the AC adaptor into the AC power outlet. The green Power/In
use light comes on and you will hear a confirmation tone.
B. Installing and charging the handset
P on the underside of the
1. Plug the AC power jack into the socket marked P on the underside of the
charger cradle and plug the AC adaptor into the AC power outlet.
2. The 750mAh Ni-MH battery pack is pre-installed. If you are charging the
batteries for the first time, place the handset on the charger cradle to
charge for at least 16 hours continuously.
3. When the handset is fully charged,
display. The display will show the time and handset number (e.g. 2) to
indicate that it is registered to the base.
Important
Warning! Use only the approved rechargeable Ni-MH battery pack (750mAh
Ni-MH rechargeable battery pack) supplied with your O2.
icon will appear steady on the
4
Page 5

C. Installing the antenna to the handset
To fit the antenna
screw clockwise
with the screen
facing you.
Unscrew
Screw
D. Replacing the handset battery
1. Unscrew the belt clip, then unscrew the 4 screws on the battery cover (the
screws will stay attached to the battery compartment door) from the back
of the handset and plug in the 750mAh Ni-MH rechargeable battery pack
supplied.
2. Replace the battery cover and screw the cover into place. Finally, screw the
belt clip on.
E. To set date and time manually
1. Press
2.
3. Enter the date using the format MM/DD/YY e.g.
4. Enter the time (HH:MM) and press
5. Press
Menu
Date & Time
, scroll D to
is highlighted. Press
Clock & Alarm
Select
and press
.
Select
08/04/19
Save
If the current time format setting is 12 hour, select am or pm.
.
n to return to standby mode.
Your phone is now ready for use.
5
.
for 4 August 2019.
Page 6

3. Getting to know your phone
Overview of your handset
I
A
B
C
D
E
F
G
H
A Earpiece
B Display
See page 8 for an overview of the display icons.
C Scroll up / Volume up
Scroll up through lists and settings.
During a call, press to increase the earpiece and hands-free volume.
When the phone is ringing, press to increase the handset ringer volume.
D Menu / OK / Secrecy
Enter the main menu.
Select the option displayed on screen.
Confirm menu option –
Turn secrecy on/o during a call.
E Redial list / Pause
In standby mode, press to open the redial list.
Press and hold to enter a pause (P) during pre-dialing.
F Talk / Hands-free
Make or answer a call.
Activate and deactivate hands-free during a call.
G * / Ringer o
Dial a *.
Press and hold to switch handset ringer on or o.
J
K
L
M
N
O
P
OK
is displayed on screen.
6
Q
Page 7

H Intercom
Press to make an internal call.
I Antenna
J Phonebook menu / Clear / Back
In standby mode, press to open the phonebook menu.
Clear incorrect input during text editing.
Return to previous menu.
K Calls Lists
Open the Calls Lists.
L End / Exit / Switch handset on/o
End a call.
When in a menu, go back to standby mode.
Press and hold to switch handset o (when in standby) or on.
M Phonebook / Scroll Down / Volume down
Open the phonebook.
Scroll down through lists and menus.
During a call, press to decrease the earpiece and hands-free volume.
When the phone is ringing, press to decrease the handset ringer volume.
N Change case / Keypad lock / # / CID format
Press to change the case when entering letters / editing.
Press and hold to lock the keypad.
Dial a #.
In calls lists: Press to toggle the Caller ID display format among 7, 10 and 11
digits when returning calls from Caller ID list.
O Flash
Use flash (F) functions.
P Microphone
Q Belt clip
7
Page 8

4. Handset display
Display icons
DECT signal strength
Handset ringer volume is O.
Displays when in hands-free
mode.
Displays when the answering
machine is on.
The alarm clock has been set.
The keypad is locked.
Displays when you have new
answering machine messages.
Displays when you have new
voicemails.
Displays when you have missed
calls and new number(s) in the
Calls list.
1
This feature is dependent on your
Network Service provider supporting
the service. A subscription fee may be
payable.
2
For this feature to work, you must
subscribe to Caller ID Service from
your network operator. A subscription
fee may be payable.
1
2
The approximate power levels of your
battery are indicated as follows:
Battery is fully charged
Battery is partially charged
Battery is running low
Battery is empty
5. Using the phone
Making a call
Enter the phone number and press t
to dial the phone number entered.
Making a call using fast call keys
Press and hold the relevant keypad
number to dial the pre-stored number
directly.
Making a hands-free call
Press t twice, then dial the telephone
number.
Answering a call
Press t to answer the incoming call.
Answering a call in hands-free
If the handset is o the charger or
auto answer is switched o, press t
twice to answer the call.
If the handset is on the charger and
auto answer is switched on, lift the
handset and press
Ending a call
Press n or replace the handset on the
cradle.
Adjusting volume
During a call, press U or D to adjust
the volume.
Muting a call
1. During a call, press
The display shows
your caller cannot hear you.
2. Press O to return to your caller.
Dialing from the redial list
1. Press r. The last number dialled is
highlighted.
2. Scroll
want.
3. Press
t to dial.
t.
Secrec.
or OK.
Secrecy On
and
U or D to the entry you
8
Page 9

Dialing from the calls list
1. Press
2. Scroll
3. Press
4. Scroll
5. Press
MENU
press
calls list (
Calls, Dialed Calls, Delete Calls
want.
want.
, scroll to
Select
.
U or D to highlight the
Missed Calls, Received
Select
.
U or D to the entry you
t to dial the number.
Call Lists
and
) you
Adding an entry to the
phonebook
Names
.
to enter the
Add Entry
and press
Select
Save
. The
.
1. Press
phonebook menu.
2. Scroll D to
Select
3. Enter a name and press OK.
4. Enter a number and press
5. Scroll U or D to the ringtone
you want and press
entry is stored.
Dialing from the phonebook
1. Press D. The first entry in the
phonebook is highlighted. Scroll
U or D to the entry you want.
2. Press
t to dial the number.
Paging/Finding the handset
1. Press f on the base. All handsets
registered to the base will ring and
display
Paging Call
2. To stop the ringing, press f on the
base again or press
button on the handset.
.
Stop
or any
Switching on the Answering
Machine
The O2 Answering Machine records
unanswered calls on the base when
it is activated. You can operate your
Answering Machine from the handset
or remotely from another phone.
From the handset:
1. Press
2. Scroll
MENU
Answer Machine
press
, the display shows
D to
Answer On/O
Select
.
, press
Select
.
and
3. Scroll U or D to O or
press
Select
.
4. Press
n to return to standby.
On
then
To change answer delay
Answer delay sets the number of
times the O2 will ring before the
answering machine picks up your
call and starts playing the outgoing
message.
You can change this setting to
between 2-9 rings or
default setting is 6 rings.
1. Press
2. Scroll
3. Scroll
4. Scroll
5. Press
Note
If
machine will answer after 2 rings
during remote access if you have new
messages. If you do not have any
new messages, it will answer after 6
rings. This means you can hang up
after 3 rings knowing you have no
new messages, saving you time and
the cost of the call.
Menu
Answer Machine
D to
press
Select
U or D to
and press
U or D to the setting you
want and press
n to return to standby.
Time Saver
is set, the answering
Time Saver
, the display shows
, press
Select
Answer Settings
.
Answer Delay
Select
.
Select
.
. The
.
and
To switch message alert tone
on / o
When you have new messages, with
the audible message alert switched
on, you will hear an audible alert once
at the handset and the answering
machine base will beep every 10
seconds. The default setting is O.
1. Press
2. Scroll
3. Scroll
4. Scroll
5. Press
Menu
Answer Machine
press
and press
press
, the display shows
D to
Answer Settings
Select
.
U or D to
Select
U or D to
Select
.
n to return to standby.
, press
Select
Message Alert
.
O
or On then
.
and
9
Page 10

6. Help
The
• Bad battery contact – move the handset slightly.
• Battery is full – no need to charge.
icon is not scrolling during charge
No dialing tone
• No power – check the connections. Reset the phone: unplug and plug back
in the mains.
• Batteries are empty – charge the batteries for at least 16 hours.
• You are too far from the base – move closer to the base.
• Wrong line cable – use the line cable provided.
• Line adaptor (when needed) is not connected to the line cord – connect the
line adaptor (when needed) to the line cord.
Poor audio quality
• The base is too close to electrical appliances, reinforced concrete walls
or metal door frames – move the base at least one meter away from any
electrical appliances.
The icon is blinking
• Handset is not registered to the base – register the handset to the base.
• You are too far from the base – move closer to the base.
No ring tone
• The ring tone is deactivated.
• Increase the volume.
Caller ID service does not work
• Check your subscription with your network operator.
Need more help?
• For a full explanation of all features and instructions, please refer to the
User’s Guide.
7. General Information
If your product is not working properly...
1. Read this Quick Start Guide.
2. Contact Customer Service on: 1-833-468-1468.
3. Please refer to the full user guide.
Manufactured, distributed or sold by Meizhou Guo Wei Electronics Co. LTD.,
ocial licensee for this product. MOTOROLA and the Stylized M Logo are
trademarks or registered trademarks of Motorola Trademark Holdings, LLC. and
are used under license. All other trademarks are the property of their respective
owners. © 2019 Motorola Mobility LLC. All rights reserved.
Version 15 (US)
10
 Loading...