

Page 1

@NNTN5466A@
NNTN5466A
Nextel i736 Phone
User’s Guide
Page 2

Page 3

Contents
Getting Started...........................................1
Removing the Battery Door .............................3
Locating Your SIM Card ..................................3
Battery .............................................................4
Powering On and Off.......................................6
Activating Service ............................................ 7
Enabling Over-the-Air Security ........................ 7
Finding Your Phone Number ...........................7
Completing Setup ............................................ 8
Phone Basics................................................. 10
SIM Card Security.......................................... 14
Locking the Keypad .......................................17
Accessories ...................................................18
Wireless Local Number Portability: Bringing
Your Phone Number From Another Carrier ... 18
®
Nextel
Customer Care................................. 18
Making Calls.............................................21
Phone Calls ...................................................21
Direct Connect
Receiving Calls.............................................. 22
Ways to Enter a Number ............................... 23
TM
Calls.................................. 21
Missed Phone Calls .......................................25
Using Speakerphone .....................................25
Using Mute.....................................................26
Making Emergency Phone Calls....................26
Call Alerts ................................................ 29
Sending Call Alerts ........................................29
Receiving Call Alerts......................................29
Using the Call Alert Queue ............................29
Recent Calls............................................. 31
Storing Recent Calls to Contacts...................31
Deleting Recent Calls ....................................32
Entering Text ........................................... 33
Using Alpha Mode..........................................33
Using Word Mode ..........................................33
Special Function Keys ...................................34
Using Numeric Mode .....................................35
Using Symbols Mode.....................................35
Contacts................................................... 37
Viewing Contacts...........................................38
Creating Entries.............................................39
Storing Numbers Faster.................................40
i
Page 4

Editing Entries................................................41
Deleting Entries .............................................41
Checking Capacity......................................... 41
Creating Pauses and Waits ........................... 41
International Numbers ................................... 42
Memo ........................................................43
®
Nextel
Voice Mail ...................................45
Setting Up Your Voice Mail Box.....................45
Playing Messages..........................................45
Changing Your Password ..............................46
Recording Your Name ...................................46
Recording Your Active Greeting ....................46
Advanced Voice Mail Features......................47
Messages .................................................53
Message Notifications....................................53
Voice Mail ......................................................54
Text and Numeric Messages......................... 54
Net Alerts.......................................................55
Call Forwarding........................................57
Forwarding All Calls....................................... 57
ii
Turning Off Call Forwarding...........................57
Forwarding Missed Calls................................58
Viewing Call Forwarding Settings ..................58
Java Applications.................................... 59
Running Applications .....................................59
Suspending Applications................................59
Resuming Applications ..................................59
Ending Applications .......................................60
Downloading Applications..............................60
Installing Applications ....................................60
Deleting Applications .....................................60
Managing Memory .........................................61
Shortcuts on the Main Menu..........................61
Java Applications and GPS Enabled .............62
Ring Tones............................................... 65
Setting Your Phone to Vibrate .......................65
Assigning Ring Tones to Contacts.................66
Ring and Vibrate ............................................66
Viewing Ring Tone Assignments...................66
Downloading More Ring Tones......................66
Managing Memory.........................................67
Page 5

Deleting Custom Ring Tones.........................67
GPS Enabled ............................................69
IMPORTANT: Things to Keep in Mind........... 69
Making an Emergency Call............................70
Viewing Your Approximate Location.............. 71
Enhancing GPS Performance........................ 72
Updating Satellite Almanac Data................... 74
Setting Privacy Options ................................. 75
Using GPS with Map Software ......................76
Nextel Online®Services..........................79
NOL Services.................................................79
Accessing NOL Services From Your Phone.. 79
Voice Records..........................................81
Creating Voice Records................................. 81
Playing Voice Records...................................81
Labeling Voice Records................................. 81
Deleting Voice Records ................................. 82
Locking Voice Records .................................. 82
Managing Memory .........................................82
Advanced Calling Features.................... 83
Call Waiting....................................................83
Switching Between Calls................................83
Putting a Call on Hold ....................................84
Calling 2 People.............................................84
Creating Pauses and Waits While Dialing.....85
Making International Calls..............................85
Setting One Touch Direct Connect ................85
Setting Flip Actions ........................................86
Group Connect
Call Timers.....................................................87
Using Your Phone as a Modem.....................88
Making TTY Calls...........................................89
Special Dialing Codes....................................91
Additional Phone Features.............................91
TM
Calls..................................87
Datebook.................................................. 93
Viewing Datebook..........................................93
Creating Events .............................................94
Editing Events ................................................96
Deleting Events..............................................97
Receiving Reminders.....................................97
Making Calls From Datebook.........................98
iii
Page 6

Customizing Datebook Setup ........................98
Setting Call Filtering.....................................114
Shortcuts................................................101
Creating a Shortcut...................................... 101
Using a Shortcut .......................................... 101
Editing a Shortcut ........................................ 101
Deleting Shortcuts ....................................... 102
Customizing Your Phone......................103
Setting the Volume ...................................... 103
Setting Your Phone to Vibrate .....................103
Using a Headset ..........................................103
Changing the Look of Your Phone...............104
Temporarily Turning Off Calls...................... 105
Using Settings..............................................105
Profiles ...................................................111
Viewing Profiles ...........................................111
Switching Profiles ........................................ 111
How Changing Settings Affects Profiles ......111
Temporary Profiles ...................................... 112
Creating Profiles.......................................... 113
Editing Profiles.............................................113
Deleting Profiles........................................... 113
iv
Nextel®Customer Care ........................ 115
Domestic Customer Care.............................115
Nextel Worldwide
®
Customer Care..............116
Understanding Status Messages......... 117
®
Nextel
Conditions of Service ........................... 121
Terms and
Safety and General Information........... 133
RF Operational Characteristics....................133
Portable Radio Product Operationand EME
Exposure......................................................133
Electro Magnetic Interference/Compatibility 136
Medical Devices...........................................136
Operational Warnings ..................................137
Operational Cautions ...................................138
Accessory Safety Information ......................139
MOTOROLA LIMITED WARRANTY...... 141
Patent and Trademark Information...... 145
Index....................................................... 147
Page 7

DECLARATION OF CONFORMITY
Per FCC CFR 47 Part 2 Section2.1077(a)
Responsible Party Name: Motorola, Inc.
Address: 8000 West Sunrise Boulevard
Plantation, FL 33322 USA
Phone Number: 1 (800) 453-0920
Hereby declares that the product:
Product Name: i736
Model Number: H63XAN6RR4AN
Conforms to the following regulations:
FCC Part 15, subpart B, section 15.107(a),
15.107(d) and section 15.109(a)
Class B Digital Device
Note: This equipment has been tested and found
to comply with the limits for a Class B
digital device, pursuantto part 15of the
FCC Rules. These limitsare designed to
provide reasonable protection against
harmful interference in a residential
installation. This equipmentgenerates,
uses and can radiate radio frequency
energy and, if not installed and used in
accordance with the instructions, may
cause harmful interference to radio
communications. However, there is no
guarantee that interference will not occur in
a particular installation.
If this equipment does causeharmful
interference to radio or television reception,
which can be determined by turning the
equipment off and o n, the user is encouraged
to try to correct the interference by one or
more of the following measures:
• Reorient or relocate the receiving
antenna.
• Increasethe separationbetween the
equipment and receiver.
• Connectthe equipmentintoan outleton a
circuit different from that to which the
receiver is connected.
• Consult the dealer or an experienced
radio/TV technician for help.
v
Page 8

vi
Page 9

Getting Started
volume
controls
PUSHTO TALK
(PTTTM) button
audio jack
accessory connector
antenna
one-line
display
TM
speaker
(in back)
earpiece
back key
light sensor
full-sized
display
navigation
key
power
button
space key
microphone
1
Page 10

Getting Started
p Power button.
Navigation key — press the arrows to
scroll through menus and lists.
O OK key — selects highlighted item;
answers calls.
m Menu key — accesses context-sensitive
menus.
A Option key —selectsthe optionappearing
above it on the display.
s Send key —placesphone calls.
e End key — ends phone calls; returns to
idle screen; in browser mode, returns to
Net main menu.
2
t Acts like s when the flip is closed; turns
Direct ConnectTM/ Group Connect
speakeron and off; usedwith voice names
TM
and voice records.
. Acts like e when the flip is closed;
accessesrecentcalls;sends incomingcalls
to voice mail.
To start using your i736 phone:
• Make sure your SIM cardis in place.
• Charge the battery.
• Activate your service.
• Enable over-the-air security.
Page 11
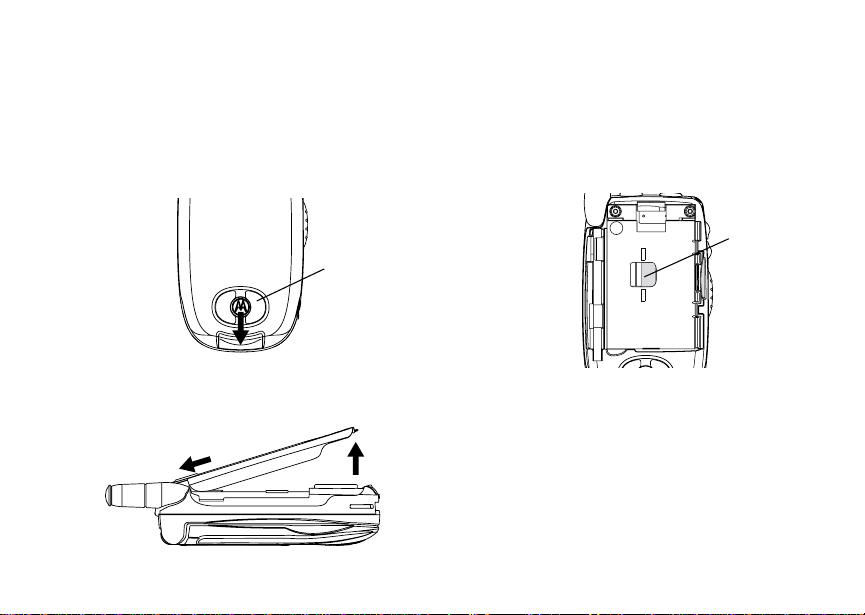
Removing the Battery Door
Removing the Batt ery Door
1 Make sure the phone is powered off. See
“Powering On and Off” on page 6.
2 Slide the releasebutton back untilit releasesthe
battery door.
speaker
3 Allow the battery door to pop up, slide it forward,
and remove it fromthe back ofyour phone.
Locating Your SIM Card
Your SIM (Subscriber Identity Module) card is a
small piece of white plastic located in the SIM card
holderin the back ofyour phone, underneath the
battery.
SIM card
If there is noSIM card in yourphone, contact Nextel
Customer Care at 1-800-639-6111.
3
Page 12
Getting Started
Battery
Inserting the Battery
Yourphone comes with a Standard Lithium Ion
Battery.
1 With the phone powered off, remove the battery
door.
2 Insert the top of the battery into the battery area.
Press the bottom of the battery to secure it.
4
3 Replace the battery door and press it gently until
you hear a click.
Charging the Battery
Yourphone comes with a rapid travel charger.
1 Plug the charger into an electrical outlet.
2 Open the connector cover.
connector
cover
Page 13

Battery
3 Plug the other end of the charger into the
accessory connector.
ChargerAttached appears on the full-sized
display.
Tip: To remove the charger from the accessory
connector: Press the buttons on thesides of
theplug.Pulltheplugstraightout.
4 If you have purchased optional batteries or
chargers, see “Charging T imes”.
Charging Times
SeeyourLithiumIonbatteryandtravelchargerto
determine the appropriate charging times.
Recommended charging times:
Battery Charger
Rapid Standard
Standard
Lithium Ion
High
Capacity
Lithium Ion
For best results, charge the batteries within the
temperature range of 50°Fto 104°F (10°C to 40°C).
Prolonged charging is notrecommended.
2 hours 4 hours
3hours 7hours
5
Page 14
Getting Started
Removing the Battery
1 With the phone powered off, remove the battery
door.
2 Remove the battery by pushing the battery toward
the antenna and liftingit out.
Battery Use and Maintenance
• The Motorola iDEN Approved Lithium Ion
chargers provide optimumperformance. Other
chargers may n ot fully charge the iDEN Lithium
Ion battery or may yield a reduced number of
lifetime charge cycles.
• Extreme temperatures degrade battery
performance. Do not store the battery where
temperatures exceed 140°F (60°C) or fall below
4°F (-20°C).
• LithiumIon batterieshave a self discharge rate
and without use, lose about1% of their charge
per day.
6
• The battery capacity is degraded if the battery is
stored for long periods while fully charged. If long
term storage is required, store at half capacity.
Powering On and Off
To power your phone on:
1 Open the flip.
2 Press p.
As your phone connectsto the network,you will see
a connecting message.When the idlescreen
appears, the phone is ready to use.
Page 15

Activating Service
To power your phone off:
1 Open the flip.
2 Press and hold p.
Activating Service
The first time you power on your phone, your service
is activated.
A screen then appears prompting you to select Ok
to update your browser information. This screen will
only appear during initial activation. See “Enabling
Over-the-Air Security”.
Enabling Over-the-Air Security
To receive Over-the-Air Radio Servic e Software
(OARSS)Security you must enablesecuritythe first
time you power on your phone or within 20 days of
first activation of your phone.
1 Press A under Ok.
Note: If you press A under Later, the idle screen
willappear. The nexttime you select Net
from the main menu, you will be prompted
to enable security before you can use
NextelOnline services.
2 You are prompted to enable security. Press A
under Yes. A series of screens and then the
default homepage displays.
3 Press e to return to the idle screen.
Within 24 hours ofenabling security, you will receive
a Net alert containing your Personal Telephone
Number (PTN), Nextel Customer Care number,
DirectConnect number,and Talkgroup lists for
Group Connect calls.
Note: If youare transferringyour phonenumber
to Nextel from yourprevious carrier,that
number will be automatically programmed
into the Contacts list for all other handsets
that were part of your order. For more
information, go to www.nextel.com/WLNP.
1 When you receive a Netalert saying New
Browser Message - Receive Programming
Info,pressA under Goto.
2 You are prompted to accept changes to your lists.
Press A under Ok.
3 You are prompted again to accept changesto
your lists. Press A under Ok.
4 A confirmation screen displays. Press A under
Ok.
5 Press e to return to the idle screen.
Finding Your Phone Number
1 Press m to access the main menu.
2 Scroll to My Info.
7
Page 16

Getting Started
3 Press O.
4 Scroll to seeyour information:
•Name— Enter your name. See “Entering Text”
on page 33.
•Line1and Line 2 — your phone numbers for
phone lines 1 and 2. These are filled in when
you receive your first Netalert after enabling
over-the-air security on your phone.
• Direct Connect — YourDirect Connect
numberis the numberthat others use to
contact you using Direct Connectservice.It is
filledin when youreceive your first Net alert
after enabling over-the-air security on your
phone.
• Group ID — the number of the Talkgroup you
havejoined.
• Carrier IP — the IP address assigned to
Nextel. Itis filledin when youregisterfor
packetdataservices.
•IP1Addressand IP2 Address —theIP
addresses assigned to you for using the
Internet with your phone.
•Ckt— Your circuitdata number is the number
youuseifyouwanttouseyourphoneto
transfer circuitdata. See “UsingYourP hone as
a Modem”on page88.Youreceivethis number
from Nextel.
8
• ServiceStatus — Thisinformation may be
used by Nextel Customer Care if there is a
problem with your phone’sservices.
Completing S etup
Joining a Talkgroup
When you enable over-the-air security, you receive
a list of Talkgroups that have been set up for you if
you subscribe to this service. The Talkgroup list is
saved to Contacts.
To receive Group Connect calls made to any of
theseTalkgroups, you mustjoin the Talkgroup.
1 Press A under Contcs. -or-
From the main menu, scroll to Contacts and
press O.
2 Scroll to the Talkgroup you want to join.
3 Press A under Join.
Note: YouwillnowbeabletoreceiveGroup
Connect communications from this
Talkgroup only. You can only monitorone
Talkgroup at a time.
Page 17

Completing Setup
Setting Up More Talkgroups
You can setup more Talkgroupsin three ways:
• Using Group Connect Management on MyNextel
at www.nextel.com
• Contacting your Nextel Sales Representative at
the time of activation
• Using Wireless Manager to create, manage, and
delete Talkgroups
When you create your Talkgroups,you can select
your own Talkgroupnumbers.
YoucanjoinanewTalkgroupbypressing# and
entering the number using the keypad. Then press
A under Join.
Nextel®Voice Mail
You must set up your voice mail box before you can
retrieve messages. See “Setting Up Your Voice Mail
Box” on page45.
Nextel Worldwide®Service
You can useyour phone to makecalls
internationally in select cities using other iDEN
networksby calling Customer Care to activate
international dialingon your account. Countriesin
whichyou can use your phone include Argentina,
Brazil, Canada, Philippines, Israel, Mexico and
Peru*.
* Credit approval may berequired. Other conditions may apply.
®
Customizing Features
You can control many features of your phone,
including the sizeof the text on the display, the way
youaccessmainmenuitems,andthevolumeof
incoming sound, rings, and other tones. See
“Customizing Your Phone” on page 103.
9
Page 18
Getting Started
Phone Basics
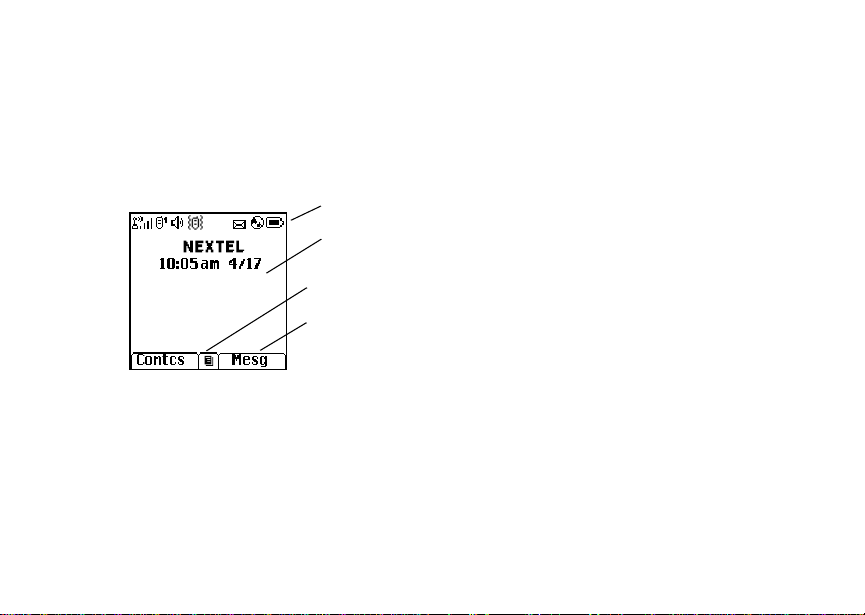
Any time your phone is poweredon, the display
provides you withinformation and options.
The one-line display shows a shortened version of
the full-sized display. To see more information, open
the phone cover.
The screen shown above isthe idle screen. The idle
screen appears when your phone is on,but not
engaged in any activity.
Text Area
This area displays menus, messages, names,
phone numbers, and other information.
10
status icons
text area
menu icon
display options
Display Options
Two display options appear at the bottom of most
screens. You select a displayoptionby pressing the
option key below it.
Menus and Lists
Yourphone’sfeaturesare arranged in menus,
submenus, and lists.
Toaccesstheitemsinamenuorlist,scrollusing
the navigation key at the top of your keypad. This
key lets you scroll up, down, left, or right. Holding
down the appropriate part of the navigation key
speeds up scrolling.
Inthisguide, thissymbol> tellsyoutoselectamenu
or list item. Forexample, Settings > Security
means:
1 Scroll to Settings onthe main menu.
2 Press O to see the Settings screen.
3 Scroll to Security.
4 Press O to see the Security screen.
Page 19

Phone Basics
Quick Access to Main Menu Items
Each arrow in the navigation key and O can be
used to access amain menu item from the idle
screen. Each of these keys is assigned to a main
menu item when your receive your phone. Toassign
different main menu items, see “Personalize
Features” on page 107.
OK Key
Pressing O:
• Selectsthe highlighted menu item orlist item
• Sets options
• Confirms actions
• Places and answer calls
• From the idle screen, accesses ring tones list.
This is the defaultsetting. You can assign a
different main menu item to O.
Menu Key
Many features provide context-sensitive menus that
let you access relatedfeatures a nd actions. The m
icon appears any time a context-sensitive menu is
available. Press m to access the menu.
Main Menu
All your phone’s features can be accessed through
the main menu. You canset the main menu to
appearas a list or aslarge icons (see “Settingthe
Menu View” on page 105).
Net Access to Nextel Online
a
Java Apps Java applications on your
q
Settings
b
Display/Info
Phone Calls
DC/GC Options
Personalize
Volume
Security
Advanced
Ring Tones
m
VibeAll
list of ring tones
Ring Tones menu
Nascar Access the NASCAR
services. See page79.
phone.See page 59.
Customize your phone.
Seepage103.
Assignring tones and turn
ringer off. See page 65.
sectionof Nextel Online
directly from this link. See
page 79
11
Page 20

Getting Started
My Info View personal phone
j
n Downloads Provides a catalog of ring
GPS Find your approximate
l
12
information, including
phone number and Direct
Connectnumber.See
page 7.
tones, wallpaper, games
and applications that you
can download directlyfrom
your phone. Browse
throughthecatalogtoadd
a new ring tone, a
wallpaper to serve as the
background image on your
phone,a game for
entertainment, or an
applicationthat servesyour
business and productivity
needs. Items in these
catalogs change daily, so
check regularly for fresh
content.
geographicallocation. See
page 69.
Contacts
d
new contact form
list of contacts
Contacts menu
Messages
e
Voice Mail
Net Alert
TextMsgs
Call Forward Set call forwardingoptions.
f
Datebook
o
new event form
list of events
Datebook menu
Memo Store a number to access
g
Call Timers Phone usage information.
h
Recent Calls
i
list of calls
recentcalls menu
Call Setup menu
Shortcuts Createshortcuts to
s
Create, view, store, edit
contacts. See page37.
Access messages.See
page 53.
Seepage57.
Schedule appointments.
Seepage93.
later. See page 43.
Seepage87.
Lists recent calls. See
page 31.
screens.S ee page101.
Page 21

Phone Basics
Profiles
p
new profile form
list of profiles
Profiles menu
Call Alert
k
list of call alerts
Call Alerts menu
VoiceRecord Record and play audio
c
Groups of settings you
applytogether. See
page 111.
Lists call alerts. S ee
page 29.
messages. See page 81.
Status Icons
Status icons appear at the top of the display. Some
appearat all times. Others appear only whenyour
phone is engaged in certain activities or whenyou
have activated certain features.
abcd
efgd
opqr
s
A
Battery Strength —A fuller battery
indicates a greater charge.
Signal Strength — More bars next
to the antenna indicate a stronger
signal.
Phone In Use —Your phone is
active on a phone call.
B
C
12
GL
IJ
HK
M Q
u
wxT
yz
Direct ConnectIn Use — Your
phone is active on a Direct Connect
call.
Talkgroup In Use —Your phone is
activeon aGroupConnect call.
Active Phone Line —1indicates
phoneline 1is ready to make calls;2
indicates phone line 2 is ready to
make calls.
Call Forward — Your phone is set to
forwardcalls. See “Call Forwarding”
on page 57.
Ringer Off — Your phone is setnot
to ring. See “Setting Your Phone to
Vibrate” on page 65.
Speaker Off —Sets Direct Connect
and Group Connect sound to come
through the earpiece rather than
through the speaker. Your phone
does not ring for Direct Connect and
Group Connectcalls if Alert Type is
set to Silent or Vibrate.
Messages— You have one or more
messages.See “Messages”on page
53.
13
Page 22

Getting Started
DE
U
YZ
N O
Internet — You areready to browse
the internet or are browsingthe
internet using a secure connection.
Airplane Mode — Your phone is set
to Airplane Mode. See “Temporarily
Turning Off Calls” on page 105.
Packet Data — You are ready to
transfer packet data or are
transferringpacketdata. See “Using
Your Phone as a Modem” on page
88.
TTY — You are ready to use your
phonetomakecallsusinga
teletypewriter device. See “Making
TTY Calls” on page 89.
SIM Card Security
Your SIM card stores all your Contacts and protects
your personal information. Since this information is
stored on your SIM card, not in your phone, you can
remove the information by removing your SIM card.
Note: Except for making emergency calls, your
phonewill not functionwithoutthe SIM
card.
14
To prevent unauthorized use of your phone, your
SIM card is protected by a PIN that you enter each
time the phone is powered on. You can change the
PIN or turn off the requirement that it be entered.
Turning the PIN Requirement On and Off
When the SIM PIN requirement is off, your phone
can be usedwithout entering a PIN.
Important: W hen the SIM PIN requirement is off, the
When the SIM PIN requirement is on, you are
prompted to enter your PIN eachtime you power on
your phone.
Note: If aSIM PINis required,your phone will not
1 From the mainmenu,selectSettings > Security
>SIMPIN.
2 Select On or Off.
3 Enter the current SIM PIN.
Note: When you receive yourphone,the SIM PIN
personal data on your SIMcard isnot
protected. Anyone canuse your phone
and access your personal data.
function until the SIM PIN is entered,
exceptfor making emergencycalls.
is 0000. Change your PIN to prevent
fraudulentuse oft he SIM card (see
“Changing the PIN” on page15).
Page 23

SIM Card Security
4 Press A under Ok.
Entering the PIN
1 When the Enter SIM PIN Code screen appears
afteryou poweron your phone, enter your SIM
PIN.
2 Press A under Ok.
The message SIM Unlocked displays.
Important: If you enter your PIN incorrectly 3 times,
your SIM card is blocked. To unblock
your SIM card, you must contact Nextel
Customer Care. See “Unblocking the
PIN”.
Changing the PIN
Note: The SIM PIN requirement must be turned
on in order to access this feature.
1 From the mainmenu, select Settings > Security
> Change Password > SIM PIN.
2 At the Enter Old SIM PIN screen, enter the
current SIM PIN.
3 Press A under Ok.
4 At the Enter New SIM PIN screen, enter the new
4- to 8-digit SIM PIN.
5 Press A under Ok.
6 At the Re-enter New SIM PIN screen, re-enter
the new SIM PIN to confirm.
7 Press A under Ok.
Changed: SIM PIN displays.
Unblocking the PIN
If you enter your PINincorrectly 3 times, your SIM
cardis blocked.To unblockyour SIM card, you must
contact Nextel Customer Care to geta PIN Unblock
Code (PUK).
Important: If you unsuccessfully enter the PUK code
To unblock the PIN:
1 Press *#m1.
2 At your Nextel Customer Care representative’s
request, provide the information needed to give
you a PUK code.
3 Select Unblock PIN.
4 Enter the PUK code.
5 Enteranew4-to8-digitSIMPIN.
10 times, your SIM card is permanently
blocked and must be replaced. If this
happens, all data is lost. You will get a
message to contact Nextel Customer
Care. Except for making emergency
calls,y our phonewill notfunction with a
blocked SIM card.
15
Page 24
Getting Started
6 Re-enteryour SIM PIN.
Note: These steps must beperformed in quick
succession.
If you entered the codes properly,SIM Unlocked
appears on the display.
Inserting and Removing Your SIM Card
The SIM card is designed for optimal Contacts
storage and feature use. For Nextel SIM card
compatibility information, visit www.nextel.com/sim.
If you remove your SIM card and use it with another
phone, or use another SIM card with your phone,
the following information is erased:
• The recent calls list
• Call forwarding settings
• Net alerts
• InformationstoredinMemo
• 3 most recent GPS Enabled locations
• Voice records
• Voice names
• Datebook events
• Options setusing the Personalizemenu
16
Note: In some cases, Contacts may not be
accessible if you move your SIM card to
another phone. Contactsentriescreated
with your i736 phone are not readableby
an older iDEN SIM-based phone.
InsertingYour SIM Card
1 With your phone powered off, remove the battery
door and battery.
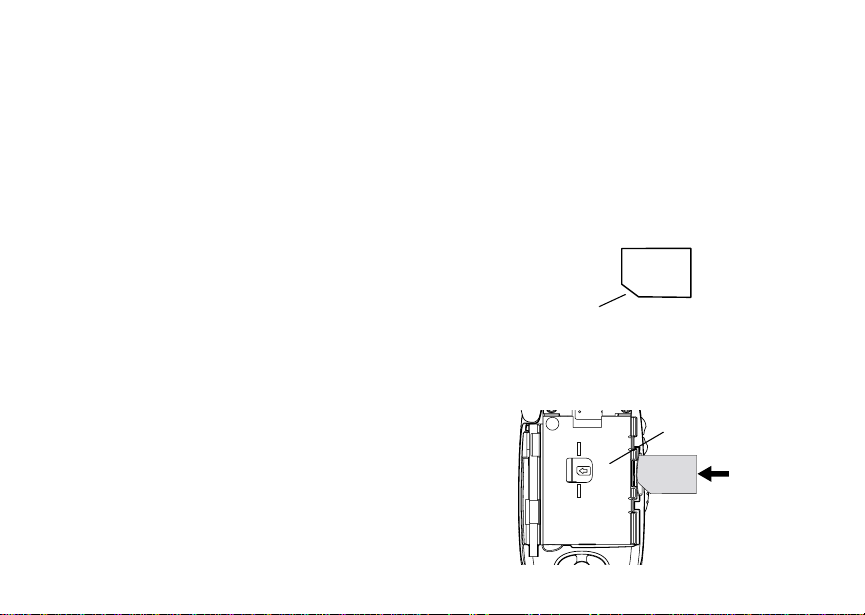
2 Hold your SIM card asshown.
cut corner
3 Carefully slide your SIMcard into your phone until
it lines up with the marks above and below the
SIM card holder.
SIM card
holder
Page 25

Locking the K eypad
Removing Your SIM Card
Important: To avoid loss ordamage, donot remove
your SIM card fromyour phoneunless
absolutely necessary.
1 With your phone powered off, remove the battery
door and battery.
2 While holding the tab down, slide your SIM card
out of the SIM card holder.
SIM card
holder
Note: Protect your SIM card as you would any
delicate object. Store itcarefully.
Locking the Keypad
Locking the phone’skeypadprevents its buttons
frombeing pressed.When the keypadis locked,you
can only:
• Power the phone on and off
• Unlock the keypad
• Respondto incomingcalls,messages,and alerts
Important: Emergency calls cannot be placed while
To lock the keypad:
1 From the idle screen, press m.
2 Press *.
If you pressa key while thekeypad is locked,
instructions for unlocking the keypad display briefly.
To unlock the keypad:
1 From the idle screen, press m.
2 Press *.
While the keypad islocked,you can respond to
incomingcalls, messages,and alerts just as you do
when the keypad is not locked. When finished, press
e to return to the idle screen.Thekeypadremains
locked.
the keypad is locked.
17
Page 26

Getting Started
You also have the option of setting your phone to
automatically lock thekeypad if there has beenno
activity for a specified time.
1 From the main menu, select Settings > Security
> Keypad Lock.
2 To lock the keypad immediately,select Lock
Now. You will be given the option to press m and
* to lock and unlock the keypad.
3 To set a specific time for the keypad to lockif
therehas been no activity,selectAuto Lock and
then select a time.
The keypad can beset to lock in 5, 10, 15 or 20
minutes if the keypad is not touched during the
specified time. To turn the auto lock off, repeat
step 3 and select Off.
Accessories
Yourphone comes with a Standard Lithium Ion
Battery, rapid travel charger,and holster.
Various accessories areavailable for usewith your
i736 phone, including cases, vehicle battery
charger, batteries, Hands-Free accessories and
more.
18
To order additional accessories, go to
www.nextel.com or c all 1-800-Nextel6.You can also
contact your Nextel Authorized Sales
Representative or stop by any Nextel-owned Retail
Store. Forinformationon Nextel retail store
locations, go to www.nextel.com.
Wireless Local Number Portability: Bringing Your Phone Number From Another Carrier
If you are bringing your phone number from another
carrier, there is additionalinformation about certain
features on yourNextelphone that you need tobe
aware of. Go to www.nextel.com/WLNP for more
details.
Nextel®Customer Care
NextelCustomer Care: 1-800-639-6111 or dial 611
from your i736 phone.
NextelWorldwide CustomerCare: +1-360-662-5202
(toll-free from your i736 phone).
Page 27

i736 Phone Menu Tree
Net
Java Apps
Java Applications (if any)
Deinstall
Permissions
License Info
Java System
Reset System
Delete All
Settings
Display/Info
Phone Calls
DC/GC Options
Personalize
Volume
Security
Advanced
Ring Tones
VibeAll On/Off
Available Ring Tones
Vibrate
Silent
Assign To
Assign w/vibe
Overview
Memory Usage
Delete
Nascar
My Info
Name
Line 1
Line 2
Direct Connect
Group ID
Carrier IP
IP1 Address
IP2 Address
CKT
Service Status
Downloads
GPS
Position
Privacy
Interface
Contacts
[New Contact]
Search
New
Capacity
Filter
Call Setup
Contacts (if any)
Edit
New
Search
Delete Contact
Delete Number
Capacity
Filter
Call Setup
Messages
Voice Mail
Net Alert
Text Msgs
Memory
Delete All
Call Forward
All Calls
- To
Status
Detailed
If Busy
-
If No Answer
-
If Unreachable
-
Status
Datebook
[New Event]
Go To Today
Go To Date
Week View
Month View
Setup
Events (if any)
Edit
New
Go To Today
Go To Date
Week View
Month View
Setup
Delete
Copy
Call # in Event
Alert # in Event
Talkgroup
Memo
Store to Cntcs
Cancel
Delete
Call Timers
Last Call
Phone Reset
Phone Lifetime
DC/GC Reset
DC/GC Lifetime
Circuit Reset
Circuit Lifetime
Kbytes Reset
Recent Calls
Recent Calls (if any)
Store
Delete
Delete All
Call Alert Queue
Call Setup
Shortcuts
[New Entry]
Shortcuts (if any)
Edit
New
Reorder
Delete
Delete All
Nextel®CustomerCare
Profiles
[New Profile]
Profiles (if any)
View
Edit
New
Delete
Delete All
Setup
Call Alert
Call Alerts (if any)
Store
Delete
Delete All
Sort By
Recent Calls
VoiceRecord
[New VoiceRec]
VoiceRecords (if any)
Label
New
Lock
Add To
Memory
Delete
Delete All
19
Page 28

20
Page 29

Making Calls
Your i736 phone makes two types of calls: digital
cellular phone calls and Direct Connect calls. W ith
Direct Connect calls, you use your phone as a
long-range, digitalwalkie-talkie.
Phone Calls
With the Flip Open
1 Enter the number you want to call.
2 To place thecall:
Press s. -or-
If you entered the number from t he idle screen,
press O.
3 To end the call:
Press e. -or-
Closethe flip.
To end a call by closingthe flip, you must have the
Flip to End feature turned on (see “Setting Flip
Actions” on page 86).
With the Flip Closed
1 Select the number you want to call from the
recentcalls listand press t. -or-
Usea voice name toselect number and place the
call.
2 To end thecall, press ..
Direct ConnectTMCalls
1 If the flip is open, enter the Direct Connect
number you want to call. -or-
Iftheflipisclosed,selectthenumberasyou
wouldwhen making a phonecall.
2 Pressand hold the PTT button on the side of your
phone. Begin talking after your phone emits a
chirping sound.
3 ReleasethePTTbuttontolisten.
Tip: To let someone know youw ant totalkto him
or her on a Direct Connect call, send a call
alert.S ee “Call Alerts”on page 29.
Dialing Direct ConnectTMNumbers
EveryDirectConnectnumber has3 parts — an area
ID, a network ID, and amemberID — with an
asterisk betweeneach of these parts. For example:
999*999*9999.
21
Page 30

Making Calls
When you place a DirectConnectcall, you must
enterthe whole Direct Connect number including
the asterisks.
Tip: When you store a DirectConnect number in
Contacts it is good practice to include the
whole Direct Connect number including the
asterisks in caseyou travel with your phone,
or another Direct Connect user whom you
are trying to reach travelswith their phone,
outside of your network.
Receiving Calls
Phone Calls
When you receive a phonecall, your phone rings,
vibrates, or lights up itsbacklight.
Answering
If the flip is closed, press t. -or-
Open the flip. -or-
Press s. -or-
Press O. -or-
Press A under Yes. -or-
Press any number key.
22
To answer a callby opening the flip, you must have
theFliptoAnsfeatureturnedon(see“SettingFlip
Actions” on page86). To answer a call by pressing
any key onthe keypad, you must have the Any Key
Ans feature turned on (see “Phone Calls Features”
on page 106).
Sending to Voice Mail
If the flip is closed, press .. -or-
Press e. -or-
Press A under No.
Ending
If the flip is closed, press ..
Press e. -or-
Close the flip.
Direct ConnectTMCalls
When you receive aDirect Connect call, your phone
emits a chirping sound or vibrates.
1 Waitfor the caller to finish speaking.
2 Press and hold the PTT button on theside of your
phone.Begin talkingafteryour phone emits a
chirping sound.
3 ReleasethePTTbuttontolisten.
Page 31

Ways to Enter a Number
Ways to Enter a N umber
• Use the numbers on the keypad
• Select the number from the recent calls list
• Select the number from Contacts
• Select a number storedin Datebook
• Redialthe last phone number called
• Say a voicename into your phone
• Use Speed Dial or Turbo Dial
• Use One Touch Direct Connect to makea Direct
Connectcall
• Use a TTY device —see “Making TTY Calls” on
page 89
From the Keypad
To enter the number you want to call,pressthe
numbers on the keypad.
Ifyoumakeamistake:
• To clear adigit,press A under De lete.
• To clear all digits,pressand hold A under Delete .
• T oinsert or delete a digit anywhere in the string of
digits you have entered, scroll left or right.
• To can cel, press e.
®
From the Recent Calls List
The recent callslist stores the last20 calls you
made or received.
With the Flip Open
1 From the mainmenu,select Recent Calls.
2 Scroll to the name or numberyou want to call.
With the Flip Closed
1 Press . to display the most recent call.
2 To view the rest of the recent calls list, press the
volume controls.
You can call the number displayed by pressing t.
From Contacts
If you have numbers stored in Contacts, you can
usethese numberstomakecalls. For informationon
entering numbers into Contacts,see “Creating
Entries” on page 39.
1 From the mainmenu,select Contacts.
2 Scroll to the name or numberyou want to call.
Tip: Tofind Contacts entriesfaster, use the
keypad to enter the first letter of the name.
3 Place the call now. -or-
Scroll left or right to display the Contacts type for
the number you want to call.
23
Page 32

Making Calls
If you aremaking a Direct Connect call, your phone
places the call to the Direct Connect number stored
in the Contacts entry, even if the Direct Connect
icon is not displayed.
If you are making a phone call:
• Your phone places the call to the phone number
assigned to the C ontactstype displayed.
• If the Contactstype displayed is nota phone
number, your phone places the callto the phone
numberstored in the Contacts entry.
• If the Contactstype displayed is nota phone
number and you have more than one phone
number stored in theContactsentry, your phone
prompts you to select the phone number you want
to place the call to.
From Datebook
If you have numbers stored as part of events in
Datebook, you canuse these numbersto make
calls. For information on storing events in Datebook,
see “Datebook” on page 93.
1 From the main menu, select Datebook.
2 Selectthedayof the event containingthe number
youwanttocall.
3 Highlight or select the event containing the
numberyou want to call.
24
For details,see “Making Calls From Datebook” on
page 98.
Redialing the Last Number
Press and hold s to placea callto the last phone
number you called.
Using a Voice Name
Ifyou have createda voice name in Contacts for the
number you want to call, say the voice name into
your phone to enter the number. See page 38 for
information on voice names.
You can use avoice name toenter a number with
the flip open orclosed.
1 Pressand hold t until apromptappearstelling
youtosaythevoicename.
2 Speaking into the microphone, say the voice
name assigned to the number you want to call.
Yourphone plays the nameback to you.
If you are making a phone call, the call is placed
automatically.
Tip: To stop a phone call from being completed,
press . if the flip is closed or press e.
If you aremakinga Direct Connect call, press and
hold the PTT button to place the call.
Page 33

Using Speed Dial and Turbo Dial
Each phone number storedin Contactsis assigned
a Speed Dial number which you can use to call that
number.
Speed Dial
1 From the idle screen, use thekeypad to enterthe
Speed Dial number assigned to the phone
numberyou want to call.
2 Press #.
3 Press s.
Turbo Dial
From the idle screen, press and hold the Speed
Dialnumber (1 through 9) assigned to the phone
numberyou want to call.
Using One Touch Direct Connect
One Touch Direct Connect sets your phone to call
the most recent Direct Connect number on the
recentcalls list, or a Direct Connect number you
choose,every time you press the PTT button. See
“SettingOne TouchDirect Connect”on page 85.
®
TM
Missed Phone Calls
Missed Phone Calls
When you miss a call, this icon V andt he number
of phone calls you havemissed appear briefly.
With the Flip Open
Ifyouwanttodismissthemissedcallmessage,
press A under Back. -or-
If you want to view the missed call on the recent
calls list, press A under View.
With the Flip Closed
Ifyouwanttodismissthemissedcallmessage,
press ..
If you want to view the missed call on the recent
calls list, press . twice.
Using Speakerphone
Turning onspeakerphone makes incoming sound
come out ofthe phone’s speaker instead of the
earpiece. Speakerphone is available whenever you
areonanactivephonecall.
With the Flip Open
To turn speakerphone on or off:
Press A under Spkr. -or-
Press t.
25
Page 34

Making Calls
With the Flip Closed
When you make a call with the flip closed,
speakerphone is always on.
Opening the flip turns speakerphone off.
Using M ute
Muting calls lets you listen to incoming sound
without transmitting sound. Mute isavailable
whenever you are on anactive call.
To turn mute on:
Press A under Mute.
Whilemute is on,Unmute appears as a display
option.
To turn mute off:
Press A under Unmute.
Making Emergency Phone Calls
Your phone supports emergency calling.
Emergency phone calls can be made even when
your SIM card is blocked or notin yourphone.
Dial 911 to be connected to an emergency response
center. If you are on an active call, you must end it
before calling 911.
26
When you make an emergencycall,your phone’s
GPS Enabled feature can help emergency service
personnel find you, if you are in a location where
your phone's GPS antenna has established a clear
viewof t he opensky and yourlocalemergency
response center has the equipment to process
location information. See “GPSEnabled” on page
69, and particularly“IMPORTANT: Things to Keep
inMind”onpage69and“MakinganEmergency
Call”on page 70, for more information on the
limitations of this feature. Because of the limitations
of this feature, always provide your best knowledge
of your location to the emergency response center
whenyou make an emergency call.
Important: Emergency calls cannot be placed while
Important: If you have not registered on the
the keypad is locked.
network, emergency calls cannot be
placed while your SIM card isin your
phone.
Page 35

MakingEmergency Phone Calls
Important: If you are bringing your phone number to
Nextel from your previous carrier, you
may receive a temporary telephone
number while your Nextelphone is being
programmedwith your permanent phone
number. If you make a call to 911 and the
call fails, the 911 emergency response
center will n otbe able to call youback on
your Nextel phone if in the meantime,
your Nextel phone has been
programmed with your permanent
telephonenumber.
27
Page 36

28
Page 37

Call Alerts
Sendinga callalertletsthe recipientknow you want
to talk tohim or her on a Direct Connect call.
When you send a call alert, the recipient’s phone
emits a series of beepsand displays your name or
Direct Connect number.
The recipientcan:
• Answer — begin a Direct Connect call with the
sender
• Queue — store the call alert to the call alert
queue, which is a list of call alerts
• Clear — dismiss and delete the call alert
Sending Call Alerts
1 Enter the Direct Connect number you want to
send to, as you would when making a Direct
Connectcall.
2 Press A under Alert.Ready to Alert appearson
the display.
3 Press the PTTbuttonuntilAlert Successful
appears on the display.
Note: If the alert is not successful, this may mean
thepersonyouaretryingtoreachisona
callor has the phone turned off.
Receiving Call Alerts
When you receive a call alert, you must answer,
queue,or clear it. You cannotreceivephone calls or
Direct Connect calls until you do.
To answer acall alert:
Pressthe PTT button to make a DirectConnect
call to the sender.
To queue acall alert:
Press A under Queue.
To clear acall alert:
Press O. -or-
Press A under Clear. -or-
Iftheflipisclosed,press..
Note: The recent calls list also stores call alerts
you have received. They appear as Direct
Connect calls. Call alerts remain in your
recent calls list until you delete them or until
they reach the endof the list.
Using the Call Alert Queue
When you queue a call alert, it remains in the call
alertqueue until you makea Direct Connect call to
the sender or delete it.
29
Page 38

Call Alerts
Viewing Call Alerts
1 From the main menu, select Call Alert.
2 Scroll through the list.
Viewing Date and Time
To view thedate and time a call alert was received:
1 From the main menu, select Call Alert.
2 Select the call alert you want informationon.
Responding to Call Alerts in the Queue
After you queue acall alert, you can respond to it by
makinga Direct Connect call to the sender or
sending a call alert to the sender.
Making a Direct Connect Call to the Sender
1 From the main menu, select Call Alert.
2 Scroll to the call alert you want to respond to.
3 PressthePTTbuttontobeginthecall.
This removes the call alert from the queue.
Sending a Call Alert to the Sender
1 From the main menu, select Call Alert.
2 Scroll to the call alert you want to respond to.
3 Press A under Alert. Ready to Alert appears on
the display.
30
4 Pressthe PTT button until Alert Successful
appearson the display.
Deleting Call Alerts
To delete a call alert from the queue:
1 From the callalert queue,scrollto the callalert
you want todelete.
2 Press m.
3 Select Delete.
4 Press O or pressA under Yes to confirm.
To delete all call alerts from the queue:
1 From the call alert queue, press m.
2 From the call alert menu, select Delete All.
3 Press O or pressA under Yes to confirm.
Sorting Call Alerts
Tip: Youmust have at least one call alert in the
queue to access this feature.
To sortcall alerts by the order they were received:
1 From the main menu, select Call Alert.
2 Press m.
3 Select Sort By.
4 Select First on Top or Last on T op.
Page 39

Recent Calls
The recent calls list stores the numbers of the20
most recent callsyou have made and received.
If the number of a recentcall is stored inContacts,
the name associated with the number appears on
the recent calls list.
An icon appears beside the name or number
indicating the Contacts type of the number used in
thecall.See“Contacts”onpage37.
For phone calls, anicon appears to theleft of the
name or number giving more information about the
call:
A call you made.
X
A call you received.
W
A missed call. Missed calls appear on the
V
recent calls list only if youhave Caller ID.
Note: The recent calls list also stores call alerts
you have received. They appear as Direct
Connectcalls. Call alerts remain in your
recent calls list until youdelete themor until
they reach the end of the list.
Viewing Recent Calls
With the Flip Open
1 From the mainmenu,select Recent Calls.
2 Scrollthrough the list.
To get more information on a recent call:
Fromthe recent calls list, select the call you want
information on.
This displays information such asthe name
associated with the call, the number,the date, time,
and duration of the call.
With the Flip Closed
1 Press . to display the most recent call.
2 To view the rest the recent call list, press the
volume controls.
3 Press . to dismissthe recent calls list.
Tip: Press t to call the number displayed.
Storing Recent Calls to Contacts
1 From the recent calls list, scroll to the number you
wantto store.
31
Page 40

Recent Calls
2 Press A under Store. -or-
If Store is not one of your options: Press m.
Select Store.
Tip: If Store is not on this menu, the number is
already stored in Contacts.
3 To store the number as a new entry, select [New
Contact]. -or-
To store thenumber to an existingentry, select
the entry.
4 With the Contacts type field highlighted, scroll left
or right to display the Contacts type you want to
assignthe number.For informationon Contacts
types,see page 37.
5 If you want to add more information tothe entry,
follow the applicable instructions in “Creating
Entries” on page39.
6 Press A under Done.
Deleting Recent Calls
Todeleteacall:
1 From the recent calls list, scroll to thecall you
want to delete.
2 Press A under Delete. -or-
If Delete is not one of your options: Press m.
Select Delete.
32
3 Press O or pressA under Yes to confirm.
To delete all calls:
1 From the recent calls list, press m.
2 Select Delete All.
3 Press O or pressA under Yes to confirm.
Page 41

Entering Text
You can enter text into your phone using the
traditional method of pressing a key several times
for each character, or by pressing a key once for
each letter while words likely to be the one you want
are chosen from a database. You can alsoenter
symbolsand numbers into atext field.
In screens that require you to enter text, you see the
following icons. These icons tell you which text input
mode you are using:
Alpha — Press a key several times for each
l
character.
Word — Press a key once for each letter while
j
words likely to be the one you want are chosen
from a database.
Symbols — Enter punctuation and other
i
symbols.
Numeric — Enter numbers.
k
When you access a screenthat requires you to
entertext, you start in themode last used.
To choose atext input mode:
1 At a screen that requires you to enter text, press
m.
2 Select the text input mode you want touse. A
checkmark appears next tothe current mode.
Using Alpha Mode
• Press any key on the keypad to enter the letters,
numbers, and symbols on that key. For example,
to enter the letter Y, press 9 three times.
• Typealetterthenscrolluptomakethatletter
uppercase, or type a letter then scroll down to
make that letter lowercase.
• See“SpecialFunctionKeys”onpage34formore
information on adding spaces, capitalization, and
punctuation.
Using Word Mode
In Word mode,T9 Text Input analyzesthe letterson
the keypad button you press and arranges them to
create words. As youtype, T9 TextInput matches
your keystrokes to words in its databaseand
displaysthemostcommonlyusedmatchingword.
You can addyou own words to this database.
Entering a Word
1 Select Word as yourtext input mode.
2 Typeawordbypressingonekeyforeachletter.
For example, to type“test” press 8378.
33
Page 42

Entering Text
The displayed word may change as you type it.
Do not try to correct the word as you go. Type to
the end ofthe word before editing.
3 If the wordthat appears is not the desired word,
press 0 to change the wordon the display to
the next most likely word in the database.
Repeat until the desired word appears.
If the desired word does notappear,you can add it
to the database.
Adding Words to the Database
1 Select Alpha as yourtext input mode.
2 Typethe word using Alpha mode.
3 SelectWord as yourtext input mode.
4 Press #.
The word you typed in Alpha text entry mode is now
in the database.
Note: You cannot store alphanumeric
combinations, such as Y2K.
Choosing a Language
To change the language of the database:
1 At ascreenthat requires you toenter text, press
m.
2 Select Languages.
34
3 Selectthe language you want for yourdatabase.
Special Function K eys
Some of thephone’s keys assume different
functions while in Alpha or Word mode.
Spaces
Press # for a space.
Capitalization
Press and hold # tomakethe next letter typed
uppercase (shift), to make all subsequent letters
typeduppercase (caps lock), or to go back to
lowercase letters.
These icons appear in the top row of your display:
m or X
n or W
When neither of these icons appear, letters typed
are lowercase. S crollingup after typing a letter
makes that letter uppercase.
Note: Your phone automatically makes the first
Shiftis on.
Caps lock is on.
letter of a sentence uppercase.
Page 43

Punctuation
Press 1 or 0 to insert punctuation. Continue to
press the key to view the list of symbols available
through that key. Pause to select the symbol you
want.
Note: Additionalpunctuation symbols are
available in Symbols mode.
Using Numeric Mode
1 Select Numeric as your text input mode.
2 Press the number buttons on your keypad to
enter numbers.
Using Symbols Mode
1 Select Symbols as yourtext input mode.
A row of symbols appearsalongthe bottomof the
phone’s display. Scroll right to view the complete
row.
2 Press O to selectthe highlighted symbol.
Using Numeric Mode
35
Page 44

36
Page 45

Contacts
Contacts stores up to 600 numbers or addresses.
Each Contacts entry can store severalnumbersor
addresses.
Information stored inContacts is saved on your SIM
card.
A Contacts entry contains:
• A name — A name is required if your are storing
more than one number or address to theentry;
otherwise,itis optional.Typically, this is the name
of the person whose contact information is stored
in the entry.
• Aringtone—Youcanassignaringtonetoeach
entry. This is the sound your phone makes when
you receive phone calls orcall alerts from any of
the numbers stored in the entry.
• A Contactstype — Each number or address
storedmust be assigned a Contactstype:
Mobile phone number
A
Direct
B
Connect #
Work1 phone number
C
Work2 phone number
D
Home phone number
E
Email emailaddress
F
Fax phone number
G
Pager phone number
H
Talkgroup Talkgroup number
I
IP IP address
J
Other phone number
K
• A number or address — Each Contacts entry
must contain a number or address. This may be
any type of phone number, Direct Connect
number, Talkgroup number,email address, or IP
address.
Direct Connect number
37
Page 46

Contacts
Note: Youcanstorenumbersupto64digitslong,
but every 20 digits must be separated by a
pause or wait. See “Creating Pauses and
Waits” on page 41.
• A Speed Dial number — When you store a phone
number, it isassigneda SpeedD ial number. You
can accept the default SpeedDial number or
change it.
• A voice name — If youcreate a voice name fora
number, you canthen dial that number by saying
the voice name into yourphone. This icon
appears
a voice name isassigned.
P to the left of the Contacts type icon if
Viewing Contacts
To access Contacts:
From the main menu, select Contacts. -or-
Ifyouareonacall:Pressm.SelectContacts.
To view entries:
1 From the Contacts list, scroll to the entry you want
to view.
2 If an entry has more than one number or address
3 Press O to view the entry.
38
<> surrounds the Contacts type icon.
stored,
Scrollleft or rightto view the icon for each number
storedin t he entry.
4 Scroll to view the other numbers and addresses
stored for the entry.
Tip: Toview more entries, continue scrolling.
Searching for a Name
To search for a name in Contacts:
1 From the Contacts list, press A under Search.
-or-
If Search is not one of your options: Press m.
Select Search.
2 Enter the name you want to see. See “Entering
Text”onpage33.
3 Press O.
Yourphone finds the name you enteredor the
nearest match.
Showing Only Direct Connect numbers and Talkgroups
To set Contacts to show only entries that contain
Direct Connect numbers and Talkgroup entries:
1 From the Contacts list, press m.
2 Select Filter.
3 Set this option to Show DC.
Page 47

Creating Entries
To set Contacts to showall entries:
1 From the Contacts list, press m.
2 Select Filter.
3 Set this option to Show All.
Creating Entries
A number or address and a Contacts type are
required for all Contactsentries.Other informationis
optional. You may enter the informationin anyorder
by scrolling through the entry details.
After you have entered the number or address,
Contacts type, andany other information you want,
you can press A under Done to savethe entry to
Contacts.
To cancel a Contacts entry at any time press, e to
return to the idle screen.
To create aContactsentry:
1 To access the entry detailsscreen:
Select Contacts > [NewContact]. -or-
From the Contacts list, press m. Select New.
2 Ifyouwanttoassignanametotheentry:
Select Name.
Enterthe name. See“Entering Text” on page 33.
When you arefinished, press O.
Tip: Press A under Browse to select a name
already in Contacts.
3 Ifyouwanttoassignaringtonetothename:
Select Ringer.
Selecttheringtonetoyouwanttoassign.
4 To assign aContacts type tothe number or
address being stored:
Selectthe Contacts type field.
Selectthe Contacts type youwant to assign.
5 To store a number or address:
Select the # field (orID foran email address,orIP
for an IP address).
Enterthe number or address.For phone
numbers, use the 10-digit format. For email
addresses, see “Entering Text” on page 33.
Tip: Press A under Browse to select a number
or address from Contacts, the recent calls
list, or Memo.
When you are finished, press O.
6 If you want to assign more options to thenumber,
select [Options]. See “Assigning Options” on
page 40.
7 If you want to add more numbers or addresses to
the entry:
39
Page 48

Contacts
Scroll past the information you already entered.
Enter the additional information for the entry using
step 2 through step 6. You must assign aname to
the entry, if youhave not already.
8 Press A under Done.
Assigning Options
1 If you have not already, select [Options].
2 The default Speed Dial number assignedto a
phonenumber is displayedin the Speed # field.
Thisis always the next availableSpeed Dial
location.
If you wantto assign the phone number to a
different Speed D ial location:
With the Speed # field highlighted, press O.
Press A under Delete to delete the current
Speed Dial number.
Enterthe new Speed Dial number using the
keypad.
When you are finished, press O.
3 Ifyouwanttocreateavoicenameforaphone
number, select Voice Name.
As directed by the screen prompts, say and
repeat the name you want to assign to the
number.Speakclearly into the microphone.
40
4 When you arefinished, press A under Back.
Storing Numbe rs Faster
To store numbers to Contacts from the recent calls
list, see “StoringRecentC alls to Contacts” on page
31.
To store numbers to Contactsfrom Memo, see
“Memo” on page 43.
To store numbers to Contacts from the idle screen:
1 Use the keypad to enterthe number you want to
store.
2 Press m.
3 Select Store Number.
4 To store thenumber asa new entry,select [New
Contact]. -or-
To store the number to an existingentry,select
the entry.
5 With the Contacts type field highlighted, scroll left
or right to displaythe Contacts type youwant to
assign the number.
6 If you wantt o addmore informationto the entry,
follow the applicable instructions in “Creating
Entries” on page 39.
7 Press A under Done.
Page 49

Editing Entries
Editing Entries
1 From the Contacts list, scroll to the entry you want
to edit.
2 Press A under Edit. -or-
If Edit is not one of your options: Press m.Select
Edit.
The entry details screen displays.
3 Follow the applicable instructions in “Creating
Entries” on page 39to editthe various fields.
Deleting Entries
Delete an Entry
1 From the Contacts list, scroll to the entry you want
to delete.
2 Press m.
3 To delete the entire entry,select Delete Contact.
4 Press O or press A under Yes to confirm.
Delete a Number or Address
1 From the Contacts list, scroll to the entry that
contains the number or address you want to
delete.
2 Scroll left or right to display the Contacts type for
the number you want to delete.
3 Press m.
4 Select Delete Number.
5 Press O or press A under Yes to confirm.
Note: If an entry containsonly one number or
address, deleting the number or address
deletes the entry.
Checking Capacity
To see how many numbers are stored in Contacts:
1 From the Contactslist,press m.
2 Select Capacity.
Creating Pauses and Waits
When storing a number, you canprogramyour
phoneto pause or wait between digits while dialing.
A pause makes your phone pause for 3 seconds
beforedialing further.A wait makes your phone wait
for your response before dialing further.
This featureisuseful when using voice mailor other
automated phone systems that require you to dial a
phone number and then enter an accessnumber.
To program a pause:
Pressand hold * until the letter P appears. The
P represents a 3-second pause.
41
Page 50

Contacts
If you store 17035551235P1234, when you select
this number and make acall, your phone dials the
first11 digits,pauses for 3seconds,then dials the
last 4 digits.
If you want a pause longer than 3 seconds, press
and hold * more thanonce.Each P represents a
3-second pause.
To program a wait:
Press and hold * untilthe letter W appears.The
W means your phone waits before dialing further.
If you store 17035551235W1234,when you select
this number and make acall, your phone dials the
first 11 digits and then waits. A message appears
asking if you want to send the rest of the digits.
Press A under Yes to dialthe last 4digits.
Tip: You can create pauses and waits while
dialing a number from the keypad. See
“Creating Pauses and Waits While Dialing”
on page 85.
International Numbers
When storing a number that you plan to use for
international calls, use Plus Dialing:
1 Press and hold 0 for twoseconds.A “0”
appears,then changes to a “+”.
42
Note: The network translates the “+” into the
appropriate international access code
neededto place the call.
2 Enter the country code, city code or areacode,
and phone number.
Forinformationaboutmakinginternationalcalls,see
“Making International Calls” on page 85.
Page 51

Memo
Memoletsyoustoreanumber,makeacalltothat
number, and save it to Contacts.
To create amemo:
1 From the mainmenu, select Memo.
2 Enter the number using your keypad.
3 Press O.
Toviewthememolater:
1 From the mainmenu, select Memo.
To delete the memo:
1 From the mainmenu, select Memo.
2 Press and hold A under Delete.
To edit the memo:
1 From the mainmenu, select Memo.
2 Enter the new number.
3 Press O.
To make a call to thememo number:
1 From the mainmenu, select Memo.
2 Press s.
To store thememo numbert o Contacts:
1 From the mainmenu, select Memo.
2 Press m.
3 Select Store to Cntcs.
4 To store the number as a new entry, select [New
Contact]. -or-
To store the number to anexistingentry, select
the entry.
5 With the Contactstype field highlighted, scroll left
or right to displaythe Contacts type you want to
assign the number.
6 Ifyouwanttoaddmoreinformationtotheentry,
followthe applicable instructions in “Creating
Entries” on page 39.
7 Press A under Done.
43
Page 52

44
Page 53

Nextel®Voice Mail
Note: To receive voice mail messages, you must
firstset up your voice mailbox.
Setting Up Your Voice Mai l Box
Using your i736 phone, dial your 10-digit Nextel
Personal Telephone Number (PTN). For example:
7035557777. Follow the system instructions to
createa new4- to 7-digit password, record your
name, and record a greeting. When the system
says, “Thank you forusing Nextel Voice Mail,” your
mailbox is set up.
If you are calling from aphoneotherthan your i736,
dial your 10-digit Nextel PTN. When you hear the
greeting, press the star key to access your voice
mail box. The system will prompt you to enter your
password. E nter the last seven digits of yourNextel
PTN. For example:5557777. This is your temporary
password.
Youareinthemainvoicemailmenuwhenyouhear
the options listed below.
• To play your messages, press 1.(This option
plays only if you have new or saved messages.)
• To record a message, press 2.
• To changeyour greeting, press 3.
• To accessyour personal options, press 4.
If you press * while you arein a sub-menu, you
will go to the previous menu. If you press **,
youwillgotothemainvoicemailmenu.Fromthe
main voice mail menu, press # to exit voice mail.
At any time,you mayend the callby pressing e.
Playing Messages
When you receive a new voice mail message, you
caneitherlistentoitimmediatelybypressingA
under Call, or laterby pressing A under Back.
These are options available while you are listening
to your messages:
• Backup — press 1.
• Rewind to beginning of message — press 11.
• Pause or continue thecurrentmessage— press
2.
• Fast forward — press 3 .
• Fast forward to end of message — press 33.
• Play the date and time stamp — press 55.
Theseoptionsareavailablewhileamessageis
playing or after it has played:
• Forwardthe message to another subscriber —
press 6.
• Delete the message — press 7.
45
Page 54

Nextel®Voice Mail
• Reply to a message — press 8.
• Save the message — press 9.
• Skip to the next message —press #.
Messages that are notsaved or deleted remain in
your mailbox as new messages. All messages are
automatically deleted after 30 days.
To retrieve deleted messages, press *3.This
option only applies to the current voice mail session.
Ifyouendthecall,themessageswillbe
permanently deleted.
Important: After exiting the voice mail session, you
cannot recover deleted messages.
Changing Your Password
1 From the main voice mail menu, press 4 to
accesspersonaloptions.
2 Press 4 t o access personalpreferences.
3 Press 1 to modify password.
4 Enter your new password. It must be 4 to 7 digits
long.
Note: It is important that you choose a number
that is easy for you to remember, but hard
for someone else toguess. Passwords
using all the same digits, for example
4,4,4,4or a sequentialseries of digits,
1,2,3,4, will not be accepted.
46
5 Press ** to return to the main menu.
Note: If youforgetyour password, contact
Customer Care.
Recording Your Name
When you send, reply to, or copy a message, your
nameresponseprecedesthe message. To record
or re-record your name at any time:
1 From the main voi ce mailmenu, press 4 to
accesspersonaloptions.
2 Press 4 to accesspersonal preferences.
3 Press 3 toaccesstherecordyournameoption.
4 Press 2 to record your name.
5 Press ** to return to the main menu.
Recording Your Active G reeting
You may want to include one orall of the following
options in your greeting so that callers will know they
are available.
• Press1 tosend a numeric message.
• Press2 tosend an operator-assisted message.
(Thisoptionis availableonly if you are a
subscriber of Operator Assisted Messaging.
Contact Nextel Customer Care for more
information.)
Page 55

Advanced Voice Mail Features
• Press # to skip the greeting and record a
message immediately.
To record or alter your greeting at any time:
1 From the main voice mail menu, press 3 to
changeyour greeting.
2 Press 1 to play , press 2 to record or
re-record,or press 7 to delete your active
greeting.
3 Record your greeting and press# when you
have finished.
4 Press ** to return to the main menu.
Advanced Voice Mail Features
Multiple Greetings
You can create up to five different greetings and
designate whichgreetingwill be your active greeting
at any given time. The greeting that was recorded
duringyourinitialvoicemail box setup is greeting 1.
This is your default active greeting.
To record additional greetings:
1 From the main voice mail menu, press 3 to
access the greetings menu.
2 Press 4 to modify greetings.
3 Enter the greeting number you wish to create or
modify.
4 Press 2 to record a greeting.
5 Record your greeting and press # when you
have finished.
6 Press ** to return to the main menu.
To select your activegreeting:
1 From the main voice mail menu, press 3 to
access the greetings menu.
2 Press 3 to select another greeting to be active.
3 Enter the number of the greeting that you would
liketobeactive.Thesystemwillconfirmyour
active greetingnumber.
4 Press 1 t o playyour active greeting.
5 Press ** to return to the main menu.
Greetings Schedule
You can choose to haveyour greetings
automatically activatedbased on a pre-determined
time schedule. By activatingthe Greeting Schedule,
Greetings 1, 2, and 3will automatically play
according to the timeschedule listedbelow.
Greeting 1 Evenings and
Weekends
5:00 pm – 7:59 am,
Monday– Friday
24-hours, Saturday
and Sunday
47
Page 56

Nextel®Voice Mail
Greeting 2 Weekday
Mornings
Greeting 3 Weekday
Afternoons
8:00 am – 11:59 am
Monday– Friday
Noon–4:59pm
Monday– Friday
To activate the greeting schedule:
1 From the main voice mail menu, press 3 to
access the greetings menu.
2 Press 9 to activate your greeting schedule.
3 Press ** to return to the main menu.
Note: The greeting schedule, whenon, will
override any other greeting that you may
setas active.If a greetingis not recorded,a
systemstandard greeting will be played.
Automatic Playback
By default, the playback mode of your voice mail
service is set tonormal. This feature automatically
playsand savesnew messages when you log in.T o
activate automatic playback:
1 From the main voice mail menu, press 4 to
accesspersonaloptions.
2 Press 4 t o access personalpreferences.
3 Press 2 to access playback preferences.
4 Press 2 toswitchbetweenautomatic and
normalplayback.
48
5 Press ** to return to the main menu. Changing the Playback Order of Messages
You can select the order inwhich you want unheard
messages to be played. You may listento the last
received messagefirst, or you maylistento the first
received message first. To select the order in which
new messages should be played:
1 From the main voi ce mailmenu, press 4 to
accesspersonaloptions.
2 Press 4 to accesspersonal preferences.
3 Press 2 to access playback preferences.
4 Press 1 to switch between the playback orders.
5 Press ** to return to the main menu.
Recording, Forwarding, and Replying to Messages
Thesefunctions allow youto record and send, reply
to, or forward a message to an assigned destination
address or group list number. If you record a
complete or partial message, but do not send it,
NextelVoice Mail service will referto this message
as an “in preparation” message.
To record and senda message:
1 From the main voi ce mailmenu, press 2 to
record a message.
Page 57

Advanced Voice Mail Features
2 Record your message andpress # to end the
message.
3 Press 9 at the prompt to indicate that you want
to send the message orpress 5 for delivery
options.
4 Enter the mailbox number and/or group list
number(s). (A mailbox number is the 10-digit
NextelPTN of a Nextel customer. TheNextel
customer must be in yourlocal calling area. The
name of the recipient plays ifit is recorded.)
5 Press # to send.
6 Press ** to return to the main menu.
Note: Youcan only send messages using this
method to Nextel customers in your home
market.
Delivery Options
After you have created amessage,you can assign
themessageto a categorybefore yousendit. Below
is a list of the options that can be applied to a
message:
•Urgent— Recipient will hear this message
beforeother messages.
•Private—Recipientcannot copy the message to
another mailbox or phone number.
• Notification of Non-Delivery — You will be
notified if the recipient has not listened to your
message by a certain date and time.
• Future Delivery —You can specify a time and
date (up to three months in advance) for the
messagetobedelivered.
Note: All dates must have digitsin the MM/DD
format(2 digits for the month and2 digits
for the date). Forexample, January 2nd
wouldbe0102.
Important: Once a message has been sent for future
delivery, it cannotbe retrieved or deleted.
To set a special delivery option:
1 After recording your message, but before sending
it, press 5 for deliveryoptions.
2 Press the number that corresponds with the
desired delivery option:
• Press 1 for urgent.
• Press 2 for private.
• Press 3 for notification of non-delivery. At
prompt, specify time and date.
• Press 4 for future delivery of messages. At
prompt, specify time and date.
• Press 9 to send the message immediately.
49
Page 58

Nextel®Voice Mail
3 The list of options will be presented again. Select
an additionaloption or press 9 to send the
message.
4 Enter the destination mailbox or group listnumber
of the recipient(s).
5 Press # to send.
6 Press ** to return to the main menu.
Working With Group Lists
Thisfeatureenablesyou to create a list and assignit
a unique name. Then, you can add mailbox
numbers, grouplists, or individuals. Once you
createa list youcan send a voice message to
everyone on the list by entering the group list
number.Youcanhaveupto40grouplists.Eachlist
canholdupto50addresses.
To set up a grouplist:
1 From the main voice mail menu, press 4 to
accesspersonaloptions.
2 Press 2 to access your Group Lists.
3 Press 2 tocreatea Gro up List.
4 Enterthe1- or 2-digit grouplistnumberandpress
#.
5 Recordanameforthelistandpress#.
6 Select group members by mailbox number, group
list,or name.
50
7 Press # to save all entries added tothe list.
8 Press ** to return to the main menu.
To modify a grouplist:
1 From the main voi ce mailmenu, press 4 to
accesspersonaloptions.
2 Press 2 to access group lists.
3 Press 4 to modify agroup list. Enter the number
of the group list you want to modify.
4 Press 1 to add a newrecipient.
5 Press # to save your changes.
6 Press ** to return to the main menu.
Deleting a group list:
1 From the main voi ce mailmenu, press 4 to
accesspersonaloptions.
2 Press 2 to access group lists.
3 Press 3 to delete a group list.
4 Enter the number of thegroup list you wantto
delete.The systemwillplay the nameof the
grouplist.
5 Press # to delete the list.
6 Press ** to return to the main menu.
Page 59

Message Forwarding
Note: Youcan only forward messagesto Nextel
customers in your homemarket.
This featureallowsyou to program your phoneto
automatically forward incoming messages to
another mailbox. There are two types of forwarding:
notified and silent. Notified forwarding prompts the
callerthat the message willbe forwarded. Silent
forwarding does not prompt the caller thatthe
message will be forwarded.
To modify forwarding options:
1 From the main voice mail menu, press 4 to
access personaloptions.
2 Press 5 tomodifyforwarding options.
3 Select the applicable option below:
• To createa forwarding number, press 2.
• If you have already created a forwarding
number, press2 to modify the number.
• T o enable or disable message forwarding,
press 3.
• To change the forwarding type, press 2.
4 Press ** to return to the main menu.
Advanced Voice Mail Features
51
Page 60

52
Page 61

Messages
To access your voice mail messages, text and
numericmessages,Net alerts, and any other types
of messages you are able to receive, go to the
messagecenter:
1 From the mainmenu, select Messages.
2 Select the typeof messageyou want to access.
The message center shows how manymessages
you have of each type. You can listen to, read, or
deletethese messages.
Note: In order for you to access voice mail
through the message center,theremust
already be a message in your voice mail
box. If there is no message, you must
accessvoicemail by dialinginto your vo ice
mail box using your PTN.
Message Notifications
When you receive a message, yourphone notifies
youwithtextonthedisplayandanotificationtoneor
vibration. You canaccess the message or dismiss
the notification.
If you dismiss the notification, the message is not
deleted.It can be accessed through the message
center.
If you arenot on a phone call when youreceivea
message, your phone sounds a notificatio n tone
every 30 seconds until you access the message or
dismiss the alert.
If you are on acall when you receive a message,
yourphonemay sound a notification tone duringthe
call or after you endthe call, depending on howyou
set your notification options.
Setting Notification Options
To control whether your phone sounds message
notification tones whileyou are on phone calls:
1 From the mainmenu,select Settings > Phone
Calls > Notifications.
2 Selectthe option you want:
• Receive All — Tones sound duringcalls for all
types of messages.
• Msg Mail Only — Tones sound during calls for
mail messages;tonesfor all other t ypes of
messages are held until you end calls.
•DelayAll— Tones for all types of messages
are held until you end calls.
Note: Delay All is the default setting.
Tip: To set notification options during a call: Press
m. Select In Call Setup > Notifications.
53
Page 62

Messages
Voice Mail
When you receive a voice mail message, New
Voice Mail Message appears on thedisplay.
Press A under Call.
To dismiss the message notification:
If the flip is closed, press .. -or-
If the flipis open,press O or press A under
Back,orclosetheflip.
Thisicon
you that youhave a new message.
Sending Unanswered Calls to Voice Mail
To send aphone call tovoicemail instead of
answering it:
If the flip is closed, press .. -or-
Press e. -or-
Press A under No.
If the caller leaves a message, this icon
on the display, remindingyou that you have anew
message.
54
y appears on the display, reminding
y appears
Text and Numeric Messages
The phone’s display refers to text and numeric
messages as Text Messages.
Thesemessages can be up to 160 letters long. You
can store up to 20 of these messages. Each
message is stamped with thedate and time it was
left.
If your phone is powered off when youreceivea
message, yourphone notifiesyou the next time you
powerit on. If you are out of your coverage area,
your phone alerts you when you return to your
coverage area.
Yourphone attempts to deliver these messages for
upto7days.
Tip: While reading a text and numeric message
thatcontainsa phone number,you can press
s to call that number.
Receiving a Message
When you receive a text and numeric message, this
icon
w appears on thedisplay.
To view the message:
1 Press A under Read.
2 If the message fills more than one screen, scroll
to read it.
Page 63

NetAlerts
3 To keep the message, pressO. -or-
To delete the message, scroll to the end of the
message, then press A under Delete.
To dismiss the message notification:
If the flip is closed, press .. -or-
If the flip is open, press A under Back or close
the flip.
This icon
you that you have a new message.
w appears on the display, reminding
Reading from th e Message Center
1 From the mainmenu, select Messages> Text
Msgs.
2 Selectthemessageyouwanttoread.
3 If the message fills more than one screen, scroll
to read it.
4 To keep the message, pressO. -or-
To delete the message, scroll to the end of the
message, then press A under Delete.
Net Alerts
Net alerts are notifications that you havea text and
numericmessagessent from:
• An i736 phone
• www.nextel.com
• Any email application
Note: Yourphone's SMS address is your
PTN@page.nextel.com. Your phone's
Two-Way Messaging address is your
PTN@messaging.nextel.com.
When you receive a Netalert, a notification appears
on the display.
If you dismiss thenotification,this icon
on the display, reminding you that youhave a new
message.
When you delete a Net alert, the message is not
deleted, but it is no longer accessiblethrough the
messagecenter. You can stillaccessthe message
through Nextel Onlineservices.
T appears
55
Page 64

56
Page 65

Call Forwarding
Call forwarding sends calls to the phone numbers
you specify. You can forward all calls to one number
or forward missed calls todifferent numbers
depending on the reason you missed the call.
You can forward phone lines 1 and 2 independently.
Forwarding All Calls
When you setyour phone to forward all calls, an
icon appears in the top row of the display:
Phone line 1 is active; calls to phone line 1 are
G
being forwarded.
Phone line 1 is active; calls to phone line 2 are
I
being forwarded.
Phone line 1 is active; calls to phone lines 1
H
and 2 arebeing forwarded.
Phone line 2 is active; calls to phone line 1 are
J
being forwarded.
Phone line 2 is active; calls to phone line 2 are
L
being forwarded.
Phone line 2 is active; calls to phone lines 1
K
and 2 arebeing forwarded.
To forward all calls:
1 From the mainmenu,select Call Forward >
Forward > All Calls.
2 Select To.
If you specifieda forwarding number for all calls
before, this number displays.
To forward calls to this number, press A under
Back.
To delete this number, press O,thenpressand
hold A under Delete.
3 To enter the number you want toforward calls to:
Enterthe number using your keypad. -or-
Press A underSearch.SelectContacts , Recent
Calls,orMemo. Select the number you wantto
enter.
4 Press O.
All your calls arenow forwarded to the number you
specified.
Turning Off Call Forwarding
If you don’t want all your calls forwarded,turn the
feature off:
1 From the mainmenu,select Call Forward >To.
2 Set this option to Off.
57
Page 66

Call Forwarding
All your calls arenow sentto your phone.
Calls you miss are forwarded according to the
options set for missed calls. By default, missed calls
are forwardedto voice mail.
Forwarding Missed Calls
You can specify a forwarding number for each type
of missed call:
•IfBusy— Yourphone is on acall or transferring
data.
•IfNoAnswer— Youdo not answer on the first 4
rings.
• If Unreachable — Your phone is outof coverage
or powered off.
Note: If you want at ype of missed call sent to
voicemail, the call forwarding number for
that type of missedcall must be your voice
mail access number. Your voice mail
accessnumberis your area code+ first 3
digitsof your PTN +MAIL (6245).
Toforwardmissedcalls:
1 From the main menu, select Call Forward >
Forward > Detailed.
2 Select If Busy to specifya forwarding number for
callsreceivedwhen your phone is busy.
58
3 If you specified a forwarding number for this type
of call before,this number displays.
To forward callsto this number,pressA under
Back and go to step 6. -or-
To delete this number, press O,then press and
hold A underDelete.
4 Toenter the number you want toforward this type
of call to:
Enterthe number using your keypad. -or-
Press A underSearch.SelectContacts, Recent
Calls,orMemo. Select the number youwant to
enter.
5 Press O.
6 Repeat step 2 through step 5 for If No Answer
and If Unreachable.
7 When you arefinished, press A under Back.
Viewing Call Forwarding Settings
1 From the main menu, select Call Forward >
Forward > All Calls.
2 With To highlighted, press A under Status.
Page 67

Java Applications
Your phone arrives with Java applications installed
and ready to run. You candownload and install
more Java applications.
To download and install moreJava applications, go
to www.nextel.com/idenupdate. You can also check
the Downloads menuoptionon yo ur phonefor a
catalog of additional items available for purchase
and download.
Note: Using Java applications may cause your
phone to use up more battery power than
otheruses of your phone.
Running Applications
Torunanapplicationthathasashortcutonthemain
menu:
1 From the mainmenu, select the application or
suite of applications you want to run.
2 If you have selecteda suite of applications,select
the application you want to run.
To run an application that does not have a shortcut
on the main menu:
1 From the mainmenu, select Java Apps.
2 Select the application or suite of applications you
wantto r un.
3 If you have selecteda suite ofapplications, select
the application you wantto run.
Tip: If youdon’thear the sounds associatedwith
the Java application, select Settings >
Volume and check the volumes of Java
Speaker and Java Earpiece.
Suspending Applications
When you suspend an application, it does not stop
running. It goes to the background so that you can
run another application in the foreground.
To suspend an application:
Press e or close the flip.
To view yoursuspendedapplications:
From the Java menu, select Suspended Apps.
You can have up to 3 applications running at one
time — 1 running in the foreground and 2 in the
background.
Resuming Applications
You can resume a suspended application at any
time. This brings it to the foreground.
1 From the Java menu, select Suspended Apps.
2 Selectthe application you want to resume.
59
Page 68

Java Applications
Ending Applica ti ons
To end an application:
1 From the main menu, select Java Apps.
2 If the application you want to end is part of a suite
of applications, select the suite.
3 Scroll to the application you want to end.
4 Press A under End.
To end allapplications:
1 From the main menu, select Java Apps.
2 Scroll to Suspended Apps.
3 Press m.
4 Select End All.
5 If you want to end all applications withoutletting
them exit,pressA under EndNow.
Tip: You can also end applications from the
Suspended Apps screen.
Downloading Applications
If you wantto run more Java applications, you can
download them into your phone. Go to
www.nextel.com/idenupdate for a selection of Java
applications and downloading instructions.
60
Installing Applications
Before running mostapplicat ions you have
downloaded, you must install them.
1 From the main menu, select Java Apps.
2 Select the application or suite of applications you
want to install.
Installation messages appear as the application
installs.
3 If you want to create a shortcut to the Java
application on themain menu: Press A under
Next.PressA under Yes. -or-
Ifyoudonotwanttocreateashortcut,pressA
under Done.
4 Press O.
5 Press A under Done.
Deleting Applications
To delete an application:
1 From the main menu, select Java Apps.
2 Scroll to the application you want to delete.
3 Press m.
4 Select Deinstall.
5 Press O or pressA under Yes to confirm.
Page 69

Managing Memory
6 When your phone has finished deleting the
application, press A under Done.
To delete all Java applications:
1 From the mainmenu, select Java Apps.
2 Scroll to Java System.
3 Press m.
4 Select Delete All.
5 Press O or press A under Yes to confirm.
Managing Memory
To view theamount of memory available for Java
applications:
1 From the mainmenu, select Java Apps > Java
System.
2 Press A under Next.
3 To see more memory information,pressA under
Next again.
Deleting Java applications frees memory.
Note: Java application data is storedin your
phone using the same memory space used
to store voice records, ring tones, and
wallpaper images. Deleting some of these
other items frees memory space for Java
applications.
Shortcuts on the Main Menu
When you install an application, you can create a
shortcut to the application on the main menu.
Tocreateashortcuttoanapplicationthatisalready
installed:
1 From the mainmenu,select Settings >
Personalize > Menu Options > Add/Remove
Apps. -or-
From the main menu: Press m.Select Main
Menu Setup > Add/Remove Apps.
2 Scroll to view the list of Java applications. Any
applicationthat has a shortcuton the main menu
has a checkmark nextto it .
3 Scrolltotheapplicationyouwanttocreatea
shortcut for.
4 Press O.
5 Press A under Done.
To remove a shortcut:
1 From the mainmenu,select Settings >
Personalize > Menu Options > Add/Remove
Apps. -or-
From the main menu: Press m.Select Main
Menu Setup > Add/Remove Apps.
61
Page 70

Java Applications
2 Scroll to view the list of Java applications. Any
application that has a shortcuton t he mainmenu
has a checkmark next to it.
3 Scroll to the application you want to remove the
shortcut for.
4 Press O.
5 Press A under Done.
Java Applications and GPS Enabled
Some Java applications can make use of your
phone’s GPS feature to determine the approximate
geographical location of your phone. (See “GPS
Enabled” on page 69for more information on the
GPS feature.) However, for privacy reasons, you
may not always want Java applications to access
the location of your phone. Your phone protects your
privacy by giving you the option to blockall or some
Javaapplications from accessing the locationof
your phone.
Setting Privacy for All Java Applications
These options control the privacy of all Java
applicationson your phone:
62
• Restricted —NoJavaorsimilarsoftware
applicationsmay access the locationof your
phone.However, location information may still be
available to thephone’s owner, fleet manager, or
account administrator.
•Unrestricted— All Java applications may access
the location of your phone, without notifying you.
• By Permission — When aJava application
attempts to access the location of your phone,
you are prompted togive permission.However,
location information may still be available to the
phone’s owner, fleet manager, or account
administrator.
See “Setting Privacy Options” on page 75 for
information on choosing these options.
Granting or Denying Permission
If you choose By Permission, youmust grant or
denyeach Javaapplication access to the locationof
your phone when the application requests access
for the first time. You may be required to grant or
denysubsequent requests from thesame
application,depending on theprivacysetting you
choose for the individual Java application (see
“Setting Privacy for EachJava Application” on page
63).
Page 71

Java Applications and GPS Enabled
When a Javaapplication requests access t o the
locationof yourphone, a screen appearsinforming
you.
To deny this request:
1 Press A under Deny. The application does not
access the location of your phone.
2 Select the denying option you want:
• Always— If the application requests access to
the locationof your phone again, the request is
denied withoutnotifying you.
• For this session — If the applicationrequests
access to the location of your phone again
beforeyou power off your phone,therequestis
denied withoutnotifying you.
•OnlyOnce— If the application requests
access to the location of your phone again, you
are prompted to grant or deny permission.
To grant this request:
1 Press A under Gra nt. The application accesses
your phone’s location.
2 Select the grantingoptionyou want:
• Always— If the application requests access to
the locationof your phone again, the request is
grantedw ithout notifyingyou.
• For this session — If the application requests
accessto the location of your phone again
beforeyou power off yourphone,therequestis
granted withoutnotifying you.
•OnlyOnce— If the application requests
accessto the locationof your phoneagain,you
arepromptedtograntordenypermission.
Setting Privacy for Each Java Application
After a given Java application r equests access to
the location ofyour phone for the first time, you have
the opportunity to set the GPS privacy option forthat
Java application.
1 From the mainmenu,select Java Apps.
2 Scroll to the application or suite of applicat ions
you want to set the privacy option for.
If the application has requested access to the
location of your phone, m appears when you
highlight the application.
3 Press m.
4 Select Permissions.
5 Select the privacy option youwant for this
application:
•Always— The application always has
permission to access t he location of your
phone,without notifyingyou.
63
Page 72

Java Applications
•Ask— When the application requests access
tothelocation ofyour phone,you are prompted
to grant or deny permission (see “Granting or
Denying Permission” on page 62).
• Never — When the application requests
access to the location of yourphone, the
requestis denied without notifying you.
64
Page 73

Ring Tones
To set the ring tone your phone makes when you
receive phone calls, message notifications, or call
alerts:
1 From the main menu, select Ring Tones.
2 Make sure VibeAll is set to Off.
3 Scroll through the list of ring tones and select the
oneyouwanttoassign.Vibrate setsyour phoneto
vibrateinsteadof makinga sound;Silent sets your
phone to neither vibrate nor make a sound.
Tip: Highlighting a ring tone lets you hear it.
4 Select the features you want to assign the ring
toneto.
5 When you are finished, press A under Done.
Setting Your Phone to Vibrate
You can set your phone to vibrate instead of making
a sound whenyou receive all phone calls, Direct
Connect calls, Group Connect calls, messages
notifications, and call alerts.
1 From the main menu, select Ring Tones >
VibeAll.
2 Set this option to On.
Tip: Pressingthe volume controls to turn down the
volumeas far a s possible sets VibeAll to On.
To set your phone to vibrate instead of making a
sound for some features but not others:
1 From the mainmenu, select Ring Tones.
2 Make sure VibeAll isset to Off.
3 Select Vibrate from the list ofring tones.
4 Select the features you want to set to make no
sound.
5 When you are finished,press A underDone.
Note: To set ring options for Direct Connect calls
and Group Connect calls, see “Setting Your
PhonetoVibrate”onpage103.
These icons indicate how the ringer is set.
Q The phone always vibrates insteadof ringing.
The phone does not ring for phone calls.
M
Group Connect calls and Direct Connect calls
u
are heard through the earpiece, notthe
speaker.
These icons may appear at the same time.
65
Page 74

Ring Tones
Assigning Ring Tones to Contacts
You can set theringtone your phone makes when
you receive phone calls orcall alerts from someone
youhavestoredinContacts.
1 From the main menu, select Ring Tones.
2 Make sure VibeAll is set to Off.
3 Scroll through the list of ring tones and select the
one you want to assign.
4 SelectAContact.
5 SelecttheContactsentryyouwanttoassignthe
ring tone to.
Ring and Vibrate
To set your phone to ring and vibratewhen you
receive phone calls or call alerts:
1 From the main menu, select Ring Tones.
2 Make sure VibeAll is set to Off.
3 Scrollthroughthe list of ring tonesand highlight
theoneyouwanttoassign.
4 Press m.
5 Select Assign w/Vibe.
6 Select the features you want to set to ring and
vibrate.
66
7 When you are finished, press A under Done.
This icon
S appears on the display.
Viewing Ring Tone Assignments
1 From the mainmenu, select Ring Tones.
2 Make sure VibeAll is set to Off.
3 Highlight any ring tone.
4 Press m.
5 Select Overview.
6 Scroll to view ring tones assigned to features and
Contact entries.
Downloading More Ring Tones
If you want to use otherringtones,you can download
them into your phone for a fee. Go to
www.nextel.com/idenupdatefor a selection of custom
ring tones and downloading instructions.
You can also check the Downloads menu option on
your phone for acatalogof additional items available
for purchase and download.
Note: Ring t ones purchasedfrom this website
may be downloaded only once. If you delete
a ring tonefrom yourphone, you must
purchase it again to download it again.
Page 75

Managing Memory
To view the amount of memory available for custom
ring tones:
1 From the main menu, select Ring Tones.
2 Make sure VibeAll is set to Off.
3 Highlight any ring tone.
4 Press m.
5 Select Memory Usage.
Deleting custom ring tonesfrees memory.
Note: Ring tones are storedin your phone using
thesamememoryspaceusedtostorevoice
records, Javaapplications, andwallpaper
images.Deleting some of these other items
frees memory space for ring tones.
Deleting Custom Ring Tones
To delete a custom ring tone:
1 From the main menu, select Ring Tones.
2 Make sure VibeAll is set to Off.
3 Scrollto the ring toneyou wantto delete.
4 Press m.
5 Select Delete.
6 Press A under Yes to confirm.
Managing Memory
67
Page 76

68
Page 77

GPS Enabled
Your phone’s GPSEnabled feature uses information
from Global Positioning System (GPS) satellites
orbiting the Earth to determine the approximate
geographical location ofyour phone, expressedas
latitude and longitude. Theavailability and accuracy
of this locationinformation (and the amountof time
that it takes to calculate it) will vary depending on
the environmentin which youare using theGPS
feature. For example, GPS location fixes are often
difficult to obtain indoors, in covered locations,
betweenhigh buildings, orin other situations where
you have notestablisheda clear broad view of the
sky. SEE: “IMPORTANT: Things to Keep in
Mind”.
When you make a 911 emergency call, the GPS
feature of your phone can help emergency
personnel locate you if your phone hasadequate
accessto GPSsatellitesignals and your emergency
response center is equipped to process such
information.
You can also use the GPS feature to viewyour
approximate location.Locationinformationappears
on the phone’s display.
Java applications loaded on your phone can also
request your location. If your phone is connected to
a laptop computer or similar device, software
running onthat device can request your location. To
protectyour privacy, you can control whether these
requests are granted.
IMPORTANT: Things t o Keep in Mind
Ifyou are using the GPS featureof yourphonewhile
driving, please give fullattention to driving and to the
road.
Where adequate signals from multiple satellites
are not available (usuallybecauseyour GPS
antennacannot establisha view ofa wide area of
open sky), the GPS feature of your phone WILL
NOT WORK. Such situations include but are not
limited to:
• In underground locations
• Inside of buildings, trains, or other covered
vehicles
• Under any other metal or concrete roof or
structure
• Between ta ll buildings or under dense
tree-cover
• Near a powerful radio or television tower
69
Page 78

GPS E nabled
• When your GPS antenna is covered (for
example, by your hand or other object) or
facing the ground
• Intemperatureextremesoutside the operating
limits of your phone
Walking or driving very slowly may also
substantially reduce GPS performance.
Even where location informati on canbe
calculated in such situations, it may take much
longerto do so, and your location estimatemay
not be as accurate. Therefore, in any 911 call,
always report the location to the emergency
response center if you can and if you cannot,
remain on your phone for as long as the
emergency response center instructs you.
Even where adequate signals from multiple
satellites are available, your GPS feature will
only provide an approximate location, often
within 150 feet (45 meters) but sometimes much
further from your actual location. Advice on how
to improve GPS performance is provided in
“Enhancing GPS Performance” on page 72.
While the GPS feature of your phone can be a
valuable navigational aid, it doesnot replace the
need for careful navigating and good judgment.
Never rely solely on onedevice for navigation.
Remember that the accuracy of the location
70
informationandthetimeneededtoobtainitwillvary
depending on circumstances, particularly the ability
to receive signals from adequate numbers of
satellites.
On emergency calls, your phone uses assistance
informationfrom the phone network to improve the
speed and accuracy of yourphone’slocation
calculation:if such assistanceinformation becomes
unavailable, it may reduce the speed and accuracy
of the location calculation.
The satellites used by the GPS feature of your
phoneare controlledby the U.S. government and
are subject to changes implementedin accordance
with the Department of Defense GPS user policy
and the Federal Radionavigation Plan. These
changes may affect the performance of the GPS
feature of your phone.
Making an Emergency Call
Dial 911 to be connected to an emergency response
center.Ifyouareonanactivecall,youmustendit
before calling 911.
Whenyoumakeanemergency911call,theGPS
feature of your phone begins to seek information to
calculate your approximate location. It will take the
GPS feature of your phone some time to
determine your approximate location. Even
where your phone has goodaccess to sufficient
Page 79

Viewing YourApproximate Location
GPSsatellite signalsandnetworkassist data, it may
take 30 seconds or more to determine the
approximate location.This time will increase where
thereis reduced access to satellite signals. When
your approximate location is determined,it is made
available to the appropriat e emergency response
center.
In some cases, your local 911 emergency
response center may not be equipped to receive
GPS location information. For this reason, and
becausethe GPS location information reported is
only approximate or may not be available in your
location(see “IMP ORTANT: Things to Keep in
Mind”onpage69),always report your location to
the 911 operator you speak to when making an
emergency call,if able, justas you would when
using a phone without GPS capabilities.
Note: If you are concerned about whether your
local911 emergency response center is
equipped to receive GPS location
information, contact your local authorities.
In general, if your phone has access to signals from
more GPS satellites,your location will be
determined faster andmore accuratelythan if your
phone has access to signals from fewer GPS
satellites.
If your phone does not have adequate access to
GPS satellitessignals, the locationof t he nearest
celltowerin contactwithyourphoneis automatically
madeavailableto the emergencyresponsecenter,if
the center has the capability to receive such
information.
See “EnhancingGPS Performance” on page 72
forinformationon how to help your phone determine
your location.
Viewing Your Approximate
Location
1 From the mainmenu,select GPS > Position.
2 Scroll to viewthe entire screen.
This displays the following information about the last
time your location was calculated:
• The time (asGreenwich Mean Time)and date
that the location was last calculated
• The approximate location, expressed as latitude
and longitude
• The estimated accuracy of the calculated
location.Thisestimateofaccuracyisonlyavery
rough estimate and may vary substantially from
the actual accuracyof the approximate location
information reported.
71
Page 80

GPS E nabled
• The number of satellites used to calculate the
location. In general,more satellitesmake for
better accuracy.
To calculate your location again:
Press A under Rfrsh.
It may take your phone severalminutesto complete
theprocessof determining your location.During this
time,a message usually appearson your phone’s
display saying your phone is scanning for satellites.
For tips on getting the best location calculation, see
“Enhancing GPS Performance”.
The Position screen displays the updated
information.
To cancel a location calculation before it is
completed:
Press A under Cancelto return to the Position
screen. -or-
Press e to return to the idle screen.
Each time approximatelocation of your phoneis
calculated, the latest location information is stored in
your phone and remains there even when your
phoneis powered off. You will see this information
the next time you view the Position screen.
72
Ifyou receiveda phone call or aler t while attempting
to determine your location, the Position screen will
disappear, but your phone will continue attempting
to determine its location. If it is successful, the new
location information will be displayed the next time
you view the Position screen.
Enhanci ng GPS Per formance
Sometimes the GPS feature of your phone may be
unable to complete a location calculation
successfully. If this happens whenyou are making
an emergency call, the location of the nearest cell
tower in contact with your phone is made available
to the appropriate emergency response center if the
centerhas the capability to receive such
information. If this happens when you are trying to
view your location on the phone’s display, you will
see a message indicatingthat your phone cannot
accesssatellites.
Page 81

Enhancing GPS Performance
To improve accuracy and increase your chances of
a successful calculation, do the following w hile your
phone is determining your approximate location:
• Stay in the open. The GPS feature works best
wherethere is nothing between your phone and a
largeamountof open sky. If possible,go outside,
away from tall buildings and foliage. While
performanceinabuildingisimprovedbymoving
closerto windows, glass with certainsun
shielding films may block satellite signals.
• Extend your phone antenna.
• Hold your phone to enhance reception. Signals
from GPS satellites are transmitted to your GPS
antenna, which is in your phone antenna. Hold
your phone away from your body, giving the
antenna clear access to satellite signals. Do not
cover the antenna area with your fingers or
anything else.
GPS antenna
73
Page 82

GPS E nabled
• Stand still.If possible, stand still until your phone
isfinisheddeterminingyour location.Moving your
phone at awalkingpace while your phone is
calculating your approximatelocation may
substant ially decrease GPS performance.
• In a car. When using the GPS Enabled feature in
a car, position your phone so that the GPS
antennahas good accessto GPS signalsthrough
the car’s windows. Typically, the GPS antenna
has best access to GPS signals in a car when
placednear a window.
Note: Although moving your phone at a walking
pace decreases GPS performance, moving
it at the speed of a moving car does not.
• Stay in network coverage.Depending on who
your service provider is, thenetworkwill provide
your phone with information that helps determine
your locationmore quicklyand accurately.
74
Updating Satellite Almanac Data
Another wayto keep the GPS feature ofyour phone
working well is to keep your satellite almanac data
up to date.
The United States governmentmaintains an
almanac of data about w here GPSsatellites areas
they orbit the E arth. This information is available to
your phone. Keeping your satellite almanac up to
datehelps your phone determineyour locationmore
quickly.
Thealmanaccontainsinformationabout the location
of satellites, their operational status, and other
satellite information. Keeping this information
updated enhances the performance of your GPS
feature. In mostcases, your phone will beable to
get a fix in strong satellite signal conditions with
outdated almanacdata,but it may take longer.
Note: When youmake an emergencycall, your
phone does not rely upon the almanac to
determine yourlocation.
If your satellite almanac data is out of date,your
phone may prompt you to update it. Follow the
instructions that appear on the phone’s display. You
may be asked to go to a web site or call a customer
care number.
Page 83

Setting Privacy Options
Setting Privacy Options
Your phone’s GPS privacyoptionscontrolwhether
Java applications on your phone or othersoftware
applicationsmay view the locationof your
phone.Youmay set your phone to one ofthese GPS
privacy options.
Note: Privacy options do not apply to the
transmission of location information during
emergency 911 calls.
To set your GPS privacy options:
1 From the mainmenu, select GPS > Privacy.
2 If your GPS PINsecurity feature is enabled, enter
your GPS PIN. (See “Setting the GPS PIN
Security Feature” for more information.)
3 Select the privacy option you want:
• Restricted — No Java or similar software
applicationsmay view the locationof your
phone.However, location information may still
be available to the phone’s owner, fleet
manager, or account administrator.
• Unrestricted — All applications may view the
locationof yourphone, withoutnotifying you.
• By Permission —Whenanapplication
attempts to view the location of your phone,
youwillbepromptedtogivepermission.
However, location information may still be
available to thephone’s owner, fleet manager,
or account administrator.
Setting the GPS PIN Security Featur e
To prevent your GPSprivacy settings from being
altered without yourknowledge, yourGPS privacy
optioncan be protected by a PIN.
When you receive yourphone,the GPS security
feature is turned off, so you do not have to enter a
GPS PIN to access your GPS privacyoptions. If you
turn this feature on, youwill berequiredto enter a
GPS PIN to access your GPS privacy options.
To turn the GPS Enabled security feature on or off:
1 From the mainmenu, select Settings > Security
> GPS PIN.
2 Select On or Off.
3 Enter the current GPS PIN.
Note: When you receive your phone, your GPS
PIN is 0000.
4 Press A under Ok.
75
Page 84

GPS E nabled
To change your GPSPIN:
1 From the main menu, select Settings > Security
> Change Password > GPS PIN.
2 Enter the current GPS PIN.
Note: When you receiveyour phone, your GPS
PIN is 0000.
3 Press A under Ok.
4 Enterthenew4-to8-digitGPSPIN.
5 Press A under Ok.
6 Enterthenew4-to8-digitGPSPINtoconfirm.
7 Press A under Ok.
Using GP S with Map Software
You can use the GPS feature of your phone to
provide approximate location data to a laptop
computer or similardevice that is running interactive
map software such as that made by DeLorme or
Microsof t. Thisway, if your phone hasgood access
to GPS signals,your approximate posit ion on amap
canbemadeavailableasyoutravelinavehicle.
To do this, connect your phone to your laptop (or
other device) with a data cable and set your phone
to transmit data (see “Getting Started” on page 77).
Your phone then provides your approximate location
to the device running the mapsoftware,which
76
displays your location on a map. Your phone
provides an updated location every second and the
mapsoftwaredisplays your changinglocation on its
map.
See “Enhancing GPS Performance” on page 72
for more details on obtaining good location
information.
Note: Because your phone is continuously
determining your location, using the GPS
feature of your phone with map software
uses the phone’s battery power quickly.
Software Compatibility
Your phone sends location information to your
laptop or other device using the st andard National
MarineElectronics Association (NMEA) format.
Yourphone supports output messages in
NMEA-0183 format and supportsthe following
NMEA-0183 sentences: GGA, GLL, GSA, GSV,
RMC, and VTG.
Themapsoftwarerunningonyourlaptoporother
device must support NMEA 3.0.
Page 85

Using GPS with Map Software
Getting Started
To connect your phone to your laptop or other
device:
1 Open the connector cover.
connector
cover
2 Withthe phone’sdisplayfacingup,insertthe data
cable’s connector into the accessory connector,
until you hear a click.
3 InsertthedataplugintotheCOMportofyour
laptop or other device.
Make sure no other application is using the COM
port selected.
Make sure theCOM portsettingsof your laptop or
otherdevice are set to the following:
• Bits per second: 4800
• Data bits: 8
• Parity: None
77
Page 86

GPS E nabled
• Stopbits: 1
• Flow control: Hardware
To set your phone to send locationinformation to
your laptop or other device:
1 From the main menu, select GPS > Interface.
2 Set NMEA OUT to On.
Yourphone is nowsendinglocation data to your
laptop or other device.
To stop your phone from sending location data to
your laptop or other device:
Set NMEA OUT to Off.
Each time you power your phone on,NMEA OUT is
automatically set to Off.
78
Page 87

Nextel Online®Services
You can useyour phone’s Net feature to access a
suite of wireless data productsknown as Nextel
Online (NOL) services. Services include Two-Way
Messaging, Web and Premium Web, Address Book,
Mobile Email, and wireless access to AOL
Messenger
Your i736 phone may come provisioned with the
NextelOnlineServices, whichwillbeneededfor you
to enjoy your NASCAR wireless experience. To
order, call 1-800-NEXTEL6 or contact your Next el
salesrepresentative.
* Nextel Online is only available in the continental United States.
TM
.
NOL Services
• Two-Way Messaging — Discretely send and
receivetextmessagesvia your Nextelphone,any
email address,or www.nextel.comwith Two-Way
Messaging.Forcustomers who purchaseda Free
Incoming plan, thereis a nominal chargefor each
message sent and received. Or, customers have
the option of subscribing to a Two-Way
Messaging Premier package for enhanced
functionality and unlimitedmessaging.
• Web — accessthe wireless Internet from your
Nextelphone.
®
Instant
• Premium Web — access any site on the wireless
Internet, conduct topic and keyword searches,
bookmark sites and applications, and customize
your phone's browser menu.
• AddressBook —program your Contactsfromthe
Internet.
• Mobile Email — access and send email from your
Nextelphone.
®
• AOL
• NASCAR On Nextel Online Services — Check
Instant MessengerTM— send and receive
instant messages in real–time through a
handset-based interface.
news, schedules, standings, and other driver
information. Subscribe to NASCAR alerts and
learnaboutnew NASCAR wireless content,
downloadablegames,ringtones,andwallpaper.
To access this NASCAR wireless information,
select NASCAR from the mainmenu of your i736
phone.
Accessing NOL Services From Your Phone
You must first enable security on yourphone to
receive NOL services. See “Enabling Over-the-Air
Security” on page 7.
1 Press m toaccessthemainmenuandselect
Net.
79
Page 88

Nextel Online®Services
Your NOL homepage displays.
2 Choose the service you want to access.
To access your Two-Way Messaging Service:
Selectthe Text Messaging application fromthe
Net menu.
To access theWeb:
Select Web Sites,Marketplace,orSearch
To access Address Book:
Select BusinessTools >Address Book
To access Mobile Email:
Select Email & More > Mobile Email
®
To access AOL
Instant MessengerTM:
Select Email & More > AIM
Note: Many screens will require you to enter text.
For information on entering text, see
“Entering Text” on page33.
Navigation Keys
•Home—Presse to return to your home page.
Tip: Press e twicetoreturntoyourphone'sidle
screen.
•Back—Press* to return to a previous screen.
80
•Scroll— A scroll bar on the left of the phone’s
display indicatesthat additional text canbe
viewed.Scrollusing the navigationkey.
Tip: While navigating through Nextel Online
screens, a number may appear to theleft of
theapplicationortopicyouwanttoaccess.
Press the corresponding number on the
keypad for quicker access to that application
or topic.
When transmitting highly personal or sensitive data,
such as a credit card number, this icon
indicating that the data is e ncrypted during
transmission.
E appears,
Note: Youmay be asked to (re)enablesecurityas
Nextel adds new services or upon your
return to theU.S.after traveling.
For more information and multimedia demos, go to
www.nextel.com. You can also get o ne page
service-specific guides called Customer Quick Start
Guides and other instruction for NextelOnline
services at www.nextel.com.
Page 89

Voice Records
A voice record is a recording you make with your
phone and can play back. Youcan record notes to
yourselfor phonecalls.
Your phone can store up to20 voice records.
Creating Voice Records
Torecordanotetoyourself:
1 From the mainmenu, select VoiceRecord >
[New VoiceRec].
2 Say t he message you wantto record into the
microphone.
Tip: Tostop recording beforeyou are finished,
press A under Pause. To start recording
again,press A under Resume.
3 When you are finished recording, press O.
Toaddtotheendofvoicerecord:
1 From the mainmenu, select VoiceRecord.
2 Scroll to the voice record you wantto add to.
3 Press m.
4 Select Add To.
5 When you are finished recording, press O.
To record a phone call:
1 While on an active call, press m.
2 Select Record.
3 When you are finished recording, press O.
Note: Recording of phone callsis subject to
applicable laws regarding privacy and
recording of phoneconversa tions.
Playing Voice Records
1 From the mainmenu,select VoiceRecord.
2 Select the voice record you want to play.
3 To stop the voice record whileit is playing,press
O.
Tip: To fast forward, scroll righ t. To rewind, scroll
left. To pause or resume, press any key.
Labeling Voice Records
When you create a voice record, it is labeled with
the time and date it was recorded.You can then
rename itwith a custom label.
1 From the mainmenu,select VoiceRecord.
2 Scroll to the voice record you wantto label.
3 Press A under Label.
4 Enter the label you wantto assign. See “Entering
Text ” on page 3 3.
81
Page 90

Voice Records
5 Press O.
Deleting Voice Records
To delete a voice record:
1 From the main menu, select VoiceRecord.
2 Scroll to theunlocked voice record you want to
delete.
3 Press m.
4 Select Delete.
5 Press O or A under Yes to confirm.
To delete all voice records:
1 From the main menu, select VoiceRecord.
2 Scroll to any voice record.
3 Press m.
4 Select Delete Al l.
5 Press O or A under Yes to confirm.
Locking Voice Records
When you lock a voice record, it cannot be deleted
until you unlock it.
1 From the main menu, select VoiceRecord.
2 Scroll to thevoice record you want to lock or
unlock.
3 Press m.
82
4 Select Lock tolock the message. -or-
Select Unlock to unlock the message.
When a voice record is locked, this icon
next to it.
R appears
Managi ng Memory
To view the amount of memory available for voice
records:
1 From the main menu, select VoiceRecord.
2 With [New VoiceRec] highlighted, press A under
Memory. -or-
With any voice record highlighted, press m.
Select Memory.
To free more memory by deleting all unlocked voice
records:
1 From the voice records memory screen, press A
under Delete.
2 Press O or A under Yes to confirm.
Note: Voicerecordsare stored in yourphone
using the same memory space used to
storeJavaapplication data, ring tones, and
wallpaper images. Deleting some ofthese
otheritems frees memory space forvoice
records.
Page 91

Advanced Cal ling Features
Call Waiting
Call Waiting lets you receive a second call while on
an active call. Call Waiting is always available,
unlessyou turn it off for a specificcall.
Ifyouareonacallandreceiveasecondcall,your
phone emits a toneand displays a messagesaying
youarereceivingasecondcall.
To accept the second call and put the active call on
hold:
Press A under Yes.
To accept the second call and endthe active call:
1 Press e.
Yourphone rings with thesecondcall.
2 Answer the second call.
To decline the secondcall:
Press A underNo. Ifyou subscribe to voice mail,
the call is forwarded to your voicemail box,
unless you set Call Forward for If Busy to a
different number.
Turn Off Call Waiting
To turn offCall Waiting during a call:
1 Press m.
2 Select In Call Setup > Call Waiting.
3 Set this option to Off.
Tip: To turn Call Waiting back on while still on the
call, set this option to On.
To turn off CallWaiting for thenext call you make or
receive:
1 From the mainmenu,select Settings > Phone
Calls > Call Waiting.
2 Set this option to Off.
CallWaitingisturnedbackonwhenyouendthe
call.
Switching Between Calls
Any time you have one call active and one call on
hold, to make the callon hold active and put the
active call on hold:
Press A under Switch. -or-
If Switchis not one of your options: Press m.
Select Switch.
83
Page 92

Advanced Calling Features
Putting a Call on Hold
1 Whileonanactivecall,pressm.
2 Select Hold.
If you want to make the call active again, press A
under Resume.
Calling 2 People
Putting a Call on Hold, Making a Second Call
1 Place or receive a phone call.
2 While the call is active, press m.
3 Select 2nd Call. This puts thecall on hold.
4 Enter the second phone number you wantto call.
Tip: For quick ways to enter the number, press
m.
5 Press s to place the call.
To end the second call and make the call on hold
active again:
Press e.
Tomakethecallonholdactiveandputtheactive
callon hold:
Press A under Switch.
84
Making a 3-Way Call
1 Placeorreceiveaphonecall.
2 While the call isactive,press m.
3 Select 3Way. Thisputs the call on hold.
4 Enter the second phone number you want to call.
Tip: For quick ways to enter the number, press
m.
5 Press s to place the call.
6 Press A under Join.
All 3 people in the call can speak to and hear each
other.
Merging 2 Calls into a 3-Way Call
You cancombine 2 phone calls into a 3-way call any
time you have a callon hold and a callactive:
1 Press m.
2 Select Join.
All 3 people in the call can speak to and hear each
other.
Page 93

Creating Pauses and Waits While Dialing
Creating Pauses and Waits
While D ialing
You can enter a pause or wait while dialing a
number. For more information on pauses and waits,
see “CreatingPauses and Waits” on page41.
To create a pause while dialing a phonenumber:
1 From the keypad, enter the digits you want to
occur before the pause.
2 Press m.
3 Select Insert Pause.
4 Enter the digits you want tooccur after the pause.
To create a wait while dialing a phone number:
1 From the keypad, enter the digits you want to
occurbefore the wait.
2 Press m.
3 Select Insert Wait.
4 Enter the digits you want to occur after thewait.
Making International Calls
Your service default is “InternationalCalls
Restricted.”Contact NextelCustomer Care to obtain
international dialing access.
Calls placed between theUnited States and Canada
do not require an international accesscode.
Plus Dialing lets you place an international call to
most countries without entering the local
internationalaccess code.
1 Press and hold 0 for two seconds. A “0”
appears, then changes to a “+”.
Note: The network translates the “+” i nto the
appropriate international access code
needed to place the call.
2 Enter the country code,city codeor area code,
and phone number.
SettingOneTouchDirect Connect
One Touch Direct Connect sets your phone to call
the most recent DirectConnect number on the
recentcalls list, or a Direct Connect number you
choose,every time you pre ss the PTT button.
To set your phone to call the most recent Direct
Connect number on the recent calls list:
1 From the mainmenu,select Settings > DC/GC
Options > One TouchDC.
2 Set this option to Last Call.
85
Page 94

Advanced Calling Features
To set your phone to call a Direct Connect number
you choose:
1 From the main menu, select Settings > DC/GC
Options > One Touch DC > Assigned Number.
2 To enter the Direct Connect number you want
your phone to callevery time youpress the PTT
button:
Enter the number using your keypad. -or-
Press A under Search.SelectContacts, Recent
Calls,orMemo. Select the number youwantto
enter.
Tip: If you are enteringa Talkgroupnumber,enter
# before the number.
3 Press O.
To turn off One Touch Direct Connect:
1 From the main menu, select Settings > DC/GC
Options > One Touch DC.
2 Set this option to Off.
86
Setting Flip Actions
For Answering Calls
To set your phone toanswer calls when youopen
the flip:
1 From the main menu, select Settings > Phone
Calls > Flip Activation > Flip to Ans.
2 Set this option to On.
To set your phonenot to answer calls w hen you
open the flip:
Set Flip to Ans to Off in step 2.
For Ending Calls
To set your phone toend calls when you close the
flip:
1 From the main menu, select Settings > Phone
Calls > Flip Activation > Flip to End.
2 Set this option to On.
To set your phonenot to answer calls w hen you
open the flip:
Set Flip to End to Off in step 2.
Note: Ifyouareusingyourphonewithaheadset,
and you have the Flip to End option set to
On, closing your flip sends incoming sound
to the headset and does not end the call.
Page 95

Group ConnectTMCalls
Group ConnectTMCalls
A Group Connect call isa call made to all members
of a Talkgroup at once. A Talkgroup is a
predetermined group of up to 25 Nextel customers.
Before you can make or receive GroupConnect
calls,a Talkgroupmust be established. A fter the
Talkgroup is established, you mustjoin the
Talkgroup. See “Joining a Talkgroup” on page 8.
Making Group ConnectTMCalls
1 Press #. Then enter the T alkgroup number
using the keypad. -or-
Choose the Talkgroup name from Contacts or
recent calls list.
2 Proceed as ifmaking a Direct Connect call.
Receiving Group ConnectTMCalls
To answer aGroup Connect call:
Proceed as if answering a Direct Connect call.
Only one person at a time may speak on a Group
Connectcall.
The Direct Connect number or name of the
personwho is speakingwillappear on the display
below the Talkgroup number.
Turning off Group ConnectTMCalls
To set yourphone to prevent you fromhearing
Group Connect calls to yourTalkgroup:
1 From the mainmenu,select Settings > DC/GC
Options > Tkgrp Silent.
2 Set this option On.
To set your phone to let you hear Group Connect
calls to your Talkgroup:
Set Tkgrp Silent to Off instep 2.
Call Timers
Call timers measure the duration of your phone
calls,DirectConnect or Group Connect calls, and
circuit data use, as well as the number of Kilobytes
sent and received byyour phone:
•LastCall— displays the duration of yourmost
recentphone call.
• Phone Reset — keeps a running total of your
phonecall minutes,until you reset it.
• Phone Lifetime — displays the total minutes of
all your phone calls.
• DC/GC Reset — keeps a running totalof all of
your Direct Connect and Group Connect call
minutes, until you reset it.
87
Page 96

Advanced Calling Features
• DC/GC Lifetime — displays the totalminutesof
all your Direct Connect and Group Connect calls.
• Circuit Reset — keeps a running total of all of
your circuit data use, until you resetit.
• Circuit Lifetime —displays the total minutes of
all of yourcircuitdata use.
• Kbytes Reset — keeps a running total of the
number of Kilobytes sent and received by your
phone,until you reset it.
To view or reset a timer:
1 From the main menu, select Call Timers.
2 Select the feature you want to view or reset.
3 To viewa featurewithoutresetting: Press O when
you are finished viewing. -or-
To reset a feature:Press A underReset.Press
O orpress A underYes to confirm.
Note: The values displayed by Call Timers should
not be used for billing. Call timers are
estimatesonly.
88
Using Your Phone as a Mode m
To use your phone as a modem with a laptop,
handheld device, or desktop computer:
1 Open the connector cover.
connector
cover
Page 97

Making TTY Calls
2 With the phone’s display facing up, insert a data
cable’s connector into the accessory connector,
until you hear a click.
3 Insert the data plug into the COM port of the other
device.
Whenusedasa modem, your phone hasthesedata
transfer modes:
• Circuit data — used for sending and receiving
faxes and for transferring large files
• Packet data — used for small file transfers such
as email
To use theseservices, you must install the iDEN
Wireless Data Services software (available
separately)and subscribe to a Nextel Wireless Web
accessplan. For more information on setting up
your computer and your i736 phone for packet and
circuit data calls, refer to the Nextel Online
Guide on www.nextel.com.
®
User's
Making TTY Calls
To use your phone to make phone calls using a
teletypewriter (TTY) device:
1 Connectone endof a 2.5mmcable into the audio
jackon your phone.Connect the other end of the
cable to your TTY device.
2 Make sure thatyour phone’s TTY featureis on
and select the TTY mode you want to use.
3 Use your phone to enter phone numbers and
make calls.
When you make a TTY call, these icons appear on
the phone’s display:
Phone call is active.
N
Phone call is on hold.
O
89
Page 98

Advanced Calling Features
TTY device features such as Turbo-Code,
High-Speed,and Interruption are not supported by
your phone. These features must be turned off or
disabled to use your TTY device with your phone.
TurningOntheTTYFeature
Yourphone’sTTY feature must be on if youwant to
make TTY calls, set the TTY mode, or change the
TTY baud rate. To make sure the TTY feature is on:
From the main menu, select Settings > Phone
Calls>TTY>UseTTY. This field must say On.
Choosing a Mode
Yourphone supportsthese TTY modes:
•TTY— You type and read text on your TTY
device.
•VCO(Voice-Carry-Over) — You speak into your
phone and read text replies on your TTY device.
• HCO (Hearing-Carry-Over) — You type text on
yourTTYdeviceandlistentovoicereplieson
your phone speaker.
To change mode while not in a call:
1 From the main menu, select Settings > Phone
Calls>TTY>Type.
2 Select the TTY mode you want.
90
WhenyoumakeaTTYcall,thecallbeginsinthe
TTY mode you last selected.
To change mode during a call using your phone:
1 Press m.
2 Select In Call Setup > TTY > Type.
3 Select the mode you want.
To change mode during a call using your TTY
device, issue one ofthe following commands:
• “VCO please” — to select VCO mode
• “HCO please” — to select HCO mode
• “HCO offplease” — to turn off HCO mode
Important: W hen you are using HCO, the sound
comingfrom your phone speaker may be
uncomfortably loud. Use caution when
putting the phone to your ear.(For
information on settingthe volume of
your phone speaker, see “Setting the
Volume” on page 103.)
Changing the TTY Baud Rate
By default,your phone’s TTY baudrateis set to
45.45,thebaudraterequiredforTTYcallswithinthe
U.S. To make calls outside the U.S., set your TTY
baud rate to 50.0.
Page 99

Special Dialing Codes
To change the TTY baud rate:
1 From the main menu, select Settings > Phone
Calls >TTY > Baud.
2 Selectthebaudrateforyourlocation.
Special Dialing Codes
Non-Emergency Numbers
Nextelsupportsmany “non-emergency” numbers
(such as #77, 311,...) provided by local and state
governments. These numbers are used to report
non-emergency incidents. If the situation includes
imminent danger or loss of life, you should dial 911.
Telecommunications Relay Service
Nextel supports services for communicating with
speech and/or hearing impaired individuals. Youcan
dial 711 to reach a local Telecommunications Relay
Center. You will then be connected to your
destination number. Relay serviceworks through a
Communications Assistant who readsmessages
typedintoaTDD/TTYdevicebyaspeechorhearing
impaired individual to you. TheCommunications
Assistant then types your spokenmessagesto the
hearingor speech impaired individual.
Telecommunications Relay S ervice is available 24
hours a day, seven days a week, and every call is
strictly confidential.
Note: Using 711 to reach Telecommunications
RelayServicemay not beavailable inall
areas.
Additional Phone Features
ContactNextelCustomerCare to obtain these
servicesor foradditional information:
Note: Some servicesare not availableoutside of
the continental United States.
Caller ID
Your phone automatically displays the phone
numberor name (if the 10-digit phone number is
stored in your Contacts) of the person calling
(unlessblocked by the caller), enablingyou to
decidewhetherto take thecall or forward it tovoice
mail.
Caller ID information is not available on all calls.
Per-Call Blocking
You can block delivery of yourphone number to
other Caller ID units for a single phone call:
Press *67before dialing thecall.
Your Nextel phone number cannot be blocked from
callsmade to 911, 800,855, 866, 877,888, or other
toll-free phone numbers.
91
Page 100

Advanced Calling Features
Per-Line Blocking
You can permanently block delivery of your phone
number on every call you make.
To disable on a per-call basis:
Press *82before dialing the call.
Alternate Line Service
You can have two differentphone numbers on the
same handset. With Alternate Line Service, you can:
• Set up different billing addresses for each phone
line.
• Use differentringerstyles so that you can tell
which line is receiving the call.
• Forwardincoming calls to theprimaryand
alternate lineto differentphone numbers.
To set the active line:
1 From the main menu, select Settings > Phone
Calls > Set Line.
2 Selectthe phone line you want to bethe active
line.
When calls made to the line that isnot active are set
to be forwardedto the act ive line, these calls are
sent to voice mail without ringing. See “Call
Forwarding” on page 57.
92
Call Restrictions
You can preventyour phone from making or
receiving longdistance, incoming, and outgoing
(except911) calls.
Nextel®411
You can call Nextel 411 within the continental United
States and Hawaii. Services includewhite and
yellow page listings, driving directions, restaurant
reservations,movie listingsand showtimes,and
localevent information.
 Loading...