

Page 1
User Manual
Motorola Netopia® 7107-65
Ethernet Gateway
4-port Ethernet, 802.11b/g Wi-Fi
Page 2

Safety Information
IMPORTANT SAFETY INSTRUCTIONS – POWER SUPPLY INSTALLATION.
the power jack on the Motorola Gateway. Plug the power supply into an appropriate electrical outlet.
CAUTION:
ply cord plug or the appliance coupler serves as the mains power disconnect. It is important that the direct plug-in power supply,
socket-outlet or appliance coupler be located so it is readily accessible.
(Sweden)
(Norway)
ENGLISH
TELECOMMUNICATION INSTALLATION.
be followed to reduce the risk of fire, electric shock and injury to persons, including the following:
• Do not use this product near water, for example, near a bathtub, wash bowl, kitchen sink or laundry tub, in a wet basement or
• Avoid using a telephone (other than a cordless type) during an electrical storm. There may be a remote risk of electrical shock
• Do not use the telephone to report a gas leak in the vicinity of the leak.
PRODUCT VENTILATION.
product should not exceed 104°F (40°C). It should not be used in locations exposed to outside heat radiation or trapping of its own
heat. The product should have at least one inch of clearance on all sides except the bottom when properly installed and should not
be placed inside tightly enclosed spaces unless proper ventilation is provided.
SAVE THESE INSTRUCTIONS
Motorola Part Number:
Copyright © 2009 by Motorola, Inc.
All rights reserved. No part of this publication may be reproduced in any form or by any means or used to make any derivative work (such as translation,
transformation or adaptation) without written permission from Motorola, Inc.
Motorola reserves the right to revise this publication and to make changes in content from time to time without obligation on the part of Motorola to provide notification of such revision or change. Motorola provides this guide without warranty of any kind, either implied or expressed, including, but not limited to, the implied warranties of merchantability and fitness for a particular purpose. Motorola may make improvements or changes in the product(s)
described in this manual at any time. MOTOROLA and the Stylized M Logo are registered in the US Patent & Trademark Office. Microsoft, Windows, Windows Me, and Windows NT are either trademarks or registered trademarks of Microsoft Corporation in the U.S and/or other countries. Macintosh is a registered trademark of Apple, Inc. Firefox is a registered trademark of the Mozilla Foundation. All other product or service names are the property of their
respective owners.
Depending on the power supply provided with the product, either the direct plug-in power supply blades, power sup-
Apparaten skall anslutas till jordat uttag när den ansluts till ett nätverk
Apparatet må kun tilkoples jordet stikkontakt.
When using your telephone equipment, basic safety precautions should always
near a swimming pool.
from lightning.
The Motorola Device is intended for use in a consumer's home. Ambient temperatures around this
556784-002-00
Connect the power supply cord to
2
Page 3
1
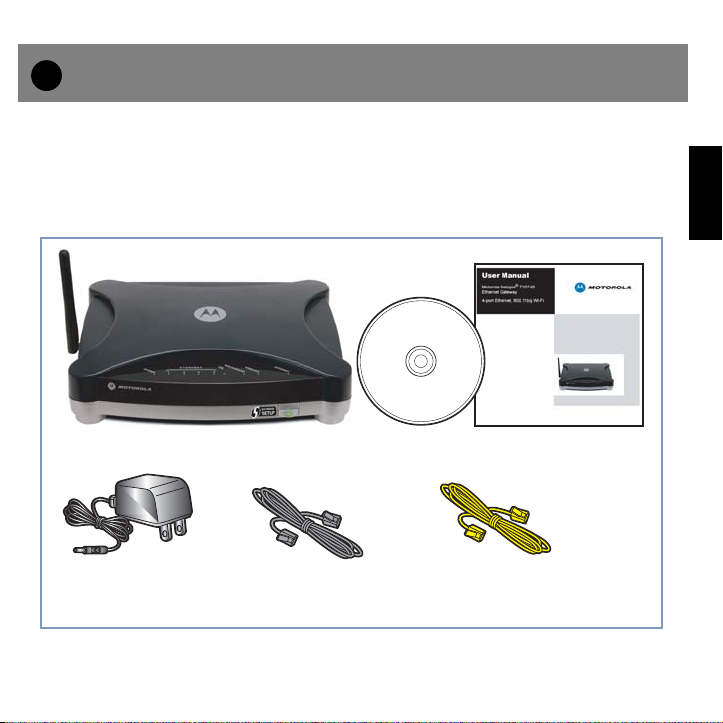
Checklist
Thank you for selecting the Motorola Netopia® 7107-65 Wi-Fi Gateway. This guide will help you set up
and configure your network.
Check your package contents. It should contain the items shown here:
M
ENGLISH
Motorola Gateway
Power
Supply
If you don’t have everything, contact your supplier immediately.
1 Gray RJ-45
Ethernet Cable
CD and User Manual
1 Yellow RJ-45
Ethernet Cable
3
Page 4

2
Connections
1. Decide on a location for the Gateway.
Put the Gateway near a power source, near your DSL or cable modem or fiber-optic media converter, and in a location where air can circulate freely around it.
2. Power the Gateway.
ENGLISH
Connect the power supply to the power jack on the back panel of the Gateway. Then, plug the
power supply into an electrical outlet. Turn on the Power switch.
The
3. Insert the Motorola Netopia® CD into your CDROM drive.
The Motorola Netopia® Installation Guide Wizard automates several tasks to get you up and
running easily. These tasks include making the cable connections and configuring the Gateway.
Run the Wizard on every computer that will connect to your network.
LED should light solid green.
Power
The Installation Guide Wizard will start automatically and the Welcome screen will appear to step
through the process.
Follow the on-screen instructions to make all of
your connections.
4
Page 5
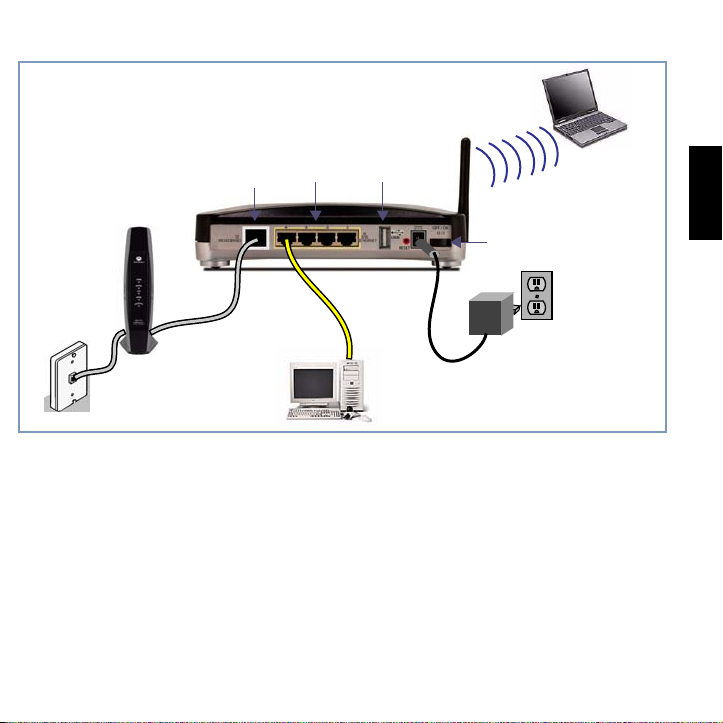
When all of your connections are made, your network may look like this:
Rear View
USB
Port
(not used)
Power Switch
DC Power
Broadband Port
Cable Modem,
DSL Modem, or
Fiber-optic media converter
Ethernet
Port s
4. Enable Wireless Protected Setup (WPS) on your Wi-Fi devices.
Adding wireless clients to your network is easier using Wireless Protected Setup (WPS). Older,
non-WPS clients can still be added to the network by configuring them the standard way with
WPA-PSK.
Make sure your wireless clients are running. Press the WPS push-button to begin the exchange,
which may last up to two minutes.
Do not power off your Gateway during the exchange.
The Gateway will display a success message when the exchange has completed.
Not all client wireless devices support WPS. Refer to their documentation.
Note:
ENGLISH
5
Page 6

When all of your connections are made, the status LEDs on the front of your Motorola Netopia® Gateway will light, according to the following diagram:
Front View
ENGLISH
POWER
POWER
ETHERNET 1, 2, 3, 4
BROADBAND
WIRELESS
INTERNET
6
ETHERNET 1, 2, 3, 4
USB
LED Action
Green
new embedded software is being installed.
Solid
USB
Not currently used.
Off when not connected to a modem; solid
is detected; flashing
Flashes
to initialize, or if wireless is disabled.
Solid
or receiving data on the WAN port.
BROADBAND WIRELESS
when power is on.
green
when connected. Flash
green
when there is activity on the wireless LAN. Off if driver fails
green
when Gateway is connected. Flashes
Red
if device malfunctions. Flashes
green
green
when receiving or transmitting data.
INTERNET
Red
when
when there is activity on the LAN.
green
when a broadband device
green
when transmitting
Page 7
3
Device Configuration
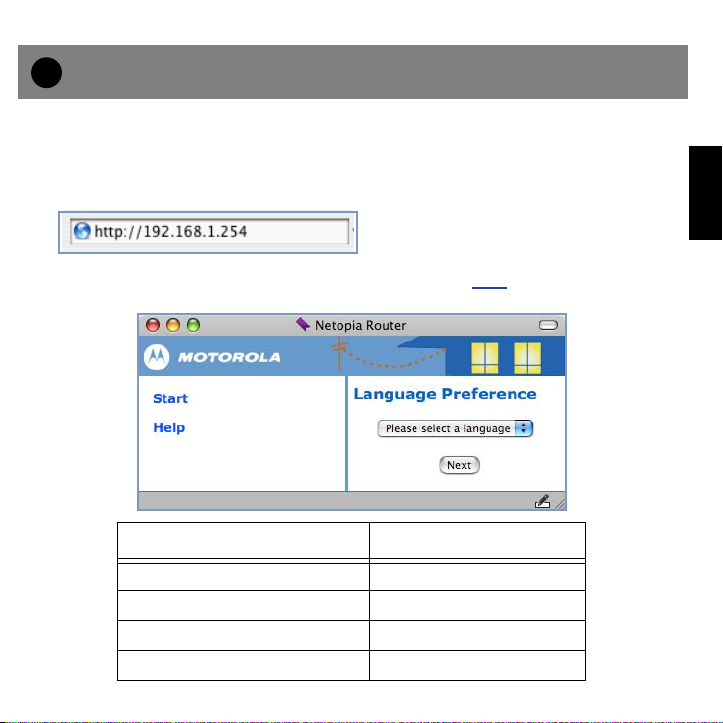
You can access the configuration pages at any time as follows:
1. Run a Web browser, such as Firefox, Safari, or Microsoft Internet Explorer, and
enter
http://192.168.1.254
in the URL Address text box.
Press Return.
ENGLISH
2. Select your language from the pull-down menu and click
ChoIces in the Americas are: Choices in Europe are:
English English
Español Latinoamericano Français
Portugués do Brasil Deutsch
Italiano
Next
.
7
Page 8

3. For security purposes you must create a password for your Gateway. Enter a new
password, repeat it, and click the
ENGLISH
Next
button.
You will be asked to log in
to your Gateway with a
UserName and Password.
The default UserName is
admin
. Enter the Password
you just created. Type these
in their respective fields and
click the
Next
button.
Congratulations!
net by typing a URL address in your browser’s Address text box or by selecting any of your favorite bookmarks.
Should you require additional information, page 12 of this Guide contains Frequently Asked Questions
(and Answers) and Basic Troubleshooting tips. The latest
figuration instructions is also available on-line at:
http://www
8
.motorola.com/us/products.jsp
Your connection is up and running and you should be able to browse the Inter-
Administrator’s Handbook
with advanced con-
Page 9

Client Configuration
Your Gateway serves Dynamically-assigned IP addresses by default. Be sure to configure each computer connected to your Gateway to accept a Dynamically-assigned IP address, commonly referred to
as DHCP.
Microsoft Windows:
Step 1. Navigate to the
a. Windows 98, 2000, and ME versions follow a path like this:
Start
menu ->
Dial-up Connections
TCP/IP [your_network_card]
erties
b. Windows XP follows a path like this:
Start
menu ->
->
Network Connections
->
Internet Protocol [TCP/IP]
TCP/IP Properties
Settings
->
Control Panel
->
Local Area Connection
Control Panel
Control Panel.
->
Network
or
Internet Protocol [TCP/IP]
->
Network and Internet Connections
->
Local Area Connection
->
Properties
(or
->
Properties
->
Network and
) ->
->
Prop-
Properties
ENGLISH
Step 2. Select
Step 3. Select
Step 4. Remove any previously configured Gateways, if available.
Step 5. OK the settings. Restart if prompted.
Obtain an IP address automatically
Obtain DNS server address automatically
.
, if available.
9
Page 10

c. Windows Vista is set to obtain an IP address automatically by default. You may not need to configure
it at all.
To check, open the
Click the
The
(TCP/IPv4) Properties
ENGLISH
should appear as shown.
If not, select the radio buttons shown
above, and click the OK button.
Properties
Internet Protocol Version 4
Networking
button.
window
Control Panel and select
Internet Protocol Version 4 (TCP/IPv4)
.
10
Page 11

Macintosh Mac OS 9 or Mac OS X:
Step 1. Access the
a. Mac OS 9 follows a path like this:
Apple
TCP/IP
Menu ->
or
Network
Control Panels
control panel.
->
TCP/IP
Control Panel
b. Mac OS X follows a path like this:
Apple
Menu ->
Step 2. Select
Step 3. Select
Step 4. Close and Save, if prompted.
System Preferences
Built-in Ethernet
Configure Using DHCP
->
Network
ENGLISH
11
Page 12

FAQ s
Q: Why is my BROADBAND light flashing green?
A:
A flashing green light indicates that no cable is attached to the BROADBAND port or that the
Motorola Netopia® Gateway is negotiating a connection. A solid green BROADBAND light indicates that an internet connection is established.
ENGLISH
If your BROADBAND light does not become solid green, verify that the connection from the
Motorola Netopia
Q: I forgot my password, how can I access my Motorola Netopia® Gateway?
A:
If you don't have a password, the only way to access the Motorola Gateway is the following:
Referring to the following diagram, find the round Reset Switch opening.
Factory Reset Switch
a factory reset, clear all settings and configurations, and reboot.
®
Gateway’s BROADBAND port to your cable or DSL modem jack is secure.
Carefully insert the point of a pen or an unwound
paperclip into the opening.
•If you press the factory default button for less than 1/2
a second, the unit will continue to run as normal.
•If you press the factory default button for more than 15
seconds, when you release it, the Gateway will perform
Note: T
switch for more than 15 seconds. When you release it, the Gateway will perform a factory reset,
clear all setting and configurations, and reboot. Keep in mind that all of your settings will need
to be reconfigured.
o assure the
Motorola Netopia
®
Gateway factory defaults you MUST hold the reset
12
Page 13

Q: What is the default IP address of my Motorola Netopia® Gateway?
A:
The default IP address of the Motorola Netopia® Gateway is 192.168.1.254. You may access
the WebUI configuration pages by typing http://192.168.1.254 URL into your browser.
Q: I made some configuration changes in my Motorola Netopia® Gateway and the changes
have not taken effect.
A:
Any configuration changes made to the Motorola Netopia® Gateway require a save and
restart before they take effect.
Q: How do I access the configuration screens of my Motorola Netopia® Gateway?
A:
You may access your Motorola Netopia® Gateway by typing the following into your web
browser
http://192.168.1.254
Note:
By default, your Motorola Netopia
192.168.1.254
.
.
®
Gateway has an Ethernet IP Address of
Q: What is the default user name and password of the Motorola Netopia® Gateway?
A:
The default User Name is
Admin
. Motorola Netopia® Gateways are not distributed with a
default password. Upon initial configuration, the Gateway requires a new password to be set.
ENGLISH
13
Page 14

Basic Troubleshooting
This section gives some simple suggestions for troubleshooting problems with your Gateway’s initial
configuration.
Before troubleshooting, make sure you have
• plugged in all the necessary cables; and
ENGLISH
• set your PC’s TCP/IP controls to obtain an IP address automatically.
The first step in troubleshooting is to check the status indicator lights (LEDs) in the order outlined
below.
Front View
14
POWER
ETHERNET 1, 2, 3, 4
BROADBAND WIRELESS
USB
INTERNET
Page 15

LED Function Summary
Power Broadband Internet
Unlit
Solid Green
Flashing Green
Solid Red
Flashing Red
Unlit No signal No wireless signal
Solid Green Synched with Ethernet card N/A
Flashing Green Activity on the Ethernet cable Activity on the wireless LAN
Solid Red N/A N/A
Flashing Red N/A N/A
No power Not connected Not connected
Power on Connected to a broad-
band device.
N/A Transmitting or receiving
data on the WAN port
System malfunction N/A N/A
Updating embedded software
Ethernet 1, 2, 3, 4 Wireless
N/A N/A
Connected to the Internet
Transmitting or receiving
data on the WAN port
ENGLISH
15
Page 16

If a status indicator light does not look correct, look for these possible problems:
If LED is
not Lit
Power
ENGLISH
Broadband
Ethernet
1,2,3,4
Possible problems
• Make sure the power switch is in the ON position.
• Make sure the power adapter is plugged into the Gateway properly.
• Try a known good wall outlet.
• Replace the power supply and/or unit.
• Make sure the gray Ethernet cable is plugged into the correct port on your DSL or cable
modem.
• Make sure the gray Ethernet cable is plugged into the BROADBAND port on your Gateway.
• Make sure your broadband account has been activated by your service provider.
• Make sure your Gateway is not plugged into a micro filter.
• Make sure the Ethernet cable is securely plugged into the Ethernet jack on the PC.
• Make sure the Ethernet cable is securely plugged into the Ethernet port on your Gateway.
• Try another Ethernet cable if you have one available.
• Make sure you have Ethernet drivers installed on the PC.
• Make sure the PC’s TCP/IP Properties for the Ethernet Network Control Panel is set to obtain
an IP address via DHCP.
• Make sure the PC has obtained an address in the 192.168.1.x range. (You may have
changed the subnet addressing.)
• Make sure the PC is configured to access the Internet over a LAN.
• Disable any installed network devices (Ethernet, HomePNA, wireless) that are not being
used to connect to your Gateway.
16
Page 17

Support
Answers to many frequently asked product-related questions, as well as full product documentation
with advanced configuration instructions, are also available on-line at:
http://www
Note the serial number (SN:) of your Gateway. It is located on the label on the bottom of the Gateway
below the model number. You will need the Gateway’s serial number if you need to call for technical
support.
.motorola.com/us/products.jsp
Caring for the Environment by Recycling
ENGLISH
When you see this symbol on a Motorola product, do not dispose of the product with residential or commercial
waste.
Contact your local authorities for information about practices established for your region.
If collection systems are not available, call Motorola Customer Service for assistance.
Recycling your
Motorola Equipment
Please do not dispose of
this product with your
residential or commercial waste. Some countries or regions, such as
the European Union, have
set up systems to collect
and recycle electrical and
electronic waste items.
17
Page 18

Please visit www.motorola.com/recycle
Besk
ilj
U
<http://www.motorola.com/recycle> for instructions on recycling.
yttelse af m
genbrug
Når du ser dette symbol på et Motorolaprodukt, må produktet ikke bortskaffes
sammen med husholdningsaffald eller
ENGLISH
erhvervsaffald.
mweltschutz durch Recy-
cling
Wenn Sie dieses Zeichen auf einem
Produkt von Motorola sehen, entsorgen
Sie das Produkt bitte nicht als gewöhnlichen Hausoder Büromüll.
øet med
Genbrug af dit Motorola-udstyr
Dette produkt må ikke bortskaffes sammen med husholdningsaffald eller erhvervsaffald. Nogle lande eller områder,
f.eks. EU, har oprettet systemer til indsamling og genbrug
af elektriske og elektroniske affaldsprodukter. Kontakt de
lokale myndigheder for oplysninger om gældende fremgangsmåder i dit område. Hvis der ikke findes tilgængelige
indsamlingssystemer, kan du kontakte Motorola Kundeservice.
Recycling bei Geräten von Motorola
Bitte entsorgen Sie dieses Produkt nicht als gewöhnlichen
Haus- oder Büromüll. In einigen Ländern und Gebieten, z. B.
in der Europäischen Union, wurden Systeme für die Rücknahme und Wiederverwertung von Elektroschrott
eingeführt. Erkundigen Sie sich bitte bei Ihrer Stadtoder
Kreisverwaltung nach der geltenden Entsorgungspraxis.
Falls bei Ihnen noch kein Abfuhroder Rücknahmesystem
besteht, wenden Sie sich bitte an den Kundendienst von
Motorola.
18
Page 19

Cuid
ar el medio ambiente
R
mediante el reciclaje
Cuando vea este símbolo en un producto
Motorola, no lo deseche junto con residuos residenciales o comerciales.
Reciclaje de su equipo Motorola
No deseche este producto junto con sus residuos residenciales o comerciales. Algunos países o regiones, tales
como la Unión Europea, han organizado sistemas para recoger y reciclar desechos eléctricos y electrónicos. Comuníquese con las autoridades locales para obtener
información acerca de las prácticas vigentes en su región.
Si no existen sistemas de recolección disponibles, solicite
asistencia llamando el Servicio al Cliente de Motorola.
ENGLISH
ecyclage pour le respect
de l'environnement
Lorsque vous voyez ce symbole sur un
produit Motorola, ne le jetez pas avec
vos ordures ménagères ou vos rebuts
d'entreprise.
Recyclage de votre équipement Motorola
Veuillez ne pas jeter ce produit avec vos ordures
ménagères ou vos rebuts d'entreprise. Certains pays ou
certaines régions comme l'Union Européenne ont mis en
place des systèmes de collecte et de recyclage des produits électriques et électroniques mis au rebut. Veuillez
contacter vos autorités locales pour vous informer des pratiques instaurées dans votre region. Si aucun système de
collecte n'est disponible, veuillez appeler le Service clientèle de Motorola qui vous apportera son assistance.
19
Page 20

Milieub
ewust recycleren
Dbałość
Als u dit symbool op een Motorola-product ziet, gooi het dan niet bij het
huishoudelijk afval of het bedrijfsafval.
ENGLISH
Uw Motorola-materiaal recycleren.
Gooi dit product niet bij het huishoudelijk afval het of bedrijfsafval. In sommige landen of regio's zoals de Europese
Unie, zijn er bepaalde systemen om elektrische of elektronische afvalproducten in te zamelen en te recycleren.
Neem contact op met de plaatselijke overheid voor informatie over de geldende regels in uw regio. Indien er geen
systemen bestaan, neemt u contact op met de klantendienst van Motorola.
o środowisko -
recykling
Produktów Motorola oznaczonych tym
symbolem nie należy wyrzucać do
komunalnych pojemników na śmieci.
20
Recykling posiadanego sprzętu Motorola
Produktu nie należy wyrzucać do komunalnych pojemników
na śmieci. W niektórych krajach i regionach, np. w Unii Europejskiej, istnieją systemy zbierania i recyklingu sprzętu elektrycznego i elektronicznego. Informacje o utylizacji tego rodzaju
odpadów należy uzyskać od władz lokalnych. Jeśli w danym
regionie nie istnieją systemy zbierania odpadów elektrycznych i elektronicznych, informacje o utylizacji należy uzyskać
od biura obsługi klienta firmy Motorola (Motorola Customer Service).
Page 21

Cuidando d
o meio ambi-
V
ädd
iljö
ente através da reciclagem
Quando você ver este símbolo em um
produto Motorola, não descarte o
produto junto com lixo residencial ou
comercial.
ente da Motorola para obter assistência.
Reciclagem do seu equipamento Motorola
Não descarte este produto junto com o lixo residencial ou
comercial. Alguns países ou regiões, tais como a União
Européia, criaram sistemas para colecionar e reciclar
produtos eletroeletrônicos. Para obter informações sobre
as práticas estabelecidas para sua região, entre em contato com as autoridades locais. Se não houver sistemas de
coleta disponíveis, entre em contato com o Serviço ao Cli-
ENGLISH
ar r
om m
n genom
återvinning
När du ser den här symbolen på en av
Motorolas produkter ska du inte kasta
produkten tillsammans med det vanliga
avfallet.
Återvinning av din Motorola-utrustning
Kasta inte denna produkt tillsammans med det vanliga
avfallet. Vissa länder eller regioner, som t.ex. EU, har satt
upp ett system för insamling och återvinning av el- och elektronikavfall. Kontakta dina lokala myndigheter för information om vilka regler som gäller i din region. Om det inte
finns något insamlingssystem ska du kontakta Motorolas
kundtjänst för hjälp.
21
Page 22

 Loading...