

Page 1
®
MR350 Radio line drawing with point lines
wo-Way Radio
T
User’s Guide
KEM-ML36100-31
This model is not for sale in Canada.
or More Information
F
For further information, you may contact Motorola Solutions, Inc. as follows:
USA: Call 1-800-638-5119, send e-mail to
giant@callcenter.com or visit www.motorolasolutions.com/talkabout.
Mexico: Call 01-800-021-0000.
Uruguay: Call 00-04-01-78-70-11.
Panama: Call 507-340-0293.
MR350MRC
Safety and General Information
mportant Information on Safe and Efficient Operation
I
Read This Information Before Using Your Radio.
The information provided in this document supersedes the general safety
information in user guides published prior to December 1, 2002.
Transmit and Receive Procedure
Your two-way radio contains a transmitter and a receiver. To control your
exposure and ensure compliance with the general population/
uncontrolled environment exposure limits, always adhere to the following
procedure:
• Transmit no more than 50% of the time.
• To receive calls, release the PTT button.
• To transmit (talk), press the Push to Talk (PTT) button.
Transmitting 50% of the time, or less, is important because the radio
generates measurable RF energy exposure only when transmitting (in
terms of measuring standards compliance).
Exposure to Radio Frequency Energy
Your Motorola two-way radio complies with the following RF energy
exposure standards and guidelines:
• United States Federal Communications Commission, Code of Federal
Regulations; 47CFR part 2 sub-part J.
• American National Standards Institute (ANSI)/Institute of Electrical
and Electronic Engineers (IEEE) C95. 1-1992.
• Institute of Electrical and Electronics Engineers (IEEE) C95.
1-1999 Edition.
• International Commission on Non-Ionizing Radiation Protection
(ICNIRP) 1998.
• Ministry of Health (Canada) Safety Code 6. Limits of Human Exposure
to Radiofrequency Electromagnetic Fields in the Frequency Range
from 3 KHz to 300 GHz, 1999.
• Australian Communications Authority Radiocommunications
(Electromagnetic Radiation—Human Exposure) Standard, 2003.
• ANATEL ANNEX to Resolution No. 303 of July 2, 2002.
• ANATEL ANNEX to Resolution No. 533 of September 10, 2009.
To ensure optimal radio performance and make sure human exposure to
radio frequency electromagnetic energy is within the guidelines set forth
in the above standards, always adhere to the following procedures.
Portable Radio Operation and EME Exposure
Antenna Care
Use only the supplied or an approved replacement antenna.
Unauthorized antennas, modifications, or attachments could damage the
radio and may violate FCC regulations.
o NOT hold the antenna when the radio is “IN USE.” Holding the
D
ntenna affects its effective range.
a
ody-Worn Operation
B
o maintain compliances with RF exposure regulatory guidelines, if you
T
ear a radio on your body when transmitting always place the radio in a
w
Motorola-supplied or approved clip holder, holster, case or body harness
for this product. Use of non-Motorola-approved accessories may exceed
F exposure regulatory guidelines.
R
f you do not use one of the Motorola-supplied or approved body-worn
I
ccessories and are not using the radio held in the normal use position,
a
nsure the radio and its antenna are at least 1 inch ( 2.5 cm) from your
e
ody when transmitting.
b
ata Operation
D
f applicable, when using any data feature of the radio with or without an
I
ccessory cable, position the radio and its antenna at least one inch
a
( 2.5 cm) from the body.
Approved Accessories
For a list of approved Motorola accessories, visit our Web site at
ww.motorolasolutions.com/talkabout.
w
Electromagnetic Interference/Compatibility
ote: Nearly every electronic device is susceptible to electromagnetic
N
nterference (EMI) if inadequately shielded, designed or otherwise
i
onfigured for electromagnetic compatibility. This device complies with
c
art 15 of the FCC Rules. Operation is subject to the following two
P
conditions:
1. This device may not cause harmful interference; and
. This device must accept any interference received, including
2
interference that may cause undesired operation.
acilities
F
To avoid electromagnetic interference and/or compatibility conflicts, turn
off your radio in any facility where posted notices instruct you to do so.
Hospitals or health care facilities may be using equipment that is
sensitive to external RF energy.
Aircraft
When instructed to do so, turn off your radio when onboard an aircraft.
ny use of a radio must be in accordance with applicable regulations
A
er airline crew instructions.
p
edical Devices – Pacemakers
M
he Advanced Medical Technology Association recommends that a
T
inimum separation of 6 inches (15 cm) be maintained between a
m
handheld wireless radio and a pacemaker. These recommendations are
consistent with the independent research by and recommendations of
the U.S. Food and Drug Administration.
People with pacemakers should:
• ALWAYS keep the radio more than 6 inches (15 cm) from their
pacemaker when the radio is turned ON.
• Not carry the radio in the breast pocket.
• Use the ear opposite the pacemaker to minimize the potential for
interference.
• Turn the radio OFF immediately if there is any reason to suspect that
interference is taking place.
Medical Devices – Hearing Aids
Some digital wireless radios may interfere with some hearing aids. In the
event of such interference, you may want to consult your hearing aid
manufacturer to discuss alternatives.
Medical Devices – Other
If you use any other personal medical device, consult the manufacturer
of your device to determine if it is adequately shielded from RF energy.
Your physician may be able to assist you in obtaining this information.
Safety and General Use While Driving
Check the laws and regulations regarding the use of radios in the area
where you drive, and always obey them. If you do use your radio while
driving, please:
• Give full attention to driving and to the road.
• Use hands-free operation, if available.
• Pull off the road and park before making or answering a call if driving
conditions so require.
The use of a two-way radio while engaged in activities requiring
concentration may cause distraction or otherwise impair your ability to
safely participate in such activities. Always use technology safely.
Do not place a portable radio in the area over an air bag or in the air bag
deployment area. Air bags inflate with great force. If a portable radio is
placed in the air bag deployment area and the air bag inflates, the radio
may be propelled with great force and cause serious injury to occupants
of the vehicle.
Potentially Explosive Atmospheres
Turn off your radio prior to entering any area with a potentially explosive
atmosphere. Only radio types that are especially qualified should be
used in such areas as “Intrinsically Safe.” Do not remove, install or
charge batteries in such areas. Sparks in a potentially explosive
atmosphere can cause an explosion or fire resulting in bodily injury or
even death.
Note: The areas with potentially explosive atmospheres referred to
above include fueling areas such as below decks on boats, fuel or
chemical transfer or storage facilities, areas where the air contains
hemicals or particles (such as grain, dust or metal powders) and any
c
ther area where you would normally be advised to turn off your vehicle
o
ngine. Areas with potentially explosive atmospheres are often—but not
e
lways—posted.
a
lasting Caps and Areas
B
To avoid possible interference with blasting operations, turn off your
radio when you are near electrical blasting caps, in a blasting area, or in
reas posted “Turn off two-way radios.” Obey all signs and instructions.
a
Operational Cautions
Antennas
o not use any portable radio that has a damaged antenna. If a
D
amaged antenna comes into contact with your skin, a minor burn can
d
esult.
r
atteries
B
ll batteries can cause property damage and/or bodily injury such as burns
A
f a conductive material—like jewelry, keys or beaded chains— touch
i
exposed terminals. The conductive material may complete an electrical
circuit (short circuit) and become quite hot. Exercise care in handling any
charged battery, particularly when placing it inside a pocket, purse or other
ontainer with metal objects.
c
Exercise care when removing NiMH or AA batteries. Do not use sharp or
conductive tools to remove either of these batteries.
attery Charger Safety Instructions:
B
ave these Instructions
S
. Do not expose the charger to rain or snow.
1
. Do not operate or disassemble the charger if it has received a sharp
2
low, or has been dropped or damaged in any way.
b
3. Never alter the AC cord or plug provided with the unit. If the plug will
ot fit the outlet, have the proper outlet installed by a qualified
n
lectrician. An improper condition can result in a risk of electric
e
hock.
s
. To reduce the risk of damage to the cord or plug, pull the plug rather
4
han the cord when disconnecting the charger from the AC
t
eceptacle.
r
. To reduce the risk of electric shock, unplug the charger from the
5
utlet before attempting any maintenance or cleaning.
o
6. Use of an attachment not recommended or sold by Motorola may
result in a risk of fire, electric shock or personal injury.
. Make sure the cord is located so it will not be stepped on, tripped
7
ver or subjected to damage or stress.
o
8. An extension cord should not be used unless absolutely necessary.
se of an improper extension cord could result in a risk of a fire
U
and/or electric shock. If an extension cord must be used, make sure
that:
• The pins on the plug of the extension cord are the same number,
size and shape as those on the plug of the charger.
• The extension cord is properly wired and in good condition.
• The extension cord size is 18 AWG for lengths up to 100 feet, and
16 AWG for lengths up to 150 feet.
9. The supply cord of the AC adaptor cannot be replaced. If the cord is
damaged, call customer service at the appropriate number listed in
the Warranty section.
Changes or modifications, not expressly approved by Motorola, may void
the user’s authority granted by the local regulatory agency to operate
this radio and should not be made. To comply with local regulatory
requirements, transmitter adjustments should be made only by or under
the supervision of a person certified as technically qualified to perform
transmitter maintenance and repairs in the private land mobile and fixed
services as certified by an organization representative of the user of
those services. Replacement of any transmitter component (crystal,
semiconductor, etc.) not authorized by the local agency’s equipment
authorization for this radio could violate local government regulatory rules.
Note:
• Use of this outside the country where it was intended to be distributed
is subject to government regulations and may be prohibited.
Licensing Information
Your Motorola radio has 22 operating channels. The FRS channels
operate within the range of free use frequencies and do not require
authorization from your local regulatory body.
The GMRS channels may require authorization from your local
regulatory body.
Channels and Frequencies
Channel Frequency Description Channel Frequency Description
1 462.5625 MHz GMRS 12 467.6625 MHz FRS
62.5875 MHzGMRS
2 4
62.6125 MHzGMRS
3 4
4 462.6375 MHz GMRS 15 462.5500 MHz GMRS
5 462.6625 MHz GMRS 16 462.5750 MHz GMRS
6 462.6875 MHz GMRS 17 462.6000 MHz GMRS
7 462.7125 MHz GMRS 18 462.6250 MHz GMRS
67.5625 MHzFRS
8 4
67.5875 MHzFRS
9 4
67.6125 MHzFRS
104
67.6375 MHzFRS
114
Mexico
se of GMRS frequencies is subject to the Rules and Regulations of the
U
ecretary of Communications and Transport (SCT) and Federal
S
Telecommunications Commissions (COFETEL). SCT/COFETEL requires
that all operators using GMRS frequencies obtain a permit before
operating their equipment. To obtain a permit from the SCT, the user
ust proceed in accordance with Articles 14 and 15 of the Federal
m
elecommunications Law. Consult your local SCT/COFETEL office for
T
more information: www.sct.gob.mx./www.cft.gob.mx.
ruguay
U
se of GMRS frequencies is subject to the Rules and Regulations of the
U
Regulatory Unit Communications Services (URSEC). URSEC requires
that all operators using GMRS frequencies obtain a permit before
perating their equipment. The authorization shall depend on the
o
hannel availability at the time the authorization is requested. To obtain
c
a permit from URSEC, consult your local URSEC office for more
information: www.ursec.gub.uy.
67.6875 MHz
134
67.7125 MHz
144
62.6500 MHzGMRS
194
62.6750 MHzGMRS
204
62.7000 MHzGMRS
214
62.7250 MHzGMRS
224
RS
F
RS
F
Panama
he Republic of Panama does not require authorization to use
T
FRS/GMRS radio equipment frequencies.
USA
Use of GMRS frequencies is subject to the Rules and Regulations of
the Federal Communications Commission (FCC). The FCC requires that
all operators using GMRS frequencies obtain a radio license before
operating their equipment. To obtain the FCC forms, please visit the
FCC’s Web site at wireless.fcc.gov/uls/index.htm?job=home to source
form 605 and 159, which include all the instructions you will need.
If you wish to have the document faxed or mailed, or if you have
questions, please use the following contact information:
For a fax:
Contact the
Fax-0n-Demand
system
1-202-418-0177 1-800-418-FORM
For mail service:
Call the FCC
Forms Hotline
(3676)
If you have
questions about
the FCC License:
Call the FCC
1-888-CALL-FCC
(225-5322)
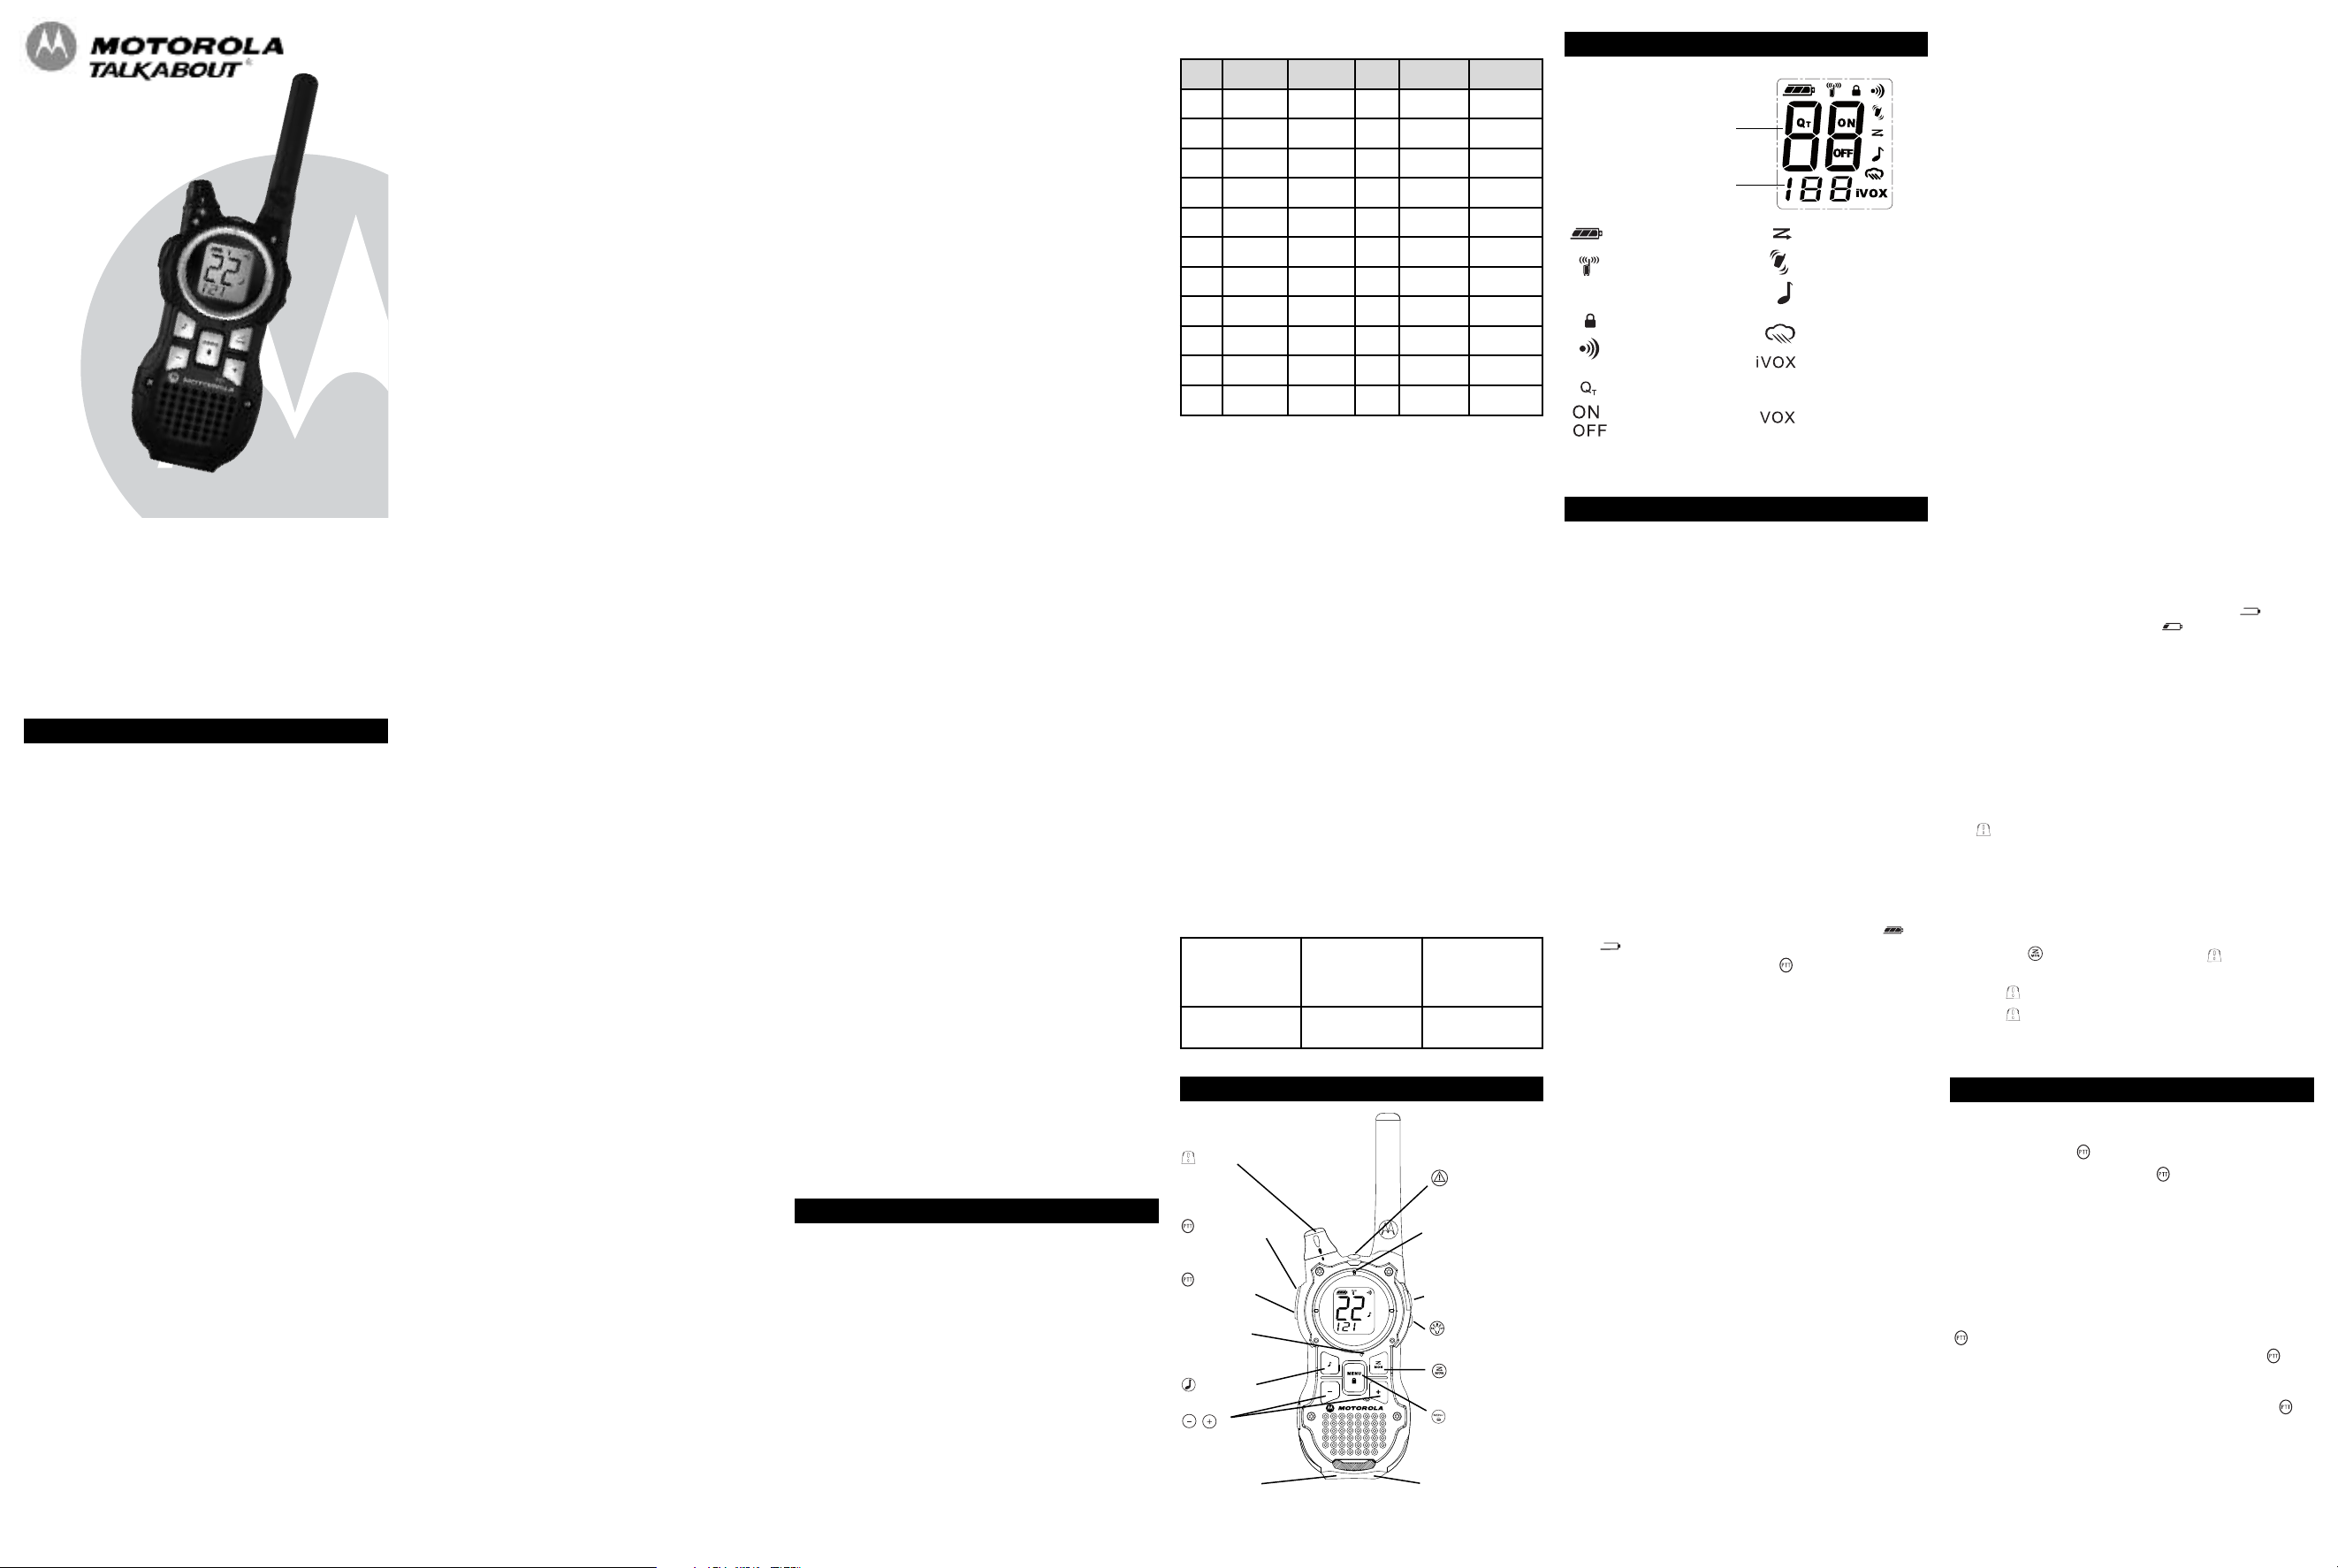
Control Buttons
Volume
Emergency Alert
Push-to-Talk
( High)
Push-to-Talk
( Low)
Microphone
Call Tone
Scroll/Weather
Mini-USB
Charging Port
LED Indicator
Accessory Jack
Flashlight Button
Scan/Monitor
Menu/Lock
Flashlight LED
Display Screen Guide
umbers for Channel,
N
Call Tone
Numbers for Codes
— Battery Meter
— Channel Power
Indicator
see Menu Options)
(
Lock
—
Talk Confirmation
—
Tone (Roger Beep)
— Noise Filtering
On/Off for each
—
eature
f
*This feature is not available in Latin America.
Getting Started
Installing the Batteries
ach radio can use either 1 NiMH rechargeable battery pack or 3 AA
E
lkaline batteries and beeps when the batteries are low.
a
nstalling NiMH Rechargeable Battery Pack ( Optional Accessory)
I
. Turn the radio off.
1
. With the back of the radio facing you, lift the battery cover latch up
2
nd remove the cover.
a
. Remove the NiMH battery pack from the clear plastic bag. (Do not
3
isassemble or unwrap the battery pack.)
d
4. Insert the NiMH battery pack with the diagram facing you. (The
ribbon should be underneath the battery pack and should wrap
around the right side of the pack for easy removal.)
. Reposition the battery cover and press down to secure.
5
nstalling the Three AA Alkaline Batteries
I
1. Turn the radio off.
2. With the back of the radio facing you, lift the battery cover latch up
and remove the cover.
3. Insert the three AA alkaline batteries with + and - polarity as shown
inside. (The ribbon should be underneath the AA alkaline batteries
and should wrap around the right side of the batteries.)
4. Reposition the battery cover and press down to secure.
Radio Battery Meter
The radio battery icon shows the battery charge level, from full to
empty . When the radio has one segment left, the
radio chirps periodically or after releasing (Low Battery Alert).
Removing the NiMH Battery Pack ( Optional Accessory)
1. Turn the radio off.
2. With the back of the radio facing you, lift the battery latch up to
release the battery cover and remove the cover.
3. Remove the NiMH battery pack by pulling the ribbon attached to
the radio.
4. Reposition the battery cover and press down to secure.
Removing the Three AA Alkaline Batteries
1. Turn the radio off.
2. With the back of the radio facing you, lift the battery latch up to
release the battery cover and remove the cover.
3. Gently remove each alkaline battery by easing each battery out
individually.
4. Reposition the battery cover and press down to secure.
Notes
• Exercise care when removing NiMH or AA batteries. Do not use
sharp or conductive tools to remove either of these batteries.
• Remove the batteries before storing your radio for extended periods
of time. Batteries corrode over time and may cause permanent
damage to your radio.
Using the Battery Charger ( Optional Accessory)
The battery charger provides drop-in charging convenience for NiMH
batteries and can be placed on any flat surface, such as a desk or
workbench. Charge the NiMH battery overnight (at least 16 hours) before
using it for the first time. After the initial charge, an empty battery is fully
charged within 14 hours.
1. Follow the steps above to install a NiMH Battery Pack.
2. Plug the AC power supply cord into the jack on the desk stand.
3. Plug the AC power supply into a standard wall outlet.
4. With a radio facing forward, slide it into one of the charging pockets.
— Scan
— Vibrate
— Call Tone,
Keypad Tone
Weather Alert*
—
Hands-Free Use
—
ithout
W
Accessories
Hands-Free Use
—
ith Accessories
W
. When charging in the battery charger, the red light on the charger
5
ase will glow continuously.
b
sing the mini-USB Charging Connector
U
he mini-USB charging connector is a handy port that allows you to
T
onveniently charge your NiMH battery pack. This is an alternative to
c
harging your NiMH battery pack in the Battery Charger desk stand
c
sing the AC wall adaptor and especially useful when used while
u
traveling.
Available mini-USB charging options (Optional Accessories):
1. Wall travel charger
2. Vehicle charger
. Mini-USB computer cable
3
f using a computer, the computer must be turned on.
I
his and other accessories (sold separately) are available for
T
our radio. For more information, visit our Web site at
y
ww.motorolasolutions.com/talkabout.
w
. Plug your mini-USB cable or charger into a power source as is
1
appropriate for your accessory.
. Plug the cable into the mini-USB port on the bottom of your radio.
2
. An empty battery will be fully charged in 14 hours.
3
. The LED indicator light on the radio will glow to indicate that the
4
attery is charging.
b
Notes
• The light will remain red after the NiMH battery pack is fully charged.
• When moving between hot and cold temperatures, do not charge the
NiMH battery pack until the battery temperature acclimates (usually
bout 20 minutes).
a
• For optimal battery life, remove the radio from the charger within 16
ours. Do not store the radio while connected to the charger.
h
• If the radio is kept on while charging, the charging time will be
extended.
• Even though the charger is connected, you may not be able to
transmit a message if the battery is completely empty . Allow
time for the battery to charge to 1 bar before attempting to
ransmit a message.
t
Attaching and Removing the Belt Clip
. Attach belt clip to pocket or belt strap.
1
. Align the belt clip post with the hole in the back of the radio.
2
3. Gently push until the clip clicks in place.
o Remove
T
1. Push down on the release tab at the top of the belt clip to release
the catch.
2. Pull the belt clip away from the back of the radio.
Turning your Radio On and Off
Turn clockwise to turn the radio on and counterclockwise to turn the
radio off.
1. In the ON position, the radio chirps and briefly shows all feature
icons available on the radio.
2. The display screen then shows the current channel, code and all
features that are enabled.
Setting the Volume
Press and hold for three seconds while rotating until you reach a
comfortable listening level.
1. Rotate clockwise to increase the volume.
2. Rotate counterclockwise to decrease the volume.
Do not hold the radio close to your ear. If the volume is set to an
uncomfortable level, it could hurt your ear.
Talking and Listening
To communicate, all radios in your group must be set to the same
channel and Interference Eliminator Code.
1. To talk, press and hold .
2. When you are finished talking, release .
For maximum clarity, hold the radio two to three inches away from your
mouth and speak directly into the microphone. Do not cover the
microphone while talking.
Talk Range
Your radio is designed to maximize performance and improve
transmission range. Do not use the radios closer than five feet apart.
Power Boost
To boost your radio’s power up to high power, press the top portion of the
button when talking. If you know your party is close by, you can
conserve your battery’s energy by pushing the lower part of the
button to use less power.
Note:
If you are on an FRS only channel (see Channels and Frequencies
table) the radio will only use low power when either portion of the
is pressed.
MR350MRC
Page 2
onitor Button
M
ressing and holding for three seconds allows you to listen to the
P
olume level of the radio when you are not receiving. This allows you to
v
djust the volume, if necessary. You can also press to check for
a
activity on the current channel before you talk.
ush-to-Talk Timeout Timer
P
o prevent accidental transmissions and save battery life, the radio emits
T
continuous warning tone and stops transmitting if you press for 60
a
ontinuous seconds.
c
Menu Options
electing the Channel
S
our radio has 22 channels. The channel is the frequency the radio uses to
Y
transmit. Channels 8-14 are FRS 0.5 watt only and all other channels are
GMRS. (See the "Channels and Frequencies" table under Licensing
Information for details.)
1. With the radio on, press . When the radio is on a 0.5
watt channel, displays. When the radio is on a 1.5 watts
hannel, displays. The current channel flashes.
c
. Press or and select an unused or quiet channel.
2
3. Press to save the channel setting or to continue set up.
electing the Interference Eliminator Code
S
nterference Eliminator Codes help minimize interference by blocking
I
transmissions from unknown sources. Your radio has 121 Interference
Eliminator Codes. Codes 1 – 38 are the standard analog codes that
appear on other FRS/GMRS radios. Codes 39 – 121 are additional digital
odes added for superior interference protection. 0 is the off position, no
c
nalog or digital codes are enabled.
a
o set the code for a channel:
T
. Press until the code starts to flash.
1
2. Press or to select the code.
3. Press to save the code setting or to continue set up.
You can set a different code for each channel using this procedure. An
extended press of or allows you to scroll through the Interference
ode rapidly so you can quickly reach the code you want.
C
ote: You must set the Interference Eliminator Code to 0 on a radio that
N
uses Interference Eliminator Codes to communicate with radios that do
not have Interference Eliminator Codes. Select 0 for “no tone, no code”
and OFF will flash on your radio’s display.
Setting and Transmitting Call Tones
Your radio can transmit different call tones to other radios in your group
so you can alert them that you want to talk. Your radio has 20 call tones
from which to choose.
To set a call tone:
1. Press three times until the current call tone setting flashes and
appears.
2. Press or to change and hear the call tone.
3. Press to set the new call tone or to continue set up.
To transmit your call tone to other radios set to the same channel and
Interference Eliminator Code as your radio, press .
Note: Setting the call to 0 disables the call tone feature.
Hands-Free Use Without Accessories ( )
You can use the iVOX feature to transmit hands-free without the need for
any headset accessories. Once iVOX is turned on, the radio detects your
voice and transmits when you speak into the internal microphone.
1. Press until appears on the display. The current setting
On/Off will flash.
2. Press or to select On or Off.
3. Press to set or to continue set up.
Hands-Free Use With Accessories ( )
You can transmit hands-free more reliably with the use of optional
headset accessories. Once VOX is turned on, the radio detects your
voice and transmits when you speak.
Many accessories (sold separately) are available for your
radio. For more information, visit our Web site at
www.motorolasolutions.com/talkabout.
1. Turn the radio off and plug the VOX accessory into the accessory port.
2. Turn the radio on. VOX shows on the display.
3. Adjust the volume appropriately by rotating . Lower the volume
before placing the accessory on your head or in your ear.
4. To turn off, simply remove accessory.
Note: There is a short delay between the time you start talking and
when the radio transmits. There is a short delay before the transmission
is completed.
Setting the Sensitivity Level When in Mode
Adjusting the radio’s sensitivity level helps minimize the possibility of
unintended noises triggering a transmission and helps the radio pick up
soft voices.
1. Press until VOX and the level setting (1 - 3) appear on the
display.
2. Press or to select the sensitivity level.
3. Press to set or to continue set up.
= High Sensitivity for quiet environments
3
2 = Medium Sensitivity for most environments
= Low Sensitivity for noisy environments
1
Note: When you connect a headset, the radio is automatically set to the
ast chosen sensitivity level.
l
xtended Battery Save
E
his feature puts the radio into a low power "sleep" mode for cycle
T
eriods of 1, 2, or 3 seconds. The radio will briefly check for any channel
p
activity after each sleep cycle. The sleep cycle repeats until a key is
pressed or a call is received.
1. Signals received during the sleep period will not be heard until after
he timer period expires. The first 1-3 seconds of speech can be
t
issed. Do not use (battery save) 1, 2, or 3 settings when
m
mmediate response may be required.
i
. SCAN, VOX, iVOX, and Q
2
attery save modes. Using SCAN, VOX, iVOX, or enabling Q
b
necessarily disable the extended sleep cycle battery settings.
3. Maximum battery life savings may be achieved only when usage is
primarily in standby mode and very little TX or RX (talking or
listening) use occurs. When RX or TX are often used, little or no
attery life extension will occur.
b
Q
oise Filtering
N
T
he Q
oise filtering feature helps to ensure uninterrupted communication
T
n
T
ith other Motorola radios that have this feature. This feature filters out
w
nwanted transmissions from other radios. This is useful in places where
u
there is heavy radio traffic, such as amusement parks or ski resorts.
Note: Q
noise filtering is not available when the radio is scanning.
T
To turn Q
and extended battery save modes on or off:
T
1. Press until Q
0, 1, 2, 3 will display.
2. Press or to select one of the following settings for Q
extended battery save mode:
Feature Description
/ Q
0
0 / QTON
/ Q
1
2 / QTOFF
3 / QTOFF
3. Press to confirm your selection or to continue set up (or
wait 5 seconds).
To transmit to a radio that has Q
1. Select the same channel and Interference Eliminator Code as the
other radio
2. Press to send a call tone. This allows your voice to pass through
the Q
3. Press and speak normally.
Note: If you skip step 2, the beginning of your message may not be
heard on the receiving radio. For a 30-second period, starting after the
last transmission, all transmissions received on the selected channel
and code will pass through the Q
VibraCall
VibraCall
receiving a message. This is useful in noisy environments. When the
alert is on, the radio vibrates once every 30 seconds when you receive a
message on the channel and code you set.
1. To turn vibrating alerts on, press until is displayed. The
current setting will flash.
2. Press or to change the setting to On/Off.
3. Press to set or to continue set up.
Keypad Tones
You may enable or disable the speaker key tones. You will hear the key
tone each time a button is pushed.
1. Press until appears. The current setting On/Off will flash.
2. Press either or to turn On or Off.
3. Press to confirm or to continue set up.
Note: When the key tone feature is off, the following are not disabled:
• Transmit timeout alert tone
• Call tone
• Low battery alert tone or
• The transmitted talk confirmation tone
Transmitting a Talk Confirmation Tone
You can set your radio to transmit a unique tone when you finish
transmitting. It is like saying “Roger” or “Over” to let others know you
are finished talking.
Normal battery save mode, QTdisabled (default)
FF
O
T
ormal battery save mode, Q
N
sec. extended battery save mode (low setting);
1
FF
O
T
Q
T
2 sec. extended battery save mode (mid setting);
Q
T
3 sec. extended battery save mode (max setting);
Q
T
noise filter on the receiving radio
T
TM
Alert
TM
is a vibrating alert that notifies you that your radio is
odes are not available with extended
m
T
and displays. The current setting ON/OFF and
T
nabled
e
T
s disabled
i
is disabled
is disabled
noise filtering turned on:
T
noise filter.
T
w
T
T
ill
and
. With the radio on, press until the appears. The current setting
1
n/Off flashes.
O
. Press or to turn On or Off.
2
. Press to set or to quit menu mode.
3
Special Features
mergency Alert Mode
E
he Emergency Alert feature can be used to signal members in your
T
group of your need for urgent help. MR series radios will operate in an
utomatic “hands-free” emergency control mode for a total of 30
a
seconds after activating the Emergency Alert. MR series radios in your
roup will automatically advance the speaker volume to the maximum
g
etting and sound a warbling alert tone for 8 seconds. The alert tone is
s
emitted from your own radio speaker and the receiving radios in your
roup. After the 8 second alert, any spoken words or incidental sounds at
g
your end will be transmitted to the group for 22 seconds. For the 30
econd duration of Emergency Alert mode, MR series radio controls and
s
buttons will be locked to maximize reception of the emergency message.
1. Press and hold the Emergency Alert button for 3 seconds.
2. Release the button after the LED Indicator glows red and the alert tone
begins to sound. There is no need to continue to hold the Emergency
Alert button or use PTT for your message to be transmitted.
3. After the alert tone ends you may speak into the microphone. Your
voice or incidental sounds will be transmitted. The LED indicator will
ontinue to glow for the duration of the 22 second period.
c
4. After 30 seconds your radio speaker will emit a Talk Confirmation
Tone and the LED Indicator will extinguish. Operation then returns to
ormal two-way mode.
n
ote: All Motorola Talkabout EM, MJ, and MR series radios are fully
N
compatible with the Emergency Alert feature. Radios other than EM, MJ,
R series can receive the emergency alert signal, but will not respond
M
with adjusted volume settings, locked controls, or a warbling alert tone.
Users of other radio models set to the same channel and Interference
liminator Code will hear a steady tone for 8 seconds followed by the
E
voice transmission for 22 seconds.
arning: The Emergency Alert feature should only be used in the event
W
of an actual emergency. Motorola is not responsible if there is no
esponse to the emergency alert from the receiving group.
r
Built-in Flashlight
Press and hold the flashlight button to turn and keep the light on. The
switch functions as a momentary control for the light.
Note: Turn off the flashlight when not in use to conserve battery power.
Keypad Lock
To avoid accidentally changing your radio settings:
1. Press and hold until displays.
2. When in lock mode, you can turn the radio on and off, adjust the
volume, receive, transmit, send a call tone, and monitor channels. All
other functions are locked.
To unlock the radio, press and hold until is no longer displayed.
Scanning Channels
Use scan to search the 22 channels for transmissions from unknown
parties, to find someone in your group who has accidentally changed
channels, or to quickly find unused channels for your own use.
There is a priority feature and 2 modes of scanning ( basic and
advanced ) to make your search more effective. The basic scan mode
uses the channel and code combinations for each of the 22 channels as
you have set them ( or with the default code value of 1). The “Advanced
Scan” mode will scan all channels for any and all codes, detect any
code in use, and use that code value temporarily for that channel.
Priority is given to the “home channel,” that is, the channel (and
Interference Eliminator Code) your radio is set to when you start the scan.
This means the initial channel (and code setting) is scanned more often
than the other 21 channels, and your radio will respond quickly to any
activity occurring on the home channel as a priority.
To start Scanning:
1. Briefly press the key. The scan will appear in the display, and the
radio will begin to scroll through the channel and code combinations.
2. When the radio detects channel activity matching the channel and
code combination, it stops scrolling and you can hear the
transmission.
3. To respond and talk to the person transmitting, press within five
seconds after the end of the transmission.
4. The radio will resume scrolling through the channels five seconds
after the end of any received activity.
5. To stop scanning, briefly press the key.
To start Advanced Scanning:
1. Set the Interference Eliminator Code to “zero” or OFF.
2. Briefly press the key. The scan will appear in the display, and
the radio will begin to scroll through the channels. No Interference
Eliminator Codes will filter what is heard.
3. When the radio detects channel activity with ANY code (or NO
code), it stops scrolling and you can hear the transmission. Any
Interference Eliminator Code that may be in use by that party will be
detected and displayed.
4. To respond and talk to the person transmitting, press within five
seconds of the end of the transmission. The radio will transmit using
the newly detected Interference Eliminator Code.
. The radio will resume scrolling through the channels five seconds
5
fter the end of any received activity.
a
. To stop scanning, briefly press the key.
6
Scanning Notes:
. If you press while the radio is scrolling through inactive
1
hannels, the transmission will be on the “home channel”. Scanning
c
ill resume five seconds after the end of your transmission. You may
w
ress the key to stop scanning at any time.
p
. If the radio stops on an undesired transmission, you may immediately
2
esume the scan by briefly pressing or .
r
. If the radio repeatedly stops on an undesired transmission, you may
3
emporarily remove that channel from the scan list by pressing and
t
olding or for three seconds. You may remove more than one
h
channel in this way.
. To restore the removed channel(s) to the scan list, turn the radio off
4
and then back on, or exit and re-enter the scanning mode by
pressing .
. You cannot remove the home channel from the scan list.
5
. In Advanced Scan, the detected code will only be used for one
6
ransmission. You must note the code, exit scan, and set that
t
etected code on that channel to permanently use the detected code.
d
Weather Receiver
his feature is not available in Latin America
T
Your radio can tune in to broadcasts by the United States National Oceanic
nd Atmospheric Administration (NOAA) Weather Radio.
a
ou can listen to a weather channel (see “Weather Channels and
Y
Frequencies” table below) or set your radio to alert you to emergency
eather broadcasts that interrupt routine broadcasts. When you listen to a
w
weather channel, you cannot use your radio in scan mode or for two-way
ommunications.
c
NOAA has transmitters located throughout the United States. These
ransmitters broadcast watches, forecasts, and other information 24 hours
t
a day.
Note: NOAA weather radio stations are assigned to cover specific areas
nd service may be limited. Please check with your local weather office for
a
frequency and details, or visit www.weather.gov/nwr in the US to view the
ppropriate transmitter for your area.
a
The use of the NOAA logo does not provide an endorsement or implied
ndorsement by NOAA’s National Weather Service.
e
Turning Weather Channel Reception On and Off
1. To turn weather reception on, press and hold for 3 seconds.
2. To turn off, press or turn the radio off and then back on.
Setting the Weather Channel
Your radio receives weather frequencies:
1. After turning weather reception on, press . The current
channel flashes.
2. Press or to select the appropriate channel with good
reception in your area.
3. Press to save the weather channel setting.
Setting the Weather Alert
Your radio can be set to respond to NOAA Weather Radio emergency
messages. A special alarm tone sounds an alert and turns on the
weather receiver to give you immediate weather and emergency
information.
1. After turning weather reception on, press twice. On/Off displays.
2. Press or to select On/Off. If you activate Weather Alert and
return to two-way mode, will display.
3. Press to save the Weather Alert setting.
4. Press to return to two-way mode.
As with two-way radio reception, weather channel reception depends on
how close you are to a transmitter and whether you are indoors or
outdoors. Because weather channels are transmitted without codes, they
may contain static or noise. Weather Alert will not function while actively
transmitting or receiving in two-way mode.
Weather Channels and Frequencies
Weather
Channel
WX1 162.550 MHz WX7 162.525 MHz
WX2 162.400 MHz WX8 161.650 MHz
WX3 162.475 MHz WX9 161.775 MHz
WX4 162.425 MHz WX10 161.750 MHz
WX5 162.450 MHz WX11 162.000 MHz
WX6 162.500 MHz
Frequency Weather
Channel
Frequency
Warranty
Consumer Two-Way Radio Products and Accessories purchased in
exico, Uruguay, Panama, and USA.
M
hat Does this Warranty Cover?
W
Subject to the exclusions contained to the right, Giant International
td. warrants the Motorola branded consumer two-way radios that
L
perate via Family Radio Service or General Mobile Radio Service
o
hat it manufactures (“Products”), the Motorola branded or certified
t
ccessories sold for use with these Products that it manufactures
a
(“Accessories”) to be free from defects in materials and
orkmanship under normal consumer usage for the period(s)
w
utlined below. This limited warranty is a consumer’s exclusive
o
emedy, and applies as follows to new Motorola branded Products
r
nd Accessories manufactured by Giant International Ltd., and
a
purchased by consumers in the countries listed above, which are
ccompanied by this written warranty:
a
ho is covered?
W
This warranty extends only to the first consumer purchaser, and is
ot transferable.
n
hat will GIANT INTERNATIONAL LTD. do?
W
GIANT INTERNATIONAL LTD., at its option, will at no charge repair,
eplace or refund the purchase price of any Products or
r
ccessories that does not conform to this warranty. We may use
A
functionally equivalent reconditioned/ refurbished/ pre-owned or
ew Products, Accessories or parts.
n
Products Covered
Products and Accessories as
efined above, unless
d
therwise provided for below.
o
Length of Coverage
One ( 1) year from the date of
urchase by the first consumer
p
urchaser of the product unless
p
otherwise provided for below.
1. Consumer Two-Way Radio
Accessories.
1. Ninety ( 90) days from the
date of purchase by the first
onsumer purchaser of the
c
product.
2. Products and Accessories
that are Repaired or
Replaced.
2. The balance of the original
warranty or for ninety ( 90)
days from the date returned
to the consumer, whichever
is longer.
How to Obtain Warranty Service or Information?
Please return product to the retailer, otherwise to obtain service or
information, please call:
USA Two-Way Radios Mexico Two-Way Radios
1-800-638-5119 01-800-021-0000
giantintl@callcenter.com
Uruguay Two-Way Radios Panama Two-Way Radios
00-04-01-78-70-11 507-340-0293
Patent and Copyright Information
Manufactured, distributed or sold by Giant International Ltd., official
licensee for this product. MOTOROLA, MOTOROLA SOLUTIONS and
the Stylized M Logo are trademarks or registered trademarks of
Motorola Trademark Holdings, LLC and are used under license. All
other trademarks are the property of their respective owners.
©2012 Motorola Solutions, Inc. All rights reserved.
hat Other Limitations Are There?
W
NY IMPLIED WARRANTIES, INCLUDING WITHOUT LIMITATION
A
HE IMPLIED WARRANTIES OF MERCHANTABILITY AND FITNESS
T
OR A PARTICULAR PURPOSE, SHALL BE LIMITED TO THE
F
DURATION OF THIS LIMITED WARRANTY, OTHERWISE THE REPAIR,
EPLACEMENT, OR REFUND AS PROVIDED UNDER THIS EXPRESS
R
LIMITED WARRANTY IS THE EXCLUSIVE REMEDY OF THE
ONSUMER, AND IS PROVIDED IN LIEU OF ALL OTHER
C
ARRANTIES, EXPRESS OR IMPLIED. IN NO EVENT SHALL
W
MOTOROLA SOLUTIONS, INC. OR GIANT INTERNATIONAL LTD. BE
IABLE, WHETHER IN CONTRACT OR TORT (INCLUDING
L
NEGLIGENCE) FOR DAMAGES IN EXCESS OF THE PURCHASE PRICE
F THE PRODUCT OR ACCESSORY, OR FOR ANY INDIRECT,
O
NCIDENTAL, SPECIAL OR CONSEQUENTIAL DAMAGES OF ANY
I
KIND, OR LOSS OF REVENUE OR PROFITS, LOSS OF BUSINESS,
OSS OF INFORMATION OR OTHER FINANCIAL LOSS ARISING OUT
L
OF OR IN CONNECTION WITH THE ABILITY OR INABILITY TO USE
HE PRODUCTS OR ACCESSORIES TO THE FULL EXTENT THESE
T
AMAGES MAY BE DISCLAIMED BY LAW.
D
Some states and jurisdictions do not allow the limitation or
xclusion of incidental or consequential damages, or limitation on
e
he length of an implied warranty, so the above limitations or
t
exclusions may not apply to you. This warranty gives you specific
egal rights, and you may also have other rights that vary from state
l
to state or from one jurisdiction to another.
Exclusions
Normal Wear and Tear.
eplacement of parts due to normal wear and tear are excluded
r
rom coverage.
f
atteries.
B
nly batteries whose fully charged capacity falls below
O
Periodic maintenance, repair and
80% of their rated capacity and batteries that leak are covered by
this limited warranty.
buse & Misuse.
A
efects or damage that result from: (a) improper
D
operation, storage, misuse or abuse, accident or neglect, such as
physical damage (cracks, scratches, etc.) to the surface of the
product resulting from misuse; (b) contact with liquid, water, rain,
extreme humidity or heavy perspiration, sand, dirt or the like,
extreme heat, or food; (c) use of the Products or Accessories for
commercial purposes or subjecting the Product or Accessory to
abnormal usage or conditions; or (d) other acts which are not the
fault of Motorola Solutions, Inc. or Giant International Ltd., are
excluded from coverage.
Use of Non-Motorola branded Products and Accessories.
Defects
or damage that result from the use of Non-Motorola branded or
certified Products or Accessories or other peripheral equipment
are excluded from coverage.
Unauthorized Service or Modification. Defects or damages
resulting from service, testing, adjustment, installation,
maintenance, alteration, or modification in any way by someone
other than Motorola Solutions, Inc., Giant International Ltd. or its
authorized service centers, are excluded from coverage.
Altered Products. Products or Accessories with (a) serial numbers
or date tags that have been removed, altered or obliterated; (b)
broken seals or that show evidence of tampering; (c) mismatched
board serial numbers; or (d) nonconforming or non-Motorola
branded housings, or parts, are excluded from coverage.
Communication Services. Defects, damages, or the failure of
Products or Accessories due to any communication service or
signal you may subscribe to or use with the Products or
Accessories is excluded from coverage.
For Accessories, please call the telephone number designated
above for the product with which they are used.
You will receive instructions on how to ship the Products or
Accessories at your expense, to a GIANT INTERNATIONAL LTD.
Authorized Repair Center. To obtain service, you must include: (a) a
copy of your receipt, bill of sale or other comparable proof of
purchase; (b) a written description of the problem; (c) the name of
your service provider, if applicable; (d) the name and location of the
installation facility (if applicable) and, most importantly; (e) your
address and telephone number.
MR350MRC
Page 3

®
MR350 Radio line drawing with point lines
adios recreativos
R
de dos vías
Manual del usuario
KEM-ML36100-32
Este modelo no se encuentra a la venta en Canada.
ara mayor información
P
Para obtener información adicional, comuníquese con Motorola
Solutions, Inc. de la siguiente manera:
stados Unidos: Llame al 1-800-638-5119, envíe un correo electrónico a
E
iant@callcenter.com o visite www.motorolasolutions.com/talkabout.
g
México: Llame al 01-800-021-0000.
Uruguay: Llame al 00-04-01-78-70-11.
anamá: Llame al 507-340-0293.
P
Información general y sobre seguridad
nformación importante sobre seguridad y para una operación eficiente
I
ea esta información antes de usar su radio.
L
La información proporcionada en este documento reemplaza a la
información general sobre seguridad que se encuentra en las guías del
usuario publicadas antes del 1º de diciembre de 2002.
Procedimiento de transmisión y recepción
Su radio de dos vías contiene un transmisor y un receptor. Para controlar su
exposición y garantizar que cumple con los límites generales de exposición
ambiental sin control/de la población, siga siempre el siguiente procedimiento:
• No transmita más del 50% del tiempo.
• Para recibir llamadas, suelte el botón PTT (Push-to-Talk).
• Para transmitir (hablar), presione el botón PTT.
Es importante transmitir el 50% del tiempo, o menos, debido a que el
radio genera una exposición mensurable de energía de radiofrecuencia
(RF) solamente cuando transmite (en términos del cumplimiento con las
normas de medición).
Exposición a la energía de radiofrecuencia
Su radio de dos vías de Motorola cumple con las siguientes normas y
pautas de exposición a la radiofrecuencia:
• Comisión Federal de Comunicaciones de los Estados Unidos, Código
de Regulaciones Federales; 47CFR Parte 2, Subparte J.
• Instituto Nacional de Normas de los Estados Unidos (American
National Standards Institute, ANSI)/Instituto de Ingenieros Eléctricos
y Electrónicos (Institute of Electrical and Electronic Engineers, IEEE)
C95. 1-1992.
• Instituto de Ingenieros Eléctricos y Electrónicos (Institute of
Electrical and Electronic Engineers, IEEE) C95. Edición 1-1999.
• Comisión Internacional de Protección contra la Radiación no
Ionizante. (International Commission on Non-Ionizing Radiation
Protection, ICNIRP) 1998.
• Código de seguridad Nº 6 del Ministerio de Salud (Canadá). Límites
de la exposición humana a los campos de radiofrecuencia
electromagnética en el rango de frecuencia de 3 Khz a 300 GHz, 1999.
• Norma sobre radiocomunicaciones de la Autoridad Australiana de
Comunicaciones. (Exposición humana a la radiación
electromagnética), 2003.
• ANEXO ANATEL a la resolución N° 303 del 2 de julio de 2002.
• ANEXO ANATEL a la resolución N° 533 del 10 de setiembre de 2009.
Para garantizar un desempeño óptimo del radio y asegurarse de que la
exposición humana a la energía de radiofrecuencia electromagnética se
encuentre dentro de las pautas establecidas en las normas anteriores,
siga siempre los siguientes procedimientos.
Operación y exposición a la energía electromagnética ( Electro
Magnetic Energy, EME) del radio portátil
Cuidado de la antena
Use solamente la antena suministrada con el equipo o un reemplazo aprobado.
Las antenas, las modificaciones y los accesorios no autorizados podrían
dañar el radio y pueden violar las regulaciones de la Comisión Federal de
Comunicaciones (Federal Communications Commission, FCC).
NO sostenga la antena cuando el radio esté “EN USO”. Sostener la
antena afecta el rango de comunicación efectivo.
MR350MRC
peración de uso en el cuerpo
O
i usted usa un radio en su cuerpo cuando transmite, coloque siempre el
S
radio en un sujetador, soporte, funda, estuche o arnés suministrado por
Motorola o que esté aprobado para usar con este producto para cumplir
on las pautas reguladoras de exposición a la radiofrecuencia. El uso de
c
ccesorios no aprobados por Motorola puede exceder las pautas
a
eguladoras de exposición a la radiofrecuencia.
r
i usted no está usando uno de los accesorios para uso en el cuerpo aprobados
S
suministrados por Motorola, y no está usando el radio en la posición de uso
o
normal, cerciórese de que el radio y su antena estén por lo menos a 1 pulgada
( 2,5 cm) de distancia de su cuerpo cuando esté transmitiendo.
peración de datos
O
i ése es el caso, cuando use alguna característica de datos del radio
S
on o sin un cable accesorio, coloque el radio y su antena por lo menos
c
a una pulgada ( 2,5 cm) de distancia de su cuerpo.
Accesorios aprobados
Para ver una lista de los accesorios aprobados por Motorola, visite
uestro sitio web www.motorolasolutions.com/talkabout.
n
nterferencia/compatibilidad electromagnética
I
ota: Casi todos los dispositivos electromagnéticos son susceptibles a
N
la interferencia electromagnética (electromagnetic interference, EMI) si
no están adecuadamente protegidos, diseñados o configurados de
lguna otra forma para tener compatibilidad electromagnética. Este
a
ispositivo cumple con la Sección 15 de las reglas de la FCC. Su
d
peración está sujeta a las siguientes dos condiciones:
o
. este dispositivo no puede causar interferencia dañina y
1
. este dispositivo debe aceptar cualquier interferencia recibida, incluyendo
2
a interferencia que pueda causar una operación no deseada.
l
nstalaciones
I
ara evitar una interferencia electromagnética y/o conflictos de
P
ompatibilidad, apague su radio en cualquier instalación donde haya
c
avisos que le indiquen hacerlo. Los hospitales y las instalaciones de
asistencia médica pueden estar usando equipos que sean sensibles a la
nergía de radiofrecuencia externa.
e
eronave
A
uando se le indique hacerlo, apague su radio al abordar un avión. Todo
C
uso de un radio debe realizarse de conformidad con las regulaciones
pertinentes de acuerdo a las instrucciones de la tripulación de la aerolínea.
Dispositivos médicos – Marcapasos
a Asociación de Tecnología Médica Avanzada (The Advanced Medical
L
echnology Association) recomienda mantener una separación mínima
T
de 6 pulgadas (15 cm) entre un radio portátil inalámbrico y un
marcapasos. Estas recomendaciones son consistentes con las de la
investigación independiente y con las recomendaciones de la
Administración de Alimentos y Medicamentos de los EE. UU.
Las personas que usan marcapasos deben:
• mantener SIEMPRE el radio a más de 6 pulgadas (15 cm) de
istancia de su marcapasos cuando ENCIENDAN el radio,
d
• no llevar el radio en el bolsillo de la camisa,
• usar el oído opuesto al lado donde está colocado el marcapasos
para minimizar el potencial de la interferencia, y
• APAGAR el radio inmediatamente si existe alguna sospecha de que
se está produciendo una interferencia.
Dispositivos médicos – Dispositivos de ayuda para la audición
Ciertos radios inalámbricos digitales pueden interferir con algunos
dispositivos de ayuda para la audición. En caso se produzca dicha
interferencia, usted debe consultar con el fabricante de dicho
dispositivo para analizar sus alternativas.
Dispositivos médicos – Otros
Si usted usa algún otro dispositivo médico personal, consulte al
fabricante de su dispositivo para determinar si éste está adecuadamente
protegido contra la energía de radiofrecuencia. Su médico puede estar
en capacidad de ayudarle a obtener esta información.
Uso general y con seguridad mientras conduce
Consulte las leyes y regulaciones referentes al uso de radios en el área donde
usted conduce y sígalas siempre. Si usted usa su radio mientras conduce:
• preste total atención a la conducción y a la carretera,
• use la operación manos libres, si dispone de ella, y
• si las condiciones de conducción lo requieren, salga de la carretera
y estaciónese antes de hacer o contestar una llamada.
El uso de radios de dos vías cuando desarrolla actividades que
requieren de concentración, puede causar distracción o de otro modo
perjudicar su capacidad para participar de manera segura en dichas
actividades. Siempre utilice la tecnología de manera segura.
No coloque un radio portátil en el área ubicada sobre una bolsa de aire
o en el área de despliegue de la misma. Las bolsas de aire se inflan con
gran fuerza. Si se coloca un radio portátil en el área de despliegue de
una bolsa de aire y ésta se infla, el radio puede ser lanzado con gran
fuerza y causar una lesión grave a los ocupantes del vehículo.
Atmósferas potencialmente explosivas
Apague su radio antes de ingresar a algún área que tenga una
atmósfera potencialmente explosiva. Solamente los tipos de radio que
están especialmente calificados se pueden usar en dichas áreas como
“intrínsecamente seguros”. No retire, instale o cargue las baterías en
dichas áreas. Las chispas en una atmósfera potencialmente explosiva
pueden causar una explosión o un incendio, ocasionando lesiones
corporales e incluso la muerte.
Nota: Las áreas con atmósferas potencialmente explosivas mencionadas
anteriormente incluyen las áreas de carga de combustible, tales como
cubiertas inferiores de botes, instalaciones de transferencia o
almacenamiento de combustible o de sustancias químicas, áreas donde el
aire contiene sustancias químicas o partículas (tales como de granos de
polvo o metálicas) y cualquier área donde normalmente se le recomendaría
apagar el motor de su vehículo. Las áreas con atmósferas potencialmente
explosivas normalmente, pero no siempre, están señalizadas.
Detonadores y áreas de detonación
Para evitar una posible interferencia con las operaciones de detonación
apague su radio cuando se encuentre cerca a detonadores eléctricos,
en áreas de detonación o en áreas señalizadas con “Apague los radios
de dos vías”. Siga todos los avisos e instrucciones.
Precauciones de operación
ntenas
A
o use ningún radio portátil que tenga la antena dañada. Si una antena
N
añada hace contacto con su piel, le puede ocasionar una quemadura leve.
d
aterías
B
odas las baterías pueden ocasionar daños a la propiedad y/o lesiones
T
corporales, tales como quemaduras, si un material conductor – como
oyas, llaves o cadenillas - toca los terminales expuestos. El material
j
onductor puede cerrar un circuito eléctrico (crear un cortocircuito) y
c
alentarse bastante. Tenga cuidado al manipular cualquier batería
c
argada, particularmente al colocarla dentro de un bolsillo, un bolso u
c
tro recipiente que contenga objetos metálicos.
o
Tenga mucho cuidado al retirar baterías NiMH o AA. No utilice ninguna
herramienta afilada o conductora para retirar alguna de estas baterías.
Instrucciones de seguridad del cargador de baterías:
onserve estas instrucciones
C
. No exponga el cargador a la lluvia o la nieve.
1
. No opere ni desarme el cargador si éste ha recibido un golpe fuerte,
2
e ha caído o se ha dañado de alguna forma.
s
. Nunca altere el cable o el enchufe de AC suministrado con la unidad.
3
i el enchufe no encaja en el tomacorriente, haga instalar el
S
omacorriente adecuado por un electricista calificado. Una condición
t
inadecuada se puede convertir en un riesgo de choque eléctrico.
. Para reducir el riesgo de daño al cable o al enchufe, tire del enchufe
4
en lugar del cable al desconectar el cargador del tomacorriente de CA.
. Para reducir el riesgo de choque eléctrico, desconecte el cargador
5
del tomacorriente antes de intentar llevar a cabo el mantenimiento o
la limpieza del mismo.
6. El uso de un accesorio no recomendado ni vendido por Motorola
puede crear un riesgo de incendio, choque eléctrico o lesión personal.
7. Asegúrese de que el cable esté colocado de tal forma que nadie lo
pise o se tropiece con él, ni que esté sujeto a daño o esfuerzos.
8. No se deben usar cables de extensión a menos que sea
absolutamente necesario. El uso de un cable de extensión
inadecuado podría ocasionar un riesgo de incendio y/o de choque
léctrico. Si se debe usar un cable de extensión, asegúrese de que:
e
• las clavijas del enchufe del cable de extensión sean del mismo
úmero, tamaño y forma que las del enchufe del cargador,
n
el cable de extensión esté correctamente conectado y en
•
uenas condiciones, y
b
el tamaño del cable sea de 18 AWG para longitudes de hasta
•
00 pies (30,48 m) y de 16 AWG para longitudes de hasta 150 pies
1
(45,72 m).
. El cable de alimentación de este cargador no se puede reemplazar.
9
i el cable está dañado, llame al servicio de atención al cliente al
S
úmero apropiado que aparece en la sección Garantía.
n
ambios o modificaciones no aprobados expresamente por Motorola
C
odrían anular la autorización de la agencia reguladora local para operar
p
este radio y no deberían realizarse. Para cumplir con las normas
eguladoras locales, los ajustes del transmisor deben realizarse
r
únicamente bajo la supervisión de una persona certificada como técnico
calificado para realizar las tareas de mantenimiento y reparación de
transmisores del servicio de telefonía privada móvil y fija, según el
certificado emitido por un representante de la organización del usuario de
dichos servicios. El reemplazo de cualquiera de los componentes del
transmisor (cristal, semiconductor, etc.) que no haya sido aceptado
mediante la autorización de equipos de la agencia local para este radio,
podría violar las normas reguladoras del gobierno local.
Nota:
• El uso de este radio fuera del país donde se proyectó que fuera
distribuido está sujeto a las regulaciones gubernamentales y puede
estar prohibido.
Información de licencia
Su radio tiene 22 canales. Los canales FRS operan en el rango de
frecuencias de uso libre y no requieren autorización por parte de la
agencia reguladora local.
Los canales GMRS podrían requerir de la autorización por parte de la
agencia reguladora local.
Canales y frecuencias
Canal Frecuencia Descripción Canal Frecuencia Descripción
1 462.5625 MHz GMRS 12 467.6625 MHz FRS
2 462.5875 MHz GMRS 13 467.6875 MHz FRS
3 462.6125 MHz GMRS 14 467.7125 MHz FRS
4 462.6375 MHz GMRS 15 462.5500 MHz GMRS
5 462.6625 MHz GMRS 16 462.5750 MHz GMRS
6 462.6875 MHz GMRS 17 462.6000 MHz GMRS
7 462.7125 MHz GMRS 18 462.6250 MHz GMRS
8 467.5625 MHz FRS 19 462.6500 MHz GMRS
9 467.5875 MHz FRS 20 462.6750 MHz GMRS
10 467.6125 MHz FRS 21 462.7000 MHz GMRS
11 467.6375 MHz FRS 22 462.7250 MHz GMRS
éxico
M
El uso de las frecuencias GMRS está sujeto a las leyes y regulaciones
e la Secretaría de Comunicaciones y Transportes (SCT) y las
d
omisiones Federales de Telecomunicaciones (COFETEL). La
C
CT/COFETEL exige que todos los operadores de frecuencias GMRS
S
btengan una licencia para utilizar radios antes de comenzar a operar
o
l equipo. Para obtener una concesión por parte de la SCT, se deberá
e
roceder conforme a los artículos 14 y 15 de la Ley Federal de
p
elecomunicaciones. Para más información, consulte la oficina local de
T
CT/COFETEL en www.sct.gob.mx./www.cft.gob.mx.
S
ruguay
U
l uso de las frecuencias GMRS está sujeto a las leyes y regulaciones
E
e la Unidad Reguladora de Servicios de Comunicaciones (URSEC). La
d
URSEC exige que todos los operadores de frecuencias GMRS obtengan
na licencia para utilizar radios antes de comenzar a operar el equipo.
u
a autorización se otorgará dependiendo de la disponibilidad de canales
L
l momento en que solicita la autorización. Para obtener una licencia de
a
URSEC, consulte su oficina local de URSEC en: www.ursec.gub.uy.
anamá
P
a República de Panamá no exige autorización para el uso de las
L
recuencias FRS/GMRS con equipos de radio.
f
Estados Unidos
El uso de las frecuencias GMRS está sujeto a las leyes y regulaciones
de la Comisión de Comunicaciones Federales (FCC). La FCC exige que
odos los operadores de frecuencias GMRS obtengan una licencia para
t
tilizar radios antes de comenzar a operar el equipo. Para obtener los
u
formularios de la FCC, visite el sitio web de la FCC en
wireless.fcc.gov/uls/index.htm?job=home y descargue los formularios
05 y 159, que incluyen todas las instrucciones que usted necesitará.
6
Si desea que le envíen el documento por fax o por correo, o si tiene
alguna pregunta, sírvase utilizar la siguiente información:
Para un fax:
omuníquese con el
C
sistema de Fax-On
emand
D
1-202-418-0177 1-800-418-FORM
Para servicio por
orreo: Llame a la
c
línea directa de
ormularios de la FCC
f
(3676)
Si tiene preguntas
cerca de la licencia
a
de la FCC:
lame a la FCC
L
1-888-CALL-FCC
(225-5322)
Botones de control
Volumen
Alerta para
emergencias
Presionar para
Luz indicadora LED
Hablar ( Alto)
Presionar para
Hablar ( Bajo)
Micrófono
Enchufe accesorio
Linterna
Botón de monitoreo
Tono de llamada
Menú/Bloqueo de
seguridad
Escaneo/clima
Mini USB
Puerto para carga
LED de la linterna
Guía de la pantalla indicadora
Números para canal y
tono de llamada
Números para códigos
— Indicador de la batería
— Indicador de potencia
del canal (consulte
Opciones de menú)
— Bloqueo
— Tono de confirmación
de llamada (Roger
beep/pitido de
cambio)
— Filtrado de ruido
— Activación/
desactivación de
cada característica
*Esta función no está disponible en Latino América.
— Escaneo
— Vibrar
— Tono de llamada,
tono del teclado
— Alerta climática*
— Uso de manos
libres sin
accesorios
— Uso de manos
libres con
accesorios
Primeros pasos
nstalación de las baterías
I
ada radio utiliza 1 batería recargable NiMH o 3 baterías alcalinas AA y
C
mite un sonido de alerta cuando las baterías están bajas.
e
Instalación del paquete de batería recargable NiMH ( accesorio
pcional)
o
. Apague el radio.
1
. Con el reverso del radio en dirección a usted, destrabe la tapa del
2
adio y remuévala.
r
. Retire la batería NiMH de la bolsa de plástico transparente. (No
3
esarme ni desenvuelva la batería).
d
. Inserte la batería NiMH con el diagrama en dirección a usted. (La
4
inta debe estar debajo de la batería y debe rodear el lado derecho
c
e ésta para quitarla fácilmente).
d
. Vuelva a poner la tapa de la batería en su lugar y presione hacia
5
bajo para asegurarla.
a
nstalación de las tres baterías alcalinas AA
I
. Apague el radio.
1
. Con el reverso del radio en dirección a usted, destrabe la tapa del
2
adio y remuévala.
r
. Inserte las tres baterías alcalinas AA con los símbolos de polaridad +
3
- como se muestra en el interior. (La cinta debe estar debajo de las
y
aterías alcalinas AA y debe rodear el lado derecho de las baterías).
b
. Vuelva a poner la tapa de la batería en su lugar y presione hacia
4
bajo para asegurarla.
a
Medidor de la batería del radio
l icono de la batería del radio muestra el nivel de carga de la misma,
E
esde lleno
d
egmento de carga, el radio emite periódicamente un sonido o después
s
de soltar el botón
ara retirar la batería NiMH ( accesorio optativo)
P
1. Apague el radio.
. Con el reverso del radio en dirección a usted, destrabe la tapa del
2
radio y remuévala.
. Para retirar la batería NiMH, tire de la cinta del radio.
3
4. Vuelva a poner la tapa de la batería en su lugar y presione hacia
bajo para asegurarla.
a
Para retirar las tres baterías alcalinas AA
1. Apague el radio.
. Con el reverso del radio en dirección a usted, destrabe la tapa del
2
adio y remuévala.
r
3. Retire cuidadosamente cada batería alcalina quitándolas una por una.
4. Vuelva a poner la tapa de la batería en su lugar y presione hacia
abajo para asegurarla.
Notas:
• Tenga mucho cuidado al retirar baterías NiMH o AA. No utilice
ninguna herramienta afilada o conductora para retirar alguna de
estas baterías.
• Retire las baterías antes de guardar su radio por periodos de tiempo
prolongados. Las baterías se corroen con el tiempo y pueden dañar
permanentemente su radio.
Uso del cargador de baterías ( accesorio opcional)
El cargador de baterías proporciona una carga cómoda y sencilla de las
baterías NiMH y se puede colocar sobre cualquier superficie plana,
tales como sobre un escritorio o un banco de trabajo. Cargue la batería
NiMH durante la noche (al menos 16 horas) antes de usarla por primera
vez. Después de la carga inicial, una batería descargada se carga
completamente en un período de 14 horas.
1. Siga los pasos anteriores para instalar el paquete de la batería NiMH.
2. Conecte el suministro de energía de CA en el enchufe del cargador
de mesa.
3. Conecte el suministro de energía de CA al tomacorriente estándar de
la pared.
4. Con el radio mirando hacia adelante, deslícelo en una de las
cavidades de carga.
5. Mientras cargue la batería, la luz roja en la base del cargador
permanecerá encendida.
Uso del conector de carga mini USB
El conector de carga mini USB es un puerto útil que le permite cargar
sus baterías NiMH de forma cómoda. Se trata de una alternativa a la
carga de la batería NiMH en el cargador de mesa de la batería mediante
el uso del adaptador de pared para CA, que es particularmente útil
durante los viajes.
Opciones disponibles para carga con mini USB (accesorios opcionales):
1. Cargador de pared para viajes
2. Cargador para vehículos
3. Cable mini USB para computadoras
Si utiliza una computadora, ésta debe estar encendida.
Éste y otros accesorios disponibles para su radio se venden
por separado. Para más información, visite nuestro sitio web
www.motorolasolutions.com/talkabout.
1. Conecte su cable o cargador mini USB al suministro de energía
según corresponda al accesorio.
asta vacío . Cuando a la batería le queda sólo un
h
(alerta de batería baja).
. Conecte el cable al puerto mini USB que se encuentra en la parte
2
nferior del radio.
i
. Las baterías descargadas se cargan completamente en un período
3
e 14 horas.
d
. La luz indicadora LED del radio se ilumina para indicar que la batería
4
e está cargando.
s
otas:
N
La luz permanecerá en rojo luego de que la batería NiMH esté
•
ompletamente cargada.
c
Cuando se moviliza entre temperaturas altas y bajas, no cargue la
•
atería hasta que la temperatura de ésta se aclimate
b
aproximadamente 20 minutos).
(
Para mayor duración de la batería, retire el radio del cargador luego
•
e 16 horas. No guarde el radio mientras esté conectado al cargador.
d
Si el radio se mantiene encendido durante la carga, el tiempo de la
•
arga será más prolongado.
c
• Si la batería se encuentra completamente descargada , es
osible que no pueda enviar mensajes aunque el cargador esté
p
onectado. Permita que la batería cargue 1 barra antes de
c
ntentar transmitir un mensaje.
i
ómo colocar y retirar el sujetador para cinturón
C
. Coloque el sujetador para cinturón en el bolsillo o cinturón.
1
. Alinee el gancho del sujetador para cinturón con el agujero en el
2
everso del radio.
r
. Empuje cuidadosamente hasta que el sujetador encaje en su lugar.
3
Para retirar
1. Presione la lengüeta en la parte superior del sujetador del cinturón
ara soltar el seguro.
p
2. Tire del sujetador desde la parte trasera del radio.
Cómo encender y apagar el radio
Gire en sentido horario para encender el radio y en sentido
antihorario para apagarlo.
1. Si está ENCENDIDO, el radio emite un sonido y muestra brevemente
todos los iconos de las características disponibles en su radio.
2. La pantalla muestra enseguida el canal actual, el código y las
características que están activadas.
juste del volumen
A
antenga presionado durante tres segundos mientras gira hasta
M
lcanzar un nivel de audio agradable.
a
. Gire en sentido horario para aumentar el volumen.
1
. Gire en sentido antihorario para disminuir el volumen.
2
No coloque el radio cerca de su oído. Si el ajuste de volumen es
inadecuado, podría ser perjudicial para su oído.
Cómo hablar y escuchar
Para comunicarse, todos los radios del grupo deben ajustarse en el
mismo canal y el mismo código de eliminación de interferencia.
1. Para hablar, mantenga presionado el botón .
2. Al terminar de hablar, suelte el botón .
Para una máxima claridad de comunicación, sostenga el radio a dos o
tres pulgadas (5 o 7,6 cm) de distancia de su boca y hable directamente
hacia el micrófono. No cubra el micrófono mientras habla.
Rango de conversación
Su radio está diseñado para maximizar su desempeño y mejorar el rango de
transmisión. No use los radios a menos de cinco pies (1,52 m) de distancia.
Impulsor de potencia
Para aumentar la potencia del radio a potencia alta, presione la parte
superior del botón al hablar. Si sabe que el receptor se encuentra
cerca, puede ahorrar energía de la batería al presionar la parte inferior
del botón para utilizar menos energía.
Nota:
Si está en un canal únicamente FRS (consulte la tabla Canales y
Frecuencias) el radio sólo utilizará baja energía al presionar cualquier
parte del botón .
Botón de monitoreo
Mantenga presionado por 3 segundos para escuchar el volumen del
radio cuando no esté recibiendo una llamada. Esto le permitirá ajustar el
volumen, si es necesario. También puede presionar para controlar la
actividad en el canal actual antes de hablar.
Temporizador de desconexión del botón PTT
Para evitar transmisiones accidentales y para que la batería dure, el
radio emite un tono de advertencia continuo y deja de transmitir si usted
presiona el botón durante 60 segundos continuos.
Opciones de menú
Selección del canal
Su radio tiene 22 canales. El canal es la frecuencia que su radio usa
para transmitir. Los canales del 8 al 14 son FRS de 0.5 watts solamente y
los demás canales son GMRS. (Consulte la tabla de “Canales y
Frecuencias” debajo de “Información de licencia” para más detalles).
1. Con el radio encendido, presione el botón . Cuando el radio esté
en un canal de 0.5 watt, aparecerá . Cuando el radio esté en un
canal de 1.5 watt, aparecerá . El canal actual destellará.
MR350MRC
Page 4

. Presione o y seleccione un canal que no esté en uso o uno
2
in ruido.
s
. Presione para guardar el canal seleccionado o para
3
ontinuar con la configuración.
c
elección del Código Eliminador de Interferencia
S
Los Códigos Eliminadores de Interferencia ayudan a reducir la
nterferencia bloqueando las transmisiones de fuentes desconocidas. Su
i
radio tiene 121 códigos eliminadores de interferencia. Los códigos del 1
l 38 son los códigos analógicos estándar que aparecen en otros radios
a
RS/GMRS. Los códigos del 39 al 121 son códigos digitales adicionales
F
ara proporcionar mayor protección contra interferencias. 0 es la
p
osición de apagado (no hay códigos analógicos ni digitales habilitados).
p
ara configurar el código correspondiente a un canal:
P
. Presione el botón hasta que el código comience a destellar.
1
. Presione el botón o para seleccionar el código.
2
3. Presione el botón para guardar el canal seleccionado o para
continuar con la configuración.
ediante este procedimiento, usted puede configurar un código
M
diferente para cada canal. Si presiona o por un tiempo
rolongado, podrá desplazarse por los Códigos Eliminadores de
p
Interferencia rápidamente a fi de llegar enseguida al código deseado.
ota: Debe establecer el Código Eliminador de Interferencia en 0 en un
N
radio que use Códigos Eliminadores de Interferencia para comunicarse con
n radio que no tenga dichos códigos. Seleccione 0, que corresponde a “sin
u
tono, sin código”, y en la pantalla del radio destellará OFF (apagado).
Configuración y transmisión de los tonos de llamada
u radio puede transmitir diferentes tonos de llamada a otros radios de
S
su grupo para avisarles que usted desea hablar. Dispone de 20 tonos de
lamada entre los que puede elegir.
l
ara configurar un tono de llamada:
P
. Presione tres veces hasta que el tono de llamada actual destelle
1
y aparezca .
2. Presione o para cambiar y escuchar el tono de llamada.
3. Presione para guardar el nuevo tono de llamada o para
continuar con la configuración.
Para transmitir su tono de llamada a otros radios con el mismo canal y
código eliminador de interferencia de su radio, presione .
Nota: Si ajusta la llamada a 0, desactiva la característica de tono de llamada.
so de manos libres sin accesorios ()
U
Puede utilizar la característica iVOX para transmitir utilizando manos
ibres sin la necesidad de utilizar juegos de audífono-micrófono. Una vez
l
activada la característica iVOX, el radio detecta su voz y transmite al
ablar al micrófono interno.
h
1. Presione hasta que aparezca . Destellará la
activación/desactivación actual.
2. Presione o para seleccionar Encender o Apagar.
3. Presione para guardar o para continuar con la configuración.
Uso de manos libres con accesorios ()
Puede utilizar juegos de audífono-micrófono opcionales para transmitir
utilizando manos libres de manera más confiable. Una vez activada la
característica VOX, el radio detecta su voz y la transmite al hablar.
Existe una gran variedad de accesorios disponibles para su radio (se
venden por separado). Para más información, visite nuestro sitio web
www.motorola.com.
1. Apague el radio y conecte el accesorio VOX en el puerto para accesorios.
2. Encienda el radio. Aparece VOX en la pantalla.
3. Para ajustar el volumen correctamente, gire . Disminuya el
volumen antes de colocar el accesorio en su oreja o sobre su cabeza.
4. Para apagarlo, simplemente desconecte el accesorio.
Nota: Existe una breve demora entre el momento en el que usted
comienza a hablar y en el que el radio transmite. Existe una breve
demora en la finalización de la transmisión.
Ajuste del nivel de sensibilidad en modo
El ajuste del nivel de sensibilidad del radio ayuda a minimizar la posibilidad
de ruidos no deseados en una transmisión y ayuda al radio a captar las
voces suaves.
1. Presione hasta que VOX y el nivel (1-3) aparezcan en
la pantalla.
2. Presione el botón o para seleccionar el nivel de sensibilidad.
3. Presione para guardar o para continuar con la configuración.
3 = Alta sensibilidad para entornos silenciosos
2 = Sensibilidad intermedia para la mayoría de los entornos
1 = Sensibilidad baja para entornos ruidosos
Nota: Al conectar un juego de audífono-micrófono, el nivel de sensibilidad
del radio se establece automáticamente en el último nivel seleccionado.
Ahorro para larga duración de la batería
Esta característica pone el radio en modo de “suspensión” con baja
potencia durante períodos cíclicos de 1, 2 o 3 segundos. El radio
realizará una breve comprobación en busca de actividad de los canales
al finalizar cada ciclo de suspensión. El ciclo de suspensión se repite
hasta presionar una tecla o recibir una llamada.
1. Las señales recibidas durante el período de suspensión no se oirán
hasta que termine el período del temporizador. Es posible que se
pierdan los primeros 1 a 3 segundos de voz. No utilice los valores 1, 2
o 3 de (ahorro de batería) en caso de que se requiera una
respuesta inmediata.
. Los modos SCAN, VOX, iVOX y QT no se encuentran disponibles en
2
los modos de ahorro para larga duración de la batería. El uso de
CAN, VOX, iVOX o la activación de QT desactivará la configuración
S
del ciclo de suspensión extendido de la batería.
. El ahorro máximo de la batería puede lograrse sólo si se utiliza
3
principalmente en modo de espera y si se utiliza TX o RX con poca
recuencia (hablar o escuchar). Si RX o TX se utiliza con frecuencia,
f
o se producirá la extensión de la duración de la batería o este
n
eríodo será muy breve.
p
Quiet Talk)
iltrado de ruido Q
F
a característica del filtrado de ruido Q
L
comunicación sin interrupciones con otros radios Motorola que tengan
sta característica. Esta característica filtra las transmisiones no
e
deseadas de otros radios. Esto es útil en lugares donde se presente un
ráfico pesado de transmisiones de radio, tales como en los parques de
t
diversiones o los centros de esquí.
ota: El filtrado de ruido Q
N
está escaneando.
ara encender o apagar los modos Q
P
la batería:
1. Mantenga presionado el botón hasta que aparezcan Q
parecen el valor actual Encendido/Apagado y 0, 1, 2, o 3.
A
. Presione o para seleccionar uno de los siguientes valores
2
ara el modo Q
p
Característica Descripción
/ Q
0
/ Q
0
1 / QTOFF
/ Q
2
/ Q
3
. Presione para confirmar la selección o para continuar con
3
a configuración (o espere 5 segundos).
l
Para transmitir a un radio que tiene la función de filtrado de ruido Q
. Seleccione el mismo canal y el mismo código de eliminación de
1
nterferencia que el otro radio.
i
2. Presione el botón para enviar un tono de llamada. Esto permite
ue la voz pase por el filtro de ruido en el radio receptor.
q
. Presione el botón y hable normalmente.
3
Nota: Si usted pasa por alto el paso 2, el inicio de su mensaje puede no
escucharse en el radio receptor. Por un período de 30 segundos,
empezando después de la última transmisión, todas las transmisiones
recibidas en el canal y código seleccionados pasarán a través del filtro
de ruido Q
Alerta VibraCall
VibraCallTMes una alerta vibradora que le avisa que el radio está
recibiendo un mensaje. Es útil en entornos ruidosos. Cuando la alerta se
enciende, el radio vibra cada 30 segundos al recibir un mensaje en el
canal y código establecidos.
1. Para activar las alertas vibradoras, presione hasta que aparezca
. Destellará el valor actual.
2. Presione o para cambiar a Encendido/Apagado.
3. Presione para guardar o para continuar con la configuración.
Tonos del teclado
Es posible activar o desactivar los tonos de las teclas para el altavoz.
Escuchará un tono de tecla cada vez que presione un botón.
1. Presione el botón hasta que aparezca . Destellará la
activación/desactivación actual.
2. Presione el botón o para seleccionar Encender o Apagar.
3. Presione para confirmar o para continuar con la
configuración.
Nota: Cuando la característica de tono de tecla está desactivada, no se
desactivan las siguientes características:
• Tono de alerta de desconexión de transmisión
• Tono de llamada
• Tono de alerta de batería baja o
• El tono de confirmación de transmisión de voz
Transmisión de un tono de confirmación de llamada
Puede configurar su radio para transmitir un tono único cuando termina
de transmitir. Es como decir “Copiado” (Roger) o “Cambio y fuera”
(Over) para hacer saber a los demás que usted ha terminado de hablar.
1. Con el radio encendido, presione el botón hasta que
aparezca . Destellará la activación/desactivación actual.
2. Presione o para seleccionar Encender o Apagar.
3. Presione para guardar o para salir del modo menú.
(
T
o está disponible cuando el radio
n
T
de ahorro para larga duración de la batería.
y
T
Modo de ahorro de batería normal, QTdesactivado
FF
O
T
(predeterminado)
odo de ahorro de batería normal, Q
M
N
O
T
Modo de ahorro para larga duración de la batería de
1 seg. (valor bajo), Q
Modo de ahorro para larga duración de la batería de
FF
O
T
seg. (valor intermedio), Q
2
odo de ahorro para larga duración de la batería de
M
FF
O
T
3 seg. (valor máximo), Q
.
T
TM
yuda a asegurar una
a
T
ahorro para larga duración de
y
T
desactivado
T
esactivado
d
T
desactivado
T
a
T
T
ctivado
T
y.
activada:
Características especiales
Modo de alerta para emergencias
La característica de Alerta para emergencias puede utilizarse para
avisar a los miembros de su grupo que necesita ayuda urgente. Los
radios de la serie MR funcionarán en modo de control de emergencia
con “manos libres” automático durante un total de 30 segundos después
de activar la Alerta para emergencias. Los radios de la Serie MR de su
rupo aumentarán automáticamente el volumen del altavoz al máximo y
g
emiten un tono de alerta modulado en frecuencia durante 8 segundos. El
ono de alerta se emite desde el altavoz del radio y los radios receptores
t
el grupo. Después de la alerta de 8 segundos, las palabras que se
d
ronuncien o los posibles sonidos de su lado se transmitirán al grupo
p
urante 22 segundos. Durante los 30 segundos de duración del modo de
d
Alerta para emergencias, los controles y botones de los radios Serie MR
e bloquearán para maximizar la recepción del mensaje de emergencia.
s
1. Mantenga presionado el botón de Alerta para emergencias durante
segundos.
3
. Suelte el botón una vez que el indicador LED se encienda en color
2
ojo y el tono de alerta comience a sonar. No es necesario continuar
r
presionando el botón Alerta para emergencias ni utilizar el botón
TT para que se transmita el mensaje.
P
. Al finalizar el tono de alerta, puede hablar al micrófono. Se
3
ransmitirá su voz o los sonidos que puedan producirse. El indicador
t
LED continúa encendido durante el período de 22 segundos.
4. Después de 30 segundos, el altavoz del radio emite un tono de
onfirmación de llamada y el indicador LED se apaga. Luego, la
c
operación regresa al modo normal de dos vías.
ota: Todos los radios Serie EM, MJ y MR de Motorola Talkabout son
N
totalmente compatibles con la característica de Alerta para emergencias.
os radios de series diferentes de EM, MJ y MR pueden recibir la señal de
L
alerta para emergencias, pero no responderán con ajuste de volumen,
loqueo de controles ni tono de alerta modulado en frecuencia. Los usuarios
b
e radios de otros modelos que se encuentren en el mismo canal y con el
d
mismo Código eliminador de interferencia escucharán un tono sostenido
urante 8 segundos seguido por una transmisión de voz de 22 segundos.
d
Advertencia: La característica de Alerta para emergencias sólo debe
tilizarse en caso de emergencia real. Motorola no se hace responsable si
u
no hay respuesta a la alerta para emergencias por parte del grupo receptor.
Linterna integrada
antenga presionado el botón de la linterna para encender la luz y
M
mantenerla encendida. El interruptor funciona como control temporario
e la luz.
d
Nota: Apague la linterna cuando no la esté utilizando para ahorrar
nergía de la batería.
e
loqueo del teclado
B
Para evitar cambiar accidentalmente las configuraciones de su radio:
1. Mantenga presionado el botón hasta que aparezca .
2. Cuando esté en el modo bloqueo, usted puede encender o apagar el
radio, ajustar el volumen, recibir, transmitir, enviar un tono de llamada y
onitorear los canales. Las demás funciones están bloqueadas.
m
ara desbloquear el radio, mantenga presionado el botón hasta
P
que ya no aparezca.
Escaneo de canales
Use el escaneo para buscar transmisiones de desconocidos entre los 22
canales, para encontrar a un miembro del grupo que ha cambiado de canal
accidentalmente, o para encontrar canales que no están en uso rápidamente.
Existe una característica de prioridad y 2 modos de escaneo (básico y
avanzado) para hacer su búsqueda más efectiva. El modo de escaneo
básico utiliza las combinaciones de canales y códigos para cada uno de
los 22 canales según se han configurado (o con el valor de código
predeterminado 1). El modo “Escaneo avanzado” escaneará todos los
canales en busca de todos los códigos, detectará cualquier código que
se esté utilizando y utilizará el valor de dicho código de forma
temporaria para cada canal.
Se da prioridad al “canal de inicio”, es decir, el canal (y el Código eliminador
de interferencia) de su radio al comenzar el escaneo. Esto significa que el
canal inicial (y el valor del código) se escanea con mayor frecuencia que los
otros 21 canales, y que el radio responderá rápidamente a cualquier
actividad que ocurra en el canal de inicio con prioridad.
Para comenzar a escanear:
1. Presione brevemente la tecla . El indicador de escaneo
aparecerá y el radio comenzará a escanear los canales y
combinaciones de códigos.
2. Cuando el radio detecta actividad en un canal que coincide con la
combinación de canal y código, éste deja de escanear y se puede
oír la transmisión.
3. Para responder a la transmisión, presione el botón dentro de los
5 segundos posteriores a la finalización de la transmisión.
4. El radio continuará el escaneo de canales cinco segundos después
de terminar alguna actividad recibida.
5. Para dejar de escanear, presione brevemente la tecla .
Para comenzar el escaneo avanzado:
1. Ajuste el Código eliminador de interferencia en “cero” o en Apagado.
2. Presione brevemente la tecla . El indicador de escaneo
aparecerá y el radio comenzará a escanear los canales. Ningún
Código eliminador de interferencia filtrará lo que se escuche.
3. Cuando el radio detecta actividad en un canal que coincide con
CUALQUIER código (o SIN código), éste deja de escanear y se puede oír
la transmisión. Se detectará y aparecerá cualquier código eliminador de
interferencia que pueda estar siendo utilizado por ese usuario.
4. Para responder a la transmisión, presione el botón dentro de los
5 segundos posteriores a la finalización de la transmisión. El radio
transmitirá utilizando el Código eliminador de interferencia
detectado recientemente.
5. El radio continuará el escaneo de canales cinco segundos después
de terminar alguna actividad recibida.
6. Para dejar de escanear, presione brevemente la tecla .
otas de escaneo:
N
. Si usted presiona mientras el radio se está desplazando por
1
anales inactivos, la transmisión estará en el “canal de inicio”. El
c
scaneo continuará cinco segundos después de finalizar su
e
transmisión. Puede presionar el botón para detener el escaneo
en cualquier momento.
2. Si el radio se detiene en una transmisión no deseada, puede
continuar inmediatamente el escaneo presionando brevemente
.
o
3. Si el radio se detiene constantemente en una transmisión no
deseada usted puede eliminar temporalmente ese canal de la lista
e escaneo manteniendo presionado o por 3 segundos. De
d
ste modo puede eliminar más de un canal.
e
. Para restablecer los canales eliminados de la lista de escaneo,
4
pague el radio y luego vuélvalo a encender, o salga del modo
a
scaneo y vuelva a entrar presionando .
e
. No se puede eliminar el canal de inicio de la lista de escaneo.
5
6. En Escaneo avanzado, el código detectado solamente se usará para
na transmisión. Para usar permanentemente el código detectado,
u
ebe salir del escaneo y configurar el código detectado en el canal.
d
eceptor de clima
sta característica no se encuentra disponible en Latinoamérica
E
Su radio puede sintonizar transmisiones de la radio de clima United States
ational Oceanic and Atmospheric Administration (NOAA) .
N
uede escuchar un canal del clima (consulte la tabla “Canales y frecuencias
P
del clima” que se encuentra abajo) o ajustar su radio para que emita alertas
e las transmisiones en caso de emergencias climáticas que interrumpen
d
as transmisiones de rutina. Al escuchar un canal de clima, no puede utilizar
l
su radio en modo de escaneo o para comunicaciones de dos vías.
ota: Las estaciones de radio NOAA deben cubrir áreas específicas y el
N
servicio puede ser limitado. Consulte con su servicio meteorológico local
ara solicitar información acerca de las frecuencias y demás para conocer
p
el transmisor correspondiente a su área.
l uso del logotipo de NOAA no implica el aval del Servicio meteorológico
E
nacional de NOAA.
Encendido y apagado de la recepción del canal del clima
1. Para encender la recepción del clima, presione y manténgalo
resionado durante 3 segundos.
p
. Para apagarla, presione o apague el radio y vuelva a encenderlo.
2
juste del canal del clima
A
u radio recibe frecuencias del clima:
S
. Después de encender la recepción del clima, presione . El canal
1
actual destellará.
2. Presione o para seleccionar el canal correcto con buena
recepción en su área.
3. Presione para guardar el canal seleccionado.
Ajuste de la alerta del clima
Puede ajustar el radio para que responda a los mensajes de emergencia
de la radio de clima NOAA. Un tono de alarma especial emite una alerta
y enciende el receptor del clima para proporcionarle información sobre
el clima o de emergencia inmediatamente.
1. Después de encender la recepción del clima, presione dos
veces. Aparece Encender/apagar.
2. Presione o para seleccionar Encender o Apagar. Si activa la
Alerta del clima y regresa al modo de dos vías, aparecerá .
3. Presione para guardar la alerta del clima seleccionada.
4. Presione para regresar al modo de dos vías.
Al igual que en el caso de la recepción de radio de dos vías, la
recepción del canal del clima depende de la distancia a la que se
encuentre de un transmisor y de si se encuentra en un edificio o a la
intemperie. Debido a que los canales del clima se transmiten sin
códigos, estos pueden contener estática o ruidos. La Alerta del clima no
funcionará mientras se esté transmitiendo o recibiendo de forma activa
en modo de dos vías.
R
Canales y frecuencias del clima
Canal del
clima
WX1 162.550 MHz WX7 162.525 MHz
WX2 162.400 MHz WX8 161.650 MHz
WX3 162.475 MHz WX9 161.775 MHz
WX4 162.425 MHz WX10 161.750 MHz
WX5 162.450 MHz WX11 162.000 MHz
WX6 162.500 MHz
Frecuencia Canal del
clima
Frecuencia
Garantía
Productos y accesorios de radio de dos vías para consumidores,
omprados en México, Uruguay, Panamá y Estados Unidos.
c
Qué cubre esta garantía?
¿
Sujeto a las exclusiones indicadas en el lado derecho, Giant
nternational Ltd. garantiza que los radios de dos vías para
I
onsumidores que llevan la marca Motorola y que funcionan por
c
edio del Servicio de Radio Familiar que éste fabrica (“Productos”),
m
los accesorios que llevan la marca Motorola o están certificados
y
que se venden para usarse con estos Productos que fabrica
“Accesorios”) están libres de defectos de materiales y mano de
(
bra bajo el uso normal del consumidor durante el (los) período(s)
o
ndicado(s) a continuación. Esta garantía limitada es el recurso
i
xclusivo del consumidor y se aplica de la siguiente manera a los
e
Productos y Accesorios nuevos que llevan la marca Motorola y que
an sido fabricados por Giant International Ltd. y comprados por
h
consumidores en los países mencionados arriba, acompañados por
sta garantía escrita:
e
¿Quién está cubierto?
sta garantía se ofrece sólo al primer comprador consumidor y no
E
es transferible.
Qué hará GIANT INTERNATIONAL LTD.?
¿
GIANT INTERNATIONAL LTD., a juicio propio, reparará, reemplazará
reembolsará el precio de todos los Productos y Accesorios que
o
no se conformen a esta garantía, sin cargo. Podremos usar
roductos, Accesorios o partes reacondicionados/renovados/
P
usados o nuevos que sean funcionalmente equivalentes.
roductos cubiertos
P
roductos y Accesorios
P
egún
s
lo definido anteriormente salvo
especificación contraria a
ontinuación.
c
uración de la cobertura
D
n ( 1) año a partir de la fecha
U
de compra por el primer
comprador consumidor del
roducto salvo especificación
p
contraria a continuación.
. Accesorios de radios de
1
dos vías para
consumidores.
. Noventa ( 90) días contados
1
a partir de la fecha de
compra por el primer
comprador consumidor del
producto.
2. Productos y Accesorios
reparados o reemplazados.
2. El resto de la garantía
original o noventa ( 90) días
a partir de la fecha de
devolución al consumidor, el
que sea más largo.
¿Cómo obtener el servicio de garantía u otra información?
Por favor devuelva el producto al comercio donde lo compró. Para
obtener servicio o información, llame a:
Estados Unidos México
1-800-638-5119 01-800-021-0000
giantintl@callcenter.com
Uruguay Panamá
00-04-01-78-70-11 507-340-0293
Información sobre patente y derechos de autor
Fabricado, distribuido o vendido por Giant International Ltd., concesionario
oficial para este producto. MOTOROLA, MOTOROLA SOLUTIONS, y el logo
de la M estilizada son marcas o marcas registradas de Motorola
Trademark Holdings, LLC y se usan con licencia. Todas las otras marcas
son propiedad de sus propietarios respectivos. ©2012 Motorola Solutions,
Inc. Todos los derechos reservados.
Qué otras limitaciones existen?
¿
ODA GARANTÍA IMPLÍCITA, INCLUIDAS ENTRE OTRAS, LAS
T
ARANTÍAS IMPLÍCITAS DE COMERCIABILIDAD E IDONEIDAD
G
ARA UN FIN EN PARTICULAR, DEBERÁN ESTAR LIMITADAS A LA
P
DURACIÓN DE ESTA GARANTÍA LIMITADA, DE LO CONTRARIO, LA
EPARACIÓN, REEMPLAZO O REEMBOLSO SEGÚN SE DISPONE EN
R
VIRTUD DE LA PRESENTE GARANTÍA LIMITADA EXPRESA ES EL
ECURSO EXCLUSIVO DEL CONSUMIDOR, Y SE PROPORCIONA EN
R
UGAR DE TODAS LAS DEMÁS GARANTÍAS, EXPRESAS O
L
IMPLÍCITAS. EN NINGÚN CASO, MOTOROLA SOLUTIONS, INC. O
IANT INTERNATIONAL LTD. SERÁN RESPONSABLES, BIEN SEA
G
POR VÍA CONTRACTUAL O EXTRACONTRACTUAL (INCLUIDA LA
EGLIGENCIA), POR LOS DAÑOS Y PERJUICIOS EN EXCESO DEL
N
RECIO DE COMPRA DEL PRODUCTO O ACCESORIOS, O POR
P
CUALQUIER DAÑO Y PERJUICIO INDIRECTO, INCIDENTAL, ESPECIAL
CONSECUENTE DE CUALQUIER TIPO, O POR LA PÉRDIDA DE
O
INGRESOS, GANANCIAS, NEGOCIOS, INFORMACIÓN O CUALQUIER
TRA PÉRDIDA FINANCIERA QUE SURJA O SE RELACIONE CON LA
O
APACIDAD O INCAPACIDAD DE UTILIZAR LOS PRODUCTOS O
C
ACCESORIOS HASTA EL MÁXIMO GRADO EN QUE ESTOS DAÑOS Y
ERJUICIOS PUEDAN SER NEGADOS POR LEY.
P
lgunas jurisdicciones no permiten la limitación ni la exclusión de
A
los daños y perjuicios incidentales o consecuentes ni la limitación
obre la duración de una garantía implícita, por esa razón, es
s
posible que las limitaciones o exclusiones anteriores no se apliquen
ara usted. Esta garantía le otorga derechos legales específicos y
p
ambién podrá tener otros derechos que variarán de una
t
jurisdicción a otra.
xclusiones
E
Desgaste normal.
reemplazo de partes debido al desgaste normal quedan excluidos
e la cobertura.
d
Baterías.
capacidad completa de carga disminuya por debajo del 80% de su
El mantenimiento periódico, la reparación y el
Esta garantía limitada sólo cubrirá las baterías cuya
capacidad indicada y las baterías que tengan fugas.
Abuso y mal uso. Quedan excluidos de la cobertura los defectos o
daños resultantes de: (a) operación o almacenamiento no
apropiados, mal uso o abuso, accidente o negligencia, tal como el
daño físico (grietas, raspaduras, etc.) a la superficie del producto
que resulte del mal uso; (b) contacto con líquido, agua, lluvia,
humedad extrema o transpiración fuerte, arena, polvo o similares,
calor extremo o alimentos; (c) uso del Producto o los Accesorios
para fines comerciales o someter el Producto o Accesorio a un
uso o condiciones anormales; o (d) otros actos que no sean
responsabilidad de Motorola Solutions, Inc. o Giant International Ltd.
Uso de Productos y Accesorios de marcas distintas a Motorola.
Los defectos o daños que resulten del uso de Productos,
Accesorios u otros equipos periféricos que no sean de Motorola
ni estén certificados por éste, quedarán excluidos de la cobertura.
Servicio o modificación no autorizados.
resulten del servicio, prueba, ajuste, instalación, mantenimiento,
Los defectos o daños que
alteración o modificación en alguna manera por parte de alguien
distinto a Motorola Solutions, Inc., Giant International Ltd. o sus
centros de servicio autorizados, quedan excluidos de la cobertura.
Productos alterados.
Productos o Accesorios con (a) números seriales o etiquetas con
Quedan excluidos de la garantía los
fechas que se hayan removido, alterado o borrado; (b) sellos rotos
o que muestren evidencia de adulteración; (c) números de serial
del tablero diferentes; o (d) carcasas o partes irregulares de otras
marcas distintas a Motorola.
Servicios de comunicación.
defectos, daños o fallas de los Productos o Accesorios debido a
Quedan excluidos de la cobertura los
alguna señal o servicio de comunicación a la cual se pueda
suscribir o usar con los Productos o Accesorios.
Para los Accesorios, sírvase llamar al número de teléfono antes
indicado para el producto con el cual se usan.
Usted recibirá instrucciones acerca de cómo enviar los Productos o
Accesorios a su cargo, a un centro de reparación autorizado de
GIANT INTERNATIONAL LTD. Centro de Reparación Autorizado.
Para obtener el servicio, deberá incluir: (a) una copia de su recibo,
factura u otro comprobante de compra similar; (b) una descripción
escrita del problema; (d) el nombre del proveedor de servicio, si
corresponde; (d) el nombre y la ubicación de la empresa
instaladora (si corresponde) y, fundamentalmente, (e) su dirección
y número de teléfono.
MR350MRC
 Loading...