

Page 1

Important Safety Information
Retain and follow all product safety and operating instructions. Observe all warnings on the product
and in the operating instructions.
To reduce the risk of bodily injury, electric shock, fire, and damage to the equipment observe
the following precautions.
General Precautions
Avoid hot areas: The product should be placed away from heat sources such as radiators, heat
registers, stoves, or other products (including amplifiers) that produce heat.
Avoid wet areas: Never use the product in a wet location.
Avoid pushing objects into product: Never push objects of any kind into cabinet sl ot s or ot her
openings in the product. Slots and openings are provided for ventilation. These openings must not
be blocked or covered.
Mounting Accessories: Do not use the product on an unstable table, cart, stand, tripod, or bracket.
Any mounting of the product should follow the manufacturer’s instructions, and should use a
mounting accessory recommended by the manufacturer.
Avoid unstable mounting: Do not place the product with an unstable base.
Use product with approved equipment: This product sho ul d be used onl y wi t h pers onal
computers and options identified as suitable for use with your equipment.
Adjust the volume: Turn down the volume before usin g h eadp h ones or other audio devices.
Safety Precautions for Power Supply Unit
Battery
Warning
To reduce the risk of fire or burns, do not disassemble, crush,
puncture, short external contacts, or dispose of in fire or water.
Danger of explosion if battery is incorrectly replaced.
Replace only with specified batteries.
Battery may require recycling in accordance with local laws.
Contact your local regulatory authorities for more information.
Your battery should not be thrown in the trash.
Page 2

AC Adapter
Warning:
Never attempt to disassemble or repair an AC Adapter, and never
Never connect or disconnect the AC Adapter with wet hands.
Always confirm that AC Adapter plug(and the extension cord and
Plug the AC Adapter into an electrical outlet that is easily accessible
Disconnect power from the equipment by unplugging the AC Adapter
Do not place anything on the power cables. Arrange them so that no
alter their power supply cables or plugs as exposure to electric shock
hazards could result. Always contact an authorized service provider,
if repair or replacement is required.
Connection or disconnection the AC Adapter to a power source with
wet hands could cause electric shock.
plug, if any)have been fully inserted into the receptacle, to assure a
secure electrical connection.
at all times.
from the electrical outlet.
one may accidentally step on or trip over them.
Use only with Motorola original batteries and chargers.
Page 3
Hardware Features
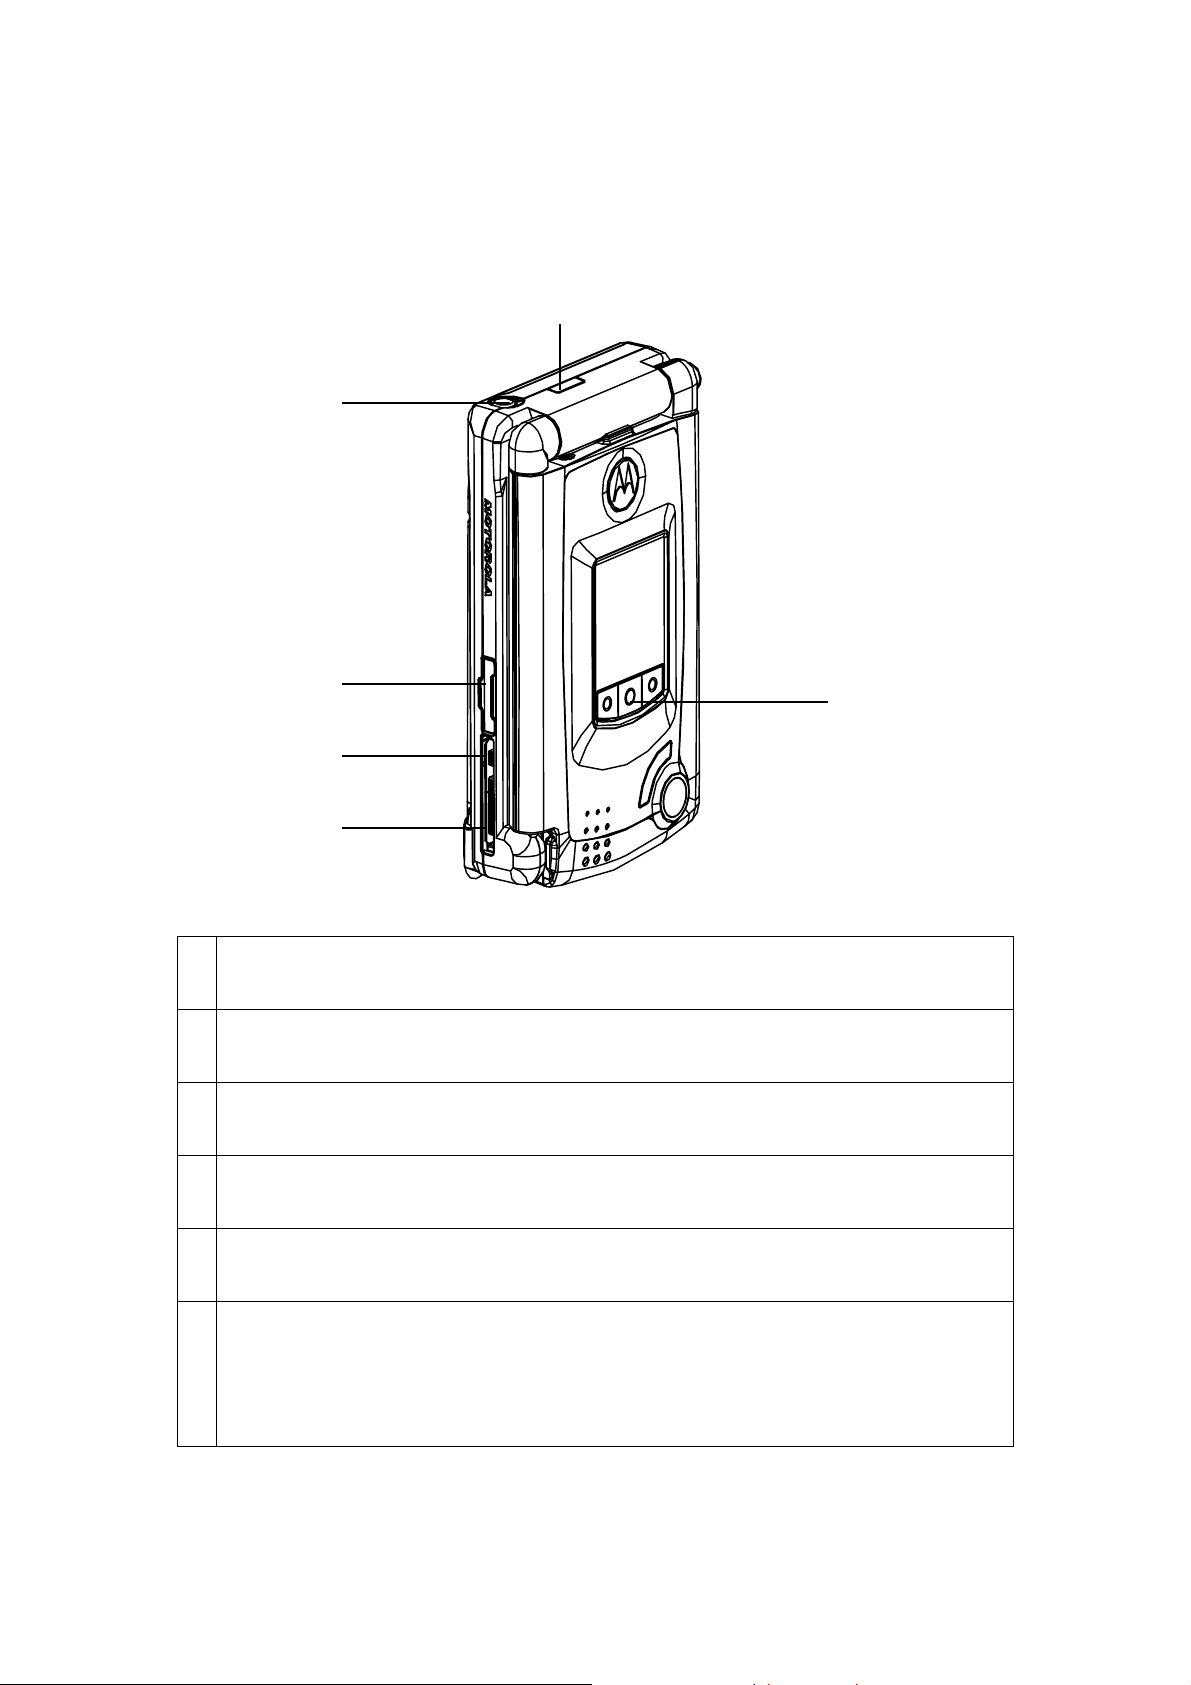
Front Panel Components
1.
2.
c
b
3.
4.
5.
a
6.
Infrared port:
1.
Enable you to exchange file(s) or data with other devices with cable/wires.
2. Earphone Jack:
Allows you to listen to audio media or use the phone hands-free kit
3. SIM card door:
Open the rubber door to insert SIM card.
4. Power Jack:
Use this connector when recharging
5. CE Bus:
Accessories connecting port
6. MP3 Key
a) Previous
b) Play / Stop
c) Back
Page 4
6.
1.
2.
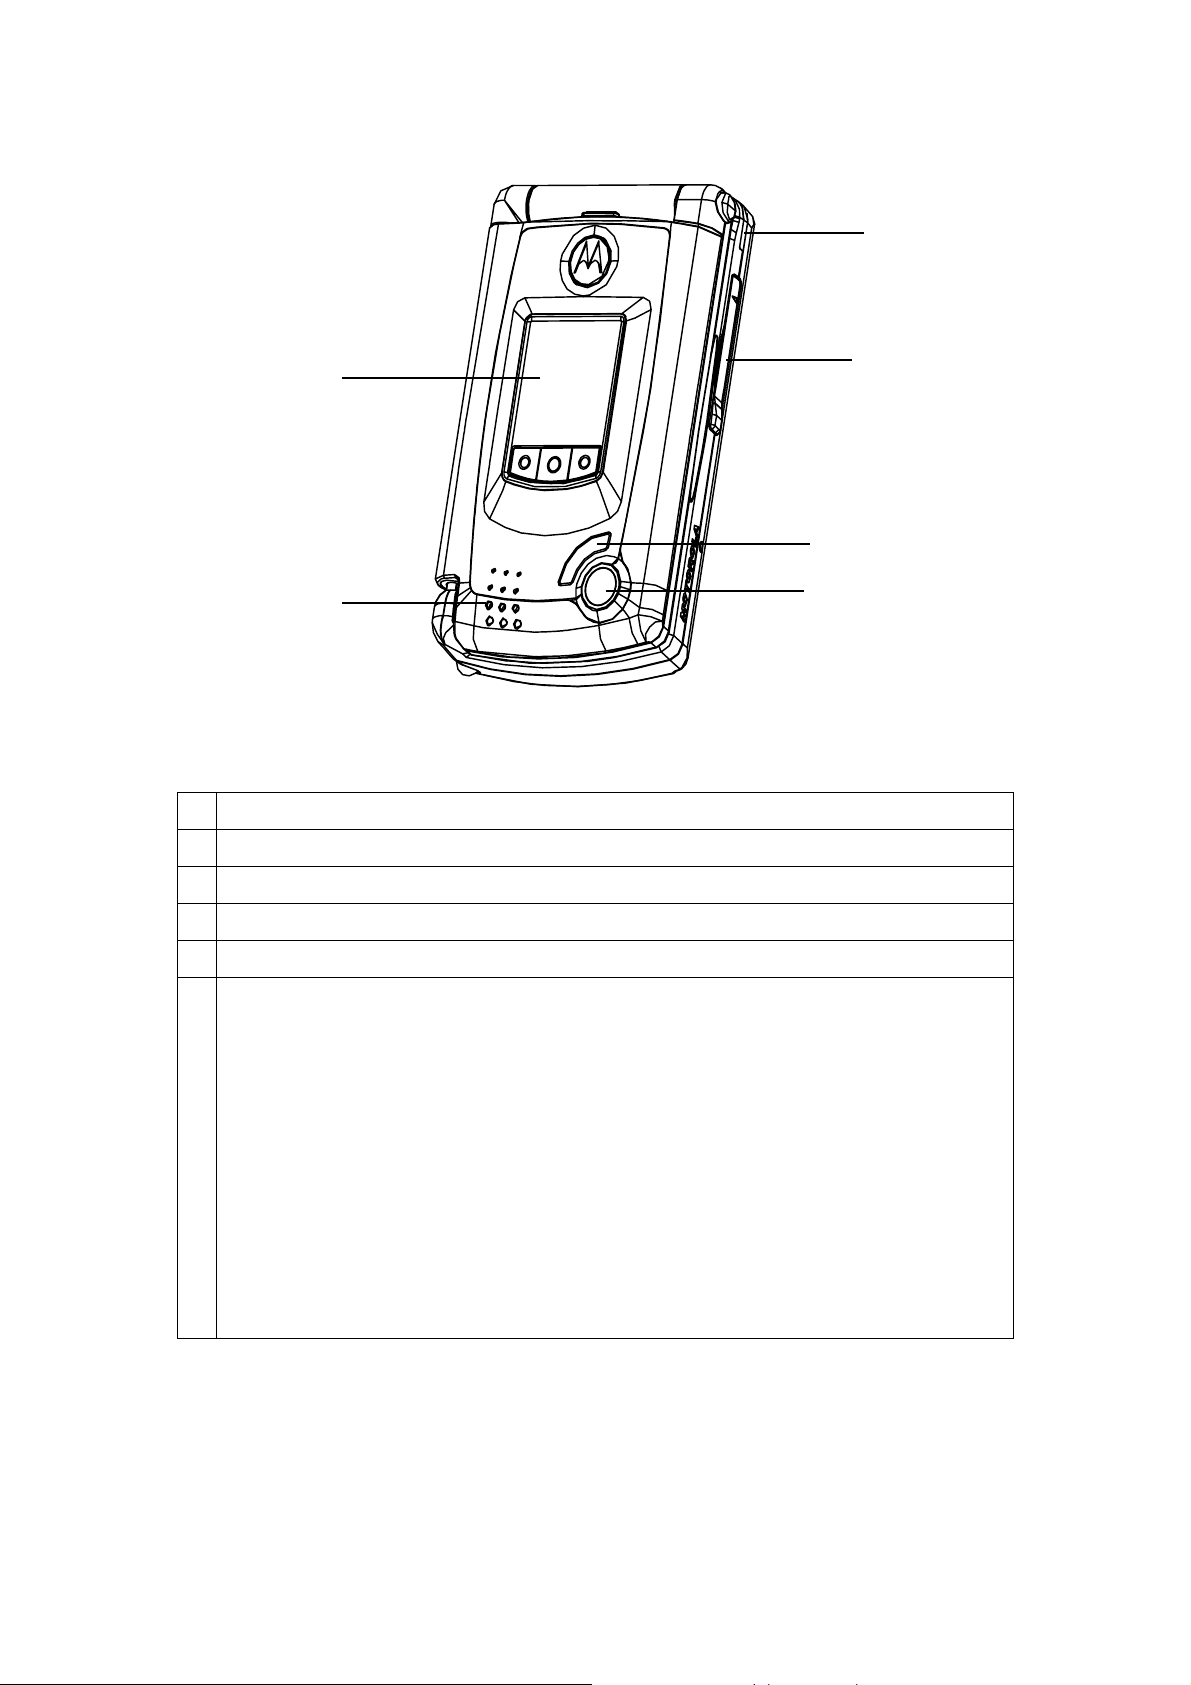
External Display:
1.
2. Speaker: Listen to audio media.
3.
Camera:
4. Flashlight:
5.
4.
3.
5. MMC and SD card slot: Insert either MMC or cards in this slot.
6. Notification LED
a) Steady Red – Charge.
b) Steady Green – Charge done.
c) Steady Blue – RF event.
d) Steady Amber – Charge done + RF.
e) Steady Magenta – Charge + RF.
f) Steady Cyan – Pre Charge.
g) Flash Blue – Notification.
h) Flash (Green + Amb er) – Charge done + notification.
i) Flash (Red + Magenta) – Charge + notification
Page 5
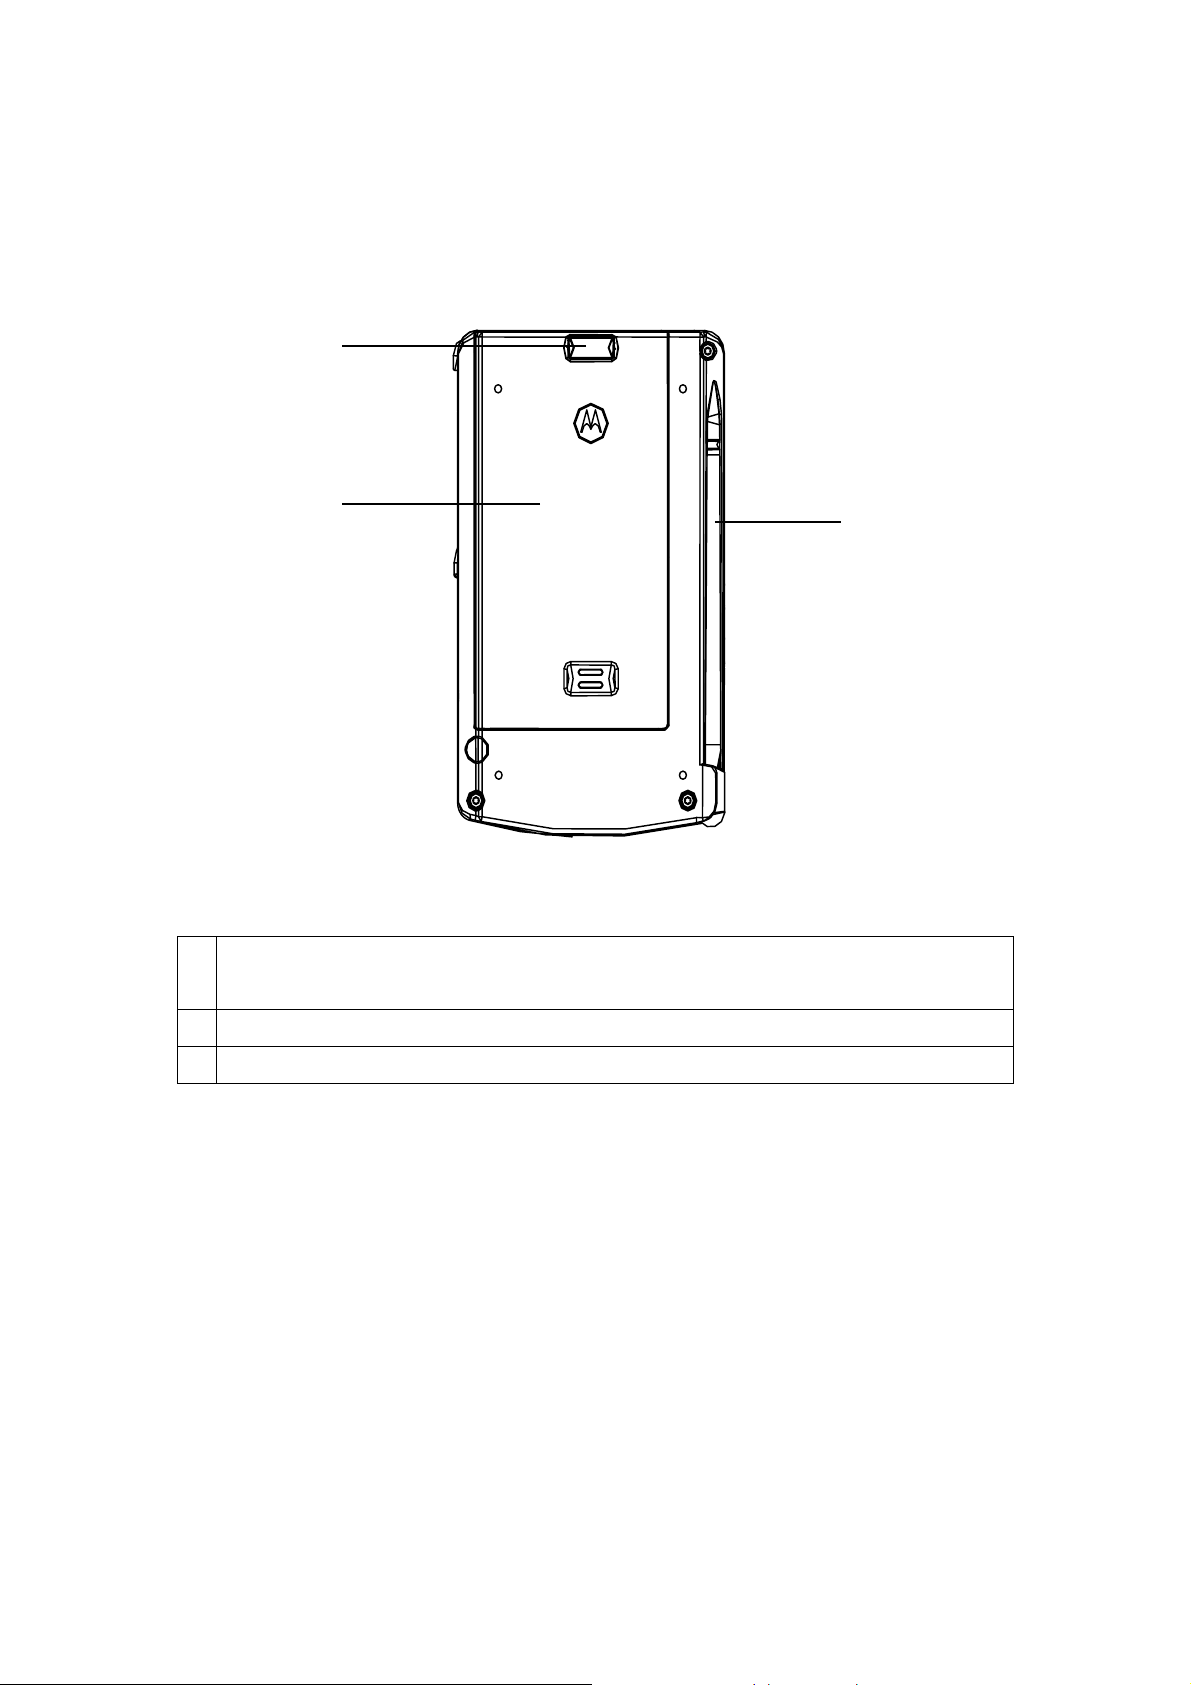
Back Panel Components
1.
2.
3.
External battery clip: Before screwing the extended battery into position please secure the
1.
bottom into this bole
2. External battery cover
3. Stylus
Page 6
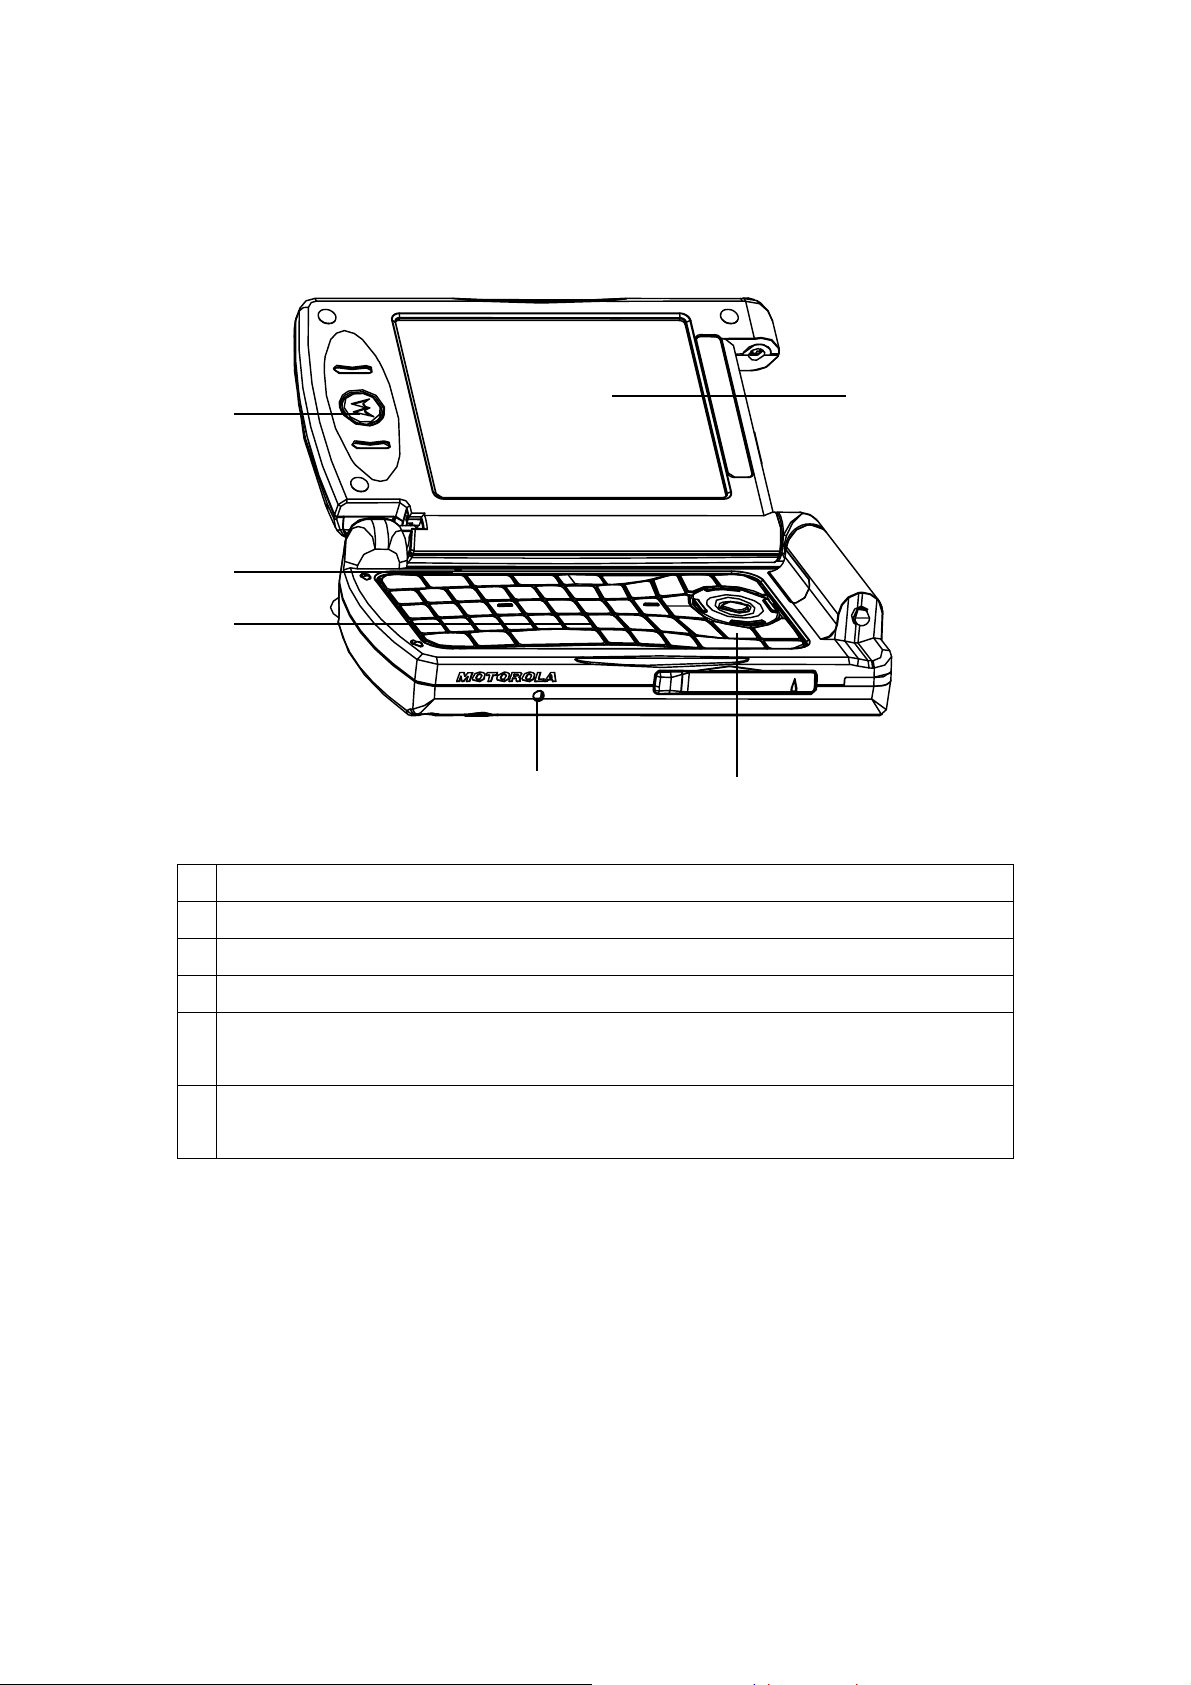
Inner Components
1.
6.
2.
3.
4.
Receiver: Listen to phone call from here.
1.
2. Microphone: Speak here when receiving/making a phone call or voice recording.
3. QWERTY Key Pad
5.
4. Soft Reset: Press into the hold with the end of your stylus to reset your device.
5. End: Press to end a call
Phone On/off: Press and hold to turn on/off your device’s phone.
6. Main Display & Touch screen : For handwriting drawing or to make a selection with the
stylus.
Page 7
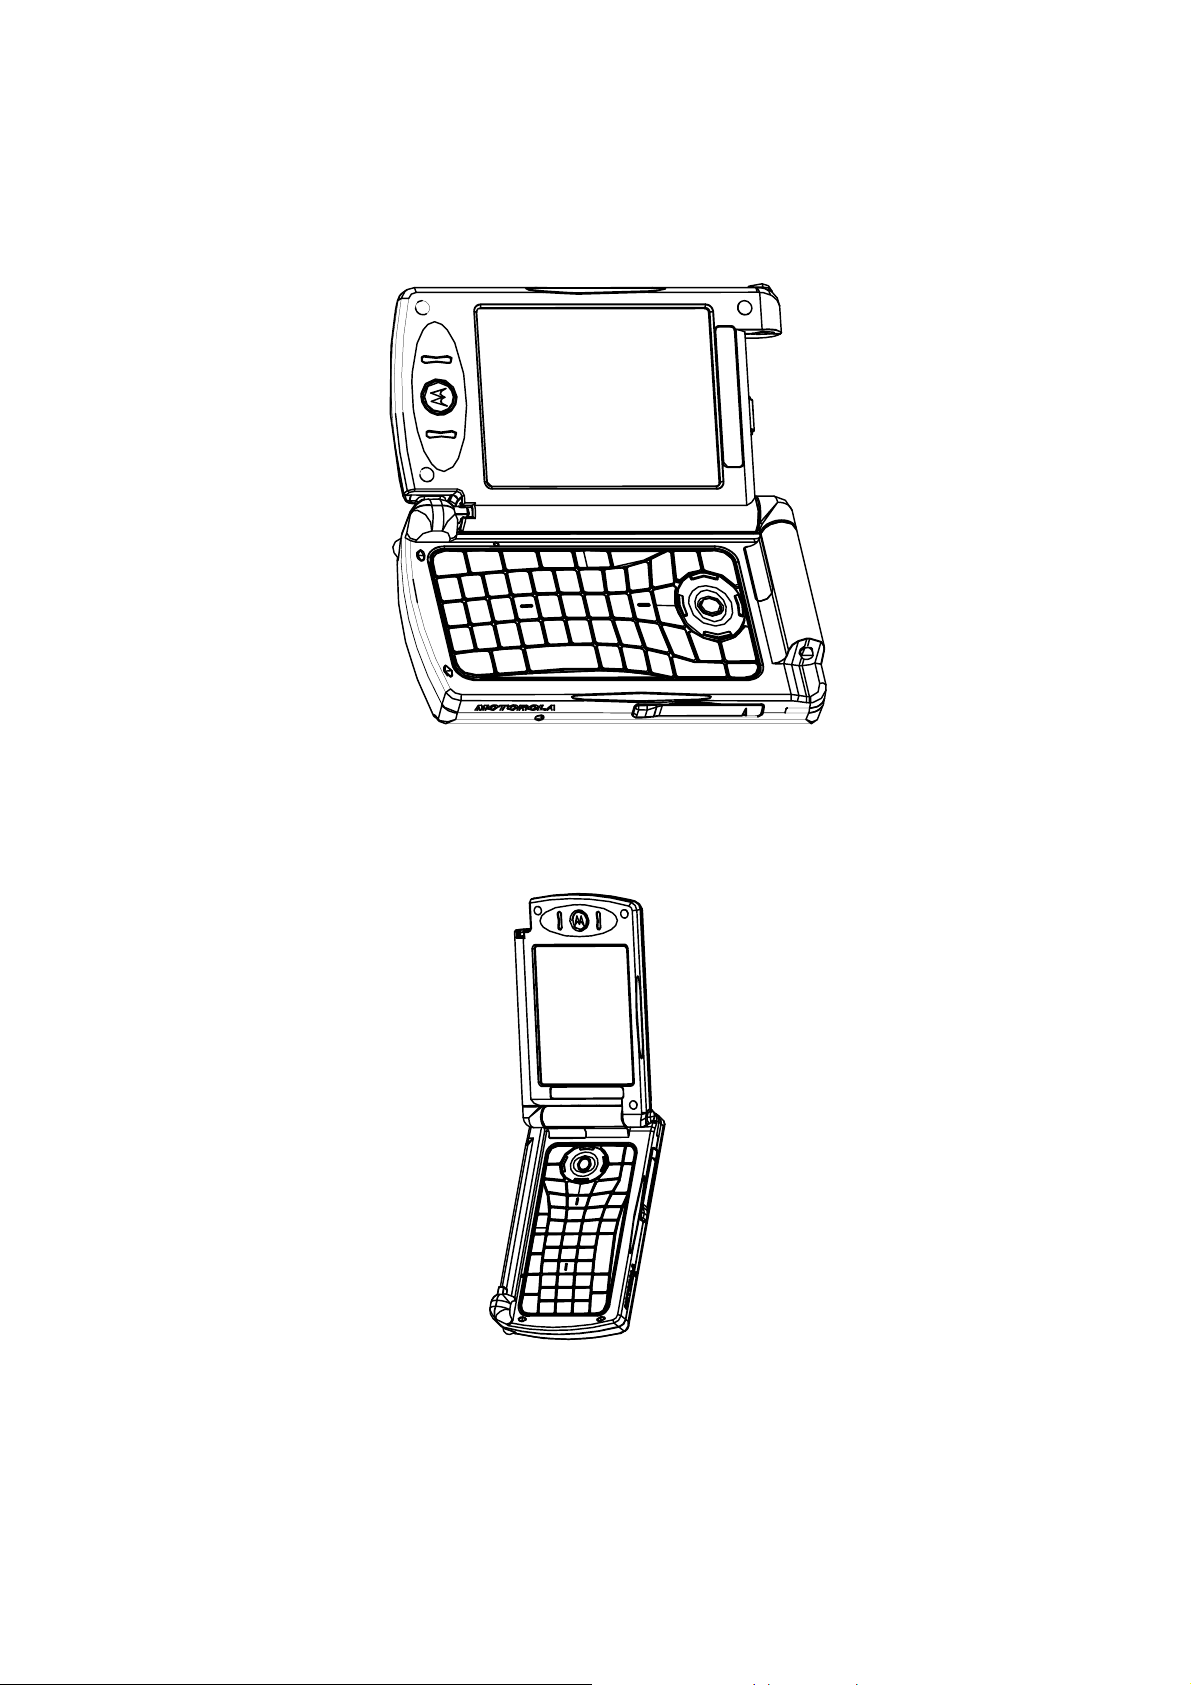
MPC300 mode
Landscape mode
Protrait mode
Page 8
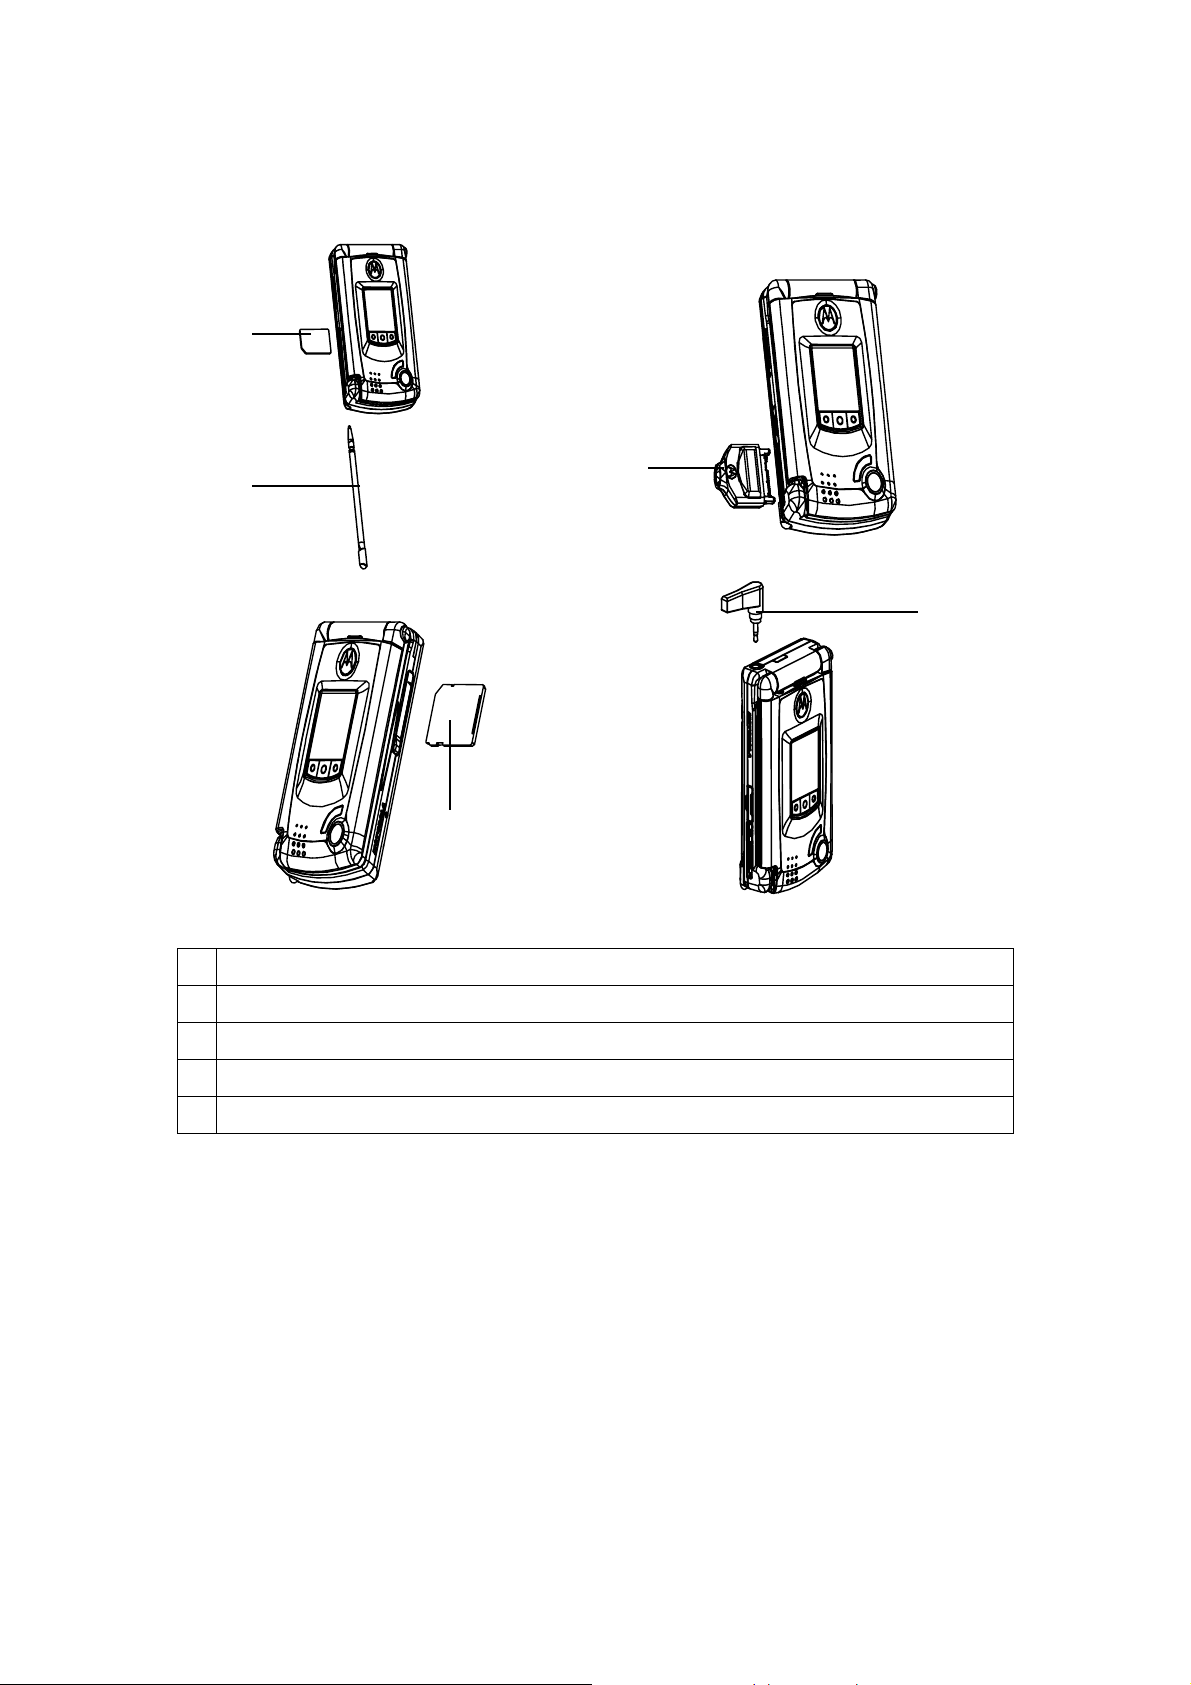
Accessories
1.
3.
2.
5.
4.
SIM card
1.
2. Stylus
3. CE BUS
4. MMC/SD card
5. Earphone
Page 9
Using Your Pocket PC
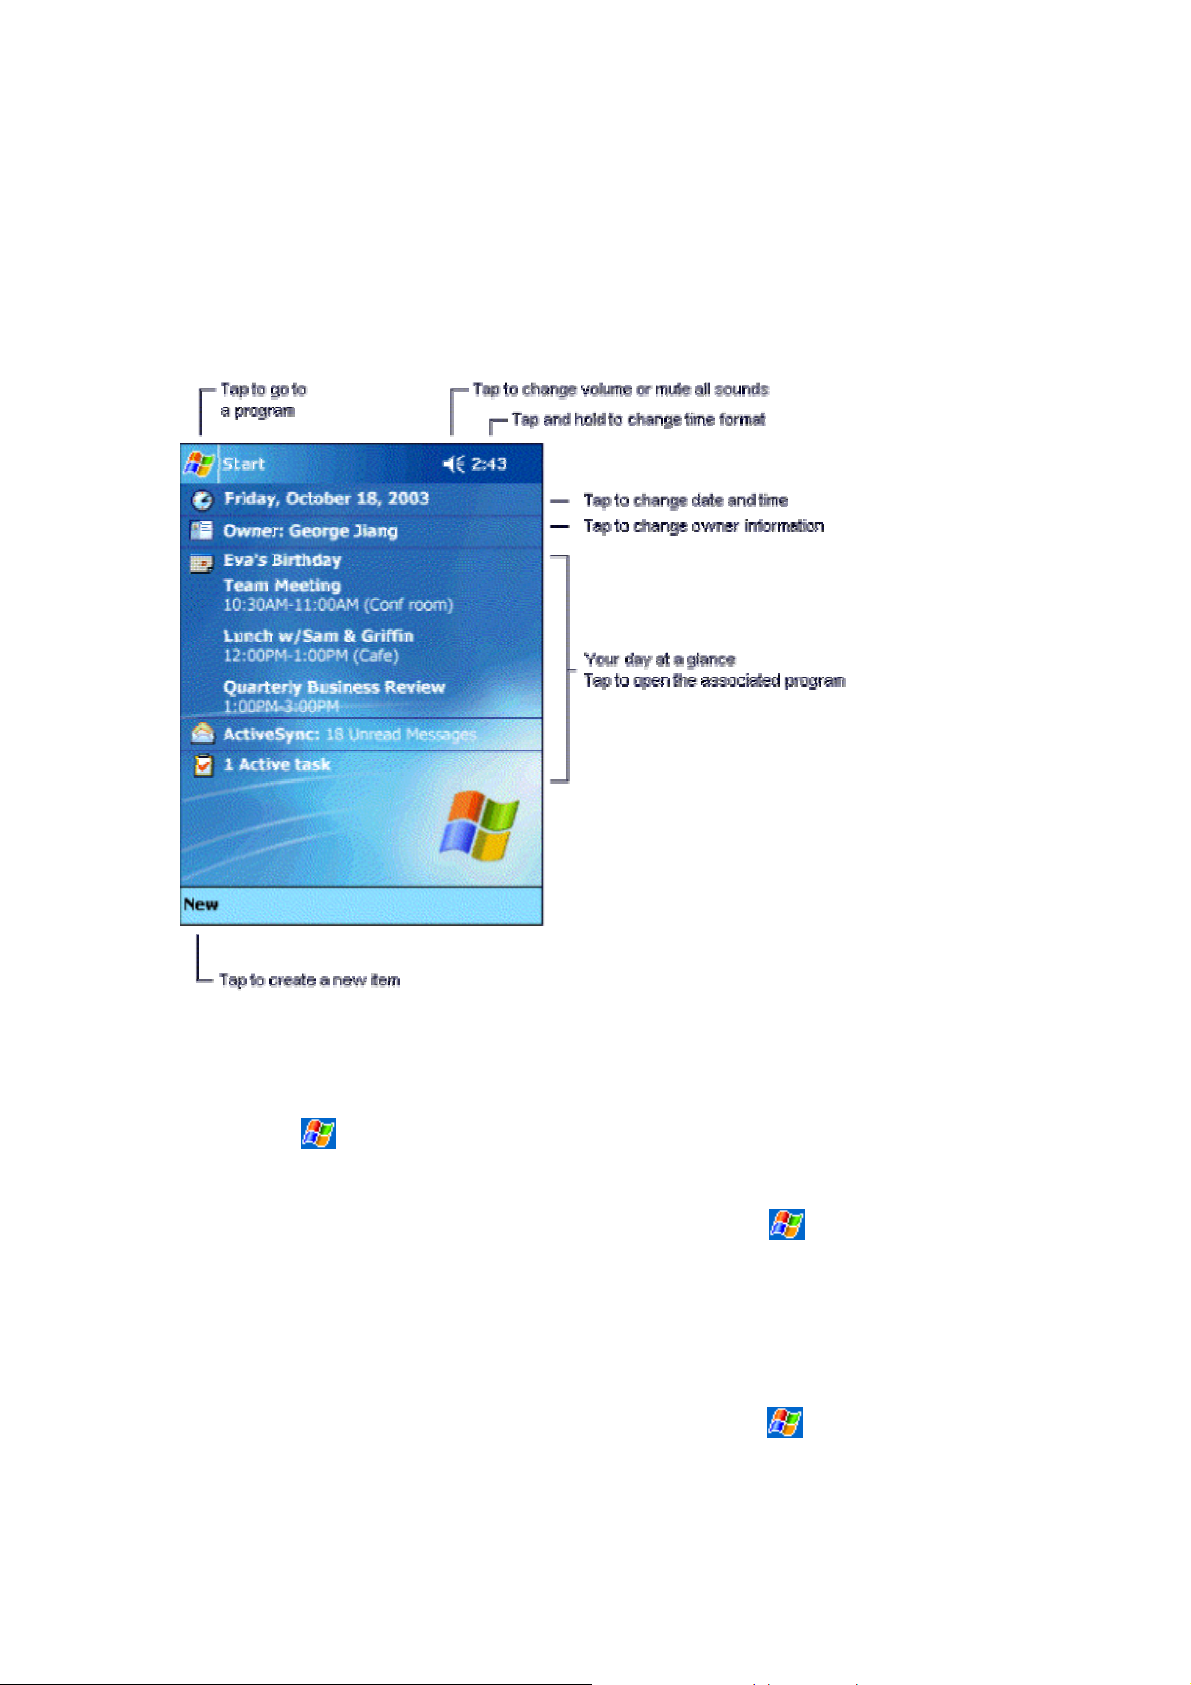
Today Screen
The Today screen displays important information, such as today's
appointments and status icons for your device. Tap the information listed on the
Today screen to open the associated program. You can go to the Today screen
by tapping
To customize what is displayed on the Today screen, including the background
image, tap Today at the top of the Today screen or tap
Personal tab > Today.
> Today.
> Settings >
The Start Menu
From the Start Menu, you can select programs, settings, and Help topics. To
display the Start Menu, from the top of any screen, tap
.
Page 10
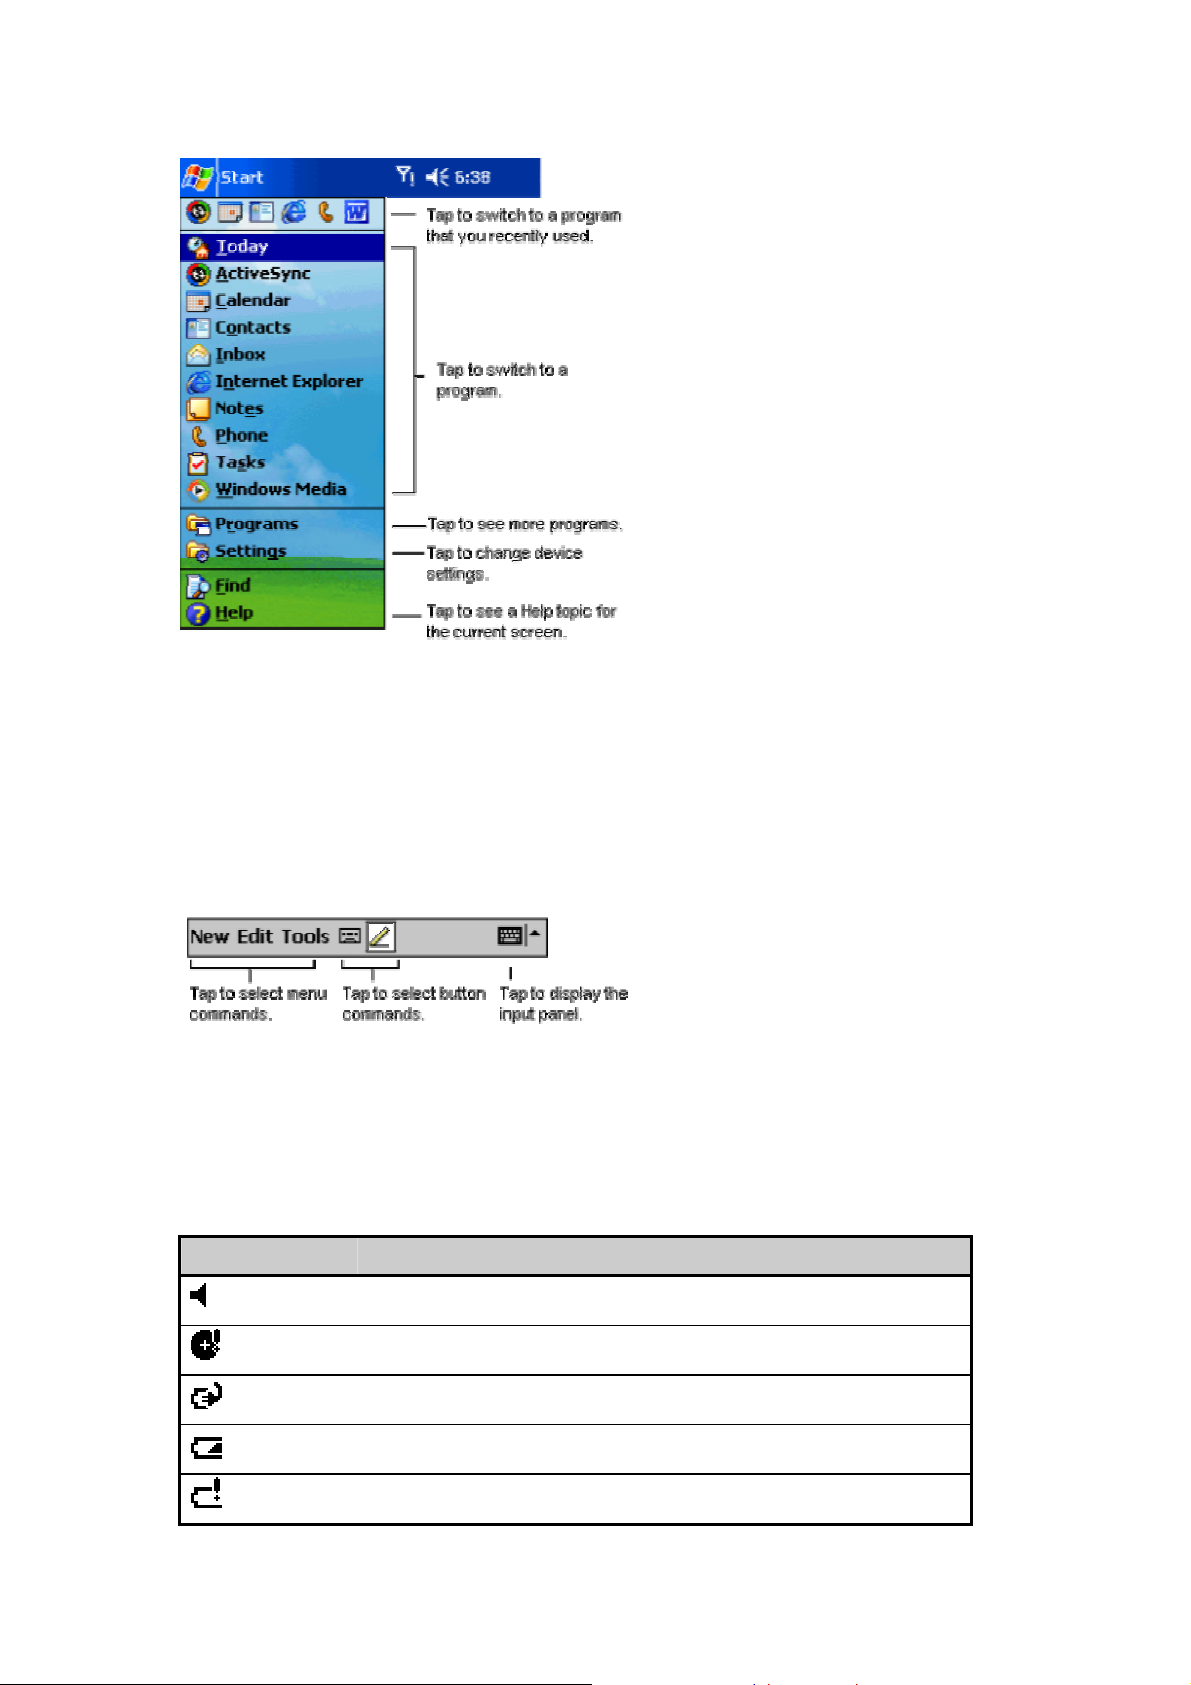
The Command Bar
At the bottom of the screen is the command bar. You can use its menus and
buttons to perform tasks in programs. Depending upon which program you are
using, the buttons may vary from those depicted.
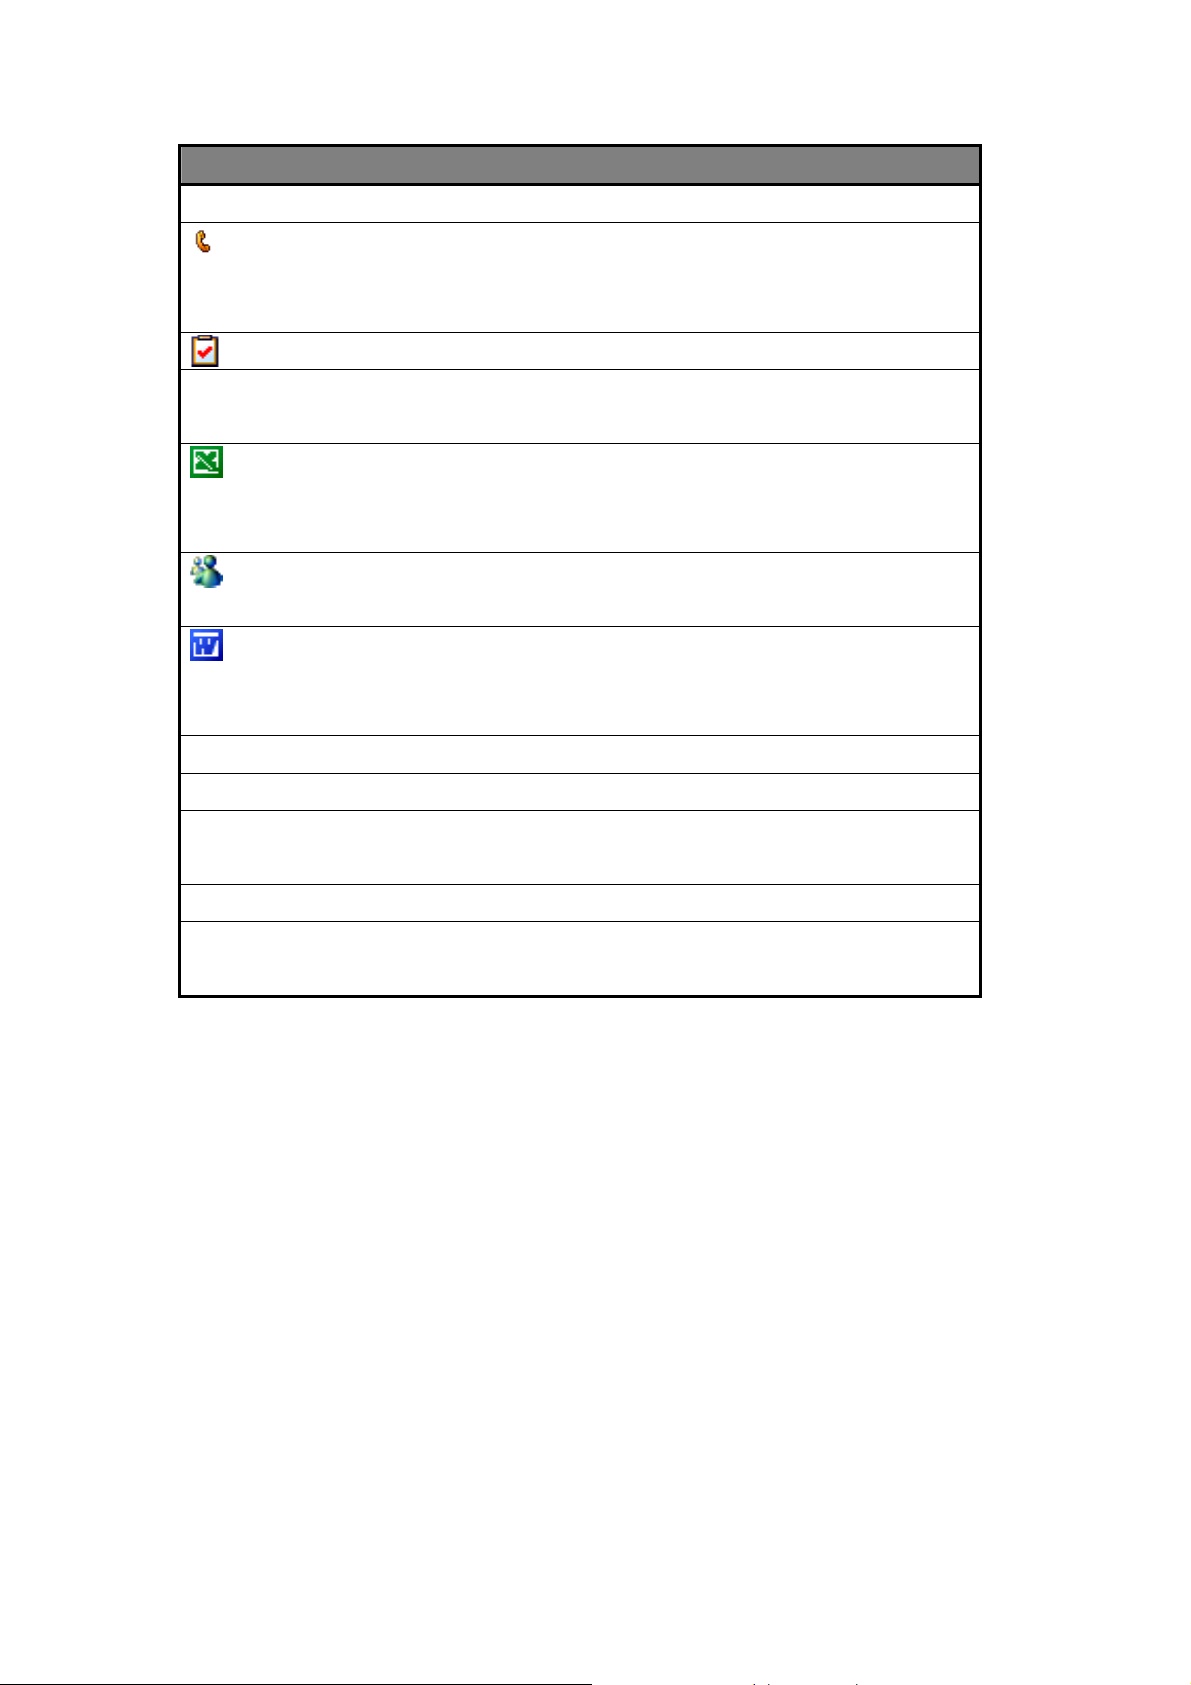
Indicators
Following are some of the status icons you may see.
Status Icon Meaning
Turns all sounds on and off
Backup battery is low
Main batteries are charging
Main batteries are low
Main batteries are very low
Page 11

Main batteries are full
Note: If more notification icons need to be displayed than there is room to
display them, the Notification icon,
notification icons.
Connection is active
Synchronization is beginning or ending
Synchronization is occurring
Notification that one or more instant messages were
received
Notification that one or more e-mail/SMS/MMS
messages were received
Indicates your mobile phone connection is on and the
signal is at full strength.
, will display. Tap the icon to view all
Programs
You can switch one program to another by selecting it from menu. To
access more programs, tap
The following table contains a partial list on your device. Look on the Pocket
PC Companion CD for additional programs that you can install onto your
device.
Icon Program Description
ActiveSync Synchronizes information between your
Calendar Keeps track of your appointments and
Contacts Keeps track of your friends and
Inbox Sends and receives e-mail/SMS/MMS
Pocket Internet
Explorer
>programs, and then tap the program icon.
device and desktop computer.
create meeting requests.
colleagues.
messages.
Browses Web and WAP sites, and
download new programs and files from
the Internet.
Notes Creates handwritten or typed notes,
Page 12
Icon Program Description
drawings, and recordings.
Windows Media
Camera
Remote Control
Phone Makes and receives calls, switches
between calls and sets up conference
calling.
Tasks Keeps track of your tasks.
Player
Pocket Excel Creates new workbooks or view and edit
Excel workbooks created on your
desktop computer.
MSN Messenger Sends and receives instant messages
with your MSN Messenger contacts.
Pocket Word Creates new documents or view and edit
Word documents created on your
desktop computer.
Java Application
Manager (JAM)
Calculator Performs basic arithmetic.
SIM Manager Collects, organizes and sorts the
Contacts list stored in your SIM card.
Pop-up Menus
Use pop-up menus to quickly perform an action on an item. For example, you
can use a pop-up menu to delete or make a copy of an item. To access a
pop-up menu, tap and hold the item that you want to perform the action on.
When the menu appears, tap the action you want to perform, or tap anywhere
outside the menu to close the menu without performing an action.
Page 13

Entering Information
You can enter information on your device in several ways, depending on the
type of device you have and the program you are using.
• Synchronizing - Using ActiveSync, exchange information between
your PC and device.
• Typing - Using the keyboard or input panel, enter typed text into the
device. You can do this by tapping keys or by using handwriting
recognition software.
• Writing - Using the stylus, write directly on the screen.
• Drawing - Using the stylus, draw directly on the screen.
• Recording - Create a stand-alone recording or embed a recording into
a document or note.
Page 14
Entering Text Using the Keyboard
TBD
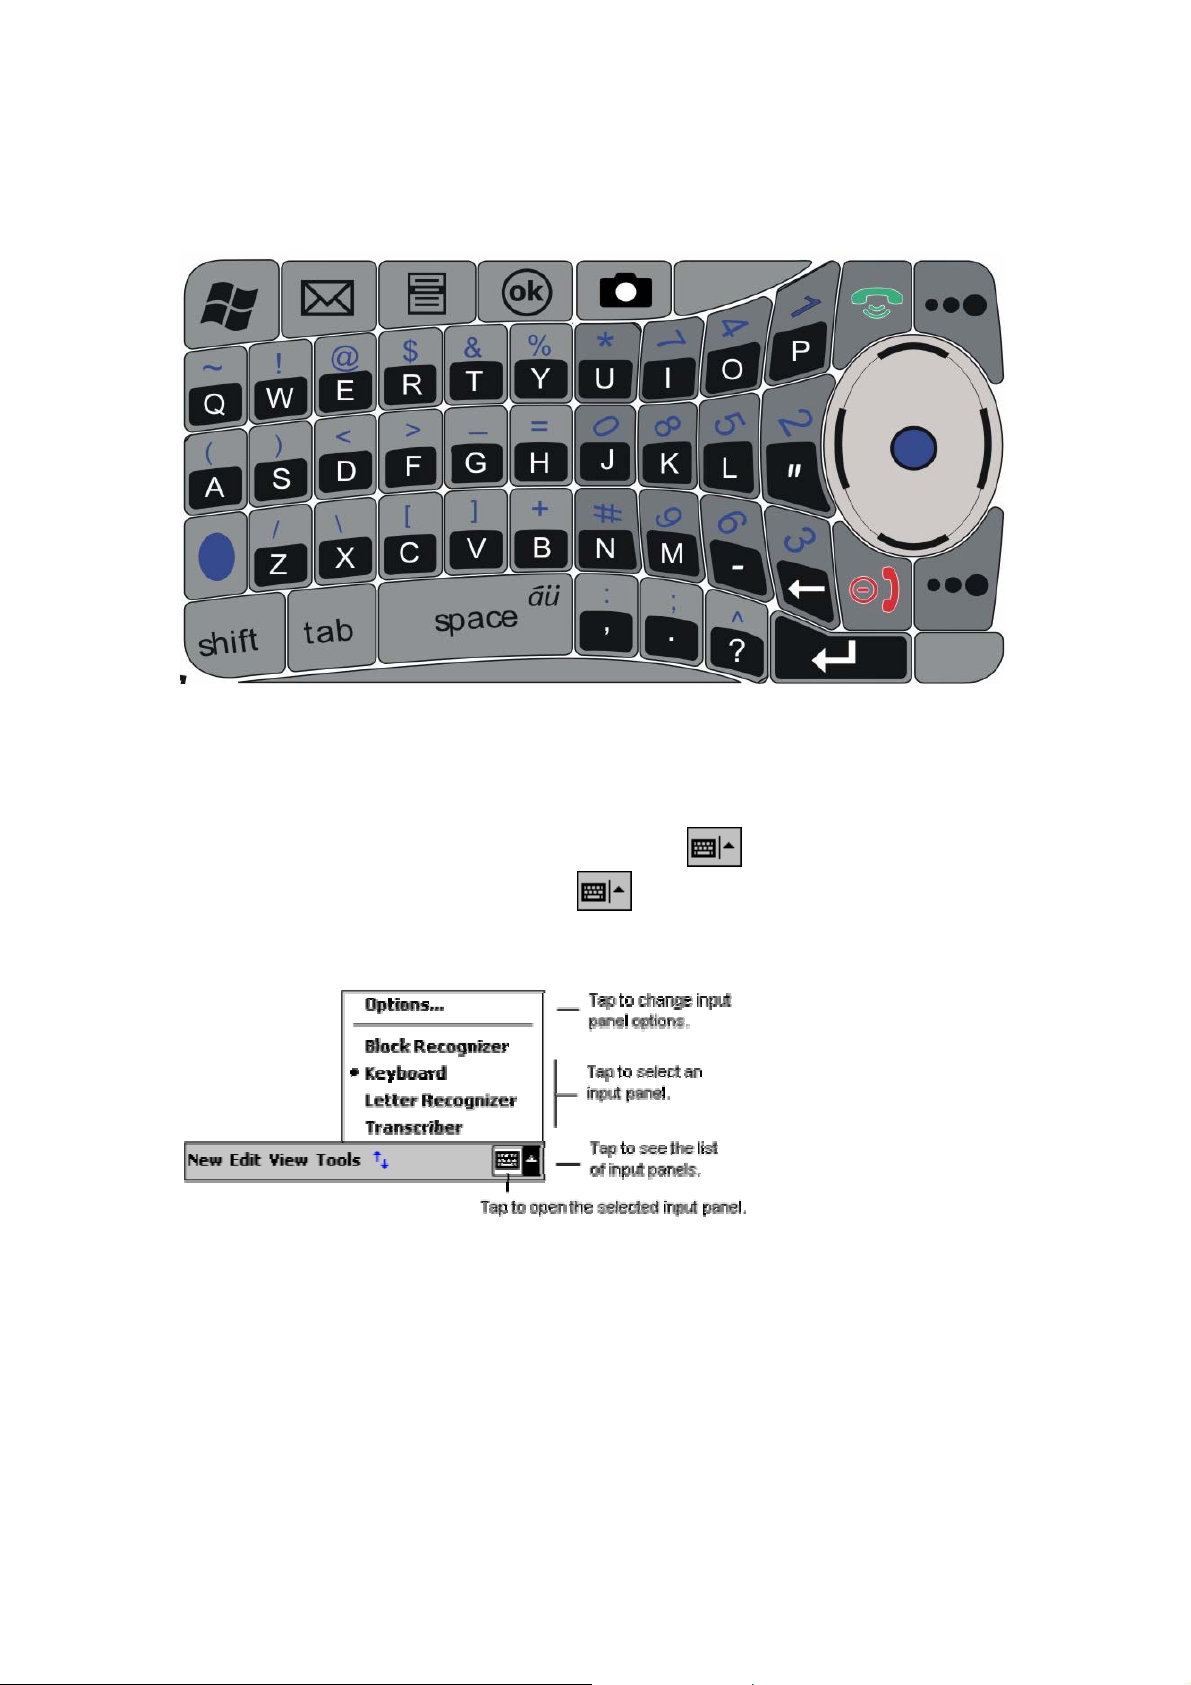
Entering Text Using the Input Panel
To show or hide the selected input method, tap on the command bar. To
select a different input panel, tap the
that you want.
When you use the input panel, your device anticipates the word you are typing
or writing and displays it above the input panel. When you tap the displayed
word, it is inserted into your text at the insertion point. The more you use your
device, the more words it learns to anticipate.
arrow and then tap the input panel
Page 15

For More Information
For information on: See this source:
Programs on your device User’s Guide and device Help. To view
Additional programs that can be
installed on the device
Connecting to and synchronizing with a
desktop computer
Last-minute updates and detailed
technical information
Up-to-date information on Pocket PC
Help, tap
Pocket PC Companion CD.
ActiveSync Help on your desktop
computer. To view Help, start
ActiveSync, click Help, and then click
Microsoft ActiveSync Help.
Readme files, located in the Microsoft
ActiveSync folder on the desktop
computer and on the Pocket PC
Companion CD.
http://www.microsoft.com/mobile/pocket
pc
and then Help.
Page 16

Using Your Phone
Dialer Screen
You can start the dialer by tapping , then Phone, or press () on your
device.
(Insert a dialer screenshot and indications)
Indicators
Below are some of the status icons you may see.
(Insert the icon table)
Checking Your Connection
The icon () indicates that you are connected to your service provider’s network.
A full strength signal is indicated by (). As the strength of the signal diminishes,
so will the number of vertical bars in the icon.
Turning Your Phone On and Off
You can turn your phone on and off while keeping your Pocket PC turned on.
Action
1. Tap () in the title bar.
2. Tap Turn on or Turn off option in the pop-up menu.
NOTE: IN MANY COUNTRIES, YOU ARE REQUIRED BY LAW TO TURN
OFF YOUR PHONE WHEN YOU FL Y. TURNING OFF YOUR POCKET PC
DOESN’T TURN OFF YOUR PHONE; YOU MUST TURN OFF YOUR
CONNECTION TO THE OPERA T OR’S NETWORK.
Adjusting the Phone Volume
Change System Volume
You can adjust the volume for system sounds, such as the sound you hear
when you tap on program names and menu options.
Page 17

Action
1. Tap
2. Under , move the system volume slider to the desired volume level.
.
Change Ringer Volume
There may be times when you want to change the ringer volume on your
device. For example, you may want to increase the ringer volume when you're
anticipating an important call, or immediately silence the ringer when you
receive a call during a meeting or when you're in a quiet environment.
Action
1. Tap .
2. Under , move the ringer volume slider to the desired volume level.
You can select On, Vibrate, or Off to quickly change both the ringer and
system volume settings.
Making a Call
There are several ways to make a call:
1. Using the phone keypad
From the Phone keypad, enter the number you want to call, and then tap Talk.
2. From Call History
To quickly call someone you have recently called or someone who has recently
called you. From the Phone keypad, tap Call History, and then tap the icon
next to the desired number.
3. From Speed Dial
From the Phone keypad, tap Speed Dial, and then select the speed dial
location number of the desired contact. You can also press and hold the speed
dial location number assigned to a contact directly from the Phone keypad.
Note: To dial a one-digit speed dial number from the Phone keypad, tap and
hold a single keypad key. To dial a two-digit speed dial number from the Phone
keypad, tap the first digit, and then tap and hold the second digit.
4. From Contacts
You can make a call from Contacts without having to look up or manually enter
the number.
Page 18

• From the contact list, tap and hold the contact, and then tap Call Work,
Call Home, or Call Mobile on the pop-up menu.
• To make a call from an open contact, tap the number you want to call.
5. From SIM Manager
Action
1. Tap
card contents to load.
2. Tap and hold the name or phone number of the person you wish
to call, and then select Call from the pop-up menu.
6. Using Voice Command
TBD
Æ Programs Æ SIM Manager, and wait for your SIM
Answering Calls
y To answer an incoming call, Tap Answer, or press () on your device.
y To Ignore or press () to reject the call. If you reject a call, the busy tone will
be sent out.
In-Call Options
Taking a Note during a Call
1. To create a note during a call, tap , and enter your note.
2. To access a note you created during a call, in the Call History list, tap
and hold the name or number for the phone call entry containing the
note, and then tap View Note. You can also access the note directly
from Notes in the Calls folder.
Putting a call on hold
y Your device will notify you when you have another incoming call. If you
accept the call, tap Answer to take the 2
nd
y To end up the 2
y You can also choose to swap between the 2 calls by tapping Swap.
call and go back to the 1st, tap End or press ().
nd
call and put the 1st on hold.
Page 19

Setting Up a Conference Call
You can create a three-way phone session between yourself and two other
parties. A conference call can include up to six people.
y From the Phone keypad, dial the first number, tap Hold, dial the second
number, and then tap Conference.
y You can also set up a conference call by accepting 2
you already have one in progress.
y To add additional people to your conference call, tap Hold, key in the
number, and then Resume to return and continue.
nd
incoming call when
Creating a Speed Dial Entry
You can create speed dials to call frequently-called numbers with a single tap.
Before you can create a speed dial entry for a phone number, that number must
already exist in Contacts.
1. From the Phone keypad, tap Speed Dial Æ New.
2. Tap the desired contact name and number.
In the Location field, tap the Up/Down arrows to select an available location to
assign as the new speed dial entry. The first speed dial location is reserved for
your voice mail.
Note: To create a speed dial entry from Contacts, tap and hold the contact
name, tap Add to Speed Dial, and then tap the Up/Down arrows to select an
available location to assign as the new speed dial entry. To delete a speed dial
entry, go to the Speed Dial list, tap and hold the cont act name in the box to the
right of the assigned speed dial number, and then tap Delete.
Managing Your Contact s
You can either import the contacts from your SIM card or the Call History.
SIM Manager
To open SIM manager, tap Æ Programs Æ SIM Manager. Wait for your
SIM card contents to load.
Page 20

Creating a SIM contact:
Action
1. After the SIM contacts complete loading, tap New.
2. Fill in the Name and Phone information then tap Add.
Saving SIM contacts to Microsoft Contacts:
y On SIM Manager screen, tap Tools Æ Select All Æ and then Save to
Contacts.
y In the SIM Manager, Tap and hold a contact from the list, and then select
Save to Contacts from the pop-up menu.
Call History
Tap () on the Phone Keypad to open Call History. It details all incoming,
outgoing, and missed calls.
Adding a record to Contacts from Call History
Action
1. Find the call record you want to add in the Contacts.
2. Tap and Hold to bring up the pop-up menu, and select
Save to Contacts.
Viewing Duration of a Call
In Call History screen, find the call you are looking in, and then tap it once.
Deleting individual calls from Call History
Tap and Hold the stylus on the call you want to delete, and then select delete
from the pop-up menu.
Deleting all calls from Call History
Tap ToolsÆ Delete all Calls
Page 21

Using the External Display
When your phone is turned on and the flip is closed, the external display
shows the phone status, including battery and network signal status. It also
shows the time. When you receive an incoming call, the external display
shows the caller’s number or name. To answer the incoming call, open the flip.
Note: To see a caller’s name on the external display, the caller’s number must
match an entry in your phonebook External Display
Personalizing Your Pocket PC
Phone
Device Settings
You can adjust device settings to suit the way you work.
Action
1. Tap
2. Tap Personal or System tab.
Æ Settings
Personal Tab
Icon Program Description
Button Assigns an application to hardware button
Input Sets up the input options
Menus Customizes the items in the Start Menu and enables
the items to appear from the New button.
Owner
Information
Password Limits access to your device
Phone Configures the phone functions
Sounds and
notifications
Display your personal information
Sets up the notification type, event and volume
Today Customizes your Today screen appearance
Page 22

System Tab
Icon Program Description
About
Backlight
Certificates
Clock
Memory
Power
Regional
Settings
Remove
Programs
Screen
Buttons
Find the Feature
Æ Settings Æ Personal Æ Buttons
Action
1. Select a button
2. Select a program in Button Assignment
3. Tap OK
Input
Find the Feature
Æ Settings Æ Personal ÆInput
y On the Input Method tab, you can select an input method and changed
preferred options.
y On the Word Completion tab, you can select desired options for word
completion.
y On the Options tab, you can select preferred options for recording and
writing. These options apply to any program on the device where you can
record and write.
Page 23

Note: You can also change the input options by tapping the arrow and
then Options.
Menu
You can add the programs you use most often to Start menu.
Find the Feature
Æ Settings Æ Personal tab Æ Menus
y On the Start Menu tab, select the programs you want, and then tap
OK.
y On the New Menu tab, you can select Turn on New button menu and
then select the items to appear on the menu. When you do this, you
can create certain programs such as Pocket Word, Pocket Excel,
Contacts, Calendar and Tasks by using the New menu in the
command bar.
Owner Information
Find the Feature
Æ Settings Æ Personal tab Æ Owner Information
Password
Page 24

Sounds and Notifications
Today
Backlight
Clock
Memory
Power
Phone Settings
You can customize phone settings, such as the ring type and ring tone to be
used for incoming calls, and the keypad tone to be used when entering phone
numbers. You can also protect your phone from unauthorized use.
Changing Sounds
Ring Type
You can change the way that you are notified of incoming calls. For example,
you can choose to be notified by a ring, a vibration, or a combination of both.
Action
1. From the Phone keypad, tap Tools Æ Options Æ Phone tab.
2. Tap the Ring type list, and select the desired option.
Page 25

Ring Tone
You can select a different sound to notify you of incoming calls.
Action
1. From the Phone keypad, tap Tools Æ Options Æ Phone tab.
2. Tap the Ring tone list, and select the sound you want to use.
Note: You can also us e .wav, .mid, or .wma files as ring tones. Copy the files
to the /Windows/Rings folder on your device. Then, select the sound from the
Ring tone list.
Keypad Tone
You can change the tone you hear when entering a phone number on the
keypad. If set to Tones, the tone is heard continuously for as long as the
number on the keypad is pressed. If set to Beep, the tone is heard only for one
or two seconds.
Action
1. From the Phone keypad, tap Tools Æ Options Æ Phone tab.
2. Tap the Keypad list, and select the option you want.
Note: To prevent tones from being heard when entering a phone number,
select Off.
Setting PIN
You can protect your phone from unauthorized use by assigning a type of
password called a PIN (Personal Identification Number). Your first PIN will be
given to you by your mobile phone service provider.
Action
1. From the Phone keypad, tap Tools > Options > Phone tab.
2. Select Require PIN when phone is used.
To change the PIN at any time, tap Change PIN.
Note: Emergency calls can be placed at any time, without requiring a PIN.
Page 26

Services
Service settings are used to set options for incoming/or outgoing calls, such as
Call Waiting, Call Forwarding, Call Barring, and Caller ID.
Find the Feature
From the Phone keypad, tap Tools Æ Options Æ Services tab
Option Description
Call Waiting Notifies you of incoming calls when you are already in a
phone session.
Call Forwarding Forwards all incoming calls to a different number.
Call Barring Blocks certain types of incoming and/or outgoing calls.
Caller ID Shows or hides your identity when calling other people
Select a service and then tap Get Settings to access the settings for a service.
Network
You can view available networks, determine the order in which your phone
accesses another network if the current one is unavailable, and specify
whether you want to change networks manually or automatically. The current
network will remain active until you change it, lose your signal, or change your
SIM card.
Find the Feature
From the Phone keypad, tap Tools Æ Options Æ Network tab
y The network your device is currently using will be listed at the top of the
screen.
y When your current network is unavailable, tap Select Network, and
manually select a different network to use.
Page 27

Synchronizing Information
Using ActiveSync
With Microsoft ActiveSync on both your PC and mobile device, you can
exchange information between your PC and your device.
Using ActiveSync, you can:
• Keep Pocket Outlook data up-to-date by synchronizing your device
with Microsoft Outlook data on your PC.
• Change synchronization settings and synchronization schedule.
• Copy files between your device and PC.
• Back up and restore device information.
y Add and remove programs on your device.
Note: You can directly synchronize information with a Microsoft Exchange
Server if your company is running Microsoft Mobile Information Server 2002 or
later.
Installing ActiveSync
To synchronize your device with your PC, you must install ActiveSync on your
PC from the Pocket PC Phone 2003 Companion CD.
Creating a Partnership
Once ActiveSync is installed on your PC, you will be prompted to connect and
create a partnership with your device by using a cable, cradle, or infrared
connection. During this partnership you can decide exactly which types of
information you want to synchronize with your PC and/or a server.
Page 28

Synchronizing Outlook
You can synchronize the following types of Outlook information:
y Inbox
y Calendar
y Contacts
y Tasks
y Notes
By default, ActiveSync doesn’t automatically synchronize all types of Outlook
information. You can use ActiveSync options to select what information types
you want to synchronize.
Microsof t Pocket Outlook
Microsoft Pocket Outlook includes Calendar, Contacts, Tasks, Inbox, and
Notes.
Using ActiveSync® you can synchronize information in Microsoft Outlook or
Microsoft Exchange on your desktop computer with your device. You can also
synchronize this information directly with a Microsoft Exchange server. Each
time you synchronize, ActiveSync compares the changes you made on your
device and PC or server and updates both computers with the latest
information. For information on using ActiveSync, see ActiveSync Help on the
PC.
Calendar: Scheduling Appointments and Meetings
Use Calendar to schedule appointments, including meetings and other events.
You can check your appointments in one of several views (Agenda, Day, Week,
Month, and Year) and set Calendar to remind you of appointments with a
sound or other method.
Page 29

NOTE
You can customize the Calendar display, such as changing the first
day of the week, by tapping Options on the Tools menu.
To create an appointment:
1. If you are in Day or Week view, tap the desired date and time for the
appointment.
2. Tap New.
Page 30

3. Using the input panel, enter a description and a location. Tap first to select
the field.
4. If needed, tap the date and time to change them.
5. Enter other desired information. You will need to hide the input panel to see
all available fields.
6. To add notes, tap the Notes tab. You can enter text, draw, or create a
recording. For more information on creating notes, see “Notes: Capturing
Thoughts and Ideas,” later in this chapter.
7. When finished, tap OK to return to the calendar.
NOTE
If you select Remind me in an appointment, your device will remind
you according to the options set in, Settings, Personal tab, Sounds
& Notifications.
Using the Summary Screen
When you tap an appointment in Calendar, a summary screen is displayed. To
change the appointment, tap Edit.
Creating Meeting Requests
You can use Calendar to set up meetings with users of Outlook or Pocket
Outlook. The meeting request will be created automatically and sent either
when you synchronize Inbox or when you connect to your e-mail server.
Indicate how you want meeting requests sent by tapping Tools and then
Options. If you send and receive e-mail messages through ActiveSync, select
ActiveSync.
Page 31

To schedule a meeting:
1. Create an appointment by tapping New.
2. In the appointment details, hide the input panel, and then tap Attendees.
3. From the list of e-mail addresses you’ve entered in Contacts, select the
meeting attendees.
The meeting notice is created automatically and placed in the Outbox folder.
For more information on sending and receiving meeting requests, see
Calendar Help and Inbox Help on the device.
Contacts: Tracking Friends and Colleagues
Contacts maintains a list of your friends and colleagues so that you can easily
find the information you’re looking for, whether you’re at home or on the road.
Using the device infrared (IR) port, you can quickly share Contacts information
with other device users.
NOTE
To change the way information is displayed in the list, tap Tools and
then Options.
To create a contact:
1. Tap New.
Page 32

2. Using the input panel, enter a name and other contact information. You will
need to scroll down to see all available fields.
3. To assign the contact to a category, scroll to and tap Categories and select
a category from the list. In the contact list, you can display contact by
category.
4. To add notes, tap the Notes tab. You can enter text, draw, or create a
recording. For more information on creating notes, see “Notes: Capturing
Thoughts and Ideas,” later in this chapter.
5. When finished, tap OK to return to the contact list.
Finding a contact
There are four ways to find a contact:
• Tap
number, or address, select Contacts for the type, and then tap Go.
• From Contacts, start typing a contact name until you see it displayed on the
screen. To show all contacts again, tap the text box at the top of the screen
and clear the text, or tap the arrow icon to the right of the text box.
• In the contact list, tap the category list (labeled All Contacts by default) and
tap the category to which you've assigned a contact. To show all contacts
again, select All Contacts.
• To view the names of companies your contacts work for, in the cont act list, tap
View > By Company. The number of contacts that work for that company will
be displayed to the right of the company name.
, then Find, enter the contact name (first, last, or middle), phone
Page 33

Using the Summary Screen
When you tap a contact in the contact list, a summary screen is displayed. To
change the contact information, tap Edit.
Tasks: Keeping a To Do List
Use Tasks to keep track of things you need to do.
Page 34
NOTE
To change the way information is displayed in the list, tap Tools and
then Options.
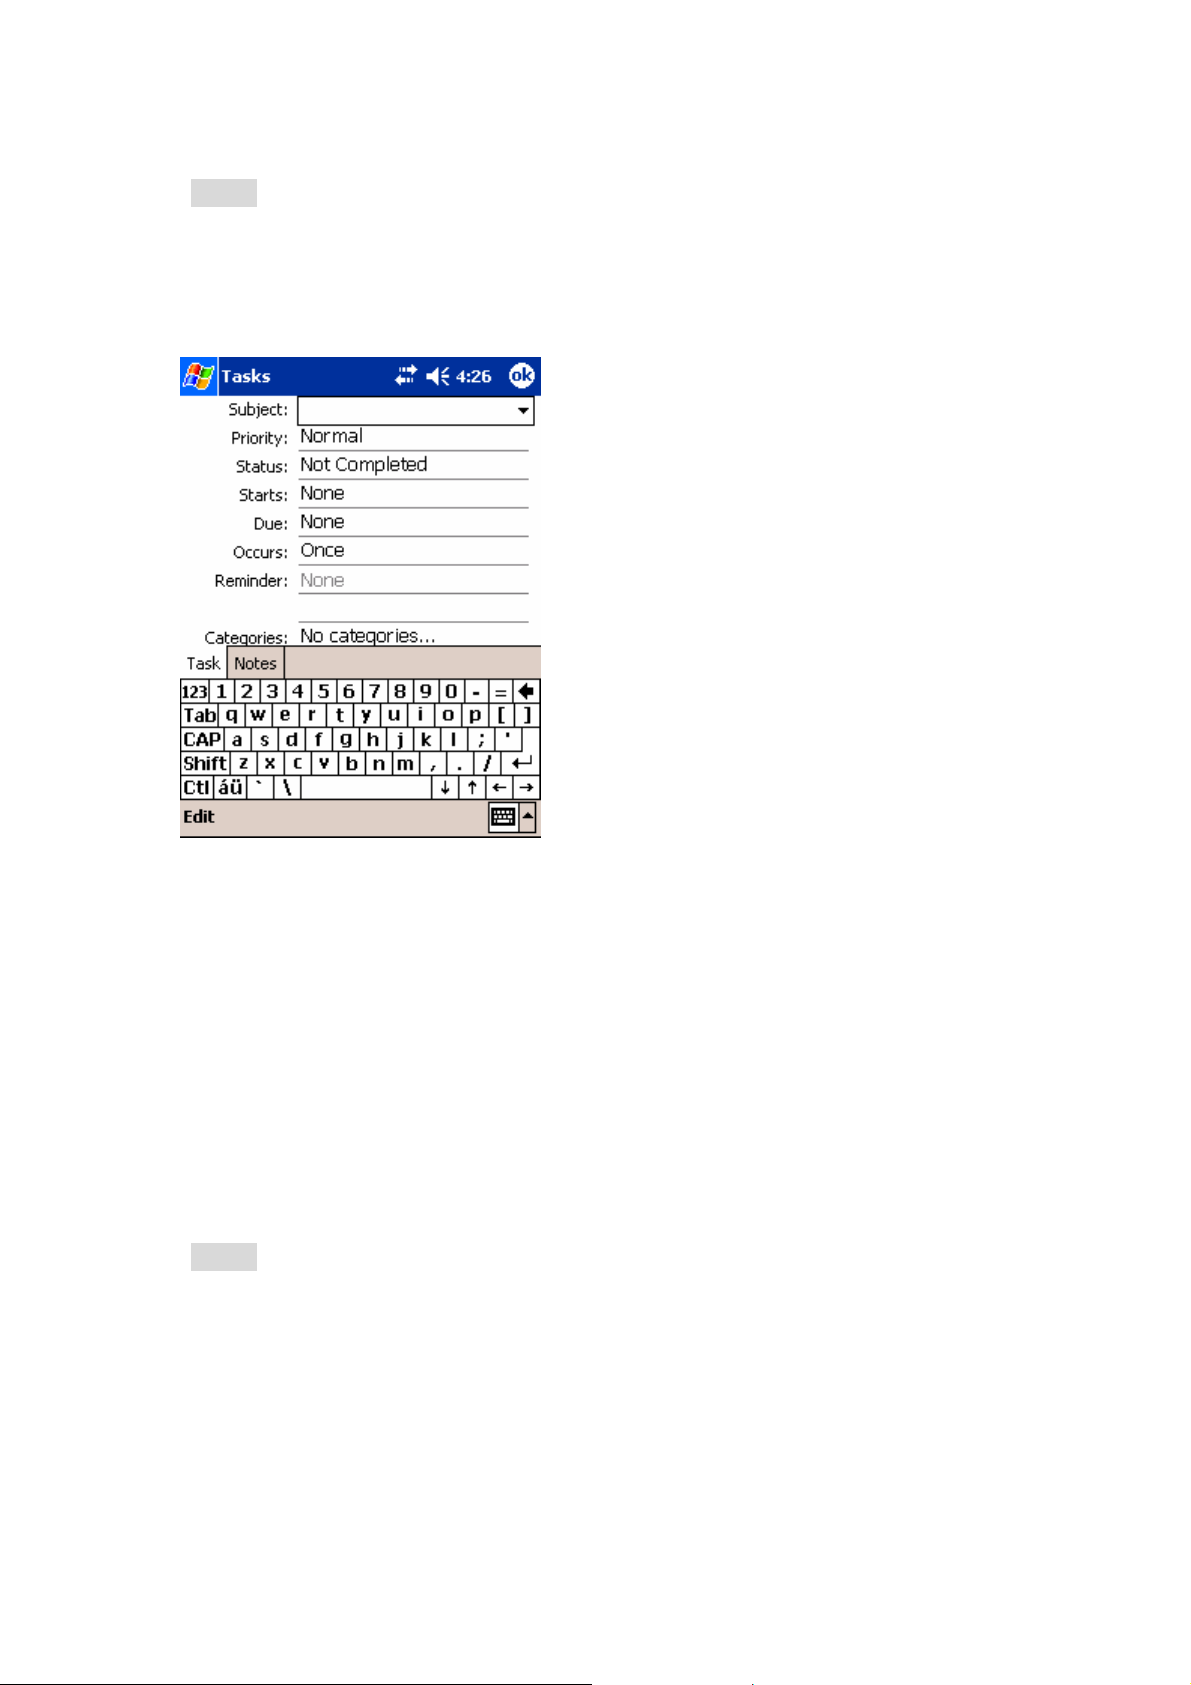
To create a task:
1. Tap New.
2. Using the input panel, enter a description.
3. You can enter a start date and due date or enter other information by first
tapping the field. If the input panel is open, you will need to hide it to see all
available fields.
4. To assign the task to a category, tap Categories and select a category from
the list. In the task list, you can display tasks by category.
5. To add notes, tap the Notes tab. You can enter text, draw, or create a
recording. For more information on creating notes, see “Notes: Capturing
Thoughts and Ideas,” later in this chapter.
6. When finished, tap OK to return to the task list.
NOTE
To quickly create a task with only a subject, tap Entry Bar on the
Tools menu. Then, tap Tap here to add a new task and enter your
task information.
Page 35

Using the Summary Screen
When you tap a task in the task list, a summary screen is displayed. To change
the task, tap Edit.
Notes: Capturing Thoughts and Ideas
Quickly capture thoughts, reminders, ideas, drawings, and phone numbers
with Notes. You can create a written note or a recording. You can also include
a recording in a note. If a note is open when you create the recording, it will be
included in the note as an icon. If the note list is displayed, it will be created as
a stand-alone recording.
Page 36

To create a note:
1. Tap New.
2. Create your note by writing, drawing, typing, and recording. For more
information about using the input panel, writing and drawing on the screen,
and creating recordings, see Chapter 2.
Inbox: Sending and Receiving Messages
You can receive Internet e-mail messages and SMS messages in Inbox.
Internet e-mail messages are sent by using an address you receive from your
Internet service provider (ISP) or your employer. SMS messages are sent and
received through your wireless phone service provider by using a phone
number as the message address.
1. Email Messages
You can use Inbox to send and receive e-mail messages in either of these
ways:
• Synchronize e-mail messages with Microsoft Exchange or Microsoft Outlook
on your PC.
• Send and receive e-mail messages by connecting directly to an e-mail server
through an Internet Service Provider (ISP) or a network.
Page 37

Setting Up an Email Service
Action
1. Open Inbox, tap Accounts, and then New Account.
2. Enter your email address and then tap Next.
3. Then Auto-configuration will attempt to connect to the e-mail server
and configure the necessary e-mail settings automatically.
Note: If auto-configuration is not successful, you need to manually enter
the settings.
4. Enter an unique name for the account, User name and Password,
then tap Next.
5. In the Account type, tap POP3 or IMAP4. (POP3 is the most common
mail protocol for ISPs.)
6. Enter your ISP’s e-mail server name of Incoming mail and Outgoing
mail, then tap Finish.
7. Connect to your email server by tapping Accounts Æ Connect.
Note: For more explanation, tap
Æ Help.
Synchronizing Email Messages
E-mail messages can be synchronized as part of the general synchronization
process. You will need to enable Inbox synchronization in ActiveSync. For
information on enabling Inbox synchronization, see ActiveSync Help on the
PC.
During synchronization:
• Messages are copied from the Inbox folder on your PC or Exchange server to
the Inbox folder on your device. When synchronizing Inbox with your PC,
ActiveSync synchronizes the first .5 KB of each new message sent to you
within the last three days each time you synchronize. When synchronizing
Inbox with a server, ActiveSync synchronizes the first 500 bytes of each new
message.
• Messages in the Outbox folder on your device are transferred to Exchange
or Outlook and then sent from those programs.
• The messages on the two computers are linked. When you delete a message
on your device, it's deleted from your PC the next time you synchronize.
• Messages in subfolders or other e-mail folders in Outlook should be selected
in ActiveSync for synchronization.
Page 38

Using the Message List
Messages you receive are displayed in the message list. By default, the most
recently received messages are displayed first in the list.
When you receive a message, tap it to open it. Unread messages are
displayed in bold.
Page 39

You can mark the messages that you want to retrieve in full during your next
synchronization or e-mail server connection. In the message list, tap and hold
the message you want to retrieve. On the pop-up menu, tap Mark for
Download. The icons in the Inbox message list give you visual indications of
message status.
You specify your downloading preferences when you set up the account or
select your synchronization options. You can change them at any time:
• Change options for Inbox synchronization using ActiveSync options. For
more information, see ActiveSync Help.
• Change options for direct e-mail server connections in Inbox on your device.
Tap Tools and then tap Options. On the Account tab, tap the account you
want to change. Tap and hold the account and select Delete to remove an
account.
Composing an Email Messages
1. In the message list, tap New.
2. In the To field, enter the e-mail address of one or more recipients,
separating them with a semicolon, or select a name from the contact list by
tapping the Address Book button. All e-mail addresses entered in the
e-mail fields in Contacts appear in the Address Book.
3. Compose your message. To enter preset or frequently used messages, tap
My Text and select a message.
Page 40

4. Tap Send when you’ve finished the message. If you are working offline, the
message is moved to the Outbox folder and will be sent the next time you
connect. If you are working online, it is sent immediately.
Managing Messages and Folders
Each email, SMS and MMS account has its own folder hierarchy with five
default folders: Inbox, Outbox, Deleted Items, Drafts, and Sent Items. The
messages you receive and send through the service account are stored in
these folders. You can also create additional folders within each hierarchy.
2. SMS Messages
You can send an SMS Message from Inbox or from Phone dialer screen. All
the SMS messages received will be stored in the Inbox.
Sending SMS
Find the Feature
y In the Inbox, open a new email message and select SMS account in
the Account type options.
y In the Phone dialer screen, tap Tools Æ Send SMS.
In the To field, enter the SMS number of one or more recipients, using “;”
to separate them. Or select a contact by tapping the Address Book
button.
When you have finished the message, Tap Send. If you are working
offline, the message will be stored in the Outbox folder and will be sent
when next time you connect.
3. MMS Messages
TBD
Companion Programs
You can launch a companion program by tapping programs on the start
menu, and then select the program name.
Page 41

MSN Messenger : Instant Messaging Service
Find the Feature
Æ Programs, and then tap MSN Messenger.
Setting Up
Before you can use MSN Messenger, you must set up the instant messaging
account(s) to use. For MSN Messenger Service, you must have a Microsoft
Passport or Hotmail account. For Exchange Instant Messaging, you must
have an Exchange account.
Action
1. In the Tools menu, tap Options and then Accounts tab.
2. Select Enable MSN Messenger Service and/or Enable
Exchange Instant Messaging.
3. Enter your sign-in name and password for the selected account.
4. To sign in, tap the sign-in screen and then Sign in button.
Pocket Word
Pocket Word works with Microsoft Word on your PC to give you easy access
to copies of your documents. You can create new documents on your device,
or you can copy documents from your PC to your device. Synchronize
documents between your PC and your device so that you have the most
up-to-date content in both locations.
Creating a new file:
Action
Tap
Note:
y You can only open only one document at a time; when you open a second
document, you’ll be asked to save the first.
y You can save a document you create or edit in a variety of formats,
including Word (.doc), Pocket Word (.psw), Rich Text Format (.rtf), and
Plain Text (.txt).
Æ Programs Æ Pocket Word, and then New.
Page 42

Pocket Excel
Windows Media Player
Microsoft Reader
Pictures
Using the Camera
TBD
Using the Remote Control
TBD
News and Entert ainment
Pocket Internet Explorer
You can use Pocket Internet Explorer to view Web pages
Java Application Manager
TBD
Page 43

Getting Connected
Wi-Fi(IEEE802.11b) Wireless LAN
TBD
Bluetooth
TBD
Troubleshooting
TBD
Page 44

 Loading...