

Page 1
MOTONAV
™
User’s Guide
Navigation Software for
the Motorola Mobile Navigator Phone
Page 2

Copyright, Distribution Policy, and Trademarks
Motorola, Inc.
Consumer Advocacy Office
600 N US Hwy 45
Libertyville, IL 60048
www.motorola.com
www.motorola.com/motoextras
www.motorola.com/motoextras/mobile
www.motorola.com/motonav
: Do not ship your device to the above address. If you need to return your device for repairs, replacement, or warranty service, please
Note
contact the Motorola Customer Support Center at:
1-877-MOTOBLU (Motorola Bluetooth support)
1-800-331-6456 (United States)
1-888-390-6456 (TTY/TDD United States for hearing impaired)
1-800-461-4575 (Canada)
Software License
The Agreement sets forth the license terms and conditions for using the enclosed Software. You may use this Software on a single computer,
and you may transfer it to another computer as long as it is used on only one computer at a time. You may copy the Software for backup
purposes only. You may not rent, sell, lease, sublicense, time-share or lend the Software to a third party or otherwise transfer this License
without written consent of Motorola. You shall not decompile, disassemble, reverse-engineer or modify the Software. This License is effective
until terminated. You may terminate it at anytime by destroying the Software together with all copies. The License also terminates if you fail to
comply with the terms and conditions of this Agreement. United States copyright laws as well as international treaty provisions protect this
Software and accompanying documentation. Any use of the Software in violation of these laws constitutes termination of the License.
Limited Liability
The Software and accompanying documentation is provided “AS IS” without warranty of any kind. Motorola specifically disclaims all other
warranties, expressed or implied, including but not limited to implied warranties of merchantability and fitness for a particular purpose. With
respect to the use of this product, in no event shall Motorola be liable for any loss of profit or any other commercial damage, including but not
limited to special, incidental, consequential or other damages.
Warni ng
: Traffic laws and current traffic conditions must always be observed and take precedence over the instructions issued by the navigation
system. The user should be aware of situations where current traffic conditions and the instructions from the navigation system may be in
conflict. The use of the navigation system does not relieve the user of his/her responsibilities. The user is ultimately responsible for the vehicle
under his/her control and should be aware of the surroundings at all times. For traffic safety reasons, it is recommended that routes should be
planned in a stationary vehicle before starting a trip.
Privacy
: Operation of the navigation system requires that the user's position be sent to a central server for use in certain MotoExtras features
of MOTONAV. The server is operated by Airbiquity, Inc., a Motorola-approved service provider (www.airbiquity.com). This information will only
be used to provide the requested service and will not be shared with any additional third parties. Users who prefer not to permit such tracking
and monitoring should avoid using the navigation system.
Responsibility
charges.
MOTOROLA IS NOT RESPONSIBLE FOR ANY DIRECT, INDIRECT, INCIDENTAL, CONSEQUENTIAL, EXEMPLARY, SPECIAL, OR PUNITIVE
AMAGES, OR OTHER DAMAGE ARISING OUT OF THE USE OF, OR INABILITY TO USE, THIS PRODUCT. THIS INCLUDES DAMAGE TO
D
PROPERTY AND, TO THE EXTENT PERMITTED BY LAW, DAMAGES FOR PERSONAL INJURY AND DEATH.
Laws in some areas prohibit the use of a cellular phone and other devices when driving a motor vehicle. Please use the utmost car
your devices safely under all circumstances. It is the responsibility of each user to be aware of and abide by any and all local laws and
ordinances, which may restrict the use of cellular phones and other devices.
: Certain features of MOTONAV require wireless network access on your mobile phone. The user is responsible for all access
e in using
Trademarks
MOTOROLA and the Stylized M Logo are registered in the US Patent & Trademark Office. All other product or ser vice names are the property of
their respective owners.
© 2009 - Motorola All rights reserved.
© 2009 - TeleAtlas All rights reserved.
© 2009 - Inrix All rights reserved.
© 2009 - Nav N Go Kft. All rights reserved
Manual Number: 68XXXXX388-A
Page 3

contents
get started
. . . . . . . . . . . . . . . . . . . . . . . . . . . . . . . . . . . . . . . . . . . . . . . . . . . . . . . . . . . . . . . . . 3
safety . . . . . . . . . . . . . . . . . . . . . . . . . . . . . . . . . . . . . . . . . . . . . . . . . . . . . . .3
set it up. . . . . . . . . . . . . . . . . . . . . . . . . . . . . . . . . . . . . . . . . . . . . . . . . . . . . .3
look around . . . . . . . . . . . . . . . . . . . . . . . . . . . . . . . . . . . . . . . . . . . . . . . . . .5
navigation menu . . . . . . . . . . . . . . . . . . . . . . . . . . . . . . . . . . . . . . . . . . . . . . . . . . . . . . . . . . . . . . . . . . . . . 5
live map. . . . . . . . . . . . . . . . . . . . . . . . . . . . . . . . . . . . . . . . . . . . . . . . . . . . . . . . . . . .
position markers on the map. . . . . . . . . . . . . . . . . . . . . . . . . . . . . . . . . . . . . . . . . . . . . . . . . . . .
other map features . . . . . . . . . . . . . . . . . . . . . . . . . . . . . . . . . . . . . . . . . . . . . . . . . . . . . . .
manipulating the map view . . . . . . . . . . . . . . . . . . . . . . . . . . . . . . . . . . . . . . . . . . . . . . . . . . . . .
Quick menu. . . . . . . . . . . . . . . . . . . . . . . . . . . . . . . . . . . . . . . . . . . . . . . . . . . . . . . . . . .
Where Am I? menu & current location . . . . . . . . . . . . . . . . . . . . . . . . . . . . . . . . . . . . . . . . . . . . . . . .
navigate
. . . . . . . . . . . . . . . . . . . . . . . . . . . . . . . . . . . . . . . . . . . . . . . . . . . . . . . . . . . . . . . . . . . 12
. . . . . . . . . . . . . . . . 5
. . . . . . . . 7
. . . . . . . . . . . . 7
. . . . . . . 10
. . . . . . . . . . . . . 11
enter your destination. . . . . . . . . . . . . . . . . . . . . . . . . . . . . . . . . . . . . . . . .12
enter an address or part of an address . . . . . . . . . . . . . . . . . . . . . . . . . . . . . . . . . . . . . . . . . . . . . . . . . . . 12
choose the midpoint of a street . . . . . . . . . . . . . . . . . . . . . . . . . . . . . . . . . . . . . . . . . . . . . . . . .
choose an intersection . . . . . . . . . . . . . . . . . . . . . . . . . . . . . . . . . . . . . . . . . . . . . . . . . . . . . .
get to a city center . . . . . . . . . . . . . . . . . . . . . . . . . . . . . . . . . . . . . . . . . . . . . . . . . . . . . . .
use a postal code . . . . . . . . . . . . . . . . . . . . . . . . . . . . . . . . . . . . . . . . . . . . . . . . . . . . . . . .
. . . . . . . 14
. . . . . . . . . 14
. . . . . . . . . . . 15
. . . . . . . . . . . 15
tips for entering addresses quickly . . . . . . . . . . . . . . . . . . . . . . . . . . . . . .16
. . . 11
go to points-of-interest (POIs) . . . . . . . . . . . . . . . . . . . . . . . . . . . . . . . . . .16
select a point-of-interest by using quick search . . . . . . . . . . . . . . . . . . . . . . . . . . . . . . . . . . . . . . . . . . . . 16
choose a POI by name . . . . . . . . . . . . . . . . . . . . . . . . . . . . . . . . . . . . . . . . . . . . . . . . . . . . . .
choose a POI by category . . . . . . . . . . . . . . . . . . . . . . . . . . . . . . . . . . . . . . . . . . . . . . . . . . . .
. . . . . . . . . 17
. . . . . . . . . 18
get assistance from Where Am I? . . . . . . . . . . . . . . . . . . . . . . . . . . . . . . .19
use the map to pick a location . . . . . . . . . . . . . . . . . . . . . . . . . . . . . . . . . .20
go to a favorite place. . . . . . . . . . . . . . . . . . . . . . . . . . . . . . . . . . . . . . . . . .20
select the most likely destination (Smart History). . . . . . . . . . . . . . . . . .21
select a destination from your history . . . . . . . . . . . . . . . . . . . . . . . . . . .21
get an overview of your route or check route settings . . . . . . . . . . . . . .22
modify your route . . . . . . . . . . . . . . . . . . . . . . . . . . . . . . . . . . . . . . . . . . . .22
change your destination . . . . . . . . . . . . . . . . . . . . . . . . . . . . . . . . . . . . . . . . . . . . . . . . . . . . . . . . . . . . . . 22
set a new starting position . . . . . . . . . . . . . . . . . . . . . . . . . . . . . . . . . . . . . . . . . . . . . . . . . . .
pause the active route. . . . . . . . . . . . . . . . . . . . . . . . . . . . . . . . . . . . . . . . . . . . . . . . . . . . .
delete the active route . . . . . . . . . . . . . . . . . . . . . . . . . . . . . . . . . . . . . . . . . . . . . . . . . . . .
change route planning method . . . . . . . . . . . . . . . . . . . . . . . . . . . . . . . . . . . . . . . . . . . . . . . . . .
check route alternatives . . . . . . . . . . . . . . . . . . . . . . . . . . . . . . . . . . . . . . . . . . . . . . . . . . . . .
change the vehicle used in route planning . . . . . . . . . . . . . . . . . . . . . . . . . . . . . . . . . . . . . . . . . . . . .
change the road types used in route planning . . . . . . . . . . . . . . . . . . . . . . . . . . . . . . . . . . . . . . . . . . .
. . . . . . . . . 23
. . . . . . . . . . . 24
. . . . . . . . . . . 24
. . . . . . . 24
. . . . . . . . . 25
. . . 26
. . 27
1 MOTONAV Software User’s Guide
Page 4

make your route a favorite . . . . . . . . . . . . . . . . . . . . . . . . . . . . . . . . . . . . .28
watch route simulation. . . . . . . . . . . . . . . . . . . . . . . . . . . . . . . . . . . . . . . .29
more details
. . . . . . . . . . . . . . . . . . . . . . . . . . . . . . . . . . . . . . . . . . . . . . . . . . . . . . . . . . . . . . 30
Smart Zoom . . . . . . . . . . . . . . . . . . . . . . . . . . . . . . . . . . . . . . . . . . . . . . . . .30
route calculation & recalculation . . . . . . . . . . . . . . . . . . . . . . . . . . . . . . . .30
speed limit warnings. . . . . . . . . . . . . . . . . . . . . . . . . . . . . . . . . . . . . . . . . .30
Traffic—TMC (Traffic Message Channel) . . . . . . . . . . . . . . . . . . . . . . . . . .31
basics . . . . . . . . . . . . . . . . . . . . . . . . . . . . . . . . . . . . . . . . . . . . . . . . . . . . . .31
buttons & screen controls. . . . . . . . . . . . . . . . . . . . . . . . . . . . . . . . . . . . . . . . . . . . . . . . . . . . . . . . . . . . . 31
beyond a single screen tap . . . . . . . . . . . . . . . . . . . . . . . . . . . . . . . . . . . . . . . . . . . . . . . . . . .
text entry. . . . . . . . . . . . . . . . . . . . . . . . . . . . . . . . . . . . . . . . . . . . . . . . . . . . . . . . . . .
. . . . . . . . . 32
. . . . . . . . . . . . . . . 33
settings & options . . . . . . . . . . . . . . . . . . . . . . . . . . . . . . . . . . . . . . . . . . . .34
MORE menu . . . . . . . . . . . . . . . . . . . . . . . . . . . . . . . . . . . . . . . . . . . . . . . . . . . . . . . . . . . . . . . . . . . . . . . 34
Settings menu . . . . . . . . . . . . . . . . . . . . . . . . . . . . . . . . . . . . . . . . . . . . . . . . . . . . . . . . . . .
colors. . . . . . . . . . . . . . . . . . . . . . . . . . . . . . . . . . . . . . . . . . . . . . . . . . . . . . . . . . . . . .
sound settings. . . . . . . . . . . . . . . . . . . . . . . . . . . . . . . . . . . . . . . . . . . . . . . . . . . . . . . . .
3D vehicle gallery . . . . . . . . . . . . . . . . . . . . . . . . . . . . . . . . . . . . . . . . . . . . . . . . . . . . . . . .
regional settings . . . . . . . . . . . . . . . . . . . . . . . . . . . . . . . . . . . . . . . . . . . . . . . . . . . . . . .
content . . . . . . . . . . . . . . . . . . . . . . . . . . . . . . . . . . . . . . . . . . . . . . . . . . . . . . . . . . . .
. . . . . . . . . . . 34
. . . . . . . . . . . . . . . 35
. . . . . . . . . . . . . 36
. . . . . . . . . . . 37
. . . . . . . . . . . . . 37
. . . . . . . . . . . . . . . 37
launch MOTONAV on your phone . . . . . . . . . . . . . . . . . . . . . . . . . . . . . . .38
from Contacts . . . . . . . . . . . . . . . . . . . . . . . . . . . . . . . . . . . . . . . . . . . . . . . . . . . . . . . . . . . . . . . . . . . . . . 38
from Messaging . . . . . . . . . . . . . . . . . . . . . . . . . . . . . . . . . . . . . . . . . . . . . . . . . . . . . . . . .
from Browser . . . . . . . . . . . . . . . . . . . . . . . . . . . . . . . . . . . . . . . . . . . . . . . . . . . . . . . . . . .
. . . . . . . . . . . 38
. . . . . . . . . . . 38
glossary
. . . . . . . . . . . . . . . . . . . . . . . . . . . . . . . . . . . . . . . . . . . . . . . . . . . . . . . . . . . . . . . . . . . . 39
2 MOTONAV Software User’s Guide
Page 5

get started
safety
first, a few rules to live by...
Using any device while driving may cause distraction. It is important to look at the display only when it
is safe to do so. If you are the driver of the vehicle, plan the route before your departure and stop if you
need to change the route.
Using a mobile device or accessory may be prohibited or restricted in certain areas. Always obey the
ws and regulations on the use of these products.
la
Do not place your MOTONAV where it obstructs the driver's vision or where it covers an airbag.
Note:
set it up
let’s get you up and moving
You can use your MOTONAV software in a car or on foot in either portrait or landscape mode— just
rotate the phone. And you don’t need to use a stylus—just tap the screen and map with your fingertips.
When using the software for the first tim
Note:
Step 1
This software is a navigation system that helps you find your way to your destination with the
built-in GPS receiver. The software does not transmit your GPS position. Other people can’t
track you.
e, it walks you through these easy steps:
The language for the software is automatically taken from the language settings of your
MOTONAV, so you don’t need to select the language.
Read the End User License Agreement, tap
Accept
, and then tap
Next
.
3 get started MOTONAV Software User’s Guide
Page 6
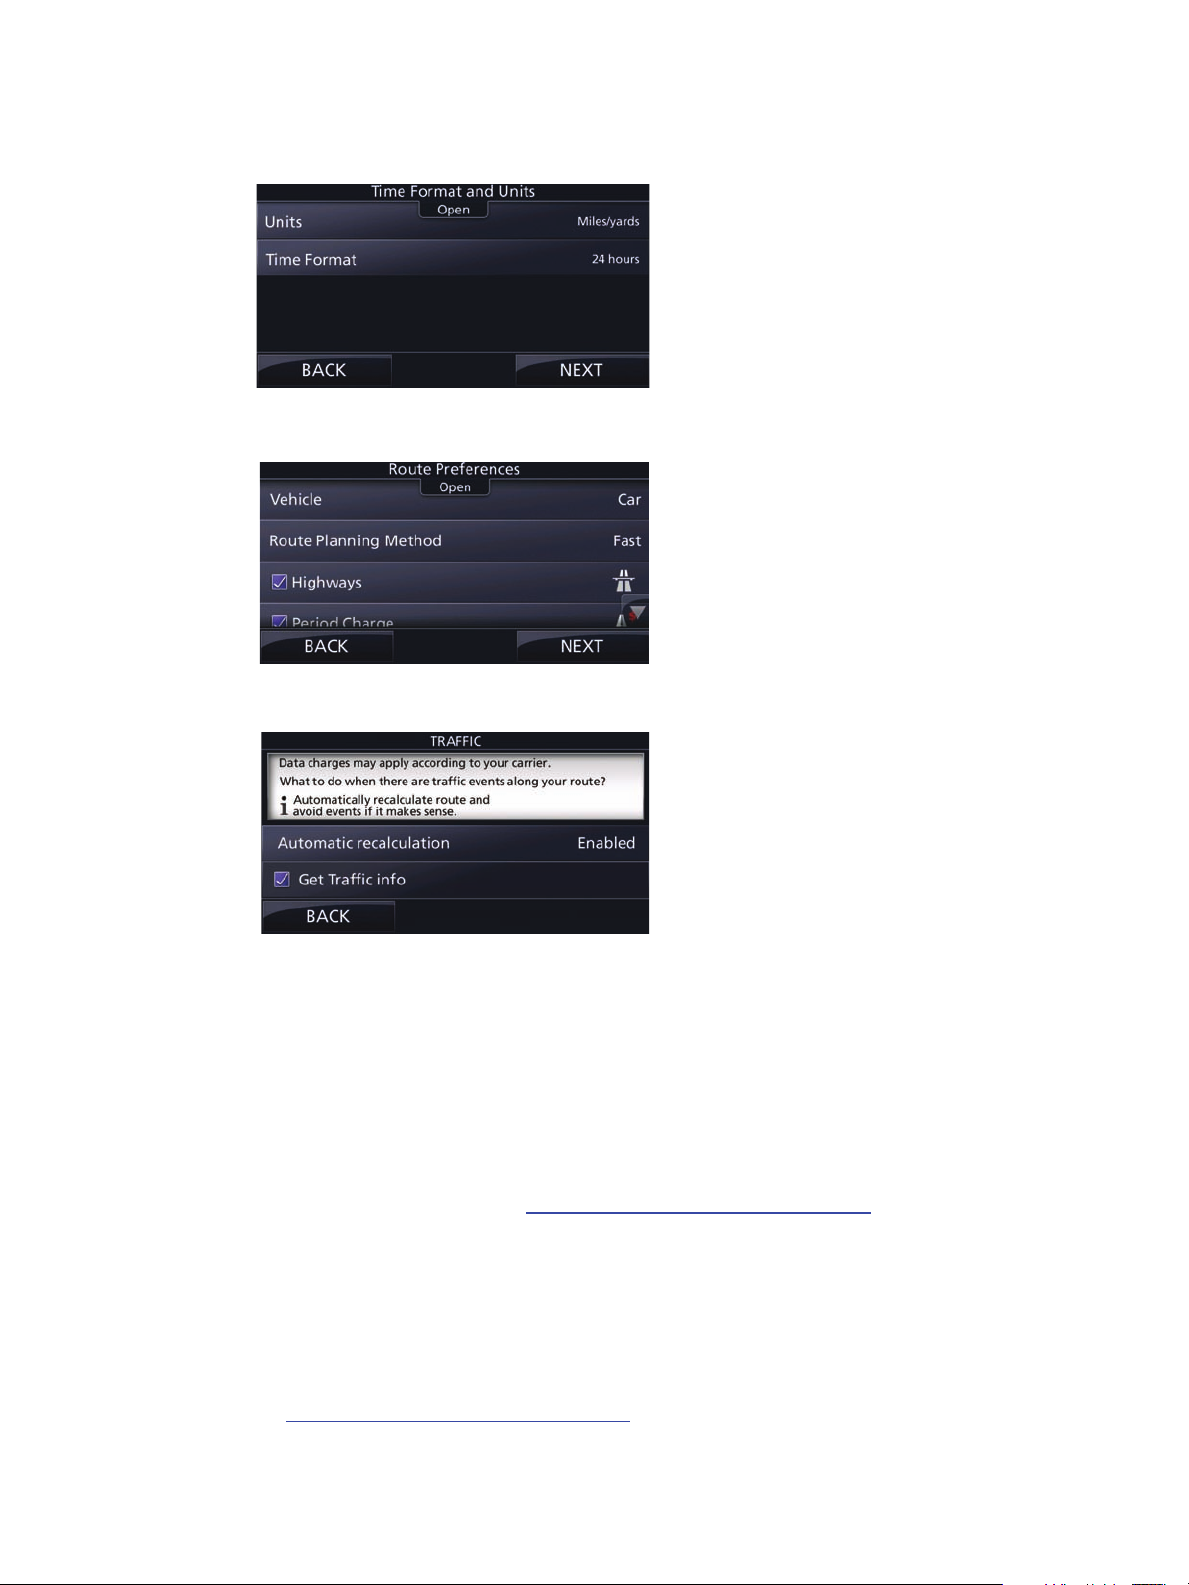
Step 2
Optionally modify the time format and unit settings. (To change them later, see page 34.)
Step 3
Step 4
Optionally modify the default route planning options. (To change them later, see page 34).
Optionally modify settings for receiving Traffic information. (To change them later, see page 31).
The initial setup is complete. If you need to run the configuration wizard again, see page 34.
Step 5
Step 6
Step 7
Tap
Finish
.
If your navigation software is not activated yet, tap
Tap through the information you might see for these optional features:
• Premium Features
after which some functionality is disabled (such as Turn-By-Turn guided navigation and Traffic).To
activate premium service, go to:
select the option to activate now, then enter
•MotoExtras
landmarks, POIs, etc.), backup and restore content, see Frequently Asked Questions,
troubleshoot known issues, and much more.
•Toolbox
your phone and to backup and restore content. Download this tool and its user’s guide for free
www.motorola.com/motoextras/mobile.
from
—Use this web portal to activate your license, buy additional content (maps, 3D
—This computer tool is required for transferring purchased content from MotoExtras to
—Your MOTONAV application might be configured for a 60-day trial period,
www.motorola.com/motoextras/mobile. After you register,
the code that is sent to your phone.
Activate Now
, or activate it later.
4 get started MOTONAV Software User’s Guide
Page 7
look around
find your way around the display
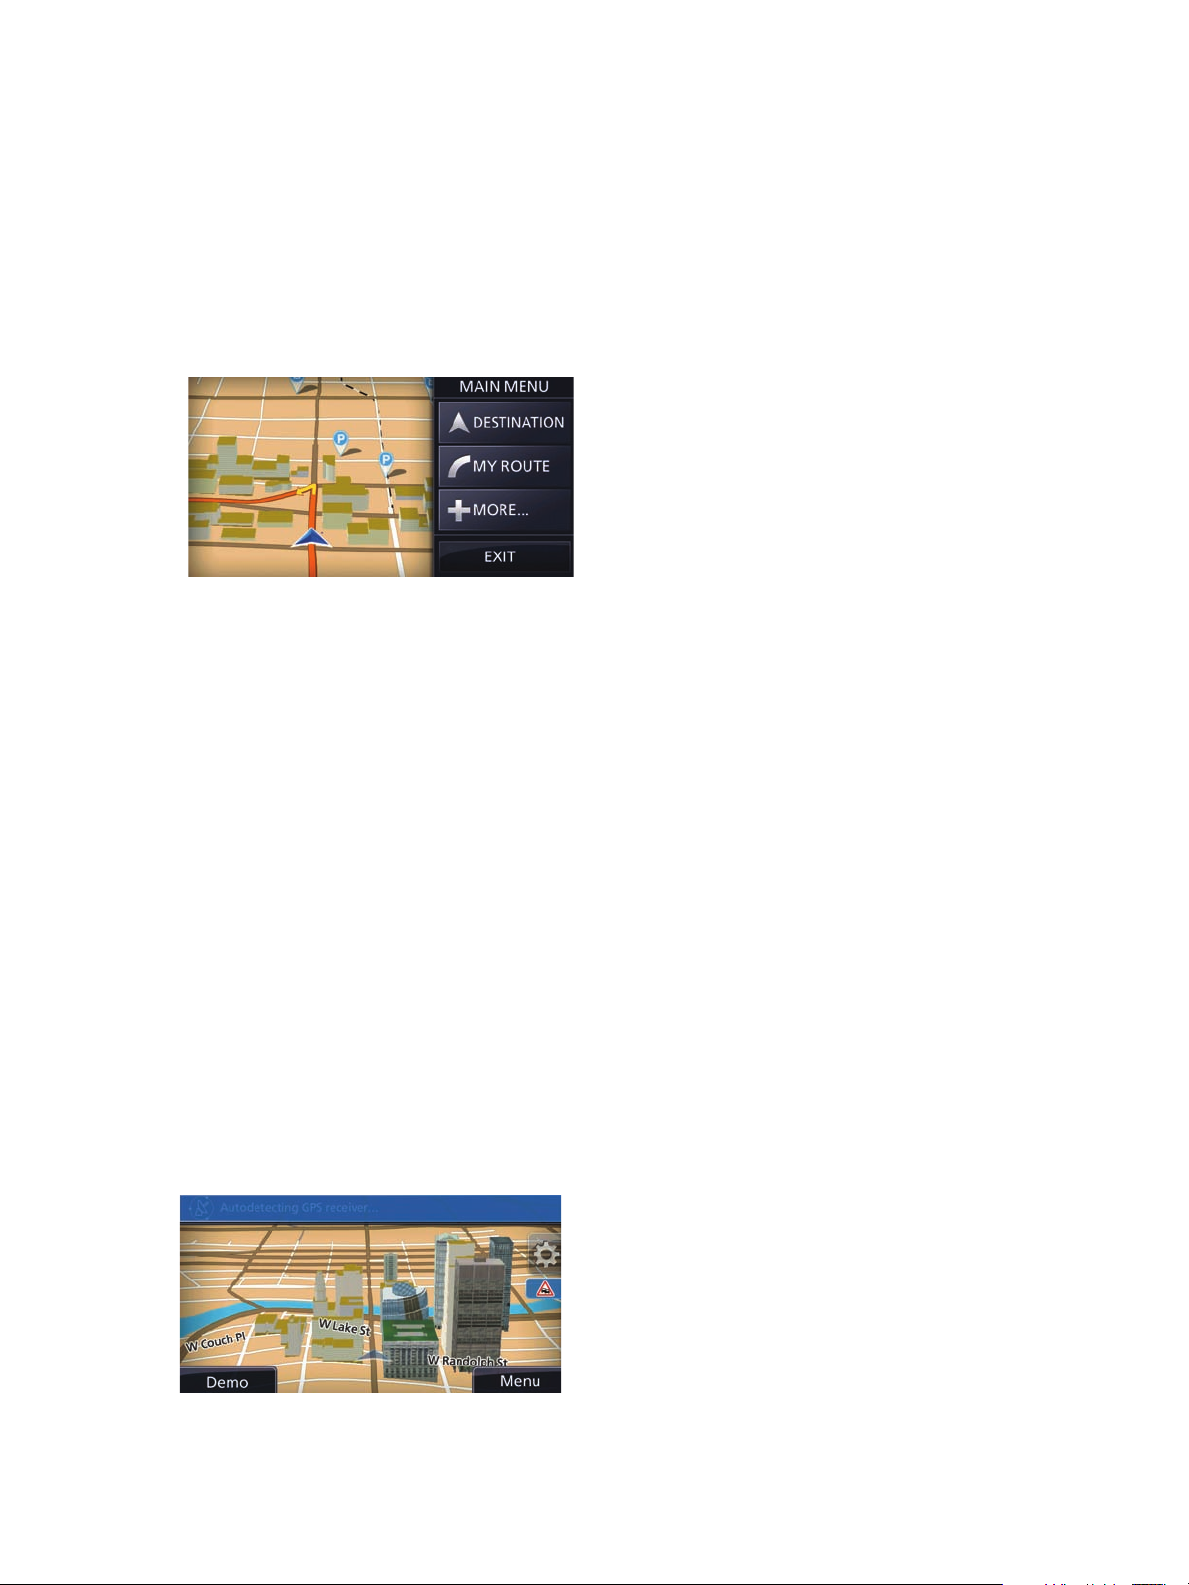
After setup, the navigation menu appears.
navigation menu
The navigation menu is your main menu and home screen all in one.
From the navigation menu, you can:
•
Tap
DESTINATION
a location on the map or one of your Favorite destinations. You can also look up your recent
destinations from the Smart History.
to select your destination by entering an address or selecting a place of interest,
•
Tap
MY ROUTE
also cancel your route, pick route alternatives, simulate navigation, or add the destination to your
Favorites.
•
Tap
MORE
•
Tap the map to switch to a full screen map. A button shows a miniature live map that with your
current position (if a GPS signal is available), the recommended route, and the surrounding map
area. Tap the button to enlarge the map to the full screen.
•
Tap
EXIT
to display the route parameters and the route in its full length on the map. You can
to customize your MOTONAV software.
to stop navigation and exit the software.
live map
The left side of the navigation menu is a live map. Tap it to enlarge the map to the full screen.
When there is no GPS position, the Vehimarker (vehicl
last known position:
e marker) is transparent. The map shows your
5 get started MOTONAV Software User’s Guide
Page 8
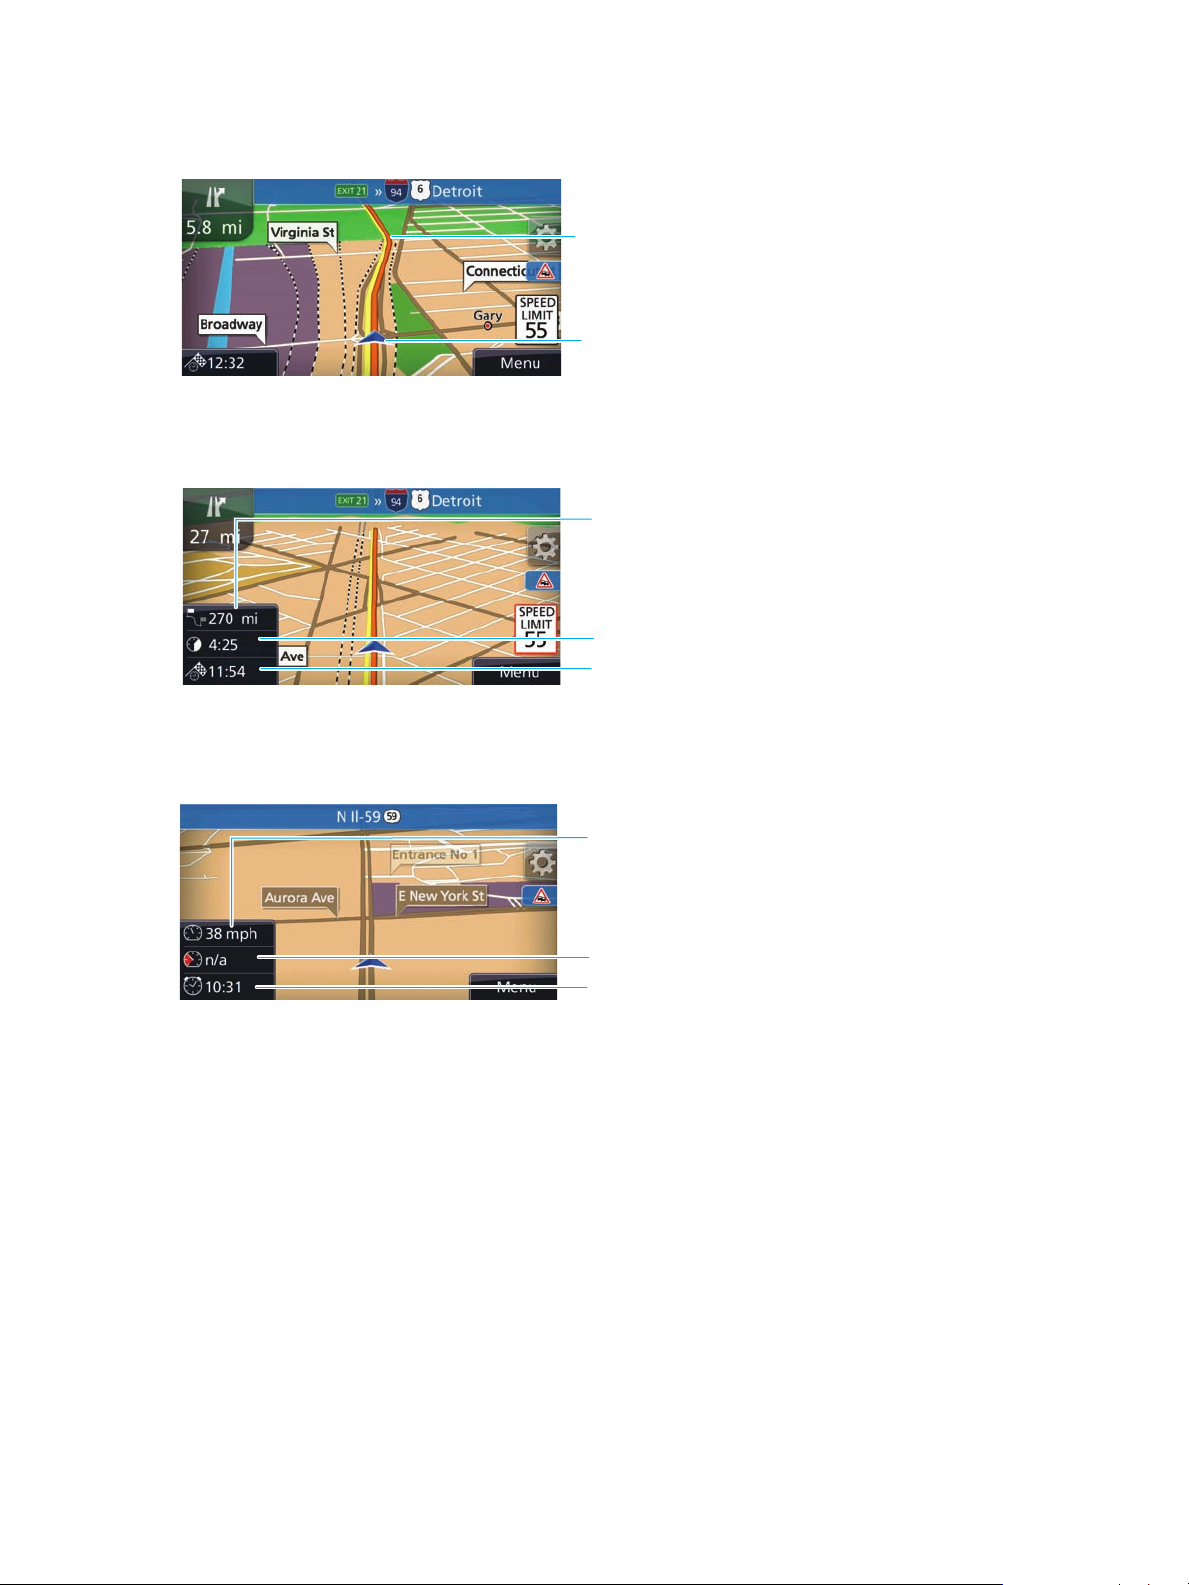
When GPS position is available, the Vehimarker appears in color and shows your current position:
Distance Left to Travel
on your Route
Estimated Remaining Tr ip T ime
(including traffic delays, if known)
Estimated Time of Arrival
(including traffic delays, if known)
Your Current Speed
Speed Limit for Current Road
(if available)
Current Time
(in your time zone)
Recommended route:
orange line
Vehimarker:
blue arrow,
your current position
Live map when cruising without a destination:
Live map when navigating a route:
6 get started MOTONAV Software User’s Guide
Page 9
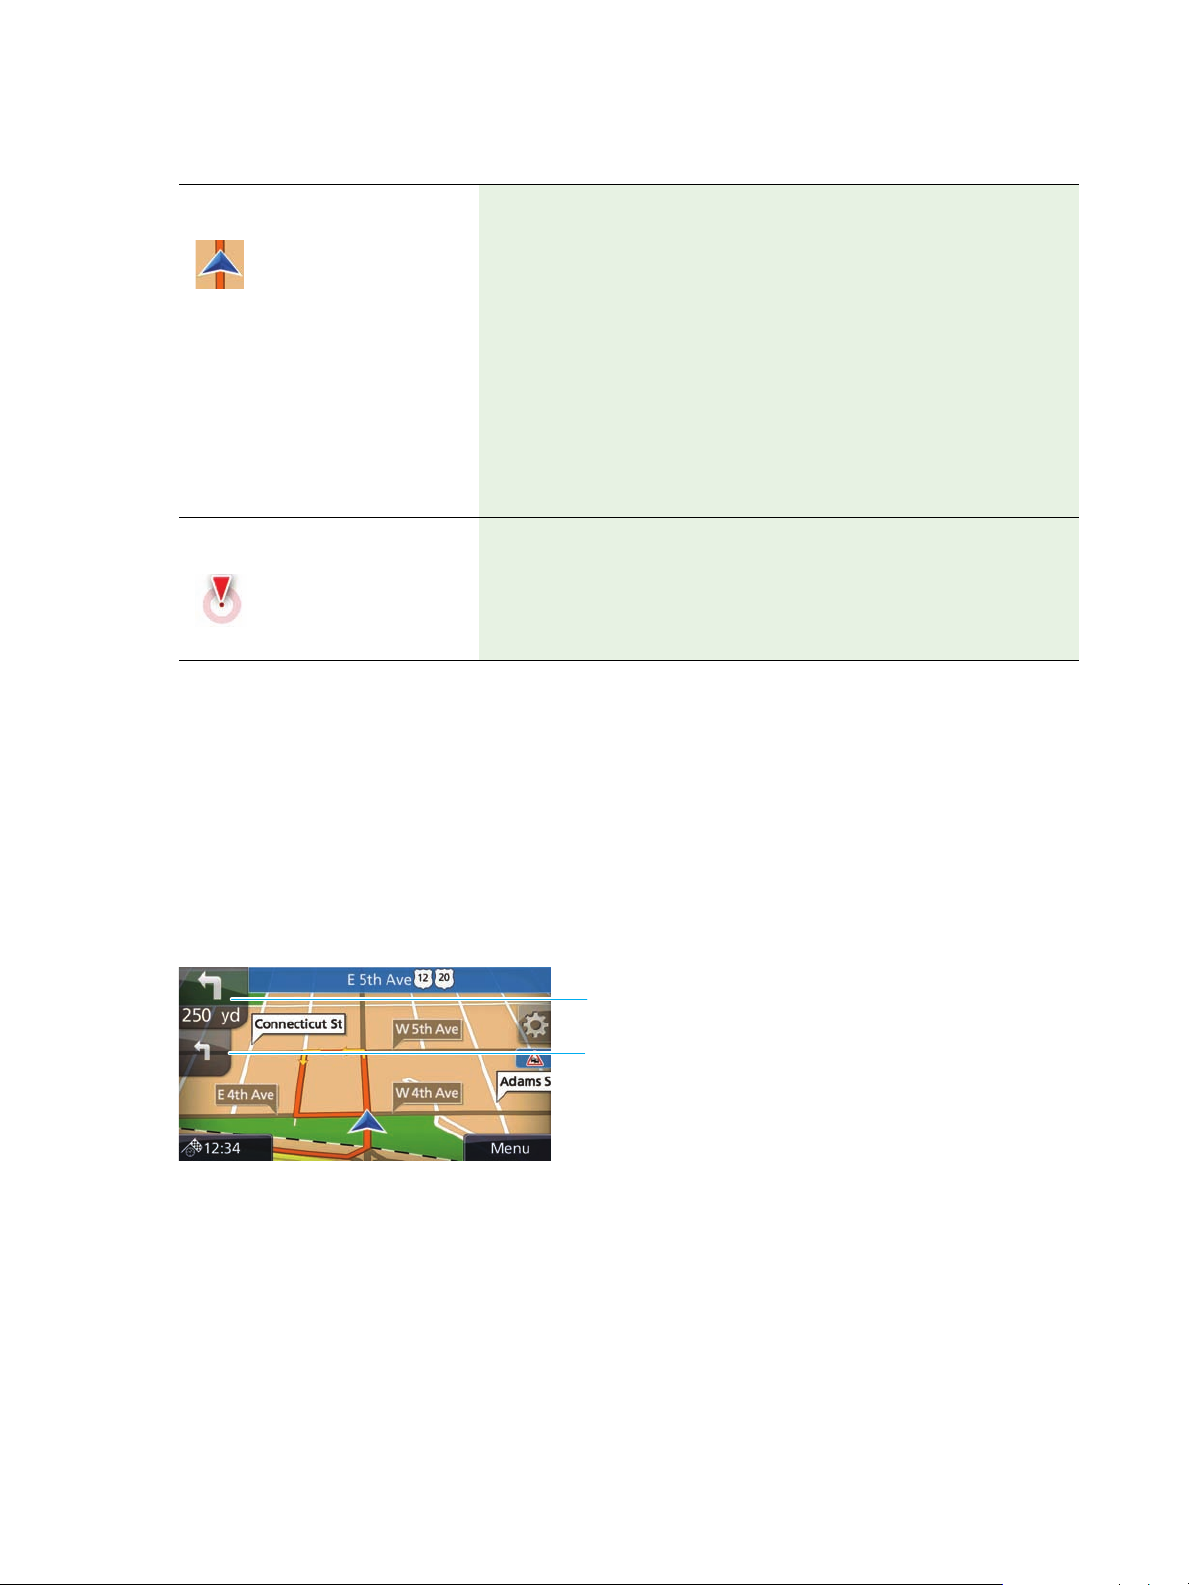
position markers on the map
Next Maneuver
on Your Route
Second Next
Maneuver on
Your Route
(if near the first)
Vehimarke r
When your GPS position is available, the Vehimarker shows your
current position as a blue arrow. (To choose a different icon, see
page 34).
The exact location of the Vehimarker depends on the vehicle type
ou choose (see page 34):
y
• Pedestrian
—The Vehimarker is at your exact GPS position.
The direction of the icon shows your current heading.
• Vehicle
—The Vehimarker may not show your exact GPS
position and heading. If you are near a road, the marker
appears on it, aligned in the direction of the road.
cursor (for Find on Map)
When you select a location on the map in Find on Map (page 20),
the cursor appears at the selected point on the map. You can use
he cursor as a destination.
t
other map features
streets & roads
Your display shows streets similar to how paper road maps show them. Width and color correspond to
their importance, so you can easily tell a highway from a small street.
next maneuver
When navigating a route, your map shows information about the next route maneuver and the next
street or the next city/town.
7 get started MOTONAV Software User’s Guide
Page 10
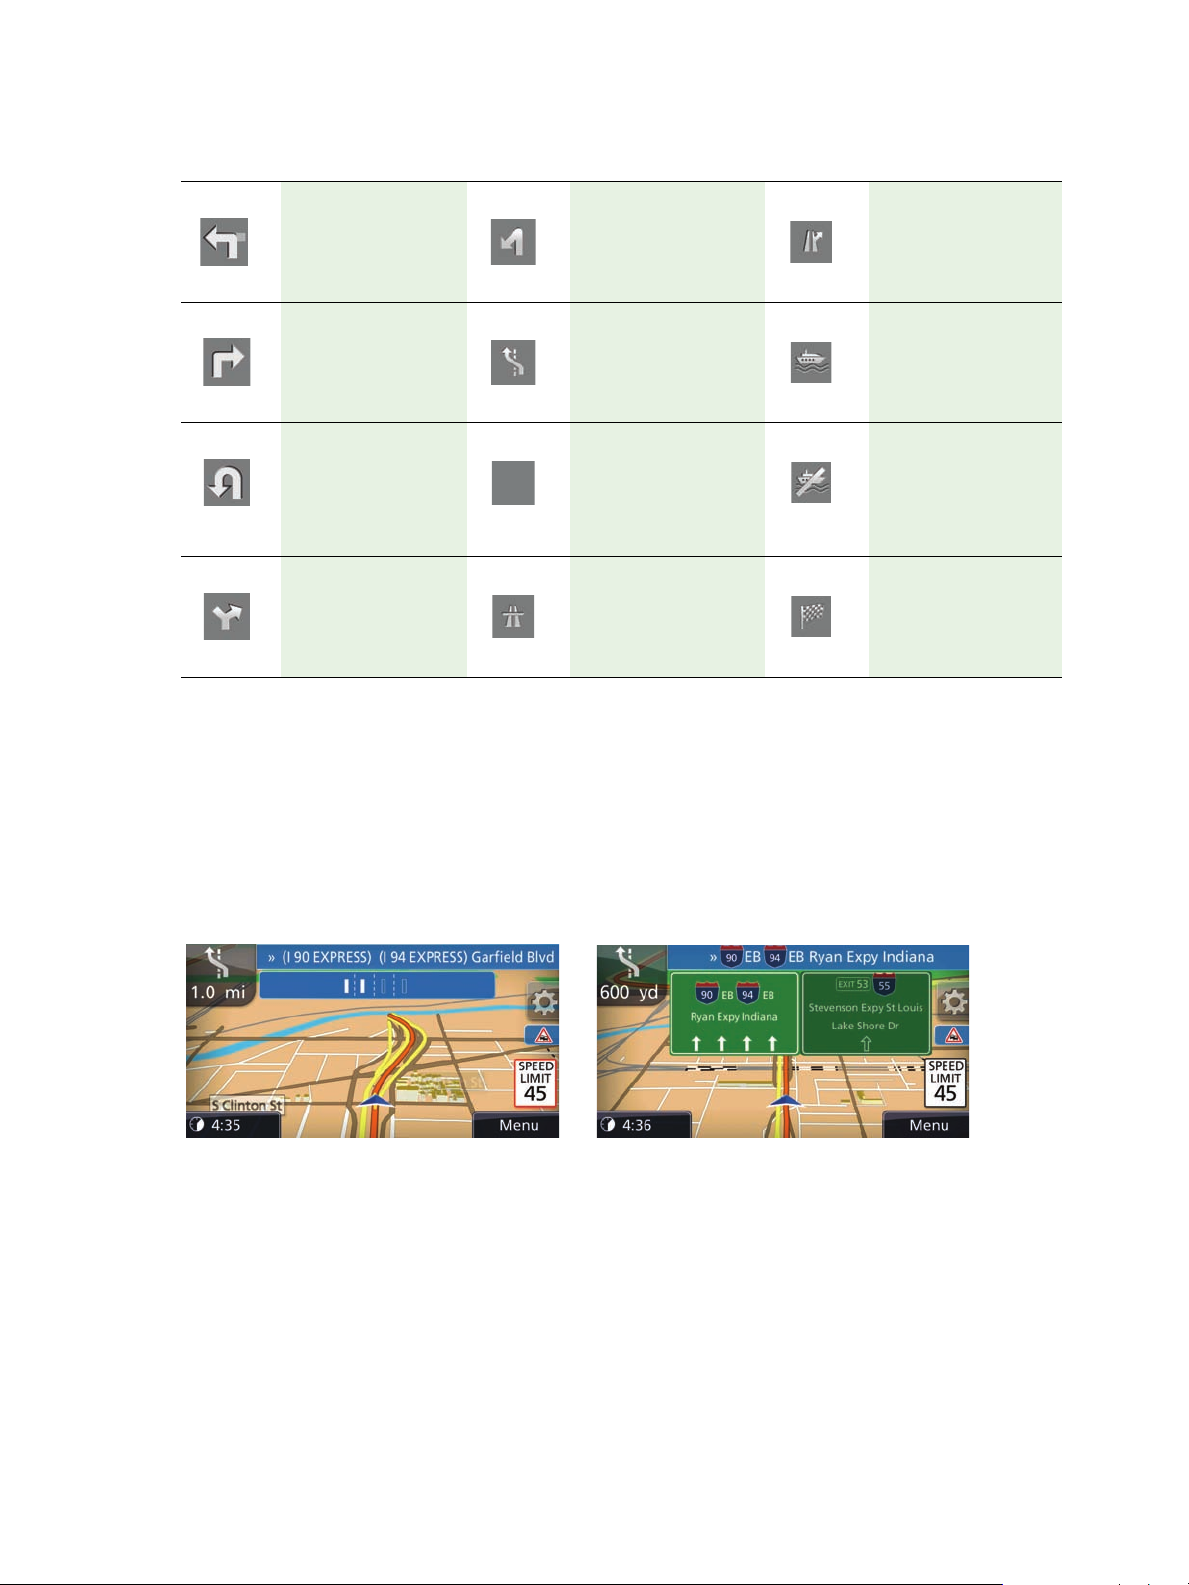
You may also see any of these icons:
Tur n l e ft. Sharp turn left. Exit highway.
Turn right. Keep left. Board ferry.
Tur n ba c k . Continue straight
through
intersection.
Bear right. Enter highway. Approach
lanes & signs
On multilane roads, sometimes you need to be in the correct lane in order to follow the recommended
route. If lane information is available, your MOTONAV software displays the lanes and their directions
using small arrows at the bottom of the map. Highlighted arrows represent the lanes you need to take.
When information is available, you may see road signs instead of arrows. When cruising (not in a route),
the signs are the same brightness. When in a route, your road sign is brighter than the others.
all
Leave ferry.
destination.
8 get started MOTONAV Software User’s Guide
Page 11
3D object types
Your software supports these 3D object types:
3D terrain
Elevated roads
3D landmarks
3D buildings
3D terrain maps shows changes in terrain, elevations, or depressions in
the land when you view a 2D map or plot a route in 3D. 3D maps show
hills and mountains in the background;, 2D maps show them in color
and shading.
Complicated intersections, overpasses, and bridges appear in 3D.
Landmarks are 3D artistic or block representations of prominent or
well-known sights.
3D landmarks may not be part of the original software or may need
ctivation. They are only available in selected cities and countries. Visit
a
www.motorola.com/motoextras/mobile for details.
You may be able to see block representation of full 3D city building data
containing actual building size and position on the map.
Building data is not part of the origina
city centers of major cities. Visit
for details.
l software, and it is limited to the
www.motorola.com/motoextras/mobile
active route map
When in a route, your map shows these elements:
• Current GPS position & start point
vehicle mode). If GPS position is available, the route starts from the current position. If not, your
software uses your last known position as the start point.
• Destination
•Map color
gray. (The software may still move the Vehimarker to show a possible but not confirmed position.)
• Route color
• Streets & road types normally excluded from your route
certain road types (see page 27). However, when your route cannot a
shows them in a different color from your route color.
• Streets & roads with traffic events
color. Small symbols along the route show the type of the traffic event.
—The end point of the route.
—The map is vivid and colorful when GPS position is available. If not, the map is appears
—The route always stands out on the map, in both daytime and night color modes.
—Your current position on the map (in either pedestrian or
—You can choose whether to avoid
void them, it includes them but
—When a road has a traffic event, it appears in an alternate
9 get started MOTONAV Software User’s Guide
Page 12
traffic events
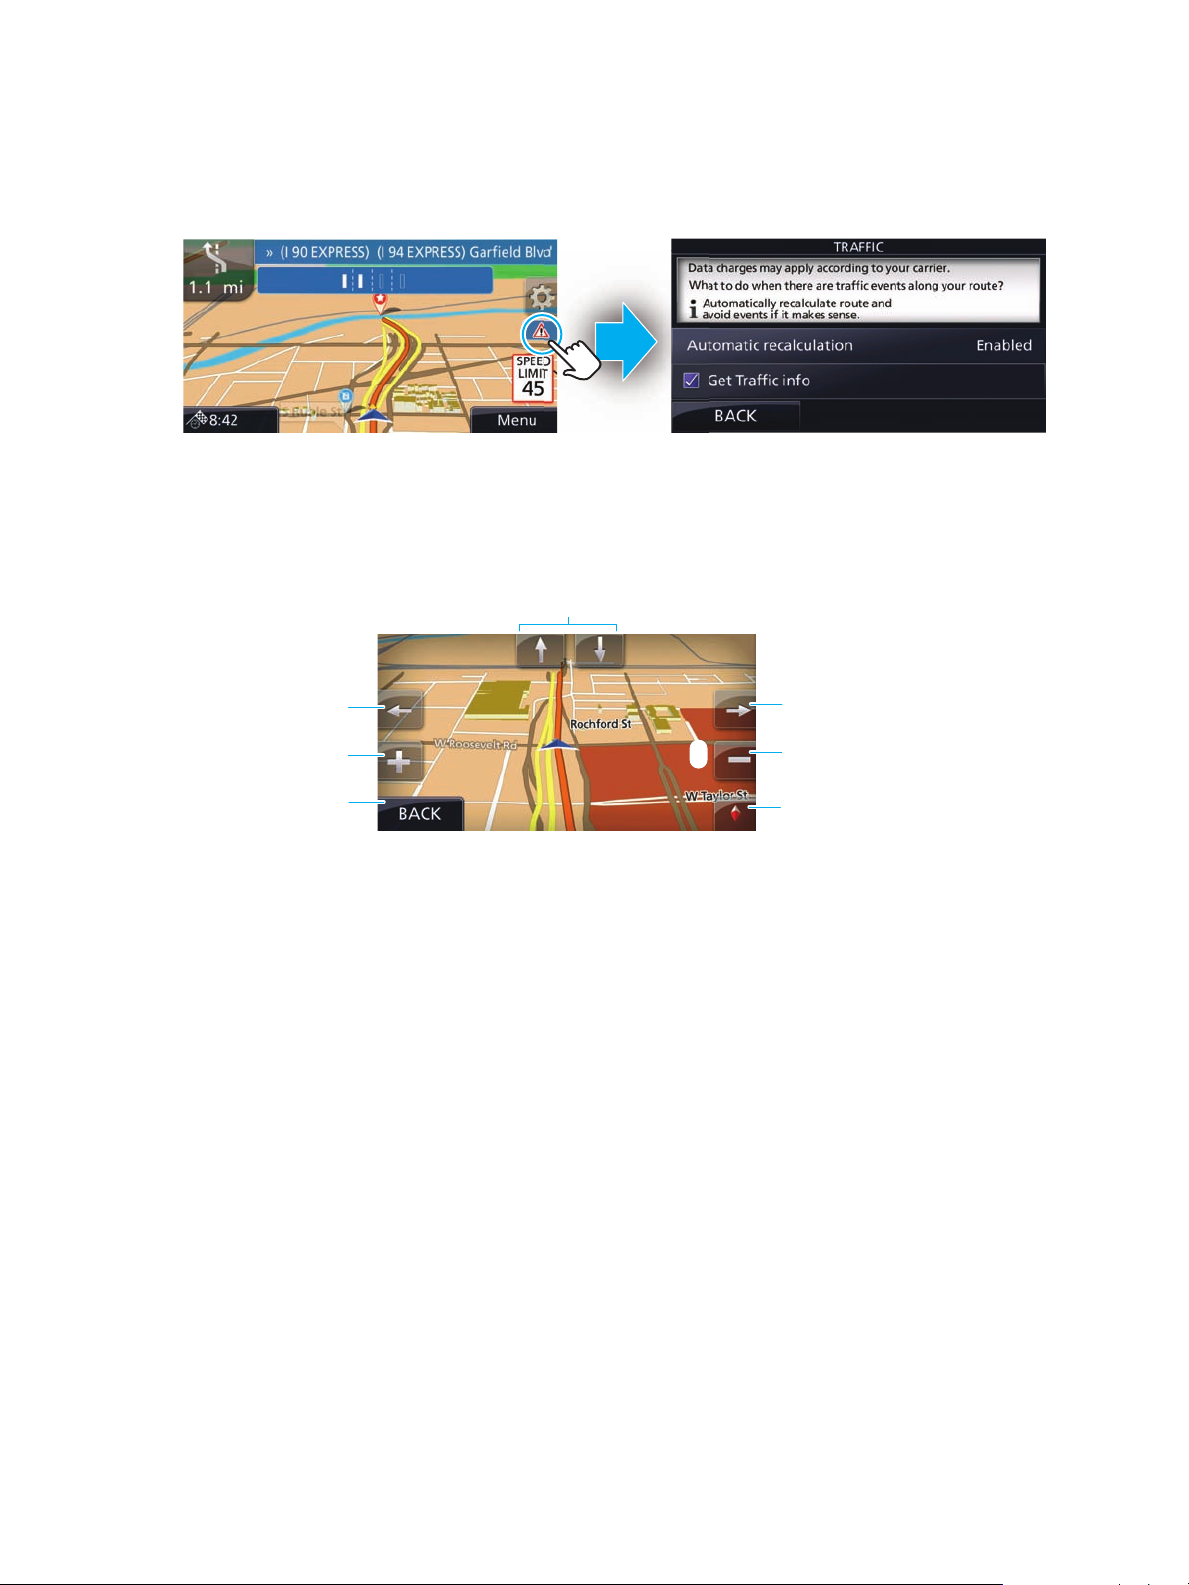
Rotate right.
Rotate left.
Tilt view up or down in 3D mode.
Zoom in.
Zoom out.
Tap for compass mode.
(The top of the map
always points north.)
Return to normal view
and clear any view
settings you modified.
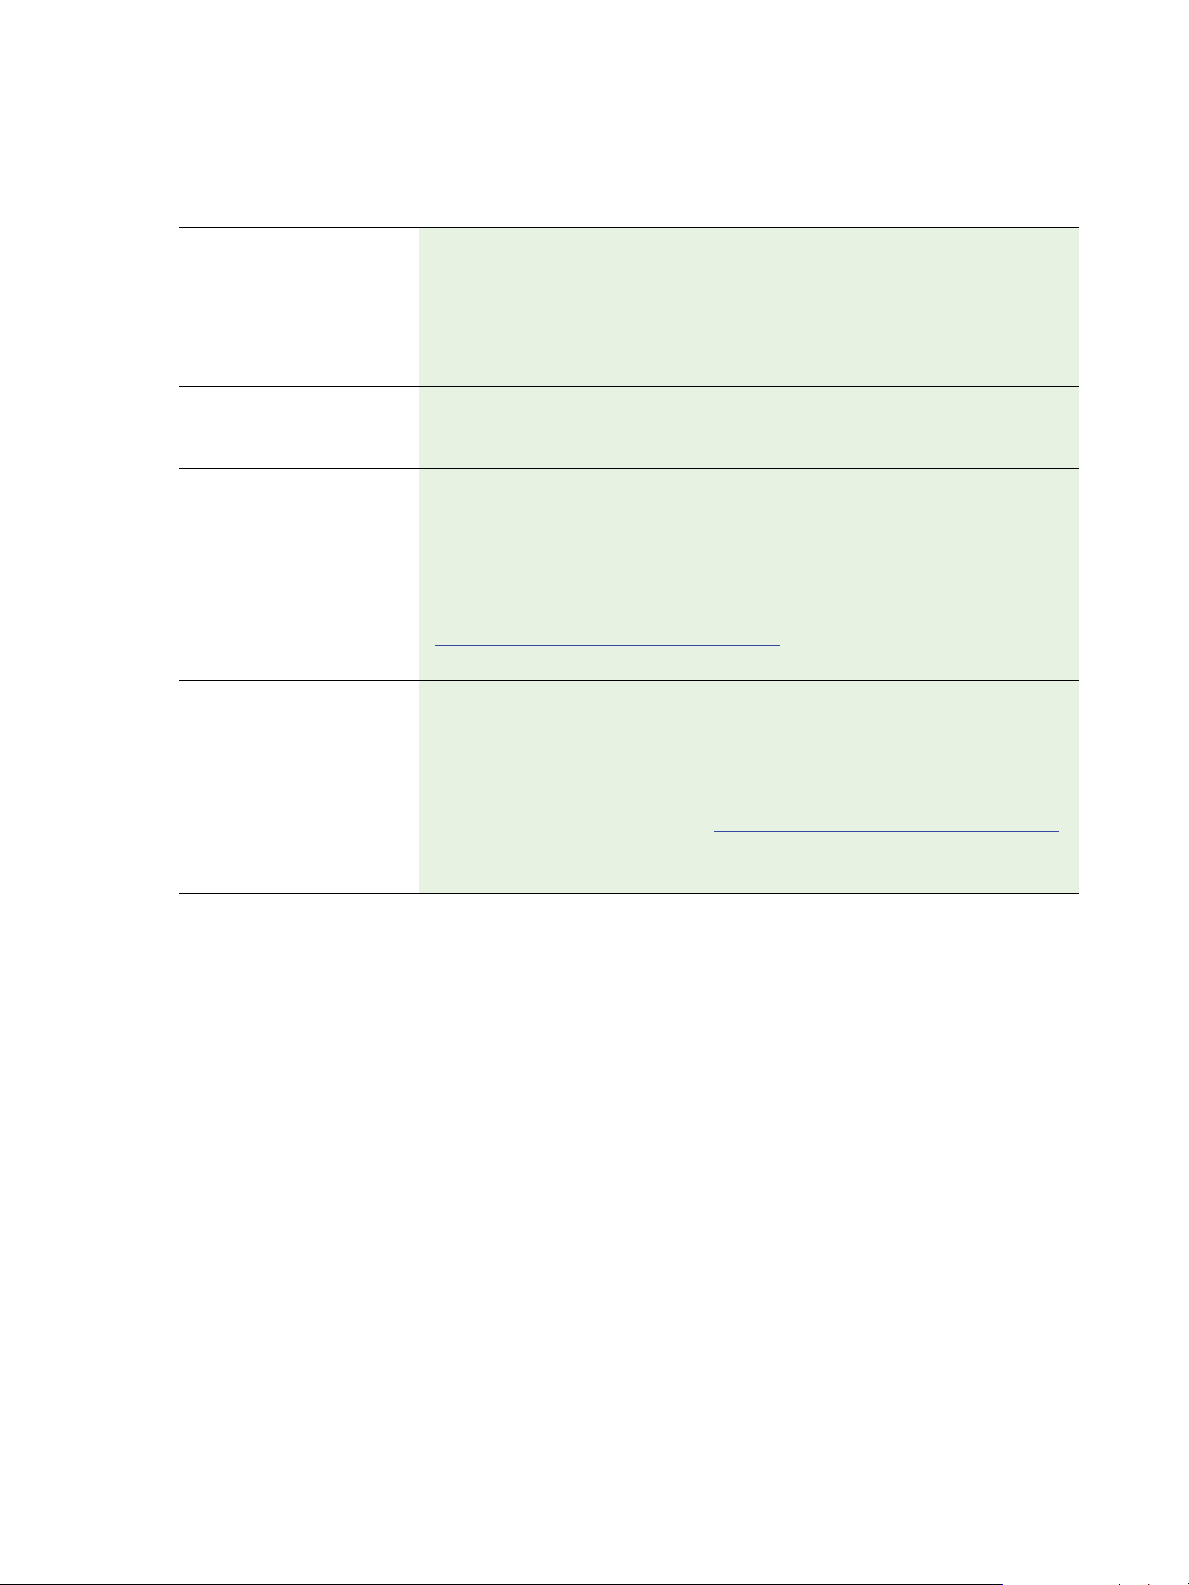
When a road has a traffic event, tap the warning icon to see details:
manipulating the map view
To browse the map during navigation, tap anywhere on it. The map stops following your current
position, and you see these control buttons:
10 get started MOTONAV Software User’s Guide
Tip:
Tap once to modify the view in steps, or tap and hold to modify it continuously and smoothly.
Page 13
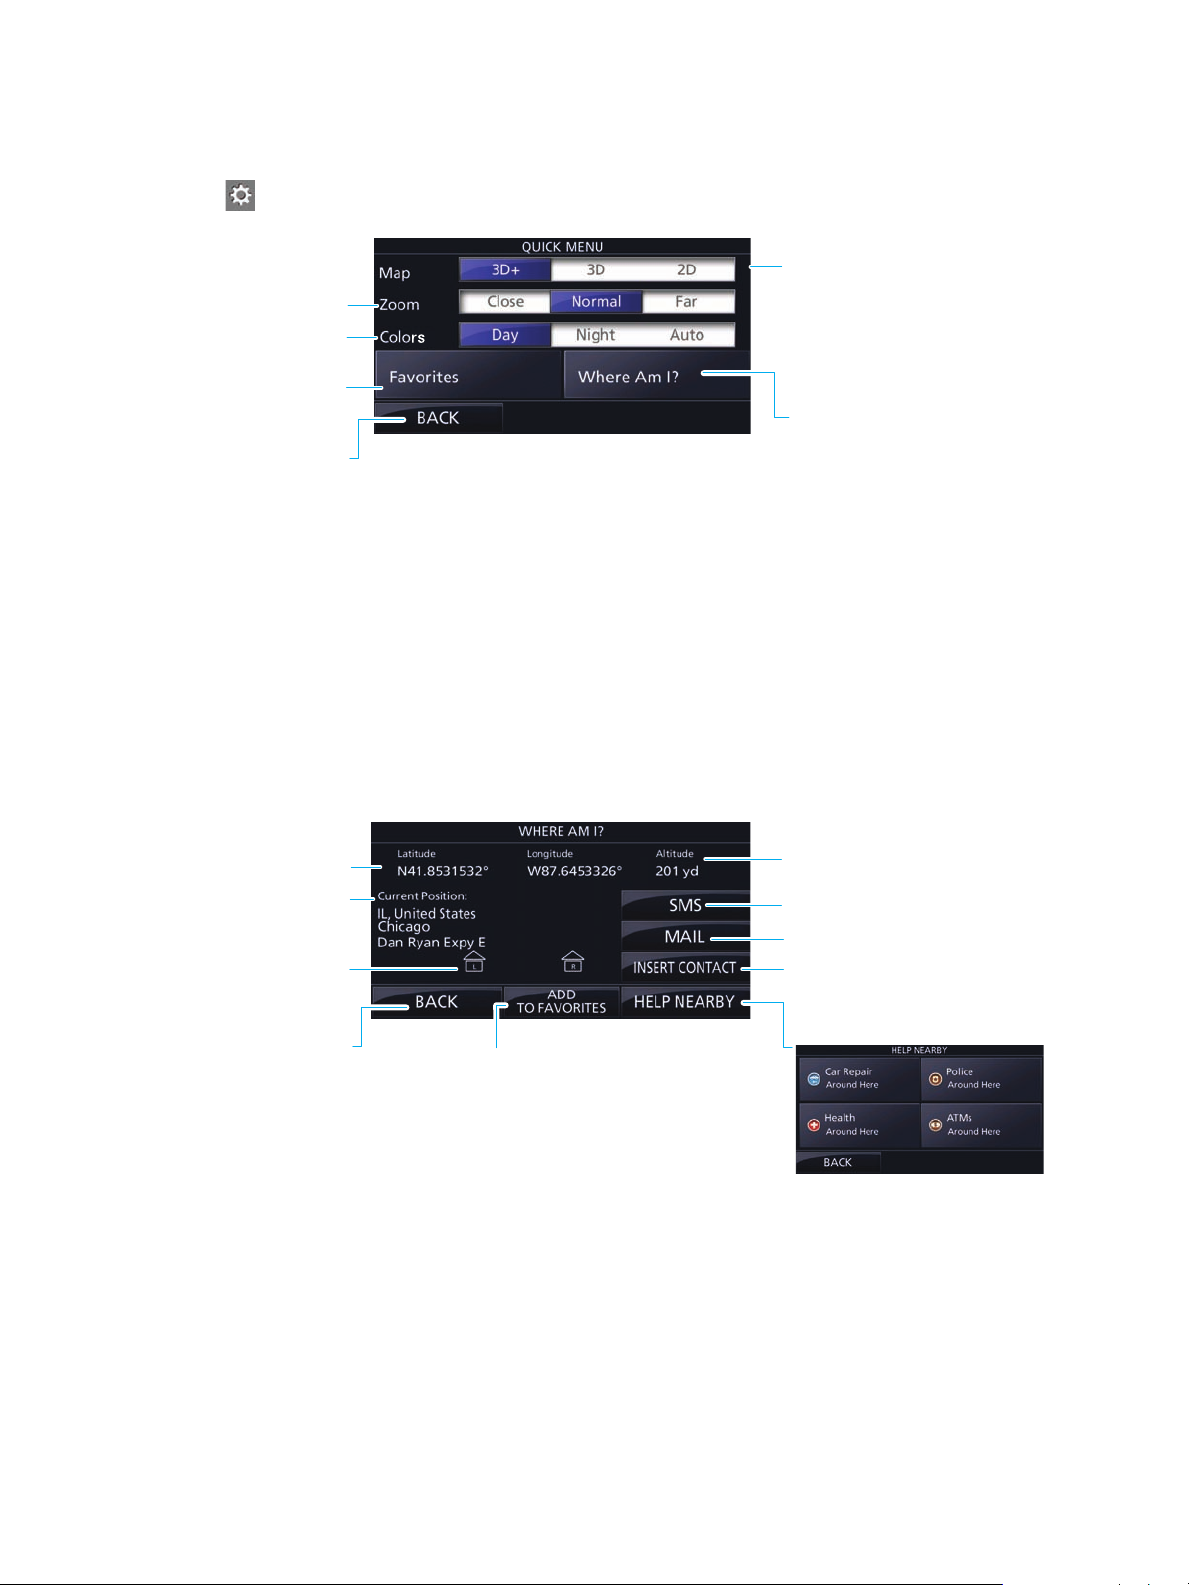
Quick menu
Select:
3D+ for 3D perspective with
buildings (when available),
3D (without buildings), or
2D (view from above)
Select a level of
magnification.
View your current position and
search for nearby emergency or
roadside assistance.
Return to the map.
Select brightness or
automatic adjustment.
View your saved
frequent destinations .
Your Approximate Altitude
Your Current Position
(in WGS84 format)
Return to the map.
House numbers on
Your Left & Right
Address of Your Current Position
(when available)
Save current address
to your Favorites.
Send your current position as a text message.
Send your current position as an email.
Save your current position as
a contact’s addresss.
Tap to find nearby car
repair or emergency
medical services,
police stations, or
cash machines.
Tap on the map for these Quick menu settings:
Note:
To control volume, use the Master Volume key on your device. The volume key overrides all
volume settings. The loudness of your software is independent of your device settings. When
you exit the program, the device default settings return. Use the device key to mute all sounds
of the device and then to re-enable them again. The switch to mute may not be available in
every device.
Where Am I? menu & current location
When you need to know your location quickly, such as in an emergency, use the Where Am I? menu. To
find it, open the Quick menu and tap
Where Am I?
select a destination from the list to navigate to it.
Tap any part of the screen for more information, or
11 get started MOTONAV Software User’s Guide
Page 14

navigate
Set your destination, then start navigating immediately.
Note:
You can also plan a route separate from your current position without using GPS reception.
(First, turn off the GPS receiver and set a new starting point. See page 23).
enter your destination
you’ve got places to go and people to see...
You have many options for entering a destination.
enter an address or part of an address
The quickest way to navigate is to enter an address, including a house number.
Step 1
Step 2
Step 3
From the Map screen, tap
From the Navigation menu, tap
The MOTONAV software lists the country, state, and city where you are.
To change countries, tap the name of the country, enter the first few letters of the country
name on the keyboard, and select a different one from the list. If you select a new country, you
also need to select the state to search for an address.
MENU
.
DESTINATION
then
FIND ADDRESS
.
Step 4
To change the state, tap the button with the name of the state, enter the first few letters of the
state name, and select a different state from the list.
12 navigate MOTONAV Software User’s Guide
Page 15

Step 5
a
<City Name>
b
c
d
To select a new city/town:
Tap the button with the name of the city/town, or if you have changed the country/state, tap
.
Use the keyboard to start entering the name of the city/town.
The most likely city/town name is always shown in the input field.
To accept it, tap OK.
If you don’t see the city name, tap
List
and select the city/town from the list.
Step 5
a
b
c
Step 4
a
b
Enter the street name:
Tap
<Street Name>
Start entering the street name on the keyboard.
The most likely street name is always shown in the input field. To accept it, tap OK.
If you don’t see the street name, tap
Enter the house number:
Tap
<House Number>
Use the keyboard to enter the house number on the keyboard. (To enter letters, tap
.
List
and select the street from the list.
.
ALT
).
c
Tap OK to continue entering the street address. (If MOTONAV can’t find the house number, it
selects the midpoint of the street as your destination.)
Note:
In the rare event that a long, long road has house numbering that restarts, a house
number can appear twice. If this is the case, a list appears after entering the house number, and
you can select the correct address.
13 navigate MOTONAV Software User’s Guide
Page 16

Step 4
When the full screen map appears with the selected point in the middle, tap
BACK
to select a different destination.
ROUTE TO
, or tap
Step 5
Tip:
Step 6
Tap
MORE OPTIONS
If you know you’ll be visiting this location often, you can tap
ADD DESTINATION TO FAVORITES
Tap
Go!
to start your trip.
or
Route Settings
to modify route parameters.
.
MORE OPTIONS
, then tap
choose the midpoint of a street
When you don’t know the street number, you can navigate to the midpoint of the street.
After you select a street, instead of enteri
ng the house number, tap
SELECT STREET
.
choose an intersection
Sometimes you just want to get to an intersection.
Search for one of the street names. After you sel
<Intersecting Street>
intersecting street names.
. Then start entering the second street name to see a list of suggested
14 navigate MOTONAV Software User’s Guide
ect it, instead of entering the house number, tap
Page 17

get to a city center
The city or town center is not the exact center of an area. In towns, it is usually the most important
intersection. In larger cities, it is one of the important intersections.
After you select a city, instead of searching for a street address, tap
SELECT CITY
.
use a postal code
Sometimes it’s easiest to enter the postal code of the city you want, especially when you’re searching
for a common street name that might appear in several different areas of a city.
Step 1
Step 2
Step 3
After you select the state, tap
Tap
ALT
to open the numeric keypad and enter the postal code.
The most likely postal code appears in the input field.
To accept it, tap OK.
<City Name>
.
Step 4
If you don’t see the postal code, tap
List
and select it from the list.
15 navigate MOTONAV Software User’s Guide
Page 18

tips for entering addresses quickly
a few hints to make you a pro
entering the name of a city/town or a street:
•
The keyboard allows you to type only letters that appear in possible search results. All other
characters are grayed out.
•
As you type, the most likely result always appear in the input field. When you see the correct result,
OK
tap
•
After you enter a couple of letters, tap
finding an intersection:
•
Search first for the street with a less common name because you can type fewer letters to find it.
•
Search for the shorter street first because it will have fewer intersecting streets to choose from.
•
You can search for the name of a road and the kind of road it is at the same time. For example,
typing “PI A” helps you find Pine Avenue and skips Pine Street and Pickle Road.
to select.
LIST
to see the items with those letters.
go to points-of-interest (POIs)
go to a specific site or just meander
select a point-of-interest by using quick search
Step 1
Step 2
Note:
Step 3
From the Map screen, tap
From the Navigation menu, tap
If you are in an active route, the MOTONAV software searches for places along the route. If you
are not in a route (destination is not selected), the MOTONAV software searches for places near
your current position. If your current position is not available either (no GPS signal), it searches
for places near your last known position.
Tap a quick search category for a list of suggestions.
MENU
.
DESTINATION
, then
FIND PLACES
.
16 navigate MOTONAV Software User’s Guide
Page 19

The places appear in order of their distance from the current position, from the destination, or
by the length of the necessary detour.
Note:
If a phone number is available, you can tap
You need to restart the software after the call.
Call
. Navigation exits if you call the location.
Step 4
Tap
SELECT
planning your route.
to choose the displayed Place of Interest as the destination and to continue
choose a POI by name
You can search for Places of Interest by names.
Step 1
Step 2
When searching for a POI, tap
Select an area to search.
OTHER PLACES
.
The result list is ordered by proximity.
Note:
Searching along a route useful when you search for a later stopover that results in a
minimal detour only, such as searching for upcoming gas stations or restaurants.
Step 3
Step 4
Tap
Find by Name
Use the keyboard to enter the name of the place, then tap the place name to begin planning a
route to it.
.
17 navigate MOTONAV Software User’s Guide
Page 20

choose a POI by category
You can search for POIs by their categories and subcategories.
Step 1
Step 2
When searching for a POI, tap
Select an area to search.
The result list is ordered b
y proximity.
OTHER PLACES
.
Step 3
Step 4
Note:
Searching along a route useful when you search for a later stopover that results in a
minimal detour only, such as searching for upcoming gas stations or restaurants.
Tap
Find by Category
Tap a category.
.
18 navigate MOTONAV Software User’s Guide
Page 21

Step 5
Tap a subcategory.
Step 6
Tap the place name to begin planning a route to it.
get assistance from Where Am I?
emergency cash or just plain emergency...get help quickly
Step 1
Step 2
Tap on the map for the Quick menu.
Tap
HELP NEARBY
.
Step 3
Step 4
Tap a category to see a list of locations.
Then, tap a location to start planning your route.
19 navigate MOTONAV Software User’s Guide
Page 22

use the map to pick a location
Tap the map to add
your own
destination marker:
easier than Lewis & Clark had it
Step 1
Step 2
Step 3
Step 4
From the Map screen, tap
From the Navigation menu, tap
Tap the map to add a cursor.
Tap
ROUTE TO
to begin planning your route using the cursor as your destination.
go to a favorite place
we all have our favorites
You can select a location that you have already saved as a favorite to be your destination. To add a
favorite, see page 28.
MENU
.
DESTINATION
then
FIND ON MAP
.
Step 1
Note:
A list of your saved favorite locations appears.
Step 2
Tip:
Tap on the map for the Quick menu.
If you’re on the navigation menu, tap
Tap a location to start planning your route.
When you’re planning a route, you can tap
FAVORITES
to save a destination.
DESTINATION
MORE OPTIONS
, then tap
, then tap
FAVORITE S
ADD DESTINATION TO
.
20 navigate MOTONAV Software User’s Guide
Page 23

select the most likely destination (Smart History)
now, that’s clever
Your previous destinations are saved in your history. Smart History shows one recent location based on
your navigation habits, using parameters like the current time of day, the day of week, and the current
location. The more you use the navigation software, the better it can guess your desired destination.
Step 1
Step 2
Step 3
From the Map screen, tap
From the Navigation menu, tap
Tap the Smart History destination to begin planning your route to it.
MENU
.
DESTINATION
.
select a destination from your history
been there, done that
Your previous destinations are saved in your history.
Step 1
Step 2
From the Map screen, tap
From the Navigation menu, tap
previous destinations.
MENU
.
DESTINATION
, then tap
SHOW ALL
to see a list of your
Step 3
Tap a destination to begin planning your route to it.
21 navigate MOTONAV Software User’s Guide
Page 24

get an overview of your route or check route settings
Return to the
navigation menu.
Delete the active route.
Change settings.
Zoom in or out.
See more options.
see the big picture
Step 1
Step 2
The map shows:
From the Map screen, tap
Tap
MY ROUTE
•
entire active route
•
name or address of the destination (at the top of the screen)
•
warning icons (if any), such as about unpaved roads or toll roads
•
route planning method (such as, Fast).
to see your entire active route on the map.
MENU
.
modify your route
•
symbol of the vehicle type used for route calculation
•
total length of the route
•
total time of the route
change of plans?
Even if you’re already in an active route, you can change your destination and more.
Warning:
Using any device while driving may cause distraction. It is important that you look at the
display only when it is safe to do so. If you are the driver of the vehicle, use the software before
you start your journey. Plan the route before your departure and stop if you need to change the
route.
change your destination
Just map a new destination (enter an address, select a POI, and so on), and your route is automatically
updated.
22 navigate MOTONAV Software User’s Guide
Page 25

set a new starting position
Normally, your MOTONAV software plans all routes using your current position as the starting position.
To plan future routes, simulate them, or see their length in time and distance, first turn off the GPS
receiver. Then, you can change the start location.
Step 1
Step 2
Step 3
Step 4
From the Map screen, tap
From the Navigation menu, tap
Scroll down and then tap
Tap
Set Starting Position
MENU
Starting Position
.
.
DESTINATION
.
, then tap
MORE
.
Step 5
Step 6
Step 7
Step 8
Select the address for the new starting position.
Tap OK. to use the new starting location without using a GPS signal
The map returns in grayscale (showing there is no GPS reception). If an active route already
e
xisted, it is now recalculated starting from the selected location.
Optionally, tap
To return to normal navigation, tap
MENU
to modify the route or to check its parameters.
Tu rn o n G P S
.
23 navigate MOTONAV Software User’s Guide
Page 26

pause the active route
You do not need to pause an active route. When you start driving again, the software restarts the voice
instructions from your position.
delete the active route
Step 1
Step 2
Step 3
Step 4
From the Map screen, tap
Tap
MY ROUTE
Tap
CANCEL ROUTE
Tap
YES
to confirm.
.
.
MENU
.
change route planning method
Pick the best type of route for your vehicle or driving preferences.
Step 1
Step 2
From the Map screen, tap
Tap
MY ROUTE
.
MENU
.
Step 3
Tap
ROUTE SETTINGS
.
24 navigate MOTONAV Software User’s Guide
Page 27

Step 4
Tap
ROUTE PLANNING METHOD
.
Step 5
Your MOTONAV software recalculates the new route and shows it using an orange line.
Select a route planning method:
Fast
Short
Economical
Easy
Gives a quick route if you can travel at or near the speed limit on all roads.
Usually the best selection for fast and normal cars.
Gives a short route. Usually practical for pedestrians, cyclists or slow
vehicles.
Tries to use the least gas by combining the benefits of Fast and Short. The
software calculates as if it were calculating the Fast route, but also uses
other roads to save fuel.
Uses a route with fewer turns and no difficult maneuvers. For example,
use the highway instead of a lot of smaller roads or streets.
check route alternatives
You can also recalculate the active route by comparing alternatives.
Step 1
Step 2
Step 3
25 navigate MOTONAV Software User’s Guide
From the Map screen, tap
Tap
MY ROUTE
Tap
MORE OPTIONS
.
.
MENU
.
Page 28

Step 4
Route Methods
with travel distance &
estimated travel time.
Least time.
Shortest distance.
Least gas.
Least
maneuvers.
Tap
ROUTE ALTERNATIVES
.
Step 5
Step 6
Tap any of the methods, and the new route appears as an orange line.
Tap
BACK
to use the selected route planning method and to return to the previous screen.
change the vehicle used in route planning
You can recalculate the active route for a pedestrian or for a different vehicle. This setting can exclude
some road types. (For example, pedestrians are not allowed to use highways.)
Tip:
You can also change the vehicle in your settings (page 34).
Step 1
Step 2
Step 3
From the Map screen, tap
Tap
MY ROUTE
Tap
ROUTE SETTINGS
.
.
MENU
.
Step 4
26 navigate MOTONAV Software User’s Guide
Tap
Vehicl e
, then tap a vehicle type.
Page 29

Step 5
Tap
BACK
to use the selected route planning method and to return to the previous screen.
Your MOTONAV software recalculates the new route and shows it using an orange line.
Note:
If you’re in pedestrian mode and you forget to change back to a car mode, the software notices
that your speed that is too fast for a pedestrian. You can switch back instantly to car mode.
change the road types used in route planning
You can recalculate the active route using different road types. For example, you may want to avoid
highways if you are towing another vehicle.
Note:
Step 1
Step 2
Step 3
Excluding a road type is a preference. It does not necessarily mean total exclusion. If your
destination can only be accessed using some of the excluded road types, they will be used but
only as much as necessary. In this case a warning icon appears on the Route Information
screen, and the part of the route not matching your preference appears in a different color on
the map.
From the Map screen, tap
Tap
MY ROUTE
Tap
ROUTE SETTINGS
.
.
MENU
.
Step 4
Step 5
Tap a road type. (You might need to scroll the list for all road types.).
Include toll roads.
Include highways.
Include roads that require a pay pass.
Include unpaved roads (excluded by default).
Include ferries (included by default, may require a fare).
Include carpool & high-occupancy lanes.
Tap
BACK
to use the selected route planning method and to return to the previous screen.
Your MOTONAV software recalculates the new route and shows it using an orange line.
27 navigate MOTONAV Software User’s Guide
Page 30

make your route a favorite
Add the destination of the active route to your saved favorites.
Step 1
Step 2
Step 3
Step 4
From the Map screen, tap
Tap
MY ROUTE
Tap
MORE OPTIONS
Tap
ADD DESTINATION TO FAVORITES
.
MENU
.
.
.
Step 5
Step 6
Use the keyboard to enter a name for the favorite.
Note:
Tap
ALT
to enter numbers or symbols.
Tap OK to save the new favorite destination.
28 navigate MOTONAV Software User’s Guide
Page 31

watch route simulation
Go to the next
maneuver.
Pause.
Go to the previous
maneuver.
End the
simulation.
know before you go
You can run a demonstration of the active route.
Step 1
Step 2
Step 3
Step 4
From the Map screen, tap
Tap
MY ROUTE
Tap
MORE OPTIONS
Tap
SIMULATE NAVIGATION
.
.
MENU
.
.
The simulation starts from the starting point of the
route, and using a realistic speed, it leads
you through the whole recommended route.
Step 5
29 navigate MOTONAV Software User’s Guide
Tap
STOP
to end the simulation.
Page 32

more details
Some handy concepts to know...along with the basics
Smart Zoom
Your MOTONAV software provides Smart Zoom, which is more automatic zoom feature:
• In a route
easily see your next maneuver. If the next turn is far away, the map zooms out and flattens the view
so you can see the road in front of you.
• Not in a route
—When approaching a turn, the screen zooms in and raises the view angle to let you
—The screen zooms in if you drive slowly and zooms out when you drive faster.
route calculation & recalculation
Your software calculates the route based on your preferences. These are the settings you change to
suit your needs (see page 34):
•
Route planning methods
•
Vehicle types
•
Road types
Your software automatically recalculates the route if y
Depending on the type of the Traffic event, your software also recalculates the route if a Traffic event
fects a part of the recommended route.
af
speed limit warnings
ou deviate from the proposed itinerary.
Maps sometimes contain information about a road’s speed limits. This information may not be available
for your region (ask your local dealer) or may not be absolutely correct for all roads on the map. Always
pay attention to actual road signs for changes.
A speed limit symbol appears in the corner of the
changes its color.
Also, you can turn on a voice warning when you exceed the speed limit:
Step 1
Step 2
From the Map screen, tap
Tap
Sounds & Warnings
MENU
, then tap
, then tap
map. When you exceed the speed limit, the symbol
MORE
.
Warn When Speeding
.
30 more details MOTONAV Software User’s Guide
Page 33

Traffic—TMC (Traffic Message Channel)
Your software can provide you with even better routes when it uses Traffic Message Channel (TMC)
information. TMC is a specific application of the FM Radio Data System (RDS) used for broadcasting
real-time traffic and weather information.
Note:
Your Motonav application contains the TMC receiver that is needed to receive Traffic events.
If Traffic information is available at your location, the software automatically uses the traffic updates it
receiv
radio stations for TMC data and uses the information in route planning. The moment your software
receives traffic information that may affect your route, the program will warn you that it is recalculating
the route, and navigation will continue with a new route that is optimal considering the most up-to-date
traffic conditions.
Road segments affected by traffic events are displayed
symbols above the road show the nature of the event.
basics
If you’re new to using a navigational device or a touch screen, here are the basics.
buttons & screen controls
TMC may not be available in your country or region. Ask your local dealer for coverage details.
es. You do not need to set anything in the program. The receiver automatically searches the FM
An icon appears on the map to show you when traf
status of the traffic receiver when there are no tr
the next traffic on your route.
fic events are received. The icon shows the
affic events on your route; otherwise it shows
with an alternate color on the map, and small
To use most MOTONAV features, just tap the screen.
buttons
buttons with
values
checkboxes
Tap once. Example:
Tap once. Example:
Tap once to enter a checkmark or to clear
the checkbox.
Example:
31 more details MOTONAV Software User’s Guide
Page 34

icons
Tap once. (Some icons show status
information. Others are also buttons.)
Example:
lists
Tap and hold your finger anywhere on the
list. Slide your finger up or down.
Depending on the speed of the sliding,
the list will scroll fast or slow, only a bit or
till the end. Or, you can scroll by using the
up and down arrows.
Example:
beyond a single screen tap
You usually need to tap the screen only once. Occasionally, you’ll need to do a little bit more.
tap & hold
Sometimes, you need to tap & hold the screen:
•
Tap and hold . on list and menu screens to return
to the navigation menu.
•
Tap and hold any of the arrow, plus, or minus buttons on the
map screen to rotate, tilt or scale the map continuously.
•
Tap and hold on keyboard screens: you can delete
several characters quickly.
•
Tap and hold the up or down arrows in long lists to scroll
continuously.
grab
(drag & drop)
rotate
Sometimes, you need to drag & drop:
• Scroll through a list
finger up or down. Depending on the speed of the sliding, the
list will scroll fast or slow, only a bit or till the end.
•Move a map
direction.
• Go back to the navigation menu
top left corner to the bottom left corner on any screen.
To switch between landscape and portrait modes, turn your
device to the side.
—grab the map, and move it in the desired
—grab the list anywhere and slide your
—slide one finger from the
32 more details MOTONAV Software User’s Guide
Page 35

text entry
Sometimes you’ll need to enter text. Type with your
fingertips on the full-screen keyboard.
Note:
To switch to another keyboard layout, for example
from an English keyboard to a Greek keyboard, see
settings on page 34.
Delete
Space
Numbers & symbols
Accept search results or
save your input
Open a list of search
results
Tap once to delete one character. Tap and hold to delete
several characters or a whole line.
Tap the space bar.
Tap to see a number and symbol keyboard.
Tap .
Enter a search, then tap .
Cancel your text and
return to the previous
screen.
Tap .
33 more details MOTONAV Software User’s Guide
Page 36

settings & options
MORE menu
Tap
MENU
, then tap
MORE
to access these features:
• Travel applications
and a calculator. (Note: you need to get an activation key for the application kit.)
• Tutorial
Demo to watch sample route simulations to see how navigation works.
• Get Extras
and other applications.
•Settings
the Configuration wizard, etc.
—Read the Tutorial to get instant understanding of the functions of your software, or run the
—Additional content, such as new maps or 3D landmarks; activate or download games
—Fine-tune route planning options, change the Vehimarker, turn on or off warnings, start
—Unit converter, clothing size converter, list of international phone numbers,
Settings menu
Tap
MENU
, then tap
MORE
, then
Settings
These settings determine how routes are calculated. Select the type of
vehicle you are driving (see page 26 for details), road types you want to use in
route planning (page 27), and route planning method (page 24).
Turn on different sounds and alerts (see page 36).
to access these features:
Use a car or person icon instead of the Vehimarker.
Set daytime and night color themes for the map. For more about colors, see
page 36.
Temporarily turn off the GPS receiver and set a different starting position for
your route.
Change the voice profile, time format and units, or the keyboard language.
34 more details MOTONAV Software User’s Guide
Page 37

colors
List all content items (maps, places of interests, landmarks, etc.) installed for
your MOTONAV application (see page 37).The list shows both the active and
the preinstalled inactive content items. Find o
visiting:
Read how to download extra content in your MOTONAV application.
Modify the basic software settings that you set during the initial setup. For
details, see page 3.
Delete all saved data and reset all settings to their factory default values.
See your software version and legal information.
www.motorola.com/motoextras/mobile.
ut how to activate content by
Set colors by tapping on the map to open the Quick menu.
color themes
The MOTONAV software uses different color themes during the day and during the night for both the
map and the menu screens.
•
Daytime colors are similar to paper road maps, and the menus are bright.
•
Night color themes use dark colors for large objects to keep the brightness of the screen low.
It can also switch automatically between the daytime and
and GPS position a few minutes before sunrise, when the sky has already turned bright, and a few
minutes after sunset, before it becomes dark.
map colors
You can fine-tune the appearance of the map screen by choosing color themes from the list for both
daytime and night use.
Step 1
Step 2
From the Map screen, tap
Scroll down and tap
Map Colors
MENU
, then tap
.
the night schemes based on the current time
MORE
.
35 more details MOTONAV Software User’s Guide
Page 38

Step 3
color in tunnels
When you enter a tunnel, the colors of the map change. All buildings disappear, large objects (such as
water or forests) and empty areas between roads become black. Roads and streets keep their colors
from the current daytime or night color theme.
After you exit the tunnel, the colors return to normal.
Tap any of the buttons to change the related color theme, then select the new theme.
sound settings
You can adjust the sounds of the software and enable some useful warnings.
Key Sounds
Warn W hen
Speeding
Speed Camera
Warning
Sound when you tap the screen.
When maps contain information about the speed limits of the road segments,
set the MOTONAV software to warn you if you exceed the current limit. This
information may not be available for your region (ask your local dealer), or may
not be fully correct for all roads in the map.
Hear a warning when you approach a Road Safety Camera. You must ensure
on your own liability that using this feature is legal in the country where you
intend to use it. You have the following warnings:
• Audible Warning
exceed the speed limit while approaching a camera.
• Visible Warning
appear on the Map screen while you are approaching a camera.
This button is not displayed when GPS position is not available or if you are in
ertain countries where Road Safety Camera warning is prohibited. Even if
c
the button is available, you are responsible for checking whether it is legal to
use this feature at your location.
:—beeps while you are approaching the camera or if you
—the type of the camera and the monitored speed limit
36 more details MOTONAV Software User’s Guide
Page 39

3D vehicle gallery
The current position is shown by a blue arrow on the map as a default. On this screen, you can select
different 3D models to replace the default Vehimarker:
Tip:
Download more vehicle markers from www.motorola.com/motoextras/mobile.
Car, Pedestrian
, or
Other Vehicles
.
regional settings
Customize the MOTONAV software for your local language, measurement units, time and date settings
and formats, as well as to choose the voice profile you prefer.
• Voice Profile
hear a sample. Tap
• Time Format and Units
•Time Format
•Units
all the listed units in some voice guidance languages. If you select a measurement unit not
supported by the chosen voice guidance language, a warning message will appear.
• Keyboard
keyboards.
—Select a new profile from the list of available languages and speakers. Tap one to
OK
after you select a new spoken language.
—Select from these options:
—Select between 12 and 24 hours time display format.
—You can set the distance units to be used by the program. Your software may not support
—Choose your keyboard layout from standard US English and several international
content
View all content items (maps, places of interests, landmarks, etc.) installed on your MOTONAV. The list
of the content categories appears first. Tap a category to see its content.
37 more details MOTONAV Software User’s Guide
Page 40

launch MOTONAV on your phone
You can launch the MOTONAV software from Messaging, Browser, or Contacts on your phone.
Tip:
Select MOTONAV as the default navigation application. The next time you select an address,
MOTONAV will launch automatically.
from Contacts
For contacts without postal addresses, select the contact icon or picture from the contact list, then
MOTONAV
select
For contacts with postal addresses, open the contact to view details, select the address, then select
MOTONAV
select
from Messaging
You can launch MOTONAV from geo-coded messages, such as messages from other MOTONAV users.
.
.
Step 1
Step 2
When you receive a message with a geo-coded address, open the message, and tap the
address.
Select
MOTONAV
.
from Browser
When a Web address is an active link that you can select, you can tap it to open a menu.
Select
MOTONAV
.
38 more details MOTONAV Software User’s Guide
Page 41

glossary
2D/3D GPS reception
Active route
City center
Color theme
The GPS receiver uses satellite signals to calculate your position
and needs at least four signals to give a three-dimensional
position, including elevation. Because the satellites are moving
and because objects can block the signals, your GPS device
might not receive four signals. If three satellites are available,
the receiver can calculate the horizontal GPS position but the
accuracy is lower and the GPS device does not give you
elevation data: only 2D reception is possible.
The currently navigated route. When you set a destination, the
route is active until you delete it, reach your destination, or exit
the software. See also: Route.
The city or town center is not the exact center of an area. In
towns, it is usually the most important intersection; in larger
cities, it is one of the important intersections.
Your software comes with different color themes for daytime or
night use. Themes are custom graphic settings that can have
different colors for streets, blocks or surface waters in 2D and
3D modes. They also display shades or shadows in 3D mode.
One daytime scheme and one night scheme is always selected
or the map and for the menus. The software switches between
f
them depending on the time.
GPS accuracy
Several factors have impact on the deviation between your real
position and the one given by the GPS device. For example,
signal delay in the ionosphere or reflecting objects near the GPS
device have a different and varying impact on how accurately
the GPS device can calculate your position.
39 glossary MOTONAV Software User’s Guide
Page 42

Map
The software works with digital maps which are more than just
the computerized versions of traditional paper maps. Similar to
the paper road maps, the 2D mode of digital maps show you
streets, roads, and elevation is also shown by colors. In 3D
mode, you can see the altitude differences, such as valleys and
mountains, elevated roads, and in selected cities you can see
3D landmarks and 3D buildings.
You can use digital maps interactively: you can zoom in and out
increase or decrease the scale); you can tilt them up and down,
(
and rotate them left and right. In GPS-supported navigation,
digital maps facilitate route planning.
MotoExtras
North-up map
orientation
Road Safety Camera
Route
Use this web portal to activate your license, buy additional
content (maps, 3D landmarks, POIs, etc.), backup and restore
content, see Frequently Asked Questions, troubleshoot known
issues, and much more. For details, go to:
www.motorola.com/motoextras/mobile.
In North-up mode the map is rotated so its top points north. See
also: Track-up map orientation.
A special type of point-of-interest for speed cameras and red
light cameras. You can configure the software to warn you
when you approach one of these cameras.
Detecting the location of Road Saf
certain countries. It is the sole responsibility of the driver to
check whether this feature can be used during the trip.
A sequence of maneuvers (for example, turns) to reach the
destination. The route contains one start point and one
destination. The start point is the current (or last known)
position by default.
ety Cameras is prohibited in
Toolbox
This computer tool is required for transferring purchased
content from MotoExtras to your phone and to backup and
restore content. Download this tool and its user’s guide for free
www.motorola.com/motoextras.
from
40 glossary MOTONAV Software User’s Guide
Page 43

Track-up map
orientation
In Track-up mode the map is rotated so its top always points in
the current driving direction. This is the default orientation in 3D
map view mode. See also: North-up map orientation.
Vehim a rker
Your current position is shown with a blue arrow on the map.
The direction of the blue arrow shows the current heading. This
position marker can be replaced with different vehicle and
pedestrian symbols. You can even specify different Vehimarkers
for different route types (depending on which vehicle type is
selected for route calculation).
41 glossary MOTONAV Software User’s Guide
 Loading...