

Page 1
EN DE PL SV
USER’S GUIDE
Dashboard Camera
Model: MDC300
The features described in this user’s guide are subject to
modifications without prior notice.
Page 2

Welcome...
to your new Motorola Dashboard
Camera!
Thank you for purchasing the Dashboard Camera. Please
keep your original dated sales receipt for your records. For
warranty service of your Motorola product, you will need to
provide a copy of your dated sales receipt to conrm warranty
status. Registration is not required for warranty coverage.
For product related questions, please visit:
www.motorolastore.com/support
This User’s Guide has all the information you need to make
the most out of your product.
Please read the Safety Instructions on page 5 before you
install the unit.
Before you use the Dashboard Camera, we recommend you
insert a SD card into the SD card slot.
Got everything?
• Dashboard Camera
• Windshield Mount
• Car Adapter
• User Manual
Page 3
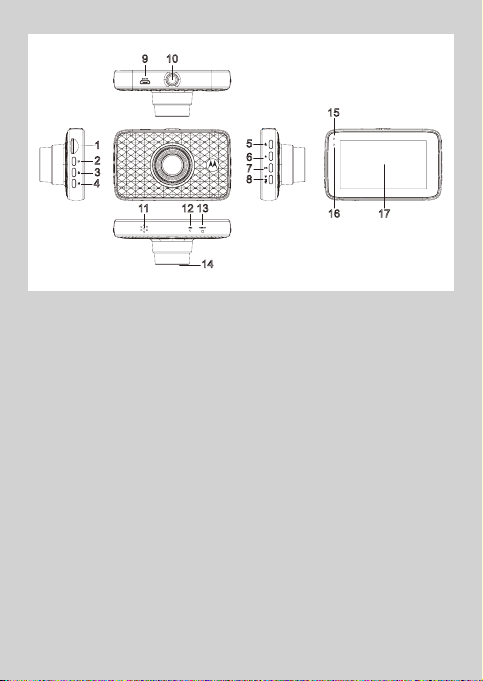
Overview of your Dashboard Camera
9 10
1
2
3
4
11 12 13
5
6
7
8
14
15
16 17
1. Micro SD card slot
2. Menu/Back Button
Setting switcher/Back
3. Lock Button
4. Mode Button
Video/ Replay mode switcher
5. On/Off Button
Short press when Off: turn On.
Short press when On: Screen
On/Off.
Long press when On: turn Off
6. Up Button
Rewind during playback; Short
press when in Video mode: Take
photo
7. OK Button
Enter when setting
Short press when in Video
mode: Start/Stop recording
8. Down Button
Fast forward during playback;
Short press when recording:
Mute
9. USB/Power Socket
10. Mount Nut
11. Speaker
12. Microphone
13. Reset Button
14. Lens
15. Charge Indicators
Red: Charging
Green: Fully charged
16. Status Light
Blue: Power On
Blue flashing: Recording
17. 3.0” Screen
Page 4
1. Safety Instructions
WARNING:
• Do not install the device within the driver’s or
passenger airbag operation range. Please refer to your
car’s service manual for details about the operation
range of your car’s airbags.
• Never modify modes, settings, or program your
device while your car is in motion.
• Ensure the device and its power cord are installed as
per the instructions on page 6, and do not obstruct
the driver’s line of sight or impede the operation of
any driving controls.
Before using the dash cam, the user shall check
the applicable laws on the use of dash cams.
In some jurisdictions, the use of dash cams can be
considered as an invasion of privacy.
Furthermore, the mounting of the dash cam on
the windshield might be regulated by law in some
jurisdictions.
It is the user’s responsibility to check the
applicable laws before using the dash cam. We do
not take any responsibility for wrong or unlawful
use of the dash cam.
4
Safety Instructions
Page 5

2. Getting Started
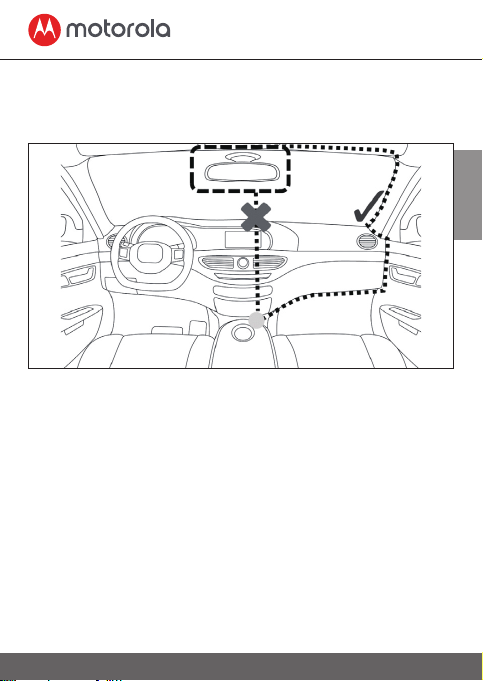
2.1 Installing your Device
Najlepsze miejsce montażu
The above illustration refers to a left-hand drive car.
For right-hand drive cars, please flip the position of
the cable installation accordingly.
• Install your device within the rear-view mirror
area and within the wiper cleaning area to get the
clearest possible view.
• Your device comes with a 3.6m USB power cable.
Organise the power cord so that it does not
interfere with the driver’s vision. Use cable clips to
secure the power cord if necessary.
EN
Getting Started
5
Page 6

• Place the device on the windshield mount
rst. Press the suction cup of the mount to the
windshield and press the lever to lock. Ensure the
mount is safely attached to the windshield.
• When using the dashboard camera device in
your car, we recommend that you always use the
cigarette charger in order to maintain the battery
level. The unit is not designed to run on battery
power alone, the battery is there for backup
purposes only.
2.2 First Use
• Insert a SD card (not provided) in the SD card slot.
Your dashboard camera accepts SD cards of up to
32GB capacity (class 10). It is recommended that
you format the SD card. Please refer to the settings
described in this manual.
• Your dashboard camera will always power up
and begin recording automatically as soon as it is
connected to a power source.
Simply connect your dashboard camera to a power
source that comes on when you start the engine of
your vehicle, and the dashboard camera will start
recording automatically without you having to
remember to press on a button.
6
Getting Started
Page 7

• You can also power it ON or OFF manually by
pressing the On/O button.
• The power LED (Red) will turn ON when the power
is plugged in. Whenever the device is turned ON
or OFF, you will see a splash screen showing the
Motorola logo.
3. Using your Dashboard Camera
3.1 Recording and Saving
The purpose of your dashboard camera is to
continuously record the road ahead, and to
automatically record and save any incidents or
accidents you might be involved in.
Your device records video by clusters of 1 minute (the
duration can be changed in video settings menu, see
“4.2 Video Settings”.). It is equipped with a sensor
that detects shocks. Each time a shock is detected, it
will permanently save the cluster during which the event
occurred. The sensitivity of the sensor can be changed
in the video settings menu, see “4.2 Video Settings”.
Once your SD card is full, it will automatically
overwrite the oldest footage. SD card storage space
has been set to: 70% for Normal, 20% for Event, 10%
for Photo.
EN
Using your Dashboard Camera
7
Page 8

3.2 Switching Modes
You can switch between the Video and Playback
mode by pressing the Mode button. Video mode is
the default mode. To view or delete saved footages,
switch to Playback mode.
IMPORTANT!
The driver must never switch modes while the car is
in motion.
3.2.1 Mass Storage Mode
You can also connect the device to your computer
using the standard micro USB cable to view and
manage videos stored inside the SD card.
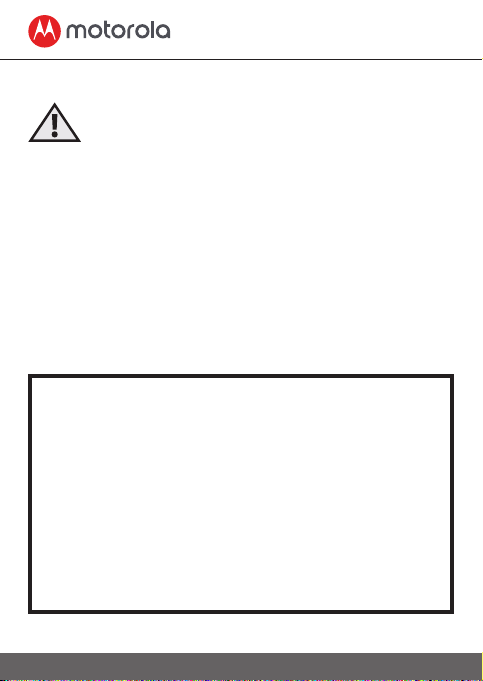
3.2.2 Video Mode
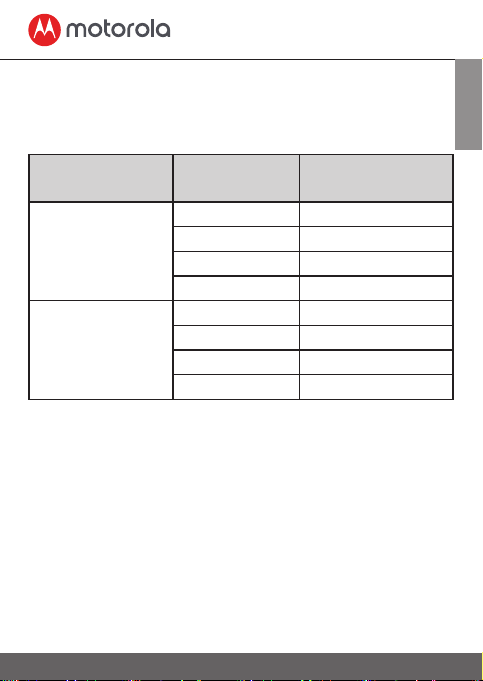
The table below explains the various information
displayed on the screen when your MDC300 is in
Video mode. Some icons will only be displayed
once the relevant function is selected within the
Video menu, as described below.
8
Using your Dashboard Camera
Page 9
1
9 10 11 12
2 3 4 5 6 7 8
6
7
EN
1. Parking
Mode
Appears on screen when Parking
Mode has been turned on.
2. Microphone Appears on screen when Audio
Recording is active
is displayed
when Mute.
3. Recording Appears on screen when recording is
in progress.
standby.
4. Resolution Displays the current resolution
is displayed when in
5. Frame Displays the number of frames per
second.
6. Mode Indicates that the dashboard camera
is in Video mode.
Using your Dashboard Camera
9
Page 10
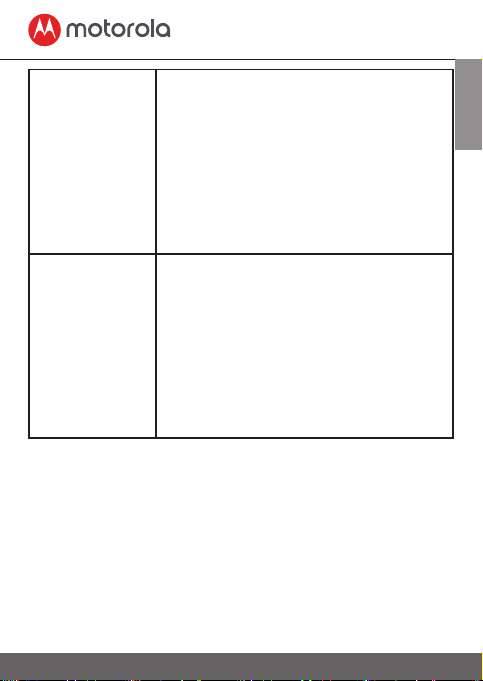
7. Memory
Card
Indicates whether a memory card is
present.
is displayed when the
memory card has been removed.
8. Battery Indicates the battery status.
9. Date Current date
10. Time Current time
11. Recording
Time
Displays recording time of current
video.
12. Protected Shown on screen when a video file has
been protected by activation of the
G Sensor or by the pressing of the file
protect button.
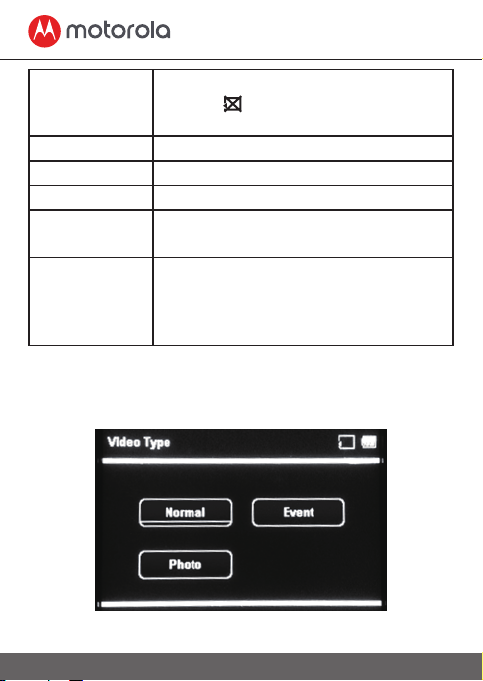
3.2.3 Playback Mode
Press the Mode button to select
Playback mode.
10
Using your Dashboard Camera
Page 11

For each Video Type, press Up or
1
5 6 7
2 3 4
navigate, OK to confirm,
Playback Setting
Menu/Back
, and
Mode
to go back.
Down
to
to go to
Once you have selected a type of video, the
following screen will be displayed.
8
The MDC300 will display the last recorded file.
Depending on the type of file, the on-screen
information and playback functions differ.
EN
Using your Dashboard Camera
11
Page 12
Video Files:
1 2 3 4
5 6
1. Mode Indicates that the dashboard
camera is in Video Playback mode.
2. Video Number Displays the current video number.
3. Memory Card Indicates whether a memory card is
present.
is displayed when the memory
card has been removed.
4. Battery Indicates the battery status.
5. Date Current video date.
6. Time Current video time.
7. Video Length Current video length.
8. Page Current page/total page.
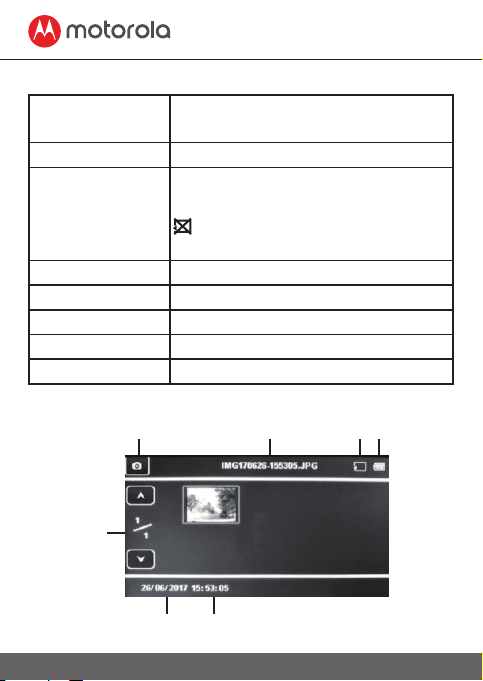
Photo Files:
7
12
Using your Dashboard Camera
Page 13
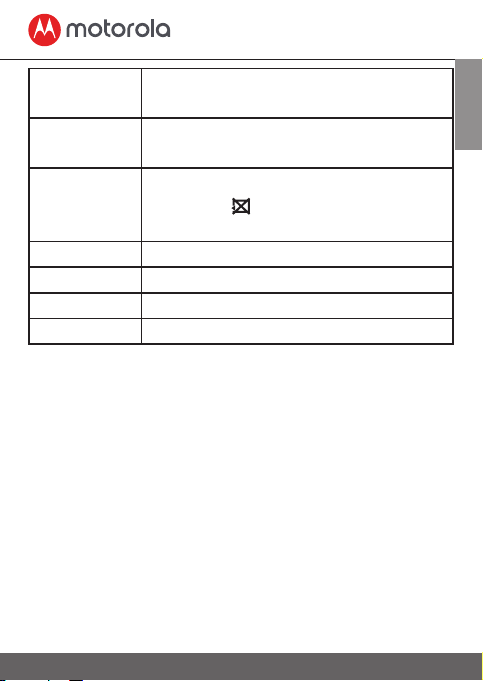
1. Mode Indicates that the dashboard camera
is in Photo Playback mode.
2. Photo
Displays current photo number.
Number
3. Memory
Card
Indicates whether a memory card
is present.
is displayed when the
memory card has been removed.
4. Battery Indicates the battery status.
5. Date Current photo date.
6. Time Current photo time.
7. Page Current page/total page.
3.3 Parking Mode
Your dashboard camera can record footages of
events occurring when your car is parked with its
engine off. The built-in battery will keep the sensor
of your device in stand-by mode, and will start
recording automatically for 30 seconds if it detects
vibration or a shock. Parking mode can only record
and save footage after an event has been detected
by the sensor.
EN
Using your Dashboard Camera
13
Page 14
IMPORTANT!
Due to technical reasons, Parking mode is disabled
by default. You can enable it in settings menu, see
section “4.2 Video Settings”.
3.4 Lock/Unlock the Video
In case of emergency, you can lock/unlock the
current video by pressing on the LOCK button when
recording. The video footage of the locked video will
be saved in the Event folder until the folder is full.
4. Settings
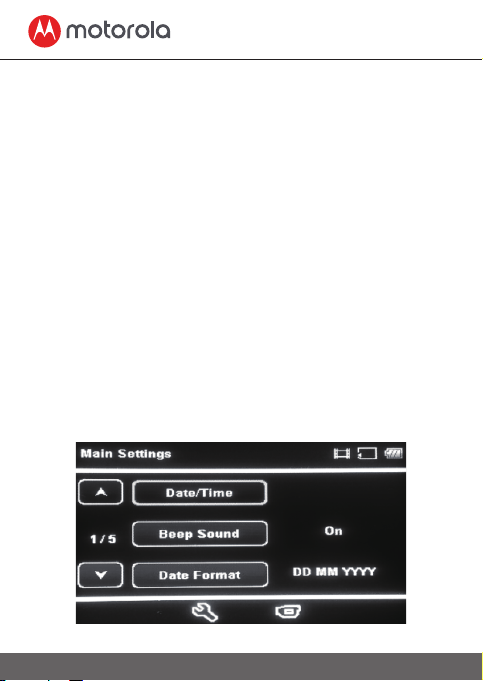
4.1 Main Settings
To access Main Settings, press the Menu/Back
button while in Video mode.
For each sub-menu, press Up or Down to navigate,
OK to confirm, and Menu/Back to go back or cancel.
Settings
14
Page 15

Date/Time Set the date and time.
Press Up or Down to set each value;
press OK to switch to the next value. It
would be adjust to satellite time once
positioned.
Beep Sound Enable or disable beep sounds.
Date Format Set the date format.
Language English/France/Espanol/ Portugues/
Deutsch/Italiano/
中文
/Russian/Japanese
简体 中文/繁体
Frequency Select exposure, used to adjust
exposure level for different light
conditions.
LCD Off You can set the LCD to never turn off
or turn off after 3 minutes
Volume Set the volume of the built-in speaker
to high/middle/low.
Exposure Used to adjust exposure level for
different light conditions. You can
adjust the exposure as you require.
Press the Up button if you need the
photos to be clearer or Down button if
you need it to be darker.
EN
Settings
15
Page 16

White Balance Adjust the white balance for different
light conditions. You can set the white
balance to Auto/Incandescent/Sunny/
Cloudy/ Fluorescent.
We recommend to leave it as Auto.
Format Use this option to format your SD
Card.
IMPORTANT!
Formatting a SD card will erase all
its memory contents.
Default Setting Reset all your device settings to
factory default.
Stamp Setting Enable or disable a date stamp
showing on your videos and photos.
Version Current firmware version.
Settings
16
Page 17

4.2 Video Settings
There are two ways to access Video Settings:
1. Press the Menu/Back button twice while in Video
mode;
2. Press the Down button while in the last sub-menu
of Main Settings.
For each sub-menu, press Up or Down to navigate,
OK to confirm, and Menu/Back to go back or
cancel.
EN
Settings
17
Page 18

Video resolution You can set the video resolution to:
FHD 1920*1080 or 720P 1280*720
IMPORTANT!
If you want to store more photos
or videos on your SD card, try
reducing the resolution.
Loop Recording Loop Recording allows your camera
to overwrite old files with new files.
Once the memory card becomes
full, the camera will delete the first
video file to make room for the latest
file. Choose the default duration for
each recording cluster: Off /1 min /
3 min / 5 min.
G-Sensor G Sensor detects forces which will
automatically protect the current
recording in the event of a collision.
You can change the sensitivity of the
sensor. It is set to Low by default, but
can be set to Off/High/Medium/Low.
If you turn the sensor off, your
dashboard camera will not be able to
permanently save any footage.
Park mode Enable or disable parking mode.
Record audio Enable or disable microphone.
Settings
18
Page 19
IMPORTANT!
Changing the video quality and resolution settings
to a lower value might reduce the amount of details
you can see on your saved videos.
Resolution Card Capacity Recording time
(minutes)
1080FHD
1920*1080
4GB 30
8GB 60
16GB 120
32GB 240
720P
1280*720
4GB 40
8GB 80
16GB 160
32GB 320
IMPORTANT!
The above information is for your reference only.
Different memory cards have slightly different total
capacity and the maximum recording time is different.
EN
Settings
19
Page 20

4.3 Playback Settings
To access Playback Settings, press the Menu/Back
button while in Playback mode. For each sub-menu,
press Up or Down to navigate, OK to confirm, and
Menu/Back to go back or cancel.
Settings
20
Page 21
Delete Use this option to delete photos and
videos stored in your SD card.
You can choose between deleting
the current file you are currently
watching, or all files on your SD card.
IMPORTANT! You cannot recover
a photo or video that has been
previously deleted.
Protect Use this option to lock photos and
videos stored in your SD card so that
they cannot be deleted.
Use the same option to unlock
previously locked photos or videos.
You can choose between Lock
Current, Unlock Current, Lock All or
Unlock All.
EN
Settings
21
Page 22

Willkommen...
Zu Ihrer neuen Motorola Dashcam
Kamera!
Vielen Dank für den Kauf der Dashcam Auto Kamera. Bitte
bewahren Sie Ihren Original-Kaufbeleg für Ihre Unterlagen
auf. Für den Garantieservice Ihres Motorola-Produkts müssen
Sie eine Kopie Ihres Original Kaufbelegs mit Kaufdatum
vorlegen, um den Garantiestatus zu bestätigen. Eine Registrierung ist für die Garantie nicht erforderlich. Für produktbezogene Fragen rufen Sie bitte folgende Nummern an:
Im Web: www.motorolastore.com/support
Dieses Benutzerhandbuch enthält alle Informationen, die Sie
benötigen, um Ihr Produkt optimal zu benutzen.
Bitte lesen Sie die Sicherheitshinweise auf Seite 5, bevor Sie
das Gerät installieren.
Bevor Sie die Dashcam-Kamera verwenden, empfehlen wir
Ihnen, eine SD-Karte einzusetzen.
Alles da?
• Dashcam Kamera
• Windschutzscheibenfassung
• Auto Adapter
• Benutzerhandbuch
Page 23

Überblick von ihrer Dashcam Kamera
9 10
1
2
3
4
11 12 13
5
6
7
8
14
15
16 17
1. Micro SD Karte Steckplatz
2. Menu/Zurück Taste
Umschalten/Zurück
3. Sperrtaste
4. Modus Taste
Video/ Wiederhol Modus
Umschaltung
5. An/Aus Taste
Aufnahme drücken
wenn Aus: einschalten.
Kurz drücken wenn An:
Bildschirm ein / aus.
Lang drücken wenn An:
Ausschalten
6. Hoch-taste
Zurück während der
Wiedergabe; Kurz drücken
während Sie im Video
Modus sind: Foto machen
7. OK Taste
Bei Einstellung eingeben
Kurz drücken während dem
Video modus: Start/Stop
Aufnahme
8. Unten Taste
Schnell vorwärts während
der Wiedergabe;
Kurz drücken während der
Aufnahme: Stumm
9. USB/Aufladen
10. Halteranschluß
11. Lautsprecher
12. Mikrofon
13. Reset Taste
14. Kameraobjektiv
15. Ladeanzeigen
Rot: Laden
Grün: Voll aufgeladen
16. Statuslicht
Blau: Eingeschaltet
Blau blinkelnd: Aufnahme
17. 3.0” Display
Page 24

1. Sicherheitshinweise
Achtung:
• Installieren Sie das Gerät nicht innerhalb des
Betriebsbereich des Airbags von Fahrer oder Beifahrer.
Einzelheiten zum Betriebsbereich der Airbags Ihres
Fahrzeugs nden Sie im Wartungshandbuch Ihres
Fahrzeugs.
• Ändern Sie niemals den Modus oder Einstellungen
des Geräts während ihr Auto in Bewegung ist.
• Stellen Sie sicher, dass das Gerät und das Netzkabel
gemäß den Anweisungen auf Seite 6 installiert sind
und diese nicht die Sichtlinie oder den Betrieb von
der Fahrsteuerung behindern.
Vor der Anwendung der DashCam muss der Benutzer
die geltenden Gesetze zur Verwendung von Dash-Cams
überprüfen.
In einigen Ländern kann die Verwendung von DashCams
als Verletzung der Privatsphäre betrachtet werden.
Darüber hinaus könnte die Montage der DashCam an
der Windschutzscheibe in manchen Gerichtbarkeiten
gesetzlich geregelt sein.
Es liegt in der Verantwortung des Benutzers, die geltenden
Gesetze vor der Verwendung der DashCam zu überprüfen.
Wir übernehmen keine Haftung für falsche oder
gesetzwidrige Verwendung der DashCam.
24
Sicherheitshinweise
Page 25
2. Erste Schritte
2.1 Ihr Gerät Installieren
Najlepsze miejsce montażu
Bester Platz zur Installation
Die obige Abbildung bezieht sich auf einen
Linkslenker. Bei Fahrzeugen mit Rechtslenkung
bitte die Position der Kabelinstallation
entsprechend umdrehen.
• Installieren Sie ihr Gerät innerhalb des
Rückspiegelbereichs und innerhalb des Bereichs
der Scheibenwischer um eine möglichst klare Sicht
zu bekommen.
• Ihr Gerät wird mit einem 3,6-m-USB-Netzkabel
geliefert. Ordnen Sie das Netzkabel so an, dass
es die Sicht des Fahrers nicht beeinträchtigt.
DE
Erste Schritte
25
Page 26

Verwenden Sie bei Bedarf Kabelclips, um das
Netzkabel zu sichern. our device comes with a 3.6m
USB power cable.
• Legen Sie das Gerät zuerst auf die
Windschutzscheibenhalterung. Drücken Sie den
Saugnapf der Halterung auf die Windschutzscheibe
und drücken Sie den Hebel zum Verriegeln.
Sorgen Sie dafür, dass die Halterung sicher an der
Windschutzscheibe befestigt ist.
• Wenn Sie die DashCam in Ihrem Auto
verwenden, empfehlen wir, dass Sie immer den
Zigarettenanzünder verwenden, um die Batterie
aufgeladen zu halten. Das Gerät ist nicht für den
Betrieb mit dem Akku entwickelt, dieser dient nur
zu Sicherungszwecken.
2.2 Erste Anwendung
• Stecken Sie eine SD Karte ein (nicht mitdabei) in
den SD Karten Steckplatz.
Ihre DashCam Kamera kann SD Karten bis zu 32GB
betreiben (Klasse 10). Es ist empfohlen, dass Sie
die SD Karte formatieren. Bitte beachten Sie die in
diesem Handbuch beschriebenen Einstellungen.
• Ihre DashCam wird sich immer eingeschalten und
26
Erste Schritte
Page 27

mit der Aufnahme automatisch beginnen, sobald
sie an eine Stromquelle angeschlossen ist.
Schließen Sie einfach Ihre DashCam an eine
Stromquelle an, die beim Starten des Motors Ihres
Fahrzeugs zu arbeiten beginnt, und die DashCam
beginnt automatisch mit der Aufnahme, ohne
dass Sie daran denken müssen, auf eine Taste zu
drücken.
• Sie können das Gerät auch manuell ein- oder
ausschalten, indem Sie auf die Ein / Aus-Taste
drücken.
• Die Strom-LED (rot) leuchtet auf, wenn das Gerät
an das Stromnetz angeschlossen ist. Wenn das
Gerät ein- oder ausgeschaltet wird, erscheint ein
Begrüßungsbildschirm mit dem Motorola-Logo.
3. Anwendung ihrer DashCam
Kamera
3.1 Aufnehmen und Speichern
Der Zweck Ihrer DashCam ist, kontinuierlich die
vorausliegende Straße zu erfassen und eventuelle
Zwischenfälle oder Unfälle, an denen Sie beteiligt
sind, automatisch aufzuzeichnen und zu speichern.
Ihr Gerät zeichnet Videos in Gruppen von 1 Minute
DE
Anwendung ihrer DashCam Kamera
27
Page 28

auf (die Dauer kann im Videoeinstellungsmenü
geändert werden, siehe 4.2 Videoeinstellungen.).
Sie ist mit einem Sensor ausgestattet, der Stöße
erkennt. Jedes Mal, wenn ein Stoß erkannt wird,
wird die Gruppe, in dem das Ereignis aufgetreten
ist, dauerhaft gespeichert. Die Empfindlichkeit des
Sensors kann im Videoeinstellungsmenü geändert
werden, siehe 4.2 Videoeinstellungen.
Sobald die SD-Karte voll ist, wird die älteste
Aufnahme automatisch überschrieben. Der
Speicherplatz für SD-Karten wurde auf 70% für
Normal, 20% für Ereignisse und 10% für Fotos
eingestellt.
3.2 Umschaltung Modus
Y Sie können zwischen Video- und
Wiedergabemodus umschalten wenn Sie die
Modus-Taste drücken. Der Videomodus ist
der Standardmodus. Um gespeicherte Fotos
anzuzeigen oder zu löschen, wechseln Sie in den
Wiedergabemodus.
WICHTIG!
Der Fahrer darf während der Fahrt niemals den
Modus wechseln.
28
Anwendung ihrer DashCam Kamera
Page 29

3.2.1 Massenspeichermodus
1
9 10 11 12
2 3 4 5 6 7 8
Sie können das Gerät auch mit dem Standard-MicroUSB-Kabel an Ihren Computer anschließen, um Fotos
und Videos auf der SD-Karte anzuzeigen und zu
verwalten.
3.2.2 Videomodus
In der folgenden Tabelle werden die verschiedenen
Informationen erläutert, die auf dem Bildschirm
angezeigt werden, wenn sich das MDC300 im
Videomodus befindet. Einige Symbole werden erst
angezeigt, wenn die entsprechende Funktion im
Menü "Video" wie unten beschrieben ausgewählt
wurde.
6
7
DE
Anwendung ihrer DashCam Kamera
29
Page 30

1. Parkmodus Erscheint auf dem Bildschirm beim
Parken. Der Modus wurde aktiviert.
2. Mikrofon Erscheint auf dem Bildschirm wenn
die Audioaufnahme aktiv ist.
Erscheint wenn auf Stumm
geschaltet ist.
3. Aufnahme Erscheint auf dem Bildschirm
während der Aufnahme.
Wird im Standby Modus angezeigt.
4. Auflösung Zeigt die aktuelle Auflösung an.
5. Bilder Zeigt die Anzahl von Bilder pro
Sekunde.
6. Modus Zeigt, dass die DashCam sich im
Videomodus befindet.
7.
Speicherkarte
Zeigt an, ob eine Speicherkarte
vorhanden ist.
wird angezeigt
wenn die Speicherkarte entfernt ist.
8. Akku Zeigt den Akku Status an
9. Datum Aktuelles Datum
10. Zeit Aktuelle Uhrzeit
11.
Aufnahmezeit
Zeigt die Aufnahmezeit des
aktuellen Videos an.
30
Anwendung ihrer DashCam Kamera
Page 31

12. Geschützt Wird auf dem Bildschirm
angezeigt, wenn eine Videodatei
durch Aktivierung des G-Sensors
oder durch Betätigen der
Dateischutztaste geschützt wurde.
3.2.3 Wiedergabemodus
Drücken Sie die Modus Taste, um den
Wiedergabemodus auszuwählen.
Für jeden Video Typ, drücken Sie die Oben oder
Unten Taste um zu navigieren, OK zur Bestätigung,
Menu/Zurück um zu den Wiedergabe Einstellungen
zu gehen und Modus um zurückzugehen
Sobald Sie einen Video Typ ausgewählt haben, wird
der folgende Bildschirm angezeigt.
DE
Anwendung ihrer DashCam Kamera
31
Page 32

1
5 6 7
2 3 4
8
MDC300 zeigt die zuletzt aufgenommene Datei an.
Je nach Art der Datei unterscheiden sich
die Bildschirminformationen und die
Wiedergabefunktionen.
Video Dateien:
1. Modus Zeigt an, dass sich die DashCam
im Video Wiedergabemodus
2. Video
Nummer
3.
Speicherkarte
befindet.
Zeigt die aktuelle Videonummer
an.
Zeigt an ob eine Speicherkarte
vorhanden ist.
wird angezeigt
wenn die Speicherkarte entfernt ist.
4. Akku Zeigt den Akku Status an.
32
Anwendung ihrer DashCam Kamera
Page 33

5. Datum Aktuelles Datum.
1 2 3 4
5 6
6. Zeit Aktuelle Uhrzeit.
7. Videolänge Länge vom aktuellen Video.
8. Seite Aktuelle Seite / gesamte Anzahl
von Seiten.
Foto Dateien:
7
DE
1. Modus Zeigt an, dass sich die DashCam im
Foto Wiedergabemodus befindet.
2. Foto
Zeigt die aktuelle Fotonummer an.
Nummer
3.
Speicherkarte
Zeigt an ob eine Speicherkarte
vorhanden ist. wird angezeigt
wenn die Speicherkarte entfernt ist.
Anwendung ihrer DashCam Kamera
33
Page 34

4. Akku Zeigt den Akku Status an.
5. Datum Aktuelles Datum.
6. Zeit Aktuelle Uhrzeit.
7. Seite Aktuelle Seite / gesamte Anzahl von
Seiten.
3.3 Parkmodus
Ihre DashCam kann Ereignisse aufzeichnen,
die passieren, während Ihr Fahrzeug mit
ausgeschaltetem Motor geparkt ist. Der eingebaute
Akku hält den Sensor Ihres Geräts im Standby-Modus
und beginnt automatisch mit der Aufnahme für 30
Sekunden, wenn er Vibrationen oder Stöße erkennt.
Der Parkmodus kann nur Aufnahmen machen
und speichern, nachdem ein Ereignis vom Sensor
erkannt wurde.
WICHTIG!
Aus Technischen Gründen ist der Parkmodus als
Voreimstelung deaktiviert. Sie können ihn unter dem
Videoeinstellungen Menü aktivieren. Dazu schauen
Sie bitte 4.2 Videoeinstellungen.
34
Anwendung ihrer DashCam Kamera
Page 35

3.4 Sperren/Entsperren des Video
Im Notfall können Sie das aktuelle Video sperren /
entsperren, indem Sie während der Aufnahme auf die
Taste LOCK drücken. Das gesperrte Video wird im
Ordner "Event" gespeichert, bis der Ordner voll ist.
4. Einstellungen
4.1 Haupteinstellungen
Um auf die Haupteinstellungen zuzugreifen, drücken
Sie im Videomodus die Taste Menü / Zurück.
DE
Einstellungen
35
Page 36

Datum/
Uhrzeit
Stellen Sie Datum und Uhrzeit ein.
Drücken Sie die Hoch oder Unten,
um jeden Wert einzustellen;
Drücken Sie OK, um zum nächsten
Wert zu wechseln. Es würde sich an
die Satellitenzeit anpassen, sobald
es positioniert ist.
Piepton Aktivieren oder deaktivieren Sie
Pieptöne.
Datumsformat
Stellen Sie das Datum Format ein.
Sprache English/France/Espanol/
Portugues/Deutsch/Italiano/
中文 / 繁体中文 /
Russian/Japanese
简体
Beleuchtung Wählen Sie Beleuchtung aus, um
verschiedene Lichtverhältnisse
einzustellen.
Sie können das LCD so Einstellen,
dass es niemals ausschaltet oder
das es.
LCD Aus Sie können das LCD so Einstellen,
dass es niemals ausschaltet oder
das es sich in 3 Minuten ausschaltet.
Einstellungen
36
Page 37

Lautstärke Stellen Sie die Lautstärke des
eingebauten Lautsprechers auf
hoch / mittel / niedrig.
Aussetzung Dient zur Einstellung der Belichtung
für verschiedene Lichtverhältnisse.
Sie können die Belichtung nach
Bedarf anpassen. Drücken Sie die
Hoch-Taste, wenn Sie die Fotos
klarer haben möchten, oder die
Unten-Taste, wenn Sie sie dunkler
machen möchten.
Weiß Balance Passen Sie die Weiß Balance für
verschiedene Lichtverhältnisse an.
Sie können Automatisch / Kunstlicht
/ Sonnig / Bewölkt / Fluoreszierend
einstellen. Wir empfehlen, es als
Auto zu lassen.
Format Benutzen Sie diese Option um ihre
SD Karte zu formatieren.
WICHTIG! Beim Formatieren einer
SD-Karte wird der ganze Inhalt der
Karte gelöscht.
DE
Einstellungen
37
Page 38

Standardeinstellung
Setzen Sie alle Geräteeinstellungen
auf Werkeinstellungen zurück.
Stempeleinstellung
Aktivieren oder deaktivieren Sie
einen Datumstempel auf alle Videos
und Fotos.
Version Aktuelle Firmware Version.
4.2 Videoeinstellungen
Es gibt zwei Möglichkeiten um auf die
Videoeinstellungen zuzugreifen:
1. Drücken Sie die Menu/Zurück Taste zweimal,
während Sie im Videomodus sind;
2. Drücken Sie im letzten Untermenü der
Haupteinstellungen die UnterTaste.
Einstellungen
38
Page 39

Für jedes Untermenü, drücken sie die Hoch und
Unter taste um zu navigieren, OK um zu bestätigen
und Menu/Zurück um zurück zu gehen oder zu
unterbrechen.
Video
Auflösung
Sie können die Video Auflösung
wie folgt einstellen: FHD
1920*1080 oder 720P 1280*720
WICHTIG!
Wenn Sie mehr Fotos oder Videos
auf Ihrer SD-Karte speichern
möchten, versuchen Sie, die
Auflösung zu einschränken.
Daueraufnahme Daueraufnahme erlaubt ihrer
Kamera alte Dateien mit neuen
Dateien zu überschreiben.
Sobald die Speicherkarte voll
ist, wird die Kamer die ersten
Videodateien löschen um Platz
für neue zu machen. Wählen
Sie die Standarddauer für jeden
Aufnahmecluster aus:
Aus / 1 min / 3 min / 5 min
DE
Einstellungen
39
Page 40

G-Sensor G Sensor erkennt Kräfte, die im
Falle einer Kollision die aktuelle
Aufzeichnung automatisch
schützen werden. Sie können
die Empfindlichkeit des Sensors
ändern. Er ist Standard auf Niedrig
eingestellt, kann aber auf Aus /
Hoch / Mittel / Niedrig eingestellt
werden.
Wenn Sie den Sensor ausschalten,
kann Ihre DashCam keine
Aufnahmen dauerhaft speichern.
Parkmodus Aktivieren oder deaktivieren Sie
den Parkmodus.
Audio
Aufnahme
Aktivieren oder deaktivieren Sie
das Mikrofon.
WICHTIG!
Die Änderung der Video Qualität und Auflösung
Einstellungen zu einem niedrigerem Wert verringert
möglicherweise die Anzahl der Details, die Sie in
Ihren gespeicherten Videos sehen können.
Einstellungen
40
Page 41

Auflösung
Kartenkapazität
Aufnahmezeit
(Minuten)
1080FHD
1920*1080
4GB 30
8GB 60
16GB 120
32GB 240
720P
1280*720
4GB 40
8GB 80
16GB 160
32GB 320
WICHTIG!
Die obige Information dient nur als Hinweis.
Unterschiedliche Speicherkarten haben eine
unterschiedliche Gesamtkapazität und die
maximale Aufnahmezeit ist unterschiedlich.
DE
Einstellungen
41
Page 42

4.3 Wiedergabeeinstellungen
Um auf die Wiedergabeeinstellungen zuzugreifen,
drücken Sie im Wiedergabemodus die Taste
Menü / Zurück. Drücken Sie für jedes Untermenü
auf Hoch oder Unter um zu navigieren, auf OK
um zu bestätigen, und auf Menü/Zurück um
zurückzugehen oder abzubrechen.
Einstellungen
42
Page 43

Löschen Benutzen Sie diese Option, um auf
Ihre SD-Karte gespeicherte Fotos und
Videos zu löschen. Sie können wählen,
ob Sie die aktuelle Datei, die Sie gerade
sehen, oder alle Dateien auf Ihrer SDKarte löschen möchten.
WICHTIG! Sie können keine Fotos
oder Videos die Sie gelöscht haben
wiederherstellen.
Sichern Benutzen Sie diese Option, um auf
der SD-Karte gespeicherte Fotos und
Videos zu sperren, damit sie nicht
gelöscht werden können.
Verwenden Sie die gleiche Option,
um zuvor gesperrte Fotos oder Videos
zu entsperren. Sie können zwischen
Aktuelle sperren, Aktuelle Freigabe, Alle
sperren oder Alle entsperren wählen.
DE
Einstellungen
43
Page 44

Witaj...
właśnie zostałeś posiadaczem kamery
samochodowej marki Motorola!
Dziękujemy za zakup naszej kamery samochodowej. Pamiętaj
o zachowaniu paragonu zakupu produktu. Aby skorzystać
z obsługi gwarancyjnej, niezbędne będzie przedstawienie
dowodu zakupu z widniejącą na nim datą nabycia produktu.
Brak rejestracji na stronie producenta nie ma wpływu
na możliwość ubiegania się o obsługę gwarancyjną. W
przypadku jakichkolwiek pytań dotyczących produktu, Adres
strony internetowej:
www.motorolastore.com/support
TDzięki niniejszej instrukcji obsługi będziesz mógł w pełni
wykorzystać możliwości produktu. Przed montażem kamery
w aucie należy zapoznać się z Wytycznymi Odnośnie Bezpieczeństwa na stronie 5.
Przed rozpoczęciem użytkowania, w odpowiednim gnieździe
kamery umieścić należy kartę SD.
Co zawiera zestaw?
• Kamerę samochodową
• Uchwyt mocujący
• Ładowarkę samochodową
• Instrukcję obsługi
Page 45

Specyka kamery samochodowej
9 10
1
2
3
4
11 12 13
5
6
7
8
14
15
16 17
1. GniazdonakartęSD
2. PrzyciskMenu/Dotyłu
Umożliwia zmianę ustawień
3. Przycisk blokady
4. Przycisk zmiany trybu
Zmiana trybu pomiędzy
Wideo a Odtwarzanie
5. Przyciskwłączania/wyłączania
Naciśnięcie, gdy urządzenie
jest wyłączone: włączanie
urządzenia. Naciśnięcie,
gdy urządzenie jest
włączone: włączenie/
wyłączenie ekranu. Dłuższe
naciśnięcie gdy urządzenie
jest włączone: wyłączenie
urządzenia.
6. Strzałkawgórę
Przewijanie w tył w trybie
odtwarzania. W trybie
Wideo: wykonanie zdjęcia.
7. Przycisk OK
Przejście do sekcji ustawień
W trybie Wideo:
Rozpoczęcie/Zakończenie
nagrywania
8. Strzałkawdół
Przewijanie w przód w trybie
odtwarzania;
W trybie nagrywania:
wyciszanie dźwięku
9. Gniazdo USB/zasilania
10. Trzpieńmontażowy
11. Głośnik
12. Mikrofon
13. Przycisk Reset
14. Obiektyw
15. Wskaźnikstanuładowania
Czerwony: Ładowanie
Zielony: Urządzenie
naładowane
16. Lampka statusu
Ciągłe światło niebieskie:
urządzenie aktywne
Migające światło niebieskie:
nagrywanie
17. Ekran 3.0”
Page 46

1. Wytyczne Odnośnie
Bezpieczeństwa
UWAGA:
• Nie należy montować urządzenia w pobliżu poduszki
powietrznej kierowcy lub pasażera. Przed montażem
sprawdzić książkę pojazdu celem określenia zasięgu
otwartych poduszek powietrznych.
• Nie należy zmieniać trybów lub ustawień urządzenia
podczas jazdy.
• Należy upewnić się, że urządzenie oraz kabel
zasilający zamontowane są w sposób zaprezentowany
na stronie 6 i nie wpływają negatywnie na pole
widzenia kierowcy ani na możliwość obsługi
kluczowych elementów pojazdu.
Before using the dash cam, the user shall check
the applicable laws on the use of dash cams.
In some jurisdictions, the use of dash cams can be
considered as an invasion of privacy.
Furthermore, the mounting of the dash cam on
the windshield might be regulated by law in some
jurisdictions.
It is the user’s responsibility to check the
applicable laws before using the dash cam. We do
not take any responsibility for wrong or unlawful
use of the dash cam.
46
Wytyczne Odnośnie Bezpieczeństwa
Page 47

2. Informacje wstępne
2.1 Montażurządzenia
Najlepsze miejsce montażu
TPowyższa ilustracja przedstawia sposób montażu
w aucie z kierownicą po lewej stronie. W przypadku
montażu w aucie z kierownicą po prawej stronie,
sposób mocowania kabla należy odwrócić.
• Zamontować urządzenie w okolicy lusterka
wstecznego oraz w obszarze szyby obejmowanym
przez ramiona wycieraczek, aby uzyskać
maksymalną możliwą widoczność.
• Do urządzenia dołączono kabel USB o długości
3.6 metra. Należy go zamocować w taki sposób,
aby nie zmniejszał on widoczności. Jeżeli jest to
PL
Informacje wstępne
47
Page 48

konieczne, do zabezpieczenia kabla użyć należy
klipsów.
• Przymocować urządzenie do uchwytu. Docisnąć
ssawkę uchwytu do szyby i przesunąć pokrętło, aby
zablokować ją w pożądanej pozycji. Upewnić się, że
uchwyt jest odpowiednio mocno przytwierdzony
do szyby.
• Używając kamery należy podłączyć ją do
gniazda zapalniczki, aby zapewnić stały poziom
naładowania baterii. Urządzenie nie jest
przeznaczone do pracy na baterii wbudowanej.
2.2 Pierwszeużycie
• Włożyć kartę SD (nie jest dołączona do zestawu)
do gniazda SD. Kamera obsługuje karty do
pojemności 32 GB (klasa 10). Zaleca się
sformatowanie karty przed użyciem. Warto
dodatkowo zapoznać się z ustawieniami
dotyczącymi karty przedstawionymi w niniejszej
instrukcji.
• Kamera włączy się oraz rozpocznie nagrywanie
każdorazowo po podłączeniu do źródła zasilania.
Wystarczy podłączyć urządzenie do źródła
zasilania, które zasilane jest automatycznie po
uruchomieniu auta, co pozwoli kierowcy uniknąć
48
Informacje wstępne
Page 49

konieczności pamiętania o każdorazowym
naciskaniu przycisku włączającego kamerę.
• Urządzenie można także w każdej chwili włączyć
lub wyłączyć naciskając przycisk włączania/
wyłączania.
• Czerwona lampka LED zapali się po podłączeniu
urządzenia do źródła zasilania. Po każdorazowym
włączeniu lub wyłączeniu urządzenia, na ekranie
pojawi się logo rmy Motorola.
3. Użytkowanie kamery
samochodowej
3.1 Nagrywanie i zapisywanie
Głównym zadaniem kamery jest stałe nagrywanie
drogi znajdującej się przed kierowcą, jak również
zapisywanie wszelkich incydentów drogowych i
wypadków, w których może on uczestniczyć.
Urządzenie nagrywa pliki wideo o długości 1 minuty
(czas trwania jednej sesji zmienić można w menu,
patrz sekcja 4.2: Ustawienia wideo). Produkt
wyposażono w czujnik wibracji. W przypadku
wyczucia nadmiernych drgań, urządzenie zapisze na
dysku pliki, podczas których drgania takie wystąpiły.
PL
Użytkowanie kamery samochodowej
49
Page 50

Czułość czujnika można zmienić, patrz sekcja 4.2:
Ustawienia wideo.
Gdy karta SD zostanie zapełniona, nowe pliki wideo
będą nadpisywać najstarsze nagrania. Pamięć
karty urządzenie dzieli w następujący sposób: 70 %
normalna jazda, 20 % zarejestrowane wydarzenia
drogowe, 10 % zdjęcia.
3.2 Zmiana trybu
Istnieje możliwość zmiany pomiędzy trybem wideo
a trybem odtwarzania poprzez naciśnięcie przycisku
trybu.
Tryb wideo jest trybem domyślnym. Aby przeglądać
lub usuwać wykonane zdjęcia, należy przejść do
trybu odtwarzania.
UWAGA!
Nie należy zmieniać trybów pracy urządzenia
podczas jazdy.
3.2.1 Trybpamięcimasowej
Urządzenie można także podłączyć do komputera
wykorzystując w tym celu standardowy kabel USB,
co pozwoli na przeglądanie i zarządzanie zdjęciami
oraz plikami wideo zapisanymi na karcie.
50
Użytkowanie kamery samochodowej
Page 51

3.2.2 Tryb wideo
1
9 10 11 12
2 3 4 5 6 7 8
Poniższa ilustracja przedstawia wszelkie informacje
wyświetlane na ekranie kamery MDC300 w trybie
wideo. Niektóre z ikon pojawiać się będą wyłącznie
po wyborze określonej funkcji, zgodnie z wytycznymi
podanymi poniżej.
6
7
1. Tryb
parkowania
Pojawia się na ekranie po wyborze
trybu parkowania
2. Mikrofon Pojawia się na ekranie, gdy aktywna
jest funkcja nagrywania dźwięku.
Ikona ta pojawi się, gdy
urządzenie zostanie wyciszone.
Użytkowanie kamery samochodowej
PL
51
Page 52

3.
Nagrywanie
Pojawia się na ekranie, gdy
rozpoczęło się nagrywanie.
Ikona informuje, że urządzenie
czuwa.
4.
Rozdzielczość
Wyświetla obecną rozdzielczość
ekranu
5. Klatki Wyświetla ilość klatek na sekundę
6. Tryb Wskazuje, że kamera jest w trybie
wideo
7. Karta
pamięci
Pokazuje, że włożono kartę pamięci.
ikona ta jest wyświetlana po
wyjęciu karty z urządzenia.
8. Bateria Informuje o stanie baterii.
9. Data Bieżąca data
10. Godzina Bieżąca godzina
11. Czas
nagrania
Wyświetla czas nagrywania
bieżącego pliku wideo.
12. Ochrona Wyświetla się na ekranie w
przypadku zablokowania pliku
wideo przez czujnik lub naciśnięcie
przycisku blokady.
52
Użytkowanie kamery samochodowej
Page 53

3.2.3 Tryb odtwarzania
Aby przejść do trybu odtwarzania, należy
nacisnąć przycisk zmiany trybu.
Dla każdego z trybów wideo, strzałki w górę i w
dół odpowiadają za nawigację, przycisk OK do
zatwierdzania wyboru, klawisz Menu do przejścia
do trybu ustawień, natomiast przycisk trybu – do
powrotu do poprzedniego ekranu.
Po dokonaniu wyboru pożądanego typu wideo,
wyświetlony zostanie ekran zawierający następujące
informacje.
PL
Użytkowanie kamery samochodowej
53
Page 54

1
5 6 7
2 3 4
8
MDC300 wyświetla na początku ostatni nagrany
plik. Zależnie od wybranego typu pliku, wyświetlane
informacje oraz funkcje mogą się od siebie różnić.
Pliki wideo:
1. Tryb Wskazuje, że kamera jest w trybie
odtwarzania.
2. Identyfikator Wyświetla identyfikator pliku.
3.Kartapamięci Pokazuje, że włożono kartę
pamięci.
ikona ta jest wyświetlana po
wyjęciu karty z urządzenia.
4. Bateria Informuje o stanie baterii.
5. Data Data nagrania klipu wideo.
54
Użytkowanie kamery samochodowej
Page 55

6. Godzina Godzina nagrania klipu wideo.
1 2 3 4
5 6
7.Długość
Długość nagranego klipu wideo.
nagrania
8. Strona Bieżąca strona/ilość stron ogółem.
Zdjęcia:
7
1. Tryb Wskazuje, że kamera jest w trybie
odtwarzania.
2. Numer
Wyświetla numer bieżącego zdjęcia.
zdjęcia
3. Karta
pamięci
Pokazuje, że włożono kartę pamięci.
ikona ta jest wyświetlana po
wyjęciu karty z urządzenia.
4. Bateria Informuje o stanie baterii.
PL
Użytkowanie kamery samochodowej
55
Page 56

5. Data Data wykonania zdjęcia
6. Godzina Godzina wykonania zdjęcia.
7. Strona Bieżąca strona/ilość stron ogółem.
3.3 Tryb parkowania
Kamera może także nagrywać zdarzenia mająca
miejsce w przypadku, gdy auto jest zaparkowane a
silnik wyłączony. Wbudowana bateria umożliwi pracę
produktu w trybie czuwania oraz nagrywanie przez
okres 30 sekund po wykryciu nadmiernych drgań lub
wibracji. Nagrywanie rozpoczyna się wyłącznie po
zarejestrowaniu nadmiernych drgań przez czujnik.
UWAGA!
Z przyczyn technicznych, tryb parkowania jest
domyślnie wyłączony. Aby go aktywować należy
postępować zgodnie z wytycznymi podanymi w
sekcji 4.2: Ustawienia wideo.
3.4 Blokowanie/odblokowywanie nagrania wideo
W przypadku wystąpienia zdarzenia drogowego,
użytkownik może zablokować/odblokować dany
klip poprzez naciśnięcie przycisku LOCK w trakcie
nagrywania. Plik zablokowany zapisany zostanie w
folderze Wydarzenia.
56
Użytkowanie kamery samochodowej
Page 57

4. Ustawienia
4.1 Ustawieniagłówne
Aby uzyskać dostęp do ustawień głównych, należy
nacisnąć przycisk Menu/Do tyłu w trybie wideo.
W każdej z podsekcji menu, strzałki kierunkowe
odpowiadają za nawigację, przycisk OK za
zatwierdzanie wyboru, natomiast przycisk Menu/Do tyłu
– za anulowanie ustawień i powrót do poprzedniego
ekranu.
PL
Ustawienia
57
Page 58

Data/Godzina Ustawianie daty i godziny.
Nacisnąć strzałki kierunkowe
aby ustawić każdą z wartości.
Naciśnięcie klawisza OK spowoduje
przejście do kolejnej wartości.
Sygnał
dźwiękowy
Format daty
Aktywuje lub deaktywuje sygnały
dźwiękowe.
Ustawianie formatu daty.
Języki Angielski/Francuski/Hiszpański/
Portugalski/Niemiecki/Włoski/
体 中文/繁体中文
/Rosyjski/
Japoński
Częstotliwość Wybór częstotliwości światła
pozwalający dostosować ekran do
różnych warunków.
Wyłączanie
LCD
Wybór, czy ekran ma się nie
wyłączać, czy też ma wyłączać się
po 3 minutach.
Głośność Zmiana głośności wbudowanych
głośników na niską/średnią/wysoką.
简
58
Ustawienia
Page 59

Ekspozycja Dostosowywanie ekspozycji do
warunków pogodowych. Nacisnąć
strzałkę w górę, jeżeli zdjęcia mają
być jaśniejsze, a strzałkę w dół – gdy
mają być ciemniejsze.
Balans bieli Dostrajanie balansu bieli do
warunków oświetleniowych.
Dostępne tryby to: Auto/
Bezchmurnie/Słonecznie/
Pochmurno/Rozbłyski światła.
Zaleca się wybór trybu Auto.
Formatowanie Pozwala sformatować kartę SD.
UWAGA!
Formatowanie usunie z karty
wszystkie pliki.
Ustawienia
domyślne
Przywraca ustawienia urządzenia do
ustawień fabrycznych.
Datownik Włącza lub wyłącza dodawanie daty
do zdjęć i filmów.
Wersja Bieżąca wersja oprogramowania.
PL
Ustawienia
59
Page 60

4.2 Ustawienia wideo
Do sekcji ustawień wideo można uzyskać dostęp na
dwa sposoby:
1. Poprzez naciśnięcie przycisku Menu/Do tyłu
dwukrotnie w trybie wideo;
2. Poprzez naciśnięcie strzałki w dół w ostatniej
sekcji ustawień głównych.
W każdej z podsekcji menu, strzałki kierunkowe
odpowiadają za nawigację, przycisk OK za
zatwierdzanie wyboru, natomiast przycisk Menu/
Do tyłu – za anulowanie ustawień i powrót do
poprzedniego ekranu.
60
Ustawienia
Page 61

Rozdzielczość
wideo
Rozdzielczość ustawić można na
wartość: FHD 1920*1080 lub 720P
1280*720
UWAGA!
Jeżeli użytkownik ma zamiar
przechowywać na karcie SD
większe ilości zdjęć i klipów
wideo, zaleca się zmniejszenie
rozdzielczości.
Nadpisywanie Opcja umożliwia nadpisywanie
starych plików. Po zapełnieniu
pamięci, urządzenie usunie
najstarszy z klipów wideo, aby
odzyskać miejsce na nowe
nagranie. W tym menu można
także wybrać długość nagrywania:
Wyłączone /1 min / 3 min / 5 min
PL
Ustawienia
61
Page 62

Czujnik
wstrząsów
Czujnik wykrywa siły działające
na auto i inicjuje nagrywanie.
Użytkownik może zmienić czułość
czujnika. Domyślnie jego czułość
ustawiono na niską. Dostępne
opcje to: Wyłączony/Wysoka/
Średnia/Niska.
W przypadku wyłączenia
czujnika, kamera nie będzie w
stanie zapisać na stałe żadnego
zdarzenia drogowego.
Tryb
parkowania
Nagrywanie
Włącza lub wyłącza tryb
parkowania.
Włącza lub wyłącza mikrofon.
dźwięku
UWAGA!
Zmiana jakości wideo i rozdzielczości na niższą
może wpłynąć na szczegółowość zapisywanych
klipów wideo.
62
Ustawienia
Page 63

Rozdzielczość Pojemność
karty
1080FHD
1920*1080
4GB 30
8GB 60
Czas nagrywania
(minuty)
16GB 120
32GB 240
720P
1280*720
4GB
40
8GB 80
16GB 160
32GB 320
UWAGA!
Niniejsze dane przedstawiono wyłącznie w celach
informacyjnych. Niektóre karty charakteryzować
może nieco inna pojemność, co z kolei wpłynie na
maksymalny czas nagrywania.
PL
Ustawienia
63
Page 64

4.3 Ustawienia odtwarzania
Aby przejść do menu ustawień odtwarzania,
należy nacisnąć przycisk Menu/Do tyłu w trybie
odtwarzania. W każdej z podsekcji menu, strzałki
kierunkowe odpowiadają za nawigację, przycisk
OK za zatwierdzanie wyboru, natomiast przycisk
Menu/Do tyłu – za anulowanie ustawień i powrót do
poprzedniego ekranu.
64
Ustawienia
Page 65

Usuwanie Opcji tej należy użyć aby usunąć
zdjęcia i filmy zapisane na karcie
SD. Wybrać można pomiędzy
usunięciem obecnie oglądanego
pliku a usunięciem wszystkich
plików na karcie SD. UWAGA!
Usuniętych plików nie da się
odzyskać.
Ochrona Opcja ta pozwala zabezpieczyć
zdjęcia i klipy wideo zachowane
na karcie SD przed usunięciem.
Tej samej opcji użyć można aby
usunąć wcześniej nałożoną blokadę.
Wybrać można opcję: Zablokuj
bieżący plik, Odblokuj bieżący plik,
Zablokuj wszystkie lub Odblokuj
wszystkie.
PL
Ustawienia
65
Page 66

Välkommen...
till din nya Motorola Dashboard
Kamera!
Tack för att du har köpt vår Dashboard Kamera. Var god behåll
ditt ursprungliga daterade kvitto för dina uppgifter. För garan-
tiservice för din Motorola produkt måste du ange en kopia av
ditt daterade kvitto för att bekräfta garantin. Registrering är
inte nödvändigt för täckning av garantin.
För produktrelaterade frågor, På webben:
www.motorolastore.com/support
Denna användarmanual har all information du behöver för att
du ska få ut det mesta av din produkt.
Vänligen läs igenom säkerhetsinstruktionerna på sida 5 före
du installerar din enhet.
Innan du använder Dashboard Kamera rekommenderar vi att
du sätter in ett SD kort i SD korthållaren.
Har du allt?
• Dashboard Kamera
• Vindrute montering
• Biladapter
• Användarmanual
Page 67

Översikt över din Dashboard Kamera
9 10
1
2
3
4
11 12 13
5
6
7
8
14
15
16 17
1. Micro SD korthållare
2. Meny/Bakåt Knapp
Inställning av omkopplare/
Baksida
3. Lås knapp
4. Läges Knapp
Video/ Replay läges omkopplare
5. På/Av Knapp
Tryck på när den är Av: Slå på.
Kort tryck när På: Skärm På/Av.
Långt tryck när den är På: slå av.
6. Upp knapp
Spola tillbaka under
uppspelning; Kort tryck i
videoläge: Ta bild
7. OK knapp
Ange när inställning är inställd
Kort tryck när du är I videoläge:
Start/Stopp inspelning
8. Ner knapp
Snabbspola framåt under
uppspelning:
Kort tryck när du spelar in: Tyst
9. USB/Strömuttag
10. Montera muttern
11. Högtalare
12. Mikrofon
13. Återstall knapp
14. Lins
15. Laddningsindikator
Röd: Laddar
Grön: Fullt laddad
16. Statuslampa
Blå: Slå På
Blå blinkande: Inspelning
17. 3.0” Skärm
Page 68

1. Säkerhets instruktioner
Varning:
• Installera inte enheten i förarens eller passagerarens
krockuddssområde. Vänligen se bilens
servicehandbok för detaljer om användningsområdet
för bilens krockkuddar.
• Ändra aldrig lägen, inställningar eller program när
bilen är igång.
• Kontrollera att enheten och nätkabeln är installerade
enligt anvisningarna på sidan 6 och hindra inte
förarens synfält eller hindra körkontrollens funktionen.
Innan du använder dash kamera ska användaren
kontrollera lagar om användning av dash kameror.
I vissa domstolar kan användning av dash kameror
betraktas som en invasion av privatlivet. Vidare
kan montering av dash kamror på vindrutan
vara reglerad inom lag i vissa domstolar. Det är
användarens ansvar att kontrollera gällande lagar
innan du använder en dash kamera. Vi tar inget
ansvar för felaktig eller olaglig användning av dash
kameror.
68
Säkerhets instruktioner
Page 69

2. Komma igång
2.1 Installera din enhet
Najlepsze miejsce montażu
Ovanstående illustration avser en vänsterstyrd
bil. För högerstyrda bilar, vänligen vänd
kabelinstallationens position I enlighet med detta.
• Installera din enhet inom backspegelsområdet och
inom torkrengöringsområdet för att få en tydlig
bild.
• Enheten levereras med en 3,6 m USB nätkabel.
Ordna nätkabeln så att den inte stör förarens sikt.
Använd kabelklämmor för att fästa strömkabeln om
det behövs.
Komma igång
SV
69
Page 70

• Placera enheten på vindrutan som underlag först.
Tryck på sugkoppen på vindrutan och tryck på
spaken för att låsa. Se till att fästet är säkert fastsatt
på vindrutan.
• När du använder dashboard kameran i bilen
rekommenderar vi att du alltid använder
2.2 Första användning
• Sätt i ett SD kort (medföljer ej) i SD korthållaren.
Din dashboard kamera accepterar SD kort med
en kapacitet på upp till 32GB (klass 10). Det
rekommenderas att du formaterar SD kortet. Se de
inställningar som beskrivs i den här handboken.
• Din dashboard kamera kommer alltid att starta och
börja spela in automatiskt så snart den är ansluten
till en strömkälla.
Anslut enkelt din dashboard kamera till en
strömkälla som uppstår när du startar din bils motor.
Dashboard kameran kommer automatiskt att börja
inspelningen utan att du behöver komma ihåg att
trycka på knappen.
• Du kan även slå PÅ eller AV manuellt genom att
trycka på På/Av knappen.
• Strömindikatorn (Röd) tänds när strömmen är
inkopplad. När enheten är PÅ eller AV ser du en
stänkskärm som visar Motorola logotypen.
70
Komma igång
Page 71

3. Använd din Dashboard Kamera
3.1 Spela in och spara
Syftet med din dashboard kamera är att kontinuerligt
spela in vägen framåt och att automatiskt spela in
och spara eventuella incidenter eller olyckor du
kanske är inblandad i.
Din enhet spelar in video efter intervaller av 1 minut
(varaktigheten kan ändras I videoinställningsmenyn,
se 4.2 Videoinställningar.). Den är utrustad med en
sensor som upptäcker stötar. Varje gång en stöt
upptäcks kommer den permanent att spela det
intervall under vilken händelse inträffade. Sensorns
känslighet kan ändras I videoinställningsmenyn, se
4.2 Videoinställningar.
När ditt SD kort är fullt kommer det automatiskt att
skriva över det äldsta bildmaterialet. SD minneskort
har blivit inställt på: 70% för normal, 20 % för
händelser, 10% för bilder.
3.2 Växlingslägen
Du kan växla mellan video och uppspelningsläge
genom att trycka på knappen Läge. Videoläget är
standardläget. Om du vill vill visa eller radera sparade
fotografier växlar du till uppspelningsläget.
SV
Använd din Dashboard Kamera
71
Page 72

VIKTIGT!
1
9 10 11 12
2 3 4 5 6 7 8
Föraren får aldrig byta lägen medan bilen är i
rörelse.
3.2.1 Masslagringsläge
Du kan också ansluta enheten till en dator med den
vanliga mikro USB kabeln for att visa och hantera
foton och videoklipp om finns lagrade i SD kortet.
3.2.2 Videoläge
Tabellen nedan förklarar de olika uppgifterna som
visas på skärmen när din MDC300 är i videoläge.
Vissa ikoner visas bara när den aktuella funktionen
har valts inom Videomenyn som beskrivs nedan.
6
7
Använd din Dashboard Kamera
72
Page 73

1.
Parkeringsläge
Visas på skärmen vid parkering.
Läget har blivit påslaget.
2. Mikrofon Visas på skärmen när ljudinspelningen är
aktiv.
Visas när den är tyst.
3. Inspelning Visas på skärmen när.
inspelningen pågår
visas när den
är i vänteläge.
4. Upplösning Visar den aktuella upplösningen.
5. Ram Visar antal bilder per sekund.
6. Läge Indikerar att dashboard kameran är i
viloläge.
7. Minneskort Anger om minneskortet är närvarande
visas när minneskortet har tagits
bort.
8. Batteri Indikerar batteristatusen.
9. Datum Nuvarande datum
10. Tid Aktuell tid
11.
Visar inspelningstid eller aktuell video.
Inspelningstid
12. Skyddad Visad på skärmen när en videofil
har skyddats genom aktivering av
G sensorn eller genom att trycka på
skyddsknappen för filer.
SV
Använd din Dashboard Kamera
73
Page 74

3.2.3 Uppspelningsläge
1
5 6 7
2 3 4
Tryck på Läges knappen för att välja
uppspelningsläge.
För varje videotyp, tryck på Upp eller Ner för att
navigera, OK för att bekräfta, Meny/Bakåt för att
gå tillbaka. När du väl har valt en typ av video visas
följande skärm.
8
Använd din Dashboard Kamera
74
Page 75

MDC300 visar den senaste inspelade filen.
Beroende på filtypen skiljer sig informationen och
uppspelningsfunktionerna på skärmen.
Videofiler:
1. Läge Indikerar att dashboard kameran
är i videouppspelningsläge.
2.
Visar det aktuella videonummeret.
Videonummer
3. Minneskort Anger om minneskortet är
närvarande.
visas när minneskortet har tagits
bort.
4. Batteri Indikerar batteristatus.
5. Datum Nuvarande videodatum.
6. Tid Aktuell videotid.
7. Videolängd Nuvarande videolängd.
8. Sida Nuvarande sida/totala sida.
SV
Använd din Dashboard Kamera
75
Page 76

Bildfiler:
1 2 3 4
5 6
7
1. Läge Indikerar att dashboard kamera är i
bildläge.
2. Bild
Visar aktuellt bildnummer.
nummer
3.
Minneskort
Anger om ett minneskort är
närvarande.
har tagits bort.
visas när minneskortet
4. Batteri Indikerar batteristatusen.
5. Datum Nuvarande bilddatum.
6. Tid Aktuell bildtid.
7. Sida Nuvarande sida/totala sida.
Använd din Dashboard Kamera
76
Page 77

3.3 Parkeringsläge
Din dashboard kamera kan spela in bilder av
händelser som uppstår när bilen är parkerad
med motorn avstängd. Det inbyggda batteriet
kommer att hålla sensorn på enheten I viloläge och
börja spela in automatiskt i 30 sekunder om den
upptäcker vibrationer eller stötar. Parkeringsläget
kan bara spela in och spara en bild efter det att en
händelse har detekterats av sensorn.
VIKTIGT!
På grund av tekniska skäl är parkeringsläget
inaktivt av standard. Du kan aktivera det i
videoinställningsmenyn, se 4.2 Videoinställningar
3.4 Lås/Lås upp video
Vid nödläge kan du låsa/låsa upp den aktuella
videon genom att trycka på LÅS knappen när du
spelar in. Videofilmen på den låsta videon sparas i
mappen Händelser tills mappen är full.
SV
Använd din Dashboard Kamera
77
Page 78

4. Inställningar
4.1 Huvudinställningar
För att komma till huvud-inställningar, tryck på Meny/
Bakåt knappen medan du är i videoläge. För varje
undermeny, tryck på Upp eller Ner för att navigera,
OK för att bekräfta och Meny/Bakåt för att gå tillbaka
eller avbryta.
Datum/Tid Ställ in datum och tid. Tryck på Upp
eller Ner för att ställa in varje värde.
Det ska vara anpassat till satelittiden
en gång placerad.
Pip ljud Aktivera eller inaktivera pip ljud.
Datum
formation
Ange datum formation.
Inställningar
78
Page 79

Språk
Engelska/Franska/Spanska/
Portugisiska/Tyska/Italienska/
中文 / 繁体中文
/Ryska/Japanska
简体
Frekvens Välj exponering som används för att
justera exponeringsnivån för olika
ljusförhållande,
LCD Av Du kan ställa in LCD så den inte
stängs av eller efter 3 minuter.
Volym Ställ in volymen för den inbyggda
högtalaren till hög/mellan/låg.
Exponering Används för att justera exponerings-
nivån för olika ljusförhållanden. Du
kan justera exponeringen som du
behöver. Tryck på upp knappen om
du vill ha bilderna klarare eller nedåt
om du vill ha dem mörkare.
Vitbalans Justerar vitbalansen för olika
ljusförhållanden. Du kan ställa in
vitbalansen till Auto/Glödande/
Soligt/Molnigt/Skimmer. Vi
rekommenderar att du lämnar det
på Auto.
SV
Inställningar
79
Page 80

Format Använd det här alternativet för att
formatera ditt SD kort.
VIKTIGT!
Om du formaterar ett SD kort
raderas allt innehåll i minnet.
Standardinställning
Stämplingsinställning
Återställ alla enhetens inställningar
till fabriksinställningar.
Aktivera eller inaktivera ett
datummärke som visas på dina
videoklipp och bilder.
Version Nuvarande firmware version.
4.2 Videoinställningar
Det finns två sätt att komma åt Videoinställningar:
1. Tryck på knappen Meny/Bakåt två gånger medan
du är i Videoläge;
Inställningar
80
Page 81

2. Tryck på Ned knappen medan du är på den sista
undermenyn I Huvudinställningar.
För varje undermeny, tryck på Upp eller Ned för att
navigera, OK för att bekräfta och Meny/Bakåt för att
gå tillbaka eller avbryta.
Videoupplösning
Du kan ställa in
videouppllösningen: FHD
1920*1080 or 720P 1280*720
VIKTIGT!
Om du vill lagra fler bilder eller
videoklipp på ditt SD kort, försök
minska upplösningen.
Loop inspelning Loop inspelning gör att kameran
kan skriva över gamla filer med
nya filer. När minneskortet är
fullt kommer kameran att radera
den första videofilen för att göra
plats för den senaste filen. Välj
standardlängden för inspelnings
intervaller: Av /1 min / 3 min / 5
min
SV
Inställningar
81
Page 82

G Sensorn G Sensorn detekterar krafter som
automatiskt skyddar den aktuella
inspelningen vid en kollision. Du
kan ändra sensorns känslighet.
Den är inställd på Låg som
standard, men kan ställas in till Av/
Hög/Medium/Låg.
Om du stänger av sensorn kan din
dashboard kamera inte permanent
spara några bilder.
Parkerings-läge Aktivera eller inaktivera
parkeringsläge.
Spela in ljud Aktivera eller inaktivera mikrofon.
IVIKTIGT!
Ändringar av inställningar för videokvalitet och
upplösning till ett längre värde kan minska mängden
detaljer som du kan se på dina sparade videor.
Inställningar
82
Page 83

Upplösning Kort kapacitet Inspelningstid
(minuter)
1080FHD
1920*1080
4GB 30
8GB 60
16GB 120
32GB 240
720P
1280*720
4GB 40
8GB 80
16GB 160
32GB 320
VIKTIGT!
Ovanstående information är endast till för
din referens. Olika minneskort har olika totala
kapaciteter och den maximala inspelningstiden är
annorlunda.
SV
Inställningar
83
Page 84

4.3 Uppspelningsinställningar
För att komma åt uppspelningsinställningar
trycker du på knappen meny/bakåt medan du är
i uppspelningsläge. För varje undermeny tryck på
Upp eller Ned för navigering, OK för att bekräfta och
Meny/Bakåt för att gå tillbaka eller avbryta.
Inställningar
84
Page 85

Radera
Använd det här alternativet för att
radera bilder och videoklipp som är
lagrade i ditt SD kort. Du kan välja
mellan att radera den aktuella filen
du tittar på eller alla filer på ditt SD
kort. VIKTIGT! Du kan inte återställa
en bild eller en video som tidigare
har tagits bort.
Skydda Använd det här alternativet om du
vill låsa bilder och videoklipp som
är lagrade I ditt SD kort så att de
inte kan raderas. Använd samma
alternativ för att låsa upp tidigare
låsta bilder eller videoklipp. Du kan
välja mellan videos. Lås aktuell, Lås
upp aktuell, Lås alla eller Lås upp
alla.
SV
Inställningar
85
Page 86

Manufactured, distributed or sold by Binatone Electronics
International LTD., official licensee for this product.
MOTOROLA and the Stylised M Logo, are trademarks or
registered trademarks of Motorola Trademark Holdings,
LLC. and are used under license. All other trademarks are
the property of their respective owners. © 2018 Motorola
Mobility LLC. All rights reserved.
EU_EN_DE_PL_SV Version 2.0
Printed in China
 Loading...