

Page 1
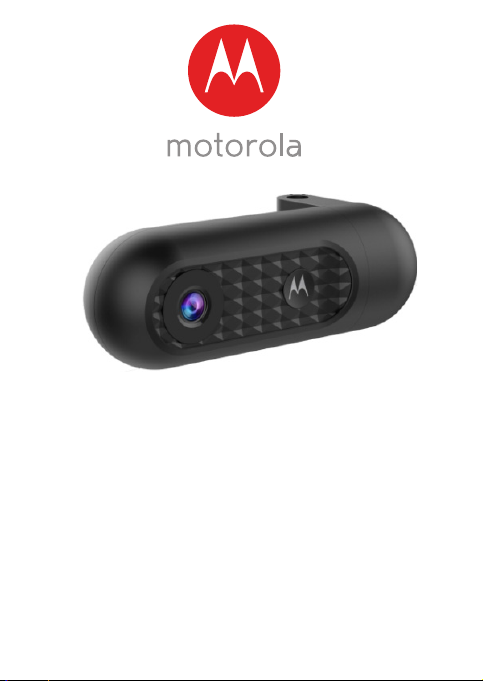
USER’S GUIDE
HD Dash Cam with Wi-Fi® For Road or
In-Car Monitoring
Model: MDC10W
The features described in this user’s guide are subject to
modifications without prior notice.
Page 2

Welcome...
to your new Motorola Dashboard Camera!
Thank you for purchasing the Dashboard Camera. The
Dashboard Camera is designed to let you record each
and every instant while you are on the road, and
manage your recordings via Hubble Dashcam app.
Please keep your original dated sales receipt for your
records. For warranty service of your Motorola
product, you will need to provide a copy of your dated
sales receipt to confirm warranty status. Registration
is not required for warranty coverage.
For product related questions, please call:
*Calls cost 7p per minute plus your telephone company's access charge
This User’s Guide has all the information you need
to make the most out of your product.
Please read the Safety Instructions on page 5
before you install the unit.
Before you use the Dashboard Camera, we
recommend you insert a SD card into the SD card
slot.
Got everything?
• Dashboard Camera
• Suction Mount
• Sun Visor Mount
• Car Adapter
• User Manual
+44 (0) 844 557 0890 (UK only)*
Mon - Fri 8:00am to 8:00pm
Sat 8.30am to 2:00pm
On the Web: www.motorolastore.com/support
+44 (0) 8187 62092 (ROI)
Email: support@motorolastore.com
Page 3
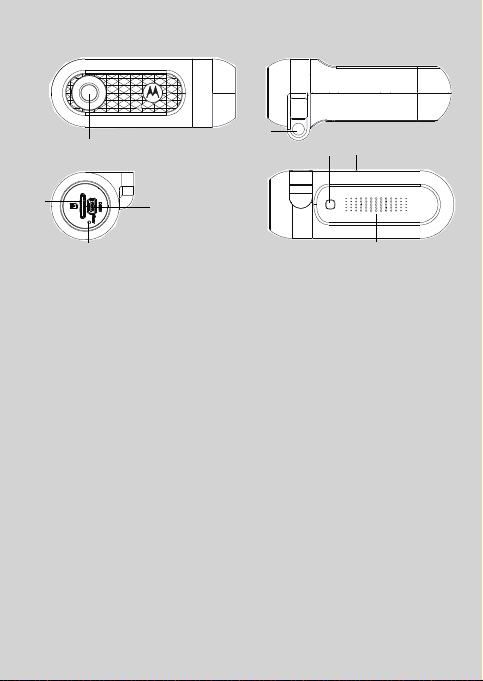
Overview of your Dashboard Camera
1
3
4
5
6
7
8
2
1.
Lens
Wide Angle 140°
2.
microSD card slot
Insert a microSD card here.*
3.
DC-IN & USB Socket
Connect the car adapter or
USB data cable here.
4.
Recessed Reset Button
In the unlikely event
MDC10W becomes
unresponsive, insert a pin
into the hole to reset
MDC10W.
* Make sure the printed side of the
card is facing the right direction as
shown.
5.
Mounting Nut
Screw in the supplied
Suction Mount or Sun Visor
Mount here.
6.
Power Button and Indicator
Press and hold for 3
seconds to turn MDC10W
On / Off.
Red light: Charging
Blue light flashing:
Recording
7.
Microphone
Integrated microphone for
audio recording.
8.
Speaker
Page 4

Table of contents
1. Safety Instructions........................................................ 5
2. Getting Started.............................................................. 6
2.1 Installing your Device ..............................................6
2.2 Basic Use.......................................................................8
3. Connecting Devices.................................................... 10
3.1 System Requirements............................................ 10
3.2 Install Hubble Dashcam App ............................. 10
3.3 Connect your smartphone to MDC10W ......... 10
3.3.1 On Android Smartphone ....................... 10
4. Manage your recordings.............................................15
5. Manage downloaded photos and videos ..............20
6. Main features and Settings ....................................... 22
7. Other settings .............................................................. 25
8. Disposal of the Device (Environment)................... 27
9. General Information ................................................... 28
10. Technical Specifications............................................ 35
4 Table of contents
3.3.2 On iOS Smartphone .................................13
6.1 Recording and Saving ...........................................22
6.2 Mass Storage Mode ................................................22
6.3 Parking Mode ............................................................23
6.4 G-sensor / File Protection....................................23
6.5 Automatic Start / Stop ........................................ 24
7.1 Change Wi-Fi password .......................................25
7.2 Language Settings ..................................................25
7.3 Device key sound ....................................................25
7.4 Audio recording .......................................................25
7.5 White Balance...........................................................25
7.6 Exposure.....................................................................26
7.7 Restore default settings .......................................26
7.8 Restore Wi-Fi password.......................................26
Page 5

1. Safety Instructions
WARNING
• Do not install the device within the driver’s or
passenger airbag operation range. Please refer
to your car’s service manual for details about
the operation range of your car’s airbags.
• Never modify modes, settings, or program
your device while your car is in motion.
• Ensure the device and its power cord are
installed as per the instructions on page 6, and
do not obstruct the driver’s line of sight or
impede the operation of any driving controls.
Safety Instructions 5
ENGLISH
Page 6
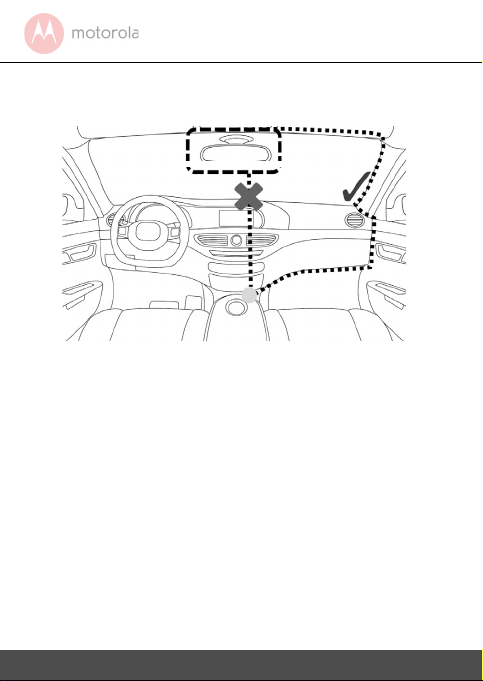
2. Getting Started
Best Installation Location
2.1 Installing your Device
The above illustration refers to a left-hand drive car. For
right-hand drive cars, please flip the position of the cable
installation accordingly.
• Install your device within the rear-view mirror
area and within the wiper cleaning area to get
the clearest possible view.
• Your device comes with a 3.6m USB power
cable. Organise the power cord so that it
does not interfere with the driver's vision. Use
cable clips to secure the power cord if
necessary.
6 Getting Started
Page 7

• There are two ways to install MDC10W in your
1. Screw the MDC10W into the mounting bolt of the Suction mount.
2. Press the suction cup of
the Suction mount against
the windshield, and press
the lever to lock. Ensure
that the mount is safely
attached to the windshield.
3. Set your desired recording
angle and lock into position
by tightening the lock nut.
Suction mount
1. Screw the MDC10W into
the mounting bolt of the
Sun visor mount.
2. Push the clip of the Sun
visor mount to the sun
visor.
Sun visor mount
car:
Getting Started 7
ENGLISH
Page 8
• When using the dashboard camera in your
car, we recommend that you always use the
cigarette lighter car adapter in order to
maintain the battery level. The unit is not
designed to run on battery power alone, the
battery is there for backup purposes only.
2.2 Basic Use
• Your dashboard camera will only record when
an SD card is inserted.
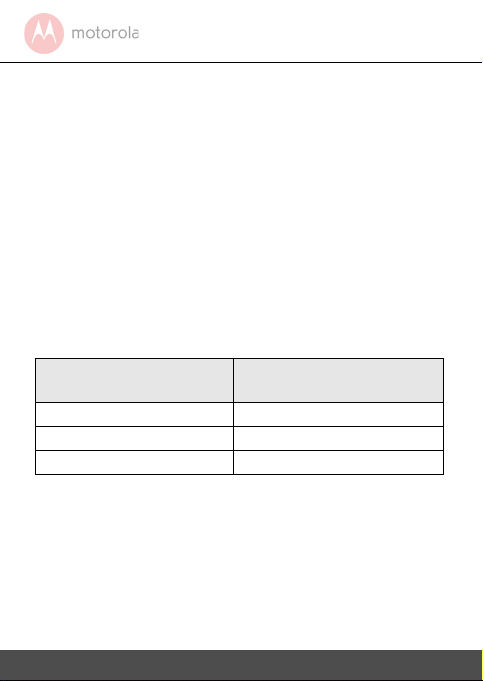
• Insert a micro SD card (not provided) into the
SD card slot. Your dashboard camera accepts
SD cards of up to 32GB capacity (class 10).
It is necessary that you format the SD card
when using it for the first time.
Card Capacity Estimated recording
time* (minutes)
4GB 20
16GB 80
32GB 160
Note
The above information is for your reference
only. Different memory cards and different
video resolutions will result in different
recording time.
• Your dashboard camera will always power up
and begin loop recording automatically as soon
8 Getting Started
Page 9

as it is connected to a power source.
Simply connect your dashboard camera to a
power source that comes on when you start the
engine of your vehicle, and the dashboard
camera will start loop recording automatically
(Blue light flashing) without you having to
remember to press on a button.
• To stop recording to protect your privacy, press
and hold the power button to shut down the
device.
Getting Started 9
ENGLISH
Page 10

3. Connecting Devices
3.1 System Requirements
Smartphones: Android™ (Android™ 5.0 or
higher) and iOS® (iOS 10) only.
3.2 Install Hubble Dashcam App
Hubble Dashcam App is available for free
download from Google Play Store (Android)
and the App Store (iOS).
The App can easily be found by searching for
"Hubble Dashcam" in your chosen store. Once
installed, Hubble Dashcam App will be available
on your smartphone.
3.3 Connect your smartphone to
MDC10W
Connecting your smartphone to the MDC10W
works similarly as connecting your smartphone
to a Wi-Fi network.
First, make sure that your MDC10W is powered
on by the car adapter (Red light on and Blue
light flashing).
3.3.1 On Android Smartphone
1. Open Hubble Dashcam app on your
smartphone.
10 Connecting Devices
Page 11

2. The following screen appears.
3. Tap “Connect to the dashcam” to connect
your smartphone to the MDC10W.
4. Enter password (the default password is
12345678) and tap Yes.
Connecting De vices 11
ENGLISH
Page 12

5. Once connected successfully, the View
Finder and Main control panel appear as
below:
Warning:
When your Android phone is connected to the
MDC10W camera for viewing of live video or
playback of video, your phone’s 3G/4G mobile
data will not be accessible. Your phone will not
have any Internet connection as well.
12 Connecting Devices
Page 13

3.3.2 On iOS Smartphone
1. Go to Settings > Wi-Fi and select
"MDC10W_xxxxxxxxx" from the list of
networks.
2. Enter password (the default password is
12345678) and tap Join.
3. The following screen appears:
4. Open Hubble Dashcam app, and tap
“Connect to the dashcam” to connect your
smartphone.
Connecting De vices 1 3
ENGLISH
Page 14

5. Once connected successfully, the View
Finder and Main control panel appear as
below:
14 Connecting Devices
Page 15

4. Manage your recordings
The following instructions and screenshots show
how things work and look using Android phones.
However, the basic steps should still work for
iOS phones.
Although Hubble Dashcam app has been
designed to be viewed in portrait mode as you
would normally use your phone, some functions
are best viewed when your phone is rotated to
landscape mode, such as: Live View and when
watching recordings.
Note
Functions and features in Hubble Dashcam app
are subject to change without notice.
Manage your rec ordings 15
ENGLISH
Page 16

Live /
Playback
(
Displayed on
top left corner)
Live: screen shows real-time
live stream from MDC10W
Red dot flashing: loop
recording mode
Playback: screen shows
playback of the recorded
video that is stored on the
memory card of MDC10W
Event videos Shows the list of Event videos
that were automatically
locked when G-sensor detects
impacts.
Tap to playback an Event
video from the list.
To return to live video and
recording mode, tap .
Take photo This allows you to take photo
of a live video or a video
playback, and save it in your
app.
Tap to take photo.
To view the photo, tap
Downloaded and select Photo.
To return to view finder and
main control panel, tap Home.
16 Manage your recordings
Page 17

Playback
video
Tap and drag inside the
timeline bar to select the time
you wish to playback the
video. You can also pinch and
spread to zoom in and out of
the timeline bar.
Recordings are colour-coded:
green for normal recordings,
red for Event videos, while no
colour indicates that there is
no recording during that time
period.
Tap to start playback. To
return to live video and
recording mode, tap .
WARNING!
Video recording will stop when
in video playback mode.
Manage your rec ordings 17
ENGLISH
Page 18

Download
videos
During video playback, tap
to download video.
Tap on the first picture that
you want to start video
download (Start), followed by
the last picture that you want
to end video download (End),
and then tap Download. Your
chosen videos will be
downloaded to your
smartphone.
To view downloaded videos,
tap Downloaded and select
Video.
To return to view finder and
main control panel, tap Home.
18 Manage your recordings
Page 19

Settings
(Displayed on
top right
corner)
Tap , and the following
screen will appear:
Tap to view more
information or options.
Tap on Dashcam Settings, and
the following screen will
appear:
The default settings have been
chosen for best performance.
However, you can also change
them based on your needs.
Manage your reco rdings 19
ENGLISH
Page 20

5. Manage downloaded photos and videos
You can use Hubble Dashcam app to manage
files that have already been downloaded from
MDC10W to your smartphone.
1. From the view finder and Main control panel, tap Downloaded and the following screen will appear:
• Tap to select Video or Photo.
• To playback a video or view a photo, simply
tap on the video or photo.
• To return to the previous screen, tap Home.
20 Manage downloaded photos and videos
Page 21

• To save Videos or Photos:
iPhone Select a file and tap SAVE on the
bottom right corner. A "DASHCAM"
folder will be automatically created
to store saved videos and photos.
You can select videos or photos to
share on your social network.
Android
Phone
Downloaded Videos or Photos will be
automatically saved to phone
memory inside "DASHCAM" folder.
• To playback saved videos, you need to install
VLC player, which supports MJpeg format
decoding.
• To delete a picture, tap Select, then tap to
select the picture you want to delete, and then
tap . To cancel your selection, tap Cancel.
Man age down loa ded phot os a nd v ideo s 2 1
ENGLISH
Page 22

6. Main features and Settings
6.1 Recording and Saving
The purpose of your MDC10W is to continuously
record the road ahead, and to automatically
record and save any incidents or accidents you
might be involved in. The status LED (Blue) will
flash when it is recording.
By default, MDC10W records video in clusters of
1 minute. It can also be set to 3 minutes or 5
minutes. Although a longer loop recording time
improves continuous playback, it will result in
larger files, which is more difficult to manage.
To change the default duration for each
recording cluster, tap in Hubble Dashcam
app, select Dashcam settings > Loop recording.
Once your SD card is full, it will automatically
overwrite the oldest footage.
6.2 Mass Storage Mode
You can also connect MDC10W to your
computer using a standard micro USB cable to
view and manage videos stored inside the SD
card.
22 Main features and Settings
Page 23

6.3 Parking Mode
Your MDC10W can record footages of events
occurring when your car is parked with its engine
off. The built-in battery will keep the G-sensor of
your device in detection mode, and will start
recording automatically for 30 seconds if it
detects vibration or a shock. Parking mode can
only record and save footage after an event has
been detected by the G-sensor.
IMPORTANT!
Parking mode is disabled by default.
To enable parking mode, tap in Hubble
Dashcam app > Dashcam settings > Parking
mode.
6.4 G-sensor / File Protection
Your MDC10W is equipped with a G-sensor that
detects shocks. Each time an impact is detected,
it will lock the recording during which the event
occurred and prevent the loop recording from
being overwritten.
The sensitivity is set to Low by default, but can
be set to Off/High/Medium/Low. A Low setting
means it requires the most impact to trigger the
'locking' of recordings, while a High setting
requires the least impact to trigger the 'locking'
of recordings.
Main fe atures an d Setting s 2 3
ENGLISH
Page 24

To change the sensitivity of the G-sensor, tap
in Hubble Dashcam app, select Dashcam
settings > G-Sensor.
Note that if you turn the G-sensor off, your
MDC10W will not be able to lock and protect
any footage.
To unlock protected recordings, tap in
Hubble Dashcam app and select Storage
Management > Unlocked > Yes.
IMPORTANT!
All the event videos will be unlocked. Make sure
that you have saved important videos before
you proceed.
6.5 Automatic Start / Stop
The MDC10W senses power supplied to the
cigarette lighter car adapter as soon as the
vehicle ignition is turned on, and will start to
record automatically. When the ignition is
turned off, MDC10W shuts down automatically.
24 Main features and Settings
Page 25

7. Other settings
7.1 Change Wi-Fi password
To change the password, tap in Hubble
Dashcam app, select Dashcam settings and tap
MODIFY under Wi-Fi password.
After changing the password, the camera will
disconnect from your phone, and it has to be
reconnected using the new password.
7.2 Language Settings
To change the language settings of your
Dashcam app, tap in Hubble Dashcam app,
select Dashcam settings > Language settings.
7.3 Device key sound
To turn the device key sound on or off, tap in
Hubble Dashcam app, select Dashcam settings >
Device key sound.
7.4 Audio recording
To turn audio recording on or off, tap in
Hubble Dashcam app, select Dashcam settings >
Audio Recording.
7.5 White Balance
To change the white balance, tap in Hubble
Dashcam app, select Dashcam settings > White
balance.
Other settings 25
ENGLISH
Page 26

7.6 Exposure
To change the exposore, tap in Hubble
Dashcam app, select Dashcam settings >
Exposure.
7.7 Restore default settings
To restore your MCD10W to its default settings,
tap in Hubble Dashcam app, select Dashcam
settings > Restore the default settings.
7.8 Restore Wi-Fi password
With the power off, press and hold the power
button on MDC10W for 30 seconds until the
blue light flashes, then release the power
button. The Wi-Fi password of MDC10W will be
restored to 12345678.
26 Other settings
Page 27

8. Disposal of the Device
(Environment)
At the end of the product life cycle, you
should not dispose of this product with
normal household waste. Take this
product to a collection point for the
recycling of electrical and electronic
equipment. The symbol on the product,
user's guide and/or box indicates this.
Some of the product materials can be re-used if you
take them to a recycling point. By reusing some parts
or raw materials from used products you make an
important contribution to the protection of the
environment.
Please contact your local authorities in case you need
more information on the collection points in your area.
Dispose of the battery pack in an environmentallyfriendly manner according to your local regulations.
Disp osal o f the De vice ( Envir onme nt) 27
ENGLISH
Page 28

9. General Information
If your product is not working properly....
1. Read this User's Guide.
2. Visit our website: www.motorolahome.com/
support
3. Contact Customer Service at
+44 (0) 844 557 0890 (UK only)*
*Calls cost 7p per minute plus your telephone company's access charge
Consumer Products and Accessories Limited
Warranty ("Warranty")
Thank you for purchasing this Motorola branded
product manufactured under license by Binatone
Electronics International Ltd ("BINATONE").
What Does this Warranty Cover?
Subject to the exclusions contained below,
BINATONE warrants that this Motorola branded
product ("Product") or certified accessory
("Accessory") sold for use with this product is
manufactured to be free from defects in materials
and workmanship under normal consumer usage
for the period outlined below. This Warranty is
your exclusive warranty and is not transferable.
THIS WARRANTY GIVES YOU SPECIFIC LEGAL
28 General Information
Mon - Fri 8:00am to 8:00pm
Sat 8.30am to 2:00pm
+44 (0) 8187 62092 (ROI)
Email: support@motorolastore.com
Page 29

RIGHTS, AND YOU MAY HAVE OTHER RIGHTS
THAT VARY BY STATE, PROVINCE OR COUNTRY.
FOR CONSUMERS WHO ARE COVERED BY
CONSUMER PROTECTION LAWS OR
REGULATIONS IN THEIR COUNTRY OF
PURCHASE OR, IF DIFFERENT, THEIR COUNTRY
OF RESIDENCE, THE BENEFITS CONFERRED BY
THIS LIMITED WARRANTY ARE IN ADDITION TO
ALL RIGHTS AND REMEDIES CONVEYED BY SUCH
CONSUMER PROTECTION LAWS AND
REGULATIONS. FOR A FULL UNDERSTANDING
OF YOUR RIGHTS YOU SHOULD CONSULT THE
LAWS OF YOUR COUNTRY, PROVINCE OR STATE.
Who is covered?
This Warranty extends only to the first consumer
purchaser, and is not transferable.
What will BINATONE do?
BINATONE or its authorised distributor at its option
and within a commercially reasonable time, will at
no charge repair or replace any Products or
Accessories that does not conform to this
Warranty. We may use functionally equivalent
reconditioned/ refurbished/ pre-owned or new
Products, Accessories or parts.
What Other Limitations Are There?
ANY IMPLIED WARRANTIES, INCLUDING
WITHOUT LIMITATION THE IMPLIED
WARRANTIES OF MERCHANTABILITY AND
FITNESS FOR A PARTICULAR PURPOSE, SHALL
General Inform ation 29
ENGLISH
Page 30

BE LIMITED TO THE DURATION OF THIS LIMITED
WARRANTY, OTHERWISE THE REPAIR OR
REPLACEMENT PROVIDED UNDER THIS
EXPRESS LIMITED WARRANTY IS THE
EXCLUSIVE REMEDY OF THE CONSUMER, AND IS
PROVIDED IN LIEU OF ALL OTHER
WARRANTIES, EXPRESS OR IMPLIED. IN NO
EVENT SHALL MOTOROLA OR BINATONE BE
LIABLE, WHETHER IN CONTRACT OR TORT
(INCLUDING NEGLIGENCE) FOR DAMAGES IN
EXCESS OF THE PURCHASE PRICE OF THE
PRODUCT OR ACCESSORY, OR FOR ANY
INDIRECT, INCIDENTAL, SPECIAL OR
CONSEQUENTIAL DAMAGES OF ANY KIND, OR
LOSS OF REVENUE OR PROFITS, LOSS OF
BUSINESS, LOSS OF INFORMATION OR OTHER
FINANCIAL LOSS ARISING OUT OF OR IN
CONNECTION WITH THE ABILITY OR INABILITY
TO USE THE PRODUCTS OR ACCESSORIES TO
THE FULL EXTENT THESE DAMAGES MAY BE
DISCLAIMED BY LAW.
Some jurisdictions do not allow the limitation or
exclusion of incidental or consequential damages,
or limitation on the length of an implied warranty,
so the above limitations or exclusions may not
apply to you. This Warranty gives you specific
legal rights, and you may also have other rights
that vary from one jurisdiction to another.
30 General Information
Page 31

Products Covered Length of Coverage
Consumer Products One (1) year from the
date of the Products,
original purchase by the
first consumer purchaser
of the product.
Consumer
Accessories
Ninety (90) days from
the date of the
Accessories, original
purchase by the first
consumer purchaser of
the product.
Consumer Products
and Accessories that
are Repaired or
Replaced
The balance of the
original warranty or for
Ninety (90) days from
the date returned to the
consumer, whichever is
longer.
Exclusions
Normal Wear and Tear.
Periodic maintenance, repair
and replacement of parts due to normal wear and
tear are excluded from coverage.
Batteries.
Only batteries whose fully charged
capacity falls below 80% of their rated capacity and
batteries that leak are covered by this Warranty.
Abuse & Misuse.
Defects or damage that result from:
(a) improper operation, storage, misuse or abuse,
accident or neglect, such as physical damage (cracks,
scratches, etc.) to the surface of the product
resulting from misuse; (b) contact with liquid, water,
31 General Information
Page 32

rain, extreme humidity or heavy perspiration, sand,
dirt or the like, extreme heat, or food; (c) use of the
Products or Accessories for commercial purposes or
subjecting the Product or Accessory to abnormal
usage or conditions; or (d) other acts which are not
the fault of MOTOROLA or BINATONE, are excluded
from coverage.
Use of Non-Motorola branded Products and
Accessories.
Defects or damage that result from the
use of Non-Motorola branded or certified Products or
Accessories or other peripheral equipment are
excluded from coverage.
Unauthorised Service or Modification.
Defects or
damages resulting from service, testing, adjustment,
installation, maintenance, alteration, or modification
in any way by someone other than MOTOROLA,
BINATONE or its authorised service centres, are
excluded from coverage.
Altered Products.
Products or Accessories with (a)
serial numbers or date tags that have been removed,
altered or obliterated; (b) broken seals or that show
evidence of tampering; (c) mismatched board serial
numbers; or (d) nonconforming or non-Motorola
branded housings, or parts, are excluded from
coverage.
Communication Services.
Defects, damages, or the
failure of Products or Accessories due to any
communication service or signal you may subscribe
to or use with the Products or Accessories is
excluded from coverage.
32 General Information
Page 33

How to Obtain Warranty Service or Other Information?
To obtain service or information, please call:
+44 (0) 844 557 0890 (UK only)*
*Calls cost 7p per minute plus your telephone company's access charge
Mon - Fri 8:00am to 8:00pm
Sat 8.30am to 2:00pm
+44 (0) 8187 62092 (ROI)
Email: support@motorolastore.com
You will receive instructions on how to ship the
Products or Accessories at your expense and risk, to a
BINATONE Authorised Repair Centre.
To obtain service, you must include: (a) the Product or
Accessory; (b) the original proof of purchase (receipt)
which includes the date, place and seller of the
Product; (c) if a warranty card was included in your
box, a completed warranty card showing the serial
number of the Product; (d) a written description of the
problem; and, most importantly; (e) your address and
telephone number.
These terms and conditions constitute the complete
warranty agreement between you and BINATONE
regarding the Products or Accessories purchased by
you, and supersede any prior agreement or
representations, including representations made in
any literature publications or promotional materials
issued by BINATONE or representations made by any
agent employee or staff of BINATONE, that may have
been made in connection with the said purchase.
General Inform ation 33
ENGLISH
Page 34

EN 60950-1: 2006+A11:2009+A1:2010+A12:2011+A2:2013
EN 62479:2010
EN 301 489
-1 V2.2.0, EN 301 489-17 V3.2.0
EN 300 328 V2.1.1
London, 26 Sep 2017
Place & Date
BINATONE TELECOM PLC
1 Apsley Way London NW2 7HF,United Kingdom.
Tel: +44(0) 20 8955 2700 Fax: +44(0) 20 8344 8877
e-mail: binatoneuk@binatonetelecom.co.uk
EC Declaration of Conformity
We,
Company name:
Postal address:
Postcode and City:
Telephone number:
E-Mail address:
declare that the DoC is issued under our sole responsibility and belongs to the following product:
Apparatus model/Product:
Type:
Object of the declaration:
The object of the declaration described above is in conformity with the relevant Union
harmonization legislation: RE Directive 2014/53/EU.
The following harmonised standards and technical specifications have been applied:
Safety (Article 3.1a):
Health (Article 3.1a):
EMC (Article 3.1b):
Radio Spectrum (Article 3.2):
Notified body : Bay Area Compliance Labs Corp. (EU Identification Number: 1313)
Additional information:
Hardware Version:
Software Version:
Accessories:
Component:
Signed for and on behalf of
Henry / Product Manager
Binatone Telecom PLC
1 Apsley Way
NW2 7HF London
+44 (0) 20 8955 2700
binatoneuk@binatonetelecom.co.uk
MDC10W series
Dash Camera
V1.2
MDC10W
V2
Adapter
Model: PGCB500150W1EU
3.7V/230mAh Lithium Rechargeable Battery
34 General Information
Page 35

10. Technical Specifications
Video resolution HD 720P resolution
Lens 140° wide angle
Video format MJPEG
Micro SD card Up to 32G capacity, Class
10
LED lights Supported
Mic and Speaker Built-in
Power 5V DC
Battery Li-polymer battery
Device dimensions 92.5x35x41mm
Device weight 46g
Mount dimensions Suction Mount:
55x55x50mm
Sun Visor Mount:
85.3x64x27.3mm
ENGLISH
Supported operating
system for file
Windows XP and later,
MAC OS
viewing
Technical Speci fications 35
Page 36

Manufactured, distributed or sold by Binatone
Electronics International LTD., official licensee for this
product. MOTOROLA and the Stylised M Logo, are
trademarks or registered trademarks of Motorola
Trademark Holdings, LLC. and are used under license.
All other trademarks are the property of their
respective owners. © 2017 Motorola Mobility LLC. All
rights reserved.
UK_EN Version 1.0
Printed in China
 Loading...