

Page 1
USER’S GUIDE
Dashboard Camera
Model: MDC100
The features described in this user’s guide are subject to
modifications without prior notice.
Page 2

Welcome...
to your new Motorola Dashboard Camera!
Thank you for purchasing the Dashboard Camera.
Please keep your original dated sales receipt for your
records. For warranty service of your Motorola
product, you will need to provide a copy of your
dated sales receipt to confirm warranty status.
Registration is not required for warranty coverage.
For product related questions, please call:
US and Canada 1-888-331-3383
E-mail: support@motorolastore.com
On the Web: www.motorolastore.com/support
This User’s Guide has all the information you need to
make the most out of your product.
Please read the Safety Instructions on page 5 before
you install the unit.
Before you use the Dashboard Camera, we
recommend you insert a SD card into the SD card slot.
Got everything?
• Dashboard Camera
• Windshield Mount
• Charging Cable
• Car Adapter
• User Manual
Page 3
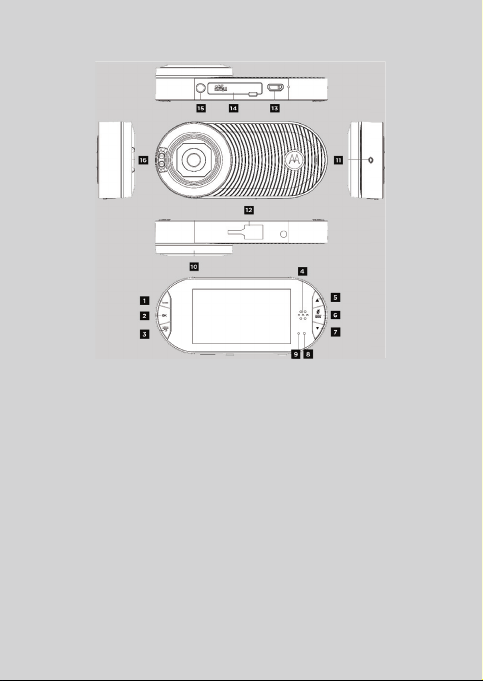
Overview of your Dashboard Camera
1. Video/Photo/Replay
mode switcher
2. OK/Enter button
3. Menu/Back button
4. Speaker
5. Up arrow
6. Short press: Mute
Long press: SOS mode
7. Down arrow
8. Status LED
9. Power LED
10. Lens
+
-
11. Reset button
12. Mount socket
13. USB/Power socket
14. Memory card slot
15. Short press when OFF:
Power ON
Short press when ON:
LED switch
Long press when ON:
Power OFF
16. LED lights
Page 4

Tab le of co nt en ts
1. Safety Instructions...................................................................5
2. Getting Started ....................................................................... 6
2.1 Installing your device ....................................................... 6
2.2 First use............................................................................. 7
3. Using your dashboard camera................................................ 8
3.1 Switching modes..............................................................9
3.2 Video recording mode ..................................................10
3.3 Photo shooting mode ....................................................10
3.4 Replay mode .................................................................. 11
3.5 Parking mode................................................................. 11
3.6 SOS mode ...................................................................... 12
3.7 Motion detection ........................................................... 12
4. Settings..................................................................................13
4.1 Main Settings.................................................................. 13
4.2 Video Settings ................................................................ 16
4.3 Photo Settings ................................................................ 19
4.4 Playback settings............................................................21
5. General Information.............................................................. 23
6. Technical Specifications.......................................................33
Table of contents 4
Page 5
1. Safety Instructions
Before using the dash cam, the user shall check the
applicable laws on the use of dash cams.
In some jurisdictions, the use of dash cams can be
considered as an invasion of privacy. Furthermore,
the mounting of the dash cam on the windshield
might be regulated by law in some jurisdictions.
It is the user’s responsibility to check the applicable
laws before using the dash cam. We do not take any
responsibility for wrong or unlawful use of the dash
cam.
WARNING
• Do not install the device within the driver’s or
passenger airbag operation range. Please refer to
your car’s service manual for details about the
operation range of your car’s airbags.
• Never modify modes, settings or program your
device while your car is in motion.
• Ensure the device and its power cord are installed
as per instructed on page 6 and do not obstruct the
driver’s line of sight or impede the operation of any
driving controls.
5 Safety Instructions
ENGLISH
Page 6
2. Getting Started
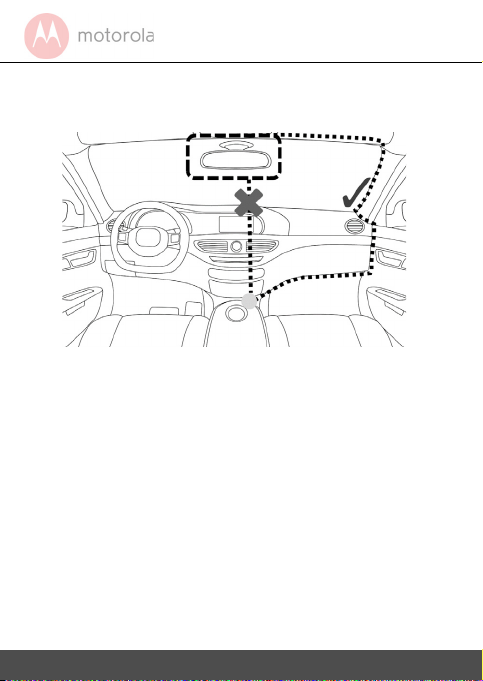
Best Installation Location
2.1 Installing your device
• Install your device within the rear-view mirror area
and within the wiper cleaning area to get the
clearest possible view.
• Your device comes with a 3.6m USB power cable,
organize the power cord so that it doesn't interfere
with the driver's vision, use cable clips to secure
the power cord if necessary.
• Place the device on the windshield mount first.
Press the suction cup of the mount to the
windshield and turn the knob clockwise to lock.
Ensure the mount is safely attached to the
windshield.
Getting Started 6
Page 7

• When using the dashboard camera device in your
car, we recommend that you always use the
cigarette charger in order to maintain the battery
level. The unit is not designed to be run on battery
power alone, the battery is there for backup
purposes only.
2.2 First use
• Your device is equipped with a SD card slot, however
the SD card itself is not provided with this dashboard
camera.
• Insert a SD card in the SD card slot. Your dashboard
camera accepts SD cards of up to 32GB capacity
(class 10). It is recommended that you format the SD
card, please to the settings described in this manual.
• Your dashboard camera will always power up and
begin recording automatically as soon as it is
connected to a power source. Simply connect your
dashboard camera to a power source that comes on
when you start the engine of your vehicle, and
dashboard camera will start recording automatically
without you having to remember to press on a button.
• You can also power it ON or OFF manually by
pressing the power button. The power LED (Red) will
turn ON when the power is ON. Whenever the device
is turned ON or OFF you will see a splash screen
showing the Motorola logo.
ENGLISH
7 Getting Started
Page 8

3. Using your dashboard camera
• The purpose of your dashboard camera is to
continuously record the road ahead and to
automatically record and save any incidents or
accidents you might be involved in. The status
LED (Blue) will flash when it is recording.
• Your device records video by clusters of up to 3
minutes, the duration can be changed in the video
settings, see 4.2 Video Settings. It is equipped
with a sensor that detects shocks. Each time a
shock is detected, it will save to the SD card the
cluster during which the event occurred. The
sensitivity of the sensor can be changed in the
video settings screen, see section 4.
• Once the memory of your SD card is full, it will
automatically overwrite the oldest footages in
which no event has been detected. Your
dashboard camera will save a maximum of 20
sensor triggered footages. When it reaches 20, it
will start deleting old recorded footages on a first
in first out basis. The actual number of files that can
be recorded depends on the SD card capacity.
Using your dashboard camera 8
Page 9

3.1 Switching modes
Your dash camera has 3 main modes for recording
and viewing:
Video recording
Photo shooting
Replay
While in video recording mode, press the OK button
to stop video recording then press the MODE button
to switch to photo mode. Press the MODE button
once again to switch to replay mode. Pressing the
MODE button once more will take you back to the
video recording mode.
IMPORTANT!
The driver must never switch modes while the car is in
motion.
9 Using your dashboard camera
Main function and default mode
for video recording.
Allows you to capture still
photographs to your SD card.
Allows you to view or delete saved
footages or photographs. You can
also connect the device to your
computer using the supplied USB
cable to view and manage photos
and videos stored inside the SD
card.
ENGLISH
Page 10

3.2 Video recording mode
Video recording will start automatically when the
device is powered on. You can manually turn video
recording off by pressing the OK button. Press the
OK button once again to restart video recording. The
status LED (Blue) will flash when the device is
recording.
Please refer to 4.2 Video Settings for detailed
description of the settings menu.
IMPORTANT!
If video recording is manually turned off, the sensor
will stop detecting shocks and no video will be saved
to the SD card.
3.3 Photo shooting mode
While in video recording mode, press the OK button
to stop video recording then press the MODE button
to switch to photo mode.
Press the OK button to take a photo, it will be saved
to the SD card. Please refer to 4.3 Photo Settings for
detailed description of the settings menu.
Using your dashboard camera 10
Page 11

3.4 Replay mode
While in video recording mode, press the OK button
to stop video recording then press the MODE button
twice to switch to photo mode.
You can browse your photos and videos using the +
and - but ton s. T o vi ew a sto red video , naviga te t o the
desired video. Use the OK button to play or stop the
video.
Use the + and - buttons to rewind or fast forward the
video.
Please refer to 4.4 Playback settings for detailed
description of the settings menu.
3.5 Parking mode
Your dashboard camera can record footages of
events occurring when your car is parked with its
engine off. The built-in battery will keep the sensor of
your device in stand-by mode and will start recording
automatically for 30 seconds if it detects vibrations or
a shock. The parking mode can only record and save
footage after an event has been detected by the
sensor.
11 Using your dashboard camera
ENGLISH
Page 12

IMPORTANT!
Due to technical reasons the Parking mode must be
disabled by default. You can enable it in the video
settings, see 4.2 Video Settings.
3.6 SOS mode
In case of emergency you can trigger the SOS mode
by long pressing on the Mute/SOS button . When
enabled, the SOS mode will save the footage current
recording cluster.
3.7 Motion detection
To save memory on your SD card, you can enable
motion detection. When enabled, the device will
stop recording when it does not detect motion for
more than 10 seconds.
IMPORTANT!
This option is disabled by default, enabling it might
cause the camera not to record or save part of an
incident or accident you might be involved in.
Using your dashboard camera 12
Page 13

4. Settings
IMPORTANT!
After exiting the settings screen, video recording will
not restart automatically. Press the OK button to start
recording.
4.1 Main Settings
To access main settings while in video mode, press
the OK button to stop video recording then press the
Menu/Back button twice.
For each sub-menu, press + or - to navigate, OK to
confirm and Menu/Back to go back or cancel.
Menu Description
Date/Time Set the date and time. Press +
or - to set each value, press
OK to switch to the next value.
13 Settings
ENGLISH
Page 14

Auto power off This option is useful to save
battery when the device is
used in Parking mode. This is
the time the device will stay
On while on battery power.
You can enable it for 1 or 3
minutes. If you select Off, the
device will remain On until the
battery is depleted.
Beep sound Enable or disable beep
sounds.
Language Change the system language
to English/France/Espanol/
Portugues/Deutsch/Italiano/
简体中文 / 繁体中文 /
Russian/Japanese
Frequency Set by default to 50Hz, you can
set it to 60Hz if you reside in
the USA.
LCD OFF You can set the LCD to never
turn off or turn off after 3
minutes.
Settings 14
Page 15

Volume Setting Set the volume of the built-in
speaker to high/middle/low.
Format Use this option to format your
SD Card.
IMPORTANT!
Formatting a SD card will
erase all its memory contents.
Default Setting Reset all your devices settings
to factory defaults.
Version Current firmware version.
15 Settings
ENGLISH
Page 16

4.2 Video Settings
To access video settings while in video mode, press
the OK button to stop video recording then press the
Menu/Back button .
For each sub-menu, press + or - to navigate, OK to
confirm and Menu/Back to go back or cancel.
Menu Description
Resolution You can set the video resolution to
1080FHD 1920*1080, 1080P
1440*1080 or 720P 1280*720.
IMPORTANT!
If you want to store more photos or
videos on your SD card, try reducing
the resolution.
Loop
recording
Settings 16
Choose the default duration for each
recording cluster: 1 Minute / 2
Minutes / 3 Minutes
Page 17

Parking
Enable or disable the parking mode.
mode
Exposure You can adjust the exposure as you
require. Press + if you wish the
videos to be clearer or - if you need
it to be darker.
Motion
Enable or disable motion detection.
detection
Record audio Enable or disable audio recording.
Date stamp Enable or disable a date stamp
showing on your videos.
G-Sensor
sensitivity
You can change the sensitivity of the
sensor. It is set to low by default but
can be set to High/Middle/Low.
If you turn the sensor off, your dash
camera will not be able to save any
footage.
IMPORTANT!
Changing the video quality and resolution settings to
a lower value might reduce the amount of details you
can see on your saved videos.
17 Settings
ENGLISH
Page 18

Resolution Card Capacity Recording time
(minute)
1080FHD
1920*1080@25
fps
4GB 22
8GB 45
16GB 90
32GB 180
1080P
1440*1080@30
fps
720P
1280*720@30f
ps
Settings 18
4GB 20
8GB 42
16GB 85
32GB 170
4GB 30
8GB 60
16GB 120
32GB 240
Page 19

4.3 Photo Settings
Press the Menu/Back button to access photo
settings while in photo mode.
For each sub-menu, press + or - to navigate, OK to
confirm and Menu/Back to go back or cancel.
Menu Description
Resolution You can set the photo resolution to
12M pixels (4000*3000), 8M pixels
(3264*2448) or 5M pixels
(2592*1944)
IMPORTANT!
If you want to store more photos or
videos on your SD card, try reducing
the resolution.
Quality You can set the photo quality to
Fine, Normal or Economy.
19 Settings
ENGLISH
Page 20

White
Balance
You can set the white balance to
Auto, Daylight, Cloudy, Tungsten
or Fluorescent. We recommend to
leave it on Auto.
Exposure You can adjust the exposure as you
require. Press + if you wish the
photos to be clearer or - if you
need it to be darker.
Date stamp Enable or disable a date only stamp
or a date+time stamp showing on
your photos.
IMPORTANT!
Changing the photo quality and resolution settings
to a lower value might reduce the amount of details
you can see on your saved photos.
Settings 20
Page 21

4.4 Playback settings
Press the Menu/Back button to access playback
settings while in playback mode.
For each sub-menu, press + or - to navigate, OK to
confirm and Menu/Back to go back or cancel.
Menu Description
Delete Use this option to delete photos and
videos stored in your SD card. You can
choose between deleting the current
file you are currently watching or all
files on your SD card.
IMPORTANT!
You cannot recover a photo or video
that has been previously deleted.
21 Settings
ENGLISH
Page 22

Protect Use this option to lock photos and
videos stored in your SD card so they
cannot be deleted. Use the same
option to unlock previously locked
photos or videos. You can choose
between Lock Current, Unlock
Current, Lock All or Unlock All.
Slide Show Create a slide show for your photos.
You can choose between 2 Seconds,
5 Seconds or 8 Seconds interval
between photos.
Thumbnail Enable or disable thumbnail view for
your stored files.
Settings 22
Page 23

5. General Information
If your product is not working properly....
1. Read this User's Guide.
2. Visit our website: www.motorola
support
3. Contact Customer Service at
US and Canada 1-888-331-3383
E-mail: support@motorolastore.com
Consumer Products and Accessories Limited
Warranty ("Warranty")
Thank you for purchasing this Motorola branded
product manufactured under license by Binatone
Electronics International Ltd ("BINATONE").
What Does this Warranty Cover?
Subject to the exclusions contained below,
BINATONE warrants that this Motorola branded
product ("Product") or certified accessory
("Accessory") sold for use with this product is
manufactured to be free from defects in materials and
workmanship under normal consumer usage for the
period outlined below. This Warranty is your exclusive
warranty and is not transferable.
23 General Information
store.com/
ENGLISH
Page 24

THIS WARRANTY GIVES YOU SPECIFIC LEGAL
RIGHTS, AND YOU MAY HAVE OTHER RIGHTS
THAT VARY BY STATE, PROVINCE OR COUNTRY.
FOR CONSUMERS WHO ARE COVERED BY
CONSUMER PROTECTION LAWS OR
REGULATIONS IN THEIR COUNTRY OF
PURCHASE OR, IF DIFFERENT, THEIR COUNTRY
OF RESIDENCE, THE BENEFITS CONFERRED BY
THIS LIMITED WARRANTY ARE IN ADDITION TO
ALL RIGHTS AND REMEDIES CONVEYED BY
SUCH CONSUMER PROTECTION LAWS AND
REGULATIONS. FOR A FULL UNDERSTANDING
OF YOUR RIGHTS YOU SHOULD CONSULT THE
LAWS OF YOUR COUNTRY, PROVINCE OR
STATE.
Who is covered?
This Warranty extends only to the first consumer
purchaser, and is not transferable.
What will BINATONE do?
BINATONE or its authorized distributor at its option
and within a commercially reasonable time, will at no
charge repair or replace any Products or Accessories
that does not conform to this Warranty. We may use
functionally equivalent reconditioned/ refurbished/
pre-owned or new Products, Accessories or parts.
General Information 24
Page 25

What Other Limitations Are There?
ANY IMPLIED WARRANTIES, INCLUDING
WITHOUT LIMITATION THE IMPLIED WARRANTIES
OF MERCHANTABILITY AND FITNESS FOR A
PARTICULAR PURPOSE, SHALL BE LIMITED TO THE
DURATION OF THIS LIMITED WARRANTY,
OTHERWISE THE REPAIR OR REPLACEMENT
PROVIDED UNDER THIS EXPRESS LIMITED
WARRANTY IS THE EXCLUSIVE REMEDY OF THE
CONSUMER, AND IS PROVIDED IN LIEU OF ALL
OTHER WARRANTIES, EXPRESS OR IMPLIED. IN
NO EVENT SHALL MOTOROLA OR BINATONE BE
LIABLE, WHETHER IN CONTRACT OR TORT
(INCLUDING NEGLIGENCE) FOR DAMAGES IN
EXCESS OF THE PURCHASE PRICE OF THE
PRODUCT OR ACCESSORY, OR FOR ANY
INDIRECT, INCIDENTAL, SPECIAL OR
CONSEQUENTIAL DAMAGES OF ANY KIND, OR
LOSS OF REVENUE OR PROFITS, LOSS OF
BUSINESS, LOSS OF INFORMATION OR OTHER
FINANCIAL LOSS ARISING OUT OF OR IN
CONNECTION WITH THE ABILITY OR INABILITY
TO USE THE PRODUCTS OR ACCESSORIES TO
THE FULL EXTENT THESE DAMAGES MAY BE
DISCLAIMED BY LAW.
Some jurisdictions do not allow the limitation or
ENGLISH
25 General Information
Page 26

exclusion of incidental or consequential damages, or
limitation on the length of an implied warranty, so the
above limitations or exclusions may not apply to you.
This Warranty gives you specific legal rights, and you
may also have other rights that vary from one
jurisdiction to another.
Products Covered Length of Coverage
Consumer Products One (1) year from the date
of the Products, original
purchase by the first
consumer purchaser of the
product.
Consumer Accessories Ninety (90) days from the
date of the Accessories,
original purchase by the
first consumer purchaser of
the product.
Consumer Products
and Accessories that
are Repaired or
Replaced
The balance of the original
warranty or for Ninety (90)
days from the date
returned to the consumer,
whichever is longer.
Exclusions
Normal Wear and Tear. Periodic maintenance,
repair and replacement of parts due to normal wear
General Information 26
Page 27

and tear are excluded from coverage.
Batteries. Only batteries whose fully charged
capacity falls below 80% of their rated capacity and
batteries that leak are covered by this Warranty.
Abuse & Misuse. Defects or damage that result from:
(a) improper operation, storage, misuse or abuse,
accident or neglect, such as physical damage (cracks,
scratches, etc.) to the surface of the product resulting
from misuse; (b) contact with liquid, water, rain,
extreme humidity or heavy perspiration, sand, dirt or
the like, extreme heat, or food; (c) use of the Products
or Accessories for commercial purposes or subjecting
the Product or Accessory to abnormal usage or
conditions; or (d) other acts which are not the fault of
MOTOROLA or BINATONE, are excluded from
coverage.
Use of Non-Motorola branded Products and
Accessories. Defects or damage that result from the
use of Non-Motorola branded or certified Products or
Accessories or other peripheral equipment are
excluded from coverage.
Unauthorized Service or Modification. Defects or
damages resulting from service, testing, adjustment,
installation, maintenance, alteration, or modification
in any way by someone other than MOTOROLA,
BINATONE or its authorized service centers, are
ENGLISH
27 General Information
Page 28

excluded from coverage.
Altered Products. Products or Accessories with (a)
serial numbers or date tags that have been removed,
altered or obliterated; (b) broken seals or that show
evidence of tampering; (c) mismatched board serial
numbers; or (d) nonconforming or non-Motorola
branded housings, or parts, are excluded from
coverage.
Communication Services. Defects, damages, or the
failure of Products or Accessories due to any
communication service or signal you may subscribe
to or use with the Products or Accessories is
excluded from coverage.
How to Obtain Warranty Service or Other Information?
To obtain service or information, please call:
US and Canada 1-888-331-3383
E-mail: support@motorolastore.com
You will receive instructions on how to ship the
Products or Accessories at your expense and risk, to
a BINATONE Authorized Repair Center.
To obtain service, you must include: (a) the Product
or Accessory; (b) the original proof of purchase
(receipt) which includes the date, place and seller of
General Information 28
Page 29

the Product; (c) if a warranty card was included in your
box, a completed warranty card showing the serial
number of the Product; (d) a written description of the
problem; and, most importantly; (e) your address and
telephone number.
These terms and conditions constitute the complete
warranty agreement between you and BINATONE
regarding the Products or Accessories purchased by
you, and supersede any prior agreement or
representations, including representations made in
any literature publications or promotional materials
issue d by BINATO NE or representations made by any
agent employee or staff of BINATONE, that may have
been made in connection with the said purchase.
FCC and IC regulations
FCC Part l5
NOTE: This equipment has been tested and found to
comply with the limits for a Class B digital device,
pursuant to Part 15 of the Federal Communications
Commission (FCC) rules. These limits are designed
to provide reasonable protection against harmful
interference in a residential installation. This
equipment generates, uses and can radiate radio
frequency energy and, if not installed and used in
accordance with the instructions, may cause harmful
ENGLISH
29 General Information
Page 30

interference to radio communications. However,
there is no guarantee that interference will not occur
in a particular installation. If this equipment does
cause harmful interference to radio or television
reception, which can be determined by turning the
equipment off and on, the user is encouraged to try
to correct the interference by one or more of the
following measures:
• Reorient or relocate the receiving antenna.
• Increase the separation between the equipment
and receiver.
• Connect the equipment into an outlet on a circuit
different from that to which the receiver is
connected.
• Consult the dealer or an experienced radio/TV
technician for help.
Changes or modifications to this equipment not
expressly approved by the party responsible for
compliance could void the user’s authority to
operate the equipment.
This device complies with Part 15 of the FCC rules.
Operation is subject to the following two conditions:
(1) this device may not cause harmful interference,
and (2) this device must accept any interference
received, including interference that may cause
undesired operation. Privacy of communications
General Information 30
Page 31

may not be ensured when using this device.
To ensure safety of users, the FCC has established
criteria for the amount of radio frequency energy that
can be safely absorbed by a user or bystander according
to the intended usage of the product. This product has
been tested and found to comply with the FCC criteria.
This Class B digital apparatus complies with Canadian
ICES-003.
CAN ICES-3(B)/NMB-3(B)
WARNING
Changes or modifications, to this equipment not
expressively approved by the party responsible for
compliance could void the user’s authority to operate
the equipment.
The socket-outlet shall be installed near the
equipment and shall be easily accessible.
Industry Canada
This device complies with Industry Canada licenceexempt RSS standard(s): Operation is subject to the
following Two conditions:(1) this device may not
cause interference, and (2) this device must accept
any interference, including interference that may
cause undesired operation of the device.
The term "IC: " before the certification/registration
number only signifies that the Industry Canada
ENGLISH
31 General Information
Page 32

technical specifications were met. This product
meets the applicable Industry Canada technical
specifications.
Le présent appareil est conforme aux CNR
d’Industrie Canada applicables aux appareils radio
exempts de licence. L’exploitation est autorisée aux
deux conditions suivantes : (1) l’appareil ne doit pas
produire de brouillage, et (2) l’utilisateur de l’appareil
doit accepter tout brouillage radioélectrique subi,
même si le brouillage est susceptible d’en
compromettre le fonctionnement.
General Information 32
Page 33

6. Technical Specifications
LCD screen 2.7-inch
Video resolution Up to FHD 1080P
Lens 120° wide angle
Video format AVI
Pictures resolution Up to 12M pixels
(4000x3000)
Photo format JPEG
Micro SD card Up to 32G capacity, Class
10
Night vision Supported
Mic and Speaker Built-in
Power 5V DC
Battery Li-polymer battery
Device Dimensions 104x48x23.1mm
Mount Dimensions 85x58x30mm
Supported operating
system for file viewing
33 Technical Specifications
Windows XP and later,
MAC OS
ENGLISH
Page 34

Manufactured, distributed or sold by Binatone Electronics
International LTD., official licensee for this product.
MOTOROLA and the Stylized M Logo, are trademarks or
registered trademarks of Motorola Trademark Holdings,
LLC. and are used under license. All other trademarks are
the property of their respective owners. © 2017 Motorola
Mobility LLC. All rights reserved.
US_EN Version 2.0
Printed in China
 Loading...