

Page 1
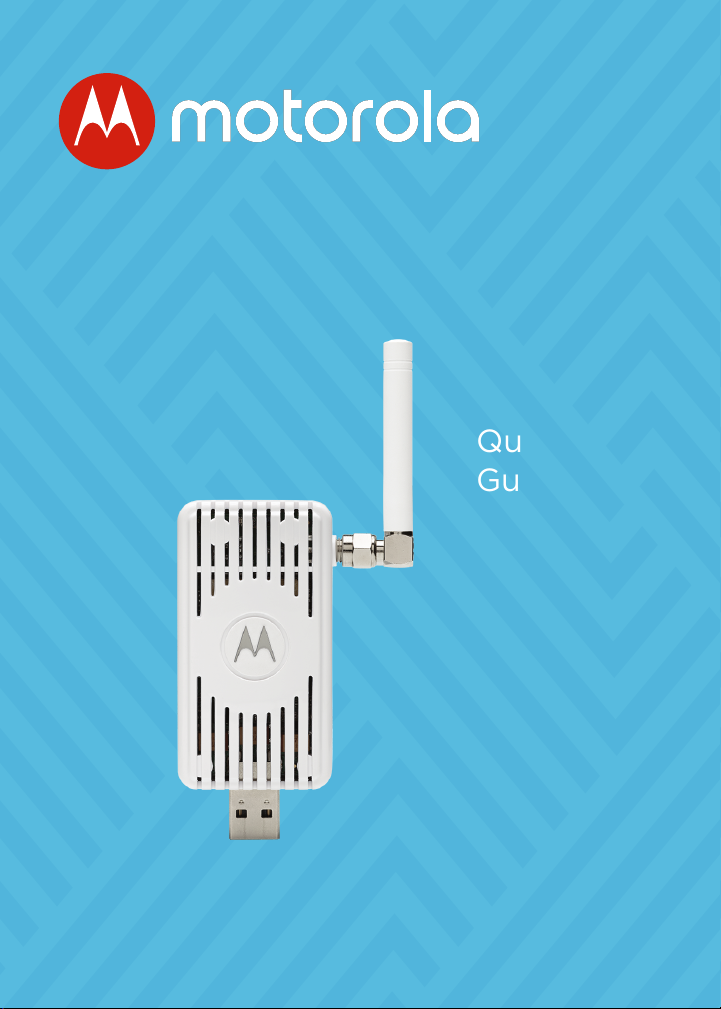
cellular multisensor
Model MC4000
Quick Start
Guide
Page 2
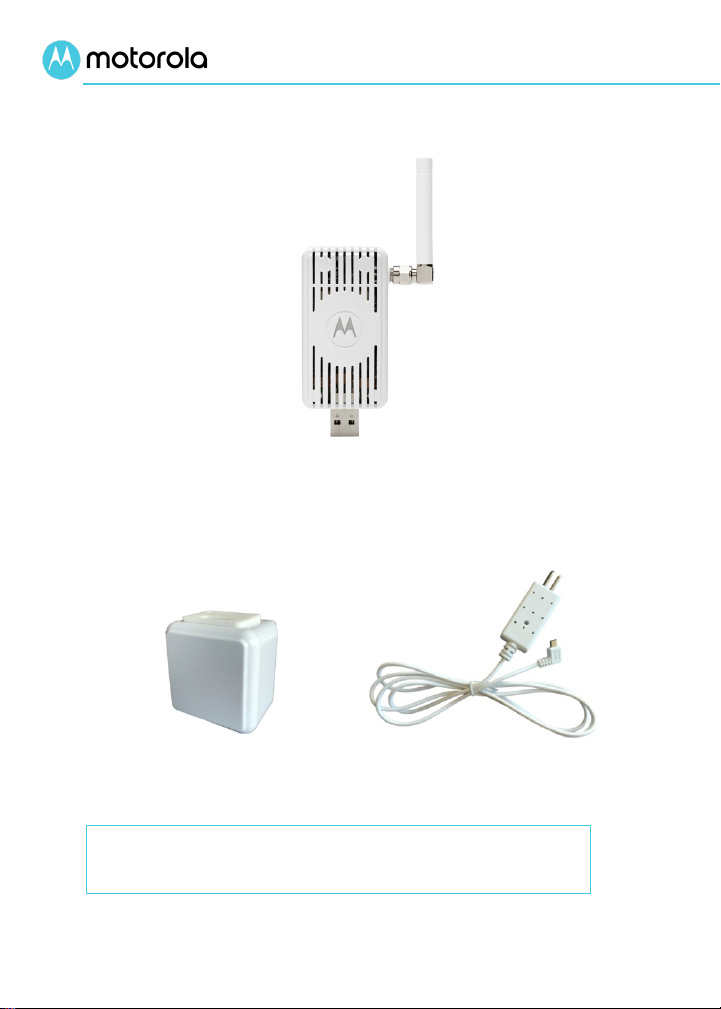
Cellular MultiSensor with Antenna,
Power Cube
Water/Flood Probe
www.motorolanetwork.com/SENSORir
Packaged with your MultiSensor
pre-installed Rechargeable Battery Pack Accessory,
Para una Guía de Inicio Rápido en español, por favor
vaya a
1
and pre-installed SIM Card
Page 3
Let's get started
The Motorola Cellular MultiSensor senses temperature,
humidity, water/flood, light intensity, shaking/acceleration,
presence of AC power, cell signal quality, and backup battery
status. Please see
about these sensors.
Installing the MultiSensor
The Motorola Cellular MultiSensor is easy to install. Here's
what to do:
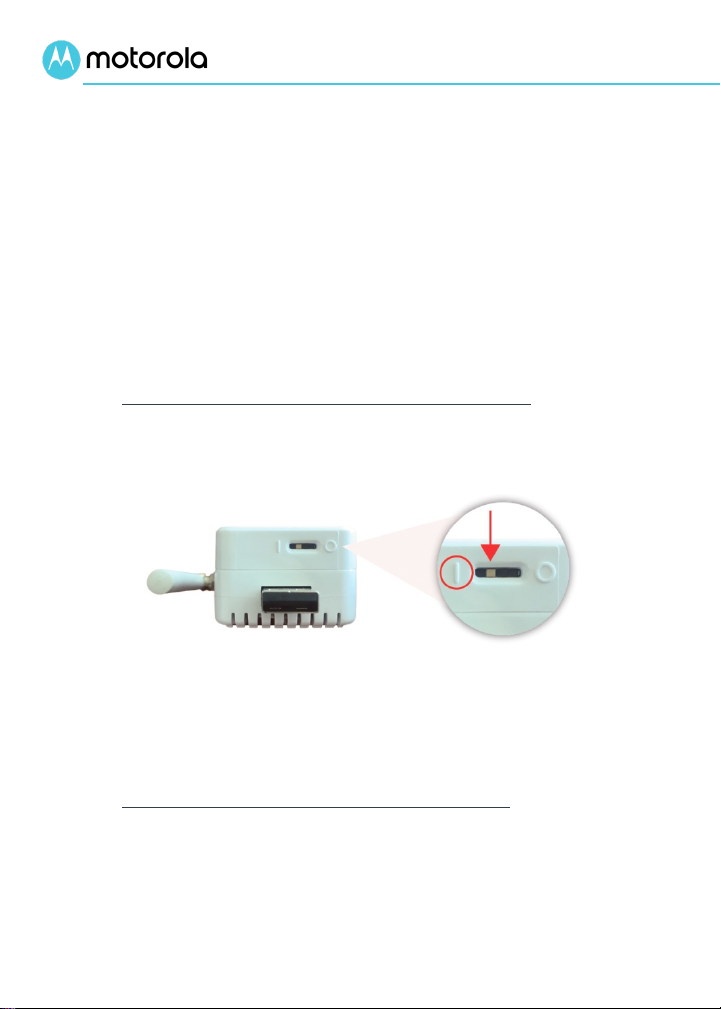
1 Switch on the MultiSensor's backup battery.
The battery's switch is shown below. Use a paper clip,
pen, or similar pointed object to gently move the slider to
1 position (Battery ON).
the
Sensor Details on page 14 for specifics
Keep the switch in the ON position unless you're not
going to be using the MultiSensor for a long period of
time and you want to save battery power. Note that the
battery will only charge when it is in the ON position.
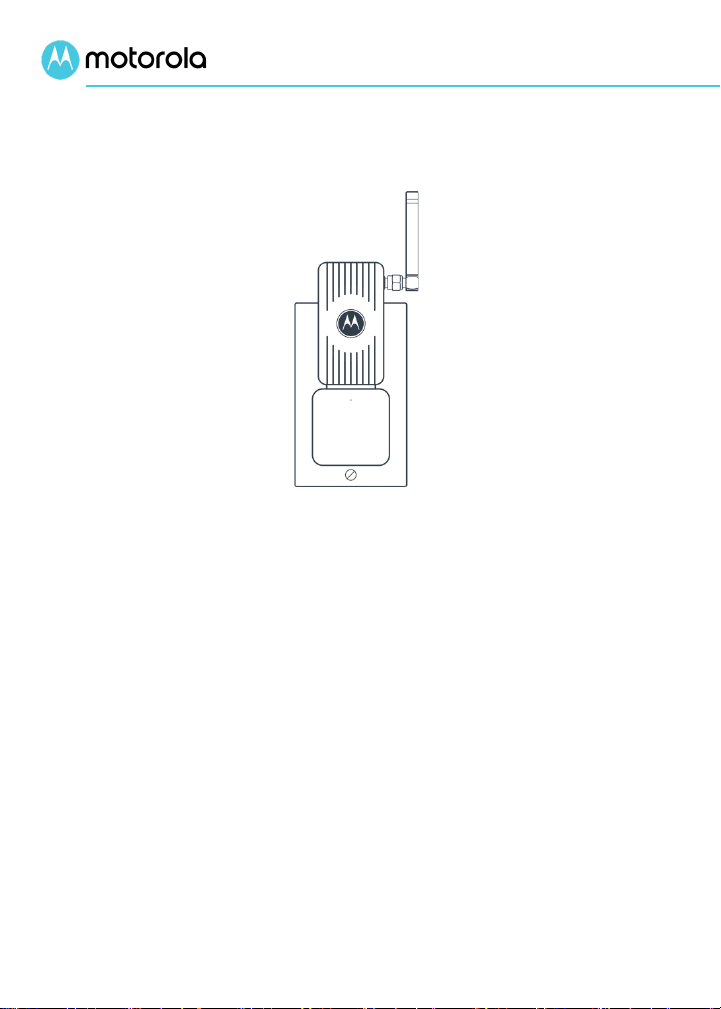
2 Plug the MultiSensor into a power source.
Typically, you plug the MultiSensor into the included USB
power cube, and then plug the USB power cube into an
AC wall outlet that's powered on. If you plan to use the
MultiSensor's water-sensing probe, you'll want to plug the
2
Page 4
sensor and cube into a power outlet near the source of a
possible "flood". If you're not using the probe, think about
which sensors you want to use and place the MultiSensor
accordingly.
Here are some other possible sources of power:
a. A computer's USB port. To ensure consistent power
supply, the computer should be configured to be
running all the time. (Note: the heat generated from
the computer may affect the MultiSensor's
temperature and humidity readings.)
b. A suitable USB power bank. A USB power bank is
useful if you want to run the MultiSensor for more
than 2 days without AC power. Care should be
taken in selecting a compatible power bank as many
power banks have auto-shut off features that
cannot be disabled. For compatible power bank
suggestions, please see
www.motorolanetwork.com/PowerBanks
3
Page 5
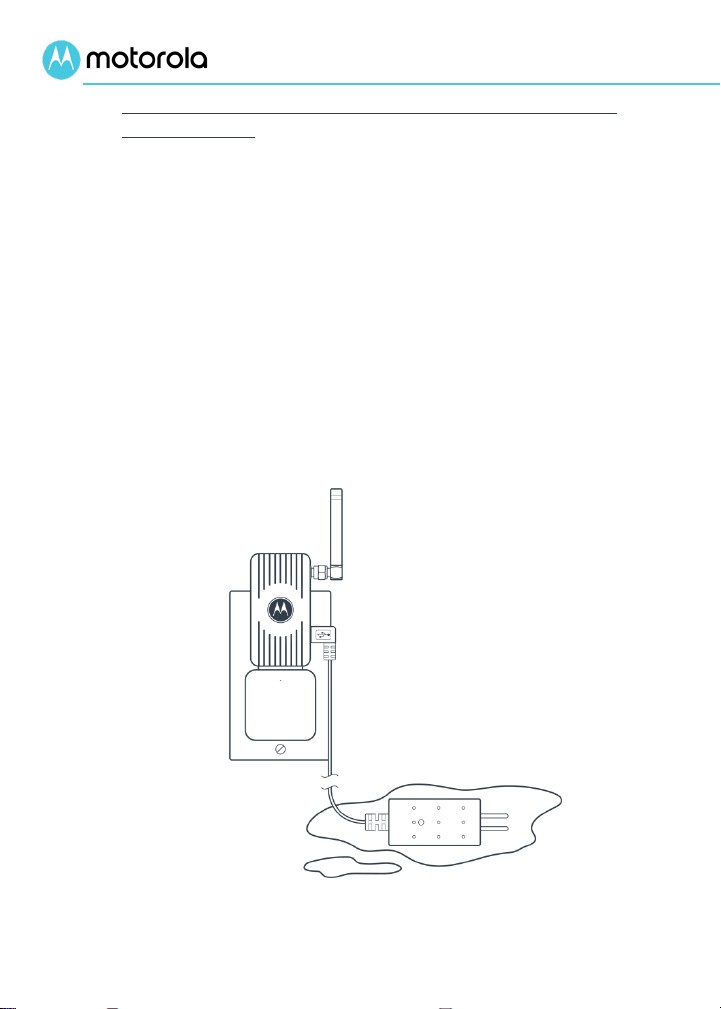
3 If you want to monitor for "flood", plug in the water-
sensing probe.
Plug the included water-sensing probe into the micro-USB
port on the MultiSensor as shown. You can put the probe
on the floor, or you can mount it on a wall or post if you
prefer.
The water sensing probe works when the metal probes
both make contact with water. When the water sensor is
on a floor, the metal probes should rest on the floor.
The flood cable length is 5 feet. If you need a longer cable,
you can plug the flood cable into a Micro-USB Extension
Cable, which has a micro-USB male connector on one end
and micro-USB female connector on the other end. These
are inexpensive, and various lengths are available online.
4
Page 6

Setting up service using the
MultiSensor app or a Web browser
Now that you have the hardware installed, you can connect
and configure your device using the web browser or the
Motorola MultiSensor app on an iPhone or one of the many
popular Android phones made by Motorola, Samsung, and
many other companies.
Instructions below are for installation using the app for
smartphones, iPads, and other smart devices. If you are going
to use the web browser instead, go to:
https://sensor.motorolanetwork.com/, and substitute clicks
for taps in the instructions below.
If you are adding a MultiSensor to an existing account, skip to
step 3.
1 Download the Motorola MultiSensor app for Android or
iPhone through Google Play or the Apple App Store.
Search for
Motorola icon below. Follow the instructions on your
smart device to download and install the app. (Or, go to
https://sensor.motorolanetwork.com/in your web
browser.)
Motorola MultiSensor and look for the
2 Set up your account. Once it is installed, the app will
appear on your device with the name MultiSensor.
Opening the mobile app, a Sensor App Login Page is
displayed.
5
Page 7
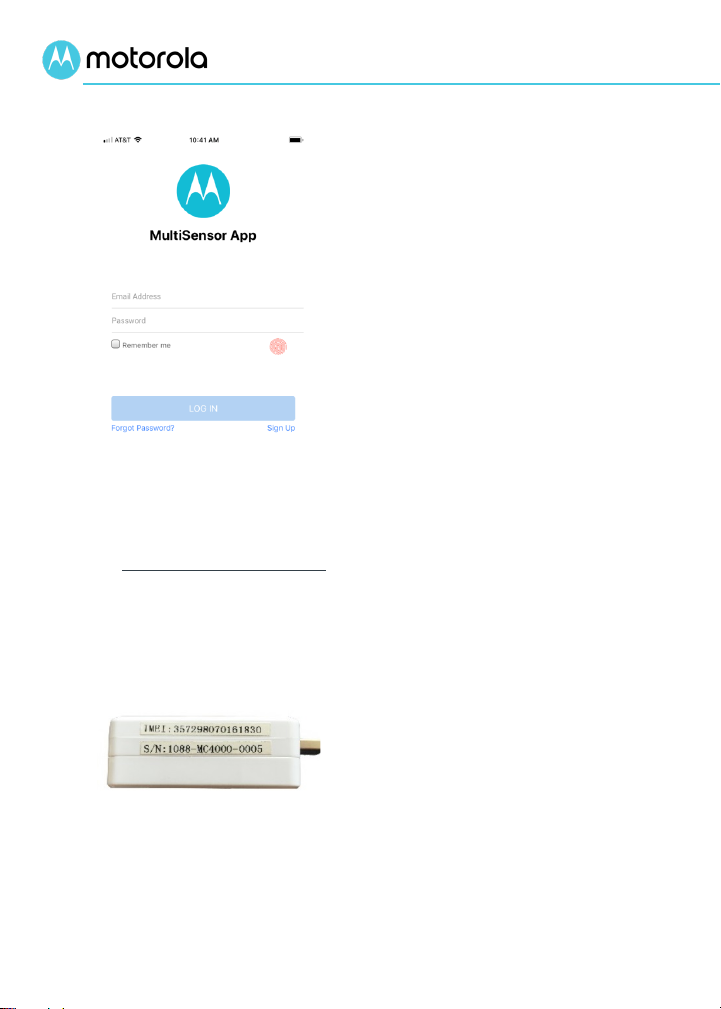
• On the bottom right of the page
Sign Up
• Sensor Name – use
Sensor ID (IMEI Number)
Note: once the account is set up you will need to login
using the provided e-mail address and password to
continue with further setup.
3 Add your MultiSensor. Tap the Configuration tab at the
bottom of the screen. Tap Sensor and then the blue + to
add your sensor. You will see a page with fields to be
completed.
is a
selection. Select it
then complete the information
requested on the next page. This
information (e-mail and phone
number) will be used as the
default Alert Recipient for this
account but may be edited later.
• A registration code will be sent
to the e-mail address provided.
This code will need to be
entered to finish setting up the
account.
Upper/Lower case letters and
numbers only. No special
characters. For example,
Basement or Beach House.
•
–
type the unique IMEI number
that’s printed on a label on your
MultiSensor.
6
Page 8
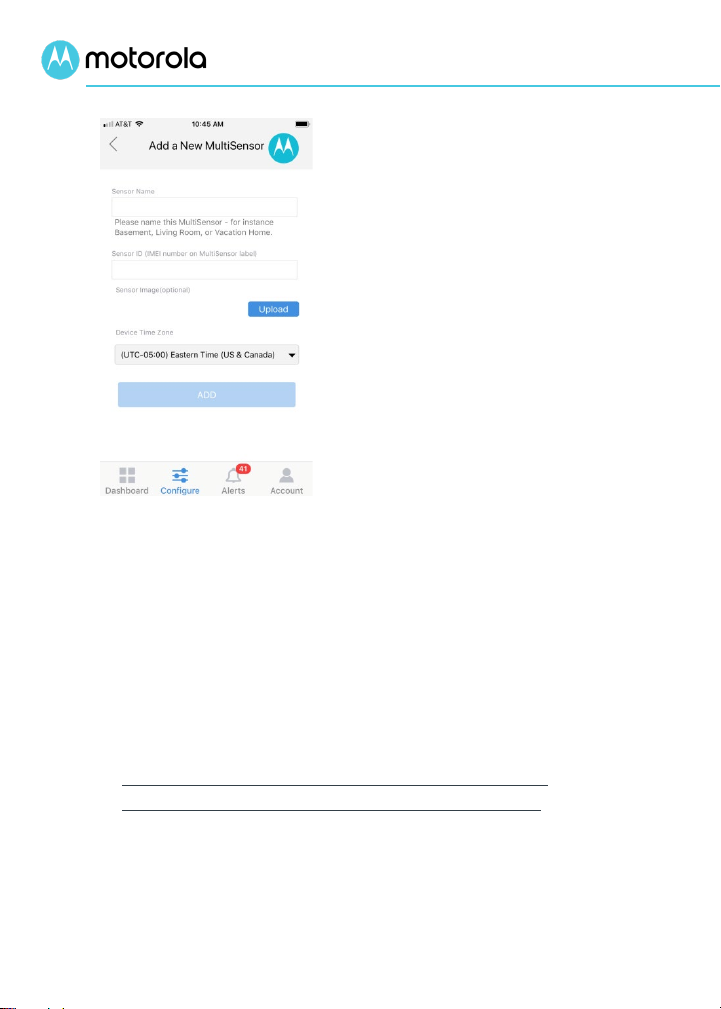
Upload button
Time Zone
4 Finally, you will need to set up and activate a
7
•
– you can
optionally upload a photo to
help identify your MultiSensor,
and the photo will be displayed
on the Dashboard page. If
Upload is not selected, then a
sensor picture will be used.
Note: This default picture is not
displayed on this page but will
appear on the Dashboard once
the sensor is added.
•
– a selection box to
select the time zone where the
sensor is used.
Once all fields are complete, the ADD button at the
bottom will become selectable to finish adding the sensor
to this account.
Note: If using the browser URL and not the mobile app,
Configure is at the top of the page. When selected,
then
the next page on the left will display Add a New Sensor
with the same fields. The default picture is displayed. At
the bottom of the page, click
Save.
subscription for service for your MultiSensor. The first
month of service is free. Subsequent months are $5 per
month per sensor. When you add an additional
MultiSensor to an existing account, the service begins
charging on the next billing cycle after it is installed.
Page 9
Account
My
Wallet
Manage Wallet
Add a new payment method
Add your Card
Select a billing address
Use this Address
Add a new
Address
Add
• Once the payment information
Payments
Payments
Activate
Billing Plan
Place Your Order
• Select
. Select
and follow the prompts
on the
page to
and to enter billing information.
Then tap
page
will display. If the address is
already populated, select it and
select
.
Otherwise, tap
. Complete the fields
and select
.
is setup, return to the Account
page and select
which displays the
page. Tap
for the
desired sensor displayed and
follow the prompts on the
page to set up
your subscription. After
selecting
Receipt screen will display, and
an email will be sent to the
Account Holder confirming
your subscription. Your
subscription should be
activated!
. The
, a
8
Page 10

• Tap any Dashboard sensor
Using your MultiSensor
Reading the MultiSensor Dashboard. The Dashboard
displays information reported by all the sensors, and signal,
power and battery status. The Updated field tells you the last
report time. Normally the device reports every 20 minutes. If
you tap the device icon at the top of the dashboard, the
dashboard will show you data from the most recent report. If
you tap the
with up-to-the-minute data.
Configure your MultiSensor for they way you want to use
it. Tap the Dashboard tab at the bottom of the screen on
your mobile app (the browser on your computer displays
Dashboard on the top left). After a short delay, you should
see the Dashboard screen with information displayed from
your MultiSensor.
Refresh button, the device will send a fresh report
icon to enable and configure
alerts, and to view history. If
you'd like, you can set alerts
for any sensor. For instance,
you may want to be alerted if
there's water on your floor or if
the temperature drops below
47 degrees, or if there's a
power loss.
Follow the on-screen
instructions for details and
read the next section for
additional assistance.
9
Page 11

• To add one or more phone
numbers and email addresses
for receiving alerts,
Configure
Alert Recipient
New Recipient
.
To enable an Alert for a
particular sensor,
you want to
On
More
Setting up alerts
tap the
icon and then the
button (on the
browser on your computer, Alert
Recipients is on the Account
page), then
.
Note: The email address and
phone number you used when
setting up the account will
already be listed by default. To
configure alerts to go to
additional destinations, you can
add up to 12 more recipients
•
first select the
appropriate MultiSensor unit (if
you have more than one) from
the top of the Dashboard. Then
tap the icon for the sensor that
monitor and receive
alerts on, such as Temperature or
Flood. A window with an Alert
button will appear. Tap the
side of the Alert button to enable
the alert. Then, press the
selection to configure the
alerting condition, and scroll
down below the History display.
Set the desired threshold(s) for
10
Page 12

alerting, then select the desired
Add
Add
Save
Alert Recipient then tap the
button. You can also add
additional recipients. Follow the
same step to select then tap
for each one, then tap the
button when finished.
Note: when an alert is enabled you will see either a green
checkmark or a red exclamation point . If the alert
condition has not been met, you will see a green checkmark. If
the alert condition has been met, you will see the red
exclamation circle.
This quick start and additional information are available online
www.motorolanetwork.com/SensorInfo
at
11
Page 13

Status
Green Light
Behavior
Blue Light
Behavior
Blue Light ---
Connection Status
Light Behavior
Normal Mode: Active Cellular
Green Light ---
Power & Battery Status
Light Behavior
Battery mode (AC power fail)
LED Lights
Lights during Initial Setup:
Power Up / Configuration
Establishing Cellular
connection
Active Cellular connection /
establishing Web server
connection
Successful Cellular and Web
server connection established
Cellular or Web server
connection not established
during Power Up
ON Solid (15 to
20 seconds)
ON Solid
ON Solid
ON Solid for 5
minutes
OFF
Single flash every
second
Single flash every
two seconds
ON Solid for 5
minutes
Sensor will repeat the sequence
above, attempting to connect to the
Cellular and Web server for 15
minutes. If it does not connect, it will
reboot and begin again.
Lights after Startup:
and Web server connection
Normal AC power mode
Low Battery
Hardware/MultiSensor fault
detected
NOTE: After the initial set up, if the lights alternate flashing − 1 second green,
1 second blue, 1 second off, repeat − it likely means that there is no SIM found.
Single flash once every 5 seconds
Single flash every 5 seconds
Double flash every 5 seconds
Triple flash every 5 seconds
Quadruple flash every 5 seconds
12
Page 14

Caution: To avoid the risk of explosion, replace the
battery with the correct type:
Dispose of used batteries according to the
instructions and regulations of your local authorities.
Rechargeable Battery Replacement
The included rechargeable 2.6Wh Lithium-ion battery lets the
MultiSensor work even when AC power is lost, and normally
works for up to 40+ hours without power. You should replace
this battery every 2 or 3 years, or if you find that it doesn't
power your MultiSensor for at least 30 to 40 hours.
For information about how to replace the battery, please see
www.motorolanetwork.com/SensorBattery
PowerExtra NP-45, FJ-NP45
Fujifilm NP-45S, NP-45A, NP-45
Lithium-ion Battery Warnings and Recommendations
Warning: This lithium-ion battery contains chemicals that can cause cancer
or reproductive harm. Under normal use, harmful exposure to these chemicals is
unlikely. See
TO THE EXTENT PERMISSIBLE BY APPLICABLE LAW, MTRLC LLC DISCLAIMS
ALL LIABILITY WHATSOEVER RELATED TO THE USE OF NON-MTRLC
APPROVED BATTERY PACKS, INCLUDING WITHOUT LIMITATION, FIRE,
DAMAGE TO PROPERTY, BODILY INJURY, AND/OR DEATH.
• Keep the battery pack away from children.
• Don't use a battery pack if its case appears damaged, swollen, or
• If you are unsure about whether a replacement battery pack is compatible,
• Follow local regulations for recycling or safe disposal of used battery
• Contact call2recycle at 1-800-822-8837 or www.call2recycle.org for the
www.P65Warnings.ca.gov for more information.
compromised.
contact MTRLC LLC at 800-753-0797.
packs. Do not throw them into regular trash.
locations of Lithium-ion battery recycling centers and battery drop-off
locations in your area.
13
Page 15

Sensor Details
The MultiSensor is equipped with highly-advanced MEMS
(Microelectromechanical Systems) sensors plus additional capabilities
for monitoring its environment and situation.
An alert can be switched on for any or all sensors. Each sensing
capability can be individually configured for desired alerting
thresholds. Here are some specifics about the MultiSensor's sensors:
Temperature
The built-in solid-state temperature sensor measures temperatures
from -40°F to 167°F (Fahrenheit), or -40°C to +75°C (Celsius).
• Range: -40°F to +167°F, or -40°C to +75°C*
• Accuracy: ± 0.9°F (0.5°C) from 59°F to 104°F (15°C to 40°C)
* Note: The USB power adapter provided with the sensor has a
maximum ambient operating temperature of 104°F (40°C). In order
to operate the sensor at higher temperatures, you must use a power
adapter or other USB power source that is rated for your desired
maximum ambient operating temperature. When a backup battery is
installed, your Sensor can be operated in an environment that’s
between -30°F and 122°F (-35°C to 50°C) if the power adapter or
source in use is also suitably rated. If a backup battery is not being
used, the environment can be between -30°F and 167°F (-35°C to
75°C), if the power adapter or source in use is also suitably rated.
Humidity
The built-in humidity sensor measures relative humidity from 0 RH%
to 100 RH% (Relative Humidity).
• Range: 0 RH% to 100 RH%
• Accuracy: ± 3.5 RH% from 20 to 80 RH%
14
Page 16

Acceleration (shaking/earthquakes)
The built-in acceleration sensor measures raw acceleration which can
occur with shaking, earthquakes, fracking, construction, or general
motion or disturbance of something that should normally be stable.
The sensor will indicate CALM, for no shaking detected, or a number
from
2 to 10. The chart below indicates the corresponding
acceleration, where the unit mg means milli-g, or 1000th g, where g is
gravitational acceleration at sea level. Raw acceleration values are
filtered to respond most strongly to frequencies typical of
earthquakes.
You can configure the acceleration sensor to send an alert if shaking
greater than a certain value occurs. If an acceleration alert is enabled,
and an acceleration greater than the configured threshold occurs, an
alert will typically be sent within 10 seconds of the event occurring.
No value is displayed in the icon on the dashboard during a shaking
event, but you will see a red alert circle. Approximately ten seconds
after shaking stops, a peak value is displayed inside the house icon.
Please note that the peak is reported after shaking stops, or every 20
minutes, whichever occurs first. After 20 minutes without shaking, the
icon scale will return to CALM.
15
Page 17

MultiSensor Acceleration Scale
Sensor Scale
(0 - 10)
Peak Acceleration
(mg)
Environmental Conditions
pending Shaking in process
0 - 2 Calm
3 - 15
15 - 24 Mild
25 - 49
50 - 84
85 - 199 Moderate
200 - 399
400 - 599
600 - 949
950 +
Strong
Severe shaking
Accelerometer Calibration: Whenever you move the MultiSensor,
you will need to recalibrate the accelerometer. To calibrate the
accelerometer, toggle the accelerometer alert enable from its current
setting and then toggle back again (enable to disable, wait 15
seconds, and then back to enable, or the reverse).
Additional information is available online at
www.motorolanetwork.com/SensorInfo
16
Page 18

Ambient Light Intensity
The built-in ambient light intensity sensor measures light in lux. Values
above 1200 lux are extrapolations.
The sensor will indicate a number from 0 to 10. The chart below
indicates the corresponding lux value. The MultiSensor is most
responsive to yellow light, and less responsive to blue and red light.
17
Page 19

MultiSensor Light Scale
Sensor Scale
lux
Environmental Conditions
0 Dark
1
2
5
14
40 General interior lighting
112
315 Bright interior lighting
881
2,467
6,908
Dim interior lighting
Full daylight
18
Page 20

Flood Detection
Flood detection is provided by connecting the Flood Sensing Cable to
the USB port on the MultiSensor. The flood sensor will indicate
water or excess moisture on a damp surface is detected on the two
metal probes. Once the device reports moisture, it will not report a
change for a minimum of 15 minutes. A dry condition will not be
reported until the flood probes have had a chance to dry.
Cellular Radio Signal Level
Cellular radio signal level indicates strength of the MultiSensor’s
cellular signal. Your sensor will indicate the cellular connection type,
3G or LTE, along with a graphical representation of the signal
strength on the Radio Dashboard icon. More blue arcs indicate a
stronger signal. The icon does not tell you if you have no cell service.
The "Updated" status on the dashboard will display in red after the
sensor fails to send two synchronous reports which occur every 20
minutes. So, after 40 minutes of no connection the status will appear
red and will state "Last Report" instead of "Updated". The Signal
History graph displays the levels in dBm (3G signals) or as blend of
dBm and signal quality (LTE).
WET if
no moisture
excess moisture
or flooding
• Levels that are between -60 and -100 are good.
• Signal levels from -100 to -110 are marginal but may be acceptable.
• Signal levels from -110 to -130 are poor.
19
Page 21

Cellular Signal Strength
Local AC Power Source Status
AC power source status indicates whether the sensor's USB
connector is receiving power from the adapter or other USB power
source. If the device isn’t receiving power from the USB source, it
means that local AC power may be lost, and the sensor is running on
its internal battery.
Grey or 'Last
Report' message
1 arc Fair
2 arcs Good
3 arcs Excellent
Power
Poor or none
No power
20
Page 22

no battery
Backup Battery Status
Backup battery status indicates whether the backup battery is
installed, and the current charge status as a percentage of full charge.
Green greater than 50%
Yellow 20 - 50%
Red less than 20%
Grey
charge
Note: when the battery icon is grey, you may see the message
“Battery Switch OFF” or “No Battery Installed”.
21
Page 23

Troubleshooting Tips
• Problem: Temperature or humidity sensor problems
• Possible causes: Direct sunlight, nearby heat sources, nearby
sources of moving air, blocked sensor vents, foreign material
inside or on sensor
• Solution: We recommend that you try moving your sensor to a
different location. The sensor will work best when there is space
around it and it is not boxed in by other objects or furniture.
• Problem: Ambient light sensor problems
• Possible causes: Blocked sensor openings, unwanted shadows,
foreign material inside or on sensor
• Solution: Be sure that there is nothing blocking the sensor and
that it is located in a location with exposure to light that you are
tracking.
• Problem: Short battery backup time
• Possible causes: Battery not allowed to fully charge, battery
needs replacement
• Solution: Allow battery to charge for a minimum of 8-10 hours and
be sure that the battery icon is green. For details, look at the
battery history graph. Replace the battery if the problem persists.
If the included battery's backup time is too short, consider a
higher-capacity external battery as discussed on page 3.
• Problem: Battery not charging
• Possible causes: Battery switch off, battery connection problem,
battery needs replacement, AC power off
• Solution: Check the Dashboard of the app and confirm whether
AC power is on (USB port is providing 5-volt power). Next, unplug
the sensor from the USB port, and confirm that the battery switch
is set to "1" (ON). If this did not resolve the issue, then remove the
two screws securing the back cover, pull off the battery holder,
and remove the battery. Then re-insert the battery and re-attach
to the sensor and plug it back in to USB. If the problem persists,
try replacing the battery.
22
Page 24

• Problem: MultiSensor unit will not turn on
• Possible causes: defective power source such as defective USB
power cube, AC power source switched off, dead battery, battery
switch not switched on, battery switch defective
• Solution: First, try moving the sensor's USB power adapter to a
different power outlet. Next, try plugging the sensor into a
different USB power source. If the sensor still will not turn on, it
may be defective.
• Problem: Not connecting to cellular tower
• Possible causes: Out of cellular range, inadequate or missing
antenna, bad or missing SIM card
• Solution: Unplug the MultiSensor from the USB power source, and
turn off the battery for 10 seconds; then turn on the battery and
plug it back in. If not resolved, try moving the sensor to another
location with better cell service. Check that the antenna is
connected and not damaged, and that the SIM card is installed.
• Problem: Not receiving updated MultiSensor data
• Possible causes: Poor MultiSensor cell signal, poor Internet
connection to device running app or browser, Motorola
MultiSensor server down, no subscription to MultiSensor cell
service, expired or cancelled subscription to MultiSensor cell
service
• Solution: Check MultiSensor lights to verify connection to the
Motorola MultiSensor server. Verify that the device you use to
view MultiSensor app or browser is on line. Make sure subscription
is active, with a valid credit card or PayPal account. If the
MultiSensor server is down, technicians will be working to bring it
back up ASAP.
• Problem: Not detecting flood
• Possible causes: Flood report can take up to 30 seconds,
improper flood cable placement, flood alert not configured
properly, flood cable defective
• Solution: Dashboard may need to be refreshed to see the flood
icon. Make sure the flood cable is plugged in snugly to the
MultiSensor, and that the exposed metal contacts of the flood
23
Page 25

cable are positioned where they will be exposed to water from
flooding. Double-check flood alert settings. Check the cable by
shorting between the two exposed metal contacts. If the device
doesn't trigger a report of flooding within 30 seconds, there may
be a problem with the cable. It should be replaced.
• Problem: Not sending alerts via text (or email, phone)
• Possible causes: Alert not enabled, threshold not configured
properly, Alert Recipient not configured properly
• Solution: Recheck all alert settings, including whether the
expected alert is enabled, threshold settings, whether alert
recipients have been successfully selected, and details to contact
alert recipients.
• Problem: Device not responding to Refresh or Reset, or
generating error message
• Possible causes: Device not online, delayed communication with
device
• Solution: Under poor signal conditions, you may need to wait up
to several minutes for the commands to take effect. If the device
is not online, check that it has power. You may need to move your
device to find a better signal.
• Problem: Dashboard doesn’t display current data
• Possible causes: Dashboard doesn’t refresh on its own
• Solution: Tap the device icon to see the latest reported data. Tap
Refresh to generate a new report.
NOTE: Normally the device reports every 20 minutes. If you tap
the device icon at the top of the dashboard, the dashboard will
show you data from the most recent report. If you tap the
button, the device will send a fresh report.
Refresh
24
Page 26

In the US and most other countries
800-753-0797 or +1 617-753-0562
We like to help.
Please visit our support Website or call our support
specialists. Our Website has our Motorola Mentor information,
and also provides returns and warranty information.
www.motorolanetwork.com/support
Email: support@motorolanetwork.com
Phone:
UK +44 800 023 9083
Spain +34 900 839 783
This quick start and additional information are available online
at www.motorolanetwork.com/SensorInfo
Limited Warranty
MTRLC LLC warrants this MultiSensor against defects in
material and workmanship for a warranty period of 2 years.
The enclosed lithium-ion battery is covered by a 1 year
warranty. To read the full warranty, please go to
www.motorolanetwork.com/warranty
25
Page 27

Safety Precautions
These precautions help protect you and your MultiSensor.
Do not put the MultiSensor or its power cube in water, since this is a shock
hazard.
The MultiSensor should normally be installed indoors. If you use it outdoors, it
must be sheltered from rain. The MultiSensor is NOT waterproof.
The USB power adapter provided with the MultiSensor has a maximum ambient
operating temperature of 104° Fahrenheit (40° Centigrade). In ord er to operate
the MultiSensor at higher temperatures, you must use a power adapter or other
USB power source that is rated for your desired maximum ambient operating
temperature. When a backup battery is installed, your MultiSensor can be
operated in an environment that’s between -30 and 122° Fahrenheit (-35 to 50°
Centigrade) if the power adapter or source in use is also suitably rated. If a
backup battery is not being used, the environment can be between -30 and 167°
Fahrenheit (-35 to 75° Centigrade), if the power adapter or source in use is also
suitably rated.
Your MultiSensor should not be in a very small confined space. There should be
some room for air flow around the top, front, and sides of the MultiSensor.
Make sure to use your MultiSensor's provided USB power cube or equivalent,
and a compatible electrical outlet.
Regulatory Information
Interference statement
This device complies with Part 15 of the FCC Rules and Industry Canada licenseexempt RSS standard (s). Operation is subject to the following two conditions:
(1) this device may not cause interference, and (2) this device must accept any
interference, including interference that may cause undesired operation of the
device. Le présent appareil est conforme aux CNR d'Industrie Canada
applicables aux appareils radio exempts de licence. L'exploitation est autorisée
aux deux conditions suivantes: (1) l'appareil ne doit pas produire de brouillage,
et (2) l'utilisateur de l'appareil doit accepter tout brouillage radioélectrique subi,
même si le brouillage est susceptible d'en compromettre le fonctionnement.
FCC Class B digital device notice
This equipment has been tested and found to comply with the limits for a Class
B digital device, pursuant to part 15 of the FCC Rules. These limits are designed
to provide reasonable protection against harmful interference in a residential
installation. This equipment generates, uses and can radiate radio frequency
energy and, if not installed and used in accordance with the instructions, may
cause harmful interference to radio communications. However, there is no
Page 28

guarantee that interference will not occur in a particular installation. If this
equipment does cause harmful interference to radio or television reception,
which can be determined by turning the equipment off and on, the user is
encouraged to try to correct the interference by one or more of the following
measures:
• Reorient or relocate the receiving antenna.
• Increase the separation between the equipment and receiver.
• Connect the equipment into an outlet on a circuit different from that to
which the receiver is connected. Consult the dealer or an experienced
radio/TV technician for help.
CAN ICES-3(B)/NMB-3(B) This Class B digital apparatus complies with
Canadian ICES-003. Cet appareil numérique de classe B est conforme à la
norme canadienne ICES-003.
Any changes or modifications could void the user’s authority to operate the
equipment.
Tout changement ou modification peuvent annuler le droit d’utilisation de
l’appareil par l’utilisateur.
MTRLC LLC PO Box 121147 Boston, MA 02112-1147
©MTRLC LLC 2018. MOTOROLA and the Stylized M Logo are trademarks or registered
trademarks of Motorola Trademark Holdings, LLC. and are used under license. All other
trademarks are the property of their respective owners. All rights reserved.
27786-EL-A/3118
 Loading...