

Page 1
HOME
2
ABC
1
3
DEF
6
MNO
5
JKL
4
GHI
7
PRS
8
TUV
9
WXY
0
HOME
MTS 2000
MTS 2000
*6881072C45*
MTS 2000
TM
Models II and III
Portable Radios
operating instructions
68P81072C45-E
Motorola Inc.
8000 W. Sunrise Blvd.
Ft. Lauderdale, FL 33322
Page 2

1 MTS 2000
TM
Models II and III
TM
Portable Radios
Contents
Introduction
Basic Radio Features .................................................................................3
FLASHport................................................................................................3
Inspection and Unpacking............................................................................3
Getting Started
Antennas..................................................................................................4
Battery Installation.....................................................................................6
Battery Removal........................................................................................6
Universal Connector Seal Removal................................................................7
Belt Clip Installation and Removal .................................................................7
Controls, Switches, Indicators, and Connectors..............................................8
Keypad...................................................................................................10
Display...................................................................................................11
Alert Tone Indications...............................................................................12
LED Indications........................................................................................14
Time-Out Timer........................................................................................14
Conventional or Trunked Radio Operation.....................................................14
Basic Radio Operation
Radio On/Off; Power-Up ...........................................................................15
Monitoring (Conventional Modes Only).........................................................15
Selecting a Zone and Mode.......................................................................16
Receiving a Call .......................................................................................18
Transmitting............................................................................................19
General Radio Features Operation
Low-Battery Alert.....................................................................................21
Coded Squelch Operation ..........................................................................21
SECURENET Operation..............................................................................21
Variable RF Power Level (VHF and UHF Radios Only)......................................23
Emergency Operation ..............................................................................23
Failsoft Operation (Trunked Systems Only)....................................................26
Transmitter Disable Operation (Non-SECURENETTM-Equipped Radios Only)..........27
Native Language Displays..........................................................................27
Muting the Keypad Tones..........................................................................28
Scan Operation........................................................................................29
Programming the Radio’s Lists ..................................................................35
Conventional Telephone Operation...............................................................39
Trunked Telephone Operation.....................................................................54
, Motorola, FLASHport, MTS 2000, SMARTNET, StartSite, Private-Line, Digital Private-Line
Private Conversation, Call Alert , SECURENET, and SmartZone are trademarks of Motorola, Inc.
© 1992, 1993, 1995, 1997 by Motorola, Inc., Radio Products Group
8000 W. Sunrise Blvd., Ft. Lauderdale, FL 33322
Printed in U.S.A. 9/97. All Rights Reserved.
Page 3

2 MTS 2000 Models II and III
Portable Radios
Contents (cont.)
Conventional Radio Features Operation
Stat-AlertTM(MDC-1200TM) Signalling Features..............................................69
Repeat/Direct ........................................................................................73
Smart PTT..............................................................................................74
Trunked Radio Features Operation
Viewing Your Radio’s ID Number.................................................................75
Trunked Enhanced Private Conversation™ Call Operation ...............................76
Trunked Private ConversationTMI and II Call Operation ....................................86
Call Alert™ Page Operation .......................................................................95
Automatic Multiple Site Selection (AMSS) ..................................................105
Dynamic Regrouping ..............................................................................107
Caller ID Display.....................................................................................108
SmartZoneTMOperation...........................................................................109
Batteries and Accessories
Battery Information................................................................................113
Recharging Nickel-Cadmium Batteries.......................................................113
Charging Temperature............................................................................113
Short Circuit .........................................................................................113
Memory Effect (Reduced Charge Capacity).................................................114
Nickel-Cadmium Battery Disposal .............................................................114
Accessories List....................................................................................114
General Information
Transmitting Distance.............................................................................116
Radio Care ...........................................................................................117
FCC Safety Standards.............................................................................118
Factory Mutual Research Corporation (FMRC) Information ...........................119
Restrictions ..........................................................................................119
Service.................................................................................................120
Express Service Plus (ESP)......................................................................121
Computer Software Copyrights ................................................................122
Patent Disclosure ..................................................................................122
Warnings, Cautions, and Notes
Throughout the text in this publication, you will notice the use of
WARNINGS, CAUTIONS, and Notes. These notations are used to emphasize
that safety hazards exist, and care must be taken or observed.
WARNING: An operational procedure, practice, or condition, etc., which may
result in injury or death if not carefully observed.
CAUTION: An operational procedure, practice, or condition, etc., which may
result in damage to the equipment if not carefully observed.
Note: An operational procedure, practice, or condition, etc., which is essential
to emphasize.
Page 4

3 Introduction
HOME
2
ABC
1
3
DEF
6
MNO
5
JKL
4
GHI
7
PRS
8
TUV
9
WXY
0
MTS 2000
Basic Radio Features
Welcome to the Motorola MTS 2000 FLASHportTMportable radio. MTS
2000 radios are sophisticated, state-of-the-art communication units, with 16- and
160-mode models available in VHF, UHF, 800 MHz, or 900 MHz frequency
ranges. Pioneering the latest technology in radio electronics, Motorola MTS 2000
radios provide features that were once only available in more expensive radios.
Intelligent and flexible software increases the radio’s capability, decreases the
radio's physical size, and permits many of the radio's features to be customized
just for you.
FLASHport
Your MTS 2000 portable radio utilizes Motorola’s revolutionary FLASHport
technology. This allows your radio’s capabilities to be flexible, because FLASHport
makes it possible to add software that drives these capabilities both at the time of
purchase and later on. Previously, changing a radio’s features and capabilities
meant significant modifications, or buying a new radio. But now, similar to how a
computer can be loaded with different software, your radio’s features and
capabilities can be upgraded with software.
FLASHport allows you to add software to your radio as your needs change
and as technology advances, making your radio investment go further.
FLASHport is the future of radio communications, and it’s yet another
example of Motorola’s commitment to your satisfaction.
Inspection and Unpacking
Inspect the shipping carton for any signs of
damage. Remove and check the contents to be
sure that all ordered items have been shipped.
Inspect all items thoroughly. If any items have
been damaged during transit, report the damage
to the shipping company immediately.
Radio Packing Box Contents
• Radio
• Antenna
• Nickel-Cadmium Battery
• Belt Clip
• Help Card
• Radio Information Sheet
• Operating Instructions
Page 5

4 Getting Started
Antennas
Radio/Antenna Identification
An information label is attached to the back of your radio (chassis), just under
the battery contacts. A radio model number is identified on this label. A typical
model number might be H01SDC9AA1AN. The fourth position of the model number
(in this case “S”) identifies the operating frequency band of the radio. The Radio
Operating-Frequency Chart lists all fourth-position alpha characters and
corresponding frequency band.
Radio Operating-Frequency Chart
Fourth-position Frequency Fourth-position Frequency Fourth-position Frequency
Character Band Character Band Character Band
K 136-178 MHz R 403-470MHz U 806-870MHz
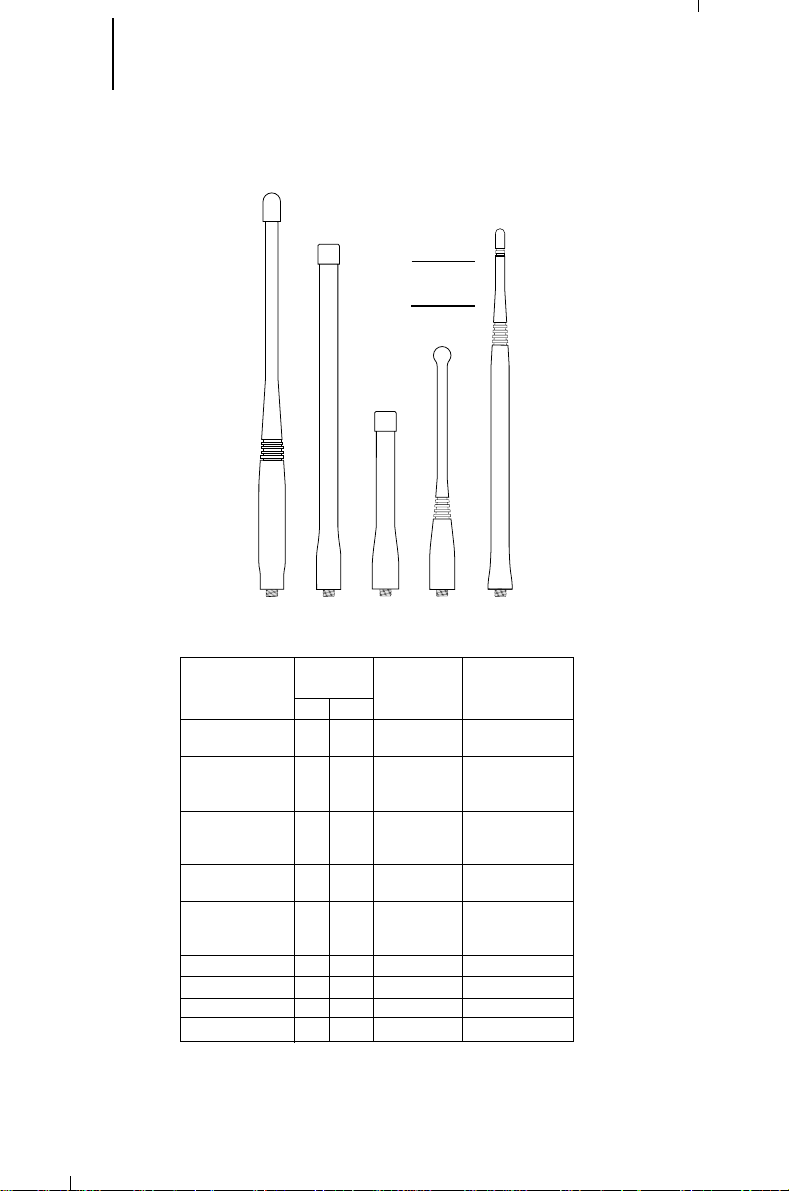
Antennas are frequency sensitive and are color coded according to the
frequency range of the antenna. The color code indicator is the insulator in the
center of the base of the antenna. The following illustrations and chart will help
identify the antenna, antenna frequency range, and corresponding color code.
Refer to the Radio Operating-Frequency Chart and the Antenna Identification
Chart to ensure that the match between your radio and antenna is correct.
S 450-520MHz W 896-941MHz
Page 6
5 Getting Started (cont.)
VHF
Wide Band
Helical
VHF
Helical
UHF
Helical
800 MHz
Whip
800 MHz
Stubby
800 MHz
Dipole
UHF Whip
Antenna Identification Chart
Antenna Approx. Insulator Frequency
Type Length Color Code Range
VHF Wide Band 8.1 203 RED 136-174 MHz
Helical
VHF 7.8 195 YELLOW 136-151 MHz
Helical 7.3 183 BLACK 151-162 MHz
UHF 3.3 83 RED 403-435 MHz
Helical 3.2 80 GREEN 435-470 MHz
UHF Wide Band 5.2 130 GREY 403-512 MHz
Whip
800/900 MHz 3.3 83 WHITE 806-941 MHz
Stubby,
Quarterwave
800 MHz Dipole 8 200 RED 806-870 MHz
900 MHz Dipole 8 200 BLUE 896-941 MHz
800 MHz Whip 7 175 RED 806-870 MHz
900 MHz Whip 6.6 165 BLUE 896-941 MHz
In. MM
6.9 172 BLUE 162-174 MHz
3.2 79 BLACK 470-512 MHz
Antenna Installation
Screw the threaded end of the antenna into the antenna receptacle located on
top of the radio. Rotate the antenna clockwise until it fits firmly against the bushing.
Page 7
REQUIRES:
MAEPF-22058-B
6 Getting Started (cont.)
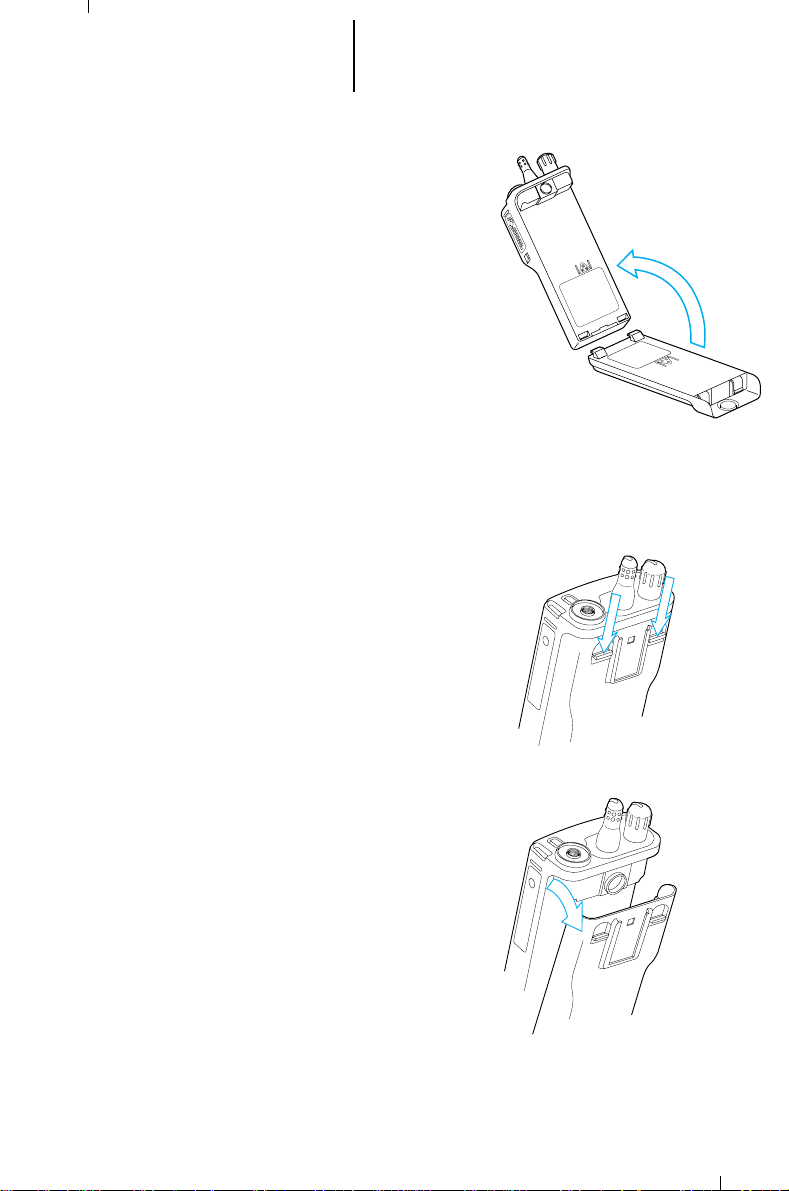
Battery Installation
1. Turn off the radio and hold it with the back of
the radio facing up.
2. Place the two notched tabs of the battery
(located at the inside base of the battery) into
the metal cutouts of the radio (located at the
inside base of the radio).
3. Rotate the battery toward the radio and press
the top of the battery into the radio until both
battery release levers "click" into place.
Note: The battery is shipped uncharged.
Batteries must be charged before use. (See
"Battery Information" section.)
Battery Removal
1. Turn off the radio and hold it so that the battery
side of the radio is tilted down.
2. Press down on the two battery release levers.
3. With the release levers pulled down, the top of
the battery will come apart from the radio.
4. Remove the battery completely away from the
radio.
Page 8

7 Getting Started (cont.)
Universal
Connector
Seal
Push
Off
MAEPF-22060-A
Universal Connector Seal Removal
WARNING:
• When not in use, keep the side connector
covered using the universal connector seal
provided.
• Touching the top two contacts of the
universal connector when transmitting
could result in a radio frequency burn.
If the universal connector seal is attached to the
radio:
1. Turn the radio off when removing the seal to
prevent sending an emergency signal should
the emergency button be inadvertently
pressed.
2. Grasp the radio as illustrated, and push your
thumb against the tabbed portion of the seal
with enough force to unsnap the universal
connector seal from the radio.
Note: An arrow on the top surface of the
seal indicates the direction of thumb
pressure to unsnap the seal.
3. Rotate the seal around the antenna to move
it away from the universal connector; slide
the seal off of the antenna and completely
away from the radio.
Belt Clip Installation and Removal
Note: To avoid damage to the radio's surface,
installation and removal of the belt clip assembly
should be done with the battery removed from
the radio.
Installing the Belt Clip
1. Insert a pencil or equivalent size instrument
between the inside of the belt clip and the metal
clip assembly so as to hold the metal clip
partially sprung (metal clip should be
approximately parallel with the plastic portion of
the belt clip).
2. Align the metal tabs of the belt clip with the
plastic slots of the battery housing.
3. Slide the belt clip onto the battery, pushing
firmly until a click is heard.
4. Remove the pencil from the clip.
Removing the Belt Clip
1. Insert a pencil, or equivalent size instrument
between the inside of the belt clip and the metal
clip assembly so as to hold the metal clip partially
sprung (metal clip should be approximately
parallel with the plastic portion of the belt clip).
2. Push the flat blade of a #2 slotted screwdriver
(or like instrument) between the battery housing
and the belt clip release tab.
3. While performing step 2, slide the belt clip out
and away from the battery, and remove the
screwdriver.
4. Remove the pencil from the clip.
Page 9
8 Getting Started (cont.)
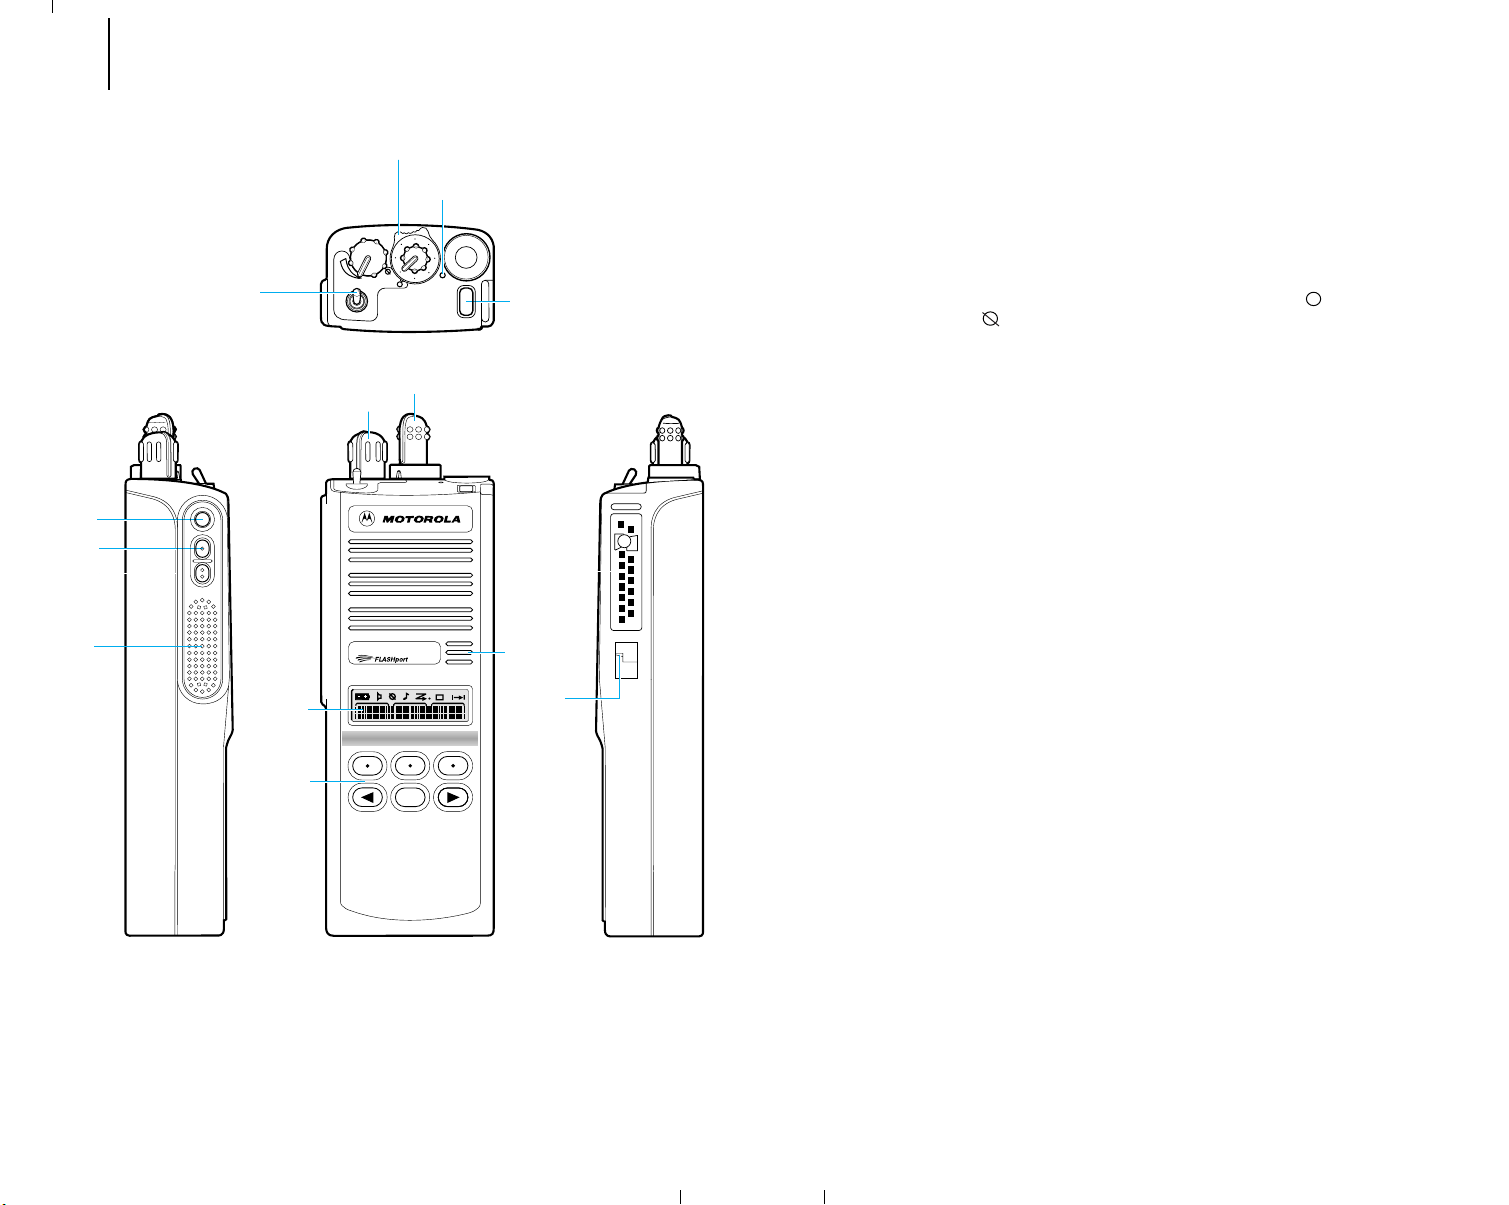
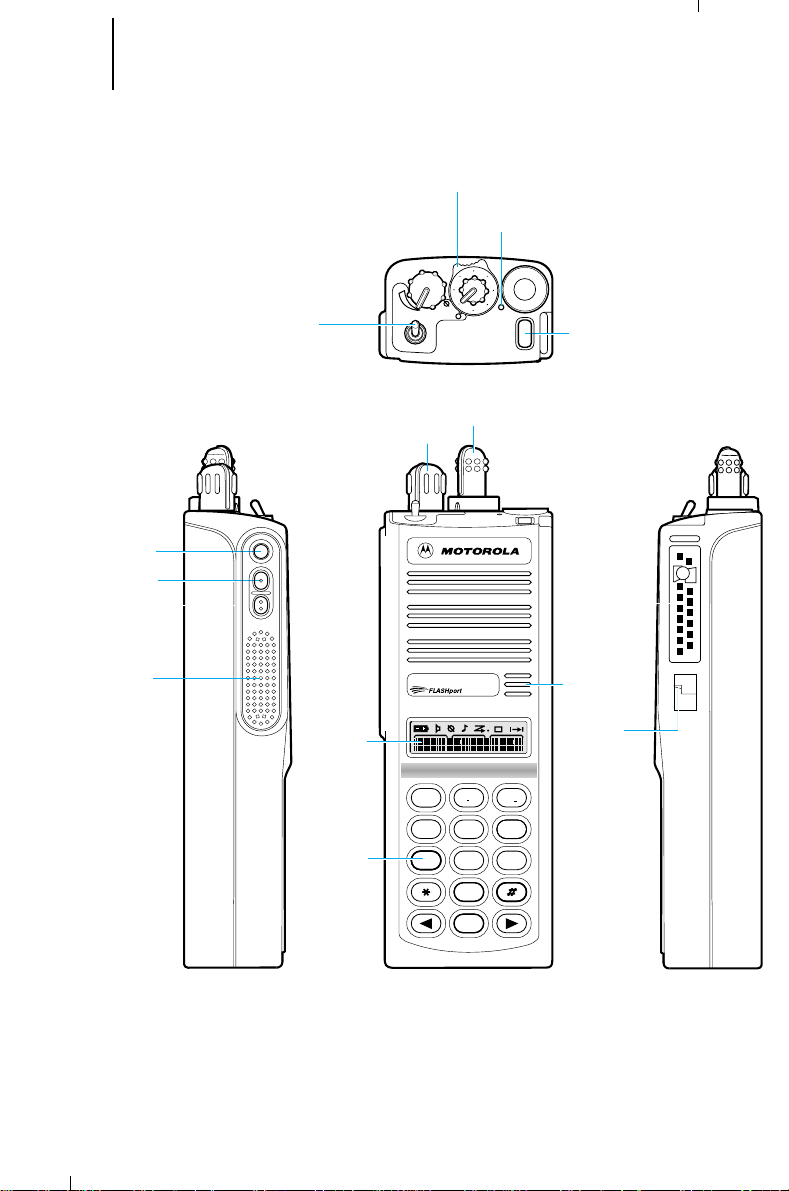
4 three-position
(ABC) toggle switch
5 indicator LED
6 orange top button
2 mode selector knob
1 on/off/volume control
13 universal
connector
7 side button 1
8 side button 2
9 side button 3
(monitor)
10 push-to-talk
(PTT) switch
12 microphone
14 noise-
cancelling
port
A
B
C
11 display
3 two-position concentric switch
1
3
5
7
13
15
9
11
15 keypad
HOME
MTS 2000
ILLUSTRATOR
DESCRIPTION
LETTERING SIZE
REQUIRES:
EDITOR
HR
MTS 2000 Ra
10
Controls, Switches, Indicators, and Connectors
1 On/Off/Volume Control – Turns the radio on and off and adjusts the volume
level.
2 Mode Selector Knob – Selects the operating channel/mode (all radios) or the
dynamic-regrouping position (trunked radios with dynamic regrouping only).
3 Two-Position Concentric Switch – Programable. In SECURENET-equipped
radios, programmed at shipment to select clear ( ) or encrypted
(SECURENET) (
) transmit operation. In non-SECURENET-equipped radios,
programmed at shipment to turn scanning on or off.
4 Three-Position (A B C) Toggle Switch – Programmable. Trunked radios are
programmed at shipment for zone selection (position A = zones 1—16; B =
zones 17—32; C = zones 33—48); conventional radios are programmed at
shipment to select repeater direct/talkaround (position A = direct; B and C =
talkaround).
5 Indicator LED – Indicates the radio operating status; green/red light-emitting
diode (LED).
6 Orange Top Button – Programmable. Programmed at shipment for
emergency alarm (all radios) and emergency call (trunked radios equipped with
emergency call only).
7 Side Button 1 – Programmable. In SECURENET-equipped radios, pressing this
button and the orange top button at the same time will erase the key.
Programmed at shipment to control the display's backlight.
8 Side Button 2 – Programmable. Trunked radios are programmed at shipment
for telephone interconnect; conventional radios are unprogrammed at
shipment.
9 Side Button 3 (Monitor Button) – Programmable. Trunked radios are
programmed at shipment for call response; conventional radios are
programmed at shipment for radio monitor.
10 Push-To-Talk (PTT) Switch – Engages the transmitter and puts the radio in the
transmit mode.
11 Display – Provides visual information about many of the radio’s features.
12 Microphone Port – Accepts voice input to the radio’s microphone.
13 Universal Connector – Provides access for programming, testing, and
accessory connections.
14 Noise-Cancelling Port – Reduces background noise during transmit.
15 Keypad – Provides control and data interface for many of the radio’s features.
MTS 2000 II Radio
Page 10
9 Getting Started (cont.)
4 three-position
(ABC) toggle switch
5 indicator LED
6 orange top button
2 mode selector knob
1 on/off/volume control
13 universal
connector
7 side button 1
8 side button 2
9 side button 3
(monitor)
10 push-to-talk
(PTT) switch
12 microphone
14 noise-
cancelling
port
A
B
C
11 display
3 two-position concentric switch
1
3
5
7
13
15
9
11
HOME
2
ABC
1
3
DEF
6
MNO
5
JKL
4
GHI
7
PRS
8
TUV
9
WXY
0
15 keypad
MTS 2000
ILLUSTRATOR DAT
DESCRIPTION
LETTERING SIZE:
REQUIRES:
EDITOR DAT
HR
MTS 2000 Radio
Model Keypad
10/21
MTS 2000 III Radio
Page 11
10 Getting Started (cont.)
HOME
2
ABC
1
3
DEF
6
MNO
5
JKL
4
GHI
7
PRS
8
TUV
9WXY
0
HOME
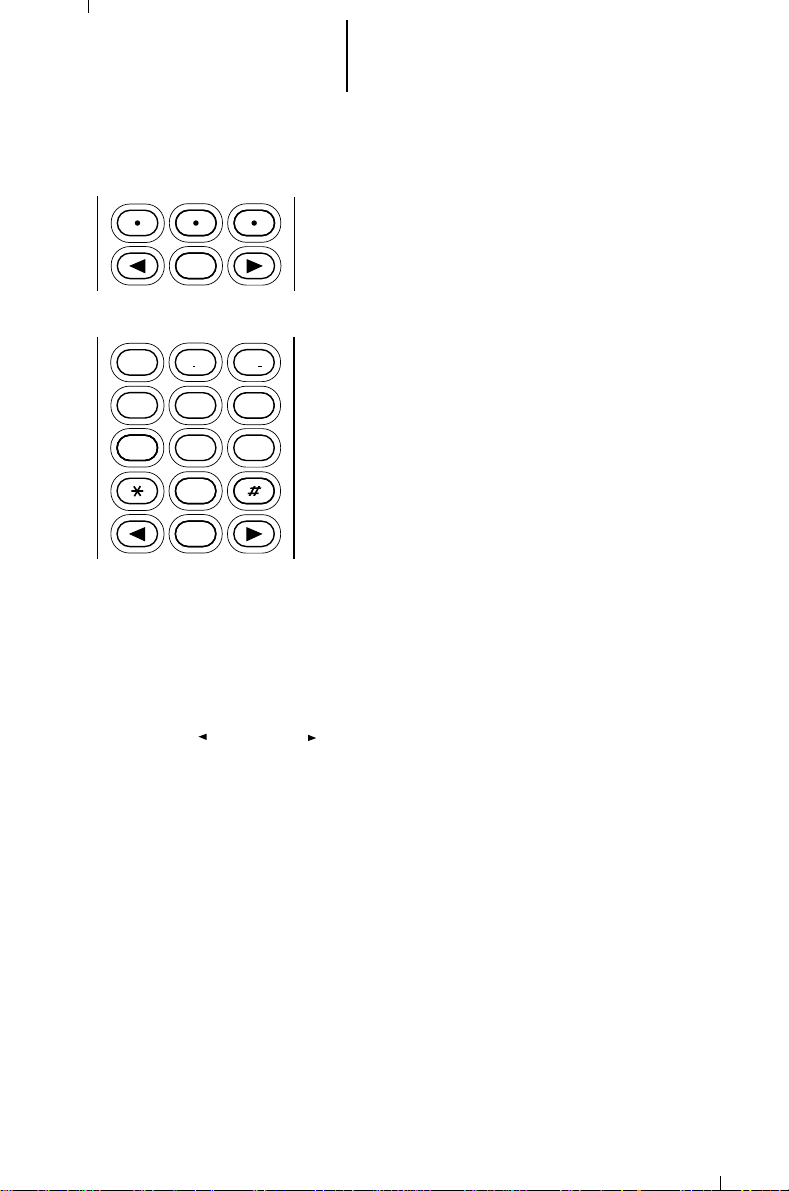
Keypad
The 6-key (MTS 2000 II) or 15-key (MTS 2000 III)
keypad controls or inputs data to many of your MTS
2000 radio’s features. Both keypads’ top three keys
access many of these features. In addition, the 15-key
keypad’s upper 12 keys are arranged, and function,
like a standard telephone keypad. The bottom three
keys of both keypads are the left arrow key, HOME key,
and right arrow key.
Selecting a Feature
A unique feature of the MTS 2000 radio is its use
of the display to give you quick access to many of the
radio’s features without having to have a dedicated
mechanical key for each feature.
The names of the features (CALL, MUTE, etc.)
are shown on the display, three at a time, with key-like
outlines to make them look like keys.
Selection of features is controlled by the three
keys directly below the feature names: the left key
controls the left feature, the middle key controls the
middle feature, and the right key controls the right
feature.
Left and Right Arrow Keys
The left ( ) and right ( ) arrow keys are used to scroll the display forward or
backward through the radio’s features and lists. There is no end point to the list, so
if you continue to scroll in one direction, the display will “wrap around” back to the
beginning of the list. If you hold either key down, the display will scroll at a faster rate
until the key is released.
The left arrow key is also used for editing when you are entering information
manually from the keypad. Pressing the left arrow key will backspace, and erase the
display, one character at a time. If you have erased all the digits, an additional press
of the left arrow key will return the display to the preprogrammed list.
HOME Key
The HOME key will always return you to the home (default) display. In most
cases, this is the current zone/mode. In addition, if you are using a feature that
requires it, pressing the HOME key will also cause information to be saved in
memory before going to the home display. Some radio features will automatically go
to the home display when they are completed, without having to press the HOME
key, thus reducing the number of keypresses required.
Page 12
11 Getting Started (cont.)
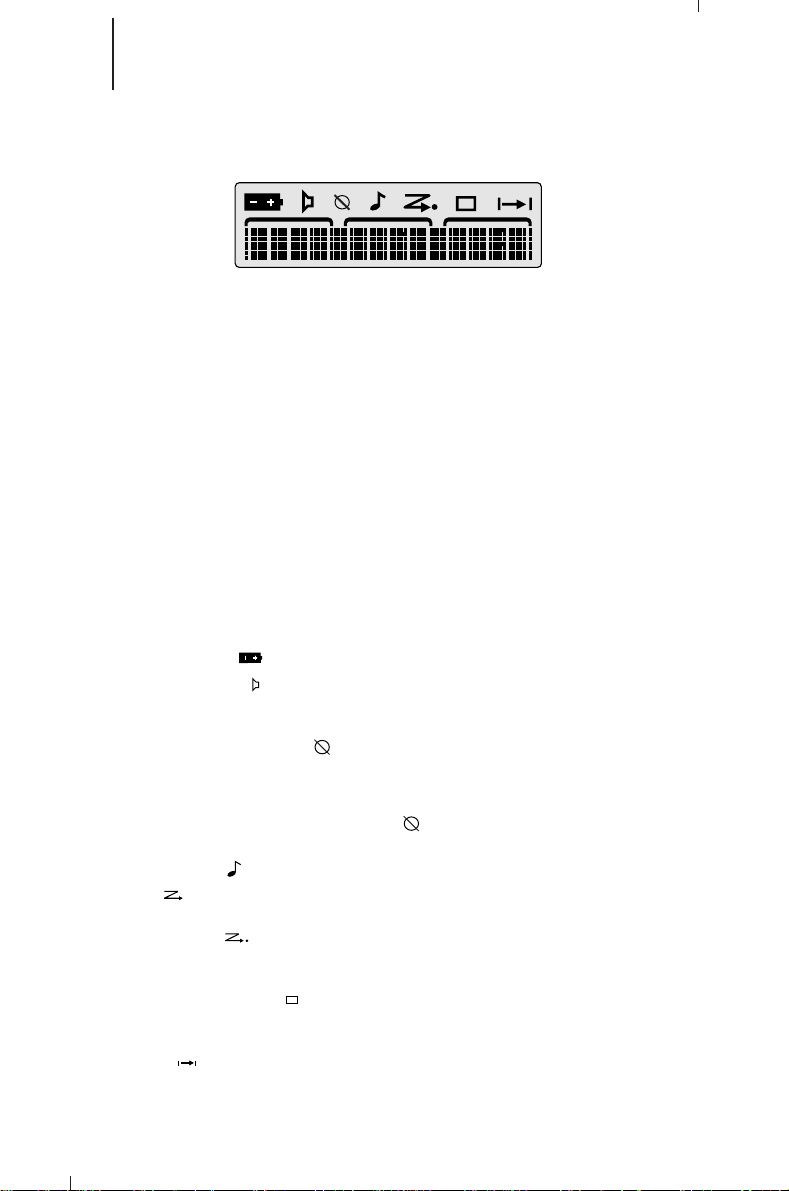
Display
The MTS 2000 radio has a 14-character, one-line liquid-crystal display (LCD),
which displays either alphanumeric messages or feature information. Above the
character displays are eight status annunciators that indicate some of the radio’s
operating conditions
Display Light
If poor light conditions make the display difficult to read, turn on the radio’s
display backlight by pressing the light button (normally side button 1). This light will
remain on for a preprogrammed time period before it turns off automatically, or
you can turn it off immediately by pressing the light button again (the light can be
turned off
key or button is pressed (except for side button 3 and the PTT switch), any knob
is turned, or any toggle switch is moved, the light will remain on for an additional
time period.
• Battery Status ( ) – Flashes when the battery is low.
• Carrier Squelch ( ) – Indicates when the active conventional mode is being
• SECURENET Operation ( ) – For SECURENET-equipped radios, appears
• Call Received ( ) – Flashes when a call or page is received.
• Scan ( ) – Indicates when the radio is scanning; ON = SCANNING/OFF =
• Priority Scan ( ) – The presence of a dot along with the scan annunciator
• Programming Mode ( ) – Indicates when the radio is in the programming
• Direct ( ) – Indicates whether you are talking directly to another radio
only
if the radio is not in a feature menu). If, while the light is on, any
Status Annunciators
The status annunciators indicate the status of certain radio functions:
monitored in the carrier squelch mode; ON = BEING MONITORED/
OFF = NOT BEING MONITORED.
either when the transmit mode you have selected has been preprogrammed
for SECURENET operation, or when the mode you have selected has been
preprogrammed for selectable operation and the two-position concentric
switch is in the SECURENET ( ) position; ON = SECURENET
TRANSMISSION/OFF = CLEAR TRANSMISSION.
NOT SCANNING.
indicates the receiving of a priority mode; FLASHING DOT = PRIORITY
1/SOLID DOT = PRIORITY 2.
mode; ON = IN PROGRAMMING MODE/OFF = NOT IN PROGRAMMING
MODE.
(talkaround), or through a repeater; ON = DIRECT/OFF = REPEATER.
Page 13

12 Getting Started (cont.)
Alert Tone Indications
The MTS 2000 radio generates a number of audible tones to indicate radio
operating conditions:
•
Low Battery – A low-battery condition is indicated by a high-pitched, cricket-like
“chirp-chirp” when the PTT switch is released following a transmission.
•
Successful Power-Up – A shor t, medium-pitched tone when the radio is first
turned on indicates that the radio has passed its power-up self test and is
ready for use.
•
Unsuccessful Power-Up – A short, low-pitched tone when the radio is first
turned on indicates that the radio has failed its power-up self test and is not
ready for use. Contact your service representative for service.
•
Transmit on Receive-Only Mode – If you press the PTT switch while tuned to a
“receive-only” mode, you will hear a continuous, low-pitched alert tone,
indicating that no transmission is possible on this mode. This tone will continue
until the PTT switch is released.
•
Transmit Inhibit on Busy Mode – If you press the PTT switch while the mode is
busy, you will hear a continuous, low-pitched alert tone, indicating that no
transmission is possible on this mode. This tone will continue until the PTT
switch is released.
•
Invalid Mode – A continuous, low-pitched tone is heard when an invalid or
unprogrammed operation is attempted on the radio.
•
Valid (Good) Key Press – A shor t, medium-pitched tone when a keypad key is
pressed indicates that the key press was accepted.
•
Invalid (Bad) Key Press – A short, low-pitched tone when a keypad key is
pressed indicates that the key press was rejected.
•
Emergency Alarm Entry – A short, medium-pitched tone when the emergency
button is pressed indicates that the radio has entered the emergency mode.
•
Emergency Alarm/Call Exit – A continuous, medium-pitched tone when the
radio is in the emergency mode indicates that the radio has exited the
emergency mode.
•
Failsoft (Trunked Systems Only) – A faint “beeping” tone every ten seconds
indicates that the radio is operating in the failsoft mode.
•
Time-Out Timer Warning – Your radio’s time-out timer limits the length of your
transmission time. When you are pressing the PTT switch (transmitting), a
short, low-pitched warning tone will sound four seconds before the allotted
time will expire.
•
Time-Out Timer Timed-Out – If you hold down the PTT switch longer than the
time-out timer’s allotted time, a continuous, low-pitched tone will sound,
indicating that your transmission has been cut off. This tone will continue until
the PTT switch is released.
•
Phone Busy – A “bah-bah-bah-bah” tone when telephone interconnect is
accessed indicates that all available modes are busy and the radio is in queue
for the next available phone line.
Page 14

13 Getting Started (cont.)
Alert Tone Indications (cont.)
•
Call Alert™ (Page) Received – A group of four medium-pitched tones every five
seconds indicates that your radio has received a Call Alert page.
•
Call Alert™ (Page) Sent – A single medium-pitched tone (central
acknowledge), followed by a group of four medium-pitched tones indicates that
a Call Alert page sent by your radio has been received by the target radio.
•
Private Conversation™ Call Received – A group of two medium-pitched tones
(800MHz radios only) indicates that your radio has received a Private
Conversation call. For all other frequency radios and for enhanced Private
Conversation, this sequence will be repeated every five seconds for
approximately 20 seconds
•
Trunked System Busy (Trunked Systems Only) – A “bah-bah-bah-bah” tone
when a trunked system is accessed indicates that all available modes are busy
and the radio is in queue for the next available mode.
•
Call Back (Trunked Systems Only} – A group of three medium-pitched tones
(di-di-dit) indicates that a talkgroup is now available for your previously
requested transmission.
• Keyfail (SECURENET-Equipped Radios Only) – Indicates when there is a
problem with transmitting in encrypted (SECURENET) operation, due to loss
of the encryption key. If programmed and the key is lost or erased, a group of
six beeps sounds immediately. In addition, if the two-position concentric
switch is in the SECURENET ( ) position: (a) if programmed, and the PTT
switch
is not being pressed
seconds, or (b) if the PTT switch
continuous beeps until the PTT switch is released, after which (if
programmed) it will sound six beeps every 5 to 10 seconds. This will continue
until the two-position concentric switch is moved to the clear ( ) position, a
clear-only mode is selected, or the key is reloaded.
• Consecutive medium-pitched tones during a secure transmission
indicate that there is a problem with encrypted (SECURENET)
operation due to loss of the encryption key.
• Six medium-pitched tones every 5 to 10 seconds while the radio is
not transmitting also serve as a reminder that there is a problem
with encrypted (SECURENET) operation. The keyfail reminder will
sound when the radio is in clear-only operation, which can be
selected either by switching to a preprogrammed clear-only mode
or by moving the two-position concentric switch to the clear ( )
position on a secure-/clear-selectable mode.
• Six medium-pitched tones when the radio is first turned on also
indicate that there is a problem with encrypted (SECURENET)
operation.
• Keyfail tones will not sound once the key has been reloaded.
• Clear Operation (SECURENET-Equipped Radios Only) – If the radio is so
programmed, one beep immediately after the PTT switch is pressed will
indicate that your transmission is clear (non-encrypted).
, the radio will sound six beeps every 5 to 10
is being pressed
, the radio will sound
Page 15

14 Getting Started (cont.)
LED Indications
The indicator LED on top of the radio indicates radio operating conditions:
A. With PTT switch pressed (radio transmitting)
•
Continuous red LED—normal transmission
•
LED unlit—radio is not transmitting
•
Blinking red light—Low battery (conventional radio only feature;
programmable from the RSS)
B. With PTT switch released (radio receiving)
•
Blinking red light—Mode busy (conventional modes only)
•
Blinking green light—Receipt of a telephone call, Private Conversation call,
or Call Alert page
Time-Out Timer
The time-out timer feature limits the amount of time that you can continuously
transmit on a mode. If you hold down the PTT switch longer than the allotted time:
•
A pre-alert warning tone will be generated four seconds before
termination of your transmission to warn you that your conversation is
about to be cut off.
•
Four seconds later your transmission is terminated and an alert tone is
emitted until the PTT is released.
Conventional or Trunked Radio Operation
Your MTS 2000 radio is capable of both conventional and trunked operation:
•
Conventional Operation – During conventional operation, your MTS 2000
radio performs like a conventional two-way radio. That is, you must monitor the
selected mode before transmitting (by checking the LED for mode busy [blinks
red when busy] and listening for the “mode busy” tone, or pressing the monitor
button) to ensure that you are observing standard two-way radio transmission
protocol by not “talking over” someone who is already transmitting.
•
Trunked Operation – During trunked operation, your MTS 2000 radio offers a
number of advantages, including fast system access, enhanced privacy, and
ease of operation. In a trunked system, there is no need for you to monitor a
mode before transmitting.
Page 16
15 Basic Radio Operation
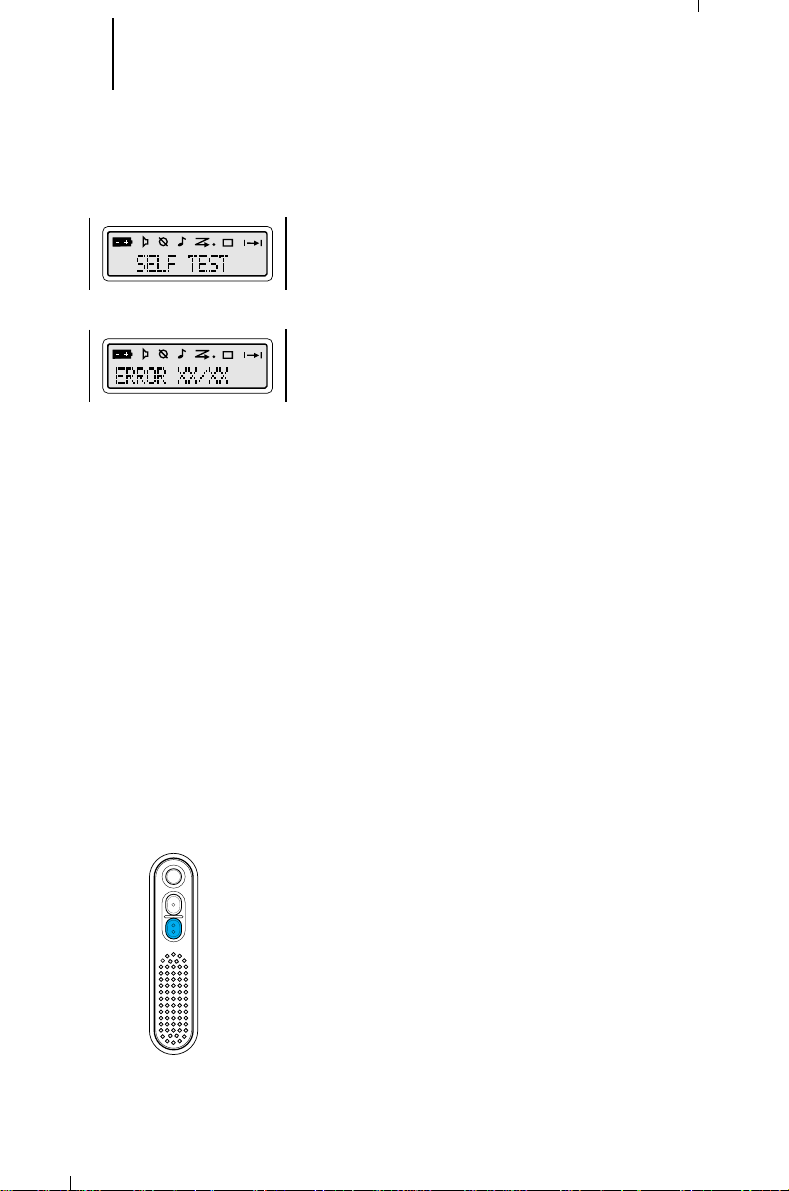
Radio On/Off; Power-Up
1. Turn the radio on by rotating the volume control
clockwise. The radio goes through a power-up self
check and, if it passes the check, the display
momentarily shows “SELF TEST.” A good-powerup, high-pitched tone sounds to indicate that the
radio has passed the self check.
If the radio fails the self check, the display shows
“ ERROR XX/XX” (where XX/XX is an
alphanumeric error code), accompanied by a badpower-up, low-pitched tone. Turn the radio off,
check the battery, and turn the radio back on. If
the radio still does not pass the self check, a
problem exists in the radio. Contact your nearest
Motorola Service Shop.
Note: The power-up self check verifies that the
radio’s microprocessor-based systems are
working, but it does not check all of the rf
components, nor does it check the operation of
all customer-specific features. Motorola
recommends that the functionality of the radio be
periodically checked by an authorized Motorola
service shop.
2. (SECURENET-equipped radios only) - If the
encryption key has failed, the display will
momentarily show “KEYFAIL,” accompanied by a
six-beep keyfail tone. For SECURENET operation to
function, reload the encryption key from a key
variable loader (KVL).
3. Turn the radio off by rotating the volume control
fully counterclockwise until you hear a click.
Monitoring (Conventional Modes Only)
Turn the radio on, momentarily press the monitor
button (typically side button 3), and listen for activity.
To put the radio in permanent monitor operation
(Private-Line®(PL) defeat), press and hold the monitor
button for five seconds (programmable time). The
radio emits a short, high-pitched tone as it enters the
permanent monitor mode. To return the radio to its
original squelch state, tap the monitor button again or
press the PTT switch.
Note (Monitor Operation): SECURENET
transmissions from a radio that has the same
key as the monitoring radio will be heard clearly,
unless the monitoring radio has had its key
erased or is using a different key; then, the
transmission will be heard as noise that is nearly
indistinguishable from channel noise.
Page 17
16 Basic Radio Operation (cont.)
2
ABC
1
3
DEF
6
MNO
5
JKL
4
GHI
7
PRS
8
TUV
9WXY
0
HOME
2
ABC
3
DEF
1
2
ABC
1
3
DEF
6
MNO
5
JKL
4
GHI
7
PRS
8
TUV
9WXY
0
HOME
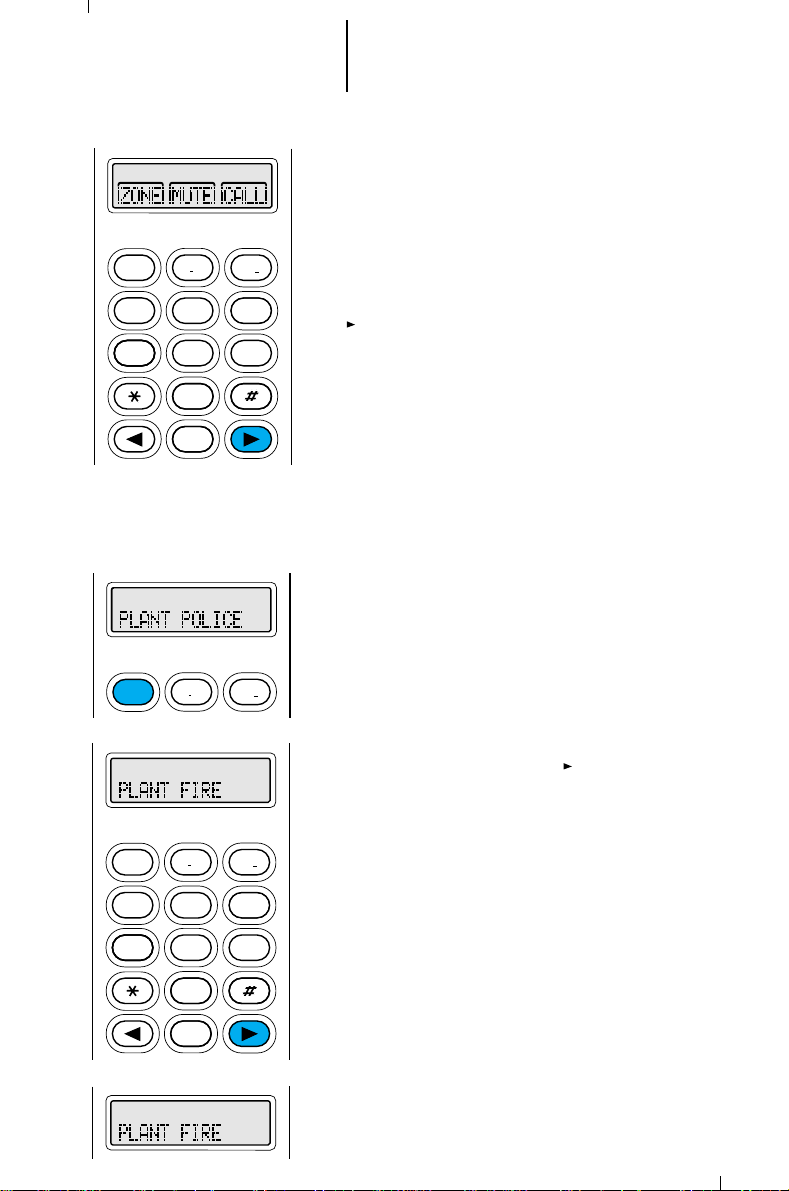
Selecting a Zone and Mode
A
mode
slaved to it. A
be selected either through the 3-position toggle
switch, or via the keypad. Before you send or receive,
set the radio to the desired zone and mode. To do
this:
1. Turn the radio on and press the right arrow key
( ) until “ZONE” appears on the display.
is a channel or talkgroup and all features
zone
is a grouping of modes that can
2. Press the key below “ZONE.” The current zone
name will flash on the display; the mode name
will stay on solid.
3a. Press the right arrow key ( ) until the desired
zone name appears on the display.
or
3b. Enter the number (1 through 16) of the desired
zone. The new zone name appears, flashing
(MTS 2000 III models only) .
Page 18
17 Basic Radio Operation (cont.)
4. Press the HOME key or the PTT switch, or turn the
mode selector knob, to store the displayed zone.
This will be the new “home” (default) zone. If you
pressed the PTT switch, you will also transmit on
the displayed mode (see “Transmitting”).
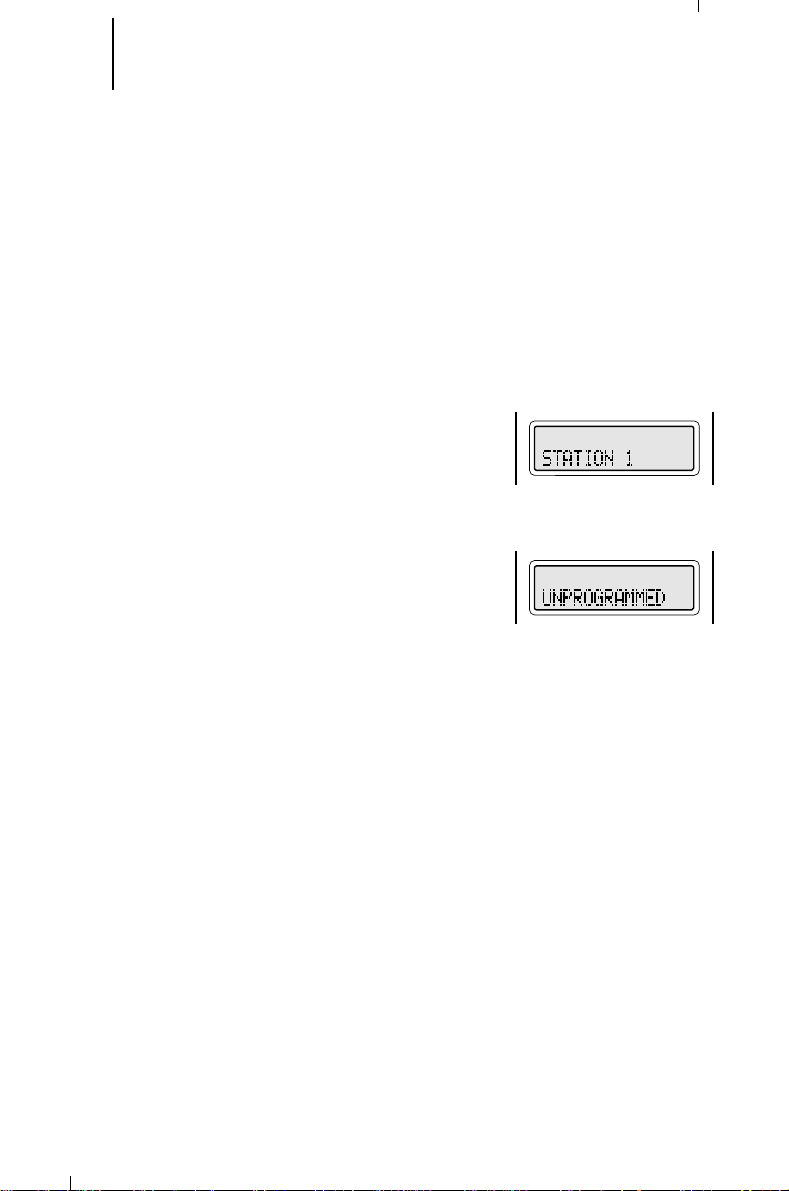
5. Turn the mode selector knob to the desired mode.
The display shows the selected mode’s name.
Notes:
• If the selected mode is unprogrammed, the
display will show “UNPROGRAMMED,” and you
will hear an invalid-mode tone until a valid
programmed mode is selected.
• You can use the mode selector knob at any
time to select the mode.
Page 19

18 Basic Radio Operation (cont.)
Receiving a Call
Conventional Modes
1. Turn the radio on and select the desired zone and mode (see “Selecting a
Zone and Mode”).
2. Listen until you hear a transmission, then adjust the volume control for a
comfortable listening level.
Or, if a button is programmed for “volume set,” press this button and adjust
the volume to a comfortable listening level.
Notes:
• The squelch opening level setting may be reprogrammed at an
authorized service facility.
• MTS 2000 SECURENET-equipped radios automatically determine
whether a SECURENET or clear voice message is being received. This
allows you to receive either type of message without having to reset the
two-position concentric switch.
3. Your radio is now set to receive calls on the selected mode.
4. Refer to the Coded Squelch paragraph of the “General Radio Features
Operation” section for Tone Private-Line
operation.
Note: A mode-busy feature is available; the red LED will blink when your radio
is receiving to indicate that the mode is busy. The radio will not unmute if the
mode is busy with a coded-squelch message that is not intended for you (see
“Coded Squelch Operation”).
®
(PL), Digital Private-Line™ (DPL)
Trunked Systems
1. Turn the radio on and select the desired zone and mode (see “Selecting a
Zone and Mode”).
2. Listen until you hear a transmission, then adjust the volume control for a
comfortable listening level, or, if your radio is so programmed, use the
“volume set” feature as discussed in step 2 of “Conventional Modes.”
Note: MTS 2000 SECURENET-equipped radios automatically determine
whether a SECURENET or clear voice message is being received. This allows
you to receive either type of message without having to reset the two-position
concentric switch.
3. Your radio is now set to receive calls on the selected zone and mode.
Page 20

19 Basic Radio Operation (cont.)
A
B
C
1
3
5
7
13
15
9
11
LED, red
Transmitting
Conventional Modes
1. Turn the radio on and select the desired zone and
mode (see “Selecting a Zone and Mode”).
2. (SECURENET-equipped radios only). If the mode is
programmed as neither secure-only nor clear-only,
turn the two-position concentric switch to the
desired postion ( = SECURENET voice
transmission; = clear voice transmission).
3. Listen for a transmission and adjust the volume
control for a comfortable listening level. Refer to
step 2 of “Conventional Modes,” “Receiving a Call.”
4. Do not interrupt another user. If the mode on
which you are transmitting is programmed to
receive PL ( or the proper code if SECURENETequipped), ensure that the mode is not in use by
momentarily depressing the monitor button to
listen for activity. If the mode-busy feature is
enabled, a blinking red LED on receive (PTT
released) will indicate that the mode is currently
busy and you should not transmit.
Note: The mode-busy feature is suggested for
SECURENET-equipped radios, since monitoring of
SECURENET activity with a different key will sound
like noise that is nearly indistinguishable from
channel noise.
5. When the mode is clear, press and hold the PTT
switch on the side of the radio and speak slowly
and clearly into the microphone area. The red LED
will be lit continuously while the radio is
transmitting. When you have finished talking
(transmitting), release the PTT to listen (receive).
Notes:
• If a mode is programmed for receive only, any
attempt to transmit on that mode will cause
an invalid-mode tone to sound until the PTT
switch is released.
• To take full advantage of the noise-cancelling
feature, avoid blocking the noise-cancelling
port during transmitting.
Page 21

20 Basic Radio Operation (cont.)
A
B
C
1
3
5
7
13
15
9
11
LED, red
Transmitting (cont.)
Trunked Systems
1. Turn the radio on and select the desired trunked zone
and mode (see “Selecting a Zone and Mode”).
2. (SECURENET-equipped radios only). If the mode is
programmed as neither secure-only nor clear-only,
turn the two-position concentric switch to the desired
position ( = SECURENET voice transmission; =
clear voice transmission).
3. Press and hold the PTT switch on the side of the
radio and speak slowly and clearly into the
microphone area. The red LED will be lit while the
radio is transmitting. When your transmission is
completed, release the PTT to listen.
Notes:
• If you hear a busy signal (a low-frequency “bah-
bah-bah-bah”), release the PTT switch and wait
for a call-back tone (sounds like “di-di-dit”). When
you hear the call-back tone you will have three
seconds to press the PTT switch, allowing you to
make your call without getting another busy
signal.
• If a continuous talk-prohibit tone is heard when
the PTT switch is pressed, transmission is not
possible. The radio may be out of range; or
(SECURENET-equipped only) the two-position
concentric switch may be in the incorrect
position for that mode; for instance, the
particular mode might be slaved encrypted voice
and the switch set to the unencrypted voice
position.
• Avoid blocking the noise-cancelling port during
transmitting so as to take full advantage of the
noise-cancelling feature.
• Transmissions on modes (talkgroups) that are
programmed as neither secure-only nor clearonly can be changed from clear to SECURENET
by turning the two-position concentric switch and
pressing the PTT switch. However, you cannot
change from SECURENET to clear during a
transmission; you must wait until the
transmission is ended before changing to clear
operation.
• You will be able to change from clear operation
to SECURENET operation, but
not
from
SECURENET to clear during a call.
• If no secure voice channels are currently
available for a SECURENET transmission that you
wish to make, the display will show “NO
SECURE,” and you must switch to a clear mode
or wait until a secure voice channel is available.
Page 22

21 General Radio Features Operation
Low-Battery Alert
The radio will emit an alert tone to indicate a lowbattery condition if the battery voltage falls below the
low-voltage level. The tone will be emitted when the PTT
is released in the transmit mode, and when the lowbattery condition is detected in the receive mode.
Coded Squelch Operation
Tone Private-Line® (PL), Digital Private-Line™
(DPL), and carrier squelch operation are all available in
the same radio, on a per-mode basis. When in carrier
squelch operation, all traffic on the mode is heard.
When in PL or DPL operation, your radio responds to
only those messages intended for you. When this
feature is mode-slaved, PL, DPL, or carrier squelch is
programmed to each mode, and you need not move any
switches for activation. Alternatively, this feature can be
programmed to the ABC switch: carrier squelch
operation in one switch position, and PL or DPL
operation in another switch position.
Whenever the radio is operating in carrier squelch,
the display will show the carrier-squelch annunciator.
SECURENET Operation
This information applies to both conventional and
trunked systems.
1. A SECURENET module must be installed in the
radio.
2. An encryption key must be loaded from a key-
variable loader (KVL), using the correct loader for
the radio’s encryption type, into the radio’s
memory. To load the key, connect the keyloader
cable to the universal connector on the side of the
radio; refer to the KVL’s instruction manual for
loading procedure. While the keyloader is
attached, the display shows “KEYLOADING.” When
the key has been loaded successfully, the radio will
sound one long beep.
Notes:
• Normal radio transmit and receive will be
disabled while the cable is connected to the
radio.
• The radio will abort a secure transmission
when there is not a valid encryption key. When
this happens, the display shows “KEYFAIL,”
and a continuous keyfail tone (consecutive
medium-pitched beeps) sounds until the PTT
switch is released.
Page 23
22 General Radio Features Operation
(cont.)
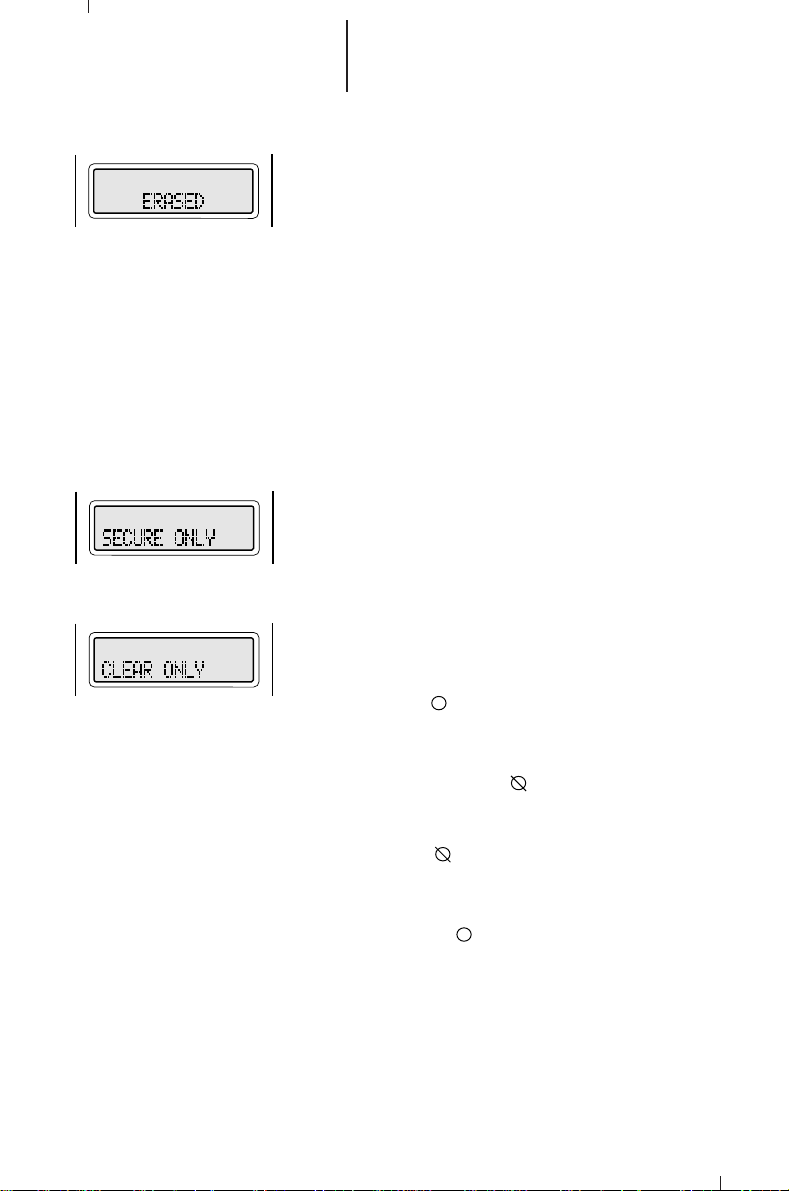
3. To erase a key, hold down the green side button 1
and the orange top button at the same time. When
key erase is complete, the display will show
“ERASED.”
Note: Do not press the orange top button first.
This button may have been programmed for
emergency operation.
If the battery is removed for more than
approximately 30 seconds from a radio that is
turned off, the key may be lost. The key may also
be lost from a radio that is turned on if the battery
is removed for any length of time, or if the battery’s
charge is allowed to drop to too low a level. If the
key is lost, it will have to be reloaded using the
KVL. Battery removal
of key erasure.
4. On SECURENET-equipped radios, the two-position
concentric switch selects whether the radio will be
transmitting clear or secure audio, if a mode is
programmed for neither secure- nor clear-only
operation. The two-position concentric switch will
set the transmit operation of the radio before PTT.
The switch cannot change the transmit operation
while the PTT is pressed.
If a mode is programmed for SECURENET-only
operation, and the two-position concentric switch is
in the clear ( ) position, when the PTT switch is
pressed, the display will show “SECURE ONLY,” an
invalid-mode tone will sound, and the radio will not
transmit until the two-position concentric switch is
set to the SECURENET ( ) position.
If a mode is programmed for clear-only operation,
and the two-position concentric switch is in the
SECURENET ( ) position, when the PTT switch is
pressed, the display will show “CLEAR ONLY,” an
invalid-mode tone will sound, and the radio will not
transmit until the two-position concentric switch is
set to the clear ( ) position.
is not
a guaranteed method
Page 24

23 General Radio Features Operation
(cont.)
Variable RF Power Level (VHF and UHF Radios Only)
VHF and UHF radios can have more than one power level. High power can be
programmed on those modes where the frequency is licensed for high power, and
low power can be programmed on all other modes. The high-/low-power feature
can also be programmed to the ABC switch, with one switch position being lowpower operation, and another switch position being high-power operation.
Emergency Operation
Pressing the orange top emergency button (for radios with emergency
operation) will send out an emergency signal, which takes precedence over any
other signalling activity in progress. This emergency signal can take two forms:
emergency alarm and emergency call. The MTS 2000 radio can have either or
both signal types enabled.
• The
• The
• Clear or SECURENET emergency call operation will be determined by the
other reason.
emergency alarm
control mode to alert the dispatcher to an emergency condition and identify
the unit sending the emergency signal.
emergency call
of dispatch operation which gives your radio priority access to modes.
Emergency call is programmable via the radio service software (RSS) for
either tactical or non-tactical operation.
the call to the currently selected mode;
to a predetermined emergency mode.
preprogramming of the selected mode (talkgroup) or default emergency
mode, if set up. Otherwise, transmit operation will be controlled by the
position of the two-position concentric switch. You
from SECURENET operation to clear operation, or from clear operation to
SECURENET operation, during a call.
“Emergency” signals a critical situation. It should never be used for any
feature sends a data transmission on the trunked
(radios with trunked emergency operation only) is a type
Tactical
non-tactical
emergency operation places
operation places the call
will not be able
to change
Page 25

24 General Radio Features Operation
(cont.)
Emergency Operation (cont.)
Sending an Emergency Alarm
1. Press and hold the emergency button (the length of
button press is RSS programmable) until the LED
lights solid red and the display alternates between
showing “EMERGENCY” and the current zone and
mode. A short, medium-pitched emergency tone
sounds.
2. When the trunked emergency alarm is
acknowledged by the central controller, the radio
sounds four beeps and the alarm ends. The radio
returns to normal operation or, if enabled in your
radio (trunked emergency call systems only), enters
at step 3 of “Sending an Emergency Call.” While in
emergency call operation, subsequent presses of
the emergency button will reinitiate the emergency
silence sequence.
Unmute Option - With this option enabled, the
radio will unmute to all voice activity on the
emergency channel. If disabled, the radio will
operate as normal, muting all voice activity on the
emergency channel until the emergency alarm is
cancelled. This option is RSS programmable.
Sending a Silent Emergency Alarm
In radios with the silent emergency alarm option
enabled, pressing the emergency button sends an
emergency signal to the dispatcher. During the
emergency alarm procedure: the LED will not light,
tones will not be heard, and the display will not change.
The audio will be muted (turned off), and will
remain so until you exit the emergency state.
Cancelling an Emergency Alarm
Press the emergency button for more than 1 1/2
seconds (programmable); a medium-pitched emergencyexit tone sounds until the button is released and the
radio returns to normal operation.
The alarm will also be cancelled (without
emergency-exit tone) by:
• pressing the PTT switch (see the note below),
• turning the radio off, or
• receiving an acknowledge from the dispatcher.
Note: Pressing the PTT switch while the radio is in
emergency alarm
emergency call
enabled. (see step 3 of “Sending an Emergency
Call”).
operation will place the radio in
operation if emergency call is
Page 26

25 General Radio Features Operation
(cont.)
Emergency Operation (cont.)
Sending an Emergency Call (Radios With Trunked
Emergency Call Operation Only)
1. Press the emergency button. The LED lights solid
red, the display alternates between showing
“EMERGENCY” and the current trunked zone and
mode, and a short, medium-pitched emergency
tone sounds.
2. Press the PTT switch to request a priority mode
assignment in the trunked system.
3. While the radio is in emergency call operation it
operates in the usual dispatch manner.
Note:
• The trunked mode you will talk to in an
emergency is controlled by whether your radio
is programmed for tactical or non-tactical
operation. If tactical, you will be talking to the
mode you selected before entering emergency
call; if non-tactical, you will talk to a
preprogrammed emergency mode.
• If you change trunked modes while in
emergency call operation, the emergency call
will be moved to, and continued on, the new
mode.
4. It is important that you exit the emergency call
mode when you have finished your emergency call.
To do this, press the emergency button for more
than 1 1/2 seconds (programmable). You will hear
a medium-pitched emergency-exit tone until the
emergency button is released, and the radio will
return to normal operation.
Emergency with Voice to Follow
With this feature (aka "Hot Microphone"), the radio
is placed in the transmit mode for a preprogrammed
period of time (programmable by RSS) after the
emergency alarm is activated. During this time period,
the "hands-free" mode is activated, and voice
transmisions can be made without pressing the PTT.
After the transmit time has expired, the unit will dekey
and go into a receive mode as it normally does after
dekeying. At this point, normal operation resumes; the
user will be required to press PTT for any further
transmissions on that emergency channel.
Page 27
26 General Radio Features Operation
(cont.)
Failsoft Operation (Trunked Systems Only)
The “failsoft” system ensures that you will continue
to have radio communications capability in the event of
trunked system failure. During trunked operation, the
radio will automatically go into failsoft operation if the
central trunking controller fails for any reason. While in
failsoft, your radio will transmit and receive on a
predetermined frequency on a conventional, as opposed
to trunked, mode. When the trunked system returns to
normal operation, the radio will automatically leave the
failsoft operation and return to trunked operation.
Clear or SECURENET operation will be determined
by the preprogramming of the selected mode
(talkgroup), if so programmed. Otherwise, transmit
operation will be controlled by the position of the twoposition concentric switch. You
from SECURENET operation to clear operation, or from
clear to SECURENET, during a call.
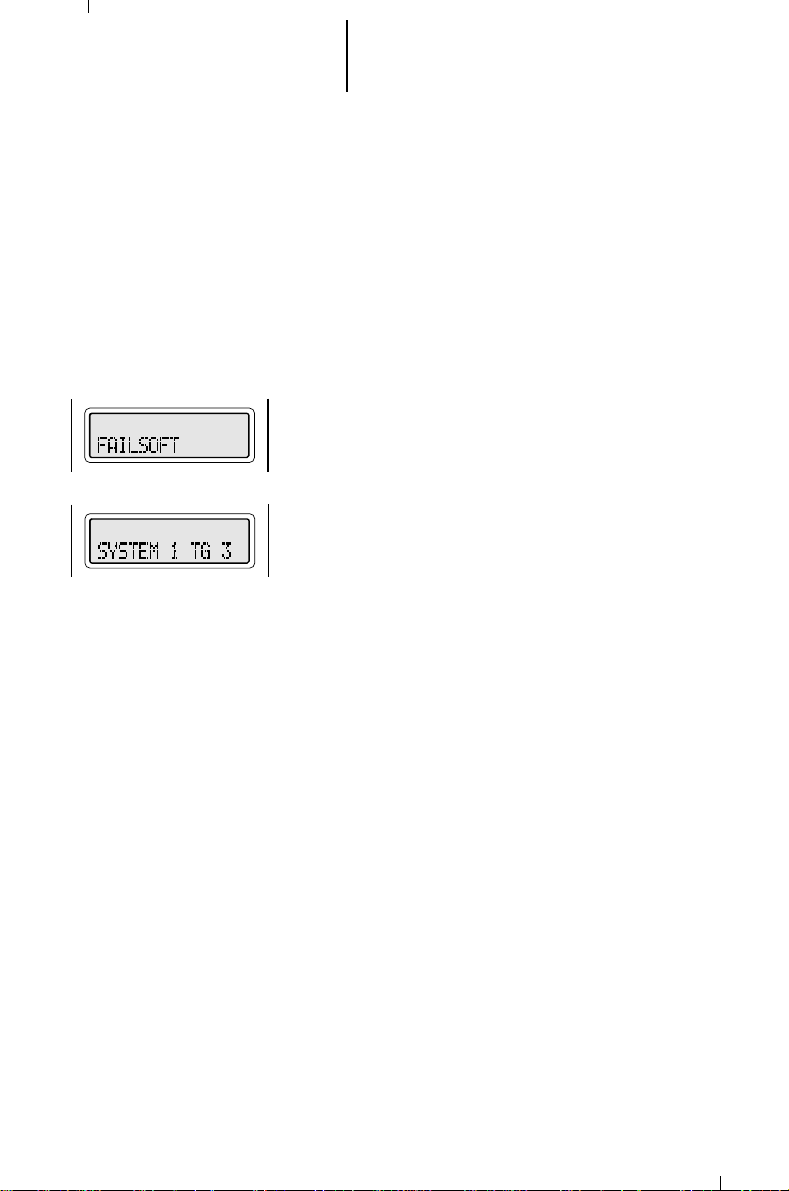
When the radio is in failsoft operation, you will hear
a faint “beeping” sound every ten seconds, and the
radio will become unsquelched. At the same time, the
display will alternate between showing “FAILSOFT” and
the current active trunked zone.
will be able
to change
Page 28

27 General Radio Features Operation
(cont.)
Transmitter Disable Operation
If your radio is
when enabled in your radio (via radio service software [RSS] programming, allows
you to put the radio in a condition where it will not transmit. This will prevent the
radio from accidentally transmitting in a hazardous environment. All
transmissions, including automatic data transmissions, will be inhibited.
To disable the radio transmitter, put the two-position concentric switch in
the“
PTT switch will cause a low-pitched alert tone to sound, indicating that a
transmission is not taking place.
display will react as in normal operation. However, the red LED transmit indicator
will not turn on.
concentric switch in the “ ” position.
Native Language Displays
displays:
1. English
2. Spanish
3. Italian
4. French
5. German
6. Portuguese
All of your radio displays will be shown in the selected language.
” position. When your radio's transmitter has been disabled, pressing the
Note: While the transmission is disabled, if you attempt to transmit, the
To enable the transmitter for normal operation, put the two-position
This feature allows you to choose any one of six languages for your radio
NOT
SECURENET-equipped, the Transmitter Disable feature,
(Non-SECURENET-Equipped Radios Only)
Page 29
28 General Radio Features Operation
HOME
2
ABC
1
3
DEF
6
MNO
5
JKL
4
GHI
7
PRS
8
TUV
9WXY
0
3
DEF
1
2
ABC
(cont.)
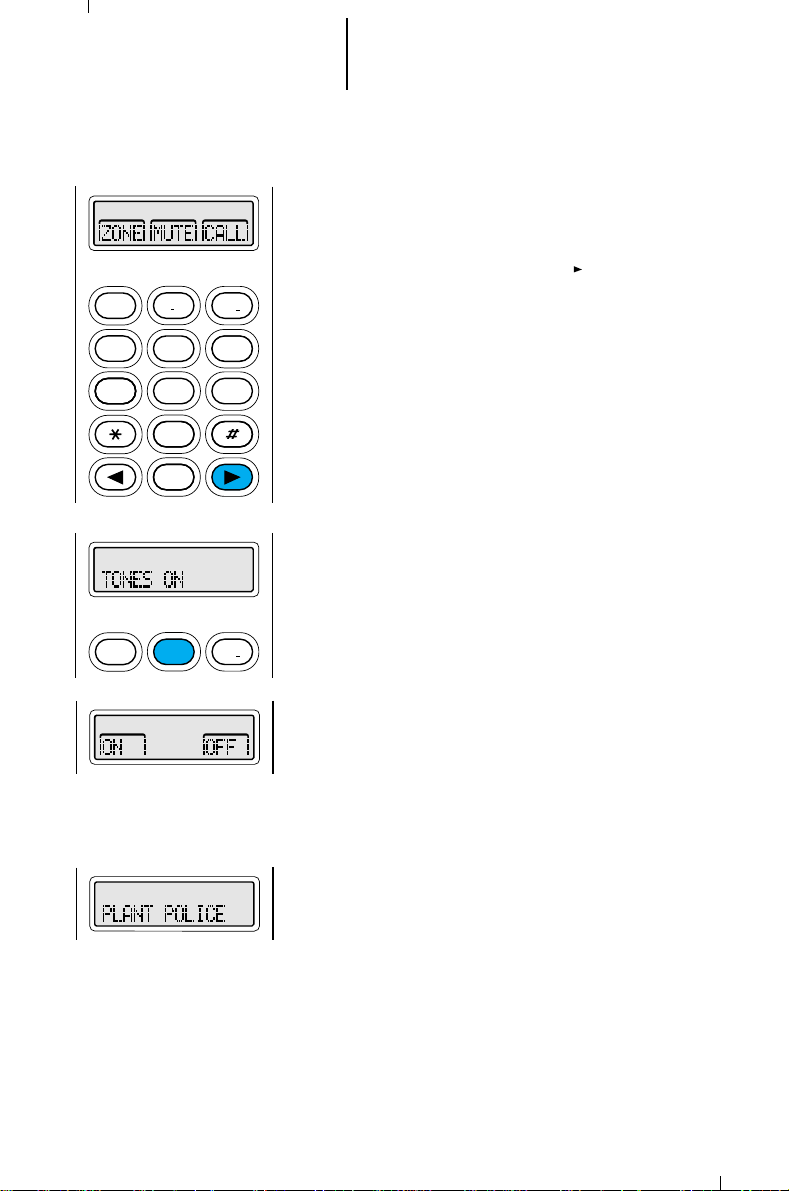
Muting the Keypad Tones
The radio’s keypad tones, normally heard each time
a keypad key is pressed, can be turned off (muted) or
on (unmuted) at your discretion. To use the keypad
mute feature:
1. Press the right arrow key ( ) until “ MUTE”
appears on the display.
2. Press the key below “MUTE.” The current mute
state (“TONES ON” = keypad tones unmuted;
“TONES OFF” = keypad tones muted) appears on
the display for a few seconds.
Then, the display shows the additional selections,
“ON” and “OFF.”
3. Press the key below the desired mute state (on or
off). The radio automatically returns to the home
display.
Note: Pressing the HOME key or the PTT switch
will exit this menu without changing the mute
selection
Page 30

29 General Radio Features Operation
(cont.)
Scan Operation
The scan feature allows you to monitor activity on
different conventional or trunked modes by scanning a
“scan list” of modes. Each scan list can contain as many
as 16 different modes; each radio can have up to 20
different scan lists. The modes to be scanned in a scan
list can be programmed with the radio service software
(RSS).
Three types of scan lists are available (Refer to the
RSS manual for additional information):
• Trunking Priority Monitor—Comprises modes that
are all from the same trunked system.
• Conventional—Comprises conventional-only modes.
• Talkgroup Scan—Comprises conventional modes
and trunked modes from more than one trunking
system. Priority operation
type of list.
The radio supports both priority and non-priority
scanning. With priority scanning enabled, a scan list
can have one mode assigned as the first priority mode,
and a second as the second priority mode.
All MTS 2000 radios support automatic scanning
(autoscan), which is programmed into the radio through
the RSS. With this feature, the radio begins scanning
whenever you select a mode to which a scan list is
assigned (strapped). The radio will continue
autoscanning until you select a mode that does not have
autoscan enabled.
In radios that are not SECURENET-equipped, scan
can can be selected by the scan select switch (twoposition concentric switch) or the menu.
Turning Scan On/Off Using the Scan Select Switch
1. To turn scanning on, place the scan select switch
(programmable via the RSS) in the “scan on”
position.
2. The scan status annunciator appears on the
display, indicating that scan is active, and the radio
begins scanning. The scan annunciator will remain
on until scan is turned off.
is not
available in this
3. To turn scanning off, place the scan select switch
in the “scan off” position.
4. The scan status annunciator turns off, indicating
that scan is off, and the radio stops scanning.
Page 31

30 General Radio Features Operation
3
DEF
1
2
ABC
2
ABC
3
DEF
1
HOME
2
ABC
1
3
DEF
6
MNO
5
JKL
4
GHI
7
PRS
8
TUV
9WXY
0
(cont.)
Scan Operation (cont.)
Turning Scan On Using the Keypad
1. Press the right arrow key ( ) until “SCAN”
appears on the display.
2. Press the key below “SCAN.” The current scan
state (in this case, “SCAN OFF”) appears on the
display for a few seconds.
Then, the display shows “ON” and “OFF.”
3. Press the key below “ON.” On the display, the scan
status annunciator turns on and the radio
automatically returns to the home display.
Note: The scan status annunciator will remain on
until scan is turned off.
Page 32

31 General Radio Features Operation
HOME
2
ABC
1
3
DEF
6
MNO
5
JKL
4
GHI
7
PRS
8
TUV
9WXY
0
3
DEF
1
2
ABC
(cont.)
Scan Operation (cont.)
Turning Scan Off Using the Keypad
1. With the scan status annunciator showing on the
display, press the right arrow key ( ) until “SCAN”
appears on the display.
2. Press the key below “SCAN.” The current scan
state (in this case, “SCAN ON”) appears on the
display for a few seconds.
Then, the display shows “ON” and “OFF.”
3. Press the key below “OFF.” On the display, the scan
status annunciator turns off, and the radio
automatically returns to the home display.
Notes:
• The radio will stop scanning at this point.
• Pressing the PTT switch or the HOME key will
exit this menu without changing the scan
selection.
Page 33

32 General Radio Features Operation
(cont.)
Scan Operation (cont.)
Deleting Nuisance Modes
When the radio scans to a mode that you do not wish to hear (nuisance
mode), you can temporarily delete the mode from the scan list.
1. When the radio is locked onto the mode to be deleted, press the nuisancemode delete button (programmed through the RSS). A valid-keypress chirp is
heard, indicating that the mode has been deleted.
Note: Priority modes cannot be deleted.
2. The radio continues scanning the remaining modes in the list. To resume
scanning the deleted mode, you must leave and reenter scan operation.
Dynamic Priority Change (Conventional Operation Only)
While the radio is scanning, the dynamic priority change feature lets you
temporarily
priority 2 mode. The present priority 2 mode becomes a non-priority mode. This
change remains in effect until scan is turned off, then scanning reverts back to
the preprogrammed state.
1. When the radio is locked onto the mode to be designated as priority 2, press
change any mode in a scan list (except the priority 1 mode) to the
the dynamic priority button (programmed through the RSS). A valid-keypress
chirp is heard, indicating that the priority change has occurred.
Note: The priority 1 mode cannot be changed to priority 2.
2. The radio continues scanning the remaining modes in the list. To resume
scanning the preprogrammed priority 2 mode, you must leave and reenter
scan operation.
Page 34

33 General Radio Features Operation
HOME
2
ABC
1
3
DEF
6
MNO
5
JKL
4
GHI
7
PRS
8
TUV
9WXY
0
2
ABC
1
3
DEF
1
3
DEF
2
ABC
HOME
2
ABC
1
3
DEF
6
MNO
5
JKL
4
GHI
7
PRS
8
TUV
9WXY
0
(cont.)
Scan Operation (cont.)
Viewing a Scan List
The “view scan list” feature allows you to view the
members of the scan list associated with the currently
selected mode.
1. To view a scan list, press the right arrow key ( )
until “VIEW” appears on the display.
2. Press the key below “VIEW.” The display changes
to show the types of lists (scan, phone, call, etc.)
that can be examined with the “list view” feature.
3. Press the key below “SCAN.” The display shows the
first member of the scan list. The scan status
annunciator flashes (indicating that a scan list is
being viewed), the priority scan annunciator flashes
(indicating a priority 1 mode), and the
programming-mode annunciator turns on (the radio
is using the list view feature).
Note: The programming-mode annunciator will
remain on until the list view mode is exited.
4. Press the right arrow key ( ). The display shows
the second member of the scan list. The scan
status annunciator is flashing, the priority scan
annunciator is on constantly (indicating a priority 2
mode), and the programming-mode annunciator is
on constantly.
Page 35

34 General Radio Features Operation
HOME
2
ABC
1
3
DEF
6
MNO
5
JKL
4
GHI
7
PRS
8
TUV
9WXY
0
2
ABC
1
3
DEF
6
MNO
5
JKL
4
GHI
7
PRS
8
TUV
9WXY
0
HOME
(cont.)
Scan Operation (cont.)
5. Press the right arrow key ( ) again. The display
shows the next member of the scan list. The scan
status annunciator is flashing, the priority scan
annunciator is off (indicating a non-priority mode),
and the programming mode annunciator is on
constantly.
6. Each time you press the right arrow key ( ), the
display changes to show the next member of the
scan list. When the last member of the scan list is
showing, the next press of the right arrow key will
cause the display to scroll back to the first member
of the list.
7. To leave the scan list feature, press the HOME key
or the PTT switch, or turn the mode selector knob.
The radio returns to the home display; the scan
and programming mode annunciators turn off.
Pressing the PTT switch will also cause the radio to
transmit.
Page 36

35 General Radio Features Operation
HOME
2
ABC
1
3
DEF
6
MNO
5
JKL
4
GHI
7
PRS
8
TUV
9WXY
0
2
ABC
3
DEF
1
1
3
DEF
2
ABC
HOME
(cont.)
Programming the Radio’s Lists
Programming the Telephone List Numbers
(MTS 2000 III Model Only)
This feature lets you use the radio’s keypad to
change the telephone numbers assigned to any of the
telephone list members. Each phone number can have
up to 16 digits. Only the numbers can be changed from
the keypad; to change the names of the members, the
RSS must be used.
1. To change the telephone list, press the right arrow
key ( ) until “PROG” appears on the display.
2. Press the key below “PROG.” The display changes
to show the types of lists (phone, call, etc.) that
can be programmed.
3. Press the key below “PHON.” The display shows
the first programmable member of the telephone
list and the programming mode status annunciator
flashes, indicating that the radio is in the program
mode. The programming mode annunciator will
continue flashing while the radio is in the program
mode.
4. To move around in the telephone list, press either
the right ( ) or the left ( ) arrow key. The right
arrow key will take you forwards to the next
member of the list; the left arrow key will take you
backwards to the previous member of the list. You
can also use the keypad to enter the desired
member’s position number (any programmed
location from 1 through 19) in the list to go directly
to that member.
5. When you stop on a member of the list, the display
will alternate between showing the member’s name
and telephone number.
Page 37

36 General Radio Features Operation
2
ABC
1
3
DEF
6
MNO
5
JKL
4
GHI
7
PRS
8
TUV
9WXY
0
HOME
(cont.)
Programming the Radio’s Lists (cont.)
6. Press the “select” key (programmed via the RSS) to
enter the number-edit mode. The display shows the
current member’s telephone number. You can now
change numbers, using any of the numeric (0 – 9)
keys, as well as the “*” and “#” keys. The blinking
cursor indicates the position of the next number to
be added.
Some telephone networks require a pause in the
phone dialing sequence to allow for delays in the
telephone switches. A pause character can be
placed in the 16-digit number by first pressing the
“*” key, then pressing the “#” key. The display will
show a “P” for pause.
Note: In this mode, the left arrow key ( ) will
function as a backspace key. Pressing this key will
erase the previous digit, and the cursor will move
to the left. When the last digit on the display has
been erased, an additional press of this key or the
right arrow key ( ) will cause you to leave the
number-edit mode without making any changes,
and re-enter the procedure at step 5.
7. Begin changing the telephone number. The display
shows the numbers as they are entered; the
cursor flashes to indicate the location of the next
number to be entered. When the maximum
number of digits (16) have been entered, the
cursor will disappear. If you try to add any more
digits, you will hear an invalid (bad) keypress alert
tone.
8. When you have finished changing the telephone
number, press the select key again; the change is
saved in the radio’s memory and you are returned
to step 5. The display will again alternate between
showing the member’s name and telephone
number; you can change additional numbers from
this point.
9. When you have finished making changes, press the
HOME key to exit the program mode. The radio will
return to the home display.
Page 38

37 General Radio Features Operation
2
ABC
1
3
DEF
6
MNO
5
JKL
4
GHI
7
PRS
8
TUV
9WXY
0
HOME
2
ABC
1
3
DEF
2
ABC
1
3
DEF
HOME
(cont.)
Programming the Radio’s Lists (cont.)
Programming the Call List (Trunked MTS 2000 III
Models Only)
This feature lets you use the radio’s keypad to
change the radio ID numbers assigned to the call list
used by the trunked Private Conversation™ and Call
Alert™ features.
1. To change the call list radio ID numbers, press the
right arrow key ( ) until “PROG” appears on the
display.
2. Press the key below “PROG.” The display changes
to show the types of lists (phone, call, etc.) that
can be programmed.
3. Press the key below “CALL” or “PAGE” (either
choice will access the same call list). The display
shows the first member of the call list and the
programming mode status annunciator flashes,
indicating that the radio is in the program mode.
The programming mode annunciator will continue
flashing while the radio is in the program mode.
4. To move around in the list, press either the right
( ) or the left ( ) arrow key. The right arrow key
will take you forwards to the next member of the
list; the left arrow key will take you backwards to
the previous member of the list. You can also use
the keypad to enter the desired member’s position
number (any preprogrammed location from 1
through 19) in the list to go directly to that
member.
5. When you stop on a member of the list, the display
will alternate between showing the member’s name
and radio ID number.
Page 39

38 General Radio Features Operation
HOME
2
ABC
1
3
DEF
6
MNO
5
JKL
4
GHI
7
PRS
8
TUV
9WXY
0
HOME
(cont.)
Programming the Radio’s Lists (cont.)
6. Press the “select” key (programmable via the RSS)
to enter the number-edit mode. The display shows
the current member’s radio ID number. You can
now change numbers, using any of the numeric (0
– 9) keys. The blinking cursor indicates the position
of the next number to be added.
Note: In this mode, the left arrow key ( ) will
function as a backspace key. Pressing this key will
erase the previous digit, and the cursor will move
to the left. When the last digit on the display has
been erased, another press of this key or the right
arrow key ( ) will cause you to leave the numberedit mode without making any changes, and
reenter this procedure at step 5.
7. To change the radio ID number, use the left arrow
key to erase the existing ID number’s digits. Then,
enter the new digits. The display shows the digits
as they are being entered; the cursor flashes to
indicate the location of the next digit to be entered.
When the maximum number of digits have been
entered, the cursor will disappear. If you tr y to add
any more digits, you will hear an invalid (bad)
keypress alert tone.
8. When you have finished changing the ID number,
press the select key again; the change is saved in
the radio’s memory and you are returned to step
5. The display will again alternate between showing
the member’s name and radio ID number; you can
change additional numbers from this point.
9. When you have finished making changes, press the
HOME key to exit the program mode. The radio will
return to the home display.
Page 40

39 General Radio Features Operation
HOME
2
ABC
1
3
DEF
6
MNO
5
JKL
4
GHI
7
PRS
8
TUV
9WXY
0
1
2
ABC
3
DEF
(cont.)
Conventional Telephone Operation
The conventional telephone feature allows you to
use your conventional radio similar to a standard
telephone. To make a call through the telephone
system, your radio must send access and hangup
codes to the system. Unless otherwise indicated, the
conventional telephone sections in this manual assume
that the access and hangup codes have been
programmed into the radio by the RSS. These codes will
then be automatically transmitted.
When you are dialing from the keypad (MTS 2000
III model only), your radio may be programmed with
either
buffered dial
PTT before the digits are sent out) or
is sent out as it is pressed).
Calling the Last Number Dialed
1. To send a telephone call to the last number dialed,
press the right arrow key ( ) until “PHON”
appears on the display.
Note: If your radio has been so programmed, you
can press the phone button for quick access to the
telephone call feature. This will take you directly to
the ”last number dialed” display shown in step 2;
skip to step 3.
(you enter all digits and press the
live dial
(each digit
2. Press the key below “PHON.” The display changes
to show the last telephone number dialed. At this
point, either:
3a. If your radio is programmed for immediate access,
the display shows “PLEASE WAIT” while your radio
attempts to access the telephone system. Go to
step 4.
Note: This is a timed message. If you cannot
access the telephone system (no dial tone heard),
you will have to press the HOME key to hang up,
and start again at step 1 of this procedure.
or
3b. If your radio is programmed for delayed access,
the display does not change. Press the PTT switch.
The display shows “PLEASE WAIT” while your radio
attempts to access the telephone system.
Note: This is a timed message. If you cannot
access the telephone system (no dial tone heard),
you will have to press the HOME key to hang up,
and start again at step 1 of this procedure.
Page 41

40 General Radio Features Operation
2
ABC
1
3
DEF
6
MNO
5
JKL
4
GHI
7
PRS
8
TUV
9WXY
0
HOME
(cont.)
Conventional Telephone Operation (cont.)
4. If the access was successful, you will hear a dial
tone. The display will again show the last number
dialed.
5. Press the PTT switch to place the telephone call.
The telephone number will be sent out; you will
hear tones as they are being sent. When the
number has been completely sent out, you will hear
either a busy signal or ringing.
6. If the party you are calling answers, carry on with
your conversation in the normal manner. Press the
PTT switch to talk; release the PTT to listen.
Notes:
• After reaching the number you are calling, you
may need to dial an extension number before
you can reach your party. If this is the case,
enter the extension number from the keypad
(MTS 2000 III model only) or (if so
programmed) use the arrow keys to find the
extension number in the telephone list. If you
have live dial, the number will be sent as the
keys are pressed. If you have buffered dial,
press the PTT switch again to send out the
extension number.
• Many conventional telephone patches will
generate a high-pitched go-ahead tone when
the radio’s PTT switch is released. This is
heard by the land-line party as an indication to
begin talking.
7. When you have finished your conversation, or if the
number you are calling is busy or does not answer,
press the HOME key or the phone button to send
the hang-up code. The radio will return to the home
display.
Page 42

41 General Radio Features Operation
HOME
2
ABC
1
3
DEF
6
MNO
5
JKL
4
GHI
7
PRS
8
TUV
9WXY
0
1
2
ABC
3
DEF
HOME
2
ABC
1
3
DEF
6
MNO
5
JKL
8
TUV
9WXY
0
4
GHI
7
PRS
(cont.)
Conventional Telephone Operation (cont.)
Making a Delayed Access Telephone Call Using the
Keypad (MTS 2000 III Model Only)
1. To make a delayed access call using the keypad,
press the right arrow key ( ) until “PHON”
appears on the display.
Note: If your radio has been so programmed, you
can press the phone button for quick access to the
telephone call feature. This will take you directly to
the “last number dialed” display shown in step 2;
skip to step 3.
2. Press the key below “PHON.” The display changes
to show the last telephone number dialed.
The new telephone number can now be entered
from the keypad, using any of the numeric (0 – 9)
keys, as well as the “*” and “#” keys. You can also
enter a pause in the telephone number by first
pressing the “*” key, then the “#” key. The pause
will be shown on the display as a “P.”
3. Begin entering the telephone number. The display
changes to show the numbers as they are being
entered. The cursor will flash to indicate the
location of the next number to be entered. When
the maximum number of digits have been entered,
the cursor will disappear.
Note: Once you have star ted entering numbers,
the left arrow key ( ) will function as a backspace
key. Pressing this key will erase the last digit
entered, and move the cursor to the left. When
the last digit on the display has been erased, an
additional press of this key will cause the last
member of the preprogrammed telephone list to be
displayed; pressing the right arrow key will show
the first member of the list.
Page 43

42 General Radio Features Operation
2
ABC
1
3
DEF
6
MNO
5
JKL
4
GHI
7
PRS
8
TUV
9WXY
0
HOME
(cont.)
Conventional Telephone Operation (cont.)
4. When you have finished dialing your number, press
the PTT switch. The display shows “PLEASE WAIT”
while your radio attempts to access the telephone
system.
Note: This is a timed message. If you cannot
access the telephone system (no dial tone heard),
you will have to press the HOME key or the phone
button to hang up, and start again at step 1 of this
procedure.
5. If the access was successful, you will hear a dial
tone. The display will again show the number
dialed.
6. To place the telephone call, press the PTT button
again. The telephone number will be sent out; you
will hear tones as they are being sent. When the
number has been completely sent out, you will hear
either a busy signal or ringing.
7. If the party you are calling answers, carry on with
your conversation in the normal manner. Press the
PTT switch to talk; release the PTT to listen.
Notes:
• After reaching the number you are calling, you
may need to dial an extension number before
you can reach your party. If this is the case,
enter the extension number from the keypad
(MTS 2000 III model only) or (if so
programmed) use the arrow keys to find the
extension number in the telephone list.
• Many conventional telephone patches will
generate a high-pitched go-ahead tone when
the radio’s PTT switch is released. This is
heard by the land-line party as an indication to
begin talking.
8. When you have finished your conversation, or if the
number you are calling is busy or does not answer,
press the HOME key or the phone button to send
the hang-up code. The radio will return to the home
display.
Page 44

43 General Radio Features Operation
HOME
2
ABC
1
3
DEF
6
MNO
5
JKL
4
GHI
7
PRS
8
TUV
9WXY
0
HOME
2
ABC
1
3
DEF
6
MNO
5
JKL
8
TUV
9WXY
0
4
GHI
7
PRS
(cont.)
Conventional Telephone Operation (cont.)
Making an Immediate Access Telephone Call Using
the Keypad (MTS 2000 III Model Only)
1. To make an immediate access call using the
keypad, press the right arrow key ( ) until
“PHON” appears on the display.
Note: If your radio has been so programmed, you
can press the phone button for quick access to the
telephone call feature. This will take you directly to
the “PLEASE WAIT” display shown in step 2; skip
to step 3.
2. Press the key below “PHON.” The display shows
“PLEASE WAIT” while your radio attempts to
access the telephone system.
Note: This is a timed message. If you cannot
access the telephone system (no dial tone heard),
you will have to press the HOME key or the phone
button to hang up, and start again at step 1 of this
procedure.
3. If the access was successful, you will hear a dial
tone. The display will show the last number dialed.
The new telephone number can now be entered
from the keypad, using any of the numeric (0 – 9)
keys, as well as the “*” and “#” keys. You can also
enter a pause in the telephone number by first
pressing the “*” key, then the “#” key. The pause
will be shown on the display as a “P.”
4. Enter the telephone number. The display changes
to show the numbers as they are being entered.
The cursor will flash to indicate the location of the
next digit to be entered. When the maximum
number of digits have been entered (buffered dial
only), the cursor will disappear.
Page 45

44 General Radio Features Operation
2
ABC
1
3
DEF
6
MNO
5
JKL
4
GHI
7
PRS
8
TUV
9WXY
0
HOME
(cont.)
Conventional Telephone Operation (cont.)
5a. If your radio has been programmed by the RSS for
“live dial,” each digit is sent out as its key is
pressed.
or
5b. If your radio has been programmed by the RSS for
“buffered dial,” the digits of the number are
temporarily stored as you enter them. When you
have completely entered the number, press the
PTT switch to send out the number. The telephone
number will be sent out; you will hear tones as they
are being sent.
Note: Once you have star ted entering numbers,
the left arrow key ( ) will function as a backspace
key. Pressing this key will erase the last digit
entered, and move the cursor to the left. When
the last digit on the display has been erased, an
additional press of this key will cause the last
member of the preprogrammed telephone list to be
displayed; pressing the right arrow key will show
the first member of the list.
6. If the party you are calling answers, carry on with
your conversation in the normal manner. Press the
PTT switch to talk; release the PTT to listen.
Notes:
• After reaching the number you are calling, you
may need to dial an extension number before
you can reach your party. If this is the case,
enter the extension number from the keypad
or (if so programmed) use the arrow keys to
find the extension number in the telephone list.
If you have live dial, the number will be sent as
the keys are pressed. If you have buffered dial,
press the PTT switch again to send out the
extension number.
• Many conventional telephone patches will
generate a high-pitched go-ahead tone when
the radio’s PTT switch is released. This is
7. When you have finished your conversation, or if the
heard by the land-line party as an indication to
begin talking.
number you are calling is busy or does not answer,
press the HOME key or the phone button to send
the hang-up code. The radio will return to the home
display.
Page 46

45 General Radio Features Operation
HOME
2
ABC
1
3
DEF
6
MNO
5
JKL
4
GHI
7
PRS
8
TUV
9WXY
0
1
2
ABC
3
DEF
HOME
2
ABC
1
3
DEF
6
MNO
5
JKL
4
GHI
7
PRS
8
TUV
9WXY
0
(cont.)
Conventional Telephone Operation (cont.)
Making a Delayed Access Call to a Number on the
Telephone List
1. To make a delayed access call to a number on the
preprogrammed telephone list, press the right
arrow key ( ) until “PHON” appears on the
display.
Note: If your radio has been so programmed, you
can press the phone button for quick access to the
telephone call feature. This will take you directly to
the “last number dialed” display shown in step 2;
skip to step 3.
2. Press the key below “PHON.” The display changes
to show the last telephone number dialed.
3. To enter the telephone list, press either the right
( ) or the left ( ) arrow key. The right arrow key
will take you forwards to the first or next member
of the list; the left arrow key will take you
backwards to the last or previous member of the
list.
4. When you stop on a member of the list, the display
will alternate between showing the member’s name
and telephone number.
Page 47

46 General Radio Features Operation
2
ABC
1
3
DEF
6
MNO
5
JKL
4
GHI
7
PRS
8
TUV
9WXY
0
HOME
(cont.)
Conventional Telephone Operation (cont.)
4. When you have selected the member you wish to
call, press the PTT switch. The display will show
“PLEASE WAIT” while your radio attempts to
access the telephone system.
Note: This is a timed message. If you could not
access the telephone system (no dial tone heard),
you will have to press the HOME key or the phone
button to hang up, and start again at step 1 of this
procedure.
5. If the access was successful, you will hear a dial
tone. The display will again show the member’s
name.
6. To place the telephone call, press the PTT button
again. The telephone number will be sent out; you
will hear tones as they are being sent.
7. If the party you are calling answers, carry on with
your conversation in the normal manner. Press the
PTT switch to talk; release the PTT to listen.
Notes:
• After reaching the number you are calling, you
may need to dial an extension number before
you can reach your party. If this is the case,
enter the extension number from the keypad
(MTS 2000 III model only) or (if so
programmed) use the arrow keys to find the
extension number in the telephone list. Press
the PTT switch again to send out the
extension number.
• Many conventional telephone patches will
generate a high-pitched go-ahead tone when
the radio’s PTT switch is released. This is
heard by the land-line party as an indication to
begin talking.
8. When you have finished your conversation, or if the
number you are calling is busy or does not answer,
press the HOME key or the phone button to send
the hang-up code. The radio will return to the home
display.
Page 48

47 General Radio Features Operation
HOME
2
ABC
1
3
DEF
6
MNO
5
JKL
4
GHI
7
PRS
8
TUV
9WXY
0
1
2
ABC
3
DEF
HOME
2
ABC
1
3
DEF
6
MNO
5
JKL
4
GHI
7
PRS
8
TUV
9WXY
0
(cont.)
Conventional Telephone Operation (cont.)
Making an Immediate Access Call to a Number on
the Telephone List
1. To make an immediate access call to a number on
the preprogrammed telephone list, press the right
arrow key ( ) until “PHON” appears on the
display.
Note: If your radio has been so programmed, you
can press the phone button for quick access to the
telephone call feature. This will take you directly to
the “PLEASE WAIT” display shown in step 2; skip
to step 3.
2. Press the key below “PHON.” The display shows
“PLEASE WAIT” while your radio attempts to
access the telephone system.
Note: This is a timed message. If you cannot
access the telephone system (no dial tone heard),
you will have to press the HOME key or the phone
button to hang up, and start again at step 1 of this
procedure.
3. If the access was successful, you will hear a dial
tone. The display will show the last number dialed.
4. To enter the telephone list, press either the right
( ) or the left ( ) arrow key. The right arrow key
will take you forwards to the first or next member
of the list; the left arrow key will take you
backwards to the last or previous member of the
list.
Page 49

48 General Radio Features Operation
2
ABC
1
3
DEF
6
MNO
5
JKL
4
GHI
7
PRS
8
TUV
9WXY
0
HOME
(cont.)
Conventional Telephone Operation (cont.)
5. When you stop on a member of the list, the display
will alternate between showing the member’s name
and telephone number.
6. To place the telephone call, press the PTT button.
The telephone number will be sent out; you will
hear tones as they are being sent.
7. If the party you are calling answers, carry on with
your conversation in the normal manner. Press the
PTT switch to talk; release the PTT to listen.
Notes:
• After reaching the number you are calling, you
may need to dial an extension number before
you can reach your party. If this is the case,
enter the extension number from the keypad
(MTS 2000 III model only) or (if so
programmed) use the arrow keys to find the
extension number in the telephone list. If you
have live dial, the number will be sent as the
keys are pressed. If you have buffered dial,
press the PTT switch again to send out the
extension number.
• Many conventional telephone patches will
generate a high-pitched go-ahead tone when
the radio’s PTT switch is released. This is
heard by the land-line party as an indication to
begin talking.
8. When you have finished your conversation, or if the
number you are calling is busy or does not answer,
press the HOME key or the phone button to send
the hang-up code. The radio will return to the home
display.
Page 50

49 General Radio Features Operation
HOME
2
ABC
1
3
DEF
6
MNO
5
JKL
4
GHI
7
PRS
8
TUV
9WXY
0
1
2
ABC
3
DEF
HOME
(cont.)
Conventional Telephone Operation (cont.)
Making a Delayed Access Call to a Number at a
Location in the Telephone List
1. To make a delayed access call to number at a
location in the preprogrammed telephone list,
press the right arrow key ( ) until “PHON”
appears on the display.
Note: If your radio has been so programmed, you
can press the phone button for quick access to the
telephone call feature. This will take you directly to
the “last number dialed” display shown in step 2;
skip to step 3.
2. Press the key below “PHON.” The display changes
to show the last telephone number dialed.
3. To enter the telephone list, press either the right
( ) or the left ( ) arrow key. The right arrow key
will take you forwards to the first or next member
of the list; the left arrow key will take you
backwards to the last or previous member of the
list.
4. Enter the location (any preprogrammed location
from 1 through 19) of the number you wish to call.
5. The radio will go to the selected location. The
display will alternate between showing the list
member’s name and telephone number.
Page 51

50 General Radio Features Operation
2
ABC
1
3
DEF
6
MNO
5
JKL
4
GHI
7
PRS
8
TUV
9WXY
0
HOME
(cont.)
Conventional Telephone Operation (cont.)
6. Press the PTT switch. The display will show
“PLEASE WAIT” while your radio attempts to
access the telephone system.
Note: This is a timed message. If you could not
access the telephone system (no dial tone heard),
you will have to press the HOME key or the phone
button to hang up, and start again at step 1 of this
procedure.
7. If the access was successful, you will hear a dial
tone. The display will again show the member’s
name.
8. To place the telephone call, press the PTT button
again. The telephone number will be sent out; you
will hear tones as they are being sent.
9. If the party you are calling answers, carry on with
your conversation in the normal manner. Press the
PTT switch to talk; release the PTT to listen.
Notes:
• After reaching the number you are calling, you
may need to dial an extension number before
you can reach your party. If this is the case,
enter the extension number from the keypad
(MTS 2000 III model only) or (if so
programmed) use the arrow keys to find the
extension number in the telephone list. Press
the PTT switch again to send out the extension
number.
• Many conventional telephone patches will
generate a high-pitched go-ahead tone when
the radio’s PTT switch is released. This is
heard by the land-line party as an indication to
begin talking.
10. When you have finished your conversation, or
if the number you are calling is busy or does
not answer, press the HOME key or the phone
button to send the hang-up code. The radio
will return to the home display.
Page 52

51 General Radio Features Operation
HOME
2
ABC
1
3
DEF
6
MNO
5
JKL
4
GHI
7
PRS
8
TUV
9WXY
0
1
2
ABC
3
DEF
HOME
2
ABC
1
3
DEF
6
MNO
5
JKL
4
GHI
7
PRS
8
TUV
9WXY
0
(cont.)
Conventional Telephone Operation (cont.)
Making an Immediate Access Call to a Number at
a Location in the Telephone List
1. To make an immediate access call to number at a
location in the preprogrammed telephone list,
press the right arrow key ( ) until “PHON”
appears on the display.
Note: If your radio has been so programmed, you
can press the phone button for quick access to the
telephone call feature. This will take you directly to
the “PLEASE WAIT” display shown in step 2; skip
to step 3.
2. Press the key below “PHON.” The display shows
“PLEASE WAIT” while your radio attempts to
access the telephone system.
Note: This is a timed message. If you cannot
access the telephone system (no dial tone heard),
you will have to press the HOME key or the phone
button to hang up, and start again at step 1 of this
procedure.
3. If the access was successful, you will hear a dial
tone. The display will show the last number dialed.
4. To enter the telephone list, press either the right
( ) or the left ( ) arrow key. The right arrow key
will take you forwards to the first or next member
of the list; the left arrow key will take you
backwards to the last or previous member of the
list.
Page 53
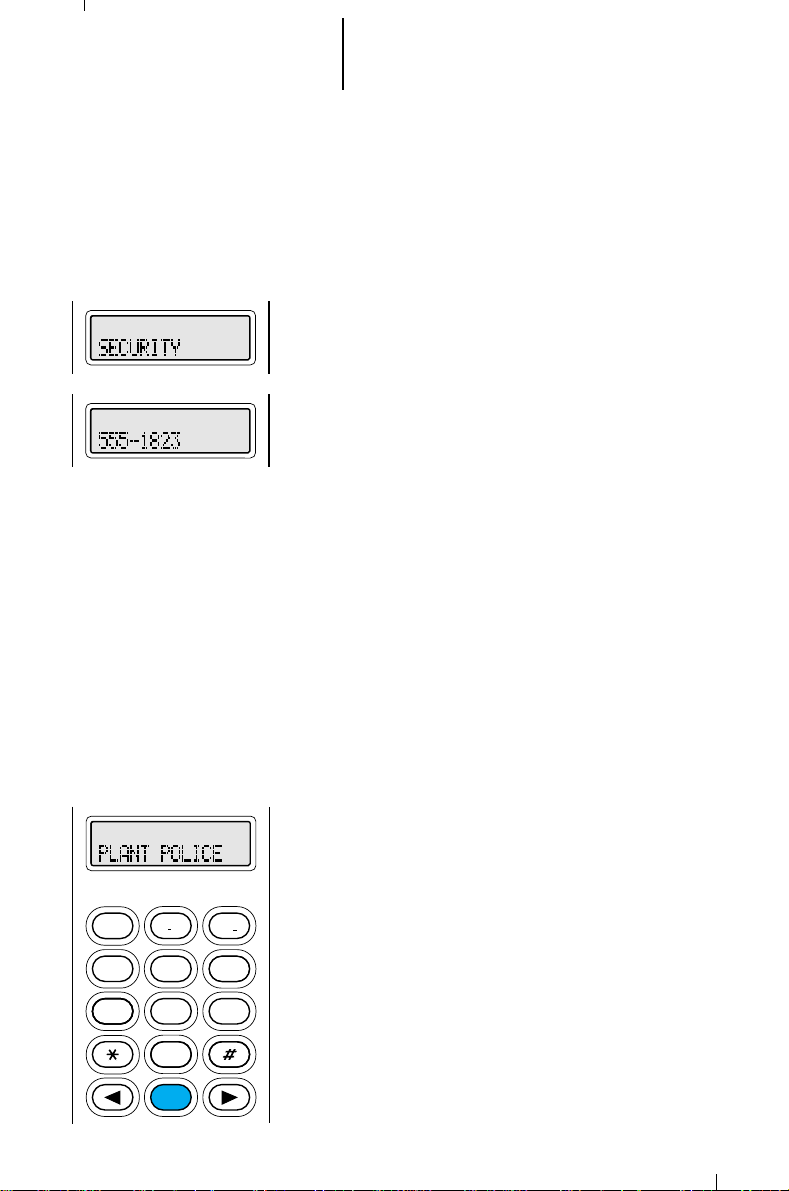
52 General Radio Features Operation
2
ABC
1
3
DEF
6
MNO
5
JKL
4
GHI
7
PRS
8
TUV
9WXY
0
HOME
(cont.)
Conventional Telephone Operation (cont.)
5. Enter the location (any preprogrammed location
from 1 through 19) of the number you wish to call.
6. The radio will go to the selected location. The
display will alternate between showing the list
member’s name and telephone number.
7. To place the telephone call, press the PTT button.
The telephone number will be sent out; you will
hear tones as they are being sent.
8. If the party you are calling answers, carry on with
your conversation in the normal manner. Press the
PTT switch to talk; release the PTT to listen.
Note:
• After reaching the number you are calling, you
may need to dial an extension number before
you can reach your party. If this is the case,
enter the extension number from the keypad
(MTS 2000 III model only) or (if so
programmed) use the arrow keys to find the
extension number in the telephone list. If you
have live dial, the number will be sent as the
keys are pressed. If you have buffered dial,
press the PTT switch again to send out the
extension number.
• Many conventional telephone patches will
generate a high-pitched go-ahead tone when
the radio’s PTT switch is released. This is
heard by the land-line party as an indication to
9. When you have finished your conversation, or if the
begin talking.
number you are calling is busy or does not answer,
press the HOME key or the phone button to send
the hang-up code. The radio will return to the home
display.
Page 54

53 General Radio Features Operation
HOME
2
ABC
1
3
DEF
6
MNO
5
JKL
4
GHI
7
PRS
8
TUV
9WXY
0
HOME
2
ABC
1
3
DEF
6
MNO
5
JKL
8
TUV
9WXY
0
4
GHI
7
PRS
(cont.)
Conventional Telephone Operation (cont.)
Making a Manual Access Telephone Call Using the
Keypad (MTS 2000 III Model Only)
1. To make a manual access call using the keypad,
press the right arrow key ( ) until “PHON” appears
on the display.
Note: If your radio has been so programmed, you
can press the phone button for quick access to the
telephone call feature. Skip to step 3.
2. Press the key below “PHON.” The display will show
the last number dialed.
3. Enter the telephone system access code. The
display shows the digits as they are being entered.
Each digit is sent as its key is pressed.
4. If the access was successful, you will hear a dial
tone. If you cannot access the telephone system (no
dial tone heard), go to steps 7 and 8 to hang up,
and start again at step 1 of this procedure.
5. Enter the telephone number. The display shows the
digits as they are being entered. Each digit is sent
as its key is pressed.
6. If the party you are calling answers, carry on with
the conversation in the normal manner. Press the
PTT switch to talk; release the PTT switch to listen.
7. When you have finished your conversation, or if the
number you are calling is busy or does not answer,
you must send the manual hangup code to hang up.
Enter the hangup code. The display shows the digits
as they are being entered. Each digit is sent as its
key is pressed.
8. After the hangup code is sent, press the HOME key
or the phone button to return to the home display.
Page 55

54 General Radio Features Operation
2
ABC
1
3
DEF
6
MNO
5
JKL
4
GHI
7
PRS
8
TUV
9WXY
0
HOME
(cont.)
Trunked Telephone Operation
The trunked telephone feature allows you to use
your trunked radio similar to a standard telephone.
When you are dialing from the keypad (MTS 2000
III model only), your radio may be programmed with
either
buffered dial
PTT before the digits are sent out) or
is sent out as it is pressed).
Note: When you are making a call, transmit
operation will be controlled by the position of the
two-position concentric switch. You
change from SECURENET operation to clear
operation, or from clear to SECURENET, during the
call.
Answering a Telephone Call
1. When a telephone call is being received, you will
hear telephone-type ringing. The display will
alternate between showing the present talkgroup
and “PHONE CALL,” and the call received status
annunciator will flash to indicate that a call is being
received.
Note: Incoming phone numbers are not stored in
the phone list.
(you enter all digits and press the
live dial
(each digit
will be able
to
2. To answer the call, press the phone button or call
response button (programmed via the RSS). The
display will show “PHONE CALL” constantly, and the
call received annunciator will turn off.
3. Carry on with your conversation in the normal
manner. Press the PTT switch to talk; release the
PTT to listen.
4. When you have finished your conversation, press
the HOME key or the phone button to hang up. The
radio will return to the home display.
Page 56

55
HOME
2
ABC
1
3
DEF
6
MNO
5
JKL
4
GHI
7
PRS
8
TUV
9WXY
0
1
2
ABC
3
DEF
General Radio Features Operation
(cont.)
Trunked Telephone Operation (cont.)
Calling the Last Number Dialed
1. To send a telephone call to the last number dialed,
press the right arrow key ( ) until “PHON” appears
on the display.
Note: If your radio has been so programmed, you
can press the phone button for quick access to the
telephone call feature. This will take you directly to
the ”last number dialed” display shown in step 2; skip
to step 3.
2. Press the key below “PHON.” The display changes to
show the last telephone number dialed. At this point,
either:
3a. If your radio is programmed for immediate access,
the display shows “PLEASE WAIT” while your radio
attempts to access the telephone system. Go to
step 4.
Notes:
• This is a timed message. If you cannot access the
telephone system (no dial tone heard), you will have
to press the HOME key to hang up, and start again
at step 1 of this procedure.
• If you are out of range of the trunked system or the
phone interconnect is out of service, “NO PHONE” is
displayed and a continuous low-pitched tone sounds.
• If the trunked phone interconnect is in use, a busy
tone sounds and “PHONE BUSY” is displayed. Your
number will automatically be dialed when the phone
interconnect becomes available. If you hang up, you
will lose your place in line.
or
3b. If your radio is programmed for delayed access, the
display does not change. Press the PTT switch. The
display shows “PLEASE WAIT” while your radio
attempts to access the telephone system.
Notes:
•
• If you are out of range of the trunked system or the
This is a timed message. If you cannot access the
telephone system (no dial tone heard), you will have
to press the HOME key to hang up, and start again
at step 1 of this procedure.
phone interconnect is out of service, “NO PHONE” is
displayed and a continuous low-pitched tone sounds.
Page 57

56 General Radio Features Operation
2
ABC
1
3
DEF
6
MNO
5
JKL
4
GHI
7
PRS
8
TUV
9WXY
0
HOME
(cont.)
Trunked Telephone Operation (cont.)
• If the trunked phone interconnect is in use, a busy
tone sounds and “PHONE BUSY” is displayed. Your
number will automatically be dialed when the phone
interconnect becomes available. If you hang up, you
will lose your place in line.
4. If the access was successful, you will hear a dial
tone. The display will again show the last number
dialed.
5. The telephone number will be sent out; you will
hear tones as they are being sent. When the
number has been completely sent out, you will hear
either a busy signal or ringing. If you hear a busy
signal, go to step 7 for hang-up procedure.
6. If the party you are calling answers, carry on with
your conversation in the normal manner. Press the
PTT switch to talk; release the PTT to listen.
Notes:
• After reaching the number you are calling, you
may need to dial an extension number before
you can reach your party. If this is the case,
enter the extension number from the keypad
(MTS 2000 III model only) or (if so
programmed) use the arrow keys to find the
extension number in the telephone list. If you
have live dial, the number will be sent as the
keys are pressed. If you have buffered dial,
press the PTT switch again to send out the
extension number.
• Motorola trunked radios generate a high-
pitched go-ahead tone when the radio's PTT
switch is released. This is heard by the landline party and is an indicator to begin talking.
7. When you have finished your conversation, or if the
number you are calling is busy or does not answer,
press the HOME key or the phone button to send
the hang-up code. The radio will return to the home
display.
Page 58

57 General Radio Features Operation
HOME
2
ABC
1
3
DEF
6
MNO
5
JKL
4
GHI
7
PRS
8
TUV
9WXY
0
1
2
ABC
3
DEF
HOME
2
ABC
1
3
DEF
6
MNO
5
JKL
8
TUV
9WXY
0
4
GHI
7
PRS
(cont.)
Trunked Telephone Operation (cont.)
Making a Delayed Access Telephone Call Using the
Keypad (MTS 2000 III Model Only)
1. To make a delayed access call using the keypad,
press the right arrow key ( ) until “PHON”
appears on the display.
Note: If your radio has been so programmed, you
can press the phone button for quick access to the
telephone call feature. This will take you directly to
the “last number dialed” display shown in step 2;
skip to step 3.
2. Press the key below “PHON.” The display changes
to show the last telephone number dialed.
The new telephone number can now be entered
from the keypad, using any of the numeric (0 – 9)
keys, as well as the “*” and “#” keys. You can also
enter a pause in the telephone number by first
pressing the “*” key, then the “#” key. The pause
will be shown on the display as a “P.”
3. Begin entering the telephone number. The display
changes to show the numbers as they are being
entered. The cursor will flash to indicate the
location of the next number to be entered. When
the maximum number of digits have been entered,
the cursor will disappear.
Note: Once you have star ted entering numbers,
the left arrow key ( ) will function as a backspace
key. Pressing this key will erase the last digit
entered, and move the cursor to the left. When
the last digit on the display has been erased, an
additional press of this key will cause the last
member of the preprogrammed telephone list to be
displayed; pressing the right arrow key will show
the first member of the list.
Page 59

58 General Radio Features Operation
2
ABC
1
3
DEF
6
MNO
5
JKL
4
GHI
7
PRS
8
TUV
9WXY
0
HOME
(cont.)
Trunked Telephone Operation (cont.)
4. When you have finished dialing your number, press
the PTT switch. The display shows “PLEASE WAIT”
while your radio attempts to access the telephone
system.
Notes:
• This is a timed message. If you cannot access
the telephone system (no dial tone heard), you
will have to press the HOME key or the phone
button to hang up, and start again at step 1 of
this procedure.
• If you are out of range of the trunked system or
the phone interconnect is out of service, “NO
PHONE” is displayed and a continuous low-pitched
tone sounds.
• If the trunked phone interconnect is in use, a busy
tone sounds and “PHONE BUSY” is displayed.
Your number will automatically be dialed when the
phone interconnect becomes available. If you hang
up, you will lose your place in line.
5. If the access was successful, you will hear a dial
tone. The display will again show the number dialed.
6. The telephone number will be sent out; you will hear
tones as they are being sent. When the number has
been completely sent out, you will hear either a busy
signal or ringing. If you hear a busy signal, go to
step 8 for hang-up procedure.
7. If the party you are calling answers, carry on with
your conversation in the normal manner. Press the
PTT switch to talk; release the PTT to listen.
Notes:
• After reaching the number you are calling, you
may need to dial an extension number before you
can reach your party. If this is the case, enter the
extension number from the keypad (MTS 2000 III
model only) or (if so programmed) use the arrow
keys to find the extension number in the
telephone list. Press the PTT switch again to
send out the extension number.
• Motorola trunked radios generate a high-pitched
go-ahead tone when the radio's PTT switch is
released. This is heard by the land-line party and
is an indicator to begin talking.
8. When you have finished your conversation, or if the
number you are calling is busy or does not answer,
press the HOME key or the phone button to send
the hang-up code. The radio will return to the home
display.
Page 60

59 General Radio Features Operation
HOME
2
ABC
1
3
DEF
6
MNO
5
JKL
4
GHI
7
PRS
8
TUV
9WXY
0
1
2
ABC
3
DEF
HOME
2
ABC
1
3
DEF
6
MNO
5
JKL
8
TUV
9WXY
0
4
GHI
7
PRS
(cont.)
Trunked Telephone Operation (cont.)
Making an Immediate Access Telephone Call Using
the Keypad (MTS 2000 III Model Only)
1. To make an immediate access call using the keypad,
press the right arrow key ( ) until “PHON” appears
on the display.
Note: If your radio has been so programmed, you
can press the phone button for quick access to the
telephone call feature. This will take you directly to
the “PLEASE WAIT” display shown in step 2; skip to
step 3.
2. Press the key below “PHON.” The display shows
“PLEASE WAIT” while your radio attempts to access
the telephone system.
Notes:
• This is a timed message. If you cannot access the
telephone system (no dial tone heard), you will
have to press the HOME key or the phone button
to hang up, and start again at step 1 of this
procedure.
• If you are out of range of the trunked system or
the phone interconnect is out of service, “NO
PHONE” is displayed and a continuous low-pitched
tone sounds.
• If the trunked phone interconnect is in use, a busy
tone sounds and “PHONE BUSY” is displayed.
Your number will automatically be dialed when the
phone interconnect becomes available. If you hang
up, you will lose your place in line.
3. If the access was successful, you will hear a dial
tone. The display will show the last number dialed.
The new telephone number can now be entered from
the keypad, using any of the numeric (0 – 9) keys, as
well as the “*” and “#” keys. You can also enter a
pause in the telephone number by first pressing the
4. Enter the telephone number. The display changes to
“*” key, then the “#” key (Buffered dial only - The
pause will be shown on the display as a “P”).
show the numbers as they are being entered. The
cursor will flash to indicate the location of the next
digit to be entered. When the maximum number of
digits have been entered (buffered dial only), the
cursor will disappear.
Page 61

60 General Radio Features Operation
2
ABC
1
3
DEF
6
MNO
5
JKL
4
GHI
7
PRS
8
TUV
9WXY
0
HOME
(cont.)
Trunked Telephone Operation (cont.)
5a. If your radio has been programmed by the RSS for
“live dial,” each digit is sent out as its key is
pressed.
or
5b. If your radio has been programmed by the RSS for
“buffered dial,” the digits of the number are
temporarily stored as you enter them. When you
have completely entered the number, press the
PTT switch to send out the number. The telephone
number will be sent out; you will hear tones as they
are being sent. If you hear a busy signal, go to step
7 for hang-up procedure.
Note: Once you have star ted entering numbers,
the left arrow key ( ) will function as a backspace
key. Pressing this key will erase the last digit
entered, and move the cursor to the left. When
the last digit on the display has been erased, an
additional press of this key will cause the last
member of the preprogrammed telephone list to be
displayed; pressing the right arrow key will show
the first member of the list.
6. If the party you are calling answers, carry on with
your conversation in the normal manner. Press the
PTT switch to talk; release the PTT to listen.
Notes:
• After reaching the number you are calling, you
may need to dial an extension number before
you can reach your party. If this is the case,
enter the extension number from the keypad
or (if so programmed) use the arrow keys to
find the extension number in the telephone list.
If you have live dial, the number will be sent as
the keys are pressed. If you have buffered dial,
press the PTT switch again to send out the
extension number.
• Motorola trunked radios generate a high-
7. When you have finished your conversation, or if the
pitched go-ahead tone when the radio's PTT
switch is released. This is heard by the landline party and is an indicator to begin talking.
number you are calling is busy or does not answer,
press the HOME key or the phone button to send
the hang-up code. The radio will return to the home
display.
Page 62

61 General Radio Features Operation
HOME
2
ABC
1
3
DEF
6
MNO
5
JKL
4
GHI
7
PRS
8
TUV
9WXY
0
1
2
ABC
3
DEF
HOME
2
ABC
1
3
DEF
6
MNO
5
JKL
4
GHI
7
PRS
8
TUV
9WXY
0
(cont.)
Trunked Telephone Operation (cont.)
Making a Delayed Access Call to a Number on the
Telephone List
1. To make a delayed access call to a number on the
preprogrammed telephone list, press the right
arrow key ( ) until “PHON” appears on the
display.
Note: If your radio has been so programmed, you
can press the phone button for quick access to the
telephone call feature. This will take you directly to
the “last number dialed” display shown in step 2;
skip to step 3.
2. Press the key below “PHON.” The display changes
to show the last telephone number dialed.
3. To enter the telephone list, press either the right
( ) or the left ( ) arrow key. The right arrow key
will take you forwards to the first or next member
of the list; the left arrow key will take you
backwards to the last or previous member of the
list.
4. When you stop on a member of the list, the display
will alternate between showing the member’s name
and telephone number.
Page 63

62 General Radio Features Operation
2
ABC
1
3
DEF
6
MNO
5
JKL
4
GHI
7
PRS
8
TUV
9WXY
0
HOME
(cont.)
Trunked Telephone Operation (cont.)
4. When you have selected the member you wish to
call, press the PTT switch. The display will show
“PLEASE WAIT” while your radio attempts to
access the telephone system.
Notes:
• This is a timed message. If you could not access
the telephone system (no dial tone heard), you
will have to press the HOME key or the phone
button to hang up, and start again at step 1 of
this procedure.
• If you are out of range of the trunked system or
the phone interconnect is out of service, “NO
PHONE” is displayed and a continuous low-pitched
tone sounds.
• If the trunked phone interconnect is in use, a busy
tone sounds and “PHONE BUSY” is displayed.
Your number will automatically be dialed when the
phone interconnect becomes available. If you hang
up, you will lose your place in line.
5. If the access was successful, you will hear a dial
tone. The display will again show the member’s
name.
6. The telephone number will be sent out; you will
hear tones as they are being sent.
7. If the party you are calling answers, carry on with
your conversation in the normal manner. Press the
PTT switch to talk; release the PTT to listen.
Notes:
• After reaching the number you are calling, you
may need to dial an extension number before
you can reach your party. If this is the case,
enter the extension number from the keypad
(MTS 2000 III model only) or (if so programmed)
use the arrow keys to find the extension number
in the telephone list. Press the PTT switch again
to send out the extension number.
• Motorola trunked radios generate a high-pitched
go-ahead tone when the radio's PTT switch is
released. This is heard by the land-line party and
is an indicator to begin talking.
8. When you have finished your conversation, or if the
number you are calling is busy or does not answer,
press the HOME key or the phone button to send
the hang-up code. The radio will return to the home
display.
Page 64

63 General Radio Features Operation
HOME
2
ABC
1
3
DEF
6
MNO
5
JKL
4
GHI
7
PRS
8
TUV
9WXY
0
HOME
2
ABC
1
3
DEF
6
MNO
5
JKL
4
GHI
7
PRS
8
TUV
9WXY
0
(cont.)
Trunked Telephone Operation (cont.)
Making an Immediate Access Call to a Number on
the Telephone List
1. To make an immediate access call to a number on
the preprogrammed telephone list, press the right
arrow key ( ) until “PHON” appears on the
display.
Note: If your radio has been so programmed, you
can press the phone button for quick access to the
telephone call feature. This will take you directly to
the “PLEASE WAIT” display shown in step 2; skip
to step 3.
2. Press the key below “PHON.” The display shows
“PLEASE WAIT” while your radio attempts to
access the telephone system.
Notes:
• This is a timed message. If you cannot access
the telephone system (no dial tone heard), you
will have to press the HOME key to hang up,
and start again at step 1 of this procedure.
• If you are out of range of the trunked system or
the phone interconnect is out of service, “NO
PHONE” is displayed and a continuous low-pitched
tone sounds.
• If the trunked phone interconnect is in use, a busy
tone sounds and “PHONE BUSY” is displayed.
Your number will automatically be dialed when the
phone interconnect becomes available. If you hang
up, you will lose your place in line.
3. If the access was successful, you will hear a dial
tone. The display will show the last number dialed.
4. To enter the telephone list, press either the right
( ) or the left ( ) arrow key. The right arrow key
will take you forwards to the first or next member
of the list; the left arrow key will take you
backwards to the last or previous member of the
list.
Page 65
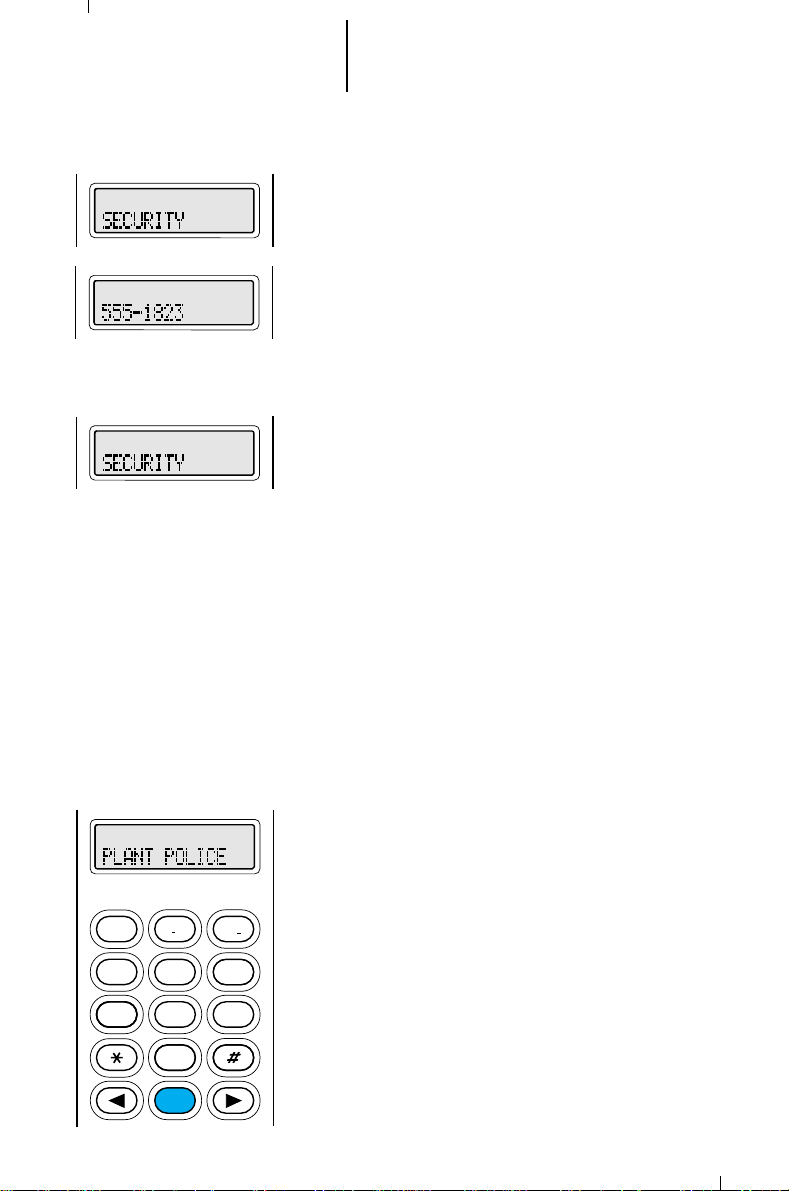
64 General Radio Features Operation
2
ABC
1
3
DEF
6
MNO
5
JKL
4
GHI
7
PRS
8
TUV
9WXY
0
HOME
(cont.)
Trunked Telephone Operation (cont.)
5. When you stop on a member of the list, the display
will alternate between showing the member’s name
and telephone number.
6. To place the telephone call, press the PTT button.
The telephone number will be sent out; you will
hear tones as they are being sent. When the
number has been completely sent out, you will hear
either a busy signal or ringing, and the member’s
name will be displayed. If you hear a busy signal, go
to step 8 to hang up.
7. If the party you are calling answers, carry on with
your conversation in the normal manner. Press the
PTT switch to talk; release the PTT to listen.
Notes:
• After reaching the number you are calling, you
may need to dial an extension number before
you can reach your party. If this is the case,
enter the extension number from the keypad
(MTS 2000 III model only) or (if so
programmed) use the arrow keys to find the
extension number in the telephone list. If you
have live dial, the number will be sent as the
keys are pressed. If you have buffered dial,
press the PTT switch again to send out the
extension number.
• Motorola trunked radios generate a high-
pitched go-ahead tone when the radio's PTT
switch is released. This is heard by the landline party and is an indicator to begin talking.
8. When you have finished your conversation, or if the
number you are calling is busy or does not answer,
press the HOME key or the phone button to send
the hang-up code. The radio will return to the home
display.
Page 66

65 General Radio Features Operation
HOME
2
ABC
1
3
DEF
6
MNO
5
JKL
4
GHI
7
PRS
8
TUV
9WXY
0
1
2
ABC
3
DEF
HOME
(cont.)
Trunked Telephone Operation (cont.)
Making a Delayed Access Call to a Number at a
Location in the Telephone List
1. To make a delayed access call to number at a
location in the preprogrammed telephone list,
press the right arrow key ( ) until “PHON”
appears on the display.
Note: If your radio has been so programmed, you
can press the phone button for quick access to the
telephone call feature. This will take you directly to
the “last number dialed” display shown in step 2.
2. Press the key below “PHON.” The display changes
to show the last telephone number dialed.
3. To enter the telephone list, press either the right
( ) or the left ( ) arrow key. The right arrow key
will take you forwards to the first or next member
of the list; the left arrow key will take you
backwards to the last or previous member of the
list.
4. Enter the location (any preprogrammed location
from 1 through 19) of the number you wish to call.
5. The radio will go to the selected location. The
display will alternate between showing the list
member’s name and telephone number.
Page 67

66 General Radio Features Operation
2
ABC
1
3
DEF
6
MNO
5
JKL
4
GHI
7
PRS
8
TUV
9WXY
0
HOME
(cont.)
Trunked Telephone Operation (cont.)
6. When you have selected the member you wish to
call, press the PTT switch. The display will show
“PLEASE WAIT” while your radio attempts to
access the telephone system.
Notes:
• This is a timed message. If you could not access
the telephone system (no dial tone heard), you
will have to press the HOME key or the phone
button to hang up, and start again at step 1 of
this procedure.
• If you are out of range of the trunked system or
the phone interconnect is out of service, “NO
PHONE” is displayed and a continuous low-pitched
tone sounds.
• If the trunked phone interconnect is in use, a busy
tone sounds and “PHONE BUSY” is displayed.
Your number will automatically be dialed when the
phone interconnect becomes available. If you hang
up, you will lose your place in line.
7. If the access was successful, you will hear a dial
tone. The display will again show the member’s
name.
8. The telephone number will be sent out; you will
hear tones as they are being sent.
9. If the party you are calling answers, carry on with
your conversation in the normal manner. Press the
PTT switch to talk; release the PTT to listen.
Notes:
• After reaching the number you are calling, you
may need to dial an extension number before
you can reach your party. If this is the case,
enter the extension number from the keypad
(MTS 2000 III model only) or (if so programmed)
use the arrow keys to find the extension number
in the telephone list. Press the PTT switch again
to send out the extension number.
• Motorola trunked radios generate a high-pitched
go-ahead tone when the radio's PTT switch is
released. This is heard by the land-line party and
is an indicator to begin talking.
10. When you have finished your conversation, or if the
number you are calling is busy or does not answer,
press the HOME key or the phone button to send
the hang-up code. The radio will return to the home
display.
Page 68

67 General Radio Features Operation
HOME
2
ABC
1
3
DEF
6
MNO
5
JKL
4
GHI
7
PRS
8
TUV
9WXY
0
HOME
2
ABC
1
3
DEF
6
MNO
5
JKL
4
GHI
7
PRS
8
TUV
9WXY
0
(cont.)
Trunked Telephone Operation (cont.)
Making an Immediate Access Call to a Number at
a Location in the Telephone List
1. To make an immediate access call to number at a
location in the preprogrammed telephone list,
press the right arrow key ( ) until “PHON”
appears on the display.
Note: If your radio has been so programmed, you
can press the phone button for quick access to the
telephone call feature. This will take you directly to
the “PLEASE WAIT” display shown in step 2.
2. Press the key below “PHON.” The display shows
“PLEASE WAIT” while your radio attempts to
access the telephone system.
Notes:
• This is a timed message. If you could not access
the telephone system (no dial tone heard), you
will have to press the HOME key or the phone
button to hang up, and start again at step 1 of
this procedure.
• If you are out of range of the trunked system or
the phone interconnect is out of service, “NO
PHONE” is displayed and a continuous low-pitched
tone sounds.
• If the trunked phone interconnect is in use, a busy
tone sounds and “PHONE BUSY” is displayed.
Your number will automatically be dialed when the
phone interconnect becomes available. If you hang
up, you will lose your place in line.
3. If the access was successful, you will hear a dial
tone. The display will show the last number dialed.
4. To enter the telephone list, press either the right
( ) or the left ( ) arrow key. The right arrow key
will take you forwards to the first or next member
of the list; the left arrow key will take you
backwards to the last or previous member of the
list.
Page 69

68 General Radio Features Operation
2
ABC
1
3
DEF
6
MNO
5
JKL
4
GHI
7
PRS
8
TUV
9WXY
0
HOME
(cont.)
Trunked Telephone Operation (cont.)
5. Enter the location (any preprogrammed location
from 1 through 19) of the number you wish to call.
6. The radio will go to the selected location. The
display will alternate between showing the list
member’s name and telephone number.
7. To place the telephone call, press the PTT button.
The telephone number will be sent out; you will
hear tones as they are being sent.
8. If the party you are calling answers, carry on with
your conversation in the normal manner. Press the
PTT switch to talk; release the PTT to listen.
Notes:
• After reaching the number you are calling, you
may need to dial an extension number before
you can reach your party. If this is the case,
enter the extension number from the keypad
(MTS 2000 III model only) or (if so
programmed) use the arrow keys to find the
extension number in the telephone list. If you
have live dial, the number will be sent as the
keys are pressed. If you have buffered dial,
press the PTT switch again to send out the
extension number.
• Motorola trunked radios generate a high-
pitched go-ahead tone when the radio's PTT
switch is released. This is heard by the landline party and is an indicator to begin talking.
9. When you have finished your conversation, or if the
number you are calling is busy or does not answer,
press the HOME key or the phone button to send
the hang-up code. The radio will return to the home
display.
Page 70

69
Conventional Radio Features Operation
Stat-AlertTM(MDC-1200TM) Signalling Features
Stat-Alert—Emergency
If this feature is enabled in your radio, pressing the emergency button (the
orange top button) will send out an emergency alarm signal. This signal takes
precedence over any other signalling activity in progress.
“Emergency” signals a critical situation. It should never be used for any
other reason.
Sending an Emergency Alarm
1. Press and hold the emergency button (the length of the button press is RSS
programmable) until the LED lights solid red and the display alternates
between showing “EMERGENCY” and the current zone and mode. A short,
medium-pitched emergency tone sounds.
2. When the alarm is acknowledged by the base, the radio sounds four beeps
and the alarm ends. The radio returns to normal operation.
Sending a Silent Emergency Alarm
In radios with the silent emergency alarm option enabled, pressing the
emergency button sends an emergency signal to the dispatcher. During the
emergency alarm procedure: the LED will not light, tones will not be heard, and
the display will not change.
The receive audio will be muted (turned off), and will remain so until you exit
the emergency state. As an option, the receive audio can be enabled to allow you
to hear messages.
Cancelling an Emergency Alarm
Press the emergency button for more than 1 1/2 seconds (programmable).
A medium-pitched, emergency-exit tone sounds until the button is released and
the radio returns to normal operation.
The alarm will also be cancelled (without emergency-exit tone) by:
• pressing the PTT switch,
• turning the radio off, or
• receiving an acknowledge from the dispatcher.
Stat-Alert - Emergency Hot Microphone
This feature will automatically send an emergency alarm and start the radio
transmitting using either the internal microphone or the optional remote speaker
microphone.
Both emergency alarm and call must be enabled. Initiate the emergency. The
radio will send an alarm and begin transmitting on the specified emergency group
through the internal microphone or remote speaker microphone for a preprogrammed transmit time. The radio will remain in normal emergency call after
the transmit time has expired. To re-initiate the hot-microphone emergency, you
must exit and re-start the emergency.
Page 71

70
Radio Operation with Features (cont.)
Stat-Alert—PTT-ID
Stat-Alert PTT-ID is a per-mode feature describing an identification code
transmission that is tied to the PTT switch. The ID code is automatically sent
every time a voice transmission occurs (that is, the PTT switch is pressed). When
PTT-ID comes before the voice transmission, you will hear a tone until the ID
transmission is completed; this helps you avoid talking while the ID code is being
transmitted. This tone can be disabled on a per-radio basis. Also, the ID code
transmission can be programmed to follow the voice transmission.
Stat-Alert—Call Alert™ (Page) (Decode)
Stat-Alert Call Alert is a per -radio feature that provides a convenient way for
the dispatcher to page you through your radio. This is especially useful in noisy
environments, or when you may need to be away from your radio equipment.
When a Call Alert (page) is received, the radio emits a continuous series of four
beeps and the LED flashes green. On the display, the call-received status
annunciator ( ) flashes. The green flashing LED, alert tone, and flashing
annunciator will continue until the Call Alert is acknowledged (you press the PTT,
or press and release the monitor button).
Stat-Alert Call Alert (Page) (Encode)
This feature allows a radio to page another radio or group of radios with
its ID.
Sending the Call Alert
To make a Call Alert, either press the “page” button or select PAGE from the
menu. The last transmitted or received ID is displayed. You can select the ID
you wish to page by scrolling forward with the mode selector to select an ID
from the page list. You may also scroll backward with the arrow keys to show
the last group ID paged, your own radio ID and your own radio group ID. If
unlimited page is allowed, you may enter an ID from the keypad.
Note: Keypad entry only applies to Model III.
To transmit a page to the selected ID, either press the PTT or the select
button. The radio will display “ACKNOWLEDGE” if received or
“NO ACKNOWLEDGE” if the paged radio is not reached.
Receiving a Call Alert
The radio receiving the page will display “PAGE RECEIVED” and generate
page received alert tones until the page is cancelled by any button press
other than DIM. The ID of the paging radio may be viewed by entering PAGE
via button or menu (Model II only).
Wildcard ID Entry
In both Selective Call and Call Alert, a * will match any number in the ID
position. For example, paging ID 000* will page all IDs from 0000-0009.
Paging **** will page all radios on the system.
Page 72

71
Radio Operation with Features (cont.)
Stat-Alert—Voice Selective-Call (Decode)
This feature provides a convenient way for a dispatcher to voice page an
individual or group. Voice selective-call decode also eliminates the need for you to
listen to traffic that is of no concern to you. This is a per-radio feature, enabled on
a per-mode basis, and available as individual call or group call.
1. When a call is received, the green LED flashes, and a one-time, two-beep
alert tone is emitted; on the display, the call-received status annunciator ( )
flashes. A voice message will follow. The green LED will continue to flash for
the entire length of the message.
2. Return the radio back to voice selective-call operation by pressing the monitor
button or, if so programmed, the radio will automatically reset.
Two automatic-reset features are available for voice selective-call:
• Automatic Reset Without Carrier Override — The automatic-reset
timer will start after the voice selective-call code is lost or after the radio
is dekeyed (you release the PTT switch).
• Automatic Reset With Carrier Override — When a carrier is detected,
the automatic reset timer will stop; when the carrier is lost, the
automatic-reset timer will start over.
Note: Voice selective-call automatic reset is cancelled when the monitor
button is pressed or when the mode is changed. The automatic-reset timer is
started over if it was running when either a voice selective-call was decoded
or a successful transmission was initiated.
Stat-Alert—Radio Check
This feature allows the dispatcher to determine if a radio unit is on the air
without disturbing the radio operator. This is a useful tool for the radio dispatcher
to use for routine maintenance checks, or if there is reason to doubt the
availability of a radio unit. When the dispatcher "checks" for the radio, the radio
will receive the command and automatically acknowledge it. The transmit (red)
LED will light when the radio sends the acknowledgement.
Page 73

72
Conventional Radio Features
Operation (cont.)
Stat-Alert Selective Call
Selective Call is another method of unmuting a radio with other than PL
codes. Radios with Selective Call may be programmed to unmute one of two ways:
1. (OR muting option) upon receiving proper PL code or a Selective Call, or
2. (AND muting option) upon receiving both proper PL code and Selective
Call
Making a Selective Call
Either press the “call” button or select PRIVATE CALL from the menu. The
last transmitted or received ID is displayed. You can select the ID you wish to
call by scrolling forward with the arrow keys to select an ID from the call list.
You may also scroll backward with the arrow keys to show the last group ID
called, your own radio ID and your own radio group ID. If unlimited calling is
allowed, you may enter an ID from the keypad.
Note: Keypad entry only applies to Model III.
To transmit a call to the selected ID, press the PTT. If automatic Selective Call
is enabled, your radio will remain in Selective Call until you exit. If automatic
Selective Call is disabled in your radio, the radio will immediately exit Selective
Call when you release the PTT.
Receiving a Selective Call
When receiving a selective call, your radio will generate the call received tone
and display “CALL RECEIVED” momentarily. The Selective Call voice will then
be heard.
If OR muting is programmed into your radio, your radio will unmute whenever
it receives proper PL or a Selective Call.
If AND muting is programmed into your radio, your radio must receive proper
PL and a Selective Call to unmute. For a pre-programmed time after receiving
a Selective Call, your radio will unmute on proper PL. After this preprogrammed time, another Selective Call with proper PL will be required to
unmute the radio.
Page 74

73 Conventional Radio Features
Operation (cont.)
Repeat/Direct
The repeat/direct feature allows you to bypass the repeater and talk directly
to another portable radio. This is known as DIRECT operation. The transmit
frequency is the same as the receive frequency.
• In REPEAT operation, you talk through the repeater, which increases the
radio's operating range. The transmit frequency is not the same as the
receive frequency.
• If the repeat/direct feature is slaved to a mode, that mode is programmed
to either one or the other type of operation (direct or repeat).
• If the repeat/direct feature is programmed, through the RSS, to the three-
position toggle switch, one position on the switch will select repeat operation,
and another position will select direct operation.
• If the repeat/direct feature is programmed, by the RSS, to the keypad,
change the repeat/direct setting by doing the following:
1. Press the right arrow ( ) key until “DIR” appears on the display.
2. Press the key below “DIR.” The current talkaround state (“REPEATER
MODE” or “DIRECT MODE”) appears on the display for a few seconds.
Then, the display shows “RPTR” and “DIR.”
3. Press the key below the desired talkaround state (RPTR or DIR). The
radio automatically returns to the home display.
Page 75

74 Conventional Radio Features
Operation (cont.)
Smart PTT
Smart PTT is a per-mode feature which gives the system manager better
control of radio operators. When smart PTT is enabled in your radio, you will not
be able to transmit on an active mode. Also, the monitor function will be disabled
on modes programmed with smart PTT. Three radio-wide variations of smar t PTT
are available:
• Transmit Inhibit on Busy Mode—With this feature enabled, you will be
inhibited from transmitting if any activity is detected on the mode.
• Transmit Inhibit on Busy Mode with Wrong Squelch Code—With this
feature enabled, you will be inhibited from transmitting on an active mode
with a squelch code or (if SECURENET-equipped) encryption key other than
your own. If the PL or encryption code is the same as yours, the
transmission will not be inhibited.
• Quick-Key Override—This feature can work in conjunction with either of the
two above variations. With this feature enabled, you will be able to override
the transmit-inhibit state by quick-keying (two PTT presses within one second
of each other) the radio.
Smart PTT radio operation is exactly the same as standard radio operation,
except that, if you try to transmit (press the PTT) on a smart PTT mode, a
continuous alert tone is generated until the PTT is released; the transmission will
be inhibited.
The red LED will blink when the radio is receiving to indicate that the mode is
busy.
Page 76

75 Trunked Radio Features Operation
2
ABC
1
3
DEF
6
MNO
5
JKL
4
GHI
7
PRS
8
TUV
9WXY
0
HOME
1
2
ABC
3
DEF
HOME
2
ABC
1
3
DEF
6
MNO
5
JKL
4
GHI
7
PRS
8
TUV
9WXY
0
HOME
Viewing Your Radio’s ID Number
1. To view your radio’s ID number, press the right
arrow key ( ) until “CALL” appears on the display.
Note: If your radio has been so programmed, you
can press the call button for quick access to the
Private Conversation feature. This will take you
directly to the “last ID number transmitted or
received” display shown in step 2; skip to step 3.
2. Press the key below “CALL.” The display changes to
show the last ID number transmitted or received.
3. Press the left ( ) arrow key to view "MY ID:" or, if
already in the preprogrammed call list, press the
“*" key. The display will show "MY ID:" along with
your radio's ID number.
Note: Pressing the right ( ) arrow key will take
you to the last ID number transmitted or received.
Pressing the left ( ) arrow key will take you to the
last member in the list.
4. Press the HOME key to return the radio to the
home display.
Page 77

76 Trunked Radio Features Operation
2
ABC
1
3
DEF
6
MNO
5
JKL
4
GHI
7
PRS
8
TUV
9WXY
0
HOME
(cont.)
Trunked Enhanced Private Conversation™ Call
Operation
The Enhanced Private Conversation feature not only
allows you to carry on a conversation that is heard only
by the two parties involved, but also enables you to
determine whether the radio that you are calling is in
service. The radio being called can also view the calling
radio's ID number before answering. You can then
choose whether or not to leave your radio’s ID number
(via a Call Alert page) with the radio you are calling so
that you may be called back. Enhanced Private
Conversation operation is similar to telephone
operation.
Note: When you are making a call, transmit
operation will be controlled by the position of the two-
position concentric switch. You
from SECURENET operation to clear operation,
not
from clear to SECURENET, during the call.
Answering a Private Conversation Call
1. When your radio receives a Private Conversation
call, you will hear two alert tones (repeating every
five seconds for 20 seconds), and the display will
alternate between “CALL RECEIVED” and the home
display. The green LED and call received status
annunciator will flash to indicate that a call is being
received. You will have 20 seconds to answer the
call before the radio automatically returns to the
home display.
2. Press the call response button or the call button
(both programmed through the RSS). The display
will show the incoming caller’s ID number, and the
call received annunciator will turn off. After viewing
the caller’s ID number, you can decide to either talk
privately (go to step 3), or not answer the call by
letting the remainder of the 20 seconds elapse and
returning to the home display.
Note: If you press the PTT switch before you press
the call response button, the response will be
transmitted to everyone in the talkgroup (see
dispatch mode operation).
3. If you decide to answer the call, press the PTT
switch to carry on a Private Conversation with the
caller. The caller’s ID number will remain on the
display for the duration of the call.
4. When you have finished your conversation, press
the HOME key or the call response button to hang
up; the radio will return to the home display.
will be able
to change
but
Page 78

77 Trunked Radio Features Operation
(cont.)
Trunked Enhanced Private Conversation™ Call
Operation
Viewing and Storing the Incoming ID Number
Without Responding to the Private Conversation
1. When your radio receives a Private Conversation
call, you will hear two alert tones (repeating every
five seconds for 20 seconds). The display will
alternate between showing the current mode and
“CALL RECEIVED.” The green LED and the call
received status annunciator will flash to indicate
that a call is being received. You will have 20
seconds to answer the call.
Note: If you do not answer the call within 20
seconds, the radio will automatically return to the
home display.
2. Press the call response button or the call button
(both programmed through the RSS). The display
will show the incoming caller’s ID number, and the
call received annunciator will turn off.
Converse...press PTT to transmit and release PTT
to receive.
3. When you have finished your conversation, press
the HOME key. The caller’s ID number will be
stored and the radio will return to the home
display.
Note: The stored ID number is now the “last ID
number received.”
Page 79

78 Trunked Radio Features Operation
2
ABC
1
3
DEF
6
MNO
5
JKL
4
GHI
7
PRS
8
TUV
9WXY
0
HOME
1
2
ABC
3
DEF
2
ABC
1
3
DEF
6
MNO
5
JKL
4
GHI
7
PRS
8
TUV
9WXY
0
HOME
(cont.)
Trunked Enhanced Private Conversation™ Call
Operation
Enhanced Calling the Last ID Number Transmitted
or Received
1. To call the last ID number transmitted or received,
press the right arrow key ( ) until “CALL” appears
on the display.
Note: Alternatively press the call encode button if
the radio is so programmed.
2. Press the key below “CALL.” The display changes to
show the last ID number transmitted or received.
3. Press the PTT switch; the ID number is
transmitted. If the radio you are calling is on the
air, you will hear telephone-type ringing for 20
seconds, or until the called radio answers the call.
Note: If the radio you are calling
is not in service
,
you will not hear the ringing and the display will
show "NO ACK". Go to step 6 to hang up.
4a. If the party you are calling
does not answer
the call
within twenty seconds, the display will show “NO
ANSWER”; the telephone ringing will stop and an
alert tone will sound. At this point you can either
send a Call Alert™ page (go to step 1 of “Leaving a
Call Alert Page When the Called Party Does Not
Answer the Private Conversation Call”), or go to
step 6 of this procedure to hang up.
or
4b. If the par ty you are calling
you will hear his/her voice.
5. Press the PTT switch to carry on a Private
does answer
the call,
Conversation with the called person.
6. When you have finished your conversation, or if
the radio you are calling does not answer or is not
in service, press the HOME key to hang up; the
radio will return to the home display.
Page 80

79 Trunked Radio Features Operation
2
ABC
1
3
DEF
6
MNO
5
JKL
4
GHI
7
PRS
8
TUV
9WXY
0
HOME
1
2
ABC
3
DEF
1
3
DEF
6
MNO
8
TUV
9WXY
0
HOME
2
ABC
5
JKL
4
GHI
7
PRS
(cont.)
Trunked Enhanced Private Conversation™ Call
Operation
Direct Entry of the ID Number to be Called
1. To directly enter the ID number to be called, press
the right arrow key ( ) until “CALL” appears on
the display.
Note: If your radio has been so programmed, you
can press the call button for quick access to the
Private Conversation feature. This will take you
directly to the “last ID number transmitted or
received” display shown in step 2; skip to step 3.
2. Press the key below “CALL.” The display changes
to show the last ID number transmitted or
received. You can now enter the ID number to be
called.
3. Enter the new six-digit ID number from the keypad.
On the display, the old ID number disappears and
the new digits appear as they are being entered.
The cursor flashes to indicate the location of the
next number to be entered.
Notes:
• If fewer than six digits are entered and the
PTT switch is pressed, you will hear a badkeypress tone and the display will show
"INVALID ENTRY". A bad-keypress tone will
also be heard if you try to enter a seventh
digit.
• Once you have started entering numbers, the
left arrow ( ) key will function as a backspace
key. Pressing this key will cause the last digit
entered to be erased, and the cursor to move
to the left. When the last digit has been
erased, an additional press of this key will
cause the last member of the preprogrammed
Private Conversation list to be displayed;
Pressing the right arrow key will show the first
member of the list.
Page 81

80 Trunked Radio Features Operation
2
ABC
1
3
DEF
6
MNO
5
JKL
4
GHI
7
PRS
8
TUV
9WXY
0
HOME
(cont.)
Trunked Enhanced Private Conversation™ Call
Operation
4. Press the PTT switch; the new ID number is
transmitted. If the radio you are calling is on the
air, you will hear a telephone-type ringing for 20
seconds, or until the called radio answers the call.
Note: If the radio you are calling
you will not hear the ringing and the display will
show "NO ACK". Go to step 7 to hang up.
5a. If the party you are calling
within twenty seconds, the display will show “NO
ANSWER”; the telephone ringing will stop and an
alert tone will sound. At this point you can either
send a Call Alert™ page (go to step 1 of “Leaving a
Call Alert Page When the Called Party Does Not
Answer the Private Conversation Call”), or go to
step 7 of this procedure to hang up.
or
5b. If the par ty you are calling
you will hear his/her voice.
6. Press the PTT switch to carry on a Private
Conversation with the called person.
7. When you have finished your conversation, or if
the radio you are calling does not answer or is not
in service, press the HOME key to hang up; the
radio will return to the home display.
is not in service
does not answer
does answer
the call
the call,
,
Page 82
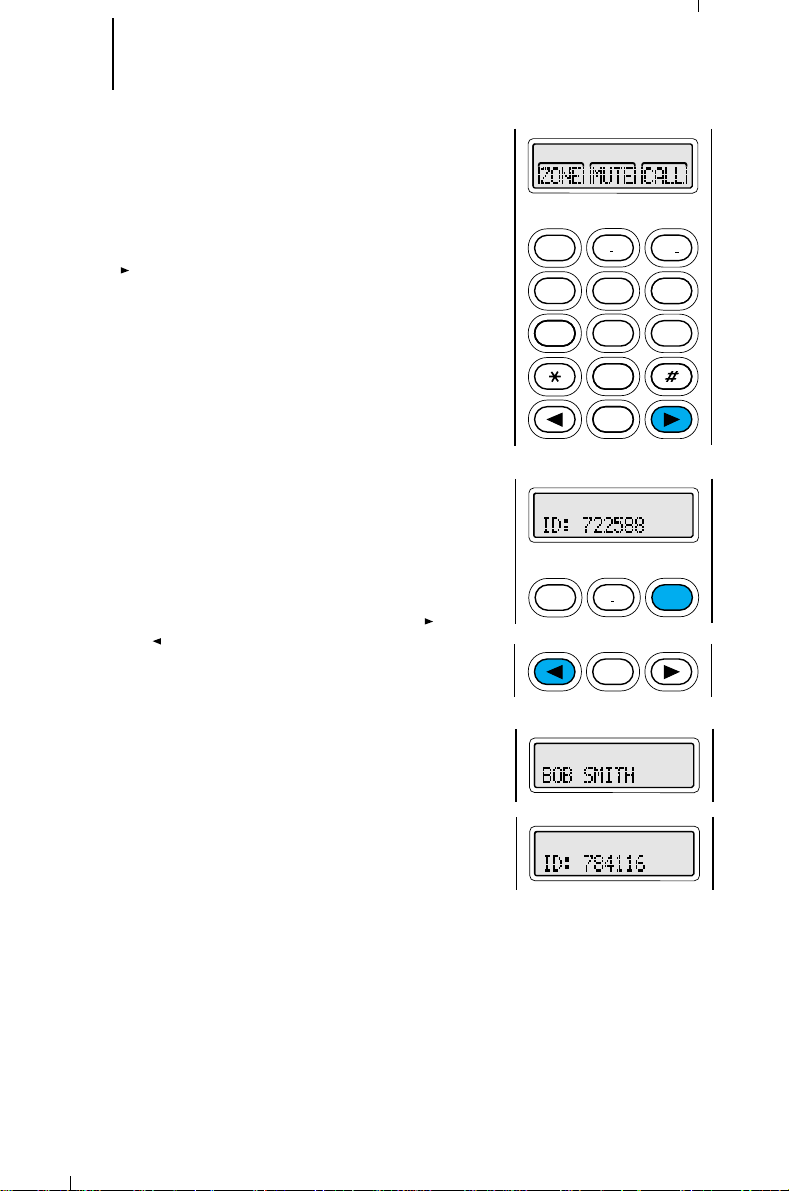
81 Trunked Radio Features Operation
2
ABC
1
3
DEF
6
MNO
5
JKL
4
GHI
7
PRS
8
TUV
9WXY
0
HOME
1
2
ABC
3
DEF
HOME
(cont.)
Trunked Enhanced Private Conversation™ Call
Operation
Scrolling to an ID Number in the Call List
1. To scroll to an ID number to be called from the
preprogrammed call list, press the right arrow key
( ) until “CALL” appears on the display.
Note: The same list is shared by both Private
Conversation and Call Alert features.
Note: If your radio has been so programmed, you
can press the call button for quick access to the
Private Conversation feature. This will take you
directly to the “last ID number transmitted or
received” display shown in step 2; skip to step 3.
2. Press the key below “CALL.” The display changes
to show the last ID number transmitted or
received. You can now select an ID number from
the list.
3. To enter the list, press either the right ( ) or the
left ( ) arrow key. The right arrow key will take
you forwards to the first or next member of the
list; the left arrow key will take you backwards to
the last or previous member of the list.
Note: The last member of the list will be the “last
ID transmitted or received.” This member can also
be found at location “OO” in the list (see “Calling an
ID Number at a Location in the Call List”).
4. When you stop on a member of the list, the display
will alternate between showing the member’s name
and ID number.
Page 83

82 Trunked Radio Features Operations
2
ABC
1
3
DEF
6
MNO
5
JKL
4
GHI
7
PRS
8
TUV
9WXY
0
HOME
(cont.)
Trunked Enhanced Private Conversation™ Call
Operation
5. When you have selected the member you wish to
call, press the PTT switch. The display freezes to
show the selected member’s name, and the
member’s ID number is transmitted. If the radio
you are calling is on the air, you will hear a
telephone-type ringing for 20 seconds, or until the
called radio answers the call.
Note: If the radio you are calling
you will not hear the ringing and the display will
show "NO ACK". Go to step 8 to hang up.
6a. If the party you are calling
within twenty seconds, the display will show “NO
ANSWER”; the telephone ringing will stop and an
alert tone will sound. At this point you can either
send a Call Alert™ page (go to step 1 of “Leaving a
Call Alert Page When the Called Party Does Not
Answer the Private Conversation Call”), or go to
step 8 of this procedure to hang up.
or
6b. If the par ty you are calling
you will hear his/her voice.
7. Press the PTT switch to carry on a Private
Conversation with the called person.
8. When you have finished your conversation, or if
the radio you are calling does not answer or is not
in service, press the HOME key to hang up; the
radio will return to the home display.
is not in service
does not answer
does answer
the call
the call,
,
Page 84

83 Trunked Radio Features Operations
2
ABC
1
3
DEF
6
MNO
5
JKL
4
GHI
7
PRS
8
TUV
9WXY
0
HOME
1
2
ABC
3
DEF
HOME
2
ABC
3
DEF
1
(cont.)
Trunked Enhanced Private Conversation™ Call
Operation
Calling an ID Number at a Location in the Call List
1. You can also private call an ID number at a
particular location in the preprogrammed call list
(for example, the fifth location in the list would be
position “5”). To do this, press the right arrow key
( ) until “CALL” appears on the display.
Note: If your radio has been so programmed, you
can press the call button for quick access to the
Private Conversation feature. This will take you
directly to the “last ID number transmitted or
received” display shown in step 2; skip to step 3.
Note: The same list is shared by both Private
Conversation and Call Alert features.
2. Press the key below “CALL.” The display changes
to show the last ID number transmitted or
received. You can now select an ID number from
the list.
3. Enter the list by pressing either the right ( ) or
the left ( ) arrow key. The right arrow key will take
you forwards to the first or next member of the
list; the left arrow key will take you backwards to
the last or previous member of the list.
Note: The last member of the list will also be the
“last ID transmitted or received” at position “OO” in
the list.
4. Enter the first digit of the location number.
a. If there are fewer than 10 members in the
list, the radio goes immediately to that position
in the list, and the display alternates between
showing that list member’s name and ID
number. Go directly to step 7.
b. If there are 10 or more members in the list,
the display changes to show “ID LOC#X_”
(where X is the first digit). The cursor will flash
to show the location of the second digit.
Continue with step 5.
Page 85

84 Trunked Radio Features Operations
2
ABC
1
3
DEF
6
MNO
5
JKL
4
GHI
7
PRS
8
TUV
9WXY
0
HOME
(cont.)
Trunked Enhanced Private Conversation™ Call
Operation
5. Enter the second digit of the location number.
6. Then, the radio goes to that position in the list, and
the display alternates between showing that list
member’s name and ID number.
Note: If you enter a location number that does not
exist (for example, “24”), the display will show
“INVALID ENTRY,” and the radio will sound an
invalid-keypress tone and return back to step 4 of
this procedure. Continue from this point.
7. To make the call, press the PTT switch. The display
freezes to show the selected member’s name, and
the member’s ID number is transmitted. If the
radio you are calling is on the air, you will hear a
telephone-type ringing for 20 seconds, or until the
called radio answers the call.
Note: If the radio you are calling
you will not hear the ringing and the display will
show “NO ACK.” Go to step 10 to hang up.
8a. If the party you are calling
within twenty seconds, the display will show “NO
ANSWER”; the telephone ringing will stop and an
alert tone will sound. At this point you can either
send a Call Alert™ page (go to step 1 of “Leaving a
Call Alert Page When the Called Party Does Not
Answer the Private Conversation Call”), or go to
step 10 of this procedure to hang up.
or
8b. If the party you are calling
you will hear his/her voice.
9. Press the PTT switch to carry on a Private
Conversation with the called person.
10. When you have finished your conversation, or if
the radio you are calling does not answer or is not
in service, press the HOME key to hang up; the
radio will return to the home display.
is not in service
does not answer
does answer
,
the call
the call,
Page 86

85 Trunked Radio Features Operations
(cont.)
Trunked Enhanced Private Conversation™ Call
Operation
Leaving a Call Alert Page When the Called Party
Does Not Answer the Private Conversation Call
1. If the party you are private calling
the call within twenty seconds, the display will show
“NO ANSWER”; the telephone ringing will stop and
an alert tone will sound. At this point you can send
a Call Alert™ page to the party you are calling. This
will leave your radio’s ID number with the called
radio so that you can be called back later.
2. Press the PTT switch to send the Call Alert page.
You will hear five beeps, indicating that the system
has received your ID number and the radio you are
calling is on the air.
3. Press the HOME key and the radio will return to
the home display
Note: Once engaged in a private conversation, if the
radio is left idle for more than one minute, a momentary
warning alert will sound every six seconds to remind you
that dispatch calls are not being heard. After two
minutes, a permanent invalid mode tone will be heard.
does not answer
Page 87

86 Trunked Radio Features Operations
2
ABC
1
3
DEF
6
MNO
5
JKL
4
GHI
7
PRS
8
TUV
9WXY
0
HOME
(cont.)
Trunked Private Conversation™ I and II Call
Operation
The Private Conversation feature allows you to
carry on a conversation that is heard only by the two
parties involved. With Private Conversation, the radio
being called can also view the calling radio's ID number
before answering.
Note: When you are making a call, transmit
operation will be controlled by the position of the two-
position concentric switch. You
from SECURENET operation to clear operation,
not
from clear to SECURENET, during the call.
Answering a Private Conversation Call
1. When your radio receives a Private Conversation
call, you will hear two alert tones, the display will
show “CALL RECEIVED”, and you will hear the
caller.
2. Press the call response button or the call button
(both programmed through the RSS). The display
will show the incoming caller’s ID number or
"RECEIVED ID", and the call received annunciator
will turn off. After viewing the caller’s ID number,
you can decide to either talk privately (go to step
3), or not answer the call.
Note: If you press the PTT switch before you press
the call response button, the response will be
transmitted to everyone in the talkgroup (see
dispatch mode operation).
3. If you decide to answer the call, press the PTT
switch to carry on a Private Conversation with the
caller. The caller’s ID number will remain on the
display for the duration of the call.
Note: If the system is busy when you attempt to
answer the call, a busy tone sounds. When a mode
becomes available, you will receive a call back tone
and your radio automatically keys up for three
seconds so that you can begin talking.
4. When you have finished your conversation, press
the HOME key to hang up; the radio will return to
the home display.
will be able
to change
but
Page 88

87 Trunked Radio Features Operations
(cont.)
Trunked Private Conversation™ I and II Call
Operation
Viewing and Storing the Incoming ID Number
Without Responding to the Call
1. When your radio receives a Private Conversation
call, you will hear two alert tones. The display will
show "CALL RECEIVED" for two seconds. The
green LED and the call received status annunciator
will flash to indicate that a call is being received.
2. Press the call response button or the call button
(both programmed through the RSS). The display
will show the incoming caller’s ID number or
"RECEIVED ID", and the call received annunciator
will turn off.
3. Press the call response button again. The caller’s
ID number will be stored and the radio will return
to the home display.
Note: The stored ID number is now the “last ID
number received.”
Page 89

88 Trunked Radio Features Operations
2
ABC
1
3
DEF
6
MNO
5
JKL
4
GHI
7
PRS
8
TUV
9WXY
0
HOME
1
2
ABC
3
DEF
2
ABC
1
3
DEF
6
MNO
5
JKL
4
GHI
7
PRS
8
TUV
9WXY
0
HOME
(cont.)
Trunked Private Conversation™ I and II Call
Operation
Calling the Last ID Number Transmitted or
Received
1. To call the last ID number transmitted or received,
press the right arrow key ( ) until “CALL” appears
on the display.
Note: If your radio has been so programmed, you
can press the call button for quick access to the
Private Conversation feature. This will take you
directly to the “last ID number transmitted or
received” display shown in step 2; skip to step 3.
2. Press the key below “CALL.” The display changes to
show the last ID number transmitted or received.
3. Pause for a second to allow the alert tone to sound
in the receiving radio, then begin talking.
4a. If the party you are calling
press the HOME key to exit the Private
Conversation feature. You may then enter the Call
Alert feature to leave a permanent page with the
radio.
or
4b. If the par ty you are calling
you will hear his/her voice.
5. Press the PTT switch to carry on a Private
Conversation with the called person.
6. When you have finished your conversation, or if
the radio you are calling does not answer or is not
in service, press the HOME key to hang up; the
radio will return to the home display.
does not respond
does answer
the call,
, then
Page 90

89 Trunked Radio Features Operations
2
ABC
1
3
DEF
6
MNO
5
JKL
4
GHI
7
PRS
8
TUV
9WXY
0
HOME
1
2
ABC
3
DEF
1
3
DEF
6
MNO
8
TUV
9WXY
0
HOME
2
ABC
5
JKL
4
GHI
7
PRS
(cont.)
Trunked Private Conversation™ I and II Call
Operation
Direct Entry of the ID Number to be Called
1. To directly enter the ID number to be called, press
the right arrow key ( ) until “CALL” appears on
the display.
Note: If your radio has been so programmed, you
can press the call button for quick access to the
Private Conversation feature. This will take you
directly to the “last ID number transmitted or
received” display shown in step 2; skip to step 3.
2. Press the key below “CALL.” The display changes
to show the last ID number transmitted or
received. You can now enter the ID number to be
called.
3. Enter the new six-digit ID number from the keypad.
On the display, the old ID number disappears and
the new digits appear as they are being entered.
The cursor flashes to indicate the location of the
next number to be entered.
Notes:
• If fewer than six digits are entered and the
PTT switch is pressed, you will hear a badkeypress tone. A bad-keypress tone will also
be heard if you try to enter a seventh digit.
• Once you have started entering numbers, the
left arrow ( ) key will function as a backspace
key. Pressing this key will cause the last digit
entered to be erased, and the cursor to move
to the left. When the last digit has been
erased, an additional press of this key will
cause the last member of the preprogrammed
Private Conversation list to be displayed;
Pressing the right arrow key will show the first
member of the list.
Page 91

90 Trunked Radio Features Operations
2
ABC
1
3
DEF
6
MNO
5
JKL
4
GHI
7
PRS
8
TUV
9WXY
0
HOME
(cont.)
Trunked Private Conversation™ I and II Call
Operation
4. Press the PTT switch. Pause for a second to allow
the alert tone to sound in the receiving radio, then
begin talking.
5a. If the party you are calling
press the HOME key to exit the Private
Conversation feature. You may then enter the Call
Alert feature to leave a permanent page with the
radio.
or
5b. If the par ty you are calling
you will hear his/her voice.
6. Press the PTT switch to carry on a Private
Conversation with the called person.
7. When you have finished your conversation, or if
the radio you are calling does not answer or is not
in service, press the HOME key to hang up; the
radio will return to the home display.
does not respond
does answer
the call,
, then
Page 92

91 Trunked Radio Features Operations
2
ABC
1
3
DEF
6
MNO
5
JKL
4
GHI
7
PRS
8
TUV
9WXY
0
HOME
1
2
ABC
3
DEF
HOME
(cont.)
Trunked Private Conversation™ I and II Call
Operation
Scrolling to an ID Number in the Call List
1. To scroll to an ID number to be called from the
preprogrammed call list, press the right arrow key
( ) until “CALL” appears on the display.
Note: If your radio has been so programmed, you
can press the call button for quick access to the
Private Conversation feature. This will take you
directly to the “last ID number transmitted or
received” display shown in step 2; skip to step 3.
Note: The same list is shared by both Private
Conversation and Call Alert features.
2. Press the key below “CALL.” The display changes
to show the last ID number transmitted or
received. You can now select an ID number from
the list.
3. To enter the list, press either the right ( ) or the
left ( ) arrow key. The right arrow key will take
you forwards to the first or next member of the
list; the left arrow key will take you backwards to
the last or previous member of the list.
Note: The last member of the list will be the “last
ID transmitted or received.” This member can also
be found at location “OO” in the list (see “Calling an
ID Number at a Location in the Call List”).
4. When you stop on a member of the list, the display
will alternate between showing the member’s name
and ID number.
Page 93

92 Trunked Radio Features Operations
2
ABC
1
3
DEF
6
MNO
5
JKL
4
GHI
7
PRS
8
TUV
9WXY
0
HOME
(cont.)
Trunked Private Conversation™ I and II Call
Operation
5. When you have selected the member you wish to
call, press the PTT switch. The display freezes to
show the selected member’s name, and the
member’s ID number is transmitted. Pause for a
second to allow the alert tone to sound in the
receiving radio, then begin talking.
6a. If the party you are calling
press the HOME key to exit the Private
Conversation feature. You may then enter the Call
Alert feature to leave a permanent page with the
radio.
or
6b. If the par ty you are calling
you will hear his/her voice.
7. Press the PTT switch to carry on a Private
Conversation with the called person.
8. When you have finished your conversation, or if
the radio you are calling does not answer or is not
in service, press the HOME key to hang up; the
radio will return to the home display.
does not respond
does answer
the call,
, then
Page 94

93 Trunked Radio Features Operation
2
ABC
1
3
DEF
6
MNO
5
JKL
4
GHI
7
PRS
8
TUV
9WXY
0
HOME
1
2
ABC
3
DEF
HOME
2
ABC
3
DEF
1
(cont.)
Trunked Private Conversation™ I and II Call
Operation
Calling an ID Number at a Location in the Call List
1. You can also call an ID number at a particular
location in the preprogrammed call list (for
example, the fifth location in the list would be
position “5”). To do this, press the right arrow key
( ) until “CALL” appears on the display.
Note: If your radio has been so programmed, you
can press the call button for quick access to the
Private Conversation feature. This will take you
directly to the “last ID number transmitted or
received” display shown in step 2; skip to step 3.
Note: The same list is shared by both Private
Conversation and Call Alert features.
2. Press the key below “CALL.” The display changes
to show the last ID number transmitted or
received. You can now select an ID number from
the list.
3. Enter the list by pressing either the right ( ) or
the left ( ) arrow key. The right arrow key will take
you forwards to the first or next member of the
list; the left arrow key will take you backwards to
the last or previous member of the list.
Note: The last member of the list will also be the
“last ID transmitted or received” at position “OO” in
the list.
4. Enter the first digit of the location number.
a. If there are fewer than 10 members in the
list, the radio goes immediately to that position
in the list, and the display alternates between
showing that list member’s name and ID
number. Go directly to step 7.
b. If there are 10 or more members in the list,
the display changes to show “ID LOC#X_”
(where X is the first digit). The cursor will flash
to show the location of the second digit.
Continue with step 5.
Page 95

94 Trunked Radio Features Operation
2
ABC
1
3
DEF
6
MNO
5
JKL
4
GHI
7
PRS
8
TUV
9WXY
0
HOME
(cont.)
Trunked Private Conversation™ I and II Call
Operation
5. Enter the second digit of the location number.
6. Then, the radio goes to that position in the list, and
the display alternates between showing that list
member’s name and ID number.
Note: If you enter a location number that does not
exist (for example, “24”), the display will show
“INVALID ENTRY,” and the radio will sound an
invalid-keypress tone and return back to step 4 of
this procedure. Continue from this point.
7. To make the call, press the PTT switch. The display
freezes to show the selected member’s name, and
the member’s ID number is transmitted. Pause for
a second to allow the alert tone to sound in the
receiving radio, then begin talking.
8a. If the party you are calling
does not respond
, then
press the HOME key to exit the Private
Conversation feature. You may then enter the Call
Alert feature to leave a permanent page with the
radio.
or
8b. If the party you are calling
does answer
the call,
you will hear his/her voice.
9. Press the PTT switch to carry on a Private
Conversation with the called person.
10. When you have finished your conversation, or if
the radio you are calling does not answer or is not
in service, press the HOME key to hang up; the
radio will return to the home display.
Page 96

95 Trunked Radio Features Operation
(cont.)
Call Alert™ Page Operation
The Call Alert page feature lets your radio function
like a pager (beeper). Depending upon how it is
programmed by the RSS, the radio can receive and
respond to pages from other radios, and send pages to
them.
Answering a Call Alert Page
1. When a Call Alert page is being received, you will
hear a recurring four-beep tone until you answer
the call or reset the radio. The display will alternate
between showing the current talkgroup and “PAGE
RECEIVED.” The green LED and the call received
status annunciator will flash.
Note: Any button press, keypad press, or mode
change will turn the Call Alert audible and visual
indicators off.
2. To answer the page, press the PTT switch. The
display will show the current talkgroup constantly;
the audible alert and the LED and call received
annunciator will turn off. The ID number of the
radio that paged you is stored as “the last ID
number received.”
3. Carry on with your conversation in the normal
manner; all members of your talkgroup will hear
your response. Press the PTT switch to talk;
release the switch to listen.
Page 97

96 Trunked Radio Features Operation
2
ABC
1
3
DEF
6
MNO
5
JKL
4
GHI
7
PRS
8
TUV
9WXY
0
HOME
(cont.)
Call Alert Page Operation (cont.)
Answering a Call Alert Page With an Enhanced
Private Conversation Call (900 MHz Only)
1. When a Call Alert page is being received, you will
hear a recurring four-beep tone until the call is
answered or the radio is reset. The display will
alternate between showing the current talkgroup
and “PAGE RECEIVED.” The green LED and the call
received status annunciator will flash to indicate
that a page is being received.
Note: Any button press, keypad press, or mode
change except for the light button or volume
control will turn the Call Alert audible and visual
indicators off.
2. Press the call response button or the call button
(both programmed via the RSS), or press the right
arrow key until the display shows “CALL,” then
press the key below “CALL.” The display will show
the ID number of the radio that paged you.
3. Press the PTT switch to transmit the ID number. If
the radio you are calling is on the air, you will hear
telephone-type ringing for 20 seconds, or until the
radio you are calling answers the call. The ID
number of the calling radio is stored as the “last ID
number transmitted or received.”
Note: If the radio you are calling
is not in service
you will not hear the ringing. Go to step 6 of this
procedure to hang up.
4a. If the party you are calling
does not answer
within 20 seconds, the display will show “NO
ACKNOWLEDGE”; the ringing will stop and an alert
tone will sound. Go to step 6 of this procedure to
hang up.
or
4b. If the party you are calling
does answer
you will hear his/her voice.
5. Press the PTT switch to carry on a Private
Conversation will the called person
6. When you have finished your conversation, or if the
radio you are calling does not answer or is not in
service, press the HOME key or the page button
(normally side button 2) to hang up. The radio will
return to the home display.
,
the call
the call,
Page 98

97 Trunked Radio Features Operation
2
ABC
1
3
DEF
6
MNO
5
JKL
4
GHI
7
PRS
8
TUV
9WXY
0
HOME
(cont.)
Call Alert Page Operation (cont.)
Answering a Call Alert Page With a Private
Conversation II Call (800 MHz Only)
1. When a Call Alert page is being received, you will
hear a recurring four-beep tone until the call is
answered or the radio is reset. The display will
alternate between showing the current talkgroup
and “PAGE RECEIVED.” The green LED and the call
received status annunciator will flash to indicate
that a page is being received.
Note: Any button press, keypad press, or mode
change (except for the light button or volume
control) will turn the Call Alert audible and visual
indicators off.
2. Press the call response button or the call button
(both programmed via the RSS), or press the right
arrow key until the display shows “CALL,” then
press the key below “CALL.” The display will show
the ID number of the radio that paged you.
3. Press the PTT switch to transmit the ID number.
The ID number of the calling radio is stored as the
“last ID number received.”
4a. If the par ty you are calling
does not answer
call, go to step 6 of this procedure to hang up.
or
4b. If the par ty you are calling
does answer
you will hear his/her voice.
5. Press the PTT switch to carry on a Private
Conversation with the called person.
6. When you have finished your conversation, or if the
radio you are calling does not answer, press the
HOME key or the page button to hang up. The
radio will return to the home display.
the
the call,
Page 99

98 Trunked Radio Features Operation
2
ABC
1
3
DEF
6
MNO
5
JKL
4
GHI
7
PRS
8
TUV
9WXY
0
HOME
3
DEF
2
ABC
1
2
ABC
1
3
DEF
6
MNO
5
JKL
4
GHI
7
PRS
8
TUV
9WXY
0
HOME
(cont.)
Call Alert Page Operation (cont.)
Sending a Call Alert to the Last ID Number
Transmitted or Received
1. To send a Call Aler t to the last ID number
transmitted or received, press the right arrow key
( ) until “PAGE” appears on the display
Note: If your radio has been so programmed, you
can press the page button for quick access to the
Call Alert feature. This will take you directly to the
“last ID number transmitted or received” display
shown in step 2; skip to step 3.
2. Press the key below “PAGE.” The display shows the
last ID number transmitted or received.
3. Press the PTT switch to send the ID number.
4a.
If you hear one beep
, the ID number has been
received by the system, but the radio you are
paging is not on the air; your radio remains in the
Call Alert mode. You can either go back to step 3
and press the PTT switch to send the ID number
again, or press the HOME key to hang up and
return to the home display.
Note: If after six seconds the called radio fails to
acknowledge the alert, a low-pitched alert tone
sounds and the display changes to "NO
ACKNOWLEDGE". Try again or press the HOME
key to exit
or
4b.
If you hear five beeps
received by the system, and the radio you are
paging is on the air and has received your page.
The radio automatically returns to the home
display.
, the ID number has been
Page 100

99 Trunked Radio Features Operation
2
ABC
1
3
DEF
6
MNO
5
JKL
4
GHI
7
PRS
8
TUV
9WXY
0
HOME
3
DEF
2
ABC
1
1
3
DEF
6
MNO
8
TUV
9WXY
0
HOME
2
ABC
5
JKL
4
GHI
7
PRS
(cont.)
Call Alert Page Operation (cont.)
Direct Entry of the ID Number to be Call Alert
Paged
1. To directly enter the ID number to be Call Alert
paged, press the right arrow key ( ) until “PAGE”
appears on the display.
Note: If your radio has been so programmed, you
can press the page button for quick access to the
Call Alert feature. This will take you directly to the
“last ID number transmitted or received” display
shown in step 2; skip to step 3.
2. Press the key below “PAGE.” The display changes
to show the last ID number transmitted or
received. You can now enter the ID number to be
paged.
3. Enter the new six-digit ID number from the keypad.
On the display, the old ID number disappears and
the new digits appear as they are being entered.
The cursor flashes to indicate the location of the
next number to be entered.
Notes:
• If fewer than six digits are entered and the
PTT switch is pressed, you will hear a badkeypress tone. A bad-keypress tone will also
be heard if you try to enter a seventh digit.
• Once you have started entering numbers, the
left arrow key ( ) will function as a
backspace key. Pressing this key will cause the
last digit entered to be erased, and the cursor
to move to the left. When the last digit has
been erased, an additional press of this key
will cause the last member of the
preprogrammed call list to be displayed;
pressing the right arrow key will show the first
member of the list.
 Loading...