


T
able of Contents
INTRODUCTION...............................................................................1
ADVANCED FEATURE PORTABLE ...............................................2
ADVANCED FEATURES (L3000E)..................................................4
Multi-Simultameous T alkgroup Scan..........................................4
Entering Group Mode...........................................................4
Initiating a Group Call..........................................................5
Responding to a Secondary Talkgroup.................................6
Turning Scan On and Off......................................................7
Talkgroup Mode Selection by Direct Entry..........................7
Talkgroup Mode Selection by Memory Scroll .....................8
Emergency Group Call ................................................................9
Placing an Emergency Group Call........................................9
Cancelling an Emergency Group Call..................................9
Receiving an Emergency Group Call...................................10
Receiver Operations During an Emergency Call..................10
Status Message.............................................................................11
Entering the Status Message Function..................................11
Selecting a Status Message with Direct Entry......................11
Selecting a Status Message Using Memory Scroll...............12
Selecting a Target by Direct Entry........................................12
Selecting a Target by Memory Scroll ...................................12
Selecting a Target by Alpha Search ......................................13
Sending a Status Message.....................................................13
Exiting the Status Message Function....................................14
Receiving a Status Message..................................................14
ID List Programming............................................................14
Isolated Site Operation.................................................................15
Entering ISO.........................................................................15
Initiating a Group Call..........................................................16
Exiting ISO...........................................................................16
Other Operations...................................................................17
TROUBLESHOOTING......................................................................18
SAFETY AND GENERAL INFORMATION....................................20
Cleaning Instructions...................................................................24
For Further Information...............................................................24
-1

INTRODUCTION
This manual (L3000E) is a supplement to the Motorola Digital
Communicator L3000 User’s Guide. It explains advanced features
that are available on your portable.
This manual explains how the radio works when it ships from the
factory. Many features are programmable by your organization. Be
sure to refer to your organization’s instructions to find out the differences.
This Supplement explains the following Advanced Dispatch Features:
Multi-Simultaneous Talkgroup Scan
This feature allows you to monitor more than one talkgroup within
your fleet.
Status Message
Status Message - Allows you to send a Status Message to the dispatcher, or to the target ID of your choice. Status Messages like “AT
LUNCH” and “EN ROUTE” can be programmed and sent. Up to
10 named (aliased) Status Messages are available per unit.
Emergency Group Call
Emergency Group Call - Provides priority access to talkgroup members, and provides visible and audible indications of an emergency
condition. The emergency call will take place on a pre-programmed
emergency talkgroup or the last selected talkgroup (depending on
how the portable is programmed).
Isolated Site Operation (ISO)
ISO allows you to continue group call communications within a single cell site when connectivity to the network is lost. This feature
does this by allowing the cell to operate in a local, one cell only
mode.
1
ADV
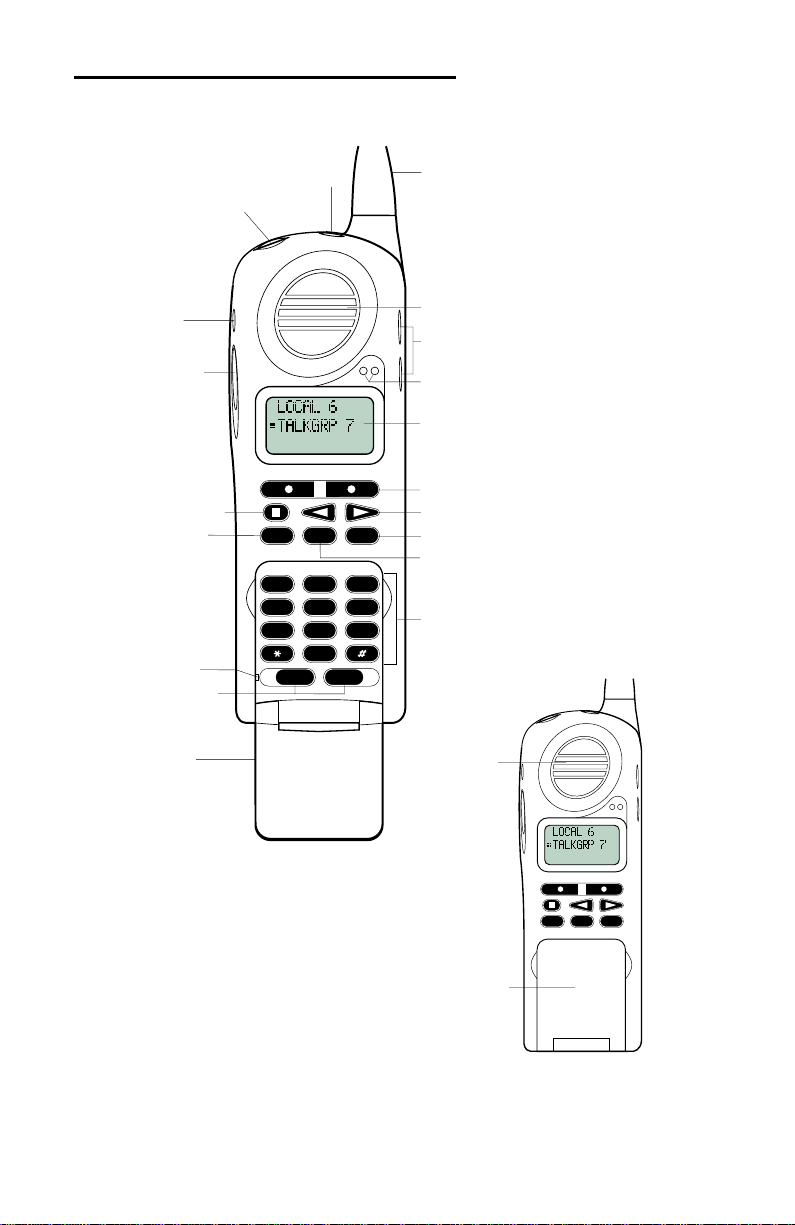
ANCED FEATURE PORTABLE
19. Emergency Key
18. Power (On/Off) Key
17. Mute Key
16. Push-To-Talk
(PTT) Button
15. Active-Line Key
14. Phone Mode
Key
13. Microphone
12. Phone Control
Keys
PHONE GROUP PRVT
ABC3DEF
QZ
12
JKL
GHI
4
PRS8TUV9WXY
7
SEND END
6
5
0
MNO
1. Antenna
2. Earpiece
3. Volume Control Keys
4. Status Indicators
5. Alphanumeric Display
6. Option Keys
7. Directional Keys
8. Private Mode Key
9. Group Mode Key
10. Alphanumeric Keypad
11. Flip (Open)
2
20. Speaker
PHONE GROUP PRVT
11. Flip (Closed)

1. Antenna
2. Earpiece -
When the Flip is open, the earpiece is used for listening
during low-audio communication.
3. Volume Control Keys -
Used to adjust volume levels of the ear-
piece, speaker, ringer, keypad, and message notification.
4. Status Indicators -
Solid or blinking lights indicate different conditions that your unit may be in. (See the “Safety and General Information” section of the L3000 User’s Guide for the Status Indicator
Table).
5. Alphanumeric Display -
A three-line display, providing up to 11
characters per line.
6. Option Keys -
Used to select the option that appears directly above
the key on the third line of the display.
7. Directional Keys -
Used to perform Memory, Scrolling, optiona
scrolling, and editing.
8. Private Mode Key -
cation.
9. Group Mode Key -
10. Alphanumeric Keypad -
vice area IDs, talkgroup IDs, phone numbers or names.
11. Flip -
Used to answer and end phone calls. Also used during Radio
Used for one-to-one private radio communi-
Used for one-to-many radio communication.
Used for direct entry of radio IDs, ser-
Operation to swith between high audio levels (Flip closed) and Earpiece audio levels (Flip open).
12. Phone Control Keys -
END
( ) telephone calls.
13. Microphone -
14. Phone Mode Key -
15. Active Line Key -
Used to speak into during communication.
Used for telephone communication.
Used to control the Active Line Indicator ( )
Used to place ( ) or terminate
SEND
that appears on the display.
16. Push-toTalk (PTT) Button -
Used to transmit voice during Group
Calls and Private Conversations. Also used to send Call Alerts.
17. Mute Key -
Used to enable and disable the microphone during telephone calls so that the other party cannot hear you. A solid yellow
status indicator illuminates when the microphone is muted.
18. Power On/Off Key -
19. Emergency Key -
20. Speaker -
When the flip is closed, the speaker is used for listening
Used to turn the portable unit on and off.
Used to make emergency group calls.
during high-audio radio communication.
3

ADV
GROUP
LLLLOOOOCCCCAAAALLLL 11
11
3333::::EEEElllleeeeccccttttrrrriiiiccccii
ii
ANCED FEATURES (L3000E)
The L3000E is provided with an advanced feature set as described
in this section. Additionally, the L3000E has 4.8 kbs data functionality and can initiate and receive data calls. For a complete description of these functions please refer to te Circuit Data User’s Guide
(publication number 68P81084C18).
Multi-Simultaneous T
alkgroup Scan
Multi-Simultaneous Talkgroup Scan (Scan) allows users within a
fleet to monitor more than one talkgroup. A Talkgroup Mode,
within the range of 1-255, is comprised of up to four talkgroups (one
Primary Talkgroup and up to three Secondary Talkgroups). Calls
can only be initiated on the user’s Primary Talkgroup, however, a
user can respond to an active call on either a Primary or Secondary
Talkgroup. Both Primary and Secondary Talkgroups can be named
(aliased), however, Talkgroup Modes cannot be aliased. The default
setting of the Scan feature is “ON”, but the user has the capability
of disabling Scan through an option key. The unit will store the last
Scan setting, and power on with that setting.
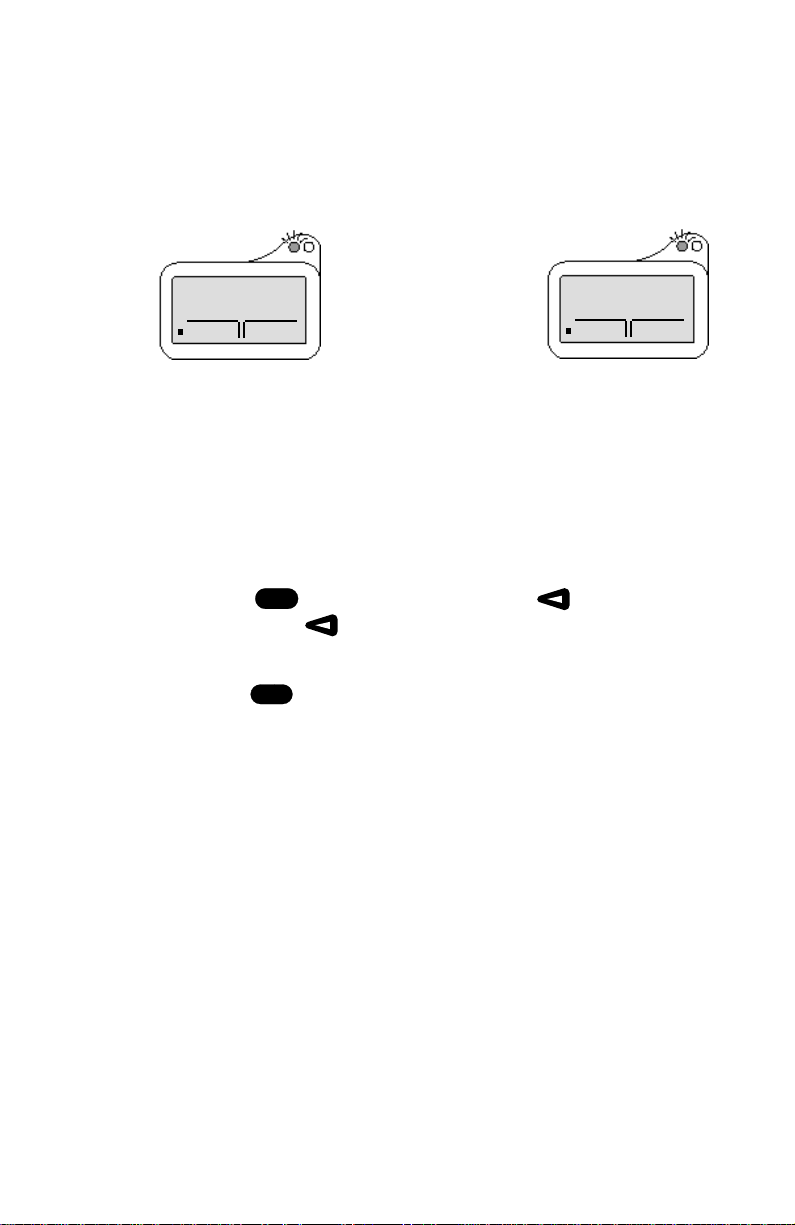
Entering Group Mode
Press the
Group Mode.
Two different Talkgroup Modes are displayed below. The Primary
Talkgroup is indicated to the right of the Talkgroup Mode. The display on the left shows a non-aliased Primary Talkgroup, and the display on the right shows an aliased Primary Talkgroup.
Power key to power on your unit. Press to enter
11
LLLLOOOOCCCCAAAALLLL 11
gg
gg
TT
111155
55
111100002222::::TT
Primary Talkgroup Primary Talkgroup
Not Aliased Aliased
4

Initiating a Group Call
Jason’s Display
LLLLOOOOCCCCAAAALLLL 11
11
3333::::TT
TT
gg
gg
33
33
IIIIDDDD::::FFFFrrrreeeedd
dd
Julie’s Display
LLLLOOOOCCCCAAAALLLL 11
11
1111::::EEEElllleeeeccccttttrrrriiiiccccii
ii
IIIIDDDD::::FFFFrrrreeeedd
dd
Press and hold the PTT button to initiate a
group call on your Primary Talkgroup.
The example to the right illustrates the display if Fred pressed the PTT to initiate a
call on the Electricians talkgroup. This is
11
LLLLOOOOCCCCAAAALLLL 11
3333::::EEEElllleeeeccccttttrrrriiiiccccii
ii
Fred’s Primary Talkgroup for Mode 3.
All subscriber units that have affiliated with
your Primary Talkgroup as either a Primary
Fred’s Display
or Secondary Talkgroup in any Talkgroup
Mode will receive your group call if they are
not already engaged in an active call.
The following screens will be displayed on the receiver subscriber
units indicating they have joined the call. The second line of the
display will indicate the Mode number followed by Primary or Secondary Talkgroup, which may be aliased. The third line of the display indicates the PTT-ID of the unit initiating the group call, which
can also be aliased.
Example: Jason joins the Electricians talkgroup. He has also selected Electricians as
his Primary Talkgroup for Talkgroup 3, but
he has no alias for his talkgroup, so the Talkgroup number (TG ID) is displayed. Fred’s
PTT-ID is displayed on the third line.
Example: Julie joins the call and the unit
updates the alias to indicate active Secondary Talkgroup. (Mode 1, Secondary Talkgroup 3). Fred’s PTT-ID is displayed on the
third line.
5

Responding to a Secondary Talkgroup
Julie’s Display
LLLLOOOOCCCCAAAALLLL 11
11
1111::::EEEElllleeeeccccttttrrrriiiiccccii
ii
Fred’s Display
LLLLOOOOCCCCAAAALLLL 11
11
3333::::EEEElllleeeeccccttttrrrriiiiccccii
ii
IIIIDDDD::::JJJJuuuulllliiiiee
ee
Julie’s Display
LLLLOOOOCCCCAAAALLLL 11
11
3333::::TT
TT
gg
gg
33
33
IIIIDDDD::::FFFFrrrreeeedd
dd
To respond to a call on a Secondary Talkgroup, press the PTT button.
FOR EXAMPLE:
Julie responds to Fred by pressing the PTT
button.
Fred has released his PTT button, then
begins to receive Julie’s response.
Jason receives Julie’s response.
After the Secondary Talkgroup call is completed, all receiving subscriber units’ displays will revert to their Primary Talkgroup of the selected Talkgroup Mode.
6
Turning Scan On and Off
LLLLOOOOCCCCAAAALLLL 11
11
11118888----EEEEnn
nn
gg
gg
iiiinnnneeeeeeeerr
rr
SSSSCCCCAAAANNNN SSSSTTTTSS
SS
Scan Disabled
The capability to turn scan on and off is available as an option key.
Press the “Scan” option key. The unit will affiliate with the selected
mode. Press the “S Off” option key to disable scan.
11
LLLLOOOOCCCCAAAALLLL 11
gg
gg
nn
iiiinnnneeeeeeeerr
SS
rr
11118888::::EEEEnn
SSSS OOOOFFFFFFFF SSSSTTTTSS
Scan Enabled
When Scan is disabled, you will not have access to your Secondary
Talkgroups.
Talkgroup Mode Selection by Direct Entry
You may select a different Talkgroup Mode at any time.
1. Press the key. To erase a digit, press . To clear all dig-
QZ
1
its, press and hold . To return to your previously selected Talkgroup Mode, press the “Cancl” option key.
TUV
2. Press the key.
8
3. Press the PTT button or the “Ok” option key. “Mode 18” will
flash until affiliation is complete. If you selected the Talkgroup
Mode by pressing the PTT button, you will initiate a call on your
Primary Talkgroup.
7

Talkgroup Mode Selection by Memory Scroll
LLLLOOOOCCCCAAAALLLL 11
11
MMMMOOOODDDDEEEE 111188
88
CCCCAAAANNNNCCCCLLLL OOOOKK
KK
The Memory Scroll feature allows you to use the keys to
scroll through memory for Talkgroup Modes.
1. Press . Press and hold this key to
Auto Scroll through your lists more quickly.
2. Press the PTT button or the “Ok” option
key.
Note: To transmit, press the PTT; to listen
only, press “Ok”.
8

Emergency Group Call
EEEEMMMMEEEERRRRGGGGEEEENNNNCCCCYY
YY
1111::::SSSSEEEE PPPPllllaaaannnntt
tt
IIIIDDDD::::JJJJoooohhhhnn
nn
Placing an Emergency Group Call
An Emergency Group Call allows a user to have priority access to his
talkgroup members and provide them visual and audible indications
of an emergency condition. The Emergency call can be placed from
any mode (private, group, phone).
1. Press and hold the Emergency Button. The portable will emit an
emergency start tone to indicate that you have successfully
requested an emergency call.
2. Press the PTT to talk. The currently
selected Talkgroup Mode will be selected
unless your organization preprogrammed an
emergency Talkgroup Mode. If this is the
case, the preprogrammed emergency Talkgroup Mode will flash in the display. The
Talkgroup Mode appears in the second line
of the display as shown.
3. To end an emergency call, press and hold
the Emergency Button for 3 seconds. The
portable will return to the last selected talkgroup. The initiator cannot exit the emergency call without first cancelling the emergency call.
Cancelling an Emergency Group Call
Press the Emergency Button until the unit generates an Emergency
Call Cancel tone. This tone indicates the cancellation has occurred.
The display will return to the non-emergency state.
An emergency call will be cancelled if no talkgroup activity occurs
for 30 seconds. The dispatcher, or any other person provisioned to
cancel an emergency call, can also cancel the emergency call.
9

Receiving an Emergency Group Call
EEEEMMMMEEEERRRR::::555588
88
1111::::SSSSEEEE PPPPllllaaaannnntt
tt
IIIIDDDD::::CCCChhhheeeerrrryyyyll
ll
When an emergency call is initiated, other members of the talkgroup
will be notified of an emergency condition.
The receiving unit will hear an Emergency
Receive Tone, and the receiver’s display will
change to indicate the condition.
The first line of the diplay will indicate the
ID or alias of the person initiating the emergency call. The second line will show you
the Talkgroup Mode and Active Talkgroup
name or number. The third line shows you
the ID or alias of the person who is currently
speaking. The third line will remain blank
when the receiving unit initiates a transmission.
Receiver Operations During an Emergency Call
Other members of the Emergency Group Call can leave the emergency call and change modes (phone, group, private) while involved
in the call.
While listening to the emergency call, the receiving unit will not
receive phone calls, Call Alerts, Message Mails, Status Messages,
Private Calls or other group calls for the duration of the emergency
call.
10

Status Message
SSSSTTTTSSSS MMMMEEEESSSSSSSSAAAAGGGGEE
EE
EEEEnnnn RRRRoooouuuuttttee
ee
EEEEXXXXIIIITTTT TTTTAAAARRRRGGGGTT
TT
SSSSTTTTSSSS MMMMEEEESSSSSSSSAAAAGGGGEE
EE
2222____====AAAAtttt LLLLuuuunnnncccchh
hh
CCCCAAAANNNNCCCCLLLL OOOOKKKK
Status Message lets you send a pre-defined message to the dispatcher or to another user’s ID. Up to 10 pre-defined alphanumeric
Status Messages are available such as “At Lunch” or “En Route”.
You can also send any numeric Status Message from 1-255. A Status
Message can be sent by selecting both the Status Message and target
ID (alias) of the person who is to receive the Status Message. You
can cut talk time to a minimum by sending Status Messages. You
can also leave a Status Message for receivers while they are away
from their portables.
Entering the Status Message Function
1. Press the Status Option Key to get to the Status Message function. You must be in Group or Private Mode to access this function.
The second line of the display shows the
Status Message (alpha or numeric) of the last
successfully sent status.
2. Press Option “Exit” to return to either the
Group or Private mode. Press Option
“Targt” to go to the Target ID selection
screen.
Selecting a Status Message with Direct Entry
Direct Entry allows you to use the keypad to select the message you
want to send. Enter any number from 1-255 to select a Status Message. The number can correspond to one of 10 pre-programmed
alphanumeric status messages or any other numeric Status Message
within the range of 1-255.
1. Press 2.
2. Press “Ok”. Pressing the PTT at this
time will send the message to the last unit to
which you sent a successful message.
3. Press “Targt”.
11

Selecting a Status Message Using Memory Scroll
SSSSTTTTSSSS MMMMEEEESSSSSSSSAAAAGGGGEE
EE
AAAAtttt LLLLuuuunnnncccchh
hh
CCCCAAAANNNNCCCCLLLL OOOOKKKK
SSSSTTTTSSSS TTTTAAAARRRRGGGGEEEETT
TT
5555____====RRRRoooocccchhhheeeellllllllee
ee
CCCCAAAANNNNCCCCLLLL OOOOKKKK
SSSSTTTTSSSS TTTTAAAARRRRGGGGEEEETT
TT
JJJJuuuulllliiiiee
ee
CCCCAAAANNNNCCCCLLLL OOOOKK
KK
You can select Status Messages by using the or keys to
scroll through the 10 named (aliased) Status Messages which you
have programmed.
1. Press until you find the message you
want. In this case we scrolled to the Status
Message “At Lunch”.
2. Press “Ok”.
3. Press “Targt” to select a target for this
message.
Selecting a Target by Direct Entry
1. Enter the numeric ID of the person to
whom you are sending the message.
2. Press “Ok”.
3. Press the PTT to send the message to the
selected ID.
Selecting a Target by Memory Scroll
You can select a target by scrolling through the portable IDs or
aliases by using the keys.
1. Press the key until you find the person to whom you want to send the message.
2. Press “Ok”.
Press the PTT. The display shows the message that has been sent.
12

Selecting a Target by Alpha Search
AAAALLLLPPPPHHHHAAAA::::SSSSTTTTSS
SS
RRRR====RRRRaaaannnndd
dd
yy
yy
CCCCAAAANNNNCCCCLLLL OOOOKK
KK
SSSSTTTTSSSS----SSSSEEEENNNNTT
TT
SSSSUUUUCCCCCCCCEEEESSSSSSSSFFFFUUUULL
LL
TTTTAAAARRRRGGGGEEEETTTT NNNNOOOOTT
TT
AAAAVVVVAAAAIIIILLLLAAAABBBBLLLLEE
EE
You can select a portable ID by selecting the first letter of the name
(alias). If no name is stored under a letter, the unit will automatically
search forward, alphabetically, until the next name is found.
1. Press the “Alpha” key.
2. Press a numeric key. ie: Press
PRS
7
twice to view the names (aliases) that begin
with the letter R.
3. Use either the keys to scroll to
the name (alias) who is to receive the Status
Message.
4. Press PTT.
Sending a Status Message
After selecting both a Status Message and a desired target ID, press
the PTT to send the message. Two high pitched tones will be heard
during transmission.
If successful, two high pitched tones will be
heard to indicate the message was successfully delivered to the target portable.
If unsuccessful, an alert tone will be heard to
indicate that the targeted unit is busy, outof-range, or turned-off.
In either case, the portable will return to the
status screen after 3 seconds.
13

Exiting the Status Message Function
SSSSTTTTSSSS----KKKKeeeellllllllyy
yy
AAAAtttt LLLLuuuunnnncccchh
hh
CCCCLLLLEEEEAAAARRRR
22225555====SSSSTTTTSSSS MMMMEEEESSSSGG
GG
LLLLIIIISSSSTTTT PPPPGGGGMM
MM
EEEEXXXXIIIITTTT OOOOKK
KK
Press any mode key (phone, group, private) to exit the Status Message screen. Pressing the “Exit” option key from the Status Message screen will also allow you to exit the Status Message function.
Receiving a Status Message
The portable will receive a message along
with alert tones. To silence the recurring
alert tones only, press any key except
GROUP
PHONE
, , , or the “Clear” option
PRVT
key.
All calls remain blocked until this
message is cleared.
ID List Programming
Feature menu #25 allows you to program 10
status messages, each up to 11 characters
long.
14

Isolated Site Operation
PPPPHHHHOOOONNNNEEEE----IIIIssssoooofffftt
tt
SSSSPPPPDDDD#### AAAALLLLPPPPHHHHAA
AA
GGGGRRRROOOOUUUUPPPP----IIIIssssoooofffftt
tt
3333::::EEEElllleeeeccccttttrrrriiiiccccii
ii
PPPPRRRRVVVVTTTT----IIIIssssoooofffftt
tt
JJJJuuuulllliiiiee
ee
AAAALLLLEEEERRRRTTTT AAAALLLLPPPPHHHHAA
AA
Isolated Site Operation (ISO) allows group call communications to
continue within a single cell site when connectivity to the network is
lost by allowing the cell to operate in a local, one cell only mode.
ISO is limited to dispatch talkgroup calls only. In Phone and Private
Conversation modes the display will update to include “-Isoft” on
the first line. Talkgroup communications will be limited to only
those units that are connected to the ISO cell, and only on the talkgroup or Talkgroup Mode (depending on Scan setting) that the subscriber unit last used before the cell entered the ISO state.
Entering ISO
The portable will enter the ISO state when its cell becomes isolated
from the network, assuming the portable has no available neighbor
cells. It will display one of the following screens: (while in ISO the
LED indicator is off unless the unit is transmitting. The LED will
be green during those periods).
Phone Mode
Group Call Mode
Private Call Mode
Note: If the portable is powered on in an ISO cell, it will enter the
ISO state if there are no available neighbor cells.
15

Initiating a Group Call
GGGGRRRROOOOUUUUPPPP----IIIIssssoooofffftt
tt
3333::::EEEElllleeeeccccttttrrrriiiiccccii
ii
LLLLOOOOCCCCAAAALLLL 11
11
3333::::EEEElllleeeeccccttttrrrriiiiccccii
ii
If the portable has Scan enabled when the site enters ISO, the portable will be able to initiate a call on its Primary Talkgroup and can
respond to calls started on either the Primary or any Secondary Talkgroup.
The portable will not be able to select a new
Talkgroup Mode while in ISO condition.
If the portable has Scan disabled when the
site enters ISO, the portable will be able to
initiate and respond to calls on the Primary
Talkgroup only.
Exiting ISO
When the cell returns to normal operation, the unit will revert back
to standard operation. The green LED indicator will resume blinking.
If the unit goes out of range of the ISO cell and has no available
neighbor cells, the unit will go out of service.
16

Other Operations
Since the ISO operation is limited to group calls only, any attempts
to communicate in other modes (phone, private, alert, status) will
result in a “Service Not Available” message. However, all other
functions (memory scroll, direct entry, feature menu programming,
etc.) are still operable.
17

TROUBLESHOOTING
You may encounter error messages under certain conditions. For
descriptions of the error messages refer toTable 1. Before
contacting your service provider, note the message and the
conditions under which it appeared.
Table 1:
Error Messages Message Description
Invalid Entry The entered number is not
valid.
Target Not Available The targeted unit of your call
is either busy, out-of-range, or
turned off. Please try again
later.
Target Not Authorized The targeted unit of your call
has not purchased this
service.
Network Trouble The network is experiencing
difficulty. Please try again
later.
Service Out of Order This service is temporarily
not available. Please try again
later.
Target Busy in Dispatch The targeted unit that you
are trying to contact is busy in
a Private Call.
Service Restricted This service has been
restricted by your service
provider or it has not been
purchased.
Service Not Available This feature is not available
on the current network.
System Busy Try Later The system is experiencing
heavy traffic. Please try again
later.
18

Table 1:
Error Messages Message Description
Service Conflict This service cannot be
enabled because an
incompatible service has
already been turned on.
Please Try Again A general error has occurred.
Self Check Error A fault has been detected
with your portable. Should
this error recur, note the error
code and contact your service
provider.
Self Check Fail An operational fault has been
detected with your portable.
Turn your portable off and
contact your service
provider immediately.
19

SAFETY AND GENERAL INFORMATION
IMPORTANT INFORMATION ON SAFE AND EFFICIENT
OPERATION. READ THIS INFORMATION BEFORE USING
YOUR INTEGRATED MULTI-SERVICE PORTABLE RADIO.
For the safe and efficient operation of your radio, observe these
guidelines.
Your radio contains a transmitter and a receiver. When it is ON, it
receives, and also transmits, radio frequency (RF) energy. The
radio operates in the frequency range of 806MHz to 866MHz,
and employs digital modulation techniques. When you use your
radio, the system handling your call controls the power level at
which your radio transmits. The power level may typically vary
over a range from 0.01 of a watt to 0.6 of a watt.
• Exposure to Radio Frequency Energy
In August 1996 the Federal Communications Commission (FCC)
of the United States with its action in Report and Order FCC 96326 adopted an updated safety standard for human exposure to
radio frequency electromagnetic energy emitted by FCC regulated transmitters. In addition, the International Commission on
Non-Ionizing Radiation Protection (ICNRP) has established
standards containing RF exposure guidelines. Motorola iDEN
products comply with these standards.
• Efficient Radio Operation
The following practices will enable your radio to operate at the
lowest power level, consistent with satisfactory call quality.
When placing or receiving a phone call, or using the group or private call functions with the Group/Private Speaker OFF (muted
speaker icon visible in the display), hold the radio as you would a
telephone. Speak directly into the mouthpiece and position the
antenna up and over your shoulder.
When using the radio as a traditional two-way
radio while making group or private calls with
the Group/Private Speaker ON (no speaker
icon visible in the display), hold the radio in a
vertical position with the microphone one to
two inches away from the lips.
DO NOT hold the antenna when the radio is “IN USE”. Holding the antenna affects call quality and may cause the radio to
operate at a higher power level than needed.
20

• Antenna Considerations
Use only the supplied or an approved antenna. Unauthorized
antennas, modifications, or attachments could impair call quality,
damage the radio, or result in violation of ICNRP or FCC regulations.
• Interference to Medical and Personal
Electronic Devices
Most electronic equipment is shielded from RF energy. However, RF energy from the radio transmitter may affect inadequately shielded electronic equipment.
Consult the manufacturer(s) of your medical and personal electronic device(s) (for example. - a pacemaker or a hearing aid) to
determine if they are adequately shielded from external RF
energy. Your physician may be able to assist you in obtaining this
information.
Turn your radio off in health care facilities when any regulations
posted in the area instruct you to do so. Hospitals and health care
facilities may be using equipment that is sensitive to external RF
energy.
• Interference to Other Electronic
Devices
RF energy may affect improperly or inadequately shielded electronic operating and entertainment systems in motor vehicles.
Check with the manufacturer or representative to determine if
these systems are adequately shielded from external RF energy.
Also check with the manufacturer of any equipment that has
been added to the vehicle.
Turn your radio off before boarding any aircraft to prevent possible interference to aircraft systems. Regulations of the United
States Federal Aviation Administration prohibit use when the
plane is in the air and require you have permission from a crew
member to use your radio while the plane is on the ground.
21

• Batteries
All batteries can cause property damage, injury
or burns if a conductive material such as jewelry,
keys or beaded chains touch the exposed termi-
!
C a u t i o n
• Use While Driving
Check the laws and regulations on the use of telephones in the
areas where you drive. Always obey them.
!
C a u t i o n
nals. The material may complete an electrical
circuit (short circuit) and become quite hot.
Exercise care in handling any charged battery,
particularly when placing it inside your pocket,
purse or other container. To protect against a
short circuit when the battery is detached from
the phone, keep the battery in the insulated protective case provided with the battery.
When using the phone while driving, please:
• give full attention to driving and to the road;
• use hands free operation, if available; and
• pull off the road and park before making or
answering a call if driving conditions so
require.
• Children
Do not allow children to play with your radio. It
is not a toy. Children could hurt themselves or
others (by poking themselves or others in the
!
C a u t i o n
• Blasting Areas and Explosives
!
!
eye with the antenna, for example). Children
also could damage the radio, or make calls that
increase your service bills.
DO NOT operate your radio near electric blasting caps, or in a blasting area, to avoid the possibility of triggering an explosion. Turn your radio
OFF when in a “blasting area” or in areas where
such requirements are posted.
W A R N I N G
22

• Potentially Explosive Atmospheres
Turn your radio OFF and do not replace the battery when in any area with a potentially explosive
atmosphere. It is rare, but your radio or its accesso-
!
!
W A R N I N G
ries could generate sparks which might trigger an
explosion.
Areas with a potentially explosive atmosphere are
often, but not always, clearly marked. They
include areas such as below deck on boats, fuel or
chemical transfer or storage facilities, and areas
where the air contains chemicals or particles, such
as grain, dust, or metal powders.
Do not transport or store flammable gas, liquid, or
explosives in the compartment of your vehicle
which contains your radio or accessories.
Vehicles powered by liquefied petroleum gas (such
as propane or butane) must comply with the
National Fire Protection Standard (NFPA-58). For
a copy of this standard, contact the National Fire
Protection Association. One Batterymarch Park,
Quincy, MA 02269, Attn: Publications Sales Division.
• For Vehicles Equipped with an Air Bag
An air bag inflates with great force. DO NOT
place objects, including communication equip-
ment, in the area over the air bag or in the air bag
!
!
W A R N I N G
deployment area. If the communication equip-
ment is improperly installed and the air bag
inflates, this could cause serious injury.
Installation of vehicle communication equipment
should be performed by a professional installer/
technician qualified in the requirements for such
installations. An air bag’s size, shape, and deploy-
ment area can vary by vehicle make, model, and
front compartment configuration (for example,
bench seat vs. bucket seats).
Contact the vehicle manufacturer’s corporate
headquarters, if necessary, for specific air bag
information for the vehicle make, model, and front
compartment configuration involved in your com-
munication equipment installation.
23

Cleaning Instructions
Clean the external surfaces with a damp cloth, using a mild
solution of dishwashing detergent and water. Some household cleaners may contain chemicals which could seriously damage the unit.
Avoid the use of any petroleum-based solvent cleaners. Also, avoid
applying liquids directly on the portable unit.
For Further Information
Be sure to carry the Pocket Reference Card with you so you can look
up reminders about how selected features work.
24

Owner’s Information
Mobile Equipment Identifier (IMEI)
_____________________________
Personal Radio ID
_____________________________
Phone Number
_____________________________
Date Purchased
______________
Dealer Telephone Number
_______________________
Customer Service Number
_______________________
25

Radio ID Directory
Radio ID Name
1
2
3
4
5
6
7
8
9
Talkgroup ID Directory
Radio ID Name
26
1
2
3
4
5
6
7
8
9
 Loading...