

Page 1

Motorola
iDEN
Digital Multi-Service Data-Capable Phone
®
i88s Phone User’s Guide
@NNTN4487A@
NNTN4487A
Page 2

www.motorola.com/iden
Page 3

Table of Contents
Introduction .......................................................................................... 1
Driving Safety Tips.........................................................................................3
Getting Started......................................................................................5
i88s Phone Features ........................................................................................6
Battery.............................................................................................................7
Turning Your i88s Phone On/Off ..................................................................9
Enabling Security ..........................................................................................11
Receiving Over-the-Air Programming..........................................................11
Security Features of the i88s Phone..............................................................12
Status of Your i88s Phone.............................................................................24
My Information .............................................................................................24
Using T9 Text Input ......................................................................................25
Display Essentials ............................................................................... 31
Display Screen Elements...............................................................................31
Text Display Area .........................................................................................34
Call Information Icons...................................................................................34
Navigating Menus and Lists..........................................................................35
Main Menu Options.......................................................................................36
Phonebook...........................................................................................39
Accessing Phonebook with an i2000, i2000plus, or GSM Phone.................40
Phonebook Entries and Speed Dial Numbers................................................40
Phonebook Icons ...........................................................................................40
Voice Names .................................................................................................41
Accessing Your Phonebook ..........................................................................41
About PhonebookEntries..............................................................................42
Pause Digit Entry...........................................................................................51
Plus Dialing...................................................................................................52
i
Page 4

Digital Cellular.................................................................................... 53
Making Phone Calls ......................................................................................53
Emergency Calling........................................................................................59
Receiving a Phone Call.................................................................................59
Ending a Phone Call......................................................................................59
Recent Calls...................................................................................................59
Missed Calls ..................................................................................................63
Call Timers....................................................................................................63
Hands-Free Speakerphone.............................................................................64
Mute...............................................................................................................64
Call Waiting ..................................................................................................65
Call Hold .......................................................................................................66
Three-Way Calling ........................................................................................67
Call Forwarding.............................................................................................68
Messages.............................................................................................. 73
Message Center .............................................................................................73
Voice Mail.....................................................................................................74
Using Voice Mail ..........................................................................................75
Text and Numeric Messaging........................................................................76
Net Alert........................................................................................................78
Using Your Phone as a Modem.....................................................................79
Private Calls........................................................................................ 81
Private Call....................................................................................................81
Call Alerts......................................................................................................84
Group Call .....................................................................................................88
GPS Enabled .......................................................................................93
IMPORTANT: Things to Keep in Mind.......................................................94
Making an Emergency Call ...........................................................................95
Accessing the GPS Menu..............................................................................96
Viewing Your Approximate Location...........................................................96
Enhancing GPS Performance ........................................................................98
www.motorola.com/iden
ii
Page 5

Updating Satellite Almanac Data ..................................................................99
Setting Privacy Options.................................................................................99
Using GPS with Map Software ...................................................................101
Datebook............................................................................................ 105
Datebook Icons............................................................................................106
Viewing Your Datebook .............................................................................106
About DatebookEvents...............................................................................108
Adding New Events.....................................................................................109
Editing Events .............................................................................................113
Deleting Events ...........................................................................................113
Datebook Event Reminders.........................................................................114
Customizing Datebook Set Up....................................................................114
Memo .................................................................................................117
Creating a Memo.........................................................................................117
Viewing the Memo......................................................................................117
Editing the Memo........................................................................................118
Deleting the Memo......................................................................................118
Making a Call to the Memo Number...........................................................118
Storing the Memo Number to Phonebook...................................................119
Voice Record .....................................................................................121
About Voice Record....................................................................................121
Accessing Voice Record .............................................................................121
Recording a Voice Record ..........................................................................122
Playing a Voice Record...............................................................................122
Adding to a Voice Record...........................................................................123
Labeling a Voice Record.............................................................................123
Deleting a Voice Record .............................................................................124
Locking/Unlocking a Voice Record............................................................124
Voice Record Memory................................................................................125
Java .................................................................................................... 127
Installing Java Applications ........................................................................128
iii
Page 6

Running Java Applications..........................................................................128
Downloading Java Applications..................................................................129
Java Applications and GPS Enabled ...........................................................129
Java Memory ...............................................................................................131
Deinstalling Java Applications....................................................................132
Customizing the i88s Phone............................................................. 133
Settings........................................................................................................133
Styles ...........................................................................................................150
Shortcuts......................................................................................................155
Accessories......................................................................................... 159
Wearable Carrying Solutions ......................................................................159
Batteries.......................................................................................................161
Travel Chargers ...........................................................................................162
Data Accessories .........................................................................................164
Other Important Information ......................................................... 169
Understanding Status Messages ..................................................................169
Safety and General Information ..................................................... 172
RF Operational Characteristics ...................................................................172
Portable Radio Product Operation and EME Exposure ..............................172
Electro Magnetic Interference/Compatibility..............................................175
Medical Devices..........................................................................................175
Operational Warnings..................................................................................177
Operational Cautions...................................................................................178
Accessory Safety Information.....................................................................180
The U.S. Food and Drug Administration's Center for Devices
and Radiological Health Consumer Update on Mobile Phones..................182
Limited Warranty Motorola Communication Products...............................188
Limited Warranty Motorola Communication Products(International) ......192
Patent and Trademark Information..............................................................196
Index .................................................................................................. 198
www.motorola.com/iden
iv
Page 7

IMPORTANT!
Read “Safety and General Information” on page 172
before using your i85s Phone.
v
Page 8

DECLARATION OF CONFORMITY
Per FCC CFR 47Part 2 Section 2.1077(a)
ResponsibleParty Name: Motorola, Inc.
Address: 8000 West Sunrise Boulevard, Plantation, FL 33328 USA
Phone Number: 1 (800) 453-0920
Hereby declares that the product:
Product Name: i88s
Model Number: H58XAH6RR7AN
Conforms to the following regulations:
FCC Part 15, subpart B, section 15.107(a), 15.107(d) and section 15.109(a)
Class B Digital Device
Date: July 1, 2002
Note: This equipment has been tested and found to comply with the limits for a Class B digital
device, pursuant to part 15 of the FCC Rules. These limits are designed to provide reasonable
protection against harmful interference in a residential installation. This equipment generates,
uses and can radiate radio frequency energy and, if not installed and used in accordance with the
instructions, may cause harmful interference to radio communications. However, there is no
guarantee that interference will not occur in aparticular installation.
If this equipment does cause harmful interference to radio or television reception, which can be
determined by turning the equipment off and on, the user is encouraged to try to correct the
interference by one or more o fthe following measures:
--Reorient or relocate the receiving antenna.
--Increase the separation between the equipment and receiver.
--Connect the equipment into an outlet on a circuit different from that to which the receiver is
connected.
--Consult the dealer or an experienced radio/TV technician for he lp.
vi
www.motorola.com/iden
Page 9

Introduction
ongratulationson purchasing your Motorola iDEN i88s
multi-service, data-capable, digital, portable phone.
C
phone
offers:
• Voice Activated Dialing — Youri88sphone offers state-of-the-art Voice
Activated Dialing.
• Speakerphone — You canenjoy hands-free communicationatthe touch
of a button. And Speakerphone is especially great for conference calls.
• Phonebook— Yourconsolidated Phonebook holds up to 250 entries and
allows youtostore multiplecontact numbers foreach person, offering you
various ways to communicate withyour business and personal contacts.
• SIM Card — Your phone’s SIM (Subscriber Identity Module) card holds
all entries storedin your Phonebook. In addition,youhave a PIN (Personal
IdentificationNumber) to keep yourinformation safe and secure.
• Datebook—Schedule and keep track of appointments using yourphone’s
Datebook feature.
• Messages — The Message Center allows you to manage and access your
Voice Mail, Text Messages, and Net Alert all from the same inbox.
• Private andGroupCalls — You can use your phone as a two-wayradio
to communicate directly with business and personal contactsin your iDEN
service area.
• Voice Record — VoiceRecord enablesyou to record and playback
personal messages or the incoming portion of phone calls on your i88s
phone.
• GPS Enabled—Useyour phone’sGPSEnabled featureto determineyour
approximate geographical location,expressed as latitude and longitude.
When you make an emergency call, thisfeature can help emergency
servicepersonnel find youunder certain circumstances. This feature
depends on accesstoGPSsatellite signals and, for emergency calls, the
capabilities of your local emergency responsecenter. See GPS Enabled,
particularly “IMPORTANT: Things to Keep in Mind” on page 94, for
more information on the limitations of this feature.
*
• Fax and Data Transfer
“Using YourPhoneas a Modem” on page 78.
• J2ME
TM
many Java programs. Either download Java applicationsdirectly fromthe
Internet, or try one of the pre-loaded applications.
— With the JavaTMapplications feature, you can choose from the
— for circuitdata faxes and file transfers. See
Your i88s
1
Page 10

• Customization — Use the Settings, Styles, and Shortcuts features to
customize your i88s phone to meet your individual needs.
For more information on these and other featuresof the i88s phone, review this
User’s Guide. There is a Table of Contents in the front of the guide and an Index
in the back of the guide to assistyouin finding the specific information you
want.
NOTE: Some features of your i88s phone are available only in the iDEN
service area, and are indicated as such in this guide.
NOTE:This guide describes the features of the i88s phone as they
were set up by Motorola. However, your carrier or your
organization may have changed or added features. For more
information, check with your carrier or your organization.
www.motorola.com/iden
2
Page 11

Driving Safety Tips
Driving Safety Tips
“Safety is your most important call!”
Your Motorola wireless telephone gives you the powerful ability to
communicate by voice — almost anywhere,anytime, wherever wireless phone
serviceis available and safe conditions allow. But an importantresponsibility
accompanies that benefits of wireless phones,one that every user must uphold.
Whendrivingacar, driving isyour firstr esponsibility. Ifyoufind itnecessaryto
use yourwireless phone while behind thewheel of a car, practice goodcommon
sense and rememberthefollowing tips:
1. Get to know your Motorola wireless phoneandits features suchas speed
dial and redial. If available, these features help you to place your call without taking your attention off the road.
2. When available, use a hands-free device. If possible, add an additional
layer of convenience to your wireless phone with one of the many Motorola Original hands-free accessories available today.
3. Positionyour wireless phone within easy reach. Be able to access your
wireless phone without removing your eyes from the road. If you receive
an incomingcallatan inconvenient time, if possible, let your voice mail
answer it foryou.
4. Let the person you are speaking with know you are driving;ifnecessary,
suspend the callin heavy traffic or hazardous weather conditions. Rain,
sleet,snow, ice, and even heavy traffic can be hazardous.
5. If your eceive an incoming call atan inconvenientt ime do not takenotes or
look up phone numbers while driving. Jotting down a “to do” list or going
through your address book takes attention away from your primary responsibility — driving safely.
6. Dialsensibly andassess thetraffic; ifpossible,place calls whenyou are not
moving or before pulling into traffic. Try to plan calls when your car will
be stationary. If you need to make a call while moving,dialonly a few
numbers,check the road and your mirrors, thencontinue.
7. Do not engage in stressful or emotional conversations that may be distracting. Make peopleyou are talking with aware you are driving and suspend
conversations which havethepotential to divert yourattention away from
the road.
3
Page 12

8. Your phone can perform many other functions besides allowing you to
make and receive calls. Do not let thesefeatures distract you from driving.
Use them only when it is safe to do so.
9. Use your wirelessphone to call for help. Dial 9-1-1 or other localemergency number in the case of fire, traffic accident or medicalemergencies.
10. Use your wirelessphone to help others inemergencies.Ifyou see an auto
accident, crime in progressor other serious emergency where lives arein
danger,call 9-1-1 or other localemergency number,as youwouldwant
others to do for you.
11. Call roadside assistance or a special non-emergency wireless assistance
number when necessary.If you seea broken-down vehicle posing no serioushazard,abrokentrafficsignal,aminortrafficaccidentwherenoone
appearsinjured, oravehicleyouknow to be stolen, callroadsideassistance
or other special non-emergency wirelessnumber.
1
1
1. Wherever wireless phone service is available.
www.motorola.com/iden
4
Page 13

Getting Started
This section includes:
i 88s Phone Features Page 6
Battery Page 7
Turning Your i88s Phone On/Off Page 9
Enabling Security Page 11
Status of Your i88s Phone Page 24
My Information Page 24
Using T9 Text Input Page 25
5
Page 14
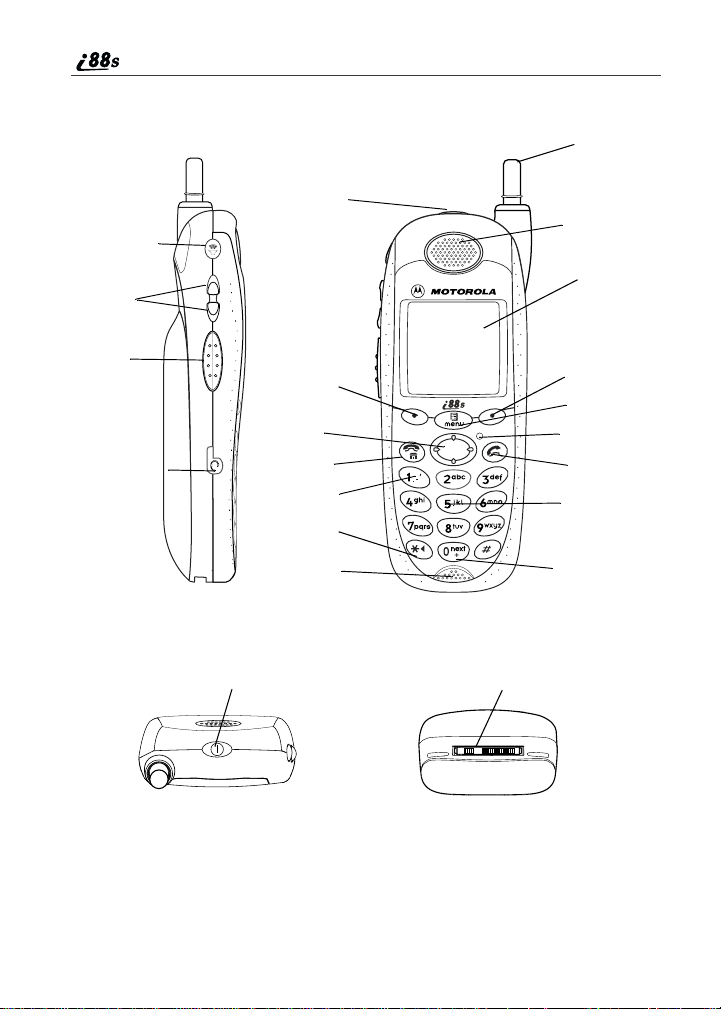
i88s Phone Features
Power Button
StatusLight
SpeakerKey
Antenna
Earpiece
Volume
Control
Buttons
Push-To-Talk
(PTT) Button
Headset Jack
SIDE VIEW
TOP VIEW
Option Key
4-Way
Navigation
Key
End/Home
Key
Punctuation
Key
Back/Pause
Dialing Key
Microphone
Power Button
StatusLight
FRONT VIEW
BOTTOM VIEW
Display
Option Key
Menu Key
Photosensor
Send Key
Alpha Numeric
Keypad
Next Word/
International
Plus DialingKey
Accessory and Data
Cable Connector
www.motorola.com/iden
6
Page 15
Battery
Battery
Your i88s phone comes with a Lithium Ion battery. After attaching the battery,
you must charge it before you use it for the first time.See “Charging Lithium
Ion Batteries” on page 161 for the chargingtimes for your phone’s battery. The
firsttimeyou charge your phone’s battery, charge for 30 minutes more than the
time shownon page 161. Afterthe initial charging, thebattery canbechargedin
thetimeshownonpage161.
Remove the battery from the protective plastic safety tray provided in the
originalpackaging. When the battery is not attached to the phone store it in the
original tray.
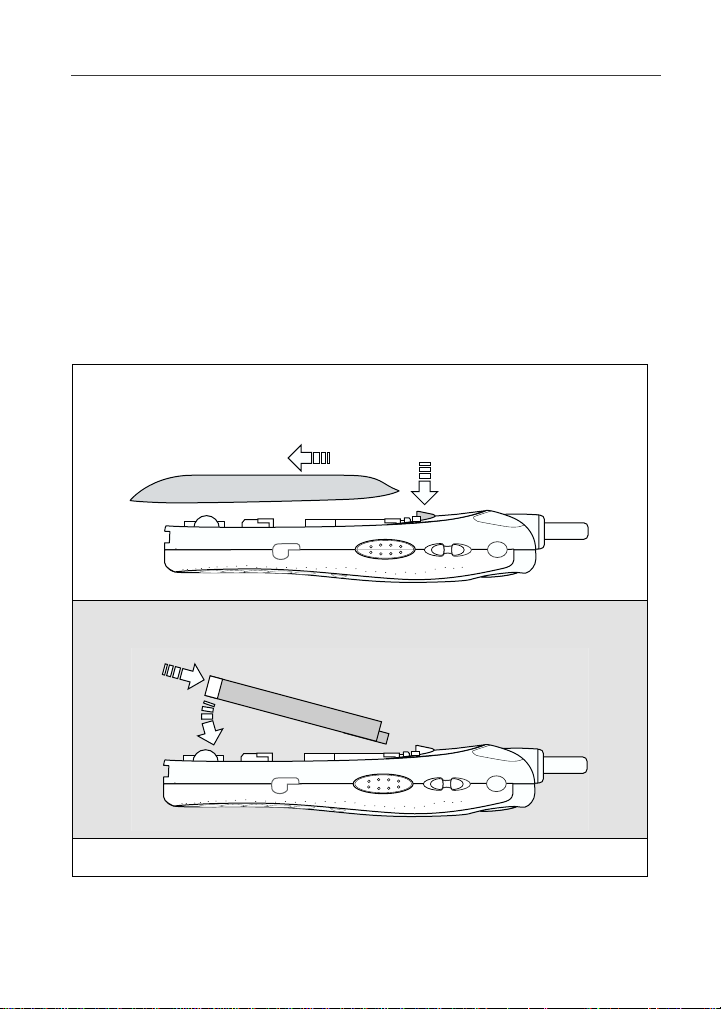
Attaching the Battery
1
Remove the batterycover located on the back of the phone by pressing
the battery coverrelease buttonand sliding the battery coveraway from
the antenna.
Release Button
2
Insert the top of the battery into the battery area. Press down on the
bottom of the battery to secure it.
3
Replace the battery cover and push forwarduntil you hear a click.
7
Page 16
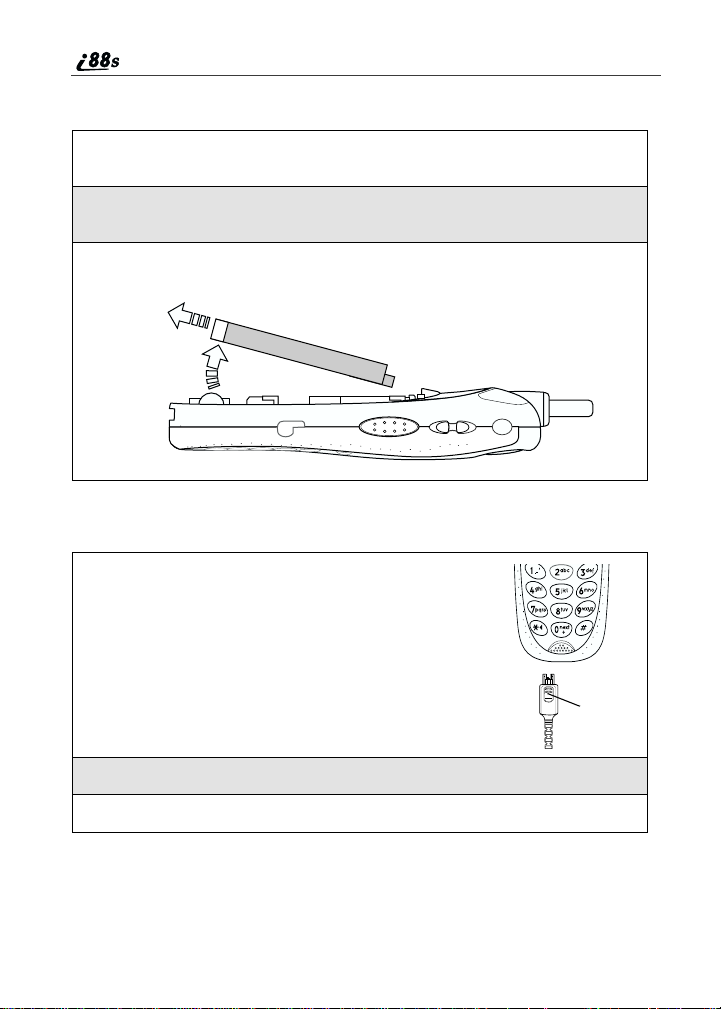
Detaching the Battery
1
Ensure that the phoneis powered off beforeattempting to detach the
battery.
2
Press the battery cover release button and slide the battery coveraway
from the antenna.
3
Remove the batteryby pushing the battery towardthe antenna and
liftingitout of the phone.
Charging the Battery
1
With your phone’s keypad facing up, plug the
charger’s accessory connector intothe left side of
the accessory connector on the bottom of the phone.
NOTE:Press the buttonofthecharger’s
accessory connector before inserting the
connector into thebottomofthe phone.
button
2
If the charger hasfoldi ng electrical prongs, flip open the prongs.
3
Plug the charger intoan electrical outlet.
Your phone’sscreen backlight will remain lit while thebattery is charging.
www.motorola.com/iden
8
Page 17
Turning Your i88s Phone On/Off
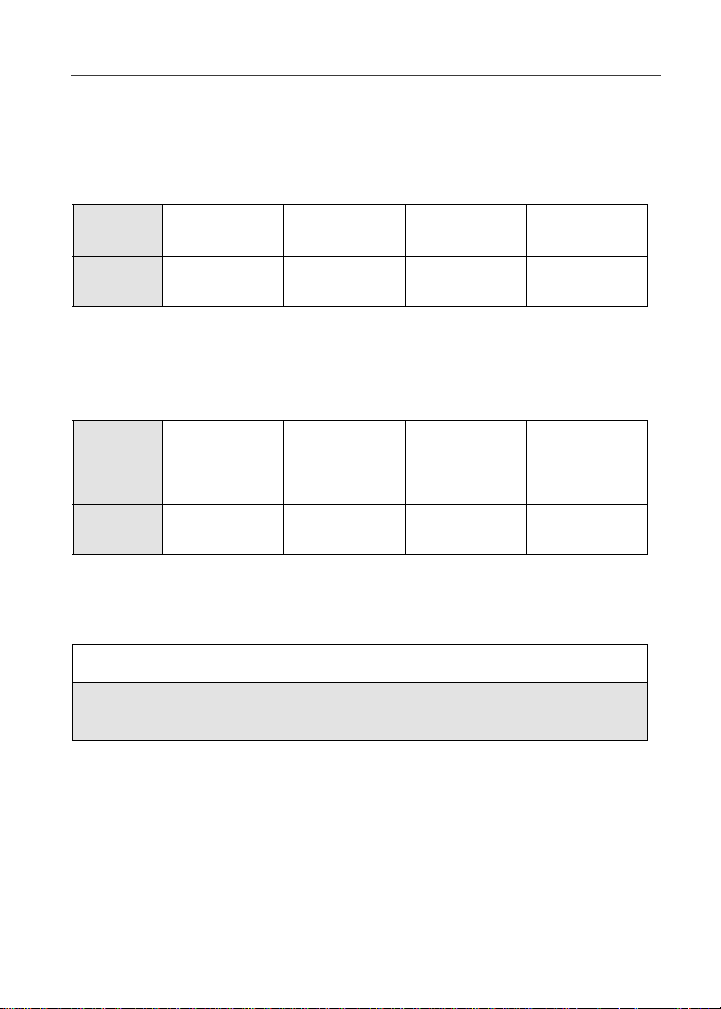
Battery Charging Status
The battery strength indicator icon foundonyour phone’s display screen shows
thechargeamountremaininginthebattery.
When Using Phone
Icon
Display
Battery
Strength
A short, chirp-like sound indicates a low battery. The icon flashes to indicate
that you have approximately five minutes of talk time remaining.
abcd
Low
Battery
11% to
40%
41% to
70%
Fully
Charged
When Charging Battery
Icon
Display
Battery
Strength
efgd
1flashingbar 1flashingbar,
Low
Battery
1 continuous bar
31% to
60%
1 flashing bar,
2 continuous bars
61% to
90%
3 continuous bars
Fully
Charged
Turning Your i88s Phone On/Off
To power the phone on:
1
For optimal cellular signalstrength, extend the antenna.
2
Pressandhold p at thetopof the phoneuntil the status lightglows red
and a tone briefly sounds.
9
Page 18

3
Whenthe Enter SIM PIN Code screen displays, enter your SIM PIN.
(For more information see “SIM Card Personal Identification Number
(PIN)” on page12.)
NOTE: The default SIM card PIN is 0000. It is recommended that you
change your PIN to prevent fraudulent use of the SIM card
(see “Changing the SIM PIN” on page 14).
4
Press B under OK.
As your phone connects to the network,
youwillseeawelcomemessageanda
connecting message. When the Ready
screen appears on the display, you are
readytouseyouri88s phone!
A
To power the phone off:
1
Press and hold p on the top ofthe phone until you see the message
Powering Off.
2
Push down the antenna.
10
www.motorola.com/iden
Page 19

Enabling Security
Enabling Security
To utilize browser functionality from your service provider, you mustenable
securitythe first time you power on your phone or within 20 days of first
activation of your phone.
1
When you power on your phone for the
first time, after the Re ady screenappears,
you willbe prompted toselect OK to
update your browser info.
NOTE: If you press A under LATER,
youwillbepromptedtoenable
security each time you power on
your phone until you press
under OK. It is recommended
that you do not choose LATER.
2
Press A under OK.
3
You are prompted to enable security. Press A under YES.
A series of screensdisplay. If you subscribe to your service provider
plan, your home page displays.
4
Press e to return to theReadyscreen.
a
A
Receiving Over-the-Air Programming
If you have been set up to receive Over-the-Air Programming byyourservice
provider, you will receive yourPrivate ID and Talkgroup lists for Private Call
use, and your Personal Telephone Numbervia a Net Alert message.
In order to receiveyour programming,you must have enabled security. Within
24 hours of enablingsecurity, you willreceive a Net Alert message containing
your lists.
To accept your phone programming:
1
You willreceiveaNet Alert with themessage NewBrowserMessage –
Receive Programming Info.
2
Press A under GOTO.
11
Page 20

3
You are prompted to accept changesto your Phonebook. Press A
under OK.
4
A confirmation screen displays. Press A under OK.
5
You are prompted again to accept changes to your Phonebook. Press
A under OK.
6
A confirmation screen displays. Press A under OK.
7
Press e to return to the Ready screen.
Security Features of the i88s Phone
The i88s phone comes with two levels of security protection:
• SIM Card
• Keypad Lock
Your phonecomes with a built-in level of security protection through the use of
the SIM card. The SIM card stores all yourPhonebook information. Since this
information is stored on the SIM card, not in your phone itself, you can remove
the information by removing the SIM card.
The SIM card is locatedinthe SIM Card Holder on the back of the phone,
underneath thebattery.You canverify thatthe SIM cardisin place byremoving
the batteryand viewing the SIM card throughthe SIM cardcover.
See “Inserting/Removing the SIM Card”onpage 18 for information on locating
the SIM card. If there isno SIM cardin yourphone, notify your sales
representative.
NOTE: Except formaking emergency calls, your phone will not
functionwithout theSIM card.
SIM Card Personal Identification Number (PIN)
To prevent unauthorized use of your phone, your SIM card is protected by a
PIN. Each time the phone is powered on,youmust enter your PIN. You can
change or disable your PIN if desired.
NOTE: Disabling your PIN enables anyone to use your phone. If you
disable your PIN, you must still keep the SIM card in the phone
to make calls.
www.motorola.com/iden
12
Page 21

Security Features of the i88s Phone
Entering the SIM PIN
Depending on your service provider, your phone
may or may not require you to enter a SIM PIN
when you first use your phone.
If your phone is required to enter a PIN, your
default SIMcard PINis0000. It isrecommended
that you changeyour PIN to prevent fraudulent
use of the SIM card (see “Changing the SIM
PIN” on page 14).
P
IMPORTANT:
1
From the Enter SIM PIN screen, enter your four-to eight-digit PIN.
An asteriskappears for each character entered.
NOTE: Other than emergency dialing, you will be unable to use any
of the phone functions, including receiving phone calls, until
you enter the PIN.
2
Press B under OK.
If you enter an incorrect PIN, the message SIM PIN incorrect:Tryagain
appearson yourphone’s screen. After three consecutive incorrect attempts, the
SIM card isblocked. The phonedoes not allow youtoattempt to enter your PIN
again, even after poweringthe phone off and back on. If this happens,see
“Unblocking theSIM PIN” on page 15.
Incorrectly entering your PIN three times
causes the SIM card to be blocked. To
unblock yourSIM card, you must contact
your service provider. For more information,
see “Unblocking the SIM PIN” on page 15
13
Page 22

Changing the SIM PIN
1
At the Ready screen, press m and then
press R to scrollto Settings.
B
2
Press B under SELECT. The Settings screen displays.
3
Press R to scrolltoSecuri ty.PressB
under SELECT to access theSecurity
screen.
C
4
At the Securityscreen,press R to scroll to New Passwords.PressB
under SELECT to access theNewPasswords screen.
5
At the NewPasswordsscreen, press R to scrolltoSIM PIN and press
B under SELECT.
6
At the Enter Old SIM PIN Code screen, enter the current SIM PIN
and press B under OK.
7
At the Enter New SIM PIN Code screen, enter the new 4- to 8-digit
SIM PIN and press B under OK.
8
At the Re-enter New SIM PIN Code screen, re-enter the new SIM PIN
to confirm, and press B under OK.
www.motorola.com/iden
14
Page 23
Security Features of the i88s Phone
Unblocking the SIM PIN
If you forget yourPIN and unsuccessfully enter it three times, access to your
phone will be blocked.
NOTE: Before you begin, obtain the PIN Unblocking Key (PUK) code
from your service provider, then read and understand the PIN
unblockingsequence.In entering the keypresssequence,each
key press must occur within 5 seconds of the prior key press.
IMPORTANT:
If you unsuccessfully enter the PUK code
ten times, the SIM card is permanently
blocked and must be replaced. If this
happens, all data will be lost.You will geta
message to contact your service provider. If
the SIM card is blocked, the i88s phone only
allows outgoing emergency calls.
To unblock the PIN:
1
Press **05s.
2
Enter the PUK code.
3
Press s.
4
Enter a new 4- to 8-digit SIM PIN and press s.
5
Re-enter your SIM PINand press s.
If you entered the codesproperly, the SIM Unlocked screen displays.
15
Page 24

Disabling/Enabling the PIN Requirement
When the PIN requirement is enabled,you are
prompted to enteryour PIN e ach time you turn
on your phone. Until a valid PIN is entered,you
can usethephone only to make emergency calls.
After the PIN is accepted, the phone registers on
the network and the Ready screen displays.
Whenthe PINrequirement is disabled, the phone
can be used without entering a PIN.
NOTE: If you disable the PIN requirement,
youremove protectionof personal
data on your SIM card. Anyone
can then use your phone and
access your personal data.
1
At the Ready screen, press m and then
press R to scrollto Settings.
P
B
2
Press B under SELECT. The Settings screen displays.
www.motorola.com/iden
16
Page 25

Security Features of the i88s Phone
3
Press R to scrolltoSecuri ty.PressB
under SELECT to access theSecurity
screen.
C
4
At the Security screen, press R to scrollto SIM PIN.PressB under
SELECT to access the SIM PIN screen.
5
Press R to scrolltoOn or Off. On enables the SIM PIN requirement;
Off disables the SIM PIN requirement. Press B under SELECT.
6
At the Veri fy SIM PIN Code screen,enter the current SIM PINand
press B under OK.
17
Page 26
Inserting/Removing the SIM Card
IMPORTANT:
If you remove your SIM card and insert
another SIM card into your phone, t he
following information is erased when you
use the phonewith the new SIM card:
• Datebook events
• Recent Calls list
• Voice Record
• Voice names forPhonebook entries and
Shortcuts
• Call Forwardingsettings
• Call filtering settings in Styles
• Net Alerts
• InformationstoredinMemo
• Browser Bookmarks
• Previous three GPS Enabled location
fixes
All Phonebook information will remain
stored on youroriginal SIM card.
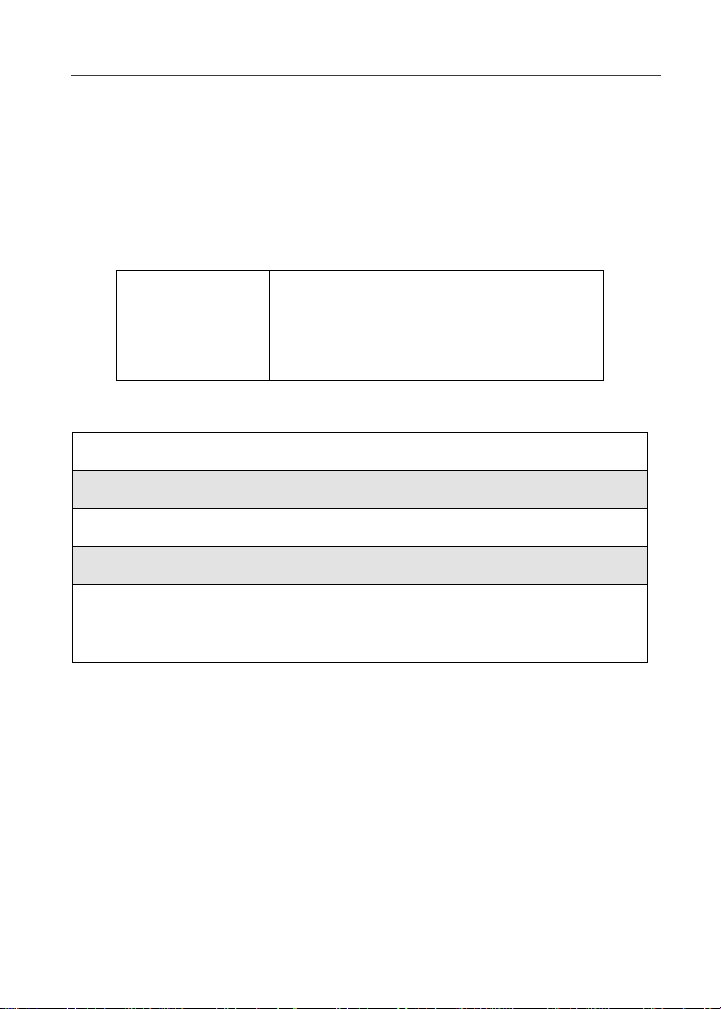
IMPORTANT:
1
With the phone powered off, remove the battery cover and battery. See
Do not touchthe gold-colored areasof the
SIM card.
To avoid loss or damage, do not remove
your SIM cardfrom your phone unless
absolutely necessary.
“Detaching the Battery” on page 8.
2
With the antenna facing away
from you, and the back of the
phone exposedandfacing up,
locate the SIM cover and gently
push it forward.
www.motorola.com/iden
18
Page 27
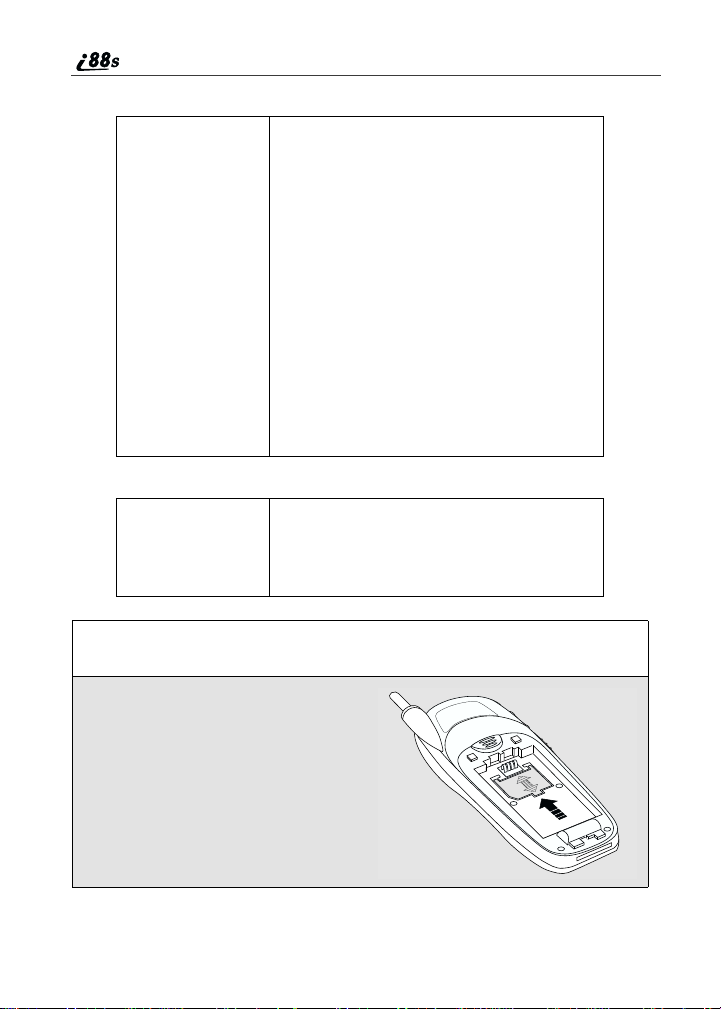
3
Lift theSIMcover up.
4
To remove the SIM card, very
carefully lift it out of its holder.Do
not touch the gold-colored areasof
the SIM card.
NOTE: ProtecttheSIM cardas you
would any delicate object.
When the SIM card is not in
the phone, you should
store it in something
protective, such as a
mailing envelope.
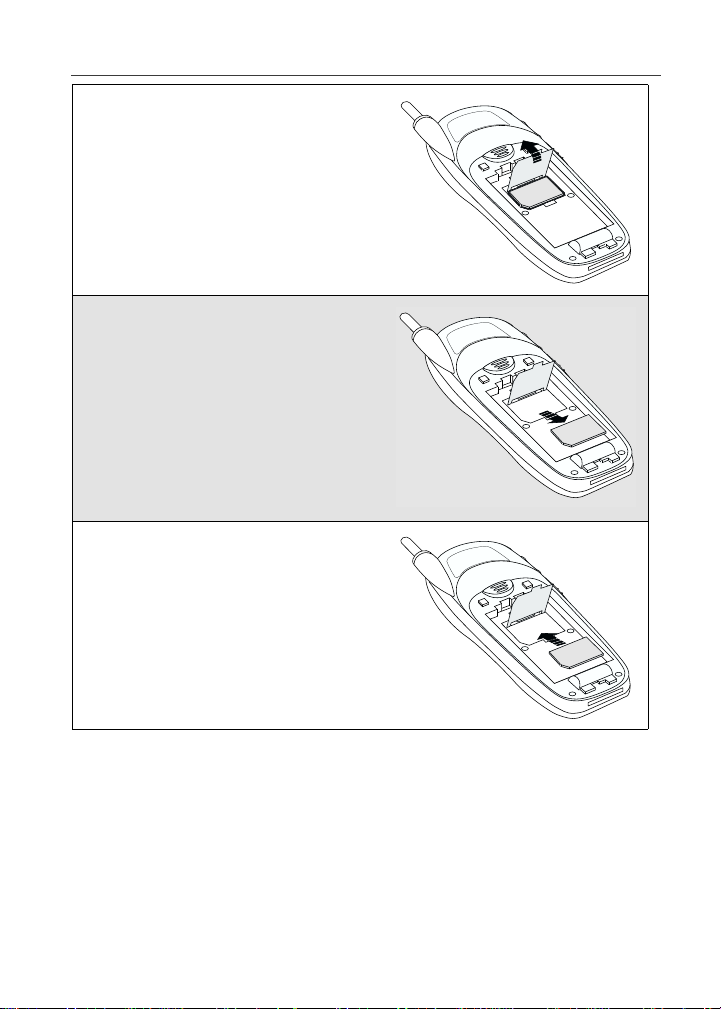
5
To insert the SIM card, very
carefully place it in its holderwith
the gold contactside facing down
and the cut corneron the card
properly aligned with the cut corner
of the holder.
Close the SIM card cover andslide
it down until you hear a click.
Security Features of the i88s Phone
000800137866150
000800137866150
000800137866150
19
Page 28

Keypad Lock
The i88s phonei ncludes a KeypadLockfeature thatenables youtoquickly lock
the phone’s keypad to avoid inadvertently pressing keys or placing calls. Once
Keypad Lock is activated, you can only perform the followingtasks:
• Turn your phone onand off
• Unlock the keypad
• Receive incoming calls, messages, and alerts.
NOTE: Emergency calls cannot be placed while Keypad Lock is
activated.
Beforelocking yourphone’s keypad,you may want to read thisentire section to
learnhowtorespondtoincomingcalls,messages,andalerts.
Activating Keypad Lock
From the Ready screen, press m then
*.ThemessageKeypad Locked
displayson your phone.
D
Wheneverakeyis pressed while in KeypadLock mode, the unlock instructions
display briefly.
You can also set your phone’s keypad to lock automatically after a specified
period of time.See “SettingKeypadLock” on page 139.
20
www.motorola.com/iden
Page 29

Security Features of the i88s Phone
Receiving Incoming Calls
When you receive anincoming phone call (see“Receiving a Phone Call” on
page 59), KeypadLockistemporarilydisabl ed.
1
Press B under YES or press s to answer the call.
Or,
Press A under NO or press e to send the call to Voice Mail and
reactivate Keypad Lock.
2
When you end the call, theRecent Callslistappears. Press e to
reactivate Keypad Lock and return to the Ready screen.
Receiving Private Calls
When you receive an incoming Private call, Talkgroup call, or call alert (see
“Private Call” on page 81), Keypad Lock is temporarilydisabled.
1
Press and holdthe Push-To-Talk (PTT) buttonont he side of the phone.
Begin talking after thephoneemits a chirping sound.Release the PTT
buttontolisten.
2
When you end the call, theRecent Callslistappears. Press e to
reactivate Keypad Lock and return to the Ready screen.
21
Page 30

Receiving New Voice Mail
When you receive new Voice Mail (see “Voice Mail” on page 74), Keypad
Lock is temporarily disabled.
1
WhenNe w Voice Mail Message displays, press A under EXIT to
returnto theReady screen and reactivate Keypad Lock.
Or,
Press B under CALL to access Voice Mail.
2
Once you have finished, press e to exit Voice Mail. The Recent Calls
list displays. Press e or press B under EXIT to reactivate Keypad
LockandreturntotheReady screen.
Receiving New Text Messages
When you receive new Text Messages (see “Text and NumericMessaging” on
page 76), KeypadLockistemporarily disabled.
1
WhenNew Text Message displays, pressA under EXIT to return to
the Ready screen and reactivate Keypad Lock.
Or,
Press B under READ to read the message.Press B under SAVE or
DELETE.
2
Once you have finished, press A under EXIT to reactivate Keypad
Lock return to the Ready screen.
22
www.motorola.com/iden
Page 31

Security Features of the i88s Phone
Receiving New Net Alerts
When you receive a new Net Alert,Keypad Lock is temporarily disabled.
1
When New Browser Message displays,press A under EXIT to return
to the Ready screen andreactivate Keypad Lock.
Or,
Press B under GOTO. Press A under View. Press A under OK or
Reply.
2
Once you have finished, press e until you reactivate Keypad Lock
return to the Ready screen.
Deactivating Keypad Lock
From the Ready screen, press m then
*.ThemessageKeypad Unlocked
displaysbriefly.
E
23
Page 32

Status of Your i88s Phone
Your i88s phone has a status light that displays around the power button.The
statuslight indicates the status of your connection.
Status Light
Indicator
Flashing Red Signing on to the network. Please wait.
Solid Red No service or out of coverage area.
Flashing
Green
Solid Green In use
i88s Phone Status
Inservice/Readytouse.
.
My Information
You can selectMy Info from the main menu to display or edit the following:
• Name — Enter your name in this field.
• PrivateID — Y our Private ID is displayed in this field. Your Private ID is
the number thatothers use to contact you using Private calls.
• Phone Numbersof Lines 1 and 2 — Your phone’s numbers aredisplayed
in these fields. You can edit the phone numbers displayed on the My
Information screen, but this does not change your phone numbers.
• Carrier IP — This field displays your phone’s carrierassigned IP address.
• IP Addresses — These fields display the IP addresses you use to access the
Internetwith your phone.
• Circuit DataNumber (Ckt) — Your circuit data numberis in this field.
Viewing/Editing My Information
1
From the Ready screen, press m.
2
Press R to scrolltoMy Info.PressB under SELECT. The My
Information screen displays.
www.motorola.com/iden
24
Page 33

Using T9 Text Input
3
Use S to scroll through the fields.
4
Toedit the displayed information,press B under CHANGE. Edit
information as desired, and press B under OK to save the changes.
To return to the Ready screen, press A under EXIT.
Using T9 Text Input
Your i88s phone has embedded software, called T9®Text Input,that makes
typing on a phone keypad much like typing on a computer keyboard: it
eliminates the traditional “multi-tap” method of text entry. As you type, you
pressonly one keyper letter. T9 TextInput matchesyourkeystrokes towords in
its linguist ic database of approximately 60,000 words and proper names. You
may also storeadditional words youfrequently use in your own user database,
which is incorporated into theT9 database.
T9 Text Input is availablewhen you are typing information into your
Phonebook and Datebook.
T9 Text Input Entry Modes
Four text entry modes are available in T9 Text Input: Alpha, Word,Symbols,
and Numeric. When you are using T9 Text Input, an icon in the top right corner
of your phone’s displayscreen (next to the battery strengthindicator icon)
indicates the T9 Text Input entry mode you are using:
Icon T9 Entry Mode
Name
w Alpha Standard “multi-tap” keypad
# Word Entering words and
! Symbols Entering punctuation and
, Numeric Entering keypad numbers.
Used For...
text entry.
punctuation with one
key-press per character.
symbols suchas “@” or “?”.
25
Page 34

Choosing a Text Entry Mode
You select yourtextentry mode from a menu availablewhenever the phone is
displaying a screen that requires you to enter text (for example, the Name:
screen or Title:screen).
To choose a text entry mode:
1
From any Phonebook or Datebook screen thatrequires text input, press
m to access the Entry Method menu.
A check mark appearsnext to the current text entrymode. When you
access a Phonebook or Datebook screenthat requires textinput, the
default text entry mode is Alpha.
2
Press S to highlight the T9 TextInput text entry mode you want to
use.
3
Press B under SELECT.
The phone returns to thetextentry screen. The text entrymode you
selectedis now active.
Using Alpha Mode
To enter text while in Alpha text entry mode to enter letters, numbers, and
symbols:
• Press any buttonontheal phanumeric keypad to enterthe letters,numbers,
and symbols on that key. For example, to enter the letter Y, press 9 three
times.
• TypealetterthenpressQ to activateCapsLock or type a letter then press
R to deactivate Caps Lock.
• Pause briefly to leave the currently displayed character in place and move
on to the next place in the text entry field.
• Press P to create a space in the text entry field.
• Press A under DELETE to deleteone character. Press and holdA under
DELETE todelete an entire entry.
Using Word Mode
In Word mode, T9 Text Inputanalyzes the letterson the keypad button you
press and arranges them to create words. As you type, T9 Text Input matches
www.motorola.com/iden
26
Page 35

Using T9 Text Input
your keystrokes to words in its database and willdisplay the most commonly
used matching word.
Special Key Functions
Some of your phone’s keys assume different functions while in T9 Text Input
Word mode.
Backspace and Erase
Press A underDELETE once tobackspace ortoerase a single character. Press
and hold A under DELETE to erase the entire text entry field.
Space
Press R once to accept a word and insert a spacewhen entering text.
Next Word in Database
Press 0 to display more wordsin the database that match the keystroke
sequence you entered.
Shift and Caps Lock
Press # to make thenext lettertyped uppercase(Shift),tomake all subsequent
letters types uppercase (CapsLock), or to go back to lowercase letters.
These icons appear in the top row of your display screen:
• $ for Shift to uppercase
• x for Caps Lock
When neither of these icons appear, letterstyped are lowercase.
NOTE: T9 Text Input automatically makes the first letter of a sentence
uppercase.
Punctuation
In Word mode, T9 Text Input usesSmart Punctuationto quickly apply basic
rules of grammar to insert the correct punctuation within a word and at the end
of a sentence.
Press 1 to insert punctuation. One of eight basic punctuation symbolswillbe
inserted(.,-’ @:?;).
Press0 tochange the inserted punctuationsymbol to another of theeight basic
punctuation symbols.
27
Page 36

Press R to accept the punctuation and continue typing.
NOTE: Additional punctuation symbols are available in Symbols mode.
Enter a Word
To enter a word using Word mode:
1
Choose Word as your text entry mode.
2
Type a word by using one key-press per desired letter.
For example, to type “test” press 8378.
The displayed word may change as you typeit. Do not try tocorrect the
word as you go. Type to the end of the word before editing.
3
If the wordthat appears isnot the desiredword, press 0 to change the
word on the display to the next most likely word in the database.
Repeat until the desired wordappears.
If the desiredword does not appear, you can add it to the database of
words usingtheinstructions in “Adding Words to the User Database”
on page 28.
Adding Words to the U ser Database
To add words to the T9 database:
1
Change from Word text entry mode to Alpha text entry mode. See
“Choosing a Text Entry Mode” on page 26.
2
Type the word using Alpha text entrymode.
3
Return to Word text entry mode.
4
Press R to add a space.
The word you typed in Alpha text entrymode is now in the database.
NOTE: You cannot store alphanumeric combinations, such as Y2K.
www.motorola.com/iden
28
Page 37

Using T9 Text Input
Choosing a Language
To change the languageofthe database T9 Text Input chooses common words
from:
1
From any Phonebook or Datebook screen thatrequires text input, press
m to access the Entry Method menu.
2
Press S to scroll to Languages.
3
Press B under SELECT.
4
Press S to scroll to the language of the databaseyou want T9 Text
Inputtextuse.
5
Press B under SELECT.
Using Numeric Mode
To use Numeric text entry mode, choose Numericas your text entry mode and
press the number buttons on your keypad to enter numbers.
Using Symbols Mode
To use Symbols text entry mode:
1
Choose Symbols asyour textentry mode.
A row of 32 symbols appears along the bottom of your phone’sdisplay
screen,justabove the display option and menu icon. (Press T to view
the complete row.)
2
Press T to highlight the symbol you want to enter into thetextentry
field.
3
Press B under SELECT to enter the symbol.
29
Page 38

30
www.motorola.com/iden
Page 39

Display Essentials
Your i88s phone’s display screen tells you what you need to know as you use
your phone.
This section includes:
DisplayScreen Elements Page 31
Text Display Area Page 34
Call Information Icons Page 34
NavigatingMenus andLists Page 35
Main Menu Options Page 36
Display Screen Elements
Any time your phoneis powered on, the display screenprovides you with
information and options.
The Ready Screen
The Ready screen displays any time
the phone is poweredon, but not
engaged in some activity.
The Ready screen consist of elements
commontomanyofthescreensyour
phone displays:
• statusicons
• text displayarea
• menu icon
• displayoptions
USER TIP: You can always access the Ready screen by pressing e.
A
Status
icon
rows
Text
display
area
Menu
icon
Display
options
31
Page 40

Status Icons
Statusicons provide you with information aboutyour phone and its functions.
These icons are context sensitive; meaning, the icons that appeardepend on the
task you are performing.
Statusicons appear inthe tworows at thetop of the displayscreen. Someappear
at all times. Othersappear only when yourphoneis engaged in certain activities
or when you have activated certain features.
Icon Indicates...
abcd
efgd
opqrs Signal Strengthicons — strength of the
01 Active Line icons — currently active
GHI
JKL
c Phone InUse— phone is connected on an
h PrivateIn Use — numberbeing calledis a
% Talkgroup In Use — phone is active on a
Y Packet Data Ready — phone is ready to
Z Packet Data Activity — phone is
BatteryStrength icons— remaining
battery charge. More bars on the battery
indicate a greater charge.See the table on
page 9 for detailed information about the
meaning of eachbattery strength icon.
network signal. More bars next to the
antenna indicate a stronger signal.
phone line; 0 indicates Line1is active;1
indicates Line 2 is active.
Call Forward icons — phone is set to
forward calls. See “Call Forwarding” on
page 68 for more information.
active call.
Private ID.
talkgroup call.
receive data through a data cable.
transmitting data.
32
www.motorola.com/iden
Page 41

Display Screen Elements
] Mobile IP — phone is ready to access the
{ Secure Data — phone is accessi ng the
} Non-secureData — phone is accessing
l Roaming — phone is searching for
. Text Message — you have one or more
y Voice Mail — you have one or more Voice
B
u Speaker Off — phone’s speaker is off.
-[\* Ring/Vibe icons — you have customized
w#,!
$x
Internet.
Internetusing a secure connection.
the Internetusing a non-secure connection.
network connections outsideyourlocal
area.
Text Messages or Net Alertmessages.
Mailmessages.
FaxMail—you have oneor more FaxMail
messages.
the way in which the phone is set to notify
you when you receive calls andother types
of messages.See “Ring Style and
Notification Type” on page 135 for more
information.
T9 Te xt Input icons — youareusingT9
Text Input to enter text. See “Using T9
Text Input” on page 25 for more
information.
`
The icon of the main menu feature currently in use always appears in the top left
of the status icon rows. For a list of the main menu icons, see “Main Menu
Options” on page 36.
TTY— your phone supports TTY devices
and communications
33
Page 42

Text Display Area
On the Ready screen, the text displayedin this area is determinedby your
wireless communications provider. When you access other screens, this area
displaysmenu options, messages, names, phone numbers, and other
information.
The number of lines of text displayed in the text display area depends on which
display view is selected — Standard view, Compressedview, or Zoom view.
(For more information,see “Setting Text Display” on page 145.) In Standard
view, five lines of text are displayed.
NOTE:Standard view is the default display setting. Unless otherwise
noted, illustrations in this User’s Guide depict Standard view.
Call In formation Icons
Each of the followingicons appear on the leftsideof the textdi splay area
providing you withinformation about your phone’s line or lines.
Icon Indicates...
D In Call - phone is on an active call.
E Incoming Call - phone is receivingan
X Outgoing Call - phone is placingan
z
? End Call - phone has ended the active call.
incoming call.
outgoingcall.
On Hold - phone has a call on hold.
Menu Icon
This menu icon S appears on any screen fromwhich a menu can be accessed.
To access a menu, press the menu key on your keypad.This key has the menu
icon printed on it.
Menus are context sensitive.The menu that appears depends on the screen you
access it fromand the items on the menu apply to the task you are currently
performing.
www.motorola.com/iden
34
Page 43

Navigating Menus and Lists
Press m from the Ready screen to accessthe main menu.
Display Options
Two displayoptions appear atthebottom of mostscreens. Theseoptions enable
you to perform a wide varietyof actions, including changing, saving and
viewing information,running programs,and cancelingprevious actions. You
activate a display option by pressingthe option key below it.
The Ready screen display options provide quick accessto two main menu
features. By default, the Phonebook(PHBK)andMessages(MESG)display
optionsappear on the Ready screen. You can control which display options
appearon the Ready screen usingthe phone’s Personalize feature in the Settings
menu (see “Changing Ready Screen Options” on page 141).
The display options on screens other thantheReady screen cannot be
customized.
Navigating Menus and Lists
The i88s phone is menu driven. By navigating menus,you access submenus
which lead to allofthe functionsand featuresthat arebuilt intoyour phone.Use
the menus to store calls, manage your Phonebook and Datebook, change your
phone settings, browse the Internet, and more.
Some features include lists of names, numbers, or other informati on. These list
items can be accessed the same way menu options are.
To access theitems in a menu or list,scroll through usingthefour-way
navigation key N near the center of your keypad. Scrolldownby pressing the
lower portion of the navigation key R. Scroll up by pressing the upper portion
of the navigation key Q. Holding down the appropriate part of the navigation
key speedsup scrolling. If you continuescrolling afteryouhave reached the
bottom or top of a menu or list, you “wrap-around” to the opposite end (if the
scroll setting is set to “wraparound”).
35
Page 44

If more items appear in a menu or list than can be displayed in the text area,a
down arrow or up arrow appears in the left side of the screen indicating that
more options may be accessed by scrollingup or down.
Down arrow Up arrow
B
Main Menu Options
By default, the main menu options appear in the order determined by your
service provider. You canchange the order in which they appear by using the
Personalize feature (see “Reordering Main Menu” on page 140)
To access the main menu, press m from the Ready screen:
Menu Item Use to ...
7 Net Browse the Web.
F Java Run pre-installed and download custom
Java applications on your phone.
m Settings Customizeyour phone: Ring/Vibe, In Call
Setup, Security, Personalize, Initial Setup,
PhoneSetup, Voice Volume,and Talkgroup
Settings.
! GPS Find your phone’s approximate
geographicallocation,expressed as latitude
and longitude. See “IMPORTANT: Things
to Keep in Mind” on page 94 for important
limitations on this feature.
S
36
www.motorola.com/iden
Page 45

Main Menu Options
( VoiceRecord Record personal messagesor the incoming
b Phonebook Storeand retrieve alist of stored entries for
R Messages Receive, store, access andmanage Voice
; Call Forward Settingsfor forwarding calls in various
= Datebook Scheduleand organize events,by the day
O Memo Input and store numbers to access later.
z Call Timers Display the durat ion of phone calls, private
j Recent Calls Access alistof the last 20sent, received,or
n Shortcuts Associate a menu option with a number on
portion ofphone callstoplay backat a later
time.
calling,editing, viewing and deleting.
Mail, FaxMail, Text Messages, and Net
Alert.
situations.
or the month, such as appointmentsand
meetings.
or group calls,circuit data use, and
Kilobytessent and received.
missedcalls. Calls can be made from this
list.
the alphanumeric keypadforquick and
easy access.
U My Info View the name,Private ID, phone numbers
for lines 1 and 2, IP address,and circuit
data number of your phone.
v Styles Create oredita groupof settings andsave
them as one for use in different
environments.
: Call Alert Storereceived call alertstorespond to at
your convenience.
37
Page 46

To choose the highlighted Main Menu selection, press B under SELECT. To
exittheMainMenu(andreturntotheReady screen), press A under EXIT or
press e.
38
www.motorola.com/iden
Page 47

Phonebook
The Phonebook allows you to store up to 250 frequently used names and
numbers.
When youstore information inyourPhonebook, it issavedon your SIM card.If
you move your SIM card to anotherSIM-based Motorola iDENphone, you can
access information in your Phonebook from that phone.
This section includes:
AccessingPhonebook with an i2000, i2000plus, or
GSM Phone
Phonebook Entries and Speed Dial Numbers Page 40
Phonebook Icons Page 40
Voice Na mes Page 41
AccessingYour Phonebook Page 41
About Phonebook Entries Page 42
Viewing PhonebookEntries Page42
Sorting Phonebook Entries Page 43
Adding Phonebook Entries Page 44
Editing Phonebook Entries Page 50
StoringPhone Numbers and Private IDs Quickly Page 48
Deleting Phonebook Entries Page 51
Pause Digit Entry Page 51
Plus Dialing Page 52
Page 40
39
Page 48

Accessing Phonebook with an i2000, i2000plus, or GSM Phone
If you plan to use the informati on stored in your Phonebook with an i2000,
i2000plus, or any other GSM phone,you must purchase CompanionPro. Go to
www.motorola.com/iden or your service provider’swebsiteformore
information.
You can use CompanionPro to make the Phonebook information saved to your
i88s phone’s SIM card accessible in this type of phone.
Phonebook Entries and Speed Dial Numbers
Your Phonebookcan store multiple phone numbers to a single name. For
example,youcanenter someone’s name into yourPhonebook once and then
assign thatperson’s home, office, mobilephone and faxnumbers to the name.
Each number stored in your Phonebook is automatically assigned a Speed Dial
number thatcorresponds to its location in your Phonebook. Each phonenumber
uses one Speed Dial location, even if it is assigned to the same name as other
phone numbers.The phone number stored in location 1 is assignedSpeed Dial
number 1,thephone number stored inlocation 2 is assignedSpeed Dial number
2, and so forth, to location 250.
Phonebook Icons
Icons that appear to the right of entries in your Phonebookconvey information
about those entries.
When you enter a phone number in your Phonebook,youcan designate the
phone number’stype using any of the following icons:
40
W Mobile
h Private
q Work
Q Main
L Home
b Pager
www.motorola.com/iden
Page 49

Voice Names
K Fax
Z Other
n Talkgroup
For more information on entering phonenumbers into your Phonebook, see
“Adding Phonebook Entries” on page 44.
The “picker” arrows appearing around thephonenumber type icon indicates
multiplephone numbers storedunderone name:
ef pickers
The Voice Name icon appearing to the left of one of the phone number type
icons indicates that a voice name is associated with the Phonebook entry:
p Voi ce Na me
Voice Names
A voice name is an audio recording you make that you assign to a number in
your Phonebook byspeaking into your i88s phone. You can then dialthe
number by speakingthe words you recorded intothephone.See step 6 of
“Adding Phonebook Entries” on page 44 for more information on creating a
voice name.
Accessing Your Phonebook
If PHBK is one of your display options:
From the Readyscreen, press A under PHBK.
If PHBK is not one of your display options:
1
From the Ready screen, press m.
41
Page 50

2
Press R to scroll to Phonebook.
3
Press B under SELECT.
USER TIP: Youcan also access the Phonebook by pressing
while your phone is in a phone call or private call.
This bringsyou to the Phonebook screen.From this screen, you can view,sort,
add, edit,and delete Phonebook entries, check Phonebook capacity, or make
calls.
m
About Phonebook Entries
Each Phonebookentry may contain the following information:
• The name associated with the entry. Typically, this is the name of the
person whosenumber you are storing inthePhonebook.
• The type of number to be stored:Mobile, Private, Work, Main, Home,
Pager, Fax, Other,or Talkgroup.
• The phone number to be stored. Every Phonebook entry must containa
phone number. This number maybeany type ofphonenumber,PrivateID,
or Talkgroup number.
• A Speed Dial number. You may accept the default Speed Dialnumber or
assign a different one.
• A voice name audio recording for voice-activated dial ing.
Viewing Phonebook Entries
Names with more thanone numberassigned to them appear with ef
surrounding the icon to the right of the name. For example, if you had stored a
home and work number for Joe Smith,the entry for Joe Smith’s home phone
number would look like this:
Joe Smith eLf
Whenthenameishighlighted,pressT to scroll to the icons representing each
of the numbers assigned to that name.
42
www.motorola.com/iden
Page 51

About Phonebook Entries
To view any of the phone numbers assigned to a name:
1
From the Phonebook screen, press S to scroll to the name associated
with the phone numberyou want to see.
2
Press T to view the icons representing the phone numbers assigned to
that name.
3
When the icon representing the number you want to view is displayed,
press B under VIEW.
If there is a Private ID or a Talkgroup numberstored for the person,
press m.ThenpressR to scroll to View and press B under
SELECT.
4
Press S to view the other numbers stored forthis name.
Sorting Phonebook Entries
You can sort yourPhonebook entries by:
• Name — thenameyouenteredfortheentry.
• Speed # — the Speed Dial location of the entry.
NOTE:Private calls cannot be made from the Phonebook when sorted
by Speed Dial location.
To sort your Phonebooklist:
1
From thePhonebook screen, press m to
view the Phonebook Menu screen.
2
Press R to scroll to Sort By.
}
43
Page 52

3
Press B under SELECT.
4
Press R to scroll to the desired sorting method: Nameor Speed#.
5
Press B under SELECT.
Checking Phonebook Capacity
Your Phonebookcan store up to 250 numbers of any kind. To see how many
entriesarestored in your Phonebook:
1
From the Phonebook screen,press m to view the Phonebook Menu
screen.
2
Press R to scroll to Capa city.
3
Press B under SELECT.
The Capacity screen showshow many storage spaces in you
Phonebook are in use and how many are empty.
Adding Phonebook Entries
Using the following instructions, you will enter the information in the order the
items appearon the Phonebook EntryDetails screen. However, you can enter
this information in any order by pressing S to scrollthrough the items on the
Entry Details screen.
YoucanleaveanyitemblankorunchangedbypressingS to scroll past it on
the Entry Details screen.
NOTE:Number and Type are required for a valid Phonebook entry.
After you have entered a phone number and any other information you wish to
include, you can press A under DONE to save the Phonebook entry.
To cancela Phonebook entryatany time, press e to return to the Ready screen.
44
www.motorola.com/iden
Page 53

To add a Phonebook entry:
H
1
To access the Entry Details screen:
From the Phonebook screen with[New
Entry] highlighted, press B under
SELECT.
Or,
From the Phonebook screen, press m.
Then press R to scroll to New and press
B under SELECT.
2
If you want to assign a name to your
Phonebook entry:
With the Name field highlighted, press
B under CHANGE.
From the Namescreen, enter the name
using the alphanumeric keypad.
See “UsingT9TextInput” on page 25 for
information about entering text into this
field.
When you are finished, pressB under OK.
About Phonebook Entries
I
The Entry Details screen returns with the Type field highlighted.
3
To assign the number type:
Withthe Type field highlighted, press B
under CHANGE.
From the Type Editor screen, press R to
scroll to the type of phone numberyou
want to assignto the Phonebook entry.
Press B under SELECT.
The Entry Details screen returns with the
# field highlighted.
J
45
Page 54

4
Assign a phone number toyour
Phonebook entry:
With the # field highlighted, press B
under CHANGE.
Type the number using the alphanumeric
keypad. For phonenumbers, use the
10-digit format.
To delete a digit, press A under
DELETE.
See “Pause Digit Entry” on page 51 and “Plus Dialing” on page 52 for
information onusing thesefeatureswhen storingphone numbers inyou
Phonebook.
NOTE:The number can be up to 20 characters long.
When you are finished, pressB under OK.
The Entry Details screen returns with the Speed # field highlighted.
5
The default Speed Dialnumber assigned
to the Phonebookentry is displayedin the
Speed # field. This is always the next
available Speed Dial location.
If you want to assign the phone number to
a differentSpeed Dial location:
With the Speed # field highlighted, press
B under CHANGE.
K
L
Press A under DELETE to delete the
current Speed Dial number.
Type the new Speed Dial number using the alphanumeric keypad.
When you are finished, pressB under OK.
www.motorola.com/iden
46
Page 55

About Phonebook Entries
6
If you want to assign a voice name to the
number:
With the Voice Name field highlighted,
press B under RECORD.
Asdirected by thescreen prompts, say and
repeat the nameyou wanttoassign to the
number. Speak clearly into the
microphone.
An ) icon appearsin theVoice Name
field indicating that the voice name has been recorded.
USER TIP: For best results, record in a quiet environment.
7
If you want to store more phone numbers
to the name associated withthis
Phonebook entry:
Press R to scroll to the bottom of the
Type field and then press B under
CHANGE.
AnewType field appears for the
additional number.
Enterthe information for the additional
phone numberusingstep 3 through step 7.
M
b
T
NOTE:Each name in your Phonebook may have up to sevenphone
numbers and one Private ID associated with it.
8
Whenyouhave entered all theinformation
you wanted in this Phonebook entry, press
A under DONE.
N
47
Page 56

Storing Phone Numbers and Private I Ds Quickly
Your phone givesyou three ways to store phone numbersquickly: from the
Ready screen,from theRecent Callslist, and from Memo.
To store a number from the Ready screen:
1
From the Ready screen, use the alphanumeric keypad to enter the
number you want to store.
2
Press m to access the Dialing Menu screen.
3
With Store Numberhighli ghted, press B under SELECT.
This displays theStore To screen.
4
To store to a new entry, press B under SELECT. The Entry Details
screen willdisplay with the number entered in the field.
Or,
To store to an existing entry, press S to scroll the list of namesinyour
Phonebook. Or press the first letter of the entry to jump to the entry.
Once the desired entry is highlighted, press B under SELECT. The
Phonebook information for thatentry displays with the number entered
in the # field.
5
From the EntryDetails screen, press S to scroll tothe firstType field.
6
From the Type Editor screen, press S to scroll to the selection that
you want to assign to the phone number.PressB under SELECT.
7
If you wanttoadd more information to the Phonebook entry,follow the
applicable instructions in “Adding Phonebook Entries ” on page 44.
8
Press A under DONE.
www.motorola.com/iden
48
Page 57

About Phonebook Entries
To store a number from the Recent Calls list:
1
From the Recent Callsscreen, press R to scroll to the 10-digit
telephonenumber you want to store.
2
Press B under STORE. This displaystheStore To screen with [New
Entry] highlighted.
3
To store a new entry, press B under SELECT. The Entry Details
screendisplays withthe numberentered in the # field and the Type field
highlighted.
Or,
To store to an existing entry, press S to scroll the list of namesinyour
Phonebook. Or press the first letter of the entry to jump to the entry.
Once the desired entry is highlighted, press B under SELECT. The
Phonebook information for thatentry displays with the number entered
in the # field and the Type field highlighted.
4
PressB underCHANGE.Pr ess R to scroll tothetype of numberyou
want to assignto the Phonebook entry. Press B under SELECT.
5
If you wanttoadd more information to the Phonebook entry,follow the
applicable instructions in “Adding Phonebook Entries ” on page 44.
6
Press A under DONE.
To store a Private ID from the Recent Calls list:
1
Press R to scroll to the Private ID number you want to store.
NOTE: The Store option for Private ID numbers (e.g., 123*123*1234),
will not display in the Recent Calls list.
2
With the Private ID highlighted, press m to access the Rec. Calls
Menu.PressR to scroll to Store.PressA under SELECT. This
displays the Store To screen with [New Entry] highlighted.
Follow step 3 throughstep 6 in “To store a number from the Recent Calls list”
on page 49.
49
Page 58

To store a number or Private ID from Memo:
1
Go to the Memo screen. If the number or PrivateID you want to store
in your Phonebookisnot already stored on your Memo screen, enter it
now.
2
Press m.WithStore to PHBK highlighted,press A under
SELECT.
3
Press A under SELECT. This displaystheStore To screen with [New
Entry] highlighted.
4
To create a valid Phonebook entry, you must assign a type. PressR to
scrollto the Type field.
5
PressB underCHANGE.Pr ess R to scroll tothetype of numberyou
want to assignto the Phonebook entry. Press B under SELECT.
6
If you wanttoadd more information to the Phonebook entry,follow the
applicable instructions in “Adding Phonebook Entries ” on page 44.
Editing Phonebook Entries
1
From the Phonebook screen, pressR toscroll to the entry you want to
edit.
2
Press m to view the Phonebook Menu.
3
Press R to scroll to Edi t.
4
Press B under SELECT.The Entry Detailsscreen displays.
5
Followthe applicable instructionsin“Adding Phonebook Entries” on
page 44 to edit the various fields.
www.motorola.com/iden
50
Page 59

Pause Digit Entry
Deleting Phonebook Entries
1
From the Phonebook screen, pressR toscroll to the entry you want to
delete.
2
Press m to view the Phonebook Menu.
3
Press R to scroll to De lete Contact or Delete Number.
Delete Contact deletes the nameand allnumbers associated withthat
name.
Delete Number deletes the numberassociatedwith the icon that is
currently displayedin the Phonebook list for the name. Thename and
all the other numbers will remain.
4
Press B under SELECT. A warning screen displays requiring you to
confirm the deletion.
Pause Digit Entry
Whenstoring a number, youcan programyour phone so thatit will not onlydial
a number but also pause before entering another series of numbers suchas a
personal identification number (PIN)or password. This feature is particularly
usefulfor accessing automatedservices such as voice mail andbanking systems
from your i88s phone.
Here’s how it works. Let’s say youhave a company voice mailaccount that you
frequently check while traveling. And, to access thataccount you must do the
following:
• Dial your work number;
• Press # while the voice mail greeting is being played; and
• Enter your PIN to accessyour m essages.
You can program yourphone to enter all of the above information for you. All
you have to do is separate each entry with a pause. If you wereto program your
phone to automatically input the aboveinformation, the stored data would look
likethis17035551234P#P1234.Inthis example, the first elevendigits represent
the number thatmustbe dialed to accessyour voice mail.The P represents a 3
second pause. The # interrupts your greeting. The second P representsanother 3
second pause. The last four digitsrepresent your PIN.
51
Page 60

You can use this featurenot only to enter PINs and passwordsbutalsotohave
the phone automatically select menu options (i.e., press 1 to hear messages).
To create a three-second pause followthe steps below:
Press and hold * for two seconds. Thepause symbol (P) will appear
on the display screen.
NOTE:You can enter up to 20 characters in a single entry, stored or
dialed.
NOTE:If you use a system that will not let you enter an option until the
automated message has played in its entirety, you can program
your phone to pause for more than 3 seconds. For example,
performing the above step twice will program two pauses and
cause your phone to wait 6 seconds before entering the next set
of numbers.
Plus Dialing
This feature enables you to placean international call from most countries —
without entering the local international access code. Use Plus Dialing for all
Phonebook entries if you plan to travel outsidetheUnited States. Begin by
following the instructions for “Adding PhonebookEntries” on page 44. Before
you type the phone number to be stored:
1
Press and hold 0 for two seconds.A “0” appears,then changes to a
“+”.
NOTE:The network translates the “+” into the appropriate
international accesscode neededto place the call.
2
Enter the countrycode, city code, or area code, and phone number.
3
Follow the rest of the instructions for “Adding Phonebook Entries” on
page 44.
www.motorola.com/iden
52
Page 61

Digital Cellular
The i88s phone enablesyouto makeand receive domestic andinternational
phone calls, make emergency calls,and be notified of a missed call.
This section includes:
Making Phone Calls Page 53
Emergency Calling Page 59
Receiving a Phone Call Page 59
Ending a Phone Call Page 59
Recent Calls Page 59
Call Timers Page 63
Hands-FreeSpeakerphone Page64
Mute Page 64
Call Waiting Page 65
Call Hold Page 66
Three-Way Calling Page 67
Call Forwarding Page 68
Making Phone Cal ls
Your i88s phone provides the following features formaking phone calls:
• Direct Dial
• Phonebook
• RecentCalls
• Speed Dial
• Turbo Dial
®
53
Page 62

• Voice-Activated Dialing
• Last Number Redial
• TTY — your phone supports TTY devices and communica tions.
Using Direct Dial
1
From the Readyscreen, usethekeypad to enterthe number youwant to
call.
2
Press s to place the call.
3
Press e to end the call.
NOTE:See “Plus Dialing” on page 52 for information on making
international calls.
If you make a mistake:
• To clear one digit, press A under DELETE.
• To clear all digits, press and hold A under DELETE.
• To cancel, press e.
Making Calls from the Phonebook
After you have entered phone numbers intoyour Phonebook, you can use these
numbers to make phonecalls. For information on entering numbers into your
Phonebook, see “Adding Phonebook Entries” on page 44.
54
www.motorola.com/iden
Page 63

Making Phone Calls
To make calls from the Phonebook:
1
From the Ready screen, if PHBK is one of your display options, press
A under PHBK.
Or,
From the Readyscreen, press m,thenpressR to scroll to
Phonebook.PressB under SELECT.
2
Press R to scroll through the namesinyourPhonebook.
Or,
Use the alphanumeric keypad to enter the first letter of the name and
press R to scroll through the names beginning with that letter.
Stop when the nameof the person you want to call is highlighted.
3
If more than one number is stored fortheperson you want to call, ef
appearsaround the icon to the rightof the person’sname.
Press T to scroll through the iconsrepresenting thenumbers stored for
that person.
Or,
Press B under VIEW to view all the numbers stored for this person.
Then press R to scroll to the number you want to call.
For moreinformation onassigning multiple numberstoone person, see
“Adding Phonebook Entries” on page 44.
4
Press s to place the call.
5
Press e to end the call.
55
Page 64

Making Calls from the Recent Calls List
Your phone storesthenumbers of the last 20 calls you received or sent in the
RecentCalls list.
1
From the Ready screen, press R.
Or,
From the Readyscreen, press S to Recent Calls is not the first item
on the list, press S to scroll to it. Press B under SELECT.
2
Press S to scroll the list received or sent recent calls until you reach
the desired call.
3
To view additionalinformation about thecall:
Press B under VIEW.
Or,
Press m to access the Rec. Calls Menu.ThenpressR to scroll to
View and press B under SELECT.
4
Press s to place the call.
5
Press e to end the call.
Using Speed Dial
Each phonenumber stored in yourPhonebook is assigneda Speed Dial number.
You can use the Speed Dial number to quicklyplace a call.
1
From the Ready screen, enter the Speed Dial number assigned to the
phone numberyou want to call.
2
Press #.
3
Press s to place the call.
4
Press e to end the call.
www.motorola.com/iden
56
Page 65

Making Phone Calls
Using Turbo Dial
Turbo Dialallowsyou to call the numbers in your Phonebookassociatedwith
Speed Dialnumbers 1 through 9 by pressing and holding the corresponding
numerickeyonthekeypad.
Press and hold a number (keys 1 through9).
NOTE:Turbo Dial cannot be accessed while the browser is active, nor
while Keypad Lock or SIM Lock is active.
Making Calls Using Voice-Acti vated Di aling
If you have recordeda voice name for a phone number in your Phonebook (see
“Voice Names” on page 41), you can use this voice name to call the number.
USER TIP: If you have difficulty making phone calls using a voice
1
From the Ready screen, press and hold t on the side of your phone
until the Say Name Now screen appears.
2
Speaking into the microphone, saythevoicename assigned to the
phone numberyou want to call.
name, try assigning a longer voice name to the number. For
example, if the voice name “Joe” fails to plac e a call to Joe
Smith’s number, try assigning the voice name “Joe Smith”
to the number.
3
Your phone will play the name back to you.
The call will automaticallybe placed.
Last Number Redial
Press and hold s to redial the last number you called.
57
Page 66

Making TTY Calls
NOTE:This feature may not be offered by
your service provider.
You can use your phone to make calls using a
TTY device.
When you make a TTY call, the call begins in the
TTY mode you last selected. You can change the
TTY mode during a call.Formore information on
choosinga TTY mode, see “Setting TTY Mode”
on page 147.
To make a call using a TTY device:
1
Connectone end of a2.5mm cableinto the jackon the phone.(To locate
the jack, see page6.) Connectthe other end of the cord into your TTY
device.
2
Enter the phone numberyou wish to call and press.
Placing International Phone Calls
When making an international call, you can either enter the international access
code directly(011 in the United States) oruse Plus Dialing.
You can make international callsfromyour Phonebook if you have storedthe
numbers with Plus Dialing. See “Adding Phonebook Entries” on page 44 and
“Plus Dialing” on page 52 for more information.
NOTE:Your service default is “International Calls Restricted.”
Therefore, you must contact Customer Care to obtain
international dialing access.
To make an international call using Plus Dialing:
Q
1
Press and hold 0 for two seconds.A “0” appears,then changes to a
“+”.
NOTE:The network translates the “+” into the appropriate
international accesscode neededto place the call.
2
Enter the countrycode, city code, or area code, and phone number.
www.motorola.com/iden
58
Page 67

Emergency Calling
3
Press s to place the call.
4
Press e to end the call.
Emergency Calling
Your phone supports emergency calling. Emergencycallscan be made even
when the SIM card is blocked or not in the phone.
Dial 911 to be connected toan emergency response center. If you are on an
active call,you must end it before calling 911.
When you make an emergency call, your phone’s GPS Enabled featurecan help
emergency service personnel find you, if you are in a location where your
phone'sGPSantenna has established a clear view oft he open sky and yourlocal
emergency response center has the equipment to process location information.
See “GPS Enabled” on page 93, and particularly “IMPORTANT: Things to
Keep in Mind” on page 94 and “Making an Emergency Call” on page 95, for
furtherinformation on the limitations of this feature. Because of the limitations
of this feature,always provide your best knowledge of your location to the
emergency response center when you make a 911 call.
NOTE: If you have enabled the Keypad Lock feature, you must unlock
the phone’s keypad before any call can be made, including 911
emergency calls.
Receiving a Phone Call
Incoming calls are indicated by a ring, vibration,or backlight
illumination. Press s or any keyon the keypad orpress B under YES
to answer the call.
Ending a Phone Call
Press e to hang up.
Recent Calls
The Recent Calls feature stores the phonenumbers of the 20 most recent calls
you have made and received, including private andtalkgroup calls. You can
access Recent Calls to:
59
Page 68

• view your recentcall s
• store numbers to the Phonebook
• deleterecent calls
• call numbers ontheRecent Calls list
NOTE: The Recent Calls list displays briefly after each call.
Viewing Recent Calls
To view your Recent Calls list:
1
From the Ready screen, press R.
Or,
From the Readyscreen, press S to scroll to Recent Calls.PressB
under SELECT.
2
Press S to scroll the list of recent calls.
If thenumber of therecent call is stored inyourPhonebook,the nameassoc iated
with the phone numberappears on the Recent Calls list.
For privatecalls, Talkgroupcalls, and numbersstored in your Phonebook, an
icon appears to the right or the name of number indicating the Phonebook type
of the number used in the call. See“Phonebook Icons” on page 40 for more
information about Phonebook types.
For phone calls, an icon appears to the left of the name or number indicating the
type of call:
• N indicates an incoming call
• a indicates an outgoing call
• V indicatesa missed call. (Missed calls appearon yourRecent Calls list
only if you haveCaller ID.)
For private calls, anicon appears to theleft of thename ornumber indicatingthe
type of call:
• h indicates a Private Call
• % indicates a Group Call
60
www.motorola.com/iden
Page 69

Recent Calls
Getting Detailed Information About Recent Calls
To get more information about a recent call:
1
From the Recent Callsscreen, press S to scroll to the call you want
more information on.
2
Press m to access the Rec. Calls Menu.ThenpressR to scroll to
View and press B under SELECT.
The Call Details screen that appears displays infor mation such as the name
associated withthe phonenumber of therecent call, the phonenumber, the date,
time, and duration of the call.
Storing a Recent Call Number to the Phonebook
To store a number from the Recent Calls list to the Phonebook:
1
From the Recent Callsscreen, press S to scrollto the number you
want to store.
2
Press B under STORE.
Or,
Press m to access the Rec. Calls Menu.ThenpressR to scroll to
Store and press A under SELECT.
This displays theStore To screen with[New Entry] highlighted.
3
To store a Recent Call numberof Private ID to the Phonebook, follow
step3throughstep6in“Storing PhoneNumber s and Private IDs
Quickly” on page 48.
Calling From the Recent Calls List
See “Making Calls from the Recent Calls List” on page 56.
61
Page 70

Deleting Recent Calls
To delete a recentcall:
1
From the RecentCallsscreen,press S to scroll to the call you want to
delete.
2
Press m to access the Rec. Calls Menu.
3
Press R to scroll to De lete.
4
Press B under SELECT.
5
Press A under YES to confirm the deletion.
To delete allcalls on the Recent Calls list:
1
From the Recent Calls screen, press m to access the Rec. Calls
Menu.
2
Press R to scroll to De lete All.
3
Press B under SELECT.
4
Press A under YES to confirm the deletion.
Accessing Voice Record From Recent Calls
You can accessthe Voice Record feature from RecentCalls and use it to record
spoken messages that you canlisten to later.
1
From the Recent Callsscreen, press m to accessthe Rec. Calls
Menu.
2
Press S to scroll to VoiceRecord.
3
Press B under SELECT.
For more information about Voice Record, see“VoiceRecord” on page 121.
www.motorola.com/iden
62
Page 71

Missed Calls
Missed Calls
Missedcalls are shown on the display screen withthe missed call iconV.
Call Time rs
Call Timers measure the duration of your phone calls, Private or Group calls,
and circuit data use, as well as the number of Kilobytes sent and receivedby
your phone.
The Call Timers menu displays the following options:
• Last Call — displaystheduration of your most recentphonecall.
• PhoneReset— keeps a runningtotal of your phone callminutes, until you
reset it.
• Phone Lifetime — displays the total minutes of all your phone calls.
• Prvt/Grp Reset — keeps a running total of all of your Private and Group
call minutes, until you reset it.
• Prvt/GrpLifetime — displays the total minutes of all your Private and
Groups calls.
• CircuitReset — keeps a running total of all of your circuit data use, until
you reset it.
• Circuit Lifetime — displays the total minutesof all of your circuit data
use.
• Kbytes Reset — keeps a runningtotal of the numberof Kilobytes sentand
receivedby your phone, until you reset it.
To view the Call Timers menu:
1
From the Ready screen, press m.
2
Press R to scroll to Ca ll Timers.
3
Press B under SELECT.
To view or reset a Call Timers option:
1
From the Call Timersmenu, press S to scroll to the Call Timers
option youwant toviewor reset.
63
Page 72

2
Press B under SELECT.
3
If the feature does not include an option to reset or you do not wish to
reset the option, press A under DONE when you are finished viewing.
To reset a feature, press B under RESET.W hen the confirmation
screen appears, press A under YES to confirm the reset.
NOTE:The values displayed by Call Timers should not be used for
billing. Call timers are estimates only.
Hands-Free Speakerphone
The i88s phone provides the convenienceof a hands-free speakerphone for
holding impromptu meetingsor placing safer phone calls. The speakerphone
option (SPEAKER) isavail able whenever you are on an active call.
To turn the speakerphone on:
While on an active call, press B under SPEAKER.
While speakerphone is on, Spkrphone On appearsinthe text displayarea.
To turn the speakerphone off:
Press B under SPEAKER.
Mute
Use the Mute featureto listen to incoming audio without allowing soundfrom
your phone’s microphone to be transmitted over the phone line.
To turn mute on:
While on an active call, press B under MUTE.
While mute is on, UNMUTE appears as a display option.
www.motorola.com/iden
64
Page 73

Call Waiting
To turn mute off:
Press B under UNMUTE.
Call Waiting
Call Waiting allowsyou to receivea second call whileyou are talkingon the
phone. You can switch between callsso you neverhaveto missa call. By
default, Call Waiting is always on unless you turn it off for a specific call.
If you’re on a call and you receive a secondcall,
you will:
• hear a tone; and
• see a message on your display informing
you of another incoming call.
e
Accepting Calls
Press B under YES. The first call is placedon hold.
To end the active call andacceptthe second call, press e.
Switching Between Calls
When you accept a second callwhile you are talkingon the phone,your display
shows thename or numberofeach call.An icon appearstothe left of eachname
or number indicating that the call on hold z or active D.
Press B under SWITCH to switch between calls.
65
Page 74

Declining Calls
Press A under NO. If you subscribe to Voice Mail, the call will be
forwarded to your Voice Mail box.
Ending the Active Call
Press
e.
Tu rning Off Call Waiting
If you do not want to be interruptedduring a call, you can turn Call Waiting off
prior to making/receiving a call.
1
From the Ready screen, press m.PressR to scroll to Settings,and
press B under SELECT.
2
Press R to scroll to In Call Setupand press B under SELECT.
3
Press R to scroll to Call Waiting and press B under CHANGE.
4
Press R to scroll to Off and press B under SELECT.
Call Waiting is now disabled for the next call. It will automatically reset
to On when you hang up.
Call Hold
When you are on an active call,you can place the call on hold and make a
second call.
To place an active call on hold:
1
Press m to access the Calls Menu.
2
Press R to scroll to Ho ld.
www.motorola.com/iden
66
Page 75

Three-Way Calling
3
Press B under SELECT.
4
If you have not placed a secondcall, you can resume this callby
pressing B under RESUME.
To place a second call while the first call is on hold:
1
Enter the second phonenumber you want to call. Or select the number
from your Phonebookby pressing m and selecting Phonebook.
2
Press s to place the second call.
To togglebetween the two calls:
Press B under SWITCH.
To end the activecall:
Press e. The call on hold becomes active.
Three-Way Calling
Using Three-Way Calling, you can combine twoongoing phone calls into one
conversation. While on an activecall, you can make a second call and combine
the two calls. When you place or receive a phone call, the 3-WAY option
appearsin the bottom left-hand corner of the display screen.
To make a three-way call:
1
Place or receive a phone call.
2
While in a call, press m to access Call Menu.
3
Press R to scroll to 3-WAY.
4
Press B under SELECT. The first call will be placedon hold.
67
Page 76

5
Enter the second phonenumber you want to call and press s to place
the secondcall.
Or, access the number from your Phonebook:
Press m andthenpressR to scroll to Phonebook.
Press B under SELECT.
To place the call, see“Making Calls from the Phonebook” on page 54.
6
After you reachthesecond individual, press m.
7
Press R to scroll to 3-WAY.
8
Press B under SELECT. Both calls will appear on your display.
Call Forwarding
CallForwarding forwards calls to thenumberyoudesignate.The followingCall
Forwarding options are available:
• All Calls — When this option is turned on, all calls will be sent
automatically to a number you specify.
• Detailed — Choosing this option enablesyou to forward calls you missed
to different numbers, or to Voice Mail, dependingonwhyyou missed each
call:
• Busy — your phone is engaged in other activities.
• No Answer — you do not answer. The phone willring4 t imes before
forwarding the call.
• Unreachable — your phone is out of coverage or powered off.
You can forward Line1 andLine 2 independently.
68
www.motorola.com/iden
Page 77

Call Forwarding
When your phoneis set to forward all calls,one of the following icons appears
on the top row of your display screentoindicate the call forwarding optionyou
have chosen:
Icon Indicates...
G Line1is active;calls from Line 1arebeing
H Line1is active;calls from Line 2arebeing
I Line 1 is active; calls from Line 1 and Line
J Line2is active;calls from Line 1arebeing
K Line2is active;calls from Line 2arebeing
L Line 2 is active; calls from Line 1 and Line
forwarded.
forwarded.
2 are being forwarded.
forwarded.
forwarded.
2 are being forwarded.
TurningOnCallForwarding
1
Press m then press R to scroll to Call Forward.
2
Press B under SELECT.
3
At the Call Forwardscreen, the Forward field is highlighted. Press
B under CHANGE.
4
Press S to scroll to Al l Calls.
5
Press B under SELECT.
6
Press R to scroll to the To field and press B under CHANGE.
69
Page 78

7
To activate a callforwarding number:
If you have never used Call Forwarding before,theForward screen
appears. To entera call forwarding number, type the number on your
phone’skeypadorpressB under SEARCH to select from numbers
stored in yourphone.Press B under OK.
Or,
If you have used Call Forwarding before, the call forwarding number
youlastusedisdisplayed.PressB under CHANGE to ac cess t he
Forward screen.
To forward your calls to this number, press B under OK.
To forward your calls to a differentnumber, pressand hold A under
DELETE to erase the displayed number. Type the new number on your
phone’skeypadorpressB under SEARCH to select from numbers
stored in yourphone.Press B under OK.
Your calls willnow be forwarded to the number thatyou selected.
Turning Off Call Forwarding
1
Press m then press R to scroll to Call Forward.
2
Press B under SELECT.
The Call Forward screen displays with the Forward field highlighted.
www.motorola.com/iden
70
Page 79

Call Forwarding
3
Press R to scroll to the To field and press B under CHANGE.
4
Press S to scroll to Off and press B
under SELECT.
{
You will now receive allcalls on your phone. When you are unavailable,your
calls will be forwarded according to your Detailed call forwarding settings. By
default, the Detailed option is set to forward your calls to Voice Mail.
SettingCallForwardingtoVoiceMail
In mostcases, turning off CallForwarding restoresyour ability toreceive Voice
Mail messageswhen you are unavailable (see “Turning Off Call Forwarding”
on page 70). If you have completed those steps but are still not able to receive
Voice Mail messages, you can reset Call ForwardingtoVoice Mail.
For you to receive Voice Mail messages, Call Forwarding must be set to
Detailed with your Voice Mailaccess number:
1
Press m then press R to scroll to Call Forward.
2
Press B under SELECT.
The Call Forward screen displays with the Forward field set to
Detailed.
3
Press R to scroll to the If Busy field and press B under CHANGE.
4
The call forwarding number you last used is displayed. Press B under
CHANGE. If this is your Voice Mail access number (the first six digits
of your 10-digit phone number followed by 6245),go to step7.
5
Press and hold A under DELETE to erase the displayed number.
71
Page 80

6
Enter your Voi ce Mail access number.
Your Voice M ail access number is the first six digits of your 10-digit
phone number, followed by 6245. (For example 7035556245.)
7
Press B under OK.
8
Repeat step 3 throughstep 7 for the If No Ans wer field and the If
Unreachable field.
9
When finished, press A under EXIT.
72
www.motorola.com/iden
Page 81

Messages
The main topicscovered in this section are listed below:
MessageCenter Page 73
Voice Mail Page 74
Text and Numeric Messaging Page 76
Net Alert Page 78
Using Your Phone as a Modem Page 79
Message Center
The Message Centerenables you to access allmessaging services through one
screen.
To access the Message Center:
If MESG is one of your display options:
From the Readyscreen, press B under MESG.
If MESG is not one of your display options:
1
From the Ready screen, press m.
2
Press R to scroll to M essages.
3
Press B under SELECT.
The Message Center screen displays the number of messages you have in each
message service — Voice Mail (Voice Mail),Text Msgs(Text and Numeric
Messages), and Net Alerts (Net Mail).
73
Page 82

To access any message service:
1
From the Message Centerscreen, press R to scroll to the message
serviceyou wanttoaccess.
2
Press B under the display optionon the right. This option varies
depending on the message serviceselected.
Voice Mail
New Message Indicators
When you receive a new message:
• NewVoiceMail Message willdisplayonthescreen.
f
• Your phone will alert you every 30 seconds until youpressB under
CALL or A under EXIT. (If you are on a call,yourphone will alert you
once during the call.)
Transferring Ca lls to Voice Mail
Press A under NO while your phone is ringing to transfer incoming
calls directly to Voice Mail.
www.motorola.com/iden
74
Page 83

Using Voice Mail
Logging Into Voice Mail
1
From the Ready screen, press B under
MESG to open up the MessageCenter
screen.
2
Voice Mail should be highlighted to
indicate that it is selected. If it isn’t
highlighted, pressS to scroll tothe Voice
Mail field.
The number of new messages and the total
numberof messages are displayed.
Using Voice Mail
A
g
3
Press B under CALL to log into your Carrier’s V oice Mail System.
Calling displays asyou are connected to the network.
75
Page 84

Text and Numeric Messaging
With Text and Numeric Messaging, your i88s phone will:
• Allow text(alpha) messagesup to 140 charactersin length.
• Allow numeric messages up to 20 characters in length.
• Accept your messages even if you are unavailable, if your phone is turned
off,or if you are busy on anothercall.
• Alertyouof a new text or numeric message,even if you are onanother call.
• Store a message if you are making a Private or Groupcall and deliver it
upon completion ofthecall.
• Store the message if you are outsideof the coverage area and deliverit as
soon as you are back in a coverage area.
• Attemptcontinuous delivery of messagesuntil successful, for up to 7 days.
• Refer to textand numeric messages asText Messages.
• Stamp the message with the time and date the message was left.
• Storeupto16messagesatatime,thatwillremainuntilyoudeletethem.
NOTE:“Mail Waiting, Memory Full” displays when 16 message
registers are full. (Messages must be erased before you can
receive others.)
• Allow for “Auto Call Back” of a phone number that is included within a
message,by pressing s. If the message contains twophone numbers,Auto
Call Back will dial the last number.
Notification of New Messages
When you receive a new message:
• New Text Message willdisplayonthescreen.
76
i
www.motorola.com/iden
Page 85

Text and Numeric Messaging
• Your phone will alert you every 30 seconds until youpressB under
READ or A under EXIT. (If you are on a call, your phone willalert you
once during the call.)
Accessing New Messages
When you receive a message, you can view it immediately or later:
View a Message Immediately
1
Press B under READ. The message displays.
2
If the messagefills more than one screen, use S to scroll through the
rest of the message.
3
Press A under SAVE to save the message.
Or,
Press B under DELETE to delete the message.
Viewing a Message Later
PressA underEXIT.The
Ready screen to remindyouthat you have a stored message.
. icon willappear on the second lineof the
Viewing Stored Messages
1
In the Message Center screen, press S to scroll down to Text Msgs.
The number of new messages and the total number of messagesare
displayed.
2
Press B under SELECT.The Text Msg Inbox screen appears.
3
Press S to scroll to the message you want to read and press B under
READ.
4
If the messagefills more than one screen, use S to scroll through the
rest of the message.
77
Page 86

5
Press A under SAVE to save the message.
Or,
Press B under DELETE to delete the message.
Net Alert
NOTE:This feature may not be offered by your service provider.
With Net Alert, you can send text and numeric messages in any of three ways:
• from your i88s phone
• from a web site provided by your service provider
• from any emailapplication
When you receive a new message:
• Words will display on yourphone’s display screenindicating thatyou have
a Net Alert message.(The exact words displayed are determined by your
serviceprovider.)
• Your phone will alert you every 30 seconds until your press B to access
the messageor A to or exit the screen.
If you choose to exit the screen and view the message later, the
appear on the secondlineof the Ready screen to remind you that you have a
stored message.
You can view new or storedNet Alert messages at any time byaccess the
Message Center. For more information, see “Message Center” on page 73.
. icon will
Using Your Phone as a Modem
NOTE: Some features may be network dependent or subscription only,
and may not be available in all areas. Contact your service
provider for more information.
You can use your i88s phone as a m odem for data transfer from your laptop,
handheld device, or desktopcomputer. This is particularly usefulwhen there is
no wired phone line (wall jack) available.
www.motorola.com/iden
78
Page 87

Using Your Phone as a Modem
You simply attacha data cable (available separately) to your phone and your
computer. From that point, your phone is your modem.Thisallows you to send
or receive time-critical information such as email, a field service report, or files.
In addition, you can also send or receive faxes.
This type of wireless connection uses oneof two types ofdataconnection:
circuit-switched data and packet data.
• Circuit-switched dataistypically used for sending and receivingfaxes and
for transferring large files.
• Packetdata is used for smallfile transfers such as email.
To use theseservices,you must installthe iDEN Wireless DataServices
software (available separately). For more information on settingup your
computer and your i88s phone for Packet and Circuit Data calls, seethe
Wireless Data Services User’s Guide and contact your carrier.
TTY Users
You can use your phone and computer in TTY mode. Your computer
screen and keyboard replacethestandard TTY device. For more
information, please see the Wireless Data Services User’s Guide.
79
Page 88

80
www.motorola.com/iden
Page 89

Private Calls
The main topicscovered in this section are listed below:
Private Call Page 81
Call Alerts Page 84
Group Call Page 88
Private Call
There are twoways to reach an individual usingPrivate calls.You can enter the
person’s Private ID number then press the Push-To-Talk (PTT) button. Or, you
can store the person’s nameand Private IDnumber, thenrecall the numberfrom
your Phonebook. Whetheryoudial the person’s Private ID directly or store it in
your Phonebook, you must have the individual’s PrivateID to usePrivate calls.
To learn how to store names and numbers, see “Phonebook” on page 39.
USER TIP: To find out your own Private ID number, see “My
Making a Private Call from the Keypad
1
Enter the Private ID of the person you are trying to call.
2
Press and hold the PTT button on the side of the phone. Begin talking
after the phone emits a chirping sound.
Information” on page 24.
3
Releasethe PTT buttonto listen.
81
Page 90

Making a Pr ivate C all from the Phoneboo k
If you have stored a person’s Private ID in your Phonebook,you can use your
Phonebook to make a Private call to that person:
1
From the Ready screen, press m.
2
Press R to scroll to the Phonebook.PressB under SELECT.
3
From the Phonebook screen, press S to scrollthrough the namesuntil
the desiredname ishighlighted.
If more than one number is stored for an entry, press T until
idisplays.
4
Press and hold the PTT button on the side of the phone. Begin talking
after the phone emits a chirping sound.
5
Releasethe PTT buttonto listen.
Making a Private Call from the Recent Call List
1
From the Ready screen, press m.
2
Press R to scroll to the Recent Calls.PressB under SELECT.
3
From theRe cent Calls screen,press S to scroll through thenames and
numbers until the desired name or Private ID number is highlighted.
If more than one number is stored for an entry, press T until
idisplays.
4
Press and hold the PTT button on the side of the phone. Begin talking
after the phone emits a chirping sound.
5
Releasethe PTT buttonto listen.
www.motorola.com/iden
82
Page 91

Private Call
Making Calls Using Voice-Activated Dialing
If you have recordeda voice name for a Private ID in your Phonebook (see
“Voice Names” on page 41), you can use this voice name to call the number.
1
From the Ready screen, press and hold t on the side of your phone
until the Say Name Now screen appears.
2
Speaking into the microphone, saythevoicename assigned to the
Private ID you want to call.
3
Your phone will play the name back to you. Press the PTT button.
USER TIP: If you have difficulty making phone calls using a voice
name, try assigning a longer voice name to the number. For
example, if the voice name “Joe” fails to plac e a call to Joe
Smith’s number, try assigning the voice name “Joe Smith”
to the number.
Receiving a Private Call
When your eceive a Private call,your phoneemits a chirpi ng sound and Private
in Use appears on the screen.The Private ID or the name of the caller (if stored
in your Phonebook)displays. To respond to a Private Call:
1
Wait for the caller to finish speaking.
2
Press and hold the PTT button. Begin talking after the phone emits a
chirpingsound.
3
Release the PTT button to listen.
Storing P ri vate IDs
For information store Private ID numbers to your Phonebook, see “Adding
Phonebook Entries” on page 44.
For informationon how to quickly storePrivate IDnumbers,see “StoringPhone
Numbers and Private IDs Quickly” on page 48.
83
Page 92

Call Alerts
You can send a call alert,which lets recipients know that you wouldliketotalk
with them. When you send an alert, the recipient will receive a series of beeps
and your name or PrivateID will appear on the display.
Placing a Call Alert from the Keypad
1
Enter the Private ID of the person you want to call.
2
Press B under ALERT.The ReadytoAlertscreen displays.
3
Pressand hold thePTT buttonuntil Alert Successful displays. Thealert
sounds intermittently until the user of the phone answers, queues, or
clears the alert.
Placing a Call Alert from the Phonebook
1
From the Ready screen, press m.
2
Press R to scroll down to Phonebook.PressB under SELECT.
3
From the Phonebook screen,press S to scroll to the Phonebook entry
for the person you want toalert.
If more than one number is stored for an entry, press T until
idisplays.
84
www.motorola.com/iden
Page 93

Call Alerts
4
Press B under ALERT.The Ready to
Alert screen appears.
V
5
Pressand hold thePTT buttonuntil Alert Successful displays. Thealert
sounds intermittently until the user of the phone answers, queues, or
clears the alert.
Ready to Alert Screen
ReadytoAlertis used to confirm your requestfor the alert and to promptyou
to push the PTT button:
• If youpress the PTTbutton, thecallalert is sent, and thephone displaysthe
RecentCalls screen.
• For call alerts placedfrom thekeypad,pressingA under CANCELcauses
the phone to return to the Dial screen with the previously entered number
displayed.
• For call alertsplaced from the Phonebook,pressing A under CANCEL
causes the phone to return to the Phonebook screen.
• If you do nothing, the phone will revert to the Ready screen.
Receiving Call Alerts
Whenyoureceiveacall alert,your phoneemits a chirpanddisplays thenameor
number of thecaller. You can answer, queue, or clear thecallalert:
• To answer a call alert, press the PTTbutton.
• To queue a call alert, press B under QUEUE.
• To clear the call alert, press A under CLEAR.
NOTE:Until you answer, queue or clear the Call Alert, you will not
receive any additional phone, Private or TalkgroupCalls.
85
Page 94

Call Alert Queue
Call alert queuing enables you to save call alerts in a list, or queue. To store a
call alertin the call alert queue, pressB under QUEUE when you have
received an incoming call alert.
Accessing the Call Alert Queue
1
From the Ready screen, press m.
2
Press R to scroll to Ca l l Alert.
3
Press B under SELECT.The Call Alert Queue screen displays.
Viewing Call AlertDateandTime
Tofindoutthedateandtimeacallalertwasreceived:
1
From the CallAlertQueuescreen, press S to scroll to the desired call
alert.
2
Press m to access Call Alert Menu.
3
Press R to scroll to View.
4
Press B under SELECT.
Sorting Call Alerts
To sort your call alerts by the order they were received:
1
From the Call Alert Queue screen, press m to access Call Alert
Menu.
2
Press S to scroll to Sort By.
3
Press B under SELECT.
www.motorola.com/iden
86
Page 95

4
Press S to scroll to Fi rst on Top or Last on Top.
5
Press B under SELECT.
Responding to a Call Alert From the Queue
1
From the Call Alert Queue screen, press S to scroll to the call alert
you want to respond to. You can respond by sending a call alert or
placing a Private call.
2
To send a call alert, press B under ALERT and then pressthePTT
button.
Or,
To place a Private call,press the PTT button.
The call alert willbe removed from the queue.
Deleting a Call Alert From the Queue
To delete a call alert from the queue:
1
From the Call Alert Queue screen, press S to scroll to the entry you
want to delete.
Call Alerts
2
Press m to access Call Alert Menu.
3
Press R to scroll to De lete.
4
Press B to SELECT.
5
When the confirmation screen appears, press B under YES to delete
allcallalerts.
87
Page 96

To delete allcall alerts fromthe queue:
1
From the Call Alert Queue screen, press m to access Call Alert
Menu.
2
Press R to scroll to De lete All.
3
Press B to SELECT.
4
When the confirmation screen appears, press B under YES to delete
the entry.
Group Call
In a Group call, you can communicate instantly with a group of people thatyou
have previously set up as a Talkgroup.
Your sales representativemust set up your Talkgroups byproviding you with a
Talkgroupnumbe r for each Talkgroup. After you have the number, you can
assigneach Talkgroupnumber a nameand storei t in yourphone (see “Naminga
Talkgroup” on page 88).Your phone can store up to 30 Talkgroups.
You can make calls to any of the Talkgroups in your Phonebook at any time.
However, toreceive calls from a Talkgroup, you must first join that Talkgroup
(see “JoiningaTalkgroup” on page 90.)
Naming a Talkgroup
1
From the Ready screen, press m.
2
Press R to scroll to Phonebook.
3
Press B under SELECT.
4
Press S to scroll to Ne w Entry.
5
Press B under SELECT.The Entry Detailsscreen displays.
6
Enter the information as you would any other Phonebook entry. (See
“Adding PhonebookEntries”onpage 44.) Whenyou gettoType,make
sure that you select Talkgroup.
www.motorola.com/iden
88
Page 97

7
Enter the Talkgroup name or number.
8
When you have completed the Entry Details,pressA un der DONE.
Making a Group Call from the Keypad
1
Press # and then enter the Talkgroup number of the group that you
want to call.
2
Press and hold the PTT button on the side of the phone, wait for your
phone to emit a chirpingsound, and speak.
The phones of individuals in the Talkgroup may emit a chirping sound
to alert them that someone is calling, or may simplyemit the sound of
your voice when you start speaking. If a phone receiving a Group call
has Speakerphone set to On (see “Hands-Free Speakerphone” on page
64), it will not emita chirping sound beforeyourvoice.
3
Releasethe PTT buttonto listen.
Making a Group Call from the Phonebook
1
From the Phonebook screen, press R to scroll to the name of the
Talkgroup you want to call.
Group Call
2
Press and hold the PTT button on the side of the phone, wait for your
phone to emit a chirpingsound, and speak.
The phones of individuals in the Talkgroup may emit a chirping sound
to alert them that someone is calling, or may simplyemit the sound of
your voice when you start speaking. If a phone receiving a Group call
has Speakerphone set to On (see “Hands-Free Speakerphone” on page
64), it will not emita chirping sound beforeyourvoice.
3
Releasethe PTT buttonto listen.
89
Page 98

Making a Group Call from the Recent Calls List
1
From the Recent Calls screen, press R to scroll to the name of the
Talkgroup you want to call.
2
Press and hold the PTT button on the side of the phone, wait for your
phone to emit a chirpingsound, and speak.
The phones of individuals in the Talkgroup may emit a chirping sound
to alert them that someone is calling, or may simplyemit the sound of
your voice when you start speaking. If a phone receiving a Group call
has Speakerphone set to On (see “Hands-Free Speakerphone” on page
64), it will not emita chirping sound beforeyourvoice.
3
Releasethe PTT buttonto listen.
Receiving a Group Call
When you receive an incoming Group call, your phone may emit a chirping
sound followed by the voiceoftheperson calling,or may simply emit the voice
of the personal call ing. If you have Speakerphone set to On (see “Hands-Free
Speakerphone” onpage 64) yourphone willnotchirp whenyoureceive a Group
call; you will simply hear the caller’s voice.
To respond to a Group call:
1
Wait for the caller to finish speaking.
2
Press and hold the PTT button to talk. Release the PTT button to listen.
Joining a Talkgroup
To receive Groupcalls from a Talkgroup, you must first join the Talkgroup.
You may only belong to one Talkgroupata time. When you join a new
Talkgroup,you no longer belongto your previous Talkgroup.
www.motorola.com/iden
90
Page 99

Group Call
To join an ongoing Talkgroup:
1
Using the keypad, press # then enter the Talkgroup number.
Or,
From the Phonebook screen, press R to scroll to the name of the
Talkgroupyou want to call.
Or,
If the Talkgroup you want to join is on your Recent Call list, go to the
RecentCallscreen and press R to scroll to the name of the Talkgroup
youwanttocall.
2
Press B under JOIN.
Group-Silent Programming
Group-Silent programming enables you to silence incoming Group alerts and
voice communication.
Turning Group-Silent On or Off
1
From the Ready screen, press m.
2
Press R to scroll to Settings.PressB under SELECT.
3
Press R to scroll to Tkgrp Settings.PressB underSELECT.
4
With the Silent field highlighted, press B under CHANGE.
5
Press S to scroll to On or Off.
6
Press B under SELECT.
91
Page 100

92
www.motorola.com/iden
 Loading...