

Page 1

iDEN
i1000 - Multi-Service Wearable
Motorola
®
Digital Portable
TM
Getting Started
June 17, 1998
68P81088C88-O
0
i1000
GETTING STARTED
Page 2

CONTENTS
YOUR i1000 PORTABLE . . . . . . . . . . . . . . . . . . . . . . . . . . . . 1
About Your Portable’s Features . . . . . . . . . . . . . . . . . . . . . . . . . . .1
Features of Your
Battery . . . . . . . . . . . . . . . . . . . . . . . . . . . . . . . . . . . . . . . . . . . . . . 4
Charging the Battery . . . . . . . . . . . . . . . . . . . . . . . . . . . . . . . . 4
Attaching the Battery . . . . . . . . . . . . . . . . . . . . . . . . . . . . . . .4
Detaching the Battery . . . . . . . . . . . . . . . . . . . . . . . . . . . . . . .4
Battery and Charging Status . . . . . . . . . . . . . . . . . . . . . . . . . .4
Display Icons . . . . . . . . . . . . . . . . . . . . . . . . . . . . . . . . . . . . . . . . .5
Turning On Your Portable . . . . . . . . . . . . . . . . . . . . . . . . . . . . . . .6
Turning Off Your Portable . . . . . . . . . . . . . . . . . . . . . . . . . . . . . . .6
Speakerphone . . . . . . . . . . . . . . . . . . . . . . . . . . . . . . . . . . . . . . . . .7
VibraCall™ . . . . . . . . . . . . . . . . . . . . . . . . . . . . . . . . . . . . . . . . . .7
Selecting All Incoming Calls and Messages . . . . . . . . . . . . . .8
Selecting Individual Services . . . . . . . . . . . . . . . . . . . . . . . . .8
Turning Off Group and Private Modes . . . . . . . . . . . . . . . . . . . .10
Setting the Time and Date Format . . . . . . . . . . . . . . . . . . . . . . . .12
Storing Numbers in the Phone and Private Lists . . . . . . . . . . . . .14
Entering Phone Numbers Using the Keypad . . . . . . . . . . . .14
Entering a Name Using the Keypad . . . . . . . . . . . . . . . . . . . 14
Entering Names and Numbers . . . . . . . . . . . . . . . . . . . . . . .15
Editing and Erasing Phone List Contents . . . . . . . . . . . . . . .17
Editing and Erasing Private ID List Contents . . . . . . . . . . . .17
Changing the Display Language . . . . . . . . . . . . . . . . . . . . . . . . .18
Modes and Menus . . . . . . . . . . . . . . . . . . . . . . . . . . . . . . . . . . . .19
Modes . . . . . . . . . . . . . . . . . . . . . . . . . . . . . . . . . . . . . . . . . .19
Menus . . . . . . . . . . . . . . . . . . . . . . . . . . . . . . . . . . . . . . . . . .19
1000 . . . . . . . . . . . . . . . . . . . . . . . . . . . . . . . . .2
i
PHONE MODE . . . . . . . . . . . . . . . . . . . . . . . . . . . . . . . . . . . .23
At First Glance . . . . . . . . . . . . . . . . . . . . . . . . . . . . . . . . . . . . . . .23
Making a Phone Call . . . . . . . . . . . . . . . . . . . . . . . . . . . . . . . . . .24
Emergency Dial . . . . . . . . . . . . . . . . . . . . . . . . . . . . . . . . . . .25
Automatic Redial . . . . . . . . . . . . . . . . . . . . . . . . . . . . . . . . .25
Last Number Redial . . . . . . . . . . . . . . . . . . . . . . . . . . . . . . .25
Receiving a Phone Call . . . . . . . . . . . . . . . . . . . . . . . . . . . . . . . .26
Programming Your Own Phone Number . . . . . . . . . . . . . . . . . . .27
Selectable Ring Styles . . . . . . . . . . . . . . . . . . . . . . . . . . . . . . . . .27
Call Forwarding . . . . . . . . . . . . . . . . . . . . . . . . . . . . . . . . . . . . . .28
Selecting a Call Forward Number . . . . . . . . . . . . . . . . . . . . . 28
Unconditional Call Forwarding . . . . . . . . . . . . . . . . . . . . . .29
Conditional Call Forwarding . . . . . . . . . . . . . . . . . . . . . . . .29
i1000
GETTING STARTED
i
Page 3

Call Waiting . . . . . . . . . . . . . . . . . . . . . . . . . . . . . . . . . . . . . . . . .31
Call Hold . . . . . . . . . . . . . . . . . . . . . . . . . . . . . . . . . . . . . . . . . . .31
3-Way Calling . . . . . . . . . . . . . . . . . . . . . . . . . . . . . . . . . . . . . . .32
Alternate Phone Line . . . . . . . . . . . . . . . . . . . . . . . . . . . . . . . . . . 32
Setting the Active Line . . . . . . . . . . . . . . . . . . . . . . . . . . . . .33
Receiving a Call . . . . . . . . . . . . . . . . . . . . . . . . . . . . . . . . . .33
Receiving Calls on Your Second Line . . . . . . . . . . . . . . . . .33
PRIVATE MODE . . . . . . . . . . . . . . . . . . . . . . . . . . . . . . . . . . 35
At First Glance . . . . . . . . . . . . . . . . . . . . . . . . . . . . . . . . . . . . . . .35
Group/Private Speaker . . . . . . . . . . . . . . . . . . . . . . . . . . . . . . . . .36
Making a Private Call . . . . . . . . . . . . . . . . . . . . . . . . . . . . . . . . . . 36
Receiving a Private Call . . . . . . . . . . . . . . . . . . . . . . . . . . . . . . . .37
Programming Your Private ID . . . . . . . . . . . . . . . . . . . . . . . . . . . 37
Recalling Your Private ID . . . . . . . . . . . . . . . . . . . . . . . . . . . . . .37
Call Alert™ . . . . . . . . . . . . . . . . . . . . . . . . . . . . . . . . . . . . . . . . . 38
Sending a Call Alert . . . . . . . . . . . . . . . . . . . . . . . . . . . . . . .38
Receiving a Call Alert . . . . . . . . . . . . . . . . . . . . . . . . . . . . . .38
Call Alert Stacking . . . . . . . . . . . . . . . . . . . . . . . . . . . . . . . . . . . .38
Receiving a Call Alert with Stacking . . . . . . . . . . . . . . . . . . 39
Responding to a Call Alert in the Stack . . . . . . . . . . . . . . . .39
GROUP MODE . . . . . . . . . . . . . . . . . . . . . . . . . . . . . . . . . . . . 41
At First Glance . . . . . . . . . . . . . . . . . . . . . . . . . . . . . . . . . . . . . . .41
Group/Private Speaker . . . . . . . . . . . . . . . . . . . . . . . . . . . . . . . . .42
Making a Group Call . . . . . . . . . . . . . . . . . . . . . . . . . . . . . . . . . .42
Changing Talkgroups . . . . . . . . . . . . . . . . . . . . . . . . . . . . . . . . . . 42
Receiving a Group Call . . . . . . . . . . . . . . . . . . . . . . . . . . . . . . . .43
Area Selection . . . . . . . . . . . . . . . . . . . . . . . . . . . . . . . . . . . . . . .43
Talkgroup Naming . . . . . . . . . . . . . . . . . . . . . . . . . . . . . . . . . . . .43
Call Alerts . . . . . . . . . . . . . . . . . . . . . . . . . . . . . . . . . . . . . . . . . .43
VOICE MAIL . . . . . . . . . . . . . . . . . . . . . . . . . . . . . . . . . . . . . 45
Retrieving Voice Mail . . . . . . . . . . . . . . . . . . . . . . . . . . . . . . . . .45
Viewing Voice Mail Status . . . . . . . . . . . . . . . . . . . . . . . . . . . . .45
MESSAGE MAIL™ . . . . . . . . . . . . . . . . . . . . . . . . . . . . . . . . 47
Receiving New Message Mail . . . . . . . . . . . . . . . . . . . . . . . . . . .47
Retrieving Stored/Unread Mail . . . . . . . . . . . . . . . . . . . . . . . . . . 47
Saving and Erasing Mail . . . . . . . . . . . . . . . . . . . . . . . . . . . . . . .48
Auto Call Back . . . . . . . . . . . . . . . . . . . . . . . . . . . . . . . . . . . . . . .48
Message Mail Memory Full . . . . . . . . . . . . . . . . . . . . . . . . . . . . . 48
ii
i1000
GETTING STARTED
Page 4

PROGRAMMING MENU OPTIONS . . . . . . . . . . . . . . . . . 49
ERROR MESSAGES . . . . . . . . . . . . . . . . . . . . . . . . . . . . . . .55
ACCESSORIES . . . . . . . . . . . . . . . . . . . . . . . . . . . . . . . . . . .57
Safety Instructions. . . . . . . . . . . . . . . . . . . . . . . . . . . . . . . . . . . . .57
Batteries . . . . . . . . . . . . . . . . . . . . . . . . . . . . . . . . . . . . . . . . . . . . 59
Battery Operating Instructions . . . . . . . . . . . . . . . . . . . . . . .59
Charging Lithium Ion Batteries . . . . . . . . . . . . . . . . . . . . . .59
Travel Charger . . . . . . . . . . . . . . . . . . . . . . . . . . . . . . . . . . . . . . .60
Installing the Travel Charger . . . . . . . . . . . . . . . . . . . . . . . .60
Travel Charger Operating Specifications . . . . . . . . . . . . . . . 60
Vehicular Battery Charger . . . . . . . . . . . . . . . . . . . . . . . . . . . . . .61
Installing the Vehicular Battery Charger . . . . . . . . . . . . . . .61
Removing the Vehicular Battery Charger . . . . . . . . . . . . . . . 62
Vehicular Battery Charger Operating Specifications . . . . . .62
Desktop Charger . . . . . . . . . . . . . . . . . . . . . . . . . . . . . . . . . . . . . . 63
Charging a Battery . . . . . . . . . . . . . . . . . . . . . . . . . . . . . . . .63
Desktop Battery Charger Troubleshooting . . . . . . . . . . . . . .64
Audio Adapter . . . . . . . . . . . . . . . . . . . . . . . . . . . . . . . . . . . . . . .65
Installation Instructions . . . . . . . . . . . . . . . . . . . . . . . . . . . . .65
Attaching/Detaching the Earpiece Microphone . . . . . . . . . .65
Removing the Audio Adapter . . . . . . . . . . . . . . . . . . . . . . . .65
SAFETY AND GENERAL INFORMATION . . . . . . . . . . . 67
Radio Operation . . . . . . . . . . . . . . . . . . . . . . . . . . . . . . . . . . . . . .67
Cleaning Instructions . . . . . . . . . . . . . . . . . . . . . . . . . . . . . . . . . .72
For Further Information . . . . . . . . . . . . . . . . . . . . . . . . . . . . . . . .72
Owner’s Information . . . . . . . . . . . . . . . . . . . . . . . . . . . . . . . . . .73
Private Number Directory . . . . . . . . . . . . . . . . . . . . . . . . . . . . . . 74
Talkgroup Directory . . . . . . . . . . . . . . . . . . . . . . . . . . . . . . . . . . .74
i1000
GETTING STARTED
iii
Page 5

Patent Information
This product is protected under one or more of the following
patents:
4817157, 4896361, 4857928, 5041793, 5060294, 5066923, 5134718,
5140156, 5239963, 5257411, 5287387, 5265219, 5289504, 5316168,
5317247, 5338396, 5389927, 5406588, 5424921, 5457376, 5460906,
5551063, 5557079, 5596487, 5615412, 5638403, 5559468, 5469465,
5170413, 5140615, 5519730, 5241544, 5584059, 5574992, 5396656,
5487091, 5533004, 5299199, 5343499, 5369501, 5509031, 5515379,
5528723, 5598417, 5066923, 5241650, 5278833, 5359696, 5548631,
5410632, 5440582, 5457735, 5457818, 5471670, 5477550, 5481537,
5566181, 5229767, 5208804, 5295140, 5381449, 5440590, 5467398,
5490230, 5620242, 5623523, 5655913
Trademarks
, Motorola, VibraCall, Call Alert, and Message Mail are trademarks or
registered trademarks of Motorola, Inc.
iDEN is a registered trademark of Motorola, Inc.
®Reg. U.S. Pat. & Tm. Off.
All other trademarks mentioned in this manual are trademarks of their
respective companies.
Important!
Be sure to read “Safety and General Information” on
page 67 before using your i1000 Portable.
© Copyright 1998, Motorola, Inc. All rights reserved.
iv
i1000
GETTING STARTED
Page 6

YOUR i1000 PORTABLE
ongratulations on purchasing your Motorola iDEN i1000
multi-service digital portable. Superior features and state-of-
C
the-art technology help to keep you in constant touch with all
of your business and personal contacts.
The sleek, compact design of the i1000 portable:
• Makes it easy to wear or to carry in your pocket or purse.
• Provides a speakerphone feature for placing hands-free
incoming and outgoing phone calls.
• Includes a protective cover that, when open, provides a
comfortable earpiece.
he i1000 portable offers the following functions:
T
▲ ▲ ▲ ▲ ▲
Phone
Private
Group
Voice Mail
Message Mail
ABOUT YOUR PORTABLE’S FEATURES
Your i1000 Portable
You can use various features of your portable with the cover open or
closed. Look for special operating instructions in this manual.
This manual describes the features that most people use every day.
However, your service provider or organization might have
customized the portable for your individual needs. For more
information, check with your service provider or organization.
Additional information for your iDEN Digital Portable
can be found on the Motorola iDEN web site at:
http://www.mot.com/LMPS/iDEN
i1000
GETTING STARTED
1
Page 7
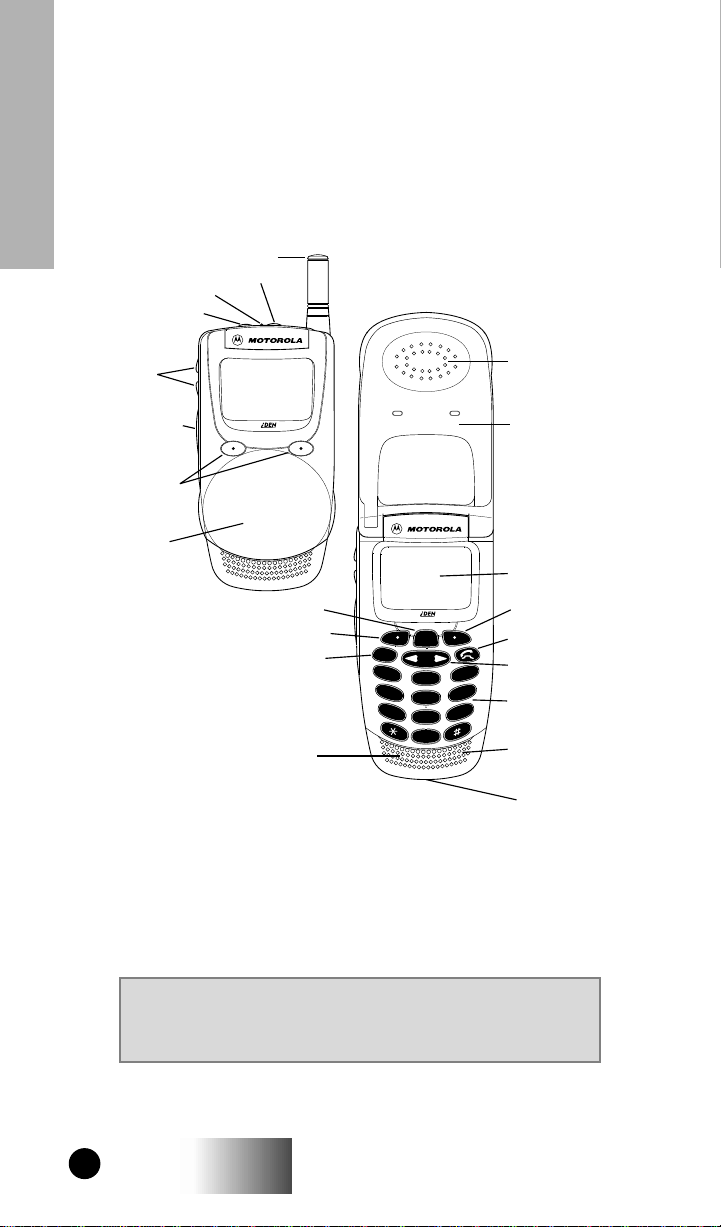
FEATURES OF YOUR i1000
Your i1000 Portable
1. Antenna
2. On/Off Key
3. LED
4. Speaker Key
5. Volume
Control
Buttons
6. Push-To-Talk
(PTT) Button
7. Option Keys
8. Flip Cover
(Closed)
9. Menu Key
7. Option Key
10. Mode Key
11. Speaker
Mode
12. Earpiece
8. Flip Cover
(Open)
13. Alphanumeric
Display
7. Option Key
MENU
1
abc
2
4
ghi
jkl
5
7
pqrs
tuv
8
0
def
3
mno
6
wxyz
9
14. SEND/END Key
15. Scroll Key
16. Alphanumeric
Keypad
17. Microphone
18. Accessory Connector
NOTE
Remove the three plastic film lens protectors fr om the
display and cover before initial use.
2
i1000
GETTING STARTED
Page 8

1. Antenna
2. On/Off Key
3. LED
4. Speaker Key
5. Volume Control
Buttons
6. Push-To-Talk (PTT)
Button
7. Option Keys
8. Cover
9. Menu Key
10. Mode Key
Your i1000 Portable
Extend for optimal signal.
Press to turn your portable on or off.
Check the i1000Õs status. See page 6 for
more information.
Press to set incoming calls through either the
earpiece or the speaker during Group and
Private calls.
Press to adjust volume levels.When using the
List menu option, press to scroll forward and
backward.
Transmit a Group or Private Call, or a Call
Alert. Press and hold the PTT button to talk;
release it to listen.
Press to select a menu option on the display
that appears directly above the left or right
option key.
Protect the keypad.
Press to scroll through menu options.
Press to change between Phone, Group, and
Private modes.
11. Speaker
12. Earpiece
13. Alphanumeric
Display
14. Send/End Key
15. Scroll Key
16. Alphanumeric
Keypad
17. Microphone
18. Accessory
Connector
Listen to Group and Private (high-audio)
conversations. Listen to Phone calls in
Speakerphone mode.
Hold to your ear to listen during Phone calls
and Group/Private (low-audio) conversations.
Listen to calls when the speakerphone is
turned off.
View up to four lines (up to 12 characters per
line) on the display.
Press to answer an incoming Phone call.
After entering a phone number, press to
begin an outgoing Phone call or to redial the
entered phone number.
Press to end Phone calls.
Press the left side to scroll backward or the
right side to scroll forward through menu
options and lists.
Enter telephone numbers, Private call IDs,
and alphanumeric characters.
Use to speak during outgoing calls.
Use to connect accessories.
i1000
GETTING STARTED
3
Page 9
BATTERY
Charging the Battery
To get the maximum use from the battery, charge it for at least three
hours before you use it for the first time.
Attach the charger connector to the i1000 then connect the adapter
Your i1000 Portable
to an electrical outlet.
“Accessories” on page 57.
For more information about chargers, see
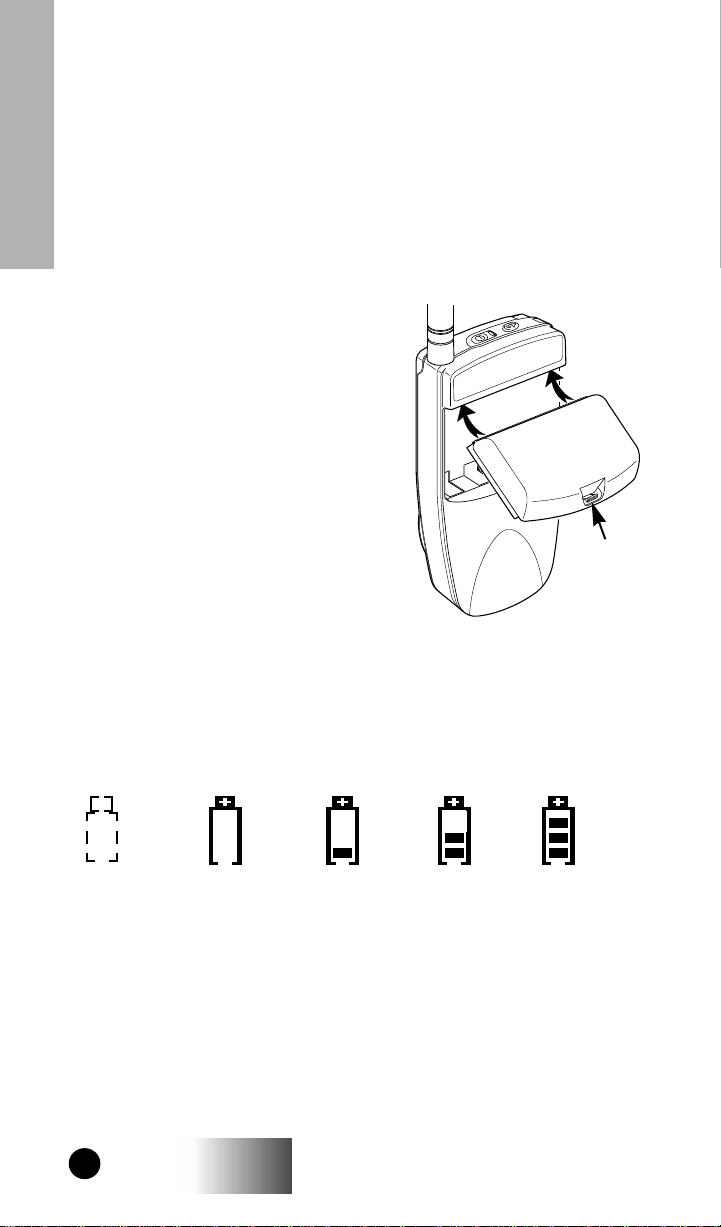
Attaching the Battery
To attach the battery to your i1000,
align the battery as shown and press
down on the battery until you hear a
click.
Detaching the Battery
To detach the battery, press the latch
to release the battery and slide the
battery downward.
Latch
Battery and Charging Status
A low battery is indicated by a short, chirp-like sound through the
speaker. The battery strength icons display battery level
information, as shown below. The battery indicators show the
battery level during both operation and charging.
Low
Battery Icon
ßashes
4
0-30% 31-60% 61-90% 90-100%
i1000
GETTING STARTED
Page 10
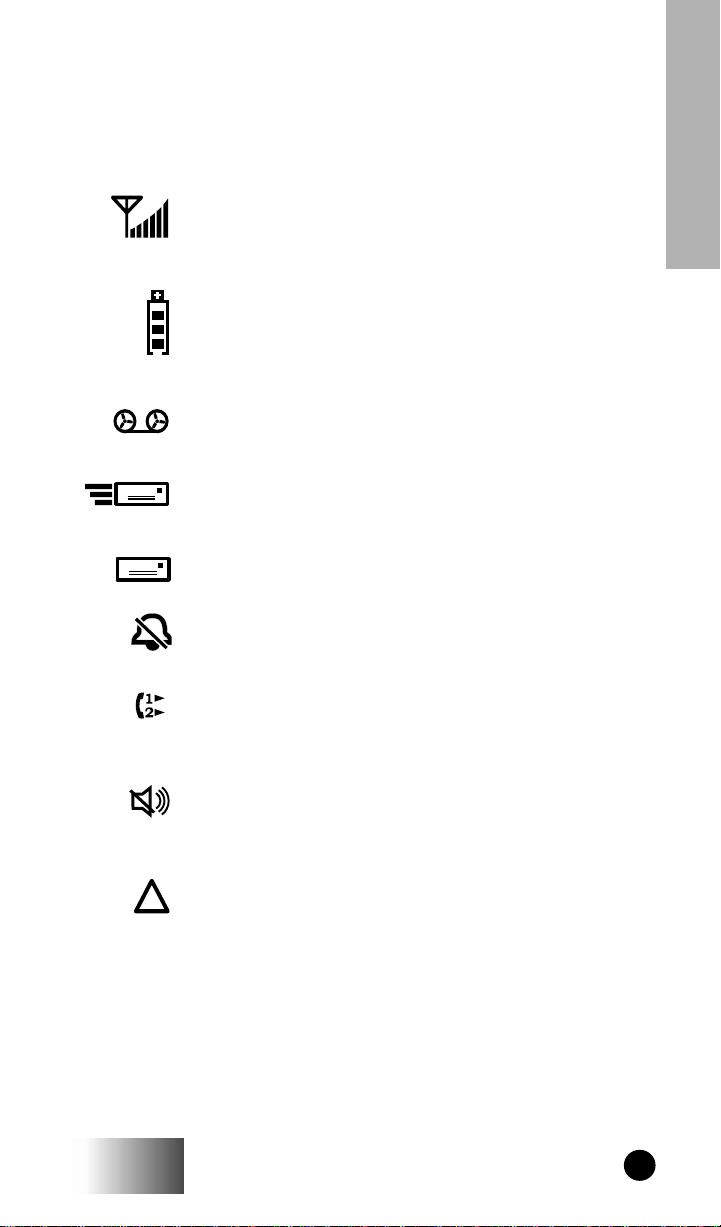
DISPLAY ICONS
After you turn on the portable and use various features, icons appear
on the screen to inform you of existing conditions.
Some of the following icons may appear along the top of the display.
Signal Strength Indicator
Shows the signal strength. Six bars indicate the
strongest signal. Calls and messages may not be
sent or received in weak signal areas.
Battery Strength Indicator
Shows the remaining charge in your battery. Three
bars show full charge. The indicator flashes when
you have less than five minutes of talk time
remaining.
Voice Mail
Indicates that unplayed messages are waiting in
your voice mail box
New Message Mail
Indicates that you have new text messages in your
mail box.
Unread Message Mail
Indicates that you have unread Message Mail.
Vibrate All
Indicates that the Vibrate All option is turned on.
You will not hear a ring tone.
Call Forward/Active Line Indication
Indicates that incoming phone calls are being
forwarded and displays the associated phone line
(1, 2, or both).
Group/Private Speaker
Indicates that the Group/Private speaker is off. You
will hear group and private calls through the ear
piece.
Roam
Displays when you enter the service area of another
iDEN service provider. The portable learns and
remembers the new radio frequencies and channels
in use.
Your i1000 Portable
i1000
GETTING STARTED
5
Page 11
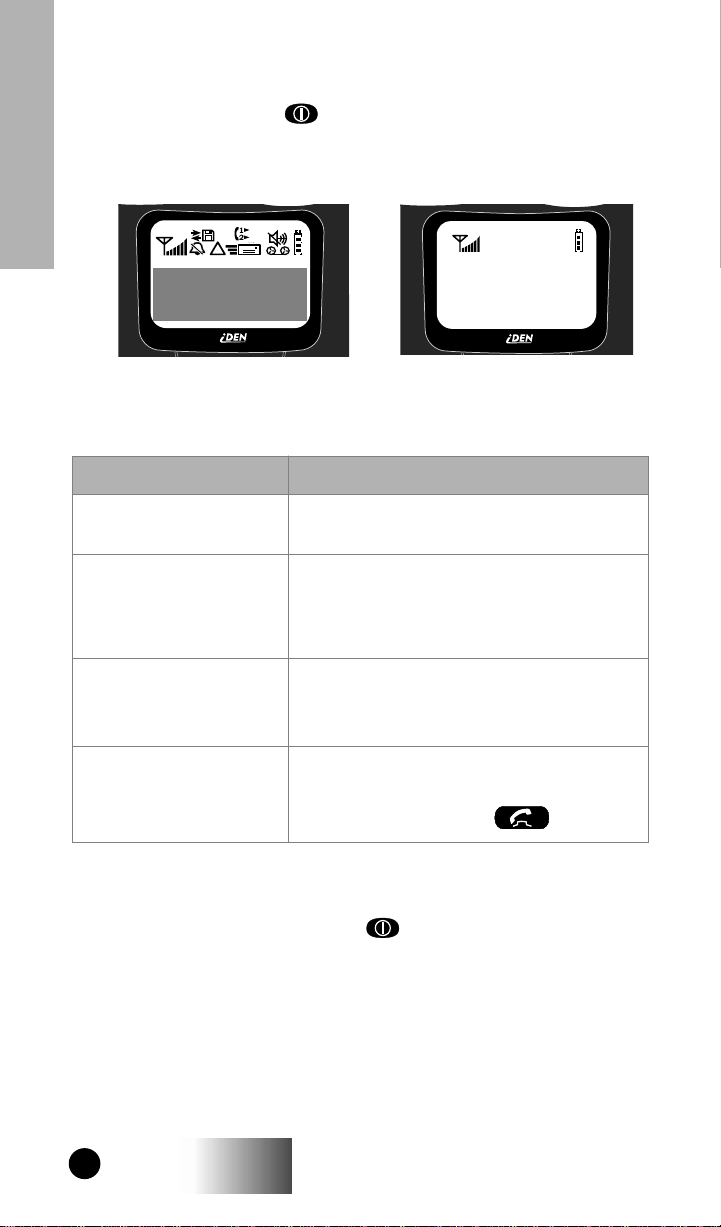
TURNING ON YOUR PORTABLE
PPPPlllleeeeaaaasssseeee WWWWaaaaiiiitt
tt
Press the On/Off button until a set of icons appears on your
display. (For a description of the icons, see page 5.) Then the
message “Please Wait” displays while the portable connects to your
carrier’s network.
Your i1000 Portable
The LED indicator located on top of the portable shows the service
state of your i1000. See Table 1.
Table 1: LED Indicator
LED Indicator Status of Your i1000
Flashing Red RegisteringÑyour portable is signing on
to your carrierÕs network.
Solid Red No serviceÑyour portable cannot sign on.
It will continue trying to connect every two
minutes as long as your portable is turned
on.
Flashing Green In serviceÑyour portable is ready to use.
You can now place and receive Phone,
Group, and Private calls.
Solid Green In useÑ-your portable is currently being
used. Check to make sure that you ended
the last call by pressing .
TURNING OFF YOUR PORTABLE
Press and hold the On/Off button until you see the message
“Powering Off”.
6
i1000
GETTING STARTED
Page 12

SPEAKERPHONE
The i1000 provides a speakerphone feature similar to a speakerphone you
may use on your office or home phone. Because the i1000 is wireless, you will
have the convenience of a hands free speakerphone anytime, anyplace to
bring people together. Use the speakerphone to hold impromptu meetings, or
to listen to your voicemail messages.
With the speakerphone feature, when one party is speaking, the
other party will not be heard. The other party must wait until the
first party stops speaking.
With the built-in speaker, you can use your portable hands free. The
cover can be open or closed during a speakerphone call. However:
• If the cover is open during a speakerphone call and you
close the cover, you will end the call.
• If the cover is closed during a speakerphone call and you
open the cover, the call switches to the earpiece. You can
switch back to speakerphone operation by pressing
under “Spkr”.
During speakerphone use, the “Spkr” option flashes to remind you
that the speakerphone is on.
Typically, the i1000 should be placed 15-30 inches away from you
during a speakerphone call. In a noisy environment, you may want
to move the i1000 closer to you for optimum audio quality to the
other party.
Your i1000 Portable
VIBRACALL
VibraCall is an alert that notifies you of incoming phone calls and
messages.
The alert choices are:
• Vibrate Only—produces only a vibration.
• Vibrate/Ring—produces a vibration followed by a ring
tone.
• Vibrate Off—turns off the vibration and produces only a
ring tone.
You can set VibraCall to notify you of all incoming calls and
messages, or you can select individual services for vibration alert.
In “Mail” and “Group/Prvt” modes, the choices are Vibe On or Vibe
Off.
If VibraCall is set for incoming calls and messages, the
power-up sequence includes a brief vibrate cycle. You
also hear a call-waiting tone.
i1000
™
NOTE
GETTING STARTED
7
Page 13
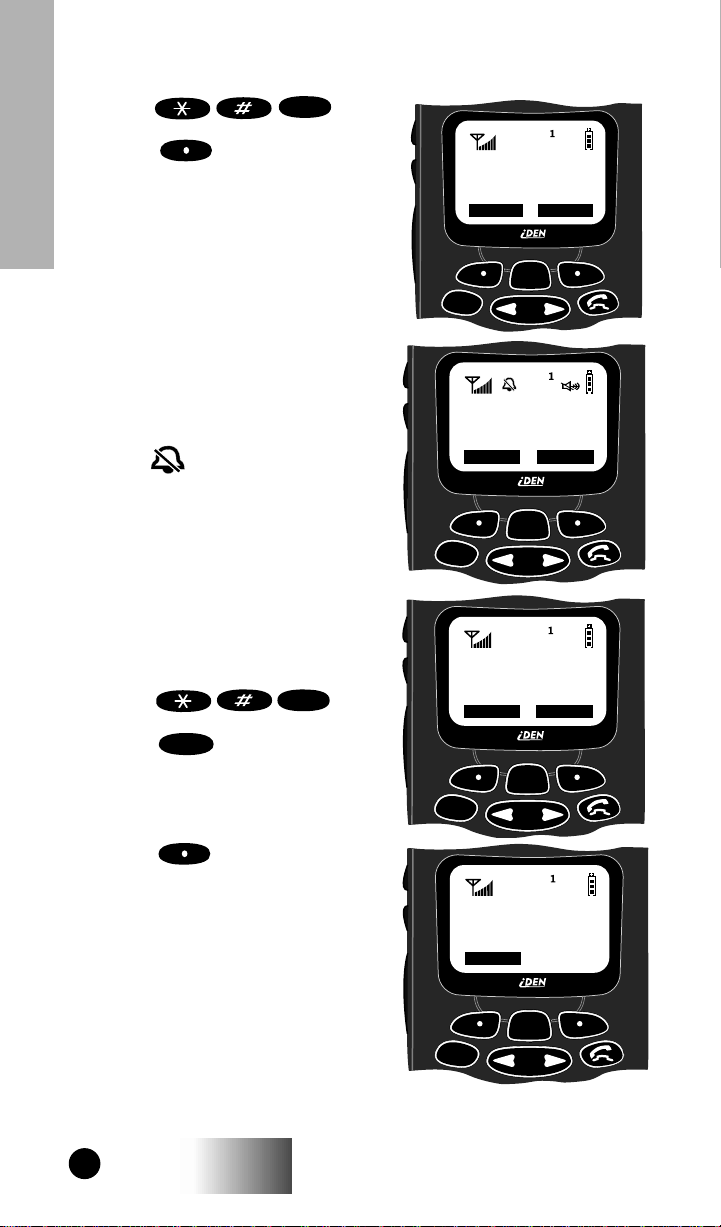
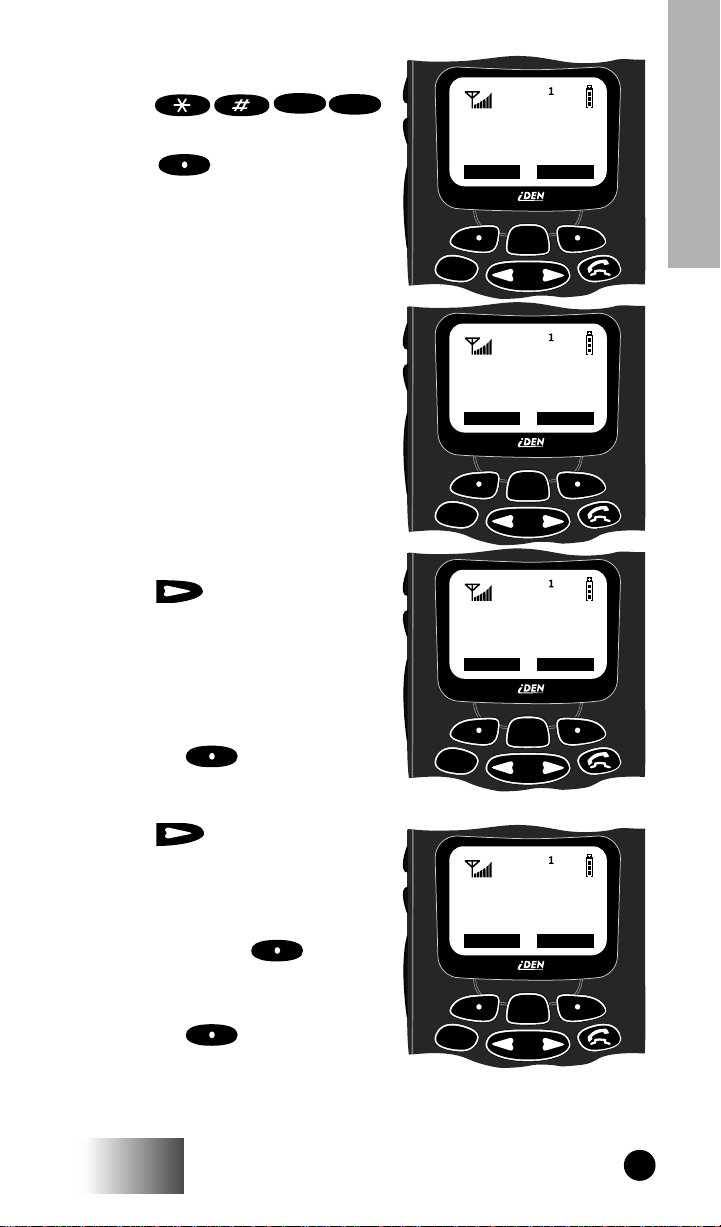
Selecting All Incoming Calls and Messages
WXYZ
1. Press .
9
2. Press under “All”.
Your i1000 Portable
After you set the vibration alert for all
incoming calls and messages, the
display returns to the previous mode.
Look for (the Vibrate All icon) at
the top of your display.
Selecting Individual Services
To set the vibration alert for specific
phone or mail services:
WXYZ
1. Press .
2. Press until you see the
MENU
“Selct” menu option on the last
line of the display.
9
9999====VVVViiiibbbbrrrraaaattttee
AAAAlllleeeerrrrtttt::::OOOOffffff
EEEExxxxiiiitttt AAAAllllll
MENU
Mode
PPPPhhhhoooonnnneeee RRRReeeeaaaaddddyy
LLLLiiiinnnneeee1111 VVVViiiibbbbee
11110000::::55554444pppp 11112222////000099
NNNNaaaammmmeeee MMMMaaaaiiiill
MENU
Mode
9999====VVVViiiibbbbrrrraaaattttee
AAAAlllleeeerrrrtttt::::OOOOffffff
EEEExxxxiiiitttt OOOOnn
MENU
Mode
ee
ff
ll
yy
ee
99
ll
ee
ff
nn
3. Press under “Selct”.
Pressing “Selct” allows you to set
individual vibration alerts for
incoming calls and messages.
8
i1000
9999====VVVViiiibbbbrrrraaaattttee
AAAAlllleeeerrrrtttt::::OOOOffffff
SSSSeeeellllcccctt
Mode
ee
ff
tt
MENU
GETTING STARTED
Page 14
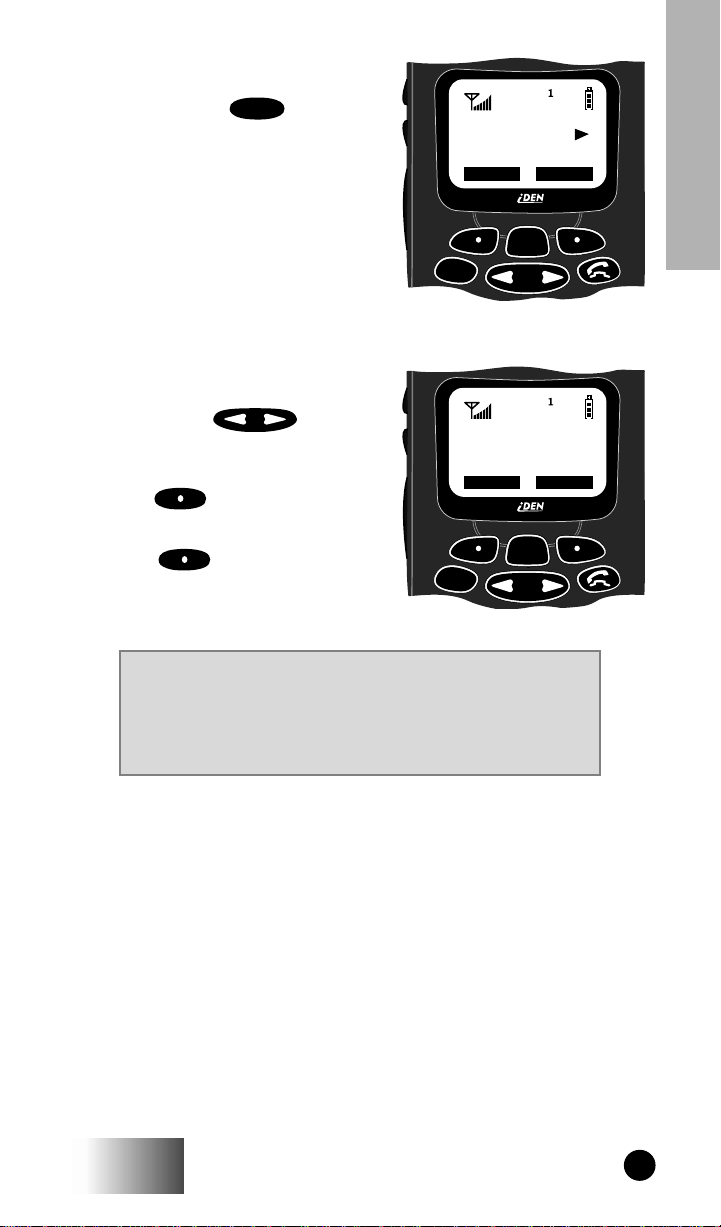
The first selection is Vibe. To view
the Vibe/Ring vibration alert
choices, press on the
MENU
keypad.
The vibration selection that you make
affects only the current mode. In this
example, vibration is set only for
Phone mode. You must set each mode
or service individually or select “All”
to set all services.
4. To set a vibration alert for another
mode, such as “Mail” or “Group/
Prvt”, press on the
keypad until you see the desired
mode or service.
5. Press under “Exit” to return
to the Vibrate Alert menu.
6. Press under “Exit” again to
return to your previous base mode.
ee
PPPPhhhhoooonnnnee
VVVViiiibbbbrrrraaaatttteeee::
VVVViiiibbbbrrrraaaatttteeee OOOOffffff
EEEExxxxiiiitttt VVVViiiibbbbee
MENU
Mode
GGGGrrrroooouuuupppp////PPPPrrrrvvvvtt
VVVViiiibbbbeeee::::OOOOffffff
EEEExxxxiiiitttt OOOOnn
MENU
Mode
Your i1000 Portable
::
ff
ee
tt
ff
nn
IF YOU HAVE A SECOND LINE
And you want to change the vibration selections for
the second line, exit this programming feature, select
the other line, and repeat the procedure for selecting
all services or selecting individual services to vibrate.
i1000
GETTING STARTED
9
Page 15
TURNING OFF GROUP AND PRIVATE
MODES
Your portable has a special feature, Phone Only mode, that allows
you to turn off the Private and Group services. You can make and
receive phone calls and receive Message Mail.
Placing the portable in Phone Only mode increases the standby battery life.
Your i1000 Portable
Make sure that the LED is blinking green, which indicates that you are in a
coverage area.
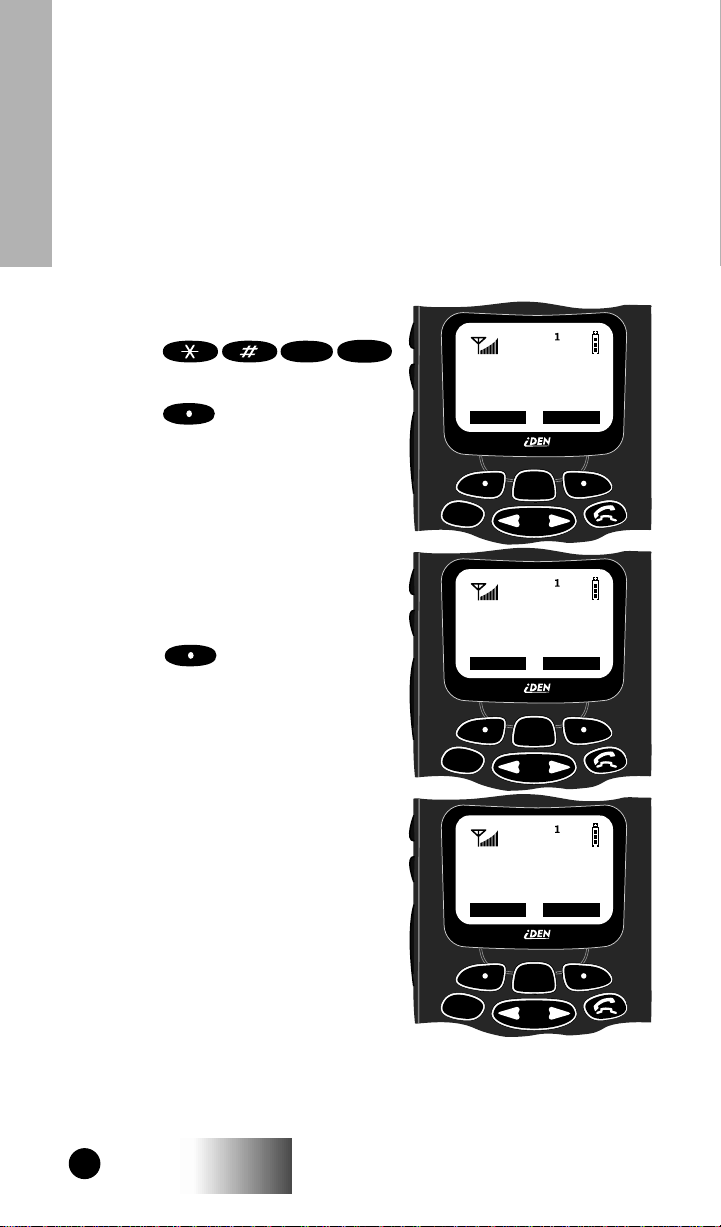
To turn on the Phone Only mode:
TUV
0
1. Press .
8
88880000====PPPPhhhhoooonnnnee
OOOOnnnnllllyyyy::::OOOOffffff
ee
ff
2. Press under “On”.
3. Press under “Exit”.
The “Phone ONLY” message
displays. Group and Private
Mode services are now
suspended.
EEEExxxxiiiitttt OOOOnn
MENU
Mode
88880000====PPPPhhhhoooonnnnee
OOOOnnnnllllyyyy::::OOOOnn
EEEExxxxiiiitttt OOOOffffff
MENU
Mode
PPPPhhhhoooonnnneeee OOOONNNNLLLLYY
11
LLLLiiiinnnneeee 11
2222::::11112222pppp 00007777////222211
NNNNaaaammmmeeee MMMMaaaaiiiill
MENU
Mode
nn
ee
nn
ff
YY
11
ll
10
i1000
GETTING STARTED
Page 16
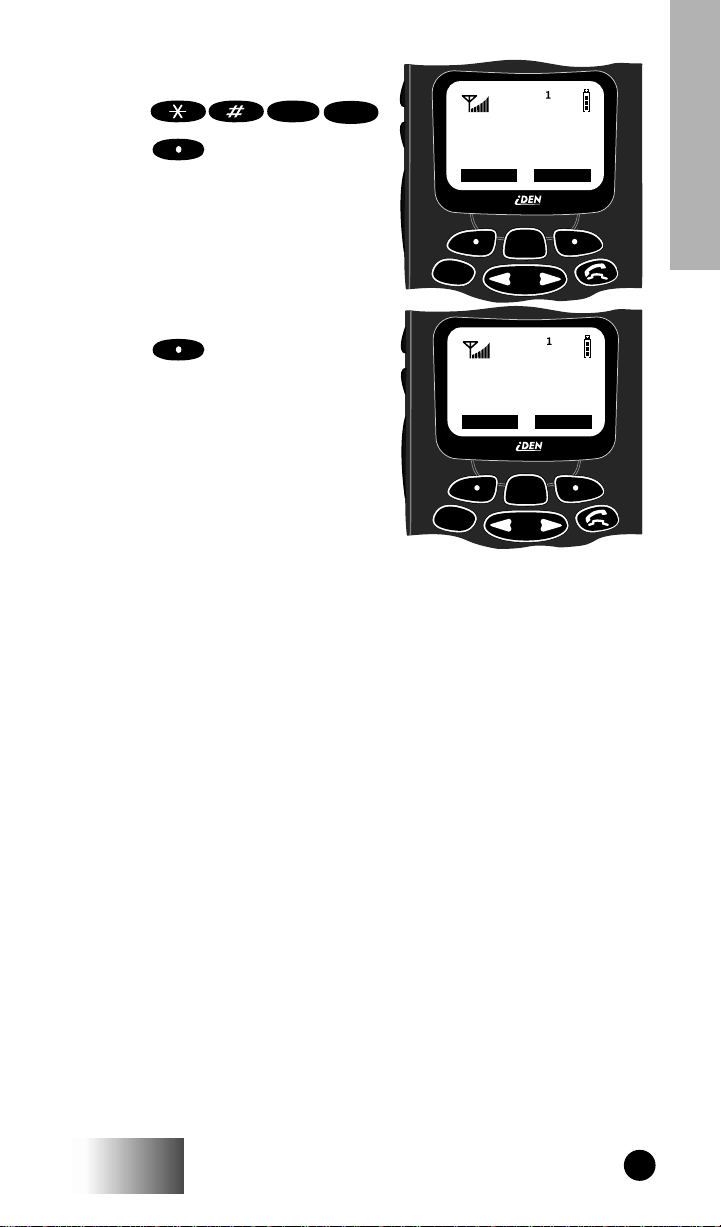
To return to normal Phone mode:
Your i1000 Portable
1. Press .
TUV
8
0
2. Press under “Off”.
3. Press under “Exit”. The
display returns to Phone Ready.
Group and Private mode services are
now available.
88880000====PPPPhhhhoooonnnnee
OOOOnnnnllllyyyy::::OOOOnn
EEEExxxxiiiitttt
Mode
88880000====PPPPhhhhoooonnnnee
OOOOnnnnllllyyyy::::OOOOffffff
EEEExxxxiiiitttt
Mode
ee
nn
MENU
ee
ff
MENU
OOOOffffff
OOOOnn
ff
nn
i1000
GETTING STARTED
11
Page 17

SETTING THE TIME AND DATE FORMAT
If your carrier provides this option, you can set your portable to
display the current time and date. Unless the portable is turned off,
it continues to display the current time during a loss of service.
You have a choice of a 12- or a 24-hour clock format. See Table 2.
Your i1000 Portable
NOTE
As you travel between different time zones, your
portable automatically displays local time.
Table 2: Time Display Options
12-Hour Display 24-Hour Display
12:00a 00:00
6:25a 06:25
10:25a 10:25
12:00p 12:00
6:25p 18:25
10:25p 22:25
You have a choice of either a MM/DD (month/day) or a DD/MM
(day/month) date format. See Table 3.
Table 3: Date Display Options
International
Format
(DD/MM)
Date
US Format
(MM/DD)
January 2nd 01/02 02/01
January 31st 01/31 31/01
October 9th 10/09 09/10
December 31st 12/31 31/12
If you activate the time and date, they are displayed in all ready
states (Phone, Group, Private). The time of day is also shown during
an active Phone call. The time and date are not displayed in Group
mode when you select an Area option.
12
i1000
GETTING STARTED
Page 18
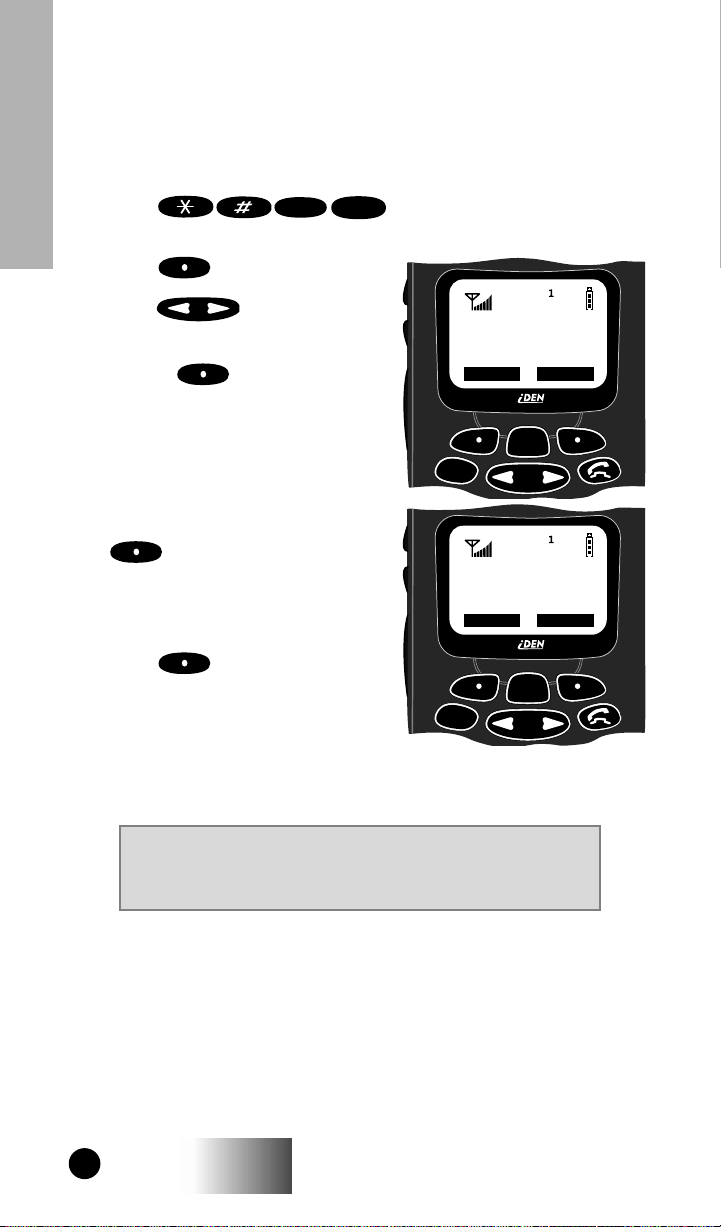
To set the time and date format:
PQRS
7
1. Press .
1
77771111====TTTTiiiimmmmeeee//
ee
DDDDaaaattttee
Your i1000 Portable
//
2. Press under “Ok”. The
Time/Date screen displays.
The default (preset) time and date format
that is displayed depends on your service
provider. You can accept the default
format or select an alternate format.
3. Press until you see the
Time Format screen.
4. Do one of the following:
• To accept the 12-hour format,
go to the next step.
• To set the 24-hour format,
press under “24hr”.
(See Table 2 on page 12.)
Then go to the next step.
EEEExxxxiiiitttt OOOOkk
MENU
Mode
TTTTiiiimmmmeeee////DDDDaaaattttee
DDDDiiiissssppppllllaaaayyyy::::OOOOnn
EEEExxxxiiiitttt OOOOffffff
MENU
Mode
TTTTiiiimmmmeeee FFFFoooorrrrmmmmaaaatttt::
rr
11112222 HHHHoooouuuurr
EEEExxxxiiiitttt 22224444hhhhrr
MENU
Mode
kk
ee
▲
nn
ff
::
▲
rr
5. Press until you see the
Date Format screen.
6. Do one of the following:
• To accept the MM/DD
format, press under
“Exit”.
• Or to set the DD/MM format,
press under
“DD/MM”. (See Table 3 on
page 12.)
i1000
GETTING STARTED
DDDDaaaatttteeee FFFFoooorrrrmmmmaaaatttt::
DD
MMMMMMMM////DDDDDD
EEEExxxxiiiitttt DDDDDDDD////MMMMMM
MENU
Mode
::
▲
MM
13
Page 19

7. Select “Exit”. The Ready screen for each mode (Phone,
Group, and Private) now displays the time and date formats that
you selected.
STORING NUMBERS IN THE PHONE AND
PRIVATE LISTS
Your i1000 Portable
You can set a Phone and a Private ID number with the associated
name, which eliminates the need to program the same name twice.
You can add up to 100 numbers to your phone list, store them with
names, and assign them to speed-dial numbers.
The display holds 12 phone-number characters. If the phone
number exceeds 12 characters, you can select “More” to see the
remaining characters. To return to the start of the number, select
“Numbr”.
Entering Phone Numbers Using the Keypad
To enter a number, press the corresponding number key.
Entering a Name Using the Keypad
The number of times that you press a key to enter a letter depends
on the position of the letter on the key. Table 4 describes how to
enter each letter on the key.
Table 4: Entering a Name on the Keypad
PQRS
7
Letter Position
P To enter the Þrst letter on the keypad, press the key
Q To enter the second letter on the keypad, press the
R To enter the third letter on the keypad, press the
S To enter the fourth letter on the keypad, press the
7 To enter the number, press the key Þve times.
14
once.
key twice.
key three times.
key four times.
i1000
GETTING STARTED
Page 20

Entering Names and Numbers
MNO
1. Press .
The “26=Phone/Prvt List”
message appears on your display.
2. Press under “Ok”.
.
ABC
6
2
22226666====PPPPhhhhoooonnnneeee//
PPPPrrrrvvvvtttt LLLLiiiisssstt
EEEExxxxiiiitt
Mode
tt
MENU
Your i1000 Portable
//
tt
kk
OOOOkk
The next screen displays the
remaining number of phone numbers
and private IDs that you can store.
3. Enter the name and press
under “Store”.
See Table 5 on page 16 for an
example of entering a name.
AAAAvvvvaaaaiiiillllaaaabbbbllllee
99998888 PPPPhhhhoooonnnneeee ##
3333 PPPPrrrrvvvvtttt IIIIDDDDss
Mode
EEEEnnnntttteeeerrrr NNNNaaaammmmee
__
__
__
__
EEEExxxxiiiitt
Mode
tt
MENU
MENU
ee
##
ss
ee
SSSSttttoooorrrree
ee
i1000
GETTING STARTED
15
Page 21
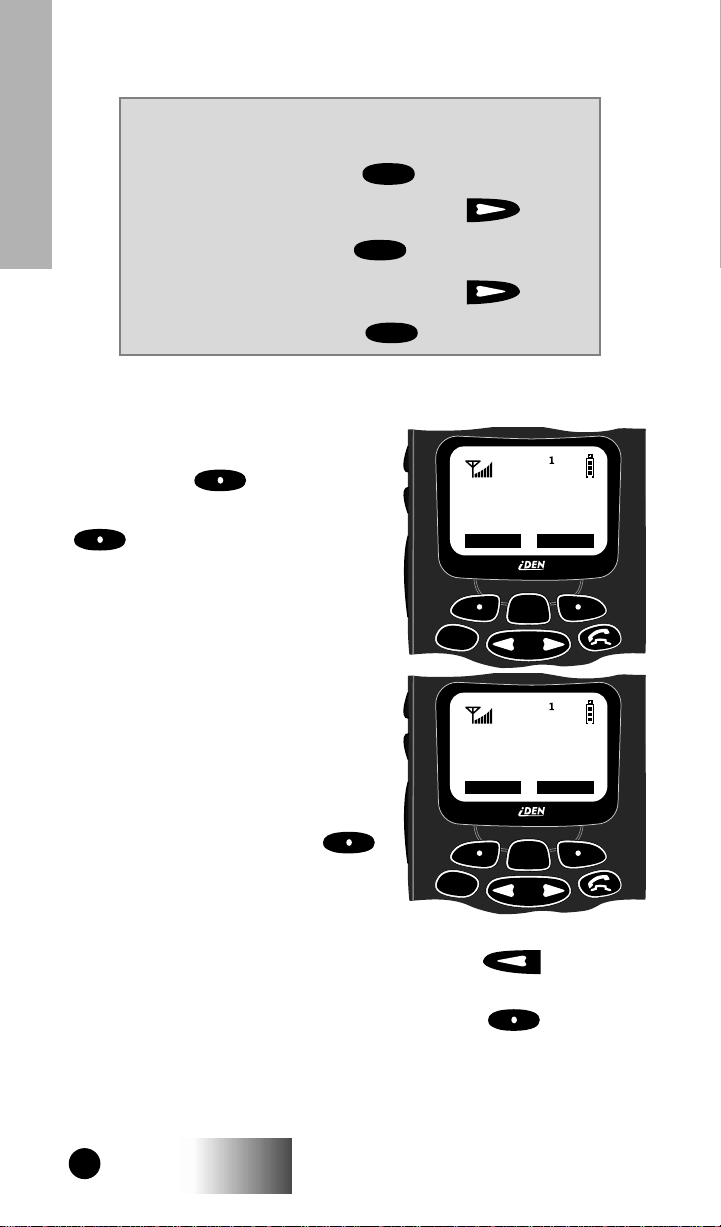
Table 5: Entering a Name
NAME METHOD EXAMPLE
To enter the name “Tim”:
1. Enter “T” by pressing once.
TUV
8
Your i1000 Portable
2. Move to the next letter by pressing .
3. Enter “i” by pressing .
4. Move to the next letter by pressing .
5. Enter “m” by pressing .
6. Enter the phone number that you
want to associate with this name
and press under “Store”.
To skip the Phone Number entry, press
under “Skip”. You will go
directly to the “Enter Prvt ID Number”
screen.
The next screen displays the name
that you entered and a flashing
speed-dial number.
7. Do one of the following:
• To accept the speed-dial
number shown, press
under “Store”.
• To change the speed-dial
number, enter the desired
number. The number stops
flashing. To enter another number, press and enter
the desired number.
GHI
4
MNO
6
EEEEnnnntttteeeerrrr PPPPhhhhoooonnnnee
NNNNuuuummmmbbbbeeeerr
__
__
__
__
SSSSkkkkiiiipppp SSSSttttoooorrrree
Mode
MM
TTTTIIIIMM
SSSSppppdddd####====33
CCCCaaaannnnccccllll SSSSttttoooorrrree
Mode
ee
rr
ee
MENU
33
ee
MENU
If you do not want to enter a speed-dial number, press under
“Cancl”. You will return to the “Enter Phone Number” screen.
16
i1000
GETTING STARTED
Page 22

0
0
8. At the next screen, enter the
Private ID number associated
with the name that you entered.
To skip the Private ID number entry,
press under “Skip”.
For more information about using the
speed-dial feature, see “Speed Dial
Method” on page 24.
Editing and Erasing Phone List Contents
Editing Phone List Entries
ABC
1. Press , , , .
2. Press under “Edit”
Erasing Phone List Entries
1. Press , , , .
2. Press once.
2
ABC
2
EEEEnnnntttteeeerrrr PPPPrrrrvvvvtt
__
__
IIIIDDDD NNNNuuuummmmbbbbeeeerr
SSSSkkkkiiiipppp SSSSttttoooorrrree
Mode
Your i1000 Portable
tt
rr
ee
MENU
3. Press under “Erase”
Editing and Erasing Private ID List Contents
Editing Private ID List Entries
ABC
1. Press , , , .
2
2. Press under “Edit”
Erasing Private ID List Entries
1. Press , , , .
2
1. Press once.
2. Press under “Erase”
i1000
GETTING STARTED
ABC
1
1
17
Page 23
CHANGING THE DISPLAY LANGUAGE
You can customize your portable to display one of four languages:
English, French, Spanish, or Portuguese.
To change the displayed language:
1. Press to view the language option
Your i1000 Portable
screen.
PQRS
0
7
2. Press under “Ok”.
3. Press to scroll through
the language options.
Pressing under “Exit” at any
77770000====LLLLaaaannnngggguuuuaaaaggggee
hh
EEEEnnnngggglllliiiisssshh
EEEExxxxiiiitttt OOOOkk
time retains the current language
selection.
MENU
Mode
4. When the desired language
appears on your display, press
under “Ok”. The text
immediately changes to the
language that you selected.
1
77770000====LLLLaaaannnngggguuuuee
FFFFrrrraaaannnnccccaaaaiiiiss
QQQQuuuuiiiitttttttt OOOOkk
ee
ss
5. Press under “Exit”,
“Quitt”, “Salir”, or “Saír”
(whichever one displays) to exit
this mode.
Mode
MENU
ee
kk
kk
The language that you select will be the displayed language.
NOTE
If you select an incorrect language, repeat the
procedure for Changing the Display Language.
18
i1000
GETTING STARTED
Page 24

MODES AND MENUS
Modes and menus are the navigational tools of your portable.
Modes
Modes are portable operation states for placing and receiving calls.
Your portable has three modes:
• Phone—for cellular phone calls and special phone features
• Private—for one-to-one radio calls
• Group—for calls with all individuals in a designated
talkgroup.
To access modes:
Cover Closed Cover Open
Your i1000 Portable
¥ To switch between Phone,
Group, and Private modes,
press under ÒModeÓ.
For more information, see “Phone Mode” on page 23, “Private
Mode” on page 35, and “Group Mode” on page 41.
¥ To switch between Phone,
Group, and Private modes,
Mode
press .
Menus
Menus are choices within each mode that enable you to use various
features.
To access menus:
MENU
Press to scroll through the menus associated with each mode.
With the cover open, when your portable is ready to use, your
display looks like the following screens for the Phone, Group, and
Private modes. If the word “Ready” does not appear after the mode
name in the display, your portable is not ready.
i1000
GETTING STARTED
19
Page 25

Phone Mode and Menus - Cover Open
Your i1000 Portable
Mode
Private Mode and Menus - Cover Open
Mode
1
ee
nn
RRRReeeeaaaaddddyy
11
MENU
MENU
yy
1
yy
PPPPhhhhoooonnnnee
LLLLiiiinnnneeee 11
11
11
0000::::55554444aaaa 11112222////000099
NNNNaaaammmmeeee MMMMaaaaiiiill
PPPPrrrrvvvvtttt RRRReeeeaaaaddddyy
JJJJoooohhhhnn
11111111::::00005555aaaa 11112222////000099
AAAAlllleeeerrrrtttt MMMMaaaaiiiill
Menu options:
ee
99
ll
NNNNaaaammmmee
FFFFoooorrrrwwwwdd
oo
MMMMeeeemmmmoo
tt
WWWWaaaaiiiitt
dd
ll
MMMMaaaaiiiill
##
SSSSppppdddd##
mm
PPPPrrrrggggmm
LLLLiiiinnnneeee 22
22
Menu options:
tt
99
ll
AAAAlllleeeerrrrtt
ee
NNNNaaaammmmee
MMMMaaaaiiiill
PPPPrrrrggggmm
ll
mm
Group Mode and Menus - Cover Open
Menu options:
MENU
yy
00
99
ll
tt
AAAAlllleeeerrrrtt
aa
AAAArrrreeeeaa
GETTING STARTED
MMMMaaaaiiiill
PPPPrrrrggggmm
ll
mm
GGGGrrrroooouuuupppp RRRReeeeaaaaddddyy
TTTTaaaallllkkkkggggrrrrpppp 111100
3333::::22227777pppp 11112222////000099
AAAAlllleeeerrrrtttt MMMMaaaaiiiill
Mode
To use menu options:
1. Press to select the mode (Phone, Group, or Private).
2. Press to scroll through the available menu options for
Mode
MENU
the selected mode.
3. Press under the displayed menu option that you wish
to select.
20
i1000
Page 26

8
TUV
NOTE
If you set the Silent Group programming menu to
silence incoming alerts and voices, the “Group
Ready” screen displays as “Group-Silent”. To reset it:
DEF
1. Press .
2. Press under “Ok”.
3
Your i1000 Portable
i1000
GETTING STARTED
21
Page 27

NOTES:
22
i1000
GETTING STARTED
Page 28

GGGGrrrroooouuuupppp RRRReeeeaaaaddddyy
yy
LLLLiiiisssstttt MMMMooooddddee
ee
11112222::::11112222pppp 00005555////000088
88
TTTTaaaallllkkkkggggrrrrpppp 111100
00
SSSSeeeelllleeeecccctttt MMMMaaaaiiiill
ll
TTTTyyyyppppee
ee
VVVVooooiiiicccceeee MMMMeeeessssgg
gg
PHONE MODE
In Phone mode, you can make and receive phone calls, forward calls,
use call waiting, put calls on hold, and use three-way calling.
AT FIRST GLANCE
The first menu option choices that appear on the Phone Ready
screen depend on whether the cover is open or closed.
Cover Closed
Phone Mode
Use the Volume Control
buttons to scroll
through your stored
List.
ee
PPPPhhhhoooonnnnee
22
0000====55555555555511112222111122
CCCCaaaannnnccccllll MMMMoooorrrree
ee
Cover Open
::
NNNNaaaammmmeeee::
__
__
CCCCaaaannnnccccllll MMMMoooorrrree
ee
PPPPhhhhoooonnnneeee RRRReeeeaaaaddddyy
LLLLiiiinnnneeee 11
11112222::::11112222pppp 00005555////000088
LLLLiiiisssstttt MMMMooooddddee
PPPPhhhhoooonnnneeee RRRReeeeaaaaddddyy
LLLLiiiinnnneeee 11
11112222::::11112222pppp 00005555////000088
NNNNaaaammmmeeee MMMMaaaaiiiill
yy
11
yy
11
ll
88
ee
88
i1000
GETTING STARTED
23
Page 29

MAKING A PHONE CALL
To make a phone call:
1. Be sure that the cover is open. You cannot make a phone call when
the cover is closed.
2. If you are not in Phone mode,
Mode
press until “Phone
Ready” appears on your display.
3. Dial your call using one of the
four options listed below: direct
dial, scroll, speed dial, or name.
PPPPhhhhoooonnnneeee RRRReeeeaaaaddddyy
LLLLiiiinnnneeee 11
3333::::11115555pppp 00008888////222211
NNNNaaaammmmeeee MMMMaaaaiiiill
11
yy
11
ll
Direct Dial Method
4. Dial the number using the
keypad. If you make a
mistake, press once for
Phone Mode
each character that you want to erase.
You can return to the “Phone Ready” mode at any time by pressing
the option key under the word “Cancl”.
5. Press to place the call.
6. To hang up, press or close the cover.
Scroll Method
4. Press to scroll backward or
forward through the stored list of numbers and names.
5. Press to place the call.
6. To hang up, press or close the cover.
Speed Dial Method
4. Press until you see the “Spd#” option on the last
line of your display.
MENU
Mode
MENU
5. Press under “Spd#”.
6. Enter the assigned speed dial number (1-100). You will
see the name associated with the number. For more
information, see “Storing Numbers in the Phone and Private
Lists” on page 14.
7. Press to place the call.
24
i1000
GETTING STARTED
Page 30

8. To hang up, press or close the cover.
Name Method
4. Press until you see the “Name” menu option on
5. Press under “Name”.
6. Press the key with the first letter of the name
7. Press to place the call.
8. To hang up, press or close the cover.
MENU
your display.
associated with the Phone number. The name and phone
number appear on your display.
Emergency Dial
The Emergency Dial feature allows you to call the emergency
phone number by continuously pressing a single key. (Your carrier
assigns this number.) This feature is available even when the
keypad is locked, although it is not available during an active call.
1. From any mode (Phone, Private, or Group), press
and hold until the unit displays “EMERGENCY”. The
portable then automatically dials the emergency number.
2. To terminate the call, press . The emergency phone
number will not be saved as the last number dialed.
Contact your service provider for details on the
Emergency Dial feature.
WXYZ
9
NOTE
Phone Mode
Automatic Redial
If you receive a “System Busy, Try Later” message, press
to have your portable automatically redial the number. You will hear
a ring tone when the call is successful.
Last Number Redial
To redial the last number, simply press .
i1000
GETTING STARTED
25
Page 31

RECEIVING A PHONE CALL
When you receive a call:.
• The portable rings and/or vibrates.
• If you subscribe to caller ID, the
caller’s ID displays.
• If the caller is stored in your Phone
List and the name matches the
caller ID, the name displays.
You can answer a phone call with the
cover open or closed. See Table 6.
Table 6: Phone Call Options
To reject a call:
Phone Mode
Cover Closed Cover Open
IIIInnnnccccoooommmmiiiinnnngggg
PPPPhhhhoooonnnneeee CCCCaaaallllll
dd
EEEEnnnndd
Mode
MENU
ll
SSSSppppkkkkrr
rr
¥ Press under ÒEndÓ.
¥ If Auto Answer is set, the call
automatically goes to the
speakerphone.
To answer a call:
Cover Closed Cover Open
Speakerphone:
Press under ÒSpkrÓ.
During the call, the Spkr menu
option ßashes to remind you that
the speakerphone is on.
Earpiece:
Open the cover to turn off the
Speakerphone. This action
transfers the sound to the
earpiece.
¥ Press under ÒEndÓ
or close the cover.
¥ If Auto Answer is set, the
call always goes to the
earpiece.
Earpiece:
Press . This action turns
on the earpiece.
Speakerphone:
Press under ÒSpkrÓ. This
action transfers the sound to the
speakerphone.
During the call, the Spkr menu
option ßashes to remind you that
the speakerphone is on.
26
i1000
GETTING STARTED
Page 32

To end a call:
Cover Closed Cover Open
¥ Press under ÒEndÓ.
This action terminates the
connection.
¥ Close the cover. This action
ends the connection.
¥ Or, press .
PROGRAMMING YOUR OWN PHONE
NUMBER
Programming your phone number means entering it into your
portable. You can enter it now, or wait for your first incoming phone
call, when your carrier’s network automatically enters it for you.
NOTE
If your portable has two phone lines, first set the line
for the phone number that you want to pr ogram, and
then continue here. For more information, see
“Setting the Active Line” on page 33.
1. To enter the phone number of your portable (or the active line,
if you have two lines), press .
2. Press under “Ok”. The “Enter Number” screen appears.
3. Enter your phone number.
1
Phone Mode
4. Press under “Store”.
SELECTABLE RING STYLES
Your portable has nine selectable ring styles. Portables with two
phone lines can use the same or different ring styles for each phone
line.
i1000
GETTING STARTED
27
Page 33

To set a ring style:
1. Press
DEF
3
to access the Programming Menu
item for ring style selection.
The display shows your current
ring style.
2. Press under “Ok”.
3. Press to scroll through
the available Ring Styles.
4. To listen to the selected ring
style, press the Volume buttons
on the side of the portable.
5. Press under “Ok” to select
Phone Mode
the current Ring Style shown. To
leave the ring style unchanged,
press under “Cancl”.
If you have a second line and want to change the ring
style for the second line, exit this programming
feature, select the other line, and repeat the above
procedure for Selectable Ring Styles.
1
NOTE
33331111====SSSSeeeetttt RRRRiiiinnnngg
SSSSttttyyyylllleeee::::11
EEEExxxxiiiitttt OOOOkk
MENU
Mode
gg
RRRRiiiinnnngg
SSSSttttyyyylllleeee 44
CCCCaaaannnnccccllll OOOOkk
MENU
Mode
gg
11
kk
44
kk
CALL FORWARDING
You can forward all your incoming calls (unconditional) to any
number that you wish or select those circumstances (conditional)
when you want your calls forwarded.
Make sure that the LED is blinking green, which indicates that you are in a
coverage area.
Selecting a Call Forward Number
You can select the call forward number using the direct dial, scroll,
speed dial or name search method. For more information, see “Making
a Phone Call” on page 24.
28
i1000
GETTING STARTED
Page 34

Unconditional Call Forwarding
Unconditional call forwarding forwards all incoming calls to the
designated number. Your portable will not ring when you activate
unconditional call forwarding.
1. Within Phone mode, press
MENU
until you see “Forwd” on the last
line of the display.
2. Press under “Forwd”.
3. To select the number where you
PPPPhhhhoooonnnneeee RRRReeeeaaaaddddyy
LLLLiiiinnnneeee 11
9999::::00006666aaaa 00009999////000033
FFFFoooorrrrwwwwdddd SSSSppppdddd##
yy
11
want your calls forwarded, do one
of the following:
• Enter a number.
Mode
MENU
• Or, press the scroll keys to
select a number from your
stored list. For more
information, see “Storing
Numbers in the Phone and
Private Lists” on page 14.
FFFFoooorrrrwwwwaaaarrrrdddd::::OOOOffffff
__
TTTToooo::::__
EEEExxxxiiiitttt OOOOnn
ff
4. Press under “On”.
5. After the “Please Wait” message
displays, press under
Mode
MENU
“Exit”.
Notice that the Call Forward icon
appears on your display when Unconditional Call Forwarding is
set.
33
##
Phone Mode
nn
Conditional Call Forwarding
You may want to forward your calls only if your unit is busy (Busy), is
not answered (NoAns), or you cannot be reached (NoRch).
NOTE
You must turn off Unconditional Call Forwarding
before you can use Conditional Call Forwarding
options.
i1000
GETTING STARTED
29
Page 35

1. Within Phone mode, press
MENU
until you see “Forwd” on
the last line of your display.
2. Press under “Forwd”.
PPPPhhhhoooonnnneeee RRRReeeeaaaaddddyy
11
LLLLiiiinnnneeee 11
9999::::00006666aaaa 00009999////000033
FFFFoooorrrrwwwwdddd SSSSppppdddd##
MENU
Mode
yy
33
##
3. Press once again until you
MENU
see “Busy” and “NoAns” on the
last line of your display.
•
To forward your calls when
your phone is busy, press
under “Busy”.
Phone Mode
• To forward your calls when
you do not answer a call, press
under “NoAns”.
4. Press again until you see
MENU
“NoRch” and “Rcl#” on the last
line of your display.
• To forward your calls when
you cannot be reached, press
under “NoRch”.
5. After you select the call-forward
option, either enter the number
where you want your calls to be
forwarded, or press the scroll
buttons and select a number.
6. Press under “On”.
7. Press under “Exit”.
FFFFoooorrrrwwwwaaaarrrrdddd::::OOOOffffff
::
TTTToooo::
BBBBuuuussssyyyy NNNNooooAAAAnnnnss
MENU
Mode
FFFFoooorrrrwwwwaaaarrrrdddd::::OOOOffffff
::
TTTToooo::
NNNNooooRRRRcccchhhh RRRRccccllll##
MENU
Mode
ff
ss
ff
##
30
NOTE
You can set call forwarding on Busy, No Reach, and
No Answer independently.
i1000
GETTING STARTED
Page 36

CALL WAITING
Using the Call Waiting feature, you can answer an incoming call
when you are on another call. Call Waiting is on unless you turn it off
for a particular call.
1. You will hear a tone to alert you of
an incoming call. Your display
shows the incoming number and
asks “Accept Call?”. To accept
the call, press under
“Yes” on the last line of your
display.
AAAAcccccccceeeepppptttt CCCCaaaallllll
OOOOnnnn LLLLiiiinnnneeee 1111??
NNNNoooo YYYYeeeess
ll
??
ss
MENU
Mode
2. Press under “Hold” to
place the second call on hold and
return to the first call. Pressing
under “Hold” takes you
back and forth between the two calls.
CCCCaaaallllllll 1111----HHHHoooolllldd
555555555555----11112222111122
22
dd
HHHHoooolllldd
dd
3. To end the active call, press
or close the cover.
MENU
CALL HOLD
Mode
“Hold” appears as an option on your
display only while you are on an active call.
1. To place the active call on hold, press under “Hold”. You
may then answer or place another call.
2. To remove the call from hold, press under ”Hold” again.
Phone Mode
i1000
GETTING STARTED
31
Page 37

3-WAY CALLING
If your portable has 3-way calling,
you can combine two ongoing phone
calls into one conversation. This
option is available only when you
initiate the second call.
You cannot place either call on hold
PPPPhhhhoooonnnneeee----IIIInnnn UUUUssssee
22
55555555555511112222111122
1111::::44440000pppp 00005555////000088
3333wwwwaaaayyyy SSSSppppkkkkrr
during a 3-way call.
1. Place a phone call or receive a
phone call.
Mode
MENU
2. Press under ”3way”. This
action places the current call on
hold.
3. Enter the phone number for the second call and press .
4. When the second call is connected, press under “3way”
Phone Mode
to join the calls.
ALTERNATE PHONE LINE
If your portable is activated with two phone lines, you can switch
between them.
To change phone lines, your portable must at the Phone Ready
screen.
The following settings are independent for each phone line. When
you enable a setting, it applies only to the active line.
• Ringer Volume
• Auto Answer
• One-minute Beep
• Automatic Display Timer
• Resettable Timer
• Total Call Timer
• Selectable Ring Styles
• Call Forwarding
ee
88
rr
32
i1000
GETTING STARTED
Page 38

Setting the Active Line
1. Be sure that your portable displays
“Phone Ready”.
2. Press until you see
“Line 2”.
3. Do one of the following:
PPPPhhhhoooonnnneeee RRRReeeeaaaaddddyy
LLLLiiiinnnneeee 11
1111::::44448888pppp 00008888////222211
WWWWaaaaiiiitttt LLLLiiiinnnneeee22
yy
11
11
22
• Press under “Line2” to
activate Line 2 when Line 1 is
the active line.
Mode
MENU
• Or, press under “Line1”
to activate Line 1 when
Line 2 is the active line.
Receiving a Call
You can receive calls on either line, regardless of the active line
setting.
• If the line is the same as the currently active line, that icon
simply flashes.
• If the call is on the line that is not currently active, the active
line icon remains lit and the alternate line icon flashes.
Receiving Calls on Your Second Line
If you are on a call on one line:
1. Press under “Yes” to
answer the call on the other line.
Your previous call will be placed
on hold.
2. Do one of the following:
• To end the call, press .
• Or, to place the current call on
hold, press under
“Hold”.
When the call is terminated, the
portable remains active in the last active
line selected.
33330000555555555555555511112222111122
TTTTaaaakkkkeeee CCCCaaaallllll
OOOOnnnn LLLLiiiinnnneeee 2222??
NNNNoooo YYYYeeeess
Mode
MENU
1
2
22
ll
??
ss
Phone Mode
i1000
GETTING STARTED
33
Page 39

NOTES:
34
i1000
GETTING STARTED
Page 40

PPPPhhhhoooonnnneeee RRRReeeeaaaaddddyy
yy
LLLLiiiisssstttt MMMMooooddddee
ee
11112222::::11112222pppp 00005555////000088
88
LLLLiiiinnnneeee 11
11
SSSSeeeelllleeeecccctttt MMMMaaaaiiiill
ll
TTTTyyyyppppee
ee
VVVVooooiiiicccceeee MMMMeeeessssgg
gg
PRIVATE MODE
A Private call is a one-to-one conversation between two
individuals. Each portable is identified by a name or a number that
contains up to five digits.
AT FIRST GLANCE
The first menu option choices that appear on the “Prvt Ready”
screen depend on whether the cover is open or closed.
Cover Closed
Use the Volume Control
buttons to scroll
through your stored
List.
PPPPrrrrvvvvtttt RRRReeeeaaaaddddyy
TTTTIIIIMM
111122223333444455
CCCCaaaannnnccccllll
yy
MM
55
Cover Open
tt
NNNNaaaammmmeeee::::PPPPrrrrvvvvtt
__
__
EEEExxxxiiiitttt QQQQuuuueeeeuuuueeee
PPPPrrrrvvvvtttt RRRReeeeaaaaddddyy
TTTTIIIIMM
11112222::::11112222pppp 00005555////000088
yy
MM
LLLLiiiisssstttt MMMMooooddddee
88
ee
Private Mode
PPPPrrrrvvvvtttt RRRReeeeaaaaddddyy
TTTTIIIIMM
11112222::::11112222pppp 00005555////000088
AAAAlllleeeerrrrtttt MMMMaaaaiiiill
yy
MM
88
ll
i1000
GETTING STARTED
35
Page 41

GROUP/PRIVATE SPEAKER
You can hear calls through either the earpiece or the speaker in
Private mode. Pressing the Speaker button on top of the
portable turns the Group/Private Speaker on or off.
If you set the Speaker button on, you will hear incoming calls
through the speaker. If you set the Speaker button off, you will hear
a short alert tone when you receive a private call. You will hear
incoming calls through the earpiece.
MAKING A PRIVATE CALL
IF THE COVER IS CLOSED...
• To contact the last Private ID that you called,
first select the “Prvt Ready” mode, then press
the PTT button.
• To select another number (previously entered
in your Private ID list), press under
“List”. This allows you to use the Volume
Control buttons to scroll to the desired name,
then press the PTT button.
With the cover open, you can use one of three methods: Direct
Entry, Scroll, or Name.
Direct Entry Method
1. Press until you see
Private Mode
2. Use the keypad to enter the
3. To speak, press and hold the
4. To listen, release the PTT
Mode
“Prvt Ready” on your display.
Private ID of the person that you
want to reach.
PTT button, wait for the chirp,
then speak into the microphone.
button.
PPPPrrrrvvvvtttt RRRReeeeaaaaddddyy
JJJJOOOOHHHHNNNN SSSSMMMMIIIITTTTHH
8888::::22223333pppp 11110000////222233
AAAAlllleeeerrrrtttt MMMMaaaaiiiill
MENU
Mode
Scroll Method
1. Press until you see “Prvt Ready” on your display.
2. Press to select the person for the private call that
36
Mode
you previously entered into your Private ID list.
i1000
GETTING STARTED
yy
HH
33
ll
Page 42

3. Press and hold the PTT button, wait for the chirp, then
speak into the microphone.
Name Method
1. Press until you see “Prvt Ready” on your display.
2. Press until you see the “Name” menu option on
3. Press under “Name”.
4. Press the key with the first letter of the name
5. Press to find the desired name in the list.
6. Press and hold the PTT button, wait for the chirp, then
Mode
MENU
your display.
associated with the Private ID.
speak into the microphone.
RECEIVING A PRIVATE CALL
When you receive an incoming Private call, you hear a brief tone.
Your unit automatically switches to Private mode, and the Private ID
or the name of the caller displays.
Wait for the caller to finish speaking, then press and hold the PTT
button. Begin speaking after you hear the chirp.
PROGRAMMING YOUR PRIVATE ID
To store your Private ID in your portable:
1. Press .
ABC
2
Private Mode
2. Press under “Ok”.
3. Enter the Private ID provided by your carrier.
4. Press under “Store”.
RECALLING YOUR PRIVATE ID
1. To recall your portable’s private ID, press .
This is the number supplied by your carrier, that you must store in your
portable. See “Programming Your Private ID” above.
2. Press under “Exit”.
i1000
GETTING STARTED
ABC
2
37
Page 43

CALL ALERT™
You can access Call Alert from Group and Private modes. Using Call
Alert, you can privately page an individual by sending an audible
tone.
Sending a Call Alert
1. Be sure that the cover is open.
2. Press to go to the “Prvt Ready” screen.
3. Press under “Alert”.
4. Enter the private ID or press to scroll to the
5. Press the PTT button to send the Call Alert.
Mode
name of the person to whom you want to send the Call Alert.
You may also select the person by pressing and using
Name Search.
MENU
Receiving a Call Alert
When you receive a Call Alert, you hear a tone and see a message on
your display.
• To return the Call Alert, press the PTT button.
• Or, to clear the Call Alert, press under “Clear”, or
press any key other than the PTT button to silence the alert
tones.
NOTE
Until the Call Alert is cleared or returned, you will
Private Mode
not receive any additional Phone, Group, or Private
calls.
CALL ALERT STACKING
Call Alert Stacking is an optional feature that allows you to save up
to eight Call Alerts in a queue.
38
i1000
GETTING STARTED
Page 44

Receiving a Call Alert with Stacking
With Call Alert Stacking, you can
either clear a Call Alert or save it to
the queue for later recall.
• To clear a Call Alert, press
under “Clear”.
• To place the Call Alert into the
queue, press under
“Queue”. Pressing also
queues the Call Alert.
If you receive multiple Call Alerts,
the last received Call Alert displays and the remaining Call Alerts
are stacked at the beginning of the queue.
Mode
Mode
Responding to a Call Alert in the Stack
You can respond to the Call Alerts in any order. To select a Call Alert
for response:
1. Press under “Queue”.
2. Press to scroll to the desired Call Alert.
3. Press the PTT button to respond to the Call Alert. After you
respond to the Alert, it is removed from the stack.
tt
AAAAlllleeeerrrrtt
JJJJOOOOHHHHNNNN SSSSMMMMIIIITTTTHH
3333 QQQQuuuueeeeuuuueeeedd
CCCClllleeeeaaaarrrr QQQQuuuueeeeuuuuee
HH
dd
MENU
ee
Private Mode
i1000
GETTING STARTED
39
Page 45

NOTES:
40
i1000
GETTING STARTED
Page 46

PPPPrrrrvvvvtttt RRRReeeeaaaaddddyy
yy
LLLLiiiisssstttt MMMMooooddddee
ee
11112222::::11112222pppp 00005555////000088
88
TTTTIIIIMM
MM
SSSSeeeelllleeeecccctttt MMMMaaaaiiiill
ll
TTTTyyyyppppee
ee
VVVVooooiiiicccceeee MMMMeeeessssgg
gg
GROUP MODE
A Group call is an instant communication that allows you to talk to
all individuals in a talkgroup at the same time. A talkgroup is a predefined set of individuals who share a common communication
need. Talkgroups appear on your display as names or numbers.
AT FIRST GLANCE
The first menu option choices that appear on the Group Ready
screen depend on whether the cover is open or closed.
Cover Closed
Use the Volume Control
buttons to scroll
through your stored
List.
yy
00
GGGGrrrroooouuuupppp RRRReeeeaaaaddddyy
TTTTaaaallllkkkkggggrrrrpppp 111100
CCCCaaaannnnccccllll
Cover Open
tt
AAAAlllleeeerrrrtt
MM
TTTTIIIIMM
dd
1111 QQQQuuuueeeeuuuueeeedd
EEEExxxxiiiitttt QQQQuuuueeeeuuuuee
ee
GGGGrrrroooouuuupppp RRRReeeeaaaaddddyy
TTTTaaaallllkkkkggggrrrrpppp 111100
11112222::::11112222pppp 00005555////000088
LLLLiiiisssstttt MMMMooooddddee
GGGGrrrroooouuuupppp RRRReeeeaaaaddddyy
TTTTaaaallllkkkkggggrrrrpppp 111100
11112222::::11112222pppp 00005555////000088
AAAAlllleeeerrrrtttt MMMMaaaaiiiill
yy
00
yy
00
ll
88
ee
88
Group Mode
i1000
GETTING STARTED
41
Page 47

GROUP/PRIVATE SPEAKER
You can hear calls through either the earpiece or the speaker in
Group mode. Pressing (the Group/Private Speaker button)
turns the Group/Private Speaker on or off.
If you set the Group/Private Speaker button on, you will hear
incoming calls through the speaker. This is helpful in monitoring
talkgroup activity.
If you set the Group/Private Speaker button off, a brief alert tone
notifies you of activity within the talkgroup. You will hear incoming
calls through the earpiece.
MAKING A GROUP CALL
IF THE COVER IS CLOSED...
• To contact the last group that you called, first
select the “Group Ready” mode, then press the
PTT button.
• Or, to select another number (previously entered
in your talkgroup list), press under “List”.
This allows you to use the Volume Control buttons
to scroll to the desired group name. At the desired
group name, press the PTT button.
1. Press until “Group
Mode
Ready” displays. Your most
recently used talkgroup displays,
for example, “Talkgrp 10”.
2. To place a call to this talkgroup,
press and hold the Push-to-Talk
GGGGrrrroooouuuupppp RRRReeeeaaaaddddyy
TTTTaaaallllkkkkggggrrrrpppp 111100
11111111::::11115555aaaa 00004444////000022
AAAAlllleeeerrrrtttt MMMMaaaaiiiill
yy
00
(PTT) button. Wait for the chirp
sound and then speak into the
microphone.
3. To listen, release the PTT
Mode
MENU
button.
CHANGING TALKGROUPS
You may change talkgroups to reach talkgroups other than the one
that is active. Your portable can store up to 30 pre-defined
talkgroups.
Group Mode
1. From Group mode, enter the talkgroup number, or press
to select the talkgroup from your stored talkgroup list.
42
i1000
GETTING STARTED
22
ll
Page 48

2. Press under “Ok”.
3. To talk, press the PTT button and wait for the chirp.
RECEIVING A GROUP CALL
No action is necessary to receive a Group call as long as your
portable is not busy in an active Phone or Private call. You can
receive group calls only on the talkgroups that you have predefined.
For more information, see “Talkgroup Naming”.
Any communication activity within the talkgroup that you select
automatically switches your portable into Group mode.
AREA SELECTION
When in Group mode, you can call only those talkgroup members in
a specific location. This is useful when you know where the
individuals are located within the service area.
1. Press until you see “Group Ready” on your display.
2. Press once, then press under “Area”.
3. Press to scroll through the targeted areas specified by
4. Press under “Ok” to select the targeted area.
Mode
MENU
your local service provider.
TALKGROUP NAMING
To add a talkgroup name to your portable:
ABC
1. Press .
2. Press under “Ok”.
3. At “Add New Entry?”, press under “Ok”.
4. At “Enter ID”, enter the desired talkgroup number.
5. Optional: At “Enter Name”, enter a name for the talkgroup.
6. Press under “Store”.
2
ABC
2
CALL ALERTS
You can access Call Alert from Group and Private modes. Using Call
Alert, you can page your talkgroup by sending an audible tone.
For more information, see “Sending a Call Alert” on page 38.
Group Mode
i1000
GETTING STARTED
43
Page 49

NOTES:
44
i1000
GETTING STARTED
Page 50

VOICE MAIL
Your portable provides full support for Voice Mail. You can go to
Voice Mail from any mode by pressing under “Mail”.
When you receive new voice mail messages in your voice mailbox,
the icon appears on your display and you hear the Voice
Mail alert tone (if Mail Notification Display is turned on).
• To turn on mail notification, press
DEF
3
then press
under “On”.
• To turn off mail notification, press
DEF
3
then press
under “Off”.
ll
3333 ====MMMMaaaaiiiill
DDDDiiiissssppppllllaaaayyyy::::OOOOnn
EEEExxxxiiiitttt OOOOffffff
nn
ff
Voice Mail
RETRIEVING VOICE
MAIL
Mode
MENU
In addition to the Voice Mail alert
tone, you also see the message, “New Voice Mail Waiting”.
When you see an exclamation point (!) on the display, you have at
least one urgent message.
To retrieve your voice mail immediately:
1. Press under “Dial”. This action automatically places a
call to your voice mailbox.
2. To close your voice mailbox, press under “Exit”.
VIEWING VOICE MAIL STATUS
You may view the status of voice
messages at anytime.
open:
1. Press under “Mail” from
any mode.
2. Press under “Voice”. Your
voice mailbox screen opens and
displays the number of New and
Total messages currently in your
voice mailbox.
3. Press under “Dial” to
retrieve your voice mail messages. The most recent message is
retrieved first.
With the cover
VVVVooooiiiicccceeee MMMMaaaaiiiill
ww
1111 NNNNeeeeww
1111 TTTToooottttaaaall
EEEExxxxiiiitttt DDDDiiiiaaaall
MENU
Mode
ll
ll
ll
i1000
GETTING STARTED
45
Page 51

NOTES:
46
i1000
GETTING STARTED
Page 52

MESSAGE MAIL
Your portable provides full support for Message Mail. You can access
this function from any mode by pressing under “Mail”.
Message Mail can be either a numeric page or a text message of up
to 140 characters. Your portable can receive and store 16 mail
messages at any time.
RECEIVING NEW MESSAGE MAIL
To read your new mail now:
™
IF THE COVER IS CLOSED...
And you select “Now”, use the Volume Up and Down
buttons (instead of the scroll keys) to scroll through
and read your messages.
When you receive a new message, the icon appears and
flashes. You may also receive an audible alert.
• Press under “Now” to
read your new mail
immediately.
• Use the scroll keys to scroll
through and read your
messages.
• Press under “Later” to
postpone reading your mail and
to clear the display. The icon
stops flashing but remains on
your display to remind you that
you have unread messages.
NNNNeeeewwww MMMMaaaaiiiill
RRRReeeeaaaadddd??
LLLLaaaatttteeeerrrr NNNNooooww
Mode
1
ll
??
ww
MENU
RETRIEVING STORED/UNREAD MAIL
To read your new mail later:
You may access postponed or saved Message Mail from any mode.
The cover must be open.
Message Mail
i1000
GETTING STARTED
47
Page 53

1. Press under “Mail”.
2. Press under “Mesg”. Your
Message mailbox opens and
briefly displays the number of
New and Saved messages
currently in your Message
mailbox. Then, the most recent
message opens.
3. Use to scroll through
the first screen of any unread or
saved mail messages.
4. Press under “Read” to
read the entire message.
Message Mail
Your message shows the time and date that
the sender entered it in the network.
SAVING AND ERASING MAIL
After you read a text or numeric
message, you can either Save or Erase
the message. Press under the
desired option.
MMMMeeeessssssssaaaaggggeeee MMMMaaaaiiiill
ww
2222 NNNNeeeeww
dd
0000 SSSSaaaavvvveeeedd
MENU
Mode
ll
1111>>>>CCCCaaaallllll
22
55555555555511112222111122
11112222::::33331111pppp 5555////11
EEEExxxxiiiitttt RRRReeeeaaaadd
MENU
Mode
ll
1111>>>>CCCCaaaallllll
55555555555511112222111122
11112222::::33331111pppp 5555////11
EEEErrrraaaasssseeee SSSSaaaavvvvee
ll
11
dd
22
11
ee
MENU
AUTO CALL BACK
Mode
With the cover open, you can respond
to numeric pages and text messages containing a call-back number.
To automatically dial a number contained within a Message Mail,
press .
MESSAGE MAIL MEMORY FULL
If all 16 message registers are full, your portable displays the
message “Mail Waiting, Memory Full”. You cannot receive new
Message Mail until you empty register space by erasing saved or
unread messages.
48
i1000
GETTING STARTED
Page 54

PROGRAMMING MENU OPTIONS
You can customize the settings on your portable using the
Programming Menu.
You may access the Programming Menu from any mode (Phone,
Group, or Private).
1. Press until you see “Prgm” on the display.
2. Press under “Prgm”.
3. Press under “Ok”.
4. Press to scroll to the desired Programming Menu
Keypad
Number
1 Own Ph # Stores the telephone number
2 Pgm Pvt ID Displays the private number of
MENU
Option or enter the number of the Option.
SHORTCUT
To enter the programming menu, press
then press the keypad number. See Table 7.
Table 7: Programming Menu Options
Menu Option Function
of your portable after you
receive the Þrst incoming call.
Or, you can enter the number.
your portable. You must initially
enter this number yourself.
Programming Menu
3 Mail Display Turns on and off the New Mail
message that is displayed with
incoming Voice or Message
Mail.
i1000
GETTING STARTED
49
Page 55

Table 7: Programming Menu Options
Keypad
Number
4 Manual Lock Locks your portable to prevent
5 Auto Lock Automatically locks your
6 Auto Answer Turns on or off automatic
9 Vibrate Alert Provides non-audible
The following options require you to press two keypad numbers. For
example, to enter keypad number 10, press 1 then press 0.
Menu Option Function
unauthorized use. You must
enter a pass code to unlock it.
With the manual lock on, you
can reach emergency help by
pressing and holding the
emergency key designated by
your carrier.
portable each time it is
powered off to prevent
unauthorized use.
answering of incoming phone
calls after 1-4 rings.
notiÞcation of incoming calls
and messages.
10 Last Call Timer Displays the duration of the
most recent phone call.
11 Display Timer Turns on or off automatic
display of the Last Call Timer at
Programming Menu
12 Reset Timer Displays cumulative airtime of
13 Total Timer Displays cumulative airtime of
14 1 Minute Beep Automatically signals each
i1000
the end of each phone call.
all phone calls since last reset.
all phone calls.
minute of elapsed phone
airtime with an audible beep.
GETTING STARTED
50
Page 56

Table 7: Programming Menu Options
Keypad
Number
20 Phone List Edit Edits and erases up to 100
21 Prvt ID List Edit Edits and erases up to 100
22 Talkgrp List
23 Area List Program Adds/Edits/Erases numbers
26 Phone/Prvt List Adds phone and private
30 Ringer Volume Allows you to set the ringer
Menu Option Function
frequently called phone
numbers and associated
names.
Private numbers and
associated names.
Adds/Edits/Erases numbers
Program
and associated names for up to
10 pre-programmed
talkgroups.
and associated names for up to
50 targeted areas.
numbers in one procedure.
volume using the volume
control keys, or lower the
volume to silence the ringer.
Programming Menu
31 Set Ring Style Allows you to select a distinct
ring style for incoming phone
calls.
32 Mail Volume Allows you to set the volume of
incoming Message Mail and
Voice Mail tones using the
volume control keys, or lower
the volume to silence the mail
alert tones.
33 Earpiece Volume Allows you to set the default
earpiece volume using the
volume control keys.
34 Keypad Volume Allows you to set the volume of
the keypad tones using the
volume control keys, or to
silence the keypad tones.
i1000
GETTING STARTED
51
Page 57

Table 7: Programming Menu Options
Keypad
Number
35 Speaker Volume Temporarily adjusts the Group/
36 Spkr Vol Set Tone Turns the speaker volume set
38 Silent Group Silences all incoming Group
40 Change Passcode Changes your secret four-digit
70 Language Provides your choice of one of
71 Time/Date Selects the format of the time
80 Phone Only Allows you to turn on or off
Menu Option Function
Private Speaker volume for
noisy environments.
tones on or off.
Call alerts and voice activity.
passcode from the initial
setting 0000.
four languages for your display
text.
and date display.
incoming Private and Group
services.
NOTE
Contact your service provider before performing the
Programming Menu
shaded programming menu features below.
Option
Number
41 Feature Reset Returns all feature settings to
42 Master Clear Performs Feature Reset and
43 Master Reset Resets the portableÕs
i1000
Menu Option Function
their original defaults.
erases all stored lists.
identiÞcation number.
GETTING STARTED
52
Page 58

44 Change Service
Key
50 NAM Selects alternate Numeric
51 Net ID Edits the pre-programmed
Changes or resets the fraud
prevention service key.
Assignment Module (NAM).
See local service provider for
information.
Network number list and select
roaming options.
Programming Menu
i1000
GETTING STARTED
53
Page 59

NOTES:
54
i1000
GETTING STARTED
Page 60

ERROR MESSAGES
You may receive error messages under certain conditions. Before
contacting your service provider, note the message, numeric code,
and the conditions under which it appeared. The following table
lists and describes the error messages.
Table 8: Error Messages
Error Messages Message Description
Number Not in Service The number that you entered is
not valid.
User Not Available The unit that you called is either
busy, out-of-range, or turned off.
Please try again later.
User Not Authorized The party that you called has not
purchased this service.
Please Try Later This service is temporarily not
available. Please try again later.
User Busy in Private The unit that you called is busy in
a Private call.
Service Restricted This service was restricted by
your service provider or it was
not purchased.
Service Not Available This feature is not available on
the current network.
System Busy Try Later The system is experiencing
heavy trafÞc. Please try again
later.
Service Conßict This service cannot be enabled
because an incompatible
service has already been turned
on.
Please Try Again An error occurred. Note the error
code and try again.
i1000
GETTING STARTED
Error Messages
55
Page 61

Table 8: Error Messages
Error Messages Message Description
Self Check Error A fault was detected with your
portable. If this error recurs, note
the error code and contact your
service provider.
Self Check Fail An operational fault was
detected with your portable. Note
the numeric code, turn your
portable off, and contact your
service provider immediately.
Error Messages
56
i1000
GETTING STARTED
Page 62

ACCESSORIES
IMPORTANT
SAVE THESE ACCESSORY
SAFETY INSTRUCTIONS
• Before using the battery, read all the instructions and
cautionary markings on (1) battery, (2) battery charger, and
(3) portable using battery.
• For your protection, store the battering it’s case when not in
use.
• Before using the Travel Charger, read all the instructions and
cautionary markings on (1) the Travel Charger, (2) the
battery, and (3) the portable using the battery.
• Before using the Vehicular Battery Charger (VBC), read all
the instructions and cautionary markings on (1) the VBC, (2)
the battery, and (3) the portable using the battery.
• Before using the Desktop Battery Charger, read all the
instructions and cautionary markings on (1) battery charger,
(2) battery, and (3) portable using battery.
• Do not expose the Travel Charger, Desktop Battery Charger
or Vehicular Battery Charger to rain or snow.
Accessories
To reduce risk of injury, charge only the
rechargeable batteries listed. Other types of
!
!
batteries may burst, causing personal injury and
damage.
W A R N I N G
• To reduce risk of damage to the cord or plug, pull by the plug
rather than the cord when disconnecting the Travel Charger
or Desktop Battery Charger from the AC receptacle or when
disconnecting the Vehicular Battery Charger from the
cigarette lighter.
• Do not operate the Travel Charger or Vehicular Battery
Charger with a damaged cord or plug.
• Do not attempt to disassemble the Travel Charger or
Vehicular Battery Charger.
• The Travel Charger or Vehicular Battery Charger may
become warm during operation, but not hot. If the Travel
Charger becomes hot to the touch, unplug it from the AC
outlet immediately and discontinue its use. If the Vehicular
Battery Charger becomes hot to the touch, unplug it from
i1000
GETTING STARTED
57
Page 63

• Use of a non-recommended attachment to the Desktop
• Make sure the Desktop Battery Charger cord is located so
Accessories
• An extension cord should not be used with the Desktop
• Do not operate the Desktop Battery Charger with damaged
• Do not operate the Desktop Battery Charger if it has
• Do not disassemble the Desktop Battery Charger; take it to a
• Maximum ambient temperature around the power supply of
• The output power from the power supply must not exceed
• The disconnection from the line voltage is made by
• To reduce risk of electric shock, unplug the Desktop Battery
• The portable must be turned off while charging in the
• The Desktop Battery Charger is for indoor use only.
the cigarette lighter immediately and discontinue its use.
Battery Charger may result in a risk of fire, electric shock, or
injury to persons.
that it will not be stepped on, tripped over, or subjected to
damage or stress.
Battery Charger unless absolutely necessary. Use of an
improper extension cord could result in a risk of fire and
electric shock. If an extension cord must be used, make sure:
(1) that the pins on the plug of the extension cord are the
same number, size, and shape as those on the plug of
the charger;
(2) that the extension cord is properly wired and in good
electrical condition; and,
(3) that the cord size is 18AWG for lengths up to 100 feet
and 16AWG for lengths up to 150 feet.
cord or plug - replace them immediately.
received a sharp blow, has been dropped, or has been
damaged in any way; take it to a qualified service technician.
qualified service technician when service or repair is
required. Incorrect reassembly may result in a risk of electric
shock or fire.
the Desktop Battery Charger must not exceed 40°C (104°F).
the rating given on the Desktop Battery Charger.
unplugging the power supply’s transformer from the AC
receptacle.
Charger from the outlet before attempting any maintenance
or cleaning.
Desktop Battery Charger.
58
i1000
GETTING STARTED
Page 64

BATTERIES
MOTOROLA BATTERIES
Kit Number Description/Chemistry Charging Time*
NTN8618A Ultra-slim Lite 2.5 Hours
NTN8615A Slim Lithium Ion 2.5 Hours
NTN8614A Standard Lithium Ion 3 Hours
NTN8617A Extended Lithium Ion 4 Hours
* Charging times based on a fully-charged battery
NOTE:
• It is recommended to charge the batteries within the
temperature range of 10°C to 40°C (50°F to 104°F).
• Prolonged charging is not recommended. Typical charging
guidelines are shown in the above table.
Charging Lithium Ion Batteries
The following are approximate charge times to 90% capacity using
Motorola iDEN Approved Lithium Ion battery Chargers. For
optimal battery life, use a Motorola iDEN Approved Lithium Ion
charger with your Motorola iDEN Lithium Ion battery. Other
chargers may not fully charge your Lithium Ion battery or may yield
a reduced number of cycles.
Accessories
Battery Operating Instructions
• Battery performance will degrade at extreme temperatures.
Do not store your battery where temperatures will exceed
60°C (140°F) or fall below -20°C (4°F).
• This Lithium Ion battery has a self discharge rate and
without use, will lose about 1% of its charge per day.
• The battery capacity will degrade if stored for long periods
while fully charged. If long term storage is required, store at
half capacity.
• The Motorola iDEN Approved Lithium Ion chargers will
provide optimum performance. Other chargers may not fully
charge your iDEN Lithium Ion battery or may yield reduced
number of charge cycles.
• Charger lights on Motorola iDEN chargers may flash or
extinguish during normal charger use.
• If the battery appears inoperative, the internal protection
circuitry may have been activated. Remove the battery from
the portable and put it into the charger for several minutes to
reset the circuitry.
i1000
GETTING STARTED
59
Page 65

TRAVEL CHARGER
The NTN6197A Travel Charger allows a battery to be charged from
an AC outlet. On one end of the travel charger, an accessory
connector attaches to the bottom of the portable unit. At the other
(AC outlet) end of the device is a compact housing containing the
Accessories
charging circuitry and a plug-in power supply. A lightweight cable
connects the two ends (accessory connector and supply).
A green LED on the accessory connector indicates that the Travel
Charger is plugged in
Installing the Travel Charger
Accessory Connector
Transformer
Figure 1: Installing the Travel Charger
1. While holding the i1000 with its front toward you, insert the
accessory connector with the Motorola logo facing you into slot
on the bottom of the i1000 until you hear an audible click.
2. Plug the Travel Charger’s transformer into an AC wall outlet.
The power light (green LED) on the accessory connector will
come on.
Travel Charger Operating Specifications
Input voltage range: 90-264 Vac @ 50/60 Hz.
Operating ambient temperature: 0°C to +50°C
60
i1000
GETTING STARTED
Page 66

VEHICULAR BATTERY CHARGER
The NTN8655A Vehicular Battery Charger (VBC) enables invehicle communications by providing power to the portable unit as
well as charging the portable’s Lithium Ion battery. The VBC is a
power supply that allows the portable’s internal charger to charge the
battery.
The power light (green LED) will light when the VBC is receiving
power.
Cigarette Lighter
Adapter
Accessory
Connector
Accessories
Figure 2: Installing the Vehicular Battery Charger
Installing the Vehicular Battery Charger
(Refer to Figure 2)
1. Attach the Vehicular Battery Charger’s accessory connector to
the bottom of the portable. While holding the i1000 with its
front toward you, insert the accessory connector with the
Motorola logo facing you into slot on the bottom of the i1000
until you hear an audible click.
2. Remove the vehicle’s cigarette lighter plug from the cigarette
lighter receptacle.
3. Plug the Vehicular Battery Charger’s cigarette lighter adapter
into the cigarette lighter receptacle. The power light (green
LED) will come on.
4. The i1000 portable may be left off, turned on, or used.
i1000
GETTING STARTED
61
Page 67

Removing the Vehicular Battery Charger
1. Unplug the Vehicular Battery Charger’s cigarette lighter adapter
from the vehicle’s cigarette lighter receptacle.
2. Press the latches on the accessory connector.
3. Pull the accessory connector from the bottom of the portable.
Accessories
Vehicular Battery Charger Operating Specifications
Operating voltage range: 10.8 - 33.0 Vdc.
Operating temperature range: -30°C to +60°C
62
i1000
GETTING STARTED
Page 68

DESKTOP CHARGER
The NTN8653A Desktop Rapid Charger will charge Motorola
authorized batteries listed on page 59 for the i1000. To charge a
battery, refer to Figure 3 and follow the procedure below:
Rear PocketFront Pocket
LED
Indicators
Pin Connector Power supply cord receptacle
Figure 3: Desktop Rapid Charger
Charging a Battery
Accessories
1. Plug the flat end of the power-supply cord into the receptacle on
the back of the charger.
2. Plug the transformer end of the power-supply cord into any
standard AC wall outlet. The charger performs a quick powerup self-test, during which the LED indicators will flash once to
indicate a successful power-up.
3. Insert an i1000 portable with an attached battery, into the
charger's front pocket. This is done by inserting the bottom of
i1000 portable onto the pin connector in the bottom of the
charger's front pocket.
4. If the portable is properly seated in the front pocket, the
charger’s front pocket LED indicator will light red to indicate
that the battery is being charged. (If a battery is in the rear
pocket and the portable with a battery is inserted into the front
pocket, the rear pocket’s LED flashes yellow, indicating that its
battery is waiting to be charged.)
5. The charger has the capability of displaying the battery’s charge
status. The indicator will show the following: solid red=1-30%;
solid yellow=31-60%; flashing green=61-90%; solid green=91100%.
i1000
GETTING STARTED
63
Page 69

Desktop Battery Charger Troubleshooting
If the battery is not charging and there is:
A flashing yellow indicator —
• If a battery is in the rear pocket, the rear pocket’s LED will
Accessories
No LED indication —
A flashing red LED indicator—
continue to flash yellow until the battery in the front pocket
is more than 90% charged (front pocket’s LED is solid
green). This is normal operation.
• In order to protect your battery’s life expectancy, the charger
will not charge a battery whose temperature is below 5°C
(41°F) or above 40°C (104°F). Charging outside of these
temperature limits can drastically reduce the life expectancy
of your battery.
• Check that the portable with battery, or a battery alone, is
inserted correctly (see “OPERATING INSTRUCTIONS”).
• Make sure the transformer is plugged into an appropriate AC
outlet, and that the connector is properly seated.
• Remove the battery from the charger, and use an ordinary
pencil eraser to clean the four metal contacts on the battery.
Replace the battery.
• If the LED indicator remains turned off, the battery may be
defective and should be replaced.
• Remove the battery from the charger, and use an ordinary
pencil eraser to clean the metal contacts on the battery.
Replace the battery.
• If the LED indicator continues to flash red, the battery may
be defective and should be replaced.
64
i1000
GETTING STARTED
Page 70

AUDIO ADAPTER
The NTN8654A Audio Adapter allows you to connect an earpiece
microphone to your portable for privacy and hands-free operation.
The Audio Adapter that fits onto the bottom of the portable, provides
a standard 2.5mm jack connection for an earpiece microphone
(NTN8367) or headset.
Installation Instructions
Audio Adapter
Connector
2.5mm jack
Accessories
Figure 4: Installing the Audio Adapter
1. Hold the portable and the Audio Adapter facing you so that you
see the Motorola logo.
2. Insert the Audio Adapter’s connector into the portable’s
receptacle. You will hear the connector snap into place.
Attaching/Detaching the Earpiece Microphone
1. Insert the 2.5mm plug of the earpiece microphone cord into the
jack of the Audio Adapter.
2. Pull on the plug, not the cord, to remove the earpiece
microphone.
Removing the Audio Adapter
1. Press the button on the front of the Audio Adapter. The front
displays the Motorola logo on the button.
2. Pull the Audio Adapter from the portable.
i1000
GETTING STARTED
65
Page 71

NOTES:
66
i1000
GETTING STARTED
Page 72

SAFETY AND GENERAL INFORMATION
IMPORTANT! Read this information before using your
portable.
RADIO OPERATION
Your portable’s radio component contains a transmitter and a
receiver. When it is ON, it receives, and also transmits, radio
frequency (RF) energy. The radio operates in the frequency range of
806MHz to 866MHz, and employs digital modulation techniques.
When you use your radio, the system handling your call controls the
power level at which your radio transmits. The power level may
typically vary over a range from 0.01 of a watt to 0.6 of a watt.
• Exposure to Radio Frequency Energy
In August 1996 the Federal Communications Commission (FCC) of
the United States with its action in Report and Order FCC 96-326
adopted an updated safety standard for human exposure to radio
frequency electromagnetic energy emitted by FCC regulated
transmitters. Those guidelines are consistent with the safety
standards* previously set by both U.S. and international standards
bodies. The design of your Motorola two-way radio complies with
the FCC guidelines and these standards.
*American National Standards Institute (C95.1 - 1992)
*National Council on Radiation Protection and Measurements
(NCRP-1986)
*International Commission on Non-Ionizing Radiation Protection
(ICNRP- 1986)
To assure optimal radio performance and to ensure that exposure to
RF energy is within the guidelines in the above standards, follow
the operating procedures outlined below.
Safety and General
• Efficient Radio Operation
The following practices will enable your radio to operate at the
lowest power level, consistent with satisfactory call quality.
When placing or receiving a phone call, or using the group or private
call functions with the Group/Private Speaker OFF (muted speaker
icon visible in the display), hold the radio as you would a telephone.
i1000
GETTING STARTED
67
Page 73

Speak directly into the mouthpiece and position the antenna up and
over your shoulder.
When using the radio as a traditional two-way
radio while making group or private calls with the
Group/Private Speaker ON (no speaker icon
visible in the display), hold the radio in a vertical
position with the microphone one to two inches
away from the lips.
For body-worn operation, the antenna should be
kept at least one inch from the body when transmitting.
DO NOT hold the antenna when the radio is “IN USE”.
Holding the antenna affects call quality and may cause the radio to
operate at a higher power level than needed.
• Antenna Considerations
Use only the supplied or an approved antenna. Unauthorized
antennas, modifications, or attachments could impair call quality,
damage the radio, or result in violation of ICNRP or FCC
regulations.
Safety and General
Do not use the radio with a damaged antenna. If
a damaged antenna comes into contact with the
!
skin, a minor burn may result.
C a u t i o n
• Interference to Medical and Personal
Electronic Devices
Most electronic equipment is shielded from RF energy. However,
RF energy from the radio transmitter may affect inadequately
shielded electronic equipment.
Consult the manufacturer(s) of your medical and personal electronic
device(s) (for example, a pacemaker or a hearing aid) to determine if
they are adequately shielded from external RF energy. Your
physician may be able to assist you in obtaining this information.
Turn your radio OFF in health care facilities when any regulations
posted in the area instruct you to do so. Hospitals and health care
facilities may be using equipment that is sensitive to external RF
energy.
68
i1000
GETTING STARTED
Page 74

• Interference to Other Electronic Devices
RF energy may affect improperly or inadequately shielded
electronic operating and entertainment systems in motor vehicles.
Check with the manufacturer or representative to determine if these
systems are adequately shielded from external RF energy. Also
check with the manufacturer of any equipment that has been added
to the vehicle.
Turn your radio OFF before boarding any aircraft to prevent
possible interference to aircraft systems. Regulations of the United
States Federal Aviation Administration prohibit use when the plane
is in the air and require that you have permission from a crew
member to use your radio while the plane is on the ground.
• Batteries
All batteries can cause property damage, injury or
burns if a conductive material such as jewelry,
keys, or beaded chains touch the exposed
!
C a u t i o n
terminals. The material may complete an
electrical circuit (short circuit) and become quite
hot. Exercise care in handling any charged
battery, particularly when placing it inside your
pocket, purse or other container. To protect
against a short circuit when the battery is
detached from the phone, keep the battery in the
insulated protective case provided with the
battery.
Safety and General
• Use While Driving
Check the laws and regulations on the use of telephones in the areas
where you drive. Always obey them.
When using the phone while driving, please:
• give full attention to driving and to the road;
• use hands-free operation, if available; and
!
• pull off the road and park before making or
answering a call if driving conditions so require.
C a u t i o n
i1000
GETTING STARTED
69
Page 75

• Children
Do not allow children to play with your radio. It is
not a toy. Children could hurt themselves or
others (by poking themselves or others in the eye
!
C a u t i o n
• Blasting Areas and Explosives
!
!
with the antenna, for example). Children also
could damage the radio, or make calls that
increase your service bills.
DO NOT operate your radio near electric blasting
caps, or in a blasting area, to avoid the possibility
of triggering an explosion. Turn your radio OFF
when in a “blasting area” or in areas where such
requirements are posted.
W A R N I N G
Safety and General
70
i1000
GETTING STARTED
Page 76

• Potentially Explosive Atmospheres
Turn your radio OFF and do not replace the
battery when in any area with a potentially
explosive atmosphere. It is rare, b ut y our radio or
!
!
W A R N I N G
its accessories could generate sparks which might
trigger an explosion.
Areas with a potentially explosive atmosphere ar e
often, but not always, clearly marked. They
include areas such as below deck on boats, fuel or
chemical transfer or storage facilities, and areas
where the air contains chemicals or particles, such
as grain, dust, or metal powders.
Do not transport or store flammable gas, liquid, or
explosives in the compartment of your vehicle that
contains your radio or accessories.
Vehicles powered by liquefied petroleum gas (such
as propane or butane) must comply with the
National Fire Protection Standard (NFPA-58).
For a copy of this standard, contact the National
Fire Protection Association. One Batterymarch
Park, Quincy, MA 02269, Attn: Publications Sales
Division.
Safety and General
i1000
GETTING STARTED
71
Page 77

• For Vehicles Equipped with an Air Bag
An air bag inflates with great force. DO NOT
place objects, including communication
equipment, in the area over the air bag or in the
!
!
W A R N I N G
Safety and General
CLEANING INSTRUCTIONS
air bag deployment area. If the communication
equipment is improperly installed and the air bag
inflates, this could cause serious injury.
Installation of vehicle communication equipment
should be performed by a professional installer/
technician qualified in the requirements for such
installations. An air bag’s size, shape, and
deployment area can vary by vehicle make,
model, and front compartment configuration (for
example, bench seat vs. bucket seats).
Contact the vehicle manufacturer’s corporate
headquarters, if necessary, for specific air bag
information for the vehicle make, model, and
front compartment configuration inv olved in y our
communication equipment installation.
Clean the external surfaces with a damp cloth, using a mild solution
of dishwashing detergent and water. Some household cleaners may
contain chemicals which could seriously damage the unit. Avoid the
use of any petroleum-based solvent cleaners. Also, avoid applying
liquids directly on the portable unit.
FOR FURTHER INFORMATION
For more detailed information on Motorola’s iDEN products, please
see the iDEN web site located at
http://www.mot.com/LMPS/iDEN
Be sure to carry the Pocket Card with you for quick reference.
72
i1000
GETTING STARTED
Page 78

OWNER’S INFORMATION
Mobile Equipment Identifier (IMEI)
_____________________________
Own Phone Number
_____________________________
Own Private Number
_____________________________
Date Purchased
______________
73
Dealer Telephone Number
_______________________
Customer Service Number
_______________________
i1000
GETTING STARTED
Page 79

PRIVATE NUMBER DIRECTORY
Private Number Name
1
2
3
4
5
6
7
8
9
TALKGROUP DIRECTORY
Talkgroup Number Name
1
2
3
4
5
6
7
8
9
74
i1000
GETTING STARTED
Page 80

75
i1000
GETTING STARTED
 Loading...