

Page 1

User’s Guide
i9
Page 2

Page 3
IMPORTANT NOTICE: PLEASE READ
PRIOR TO USING YOUR PHONE
The SIM card provided in this kit is intended for use
with the phone provided in this package.
Loss of certain features will result when using a SIM
card from one of the following models: i30sx, i35s,
i50sx, i55sr, i58s, i60c, i80s, i85s, i88s, i90c, i95cl
series, and the i2000 series.
For more information on SIM card compatibility, go to
www.motorola.com/iden.
Defects or damage to your Motorola phone that result
from the use of non-Motorola branded or certified
Accessories, including but not limited to replacement
housings and or other peripheral accessories, are
excluded from warranty coverage. Please refer to the
text of Motorola's Limited One Year warranty located
in this user’s guide for complete details.
Page 4

Page 5

DECLARATION OF CONFORMITY
Per FCC CFR 47 Part 2 Section 2.1077(a)
Responsible Party Name: Motorola, Inc.
Address: 8000 West Sunrise Boulevard
Plantation, FL 33322 USA
Phone Number: 1 (800) 453-0920
Hereby declares that the product:
Product Name: i9
Model Number: H07XAN6JR7AN
FCC-ID: IHDT56JQ1
Conforms to the following regulations:
FCC Part 15, subpart B, section 15.107(a), 15.107(d) and section
15.109(a)
FCC Notice to Users
The following statement applies to all products that have
received FCC approval. Applicable products bear the FCC logo,
and/or an FCC ID in the format FCC-ID: IHDT56JQ1 on the
product label.
Motorola has not approved any changes or modifications to this device
by the user. Any changes or modifications could void the user’s
authority to operate the equipment. See 47 CFR Sec. 15.21.
Class B Digital Device
As a personal computer peripheral, this device complies with part 15 of
the FCC Rules. Operation is subject to the following two conditions: (1)
This device may not cause harmful interference, and (2) this device
must accept any interference received, including interference that may
cause undesired operation. See 47 CFR Sec. 15.19(3).
Note:
This equipment has been tested and found to comply with the limits
for a Class B digital device, pursuant to part 15 of the FCC Rules. These
limits are designed to provide reasonable protection against harmful
interference in a residential installation. This equipment generates, uses
and can radiate radio frequency energy and, if not installed and used in
accordance with the instructions, may cause harmful interference to radio
communications. However, there is no guarantee that interference will not
occur in a particular installation.
If this equipment does cause harmful interference to radio or television
reception, which can be determined by turning the equipment off and
on, the user is encouraged to try to correct the interference by one or
more of the following measures:
•
Reorient or relocate the receiving antenna.
•
Increase the separation between the equipment and receiver.
•
Connect the equipment into an outlet on a circuit different
from that to which the receiver is connected.
•
Consult the dealer or an experienced radio/TV technician for
help.
Page 6

Page 7
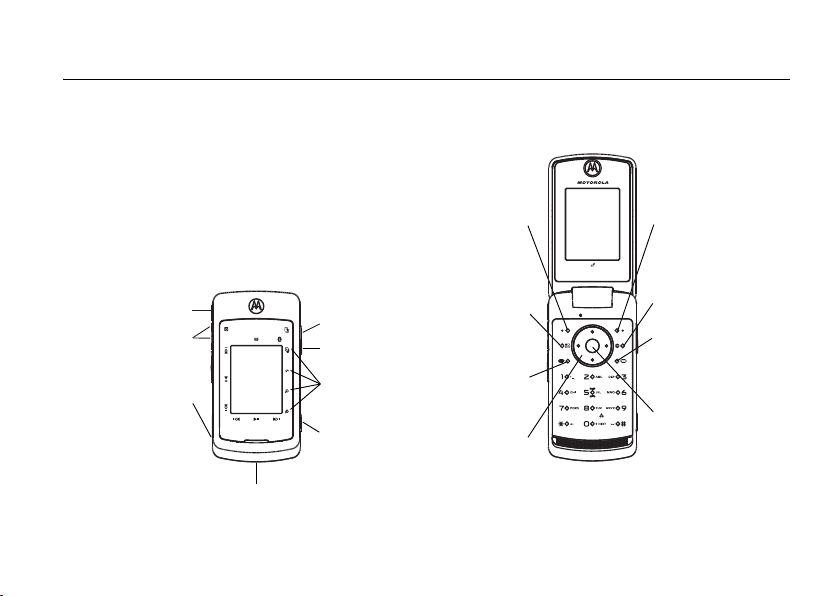
HELLOMOTO
Left Soft Key
Perform function
in lower left
display.
Right Soft Key
Perform function
in lower right
display.
End/Power Key
End calls, exit
menu system,
turns phone on/off.
Talk Key
Make &
answer calls.
OK Key
In menus & lists,
press to select
highlighted option.
4-Way Navigation
Key
Web Key
Menu Key
From home screen,
open main menu.
Speaker
On/Off Key
Volume Key
PTT Button
Mini USB
Connector
Connects charger
Camera Key
Smart Key
Lock
Antenna
For clear calls.
(Back side beneath battery)
Morphing Keys
Introducing your new Motorola wireless phone. Here’s a quick anatomy lesson.
1
Page 8
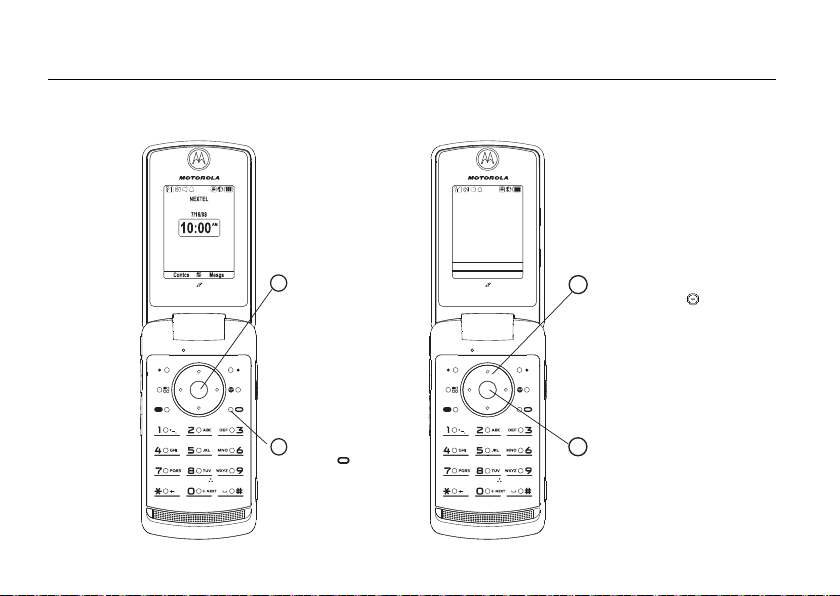
check it out
2
2
CustomizableO key
that can be used
to open the
Settings
screen
Press and hold the
1
Power Key
few seconds, or until
the screen lights up,
to turn on your
for a
phone.
BACE
S
U
T
H
G
Multimedia
Exit
Press the Navigation Key
3
up, down, left or right ( )
to highlight a menu feature.
Press the
key
to select.
O
4
Page 9

Motorola, Inc.
Consumer Advocacy Office
1307 East Algonquin Road
Schaumburg, IL 60196
www.hellomoto.com
Note:
Do not ship your phone to the above address. If you need to
return your phone for repairs, replacement, or warranty service,
please contact the Motorola Customer Support Center at:
1-800-453-0920 (United States)
1-877-483-2840 (TTY/TDD United States for hearing impaired)
Certain mobile phone features are dependent on the capabilities
and settings of your service provider’s network. Additionally,
certain features may not be activated by your service provider,
and/or the provider's network settings may limit the feature’s
functionality. Always contact your service provider about feature
availability and functionality. All features, functionality, and other
product specifications, as well as the information contained in this
user's guide are based upon the latest available information and
are believed to be accurate at the time of printing. Motorola
reserves the right to change or modify any information or
specifications without notice or obligation.
MOTOROLA and the Stylized M Logo are registered in the US
Patent & Trademark Office. All other product or service names are
the property of their respective owners. Java and all other Javabased marks are trademarks or registered trademarks of Sun
Microsystems, Inc. in the U.S. and other countries.
© Motorola, Inc., 2008.
Manual Number: NNTN7480A
3
Page 10

4
Page 11

contents
check it out . . . . . . . . . . . 2
menu map. . . . . . . . . . . . 7
use and care . . . . . . . . . . 9
essentials . . . . . . . . . . . 10
about this guide . . . . . 10
SIM card. . . . . . . . . . . . 11
memory card . . . . . . . . 11
battery . . . . . . . . . . . . 13
turn it on & off . . . . . . 18
enable security . . . . . . 18
make a phone call. . . . 19
answer a phone call . . 19
make a private call . . . 19
answer a private call. . 20
store a phone number
or private ID . . . . . . . . 21
call a stored phone
number or private ID . 22
your phone number
and private ID . . . . . . . 23
text messages . . . . . . 23
use your phone as USB
mass storage device . 27
using your handset
as a modem . . . . . . . . 28
main attractions . . . . . . 30
multimedia . . . . . . . . . 30
my music . . . . . . . . . . 34
my images . . . . . . . . . 42
my videos. . . . . . . . . . 44
camera . . . . . . . . . . . . 46
PTX features . . . . . . . . 50
one touch PTT . . . . . . 58
PT manager . . . . . . . . 60
MMS . . . . . . . . . . . . . 60
Bluetooth
®
. . . . . . . . . 77
clock screen saver . . . 81
basics. . . . . . . . . . . . . . . 83
display. . . . . . . . . . . . . 83
main menu . . . . . . . . . 84
text entry . . . . . . . . . . 84
navigation key. . . . . . . 87
handsfree speaker . . . 87
transmitters . . . . . . . . 87
use GPS with map
software . . . . . . . . . . . 88
features for the
hearing impaired. . . . . 90
features for the
vision impaired . . . . . . 91
calls . . . . . . . . . . . . . . . . 93
turn off a call alert . . . . 93
recent calls . . . . . . . . . 93
redial. . . . . . . . . . . . . . 94
contents
5
Page 12

caller ID . . . . . . . . . . . . 94
call forward . . . . . . . . . 95
voice names . . . . . . . . 95
emergency calls . . . . . 96
international calls. . . . . 97
speed dial . . . . . . . . . . 97
voicemail . . . . . . . . . . . 97
selective dynamic
group (SDG) calls. . . . . 98
MOTOtalkTM. . . . . . . . . 104
switching to
MOTOtalk . . . . . . . . . 105
exiting MOTOtalk. . . . 105
channels and codes. . 105
private MOTOtalk
calls . . . . . . . . . . . . . . 108
making emergency
calls while in
MOTOtalk
TM
mode . . 109
setup options. . . . . . . 110
customize. . . . . . . . . . . 113
volume. . . . . . . . . . . . 113
contents
6
ring tones . . . . . . . . . 113
wallpaper . . . . . . . . . . 115
datebook . . . . . . . . . . 115
hide or show location
information . . . . . . . . 116
other features . . . . . . . 118
advanced calling . . . . 118
alarm clock. . . . . . . . . 119
contacts. . . . . . . . . . . 120
datebook . . . . . . . . . . 121
GPS . . . . . . . . . . . . . . 122
handsfree . . . . . . . . . 123
memory card . . . . . . . 124
pc applications. . . . . . 125
personalize . . . . . . . . 126
TTY . . . . . . . . . . . . . . 126
security . . . . . . . . . . . 127
Safety and General
Information . . . . . . . . . 130
Service & Repairs . . . . 137
Specific Absorption
Rate Data . . . . . . . . . . . 138
Limited Warranty Motorola
Communications Products
(International) . . . . . . . 140
Hearing Aid
Compatibility . . . . . . . . 144
Information From the
World Health
Organization . . . . . . . . 146
Patent and Trademark
Information . . . . . . . . . 148
Privacy and Data
Security . . . . . . . . . . . . 149
Smart Practices While
Driving . . . . . . . . . . . . . 150
index. . . . . . . . . . . . . . . 152
Page 13

main menu
B
Recent Calls
L
Contacts
• [New Contact]
E
Messages
• [Create Message]
•Voice Mail
• Inbox
•Drafts
• Outbox
• Fax Mail
• Net Alert
1
Web
j
Multimedia
• Media Center
• My Images
• My Music
• My Videos
•Camera
• Camcorder
• Ring Tones
• VoiceRecord
S
Push To Talk
• Call Alert
• PT Manager
• PTT Options
•MOTOtalk
menu map
H
Games and Apps
•Buy More
• Alarm Clock Plus
• My Images
• My Music
• My Videos
• Java System
C
Tools
•My Info
•My Name
•Line 1
•Line 2
• Private ID1
• Private ID2
• Group ID
• Carrier IP
• IP1 Address
• IP2 Address
•Profiles
• [New Profile]
• Standard
•Car
• Meeting
•Office
• Outdoors
• Headset
•PRVT Only
•CNTCS Only
• Alarm Clock Plus
• Bluetooth
• Audio Devices
• Pair to Devices
• Device History
• Setup
• Find Me
• GPS
• Position
• Privacy
• Interface
• Datebook
• [New Event]
• Call Timers
• Last Call
• Phone Reset
• Phone Lifetime
•Prvt/Grp Reset
• Prvt/Grp Lifetime
• Kbytes Reset
•Memo
u
Settings (see next page)
This is the standard main menu layout. Your
phone’s menu may be a little different.
7
Page 14

settings menu
Display/Info
• Wallpaper
•[Buy More]
• Internal
• External
•Text Size
• Theme
• Home Icons
• Backlight
•Timer
• Java Timer
• Lighting Effect
• Sensor
• PTT Backlight
• Bluetooth LED
•Clock
•Display
• Screen Saver
•Time Format
• Date Format
•Year
• Menu View
• Icon View
•List View
•Tab View
• Large Dialing
• Language
8
Phone Calls
• Set Line
•Any Key Ans
• Auto Redial
• Call Waiting
• Auto Ans
• Flip Activation
• Minute Beep
• Call Duration
•TTY
• Hearing Aid
• Notifications
• DTMF Dialing
• Call Forward
• Prepend
Pers onalize
• Reorder Menu
• Shortcuts
•Up Key
•Down Key
•Left Key
• Right Key
• Center Key
•Left Softkey
• Right Softkey
•Power Up
Vol u me
• Ringers/Alerts
• Speaker
• Earpiece
• Multimedia
•Keypad
Voice Playback
• Speak Text
• Speak Caller
•Voice
• Multimedia Volume
Memory Card
• Remove Card
• Store Media
• Format Card
•Help
Security
• Phone Lock
• SIM PIN
• GPS PIN
• Change Passwords
Advanced
• Alert Timeout
• Headset/Spkr
• Connectivity
• Reset Defaults
• Return to Home
•Transmitters
• Phone Only
Connections
• Bluetooth
•USB
• Memory Card Access
• Data Modem
• Application Access
• GPS NMEA
•Help
Check for Update
Page 15
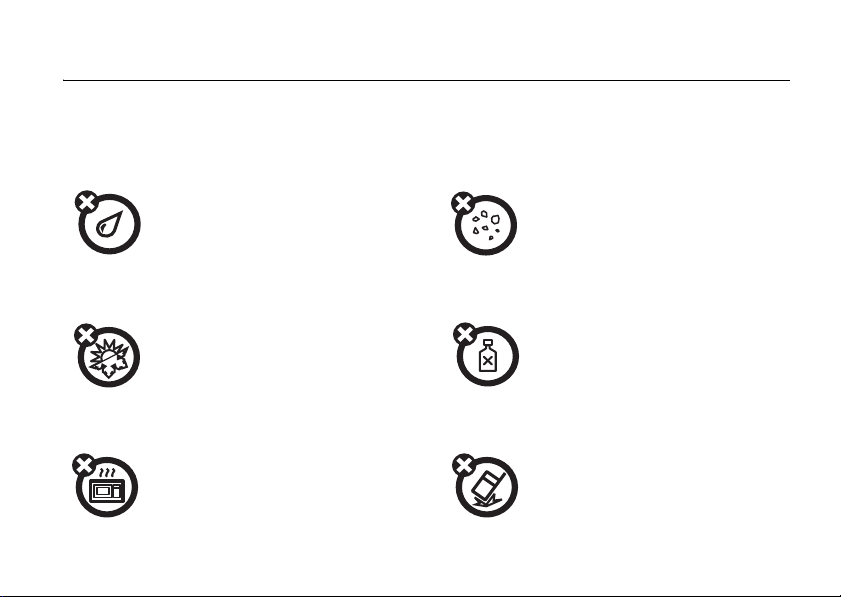
use and care
Use and Care
To care for your Motorola phone, please keep it away from:
liquids of any kind dust and dirt
Don’t expose your phone to
water, rain, extreme humidity,
sweat, or other moisture.
extreme heat or cold cleaning solutions
Avoid temperatures below
-10°C/14°F or above 45°C/113°F.
microwaves the ground
Don’t try to dry your phone in a
microwave oven.
Don’t expose your phone to
dust, dirt, sand, food, or other
inappropriate materials.
To clean your phone, use only a
dry soft cloth. Don’t use alcohol
or other cleaning solutions.
Don’t drop your phone.
9
Page 16
essentials
Caution:
time, read the Important Safety and Legal
information included in the gray-edged pages
at the back of this guide.
Before using the phone for the first
about this guide
This guide shows how to locate a menu
feature as follows:
Find it: / > u >
This means that, from the home screen:
1
Press the menu key / and then press
the
Settings
essentials
10
Phone Calls
menu option u.
2
Press the navigation keys ; to scroll to
Phone Calls
select it.
symbols
, and press the center key S to
This means a feature is network or
subscription dependent and may
not be available in all areas, or might
not be offered by your service
provider. Contact customer service
for more information.
This means a feature requires an
optional accessory.
Page 17
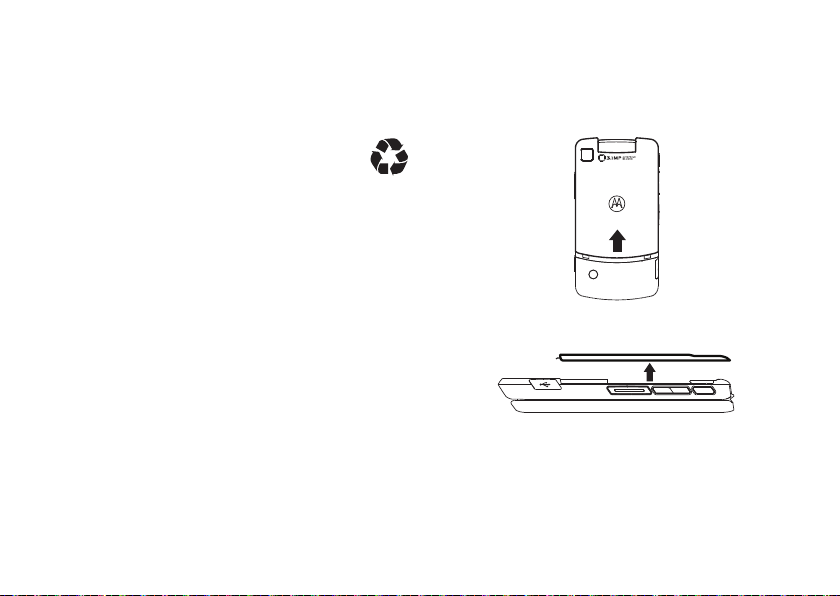
SIM card
insert the SIM card
Turn off your phone and remove your battery
before you install or remove a SIM card.
Carefully slide the SIM card into your phone,
until it lies flat in the SIM card holder.
Warning:
remove your SIM card from your phone
unless absolutely necessary.
To avoid loss or damage, do not
memory card
Your handset comes with a memory
card, memory card adapter, and memory card
1
reader
.
A memory card is removable flash memory
you can use to store pictures, videos, and
audio files.
You can connect your phone using a
Motorola data cable directly to your
computer, access the memory card
1. Depending on your service provider, the memory card,
memory card adapter, and memory card reader may not
be included with your phone. Your handset can be used
with a Transflash or MicroSD memory card.
essentials
11
Page 18
loaded in the phone to save or delete music,
images, videos, or audio files.
Find it: / > u >
Connections > USB
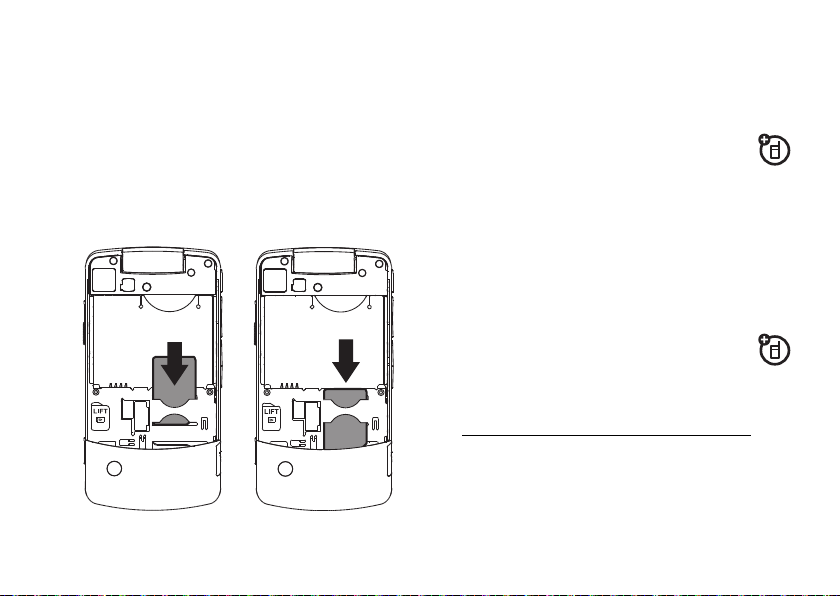
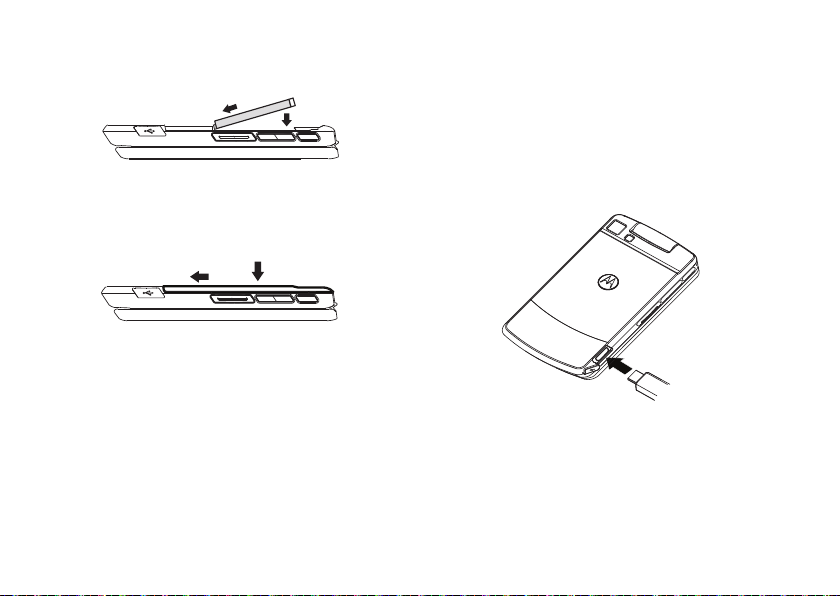
insert the memory card
1
Remove the battery door, lift the black
plastic indicator and slide the memory
card in place. Return the battery cover
when you are done.
essentials
12
Note:
The first time you insert a memory card
in your phone, you will see the following
options:
and
choice and continue.
[Do Nothing], Go To Audio Player, Go To Camera
Go To Media Center
. Select the option of your
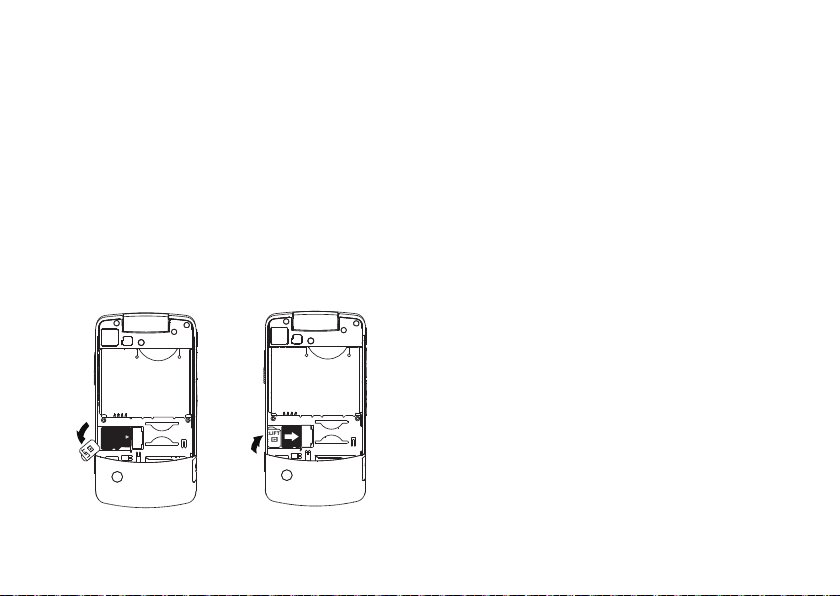
remove the memory card
Warning:
before selecting the
Settings
selecting the
loss of data.
1
2
3
Do not remove the memory card
Remove Card
. Removing the memory card before
Remove Card
From the home screen press
Memory Card > Remove Card
Once the handset confirms it is safe to
remove the SD card, press
Remove the battery door.
option under
option could result in
/ > u >
.
-
under OK.
,
Page 19
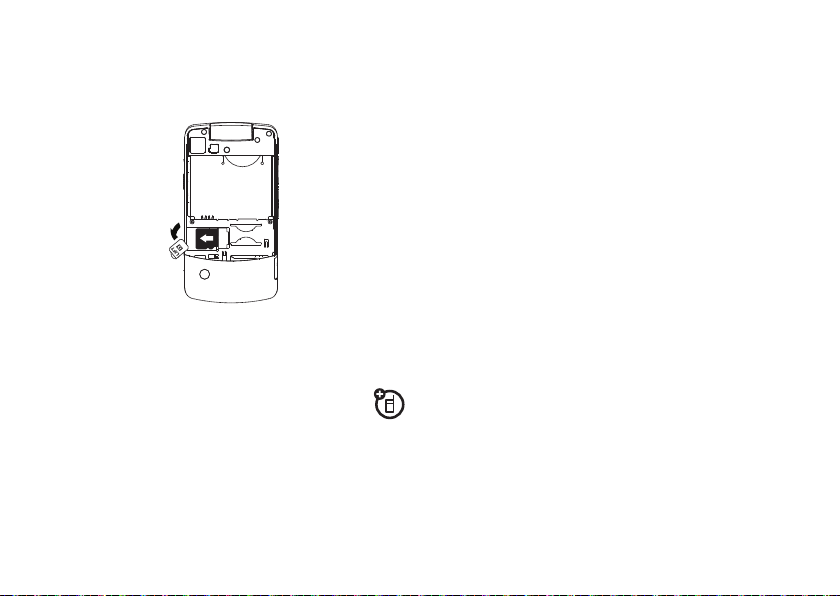
4
Lift the black plastic indicator and, with
your fingernail, slide the memory card out
of the slot.
5
Close the memory card slot cover.
battery
Battery Use & Battery Safety
• Motorola recommends you always
use Motorola-branded batteries and
chargers.
The warranty does not cover
damage caused by non-Motorola
batteries and/or chargers.
Caution:
or charger may present a risk of fire,
explosion, leakage, or other hazard.
Improper battery use, or use of a
damaged battery, may result in a fire,
explosion, or other hazard.
•
Battery usage by children should be
supervised.
•Important
are designed to work best with
qualified batteries. If you see a
message on your display such as
Battery
following steps:
•
Use of an unqualified battery
: Motorola mobile devices
or
Unable to Charge
Remove the battery and inspect it to
confirm it bears a Motorola “Original
Equipment” hologram;
, take the
Invalid
essentials
13
Page 20

•
If there is no hologram, the battery
is not a qualified battery;
•
If there is a hologram, replace the
battery and retry charging it;
•
If the message remains, contact a
Motorola Authorized Service Center.
•
New batteries or batteries stored for a
long time may take more time to
charge.
•Charging precautions:
your battery, keep it near room
temperature. Never expose batteries to
temperatures below 0°C (32°F) or
above 45°C (113°F) when charging.
Always take your mobile device with
you when you leave your vehicle.
•
When storing your battery, keep it in a
cool, dry place.
•
It is normal over time for battery life to
decrease, and for the battery to exhibit
essentials
14
When charging
shorter runtime between charges or
require more frequent or longer
charging times.
•Avoid damage to battery and mobile
device.
Do not disassemble, open,
crush, bend, deform, puncture, shred,
or submerge the battery or mobile
device. Avoid dropping the battery or
mobile device, especially on a hard
surface. If your battery or mobile
device has been subjected to such
damage, take it to a Motorola
Authorized Service Center before
using.
Do not
attempt to dry it with an
appliance or heat source, such as a hair
dryer or microwave oven.
• Use care when handling a charged
battery:
Particularly when placing it
inside a pocket, purse, or other
container with metal objects. Contact
with metal objects (e.g., jewelry, keys,
Page 21
beaded chains) could complete an
electrical circuit (short circuit), causing
the battery to become very hot, which
could cause damage or injury.
Promptly dispose of used batteries in
accordance with local regulations.
Contact your local recycling center for
proper battery disposal.
Warning:
because they may explode.
Never dispose of batteries in a fire
battery installation
1
Slide the battery door upwards until it is
released from the phone.
2
Remove the battery door.
essentials
15
Page 22
3
Push the battery down until it snaps in
place.
4
Replace the battery door and slide it
down while pressing gently until you
hear a click.
essentials
16
battery charging
New batteries are not fully charged.
charge using the charger
1
Pull out the connector cover, and insert
the charger into the micro USB connector
on your phone as shown.
2
Plug the other end of the charger into the
appropriate electrical outlet.
When you charge the battery, the battery level
indicator at the upper right of the screen
shows charging progress. At least one
Page 23
segment of the indicator must be visible to
ensure full phone functionality while charging.
charge from your computer
You can partially charge your phone’s
battery by connecting a Motorola-approved
USB cable from your phone’s micro-USB port
to a high power USB connector on a
computer (not a low-power one, such as the
USB connector on your keyboard or buspowered USB hub). Typically, USB high-power
connectors are located directly on your
computer.
Note:
The phone will be charged at a slower
rate than it is charged with the rapid charger.
Your computer must be turned on, and you
must have correct software drivers installed
on your computer. If the Phone is off when
the USB cable is connected between the
computer and the phone, the phone will
power up in charging mode. This mode allows
the phone to charge fastest and quickest.
Note:
If the battery is very low, the phone will
not turn On, but will continue to charge at a
low rate. The phone will power up in charging
mode when the battery has been charged to
approximately 5% of its capacity. For faster
charging under a very low battery condition, it
is recommended to use the rapid charger
supplied with the handset.
If the phone is turned on while charging from
a computer, it will not fully charge the battery.
In this case, the battery charge will be
maintained approximately between 80% and
95% of the battery's capacity. Cables and
software drivers are available in Motorola
TM
Original
Tip:
data kits, sold separately.
Motorola batteries have circuitry that
protects the battery from damage from
overcharging. Of course, unplugging the
charger from the wall will avoid current drain.
essentials
17
Page 24
This handset complies with environmental
energy consumption requirements by
notifying the user to unplug the charger from
the power outlet when the charger is
disconnected from phone/power outlet. This
notice can be dismissed permanently by
pressing - under No.
turn it on & off
To turn on your phone, press and hold . for
a few seconds or until the display turns on. If
prompted, enter your four-digit unlock code.
To turn off your phone, press and hold
two seconds.
essentials
18
.
for
Note:
If you press the . for more than four
seconds, the handset will power “On” in
Transmitters Off
phone with transmitters off, ensure the power
key is not held at about 4 seconds after
power-up is initiated, either by pressing the
power key or plugging a cable into the USB
port. To power up the phone normally from
charging mode, wait until the
screen is displayed, and then press the power
key. See “transmitters” on page 87.
mode. To avoid turning on the
Charger Attached
enable security
You must enable security the first time you
power on you phone or within 10 days of first
activation of your phone.
1
Press - under Ok.
2
Your are prompted to enable security.
Press
-
under
Yes
. A series of screens
Page 25

followed by the default home page
displays.
3
Press . to return to the home screen.
make a phone call
Enter a phone number and press , to make
a call or use a voice command. See “place a
call using a voice name” on page 96.
To hang up press
.
or close the flip.
2
If you want to answer the call using the
handset, just open the flip and press
To hang up press
Note:
You must have the
feature On. See “advanced calling” on
page 118.
3
If you are using a Bluetooth headset, you
can press the answer key on your
Bluetooth headset. To hang up press the
same key on your Bluetooth headset.
.
or close the flip.
Flip Activation
,
.
answer a phone call
When your phone rings and/or vibrates, you
have the following options:
1
If you want to answer the call on speaker
phone, press the speaker key
flip closed. To hang up press the smart
key
(
.
)
with the
make a private call
With Private calls service, you use your phone
as a long-range, digital 2-way radio using
one-to-one Private calls or one-to-many group
calls.
Your Private ID is the number at which you
receive one-to-one Private calls.
essentials
19
Page 26

Talkgroup numbers are numbers through
which you receive one-to-many group calls.
to make a Private call
1
Enter the Private ID you want to call.
2
Press and hold the PTT button. Begin
talking after your phone emits a chirping
sound.
3
Release the PTT button to listen.
To end the call press
Note:
A Private call ends automatically if there
is no activity on the call for a few seconds.
.
.
send call alerts
Sending a call alert discretely lets the
recipient know that you want to talk to him or
her on a Private call.
When you send a call alert, the recipient’s
handset displays your name and emits a
series of beeps or vibrations.
essentials
20
to send a call alert
1
Enter the Private ID you want to call as
you would when making a Private call.
2
Press - under
When the message
the display, press the PTT button until the
message
Alert Successful
Alert
.
Ready To Alert
appears.
appears on
answer a private call
1
When your phone emits a chirping sound
or vibrates to indicate you are receiving a
Private call, wait for the caller to finish
speaking.
2
Press and hold the PTT button and begin
talking after your phone emits a chirping
sound.
3
Release the PTT button to listen.
To end the call press
.
.
Page 27
answer a call alert
When you receive a call alert, you must:
3
Clear the call alert by pressing - under
Clear
.
option
Answer:
Begin a Private call with the sender.
Queue:
Store the call alert to the call alert
queue.
Clear:
Dismiss and delete the call alert.
You cannot receive phone calls or Private calls
until you do.
to answer a call alert
1
Press the PTT button to start a Private call
with the sender.
or
2
Queue the call alert by pressing - under
Queue
.
or
store a phone number
or private ID
You can store a phone number or private ID in
Contacts
:
Find it: / > L >
1
Enter a name for the new entry. Each
entry’s name can contain 20 characters.
2
Select a specific
3
Select a type for the entry (
Private 2, Work1, Work2, Home, Fax, Pager, IP
Other
)
. To store a private ID choose
or
Private 2
4
Enter the number for the entry and press
-
under
.
Save
when done
[New Contact]
Ring Tone/Picture
.
essentials
.
Mobile, Private1
or
Private1
,
21
Page 28

Tip:
Before saving the entry, you can save
more information. You can store an Email
address, IP addresses, and more. You can
choose a special ringer, create Contact entries
that are groups of Private IDs called Group IDs
and/or SDG lists.
After you have saved the number, the new
Contacts entry is displayed.
call a stored phone
number or private ID
Shortcut:
under
Find it: / >
1
22
From the home screen press -
Contcs
.
or
L
Scroll to the
Tip:
You can set up your handset for two
different search options by pressing
essentials
Contacts
entry.
/
>
Search Option
Search
, a new window will appear to allow
you to type the name of the contact you
are looking for. If you select
your handset will find the nearest match
to the letter you enter.
2
If the Contacts entry contains more than
one number, scroll left or right until the
type of the number you want to call is
displayed (
Work2, Home
3
If you chose a phone number, press , to
call the entry.
or
If you chose a Private ID, Talkgroup ID, or
SDG List, press and hold the PTT button
to call the number.
Tip:
If the Contacts entry you scrolled to
contains a Private ID, you can make an instant
Private call to that Private ID by pressing and
. If you select
Mobile, Private1, Private 2, Work1
, etc.).
Full Name
First Letter Search
,
,
Page 29
holding the PTT button, even if the Private ID
is not the type of number displayed.
your phone number and
private ID
Find it: / > C >
Tip:
Want to see your phone number or
Private ID while you’re on a call? Press
My Info
.
My Info
/
>
text messages
If your service provider offers Text Messaging,
your phone sends text messages using
MOSMS and receives text messages from
other phones that are using MOSMS.
set it up
Before you begin using text messaging, you
may need to set up your signature, service
center number, and expiration information.
Shortcut:
under
or
Find it: / > E > / >
The following options become available:
option
Signature:
characters long).
From the home screen press -
Mesgs
> />
Enter your signature (up to 11
Setup
.
Setup
essentials
23
Page 30
option
Quick Notes:
messages that you can create, edit, and
send in your text messages. You can store
up to 20 Quick Notes. A quick note may be
up to 30 characters long.
Select
press
pre-written Quick Notes.
Clean up:
messages in your
Dlvy Rpt Default:
report for your messages.
Memory Size:
usage of your phone.
MMS Setup:
select
Replies
24
Are short, pre-written text
Quick Notes
-
Select how often to clean up
Download Options
for MMS messaging.
essentials
to create a
under
Edit
to change the
Inbox
Select if you want a delivery
Displays the current memory
Lets you set your
[New Note]
and
Sent Items
Friendly Name
and setup quick note
or
folders.
,
Press - under
you entered.
Back
to save the information
receive a text message
1
To view the message press - under
2
To dismiss the message notification press
-
under
Back
.
Note:
If your phone is powered off when you
receive a text message, your phone notifies
you the next time you power it on. If you are
out of your coverage area, your phone alerts
you when you return to your coverage area.
Tip:
While reading a text and numeric
message that contains a phone number, you
can press
,
to call that number.
Read
read from the Message center
1
From the home screen press - under
Mesgs
>
Inbox
.
.
Page 31

2
Select the message you want to read.
Tip:
Pressing the number of the message
you want to read takes you to that
message.
3
To reply to the message, press - under
Reply
or to see all other choices, including
forwarding and deleting the message,
calling the sender, or storing the sender’s
number in
Contacts
, press /.
create and send text messages
1
From the home screen press - under
Mesgs
>
[Create Message]
or
You can also create a text message from
the
Inbox, Outbox
2
To address the message use the keypad
to enter the phone number of the person
you want to send the message to and
press
;
or press - under
, or
Drafts
.
folder.
Browse
. Select
Contacts
or
Recent Calls
want.
3
Select
Message
message or to use a quick note press
under
QNotes
you want.
4
If you want to send the message, press
-
under
Send
without sending it, press
Note:
If you want to request confirmation
of delivery press
to find the number you
: and enter the text of the
and scroll to the quick note
or to delete the message
-
under
Cancel
/
>
Delivery Report
> On.
use drafts
When you save a message as a draft, it is
saved in the drafts folder.
Shortcut:
under
1
From the home screen press -
Mesgs
>
Drafts .
Select the draft you want to edit. You also
have the choice to create new text
messages from this menu.
essentials
-
.
25
Page 32

2
To edit the fields you want to change,
follow step 2 through step 4 in “create
and send text messages” above.
resend text messages
Shortcut:
under
1
2
From the home screen press -
Mesgs
>
Outbox
.
Scroll to the message you want to resend
or press the number of the message you
want to resend.
Press / >
Resend
.
delete sent text messages
Shortcut:
under
1
2
3
26
From the home screen press -
Mesgs
>
Outbox
.
Scroll to the message you want to delete.
Press - under
Press - under
essentials
Delete
.
Yes
to confirm.
delete all unlocked sent messages
Shortcut:
under
1
2
From the home screen press -
Mesgs
>
Outbox
.
Press / >
Press - under
Delete All
.
Yes to confirm.
manage memory
Your text inbox, outbox, and drafts folder have
a set amount of memory available for storing
messages.
The text inbox holds 100 messages. If the text
inbox is full, you cannot receive messages
until you delete some.
The outbox and drafts folder hold 100
messages each. If the outbox and drafts
folder memory is full, you cannot send
messages or save drafts until you delete
some.
Page 33

To view the amount of memory available in
your text inbox:
Shortcut:
under
From the home screen press -
Mesgs
> / >
Setup > Memory Size
.
use your phone as
USB mass storage
device
Find it: / > u >
Memory Card Access.
Connections
>
USB
>
1
Slide open the connector cover, and insert
the USB data cable into micro USB
connector on your phone as shown.
2
Connect the other end of the USB cable
to the USB port of the computer.
3
Your memory card can now be accessed
by your computer.
essentials
27
Page 34

using your handset
as a modem
You can use your handset as a modem (Packet
Data only) with a laptop, handheld device, or
desktop computer. Circuit Data is not
supported. In order to use your handset as a
modem, you must create either a wired or
wireless connection between your handset
and the other device.
To connect your handset wirelessly, you must
have a Bluetooth adapter for the other device.
To create a wired connection, use a USB
cable.
connect with a USB cable
Use a USB cable to connect your
handset to a laptop, handheld device, or
desktop computer.
1
Pull out the connector cover, and insert
the USB cable into the micro USB
essentials
28
connector on your phone as shown in the
previous section.
2
Insert the data plug into the data port of
the other device.
connect via Bluetooth
Use your handset as a modem via Bluetooth.
The laptop, handheld device, or desktop
computer you want to connect to must have a
Bluetooth adapter installed.
Check that the adapter is properly installed,
and then follow the specific instructions
outlined in the device’s user guide to connect
the device to your handset.
When used as a modem, your handset is
enabled for
used for small file transfers such as email.
Data Modem
transfer mode, which is
Page 35

essentials
29
Page 36

main attractions
multimedia
Your phone comes with several multimedia
applications to let you access pictures, videos,
and audio files stored in your phone’s memory
or in the Audio, Music, Podcast, Image and
Video folders on a memory card inserted in
your phone’s memory card slot:
•
Media Center
view all supported multimedia files on
your device or your memory card.
Note:
the Music and Podcast folder from the
SD card.
•
My Music
player for music and podcast files.
main attractions
30
is a central repository to
The Media Center cannot read
provides an enhanced music
•
My Images
browser and image editor.
•
My Videos
or external display.
•
Camera
•
Camcorder
•
Ringtones
ringtones for your phone.
•
VoiceRecord
yourself.
In addition, the following audio files can be
accessed through the media center:
•
VoiceRecords
•
Musical ring tones in the list of ring
tones
provides a slide show, image
plays video files on the internal
lets you take still pictures.
lets you take short movies.
lets you purchase and preview
lets you record audio notes to
Page 37

•
Audio files saved from MMS messages
received
•
Audio files downloaded to your phone
Because the memory card inserted in your
phone may contain files saved to it using a
device other than your phone, not all types of
pictures, videos, and audio files on the
memory card may be accessed through your
phone’s media center.
Items in the media center can be sent in
MMS messages and with Bluetooth. See
“MMS” on page 60 and “Bluetooth®” on
page 77.
Pictures in the media center can be sent in
Private calls using Send via PTT. See “PTX
features” on page 50.
Media files supported by the Media Center
include:
Format Bit Rate / Info Sampling
AAC
(MPEG4
AAC-LC)
.aac* , .3gp,
.m4a, .3ga,
.mp4
AAC+
.aac*, m4a,
.3ga, .mp4
AAC+
Enhanced
.aac*, .m4a,
.3ga, .mp4
AMR-NB
.amr, .3gp,
.3ga, .mp4
Up to 320kbps 16 kHz
Up to 128 kbps
(16 to 128 kbps)
Up to 320 kbps
(16 to 320 kbps)
4.75 kbps – 12.20
kbps (supports all
3GPP specified
rates)
Rate
Max: 48
kHz
Up to
48 kHz
8 kHz
main attractions
31
Page 38

Format Bit Rate / Info Sampling
Rate
AMR-WB
.awb, .3ga,
.3gp
6.6 kbps - 23.85
Kbps (supports all
3GPP specified
8 kHz
rates)
iMelody
.imy
MIDI XMF
1 – 3.5 kHz
N/A
Monophonic
64 channels N/A
.xmf, .mmf,
.xmf0, .xmf1,
.mxmf
MIDI
64 channels N/A
Stand
.mid, .midi,
.smf
MP3
.mp3*,
*
.mpga
main attractions
32
Up to 320kbps Up to
48 kHz
Format Bit Rate / Info Sampling
Rate
PCM 16-bit
Linear
.wav, .au
Up to 1536 kbps Up to 48
kHz (8,
11.05, 12,
16, 22, 24,
3, 44, 48
kHz)
PCM 8-bit
Linear
Up to 1536kbps Up to
48 kHz
.wav, .au
PCM 8-bit
A-law
Up to 704 kbps Up to
48 kHz
.wav, .au
PCM 8-bit
mu-law
.wav, .au
Up to 704 kbps Up to 44
kHz (8,
11.05, 12,
16, 22, 44
kHz)
Real Audio
LBR (Cook)
.rm, .ra, ram
Up to 96 kbps Up to
44.1 kHz (8,
11, 22, 44
kHz)
Page 39

Format Bit Rate / Info Sampling
Rate
Real Audio
Sipro
(ACELP®.net)
.rm, .ra, ram
Real
Audio 10
.rm, .ra, ram
WMA v9 L2
(also WMA
v3, v7, v8)
*
.wma
(*) These formats support album art and lyrics.
5 kbps (fixed
rate)
8.5/6.5 kbps (dual
rate)
16 kpbs (wide
band)
Up to 192 kbps Up to
Up to 320 kbps 48 kHz
8 kHz
8 kHz
16 kHz
48 kHz (8,
11, 12, 16,
22.05, 24,
32, 44.1, 48
kHz)
Supported video file formats include:
Format
MPEG4 + AMRNB
MPEG4 + AMRWB
MPEG4 + AAC /
AAC+ /Enhanced
Resolution / Bit
and Frame Rate
352 x 288 and
320 x 240 (up
to 256 kbps);
176 x 144 and
128 x 96 (up to
128 kbps); up
to 30 fps
AAC+
H.263 + AMR-
NB
H.263 + AMR-
WB
H.263 + AAC /
352 x 288 (up
to 256 kbps);
176 x 144 and
128 x 96 (up to
64 kbps); 15
fps
AAC+ /Enhanced
AAC+
Extensi
on
.mp4,
.3gp
.3gp
main attractions
33
Page 40
Format
Real Video G2 / 8
/ 9
H.264 Up to 320
WMV8 / WMV 9 Up to 384
Resolution / Bit
and Frame Rate
Up to 320
kbps, 320 x
240, 15 fps
kbps, 320 x
240, 15 fps
kbps, 320 x
240, 24 fps
Extensi
on
.rm,
.rmvb
.mp4,
.3gp
.wmv,
.asf
my music
Your handset includes a music player that you
can use to play music files stored in the
phone memory and the MUSIC/AUDIO/
PODCAST directories on the memory card
inserted in your phone.
main attractions
34
The music player groups the music files into
folders and lists. When you select a music file
to play, the music player plays this file, then
plays the other music files grouped with it.
The music player also plays podcasts you
download to your computer and then save on
the Podcast directory on your phone’s
memory card. You can mark highlights within
a podcast file to help you find the parts you
most want to listen to.
If your service provider offers MMS, you can
send details of the podcast to a friend and
send feedback to the podcast creator using
MMS messages.
understanding the memory
card folder structure
When you first insert the memory card into
your phone, five folders are created:
Image, Music, Podcast
, and
Video
. In order to view
Audio
,
Page 41

files stored on the memory card, you must
store the given file in its corresponding format
folder: audio files such as ring tones, and
voice recordings to the
the
Image
folder, music files such as songs to
the
Music
folder, Podcasts to the
and videos to the
filename rules
When naming files stored on the memory
card, the following rules apply:
•
The filename can contain UTF8
characters, including ASCII, however
only supported characters will be
displayed.
•
The filename can be up to 255
characters long, including the file
extension, however only the first 32
characters will be displayed.
Warning:
255 characters, including the file format
If a music file name is longer than
Video
Audio
folder, pictures to
Podcast
folder.
folder
(.MP3), the song will not be visible on the
player and therefore can not be played. This
can be corrected by renaming the file and
replacing it on the card.
play music files
Find it: / > j>
1
Scroll to choose how you want your music
played (Songs, Playlists, Albums, etc.).
Tip:
The Songs folder contains all the
music files on the memory card in a single
list.
2
To play the first music file in the folder,
press
-
contains subfolders, this plays the first
music file in the first of the subfolders.)
Press
;
Scroll to a music file and press
Play to play the first music file in it.
My Music
.
under
Play
. (If the selected folder
to view the folder’s contents.
-
under
main attractions
35
Page 42

Any time you are viewing a list of folders with
the music player, you can scroll to a folder and
press
-
under
Play to start playing the
contents of that folder or press
contents of the folder.
To stop viewing a folder and return to the
folder or list that contains it, press
Back
.
;
to view the
-
under
play music while loading files
The first time the music player finds music
files on your memory card, it loads and
organizes these files. This may take a long
time for a large number of files.
To play music while files are loading:
Find it: / > j >
1
Scroll through songs and folders while
loading is going on the background.
2
Scroll to a music file or folder and press
-
under
main attractions
36
Play
My Music
or ;.
.
The following options become available
through the navigation panel:
option
Pause and Resume:
pause, and press
resume playing paused music files.
Skip to Next or Previous:
right or left to skip to the next or previous
music file.
Fast Forward and Rewind:
or left for 2 seconds to fast forward or to
rewind.
Press - under
-
under
Press and release
Press and hold ; right
Pause
Play
or ; to
or ; to
;
set up the music player
Find it: / > j >
My Music > /> Setup
Page 43
The music player can be set up with the
following options by pressing
option
Shuffle:
Lets you set the music player to play
the music files in a list or folder in random
order.
Repeat:
Lets you set the music player to play
one or all the music files in a list or folder
repeatedly.
Visuals:
Lets you choose among different
types of visual equalizers which sync with
the Music.
3D Music:
Lets you experience surround
effects when the handset is tethered
to a stereo headset.
If you set the
select a 3D effect from the list of
Reverbs
Album View:
list view or an image view.
3D Music
.
Lets you choose to view either a
/ > Setup
feature to On, you can
:
Music
option
Auto Update:
every time you launch My Music. If you set
Auto Update
music library configuration in order to save
loading time.
Equalizer:
music player.
Themes:
of the My Music Application.
Lets you reload all music files
to
Off
, it will follow the last known
Lets you customize the sound of the
Lets you customize the background
work with playlists
Playlists are lists of music files you create
from the files already available through My
Music.
Playlists enable you to organize music files,
but they do not change anything in other
folders or on the memory card. Adding or
deleting a file on a playlist does not copy,
delete or move it.
main attractions
37
Page 44

create a playlist
Find it: / > j >
[Create New]
1
.
Enter a playlist name.
Note:
If you do not assign a name, the
playlist is named
My Music > Playlists >
Playlist
followed by a
number. For example, the first playlist you
create without naming is automatically
named
Playlist-1
.
2
Select
[Add Songs]
. A list of all music files
appears.
Tip:
For options to help you sort through
this list, press
3
Select each file you want on the playlist. A
/
.
checkmark appears by each selected file.
Tip:
To deselect a selected item, scroll to
a selected file and press
4
When you are finished selecting files,
press
-
under
Done
main attractions
38
;
.
and - under
Save
The following options are available for existing
playlists by pressing
/
>
Edit Playlist
/
>
My Music> Playlists >
:
option
Edit a Playlist:
You can change a playlist name,
add music files, remove music files, and
change the order of the music files
Playlist
. Make changes and press - under
Save
.
Reorder Songs in a Playlist:
You can change the
Edit
order of the music files while creating or
editing the playlist in
the song you want to move, press
Grab
, and then scroll to the place where you
want the song to appear and press
under
Insert
.
Reorder Songs
. Scroll to
-
under
-
.
Page 45

option
Remove Songs:
songs while creating or editing a playlist.
Before you have saved a new playlist or
while editing a playlist, scroll to the song
you want to remove and press
Remove Song
Remove All Songs
confirm and
Reorder Playlists:
the playlists in the
Edit playlist
playlist you want to move and press
under
where you want the playlist to appear and
press
Delete a Playlist:
select
to delete and press
-
under
You can remove some or all
/
and press ;, or you can select
. Press - under
-
under
Save
You can change the order of
Playlists
>
Reorder Playlists
Grab
, and then scroll to the place
-
under
Insert
.
While in the music player
Playlists
. Scroll to the playlist you want
/
Yes
to confirm.
Yes
.
folder. Press / >
. Scroll to the
>
Delete Playlist
>
to
-
. Press
option
Delete all Playlists:
select
and press
Note:
Favorites playlist.
While in the music player
Playlists
. Press / >
-
under
This deletes all playlists except the
Yes
to confirm.
Delete All Playlists
use the favorites playlist
The
Favorites
playlist is a permanent playlist. You
can
Add To Favorites
order of the music files, but you cannot
rename or delete music files.
Find it: / > j >
Select the song you want to add to your
favorites and press
, remove and change the
My Music> Songs
/
>
.
Add To Favorites
.
work with podcasts
Find it: / > j >
My Music
>
Podcasts
.
main attractions
39
Page 46

Note:
The Podcasts folder is empty until you
download podcasts from your computer.
1
Scroll to view individual podcast episodes
or folders containing multiple episodes of
the same program.
2
Press ; to view the podcast episodes
within a folder or the details screen of an
individual podcast episode.
You can pause, resume, fast-forward, and
rewind just as with any other music file.
Some functions differ when playing a podcast:
•
Pressing ; when you have scrolled to
a podcast displays a screen showing
podcast details, but does not play the
podcast. To play the podcast, press
under
Play
. After you begin playing the
podcast, pressing
;
pauses and
-
resumes the podcast.
•
If the podcast you are playing contains
highlights, pressing and releasing the
main attractions
40
;
right or left skips to the next or
previous highlight within the podcast,
or to the beginning or end of the
podcast.
highlights
Highlights are portions of a podcast that are
marked to help you find them more easily. You
can use the music player to add and delete
highlight markers. Press and release (don’t
hold) the
;
right or left to find them.
You can play all the highlights in a podcast and
skip everything that is not marked as a
highlight using
Highlights Only
.
add a highlight marker
1
While playing a Podcast press / >
Highlights
.
2
Press - under On to mark the beginning.
Add
Page 47

3
Go to the point in the podcast that you
want to mark as the end of the highlight
and press
4
Press - under
Tip:
Highlight markers can be deleted by
pressing
Highlights
Podcasts menu.
send podcast information
You can only share podcast details with
others. If you want to share podcast details,
you have saved to your memory card, you can
send it in an MMS message that can be saved
and downloaded onto their computer.
Find it: / > j>
Forward Details
/
>
> / >
>
-
under
Off.
Back
.
Clear
or pressing / >
Clear All Highlights
My Music > Podcasts
Send.
Edit
from the
> / >
my music on the external
display
You can launch My Music from the external
display by pressing the Smart Key
selecting the My Music application from the
menu.
Note:
Pressing the Smart Key ( when on
the external idle screen will access the main
menu in the external display.
Use the external morphing media keys to
control My Music from the external display.
See “morphing media keys” on page 49.
(
and
background music
Your handset has the capability to play music
in the background while you are accessing
other features like
GPS, Contacts, MMS, Datebook, Memo, Recent Calls
others.
Settings, Media Center, Bluetooth
, and
,
main attractions
41
Page 48
You can also enjoy listening to your favorite
background music while browsing the web,
reading news or checking the weather.
play music in the background
Find it: / > j>
1
Select a music file and press ; to play the
song.
2
Press / >
The music player continues playing and the
handset returns to the home screen. To jump
back to the music player, press
Music
.
My Music
Hide Player
>
Songs
.
.
-
under My
my images
My Images lets you easily browse, edit and
view a slide show of images on your phone or
memory card on your internal display, or
browse, view a slide show on the external
display.
main attractions
42
my images menu
The My Images menu has many photomanagement features. The following options
are available for images by pressing
/
> j >
/ >
and choose one of the
following:
option
Edit:
Displays several options for editing your
photos including:
Resize, Borders, Stamps, Text
Slideshow:
images from the currently highlighted
image.
Save as New:
new filename.
Preview:
Rename:
filename.
Starts a slide show containing
Displays the highlighted image.
Lets you rename the image
Crop, Rotate/Flip, Color Adjustment,
and
Text Bubble.
Lets you save an image with a
Page 49
option
Delete Current:
image.
Delete Multiple:
to delete at one time.
Switch to Phone/Card:
stored on the phone or memory card.
Set as Wallpaper:
image as the device wallpaper.
Themes:
your application.
Deletes the current highlighted
Lets you chose multiple images
Toggles between images
Sets the current highlighted
Lets you choose a background for
viewing images
Find it: / > j >
1
Press
Slideshow
images in the current folder.
2
Press ; left or right to switch between
viewing images on the phone and the
My Images
to view a show of all
.
memory card. The
also be used to scroll the images.
#
and * keys can
my images on the external
display
You can launch My Images on the external
display by closing the flip while in the My
Images application, by pressing the Camera
Viewfinder toggle key while in Camera mode,
or by pressing the Smart Key
external display and selecting
the menu.
The available images are shown using
thumbnails at the bottom of the display. The
thumbnails scroll as you move through the
images.
Use the external morphing media keys to
control My Images from the external display:
(
on the
My Images
from
main attractions
43
Page 50
•
When viewing single images on the
external display use the
buttons to scroll through the images.
•
When viewing a slide show on the
external display, use the
button to control the show.
•
Press the Smart Key ( to suspend
the My Images application and go to
the External Display Menu.
For more information, see“morphing media
keys” on page 49.
Previous/Next
Pause/Play
my videos
My Videos lets you easily browse and view
video files on your phone or memory card.
Find it: / > j >
main attractions
44
My Videos
.
viewing videos
•
On the internal display, My Videos will
display the video in portrait mode by
default.
Tip:
To change the default to landscape
mode press
•
On the external display, My Videos will
always play the video in landscape
mode.
/
>
Full Screen
.
my videos setup menu
Find it: / > j >
The My Videos Setup Menu allows you to
change the following settings:
option
View:
Displays options for viewing your
videos as
3D Audio:
Default
Lets you turn 3D audio On and
My Videos > / > Setup
and
Folder
view.
Off
.
Page 51

option
Audio Reverbs:
of 3D audio visual settings.
Lets you choose from a number
my videos on the external
display
You can launch My Videos on the external
display by closing the flip while in the My
Videos application, by pressing the
Camcorder Viewfinder toggle key while in
Camcorder mode, or by pressing the Smart
Key
(
on the external display and selecting
My Videos
from the menu.
Tip:
Closing the flip while watching a video on
the internal display will move the video to the
external display.
Use the external morphing media keys to
control My Videos from the external display:
•
When viewing a video on the external
display, use the
control the video playback. Press and
hold the right
forward the video. Press and hold the
left
W
navigation key to rewind the
video.
•
When viewing videos on the external
display use the
scroll through available videos.
•
Press the
My Videos application and go to the
External Display Menu.
For more information, see“morphing media
keys” on page 49
Pause/Play
Y
navigation key to fast
Previous/Next
Smart Key (
button to
to suspend the
buttons to
main attractions
45
Page 52
camera
The 3 MP auto focus camera with a digital,
external viewfinder and an 8x zoom in your
handset takes pictures and records videos.
You can save these pictures and videos in
your phone’s memory or to a memory card
inserted in your phone’s memory card slot,
depending on the storage preference you
chose. You can access these saved pictures
and videos through the Media Center, My
Images and My Videos.
You can send the pictures you take either in
Private calls or with Bluetooth. You can also
assign them to Contacts entries, or set them
as your phone’s wallpaper.
access the camera
There are many ways to access the camera.
The simplest way is to press the
the side of the phone.
main attractions
46
e
key on
To take pictures aim the camera lens on the
back of the phone and press
or press
with the flip closed.
Note:
phone now, you are prompted to save the
picture you have just captured to the memory
card. Choosing to save the picture to the
memory card does not change your storage
preferences after the picture is saved.
To save the picture, press
To discard the picture without saving it, press
-
From the camera viewfinder, you can press
/
The following options become available:
;
with the flip open, or press e
If you insert a memory card into the
under
Discard
.
to enter
option
Media Center: Opens the Media Center so you
can browse or view your pictures.
Menu Options
-
under
Capture
;
.
.
Page 53

option
Record Video: Recording a video is similar to
taking a picture. If you store videos in
phone memory, you can record videos up to
60 seconds long. If you record video onto
the memory card, the video length is
limited by how much memory is available
on the card or two (2) hours.
Zoom: Set the zoom to 1x, 2x, 4x or 8x. You can
also set zoom from the viewfinder by
pressing
;
up and down or by using the
morphing keys on the external display.
Spotlight: Turn on the spotlight before taking a
picture in low light conditions. You can also
set it up to be
Focus: Sets the focus to
Session On, Only Once
Scenery, Auto
or
or
Session Off
Macro
.
option
Self Timer: Delay capturing the picture for a
selected number of seconds. The values
are:
Off
seconds
(default),
.
10 seconds, 15 seconds, 20
To turn off the timer before the picture is
captured, press
Picture Quality:
Normal
or
-
under
Adjust the picture quality to
Fine
.
Picture Size: Set up the
picture size to
(1536x2048)
(1200x1600)
Medium (480x640), Small
.
(176x220)
Wallpaper(240x320)
Max
,
Xlarge
,
Large (960x1280)
,
Xsmall (96x128)
. You can
,or
also set picture size from
the viewfinder by
pressing
;
left and right.
,
Cancel
.
main attractions
47
Page 54

option
White Balance: Sets the white balance to
Automatic, Sunny, Cloudy, Fluorescent, Tungsten
Night.
Exposure Control:
picture from -2 to +2.
Style: Sets the type of picture effect to
Black and White, Sepia, Solarization
Memory Usage: Displays the used and free
memory of your phone.
Memory Card:
stored:
Help
.
Camera Setup:
page 49.
Adjusts the exposure of the
and
Sets where camera pictures are
On Phone
or
Prefer On Card
See “customize the camera” on
and to display
Negative
or
Normal
.
two-step auto focus
When the focus setting is set to auto, e
works as a focus/capture button. When the
main attractions
48
button is half pressed, the focus display
notice
([ ])
will show red until the focus is set.
The focus display notice will then turn green.
Fully press
e
to take the picture.
change storage preference
You can choose whether media items are
,
saved to your phone’s memory or to the
memory card. From the camera viewfinder
press
/
>
Memory Card
1
Select
On Phone or
2
The location that you choose becomes the
Store Media
option in
>
Store Media
Prefer On Card
Settings
.
access the media center
You can access the media center from the
camera at any time by pressing
Media Center
Camera Setup
screen.
, except when you are using the
menu or viewing the memory
.
/
.
>
Page 55
The media center contains all your pictures,
music and video files located on your phone’s
memory or your removable memory card.
Use the
*
or the # to filter your results.
customize the camera
Find it: e > / >
The following options become available:
option
Ask for Name: If this option is On, you are
prompted to enter a name for each picture
before saving. Otherwise, pictures are
automatically saved with the date and a
number as their names.
Shutter Sound:
camera makes when it is taking a picture.
Default Size: Sets the default value for the
Picture Size
Set the default sound the
option.
Camera Setup.
option
Default Quality:
quality of the picture.
Spotlight Setting:
depending on the lighting condition.
Default Focus:
of the lens.
Sets the default value for the
Select
Always On
Sets the default value for focus
Select Scenery, Auto
, or
or
Off
Macro
,
.
morphing media keys
Your i9 phone comes with morphing icon keys
on the front of the flip that will change
depending on whether you are holding your
phone in portrait or landscape mode and what
application you are using.
The following icons are displayed depending
on how you are holding your phone:
Icon Function
Camera Keys are shown in Landscape
Z
Zoom in
main attractions
49
Page 56

Icon Function
[
Zoom out
b
Delete
V
Exit
\
Flash
a
Playback/Capture
]
Toggle
X
Play/Pause
W
Previous/Rewind
Y
Next/Forward
c
Bluetooth
Music Keys are shown in Portrait
b
Delete
V
Exit
X
Play/Pause Song
W
Previous Song/Rewind
Y
Next Song/Fast Forward
main attractions
50
Icon Function
c
Bluetooth
PTX features
With Push To View features, your phone can
send and receive the following items through
Private calls with other phones that have this
capability:
•
Short text messages
•
Pictures
•
Datebook events
•
My Info
•
Contact information
•
Location information
1. Additional charges may apply.
1
1
1
Page 57

You can choose to send messages, pictures,
events,
My Info, Contacts
the Private ID you are engaged in a Private call
with, Private IDs on the
Private IDs stored in
When you make or receive a Private call, your
phone automatically determines whether the
phone you are engaged in a Private call with is
able to receive each of these items. Your
phone saves this information for as long as
the Private ID is on your
saved in your
saved information each time you make or
receive a call to or from that Private ID.
You can turn your phone’s ability to send and
receive messages, pictures, events or
location information On and Off.
Note:
You cannot send PTT feature items
during Talkgroup calls or SDGC calls.
or
Location
Recent Calls
Contacts
.
Recent Calls
Contacts
. Your phone updates the
information to
list, and
list or is
send messages
The Push to Send Messages feature
lets you send short text messages through
Private calls.
When you send a message, it appears on the
display of the phone you are engaged in the
Private call with.
begin a message and choose a
recipient
You can begin a message during a Private call,
from the
the
begin a message during a Private call
While in a Private call, press / >
Feature
Note:
Messaging Fees May Apply Continue?
Contacts
list, the
PT Manager
.
>
Send Message
The first time you send a message,
.
Recent Calls
list, or from
Use PTT
appears and you
main attractions
51
Page 58

are prompted to respond. Press - under
to acknowledge the message.
begin a message from the Contacts or
the Recent Calls list
1
From the
select the entry containing the Private ID
you want to send the message to.
2
Press / >
begin a message from the PT Manager
The
PT Manager
you want to send the message to from
or the
Find it: / > S >
Browse.
Then select
of entries from the
that can receive messages.
52
Contacts
or the
Recent Calls
Use PTT Feature
lets you select the Private ID
Recent Calls
list.
PT Manager
A Contact
or
A Recent Call
Contacts
main attractions
or the
>
Send Message
>
Send Contact >
to see a list
Recent Calls
list,
Contacts
Yes
.
list
create messages
After you have begun a message and chosen
a recipient, a screen appears that lets you
create the text of the message you want to
send. Your message may be up to 400
characters long.
You can choose from a list of ready-made
words or short phrases called Quick Notes.
You can use a Quick Note as it is or edit it
before you send it. Editing a Quick Note
changes the Quick Note for this message only
and will not change the Quick Note on the list.
send a completed message
After you have completed your message,
press the PTT button to send it.
receive messages
When you receive a message, a message
notification appears on the display.
Page 59

To view the message: Press - under
To dismiss the message press
Dismiss
.
-
Read
under
reply to a message
1
View the message.
2
Press - under
3
Create the message and press the PTT
button to send it.
Reply
.
send pictures
You can send pictures stored in the
Center
through Private calls. The picture you
send appears on the Private call recipient’s
display.
If the recipient accepts the picture, their
phone saves the picture. The picture then
appears in that phone’s recent call list.
Media
.
The first time you send a stored picture after
turning the phone on,
Continue?
appears and you are prompted to
respond.
Note:
You cannot make or receive Private
calls while transmitting or receiving a picture.
Picture Fees May Apply
send a picture during a call
1
While in a Private call, press - under
Picture
or press / >
Picture.
A list of pictures that can be included in a
Private call appears.
2
Select the picture you want to send.
3
Press the PTT button to send the picture.
4
Wait while the picture is transmitted. The
Private call is temporarily interrupted
while a picture is transmitted.
Use PTT Feature
>
Send
main attractions
53
Page 60

5
When prompted, press the PTT button to
resume the Private call.
send a picture by starting a call
from the media center
Find it: / > j >
1
Scroll left or right to
Pictures
.
2
Select the picture you want to send.
3
Press / >
4
Select
A Contact
A list of contacts that have Private IDs and
are able to receive pictures appears.
5
Select the name of the person you want
to send the picture to.
6
Press the PTT button to send the picture.
7
When prompted, press the PTT button to
resume the Private call.
main attractions
54
Media Center
Send Via...
or
A Recent Call
Phone: Pictures
>
Send Via PTT
or
Card:
.
from the PT Manager:
Find it: / > S >
1
Select
A Contact
A list of contacts that have Private IDs and
are able to receive pictures appears.
2
Select the name of the person you want
to send the picture to.
3
Select
Browse Picture
4
Press the PTT button to send the picture.
5
Once picture has been sent, when
prompted press the PTT button to resume
the call.
PT Manager
or
A Recent Call
or
>
Send Picture
Capture Picture
.
.
receive a picture
When someone sends you a picture, your
phone emits a tone or vibrates and a message
appears asking if you want to accept the
picture.
Page 61

Pictures you receive are saved to your phone’s
memory or a memory card. They are
accessible through the media center.
When you see a message asking if you want
to accept the picture, press
to decline.
Tip:
If you want to stop the transmission
before it is finished, press
Note:
The first time you accept a stored
picture after turning the phone on,
May Apply Continue?
prompted to respond. Press
accept the picture.
appears and you are
Yes
to accept or No
.
.
Picture Fees
-
under
Yes to
clear a picture from the display
If you want to clear a picture from your
phone’s display while still on a call, press
/
>
Clear Screen
The picture will not appear on the display
again the next time you receive a call from
.
person who sent it. This does not delete the
picture from
Media Center
.
send a datebook event
You can send an event already stored in
your phone’s datebook or create a new
datebook event to send. You can send
datebook events during private calls, from the
Contacts list, Recent Calls list or from the PT
Manager.
to send a datebook event during a
private call
1
While in a Private call press / >
Use PTT Feature
Note:
the menu, the Private ID you are engaged
in a private call with is not able to receive
Datebook events.
2
If you want to create a new datebook
event, press
>
Send Event
.
If these options do not appear on
-
under
New and create the
main attractions
55
Page 62

event in your datebook. If you want to
chose an existing event do so.
3
If the event is a recurring event: Select
This Event Only to send only the event
selected. Select
occurrences of the event.
4
Push the PTT button to send the event.
Repeat Events
to send all
send my info
1
While in a Private Call press / >
Send My Info via PTT
to send.
or
2
From the home screen press / > C >
My Info
> / >
the PTT button to send.
set my info sending option
You can control what portion of the
information in
main attractions
56
, and push the PTT button
Send My Info via PTT
My Info
is sent and whether it is
and push
sent automatically in every call or only when
you choose to send it.
Find it: / > S >
PTT My Info
1
2
The information your phone sends always
includes
may also send
depending on your sending options.
automatic sending
To control whether you send your information
automatically:
Find it: / >
PTT My Info
1
>
Select or remove the fields you want to
send.
Press - under
My Name
>
Select On or
Info to Send
, and
Line 1,
S
>
Auto Send
Off
PT Manager
Done
.
Private1
Line 2
, and
PT Manager
>
or
>
Configure
Private2
Carrier IP
Configure
>
. You
,
>
Page 63

2
When you make a call in which your
information is sent automatically, the
name you entered in the
My Info
appears on the display of the
recipient’s phone, even if your name and
Private ID are not stored in the recipient’s
Contacts.
My Name
field of
send contact information
1
While in a Private Call press / >
Use PTT Feature
2
Select
information you want to send.
3
Push the PTT button to send.
or
1
From the home screen press / > S >
PT Manager
2
Enter the Private ID number of the person
you want to send the Contact information
to or press
.
Send Contact
>
Send Contact.
-
under
and select the contact
Browse
.
3
Select from
4
Select the contact information you want
to send and push the PTT button.
Recent Calls, Contacts
, or
Memo
.
send your location
You can transfer your approximate
location information through Private calls to
other enabled phones. Using the integrated
GPS feature the following location information
can be shared:
•
Time Stamped Latitude/Longitude
•
Relative Location or Direction and
distance from the sender in Miles or
Kilometers
Find it: / > S >
1
Select
A Contact
A list of contacts that have Private IDs and
are able to receive locations appears.
PT Manager > Send Location.
or
A Recent Call.
main attractions
57
Page 64

2
Select the name of the person you want
to send your location to.
3
Press the PTT button to send your
location.
Note:
The location information can be stored
in the recipient’s recent call list.
turn PTT features on and off
You can turn your phone’s ability to send and
receive messages, pictures, and Datebook
events on and off.
You cannot turn your phone’s ability to send
and receive My Info and contact information
on and off.
Find it: / > S >
On/Off PTT Features
4
Check or uncheck Messages, Pictures
Events and/or Location.
main attractions
58
.
PTT Options
>
one touch PTT
Find it: / > S >
One Touch PTT sets your phone to do any of
the following each time you press the PTT
button from the home screen:
option
Off: Nothing happens when you press the
PTT button from the home screen.
Last Call:
Call the most recent Private ID or
Group on the recent calls list.
Assigned Number:
Enter the number using your keypad, or
press
-
under
Calls
, or
Memo
If you are entering a Talkgroup number,
press
#
before the number.
PT Manager:
manager” on page 60.
Go to PT Manager. See “PT
PTT Options
Call a Private ID you assign.
Search.
.
>
Select
One Touch PTT.
Contacts, Recent
Page 65

option
Send Message:
message. See “send messages” on
page 51.
Send Picture:
pictures. See “send pictures” on page 53.
Send Event:
Datebook Event.
Send My Info:
Info. See “send my info” on page 56.
Send Contact:
contact. See “send contact information” on
page 57.
Send Location:
your location. See “send your location” on
page 57.
Go to the first screen to send a
Go to the first screen to send
Go to the first screen to send a
Go to the first screen to send My
Go to the first screen to send a
Go to the first screen to send
quick PTT
Quick PTT lets you quickly make a call,
create an SDG list or make a SDG call when
accessing any Private IDs on your phone.
To view a list of Contacts and SDG lists with
Private IDs in
Find it: / > S >
To move between
use the
To make a Private call or SDG call:
1
Select the entries you want.
2
Press - under
3
Push the PTT button.
To save your selections as a SDG list press
/
>
SDG lists, see “create SDG lists in contacts”
on page 98.
Contacts
:
Quick PTT
Contacts, Recent Calls
;
left or right, or press * or #.
Done
.
Save SDG
. For more information about
, or
Memo
,
main attractions
59
Page 66
If you want to assign a name to the SDG list,
enter the name.
Note:
If you do not assign a name, the SDG
list is named SDG followed by the number of
members in the SDG list. For example, SDG
(8) for a SDG list with 8 members.
PT manager
The
PT Manager
features, and other Private call features, from
the main menu.
Find it: / > S >
1
Select
Location
PTT item you are sending, select a
contact and press the PTT button to send.
or
60
lets you quickly access PTT
PT Manager
Send Event, Send My Info, Send Contact, Send
, or
Configure
. After choosing what
main attractions
2
Select Configure
Notes
,
PTT My Info, PTT Location, One Touch PTT
On/Off PTT Features
to configure your
.
PTT Quick
, or
MMS
Multimedia Messaging Service (MMS) lets
you send and receive messages that may
include text, pictures, videos, and audio files.
Depending on your service provider, your
phone may support MOSMS as well as MMS.
You should see no significant differences
between the two; some names of menu
items and the steps you take to access
features may differ.
create a message
Shortcut:
under
or
From the home screen press -
Mesgs
>
[Create Message]
Page 67

Find it: / >
Note:
Contacts, Recent Calls
To address the message:
1
Select To.
2
Add the phone number or email address.
or
3
Select from
4
Press ;.
Tip:
To remove a phone number or email
address from the list of message recipients,
scroll to the phone number or email address
and press
When you are finished addressing the
message, press
To enter or edit the body of the message:
1
Select
Messages > [Create Message]
You can also create a message from
, or the home screen.
Contacts
or
Recent Calls
-
under
Remove
.
-
under
Back
Message
.
.
.
2
Enter text using the keypad or press under
QNote
to select a quick note of your
choice (see “quick notes” on page 62)
and press
;
.
more message options
To view more message fields in a message
you are creating, select
The following options become available:
option
Subject:
Create or edit the
Attach:
Attach a picture, audio file, video or
voice record.
Cc:
Send a copy of this message to
someone else.
Auto Replies:
possible short answers for the recipient to
choose when replying to your message.
Priority:
Allows you to create a list of
Set priority
Normal
...More...
Subject
or
High
line.
.
main attractions
61
Page 68

option
Valid Until:
deliver the message end, or press
No Date
Set a date after which attempts to
-
under
.
reply to a message
You can reply to a message while you are
viewing it, or while a previously viewed
message is highlighted in the message
center. You cannot reply to unread messages.
To reply to a message:
1
View the message you want to reply to.
2
To reply to the sender only, press
select
Reply All
to reply to all recipients.
3
A list of short phrases appears. Select any
of these phrases to add it to your
messages or select
4
Edit any message fields you want to
change.
main attractions
62
[Create Reply]
Reply
or
.
5
Press - under
Send
.
quick notes
When you are filling in the
fields, you can add ready-made words or short
phrases called Quick Notes. After you add
these words or phrases, you can edit them as
you would any other text.
1
While you are creating a message, scroll
to or select
2
Press - under
3
Select the quick note you want to insert
into the message.
Message
or
QNotes
Message
Subject
.
.
and
Subject
insert a picture, video, and
audio recording from the media
center
You can insert one or more pictures, videos,
and audio files from the media center into the
Page 69

body of the message. You can include text in
the body of your message in addition to these
items.
insert items
While you are filling in the
/
and select
Audio
,
Insert Video, Capture Video, Capture Picture or Record
Voice
.
A list of available Quick Notes, pictures,
videos, and audio files appears. You can only
add one attachment at a time.
Select the quick note, picture, video, or audio
recording you want to insert.
Tip:
To view or listen to the item before
inserting it, highlight it and press
Preview
.
Insert QuickNote, Insert Picture, Insert
Message
field, press
-
under
remove an inserted item
To remove an item from the message you are
creating, highlight it and press
-
under
Delete
attach a picture, video, and
audio recording from the media
center
You can attach one or more pictures, videos,
and audio files from the media center.
1
When you are filling in the message,
select
Attach > [New Attachment]
2
Select Browse Pictures, Capture Picture, Browse
Audio
,
Record Voice, Browse Video
A list of available pictures, videos, and
audio files appears. You can only add one
type of attachment at a time. You won't
see a list of all of these items at the same
time.
.
, or
Record Video
.
.
main attractions
63
Page 70

3
Select the picture, video, or audio
recording you want to attach.
If you want to attach more items, select
[New Attachment]
4
When you are finished, press - under
Done
.
.
take a new picture
1
While you are creating a message, scroll
to any message field and press
select
Attach
>
[New Attachment]
2
Select
Capture Picture
camera.
Tip:
If you want to adjust the zoom,
spotlight, picture quality, picture size, or a
timer, set these options before taking the
picture.
3
Take the picture. For instructions on how
to take the picture see “camera” on
page 46.
main attractions
64
. This accesses the
/
.
or
4
When you have captured the picture you
want, press
automatically save it to your media center
and attaches it to your message.
To discard the picture, press
Discard
5
When you are finished, press - under
Done
.
The picture is attached to the message
and saved to the default storage location.
-
under
Save
. This will
-
under
. You can then take another picture.
record a video
You can record a video to send with a
message:
1
Select
Attach > [New Attachment]
2
Record and adjust video.
To view the video without saving it, press
-
under
Review
.
3
To save the video, press e or press ;.
.
Page 71

To discard the video without saving it,
press
-
under
Discard
.
4
The picture is attached to the message
and saved to the media center in the
default storage location.
create a new voice record
You can create a new voice record to send
with a message:
1
Press / or select
2
Select
Record Voice
3
Say the message you want to record into
the microphone.
4
When you are finished recording, press
;
.
5
When you are finished, press - under
Done
.
Attach
>
[New Attachment]
.
6
The voice record is attached to the
message and saved to the media center
and the list of voice records.
remove an attachment
To remove an attachment in a message you
are creating:
1
Select
Attach
.
2
Scroll to the attachment you want to
.
remove.
3
Press / >
Unattach
.
drafts
While composing a message you can save it
in the MSS drafts folder by pressing
In Drafts
.
You can continue to create the message. The
version you saved in the Drafts folder will not
change.
/
>
Save
main attractions
65
Page 72

send a draft
Shortcut:
under
1
2
From the home screen press -
Mesgs
>
Drafts
.
Select the draft you want to send.
Press - under
Note:
If
you might need to complete required
fields in the message in order to send it.
Send
.
Send
does not show as an option,
1
To delete a message in the Drafts folder
without sending it, scroll to the message
you want to delete and press
Delete
.
2
Press - under
Yes to confirm.
-
under
outbox
MMS messages you have sent or tried to
send are stored in the Outbox.
edit a draft
Shortcut:
under
1
2
From the home screen press -
Mesgs
>
Drafts
.
Select the draft you want to edit.
Press ;.
delete a draft
When you send a draft, it is removed from the
Drafts folder.
main attractions
66
forward items from the outbox
Shortcut:
under
1
2
3
From the home screen press -
Mesgs
>
Outbox
.
Scroll to the message you want to
forward.
Press / >
Make edits if you wish, select the
recipient and press
Forward
.
-
under
Send
.
Page 73

resend
If a message was not sent from your handset,
you can resend it.
Shortcut:
under
1
2
Note:
Resend will not appear as an option.
From the home screen press -
Mesgs
>
Outbox
.
Scroll to the message you want to resend.
Press - under
If your message was sent successfully,
Resend
.
check delivery status
If a message was successfully sent and you
set the message to give a report confirming
delivery, you can check the delivery status:
Shortcut:
under
1
2
From the home screen press -
Mesgs
>
Outbox
.
Scroll to the message you want to view.
Press / >
Delivery Status
.
delete a message
1
Scroll to the message you want to delete.
2
Press / >
3
Press - under
Delete Message
Yes
to confirm.
.
receive a message
When you receive an MMS message, a
message notification appears on the display.
1
To view the message press ;.
If your phone is set to download new
messages automatically, the message
downloads from the message server now.
2
If your phone is set to prompt you before
downloading new messages, press
3
If the message fills more than one screen,
scroll down to read it.
/
.
main attractions
67
Page 74

embedded objects and
attachments
Messages may contain pictures, videos, or
audio files as part of the body of the message
or as attachments.
If a message contains pictures, videos, or
audio files in the body of the message,
highlight each picture, video, or audio
recording to view or play it.
If a message contains a picture, video, or
audio recording as an attachment, open the
attachment to view the picture or play the
video or audio recording.
main attractions
68
open attachments
1
View the message.
2
Highlight the attachment you want to
open. Attachments appear at the end of a
message.
3
Press ;.
Note:
Attachments that are of an unknown
type cannot be opened, but they can be
deleted.
view received messages from
the message center
Shortcut:
under
Select the message. If the message has not
yet been downloaded from the message
server, it is downloaded now.
From the home screen press -
Mesgs
>
Inbox
.
Page 75

delete unread messages
1
Scroll to the message you want to delete.
2
Press - under
confirm.
Delete
and - under
Yes
to
lock and unlock messages
Locked messages cannot be deleted until you
unlock them.
1
View the message you want to lock or
unlock.
2
Press / >
Lock Message
or
Unlock Message
.
call a number in a message
If a message you receive contains a phone
number, Private ID, or Talkgroup ID in the
field, the
the body of the message, you can call or send
a call alert to that number.
To
field, the Cc field, the
Subject
From
field, or
send a call alert
1
View the message.
2
Highlight the Private ID or Talkgroup ID
you want to alert.
3
Press / >
4
Push the PTT button.
make a group call
1
View the message.
2
Press /.
3
Highlight the Talkgroup ID you want to
call.
4
Select
Talkgroup
5
Push the PTT button.
Alert
.
.
main attractions
69
Page 76

store message information to
contacts
If a message you receive contains a phone
number, Private ID, Talkgroup ID, or an email
address in the
field, the
message, you can store this information to
Contacts
.
1
View the message.
2
Highlight the number or email address
you want to save.
3
Press / >
4
To store the number or email address as a
new entry, select
To store the number or email address to
an existing entry, select the entry.
5
With the Contacts type field highlighted,
press
70
From
field, the To field, the Cc
Subject
field, or the body of the
Save Number
;
left or right to display the
main attractions
or
[New Contact]
Save Email
.
.
Contacts type you want to assign the
number or email address.
6
Press - under
Save
.
go to a website
If a message contains one or more website
URLs, you can go to that website.
1
View the message.
2
Highlight the website URL you want to go
to.
3
Press / >
Note:
message to allow you to open the
website.
Go To Website
The entire URL must appear in the
.
Page 77

save an embedded picture,
video, or audio recording
To save a picture, video, or audio recording
that is part of the body of a message you
receive:
1
View the message.
2
Highlight the picture, video, or audio
recording you want to save.
3
Press /.
4
Select
Save Picture, Save Video
The item will save in the default storage
location.
Note:
Some types of pictures, videos, and
audio files can be viewed or played, but
not saved.
, or
Save Audio
.
delete an embedded picture,
video, or audio recording
To delete a picture, video, or audio recording
that is part of the body of a message you
receive:
1
View the message.
2
Highlight the picture, video, or audio
recording you want to delete and press
/
.
3
Select
Delete Picture, Delete Video
, or
Delete Audio
save attachments
1
View the message.
2
Highlight the attachment you want to
save.
3
Press / >
Save Attachment
.
.
main attractions
71
Page 78

Selected items save to the default storage
location.
Note:
Some types of pictures, videos, and
audio files can be viewed or played, but
not saved.
delete attachments
1
View the message.
2
Highlight the attachment you want to
delete.
3
Press / >
4
Press - under
Delete Attachment
Yes
to confirm.
.
With the flip closed, press the smart key
Opening or closing the flip does not interrupt
message transmission.
(
customize messaging
Shortcut:
under
or
Find it: / > E > / >
This option is available from many contextsensitive menus when you are using MMS.
The following options become available:
From the home screen press -
Mesgs
>
/ >
Setup > Setup
Setup
.
>
Setup
.
.
message transmission
After you start to send a message you have
created or start to download a message you
have been sent, you can still stop the
message transmission from being completed:
main attractions
72
option
Signature:
Enter text here to create a
signature. Your signature is text that is
automatically inserted at the end of all
messages you create. You can edit the text
before sending the message.
Page 79

option
Quick Notes:
Lets you create new Quick Notes
and edit or delete Quick Notes you have
created.
Cleanup:
Controls how long messages remain
in the
Inbox
and
Outbox
before they are
deleted.
Dlvy Report Default:
Controls whether your
phone automatically send you a message
when your message is delivered.
Memory Size:
Shows a report on used and free
memory in your phone.
MMS Setup:
opens a submenu to set MMS
options.
MMS Setup
Shortcut:
under
From the home screen press -
Mesgs
>
/ >
Setup > Setup > MMS Setup
or
Find it: / > E > / >
Setup
>
MMS Setup
.
This option is available from many contextsensitive menus when you are using MMS.
The following options become available:
option
Friendly Name:
Enter text here to create a
friendly name. Your friendly name is the
name displayed in the
From
field on other
iDEN handsets when they receive
messages from you.
Download Options:
Controls whether your phone
automatically downloads new messages
when they arrive, or only after you respond
to a prompt or read the message from the
Inbox. Set this option to
Automatic
if you want
your phone to download new messages
automatically; set the option to
.
want your phone to prompt you before
Manual
if you
downloading new messages.
main attractions
73
Page 80

option
Replies:
Lets you create new reply phrases
and edit or delete reply phrases you have
created.
new quick notes and reply
phrases
Note:
These Quick Notes are not the same as
the Quick Notes used with MOSMS
messages. Each messaging service has its
own Quick Notes feature.
create quick notes
1
From the MMS Setup menu, select
Quick Notes
2
Select
3
Enter text from the keypad and press ;.
74
or
Replies
.
[New QuickNote]
main attractions
or
[New Reply]
.
edit quick notes
You can edit only Quick Notes and reply
phrases you have created.
1
From the MMS Setup menu, select
Quick Notes
2
Select the quick note or reply phrase you
want to edit.
3
Edit the text and press ;.
delete only quick notes and reply
phrases you have created
1
From the
or
2
Scroll to the quick note or reply phrase
you want to delete.
3
Press - under
4
Press - under
Replies
or
Replies
MMS Setup
.
.
menu, select
Delete
.
Yes
to confirm.
Quick Notes
Page 81

delete all quick notes or all reply
phrases you have created
1
From the MMS Setup menu, select
Quick Notes
2
Press / >
3
Press - under
or
Replies
Delete All
Yes
.
.
to confirm.
clean up options
The clean up option controls how long
messages remain in the Inbox and Outbox
before they are deleted. You set the clean-up
option for the Inbox and Outbox separately.
The clean up option deletes only read,
unlocked messages.
Shortcut:
under
or
Find it: / > E > / >
From the home screen press -
Mesgs
>
/ >
Setup > Cleanup
Setup
>
.
Cleanup.
1
Select
Inbox
or
Outbox
.
2
Choose a clean up option from the
following list:
option
Off:
Messages are never automatically
deleted.
5 Messages:
messages, messages are deleted in the
order they were received, starting with the
oldest, until 5 are left.
10 Messages:
messages, messages are deleted in the
order they were received, starting with the
oldest, until 10 are left.
With these options, messages are deleted
in the order they were received, starting
with the oldest, until the selected number
are left.
If you have more than 5
If you have more than 10
main attractions
75
Page 82

option
1 Day:
Messages are deleted if they are older
than 1 day.
3 Days:
Messages are deleted if they are
older than 3 days.
With these options, messages are deleted
when you exit the message center after
setting the option.
FirstIn FirstOut:
necessary on an FirstIn FirstOut basis.
Custom:
up to 99 messages or 99 days for the inbox.
3
Press - under
messages now or press
delete messages later.
76
Messages are deleted as
Lets you create a clean-up option of
Yes
to automatically delete
-
under No to
main attractions
delete all messages
To delete all read, unlocked messages from
the Inbox, all messages in the Drafts folder, or
all successfully sent messages in the Outbox:
Shortcut:
under
or
Find it: / > E.
1
2
3
From the home screen press -
Mesgs
.
Select
Inbox, Drafts
Press / >
Press - under
, or
Delete All
Yes
Outbox
.
to confirm.
.
Page 83

Bluetooth®
Your handset supports the use of wireless
Bluetooth stereo headsets and carkits. The
audio from the music player is routed to the
stereo headset.
Additionally the handset can be connected to
a Bluetooth Home Stereo Adapter to stream
content from your home entertainment
system. While streaming content, your
handset will continue to receive incoming
calls.
Find it: / > m >
The Bluetooth connection menu contains an
option to search for
stereo Bluetooth devices.
Bluetooth
Audio Devices
including
turn Bluetooth On or Off
You can turn your phone’s Bluetooth feature
on or off. While Bluetooth power is on, your
phone can communicate with other devices.
Find it: / > m >
1
Select On to power Bluetooth On.
2
Select
Name
to your handset.
3
Select
Find Me Duration
amount of time in which your handset can
be found by other Bluetooth devices.
Tip:
You can turn off Bluetooth if you want to
prolong battery life or if you enter an area
where Bluetooth is prohibited.
Bluetooth > Setup > Power
if you wish to assign a name
to determine the
main attractions
77
Page 84

make a Bluetooth connection
connect your handset with a Bluetooth
headset
Find it: / > C >
[Look for Devices]
1
Follow the instructions on your Bluetooth
headset to set it up to be found.
2
Once your Bluetooth headset is set to be
found press
phone will scan for the Bluetooth headset
until it finds it. Press
name of the Bluetooth headset on your
screen.
3
Your handset requires that you create a
bond in order to connect with a Bluetooth
headset. Press
are prompted to bond with the headset.
4
Enter the Bluetooth pass key.
main attractions
78
Bluetooth > Audio Devices >
;
on your handset. Your
;
when you see the
-
under
Yes
when you
Some Bluetooth devices ship with
Bluetooth PINs. Please refer to your
Bluetooth device’s user guide to locate
this information.
If a device ships without a Bluetooth PIN,
then you can enter any PIN for that
device. To establish a connection to that
device, enter the same PIN for both your
phone and the device. For example, if you
enter 1234 as the device’s PIN, then enter
1234 as your phone’s PIN.
5
Press - under Ok.
Note:
This handset offers the Bluetooth auto
pair feature with auto pair compatible
Motorola devices. When bonded via
Bluetooth with a certain device, the pin will
not be required
connect your handset with another
Bluetooth device
Find it: / > C >
Bluetooth > Pair To Devices
Page 85

1
Select the device you want from the list of
found devices on your screen.
2
Create a bond if you are prompted to do
so.
Tip:
If you have previously connected to a
device, the device will be stored on your
phone so you can connect with it easily.
use Bluetooth during a call
You can connect with available Bluetooth
devices during a call.
Note:
If the
Audio Devices
device, then your phone will automatically try
to connect to that device.
1
While in a call, press / >
2
Select the audio device you want to
connect to from the list of
list contains only one
Use Bluetooth
Handsfree Devices
.
.
send information via Bluetooth
You can use your handset to send Contacts
entries, Datebook events, or audio files,
pictures, and videos in the media center to
another Bluetooth device.
The receiving device must be within 32 feet
(10 meters) of your phone in order to connect
with yours.
Note:
Files sent or received may be up
to 6 MB, depending on your service
provider.
send Contacts
Shortcut:
under
1
2
3
From the home screen press -
Contcs
.
Select the contact you want to send.
Press / >
Select the device you want to transfer the
contact information to.
Send Via...
>
Bluetooth
.
main attractions
79
Page 86

or
Search for the device by selecting
Devices]
.
4
If prompted, bond with the device.
Your phone connects with the devices and
transfers the contact.
send a Datebook event
Find it: / > C >
1
Select the datebook event you want to
Datebook
send.
2
Press / >
Send Via...
>
Bluetooth
.
If the event you select repeats, then you
will be prompted to choose whether to
send the selected instance of the event or
all instances of the event.
To send only the selected instance of the
event, select
This Event Only
.
or
main attractions
80
[Look for
To send all instances of the event, select
Repeat Events
3
Select the device you want to transfer the
.
datebook information to.
or
Search for the device by selecting
[Look for Devices]
4
If prompted, bond with the device.
.
Your phone connects with the device and
sends the datebook event.
send audio files, pictures, and videos
Note:
You can only send audio files, pictures,
and videos if they are not forward locked and
if their DRM settings do not prevent you from
sending.
Find it: / > j >
1
Select the audio file, picture, or video you
Media Center
want to send.
Page 87

2
2:11pm
Clock Digital Clock Cir1 Clock Cir2
Clock Sq1 Clock Sq2
21
12
6
3
9
21
21
12
6
3
9
21
Press / >
3
Select the device you want to transfer the
Send Via...
media file information to.
or
Search for the device by selecting
[Look for Devices]
4
If prompted, bond with the device.
.
Your phone connects with the device and
sends the datebook event.
>
Bluetooth
.
clock screen saver
Your handset comes with a clock screen saver
that shows the time and day of the month
through the external display when this one is
in power save mode.
When a key is pressed the screen saver is
removed and the display lights up.
Find it: / > u >
Display/Info
>
Clock
>
Screen
Saver
You can choose from five different clock
styles:
main attractions
81
Page 88

main attractions
82
Page 89
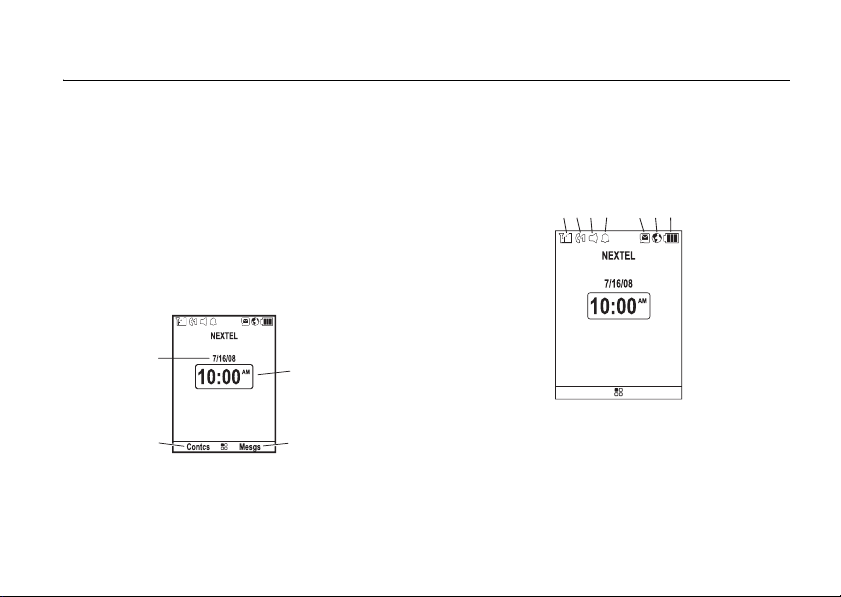
basics
1. 2. 3. 4.
5. 6. 7.
Contcs Mesgs
See page 1 for a basic phone diagram.
display
The home screen shows when you turn on
the phone. To dial a number from the home
screen, press number keys and
Note:
Soft key labels show the current soft key
functions. For soft key locations, see page 1.
,
Your home screen may look different.
Date
Left Soft
Key Label
Time
Right Soft
Key Label
status indicators
Status indicators are shown at the top of the
home screen:
.
1Signal Strength Indicator:
show the strength of the network
connection. You can’t make or receive
calls when
~
shows.
Vertical bars
basics
83
Page 90

2Active Phone Line: % indicates phone
line 1 is ready to make calls;
phone line 2 is ready to make calls.
3Speaker On/Off:
Private calls and group calls can be set to
come through the earpiece rather than
through the speaker.
4 Ringer Vibe/Off:
ring.
5 Message Indicator:
you receive a text message.
6 Packet Data:
transfer packet data or is transferring
packet data when it shows a blinking
arrow.
7 Battery Charge Indicator:
indicates a greater charge. Recharge the
battery when your phone shows
basics
84
Sounds associated with
Your phone is set to not
Your handset is ready to
'
indicates
Shows when
A fuller battery
Low Battery
main menu
All your phone’s features can be accessed
through the main menu. You can set the main
menu to appear as
Tab View
.
Find it: / > u >
List View, Icon View
Display/Info
>
Menu View
text entry
Some features let you enter text.
Your phone provides convenient ways to enter
words, letters, punctuation, and numbers
whenever you are prompted to enter text (for
example, when adding a Contacts entry or
when using Text Messaging).
change the character input mode
1
.
When you see a screen where you can
enter text, press
character input mode.
/
to change the
, or as
.
Page 91
2
Select one of the following options:
entry method
Alpha
Word
Symbols
Numeric
Text Input
Settings
Insert
Tip:
letter capitalization (
Press a key several times for
different characters.
Enter words using a predictive
text entering system that lets
you enter a word with fewer
keypresses.
Enter symbols.
Enter numbers by pressing the
numbers on the keypad.
Selects the desired entry
languages and Word Prediction
features..
Selects a item to be inserted,
such as a picture, a audio/video
clip or a voice recording.
When entering text, press # to change
Abc
>
ABC
>
abc
).
word method
The Word English text input method lets you
enter text into your phone by pressing keys
just once per letter.
The Word English text input method
combines the groups of letters found on each
phone key with a fast-access dictionary of
words, and recognizes what you want to text
as you type. It first offers the most commonlyused word for the key sequence you enter
and lets you access other choices with one or
more presses of the
enter a word using “word” method
character input
1
Select the
2
Press the corresponding keys once per
letter to enter a word (for example, to
enter the word
(If you make a mistake, press
0
key.
Word
character input method.
Bill
, press
2455
*
to erase
).
basics
85
Page 92

a single character. Press and hold * to
delete an entire entry.)
3
To accept a word and insert a space,
press
#
.
To accept a word completion (such as
Billion when you entered Bill), press
right.
If you get a word you don’t want, you can
press the
choices and pick the one you want.
0
key to see more word
;
alpha method
To enter characters by tapping the keypad:
1
Select the
2
Press the corresponding keys repeatedly
until the desired letter appears. (For
example, to enter the word
twice,
and
mistake, press
86
Alpha
method.
Bill
, press 2
4
three times, 5 three times,
5
three times again. If you make a
Delete
to erase a single
basics
character. Press and hold
entire word.)
By default, the first letter of an entry is
capitalized and the following letters are
lowercased. After a character is entered, the
cursor automatically advances to the next
space after two seconds or when you enter a
character on a different key.
Characters scroll in the following order:
characters
1
2
3
4
5
6
7
Space . 1 ? ! , @ & : ; “ - ( ) ‘ ¿ ¡ %
£ $ ¥
A B C 2 Á Ã Â À Ç
D E F 3 É Ê È
G H I 4 Í Ì
J K L 5
M N ñ O 6 Ó Õ Ô Ò
P Q R S 7 ß
Delete
to erase an
Page 93

characters
8
9
0
#
*
T U V 8 Ú Ü Û Ù
W X Y Z 9
+ - 0 * / \ [ ] = > < # §
Space
Back
navigation key
Press the navigation key
;
up, down, left, or
right to scroll to items in
the display. When you
scroll to highlight the
desired item, press
;
.
handsfree speaker
You can use your phone’s handsfree speaker
to make calls without holding the phone to
your ear.
During a call (with the flip open), press
under
Speaker
to turn the handsfree speaker
On.
The handsfree speaker stays on until you
press
-
under
Speaker
or close the flip.
Note:
The handsfree speaker won’t work
when your phone is connected to a handsfree
car kit or headset.
-
transmitters
Consult airline staff about the use of the
Transmitters Off feature during flight. Turn off
your phone whenever instructed to do so by
airline staff.
basics
87
Page 94

Transmitters Off turns off your phone’s calling
features in situations where wireless phone
use is prohibited, but you can use the phone’s
other non-calling features when Transmitters
is turned Off.
Find it: / > u >
Advanced
>
Transmitters
>
Off
.
use GPS with map
software
Your phone is enabled with a highly-capable
GPS receiver that sends location information
to a USB port on a PC, laptop, or PDA.
Note:
No serial port connectivity is provided
by your phone. Applications on the host
device which are expecting to receive the
GPS location information via a serial port must
instead use a Virtual Serial Comm Port.
The data sent to the host device is formatted
as prescribed in the National Marine
basics
88
Electronics Association 0183 V3.0 (NMEA-
0183) standard. As such it supports the
following sentences: GGA, GLL, GSA, GSV,
RMC, and VTG.
This handset is not a full NMEA-0183
compliant device supporting electrical
RS-422/RS-232 connectivity as dictated by the
NMEA-0183 standard. Consequently it's
unsuitable for conventional marine
NMEA-0183 equipment use. Its intended use
is for normal "terrestrial" mobile users who
want to enable their USB hosting computing
devices such as a PC, laptop or PDA with the
phone's highly-capable GPS functionality.
get connected
1
Open the phone's micro-USB port
and insert a micro-USB cable into the port.
2
Insert the other end of the micro-USB
cable into a vacant USB receptacle of your
host device. A virtual USB Comm Port will
Page 95

be created on your host device upon
successful enumeration of the phone as a
USB Communications Device Class
device.
3
Ensure no application in your host device
is using the created COMM port. You may
need to ensure that the created virtual
COMM port settings are set as follows:
•Bits per second
• Data bits
•Parity
: None
•Stop bits
• Flow control
4
Start the GPS application on your host
: 4 800
: 8
: 1
: None.
device. Set the GPS application to start
accepting NMEA-0183 formatted data
from the created Virtual COMM port.
5
Set your phone to start sending
NMEA-0183 formatted location
information.
Find it: / > m >
GPS
>
Interface
>
NMEA OUT
>
USB.
Your phone is now actively sending location
NMEA-0183 formatted GPS data to your USB
host device.
To stop your phone from sending location
data:
Find it: / > m >
GPS
>
Interface
>
NMEA OUT
>
Off.
Note:
Each time you power your phone Off,
NMEA OUT is automatically set to Off and
you need to manually restart it using the
menu selections above.
Your USB host device will generally provide
charging power (5V, up to 500mA) to your
phone via the micro-USB cable therefore no
other charging power to it will normally be
basics
89
Page 96

required. However some laptops may require
that you provide external AC/DC power to the
laptop in order for it to provide full 500mA
charging current capability to the phone.
features for the hearing
impaired
may need to adjust your hearing aid (HA)
volume setting
.
using your phone with a
hearing aid
For best results use the following optimization
procedures and handset setting. They
generally apply as well for users with cochlear
implants:
optimize your handset position and
orientation
While in a phone call slide your phone up and
down, then left and right until best
microphone coupling is obtained. You also
basics
90
If your HA has a telecoil, activate its switch,
then also rotate the handset as illustrated to
align the telecoils.
Note:
Some automatically switched hearing
aids may need an auxiliary switching magnet.
If you are unsure whether your HA is telecoil
equipped or needs an auxiliary magnet,
please refer to your HA user guide or contact
a hearing aid professional or supplier.
Page 97

choose your hearing aid setting
Approximate telecoil location is just
above the battery.
Approximate telecoil location is within
6-13 mm of this location.
Off - Shut off
M - Microphone
T - Telecoil
Find it: / >
1
Set this option to Microphone
Settings
>
Phone Calls
>
Hearing Aid
. Microphone
coupling is now optimized.
or
2
Set this option to Telecoil
US federal requirements for telecoil
coupling sound.
. Handset meets
or
3
Set this option to
Off
(factory default). This
is the setting for non HA users.
features for the vision
impaired
voice playback
The Voice Playback feature allows you to use a
simulated voice to guide you through phone
menus and through placing and receiving
.
phone calls.
You can hear the following as you use your
phone:
•
The number keys you have pressed
•
The names, numbers, and contact
types of each contact entry as you
scroll through Contacts
basics
91
Page 98

•
The status information on the Home
screen, such as signal strength, battery
level, date and time, and service status
Note:
When you access the idle
screen, you will hear “Home”
•
Main menu options as you scroll
through the main menu
•
A prompt indicating that your phone is
placing a call
•
The name of incoming callers rather
than a ring tone
Find it: / > u >
1
Select
Speak Text
Voice Playback
> On for the navigation
playback.
2
Select
Speak Caller
> On to hear the name or
phone number of incoming callers
3
Select
Voice
to choose either a female
voice (
Barbara
) or male voice (
basics
92
.
Simon
4
Select
Multimedia Volume
and press the
volume keys up or down to adjust the
volume of voice playback.
).
Page 99

calls
To make and answer calls, see page 19.
turn off a call alert
You can press the volume keys to turn off a
call alert before answering the call.
recent calls
The recent calls list contains information
associated with calls you have made and
received and call alerts you have received.
When you send or receive Private calls, the
recent call list contains the following PTX
items with those calls:
•
contact information received
•
My Info received
•
short text messages received
•
pictures sent or received
•
Datebook events received
•
Location information received
The recent calls list displays up to 20 of the
most recent calls and call alerts.
1
Press / >
2
Scroll through the list.
Recent Calls
.
store an item to contacts from
recent calls
Phone calls, Private calls, My Info, Contacts or
Location entries received from other phones
can be stored to the Contacts list from the
Recent Calls list.
calls
93
Page 100

Find it: / >
1
Scroll to or select the item you want to
store.
2
Press - under
information as a new entry in the
Contacts list.
or
3
Select an existing contact and update the
information.
4
Press - under
Recent Calls
Save
Save
.
to store the
to save your changes.
redial
To redial your last outgoing call, press and
hold
,
or push the PTT button if it was a
private call.
calls
94
caller ID
Caller ID allows people to identify a caller
before answering the phone by displaying the
number of the incoming call. If you do not
want your number displayed when you make
a call, just follow these easy steps.
To block your phone number from being
displayed for a specific outgoing call:
1
Press
*67
2
Enter the number you want to call.
3
Press
,
To permanently block your number, call your
customer service provider.
.
.
 Loading...