

Page 1

i885 Boost Mobile® Phone User’s Guide
Page 2

Contents
Introduction................................................1
Welcome to Boost Mobile
BoostTM Your Way............................................1
Getting Started...........................................1
What’s Included.................................................2
Battery...............................................................4
Removing the Battery Door...............................4
Powering On and Off.........................................7
Activating Your Phone.......................................7
Enabling Security ..............................................8
Finding Your Phone Number and Boost
Walkie-Talkie Number ..................................8
TM
Boost
Customizing Features .......................................9
Phone Basics ....................................................9
SIM Chip Security............................................14
Locking the Keypad.........................................18
Antenna...........................................................19
Accessories.....................................................19
Voice Mail............................................9
®........................................1
TM
Wireless Local Number Portability: Bringing
Your Phone Number From Another Carrier19
Re-Boost
Instant Re-Boost
Boost
TM
.....................................................19
TM
TM
Customer Care .................................20
.........................................20
Making Calls .............................................21
Phone Calls.....................................................21
Receiving Calls ...............................................21
Choosing a Number to Call.............................22
Missed Phone Calls ........................................24
Using Speakerphone.......................................24
Using Mute......................................................24
Making Emergency Phone Calls.....................25
Memory Card ............................................26
Ensuring Files on the Memory Card Are
Compatible With Your Phone .....................26
Using the Memory Card With Your Phone......28
Using the Memory Card With Your Computer.31
Memory Cards Compatible With Your Phone .34
MP3 Music Player.....................................35
Playing Music Files with the Flip Closed.........35
i
Page 3

Playing Music Files with the Flip Open............36
How Your Music Files Are Organized .............37
Playing Music While Files Are Loading...........38
Searching By First Letter.................................38
Playing a List, Repeat, and Shuffle.................38
Working with Playlists......................................39
Working With Podcast.....................................42
Deleting Music Files........................................45
DRM Items ......................................................45
Setting Audio and Visual Options....................46
Using Walkie-Talkie Features................. 47
Walkie-Talkie Features Icons..........................47
Walkie-Talkie Send Picture.............................47
Walkie-Talkie Send My Info.............................51
Walkie-Talkie Send Contacts..........................52
Call Alerts................................................. 53
Sending Call Alerts..........................................53
Receiving Call Alerts.......................................53
Using the Call Alert Queue..............................54
ii
Recent Calls..............................................56
Viewing the Recent Calls List..........................56
Calls and Call Alerts........................................56
Walkie-Talkie Features Items in Boost
Walkie-Talkie Calls.....................................57
Storing Items to Contacts................................59
Deleting Items.................................................59
Making Calls From the Recent Calls List ........60
TM
Entering Text ............................................61
Using Word Mode ...........................................61
Special Function Keys.....................................62
Contacts....................................................64
Accessing Contacts.........................................65
Creating Entries ..............................................65
Editing Entries.................................................67
Viewing Entries ........... ..................... ...............67
Deleting Entries...............................................69
Checking Capacity ..........................................70
Creating Pauses and Waits.............................70
International Numbers.....................................70
Making Calls From Contacts...........................71
Page 4

Memo ........................................................73
Call Forwarding........................................74
Forwarding All Calls ........................................74
Turning Off Call Forwarding............................74
Forwarding Missed Calls.................................74
Viewing Call Forwarding Settings....................75
Advanced Calling Features.....................76
Call Waiting.....................................................76
Switching Between Calls.................................76
Putting a Call on Hold......................................77
Creating Pauses and Waits While Dialing.......77
Making International Calls...............................77
Setting One Touch Boost
Setting Flip Actions..........................................79
Group Walkie-Talkie Calls..................... ..........79
Call Timers......................................................81
Using Your Phone as a Modem ......................81
Features for the Hearing Impaired ..................83
TM
Walkie-Talkie......78
Messages ................................................. 86
Message Notifications.....................................86
Voice Mail........................................................87
TM
Boost
Text and Numeric Messages............87
Web Alerts.......................................................89
Ringtones..................................................90
Setting Your Phone to Vibrate.........................90
Assigning Ringtones to Contacts ....................91
Ring and Vibrate .............................................91
Viewing Ringtone Assignments.......................92
Downloading More Ringtones.........................92
Managing Memory ..........................................92
Deleting Custom Ringtones ............................92
Multi-Media Messages .............................94
Navigating the Inbox, Drafts, and Sent Items..94
Creating and Sending Messages....................94
Drafts.............................................................104
Sent Items.....................................................105
Receiving a Message....................................106
Navigating a Message...................................107
Viewing Received Messages From the
Message Center .......................................108
Actions for Received Messages....................108
iii
Page 5

Customizing MMS.........................................112
Managing Memory.........................................114
Customizing the Camera...............................132
Managing Memory ........................................133
SMS.........................................................116
SMS Messages.............................................116
Boost Mobile® Voice Mail ..................... 118
Setting Up Your Voice Mail Box....................118
Playing Messages.........................................118
Changing Your Password..............................119
Recording Your Name...................................119
Recording Your Active Greeting....................119
Advanced Voice Mail Features......................120
Wireless Web Services..........................124
Starting the Microbrowser .............................124
Camera ................................................... 126
Accessing the Camera (including Video) ......126
Taking Pictures..............................................126
More Actions for Captured Pictures ..............129
Recording Videos..........................................130
Changing Storage Preference.......................132
Accessing the Media Center .........................132
iv
Media Center...........................................134
Viewing the Media Center.............................134
Forward Locked Items...................................136
DRM Items ....................................................137
Pictures.........................................................137
Videos...........................................................139
Voice Recordings..........................................139
Renaming Items............................................140
Locking Items................................................140
Deleting Items...............................................141
Copying and Moving Items............................141
Changing Storage Preference.......................142
Accessing the Audio Player ..........................142
Accessing the Camera..................................142
Managing Memory ........................................142
My Info.....................................................144
Viewing My Info.............................................144
Editing My Info ..............................................144
Page 6

Bluetooth® ............................................. 145
Understanding Bluetooth® Access Settings..145
Setting Your Phone for Bluetooth
Accessing Bluetooth® ...................................147
Making a Bluetooth
Setting Device Details...................................150
Sending Contacts, Datebook Events and
Pictures.....................................................151
Receiving Items.............................................152
®
Connection..................147
®.....................146
Voice Notes............................................ 153
Viewing Voice Notes .....................................153
Creating Voice Notes ....................................153
Playing Voice Notes......................................154
Labeling Voice Notes ....................................154
Locking Voice Notes......................................154
Deleting Voice Notes.....................................155
Managing Memory.........................................155
Java® Applications................................156
Running Applications.....................................156
Suspending Applications...............................156
Resuming Applications..................................156
Ending Applications.......................................157
Downloading Applications.............................157
Deleting Applications.....................................157
Managing Memory ........................................158
Shortcuts on the Main Menu .........................158
Java Applications and GPS Enabled ............159
Digital Rights Management ...................162
Installing Applications....................................162
Understanding DRM Status Icons.................162
Sharing Items................................................163
Managing DRM Items ...................................163
GPS (Global Positioning System)
Enabled................................................166
IMPORTANT: Things to Keep in Mind ..........166
Making an Emergency Call ...........................168
Viewing Your Approximate Location .............169
Enhancing GPS Performance.......................170
Updating Satellite Almanac Data ..................171
Setting Privacy Options.................................172
Using GPS with Map Software......................173
v
Page 7

Datebook ................................................175
Viewing Datebook .........................................175
Creating Events.............................................176
Editing Events ...............................................178
Deleting Events.............................................178
Receiving Reminders....................................179
Making Calls From Datebook and
Datebook Reminders................................179
Customizing Datebook Setup........................180
Customizing Your Phone......................181
Setting the Volume........................................181
Setting Your Phone to Vibrate.......................181
Changing the Look of Your Phone................182
Temporarily Turning Off Transmissions........185
Using Settings...............................................185
Profiles ................................................... 191
Viewing Profiles.............................................191
Switching Profiles..........................................191
How Changing Settings Affects Profiles........191
Temporary Profiles........................................192
Creating Profiles............................................193
vi
Editing Profiles ..............................................193
Deleting Profiles............................................193
Setting Call Filtering......................................194
Shortcuts.................................................195
Creating a Shortcut.......................................195
Using a Shortcut............................................195
Editing a Shortcut..........................................196
Deleting Shortcuts.........................................196
Using a Headset .....................................197
Using a Bluetooth® Headset .........................197
Attaching a Headset.... ..................... .............197
Using a Remote Boost
Button .......................................................198
TM
Walkie-Talkie
BoostTM Customer Care ........................199
Understanding Status Messages..........200
Patent and Trademark Information.......204
Index........................................................205
Page 8

DECLARATION OF CONFORMITY
Per FCC CFR 47 Part 2 Section 2.1077(a)
Responsible Party Name: Motorola, Inc.
Address: 8000 West Sunrise Boulevard
Plantation, FL 33322 USA
Phone Number: 1 (800) 453-0920
Hereby declares that the product:
Product Name: i885
Model Number: H94XAH6RR4AN
Conforms to the following regulations:
FCC Part 15, subpart B, section 15.107(a),
15.107(d) and section 15.109(a)
Class B Digital Device
As a personal computer peripheral, this device
complies with Part 15 of the FCC Rules. Operation
is subject to the following two conditions: (1) this
device may not cause harmful interference, and (2)
this device must accept any interference received,
including interference that may cause undesired
operation.
Note: This equipment has been tested and
found to comply with the limits for a Class
B digital device, pursuant to part 15 of the
FCC Rules. These limits are designed to
provide reasonable protection against
harmful interference in a residential
installation. This equipment generates,
uses and can radiate radio frequency
energy and, if not installed and used in
accordance with the instructions, may
cause harmful interference to radio
communications. However, there is no
guarantee that interference will not occur
in a particular installation.
If this equipment does cause harmful
interference to radio or television reception,
which can be determined by turning the
equipment off and on, the user is encouraged
to try to correct the interference by one or more
of the following measures:
• Reorient or relocate the receiving antenna.
• Increase the separation between the equipment
and receiver.
• Connect the equipment into an outlet on a circuit
different from that to which the receiver is
connected.
• Consult the dealer or an experienced radio/TV
technician for help.
Page 9

Motorola, Inc.
Consumer Advocacy Office
1307 East Algonquin Road
Schaumburg, IL 60196
www.hellomoto.com
1-800-331-6456 (United States)
1-888-390-6456 (TTY/TDD US for hearing impaired)
1-800-461-4575 (Canada)
Certain mobile phone features are dependent on the
capabilities and settings of your service provider’s
network. Additionally, certain features may not be
activated by your service provider , and/or the provide r's
network settings may limit the feature’s functionality.
Always contact your service provider about feature
availability and functionality. All features, functionality,
and other product specifications, as well as the
information contained in this user's guide are based
upon the latest available information and are believed
to be accurate at the time of printing. Motorola r eserves
the right to change or modify any information or
specifications without notice or obligation.
© Motorola, Inc., 2006. MOTOROLA a nd the S t ylized M
Logo are registered in the US Patent & Trademar k
Office. All other product or service names are the
property of their respective owners.
Software Copyright Notice
The Motorola products described in this manual may
include copyrighted Motorola and third-party soft ware
stored in semiconductor memories or other media.
Laws in the United States and ot her countrie s preserve
for Motorola and third-party software providers cert ain
exclusive rights for copyrighted software, such as the
exclusive rights to distribute or reproduce the
copyrighted software. Accordingly, any copyrighted
software contained in the Motorola products may no t be
modified, reverse-engineered, distributed, or
reproduced in any manner to the extent allowed by law .
Furthermore, the purchase of the Motorola products
shall not be deemed to grant either directly or by
implication, estoppel, or otherwise, any license under
the copyrights, patents, or patent applications of
Motorola or any third-party software provider , exce pt for
the normal, non-exclusive, royalty-free license to use
that arises by operation of law in the sale of a product.
Manual number: NNTN6774B
Page 10

Introduction
Welcome to Boost Mobile
So what’s really good? You know the answer. It’s life
with no hassles and no limits. It’s the freedom to
make your own choices at your own pace. It’s having
all the options you need to stay ahead of the game.
And that’s what makes Boost Mobile
Pay-As-You-Go such a tight fit for how you roll. With
Boost Mobile
monthly costs and get all the mobile freedom you
demand. Boost Mobile
handsets with the coolest features, like BoostTM
Walkie-Talkie, Boost
Messaging. Plus, you get instant access to Nextel’s
world-class digital iDEN network.
®
you pay up front, stay in control of your
®
has the latest Motorola
TM
Wireless Web, and Text
BoostTM Your Way
Trick out your Phone
Got some down time? Then get down with the coolest
music, games, entertainment, ringtones, musictones,
celebrity voice mails, and wallpapers available for
purchase right from your phone. No credit card
needed - get it deducted from your current stash of
minutes.
®
®
Games and applications require a Java
enabled handset. Visit boostLIVE
(www.boostmobile.com/boostlive) for the latest list of
entertainment applications currently available and
purchase these options online.
®
Page 11

Getting St arted
y
Multi-Function Button
Speaker (on/off)
Spotlight
Volume
Controls
Walkie-Talkie
Backlight
BoostTM
Walkie-Talkie
Button
BoostTM
Logo Light
Accessory
Connector
(charger
connector)
External
Display
Retractable
Antenna
Flip Open
Button
MP3 Music
Player
Controls
Audio Jack
Camera
Lens
Memory
Card Slot
Earpiece
Option Keys
Navigation Key
up: Re-BoostTM
down: recent calls menu
right: ringtones menu
®
Apps menu
left:Java
Menu Key
Send Key
Back Key
Power Key
Stereo Speaker
Internal
Display
Light Sensor
Camera Ke
Ok Key
End Key
Space Key
Microphone
1
Page 12
Getting Started
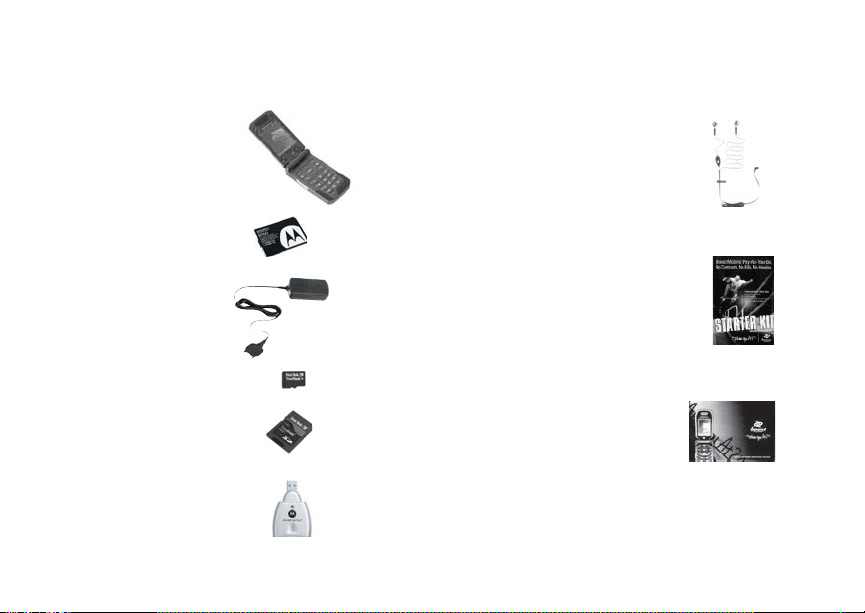
What’s Included
Boost i885 handset
BT60 Lithium Ion Battery
Travel charger
Micro SD memory card
Micro SD to SD adaptor
USB memory card reader
2
Stereo headset with
TM
Boost
Walkie-Talkie button
Starter Kit (Contains Activation
Guide, 64K SIM card, Accessory
Brochure, Welcome to Boost
Guide, Wireless Entertainment
Brochure)
Getting Started Guide
Page 13
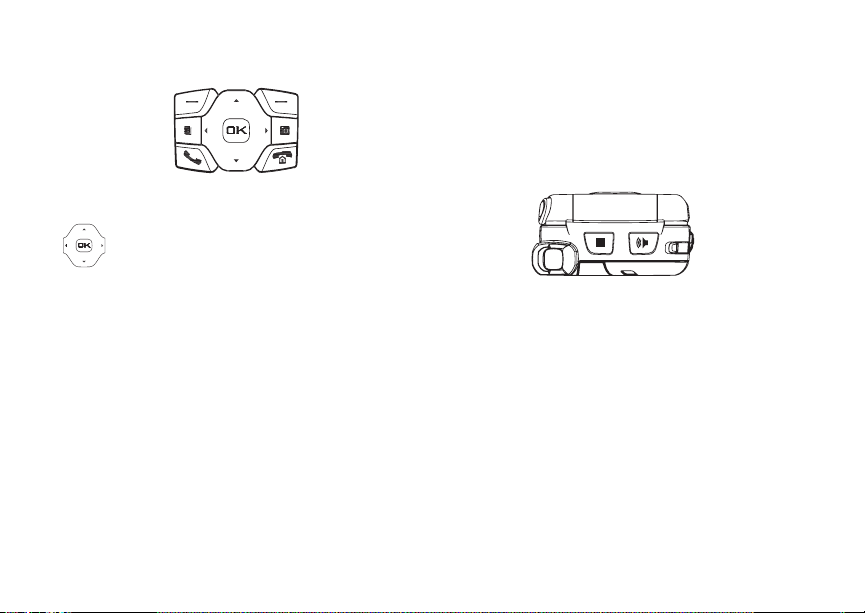
p Power button.
Navigation key — press the arrows to
scroll through menus and lists.
O OK key — selects highlighted item;
answers calls.
m Menu key — accesses context-sensitive
menus.
c Camera key — Accesses camera and
takes pictures or records video.
A Option key — selects the option
appearing above it on the display.
Note: Throughout this User’s Guide,
the option keys will be
represented by A.
What’s Included
s Send key — places phone calls.
e End key — ends phone calls; returns to
idle screen; using Wireless Data
Services, returns to home page.
t Acts like s when the flip is closed; turns
. Acts like e when the flip is closed;
TM
Walkie-Talkie speaker on and off;
Boost
used with voice names and voice records.
accesses Recent Calls; sends incoming
calls to voice mail.
3
Page 14
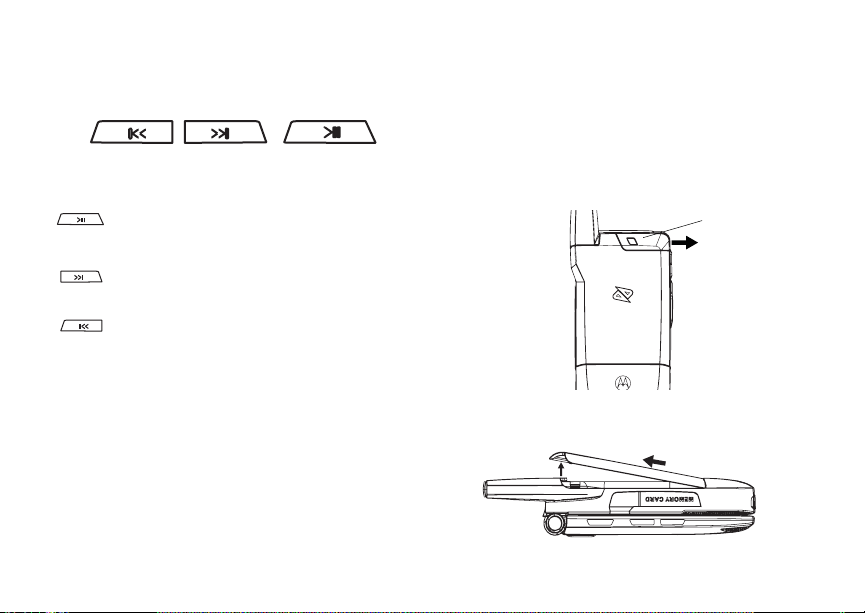
Getting Started
y Accesses the MP3 Music Player when the
flip is closed; plays audio files; pauses
audio files.
z When an audio file is playing,
fast-forwards and skips to the next audio
file.
x When an audio file is playing, rewinds and
skips to the previous audio file.
To start using your i885 phone:
• Make sure your SIM chip is in place.
• Charge the battery.
• Activate your service.
• Enable security.
4
Battery
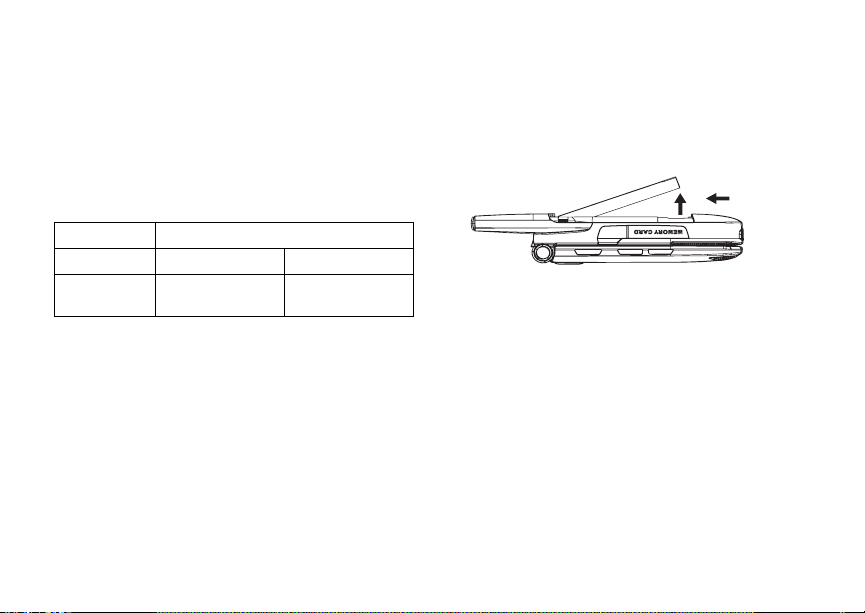
Removing the Battery Door
1 Make sure the phone is powered off. See
“Powering On and Off” on page 7.
2 Slide the latch to the side until it releases the
battery door.
3 Allow the battery door to pop up, slide it forward,
and remove it from the back of your phone.
release latch
Page 15
Removing the Battery Door
Inserting the Battery
Your phone comes with a BT60 Lithium Ion
Battery.
1 Remove the battery door.
2 Insert the battery into the battery area. Press the
battery down to secure it.
3 Replace the battery door and press it gently until
you hear a click.
Charging the Battery
Your phone comes with a travel charger.
1 Plug the charger into an electrical outlet.
2 Open the connector cover.
connector
cover
3 Plug the other end of the charger into the
accessory connector.
Charger Attached appears on the internal
display.
5
Page 16
Getting Started
Tip: To remove the charger from the accessory
connector: Press the buttons on the sides
of the plug. Pull the plug straight out.
Charging Times
Check your battery and charger type against the
grid below to determine appropriate charging
times.
Battery Charger
Rapid Standard
BT60 Lithium
Ion
For best results, charge the batteries within the
temperature range of 50°F to 104°F (10°C to
40°C).
Prolonged charging is not recommended.
6
2.5 hours 5 hours
Removing the Battery
1 With the phone powered off, remove the battery
door.
2 Remove the battery by pushing it toward the
antenna and lifting it out.
Battery Use and Maintenance
• The Motorola iDEN Approved Lithium Ion
chargers provide optimum performance. Other
chargers may not fully charge the iDEN Lithium
Ion battery or may yield a reduced number of
lifetime charge cycles.
• Extreme temperatures degrade battery
performance. Do not store the battery where
temperatures exceed 140°F (60°C) or fall below
-4°F (-20°C).
• Lithium Ion batteries have a self discharge rate
and without use, lose about 1% of their charge
per day.
Page 17

Powering On and Off
• The battery capacity is degraded if the battery is
stored for long periods while fully charged. If
long term storage is required, store at half
capacity.
Powering On and Off
To power your phone on:
1 Open the flip.
Tip: Press the flip open button to open the flip
easily.
2 Press and hold p for 4 seconds.
Note: To avoid powering on with transmitters off,
(ability to make and receive calls and
other transmissions), do not press p for
more than 7 seconds. See “Temporarily
Turning Off Transmissions” on page 185.
As your phone connects to the network, you will
see a connecting message. When the idle screen
appears, the phone is ready to use.
To power your phone off:
1 Open the flip.
2 Press and hold p.
Activating Your Phone
The first time you power your phone on, you have
to activate your phone before using your service.
1 Install your SIM.
Pop out the SIM chip from the SIM card attached
to the Starter Kit included. Insert the SIM chip
into the SIM card holder inside the back of your
phone.
Important: Do not touch the gold-colored areas of
2 Charge your battery.
Use the included wall charger.
3 Get your numbers.
You will need these numbers to activate your
Boost
• SIM ID: found in the Starter Kit, this is a
• Activation Number: 14-digit number printed on
your SIM chip.
TM
account.
15-digit number printed on the SIM chip.
the SIM card in the Starter Kit.
7
Page 18

Getting Started
• IMEI: 15-digit number printed on the phone in
the battery compartment.
• Model Number: Check the packaging or
inside the phone (example: i885).
4 Get Connected.
Online activation
your service and set up your account is online at
www.boostmobile.com/activate
Phone activation
access, contact BoostTM Customer Care at
1-888-BOOST-4U (1-888-266-7848).
You will receive your new 10-digit personal
telephone number (PTN) and Walkie-Talkie
number from either an electronic message via
the website or from Boost
: The quickest way to activate
.
: If you do not have web
TM
Customer Care.
Enabling Security
You must enable security the first time you power
on your phone or within 10 days of first activation of
your phone.
1 Press A under Ok.
2 You are prompted to enable security. Press A
under Yes. A series of screens followed by the
default homepage displays.
3 Press e to return to the idle screen.
8
Finding Your Phone Number and BoostTM Walkie-Talkie Number
My Info lets you view your phone number, BoostTM
Walkie-Talkie number, and other phone
information.
1 Press m to access the main menu.
2 Scroll to My Info.
3 Press O.
4 Scroll to see your information:
Line 1 is your phone number. Walkie-Talkie # is
your Boost
that others use to contact you using BoostTM
Walkie-Talkie service. These numbers appear
when you receive your first phone call. The last
seven digits of your Personal Telephone Number
(PTN) is your initial password.
See “My Info” on page 144 for more information
about this feature.
TM
Walkie-Talkie number, the number
Page 19
Boost
TM
Voice Mail
Boost
You must set up your voice mail box before you
can retrieve messages. See “Setting Up Your
Voice Mail Box” on page 118.
TM
Voice Mail
Customizing Features
You can control many features of your phone,
including the size of the text on the display, the way
you access main menu items, and the volume of
incoming sound, rings, and other tones. See
“Customizing Your Phone” on page 181.
Phone Basics
Flip Open Button
The flip open button located on the upper right
corner of your phone enables you to quickly open
the flip by pushing the button.
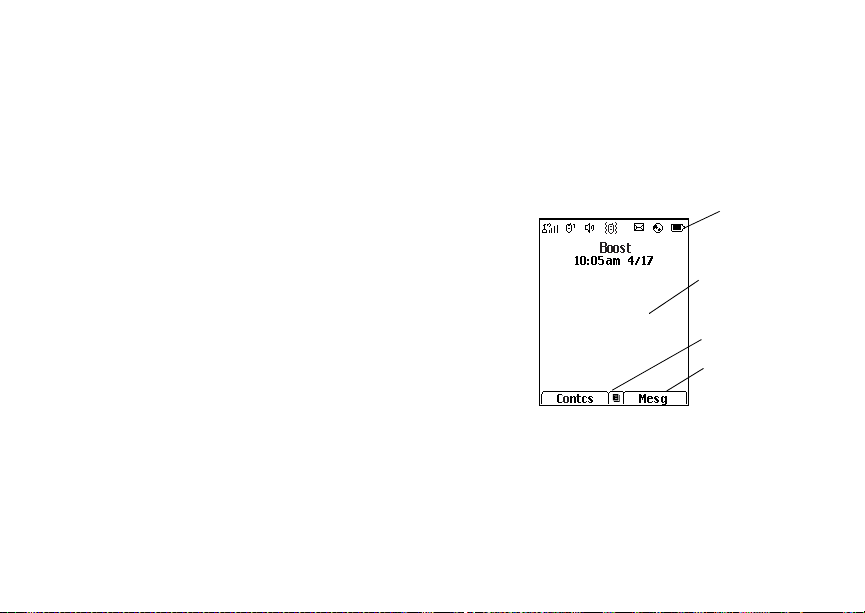
Display
Any time your phone is powered on, the display
provides you with information and options.
The external display shows a shortened version of
the internal display. To see more information, open
the flip.
status icons
text area
menu icon
display options
The screen shown above is the idle screen. The
idle screen appears when your phone is on, but not
engaged in any activity.
9
Page 20

Getting Started
Text Area
This area displays menus, messages, names,
phone numbers, and other information.
Display Options
Two display options appear at the bottom of most
screens. You select a display option by pressing
the option key below it.
Menus and Lists
Your phone’s features are arranged in menus,
submenus, and lists.
To access the items in a menu or list, scroll using
the navigation key at the top of your keypad. This
key lets you scroll up, down, left, or right. Holding
down the appropriate part of the navigation key
speeds up scrolling.
In this guide, this symbol > tells you to select a
menu or list item. For example, Settings >
Security means:
1 Scroll to Settings on the main menu.
2 Press O to see the Settings screen.
3 Scroll to Security.
4 Press O to see the Security screen.
10
OK Key
Pressing O:
• Selects the highlighted menu item or list item
• Sets options
• Confirms actions
• Places and answer calls
• From the idle screen, accesses the MP3 Music
Player. This is the default setting. You can
assign a different main menu item to O.
Menu Key
Many features provide context-sensitive menus
that let you access related features and actions.
This icon
menu is available. Press m to access the menu.
S appears any time a context-sensitive
Page 21

Phone Basics
Main Menu
All your phone’s features can be accessed through
the main menu. You can set the main menu to
appear as a list or as large icons (see “Setting the
Menu View” on page 183).
Re-Boost Recharge your account from
boostLIVE Access to boostLIVE for the
Games & Apps Java
Ringtones Assign ringtones and turn
Music Player Access the MP3 Music Player.
Camera Access camera and take
Media Center Access stored pictures, videos,
Wireless Web Access to Boost
your phone. See page 19.
latest list of wireless
entertainment applications.
®
applications on your
phone. See page 156.
ringer off. See page 90.
See page 35.
pictures and video. See
page 126.
and voice recordings. See
page 134.
TM
Wireless
Web Services. See page 124.
Bluetooth
Recent Calls Lists Recent Calls. See
Settings Customize your phone. See
My Info View personal phone
Contacts Create, view, store, edit
®
Connect to a device with
Bluetooth®. See page 145.
page 56.
page 181.
information, including phone
number and Walkie-Talkie
number. See page 8.
Contacts, and set voice
activated dialing. See page 64.
Messages Access messages center.
Datebook Schedule appointments and
Profiles Groups of settings you apply
Voice Notes Record and play audio
Call Forward Set call forwarding options.
use as an alarm clock.
together. See page 191.
messages. See page 153.
See page 74.
11
Page 22

Getting Started
Memo Store a number to access
Shortcuts Create shortcuts to screens.
Call Timers Phone usage information. See
GPS Find your approximate
Call Alert Lists call alerts. See page 53.
later. For information on
Memo, see “Memo” on page
73.
See page 195.
page 81.
geographical location. See
page 166.
Quick Access to Main Menu Items
Each arrow in the navigation key and O can be
used to access a main menu item from the idle
screen. Each of these keys is assigned to a main
menu item when you receive your phone. To
assign different main menu items, see “Personalize
Features” on page 187.
12
Status Icons
Status icons appear at the top of the display. Some
appear at all times. Others appear only when your
phone is engaged in certain activities or when you
have activated certain features.
abcd
efgd
o p q
r s
6 No Service — Your phone is
A
B
B Bluetooth
Battery Strength — A fuller battery
indicates a greater charge.
Signal Strength — More bars next
to the antenna indicate a stronger
signal.
without service. You cannot make
or receive any type of call.
Phone In Use — Your phone is
active on a phone call.
BoostTM Walkie-Talkie In Use —
Your phone is active on a BoostTM
Walkie-Talkie call.
®
is using Bluetooth®. If this icon is
blinking, then your phone is in
discoverable mode. If this icon is
static, your phone is active in a
Bluetooth
In Use — Your phone
®
connection.
Page 23

Phone Basics
1
G L
I
J
H K
RM
Q
u
w xT
yz
ljik
mXnW
DE
Active Phone Line — 1 indicates
phone line 1 is ready to make calls.
Call Forward — Your phone is set
to forward calls. See “Call
Forwarding” on page 74.
Ringer Off — Your phone is set to
not ring. See “Setting Your Phone to
Vibrate” on page 90.
Speaker Off — Sets BoostTM
Walkie-Talkie sound to come
through the earpiece rather than
through the speaker. Your phone
does not ring for Boost
Walkie-Talkie calls if Alert Type is
set to Silent or Vibrate.
Messages — You have one or
more messages. See page 86.
T9® Text Input — You are using T9
Text Input to enter text. See
“Entering Text” on page 61.
Internet — You are ready to
browse the internet or are browsing
the internet using a secure
connection.
TM
9 Transmitters — Your phone is set
Y Z
N O
7 Hearing Aid — Your phone is set
3454
354
c
U
not to receive calls and other
transmissions. See “Temporarily
Turning Off Transmissions” on page
185.
Packet Data — You are ready to
transfer packet data or are
transferring packet data. See “Using
Your Phone as a Modem” on page
81.
TTY — You are ready to use your
phone to make calls using a
teletypewriter device. See “Features
for the Hearing Impaired” on page
83.
for use with a hearing aid and is
active on a phone call.
MP3 Music Player — The MP3
Music Player is active.
Voice Record — You have one or
more voice records stored. See
page 153.
USB Mass Storage — You are
using the USB mass storage
feature. See page 33.
13
Page 24

Getting Started
Using the Memory Card
Your i885 phone comes with a 64 MB Micro SD
memory card, memory card reader, and memory
card adaptor.
A memory card is a removable flash memory card
that you can use to store pictures, videos, and
audio files. The memory card can be inserted in
your phone or connected to your computer using
the memory card reader and memory card adaptor.
When the memory card is in your phone, many
types of pictures, videos, and audio files stored on
the memory card can be viewed or played using
your phone’s Media Center. Music files stored on
the memory card can be played using your phone’s
MP3 Music Player.
For complete instructions on using the memory
card with your phone and with your computer, see
“Memory Card” on page 26.
SIM Chip Security
Your SIM chip stores all your Contacts and
protects your personal information. Since this
information is stored on your SIM chip, not in your
phone, you can remove the information by
removing your SIM chip.
14
Note: Except for making emergency calls, your
phone will not function without the SIM
chip.
To prevent unauthorized use of your phone, your
SIM chip is protected by a PIN that you enter each
time the phone is powered on. You can change the
PIN or turn off the requirement that it be entered.
Turning the PIN Requirement On and Off
When the SIM PIN requirement is off, your phone
can be used without entering a PIN.
Important: When the SIM PIN requirement is off,
When the SIM PIN requirement is on, you are
prompted to enter your PIN each time you power
on your phone.
Note: If a SIM PIN is required, your phone will
1 From the main menu, select Settings >
Security > SIM PIN.
2 Select On or Off.
3 Enter the current SIM PIN.
the personal data on your SIM chip is
not protected. Anyone can use your
phone and access your personal data.
not function until the SIM PIN is entered,
except for making emergency calls.
Page 25

SIM Chip Security
Note: The default SIM PIN is 0000. Change your
PIN to prevent fraudulent use of the SIM
chip (see “Changing the PIN” on page 15).
4 Press A under Ok.
Entering the PIN
1 When the Enter SIM PIN Code screen appears
after you power on your phone, enter your SIM
PIN.
2 Press A under Ok.
The message SIM Unlocked displays.
Important: If you enter your PIN incorrectly 3 times,
your SIM chip is blocked. To unblock
your SIM chip, you must contact
TM
Customer Care. See
Boost
“Unblocking the PIN”.
Changing the PIN
Note: The SIM PIN requirement must be turned
on in order to access this feature.
1 From the main menu, select Settings >
Security > Change Passwords > SIM PIN.
2 At the Enter Old SIM PIN screen, enter the
current SIM PIN.
3 Press A under Ok.
4 At the Enter New SIM PIN screen, enter the
new 4- to 8-digit SIM PIN.
5 Press A under Ok.
6 At the Re-enter New SIM PIN screen, re-enter
the new SIM PIN to confirm.
7 Press A under Ok.
Changed: SIM PIN displays.
Unblocking the PIN
If you enter your PIN incorrectly 3 times, your SIM
chip is blocked. To unblock your SIM chip, you
must contact Boost
Unblock Code (PUK).
Important: If you unsuccessfully enter the PUK
To unblock the PIN:
1 Press * # m 1.
2 At your Boost
request, provide the information needed to give
you a PUK code.
TM
Customer Care to get a PIN
code 10 times, your SIM chip is
permanently blocked and must be
replaced. If this happens, all data is
lost. You will get a message to contact
TM
Customer Care. Except for
Boost
making emergency calls, your phone
will not function with a blocked SIM
chip.
TM
Customer Care representative’s
15
Page 26

Getting Started
3 Select Unblock PIN.
4 Enter the PUK code.
5 Enter a new 4- to 8-digit SIM PIN.
6 Re-enter your SIM PIN.
Note: These steps must be performed in quick
succession.
If you entered the codes properly, SIM Unlocked
appears on the display.
Inserting and Removing Your SIM Chip
Important: Do not touch the gold-colored areas of
The SIM chip is designed for optimal Contacts
storage and feature use.
Note: In some cases, Contacts may not be
If you remove your SIM chip and use it with another
phone, or use another SIM chip with your phone,
the following information is erased:
• The Recent Calls list
• Call forwarding settings
16
your SIM chip.
accessible if you move your SIM chip to
another phone. Contacts created with
your i885 phone are not readable by an
older iDEN SIM-based phone.
• Net alerts
• MMS messages
• Options set using the MMS Setup menu
• Information stored in Memo
• Pictures, video, and voice recordings accessible
through the Media Center that are saved in your
phone’s memory, except those that are forward
locked. (No items saved to the memory card are
erased.)
• 3 most recent GPS Enabled locations
• Voic e records
• Voice names
• Datebook events
• Options set using the Personalize menu
Inserting Your SIM Chip
1 With your phone powered off, remove the
battery door and battery.
Page 27
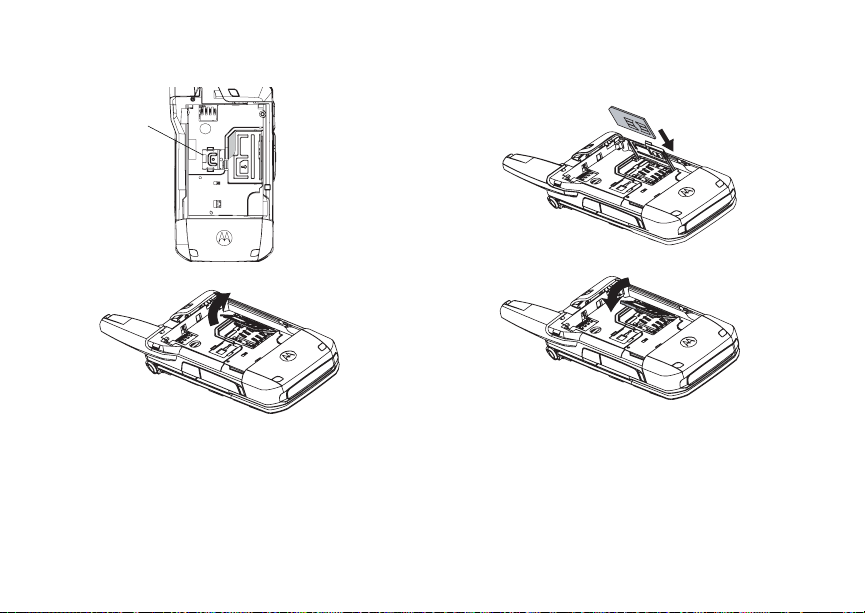
SIM Chip Security
2 Slide the latch away from the SIM chip holder
latch
3 Open the SIM chip holder.
4 Carefully slide your SIM chip into the SIM chip
holder.
5 Close the SIM chip holder.
6 Slide the latch toward the SIM chip holder.
17
Page 28

Getting Started
Removing Your SIM Chip
Important: To avoid loss or damage, do not remove
1 With your phone powered off, remove the
battery door and battery.
your SIM chip from your phone unless
absolutely necessary.
2 Slide the latch away from the SIM chip holder.
3 Open the SIM chip holder.
4 Carefully slide your SIM chip out of the SIM chip
holder.
5 Close the SIM chip holder.
6 Slide the latch toward the SIM chip holder.
Note: Protect your SIM chip as you would any
delicate object. Store it carefully.
Locking the Keypad
Locking the phone’s keypad prevents its buttons
from being pressed. When the keypad is locked,
you can only:
• Power the phone on and off
• Unlock the keypad
• Respond to incoming calls, messages, and
alerts
Important: Emergency calls cannot be placed while
18
the keypad is locked.
To lock the keypad:
1 From the idle screen, press m.
2 Press *.
If you press a key while the keypad is locked,
instructions for unlocking the keypad display
briefly.
To unlock the keypad:
1 From the idle screen, press m.
2 Press *.
You also have the option of setting your phone to
automatically lock the keypad if there has been no
activity for a specified time.
1 From the main menu, select Settings >
Security > Keypad Lock.
2 To lock the keypad immediately, select Lock
Now. You will be given the option to press m
and * to lock and unlock the keypad.
3 To set a specific time for the keypad to lock if
there has been no activity, select Auto Lock and
then select a time.
The keypad can be set to lock in 5, 10, 15, or 20
minutes if the keypad is not touched during the
specified time. To turn the auto lock off, repeat
step 3 and select Off.
Page 29

Antenna
Antenna
The retractable antenna on your i885 phone is
designed to be extended during calls and is
essential to attain the hearing aid compatibility
rating on applicable models.
To extend the antenna, pull gently on the tip until
the antenna is fully extended and clicks into
position.
When finished with a call, retract the antenna by
pushing gently on the rounded tip until the antenna
clicks into place.
To optimize your phone’s performance, extend the
antenna when you make or receive a call, and
avoid touching the antenna with any body part.
Important: Failure to fully extend or retract the
antenna until the antenna clicks into
place causes severely degraded
performance, which may result in
missed calls, dropped calls, or garbled
audio.
Accessories
Your phone comes with a BT60 Lithium Ion Battery
and travel charger.
Various accessories are available for use with your
i885 phone, cases, vehicle power charger, data
cables, Hands-Free accessories and more.
To order additional accessories, go to
www.boostmobile.com or call 1-888-BOOST4U
(1-888-266-7848). You can also contact your
TM
Boost
Authorized Dealership. For information on
BoostTM retail store locations, go to
www.boostmobile.com.
Wireless Local Number Portability: Bringing Your Phone Number From Another Carrier
Please contact BoostTM Customer Care for information about this service.
Re-Boost
You can recharge your account directly from your
handset using the Re-BoostTM menu option. On
your phone, launch the service from the main
menu. You will then be able to log on and recharge
your account using your credit card or Re-Boost
TM
®
19
Page 30

Getting Started
Card. You can also view your account balance and
call credit expiration date. The account pass code
is the same one that you use to access your
account.
Instant Re-Boost
You can Re-BoostTM instantly by dialing the letters
ADD from your mobile phone and press Send. You
are not required to enter your PTN or pass code.
If you select Prepaid Card, you will be asked to
enter the 14-digit card number printed on the
Re-Boost
will be asked simply to confirm your purchase. You
will need to have a credit card already on file to use
it for purchasing airtime. Call 1-888-BOOST-4U to
have your credit card added to your account.
®
Card. If you’ve selected credit card, you
TM
BoostTM Customer Care
BoostTM Customer Care: 1-888-BOOST-4U
(1-888-266-7848) or dial 611 from your i885
phone.
20
Page 31

Phone Calls
Making Calls
Your i885 phone makes two types of calls: digital
cellular phone calls and Boost
calls. With BoostTM Walkie-Talkie calls, you use
your phone as a long-range, digital walkie-talkie.
Phone Calls
With the Flip Open
1 Enter the number you want to call.
2 To place the call:
Press s. -or-
If you entered the number from the idle screen,
press O.
3 To end the call:
Press e. -or-
Close the flip.
To end a call by closing the flip, you must have the
Flip to End feature turned on. See “Setting Flip
Actions” on page 79.
TM
Walkie-Talkie
With the Flip Closed
You can make phone calls with the flip closed
using a voice name or the Recent Calls list to
select the number you want to call. See “Using a
Voice Name” on page 23 and “Making Calls From
the Recent Calls List” on page 60.
To end the call, press
..
Receiving Calls
Phone Calls
When you receive a phone call, your phone rings,
vibrates, or lights up its backlight.
Answering
If the flip is closed, press
Open the flip. -or-
Press s. -or-
Press O. -or-
Press A under Yes. -or-
Press any number key.
t. -or-
21
Page 32

Making Calls
To answer a call by opening the flip, you must have
the Flip to Ans feature turned on (see “Setting Flip
Actions” on page 79). To answer a call by pressing
any number key, you must have the Any Key Ans
feature turned on (see “Phone Calls Features” on
page 186).
Sending to Voice Mail
If the flip is closed, press .. -or-
Press e. -or-
Press A under No.
Ending
If the flip is closed, press .. -or-
Press e. -or-
Close the flip.
BoostTM Walkie-Talkie Calls
When you receive a BoostTM Walkie-Talkie call and
the Walkie-Talkie backlight flashes rapidly,or your
phone emits a chirping sound or vibrates.
Answering
1 Wait for the caller to finish speaking.
2 Press and hold the Boost
on the side of your phone. Begin talking after
your phone emits a chirping sound.
22
TM
Walkie-Talkie button
3 Release the Boost
listen.
TM
Walkie-Talkie button to
Ending
If the flip is closed, press .. -or-
Press e. -or-
Press A under Exit. -or-
Close the flip.
TM
A Boost
Walkie-Talkie call ends automatically if
there is no activity on the call for a few seconds.
Choosing a Number to Call
You can choose the number you want to call in
many ways:
• Enter the number on the keypad.
• Say a voice name into your phone. See “Using a
Voice Name” on page 23.
• Use Speed Dial or Turbo Dial
call. See “Using Speed Dial and Turbo Dial®” on
page 23.
• Redial the last phone number called. See
“Redialing the Last Number” on page 23.
• Select the number from the Recent Calls list.
See “Making Calls From the Recent Calls List”
on page 60.
®
to make a phone
Page 33

Choosing a Number to Call
• Select the number from Contacts. See “Making
Calls From Contacts” on page 71.
• Select a number stored in Datebook. See
“Making Calls From Datebook and Datebook
Reminders” on page 179.
• Use One T ouch Boost
BoostTM Walkie-Talkie call. See “Setting One
Touch Boost
• Use the number in Memo. See “Memo” on page
73.
TM
TM
Walkie-Talkie to make a
Walkie-Talkie” on page 78.
• Select the number in a text message you have
received.
Using a Voice Name
If you have created a voice name in Contacts for
the number you want to call, say the voice name
into your phone to enter the number. See page 66
for information on voice names.
You can use a voice name to enter a number with
the flip open or closed.
1 Press and hold
you to say the voice name.
2 Speaking into the microphone, say the voice
name assigned to the number you want to call.
Your phone plays the name back to you.
t until a prompt appears telling
3 If you are making a phone call, the call is placed
automatically.
Tip: To stop a phone call from being completed,
press
. if the flip is closed or press e.
TM
If you are making a Boost
press and hold the BoostTM Walkie-Talkie button
Walkie-Talkie call,
to place the call.
Redialing the Last Number
Press and hold s to place a call to the last phone
number you called.
Using Speed Dial and Turbo Dial
Each phone number stored in Contacts is assigned
a Speed Dial number, which you can use to call
that number.
Speed Dial
1 From the idle screen, use the keypad to enter
the Speed Dial number assigned to the phone
number you want to call.
2 Press #.
3 Press s.
Turbo Dial
From the idle screen, press and hold the Speed
Dial number (1 through 9) assigned to the phone
number you want to call.
®
23
Page 34

Making Calls
Using One Touch BoostTM Walkie-Talkie
One Touch BoostTM Walkie-Talkie sets your phone
to call the most recent BoostTM Walkie-Talkie
number on the Recent Calls list, or a Boost
Walkie-Talkie number you choose, every time you
press the BoostTM Walkie-Talkie button. See
“Setting One Touch BoostTM Walkie-Talkie” on
page 56.
TM
Missed Phone Calls
When you miss a call, this icon V and the number
of phone calls you have missed appear briefly.
With the Flip Open
If you want to dismiss the missed call message,
press A under Back. -or-
If you want to view the missed call on the Recent
Calls list, press A under View.
With the Flip Closed
If you want to dismiss the missed call message,
..
press
If you want to view the missed call on the Recent
Calls list, press
24
. twice.
Using Speakerphone
Turning on speakerphone makes incoming sound
come out of the phone’s speaker instead of the
earpiece. Speakerphone is available whenever you
are on an active phone call.
With the Flip Open
To turn speakerphone on or off:
Press A under Spkr. -or-
t.
Press
With the Flip Closed
When you make a call with the flip closed,
speakerphone is always on.
Opening the flip turns speakerphone off.
Using Mute
Muting calls lets you listen to incoming sound
without transmitting sound. Mute is available
whenever you are on an active call.
To turn mute on:
Press A under Mute.
While mute is on, Unmute appears as a display
option.
Page 35

Making Emergency Phone Calls
To turn mute off:
Press A under Unmute.
Making Emergency Phone
Calls
Your phone supports emergency calling.
Emergency phone calls can be made even when
your SIM chip is blocked or not in your phone.
Dial 911 to be connected to an emergency
response center. If you are on an active call, you
must end it before calling 911.
When you make an emergency call, your phone’s
GPS Enabled feature can help emergency service
personnel find you, if you are in a location where
your phone’s GPS antenna has established a clear
view of the open sky and your local emergency
response center has the equipment to process
location information. See “GPS (Global Positioning
System) Enabled” on page 166, and particularly
“IMPORTANT: Things to Keep in Mind” on page
166 and “Making an Emergency Call” on page 168,
for more information on the limitations of this
feature. Because of the limitations of this feature,
always provide your best knowledge of your
location to the emergency response center when
you make an emergency call.
Important: Emergency calls cannot be placed while
Important: If you have not registered on the
Important: If you are bringing your phone number
the keypad is locked.
network, emergency calls cannot be
placed while your SIM chip is in your
phone.
to Boost Mobile
carrier, the 911 emergency response
center will not be able to make a
callback to your temporary Boost
Mobile
number you requested has been
activated on your Boost Mobile
®
from your previous
®
phone number after the phone
®
phone.
25
Page 36

Memory Card
Memory Card
Your i885 phone comes with a 64 MB memory
card, memory card adaptor, and memory card
reader.
A memory card is a removable flash memory card
that you can use to store pictures, videos, and
audio files. The memory card can be inserted in
your phone or connected to your computer using
the memory card adaptor and the memory card
reader.
When the memory card is in your phone, many
types of pictures, videos, and audio files stored on
the memory card can be viewed or played using
your phone’s Media Center. Music files stored on
the memory card can be played using your phone’s
MP3 Music Player.
You can use a memory card reader and adapter or
a USB data cable to connect to your computer’s
USB port and access the memory card from your
computer. This lets you save files from your
computer to your memory card or save files from
your memory card to your computer.
26
Ensuring Files on the Memory Card Are Compatible With Your Phone
When your memory card is connected to your
computer, your computer lets you save files to your
memory card in ways that may not allow you to
access these files when the memory card is in your
i885 phone.
To ensure the files on your memory card are
compatible with your i885 phone, use the folder
structure, filename rules, and formats described in
the following sections.
Folder Structure
The first time you insert the memory card into your
phone, your phone creates folders on the memory
card. When you save files from your computer to
the memory card, save each file to the appropriate
folder:
• The Music folder is for music files you will play
using the audio player. Files in this folder cannot
be accessed from the Media Center.
• The Podcast folder is for podcasts you will play
using the audio player. Files in this folder cannot
be accessed from the Media Center.
Page 37

Ensuring Files on the Memory Card Are Compatible With Your Phone
• The Audio folder is for audio files you will play
using the Media Center. Files in this folder
cannot be accessed from the audio player.
• The Image folder in for pictures you will view
using the Media Center.
• The Video folder is for videos you will play using
the Media Center.
Because your phone creates these folders the first
time the memory card is inserted, you should insert
the memory card into your phone at least once
before using it with your computer.
Filename Rules
When naming files stored on the memory card, the
following rules apply:
• The file name can contain both ASCII and
Unicode characters.
• File names up to 32 characters long, including
the file extension and folder name, can be
displayed by your phone. File names up to 255
characters long, including the file extension and
folder name, can be read by your phone. If a file
name is more than 32 characters long, but no
more than 255 characters long, your phone
displays an abbreviated name for the file, but
does not change the name of the file on the
memory card.
Note: Only files with names no longer than 32
characters can be stored in your phone’s
memory. When you copy or move a file
with a longer name to your phone’s
memory, you are prompted to rename the
file.
• The file name must be in a language your phone
can display. To see which languages your phone
can display, select Settings > Display/Info >
Language. Your phone can display the
languages listed and other languages that use
the same alphabets.
File Formats
MP3 Music Player
These file formats are compatible with your
phone’s MP3 Music Player:
MP3 version MPEG-1, MPEG-2, MPEG-2.5.
Bit Rates (kbits/sec)
32, 40, 48, 56, 64, 80, 96, 112,
128,160, 192, 224, 256, 320.
Sampling Rates (kHz)
8, 11.025, 12,16, 22.05, 24, 32,
44.1, 48.
27
Page 38

Memory Card
AAC LC Bit Rates (kbits/sec)
32, 40, 48, 56, 64, 80, 96, 112,
128, 160, 192, 224, 256, 320.
Sampling Rates (kHz)
8, 11.025, 12,16, 22.05, 24, 32,
44.1, 48.
AAC+ v1,
AAC+ v2
Bit Rates (kbits/sec)
32, 40, 48, 56, 80,96, 112, 128.
Sampling Rates (kHz)
8, 11.025, 12,16, 22.05, 24, 32,
44.1, 48.
Media Center
These types of video files are compatible with the
video playback capabilities of your phone’s Media
Center:
Video Formats M-JPEG, MPEG-4, H.263.
Audio Formats AMR-NB.
Bit Rates
(kbits/sec)
28
Up to 128.
These types of audio files and picture files are
compatible with the Media Center:
File Type Task Formats
Audio Playback MIDI (FM-Midi, Type-0, 16
Picture View GIF (GIF89A and GI F87A),
Capture JPEG
Polyphony, SP-Midi
compliant), WAV (8 kHz,
8-bit Mono PCM Canonical
Format), AMR, AU, MP3,
AAC, AAC+.
JPEG, WBMP, PNG
Using the Memory Card With Your Phone
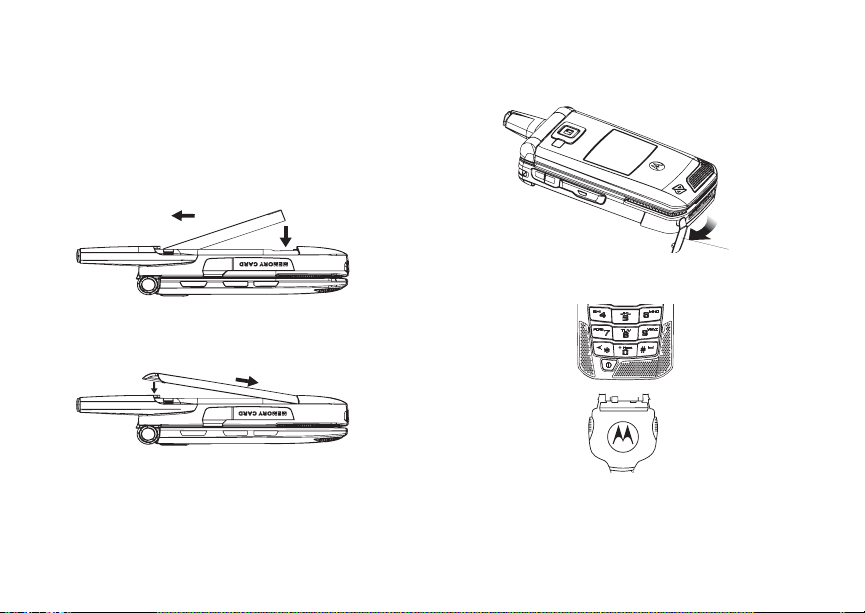
Inserting the Memory Card
1 Open the memory card slot cover.
Page 39

Using the Memory Card With Your Phone
2 Slide in the memory card. Push the memory
card into the slot until it clicks into place.
3 Close the memory card slot cover.
4 Your phone may prompt you to use the memory
card to store new media items, go to the MP3
Music Player, go to the camera, go to the Media
Center, or do nothing. If you select Do Nothing,
you will return to the idle screen.
Formatting a New Card
The memory card that came with your i885 phone
has the format required for use with your phone.
However, if you use another memory card with
your phone, you may be prompted to format the
card the first time you insert it in your phone.
Important: The Format Card option erases any data
saved to the memory card. It should
only be used if your phone prompts you
to format the memory card.
To format a memory card:
From the main menu, select Settings >
Memory Card > Format Card.
Removing the Memory Card
Important: Do not remove the memory card before
1 From the main menu, select Settings >
Memory Card > Remove Card.
2 Open the memory card slot cover.
selecting the Remove Card option.
Removing the memory card before
selecting the Remove option could
result in loss of data.
29
Page 40

Memory Card
3 Push the memory card to release it from the slot.
4 Pull out the memory card.
5 Close the memory card slot cover.
Note: If you select the Memory Card > Remove
Card option but do not remove the
memory card, you cannot use the memory
card until you remove it and insert it again.
Accessing Files on the Memory Card
Pictures, videos, and audio files stored on the
memory card are accessed using your phone’s
Media Center.
Audio files stored on the memory card can be
played using your phone’s MP3 Music Player.
30
Saving Files to the Memory Card
When the memory card is in your phone, you can
save these media items to it:
TM
• Pictures received in Boost
• Pictures and videos taken with your phone’s
camera
• Pictures, videos, and voice recordings received
via Bluetooth
®
Walkie-Talkie calls
• Pictures, videos, and voice recordings received
in MMS messages
Setting Your Storage Preference
You can choose whether media items are saved to
your phone’s memory or to the memory card.
To set the media storage option in Settings:
1 From the main menu, select Settings >
Memory Card > Store Media.
2 Select On Phone to set your phone to save
media items to the phone’s memory. -or-
Select Prefer On Card to set your phone to
save media items to the memory card if it is in
the phone. If the memory card is not in the
phone, even if you choose Prefer On Card, the
media items are saved to your phone’s memory.
Page 41

Using the Memory Card With Your Computer
If you set the media storage option to set to save to
your phone’s memory, when you insert the
memory card your phone prompts you to switch to
storing to the memory card.
Using the Memory Card With
Your Computer
You can access the memory card with your
computer in two ways:
• Using the memory card reader.
• Using your phone’s USB mass storage feature
with a USB cable.
In either case, the memory card is treated as a
removable storage drive by your computer. You
can navigate to this drive as you would any other
drive on your computer.
Using the Memory Card Reader
These instructions refer to the memory card reader
that came with your i885 phone. If you are using a
different memory card reader, following the
instructions provided with that memory card
reader.
What Is Your Computer’s Operating System?
If you have any of these operating systems running
on your computer, you do not need any additional
software to install the memory card reader:
• Microsoft
Windows ME
• MAC OS 8.6 or later
If you have Microsoft Windows 98SE, download
and install the Windows 98SE driver from this Web
site before setting up the memory card reader:
http://www.motorola.com/mdirect/drivers/USB-S
Ddrivers.html
®
Windows 2000, Windows XP, or
Setting Up the Memory Card Reader
1 To connect th e memory card reader, insert its
USB connector into the USB port on your
computer.
31
Page 42

Memory Card
You can also use the USB cable provided with
the memory card reader to connect the memory
card reader to the USB port on your computer.
Connect one end of the USB cable to the USB
connector on the memory card reader and
connect the other end to the USB port on your
computer.
The green light on the memory card reader turns
on when the memory card reader is connected.
32
2 Insert the memory card into the memory card
adaptor until it does not go in any further.
3 Insert the memory card adaptor into the memory
card reader.
Your memory card can now be accessed by your
computer.
Removing the Memory Card From the Memory
Card Reader
When you are ready to use the memory card with
your phone again, pull the memory card from the
memory card adaptor and insert it into your phone.
Page 43

Using the Memory Card With Your Computer
Note: When you read or write files to your
memory card using the memory card
reader, the green light on the memory
card reader flashes rapidly to show that it
is in use. Do not remove the card while
the green light is flashing.
More information, Hints, and Tips
For more information on the memory card reader,
go to www.motorola.com/iden/support to find the
USB 2.0 SD Card Reader manual in Product
Manuals.
Using the USB Mass Storage Feature
You can access the memory card with your
computer while the memory card is inserted in your
phone using your phone’s USB mass storage
feature.
To use this feature, you need a USB cable with a
connector compatible with your phone’s accessory
connector. You cannot use the USB cable provided
with the memory card reader that came with your
i885 phone.
When you are using your phone’s USB mass
storage feature, the memory card cannot be
accessed by your phone. Otherwise, your phone’s
functionality is not affected.
Setting Your Phone to Use the Feature
To turn on your phone’s ability to use the USB
mass storage feature:
1 From the main menu, select Settings >
Memory Card > USB Connection.
2 Select Reader Enabled.
To turn off your phone’s ability to use the USB
mass storage feature:
Set USB Connection to Reader Disabled in
step 2.
Using the Feature
To use your phone’s USB mass storage feature:
1 Ensure that your phone is powered ON, the
memory card is inserted in your phone, and
USB Connection is set to Reader Enabled.
33
Page 44

Memory Card
2 Open the connector cover.
connector
cover
3 Connect he USB cable to the USB port of your
computer.
4 With the phone’s display facing up, insert the
USB cable’s connector into the accessory
connector, until you hear a click.
Your memory card can now be accessed by your
computer.
34
Memory Cards Compatible With Your Phone
If you want to purchase and use additional memory
cards, TransFlash and MicroSD memory cards are
compatible with your i885 phone.
Page 45

Playing Music Files with the Flip Closed
MP3 Music Player
Your i885 phone includes an MP3 Music Player
that you can use to play music files stored on the
memory card inserted in your phone.
The MP3 Music Player groups the music files on
the memory card into folders and lists. When you
select a music file to play, the MP3 Music Player
plays this music file and then plays the other music
files grouped with it.
In addition to music, the MP3 Music Player plays
podcasts that you have downloaded to your
computer and then saved on the memory card
inserted in your phone. You can mark highlights
within a podcast file to help you find the parts of the
podcast you most want to listen to. You can send
details of the podcast to a friend and send
feedback to the podcast creator using MMS
messages.
If you receive a phone call, Walkie-Talkie call, call
alert, message notification, a Datebook reminder,
or a GPS notification while playing a music file with
the MP3 Music Player, the music file pauses and a
prompt appears asking you if you want to accept
the incoming call or alert or ignore it.
The MP3 Music Player begins playing at the
currently selected volume, even when Vibe All is
set to On.
To remove the memory card while using the audio
player, press m and select Remove Card.
Playing Music Files with the
Flip Closed
The controls on the side of your phone enable you
to use the MP3 Music Player with your phone’s flip
closed:
• T o access the MP3 Music Player , press and hold
y any time your phone is not in a call or
transferring data.
• T o play a music file once you have accessed the
MP3 Music Player, press .
• To pause a music file or resume playing it again,
press y .
• To skip to the next music file,press .
• To skip to the previous music file, press .
• To fast-forward, press and hold .
• To rewind, press and hold .
• To adjust the volume, use the volume keys.
• To exit the MP3 Music Player, press ..
35
Page 46

MP3 Music Player
Playing Music Files with the Flip Open
When your phone’s flip is open, you have more
ways to access the MP3 Music Player and play the
music files on the memory card.
Accessing the MP3 Music Player
From the Main Menu
From the main menu, select Music Player.
From the Media Center
1 Access the Media Center.
2 To view the audio recordings on your memory
card, press m. Select Filter > Card: Audio.
3 Select [Music Player] Play Music. -or-
Press A under Player.
Playing Music Files
1 Access the MP3 Music Player.
2 Scroll to a folder.
Tip: The Songs folder contains all the music
files on the memory card in a single list.
3 To play the first music file in the folder, press A
under Play. (If the folder you scrolled to contains
36
subfolders, this plays the first music file in the
first of these subfolders.) -or-
Press O to view the contents of the folder.
Then scroll to a music file and press A under
Play to play it, or scroll to a folder and press A
under Play to play the first music file in it.
Any time you are viewing a list of folders with the
MP3 Music Player, you can scroll to a folder and
press A under Play to start playing the contents
of that folder or press O to view the contents of
the folder.
Any time you are viewing a list of music files, you
can scroll to an music file and press A under Play
to play it.
To stop viewing a folder and return to the folder or
list that contains it, press A under Back.
Other Basic Functions
Pausing and Resume
To pause a playing music file, press A under
Pause or press O.
To resume playing a paused music file, press A
under Play or press O.
Page 47

How Your Music Files Are Organized
Skip to Next and Skip to Previous
To skip to the next music file, press and release the
right side of the navigation key, as if scrolling right.
Do not hold the right side of the navigation key.
To skip to the previous music file, press and
release the left side of the navigation key, as if
scrolling left. Do not hold the left side of the
navigation key.
Fast-Forward and Rewind
To fast-forward a playing music file, press and hold
the right side of the navigation key, as if scrolling
right.
To rewind a playing music file, press and hold the
left side of the navigation key, as if scrolling left.
Adjust the Volume
To adjust the volume, use the volume keys.
Exit
To exit the MP3 Music Player, press A under
Exit.
If Exit is not one of your options, press A under
Back or Cancel until it is.
How Your Music Files Are
Organized
The MP3 Music Player groups the music files on
the memory card into folders and lists.
Since you will probably want to use the MP3 Music
Player primarily to play songs, the MP3 Music
Player treats the music files on the memory card as
songs when grouping and organizing them.
The MP3 Music Player uses metadata found in
most music files to group the files on the memory
card by album, artist, and genre. You can also
create your own groupings of music files, called
playlists.
When you access the MP3 Music Player, you see
that the music files are grouped into these folders:
• Songs — All music files on the memory card
inserted in your phone, listed alphabetically by
title.
• Playlists — Folders and lists you have created.
If you have not created any playlists, this folder
contains only the Favorite playlist, which is
empty.
•Albums — Songs grouped by album. The
albums are listed alphabetically by title. The
songs on the albums are listed in the order that
they normally appear on the album.
37
Page 48

MP3 Music Player
•Artists — Songs grouped by artist. The artists
are listed alphabetically by name. Within each
artist’s folder, the songs are listed alphabetically
by title.
•Genres — Songs grouped by genre. The genre
are listed alphabetically by name. Within each
genre’s folder, the songs are listed alphabetically
by title.
• Podcasts — Podcast episodes grouped by
program. The programs are listed alphabetically
by name. Within each program folder, the
episodes are listed by date with the newest first.
In the Albums, Artists, and Genres folders, any
music files that do not contain enough metadata to
be grouped by album, artist, or genre are placed in
a folder labelled “Unknown”.
Playing Music While Files Are Loading
The first time the audio player encounters music
files on your memory card, it must load and
organize these files. If a large number of files must
be loaded, this may take a long time.
To play music while files are loading:
1 Access the audio player.
2 From the loading screen, press A under View.
38
3 In the folder view screen, scroll to a music file
and press A under Play. -or-
4 Press O
While music is playing, file loading is suspended.
Searching By First Letter
Any time you are viewing an alphabetical list of
music files or folders, you can go directly to the
items starting with any letter by using your phone’s
keypad to enter that letter.
Playing a List, Repeat, and Shuffle
When you select an music file to play, the MP3
Music Player plays this music file and then plays
the other music files grouped with it. The repeat
and shuffle features help determine which of these
songs are played.
If you are not using the repeat or shuffle features,
the MP3 Music Player plays the music file you
select and then plays the rest of the files in the list
or folder, in the order they appear, until it gets to
the end of the list or folder. The MP3 Music Player
then goes to the beginning of the list and pauses
until you resume playing.
Page 49

Working with Playlists
The repeat feature lets you set the MP3 Music
Player to play all the music files in a list or folder, in
order, starting again at the beginning of the list
when it gets to the end, without pausing or
stopping. It also lets you set the MP3 Music Player
to play one music file repeatedly, starting over as
soon as it ends.
The shuffle feature lets you set the MP3 Music
Player to play the music files in a list or folder in
random order, until you stop it.
Setting Repeat
1 While viewing a list, viewing the details of the
music file currently playing, or viewing visuals,
press m.
2 Select Setup.
3 Scroll to Repeat.
4 To set the MP3 Music Player to repeatedly play
the contents of a list or folder, in order, select All.
-or-
To set the MP3 Music Player to play one song
repeatedly, select One. -or-
To turn off the repeat feature, select Off.
Setting Shuffle
1 While viewing a list, viewing the details of the
music file currently playing, or viewing visuals,
press m.
2 Select Setup.
3 Scroll to Shuffle.
4 To set the MP3 Music Player to play the music
files in a list or folder in random order, select On.
-orTo turn off the shuffle feature, select Off.
Working with Playlists
Playlists are lists of music files you create from the
files already available through the MP3 Music
Player.
Playlists enable you to group music files as you like
them, but they do not change anything in the other
folders or on the memory card. Adding a file to a
playlist does not copy it or move it. Removing a file
from a playlist, or deleting the playlist that a file is
listed in, does not delete the file from any other
location.
Creating a Playlist
1 Access the MP3 Music Player.
2 Select Playlists.
39
Page 50

MP3 Music Player
3 Select [Create New] > Name.
4 If you want to give the playlist a name, enter the
name. See “Entering Text” on page 61. When
you are finished, press A under OK.
Note: If you do not assign a name, the playlist is
named “playlist” followed by the number
of unnamed playlists you have, including
this one. For example, the first playlist you
create without naming is automatically
named “Playlist-1”.
5 Select [Add Songs].
A list of all music files on the memory card
appears.
Tip: For options to help you sort through this list,
press m.
6 Select each music file you want to put on the
playlist. A checkmark appears next to each
selected file.
Tip: To deselect a selected item: Scroll to a
selected file and press O.
7 When you are finished selecting files, press A
under Done.
8 If you want to change the order of the music files
on a playlist, see “Reordering a Playlist” on page
40.
9 Select Save.
40
Editing a Playlist
After you have created a playlist, you can change
its name, add music files, remove music files, and
change the order of the music files.
1 Access the MP3 Music Player.
2 Select Playlists.
3 Scroll to the playlist you want to edit.
4 Press m.
5 Select Edit Playlist.
6 Press m to make the changes you want.
7 Select Save.
Reordering a Playlist
You can change the order of the music files on a
playlist before you save a new playlist or later,
while editing the playlist.
1 Before you have saved a new playlist or while
editing a playlist, press m.
2 Select Reorder Songs.
3 Scroll to the music file you want to move.
4 Press A under Grab.
5 Scroll to the place where you want the music file
to appear.
6 Press A under Insert.
Page 51

Working with Playlists
7 Repeat step 3 through step 6 for all the items
you want to move.
8 Press A under Done.
9 Press A under Save.
Removing Music Files
You can remove some or all music files from a
playlist before you save a new playlist or later,
while editing the playlist.
Removing a Music File From a Playlist
1 Before you have saved a new playlist or while
editing a playlist, press m.
2 Scroll to the music file you want to remove.
3 Press m.
4 Select Remove Song.
5 Press A under Save.
Removing All Music Files From a Playlist
1 Before you have saved a new playlist or while
editing a playlist, press m.
2 Select Remove All Songs.
3 Press O or A under Yes to confirm.
4 Press A under Save.
Reordering Playlists
To change the order of the playlists in the Playlists
folder:
1 Access the MP3 Music Player.
2 Select Playlists.
3 Press m.
4 Select Reorder Playlists.
5 Scroll to the playlist you want to move.
6 Press A under Grab.
7 Scroll to the place where you want the playlist to
appear.
8 Press A under Insert.
9 Repeat step 4 through step 8 for all the items
you want to move.
10 Press A under Done.
Deleting Playlist
Delete a Playlist
1 Access the MP3 Music Player.
2 Select Playlists.
3 Scroll to the playlist you want to delete.
4 Press m.
5 Select Delete Playlist.
6 Press O or A under Yes to confirm.
41
Page 52

MP3 Music Player
Deleting All Playlists
1 Access the MP3 Music Player.
2 Select Playlists.
3 Press m.
4 Select Delete All Playlists.
5 Press O or A under Yes to confirm.
This deletes all playlists except the Favorites
playlist.
Using the Favorites Playlist
The Favorites playlist is a permanent playlist. You
can add music files, remove music files, and
change the order of the music files, but you cannot
rename it or delete it.
You can add music files to the Favorites playlist as
you would any other playlist.
You can also add music files to the Favorites
playlist using the Add to Favorites shortcut.
Add the Music File Currently Playing
1 While viewing a list, viewing the details of the
music file currently playing, or viewing visuals,
press m.
2 Select Add to Favorites.
42
Add Any Music File
1 Access the MP3 Music Player.
2 Select Songs.
3 Scroll to the music file you want.
4 Press m.
5 Select Add to Favorites.
Working With Podcast
To access podcasts:
1 Access the audio player.
2 Select Podcasts.
Note: The Podcasts option does not appear if
you have no podcasts.
3 Scroll to view individual podcast episodes or
folders containing multiple episodes of the same
program.
4 Press O to view the podcast episodes within a
folder or the details screen of an individual
podcast episode.
Playing a podcast is similar to playing any other
music file. You can pause, resume, fast-forward,
and rewind just as with any other audio file.
Some functions differ when you a playing a
podcast:
Page 53

Working With Podcast
• Pressing O when you have scrolled to a
podcast displays a screen showing details of the
podcast, but does not play the podcast. To play
the podcast, press under A. After you begin
playing the podcast, pressing O pauses and
resumes the podcast.
• If the podcast you are playing contains
highlights, pressing and releasing the right or left
side of the navigation key skips to the next or
previous highlight within the podcast, or to the
beginning or the end of the podcast, rather that
skipping to the next or previous audio file.
Highlights
Highlights are portions of a podcast that are
marked to help you find them more easily.
Some podcasts you download my already have
highlights marked. You can use the audio player to
add and delete highlight markers.
Finding and Playing Highlights
To find and play highlights in the podcast you are
playing, press and release the right or left side of
the navigation key, as if scrolling right or left. Do
not hold the right or left side of the navigation key.
To play all the highlights in a podcast, and skip
everything that is not marked as a highlight:
1 While a podcast is playing or paused, press m.
2 Select Highlights Only. If the podcast has no
highlights, this option is not displayed.
Adding Highlight Markers
To add a highlight to a podcast:
1 While playing or paused within a portion of the
podcast that is not already marked as a
highlight, press m.
2 Select Add Highlights.
3 To mark the beginning of the highlight, press A
under On.
4 Go to the point in the podcast that you want to
mark as the end of the highlight. To do this,
fast-forward or let the podcast play to that point.
If you go too far, rewind.
If you reach the beginning of another highlight,
the beginning of that highlight automatically
becomes the end of the highlight you are
creating.
5 T o mark the end of the highlight, press A under
Off.
6 Press A under Back.
43
Page 54

MP3 Music Player
Deleting Highlight Markers
To delete the beginning and end markers from a
highlight:
1 While playing or paused within the highlight you
want to delete the markers from, press m.
2 Press A under Clear.
To delete all highlight markers in a podcast:
1 While playing or paused within a podcast that
contains highlights, press m.
2 Select Add Highlights or Edit Highlights.
3 Press m.
4 Select Clear All Highlights.
Sending Podcast Information
If you want another person to hear a podcast you
have downloaded and saved to your memory card,
you can send information in an MMS messages the
person can save and use to download the podcast
on his or her computer.
If the person then plays the podcast on a phone
with an audio player like the one in your phone, he
or she sees any highlight markers you created
within the podcast on your phone.
44
To send podcast information:
1 When you have scrolled to, are playing, or have
paused within the podcast, press m.
2 Select Forward Details.
3 Create, send the message as you would any
other MMS message. See “Multi-Media
Messages” on page 94. The podcast information
in automatically included in the message.
Sending Feedback
If the creator of a podcast has included an email
address for feedback in the metadata of the
podcast, you can send an MMS message to that
email address.
To send feedback email to the creator of a
podcast:
1 When you have scrolled to, are playing, or have
paused within the podcast, press m.
2 Select Send Feedback.
3 Create and send the message as you would any
other MMS message. See “Multi-Media
Messages” on page 94. The message is
automatically addressed to email address
included with the podcast.
Page 55

Deleting Music Files
Deleting Music Files
You can delete music files from the memory card
one at a time, by album, by artist, or by genre.
You can also delete all music files from the
memory card by deleting everything in the Songs,
Albums, Artists, or Genres folder.
Deleting an music file removes it from all playlists it
appears on.
Deleting a Music File
1 Access the MP3 Music Player.
2 Select the folder containing the music file you
want to delete.
3 If the folder you selected contains more folders,
within that folder, select the folder containing the
music file you want to delete.
4 Scroll to the music file you want to delete.
5 Press m.
6 Select Delete Song.
7 Press O or A under Yes to confirm.
Deleting an Album, Artist, or Genre
1 Access the MP3 Music Player.
2 Select the folder containing the music files you
want to delete: Albums, Artists, or Genres.
3 Scroll to the album, artist, or genre you want to
delete.
4 Press m.
5 Select Delete Album, Delete Artist, or Delete
Genre.
6 Press O or A under Yes to confirm.
Deleting All Music Files
Deleting everything in the Songs, Albums, Artists,
or Genres folder deletes all music files from the
memory card.
1 Access the MP3 Music Player.
2 Scroll to Songs, Albums, Artists, or Genres.
3 Press m.
4 Select Delete All Music.
5 Press O or A under Yes
to confirm.
DRM Items
Some of the audio files on the memory card may
be DRM items. When a DRM items has expired,
you can no longer play it.
If you scroll to an audio file that is expired and try to
play it, a message saying you cannot play it
appears. If you play a list containing an expired
audio file, the audio player skips over the expired
item and no message is displayed.
45
Page 56

MP3 Music Player
Setting Audio and Visual Options
You can customize the sound of the MP3 Music
Player by setting the equalizer. You can customize
the look of the MP3 Music Player screen by
choosing a theme or by viewing visuals while
listening to a music file.
Setting the Equalizer
1 From anywhere in the MP3 Music Player, press
m.
2 Select Setup > Equalizer.
A checkmark appears next to the equalizer
mode that is in use.
3 Select the equalizer mode you want.
Choosing a Theme
The theme you choose controls the appearance of
the MP3 Music Player screens.
1 Access the MP3 Music Player.
2 Press m.
3 Select Setup > Themes.
A checkmark appears next to the theme that is
in use.
4 Select the theme you want.
46
Viewing Visuals
To view visuals on the display instead of the details
of the song currently playing:
1 While viewing the details of the music file
currently playing, press m.
2 Select Setup.
3 Scroll to Visuals.
4 To set the MP3 Music Player to turn on the
visuals, selec On.
-or-
To turn off the visuals select Off.
To view the details of the song currently playing
instead of visuals:
1 While viewing visuals press m.
2 Select Setup > Visuals > Off.
Page 57

Using Walkie-Talkie Features
Your phone can send and receive the following
items through BoostTM Walkie-Talkie calls with
other phones that have this capability:
• Pictures*
• My Info
• Contact information
* Additional charges may apply.
You can choose to send My Info and contact
information to any BoostTM Walkie-Talkie number.
TM
You can choose to send pictures, to the Boost
Walkie-Talkie number you are engaged in a
TM
Boost
Walkie-Talkie with, BoostTM Walkie-Talkie
numbers on the recent calls list, and BoostTM
Walkie-Talkie numbers stored in Contacts.
When you make or receive a Boost
call, your phone automatically determines whether
the phone you are using is able to receive each of
these items. Your phone saves this information for
as long as the Boost
your recent calls list or is saved in your Contacts.
Your phone updates the saved information each
time you make or receive a call to or from that
TM
Boost
Walkie-Talkie number.
TM
Walkie-Talkie number is on
TM
Walkie-Talkie
You can turn your phone’s ability to send and
receive pictures on and off. See “Walkie-Talkie
Options Features” on page 186.
Walkie-Talkie Features Icons
When you are in a BoostTM Walkie-Talkie call,
icons appear on your phone’s display indicating
which types of Walkie-Talkie Features items you
can send and receive. These icon also indicate
when you have received a Walkie-Talkie Features
item of each type.
If the icon appears dimly, you can send and
receive the indicated type of Walkie-Talkie
Features item in the current call. When the icon
appears brightly, you have received indicated type
of Walkie-Talkie Features item in the current call..
Contact information
d
My Info
j
Picture
g
Walkie-Talkie Send Picture
The WT feature lets you send pictures through
BoostTM Walkie-Talkie calls.
47
Page 58

Using Walkie-Talkie Features
When you send a picture, it appears on the display
of the phone you are engaged in the Boost
Walkie-Talkie call with.
TM
You can send a picture stored in your phone’s
media center or use your phone’s camera to take a
new picture to send.
If the person you sent the picture to accepts the
picture, the picture is saved by that phone. The
picture then appears in the recent call list of that
phone is accessible through that phone’s media
center.
Sending a Picture During a Call
Note: You cannot talk or listen on a BoostTM
Walkie-Talkie call while a picture is being
transmitted.
Taking a Picture to Send
Note: For more information on taking pictures,
see “Taking Pictures” on page 126.
1 While in a Boost
Press c. -or-
Press m. Select Use WT Feature > Send
Picture > Capture Picture.
2 When the picture you want to capture is in view,
press c or press O or press A under
Capture.
48
TM
Walkie-Talkie call:
3 To save the picture so you can send it, press
O. -or-
To discard the picture without sending it, press
A under Discard. Repeat step 2 until you
capture a picture you want to send.
TM
4 Press the Boost
the picture.
5 Wait while the picture is transmitted. The
TM
Boost
Walkie-Talkie call is temporarily
interrupted while a picture is transmitted.
6 When prompted, press the Boost
Walkie-Talkie button to resume the Boost
Walkie-Talkie call.
Walkie-Talkie button to send
TM
TM
Sending a Stored Picture
TM
1 While in a Boost
Walkie-Talkie call:
Press A under Picture. -or-
Press m. Select Use WT Feature > Send
Picture.
A list of pictures that can be included in a
TM
Walkie-Talkie call appears.
Boost
2 Select the picture you want to send.
3 Press the Boost
TM
Walkie-Talkie button to send
the picture.
Page 59

Walkie-Talkie Send Picture
4 Wait while the picture is transmitted. The
TM
Boost
Walkie-Talkie call is temporarily
interrupted while a picture is transmitted.
5 When prompted, press the Boost
Walkie-Talkie button to resume the Boost
Walkie-Talkie call.
TM
TM
Note: The first time you send a stored picture
after turning the phone on, Picture Fees
May Apply. Continue? appears and you
are prompted to respond. Press A under
Yes to send the picture. Press A under
No to not send the picture.
Starting a Call by Sending a Picture
You can start a BoostTM Walkie-Talkie call after you
capture a picture with the camera or by choosing a
stored picture from the media center.
You can start from the camera or media center, or
use the Walkie-Talkie Features.
From the Camera or Media Center
1 Capture a picture with the camera. See “Taking
Pictures” on page 126. -or-
From the media center, scroll to or select the
picture you want to send in a Boost
Walkie-Talkie call.
2 Press m.
TM
3 Select Send Via...> Send via WT > A Contact.
TM
A list of Contacts that have Boost
Walkie-Talkie numbers and are able to receive
pictures appears.
4 Select the name of the person you want to send
the picture to.
5 Press the Boost
the picture.
6 Wait while the picture is transmitted. The
TM
Boost
interrupted while a picture is transmitted.
7 When prompted, press the WT button to resume
the Boost
TM
Walkie-Talkie button to send
Walkie-Talkie call is temporarily
TM
Walkie-Talkie call.
Receiving a Picture
When someone sends you a picture, your phone
emits a tone or vibrates and a message appears
on the display asking you if you want to accept the
picture.
Pictures you receive are saved to your phone’s
memory or to a memory card inserted in your
phone’s memory card slot, depending on the
storage preference you chose, and are then
accessible through the media center.
49
Page 60

Using Walkie-Talkie Features
The most recent picture sent to or received from a
TM
Boost
Walkie-Talkie number are stored with the
that BoostTM Walkie-Talkie number on the recent
calls list.
For information on viewing pictures from the recent
calls list, see “More Actions for Captured Pictures”
on page 129.
When you receive a picture, it appears every time
you are in a Boost
person who sent it unless you clear the picture
from the display or from the recent calls list, or
delete it from the media center. This occurs for the
last 20 people who sent you pictures.
TM
Walkie-Talkie call with the
Accepting a Picture
1 When you see the message asking you if you
want to accept the picture, press A under Yes.
2 Wait while the picture is transmitted. The
TM
Walkie-Talkie call is temporarily
Boost
interrupted while a picture is transmitted.
3 When prompted, press the Boost
Walkie-Talkie button to resume the BoostTM
Walkie-Talkie call.
50
TM
Note: The first time you accept a stored picture
after turning the phone on, Messaging
Fees May Apply appears and you are
prompted to respond. Press A under
Yes to accept the picture. Press A under
or No to not accept the picture.
Tip: If you want to stop the transmission before it
is finished, press A under Cancel.
Declining a Picture
When you see the message asking you if you
want to accept the picture, press A under No.
The picture is not transmitted.
Clearing a Picture From The Display
If you want to remove a picture from your phone’s
display while still in the Boost
in which you received it or while in a subsequent
BoostTM Walkie-Talkie call with the person who
TM
Walkie-Talkie call
sent it:
1 Press m.
2 Select Clear Screen.
This does not delete the picture from your phone’s
media center, but the picture will not appear on the
display again the next time you receive a Boost
Walkie-Talkie call from person who sent it.
TM
Page 61

Walkie-Talkie Send My Info
Walkie-Talkie Send My Info
When you send My Info, the information you sent
appears on the display of the phone you are
engaged in the Boost
After the call, the information appears on the recent
call list of that phone.
You can control what portion of the information in
My Info is sent and whether it is sent automatically
in every Boost
you choose to send it.
Tip: When you send My Info, certain
information, such as your email address or
fax number, cannot be included. To send
complete contact information, create an
entry for yourself in Contacts and send it.
Sending Information During a Call
1 While in a BoostTM Walkie-Talkie call, press m.
2 With WT Send My Info highlighted, press O.
-orSelect Use WT Feature > Send My Info.
3 When Ready to Send appears on the display,
press the WT button to send the information.
TM
Walkie-Talkie call with.
TM
Walkie-Talkie call or only when
Starting a Call by Sending My Info
4 From the main menu, select My Info. Press m.
With WT Send My Info highlighted, press O.
5 Use the keypad to enter the Boost
Walkie-Talkie number you want to send the
information to. -or-
6 Press A under Browse. Select Contacts,
Recent Calls, or Memo. Select the number you
TM
want to enter.
7 When Ready to Send appears on the display,
press the WT button to send the information.
Receiving My Info Sent to You
To view the information while still in the BoostTM
Walkie-Talkie call:
1 Press m.
2 Select View Contact.
If you receive My Info from the same phone more
than once, only the most recently sent version
appears in the recent calls list.
For information on viewing My Info from the recent
calls list, see “My Info From Other Phones” on
page 58.
51
Page 62

Using Walkie-Talkie Features
Walkie-Talkie Send Contacts
When you send contact information, the
information you sent appears on the display of the
phone you are engaged in the Boost
Walkie-Talkie call with. After the call, the
information appears on the recent call list of that
phone.
You can send contact information by selecting a
Contacts entry or an item from the recent calls list.
Contacts entries that contain only addresses
cannot be sent. When Contacts entries are
received, they do not include ring tones or pictures.
These items from the recent calls list can be sent:
• Contact information sent from other phones
• Calls to or from numbers stored in your Contacts
list
Sending Information During a Call
1 While in a BoostTM Walkie-Talkie call, press m.
2 Select Contacts or Recent Calls.
3 Scroll to the Contacts entry or item in the recent
calls list you want to send.
4 Press m.
5 Select Send Via...> Send via WT.
52
TM
6 When Ready to Send appears on the display,
press the WT button to send the information.
Starting a Call by Send ing Information
1 From the main menu, select Use WT Feature >
Send Contact. -or-
From Contacts or the recent calls list scroll to or
select the entry you want to send. Press m.
Select WT Send Contact.
TM
2 Use the keypad to enter the Boost
Walkie-Talkie number you want to send. -or-
Press A under Browse. Select Contacts,
Recent Calls, or Memo. Select the number you
want to enter.
3 When Ready to Send appears on the display,
press the WT button to send the information.
Receiving Contact Information Sent to You
To view the contact information while still in the
BoostTM Walkie-Talkie call:
1 Press m.
2 Select View Contact.
For information on viewing contact information
from the recent calls list, see “Contact Information
From Other Phones” on page 58.
Page 63

Sending Call Alerts
Call Alerts
Sending a call alert lets the recipient know you
want to talk to him or her on a Boost
Walkie-Talkie call.
When you send a call alert, the recipient’s phone
your name or Boost
recipient’s phone emits a series of beeps and the
Walkie-Talkie backlight flashes slowly, or the
TM
Walkie-Talkie number. The
phone vibrates.
The recipient can:
• Answer — begin a Boost
with the sender
TM
• Queue — store the call alert to the call alert
queue, which is a list of call alerts
• Clear — dismiss and delete the call alert
Sending Call Alerts
1 Enter the BoostTM Walkie-Talkie number you
want to send to, as you would when making a
BoostTM Walkie-Talkie call.
2 Press A under Alert. Ready to Alert appears
on the display.
3 Press the Boost
Alert Successful appears on the display.
TM
Walkie-Talkie button until
TM
Walkie-Talkie call
Note: If the alert is not successful, this may
mean the person you are trying to reach is
on a call or has the phone turned off.
Receiving Call Alerts
When you receive a call alert, you must answer,
queue, or clear it. You cannot receive phone calls
TM
or Boost
To answer a call alert:
To queue a call alert:
To clear a call alert:
Walkie-Talkie calls until you do.
TM
Press the Boost
a BoostTM Walkie-Talkie call to the sender.
Walkie-Talkie button to make
Press A under Queue.
Press O. -or-
Press A under Clear. -or-
If the flip is closed, press ..
Note: The Recent Calls list also stores call alerts
you have received. They appear as
TM
Walkie-Talkie calls. Call alerts
Boost
remain in your Recent Calls list until you
delete them or until they reach the end of
the list.
53
Page 64

Call Alerts
Using the Call Alert Queue
When you queue a call alert, it remains in the call
alert queue until you make a Boost
call to the sender or delete it.
Viewing Call Alerts
1 From the main menu, select Call Alert.
2 Scroll through the list.
Viewing Date and Time
To view the date and time a call alert was received:
1 From the main menu, select Call Alert.
2 Select the call alert you want information on.
Responding to Call Alerts in the Queue
After you queue a call alert, you can respond to it
by making a BoostTM Walkie-Talkie call to the
sender or sending a call alert to the sender.
TM
Making a Boost
Sender
1 From the main menu, select Call Alert.
2 Scroll to the call alert you want to respond to.
3 Press the Boost
the call.
54
Walkie-Talkie Call to the
TM
Walkie-Talkie button to begin
TM
Walkie-Talkie
This removes the call alert from the queue.
Sending a Call Alert to the Sender
1 From the main menu, select Call Alert.
2 Scroll to the call alert you want to respond to.
3 Press A under Alert. Ready to Alert appears
on the display.
4 Press the Boost
Alert Successful appears on the display.
TM
Walkie-Talkie button until
Deleting Call Alerts
To delete a call alert from the queue:
1 From the call alert queue, scroll to the call alert
you want to delete.
2 Press m.
3 Select Delete.
4 Press O or press A under Yes to confirm.
To delete all call alerts from the queue:
1 From the call alert queue, press m.
2 From the call alert menu, select Delete All.
3 Press O or press A under Yes to confirm.
Sorting Call Alerts
Tip: You must have at least one call alert in the
queue to access this feature.
Page 65

To sort call alerts by the order they were received:
1 From the main menu, select Call Alert.
2 Press m.
3 Select Sort By.
4 Select First on Top or Last on Top.
Using the Call Alert Queue
55
Page 66

Recent Calls
Recent Calls
The recent calls list contains information
associated with calls you have made and received
and call alerts you have received.
TM
When you send or receive Boost
calls, the recent call list contains the following
Walkie-Talkie Features items with those calls:
• contact information received
• My Info received
• short text messages received
• pictures sent or received
• Datebook events received
The recent calls list displays up to 20 of the most
recent calls and call alerts.
Viewing the Recent Calls List
With the Flip Open
1 From the main menu, select Recent Calls.
2 Scroll through the list.
To view the details of an item o
From the recent calls list, select the item you
want information on.
56
Walkie-Talkie
n the list:
Tip: To view the details of more items, scroll left
or right.
With the Flip Closed
1 Press ..
2 If you want to view the rest of the recent calls
list, press the volume controls.
3 Press . to dismiss the recent calls list.
Choosing Picture View or List View
You can set your phone to show the picture
associated with each item as you view the recent
calls list or show the list without pictures.
1 From the recent calls list, press m.
2 Select Recent Calls View.
3 Select List View to show the recent calls list
without pictures. -or-
Select Picture View to show the picture
associated with each entry.
Calls and Call Alerts
When you make or receive a call to or from a
number not stored in Contacts, the number
appears on the recent calls list.
If the number of a recent call is stored in Contacts,
the following information appears:
Page 67

Walkie-Talkie Features Items in BoostTM Walkie-Talkie Calls
• The name assigned to the number
• The picture assigned to the number, if your
phone is set to show pictures on the recent calls
list. See “Choosing Picture View or List View” on
page 56. Pictures appear for phone calls only.
• The Contacts type icon associated with the
number. If the Contacts entry containing the
number has more than one number or address
stored,
<> surrounds the Contacts type icon. For
information on Contacts types, see page 64.
TM
The Boost
icon appears when you receive a BoostTM
Walkie-Talkie call or call alert, even if the number
is not stored in Contacts.
Call alerts you have received appear as Boost
Walkie-Talkie calls. Like all items in the recent calls
list, they remain listed until you delete them or until
they reach the end of the list.
For phone calls, an additional icon appears giving
information about the call:
X
W
V
Walkie-Talkie number Contacts type
A call you made.
A call you received.
A missed call.
TM
When you select a call to view its details, you see
information such as the name associated with the
call, the number, date, time, and duration of the
call.
If you select a Boost
information on the call as well as any Walkie-Talkie
Features items associated with the call. To see
more information about the Boost
call itself from this view, select the call information
displayed.
TM
Walkie-Talkie call, you see
TM
Walkie-Talkie
Walkie-Talkie Features Items
in BoostTM Walkie-Talkie Calls
When you receive a Walkie-Talkie Features item in
TM
a Boost
indicating the type of item:
d
j
g
#
Walkie-Talkie call, an icon appears
Contact information
My Info
Picture
More than one type of Walkie-Talkie
Features item from one Boost
Walkie-Talkie number
TM
57
Page 68

Recent Calls
Contact Information From Other Phones
Contact information in the recent calls list displays:
• The name contained in the contact information
• The Contacts type icon associated with the
number or address contained in the contact
information. If the item contains more than one
number or address stored,
Contacts type icon.
The name or Boost
person who sent the contact information appears
as a separate item on the recent calls list, above
the information sent. If one person sends you more
than one item of contact information, all the items
appear below the person’s name or Boost
TM
Walkie-Talkie number.
When you select contact information to view its
details, you see the name or Boost
number of the person who sent the information and
all the information in the item.
If you receive contact information with the same
name from the same phone more than once, only
the most recently sent version appears in the
recent calls list.
58
<> surrounds the
Walkie-Talkie number of the
TM
TM
Walkie-Talkie
Pictures
The recent call list contains most recent picture
sent to or received from a BoostTM Walkie-Talkie
number.
To view the picture:
1 View the details of the call containing the picture.
2 Select Picture.
Clear the Picture
1 View the details of the call containing the picture.
2 Select Picture.
3 Press A under Clear.
This does not delete the picture from your phone’s
media center, but it removes it from the recent calls
list, and the picture will not appear on the display
again the next time you receive a Boost
Walkie-Talkie call from the person who sent it.
TM
My Info From Other Phones
My Info from other phones always includes the
sender’s BoostTM Walkie-Talkie number.
Depending on how the sender has filled in My Info
and set sending options, it may include the sender
names, phone numbers for phone lines 1 and 2,
carrier IP, and circuit data number.
To view My Info sent to you from other phones:
Page 69

Storing Items to Contacts
View the details of the call containing the
messages.
If you receive My Info from the same phone more
than once, only the most recently sent version
appears in the recent calls list.
Storing Items to Contacts
Calls, My Info from other phones, and contact
information from other phones can be stored to
Contacts.
1 From the recent calls list, scroll to or select the
item you want to store.
2 Press A under Save. -or-
If Save is not one of your options: Press m.
Select Save or Update Contacts.
Tip: If the item you want to store is a call, Save
does not appear if the number is already
stored in Contacts.
3 To store the item as a new entry, select [New
Contact]. -or-
To store the number to an existing entry, select
the entry.
Note: Storing My Info or contact information
from another phone to a Contacts entry
that has a name assigned to it does not
change the name of the Contacts entry.
4 If the item you want to store is a call, you must
assign a Contacts type to the number:
With the Contacts type field highlighted, scroll
left or right to display the Contacts type you want
to assign the number.
5 If you want to add more information to the entry,
follow the applicable instructions in “Creating
Entries” on page 65.
6 Press A under Save.
Deleting Items
To delete an item from the recent calls list:
1 From the recent calls list, scroll to or select the
item you want to delete.
2 Press A under Delete. -or-
If Delete is not one of your options: Press m.
Select Delete.
3 Press O or press A under Yes to confirm.
To delete all items on the recent calls list:
1 From the recent calls list, press m.
2 Select Delete All.
3 Press O or press A under Yes to confirm.
59
Page 70

Recent Calls
Making Calls From the Recent Calls List
With the Flip Open
1 From the main menu, select Recent Calls.
2 Scroll to the item containing the number you
want to call.
• If you scroll to a call, you can make a call to
the number that made the call. If the number
is stored in Contacts, you can make a call to
any of the numbers stored with it.
• If you scroll to contact information from
another phone, you can make a call to any of
the numbers in the contact information.
3 To place the call now, go to step 4. -or-
Scroll left or right to display the Contacts type for
the number you want to call.
4 To make a phone call, press s. -or-
To make a Boost
Walkie-Talkie button.
You can also make calls while viewing the details
of an item on the recent calls list:
1 From the recent calls list, select the item
containing the number you want to call.
60
TM
Walkie-Talkie call, press the
• If you select a call or contact information from
another phone, you can make a call to the
number shown first on the details screen.
• If you scroll to My Info from another phone,
you can make a call to the Boost
Walkie-Talkie number of the phone that sent
the information.
TM
2 To make a phone call, press s. -or-
TM
To make a Boost
Walkie-Talkie button.
Walkie-Talkie call, press the
With the Flip Closed
1 Press . to display the most recent call.
2 Press the volume controls to scroll to the name
or number you want to call.
• If you scroll to a call, you can make a call to
the number that made the call.
• If you scroll to contact information from
another phone, you can make a call to the
number currently displayed.
3 To make a phone call, press t on the top of
your phone. -or-
To make a Boost
Walkie-Talkie button.
TM
Walkie-Talkie call, press the
Page 71

Using Word Mode
Entering Text
You can enter text, numbers, and symbols into
your phone using Alpha, Word, Numeric, or
Symbol text input modes.
Alpha — Press a key several times for each
l
character.
Word — Press a key once for each letter
j
while words likely to be the one you want are
chosen from a database.
Symbols — Enter punctuation and other
i
symbols.
Numeric — Enter numbers.
k
Language -- Enter characters of the language
selected.
When you access a screen that requires you to
enter text, you start in the mode last used.
To choose a text input mode:
1 At a screen that requires you to enter text, press
m.
2 Select the text input mode you want to use. A
checkmark appears next to the current mode.
Using Word Mode
In Word mode, T9 Text Input analyzes the letters
on the keypad button you press and arranges them
to create words. As you type, T9 Text Input
matches your keystrokes to words in its database
and displays the most commonly used matching
word. You can add your own words to this
database.
Entering a Word
1 Select Word as your text input mode.
2 Type a word by pressing one key for each letter.
For example, to type “test” press 8 3 7 8.
The displayed word may change as you type it.
Do not try to correct the word as you go. Type to
the end of the word before editing.
3 If the word that appears is not the desired word,
press 0 to change the word on the display to
the next most likely word in the database.
Repeat until the desired word appears.
If the desired word does not appear, you can add it
to the database.
61
Page 72

Entering Text
Adding Words to the Database
1 Select Alpha as your text input mode.
2 Type the word using Alpha mode.
3 Select Word as your text input mode.
4 Press #.
The word you typed in Alpha text entry mode is
now in the database.
Note: You cannot store alphanumeric
combinations, such as Y2K.
Choosing a Language
To change the language of the database:
1 At a screen that requires you to enter text, press
m.
2 Select Languages.
3 Select the language you want for your database.
Special Function Keys
Some of the phone’s keys assume different
functions while in Alpha or Word mode.
62
Spaces
Press # for a space.
Capitalization
When you press and hold the # key, it acts as a
3-way toggle. Press and hold # to make the next
letter typed uppercase (shift), to make all
subsequent letters typed uppercase (caps lock), or
to go back to lowercase letters.
These icons appear in the top row of your display:
m or X
n or W
When neither of these icons appear, letters typed
are lowercase. Scrolling up after typing a letter
makes that letter uppercase.
Note: When creating a text message, you
Your phone automatically makes the first letter of a
sentence uppercase.
Shift is on.
Caps lock is on.
cannot capitalize by scrolling up.
Page 73

Punctuation
Press 1 or 0 to insert punctuation. Continue to
press the key to view the list of symbols available
through that key. Pause to select the symbol you
want.
Note: Additional punctuation symbols are
available in Symbols mode.
Special Function Keys
63
Page 74

Contacts
Contacts
Contacts stores up to 600 numbers or addresses.
Each Contacts entry can store several numbers or
addresses.
Information stored in Contacts is saved on your
SIM chip.
A Contacts entry contains:
• A name — A name is required if you are storing
more than one number or address to the entry;
otherwise, it is optional. Typically, this is the
name of the person whose contact information is
stored in the entry.
• A ringtone — This is the sound your phone
makes when you receive phone calls or call
alerts from any of the numbers stored in the
entry. You can assign the ringtone from your list
of ringtones. If you do not assign a ringtone, the
entry is created with a default ringtone assigned.
• A picture — This picture appears on the display
when you receive phone calls from any of the
phone numbers stored in the entry. You can
assign the picture from the pictures stored in the
media center. If you do not assign a picture, the
entry is created with no picture assigned.
64
• A Contacts type — Each number or address
stored must be assigned a Contacts type:
Mobile phone number
A
Walkie-Talkie BoostTM Walkie-Talkie
B
Work1 phone number
C
Work2 phone number
D
Home phone number
E
Email email address
F
Fax phone number
G
Pager phone number
H
IP IP address
J
Other phone number
K
• A number or address — Each Contacts entry
must contain a number or address. This may be
any type of phone number, Boost
Walkie-Talkie number, email address, or IP
address.
number
TM
Page 75

Accessing Contacts
Note: You can store numbers up to 64 digits
long, but every 20 digits must be
separated by a pause or wait. See
“Creating Pauses and Waits” on page 70.
• A Speed Dial number — When you store a
phone number, it is assigned a Speed Dial
number. You can accept the default Speed Dial
number or change it.
• A voice name — If you create a voice name for a
number, you can then dial that number by saying
the voice name into your phone. This icon P
appears to the left of the Contacts type icon if a
voice name is assigned.
Accessing Contacts
From the main menu, select Contacts. -or-
If you are on a call: Press m. Select Contacts.
Creating Entries
A number or address and a Contacts type are
required for all Contacts entries. Other information
is optional. You may enter the information in any
order by scrolling through the entry details.
After you have entered the number or address,
Contacts type, and any other information you want,
you can press A under Save to save the entry to
Contacts.
To cancel a Contacts entry at any time, press e
to return to the idle screen.
To create a Contacts entry:
1 To access the entry details screen:
Select Contacts > [New Contact]. -or-
From the Contacts list, press m. Select New.
2 If you want to assign a name to the entry:
Select Name.
Enter the name. See “Entering Text” on page
61. When you are finished, press O.
Tip: Press A under Browse to select a name
already in Contacts.
3 If you want to assign a ringtone or picture to the
entry, select [Ringtone/Picture]. See
“Assigning a Ringtone or Picture” on page 66.
4 To assign a Contacts type to the number or
address being stored:
Select the Contacts type field.
Select the Contacts type you want to assign.
5 To store a number or address:
Select the # field (or ID for an email address, or
IP for an IP address).
65
Page 76

Contacts
Enter the number or address. For phone
numbers, use the 10-digit format. For email
addresses, see “Entering Text” on page 61.
Tip: Press A under Browse to select a number
or address from Contacts, the Recent Calls
list, or Memo.
When you are finished, press O.
6 If you want to change the default Speed Dial
number or a create a voice name for the entry,
select [Options]. See “Assigning a Speed Dial
Number or Voice Name” on page 66.
7 If you want to add more numbers or addresses
to the entry:
Scroll past the information you already entered.
Enter the additional information for the entry
using step 3 through step 6. You must assign a
name to the entry, if you have not already.
8 Press A under Done.
Assigning a Ringtone or Picture
Note: If you choose a picture or ringtone that is
stored on the memory card, that picture or
ringtone file is automatically moved to
your phone’s memory.
1 If you have not already, select
[Ringtone/Picture].
66
2 If you want to assign a ringtone:
With Ringer highlighted, scroll left or right to
choose a ringtone from the list of ringtones. -or-
Select Ringer. Select the ringtone you want to
assign from the ringtones available in the Media
Center. If you want to assign a ring tone from the
memory card, that ringtone must be a DRM
item.
3 If you want to assign a picture from the Media
Center:
Select Picture. Select the picture you want to
assign.
Some large pictures cannot be assigned.
Tip: If an entry has a picture assigned and you
want the entry to have no picture, select
[No Picture] or press A under Unassign.
4 When you are finished, press A under Back.
5 When you are finished, press A under Back.
Assigning a Speed Dial Number or Voice Name
1 If you have not already, select [Options].
2 The default Speed Dial number assigned to a
phone number is displayed in the Speed # field.
This is always the next available Speed Dial
location.
Page 77

Editing Entries
If you want to assign the phone number to a
different Speed Dial location:
With the Speed # field highlighted, press O.
Press A under Delete to delete the current
Speed Dial number.
Enter the new Speed Dial number using the
keypad.
When you are finished, press O.
3 If you want to create a voice name for a phone
number, select Voice Name.
As directed by the screen prompts, say and
repeat the name you want to assign to the
number. Speak clearly into the microphone.
4 When you are finished, press A under Back.
Editing Entries
1 From the Contacts list, scroll to or select the
entry you want to edit.
2 Press A under Edit. -or-
If Edit is not one of your options: Press m.
Select Edit.
The entry details screen displays.
3 Follow the applicable instructions in “Creating
Entries” on page 65 to edit the various fields.
Viewi n g E n t r i e s
When you view Contacts entries, you can choose
how much detail you want to see.
Viewing the Contacts List
In this view, each entry shows:
• The name assigned to the entry
• A small version of the picture assigned to the
entry, if you have set Contacts to show pictures
in the Contacts list. See “Choosing Picture View
or List View” on page 68.
• The types of numbers and addresses stored in
the entry
To view entries from the Contacts list:
1 Access Contacts.
2 Scroll to view entries.
Tip: To find Contacts entries faster, use the
keypad to enter the first letter of the name.
3 If an entry has more than one number or
address stored,
icon. Scroll left or right to view the icon for each
number stored in the entry.
<> surrounds the Contacts type
67
Page 78

Contacts
Selecting an Entry
In this view, each entry shows:
• The name assigned to the entry
• A small version of the picture assigned to the
entry
• The name of the ringtone assigned to the entry
• The numbers and addresses stored in the entry
To select an entry:
1 From the Contacts list, select the entry you want
to view.
2 Scroll to view the numbers and addresses
stored in the entry.
Tip: To select other entries: Scroll left or right.
Or, press # or *.
To return to the Contacts list, press A under
Back.
Viewing More Details
When an entry is selected, you can view more
details about the entry by selecting items within the
entry.
Viewing Details of a Number or Address
1 Select the entry.
68
2 Select the number or address you want to view
details of.
If the you select a phone number, you can view
its Speed Dial number and see whether it has a
voice name.
To return to the entry, press A under Back or
press O.
Viewing a Large Picture
To view a large version of the picture assigned to
an entry:
1 Select the entry.
2 Select the first item shown on the entry screen.
This item shows the name assigned to the entry
or No Name.
Note: You cannot make calls from this view.
To return to the entry, press A under Back or
press O.
Choosing Picture View or List View
You can set Contacts to show the picture assigned
to each entry as you view the Contacts list or show
the Contacts list without pictures.
1 From the Contacts list, press m.
2 Select Contacts View.
Page 79

Deleting Entries
3 Select List View to show the Contacts list
without pictures. -or-
Select Picture View to show the picture
assigned to each entry.
Searching for a Name
To search for a name in Contacts:
1 From the Contacts list, press A under Search.
-or-
If Search is not one of your options: Press m.
Select Search.
2 Enter the name you want to see. See “Entering
Text” on page 61.
3 Press O.
Your phone finds the name you entered or the
nearest match.
Showing Only BoostTM Walkie-Talkie Numbers
To set Contacts to show only entries that contain
BoostTM Walkie-Talkie numbers:
1 From the Contacts list, press m.
2 Select Filter.
3 Set this option to Show Walkie-Talkie.
To set Contacts to show all entries:
1 From the Contacts list, press m.
2 Select Filter.
3 Set this option to Show All.
Deleting Entries
Delete an Entry
1 From the Contacts list, scroll to the entry you
want to delete.
2 Press m.
3 To delete the entire entry, select Delete
Contact.
4 Press O or press A under Yes to confirm.
Delete a Number or Address
1 From the Contacts list, scroll to the entry that
contains the number or address you want to
delete.
2 Scroll left or right to display the Contacts type for
the number you want to delete. -or-
Select the entry. Scroll to or select the number
you want to delete.
3 Press m.
4 Select Delete Number.
5 Press O or press A under Yes to confirm.
69
Page 80

Contacts
Note: If an entry contains only one number or
address, deleting the number or address
deletes the entry.
Checking Capacity
To see how many numbers are stored in Contacts:
1 From the Contacts list, press m.
2 Select Capacity.
Creating Pauses and Waits
When storing a number, you can program your
phone to pause or wait between digits while
dialing. A pause makes your phone pause for 3
seconds before dialing further. A wait makes your
phone wait for your response before dialing further.
This feature is useful when using voice mail or
other automated phone systems that require you to
dial a phone number and then enter an access
number.
To program a pause:
Press and hold * until the letter P appears.
The P represents a 3-second pause.
If you store 17035551235P1234, when you select
this number and make a call, your phone dials the
first 11 digits, pauses for 3 seconds, then dials the
last 4 digits.
70
If you want a pause longer than 3 seconds, press
and hold * more than once. Each P represents a
3-second pause.
To program a wait:
Press and hold * until the letter W appears.
The W means your phone waits before dialing
further.
If you store 17035551235W1234, when you select
this number and make a call, your phone dials the
first 11 digits and then waits. A message appears
asking if you want to send the rest of the digits.
Press A under Yes to dial the last 4 digits.
Tip: You can create pauses and waits while
dialing a number from the keypad. See
“Creating Pauses and Waits While Dialing”
on page 77.
International Numbers
When storing a number that you plan to use for
international calls, use Plus Dialing:
1 Press and hold 0 for two seconds. A “0”
appears, then changes to a “+”.
Note: The network translates the “+” into the
appropriate international access code
needed to place the call.
Page 81

Making Calls From Contacts
2 Enter the country code, city code or area code,
and phone number.
For information about making international calls,
see “Making International Calls” on page 77.
Making Calls From Contacts
While Viewing the Contacts List
1 Access Contacts.
2 Scroll to the name or number you want to call.
Tip: To find Contacts entries faster, use the
keypad to enter the first letter of the name.
3 To place the call now, go to step 4. -or-
Scroll left or right to display the Contacts type for
the number you want to call.
4 To make a phone call, press s. -or-
TM
To make a Boost
Boost Walkie-Talkie button.
If you are making a Boost
your phone places the call to the Boost
Walkie-Talkie number stored in the Contacts entry,
even if the BoostTM Walkie-Talkie icon is not
displayed.
Walkie-Talkie call, press the
TM
Walkie-Talkie call,
TM
If you are making a phone call:
• Your phone places the call to the phone number
assigned to the Contacts type displayed.
• If the Contacts type displayed is not a phone
number, your phone places the call to the phone
number stored in the Contacts entry.
• If the Contacts type displayed is not a phone
number and you have more than one phone
number stored in the Contacts entry, your phone
prompts you to select the phone number you
want to place the call to.
71
Page 82

Contacts
After Selecting an Entry
1 Access Contacts.
2 Select the Contacts entry that contains the
number you want to call.
3 Scroll to or select number you want to call.
4 To make a phone call, press s. -or-
To make a Boost
BoostTM Walkie-Talkie button.
If you try to make a type of call that does not match
the Contacts type of the number you chose, no call
is placed.
72
TM
Walkie-Talkie call, press the
Page 83

Memo
Memo lets you store a number, make a call to that
number, and save it to Contacts.
To create a memo:
1 From the main menu, select Memo.
2 Enter the number using your keypad.
3 Press O.
To view the memo later:
From the main menu, select Memo.
To delete the memo:
1 From the main menu, select Memo.
2 Press and hold A under Delete.
3 Press O.
To edit the memo:
1 From the main menu, select Memo.
2 Enter the new number.
3 Press O.
To make a call to the memo number:
1 From the main menu, select Memo.
2 To make a phone call, press s. -or-
To make a Boost Walkie-Talkie call, press the
Boost Walkie-Talkie button.
To store the memo number to Contacts:
1 From the main menu, select Memo.
2 Press m.
3 Select Store to Contacts.
4 T o store the number as a new entry, select [New
Contact]. -or-
To store the number to an existing entry, select
the entry.
5 With the Contacts type field highlighted, scroll
left or right to display the Contacts type you want
to assign the number.
6 If you want to add more information to the entry,
follow the applicable instructions in “Creating
Entries” on page 65.
7 Press A under Save.
73
Page 84

Call Forwarding
Call Forwarding
Call forwarding sends calls to the phone numbers
you specify. You can forward all calls to one
number or forward missed calls to different
numbers depending on the reason you missed the
call.
Forwarding All Calls
When you set your phone to forward all calls, an
icon appears in the top row of the display:
Phone line 1 is active; calls to phone line 1
G
are being forwarded.
To forward all calls:
1 From the main menu, select Call Forward >
Forward > All Calls.
2 Select To.
If you specified a forwarding number for all calls
before, this number displays.
To forward calls to this number, press A under
Back.
To delete this number, press O, then press and
hold A under Delete.
3 To enter the number you want to forward calls to:
74
Enter the number using your keypad. -or-
Press A under Search. Select Contacts,
Recent Calls, or Memo. Select the number you
want to enter.
4 Press O.
All your calls are now forwarded to the number you
specified.
Turning Off Call Forwarding
If you do not want all your calls forwarded, turn the
feature off:
1 From the main menu, select Call Forward > To.
2 Set this option to Off.
All your calls are now sent to your phone.
Calls you miss are forwarded according to the
options set for missed calls. By default, missed
calls are forwarded to voice mail.
Forwarding Missed Calls
You can specify a forwarding number for each type
of missed call:
•If Busy — Your phone is on a call or transferring
data.
Page 85

Viewing Call Forwarding Settings
• If No Answer — You do not answer on the first
4 rings.
• If Unreachable — Your phone is out of
coverage or powered off.
To forward missed calls:
1 From the main menu, select Call Forward >
Forward > Detailed.
2 Select If Busy to specify a forwarding number
for calls received when your phone is busy.
3 If you specified a forwarding number for this type
of call before, this number displays.
To forward calls to this number, press A under
Back and go to step 6. -or-
To delete this number, press O, then press and
hold A under Delete.
4 To enter the number you want to forward this
type of call to:
Enter the number using your keypad. -or-
Press A under Search. Select Contacts,
Recent Calls, or Memo. Select the number you
want to enter.
5 Press O.
6 Repeat step 2 through step 5 for If No Answer
and If Unreachable.
7 When you are finished, press A under Back.
Viewing Call Forwarding
Settings
1 From the main menu, select Call Forward >
Forward > All Calls.
2 With To highlighted, press A under Status.
75
Page 86

Advanced Calling Features
Advanced Calling
Features
Call Waiting
Call Waiting lets you receive a second call while on
an active call. Call Waiting is always available,
unless you turn it off for a specific call.
If you are on a call and receive a second call, your
phone emits a tone and displays a message saying
you are receiving a second call.
To accept the second call and put the active call on
hold:
Press A under Yes.
To accept the second call and end the active call:
1 Press e.
Your phone rings with the second call.
2 Answer the second call.
To decline the second call:
Press A under No. If you subscribe to voice
mail, the call is forwarded to your voice mail box,
unless you set Call Forward for If Busy to a
different number.
76
Turn Off Call Waiting
To turn off Call Waiting during a call:
1 Press m.
2 Select In Call Setup > Call Waiting.
3 Set this option to Off.
Tip: To turn Call Waiting back on while still on
the call, set this option to On.
To turn off Call Waiting for the next call you make
or receive:
1 From the main menu, select Settings > Phone
Calls > Call Waiting.
2 Set this option to Off.
Call Waiting is turned back on when you end the
call.
Switching Between Calls
Any time you have one call active and one call on
hold, to make the call on hold active and put the
active call on hold:
Press A under Switch. -or-
If Switch is not one of your options: Press m.
Select Switch.
Page 87

Putting a Call on Hold
Putting a Call on Hold
1 While on an active call, press m.
2 Select Hold.
If you want to make the call active again, press A
under Resume.
Creating Pauses and Waits While Dialing
You can enter a pause or wait while dialing a
number. For more information on pauses and
waits, see “Creating Pauses and Waits” on page
70.
To create a pause while dialing a phone number:
1 From the keypad, enter the digits you want to
occur before the pause.
2 Press m.
3 Select Insert Pause.
4 Enter the digits you want to occur after the
pause.
To create a wait while dialing a phone number:
1 From the keypad, enter the digits you want to
occur before the wait.
2 Press m.
3 Select Insert Wait.
4 Enter the digits you want to occur after the wait.
Making International Calls
Your service default is “International Calls
Restricted.” Contact Boost
obtain international dialing access.
Calls placed between the United States and
Canada do not require an international access
code.
Plus Dialing lets you place an international call to
most countries without entering the local
international access code.
1 Press and hold 0 for two seconds. A “0”
appears, then changes to a “+”.
Note: The network translates the “+” into the
appropriate international access code
needed to place the call.
2 Enter the country code, city code or area code,
and phone number.
3 Press s.
TM
Customer Care to
77
Page 88

Advanced Calling Features
Setting One Touch Boost
TM
Walkie-Talkie
One Touch Boost
to do any of the following each time you press the
Boost Walkie-Talkie
• Call the most recent Boost
number on the recent calls list
• Call a Boost
• Go to the first screen for sending a picture,
sending My Info, or send contact information in a
Boost Walkie-Talkie
Setting the Boost Walkie-TalkieTM Button to Call the Most Recent Priv ate ID
1 From the main menu, select Settings >
Walkie-Talkie Options > One Touch WT.
2 Select Last Call.
Setting the Boost Walkie-TalkieTM Button to Call an Assigned Private ID
1 From the main menu, select Settings >
Walkie-Talkie Options > One Touch WT >
Assigned Number.
78
TM
Walkie-Talkie sets your phone
TM
button:
TM
walkie-talkie
TM
walkie-talkie number you assign
TM
call
TM
2 To enter the Boost
want your phone to call every time you press the
Boost Walkie-TalkieTM button:
walkie-talkie number you
Enter the number using your keypad. -or-
Press A under Search. Select Contacts,
Recent Calls, or Memo. Select the number you
want to enter.
3 Press O.
Setting the One Touch Boost
TM
Walkie-Talkie to Any Other Option
1 From the main menu, select Settings >
Walkie-Talkie Options > One Touch WT.
2 To set your phone to go to the first screen for
sending a picture in a Boost walkie-talkie
each time you press the Boost Walkie-Talkie
button, select Send Picture. -or-
To set your phone to go to the first screen for
sending My Info in each time you press the
Boost Walkie-Talkie
Info. -or-
TM
button, select Send My
TM
call
TM
Page 89

Turning Off One Touch Boost
TM
Walkie-Talkie
1 From the main menu, select Settings >
Walkie-Talkie Options > One Touch WT.
2 Select Off.
Setting Flip Actions
For Answering Calls
To set your phone to answer calls when you open
the flip:
1 From the main menu, select Settings > Phone
Calls > Flip Activation > Flip to Ans.
2 Set this option to On.
To set your phone not to answer calls when you
open the flip:
Set Flip to Ans to Off in step 2.
For Ending Calls
To set your phone to end calls when you close the
flip:
1 From the main menu, select Settings > Phone
Calls > Flip Activation > Flip to End.
2 Set this option to On.
Setting Flip Actions
To set your phone not to end calls when you close
the flip:
Set Flip to End to Off in step 2.
Note: If you are using your phone with a
headset, and you have the Flip to End
option set to On, closing your flip sends
incoming sound to the headset and does
not end the call.
Group Walkie-Talkie Calls
A group Walkie-Talkie call is similar to a Boost
walkie-talkie
Talkgroup at once. A Talkgroup is a predetermined
group of up to 25 Boost customers.
Before you can make or receive group
Walkie-Talkie calls, a Talkgroup must be
established. After the Talkgroup is established, you
must join the Talkgroup.
Joining a Talkgroup
When you enable security, you receive a list of
Talkgroups that have been set up for you if you
subscribe to this service. The Talkgroup list is
saved to Contacts.
TM
call, but is made to all members of a
79
Page 90

Advanced Calling Features
To receive group Walkie-Talkie calls made to any
of these Talkgroups, you must join the Talkgroup.
1 Press A under Contcs. -or-
From the main menu, scroll to Contacts and
press O.
2 Scroll to the Talkgroup you want to join.
3 Press A under Join.
Note: You will now be able to receive Group
communications from this Talkgroup only.
You can only monitor one Talkgroup at a
time.
Setting Up More Talkgroups
You can set up a Talkgroups by contacting your
Boost Sales Representative at the time of
activation.
When you create your Talkgroups, you can select
your own Talkgroup numbers.
You can join a new Talkgroup by pressing # and
entering the number using the keypad. Then press
A under Join.
80
Making group Walkie-Talkie calls
1 Press #. Then enter the Talkgroup number
using the keypad. -or-
Choose the Talkgroup name from Contacts or
recent calls list.
2 Proceed as if making a Boost walkie-talkie
TM
call.
Receiving group Walkie-Talkie calls
To answer a group Walkie-Talkie call:
Proceed as if answering a Boost walkie-talkie
call. Only one person at a time may speak on a
group Walkie-Talkie call.
TM
The Boost
person who is speaking will appear on the
walkie-talkie number or name of the
display below the Talkgroup number.
Turning off group Walkie-Talkie calls
To set your phone to prevent you from hearing
group Walkie-Talkie calls to your Talkgroup:
1 From the main menu, select Settings > WT
Options > Tkgrp Silent.
2 Set this option On.
To set your phone to let you hear group
Walkie-Talkie calls to your Talkgroup:
TM
Page 91

Call Timers
Set Tkgrp Silent to Off in step 2.
Call Timers
Call timers measure the duration of your phone
calls, walkie-talkie calls, and circuit data use, as
well as the number of Kilobytes sent and received
by your phone:
• Last Call — displays the duration of your most
recent phone call.
• Phone Reset — keeps a running total of your
phone call minutes, until you reset it.
• Phone Lifetime — displays the total minutes of
all your phone calls.
• Walkie-Talkie Reset — keeps a running total of
all of your Boost
you reset it.
• Walkie-Talkie Lifetime — displays the total
minutes of all your Boost
• Circuit Reset — keeps a running total of all of
your circuit data use, until you reset it.
• Circuit Lifetime — displays the total minutes of
all of your circuit data use.
• Kbytes Reset — keeps a running total of the
number of kilobytes sent and received by your
phone, until you reset it.
TM
walkie-talkie minutes, until
TM
walkie-talkie calls.
To view or reset a timer:
1 From the main menu, select Call Timers.
2 Select the feature you want to view or reset.
3 To view a feature without resetting: Press O
when you are finished viewing. -or-
To reset a feature: Press A under Reset. Press
O or press A under Yes to confirm.
Note: The values displayed by Call Timers
should not be used for billing. Call timers
are estimates only.
Using Your Phone as a Modem
To use your phone as a modem with a laptop,
handheld device, or desktop computer:
1 Open the connector cover.
connector
cover
81
Page 92

Advanced Calling Features
2 With the phone’s display facing up, insert the
data cable’s connector into the accessory
connector, until you hear a click.
3 Insert the data plug into the data port of the other
device.
When used as a modem, your phone has these
data transfer modes:
• Circuit data — used for sending and receiving
faxes and for transferring large files
• Packet data — used for small file transfers such
as email
82
To use these services, you must install the iDEN
Wireless Data Services software (available
separately) and subscribe to a Boost
Web access plan. For more information on setting
up your computer and your i885 phone for packet
TM
Wireless
and circuit data calls, go to www.boostmobile.com.
Page 93

Features for the Hearing Impaired
Features for the Hearing
Impaired
Using Your Phone With a Hearing Aid
For best results use the following optimization
procedures and handset setting. They generally
apply as well for users with cochlear implants:
Optimize Your Handset Position and
Orientation
While in a phone call slide your phone up and
down, then left and right until best microphone
coupling is obtained. You also may need to adjust
your hearing aid (HA) volume setting.
If your HA has a telecoil, activate its switch, then
also rotate the handset as illustrated to align the
telecoils.
Note: Some automatically switched hearing aids
may need an auxiliary switching magnet.
If you are unsure whether your HA is telecoil
equipped or needs an auxiliary magnet, please
contact your HA user guide, professional or
supplier.
Approximate telecoil location is
within 6-13 mm of this location.
Off - Shut off
M - Microphone
T - Telecoil
Approximate telecoil
location is just above the
battery.
Optimize Your Handset Antenna Position
Your phone’s rating for HA compatibility is
determined with the antenna extended if it has an
extendable antenna. However acceptable use
might occur with the antenna retracted. Test your
handset in both antenna positions when the
handset is in the optimum orientation.
83
Page 94

Advanced Calling Features
Choose Your Hearing Aid Setting
From the main menu, select Settings > Phone
Calls > Hearing Aid.
Set this option to Microphone. Microphone
coupling is now optimized. -or-
Set this option to Telecoil. Handset meets US
federal requirements for telecoil coupling sound.
-or-
Set this option to Off (factory default). This is the
setting for non HA users.
Using Your Phone With a Teletypewriter (TTY) Device:
Connect one end of a 2.5mm cable into the stereo
headset jack on your phone. Connect the other
end of the cable to your TTY device.
4 Make sure that your phone’s TTY feature is on
and select the TTY mode you want to use.
5 Use your phone to enter phone numbers and
make calls.
When you make a TTY call, these icons appear on
the phone’s display:
Phone call is active.
N
Phone call is on hold.
O
84
TTY device features such as Turbo-Code,
High-Speed, and Interruption are not supported by
your phone. These features must be turned off or
disabled to use your TTY device with your phone.
Turning On the TTY Feature
Your phone’s TTY feature must be on if you want
to make TTY calls, set the TTY mode, or change
the TTY baud rate. To make sure the TTY feature
is on:
From the main menu, select Settings > Phone
Calls > TTY > Use TTY. This field must say On.
Choosing a TTY Mode
Your phone supports these TTY modes:
•TTY — You type and read text on your TTY
device.
•VCO (Voice-Carry-Over) — You speak into your
phone and read text replies on your TTY device.
• HCO (Hearing-Carry-Over) — You type text on
your TTY device and listen to voice replies on
your phone speaker.
To change mode while not in a call:
1 From the main menu, select Settings > Phone
Calls > TTY > Type.
2 Select the TTY mode you want.
Page 95

When you make a TTY call, the call begins in the
TTY mode you last selected.
To change mode during a call using your phone:
1 Press m.
2 Select In Call Setup > TTY > Type.
3 Select the mode you want.
To change mode during a call using your TTY
device, issue one of the following commands:
• “VCO please” — to select VCO mode
• “HCO please” — to select HCO mode
• “HCO off please” — to turn off HCO mode
Important: When you are using HCO, the sound
coming from your phone speaker may
be uncomfortably loud. Use caution
when putting the phone to your ear.
Changing the TTY Baud Rate
By default, your phone’s TTY baud rate is set to
45.45, the baud rate required for TTY calls within
the U.S. To make calls outside the U.S., set your
TTY baud rate to 50.00.
To change the TTY baud rate:
1 From the main menu, select Settings > Phone
Calls > TTY > Baud.
2 Select the baud rate for your location.
Features for the Hearing Impaired
85
Page 96

Messages
Messages
To access your voice mail messages, text and
numeric messages, Web alerts, and any other
types of messages you are able to receive, go to
the message center:
1 Press A under Mesg. -or-
From the main menu, select Messages.
2 Scroll to the type of message you want to
access.
3 Press A under the display option on the left.
The message center shows how many messages
you have of each type. You can listen to, read, or
delete these messages.
Note: In order for you to access voice mail
through the message center, there must
already be a message in your voice mail
box. If there is no message, you must
access voice mail by dialing into your
voice mail box using your PTN.
86
Message Notifications
When you receive a message, your phone notifies
you with text on the display, a notification tone or
vibration, and by flashing the logo backlight slowly.
You can access the message or dismiss the
notification.
If you dismiss the notification, the message is not
deleted. It can be accessed through the message
center.
If you are not on a phone call when you receive a
message, your phone sounds a notification tone
every 30 seconds until you access the message or
dismiss the alert.
If you are on a call when you receive a message,
your phone may sound a notification tone during
the call or after you end the call, depending on how
you set your notification options.
Setting Notification Options
To control whether your phone sounds message
notification tones while you are on phone calls:
1 From the main menu, select Settings > Phone
Calls > Notifications.
2 Select the option you want:
• Receive All — Tones sound during calls for
all types of messages.
Page 97

Voice Mail
• Message Mail Only — Tones sound during
calls for mail messages; tones for all other
types of messages are held until you end
calls.
• Delay All — Tones for all types of messages
are held until you end calls.
Note: Delay All is the default setting.
3 Press A under Select.
Tip: To set notification options during a call:
Press m. Select In Call Setup >
Notifications.
Voice Mail
When you receive a voice mail message, New
Voice Mail Message appears on the display.
Press A under Call.
To dismiss the message notification:
If the flip is closed, press .. -or-
If the flip is open, press O or press A under
Back, or close the flip.
This icon
you that you have a new message.
y appears on the display, reminding
Sending Unanswered Calls to Voice Mail
To send a phone call to voice mail instead of
answering it:
If the flip is closed, press .. -or-
Press e. -or-
Press A under No.
If the caller leaves a message, this icon
appears on the display, reminding you that you
have a new message.
y
BoostTM Text and Numeric Messages
Your i885 refers to Text Messages as Web Alerts.
TM
With Boost
• Send and receive messages (up to 500
characters in length) with preset replies and
respond to them at the touch of a button.
• Send messages to one individual from your
phone or contact several at once from any email
system or boostmobile.com.
• Respond to messages when you’re at a movie
or in a noisy location.
Text Messaging, you can:
87
Page 98

Messages
For additional information on how to use this
service, visit www.boostmobile.com.
Sending a Text Message
BoostTM Text Messaging provides 2 choices for
sending messages: Web Messaging or Email
Messaging.
Web Messaging on BoostMobile.com
TM
Web Messaging enables you to send a
Boost
message to yourself, someone else, or a group of
Boost Mobile customers.
For more information or to send a Web message,
go to www.boostmobile.com and click on Send a
Message.
Email Messaging
From any email account, type the 10-digit phone
number of a Boost
add @myboostmobile.com (for example,
2135557777@myboostmobile.com). The entire
message can be up to 500 characters.
TM
customer in the To field and
Sending a Numeric Message
BoostTM Numeric messaging is available through
BoostTM Voice Mail. These messages can be
displayed directly on your i885. To leave a numeric
message:
88
• The caller must press “1” during your Voice Mail
greeting.
• Once the caller presses “1” only numeric
messages can be sent.
The phone’s display refers to text and numeric
messages as Text Messages.
These messages can be up to 140 letters or 20
digits long. You can store up to 16 of these
messages. Each message is stamped with the
date and time it was left.
If your phone is powered off when you receive a
message, your phone notifies you the next time
you power it on. If you are out of your coverage
area, your phone alerts you when you return to
your coverage area.
Your phone attempts to deliver these messages for
up to 7 days.
Tip: While reading a text and numeric message
that contains a phone number, you can
press s to call that number.
Receiving a Message
When you receive a text and numeric message,
this icon
To view the message:
1 Press A under Read.
w appears on the display.
Page 99

Web Alerts
2 If the message fills more than one screen, scroll
to read it.
3 To keep the message, press A under Save.
-or-
To delete the message, press A under Delete.
To dismiss the message notification:
If the flip is closed, press .. -or-
If the flip is open, press A under Back or close
the flip.
This icon
you that you have a new message.
w appears on the display, reminding
Reading from the Message Center
1 From the main menu, select Messages > Text
Msgs.
2 Select the message you want to read.
3 Press A under Read.
4 If the message fills more than one screen, scroll
to read it.
5 To keep the message, press O. -or-
To delete the message, scroll to the end of the
message, then press A under Delete.
Web Al e r ts
Web alerts are text and numeric messages sent
from:
• Your i885 phone
• www.boostmobile.com
• Any email application
Note: Your phone’s SMS address is your
PTN@myboostmobile.com. Example:
2135557777@myboostmobile.com. Your
phone’s Text Messaging address is your
PTN@messaging.boostmobile.com.
When you receive a Web alert, a notification
appears on the display.
If you dismiss the notification, this icon w
appears on the display, reminding you that you
have a new message.
Deleting Web Alerts
1 From the message center, select Web Alert.
2 Press A under Goto.
3 Scroll to the message you want to delete.
4 Press m.
5 Select Delete.
6 Press A under Yes to confirm.
89
Page 100

Ringtones
Ringtones
To set the ringtone your phone makes when you
receive phone calls, call alerts, message
notifications, or Datebook reminders:
1 From the main menu, select Ringtones.
2 Make sure VibeAll is set to Off.
3 Scroll through the list of ringtones and select the
one you want to assign. Vibrate sets your phone
to vibrate instead of making a sound; Silent sets
your phone to neither vibrate nor make a sound.
Tip: Highlight a ringtone to hear it.
4 Select the features you want to assigned the
ringtone to.
Tip: A checkmark next to a feature means the
current ringtone has been assign to it. To
remove the assignment, select the feature.
5 When you are finished, press A under Done.
Note: This icon
set your phone to neither vibrate nor make
a sound for phone calls.
90
M appears on the display if you
Setting Your Phone to Vibrate
You can set your phone to vibrate instead of
making a sound when you receive all phone calls,
TM
Boost
Walkie-Talkie calls, call alerts, message
notifications, and Datebook reminders.
1 From the main menu, select Ringtones >
VibeAll.
2 Set this option to On.
Tip: Pressing the volume controls to turn down
the volume as far as possible sets VibeAll
to On.
To set your phone to vibrate instead of making a
sound for some features but not others:
1 From the main menu, select Ringtones.
2 Make sure VibeAll is set to Off.
3 Select Vibrate from the list of ringtones.
4 Select the features you want to set to make no
sound.
5 When you are finished, press A under Done.
Note: To set ring options for Boost
Walkie-Talkie calls, see “Setting Your
Phone to Vibrate” on page 181.
TM
 Loading...