

Page 1

Motorola
iDEN
i830 Handset User’s Guide
Page 2

Page 3

Contents
Getting Started...........................................1
Battery .............................................................3
Activating your M ike Account........................... 6
Powering On and Off ....................................... 6
Finding Your Number.......................................7
Handset Basics................................................ 8
Locating Your SIM Card ................................12
SIM Card Security.......................................... 12
Accessories ...................................................16
For More Information ..................................... 16
Mike’s Direct Connect Service ...............17
One Touch PTT ............................................. 19
Call Alerts ...................................................... 19
Using the Call Alert Queue ............................ 20
One-to-Many Group Calls..............................21
Making Phone Calls.................................23
Receiving Phone Calls................................... 23
Call Icons.......................................................24
Entering the Number to Call ..........................24
Missed Phone Calls.......................................26
Using Speakerphone .....................................27
Using Mute.....................................................27
Making Emergency Phone Calls....................27
Recent Calls............................................. 29
Storing Recent Calls to Contacts...................29
Deleting Recent Calls ....................................30
Contacts................................................... 31
Viewing Contacts...........................................32
Creating Entries .............................................33
Storing Numbers Quickly ...............................34
Editing Entries................................................35
Deleting Entries..............................................35
Checking Capacity.........................................35
Creating Pauses and Waits ...........................35
International Numbers....................................36
Advanced Calling Features.................... 37
Call Waiting....................................................37
Switching Between Calls................................37
Putting a Call on Hold ....................................38
Call Forwarding..............................................38
Forwarding All Calls.......................................38
i
Page 4

Turning Off Call Forwarding........................... 39
Forwarding Missed Calls ...............................39
Calling 2 People............................................. 40
Creating PausesandWaitsWhile Dialing.....41
Making International Calls ............................. 41
Setting Flip Actions ........................................41
Call Timers..................................................... 42
Entering Text............................................43
Using Alpha Mode .........................................43
Using Word Mode..........................................43
Special Function Keys ................................... 44
Using Numeric Mode ..................................... 45
Using Symbols Mode.....................................45
Messages .................................................47
Message Notifications....................................47
Voice Mail ...................................................... 47
Advanced Voice Mail with Fax.......................48
Text and Numeric Messages .........................49
Setting Up......................................................49
Receiving Messages......................................50
ReadingMessages From
ii
the Message Center.......................................50
Creating and Sending Messages...................50
Managing Memory .........................................53
Net Alerts .......................................................53
Mike’s Wireless Web Services...............55
Launching the Microbrowser..........................55
Navigating the Microbrowser .........................55
Accessing the Browser Menu ........................55
Ending the Microbrowser Session .................56
Using Your Phone as a Modem.....................56
Ring Tones............................................... 59
Setting Your Handset to Vibrate ....................59
Assigning Ring Tones to Contacts.................60
Ring and Vibrate ............................................60
Viewing Ring Tone Assignments...................60
Managing Memory .........................................60
Deleting Custom Ring Tones.........................61
Datebook.................................................. 63
Viewing Datebook..........................................63
Creating Events .............................................64
Editing Events................................................66
Page 5

Deleting Events..............................................66
Receiving Reminders..................................... 67
Making Calls From Datebook ........................67
Customizing Datebook Setup ........................ 68
Java Applications....................................69
Installing Applications ....................................69
Running Applications .....................................69
Suspending Applications ............................... 69
Resuming Applications ..................................69
Ending Applications .......................................70
Deleting Applications ..................................... 70
Managing Memory ......................................... 70
Shortcuts on the Main Menu..........................71
Java Applications and GPS Enabled .............71
GPS Enabled ............................................75
IMPORTANT: Things to Keep in Mind...........75
Viewing Your Approximate Location.............. 76
Enhancing GPS Performance........................ 77
Updating Satellite Almanac Data ................... 78
Setting Privacy Options ................................. 79
Using GPS with Map Software ...................... 80
Voice Records ......................................... 83
Creating Voice Records .................................83
Playing Voice Records...................................83
Labeling Voice Records .................................83
Deleting Voice Records .................................84
Locking Voice Records ..................................84
Managing Memory .........................................84
Memo........................................................ 85
Shortcuts ................................................. 87
Creating a Shortcut ........................................87
Using a Shortcut ............................................87
Editing a Shortcut...........................................87
Deleting Shortcuts..........................................88
Customizing Your Handset .................... 89
Setting the Volume.........................................89
Setting Your Handset to Vibrate ....................89
Using a Headset ............................................89
Using Settings................................................90
Profiles..................................................... 95
Viewing Profiles .............................................95
iii
Page 6

Switching Profiles ..........................................95
How Changing Settings Affects Profiles ........95
Temporary Profiles ........................................96
Creating Profiles............................................ 97
Editing Profiles............................................... 97
Deleting Profiles............................................. 97
Setting Call Filtering....................................... 98
Understanding Status Messages ...........99
Safety and General Information ...........103
RF Operational Characteristics.................... 103
Portable Radio Product Operation and EME
Exposure...................................................... 103
Electro Magnetic Interference/Compatibility 106
Medical Devices........................................... 106
Operational Warnings ..................................107
Operational Cautions ................................... 108
Accessory Safety Information......................109
MOTOROLA LIMITED WARRANTY ........... 111
Patent and Trademark Information.............. 114
Index .......................................................117
iv
Page 7

DECLARATION OF CONFORMITY
Per FCC CFR 47 Part 2 Section 2.1077(a)
Responsible PartyName: Motorola, Inc.
Address: 8000 WestSunrise Boulevard
Plantation, FL 33322 USA
Phone Number: 1 (800) 453-0920
Hereby declares that the product:
Product Name: i830
Model Number: H74XAH6RR4AN
Conforms to the following regulations:
FCC Part 15, subpart B, section 15.107(a),
15.107(d) and section 15.109(a)
Class B Digital Device
Note: Thisequipment hasbeent ested and found
to comply with the limits for a Class B
digital device,pursuant to part 15 of the
FCC Rules. These limitsare designed to
provide reasonable protection against
harmful interferencein a residential
installation. This equipment generates,
uses and can radiate radio frequency
energy and, if not installed and used in
accordance with the instructions, may
cause harmful interference to radio
communications. However,there is no
guarantee that interference will not occur in
a particular installation.
If this equipmentdoes cause harmful
interference to radio or television reception,
which can be determined by turning the
equipment off and on, the user is encouraged
to try to correctthe interference by one or
more of the following measures:
• Reorient or relocate the receiving
antenna.
• Increasethe separation between the
equipment and receiver.
• Connect the equipment intoan outlet on a
circuit different from that to which the
receiver is connected.
• Consult the dealeror an experienced
radio/TV technicianfor help.
v
Page 8

vi
Page 9
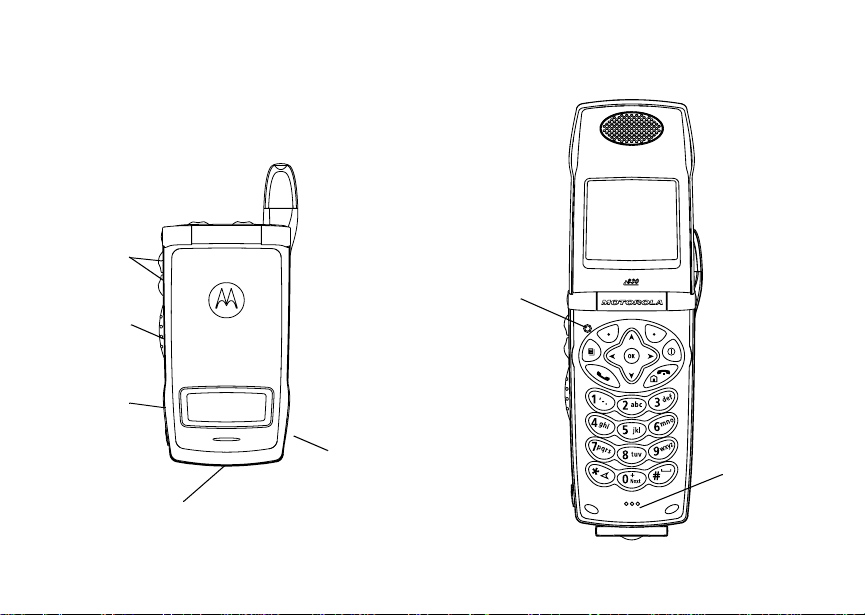
Getting Started
volume
controls
Push-To-T alk
(PTT) button
audio jack
accessory connector
speaker
(in back)
light sensor
microphone
1
Page 10

Getting Started
p Power button.
Navigationkey — pressthe arrowsto scroll
through menus and lists.
OK Key — selects highlighted item;places
O
and answers calls.
Menu Key — accesses context-sensitive
m
menus.
Option Key— selects theoption appearing
A
above it on the display.
s Send Key— places phonecalls.
End Key — ends phone calls; returns to
e
idle screen.
2
t Speakerphone Key — acts like s when
the flipis closed; turns speakerphoneon;
used with voice names and voice records.
. SmartKey — acts like e when the flip is
closed; accesses recentcalls; sends
incoming calls to voice mail.
To start using your i830 handset:
• Make sure your SIM card is in place.
• Charge the battery.
• Activateyourservice.
Page 11
Battery
Battery
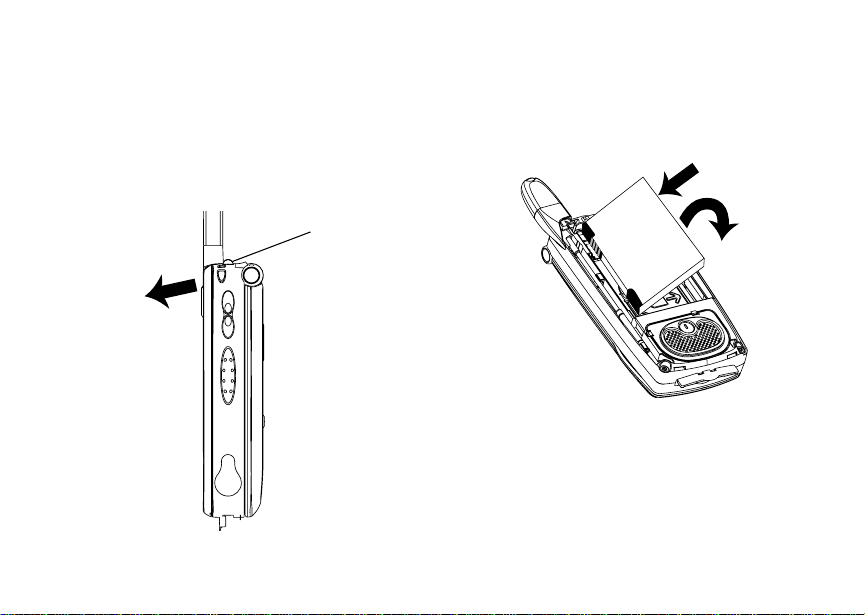
Removing the Battery Door
1 Make sure the handsetis powered off.
2 Press the release button and pull the battery door
away from the handset.
button
Inserting the Battery
1 Remove the battery door.
2 Insert the battery into the battery area. Press the
battery down to secure it.
3
Page 12
Getting Started
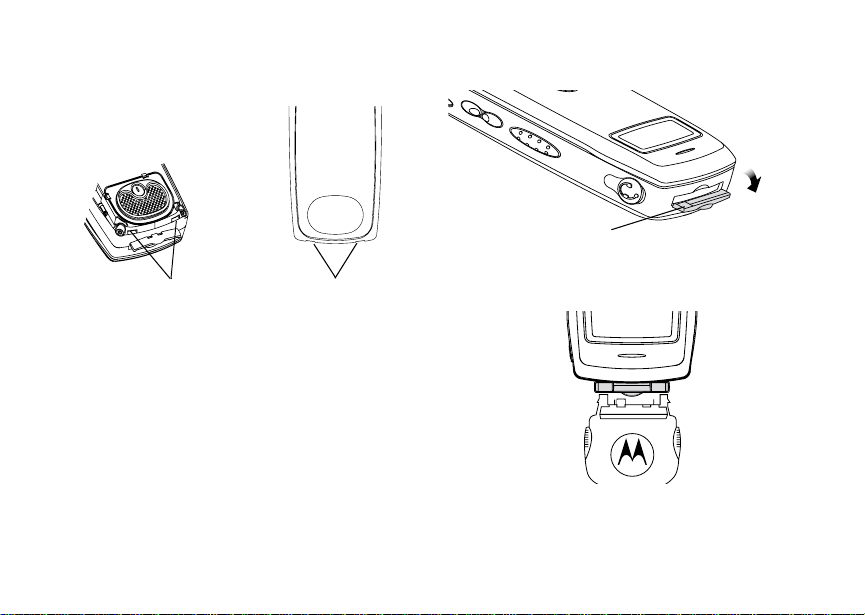
3 T o replace the battery door, locate the tabs on the
battery door and the slots in the phone.
slots
4 Placethetabs on the battery door intotheslots on
the phone.
tabs
Charging the Battery
Your handsetcomes with a battery charger.
1 Plug the charger into an electrical outlet.
4
2 Open the connector cover.
connector cover
3 Plug the otherendof the chargerinto the
accessory connector.
Tip: To remove the charger from the accessory
connector: Press the buttonson the sidesof
theplug.Pulltheplugstraightout.
Page 13
Battery
4 When charging the battery for the first time, charge
for 30 minutes longer than the time shownin
“ChargingTimes”.
Charging Times
See your battery and chargerto determine the
appropriate charging time.
Battery Charger
Rapid Mid-Rate
Slim SC 2 hours 3 hours
High
Performance
SC
For bestresults, charge the batterieswithin the
temperature range of 50°F to 104°F (10°C to 40°C).
Prolonged charging is not recommended.
2 hours 4 hours
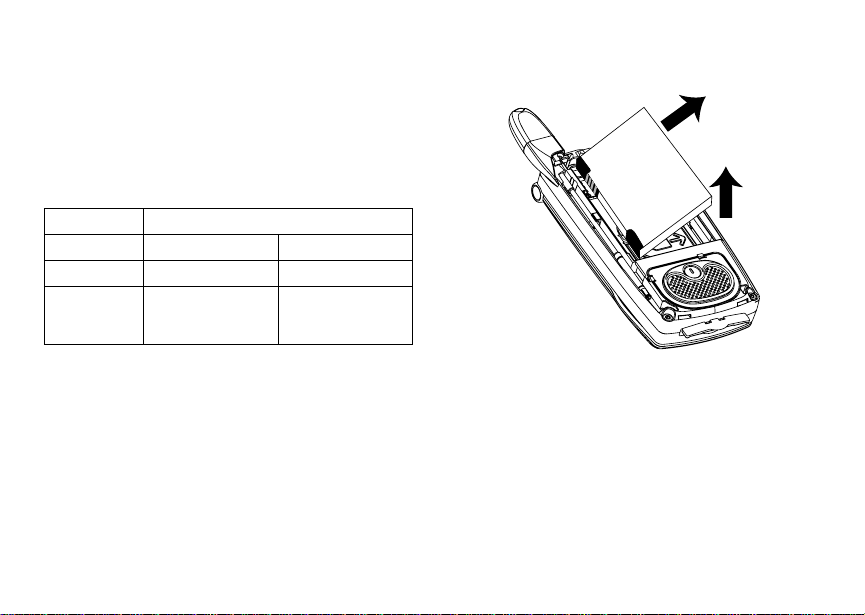
Removing the Battery
1 With the handset powered off, remove the battery
door.
2 Remove the battery by lifting it out from the side.
Battery Use and Maintenance
• The MotorolaApproved LithiumIon chargers
provide optimum performance. Other chargers
may not fully charge the iDEN Lithium Ion battery
or may yield a reducednumberof lifetime charge
cycles.
• Extreme temperatures degrade battery
performance.Donot store the battery where
temperaturesexceed 140°F (60°C)orfall below
4°F (-20°C).
5
Page 14

Getting Started
• LithiumIonbatterieshave a self discharge rate
and without use, loseabout 1% of their chargeper
day.
• The batterycapacityis degraded if the batteryis
stored for long periods while fully charged. If long
term storageisrequired, store at half capacity.
Activating your Mike Account
Before you can begin using your i830 handset, you
need to activate your Subscriber Identity Module
(SIM) card on The Mike Network. Your SIM card
holds the information required to enable your handset
to connectto TheMike Network. It also stores your
user information, languagepreference and contact
list entries.
• If you purchased your handset through an
Authorized Mike Network Dealer, your SIM should
already be active.
• If you purchased your handset at another location,
follow the “Getting Activated” instructions in the
Mike Services User’s Guide.
Powering On an d Off
The first time you power your handset on, screen
may appearasking you to update your browser
information.This means you must enable security.
6
To power your handset on:
1 Open the flip.
2 Press p.
To power your handset off:
1 Open the flip.
1 Press and hold p.
If the Enter SIM PINCode screen appears,enter
your SIM PIN. See “Entering the PIN” on page 12.
Press A under Ok.
Note: When you receive your handset, the SIM
PIN is 0000.Changeyour P IN to p revent
fraudulent use of the SIM card (see
“Changing the PIN” on page 13).
Page 15

Finding Your Number
Asyourhandsetconnectsto the network,you willsee
awelcomemessageandaconnectingmessage.
When the idle screen appears,thehandset is ready
to use.
TELUS
Finding Your Number
My Info lets you view your phone number, Private ID,
and other handset information:
1 Press m to access the main menu.
2 Scroll to My Info.
3 Press O.
4 Scroll to see your information:
•Name— Enter your name.See “EnteringText”
on page 43.
•Line1and Line 2 — your phone numbersfor
phone lines1 and2. Each is filledin whenyou
receive your first callon thatline.
•Private— Your Private ID is the number that
othersusetocontactyouusingPrivatecalls.It
is filledinwhenyou receive your first Private
call.
•GroupID— the numberoftheTalkgroup you
have joined
• Carrier IP — the IP address assigned to your
TELUS Mobility. It is filled in when you register
for packet data services.
•IP1Addressand IP2 Address —theIP
addresses you use to access the Internetwith
your handset.
•Ckt— Your circuit data number is the number
youuseifyouwanttouseyourhandsetto
transfer circuit data. See “” on page 42. You
receive this number from TELUSMobility Client
Care.
Note: The context-sensitive menuunder My Info
contains information thatmay be used by
your service provider if there is a problem
withyourphone.
7
Page 16
Getting Started
Customizing Features
You can controlmany features of your handset,
including the size of the text on the display, the way
you access main menu items,and the volume of
incoming sound, rings, and other tones. See
“Customizing Your Handset” on page 89.
Handset Basics
Any time your handset is poweredon,thedisplay
provides you with information and options.
The one-line external display shows a shortened
version of the full-sized display. To see more
information,open the flip.
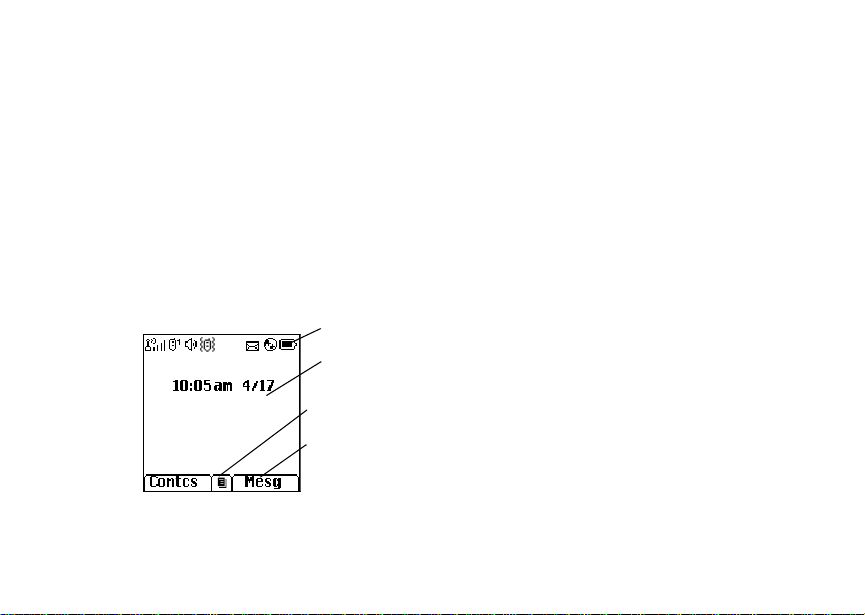
TELUS
The screen shown above is the idle screen. The idle
screen appears when yourhandset is on, but not
engaged in any activity.
8
status icons
text area
menu icon
display options
Tip: To see a one-line idle screen when your
handset closed is closed, press ..
Text Area
This area displays menus,messages, names,phone
numbers,and otherinformation.
Display Options
Two display options appearatthe bottom of most
screens.Y ou select a display option by pressingt he
option key below it.
Menus and Lists
Your handset’s features are arranged in menus,
submenus, and lists.
Toaccesstheitemsinamenuorlist,scrollusingthe
navigationkeyat the topof your keypad.Thiskey lets
you scroll up, down, left, or right. Holding down the
appropriate part of the navigation key speedsup
scrolling.
In this guide, this symbol > tells you to select a menu
or list item. For example, Settings > Security
means:
1 Scroll to Settings on the main menu.
2 Press O to see the Settings screen.
3 Scroll to Security.
Page 17

HandsetBasics
4 Press O to see the Security screen.
OK Key
Pressing O:
• Selects the highlighted menu item or list item
• Sets options
• Confirms actions
• Placesand answercalls
Menu Key
Many of the handset’s features have menu options
that will change depending on the currently
highlighted menu option. These context-sensitvie
meunsareavailableanytime
access themenu.
S appears. Press m to
Main Menu
All your handset’s features can be accessed through
the main menu. You can set the main menu to
appearasa listoras large icons (see“Large Dialing”
on page 92).
Browser BrowseMike’s Wireless
a
Java Apps Java applications on your
q
Settings
b
Display/Info
Phone Calls
2-Way Radio
Personalize
Volume
Security
Advanced
RingTones
m
Vibrate All
list of ring tones
Vibrate
Silent
VoiceRecord Record and play audio
c
Web Services.
handset. See “Java
Applications” on page 69.
Customize your handset.
See page 89.
Assign ring tones and turn
ringeroff. See page 59.
messages.See page83.
9
Page 18

Getting Started
My Info View personal handset
j
GPS Find yourapproximate
l
Contacts
d
new contactf orm
list of contacts
Contacts menu
Messages
e
VoiceMail
Test Msgs
FaxMail
Outbox
Drafts
Net Alert
Call Forward Set call forwarding options.
f
Datebook
o
new event form
list of events
Datebook menu
Memo Store a number to access
g
10
information, including
phone number and Private
ID. See page 7.
geographicallocation. See
page 76.
View,store,editcontacts.
Seepage31.
Access messages. See
page 47.
Seepage37.
Schedule appointments.
Seepage63.
later.Seepage85.
Call Timers Handsetusage information.
h
Recent Calls
i
list of calls
recent calls menu
Call Setup menu
Shortcuts Create shortcuts to
s
Profiles
p
new profile form
list of profiles
Profiles menu
Call Alert
k
list of call alerts
CallAlerts menu
Seepage42.
Lists recent calls. See
page 29.
screens. See page 87.
Groups of setting you apply
together. See page95.
Lists call alerts. See
page 19.
Page 19

HandsetBasics
Status Icons
Statusicons appear at the top of thedisplay. Some
appear at all times. Others appear only when your
handset is engaged in certainactivitiesor when you
have activated certain features.
bbcd
efgd
opqrs
A
B
C
12
Battery Strength —Morebarson
the battery indicate a greater
charge.
Signal Strength — More bars next
to the antennaindicate a stronger
signal.
Phone In Use — Your handsetis
active on a phonecall.
Private In Use — Your handset is
active on a Privatecall.
Talkgroup In Use — Your handset
is active on a group call.
Active Phon e Line —1indicates
phone line1 is ready to make calls;
2 indicatesphone line2 is ready to
make calls.
GJ
HK
IL
u M Q
wxT
y
D
U
YZ
Call Forward—Your handsetis set
to forwardcalls. See “Call
Forwarding”on page 37.
Ringer Off —Your handsetis set
nottoring.See“SettingYour
HandsettoVibrate”onpage89.
Messages — You have one or
more messages. See “Messages”
on page 47.
Internet— You areready tobrowse
the internet.
Airplane Mode — Your handsetis
set to airplanemode.
Packet Data— You are ready to
transfer packet data or are
transferringpacket data. See “” on
page 42.
11
Page 20

Getting Started
Locating Your SIM Card
YourSIM (Subscriber Identity Module) cardisa small
piece of plastic located in the SIM card holder in the
backof yourhandset, underneath the battery.
SIM card
If your SIM card is not in the SIM card holder,itmay
be in the box your handset came in, attached to the
SIM carrier. If this is the case, carefullydetach your
SIM card from the surrounding plastic and insert it as
describedin“InsertingYourSIMCard”onpage14.
SIM Card Security
Your SIM card stores all your Contacts information.
Since this information is stored on your SIM card, not
in your handset,you can removethe informationby
removing your SIM card.
12
Note: Except for making emergency calls, your
handset will not function without the SIM
card.
To prevent unauthorized useof your handset, your
SIM card can be protected by a PIN that you enter
each time the handsetis poweredon.You can
change thePINor turn off the requirement thatit be
entered.
Note: Your PIN is set to OFF by default.
Entering the PIN
You may be required to enter a SIM PIN when you
firstuse yourhandset.
Whenyoureceiveyour handset,theSIM PIN is 0000.
Change your PIN to prevent fraudulent use of the
SIM card.
Important: If you enter your PIN incorrectly 5 times,
1 When the Enter SIM PIN Code screenappears,
enteryourSIM PIN. An asterisk appears for each
character entered.
2 Press A under Ok.
your SIMcard is blocked.To unblockyour
SIM card, you must contact TELUS
Mobility Client Care. See “Unblockingthe
PIN” on page 13.
Page 21

SIM Card Security
Changing the PIN
1 Fromthe mainmenu, selectSettings > Security >
Change Password > SIM PIN.
2 At the Enter Old SIM PIN screen,enterthecurrent
SIM PIN.
3 Press A under Ok.
4 At the Enter New SIM PIN screen,enter the new
4- to 8-digitSIM PIN.
5 Press A under Ok.
6 At the Re-enter NewSIM PINscreen, re-enter the
new SIM PIN to confirm.
7 Press A under Ok.
Turning the PIN Requirement On and Off
When the SIM PIN requirementison, you are
prompted to enter your PIN each time you turn on
your handset.
Note: If a SIM PIN is required, your handsetwill
not function until the SIM PIN is entered,
except for makinge mergency calls.
When the PIN requirement is off, your handset can
be used without entering a PIN.
Important: When the SIM PIN requirementis off, the
1 From the main menu, select Settings > Security >
SIM PIN.
personal data on your SIM card is not
protected. Anyone can use your handset
and access your personal data.
2 Select On or Off.
3 Enter the current SIM PIN.
4 Press A under Ok.
Unblocking the PIN
If you enter your PIN incorrectly 5 times, your SIM
card is blocked. To unblock your SIM card, you must
contact your TELUS Mobility Client Care to get a PIN
Unblock Key (PUK).
Important: If you unsuccessfully enter the PUK code
To unblockthePIN:
1 Press *#m1.
10 times, your SIM card is permanently
blocked and must be replaced. If this
happens, all data is lost. You will get a
message to contact TELUS Mobility Client
Care. Except for making emergency calls,
your handset will not function with a
blocked SIM card.
13
Page 22

Getting Started
2 At yourTELUSMobility representative’s request,
providetheinformationneededtogiveyouaPUK
code.
3 Select Unblock PIN.
4 Enterthe PUKcode.
5 Enteranew4-to8-digitSIMPIN.
6 Re-enteryour SIM PIN.
If you enteredthecodes properly, SIM Unlocked
appears on the display.
Inserting and Removing Your SIM Card
Important: Do not touch the gold-coloredareas of
Switching SIM Cards
When you move your SIM card from one handset to
another, your Contacts information will not be erased
as the information is storedin the SIM. If you remove
yourSIM card anduseit withanotherhandset,or use
anotherSIM card withyourhandset, the following
information is erased:
• The recent callslist
• Call forwarding settings
• Net alerts
• MOSMSdrafts,outboxmessages,and customized
quick notes
14
your SIM card.
• Information stored in Memo
• 3 most recent GPS Enabledlocations
• Voicerecords
• Voice names
• Datebookevents
• Options setusingt he Personalize menu
Inserting Your SIM Card
1 With your handset powered off, remove the back
cover and battery.
2 Open the SIM card holder.
Page 23
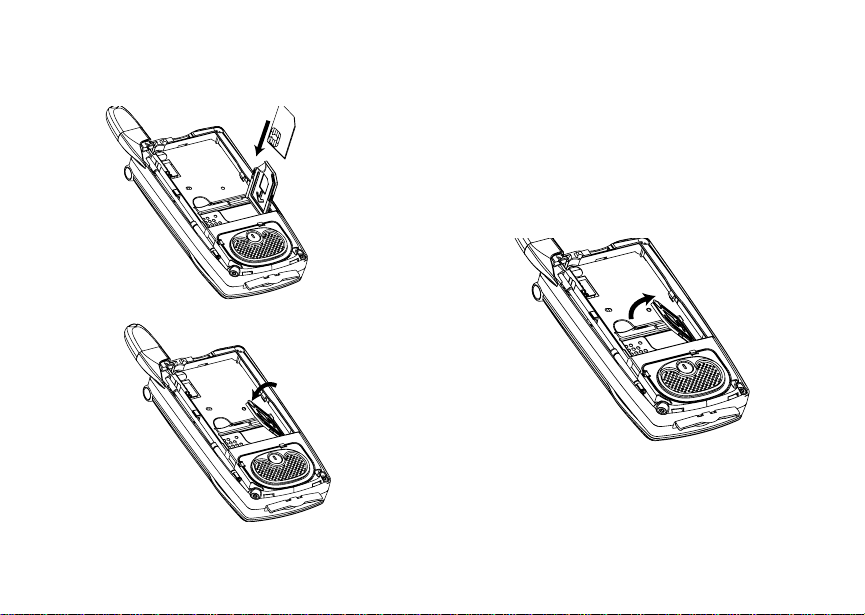
SIM Card Security
3 Carefully slide your SIM cardintothe SIM card
holder.
4 Close theSIM cardholder.
Removing Your SIM Card
Important: To avoid loss or damage, do not remove
1 With your handset powered off, remove the back
cover and battery. See “Removing the Battery” on
page 5.
your SIM card from your handset unless
absolutely necessary.
2 Open the SIM card holder.
15
Page 24

Getting Started
3 Carefully slide your SIMcardout of the SIM card
holder.
4 Close theSIM cardholder.
16
Note: Protect your SIM card as you would any
delicate object.Store it carefully.
Accessories
Your handset comes with a battery, a charger, and a
carry holster.
To order additional accessories,logon to our Web
site at www.telusmobility.com or co ntact your Mike
Dealer.
For More Inf ormati on
If you have questionsabout your i830 handset,
contact your Mike Dealer or TELUS Mobility Client
Care.
Page 25

Mike’s Direct Connect Service
There are two ways of communicating over Mike’s
Direct Connect service:
• one-to-one using a privatecall
• one-to-many in a group call
Both of these methods are very similar to two-way
radio,and at a fractionof thecostof traditional
cellular. Mike’s Direct Connect also offers the Call
Alertfeature, which gives recipients a notice, similar
toaringer,thatyouwouldliketospeaktothem.
One-to-One Private Calls
Making Private Calls
1 If the flip is open, enterthePrivate ID you want to
call. -or-
If theflip is closed,selectthenumber asyouwould
when making a phone call.
2 Press and hold the PTT button on the side of your
phone.Begin talkingafter your handsetemits a
chirping sound.
3 ReleasethePTTbuttontolisten.
Tip: To let someone know that you want to talk to
him or her on a P rivate call, send a call alert.
See“CallAlerts”onpage19.
Every Private ID number contains3parts— an area
ID, a fleet ID, and a member ID — with asterisks
between each of these parts. For example:
999*999*9999.
When you place a Private call,youmustenter the
entirePrivate ID number including the asterisks.
When you store a PrivateID numberinContacts,
include the asteriskswiththeentire Private ID
numberin caseyou travelwithyour handset, or
anotherP rivate ID user, outsideof yournetwork.
From the Keypad
To enter the Private ID you want to call, press the
numbersonthe keypad.
Ifyoumakeamistake:
• To clear a digit, press A under Delete.
• To clear all digits, press and hold A under Delete.
• To insert or delete a digit anywhere in the string of
digits you have entered, scroll left or right.
• To cancel, press e.
17
Page 26

Mike’s Direct Connect Service
From the Recent Calls Li st
The recent calls liststores thelast20calls you made
or received.
To select a Private ID from the recent calls list as the
numberyouwant to call:
1 From the idle screen, scroll down. -or-
From the main menu, select Recent Calls.
2 Scroll to the name or Private ID number you want
to call.
From Contacts
IfyouhavePrivateIDsstoredinContacts,youcan
use these numbers to make calls. For information on
entering numbersintoContacts, see “Creating
Entries” on page 33.
Calling from the Contacts List
1 From the main menu, select Contacts.
2 Scroll to the name or Private ID number you want
to call.
Tip: To find Contacts entries faster, use the keypad
to enter the first letter of the name.
3 Place the call now. -or-
18
With the Contacts type fieldhighlighted,scroll left
or right to display theContactstype for thenumber
youwanttocall.
If you are making a Private call, your phone places
the calltothePrivateID storedin the Contactsentry,
even if the Private ID icon is not displayed.
Calling from a Contacts Entry
1 From the main menu, select Contacts.
2 Scroll to the name or Private ID number you want
to call.
3 Press A under View. -or-
If View is not one of your options:Press m. Select
View.
4 Place the callnow. -or-
Scrollto view more numbers. When you place the
call,itismadeto the number displayed.
Receiving Private Cal ls
When you receive a Private call, your handset emits
achirpingsoundorvibrates.
To answer a Private call:
1 Waitforthe callerto finish speaking.
2 Press and hold the PTT button on the side of your
handset. Begin talking after your phone emits a
chirping sound.
Page 27

One Touch PTT
Release the PTT buttontolisten.
One Touch PTT
One Touch PTT setsyourphoneto call the most
recent Private ID on the recent calls list, or to a
Private ID you choose,everytimeyou press the PTT
button. See “Setting One Touch PTT” below.
Setting One Touch PTT
One Touch PTT setsyourphoneto call the most
recent Private ID on the recent calls list, or to a
Private ID you choose,everytimeyou press the PTT
button.
To set your phone to call the most recent Private ID
on the recent calls list:
1 From the main menu, select Settings > 2-Way
Radio > One Touch PTT.
2 Scroll to Last Call.
3 Press A under Select.
To set your phone to call a Private ID you choose:
1 From the main menu, select Settings > 2-Way
Radio > One Touch PTT.
2 Scroll to Assign Number.
3 Press A under Change.
4 To enter thenumber you want your phone to call
every timeyoupress the PTT button:
Enter thenumber using your keypad.-or-
Press A under Search.Select Contacts, Recent
Calls,orMemo. Enter the number from Contacts,
the recent calls list, or Memo, as you would when
making a call.
Tip: If you are enteringa Talkgroup number, enter
# before the number.
5 Press A under Ok.
To turn off One Touch PTT:
1 From the main menu, select Settings > 2-Way
Radio > One Touch PTT.
2 Scroll to Off.
3 Press A under Select.
Call Alerts
Sendingacall alert lets the recipient know that you
want to talk to him or her on a Private call.
When you send a call alert,therecipient’s phone
emitsa seriesof beepsanddisplaysyournameor
Private ID.
The recipient can:
• Answer — begin a Private callwiththesender
• Queue —store thecallalert tothecall alertqueue,
whichisa list of callalerts
19
Page 28

Mike’s Direct Connect Service
• Clear — dismiss and delete the call alert
Sending Call Alerts
1 Enter the Private ID you want to send to, as you
wouldwhenmakingaPrivatecall.
2 Press A under Alert. Ready to Alert appears on
the display.
3 Press the PTT button until AlertSuccessful
appearsonthedisplay.
Receiving Call Alerts
When you receiveacall alert, you must answer,
queue, or clear it. You cannot receive phone calls or
Private calls until you do.
To answer a call alert,press the PTT button to
make a Private call to the sender.
To queue a call alert,press A under Queue.
To clear a call alert, press A under Clear.
Using t he Call Alert Queue
When you queue a call alert,it remains in the call
alert queue until you respond to it, or delete it.
Viewing Call Alerts
1 From the main menu, select Call Alert.
2 Scroll through the list.
20
Viewing Date and Time
To view the date and time a call alert was received:
1 From the main menu, select Call Alert.
2 Scrollto the callalertyou want informationon.
3 Press m.
4 Select View.
Responding to Call Alerts in the Queue
After you queue a call alert, you can respond to it by
making a Privatecalltothesender or sending a call
alertto the sender. This call alertis thenremoved
from the queue.
Making a Private Call to the Sender
1 From the main menu, select Call Alert.
2 Scrollto the callalertyou want to respondto.
3 Press the PTT button to begin the call.
Sending a Call Alert to the Sender
1 From the main menu, select Call Alert.
2 Scrollto the callalertyou want to respondto.
3 Press A under Alert. Ready to Alert appears on
the display.
4 Press and hold the PTT button until Alert
Successful appears on the display.
Page 29

One-to-Many Group Calls
Note: Answering a callalert fromthe recentcall list
does not remove it fromthecallalert queue.
Deleting Call Alerts
To deletea call alert from the queue:
1 Fromthecall alertqueue,scroll tothecall alertyou
want to delete.
2 Press m.
3 Select Delete.
4 Press A under Yes to confirm.
To delete all call alerts from the queue:
1 From the call alertqueue, press m.
2 From the call alert menu, select Delete All.
3 Press A under Yes to confirm.
Sorting Call Alerts
To sort call alerts by the order they were received:
1 From the main menu, select Call Alert.
2 Press m.
3 Select Sort By.
4 Scroll to First on Top or Last on Top.
5 Press A under Select.
One-to-Many Group Calls
Agroupcallisatypeofdispatchcallmadetoall
membersofa Talkgroup at once. A Talkgroup is a
group of Private IDs.
To receive groupcalls made to a Talkgroup,you
must join the Talkgroup. See “Joining a Talkgroup”
on page 21.
Joining a Talkgroup
Your Mike sales representative creates Talkgroups
for you and assignseachTalkgroupto a Talkgroup
number.Youcanchoosea nameforeach of your
Talkgroups when you create entries for them in
Contacts.
To receive groupcalls made to a Talkgroup,you
must join the Talkgroup. You can belong to only one
Talkgroup at a time. When you join a new Talkgroup,
you no longer belong to your previous Talkgroup.
To join a Talkgroup:
1 Press #. Then enter the Talkgroup number using
the keypad. -or-
Choose the Talkgroup name from Contacts or
recent calls list.
2 Press A under Join.
21
Page 30

Mike’s Direct Connect Service
Making Group Calls
1 Press #. Then enter the Talkgroup number using
the keypad. -or-
Choosethe Talkgroup name from Contacts or
recentcallslist.
2 Proceed as if making a Private call.
Receiving Group C alls
To answer a group call:
Proceed as if answering a Private call. Only one
personata time may speak on a group call.
TurningoffGroupCalls
To controlwhether you hear group callsto your
Talkgroup:
1 From the main menu, select Settings > 2-Way
Radio > Tkgrp Silent.
2 Press A under Change.
3 Scroll to On if you don’t want to hear group calls to
your Talkgroup. -or-
Scroll to Off if you want to hear group calls to your
Talkgroup.
4 Press A under Select.
22
Page 31

Making Phone Calls
To make a phone call:
With the Flip Open
1 Enter the numberyouwant to call.
2 T o place the call:
Press s. -or-
If you entered the number from the idle screen,
press O.
3 T o end the call:
Press e. -or-
Close the flip.
Toendacallbyclosingtheflip,youmusthavethe
Flip to End feature turned on (see “Setting Flip
Actions” on page 41.
With the Flip Closed
1 Selectthenumber you wantto callfrom the recent
calls list and press t. -or-
Use a voice name to select number and placethe
call.
2 To end the call, press ..
Receiving Phone Calls
When you receive a phone call, your handsetrings,
vibrates, or lights up its backlight.
Answering a phone call
Iftheflipisclosed,presst. -or-
Openthe flip.-or-
Press s. -or-
Press O. -or-
Press A under Yes. -or-
Pressany numberkey on the keypad.
To answer a call by openingthe flip,youmusthave
the Flip to Ans featureturnedon(see“SettingFlip
Actions” on page41).To answera call by pressing
any key on the keypad, you musthavethe Any Key
Ans feature turned on (see “Phone CallsFeatures”
on page 91).
Sending a phone call to voice mail
Iftheflipisclosed,press.. -or-
Press e. -or-
Press A under No.
Ending a phone call
If the flip is closed, press..
23
Page 32

Making PhoneCalls
Press e. -or-
Close the flip. -or-
Call Ico ns
Whenyoumake a phonecall, calli cons appearin the
text area of the handset’s display.
Placing a phonecall.
X
Receiving a phone call.
W
Phone callis active.
Y
Phone callis on hold.
Z
Phone call ended.
U
When you miss a call, thisiconappears in the text
area:
You missed a phone call.
V
Entering the Number to Call
To enter the number you want to call, you can:
• Use the numbers on the keypad
• Select the numberfromtherecent calls list
24
• Select the number from Contacts
• Select a number storedin Datebook
• Redial the last phonenumber called
• Say a voice name into your handset
• Use Speed Dial or Turbo Dial
• UseOneTouchPTTtomakeaPrivatecall.See
“OneTouchPTT”onpage19.
Ifyoumakeamistake:
• To clear a digit, press A under Delete.
• To clear all digits, press and hold A under Delete.
• To insert or delete a digit anywhere in the string of
digits you have entered, scroll left or right.
• To cancel, press e.
®
From the Recent Calls List
The recent calls list stores the last 20 calls you made
or received.
With the Flip Open
1 From the idle screen, scroll down. -or-
From themain menu, select Recent Calls.
2 Scrollto the name or numberyouwantto call.
With the Flip Closed
1 Press . to display the most recentcall.
Page 33

Entering the Number to Call
2 To view the rest of the recentcallslist, press the
volume keys on the side of your handset.
3 Youcancall thenumber displayedby pressingt
on top of the phone.
From Contacts
If you have numbers stored in Contacts, you can use
these numbers to make calls. For information on
entering numbersintoContacts, see “Creating
Entries” on page 33.
1 From the main menu, select Contacts.
2 Scroll to the name or number you want to call.
Tip: To find Contacts entries faster, use the keypad
to enter the first letter of the name.
3 Place the call now. -or-
Scroll left or right to display the Contacts type for
the number you want to call.
If you are making a Private call,your handset places
thecalltothePrivateIDstoredintheContactsentry,
even if the Private icon is not displayed.
If you are making a phone call:
• Your handset placesthecall to the phone number
assigned to the Contactstypedisplayed.
If the Contacts type displayed is not a phone number,
your handset places the call to the phone number
storedin the Contacts entry.
• If the Contacts type displayed is not a phone
numberandyouhave more than one phone
numberstored in the Contactsentry,yourhandset
prompts you to select the phone numberyouwant
to place the call to.
From Datebook
If you have numbersstored as part of events in
Datebook, you can use these numbers to make calls.
For informationon storing events in Datebook, see
“Datebook” on page 63.
1 From the main menu, select Datebook.
2 Select the day of the event containing the number
you want to call.
3 Highlight orselect theeventcontainingthenumber
you want to call.
For details, see “Making Calls From Datebook” on
page 67.
Redialing the Last Number
Press andhold s to place a call to the last phone numberyoucalled.
25
Page 34

Making PhoneCalls
Using a Voice Name
If you have createda voicename in Contacts for the
numberyouwant to call,saythevoice name into
your to enter the number. See page 32 for
information on voice names.
You can use a voice name to enter a handset number
withtheflipopenorclosed.
1 Press and hold t until a prompt appears telling
youtosaythevoicename.
2 Speakingintothe microphone,say the voicename
assigned to the number you want to call.
Yourhandset plays the name back to you.
If you are making a Private call,pressandhold the
PTTbuttontoplacethecall.
If you are making a phone call, the call is placed
automatically.
Tip: To stop a phone call from being completed,
press . iftheflipisclosedorpresse.
Using Speed Dial and Turbo Dial
Eachphone numberstored in Contacts is assigneda
SpeedDialnumber which you can use to enter that
number.
26
®
TurboDiallets you place callstothe phonenumbers
associated with Speed Dial numbers 1 through 9
without entering thenumber.
Speed Dial
1 From the idle screen, use the keypad to enter the
Speed Dial number assigned to the phone number
youwanttocall.
2 Press #. Turbo Dial
From the idlescreen, press and hold the Speed
Dialnumber (1 through 9) assigned to the phone
number you want to call.
Missed Phone Calls
Whentheflipisclosed,theone-linedisplayshows
this icon
missed.
To dismiss the missed callmessage:
To displaythe most recentcallwithincoming Caller
ID:
V and the numberofphone callsyou have
Press ..
Press . again.
Page 35

Using Speakerphone
Youcannow callthe mostrecentcall,or view therest
of the recent call list. unknown numbers will not be
shown in the recent calls list. See page 24 for more
information.
Using Speakerphone
Turning on speakerphone makes incoming sound
comeout of the phone’sspeaker instead of the
earpiece. Speakerphoneisavailable whenever you
areonanactivephonecall.
With the Flip Open
To turn speakerphone on or off:
Press A under Speaker. -or-
Press t.
With the Flip Closed
When you make a call with the flip closed,
speakerphone is always on.
Opening the flip turns speakerphone off.
Using M ute
Muting calls lets you listen to incoming sound without
transmittingsound. Mute is availablewhenever you
areonanactivecall.
To turnmuteon:
Press A under Mute.
Whilemuteison,Unmute appears as a display
option.
To turnmuteoff:
Press A under Unmute.
Making Emergenc y Phone C alls
Your handset supports emergency calling.
Emergency phone calls can be made even when
your SIM card is blockedornot in your handset.
Dial 911 to be connected to an emergency response
center.I f you areon an active call,youmustendit
before calling 911.
Important: Emergency calls cannot be placed while
Important: If you have not registered on the network,
the keypad is locked.
emergency calls cannot be placed while
your SIM card is in your handset.
27
Page 36

28
Page 37

Recent Calls
The recent calls list stores the numbers of the 20
most recentcalls you have made and received.
If the number of a recent call is stored in Contacts,
the name associated with the number appears on the
recent calls list.
An icon appearsbeside the name or number
indicating the Contacts type of the number used in
the call.See“Contacts”on page 31.
For phone calls, an icon appears to the left of the
name or numbergiving more information about the
call:
A call you made.
X
A call you received.
W
A missed call. Missedcalls appear on the
V
recentcalls list only if you have CallerID.
Note: The recent callslist also storescallalerts
you have received. They appearas Private
calls.Callalerts remain in your recentcalls
list untilyoudelete them or until theyreach
theendofthelist.
Viewing Recent Cal ls
With the Flip Open
1 From the main menu, select Recent Calls.
2 Scroll through the list.
To get more information on a recent call:
From the recent calls list, select the call you want
information on.
This displays information such as the name
associated with the call,thenumber, the date, time,
and duration of the call.
With the Flip Closed
1 Press . to display the most recent call.
2 To view the rest the recent call list, press the
volumekeysonthe sideof your handset.
3 Press . to dismiss the recent calls list.
Tip: Press t to call the number displayed.
Storing Recent Calls to Contacts
1 From the recent calls list, scroll to the number you
wantto store.
29
Page 38

Recent Calls
2 Press A under Store. -or-
If Store is not one of your options: Pressm. Select
Store.
Tip: If Store is not on this menu, the number is
already stored in Contacts.
3 To store the number as a new entry, select [New
Contact]. -or-
To storethe number toan existingentry, selectthe
entry.
4 With the Contacts type field highlighted, scroll left
or right to display the Contacts type you want to
assignthenumber.Forinformationon Contacts
types,seepage 31.
5 If you want to add more information to the entry,
follow the applicable instructions in “Creating
Entries” on page 33.
6 Press A under Done.
Deleting Recent Calls
Todeleteacall:
1 Fromtherecent callslist, scrolltothecall you want
to delete.
2 Press A under Delete. -or-
If Delete is notone of your options:Press m.
Select Delete.
30
3 Press O or press A under Yes to confirm.
To deleteall calls:
1 From the recentcalls list, pressm.
2 Select Delete All.
3 Press O or press A under Yes to confirm.
Page 39

Contacts
Each Contacts entry can store several numbers or
addresses. Depending on the type of Mike’s Smart
Card you use,you will be ableto store different
numbersof contacts and contactinformation.
InformationstoredinContactsissavedonyourSIM
card. If you move your SIM card to another
SIM-based handset, you can access information
storedinContacts fromthathandset.
A Contactsentry contains:
• A name — A name is required if you are storing
more than one number or address to the entry;
otherwise, it is optional. Typically, this is the name
of the person whose contact information is stored
in the entry.
• Aringtone—Youcanassignaringtonetoeach
entry. Thisisthesoundyour handset makes when
you receivehandset callsor call alerts from any of
the numbers stored in the entry.
• A Contacts type — Each number or address stored
must be assigneda Contacts type:
Mobile phone number
A
Private Private ID
B
Work1 phone number
C
Work2 phone number
D
Home phone number
E
Email email address
F
Fax phone number
G
Pager phone number
H
Talkgroup Talkgroup number
I
IP IP address
J
Other phone number
K
• A number or address — Each Contacts entry must
contain a number or address.Thismaybeany
type of phone number, Private ID, Talkgroup
number, e mail address, or IP address.
31
Page 40

Contacts
Note: You can store numbers up to 64 digits long,
but every 20 digits must be separated by a
pause or wait. See “Creating Pauses and
Waits” on page 35.
• A Speed Dialnumber — When you store a phone
number, it is assigneda Speed Dial number. You
can accept thedefault SpeedD ial number or
change it.
• A voice name — If you createa voicename for a
number, you can then dial that numberby saying
the voice name intoyourhandset. This icon
appears to the left of the Contactst ype icon if a
voicenameisassigned.
P
Viewing Contacts
To access Contacts:
From the main menu, select Contacts. -or-
Ifyouareonacall:Pressm.SelectContacts.
To view entries:
1 From the Contacts list, scroll to the entry you want
to view.
2 If an entry has more than one number or address
stored,
<> surrounds the Contacts type icon. Scroll
leftor right to viewthe icon for eachnumber stored
in the entry.
3 Press O to view the entry.
32
4 Scrollto view the othernumbers and addresses
stored for the entry.
Tip: To view more entries,continuescrolling.
Searching for a Name
To search for a name in Contacts:
1 From the Contacts list,press m.
2 Select Search.
3 Enter the name you want to see. See “Entering
Text” on page 43.
4 Press O.
Your handset finds the name you entered or the
nearestmatch.
Showing Only P rivate IDs and Talkgroups
To set Contacts to show onlyentries that contain
Private IDs and Talkgroup entries:
1 From the Contacts list,press m.
2 Select Filter.
3 Set this option to Show Prvt/Grp.
To set Contacts to show all entries:
1 From the Contacts list,press m.
2 Select Filter.
Page 41

Creating Entries
3 Set this option to Show All.
Creating Entries
A number or address and a Contacts type are
required for all Contacts entries.Other information is
optional. You may entertheinformationin any order
by scrolling through the entry details.
After you have entered the number or address,
Contacts type, and any otherinformation you want,
you can press A under Done to save the entry to
Contacts.
To cancela Contacts entry at any time press, e to
return to the idle screen.
To create a Contacts entry:
1 To access the entry details screen:
Select Contacts > [New Contact]. -or-
From the Contacts list, press m. Select New.
2 Ifyouwanttoassignanametotheentry:
Select Name.
Enterthe name.See“Entering Text” on page 43.
When you are finished, press O.
Tip: Press A under Brwse to select a name
already in Contacts.
3 Ifyouwanttoassignaringtonetothename:
Select Ringer.
Selecttheringtoyouwanttoassign.
4 Toassign a Contactstypeto the numberor
address being stored:
Select theContacts type field.
Select theContacts type you want to assign.
5 Tostore a number or address:
Select the # field (or ID for an emailaddress, or IP
foranIP address).
Enterthenumber or address.For phone numbers,
use the 10-digit format.Foremail addresses, see
“Entering Text” on page 43.
Tip: Press A under Brwse to select a number or
address from Contacts, the recent calls list, or
Memo.
When you are finished, press O.
6 If you want to assign more optionst o the number,
select [Options]. See “Assigning Options” on page
34.
7 If you want to add more numbers or addresses to
the entry:
Scrollpast the informationyou already entered.
33
Page 42

Contacts
Enterthe additional information for the entry using
step 2 through step 6. You must assigna name to
the entry,ifyou have not already.
8 Press A under Done.
Assigning Options
1 If you have not already, select [Options].
2 The defaultSpeed Dial numberassigned to a
phonenumber is displayedin the Speed # field.
Thisis alwaysthenext availableSpeedDial
location.
If you want to assign the phone numberto a
different SpeedDiallocation:
With the Speed # field highlighted, press O.
Press A underDelete to delete the current Speed
Dial number.
Enterthe new Speed Dialnumber using the
keypad.
When you are finished, press O.
3 Ifyouwanttocreateavoicenameforaphone
number, select Voice Name.
As directedbythe screen prompts,say and repeat
the name you want to assign to the number. Speak
clearlyinto the microphone.
4 When you are finished, press A under Back.
34
Storing Numbers Quickly
To store numbersto Contacts from the recent calls
list,see“Storing RecentCalls to Contacts”on page
29.
To store numberst o Contacts from Memo, see
“Memo”onpage85.
To store numbersto Contacts from the idle screen:
1 Use the keypad to enter the numberyou want to
store.
2 Press m.
3 Select StoreNumber.
4 To store the number as a new entry, select [New
Contact]. -or-
To store the number to an existing entry, select the
entry.
5 With the Contactstype field highlighted,scroll left
or right to display the Contacts type you want to
assign the number.
6 Ifyouwanttoaddmoreinformationtotheentry,
followthe applicableinstructions in “Creating
Entries” on page 33.
7 Press A under Done.
Page 43

Editing Entries
Editing Entries
1 From the Contacts list, scroll to the entry you want
to edit.
2 Press A under Edit. -or-
If Edit is not one of your options: Press m.Select
Edit.
The entry details screen displays.
3 Follow the applicable instructions in “Creating
Entries” on page 33 to edit the various fields.
Deleting Entries
Delete an Entry
1 From the Contacts list, scroll to the entry you want
to delete.
2 Press m.
3 T o delete the entire entry, select Delete Contact.
4 Press O or press A under Yes to confirm.
Delete a Number or Address
1 From the Contacts list, scroll to the entry that
contains the number or address you wantto
delete.
2 Scroll left or right to display the Contacts type for
the number you want to delete.
3 Press m.
4 Select Delete Number.
5 Press O or press A under Yes to confirm.
Checking Capacity
To see how many numbers are stored in Contacts:
1 From the Contacts list,press m.
2 Select Capacity.
Creating Pauses and Waits
When storinganumber, you can program your
handset to pause or wait between digits while dialing.
A pause makes your handset pause for 3 seconds
beforedialing further. A wait makes your handset
wait for your response beforedialing further.
This feature is useful when using voice mailor other
automated handsetsystems thatrequireyoutodiala
phone number and then enter an access number.
To program a pause:
Press and hold * until the letter P appears. The P
represents a 3-secondpause.
If you store 17035551235P1234, when you select
this numberand make a call, yourhandset dials the
first 11 digits, pauses for 3 seconds, then dials the
last4 digits.
35
Page 44

Contacts
Ifyouwant a pauselonger than3 seconds,press and
hold * more than once. Each P represents a
3-second pause.
To program a wait:
Press and hold * until the letter W appears. The
W means yourhandset waitsbefore dialingfurther.
If you store 17035551235W1234, whenyou select
this numberandmakeacall,your dials the first11
digits and then waits. A message appears asking if
youwant to sendthe restofthe digits.Press A under
Yes to dialthelast4 digits.
Tip: Youcan create pauses and waits while dialing
a number from the keypad. See “Creating
Pauses and WaitsWhileDialing” on page 41.
International Numbers
When storing a number that you plan to use for
international calls, use Plus Dialing:
1 Press and hold 0 for two seconds. A “0”
appears,then changes to a “+”.
Note: The networktranslates the“+”into the
appropriate international access code
needed to placethecall.
2 Enter the country code, city code or area code,
and handset number.
36
For information aboutmaking international calls,see
“Making InternationalCalls”onpage41.
Page 45

Advanced Calling Features
Call Waiting
CallWaiting lets you receivea second call whileon
an active call. Call Waiting is always available, unless
you turn it off for a specific call.
Ifyouareonacallandreceiveasecondcall,your
handset emits a tone and displays a message saying
you are receiving a second call.
To acceptthe secondcall and put the active call on
hold:
Press A under Yes.
To accept the second call and end the active call:
1 Press e.
Your handset rings with the second call.
2 Answer the second call.
To decline the second call:
Press A under No. If you subscribe to voice mail,
the callisforwardedtoyourvoice mail box, unless
you set Call F orward for If Busy to a different
number.
Turn Off Cal l Waiting
To turn off Call Waiting during a call:
1 Press m.
2 Select In Call Setup > Call Waiting.
3 Set this option to Off.
Tip: To turn Call Waiting back on while still on the
call, setthisoption to On.
To turn off Call Waiting for the next call you make or
receive:
1 From the main menu, select Settings > Phone
Calls > Ca ll Waiting.
2 Set this option to Off.
CallWaitingisturnedbackonwhenyouendthecall.
Switching Between Calls
Any time you have one call active and one call on
hold, to makethe callon hold active and put the
activecallon hold:
Press A under Switch.-or-
If Switchis not one of your options. Press m.
Select Switch.
37
Page 46

Advanced Calling Features
Putting a Call on Hold
1 Whileonanactivecall,pressm.
2 Select Hold.
If you want to make the call active again, press A
under Resume.
Call F orwarding
Callforwardingsends calls to the phone numbers
you specify. You can forward all calls to one number
or forward missed calls to different numbers
depending on the reason you missed the call.
You can forward phone lines1 and 2 independently.
Forwarding A ll Call s
When you set your handset to forward all calls, an
iconappears in the top row of the display:
Phoneline 1 is active; callsto phoneline 1 are
G
beingforwarded.
Phoneline 1 is active; callsto phoneline 2 are
H
beingforwarded.
Phone line1 is active;calls to phone lines 1
I
and 2 are being forwarded.
38
Phone line 2 is active; calls to phone line 1 are
J
being forwarded.
Phone line 2 is active; calls to phone line 2 are
K
being forwarded.
Phone line 2 is active; calls to phone lines 1
L
and 2 are being forwarded.
To forwardallcalls:
1 From the main menu, select Call Forward >
Forward > All Calls.
If you specified a forwardingnumber for all calls
before, this number displays.
To forward calls to this number, press A under
Back. -or-
To delete this number, press O,thenpressand
hold A under Delete.
2 To enter the numberyou want to forward calls to:
Enterthenumber using your keypad. -or-
Press A under Search.Select Contacts, Recent
Calls,orMemo. Select the number you want to
enter.
3 Press O.
All your callsarenowforwarded to the numberyou
specified.
Page 47

Turning Off CallForwarding
Turning Off Call Forwarding
If you don’t want all your calls forwarded, turn the
feature off:
1 From the main menu, select Call Forward > To.
2 Set this option to Off.
All your calls are now sent to your handset.
Calls you miss are forwarded according to the
optionsset for missed calls. By default, missedcalls
are forwarded to voice mail.
Note: To receive voicemailmessages, you must
firstsetupa voicemailaccount with TELUS
Mobility Client Care.
Forwarding Missed Calls
You can specify a forwarding number for each type of
missed call:
•IfBusy— Your handsetisonacallor transferring
data.
•IfNoAnswer— Y ou do not answer on the first 4
rings.
• If Unreachable— Your handset is out of coverage
or poweredoff.
Note: Ifyouwantatypeofmissedcallsentto
voicemail, the call forwarding numberfor
that type of missed callmustbe your voice
mail accessnumber.
To forward missed calls:
1 From the main menu, select Call Forward >
Forward > Detailed.
2 Select If Busy to specify a forwardingnumber for
callsreceived whenyour handsetis busy.
3 If you specifieda forwarding numberforthistype
of call before, this number displays.
To forward calls to this number, press A under
Backandgotostep6.-or-
To delete this number, press O ,thenpressand
hold A under Delete.
4 To enter the numberyou want to forward this type
of call to:
Enter thenumber using your keypad.-or-
Press A under Search.Select Contacts, Recent
Calls,orMemo. Select the number you want to
enter.
5 Press O.
6 Repeatstep 2 throughstep 5 for No Answer and
If Unreachable.
7 When you are finished,press A underBack.
39
Page 48

Advanced Calling Features
Note: Your handset comes pre-programmed to
detailed forward to Mike’s Voice Mail. If you
change yourdetailedcallforwarding,
remember to reset the forwarding back to
your accessnumber or your phone number.
Calling 2 People
Putting a Call on Hold, Making a Second Call
1 Place or receive a phone call.
2 While the call is active, press m.
3 Select 2nd Call.This puts the call on hold.
4 Enter the secondphone number you want to call.
Tip: For quick ways to enterthe number, press m.
5 Press O or press s to place the call.
To end the second call and make the call on hold
active again:
Press e.
Tomakethecallonholdactiveandputtheactivecall
on hold:
Press A under Switch.
Making a 3-Way Call
1 Place or receive a phone call.
40
2 While the call is active, press m.
3 Select 3Way. This puts the call on hold.
4 Enter the second phonenumber you want to call.
Tip: For quick ways to enter the number, press m.
5 Press O or press s to place the call.
6 Press A under Join.
All 3 peoplein the callcan speak to andheareach
other.
Merging 2 Calls into a 3-Way Call
You can combine 2 phonecalls into a 3-way call any
timeyouhaveacallonholdandacallactive:
1 Press m.
2 Select Join.
All 3 peoplein the callcan speak to andheareach
other.
Page 49

Creating Pauses and Waits While Dialing
Creating Pauses and Waits
While Dialing
You can enter a pause or wait while dialing a number.
For more information on pauses and waits, see
“Creating Pauses and Waits” on page 35.
To create a pause while dialing a phone number:
1 From the keypad, enter the digits you want to
occur before the pause.
2 Press m.
3 Select Insert Pause.
4 Enter the digits you want to occur after the pause.
To create a wait whiledialing a phone number:
1 From the keypad, enter the digits you want to
occur before the wait.
2 Press m.
3 Select Insert Wait.
4 Enter the digits you want to occur after the wait.
Making International Calls
Plus Dialing lets you place an international call to
mostcountrieswithoutenteringthe localinternational
access code.
1 Press and hold 0 fortwoseconds.A“0” appears,
then changes to a “+”.
Note: The network translates the “+” into the
appropriateinternational accesscode
needed to place the call.
2 Enter the countrycode, city code or area code,
and phonenumber.
Setting Flip Actions
For Answering Calls
To set your phone to answer calls when you open the
flip:
1 From the main menu, select Settings > Phone
Calls > Flip Activation > Flip to Ans.
2 Set this option to On.
To set your handset not to answer calls when you
open the flip:
Set Flip to Ans to Off in step 2.
For Ending Calls
To set your handset to end calls when you open the
flip:
1 From the main menu, select Settings > Phone
Calls > Flip Activation > Flip to End.
2 Set this option to On.
41
Page 50

Advanced Calling Features
To set your handsetnot to answer callswhen you
open the flip:
Set Flip to End to Off in step 2.
Note: If you are using your handset with a
headset,and you have theFlip to End
optionset to On, closing your flipsends
incoming sound to the headset and does not
end the call.
Call Time rs
Call timers measure the duration of your phone calls,
Private or groupcalls, and circuit datause,as well as
the numberof Kilobytes sent and received by your
handset:
•LastCall— displays theduration of your most
recentphone call.
• PhoneReset — keeps a running totalof your
phone callminutes, untilyoureset it.
• PhoneLifetime—displays thetotal minutes of all
your phonecalls.
• Prvt/Grp Reset — keeps a running total of all of
yourPrivateandgroup callminutes,untilyou reset
it.
• Prvt/Grp Lifetime — displays the totalminutes of
all your Private and group calls.
42
• Circuit Reset — keeps a running total of all of
your circuit data use, untilyoureset it.
• Circuit Lifetime — displays the total minutes ofall
of your circuit data use.
• Kbytes Reset— keeps a running totalofthe
number of Kilobytes sent and received by your
phone, until you reset it.
To view or reset a timer:
1 From the main menu, select Call Timers.
2 Selectthefeatureyouwanttovieworreset.
3 T o view a feature without resetting: Press O when
you are finished viewing. -or-
Toreset a feature: PressA under Reset.PressO
or press A under Yes to confirm.
Note: The values displayed by Call Timers should
not be used for billing. Call timers are
estimates only.
Page 51

Entering Text
You can entertextinto your handset usingthe
traditionalmethod of pressing a key severaltimes for
each character, or by pressing a key once for each
letter while words likely to be the one you want are
chosenfrom a database. You canalso entersymbols
and numbers into a text field.
Note: Entering text may work differently in the
browser
In screens that require you to enter text,you see the
following icons. These icons tell you which text input
mode you are using:
Alpha — Press a key several timesfor each
l
character.
Word— Press a key once for each letter while
j
wordslikely to be the one you want are chosen
from a database.
Symbols — Enter punctuation and other
i
symbols.
Numeric — E nter numbers.
k
When you access a screen that requires you to enter
text,you start in the modelastused.
To choose a text inputmode:
1 At a screen thatrequiresyouto enter text,pressm.
2 Select the text inputmode you want to use.A
checkmark appears next to the current mode.
Using Alpha Mode
• Press any key on the keypad to enter the letters,
numbers, and symbols on that key. For example,
to enter the letter Y, press 9 three times.
• Typealetterthenscrolluptomakethatletter
uppercase, or type a letter then scroll down to
make that letter lowercase.
• See “Special Function Keys” on page 44 for more
information on adding spaces, capitalization, and
punctuation.
UsingWordMode
In Word mode, T9 Text Inputanalyzes the letters on
the keypad button you press and arranges them to
createwords.A s you type,T9 Text Input matches
your keystrokes to words in its database and displays
the most commonly used matching word.Youcan
add you own words to this database.
Entering a Word
1 Select Wordasyourtextinput mode.
43
Page 52

Entering Text
2 Type a word by pressing one key for each letter.
For example, to type “test” press 8378.
The displayed word may change as you type it. Do
not try to correctthe wordas you go. Type to the
end of the word beforeediting.
3 If the word that appearsisnotthe desired word,
press 0 to change the wordonthedisplayto the
next most likely word in the database.
Repeat until the desired word appears.
If thedesired worddoesnot appear,you can add it to
the database.
Adding Words to the Database
1 SelectAlphaasyourtextinput mode.
2 Type the word using Alpha mode.
3 SelectWord as your text input mode.
4 Press #.
ThewordyoutypedinAlphatextentrymodeisnow
in the database.
Note: You cannot storealphanumeric
combinations, such as Y2K.
44
Choosing a Language
To change the language of the database:
1 At a screen that requires you to enter text, press m.
2 Select Languages.
3 Selectthe language you want for your database.
Special Function Keys
Some of the handset’s keys assume different
functions while in Alpha or Word mode.
Spaces
Press # for a space.
Capitalization
Press andhold # to make the next letter typed
uppercase (shift), to make all subsequentletters
typed uppercase (capslock),or to go back to
lowercase letters.
These iconsappear in the top row of your display:
mor X
nor W
Shift is on.
Caps lock is on.
Page 53

When neither of these icons appear, letters typed are
lowercase. Scrolling up aftertyping a letter makes
that letter uppercase.
Note: Your handset automatically makes the first
letter of a sentence uppercase.
Punctuation
Press 1 or 0 to insert punctuation. Continueto
pressthekey to view the list of symbolsavailable
through that key. Pause to select the symbol you
want.
Note: Additionalpunctuationsymbolsare available
in Symbolsmode.
Using N umeric Mode
1 SelectNumeric as your text inputmode.
2 Press the number buttons on your keypad to enter
numbers.
Using S ymbols Mode
1 SelectSymbols as your text input mode.
A row of symbols appears along the bottom of the
handset’s display. Scroll right to view the complete
row.
2 Press O to select the highlighted symbol.
Using Numeric Mode
45
Page 54

46
Page 55

Messages
To access your voice mailmessages, text and
numeric messages, Net alerts, and any other types of
messages youareable to receive,gotothe message
center:
1 From the idle screen, press A under Mesg. -or-
From the main menu, select Messages.
2 Scrolltothetypeofmessageyouwanttoaccess.
3 Press A under the display option on the left.
The messagecenter shows how many messages
you have of each type.You can listen to, read, or
delete these messages.
Message Notifications
When you receive a message, your phone notifies
youwithtextonthedisplayandanotificationtoneor
vibration. You can access the message or dismiss
the notification.
If you dismissthenotification, the messageisnot
deleted. It can be accessed throughthemessage
center.
Ifyouarenotonaphonecallwhenyoureceivea
message, your phone soundsa notificationtone
every30 seconds until you accessthe messageor
dismiss the alert.
If you are on a call when you receive a message,
your phonemaysounda notificationtone during the
call or afteryouend the call,dependingon how you
set your notification options.
Setting Notification Options
To control whether your phone soundsmessage
notificationtoneswhile you are on phone calls:
1 From the main menu, select Settings > Phone
Calls > Notifications.
2 Choosetheoptionyouwant:
• ReceiveAll — Tones sound during calls for all
types of messages.
• Msg MailOnly — Tones sound during calls for
mail messages; tones for allothertypes of
messagesarehelduntil you end calls.
• DelayAll — Tones for alltypes ofmessagesare
helduntilyouendcalls.
3 Press A under Select.
Tip: To set notificationoption during a call:Press
m. Select In Call Setup > Notifications.
Voice Mail
Note: To receive voicemail messages, you must
first set up a voice mail account with TELUS
Mobility Client Care.
47
Page 56

Messages
When you receive a voice mail message, New Voice
Mail Messageappears on the display.
To call TELUS Mobility voice mail system and listen
to the message:
Press A under Call.
To dismissthemessage notification:
If the flip is closed, press .. -or-
If the flip is open,pressO or press A under
Back.
Thisicon
you that you have a new message.
y appears on the display, reminding
Sending Unanswered Calls to Voice Mail
To send a phone call to voice mail insteadof
answering it:
Press e. -or-
Press A under No.
If the caller leaves a message, this icon
appears on the display, reminding you that you have
a new message.
48
y
Advanced Voice Mail with F ax
Mike's Advanced Voice Mail with Fax allows you to
receivefaxes directlyto your handsetandstore them
along withyourvoice messages until you're ready to
print. Follow the voice mail prompts to print the fax to
a fax machine.It ensuresprivacy, convenienceand
eliminates the needfora separate fax line.
When you subscribe to Mike's AdvancedVoice Mail
with Fax, you'll receive a fax number from your point
of feature activation. If you haven't received a fax
number,please contactthe nearest TELUS Mobility
dealeror callTELUS Mobility client care.
Please see www.telusmobility.com for more details of
TELUS Mobility Voice Messaging services.
Fax Mail Indicator
Your i830 handset is equippedwith a Fax Mail
indicator to notify you when you have received a fax
throughMike's AdvancedVoiceMailwith Fax.
When you receivea new fax, New FaxMail Message
appearsonthedisplay.
Your handsetwill alert you audiblyuntil you press A
under Call or A under Exit.
Page 57

Text and Numeric Messages
Text and Numeric Messages
Mobile originated text messaging (MOSMS) lets you
send and receive short text messages to and from
otherMikehandsets.Messages you receiveappear
on your handset’s displayand in the text message
inbox.
If your handset is powered off when you receive a
message, yourhandsetnotifiesyouthe nexttimeyou
power it on. If you are out of your coverage area, your
handset alerts you when you return to your coverage
area.
Tip: Whilereading a text and numeric message
that containsa phone number, you can press
s to call that number.
Setting U p
Before you begin using mobile originated text
messaging, you may need to set up your signature,
service center number, and expiration information:
1 From the main menu, select Messages.
2 Scroll to Text Inbox.
3 Press m.
4 Select Text Msg Setup.
5 With the Signature fieldhighlighted, press A
under Change.
Enteryour signature.Itmaybe up to 11 characters
long. See “Entering Text” on page 43. When you
are finished,pressO.
6 Select Srvc Cntr No.
Enter thephone number of your service center. If
youdonotknowthisnumber,contactTELUS
Mobility Client Care.
When you are finished, press O.
7 With the Ex pire After field highlighted, press A
under Change.
Thisistheamountof timemessages you send are
savedif they cannotbe delivered. Afterthis period,
they are discarded.
Scroll to select the number days you want your
messages to be saved.
When you are finished, press O.
8 Select Auto Clean Up. Set this optionto On if you
wantyourphone to delete sent messages.
If you set Auto Clean Up to On, select Clean Up
After to set the numberof days after which sent
messages are deleted or the numberofmessages
to be kept.
9 Press A under Done to save the information you
entered.
49
Page 58

Messages
Receiving Messages
When you receive a message, your phone notifies
you as it would with any other type of message. See
“Message Notifications”on page 47.
To view the message:
Press A under Read.
To dismissthemessage notification:
Press A under Exit.
Reading Messages From the Message Center
1 From the main menu, select Messages > Text
Inbox.
2 Selectthemessageyouwanttoread.-or-
Press the number of the message you want to
read.
3 If the message fillsmorethan one screen,scroll to
read it.
4 To save the message, press A under Ok. -or-
To reply to the message,press A under Reply.
-or-
50
To see all other choices, including forwarding and
deleting the message,calling the sender, or
storing the sender’s number in Contacts, press m.
Your text inbox holds up to 20 messages. Each
message can be up to 160 letters long.
Creating and Sending Messages
1 From the main menu, select Messages> Text
Inbox > [Create Msg]. -or-
Select [ Create Message] from Text Inbox, Text
Outbox, or Drafts. -or-
Highlight QuickNotes and press A under Create.
2 To address the message:
Use the keypadtoenter the phone number of the
personyouwantto send themessage to. -or-
Press A under Browse.SelectContacts, Recent
Calls,orMemo. Select the number you want to
enter.
When you are finished, press O.
3 Enter thetext of the message.See “EnteringText”
on page 43. -or-
To use a quick note: Press A under Browse.
Scroll to the quick note you want. For more
Page 59

Creating and Sending Messages
informationonquicknotes,see“UsingQuick
Notes”on page51.
When you are finished, press O.
4 If youwantto send themessage, pressO orpress
A under Send. -or-
To delete themessagewithout sendingit,press A
under Cancel. -or-
If you want to request confirmation of delivery, save
the messageasa draft,orset thesending method,
press m. Select the optionyouwant.
Beginning Messages From the Recent Calls List
1 From the recent calls list, scroll to the name you
want to send a message to.
2 If the entry has more thanone phonenumber
stored, view the phone number you want to send
the message to.
3 Press m.
4 Select Compose SMS. The message is
automaticallyaddressedto the phonenumber you
chose.
5 Followstep 3 through step 4 of “Creatingand
Sending Messages” on page 50.
Beginning Messages From the Idle Screen
1 Using the keypad, enter the numberyouwantto
sendamessageto.
2 Press m.
3 Select Compose SMS. The message is
automatically addressedto thephonenumber you
chose.
4 Follow step 3 through step 4 of “Creating and
Sending Messages”on page 50.
Using Quick Notes
Quicknotesare short,pre-writtentext messages that
youcancreate,edit,andsend.Youcanstoreupto
20 quick notes.A quicknote may be up to 30
characters long.
To create a quick note:
1 From the main menu, select Messages> Quick
Notes > [New Quick Note].
2 Press A under Create.
Enter text. See “Entering Text” on page 43. -or-
To choosefrompre-installed notes:PressA
under Browse. Scroll to the note you want. Press
A under Select.
3 Press A under Store.
51
Page 60

Messages
Tip: For more options, including sending thequick
note, press m.
Using Drafts
Whenyousaveamessageasadraft,itissavedin
the drafts folder. You must have a draft saved to have
a drafts folder.
To edit a draft:
1 From the main menu, select Messages > Drafts
Folder.
2 Selectthedraftyouwanttoedit.
3 T oedit the fields you want to change, follow step 2
through step 8 in “Creating and Sending
Messages” on page 50.
Using the Outbox
Messages you have sent are stored in the outbox.
These icons appear next to messages in the outbox:
4 Sent and confirmed.
9 Send attempted.
0 Forwarded.
5 Received by addressee.
6 Not received by addressee.
52
8 Send failed.
7 Re-sent.
R Locked.
Resending Messages
To resend a message:
1 From the main menu, select Messages> Text
Outbox.
2 Scrolltothemessageyouwanttoresend.-or-
Press the number of the message you want to
resend.
3 Press s. -or-
Press m . SelectResend.
Deleting Sent Messag es
To deletea sent message:
1 From the main menu, select Messages> Text
Outbox.
2 Scrollto the message you want to delete.
3 Press A under Delete.
4 Press A under Yes to confirm.
Page 61

Managing Memory
To delete all unlocked sent messages:
1 From the main menu, select Messages > Text
Outbox.
2 Press m.
3 Select Delete All.
4 Press A under Yes to confirm.
Locking and Unlocking Sent Messages
When you lock a message,it cannotbe deleted until
you unlock it.
Locking or Unlocking a Message
1 From the main menu, select Messages > Text
Outbox.
2 Scroll to the message you want to lock or unlock.
3 Press m.
4 Select Lock or Unlock.
Managing Memory
Yourtextinbox, outbox, and draftsf older have a set
amount of memory available for storing messages.
The text inbox holds 20 messages. If the text inbox is
full,you cannotreceive messagesuntilyou delete
some.
The outboxand drafts folder share memory space.
Together they can hold 30 messages. If the outbox
and drafts folder memory is full, you cannot send
messages or save drafts until you delete some.
To view the amount of memory availablein your text
inbox:
1 From the main menu, select Messages> Text
Inbox.
2 Press A under Memory.
To view the amount of memory availablein your
outboxanddrafts folder:
1 From the main menu, select Messages> Text
Outbox or Messages > Drafts.
2 Press A under Memory.
Net Alerts
Note: As of this publication, TELUS Mobility does
not support netalertmessages on TheMike
Network.
When you receive a Net alert, a notification appears
on the display.
If you dismiss the notification, this icon w appears
on the display,reminding you that you have a new
message.
53
Page 62

54
Page 63

Mike’s Wireless Web Services
Your i830 handset is equipped with a microbrowser
that can be used to access Mike's Wireless Web
Servicesandother up-to-the-minuteinformation.You
can view specially designed text versions of popular
Internet sites that provide news, sports,weather,
entertainment, stock quote sites and other useful
information.
To access the microbrowser:
From the idle screen, press m to access the main
menu. Scrollto Browser.Press A under Browse
to access the microbrowser.
Launch i ng the Microbrows er
The first time you use the microbrowser, you will be
required to go through a security setup process that
takes approximately one to three minutes.Please
follow the on-screen prompts to complete the security
setupprocess.Thissetup processwill only occur the
first time you use the service.
To launch the microbrowser:
1 From the idle screen, press m to access the main
menu.
2 Scroll to Browser.PressA under Select.
3 Once connected, the Homepage (or the last page
visited) will be displayed. To accesstheHome
menupagefromanyother menu in the
microbrowser, press e.
4 T o view additional text while visiting a site, use the
navigation keys to scroll to read it.
Navigating the Microbrows er
When you use the microbrowser, some keys on your
handset operate differently thanduring a normal
phone call.These keys are explained below:
Home key — press to return to the default
e
Home page(thepagefirst seen when you
launch the browser).
Asterisk/Back key — press to return to the
*
previous page viewedbefore the current
page.
0/Next key — press after using the back
0
key to return to the original page viewed.
Accessing the Browser Menu
1 Press and hold m to accessthebrowser menu.
2 Scroll to select the desired option.
3 Press A under Ok to initiate the option.
55
Page 64

Mike’s Wireless Web Services
Belowis the list of available options:
• Exit Browser — closes the browser and returns
you to the idle screen. Use this option when you
want to return to the page currently viewed at a
latertime, without navigatingthrough the entire
menu structure again.
•Reload— reloads thecurrent Wireless Web page
viewed, refreshing the information with the most
currentfrom the information provider.
•Home— returns you to your default Home page,
the first page you see when launching the
microbrowser.
• Bookmarks — allows you to access bookmarks
youhavecreatedusingoption.
•MarkSite— identifies sites you would like to visit
easily and quickly from your microbrowser.
• About Phone.com — contains information about
the versionof the Phone.com browser loaded on
your handset.
• Advanced Options — helpstroubleshoot any
serviceissues you may have with your browser.
56
Ending the Microbrowser Session
At anypoint in the session,press and hold the e
to close the microbrowser.
UsingYourPhoneasaModem
To use your phone as a modem with a laptop,
handheld device,or desktop computer:
1 Open the flap covering the phone’s accessory
connector.
flap
Page 65

Using Your Phone as a Modem
2 With the phone’s displayfacing up, inserta data
cable’s connectorinto the accessory connector,
until you heara click.
3 Insert the data plug into the COM port of the other
device.
When used as a modem,yourphonehas t hese data
transfer modes:
• Circuit data — used for sending and receiving
faxes and for transferring large files
• Packet data — used for small file transfers such as
email.
To use these services, you must install the iDEN
Wireless Data Services software (available
separately).Formore informationon setting up your
computer and your i830 phone for packet and circuit
data calls, contact TELUS Mobility Client Care.
4 Press A under Change
5 Scrollto the baud rate for yourlocation.
Press A under Select.
57
Page 66

58
Page 67

Ring Tones
To set the ring tone your handset makes when you
receive phone calls, message notifications, or call
alerts:
1 From the main menu, select Ring Tones.
2 Make sure Vibrate All is set to Off.
3 Scroll through the list of ring tones and select the
one you wanttoassign. Vibrate sets your handset
to vibrate instead of making a sound; Silent sets
your handsettoneither vibrate normake a sound.
Tip: Highlightaringtonetohearit.
4 Select the features you want to assigned the ring
toneto.
5 When you are finished, press A under Done.
Setting Your Handset to Vibrate
You can set your handset to vibrate instead of
making a sound when you receive all phone calls,
Private calls, group calls, messages notifications,and
call alerts.
1 From the main menu, select Ring Tones > Vibrate
All.
2 Set this option to On.
Tip: Pressing the volume controls to turn down the
volume as far as possible sets Vibrate All to
On.
To set your handset to vibrate instead of making a
sound for some features but not others:
1 From the main menu, select Ring Tones.
2 Make sure Vibrate All is set to Off.
3 Select Vibrate from thelistof ringtones.
4 Select the features you want to set to make no
sound.
5 When you are finished,press A underDone.
Note: To set ring options for Private calls and
groupcalls, see “Setting Your Handsetto
Vibrate” on page 89.
These icons indicate how the ringer is set.
The handset always vibratesinstead of
Q
ringing.
The handset does not ring for phone calls.
M
Group calls and Private are heard through the
u
earpiece, not the speaker.
These icons may appear at the same time.
59
Page 68

Ring Tones
Assigning Ring Tones to Contacts
You can set the ring tone yourhandset makes when
you receivephone calls or call alerts from someone
youhavestoredinContacts.
1 From the main menu, select Ring Tones.
2 Make sure Vibrate All is set to Off.
3 Scroll through the list of ring tones and select the
one you want to assign.
4 Select Contact.
5 SelecttheContactsentryyouwanttoassignthe
ring tone to.
Ring and Vibrate
To set a your handset to ring and vibrate when you
receive phone calls or call alerts:
1 From the main menu, select Ring Tones.
2 Make sure Vibrate All is set to Off.
3 Scrollthrough the list of ringtones and highlight
theoneyouwanttoassign.
4 Press m.
5 Select Assign w/Vibe.
6 Select the features you want to set to ring and
vibrate.
60
7 When you are finished, press A under Done.
This icon
S appears on the display.
Viewing Ring Tone Assignments
1 From the main menu, select Ring Tones.
2 Make sure Vibrate All is set to Off.
3 Highlight any ring tone.
4 Press m.
5 Select Overview.
6 Scroll to view ring tones assigned to features and
Contact entries.
Managi ng Memo ry
To view the amount of memory availablefor custom
ring tones:
1 From the main menu, select Ring Tones.
2 Make sure Vibrate All is set to Off.
3 Highlight any ring tone.
4 Press m.
5 Select Memory Usage.
Deleting custom ring tones frees memory.
Page 69

Note: Ring tones are storedin yourhandset using
thesamememoryusedtostorevoice
records, Java applications, and wallpaper
images.Deleting voicerecords frees
memory space for ring tones.
Deleting Custom Ring Tones
To deletea customring tone:
1 From the main menu, select Ring Tones.
2 Make sure Vibrate All is set to Off.
3 Scrollto theringtoneyou want to delete.
4 Press m.
5 Select Delete.
6 Press A under Yes to confirm.
Deleting Custom Ring Tones
61
Page 70

62
Page 71

Datebook
Datebook stores up to 250 events. You can store
events over a 13 month period — 12 months after
and 1 month before the current date.
A Datebookevent contains:
• Asubject—Anameyouassigntotheevent.You
can also enter a phone number, Private ID, or
Talkgroup numberhere. Afterthe eventisstored,
you can call this numberfromDatebookor when
you get a reminder of this event.
• A location — The location of the event. You can
also entera phonenumber,Private ID, or
Talkgroup numberhere. Afterthe eventisstored,
you can call this numberfromDatebookor when
you get a reminder of this event.
• A start time — The start time automatically
assigned to an event is the beginning of the day.
You can change the start time, or assign no start
time, beforestoring the event.
• A duration — the length of time the event lasts
• A date — The dateautomatically assignedtoan
event is the date that was highlighted or selected
when you began creating the event. You can
change thisdate before storing the event.
• A repeat — An option to store the event as a
recurring event
• A reminder — If an event has a start time, you can
set Datebook to remind you that the event is going
to start.
• Aringtoneforthereminder
• A profile that your phoneisswitched to while the
event is occurring
• A Java applicationt hat starts when the event
begins
Only the subjectand date are required.
Viewing Datebook
To access Datebook:
From themain menu, select Datebook.
You can view Datebook by the day, by the week, or
by the month. You can also view the details of any
event.
In day view, briefinformationabout each event for
that day appears.
In week view, eventsappear as markers
corresponding to their times.
Inmonthview,dayswith eventsappear witha marker
in the corner.
To view an event:
1 Select the day the event occurs.
63
Page 72

Datebook
2 Select the event.
To changethe current view:
1 While viewing Datebook, press m.
2 Selectthe view you want.
Navigating Datebook
To scroll through Datebook:
Scroll left and right using the navigation key. -or-
In week viewandmonthview, press * or #.
Toseemoreindayview:
Scrollup and down usingthenavigationkey.
To highlight a day in month view:
Enter the date using the keypad.
To go to today’s date:
1 While viewing Datebook, press m.
2 Select Go To Today.
To go to any date in Datebook:
1 While viewing Datebook, press m.
2 Select Go To Date.
3 Selectthe dateyou want.
64
Creating Events
Every Datebook event must have a subject and be
storedto a date. Otherinformation is optional.
You may enter the informationinany order by
scrolling throughtheeventdetails.
Afteryouhave entered theinformationyouwant, you
can press A under Done to store the event to
Datebook.
If you decide you don’t wantto store theevent:
Press A under Cancel.
To create a Datebook event:
1 While viewingdatebook,pressA under New. -or-
In day view, select [New Event] .
2 To assign a subject to the event:
Select Subject.
Enterthename. See “EnteringText” on page 43.
-or-
Press A under Browse to choose from common
event names. -or-
Entera phone number, Private ID, or Talkgroup
number. After the event is stored, you can call this
number.
When you are finished, press O.
Page 73

Creating Events
3 Ifyouwanttoassignalocationtotheevent:
Select Location.
Enterthe location.S ee “Entering Text”on page43.
-or-
Entera phone number, P rivate ID, or Talkgroup
number. After the event is stored, you can call this
number.
When you are finished, press O.
4 The start time automatically assigned to an event
is the beginning of the day. If you want to change
the start time or assign no start time:
Select Start.
Enter the start time you want. -or-
Press A under No Time to assignno start time.
5 Ifyouwanttoassignadurationtotheevent:
Select Duration.
Select the duration you want. -or-
Select Custom to enter a duration.
6 The date automatically assigned to an event is the
date that was highlighted or selected when you
began creating the event.To changethe date of
the event:
Select Date.
Enter thedateyouwant.
7 If you want to make the event a recurring event:
Select Repeat.
Selecttherepeat cycle you want.
If the event occurs more than once a week: Select
Multiple Day. Select the days you want.
Press A under Done.
Select the date you want this event to stop
recurring.
8 If you want to create reminder for this event:
Select Reminder.
Select the remindertime you want. -or-
Select Custom to enter a reminder time.
Note: If an event has no start time,you can not
createareminder for it.
9 If you have entered all the information you want for
this event, press A under Done. -or-
If you want to assign a ring tone, a profile, or a
Javaapplication to theevent, see“AssigningMore
Options” on page 66.
65
Page 74

Datebook
Assigning More Options
To assign more options before storing an event:
1 If you have created a reminder for the event and
want to set the ring tone for that reminder:
Select Ring Tone.
Select the ring tone you want from the ring tones
storedin yourhandset.
2 Ifyouwanttoassignaprofilethatyourhandsetis
switched to while the event is occurring:
Select Profile.
Selecttheprofile youwantfrom the profiles stored
in your handset.
Your handset switches to this profile when the
event starts and switches back to the previous
profile when the event ends.
3 IfyouwanttoassignaJavaapplicationtostart
when the event starts:
Select App.
Select the application you want from the Java
applicationsstored in your handset.
If you createda reminderforthis event, your
handsetpromptsyoutostarttheJavaapplication
when you get the reminder.
66
Editing Events
To change the details of an event:
1 Selectthedaytheeventoccurs.
2 Select the event.
3 Press A under Edit.
4 Follow the applicable instructions in “Creating
Events”onpage64toeditthevariousfields.
To copy an event to anotherdate:
1 Selectthedaytheeventoccurs.
2 Select the event.
3 Press m.
4 Select Copy.
5 Press A under Yes to confirm.
6 Enter the date you want.
7 Press O.
8 If you want to change more information,follow the
applicable instructions in “Creating Events” on
page64toeditthevariousfields.
Deleting Events
1 Selectthedaytheeventoccurs.
2 Select the event.
3 Press m.
4 Select Delete.
Page 75

Receiving Reminders
5 If the event is not recurring, press O or press A
under Yes to confirm.
If the event is a recurringevent:
Select This Event Only to delete only the event
selectedin step2.
Select Repeat Event to deleteall occurrencesof
the event.
Receiving Reminders
Ifyoucreated a reminderfora Datebook event, when
the reminder time occurs,yourhandset notifiesyou
with text on the display and a reminder tone.
To view more detailsaboutthe event:
Open the flip. -or-
Press A under View.
To dismiss the reminder:
If the flip is closed, press .. -or-
If the flip is open,pressO press A under
Dismiss, or close the flip.
Tip: You can set your handset to power on when
you receivea reminder. See “Customizing
Datebook Setup”on page 68.
For Events with Java Application s
If you assigned a Java application to start when the
event starts, you can starttheapplicationwhenyou
get the reminder.
1 Press m.
2 Select Launch.
For Events with Numbers to Call
If you stored a phone number, Private ID, or
Talkgroupnumber in the Subject or Location field of
a Datebook event, you can call or send a call alert to
that number from the reminder for that event. See
step 3 on page 68.
Making Cal ls From Datebook
If you stored a phone number, Private ID, or
Talkgroupnumber in the Subject or Location field of
a Datebook event, you can call or send a call alert to
that numberfromDatebook.
To make a call or send a call alert:
1 Select the eventcontaining the number you want
to call or send a call alert to.
2 Gotostep3toplacethecallorsendthecallalert
now. -or-
67
Page 76

Datebook
If the day has more than one event containing
numbers to call, select the event containing the
numberyouwantto callor send a call alert to.
3 To make a phone call:
Press s. -or-
Press m. Select Call # in Event.
To make a Private call or group call:
Press and hold the PTT button on the side of your
handset.-or-
If you did not include a # before the Talkgroup you
want to call: Press m. Select Talkgroup.
Tosendacallalert:
Press m. Select Alert # in Event.
Customizing Datebook Setup
To access Datebook set up options:
1 From the main menu, select Datebook.
2 Press m.
3 Select Setup.
You can view or change theseoptions:
•StartView— sets Datebook to start in day view,
week view,ormonthviewwhenyouaccess
Datebook.
68
•DailyBegin— sets the beginning of your day.
This is the earliest time of day displayed in week
view, if you have a 12-hour day view.
•Reminders—IfthisoptionissettoOnly When
On, your handsett o remind you of events only
when itis on. If this option is set to Always,your
handset powers itself on when you receive
reminders. To avoid draining the battery, your
handset then powers itself off after a short time.
• Delete After — sets theamount of time Datebook
waitstodeleteaneventafterisoccurs.
•TimeShift— lets you shift the times of all
Datebookevents.This isuseful ifyou are travelling
to a different time zone.
• Alert Timeout — sets the amountof time a tone
continues to sound whenyou receive a message
notification, call alert, or Datebook reminder.
•Clock— controls whether thetimeanddate
appear on the idle screen; sets time and date
format; sets year.
Page 77

Java Applications
Yourhandset arriveswithJavaapplications installed
and readyto run.You can downloadandinstallmore
Javaapplications.
Note: Using Java applicationsmay causeyour
handsettouseup more battery power than
other uses of your handset.
Installing Applications
1 From the main menu, select Java Apps.
2 Selectthe application or suite of applications you
want to install.
3 Press O.
4 Press A under Done.
Running Applications
To run an application that has a shortcut on the main
menu:
1 Fromthemainmenu,selecttheapplicationor
suiteofapplicationsyouwanttorun.
2 If you have selecteda suite of application, select
the application you want to run.
Torunanapplicationthatdoesnothaveashortcut
on the main menu:
1 From the main menu, select Java Apps.
2 Select the applicationorsuite of applications you
want to run.
3 If you have selected a suite of applications, select
the applicationyouwantt o run.
Suspending Applications
When you suspend an application, it does not stop
running. It goes to the background so that you can
run another application in the foreground.
Tosuspendanapplication:
Press e or close the flip.
To view your suspendedapplications:
From the Java menu, select Suspended Apps.
You can have up to 3 applications running at one
time—1runningintheforegroundand2inthe
background.
Resuming Applications
You can resume a suspended application at any
time. Thisbrings it to the foreground.
1 From the Java menu, select Suspended Apps.
69
Page 78

Java Applications
2 Selectthe applicationyouwant to resume.
Ending Applicati ons
To end an application:
1 From the main menu, select Java Apps.
2 Scroll to the application you want to end.
3 Press A under End.
Tip: You can also end applications from the
Suspended Apps screen.
To end all applications:
1 From the main menu, select Java Apps.
2 Scroll to Suspended Apps.
3 Press m.
4 Select End All.
5 Press O or press A under Yestoconfirm.
6 If you want to end all applications withoutletting
them exit, pressA under EndNow.
Deleting Applications
To deleteanapplication:
1 From the main menu, select Java Apps.
2 Selectthe applicationyouwantto delete.
3 Press m.
4 Select Deinstall.
70
5 Press O or press A under Yes to confirm.
6 When your handsethasfinished deleting the
application, press A under Done.
To deleteall Java applications:
1 From the main menu, select Java Apps.
2 Selectthe application you wantto delete.
3 Press m.
4 Select Delete All.
5 Press O or press A under Yes to confirm.
Managi ng Memo ry
To view the amount of memory availablefor Java
applications:
1 From the main menu, select Java Apps > Java
System.
2 Press A under Next.
3 T o see more memory information, press A under
Next again.
Deleting Java applicationsfreesmemory.
Note: Java applicationdata is stored in your
handset using the same memory used to
store voice records, ring tones, and
wallpaper images. Deleting some of these
otheritems frees memory space for Java
applications.
Page 79

Shortcuts on the Main Menu
Shortcuts on the Main Menu
When you installan application,youcan createa
shortcut to the application on the main menu.
To create a shortcut to an application that is already
installed:
1 From the main menu, select Settings >
Personalize > Menu Options > Add/Remove
Apps. -or-
From the main menu: Press m.SelectMain Setup
> Add/Remove Apps.
2 Scroll to view the list of Java applications. Any
application that has a shortcuton t he main menu
has a checkmark next to it.
3 Scroll to the application you want to create a
shortcut for.
4 Press O.
5 Press A under Done.
To remove a shortcut:
1 From the main menu, select Settings >
Personalize > Menu Options >Add/Remove
Apps. -or-
From the main menu: Press m.SelectMain Setup
> Add/Remove Apps.
2 Scroll to view the list of Java applications. Any
application that has a shortcut on the main menu
hasacheckmarknexttoit.
3 Scrollto the applicationyouwant to removethe
shortcutfor.
4 Press O.
5 Press A under Done.
Java Applications and GPS Enabled
Some Java applicationscan make use of your
handset’s GPS featureto determine theapproximate
geographicallocation of your handset.(See “GPS
Enabled” on page 75 for more information on the
GPS feature.) However, for privacy reasons, you may
not always want Java applications to access the
location of your handset.Yourhandset protectsyour
privacy by giving you the option to block all or some
Java applications from accessing the location of your
handset.
Setting Privacy for All Java Applications
These options control the privacy of all Java
applications on your handset:
71
Page 80

Java Applications
• Restricted — No Java or similar software
applicationsmay accessthe location of your
handset. However,location information may still be
available to the handset’sowner,fleet manager, or
accountadministrator.
• Unrestricted — All Java applications may access
the location of your handset, without notifying you.
•ByPermission— When a Javaapplication
attempts to access the location of your handset,
you are promptedto givepermission.However,
location informationmaystill be available to the
handset’s owner, fleetmanager,or account
administrator.
See “SettingP rivacy Options”on page 79 for
information on choosing these options.
Granting or Denying Permission
If you chooseBy Permission, you must grant or
denyeach Javaapplicationaccess to the location of
your handset when the application requests access
for thefirstt ime. Youmay be required to grant or
deny subsequent requests from the same
application, depending on the privacy setting you
choose for the individual Java application (see
“Setting Privacy for Each Java Application” on page
73).
72
When a Java application requests access the
location of your handset,a screenappears informing
you.
To deny this request:
1 Press A under Deny. The application does not
access the location of your handset.
2 Select the denying option you want:
•Always— If the application requestsaccess to
the location of your handset again, the request
is denied without notifying you.
• For this session — If the application requests
accessto the location of your handsetagain
before you power off your handset, the request
is denied without notifying you.
• Only Once — If theapplication requests access
to the location of your handset again, you are
prompted to grant or deny permission.
To grant this request:
1 Press A under Grant. The application accesses
your handset’s location.
2 Selectthe granting optionyou want:
•Always— If the application requestsaccess to
the location of your handset again, the request
is grantedwithout notifying you.
Page 81

Java Applications andGPS Enabled
• For this session— If the application requests
accessto the location of your handsetagain
beforeyou poweroffyour handset, therequest
is grantedwithout notifying you.
• Only Once — If the application requests access
to the location of your handsetagain, you are
prompted to grant or deny permission.
Setting Privacy for Each Java Application
After a given Java application requests access to the
location of your handset for the first time, you have
the opportunity to set GPS privacy option for that
Javaapplication.
1 From the main menu, select Java Apps.
2 Selectthe application or suite of applications you
want to set the privacy option for.
If the application has requestedaccess to the
locationof your handset, m appears when you
highlight the application.
3 Press m.
4 Select Permissions.
5 Selectthe privacy option you want for this
application:
•Always— The applicationalways has
permission to access the location of your
handset, without notifying you.
•Ask— When the application requests access to
the location of your handset, you are prompted
to grant or deny permission (see “Granting or
Denying Permission” on page 72).
• Never— When the application requests access
to the location of your handset, the request is
deniedwithout notifying you.
73
Page 82

74
Page 83

GPS Enabled
Yourhandset’s GPS Enabledfeature uses
information fromGlobal Positioning System(GPS)
satellites orbiting the Earth to determine the
approximate geographical location of your handset,
expressed as latitude and longitude. The availability
and accuracy of this location information (and the
amountoftimethatittakes to calculate it) willvary
depending on the environment in which you are using
theGPSfeature.For example,GPS locationfixes are
oftendifficultto obtain indoors,in covered locations,
between high buildings, or in other situations where
you have not established a clear broad view of the
sky. SEE: “IMPORTANT: Things to Keep in Mind”
on page 75.
You can also use the GPS feature to view your
approximate location. Location information appears
on the handset’s display.
Javaapplicationsloaded on your handsetcanalso
requestyour location.If your handsetisconnectedto
a laptop computer or similar device, software running
on that device can request your location. To protect
your privacy, you can control whether these requests
are granted.
IMPORTANT: Things to Keep in Mind
If you are using the GPS featureofyourhandset
whiledriving, pleasegivefull attention to driving and
to the road.
Where adequate signals from multiple satellites
are not available (usually because your GPS
antenna cannot establish a view of a wide area of
open sky), theGPS featureof yourhandset WILL
NOT WORK. Such situations include but are not
limited to:
• In underground locations
• Inside of buildings, trains, or other covered
vehicles
• Under any other metal or concrete roof or
structure
• Between tall buildings or under dense
tree-cover
• Near a powerful radio or television tower
• When your GPS antenna is covered (for
example, by your hand or other object) or
facing the ground
• In temperature extremes outside the operating
limits of your handset
75
Page 84

GPS Enabled
Walking or driving very slowly may also
substantially reduce GPS performance.
Even where location informationcanbe
calculated in such situations, it may take much
longerto do so, and your location estimate may
not be as accurate.
Even where adequate signals from multiple
satellites are available, your GPS feature will only
provide an approximate location, often within 150
feet(45 meters)but sometimesmuchfurtherfrom
your actual location. Advice on how to improve
GPSperformanceis providedin “Enhancing GPS
Performance” on page77.
While the GPS feature of your handset can be a
valuable navigational aid,it does not replace the
need forcareful navigating and good judgment.
Never rely solely on one device for navigation.
Remember that the accuracy of the location
informationandthetimeneededtoobtainitwillvary
depending on circumstances, particularly the ability
to receivesignals from adequatenumbers of
satellites.
76
The satellites used by the GPS featureof your
handset are controlled by the U.S. government and
are subjecttochanges implemented in accordance
with the Department of Defense GPS user policy and
the Federal RadionavigationPlan. These changes
may affect the performance of the GPS feature of
your handset.
Viewing Your Approximate Location
1 From the main menu, select GPS > Position.
2 Scroll to view the entire screen.
This displays the followinginformationaboutthe last
time your location was calculated:
• Thetime(asGreenwichMeanTime)anddatethat
the location was last calculated
• The approximate location, expressed as latitude
and longitude
• The estimated accuracy of the calculated location.
This estimate of accuracy is onlya very rough
estimate and may vary substantially from the
actual accuracy of the approximate location
information reported.
• The number of satellites used to calculate the
location. In general, more satellites make for better
accuracy.
Page 85

Enhancing GPS Performance
To calculate your location again:
Press A under Rfrsh.
It may take your handset several minutes to complete
the process of determining your location. Duringthis
time,a messageusually appearson yourhandset’s
display saying your handset is scanning for satellites.
For tips on getting the best location calculation, see
“Enhancing GPS Performance”.
The Position screendisplays the updated
information.
To cancel a location calculation before it is
completed:
Press A under Cancel to return to the Position
screen. -or-
Press e to return to the idle screen.
Each timeapproximatelocation of your handset is
calculated, the latest location information is stored in
your handset and remains there even when your
handset is powered off. You will see this information
the next time you view the Position screen.
If you received a phone call or alert while attempting
to determine your location, the Position screen will
disappear, but your handset will continue attempting
to determine its location. If it is successful, the new
location information willbe displayed thenexttime
you view the Position screen.
Enhancing GPS Performance
Sometimes the GPS feature of your handsetmaybe
unabletocomplete a locationcalculation
successfully. If this happens when you are trying to
view your location on the handset’s display,youwill
see a message indicating that your handsetcannot
accesssatellites.
To improveaccuracyandincreaseyourchances of a
successful calculation, do the followingwhile your
handset is determining your approximate location:
• Stayin theopen. The GPS feature worksbest
where there is nothing betweenyourhandset and
a large amount of open sky. If possible, go outside,
away from tall buildings and foliage.W hile
performanceinabuildingisimprovedbymoving
closer to windows, glass with certain sun shielding
films may block satellite signals.
• Extend your handset’santenna.
77
Page 86

GPS Enabled
• Hold your handset to enhance reception. Signals
from GPS satellites are transmitted to your GPS
antenna, which is in your handset antenna. Hold
your handsetaway from your body, giving the
antenna clear accessto satellite signals. Do not
covertheantennaareawithyourfingersor
anythingelse.
• Stand still. If possible, stand still until your handset
is finisheddetermining your location. Moving your
handsetata walking pace while yourhandset is
calculating yourapproximatelocation may
substantiallydecrease GPS performance.
78
• Inacar.WhenusingtheGPSEnabledfeatureina
car,positionyour handsetso thattheGPS antenna
has good access to GPS signalsthrough the car’s
windows. Typically, theGPS antenna has best
accessto GPS signals in acarwhen placednear a
window.
Note: Although moving your handset at a walking
pacedecreases GPS performance,moving
it at the speed of a moving car does not.
• Stayin networkcoverage.Thenetworkwillprovide
your handset with information that helps determine
your location more quickly and accurately.
Updating Satellite Almanac Data
Another way to keep the GPS feature of your handset
working wellistokeep your satellitealmanac dataup
to date.
TheUnitedStates governmentmaintains analmanac
of data about whereGPSsatellites are as they orbit
the Earth.Thisinformation is availableto your
handset. Keeping your satellitealmanac up to date
helps your handset determine your location more
quickly.
Page 87

Setting Privacy Options
The almanaccontainsinformation about the location
of satellites, theiroperationalstatus, and other
satellite information.Keeping this information
updatedenhances the performance of your GPS
feature. In most cases, your handsetwillbe ableto
get a fix in strong satellite signalconditionswith
outdated almanacdata, but it may take longer.
If your satellite almanac data is out of date, your
handset may prompt you to update it. Follow the
instructionsthatappearonthe handset’sdisplay. You
maybeaskedtogotoawebsiteorcallacustomer
care number.
Setting Privacy Options
Yourhandset’s GPS privacyoptions controlwhether
Javaapplicationsonyourhandset or other software
applications may view the location of your
handset.You may set your handset to one of these
GPS privacyoptions.
Note: Privacy options do not apply to the
transmissionof location information during
emergency 911calls.
To set your GPS privacyoptions:
1 From the main menu, select GPS > Privacy.
2 If your GPS PIN securityfeature is enabled, enter
your GPS PIN. (See “Setting the GPS PIN Security
Feature” on page 79 for more information.)
3 Select the privacy optionyou want:
• Restricted — No Java or similar software
applicationsmay view the location of your
handset. However, location information may still
be available to the handset’s owner, fleet
manager, or accountadministrator.
•Unrestricted— All applications may view the
location of your handset,without notifyingyou.
•ByPermission— When an application
attempts to view the location of your handset,
youwillbepromptedtogivepermission.
However, location information may still be
available to the handset’sowner, fleet manager,
or accountadministrator.
Setting the GPS PIN Security Feature
To preventyour GPS privacy settings from being
altered without your knowledge, your GPS privacy
option can be protected by a PIN.
When you receiveyourhandset, the GPS security
feature is turned off, so you do not have to enter a
GPS PIN to access your GPS privacy options. If you
turn this feature on, you will be required to enter a
GPS PIN to access your GPS privacy options.
To turn the GPS Enabled security feature on or off:
1 From the main menu, select Settings > Security >
GPS PIN.
79
Page 88

GPS Enabled
2 Select On or Off.
3 Enter the current GPS PIN.
Note: When you receiveyourhandset, your GPS
PIN is 0000.
4 Press A under Ok.
To changeyourGPS PIN:
1 Fromthe mainmenu, selectSettings > Security >
Change Password > GPS PIN.
2 Enter the current GPS PIN.
Note: When you receiveyourhandset, your GPS
PIN is 0000.
3 Press A under Ok.
4 Enterthenew4-to8-digitGPSPIN.
5 Press A under Ok.
6 Enterthenew4-to8-digitGPSPINtoconfirm.
7 Press A under Ok.
Using GP S with Map Software
You can use the GPS feature of your handset to
provide approximate location data to a laptop
computer or similar device that is runninginteractive
map software such as that made by DeLorme or
Microsoft. This way, if your handset has good access
to GPS signals,your approximate positionon a map
canbemadeavailableasyoutravelinavehicle.
80
To do this, connectyourhandset to your laptop(or
other device) with a data cable and set your handset
to transmit data (see “Getting Started” on page 81).
Your handset then provides your approximate
location to the device runningthemapsoftware,
which displays your location on a map. Your handset
provides an updated location every second and the
map software displays your changing location on its
map.
See “Enhancing GPS Performance” on page 77
for moredetails on obtaining good location
information.
Note: Becauseyour handsetis continuously
determining your location, using the GPS
feature of your handset withmapsoftware
usesthe handset’s battery power quickly.
Software Compatibility
Your handset sends location information to your
laptop or other device using the standard National
Marine Electronics Association (NMEA) format. Your
handset supports output messages in NMEA-0183
format and supports the following NMEA-0183
sentences: GGA, GLL, GSA, GSV, RMC, and VTG.
The map software running on your laptopor other
device mustsupport NMEA 3.0.
Page 89

Using GPS with Map Software
Getting Started
To connectyourhandset to your laptopor other
device:
1 Open the flap covering the handset’s accessory
connector.
2 With the handset’s display facing up, insertthe
data cable’s connector into the accessory
connector,until you hear a click.
3 InsertthedataplugintotheCOMportofyour
laptop or other device.
Makesureno otherapplicationisusing the COMport
selected.
Make sure the COM port settingsofyourlaptop or
otherdevice are set to the following:
• Bits per second:4800
• Data bits: 8
• Parity: None
• Stop bits: 1
• Flow control: Hardware
To set your handset to send location information to
your laptop or other device:
1 From the main menu, select GPS > Interface.
2 Set NMEA OUT to On.
Your handset is now sending location data to your
laptop or other device.
To stop your handsetfrom sending location data to
your laptop or other device:
Set NMEA OUT to Off.
Each time you power your handset on, NMEA OUT is
automaticallyset to Off.
81
Page 90

82
Page 91

Voice Records
A voice record is a recording you make with your
handset and can play back. You can record notes to
yourself or phone calls.
Yourhandset can store up to 20 voice records.
Creating Voice Records
To record a note to yourself:
1 From the main menu, select VoiceRecord > [New
VoiceRec].
2 Say the messageyou want to record into the
microphone.
Tip: To stop recording before you are finished,
press A under Pause. To start recording
again, press A underResume.
3 When you are finished recording, press O.
Toaddtotheendofvoicerecord:
1 From the main menu, select VoiceRecord.
2 Selectthe voice recordyouwant to add to.
3 Press m.
4 Select Add To.
5 When you are finished recording, press O.
To record a phone call:
1 While on an active call, press m.
2 Select Record.
3 When you are finishedrecording, press O.
Note: Recording of phone calls is subject to
applicable laws regarding privacy and
recording of phone conversations.
Playing Voice Records
1 From the main menu, select VoiceRecord.
2 Select the voice record you want to play.
3 To stop the voice record while it is playing, press
O.
Tip: To fast forward, scroll right. To rewind, scroll
left. To pause or resume, press any key.
Labeling Voice Records
When you createa voicerecord, it is labeled with the
time and date it was recorded. You can then rename
it with a custom label.
1 From the main menu, select VoiceRecord.
2 Select the voice record you want to label.
3 Press A under Label.
4 Enter the labelyouwantt o assign. See “Entering
Text” on page 43.
83
Page 92

Voice Records
5 Press O.
Deleting Voice Records
To delete a voice record:
1 From the main menu, select VoiceRecord.
2 Scroll to the unlocked voice record you want to
delete.
3 Press m.
4 Select Delete.
5 Press O or A underYes to confirm.
To delete all voice records:
1 From the main menu, select VoiceRecord.
2 Scroll to any voice record.
3 Press m.
4 Select Delete All.
5 Press O or A underYes to confirm.
Locking Voice Records
When you lock a voice record,itcannot be deleted
until you unlock it.
1 From the main menu, select VoiceRecord.
2 Select the voice record you want to lock orunlock.
3 Select Lock to lock the message. -or-
84
Select Unlockto unlockt he message.
When a voice recordis locked,this icon
next to it.
R appears
Managi ng Memo ry
To view the amount of memory available for voice
records:
1 From the main menu, select VoiceRecord.
2 Press m.
3 Select Memory.
To free more memory by deleting all unlockedvoice
records:
1 From the main menu, select VoiceRecord.
2 Press m.
3 Select Memory.
4 Select Delete.
5 Press O or A under Yes to confirm.
Note: Voice records are stored in your handset
usingthe same memoryspace used tostore
Javaapplicationdata, ringtones,and
wallpaper images. Deleting some of these
otheritemsfrees memory space for voice
records.
Page 93

Memo
Memoletsyoustoreanumber,makeacalltothat
number,a nd save it to Contacts.
To create a memo:
1 From the main menu, select Memo.
2 Enter the numberusing your keypad.
3 Press O.
To view the memo later:
1 From the main menu, select Memo.
To delete the memo:
1 From the main menu, select Memo.
2 Press and hold A under Delete.
To edit the memo:
1 From the main menu, select Memo.
2 Enter the new number.
3 Press O.
To make a call to the memo number:
1 From the main menu, select Memo.
2 To make a Phone call, press s. -or-
To make a Private call, press the PTT button
To store the memo number to Contacts:
1 From the main menu, select Memo.
2 Press m.
3 Select Store to Cntcs.
4 Tostorethe numberas a new entry, select[New
Contact]. -or-
To store the numberto an existingentry,select the
entry.
5 With the Contactstype field highlighted,scroll left
or right to display the Contacts type you want to
assign the number.
6 If you want to add more information to the entry,
followthe applicableinstructions in “Creating
Entries” on page 33.
7 Press A under Done.
85
Page 94

86
Page 95

Shortcuts
Shortcuts lets you access most menu optionsby
pressing a number on your keypad or saying the
voice nameof the shortcut. You createthe shortcut
andthenuseittotakeyoutothatscreenanytime.
Creating a Shortcut
1 Go to the menu item you want to create a shortcut
for.
For example, if you want to create a shortcut to the
screenfor creatinga new Contactsentry:Fromthe
main menu, select Contacts > [New Contact].
2 Press and hold m until a confirmation screen
appears.
3 Press O or press A under Yes.
4 A screenappearsshowingthenumber assigned to
the shortcut. If you want to change the number
assigned: Press A under Edit. E nter the number
you want to assign. PressO.
5 Ifyouwanttorecordavoicenamefortheshortcut:
Select Voice. As directed by the screen prompts,
say and repeat the name you want to assign to the
number. Speak clearly into the microphone.
6 Press A under Done.
Using a Shortcut
If you know the shortcutnumber:
1 From the idle screen, press m.
2 On yourkeypad, press the numberassignedtothe
shortcut.
If you do not know the shortcut number:
1 From the main menu, select Shortcuts.
2 Select the shortcut you want to use.
If you assigned a voice name to the shortcut:
1 Press
2 Say the voice name into your handset.
t.
Editing a Shortcu t
To change the number assigned to a shortcut:
1 From the main menu, select Shortcuts.
2 With any shortcut highlighted, press m.
3 Select Reorder.
4 Highlight the shortcut you want to move.
5 Press A under Grab.
6 Scrollto the place whereyouwantt he shortcut to
appear.
7 Press A under Insert.
87
Page 96

Shortcuts
8 Repeatstep4 through step 7 for all the items you
want to move.
9 Press A under Done.
To changethe name or number assigned to a
shortcut:
1 From the main menu, select Shortcuts.
2 Highlight any shortcut.
3 Press A under Edit.
Deleti ng Shortcuts
Todeleteashortcut:
1 From the main menu, select Shortcuts.
2 Scroll to the shortcut you want to delete.
3 Press m.
4 Select Delete.
5 Press O or press A under Yestoconfirm.
To delete all shortcuts:
1 From the main menu, select Shortcuts.
2 With any shortcut highlighted, pressm.
3 Select Delete All.
4 Press O or press A under Yestoconfirm.
88
Page 97

Customizing Your Handset
Setting the Volume
To set the volume of the sound coming from the
handset’s earpiece or speaker:
1 From the main menu, select Settings > Volume.
2 SelectEarpiece to set the earpiece volume. -or-
Select Speaker to set the speaker volume.
3 To set the volume:
Scroll left or right. -or-
Press the volume keys on the side of your
handset.
4 Press O.
To set the volume of the handset’s ring:
Press the volume controls.
Setting Your H andset to Vibrate
To set your handset to vibrate instead of making a
sound when you receive Private callsandgroup
calls,evenif you wantyourhandset to ring for other
features:
1 From the main menu, select Settings > 2-Way
Radio > Alert Type.
Tip: If Alert Typedoesnotappear: Fromthemain
menu, select Ring Tones.Makesure Vibrate
All is set toOff. Repeat step 1.
2 Select Vibrate to set yourhandset to vibrate. -or-
Select Silent to set your handset to neithervibrate
nor make a sound.
Using a Headset
If you use a headset or similar devicewith your
phone, you can set your phone to send incoming
sound to the headsetonly,or to the headsetandthe
speakerat the same time:
1 From the main menu, select Settings > Advanced
> Headset/Spkr.
2 Select HdsetOnly to send incoming sound to the
headset only. -or-
Select Hdset&Spkr to sendincomingsoundto the
headset and ring tones to the speaker.
89
Page 98

Customizing Your Handset
Note: If you are using your phone with a headset,
and you have the Flip to End option set to
On, closing yourflipsends incoming sound
to the headset and does not end the call.
See “Setting Flip Actions” on page 41.
Using a Remote PTT Button
If you are using a headsetorotheraccessory with a
remotePTTbutton, you can use the remote PTT
button for phone calls and Private calls.
For phone calls,usethe remote PTT button to
answer calls, switch between calls, and end calls.
Hold theremote PTT button for less than2 seconds
to answer calls and switch between calls. Hold the
remote PTT button for more than 2 seconds to end
calls.
For Private calls, use the remote PTT button as you
wouldthePTTbuttononyourphone.
Using S ettings
Settings containsmanysubmenus that let you
customize your handset.
Forinformation onapplyinggroupsofsettingstoyour
handset together, see “Profiles” on page 95.
90
Display/Info Features
The Display/Info menu controls how the keypad and
display appear:
• Wallpaper — changes the wallpaperthat appears
on the idle screen.
• Palette — changes thecolorscheme of the
display.
•TextSize— sets size of text on the display.
• Home Icons —controlswhether mainmenu icons
appear on the idle screen.
• Backlight — A backlight lights the display and
keypad when you make or receive a call, open or
close the flip, or press keys or buttons. Backlight
controls how long the backlight stays on; Sensor
setsthekeypadbacklighttolightuponlyinlow
light conditions.
•Clock— controls whetherthe time and date
appear on the idle screen; sets time and date
format; sets year.
•MenuView— controls whether the items on your
main menu and Java applications menu appear as
large icons or a list.
• Large Dialing— setslarge digitsto appear on the
idle screen when you enter a number.
Page 99

Using Settings
•Contrast— sets the contrast of the
display.Language — sets the language that your
handsetdisplays.
Phone Calls Features
The Phone Calls menu controls how your handset
handles phone calls:
•SetLine— setsphone line 1 or phone line 2 as
the activeline for outgoingcalls.
•AnyKeyAns— If this feature is on, you can
answer callsbypressing any key on the keypad.
•AutoRedial— sets your handsetto automatically
redial calls you make when the system is busy.
•CallWaiting— See“Call Waiting” on page 37.
• AutoAns — sets your handset to automatically
answer an incoming call aftera specified number
of rings.Whenthis featureis on, the handset
answersby connectingyouto the caller; it does
not send the call to voicemail, unless you are out
of coverage oron the line.
• Flip Activation — See “Setting Flip Actions” on
page 41.
•MinuteBeep— causes a beep to sound every
minuteof an activecall.
• Call Duration — causes the durationof a call to
• Notifications — See “Setting Notification Options”
on page 47.
•JavaAppControl— If you have installed a Java
application that answers phone calls, this setting
letsyouturnthat application on.
2-Way Radio Features
The 2-Way Radio menu controls how your handset
handles Private callsandgroup calls:
• Tkgrp Silent — controls whether you hear group
calls to your Talkgroup.See “One-to-Many Group
Calls”onpage21.
• Tkgrp Area — lets you define your Talkgroup
area.
• One Touch PTT —controltheactionofthePTT
button from the idle screen. See “Setting One
Touch PTT” on page 19.
•AlertType— controls howyourhandset notifies
youwhenyoureceivePrivatecallsandgroup
calls.
91
Page 100

Customizing Your Handset
Personalize Fea tures
The Personalize menu makes mainmenu items
easier to access.
•MenuOptions— Reorder Menu lets you change
theorderoftheitemsonthemainmenuby
grabbing and moving them; Add/Remove Apps
letsyoucreateashortcuttoaJavaapplicationon
themainmenu.
•UpKey— sets the main menu item you access
when you scroll up from the idle screen.
•DownKey— setsthe main menuitem you access
when you scroll down from the idle screen.
• Left Key — sets the main menu item you access
when you scroll left from the idle screen.
• Right Key — sets the main menu item you access
when you scrollrightfrom the idlescreen.
• CenterKey— sets themainmenuitemyou
accesswhen you press O from the idle screen.
•LeftSftkey— sets the main menu item you
accesswhen you press theleft optionkey from the
idlescreen.
• Right Sftkey — sets the main menu item you
accesswhenyou presstheright option key from
the idle screen.
Power Up — sets the main menu item you see when
you power on your phone.
92
Volume Features
The Volumemenu setsthevolume of sounds your
handset makes:
•Line1— sets ringer volume for phone line 1.
•Line2— sets ringer volume for phone line 2.
• Messages — setsthe volume of message
notificationsandDatebook reminders.
• Earpiece — sets the volume of sound comingout
of the earpiece.
• Speaker— sets the volume of sound coming out
of the speaker.
•Keypad— sets the volume of sound associated
withpressing keys and buttons.
• Java Earpiece — sets the volume of sound
associated with Javaapplications coming out of
the earpiece.
• Java Speaker —setsthevolume of sound
associated with Javaapplications coming out of
the speakers.
•Data— sets the volume of sounds thatnotify you
that you are receiving a circuit data call.
Security Features
The Security menu lets you turn security features on
and off and change passwords:
 Loading...