

Page 1
Page 2
Motorola homesight™ System Overview
Congratulations on your purchase of the Motorola homesight Easy Start Kit. This guide describes how to set
up and get started with homesight using the Wireless System Controller, Day Camera, and Door/Window
Sensor supplied in the Easy Start Kit.
The Motorola homesight system helps you monitor activities in and around your home with a range of
devices that can be controlled and monitored on your PC. Additionally, with a broadband Internet connection
you can receive information from your system by e-mail or SMS (subject to contract terms and service
availability), triggered by particular events, such as motion outside a door being monitored by a camera.
For more information about Motorola homesight, go to
http://www.motorola.com/homesight/
To register your product, go to
http://broadbandregistration.motorola.com
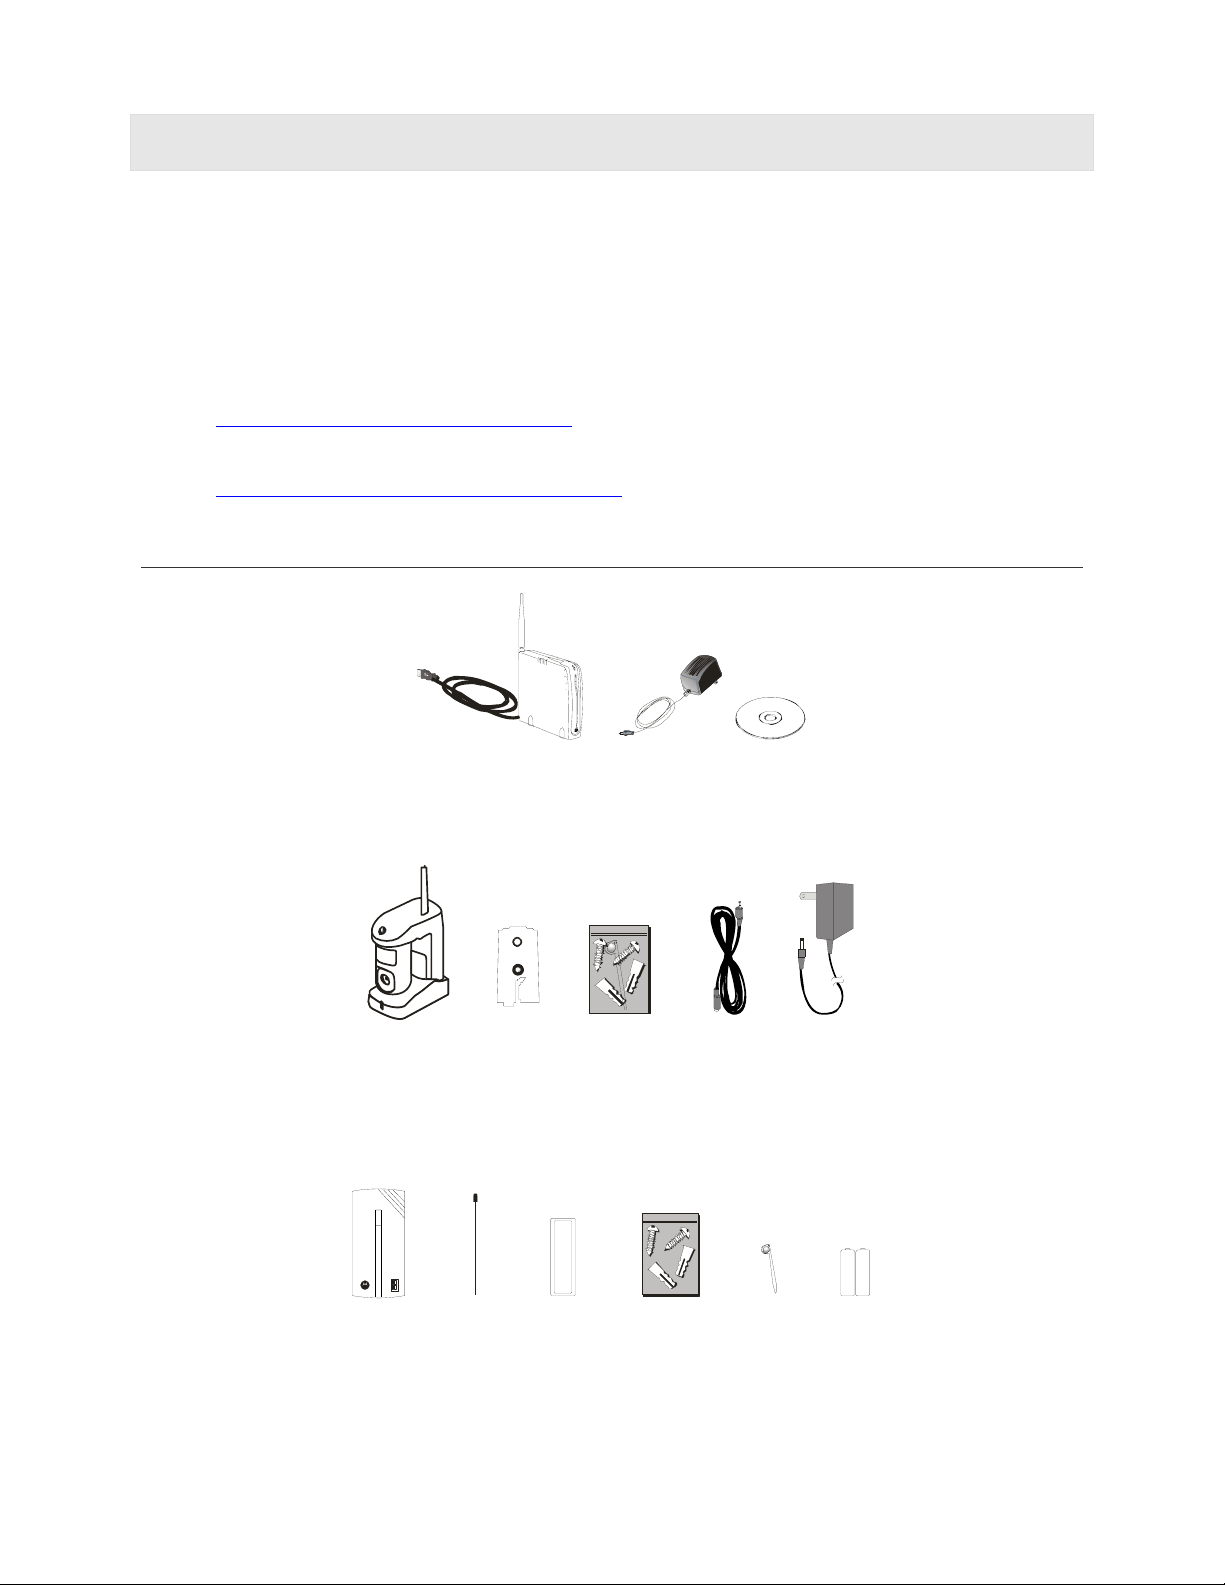
Package Contents
R
E
OW
P
O
E
VI
D
S
TU
A
ST
A
T
A
D
Wireless System
Controller
12V
Power
homesight
CD-ROM
Adapter
Wireless
Motion
Sensor
Camera
Wall
Mount
Bracket
Hardware
Mounting
Kit with
Discovery
AC
Extensi
on Cord
12V Power
Adapter
Tool
AAA
AAA
Door/Window
Sensor
Antenna Magnetic
Contact
Hardware
Mounting Kit
Discovery
Tool
Batteries
2
Page 3

Computer System Requirements
• PC with Intel Pentium
Windows
• 45 MB of hard drive space recommended for installation; 500 MB (maximum) for archives (saved images,
audio, etc).
®
2000, or Windows XP™ Home or Professional version.
®
III or later processor, 2X CD-ROM drive, USB port, and 256 RAM running
Registering Devices with the System Controller
1 In the homesight software, click System Settings.
2 Select “Device Discovery” from the menu.
3 Select “Start Discovery.”
4 Locate the Discovery hole on the device (indicated by “Discovery” and an arrow on the device) and use
the Discovery tool to depress the hidden button.
5 After a few seconds, the System Controller will find and register your device and details of the device will
appear on the screen.
Installation Hints
Please consider the following points when mounting the Day Camera:
• The camera must be aimed so that it does not directly face the sun or any bright light to avoid causing
damage to the camera.
• Avoid viewing areas where half of the area is in bright sunlight and the other half is dark. All types of
cameras have difficulty seeing wide variations of light.
• The Motorola Day Camera is constructed of UV-resistant ABS plastic. Do not install the camera wh
subjected directly to the elements.
•
The sensor's range is up to 60 feet (18 m) from the Wireless System Controller in a typical home,
depending on the number of obstacles. These can include metal framing, thick walls, and
devices operating at 2.4 GHz. It is recommended that different positions be tried for optimal results.
Additionally, please consider the following points when mounting the Door/Window sensor:
• The Motorola homesight Door/Window Sensor is constructed of UV resistant ABS plastic.
•
The sensor's range is up to 60 feet (18m) from the Wireless System Controller in a typical home,
depending on the number of obstacles. These can include metal framing, thick walls, and other wireless
devices operating at 418 MHz. It is recommended that different positions be tried for optimal results.
other wireless
ere it is
3
Page 4

Installing the Software and
Wireless System Controller
IMPORTANT: Do not connect your Wireless System Controller to your
computer until the Installation Wizard instructs you to do so.
1 Insert the enclosed Motorola homesight CD in the CD-ROM drive. The
Motorola homesight Installation Wizard is displayed.
a. If the application or autorun does not appear, right-click the Start
button and select Explore.
b. Select your CD-ROM and double-click to open.
c. Double-click Launch.exe to start the application.
PC
2 Click Next. The Choose Destination Location window is displayed.
3 Click Next to accept the default destination folder, or click Browse to
select a new one. After you click Next, the Select Program Folder window
is displayed.
4 Accept the default folder or choose a new one. Click Next. The file installation begins. After a few
moments, the Install Motorola homesight Hardware and Driver window is displayed.
5 Plug the AC adapter (red plug) into the Power port on the Wireless System Controller and into an AC
wall outlet. This powers on your Wireless System Controller.
Wireless
System
Controller
6 Connect the USB cable on the Wireless System Controller to the USB port on your computer. Windows
automatically installs the required drivers.
7 Once the driver installation is complete, click Next. "The Software installation was successful" window
is displayed. Be sure the checkbox “Launch Motorola homesight” is selected.
8 Click Finish. The Motorola Setup Wizard is displayed. Follow the on-screen steps for installing the
Motorola homesight software.
Installing Your Camera
Your camera can either be mounted on a wall or just sit on a level surface.
Wall Mount Your Wireless Motion Sensor Camera
Discover your sensor before mounting it.
Make sure the power adapter cord is long enough to reach your mounting location. Also, be sure
the AC outlet cannot be switched on and off with a wall switch.
1 Using the holes on the drilling template found later in this guide, mark the position of the
holes to be drilled.
For drywall or other composite surfaces, use a 7/32" drill bit. Drill ng
screws and insert a plastic wall anchor into each hole.
For other solid surfaces, use a 1/16" drill bit. Drill a pilot hole for each of the mounting screws.
a hole for each of the mounti
2 y
Using the screws provided, secure the camera mounting bracket to the wall. Pull off the camera base b
pulling straight down. The base detaches from the upper back side. Slide th
bracket until it is firmly seated and you feel it click as the contacts engage.
4
e camera down on to the
Page 5

)
Discovery
button
Detach base
3
Position the camera to view the desired area and plug in the power supply. Please keep in mind that the
field of view is 80 degrees and the motion sensor distance works up to 12–14 feet (3.5–4 m).
4
Make adjustments to the camera viewing angle by tilting and panning the camera head with your hand.
Table Mount Your Wireless Motion Sensor Camera
The camera can be placed on any horizontal surface.
1
Place the camera on a horizontal surface.
2
Plug the power supply into the camera and then to a wall outlet.
Make adjustments to the camera viewing angle by tilting and panning the camera head
3
with your hand.
Installing Your Door/Window
Installing your sensor is a simple process.
1
Locate the antenna and screw it into the top-right corner of the sensor, jus ntil it is
secure.
Sharp objects should be stored out of reach of children to prevent injury.
Sensor
t above the air vents, u
2
Insert the batteries. On the bottom of the sensor, slide open the door
alkaline batteries. The back of the battery door of the sensor indicates
the polarity (+ and -) of the batteries. Close the door after inserting
batteries.
The sensor does not support rechar
However, the sensor does employ built-in power saving functionality.
3
Register your sensor with your Wireless System Controller us
geable NiCad or NiMH batteries.
ing a process called Discovery.
and
insert two AAA
Mount Your Door/Window Sensor
Discover your sensor before mounting it.
The spacing between the sensor and the contact should be between 1/10 inch and ½ inch (.25 cm to 1.27 cm).
1
Using the supplied double-sided tape, peel one side of the paper strip and p
sensor. Peel the other side of the tape and place the sensor in the location desired. (See the diagram
sample mounting.)
2
You can also mount the sensor more securely using the screws in the
hardware kit. Using the drilling template found later in this guide, drill two
pilot holes for the screws. Affix the screws to one side of the object (typicall
the side to be attached to the door/window frame), leaving 1/16" (1.6 mm)
5
lace
it on the back of the
y
for
1.6 mm (1/16 inch
maximum
Page 6

n
e
e
space between the screw head
into place.
Warning: When mounting near a window, drilling too close
it to shatter, and cause injury. The an can be seen; therefore, ensure
you
r screw is beyond the glass before drilling.
Ins
tall the Magnetic Contact
and the object. Mount the sensor onto the screws and slide down to lock
to the glass could break the glass, possibly cause
window extends deeper into the frame th
1 Using the double-sided tape provided,
contact to the part of the object that moves.
You can also mount the contact more securely using the
screws in the hardware kit and the drilling template
provided later in this guide. Use the Wall Mounting Drilling
template at the end of this guide to assist you.
attach the magnetic
Mounting hol
Mounting hol
2 Make sure the magnetic contact aligns with the top of the
sensor on either the left or right side.
Wall Mount Drilling
Mounting tools: Screwdriver, electric drill, or awl. On commends that you pre-drill
½-inch-deep pilot holes with a drill bit slightly smalle
camera to the surface. When mounting a camera on soft
the material slightly smaller than the plastic
The illustrations are drawn to a one they provide the exact dimensions
required to mount the units.
Templates
hard surfaces, Motorola re
r than the camera mounting screws before securing the
surfaces like sheetrock, use an awl to punch holes in
anchors included in the hardware mounting kit.
-to-one scale, which means that
Drill holes in
these positions
Wireless Motion Sensor Camera
(Day) drilling template
6
1.11 i
Page 7

s
Top
2.07 in
0.27 in
Drill holes in
these position
Wireless
Door/Window
sensor drilling
template
1.60 in
Wireless Door/Window
contact drilling template
7
Drill holes
these
positions
in
Page 8

Troubleshooting
Day Camera
Problem
Camera will not register
with the Wireless System
Controller
No camera picture
oor picture quality
P
Motion events are
tr
iggered
Audio problems
not
Solution
• Ensure that the Wireless System Controller is powered and online.
• Ensure that you are pressing the Discovery button.
• Reposition the camera closer to the Wireless System Controller.
tton while turnin• Try a hard reset by holding down the Discovery bu
camera.
• Ensure that the Wireless System Controller is powered and onlin
• Ensure that you have the proper camera selected.
• Reposition the camera closer to the Wireless System Controller.
• Ensure that you are using the proper power supply.
• Make sure the proper
(Motorola homesight™ User Guide).
• Make sure your camera viewing area has proper lighting.
• Try another location.
• Select other operating channels on other 2.4 GHz devices. See the homesigh
User Guide for details.
• Be sure there is no conflict with your WiFi network. See the homesight User
Guide for details.
• Ensure that the camera is not positioned behind glass
triggered by changes in heat. Any material such as gl
the camera from detecting heat changes (movement).
• Ensure that the camera head is positioned properly.
• Make sure the speaker volume is turned up when playing back the video clip.
Make sure the sound is within
• the microphone range (6–10 feet).
• Does the computer have a sound card and are the speakers activated and loud
enough?
camera quality settings are configured when viewing
.
The motion sensor is
ass that "insulates” keeps
g on the
e.
t
Wireles ow Sens
Problem
LED does not light up
Wireless System Controller
does not recognize the
sensor during discovery
Events are not triggered.
Sensor continually sends
an event
s Door/Wind or
Solution
• Ensure the batteries are properly inserted with the correct polarity.
• Ensure you are using fully charged AAA batteries.
•
Ensure sensor is powered. Position the sensor in closer proximity to your
Wireless System Controller and try again. Ensure there are no other wirele
devices interfering with the sensor. The sensor transmits on the 418
frequency.
• Ensure that the sensor registered with your Wireless System Controller.
• Ensure that you have the proper settings configured for the sensor.
• Ensure that you have the proper settings configured for the sensor. For
example, confirm you have armed the sensor.
• The sensor can be configured so that it can send an event when the contacts
are closed or when they are opened.
ss
MHz
8
Page 9

Visit our website at:
http://www.motorola.com/homesight
Copyright © 2005 by Motorola, Inc.
No part of this publication may be reproduced in any form or by any means or used to make any derivative work (such as translation, transformation or
adaptation) without written permission from Motorola, Inc.
Motorola reserves the right to revise this publication and to make changes in content from time to time without obligation on the part of Motorola to
provide notification of such revision or change. MOTOROLA PROVIDES THIS GUIDE WITHOUT WARRANTY OF ANY KIND EITHER IMPLIED OR
EXPRESS, INCLUDING, BUT NOT LIMITED TO, THE IMPLIED WARRANTIES OF MERCHANTABILITY AND FITNESS FOR A PARTICULAR
PURPOSE. Motorola may make improvements or changes in the product(s) described in this manual at any time.
MOTOROLA and the Stylized M Logo are registered in the US Patent & Trademark Office. All other product or service names are the property of their
respective owners. Microsoft Windows is a registered trademark of Microsoft Corporation, and Windows XP is a trademark of Microsoft Corporation.
520369-001
10/05
9
 Loading...