


When printed by Motorola
Cleartone CM5000
TETRA Mobile Repeater/Gateway
Basic User Guide
1
3
34
2
5 11
7
8 10
6 9

Contents
Safety Information . . . . . . . . . . . . . . . . . . . . . . . . . . . . . 5
Disposal Information . . . . . . . . . . . . . . . . . . . . . . . . . . . 6
CM5000 Overview . . . . . . . . . . . . . . . . . . . . . . . . . . . . . . 7
Controls and Indicators . . . . . . . . . . . . . . . . . . . . . . . . . . . . . . . 7
Audio Signal Tones . . . . . . . . . . . . . . . . . . . . . . . . . . . . . . . . . . 8
Keys, Knob, and Buttons . . . . . . . . . . . . . . . . . . . . . . . . . . . . . . 10
Soft Keys . . . . . . . . . . . . . . . . . . . . . . . . . . . . . . . . . . . . . . . 10
Menu Button . . . . . . . . . . . . . . . . . . . . . . . . . . . . . . . . . . . . . 10
Rotary Knob . . . . . . . . . . . . . . . . . . . . . . . . . . . . . . . . . . . . . 10
Emergency Button . . . . . . . . . . . . . . . . . . . . . . . . . . . . . . . . 10
The LED Status Indicator . . . . . . . . . . . . . . . . . . . . . . . . . . . . . 11
Entering the Menu Items . . . . . . . . . . . . . . . . . . . . . . . . . . . . . . 11
Returning to the Previous Level . . . . . . . . . . . . . . . . . . . . . . . . 11
Exiting the Menu Items . . . . . . . . . . . . . . . . . . . . . . . . . . . . . . . 11
List of Menu Items . . . . . . . . . . . . . . . . . . . . . . . . . . . . . . . . . . . 12
Creating Menu Shortcuts . . . . . . . . . . . . . . . . . . . . . . . . 13
The Display . . . . . . . . . . . . . . . . . . . . . . . . . . . . . . . . . . . . . . . . 13
Status Icons . . . . . . . . . . . . . . . . . . . . . . . . . . . . . . . . . . . . . 13
Menu Icons . . . . . . . . . . . . . . . . . . . . . . . . . . . . . . . . . . . . . . 14
Inbox Icons . . . . . . . . . . . . . . . . . . . . . . . . . . . . . . . . . . . . . . 15
Contact Icons . . . . . . . . . . . . . . . . . . . . . . . . . . . . . . . . . . . . 15
Getting Started . . . . . . . . . . . . . . . . . . . . . . . . . . . . . . . . 16
Powering On/Off . . . . . . . . . . . . . . . . . . . . . . . . . . . . . . . . . . . . 16
Powering On with Emergency Button . . . . . . . . . . . . . . . . . . . . 16
Powering On with Transmit Inhibit Active . . . . . . . . . . . . . . . . . 16
Unlocking the CM5000 . . . . . . . . . . . . . . . . . . . . . . . . . . . . . . . 17
English
Selecting Operation Mode . . . . . . . . . . . . . . . . . . . . . . . 18
Entering TMO or DMO . . . . . . . . . . . . . . . . . . . . . . . . . . . . . . . 18
Gateway and Repeater Modes . . . . . . . . . . . . . . . . . . . . . . . . . 19
Entering Gateway or Repeater Mode . . . . . . . . . . . . . . . . . . 19
1

Group Calls . . . . . . . . . . . . . . . . . . . . . . . . . . . . . . . . . . . 20
“My Groups” Folder . . . . . . . . . . . . . . . . . . . . . . . . . . . . . . . . . . 20
Selecting the “My Groups” Folder . . . . . . . . . . . . . . . . . . . . 20
English
Adding a Group (TMO/DMO) to the “My Groups” Folder . . . 20
Selecting a Group . . . . . . . . . . . . . . . . . . . . . . . . . . . . . . . . . . . 20
Using Alphabetic Search . . . . . . . . . . . . . . . . . . . . . . . . . . . 20
Using Folder Search . . . . . . . . . . . . . . . . . . . . . . . . . . . . . . 20
Selecting a Folder . . . . . . . . . . . . . . . . . . . . . . . . . . . . . . . . . . . 21
TMO Group Calls . . . . . . . . . . . . . . . . . . . . . . . . . . . . . . . . . . . 21
Making a TMO Group Call . . . . . . . . . . . . . . . . . . . . . . . . . . 21
Receiving a TMO Group Call . . . . . . . . . . . . . . . . . . . . . . . . 21
DMO Group Calls . . . . . . . . . . . . . . . . . . . . . . . . . . . . . . . . . . . 21
Making a DMO Group Call . . . . . . . . . . . . . . . . . . . . . . . . . . 22
Receiving a DMO Group Call . . . . . . . . . . . . . . . . . . . . . . . . 22
Exiting DMO . . . . . . . . . . . . . . . . . . . . . . . . . . . . . . . . . . . . . 22
Private, Phone, and PABX Calls . . . . . . . . . . . . . . . . . . 23
Creating a Contact . . . . . . . . . . . . . . . . . . . . . . . . . . . . . . . . . . 23
Dialing . . . . . . . . . . . . . . . . . . . . . . . . . . . . . . . . . . . . . . . . . . . . 23
Dialling a Number . . . . . . . . . . . . . . . . . . . . . . . . . . . . . . . . . 23
Dialling via the Contact List . . . . . . . . . . . . . . . . . . . . . . . . . 23
Private Call . . . . . . . . . . . . . . . . . . . . . . . . . . . . . . . . . . . . . . . . 24
Making a Private Call . . . . . . . . . . . . . . . . . . . . . . . . . . . . . . 24
Receiving a Private Call . . . . . . . . . . . . . . . . . . . . . . . . . . . . 24
Phone and PABX Calls . . . . . . . . . . . . . . . . . . . . . . . . . . . . . . . 24
Making a Phone or PABX Call . . . . . . . . . . . . . . . . . . . . . . . 25
Emergency Mode . . . . . . . . . . . . . . . . . . . . . . . . . . . . . . 25
Entering or Exiting Emergency Mode . . . . . . . . . . . . . . . . . . . . 25
Hot Microphone Feature . . . . . . . . . . . . . . . . . . . . . . . . . . . . . . 26
Making an Emergency Group Call . . . . . . . . . . . . . . . . . . . . . . 26
Messages . . . . . . . . . . . . . . . . . . . . . . . . . . . . . . . . . . . . 26
Sending a Status Message . . . . . . . . . . . . . . . . . . . . . . . . . . . . 26
Sending a New Message . . . . . . . . . . . . . . . . . . . . . . . . . . . . . 27
Sending a User-Defined Message . . . . . . . . . . . . . . . . . . . . . . 27
Sending a Predefined Message . . . . . . . . . . . . . . . . . . . . . . . . 27
2

Handling Unread (New) Messages . . . . . . . . . . . . . . . . . . . . . . 27
TETRA/UHF Analogue Gateway Mode . . . . . . . . . . . . . 28
General . . . . . . . . . . . . . . . . . . . . . . . . . . . . . . . . . . . . . . . . . . . 28
Entering TETRA/UHF Analogue Gateway Mode . . . . . . . . . . . 28
Exiting TETRA/UHF Analogue Gateway Operation . . . . . . . . . 29
Tips & Tricks . . . . . . . . . . . . . . . . . . . . . . . . . . . . . . . . . . 30
Backlight Control . . . . . . . . . . . . . . . . . . . . . . . . . . . . . . . 30
Menu Shortcuts . . . . . . . . . . . . . . . . . . . . . . . . . . . . . . . . 30
Text Size . . . . . . . . . . . . . . . . . . . . . . . . . . . . . . . . . . . . . 30
“My Groups” Folder . . . . . . . . . . . . . . . . . . . . . . . . . . . . . 30
Options (in the Home Display) . . . . . . . . . . . . . . . . . . . . 30
Easy Navigation while in Menu . . . . . . . . . . . . . . . . . . . . 30
Exiting the Menu . . . . . . . . . . . . . . . . . . . . . . . . . . . . . . . 30
Quick Reference Guide . . . . . . . . . . . . . . . . . . . . . . . . . 31
English
© 2008 by Motorola Inc.
All Rights Reserved.
MOTOROLA and the Stylized M Logo are registered in the U.S.
Patent and Trademark Office. All other product or service names are
the property of their respective owners.
3

English
4

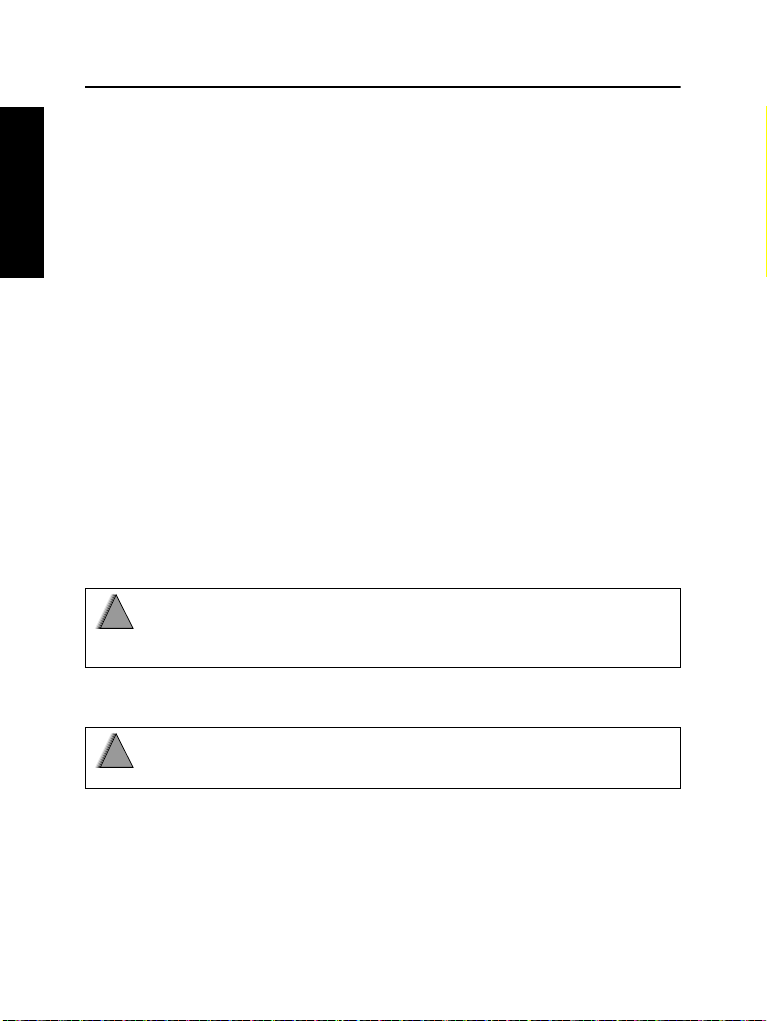
Safety Information
!
Copyright Information
The Motorola products described in this manual may include copyrighted Motorola computer
programs stored in semiconductor memories or other mediums. Laws in the United States and
other countries preserve for Motorola certain exclusive rights for copyrighted computer
programs, but not limited to, including the exclusive right to copy or reproduce in any form the
copyrighted computer program. Accordingly, any copy righted Motorola computer programs
contained in the Motorola products described in this manual may not be copied, reproduced,
modified, reverse-engineered, or distributed in any manner without the express written
permission of Motorola. Furthermore, the purchase of Motorola products shall not be deemed to
grant either directly or by implication, estoppel, or otherwise, any licence under the copyrights,
patents, or patent applications of Motorola, except for the normal non-exclusive licence to use
that arises by operation of the law in the sale of a product.
This user guide covers the basic operation of the CM5000
Mobile Terminal. Please consult your dealer for further, more
detailed information which is contained in the feature user
guide 6866539D54_.
CAUTION: Before using this product, read the operating
instructions for safe usage contained in the Product Safety
and RF Exposure booklet 6866537D37_ enclosed with your
CM5000.
ATTENTION!
The CM5000 is restricted to occupational use only to satisfy
ICNIRP RF energy exposure requirements. Before using this
product, read the RF energy awareness information and
operating instructions in the Product Safety and RF Exposure
booklet (Motorola Publication part number 6866537D37_) to
ensure compliance with RF energy exposure limits.
Keep this User Guide and the Product Safety and RF
Exposure booklet in a safe place and make it available to
other operators in case the CM5000 is passed on to other
people.
English
5

Disposal Information
English
European Union (EU) Waste of Electrical and Electronic
Equipment (WEEE) Directive
The European Union's WEEE directive requires that
products sold into EU countries must have the
crossed out trashbin label on the product (or the
package in some cases). As defined by the WEEE
directive, this cross-out trashbin label means that
customers and end-users in EU countries should not dispose
of electronic and electrical equipment or accessories in
household waste.
Customers or end-users in EU countries should contact their
local equipment supplier representative or service
centre for information about the waste collection system in
their country.
6

CM5000 Overview
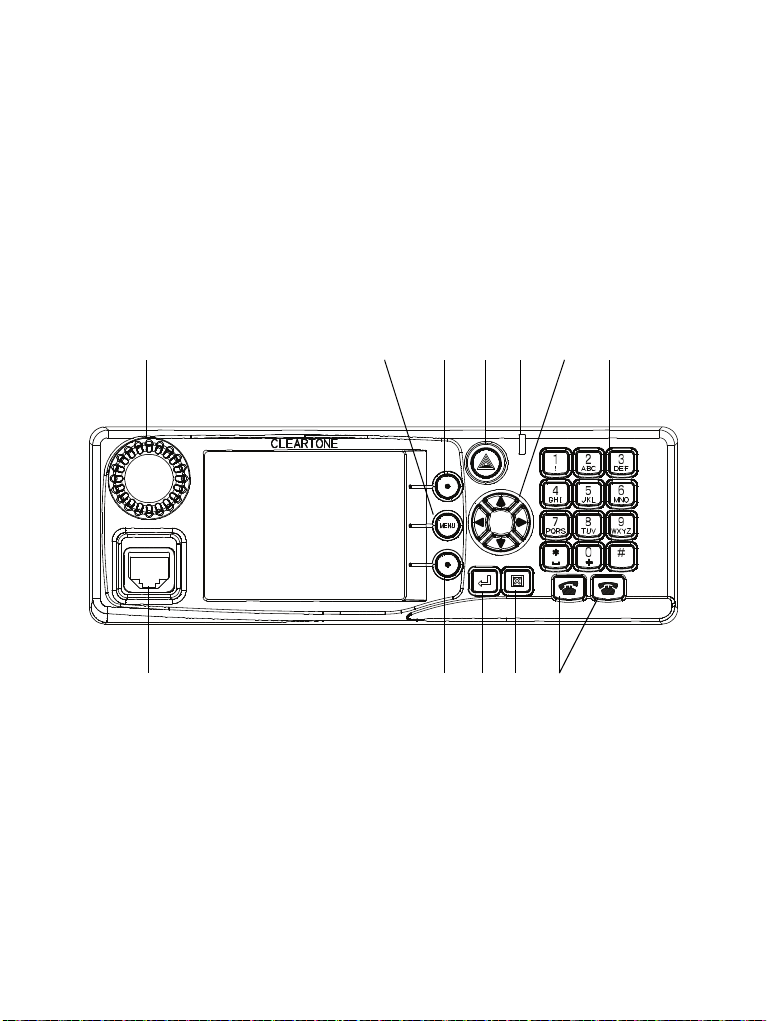
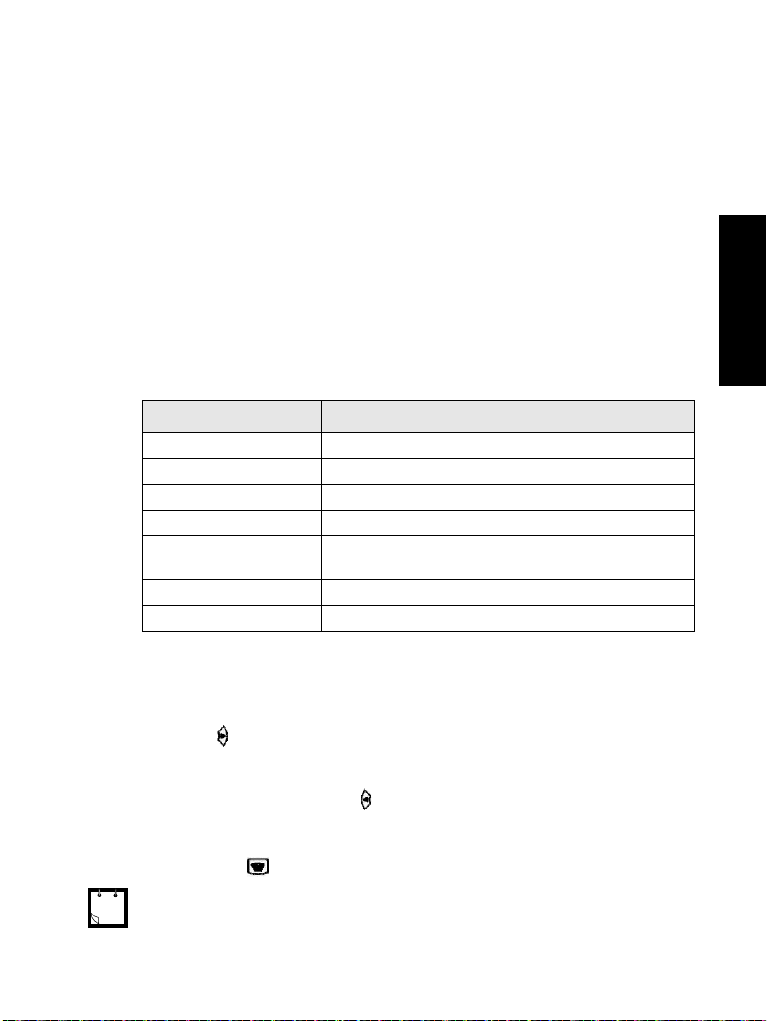
Controls and Indicators
This table describes the radio's front panel. See the figure on
the inside front cover.
Item Description
1 Rotary Knob
Used to turn the radio ON/OFF and to adjust volume level.
2 Microphone Connector
Used to connect a fist microphone in to.
3 Soft Key(s)
Used to select the option that is shown on the display.
4 Menu Key
Used to enter the main menu.
5 Emergency Key
Used to send Emergency Alarms.
6 Navigation Keys
Used for scrolling or text editing.
7 Enter Key
Used to select the required item.
8 Clear Key
Used to clear character or back to the previous screen.
9 Alphanumeric Key
Used to enter alphanumeric characters for dialing,
address book entries and text messages.
10 On Hook / Off Hook Key
Used to initiate or answer calls, end calls or send status
and text messages.
11 LED
Used to indicate the states of the CM5000.
English
7

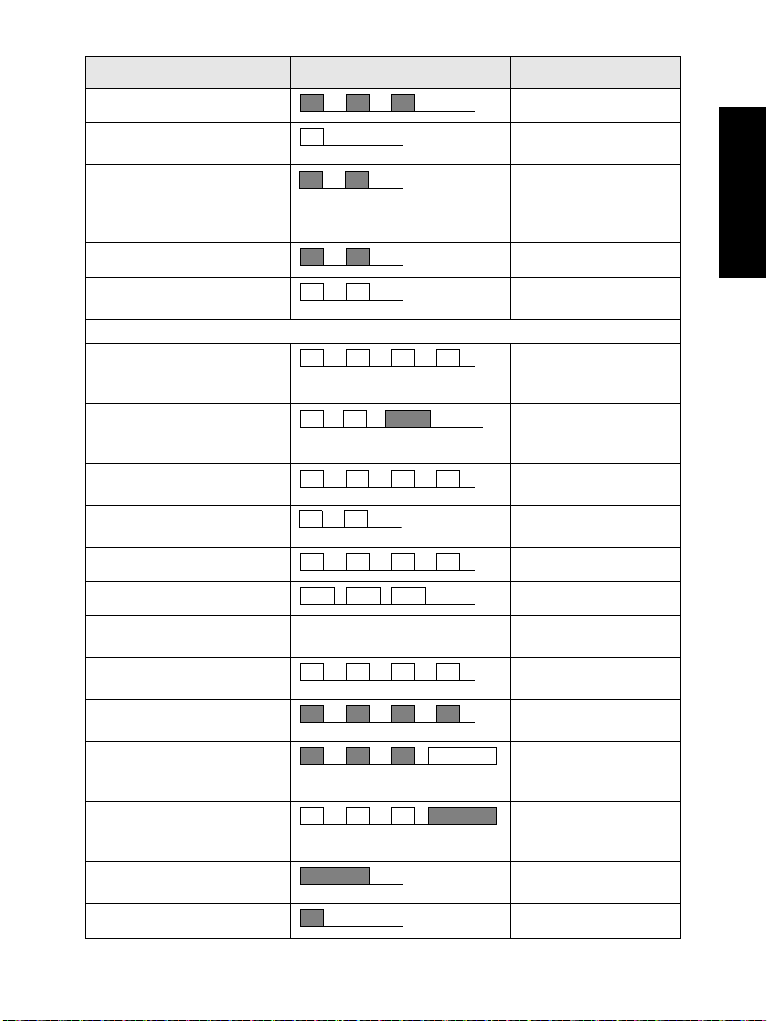
Audio Signal Tones
= High Tone; = Low Tone;
English
Description Ty pe Repeated
Idle
• Back to Home display
• Back to coverage
• Back to full service
Clear-to-send Once
Bad key press Once
Once
• Good key press
• CM5000 self-test fails at
power up
• From out-of-service to inservice
In Call
Call clear warning Once
Call waiting tone while
Phone or Private Call are
pending.
Data connected or
Data disconnected
Talk permit sounds upon
pressing the PTT.
Talk permit without
gateway sounds upon
pressing PTT. The tone
indicates the gateway is no
longer available.
• Talk prohibit
• System busy
• Time-out timer expire
• Called CM5000 not available or busy
• Call disconnected or
failed due to network
• Wrong number dialed
DMO (Direct Mode)
Entering
Once
Every 6 seconds, until
a call is terminated.
Once
Once (Normal Tone)
Once (Short Tone)
Twice
Once
Until you release the
PTT.
Once
Once
8
Description Ty pe Repeated
DMO Exiting Once
Local site trunking –
entering/exiting
Phone ring back (sending) Every three seconds,
Phone busy Every 0.5 seconds
Status message sent to the
dispatcher or failed.
Incoming Calls
Status message
acknowledged by the
dispatcher.
Your CM5000 received a
Group Call without
gateway (setup only).
High-priority Group Call
received
Emergency Alarm sent or
received
Emergency Alarm failed Four times
Emergency Call received Once
Phone ring, full-duplex
Private Call (reception)
Private Call received Until the call is
Private Call ringing to the
caller
Half-duplex Private
Pre-emptive Priority Call
(PPC) ring
Full-duplex Private PPC
ring
Limited service Once, upon entering
New mail received Once
According to the Ring Style
sub-menu setting.
Once
until the called user
answers or call is
rejected.
Twice
Four times
Once
Once
Twice
Until you answer or
the call is rejected.
answered.
Until the call is
answered.
Every 4 seconds, until
the call is answered or
rejected.
Every 4 seconds, until
the call is answered or
rejected.
limited service.
English
9

Description Ty pe Repeated
New Group Call Once
English
General
Volume setting (earpiece,
keypad, speaker)
Volume setting (Ringer) While setting the
Transmit Inhibit (TXI)
DTMF (0-9, #, *) during the
call
DTMF Continuous, until the
Continuous
volume
Once
user releases the key
Keys, Knob, and Buttons
Soft Keys
Press upper or lower to select the option that appears in
the screen directly next to the upper or lower soft key.
Menu Button
Press the Menu button to enter the following:
• The menu (when there is no on-going activity). The CM5000
menus allow you to control the CM5000 settings. Menus are
organised in a hierarchy. The menu options provide access to a
further list of options called a sub-menu.
•The context sensitive menu (when icon is on) to view a list
of items for the current menu.
Rotary Knob
The rotary knob is used for powering on and off the CM5000
and also as a volume control. Push it down and hold to turn
the device on/off. Turn clockwise to increase the audio
volume level.
Emergency Button
Press and hold this button to enter Emergency Mode.
When the CM5000 is powered down, press and hold this
10

button to power On in Emergency Mode or in standard mode
(as programmed)
.
The LED Status Indicator
The LED indicator shows the states of the CM5000.
Indicator Status
Solid GREEN Transmitting
Blinking GREEN In service
Solid RED Out of service / Disabled
Blinking RED Connecting to a network
Solid ORANGE Transmission Inhibit (TXI) in service
Blinking ORANGE Incoming call
No indication Switched off
Entering the Menu Items
1. Press the Menu button.
2. Scroll to the required item, press Select or to select.
Returning to the Previous Level
Press Back or .
Exiting the Menu Items
Press .
The CM5000 exits the menu if no key press is detected for a time-out
period.
English
11

List of Menu Items
Send Status
Inbox
New Message
Templates
Predefined
Messages
Contacts
New Contact
Existing Contacts
Security
PIN Protect
Change Code
Data Setup
Ring Style
Setup
Set Volume
Set Ring
Group Audio
Tones
Display
Battery
My Info
More...
Group Setup
Recent Calls
Shortcuts
Networks
Location
Language
PNC Mode
Outbox
English
This is the standard menu layout. Your Service Provider may enable/
disable some menu items or change their names.
12

Creating Menu Shortcuts
Use shortcuts to access frequently-used menu items.
Menu Shortcut Creation
Navigate to the menu items. Highlight the item you want to
create a shortcut for. Press and hold the Menu button as the
item is highlighted. Confirm shortcut creation when
prompted.
Menu Shortcut List
To look for assigned shortcuts, press the Menu button and
select More > Shortcuts > <shortcut name>.
Menu Shortcut Use
From Home display, press the Menu button and the numeric
key(s) assigned to the shortcut.
The Display
When you use the CM5000, icons appear on the display to
indicate the following conditions.
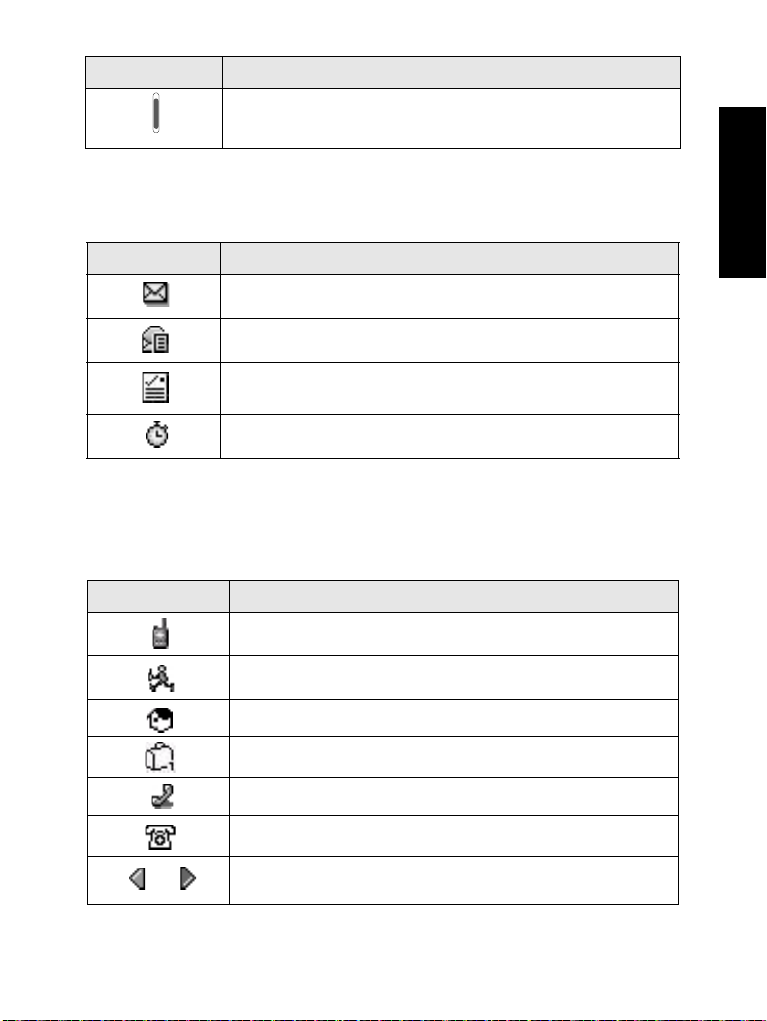
Status Icons
Status icons appear when your phone is engaged in certain
activities or when you have activated certain features.
Icon Description
Signal Strength
Indicates the signal strength in the current TMO or DMO area.
Four bars indicate the maximum strength. Fewer bars indicate
lower signal strength. You may be able to improve signal
strength by moving your vehicle to a different location.
English
New Message Has Arrived
Indicates that a new message just arrived. Once you change
the display the icon disappears.
New Message(s) in Inbox
Indicates that an unread message is in stack. Once you read
the message the icon disappears.
All Tones Off
No audible alert tones. The screen displays incoming calls.
No Speaker
Indicates no speaker output.
13

Icon Description
GPS
English
Appears when the CM5000 receives the GPS signal.
Data Connected
Appears when the CM5000 is in Packet Data Mode.
Emergency
Appears when the CM5000 is in Emergency mode.
Scan
Appears when the CM5000 is in Group scan mode.
Direct Mode (DMO)
Appears when the CM5000 is in Direct Mode.
Gateway Mode
Indicates in-service state for Gateway Mode.
Indicates CM5000 fixed communication through Gateway.
Repeater Mode
Indicates in-service state for Repeater Mode.
Indicates CM5000 fixed communication through Repeater.
Menu Icons
The following icons make it easy to identify the menu items at
first glance.
Menu Icon Description
Main Menu Items/Context Sensitive Menu
Appears above the Menu button if the main menu items/
context sensitive menu are active.
Messages
• Send status messages,
• Send short text messages (free text or according to user
defined or predefined templates),
• Receive messages in inbox.
Contacts
Add, search, edit, or erase entries in the contact list.
Security
Lets you turn On/Off and verify security features, and change
passwords.
Setup
Allows you to customise the CM5000.
More...
Contains more customisable menu items.
14
Menu Icon Description
Scroll Bar
Indicates navigation among items that occupy more than one
screen. If all items appear in one screen, the scroll bar is empty.
Inbox Icons
The following icons indicate the status of messages in the
inbox.
Inbox Icon Description
Unread (New) Message
Indicates that you have not read the message yet.
Read (Old) Message
Indicates that you have read the message.
Sender Information in Message View
Indicates sender information (name or number).
Time and Date Stamp in Message View
Indicates the time and date of message arrival.
Contact Icons
In the contact list display, the following icons may appear
next to the contact numbers to indicate the type of stored
number.
Contact Icon Description
Private ID Number
English
Mobile Phone Number
Home Phone Number
Work Phone Number
PABX Number
Other Phone Number
Pickers
Indicate more than one number is stored with the contact.
15
Getting Started
!!
!!
English
Powering On/Off
To p o w e r On, press and hold the rotary knob. The CM5000
performs a self-check and registration routine. After
successful registration, the CM5000 is in service.
To p o w e r
You hear a beep and the Powering Off message is
displayed.
Off, press and hold the rotary knob push button.
Powering On with Emergency Button
Press and hold the Emergency button to power On. The
CM5000 powers On in Emergency Mode or in standard
mode (as programmed).
Powering On with Transmit Inhibit Active
Transmit Inhibit (TXI) is a feature allowing you to switch off
transmission before entering a Radio-Frequency (RF)
sensitive area. To activate this feature, press the Menu
button and select More...> Networks > TXI Mode >
Activate.
Warning:
Pressing the Emergency button, even if Transmit Inhibit is activated,
causes the CM5000 to transmit immediately. The CM5000 must NOT
be within the RF sensitive area when entering Emergency Mode.
The TXI Mode remains active at power On. You are
prompted whether to leave the TXI Mode On or not.
Warning:
Ensure you have left the RF sensitive area before deactivating Transmit
Inhibit.
Press the Yes soft key to deactivate the TXI Mode. If the
CM5000 was previously used in Trunked Mode, it will register
to the network. If the CM5000 was previously used in Direct
Mode, it will remain in Direct Mode.
Press No in Trunked Mode and the CM5000 powers down.
16

Press No in Direct Mode and you remain in Direct Mode with
TXI selected.
Unlocking the CM5000
The CM5000 may be locked at power up.
To unlock the CM5000 after powering on, enter the code at
the prompt. The CM5000 enters the default Home display.
The unlock code is originally set to 0000. Your Service
Provider may change this number before you receive your
terminal.
English
17

Selecting Operation Mode
English
Entering TMO or DMO
Enter TMO or DMO in one of the following ways:
• From the Home display press Optns and select Direct Mode if
the CM5000 is in TMO.
• From the Home display press Optns and select Trunked Mode if
the CM5000 is in DMO.
• Press the Menu button and select More...> Networks > Trunked
Mode if the CM5000 is in DMO.
• Press the Menu button and select More...> Networks > Direct
Mode if the CM5000 is in TMO.
• Press the TMO/DMO one-touch button (if programmed by your
Service Provider).
You can make and receive the following types of calls when
the CM5000 operates in Trunked Mode:
• Group Calls
• Private Calls
• Phone Calls
• PABX Calls — local (office) extension calls
• Emergency Calls.
You can make and receive Group Calls when the CM5000
operates in Direct Mode. This includes Emergency Group
Calls.
The CM5000 returns to the Home display when there is no
activity for a few seconds.
Your terminal can alert you of an incoming call. Select the alert settings
in the Tones menu items.
18

Gateway and Repeater Modes
In Gateway Mode Operation communication relay between
TMO and DMO is available. DMO terminals communicate
with the trunked system (and the other way around).
In Repeater Mode Operation the CM5000 re-transmits
information received from one DMO terminal to the other
DMO terminal enhancing the coverage area.
Entering Gateway or Repeater Mode
When the CM5000 is in TMO enter Gateway or Repeater
Mode in one of the following ways:
• From the Home display press Optns
Mode or Repeater Mode as required.
• Press the Menu button and select More... > Networks >
Gateway Mode or Repeater Mode as required.
and select Gateway
English
19

Group Calls
English
A Group Call is a communication between you and others in
a group. A group is a predefined set of subscribers enabled
to participate in and/or invoke a Group Call.
Groups are organised in folders. Each folder may contain
several groups.
“My Groups” Folder
You can organise your favorite groups into one folder called
“My Groups”.
Selecting the “My Groups” Folder
From the Home display, press to quickly access the folder.
Adding a Group (TMO/DMO) to the “My Groups” Folder
1. Press the Menu button and select More > Group Setup > My
Groups > Edit List > [New Group].
2. Select a group by alphabetic search (“TMO/DMO by abc”). Enter
the first character of the group name. Or select a group by folder
search (“TMO/DMO by Folder”). Select the folder and select the
group. The group is added to the “My Groups” folder.
Selecting a Group
When you navigate in the “My Groups” folder and select a DMO group,
your terminal switches between TMO and DMO (and contrariwise).
Using Alphabetic Search
From the Home display, press Optns. Select a group by
alphabetic search (“TG by abc”). Enter the first character of
the group name. Select the group.
Using Folder Search
From the Home display, press Optns. Select a group by folder
search (“TG by Folder”). Select the folder and select the
group.
20

Selecting a Folder
From the Home display, press Optns. Select Folder, and
select the desired folder. The display shows the last selected
group in that folder.
TMO Group Calls
In TMO the CM5000 is used with your Service Provider’s
infrastructure.
Making a TMO Group Call
1. From the Home display and if this is the required group,
press and hold the PTT.
2. Wait for the talk permit tone (if configured) and then speak
into the microphone. Release the PTT button to listen.
When you start a call, all members of the selected group who
have their units turned on, receives the Group Call.
The “No Group” message is displayed when you are out of the normal
coverage area of your selected group. You must then select a new
group that is valid for your working location.
Receiving a TMO Group Call
Unless it is engaged in a call, the CM5000 receives the
Group Call. To answer the call, press and hold PTT.
The CM5000 shows the group name and the caller’s private
number or alias if previously stored in your contact list.
English
DMO Group Calls
In DMO the CM5000 can be used without your Service
Provider’s infrastructure.
DMO allows communication with other terminals also
operating in DMO, which are on the same frequency and
group as the CM5000.
When you start a call, the members of the selected group
who have their units turned on receive the Group Call.
21

In DMO the CM5000 can communicate with the trunking
system (and the other way around) if the Gateway option is
enabled in the CM5000.
English
Making a DMO Group Call
Select the group from Talkgroup list you require. Press PTT
button and wait for the grant tone before speaking into the
microphone. Remember to release the PTT to listen.
Receiving a DMO Group Call
When an Group call is received the mobile automatically
switches to group mode and receives the call, also the group
caller name appears on the screen.
Exiting DMO
To exit DMO, press Optns and select Trunked Mode.
22

Private, Phone, and PABX Calls
Creating a Contact
1. From the Home display, press Contcs. Select [New Contact].
2. Enter name. Press Ok to confirm.
3. Press
Private).
4. Enter number (#). Press Ok.
5. Continue to enter other types and numbers, as you may keep
several numbers (Private, Mobile, Home, Work, PABX, Other) for
the same person under the same contact name. To correct an
entry, press Change.
6. When finished, press Done. Press Back to return to Home
display.
Dialing
Dialling a Number
1. From the Home display select call type (Private, Phone, or PABX)
using
2. Dial a number.
3. Press PTT or depending on the call type.
Dialling via the Contact List
Press Contcs and search the stored number by scrolling
(
or ) or by entering the first character of the contact
name. If the contact has more than one number, use
to select the number.
/ and select the type of stored number (such as
/ .
English
or
23
Private Call
A Private Call, also called Point-to-Point or an individual call,
is a call between two individuals. No other terminal can hear
English
the conversation.
Making a Semi-Duplex Private Call
1. From the Home display select Private Mode using / .
2. When in Private Mode, dial a number.
3. Press and hold the PTT button. Wait for the talk permit tone (if
configured) before talking, and release the PTT when listening.
4. To end the call press .
While Transmit Inhibit is activated, an incoming Private Call is indicated,
but you cannot answer the call.
Receiving a Semi-Duplex Private Call
1. The CM5000 switches to the incoming Private Call. The display
shows incoming call notification and the caller’s identity.
2. To answer an incoming call, press PTT.
3. To reject or end the call, press .
Your terminal can alert you of an incoming call. Select the alert settings
in the Tones menu items
Making a Full-Duplex Private Call
1. From the Home display select Private Mode using / .
2. When in Private Mode, dial a number.
3. Press to start the call.
4. To end the call press .
Receiving a Full-Duplex Private Call
1. The CM5000 switches to the incoming Private Call. The display
shows incoming call notification and the caller’s identity.
2. To answer an incoming call, press .
3. To reject or end the call, press .
24
Phone and PABX Calls
The Phone Call allows you to call a landline telephone
number or a cellular mobile phone number.
The Private Automatic Branch Exchange (PABX) Call
allows you to call local (office) extension numbers. This type
of call needs to be activated by your Service Provider.
In this publication we use “phone number” when referring to
these numbers.
While Transmit Inhibit is activated, an incoming Phone or PABX Call is
indicated, but you cannot answer the call.
Making a Phone or PABX Call
1. From the Home display select Phone or PABX Mode
using
2. When in Phone or PABX, select a pre-programmed number from
the contact book or dial a number.
3. Press and release . You will hear a ringing tone. Wait for the
called person to answer your call.
4. To end the call, press .
/ .
Emergency Mode
English
The CM5000 enables you to send and receive Emergency
Group Calls in Trunked Mode or in Direct Mode. If your
terminal is configured to operate through a gateway,
Emergency calls can be placed through the gateway.
The Emergency Group Call can be initiated and received
from the following subscribers:
• the selected group (TMO and DMO) (if tactical emergency)
• a predefined group (if non-tactical emergency)
Contact your Service Provider to know which is the selected
mode.
25

Your Service Provider needs to configure the Emergency
Alarm and Hot Microphone features.
Emergency calls are allocated emergency priority in the
English
system.
Entering or Exiting Emergency Mode
To enter Emergency Mode, press and hold the Emergency
button.
Pressing the Emergency button even if Transmit Inhibit is activated
causes immediately the CM5000 to transmit. When entering Emergency
Operation the CM5000 should not be within the RF sensitive area any
longer!
To exit Emergency Mode, press and hold Exit. Your terminal
switches to the Home display.
Hot Microphone Feature
If the Hot Microphone feature was programmed into the
CM5000 by your Service Provider, you are enabled to make
an Emergency Group Call and talk to the dispatcher (and
members of your group) without the need to press and hold
the PTT.
The microphone stays open for a time period (programmed
by your Service Provider). The microphone stays open until:
• the Hot microphone time period expires.
• you press the On-Hook key.
At the end of the Hot Microphone the CM5000 returns to the
Emergency Mode. The Hot Microphone feature is disabled
and PTT operation returns to normal.
If required you can resume Hot Microphone by pressing and
holding the Emergency button again.
Making an Emergency Group Call
To initiate or answer a call while in Emergency Mode:
• Press and hold PTT.
• Wait for the talk permit tone (if configured) and talk.
• Release PTT to listen.
26

Messages
Sending a Status Message
Select the desired group, then press the Menu button and
select Messages > Send Status. Select status and press
Send.
Sending a New Message
Press the Menu button and select Messages > New
Message. Write your message. Press Ok select the recipient
or enter the address directly. Select Send to send the
message.
Sending a User-Defined Message
Press the Menu button and select Messages > Templates.
Scroll and choose your required template. Select Send.
Select your mail recipient or enter number. Select Send.
Sending a Predefined Message
Press the Menu button and select Messages > Predefined.
Scroll and choose your required template. Press the Menu
button and select Edit to edit the message. Type required
information. Select Send or PTT to send the message.
Handling Unread (New) Messages
Press the Menu button and select Messages > Inbox. Scroll
to the message and select Read soft key. To read a long
message, press More to read the next page and Back to
return to the previous page.
Press the Menu button and select to store/delete/delete all/
reply/forward.
For Long Text Messages Reply, Store and Forward options are not
available.
English
27
TETRA/UHF Analogue Gateway Mode
English
General
The CM5000 allows you to establish gateway connection
between the TETRA network and an UHF analogue system.
Each time an unencrypted analogue radio user transmits to the
TETRA network an audible warning tone is sent to TETRA users in
group.
Entering TETRA/UHF Analogue Gateway Mode
The CM5000 must be connected to an analogue radio
through an analogue radio interface.
Choose the required TMO talkgroup before entering the
analogue/digital mode.
The CM5000 can switch to the analogue/digital mode only in group
mode.
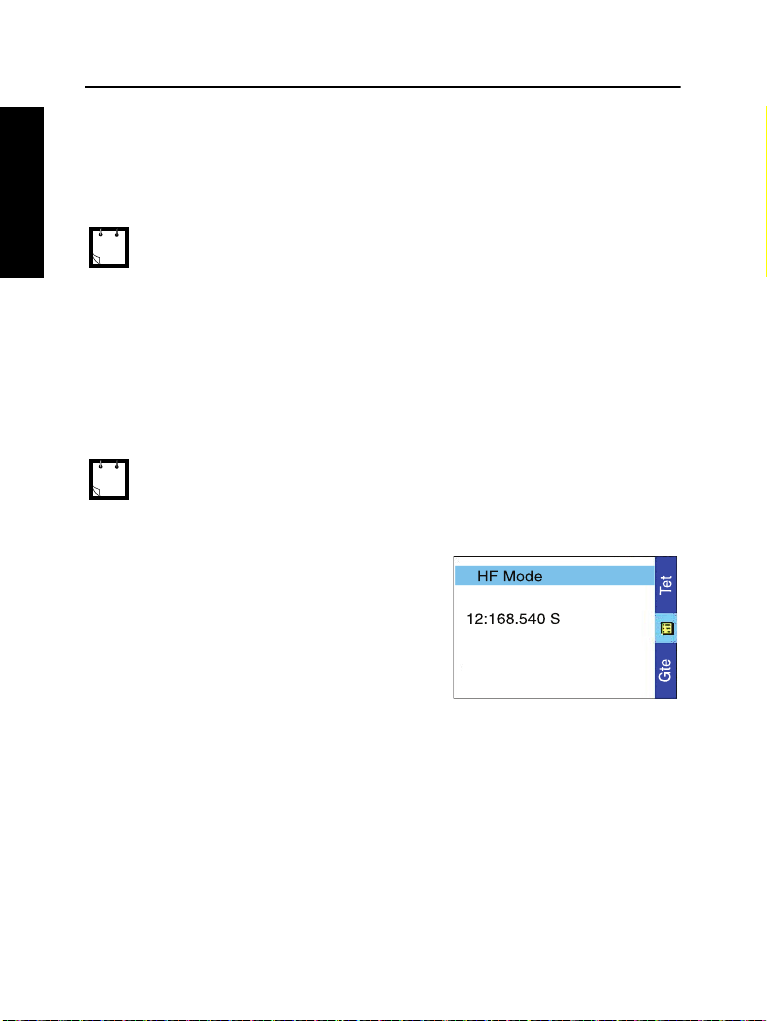
To enter the analogue/digital gateway mode:
1. From the Home display press
Menu button and then
9 alphanumeric key. The
display shows the current UHF
channel selected on UHF
mobile.
2. Select the required UHF
channel using up/down navigation keys.
3. Select Gte to enter the analogue/digital gateway operation
Select Tet to return to TMO or DMO mode.
U
28

Exiting TETRA/UHF Analogue Gateway Operation
U
To exit the analogue/digital
gateway mode, from the UHF
Gateway display select Esc.
English
29

Tips & Tricks
English
Backlight Control
You can control the intensity of the backlight via the Backlight
Control function key.
Menu Shortcuts
• You can easily access any menu item, by pressing the Menu
button and a Numeric key. (No delay between the Menu button
and the key!)
• You can ask your Service Provider to program menu shortcuts.
• You may also define a new shortcut: enter the menu item, press
and hold the Menu button, and follow the instructions in the
display.
Text Size
To set the text size from Standard to Zoomed press Menu >
Setup > Display > Text Size.
“My Groups” Folder
You can select any group (TMO or DMO) and add it to your
personal folder.
In the Home display, press
to quickly access your “My
Groups” folder.
Options (in the Home Display)
You can easily change folder, select groups, switch between
TMO and DMO (and vice-versa), and other functions via the
Home display Options.
Easy Navigation while in Menu
When scrolling up/down menu items, try also right/left
scrolling. (This selects the item or returns to previous level.)
Exiting the Menu
Wherever in the menu press the On-Hook key to exit to the
Home display.
30

to
Microphone
Connector
Display Icons
Alphanumeric
Display
Alphanumeric
Keys
Emergency
Button
Soft Keys
Menu Key
Navigation Key
Enter Key
Rotary Knob/
Power On
LED
On/Off Hook
Clear Key
English
Making a DMO Group Call
Enter DMO. Navigate to the desired
group. Press Select soft key (if
configured). Press and hold PTT. Wait
for the talk permit tone (if configured)
and talk. Release PTT to listen.
Making an Emergency Group Call
Press and hold the Emergency button.
Press and hold PTT. Wait for the talk
permit tone (if configured) and talk.
Release PTT to listen. If using “Hot
Mic” feature, wait for the Emgncy Mic
On message to appear on the display
and talk without pressing PTT.
To exit Emergency Mode, press and
hold Exit soft key.
Making a Private Call
From the Home display select Private
mode using or . Dial a number.
Press and release PTT. Ringing
sounds. Called party answers. Wait
for the called party to finish speaking.
Press and hold PTT. Wait for the talk
terminate call.
permit tone (if configured) and talk.
Release PTT to listen. Press
, select Trunked Mode/Direct
/.
button.
Turning the CM5000 On/Off
To power the CM5000 on/off, press
and hold the Knob.
Using the CM5000 Menu System
Cleartone CM5000
Quick Reference Guide
• To scroll through the menu, press
• To enter the menu, press the Menu
• To select a menu item, press Select
soft key or .
• To return to previous level, press
Back or .
Selecting Trunked/Direct/Gate-
way/Repeater Mode Operation
• Switching to Gateway or Repeater
Mode/Gateway Mode/Repeater
modes is possible in TMO only
Mode.
Optns
• From the Home display press
Making a TMO Group Call
From the Home display navigate to
the desired group. Press Select soft
key (if configured). Press and hold
PTT. Wait for the talk permit tone (if
configured) and talk. Release PTT to
listen.

to
English
• “My Groups” Folder
You can select any group (TMO or
DMO) and add it to your personal
folder.
In the Home display, press
quickly access your “My Groups”
folder.
• PIN Protect
To protect access to network
operation, from the main menu, select
Security > PIN Protect.
numeric key. (No delay between the
Menu button and the key!)
You can ask your Service Provider to
program menu shortcuts.
You may also define a new shortcut:
enter the menu item, press and hold
the Menu button, and follow the
• Menu Shortcuts
You can easily access any menu item,
by pressing the Menu button and a
instructions in the display.
• Group Audio Control
You can control audio level for any
Private or Group Call. However, you
can define via the menu to have all
Group calls always loud (Menu button
> Setup > Group Audio).
• Unified Contact List
You can keep several numbers
(Private, Mobile, Home, Work, PABX,
Other) for the same person under the
same contact name.
• Text Size
Display > Text Size.
To set the text size from Standard to
Zoomed press Menu > Setup >
Answering a Call
The CM5000 switches to the incoming
call and alerts you of the incoming
call. To answer the call, press PTT to
answer the call. To reject or end the
call press .
Sending a Status Message
Select the desired group, then press
the Menu button and select
Messages > Send Status. Select
status and press Send.
Sending a New Message
Press the Menu button and select
Messages > New Message. Write
your message. Select Send. Select
your mail recipient or enter number.
Select Send, or press PTT to send the
new message.
Tips & Tricks
• Backlight Control
You can either disable backlight
(covered operation) or have it
automatically turned on, by any key
press.

Inhalt
Sicherheitshinweise . . . . . . . . . . . . . . . . . . . . . . . . . . . . 5
Informationen zur Entsorgung. . . . . . . . . . . . . . . . . . . . 6
CM5000 – Überblick. . . . . . . . . . . . . . . . . . . . . . . . . . . . . 7
Bedienelemente und Anzeigen . . . . . . . . . . . . . . . . . . . . . . . . . 7
Signaltöne . . . . . . . . . . . . . . . . . . . . . . . . . . . . . . . . . . . . . . . . . 8
Tasten und Schalter . . . . . . . . . . . . . . . . . . . . . . . . . . . . . . . . . . 10
Funktionstasten. . . . . . . . . . . . . . . . . . . . . . . . . . . . . . . . . . . 10
Menütaste . . . . . . . . . . . . . . . . . . . . . . . . . . . . . . . . . . . . . . . 10
Drehschalter . . . . . . . . . . . . . . . . . . . . . . . . . . . . . . . . . . . . . 11
Notruftaste. . . . . . . . . . . . . . . . . . . . . . . . . . . . . . . . . . . . . . . 11
LED-Statusanzeigen . . . . . . . . . . . . . . . . . . . . . . . . . . . . . . . . . 11
Aufrufen der Menüoptionen . . . . . . . . . . . . . . . . . . . . . . . . . . . . 11
Aufrufen der vorhergehenden Menüebene . . . . . . . . . . . . . . . . 11
Verlassen der Menüoptionen . . . . . . . . . . . . . . . . . . . . . . . . . . . 11
Liste der Menüoptionen . . . . . . . . . . . . . . . . . . . . . . . . . . . . . . . 12
Menü-Kurzbefehle erstellen . . . . . . . . . . . . . . . . . . . . . . . . . 13
Die Anzeige . . . . . . . . . . . . . . . . . . . . . . . . . . . . . . . . . . . . . . . . 13
Statussymbole. . . . . . . . . . . . . . . . . . . . . . . . . . . . . . . . . . . . 13
Menüsymbole . . . . . . . . . . . . . . . . . . . . . . . . . . . . . . . . . . . . 14
Nachrichteneingangssymbole. . . . . . . . . . . . . . . . . . . . . . . . 15
Kurzwahllistensymbole . . . . . . . . . . . . . . . . . . . . . . . . . . . . . 15
Deutsch
Erste Schritte . . . . . . . . . . . . . . . . . . . . . . . . . . . . . . . . . . 16
Ein/Ausschalten . . . . . . . . . . . . . . . . . . . . . . . . . . . . . . . . . . . . . 16
Einschalten mit der Notruftaste . . . . . . . . . . . . . . . . . . . . . . . . . 16
Einschalten mit aktivierter Sendesperre (TXI) . . . . . . . . . . . . . . 16
Entsperren des CM5000 . . . . . . . . . . . . . . . . . . . . . . . . . . . . . . 17
Wahl des Betriebsmodus . . . . . . . . . . . . . . . . . . . . . . . . 18
Trunking-Modus oder Direkt-Modus aufrufen. . . . . . . . . . . . . . . 18
Gateway- und Repeater-Modus . . . . . . . . . . . . . . . . . . . . . . . . . 19
Aufrufen von Gateway- oder Repeater-Modus . . . . . . . . . . . 19
1

Deutsch
Gruppenrufe. . . . . . . . . . . . . . . . . . . . . . . . . . . . . . . . . . . 20
„Meine Gruppen“-Ordner . . . . . . . . . . . . . . . . . . . . . . . . . . . . . . 20
„Meine Gruppen“-Ordner wählen . . . . . . . . . . . . . . . . . . . . . 20
Dem „Meine Gruppen“-Ordner eine Gruppe (TMO/DMO)
hinzufügen . . . . . . . . . . . . . . . . . . . . . . . . . . . . . . . . . . . . . . 20
Eine Gruppe auswählen. . . . . . . . . . . . . . . . . . . . . . . . . . . . . . . 20
Verwendung der alphabetischen Suche . . . . . . . . . . . . . . . . 20
Verwendung der Suche nach Ordner . . . . . . . . . . . . . . . . . . 21
Einen Ordner auswählen . . . . . . . . . . . . . . . . . . . . . . . . . . . . . . 21
TMO-Gruppenrufe . . . . . . . . . . . . . . . . . . . . . . . . . . . . . . . . . . . 21
Einen TMO-Gruppenruf einleiten . . . . . . . . . . . . . . . . . . . . . 21
Einen TMO-Gruppenruf empfangen . . . . . . . . . . . . . . . . . . . 21
DMO-Gruppenrufe . . . . . . . . . . . . . . . . . . . . . . . . . . . . . . . . . . . 21
Einen DMO-Gruppenruf einleiten . . . . . . . . . . . . . . . . . . . . . 22
Einen DMO-Gruppenruf empfangen . . . . . . . . . . . . . . . . . . . 22
Den Direktmodus verlassen . . . . . . . . . . . . . . . . . . . . . . . . . 22
Einzelrufe, Telefon- und Nebenstellenrufe . . . . . . . . . . 23
Einen Kontakt erstellen . . . . . . . . . . . . . . . . . . . . . . . . . . . . . . . 23
Wählen. . . . . . . . . . . . . . . . . . . . . . . . . . . . . . . . . . . . . . . . . . . . 23
Eine Nummer wählen . . . . . . . . . . . . . . . . . . . . . . . . . . . . . . 23
Eine Nummer aus der Kontaktliste wählen . . . . . . . . . . . . . . 23
Einzelruf . . . . . . . . . . . . . . . . . . . . . . . . . . . . . . . . . . . . . . . . . . . 24
Einen Einzelruf einleiten . . . . . . . . . . . . . . . . . . . . . . . . . . . . 24
Einen Einzelruf beantworten . . . . . . . . . . . . . . . . . . . . . . . . . 24
Telefon- und Nebenstellenrufe . . . . . . . . . . . . . . . . . . . . . . . . . . 24
Durchführen eines Telefon- oder Nebenstellenrufs. . . . . . . . 25
Notrufmodus . . . . . . . . . . . . . . . . . . . . . . . . . . . . . . . . . . 26
Aufrufen oder Verlassen des Notruf-Modus . . . . . . . . . . . . . . . . 26
Notrufmikrofon . . . . . . . . . . . . . . . . . . . . . . . . . . . . . . . . . . . . . . 26
Einen Gruppennotruf ausführen . . . . . . . . . . . . . . . . . . . . . . . . . 27
Nachrichten . . . . . . . . . . . . . . . . . . . . . . . . . . . . . . . . . . . 28
Eine Statusnachricht senden . . . . . . . . . . . . . . . . . . . . . . . . . . . 28
Eine neue Nachricht senden . . . . . . . . . . . . . . . . . . . . . . . . . . . 28
Eine vom Benutzer definierte Nachricht senden . . . . . . . . . . . . 28
2

Eine vordefinierte Nachricht senden . . . . . . . . . . . . . . . . . . . . . 28
Ungelesener (neuer) Textnachrichten . . . . . . . . . . . . . . . . . . . . 28
Analoger TETRA/UHF-Gateway-Modus. . . . . . . . . . . . . 29
Allgemein . . . . . . . . . . . . . . . . . . . . . . . . . . . . . . . . . . . . . . . . . . 29
Aufrufen des analogen TETRA/UHF-Gateway-Modus . . . . . . . 29
Verlassen des analogen TETRA/UHF-Gateway-Modus . . . . . . 29
Tipps & Tricks . . . . . . . . . . . . . . . . . . . . . . . . . . . . . . . . . 30
Hintergrundbeleuchtung. . . . . . . . . . . . . . . . . . . . . . . . . . 30
Menü-Kurzbefehle . . . . . . . . . . . . . . . . . . . . . . . . . . . . . . 30
Textgröße. . . . . . . . . . . . . . . . . . . . . . . . . . . . . . . . . . . . . 30
„Meine Gruppen“-Ordner . . . . . . . . . . . . . . . . . . . . . . . . . 30
Optionen (in der Ausgangsanzeige) . . . . . . . . . . . . . . . . 30
Einfache Menü-Navigation. . . . . . . . . . . . . . . . . . . . . . . . 30
Verlassen des Menüs. . . . . . . . . . . . . . . . . . . . . . . . . . . . 30
Kurzübersicht . . . . . . . . . . . . . . . . . . . . . . . . . . . . . . . . . 31
Deutsch
© 2008 by Motorola, Inc.
Alle Rechte vorbehalten.
MOTOROLA und das stilisierte M-Logo sind beim US Patent &
Trademark Office eingetragen. Alle anderen Produkt- oder
Dienstleistungsbezeichnungen sind Eigentum ihrer jeweiligen
rechtlichen Inhaber.
3

Deutsch
4
Sicherheitshinweise
Copyright für Computer-Software
Die in diesem Handbuch beschriebenen Produkte werden zum Teil mit urheberrechtlich
geschützten Computerprogrammen ausgeliefert, die in Halbleiterspeichern oder auf anderen
Medien gespeichert sind. Nach den Gesetzen der USA und anderer Staaten sind bestimmte
exklusive Rechte an der urheberrechtlich geschützten Software, einschließlich aber nicht nur
die Rechte der Vervielfältigung in jeglicher Form der Firma Motorola vorbehalten. Demzufolge
dürfen urheberrechtlich geschützte Computerprogramme, die zusammen mit den in diesem
Handbuch beschriebenen Produkten ausgeliefert werden, ohne die vorherige schriftliche
Genehmigung von den I nhabern der Urheberrechte weder kopiert, reproduziert, modifiziert,
analysiert (Reverse Engineering) noch in jeglicher Form vertrieben werden. Auch der Erwerb
dieser Produkte bedeutet in keiner Weise den Erwerb einer Lizenz für die mitgelieferten
Produkte, die durch Copy right, Patente oder Patentanmeldungen der Inhaber dieser Rechte
geschützt sind. Der Käufer erhält mit dem Erwerb lediglich die normale Berechtigung, das
Produkt in der dafür vorgesehenen Form und in rechtmäßiger Weise zu benutzen.
In diesem Handbuch wird die grundlegende Bedienung des
CM5000 Handfunkgeräts beschrieben. Bitte setzen Sie sich mit
Ihrem Händler für weitere, im detaillierten Benutzerhandbuch
(6866539D54_) enthaltenen Informationen in Verbindung.
VORSICHT: Bitte lesen Sie vor Inbetriebnahme dieses
Produkts die mit dem CM5000 gelieferte Beilage über
!
Produktsicherheit und Funkfrequenzstrahlung 6866537D37_
zum sicheren Betrieb des Funkgeräts.
ACHTUNG!
In Erfüllung der ICNIRP-Vorschriften für Funkfrequenzstrahlung ist
das CM5000 nur für den beruflichen Gebrauch bestimmt. Um die
Einhaltung der Belastungsgrenzen im Umgang mit
Funkfrequenzstrahlung zu gewährleisten, lesen Sie bitte die im Heft
über Produktsicherheit und Funkfrequenzstrahlung (MotorolaVeröffentlichung Teile-Nr. 6866537D37_) enthaltenen Hinweise über
Funkfrequenzstrahlung und Betriebsinformationen, bevor Sie das
Funkgerät in Betrieb nehmen.
Bewahren Sie diese Bedienungsanleitung und die Allgemeinen
Sicherheitshinweise sicher auf. Stellen Sie sie auch anderen
Benutzern zur Verfügung, wenn das CM5000 an andere Personen
weitergegeben wird.
Deutsch
5

Deutsch
Informationen zur Entsorgung
EU-Richtlinie zur Entsorgung von Elektro- und
Elektronik-Altgeräten (EEAG)
Laut der EEAG-Richtlinie der Europäischen Union sind in
EU-Ländern vertriebene Produkte (sowie in manchen
Fällen auch die Verpackung) mit dem einen
durchgestrichenen Abfallcontainer anzeigenden Etikett zu
versehen. Wie laut EEAG-Richtlinie vorgeschrieben,
bedeutet dieses Etikett, dass Elektro- und Elektronikgeräte sowie
Zubehör von Verbrauchern in der EU nicht im Haushaltsmüll
entsorgt werden dürfen.
Kunden und Verbraucher innerhalb der EU werden gebeten, sich
mit dem örtlichen Vertreter oder Kundendienst ihres
Gerätelieferanten in Verbindung zu setzen, der ihnen Auskunft zur
Abfallentsorgung/-abholung geben kann.
6

CM5000 – Überblick
Bedienelemente und Anzeigen
In der nachfolgenden Tabelle wird das Bedienteil des Funkgeräts
beschrieben. Siehe dazu die Abbildung auf der
Umschlaginnenseite.
Teil Beschreibung
1 Drehschalter
Zum Ein-/Ausschalten des Funkgeräts und zur
Lautstärkeregelung.
2 Mikrofonanschluss
Zum Anschließen eines Handmikrofons.
3 Funktionstaste(n)
Zur Auswahl der im Display angezeigten Option.
4 Menütaste
Zum Aufrufen des Hauptmenüs.
5 Notruftaste
Zum Senden von Notrufalarmen.
6 Navigationstasten
Zum Durchblättern oder zur Textbearbeitung.
7 Enter-Taste
Zum Wählen eines gewünschten Punktes.
8 Löschen-Taste
Zum Löschen von Zeichen oder zur Rückkehr zum
vorhergehenden Bildschirm.
9 Alphanumerische Taste
Zur Eingabe alphanumerischer Zeichen beim Wählen, bei
der Eingabe von Kontaktinformationen und der Erstellung
von Textnachrichten.
10 Aufgelegt-Abgehoben-Taste
Zum Einleiten, Beantworten und Beenden von Rufen oder
zum Senden von Status- und Textnachrichten.
11 LED
Zum Anzeigen des Status des CM5000.
Deutsch
7

Deutsch
Signaltöne
= Hoher Ton; = Tiefer Ton;
Beschreibung Ty p Wiederholung
Ruhezustand
• Zurück zu
Ausgangsanzeige
• Zurück zu
Empfangsbereich
• Auf Vollbetrieb zurück
Sendebereit. Einmal
Drücken einer falschen Taste Einmal
• Drücken einer richtigen
Taste
• CM5000 EinschaltSelbsttest gescheitert
• Von „außer Betrieb“ zu „in
Betrieb“
Ruf
Warnung „Ruf frei” Einmal
Rufwarteton bei
anstehendem Telefon- oder
Einzelruf
„Daten Verbunden” oder
„Daten Nicht Verbunden”.
Beim Drücken der
Sprechtaste ertönt der
Freiton.
Beim Drücken der
Sprechtaste (PTT) erklingt
Freigabe-ohne-GatewayTon. Der Ton zeigt an, dass
das Gateway nicht länger
verfügbar ist.
• Sendesperre
• System belegt
• Sendezeitbegrenzer läuft
ab
• Das gerufene Funkgerät
ist nicht verfügbar oder
besetzt.
Einmal
Einmal
Alle 6 Sekunden, bis
Sie den Ruf beenden.
Einmal
Einmal
(Normaler Ton)
Einmal
(Kurzer Ton)
Zweimal
Einmal
Bis zum Loslassen
der Sprechtaste.
8

Beschreibung Ty p Wiederholung
• Ruf aufgrund eines
Netzwerkfehlers unterbrochen oder gescheitert
• Falsche Nummer gewählt
Direkt-Modus (DMO)
aufrufen
Direkt-Modus verlassen Einmal
Lokaler Trunking-Betrieb —
Aufrufen/Verlassen
Telefon-Rückrufton (Senden) Alle drei Sekunden,
Besetztton Alle 0,5 Sekunden
Statusnachricht an
Funkzentrale gesendet oder
gescheitert.
Ankommende Rufe
Quittierung der
Statusnachricht durch die
Funkzentrale.
Ihr CM5000 empfing einen
Gruppenruf ohne Gateway
(nur Setup).
Ankommender Gruppenruf
hoher Priorität
Notrufalarm gesendet oder
empfangen
Notrufalarmmeldung
gescheitert
Ankommender Notruf Einmal
Telefonrufton (Empfang)
Einzelruf im
Gegensprechverkehr
Hinweiston ankommender
Einzelruf
Einzelruf-Anruf an den
Anrufer
Je nach Einstellung im
Ruftonartunternmenü.
Einmal
Einmal
Einmal
bis die gerufene
Person den Ruf
entgegennimmt oder
der Ruf abgelehnt
wird.
Zweimal
Viermal
Einmal
Einmal
Zweimal
Viermal
Bis Sie antworten
oder der Ruf
abgelehnt wird.
Bis der Ruf
beantwortet wird.
Bis der Ruf
beantwortet wird.
Deutsch
9

Deutsch
Beschreibung Ty p Wiederholung
Einzelruf im
Wechselsprechverkehr –
PPC-Ton (Bevorzugter Ruf).
Einzelruf im
Gegensprechverkehr –PPCTon.
Eingeschränkter Service Einmal zu Beginn des
Neue Nachricht
eingegangen
Neuer Gruppenruf Einmal
Allgemein
Lautstärkeeinstellung
(Ohrhörer, Tastatur,
Lautsprecher)
Einstellen der Lautstärke —
Signalton
Sendesperre
DTMF (0-9, #, *) während
des Rufs
DTMF Ununterbrochen, bis
Alle 4 Sekunden bis
der Ruf beantwortet
oder abgelehnt wird.
Alle 4 Sekunden bis
der Ruf beantwortet
oder abgelehnt wird.
eingeschränkten
Services
Einmal
Ununterbrochen
Beim Einstellen der
Lautstärke.
Einmal
die Taste freigegeben
wird
Tasten und Schalter
Funktionstasten
Drücken Sie die untere oder obere , um die Option direkt neben
der oberen bzw. unteren Funktionstaste auf dem Bildschirm
auszuwählen.
Menütaste
Drücken Sie die Menü-Taste, um Folgendes aufzurufen:
• Das Menü (wenn gerade keine andere Aktivität ausgeführt wird).
Anhand des CM5000 Menüs können Sie die Einstellungen des
CM5000 durchführen. Menüs werden hierarchisch verwaltet. Über
die Menüoptionen erhalten Sie Zugang zu einer weiteren Liste von
Optionen, die als Untermenü bezeichnet werden.
• Das kontextsensitive Menü (wenn das -Symbol angezeigt wird)
zur Ansicht verschiedener Punkte/Optionen des aktuellen Menüs.
10
Drehschalter
Der Drehschalter dient zum Ein- und Ausschalten des CM5000
sowie als Lautstärkeregler. Zum Ein-/Ausschalten des Geräts
drücken Sie diesen Schalter und halten Sie ihn gedrückt. Zum
Höherstellen der Lautstärke drehen Sie ihn im Uhrzeigersinn.
Notruftaste
Drücken Sie diese Taste und halten Sie sie gedrückt, um in den
Notruf-Modus zu wechseln. Bei abgeschaltetem CM5000 drücken
und halten Sie diese Taste zum Einschalten im
Notruf-Modus oder im normalen Betriebsmodus (je nach
Programmierung).
LED-Statusanzeige
Die LED-Anzeige gibt den Status des CM5000 an.
Anzeige Status
Ununterbrochen GRÜN Es wird gesendet
GRÜN blinkend In Betrieb
Ununterbrochen ROT Außer Betrieb/Deaktiviert
ROT blinkend Anschlussaufbau zu einem Netz
Ununterbrochen
ORANGE
ORANGE blinkend Ankommender Ruf
Keine LED-Anzeige Abgeschaltet
Sendesperre (TXI) ist aktiviert
Deutsch
Aufrufen der Menüoptionen
1. Drücken Sie die Menütaste.
2. Blättern Sie zur gewünschten Option und drücken Sie Wählen
oder , um sie auszuwählen.
Aufrufen der vorhergehenden Menüebene
Drücken Sie Zurück oder .
Verlassen der Menüoptionen
Drücken Sie .
Wird eine bestimmte Zeit lang keine Aktivität erfasst, verlässt das CM5000
automatisch das Menü.
11

Deutsch
Sende Status
Empfangen
Neue Nachr
Muster
Vordefiniert
Nachrichten
Kontakte
Neuer Kontakt
Vorhandene Kontakte
Sicherheit
PIN-Schutz
PIN ändern
Daten einst.
Signaltöne
Einstellungen
Lautstk.einst.
Klingel einst.
Audioguppe
Töne
Anzeige
Batterie
Meine Info
Weiter…
Grup.Setup
Anruflisten
Schnelltasten
Netze
Standort
Sprache
PNC Mode
Postausgang
Liste der Menüoptionen
Dies ist die werkseitige Menüaufstellung. Einige Menüoptionen können von
Ihrem Netzbetreiber aktiviert/deaktiviert werden oder mit einer anderen
Bezeichnung versehen werden.
12

Menü-Kurzbefehle erstellen
Oft verwendete Menüoptionen können mit Kurzbefehlen einfach
und schnell aufgerufen werden.
Erstellung von Menü-Kurzbefehlen
Gehen Sie zum gewünschten Menüpunkt. Markieren Sie den Punkt,
für den ein Kurzbefehl eingerichtet werden soll. Halten Sie die
Menütaste gedrückt, während der Punkt markiert wird. Bestätigen
Sie die Erstellung des Kurzbefehls, wenn Sie dazu aufgefordert
werden.
Menü-Kurzbefehleliste
Wenn Sie bereits zugewiesene Kurzbefehle aufrufen möchten,
drücken Sie die Menütaste und wählen Weiter > Schnelltasten >
<Kurzbefehlbez>.
Menü-Kurzbefehle verwenden
Drücken Sie in der Ausgangsanzeige auf die Menütaste und auf die
dem Kurzbefehl zugewiesene Nummerntaste.
Die Anzeige
Während Sie Ihr CM5000 verwenden, werden unterschiedliche
Symbole angezeigt, die auf die im Folgenden erläuterten
Funktionen und Betriebszustände hinweisen.
Statussymbole
Statussymbole werden angezeigt, wenn Ihr Funkgerät bestimmte
Funktionen ausführt oder wenn Sie bestimmte Funktionen aktiviert
haben.
Statussymbol Beschreibung
Signalstärke
Zeigt die Signalstärke im aktuellen TMO- der DMO-Bereich an.
Vier Balken bedeuten maximale Signalstärke. Weniger Balken
bedeuten eine niedrigere Signalstärke. Die Signalstärke kann
eventuell verbessert werden, indem Sie Ihr Fahrzeug an einen
anderen Standort bringen.
Neue Nachricht eingegangen
Zeigt an, dass Sie gerade eine neue Nachricht erhalten haben.
Sobald Sie die Anzeige ändern, erlischt dieses Symbol.
Neue Nachricht(en) in Empfangen
Zeigt an, dass eine ungelesene Nachricht vorliegt. Sobald Sie
die Nachricht lesen, erlischt dieses Symbol.
Alle Töne Aus
Keine hörbaren Hinweistöne. Ankommende Rufe werden auf
dem Bildschirm angezeigt.
Deutsch
13

Deutsch
Statussymbol Beschreibung
Kein Lautsprecher
Zeigt an, dass keine Tonausgabe über den Lautsprecher
erfolgt.
GPS
Wird angezeigt, wenn das CM5000 ein GPS-Signal empfängt.
Daten verbu
Wird angezeigt, wenn sich das CM5000 im Datenpaketmodus
befindet.
Notruf
Wird angezeigt, wenn sich das CM5000 im Notruf-Modus
befindet.
Scan
Wird angezeigt, wenn sich das CM5000 im GruppenscanModus befindet.
Direkt-Modus (DMO)
Wird angezeigt, wenn sich das CM5000 im Direkt-Modus
befindet.
Gateway-Modus
Zeigt Betriebsbereitschaft für Gateway-Modus an.
Zeigt CM5000 in Festkommunikation über Gateway.
Repeater-Modus
Zeigt Betriebsbereitschaft für Repeater-Modus an.
Zeigt CM5000 in Festkommunikation über Repeater.
Menüsymbole
Die folgenden Symbole sollen die Erkennung unterschiedlicher
Menüoptionen auf einen Blick erleichtern.
Menüsymbol Beschreibung
Hauptmenüoptionen/Kontextsensitives Menü
Wird oberhalb der Menütaste angezeigt, wenn
Hauptmenüoptionen und/oder das kontextsensitive Menü aktiv
sind.
Nachrichten
• Eine Statusnachricht senden.
• Kurze Textnachrichten (neu verfasster Text oder
benutzer- bzw. vordefinierte Vorlagen) senden.
• Nachrichten im Nachrichteneingang entgegennehmen.
Kurzwahlliste
Einträge der Kurzwahlliste hinzufügen, suchen, bearbeiten
oder löschen.
Sicherheit
Zum Ein-/Ausschalten von Sicherheitsfunktionen und Ändern
des Passworts.
Einstellungen
Erlaubt die individuelle Anpassung Ihres CM5000.
14

Menüsymbol Beschreibung
Weiter…
Enthält weitere, durch den Benutzer anpassbare
Menüoptionen.
Bildlaufleiste
Unterstützt das Durchblättern von Optionen, die mehr als einen
Bildschirm in Anspruch nehmen. Werden alle Optionen auf
einem Bildschirm angezeigt, ist die Bildlaufleiste leer.
Nachrichteneingangsymbole
Die folgenden Symbole geben den Nachrichtenstatus Ihres
Nachrichteneingangs an.
Nachricten-
eingangsymbol
Ungelesene (neue) Nachricht
Zeigt an, dass Sie diese Nachricht noch nicht gelesen haben.
Gelesene (alte) Nachricht
Zeigt an, dass Sie diese Nachricht gelesen haben.
Anzeige der Senderinformationen in Nachricht
Zeigt Senderinformationen an (Name oder Nummer).
Anzeige von Uhrzeit und Datum der Nachricht
Zeigt Uhrzeit und Datum der Nachrichtenankunft an.
Beschreibung
Kurzwahllistensymbole
In der Kurzwahllistenanzeige können folgende, die Art der
gespeicherten Nummer angebende Symbole neben den
Kurzwahlnummern erscheinen.
Kurzwahllisten-
symbol
Individ. ID-Nummer
Beschreibung
Deutsch
Handy-Nummer
Telefonnummer privat
Telefonnummer Büro
Nebenstellennummer
Andere Telefonnummer
Auswahl
Zeigt an, dass mehr als eine Telefonnummer unter dieser
Kurzwahlnummer gespeichert ist.
15

Deutsch
!!
!!
Erste Schritte
Ein/Ausschalten
Zum Ein drücken Sie den Drehschalter und halten ihn gedrückt.
Das CM5000 führt einen Selbsttest durch und bucht sich ein. Nach
erfolgreichem Einbuchen ist Ihr CM5000 einsatzbereit.
Zum Aus drücken Sie den Drehschalter und halten ihn gedrückt.
Sie hören einen Hinweiston und die Meldung Schaltet ab wird
angezeigt.
Einschalten mit der Notruftaste
Zum Ein drücken Sie die Notruftaste und halten sie gedrückt. Das
CM5000 schaltet sich im Notruf-Modus oder im normalen
Betriebsmodus (je nach Programmierung) Ein.
Einschalten mit aktivierter Sendesperre (TXI)
Die Sendesperre (TXI) erlaubt Ihnen, Funksendungen vor Betreten
eines HF-Bereichs, in dem der Sendebetrieb nicht erlaubt ist,
abzuschalten. Zur Aktivierung dieser Funktion drücken Sie die
Menütaste und wählen Weiter… > Netze > Sendesperre >
Aktivieren
Warnung
Wird die Notruftaste gedrückt, sendet das CM5000 auch bei aktivierter
Sendesperre sofort. Das CM5000 darf sich beim Aufrufen des NotrufModus NICHT in einem funkstrahlungsempfindlichen Bereich befinden.
.
Die Sendesperre bleibt nach dem Ein weiter aktiviert. Sie werden
gefragt, ob Sie die Sendesperre
ein- oder ausschalten möchten
Warnung
Bevor Sie die Sendesperre aufheben, vergewissern Sie sich bitte, dass
Sie den Bereich, in dem der Sendebetrieb nicht erlaubt ist, verlassen
haben.
Drücken Sie die Funktionstaste Ja, um die Sendesperre
aufzuheben. Wurde das CM5000 vorhergehend im Trunking-Modus
verwendet, bucht es sich jetzt im Netz ein. War Ihr CM5000
vorhergehend im Direkt-Modus, bleibt es im Direkt-Modus.
.
16

Wenn Sie im Trunking-Modus Nein wählen, schaltet das CM5000
ab; wenn Sie im Direkt-Modus Nein wählen, bleibt das Funkgerät
bei aktivierter Sendesperre im Direkt-Modus.
Entsperren des CM5000
Das CM5000 ist beim Einschalten möglicherweise gesperrt.
Zum Entsperren des CM5000 geben Sie nach dem Einschalten an
der Eingabeaufforderung den Code ein. Das CM5000 wechselt in
den Ausgangsmodus.
Der Entsperrcode ist werkseitig auf 0000 gestellt. Ihr Netzbetreiber
kann diese Kombination ändern, bevor Sie Ihr Funkgerät erhalten.
Deutsch
17

Deutsch
Wahl des Betriebsmodus
Trunking-Modus oder Direkt-Modus aufrufen
Rufen Sie TMO oder DMO auf eine der folgenden Weisen auf:
• Befindet sich das Funkgerät im TMO, drücken Sie in der
Ausgangsanzeige auf Option und wählen Direkt-Modus.
• Befindet sich das Funkgerät im DMO, drücken Sie in der
Ausgangsanzeige auf Option und wählen Trunk-Modus.
• Drücken Sie die Menütaste und wählen Sie Weiter… > Netze >
Trunk-Modus, wenn sich das CM5000 im Direkt-Modus befindet.
• Drücken Sie die Menütaste und wählen Sie Weiter… > Netze >
Direkt-Modus, wenn sich das CM5000 im Trunking-Modus befindet.
• Drücken Sie die TMO/DMO-Taste (sofern von Ihrem Netzbetreiber
konfiguriert).
Während sich Ihr CM5000 im Trunking-Modus befindet, können Sie
die folgenden Rufarten einleiten und empfangen:
• Gruppenrufe
• Einzelrufe
• Telefonrufe
• Nebenstellenrufe – (Büro-) Nebenstellennummern der
Telefonanlage innerhalb der Firma.
• Notrufe.
Während sich Ihr CM5000 im Direkt-Modus befindet, können Sie
Gruppenrufe einleiten und empfangen. Dazu gehören auch
Gruppennotrufe.
Wenn Sie einige Sekunden lang keine Taste betätigen, wechselt
das CM5000 wieder auf die Ausgangsanzeige.
Ihr Funkgerät kann Sie auf einen ankommenden Ruf aufmerksam
machen. Wählen Sie dazu bitte die entsprechenden Einstellungen im
Töne-Menü.
18

Gateway- und Repeater-Modus
Im Gateway-Betriebsmodus kann zwischen TMO und DMO
übertragen werden. DMO-Geräte übertragen an das
Trunk-System (und umgekehrt).
Im Repeater-Betriebsmodus überträgt das CM5000 von einem
DMO-Endgerät empfangene Informationen an ein anderes
DMO-Endgerät und vergrößert damit den Empfangsbereich.
Aufrufen von Gateway- oder Repeater-Modus
Befindet sich das CM5000 im TMO, wird der Gateway- oder
Repeater-Modus auf eine der folgenden Arten aufgerufen:
• Drücken Sie in der Ausgangsanzeige auf Option und wählen Sie
Gateway-Modus oder Repeater-Modus.
• Drücken Sie die Menütaste und wählen Sie Weiter… > Netze >
Gateway-Modus oder Repeater-Modus wie gewünscht.
Deutsch
19

Deutsch
Gruppenrufe
Ein Gruppenruf stellt eine Verbindung zwischen Ihnen und anderen
Mitgliedern einer Gruppe her. Diese Gruppe setzt sich aus einer
festgelegten Anzahl von Teilnehmern zusammen, die an einem
Gruppenruf teilnehmen und/oder einen Gruppenruf einleiten
können.
Gruppen werden in Ordnern verwaltet. Jeder Ordner kann mehrere
Gruppen enthalten.
„Meine Gruppen“-Ordner
Sie können Ihre bevorzugten Gruppen in einem Ordner anlegen.
Dieser wird „Meine Gruppen“ genannt.
„Meine Gruppen“-Ordner wählen
Drücken Sie in der Ausgangsanzeige auf , um direkt auf den
Ordner zuzugreifen.
Dem „Meine Gruppen“-Ordner eine Gruppe (TMO/DMO) hinzufügen
1. Drücken Sie die Menütaste und wählen Sie Weiter > Grup.Setup >
Meine Gruppen > Liste ändern > [Neue Gruppe].
2. Wählen Sie eine Gruppe aus, indem Sie sie nach Namen suchen
(„Normal/Direkt n. Namen“). Geben Sie den ersten Buchstaben der
Gruppe ein. Sie können eine Gruppe auch nach Ordner suchen
(„Normal/Direkt n. Ordner“). Wählen Sie den Ordner und dann die
Gruppe. Die Gruppe wird dem Ordner „Meine Gruppen“ hinzugefügt.
Eine Gruppe auswählen
Wenn Sie eine DMO-Gruppe aus dem Ordner „Meine Gruppen“ wählen,
schaltet das Funkgerät jeweils auf TMO bzw. DMO um (oder umgekehrt).
Verwendung der alphabetischen Suche
Drücken Sie in der Ausgangsanzeige auf Option. Wählen Sie eine
Gruppe nach Namen („Grp. n. Namen“). Geben Sie den ersten
Buchstaben der Gruppe ein. Wählen Sie die Gruppe.
20

Verwendung der Suche nach Ordner
Drücken Sie in der Ausgangsanzeige auf Option. Wählen Sie eine
Gruppe nach Ordner („Grp. n. Ordner“). Wählen Sie den Ordner und
dann die Gruppe.
Einen Ordner auswählen
Drücken Sie in der Ausgangsanzeige auf Option. Wählen Sie
Ordner und dann die gewünschte Gruppe. Am Display wird die
zuletzt gewählte Gruppe dieses Ordners angezeigt.
TMO-Gruppenrufe
Im Trunking-Modus setzt das CM5000 die Infrastruktur Ihres
Netzbetreibers ein.
Einen TMO-Gruppenruf einleiten
1. Drücken Sie in der Ausgangsanzeige, sofern dies die gewünschte
Gruppe ist, auf die Sprechtaste und halten Sie sie gedrückt.
2. Warten Sie auf den Freiton und sprechen Sie in das Mikrofon.
Lassen Sie die Sprechtaste zum Hören los.
Wenn Sie einen Ruf einleiten, wird der Gruppenruf von allen
Mitgliedern der gewählten Gruppe empfangen, sofern sie ihr
Funkgerät eingeschaltet haben.
Die Meldung „Keine Gruppe“ wird dann angezeigt, wenn Sie sich außerhalb
des normalen Empfangsbereichs Ihrer gewählten Gruppe befinden. In
diesem Fall wählen Sie bitte eine neue Gruppe, die für Ihren Arbeitsstandort
gültig ist.
Deutsch
Einen TMO-Gruppenruf empfangen
Außer während eines laufenden Gesprächs schaltet Ihr CM5000
automatisch auf den Gruppen-Modus um und empfängt den Ruf.
Zum Beantworten des Rufs drücken Sie die Sprechtaste und halten
sie gedrückt.
Ihr CM5000 zeigt den Gruppennamen und die Einzelnummer oder
den Aliasnamen des Anrufers an, sofern sich diese bereits in Ihrer
Kurznummernliste befinden.
DMO-Gruppenrufe
Im Direkt-Modus kann das CM5000 ohne die Infrastruktur Ihres
Netzbetreibers verwendet werden.
21

Deutsch
Der Direkt-Modus ermöglicht den Funkverkehr mit anderen,
ebenfalls im Direkt-Modus befindlichen Funkgeräten, die die gleiche
Frequenz und Gruppe benutzen wie Ihr CM5000.
Wenn Sie einen Ruf einleiten, wird der Gruppenruf von allen
Mitgliedern der gewählten Gruppe empfangen, sofern sie ihr
Funkgerät eingeschaltet haben.
Im Direkt-Modus ist das Senden von Ihrem CM5000 zum
Trunking-System (und umgekehrt) möglich, wenn die GatewayFunktion in Ihrem CM5000 aktiviert wurde.
Einen DMO-Gruppenruf einleiten
Wählen Sie die gewünschte Gruppe aus der Liste aus. Drücken Sie
die Sprechtaste und warten Sie auf den Freiton, bevor Sie ins
Mikrofon sprechen. Zum Zuhören geben Sie die Sprechtaste frei.
Einen DMO-Gruppenruf empfangen
Bei Eingang eines Gruppenrufs schaltet das Funkgerät automatisch
in den Gruppenmodus und empfängt den Ruf. Außerdem wird der
Name des Gruppenrufers am Bildschirm angezeigt.
Den Direktmodus verlassen
Zum Verlassen des Direkt-Modus drücken Sie Option und wählen
Trunk-Modus.
22

Einzelrufe, Telefon- und Nebenstellenrufe
Einen Kontakt erstellen
1. Drücken Sie in der Ausgangsanzeige auf Kontkt. Wählen Sie
[Neuer Kontakt].
2. Geben Sie den Namen ein. Drücken Sie zur Bestätigung Ok.
3. Drücken Sie / und wählen Sie die Art der gespeicherten
Nummer (z.B. Einzelnummer).
4. Geben Sie die Nummer ein (#). Drücken Sie Ok.
5. Geben Sie weitere gewünschte Nummern und Nummernarten ein
(Einzel-, Handy-, Privat-, Büro-, Nebenstellennummer oder andere),
wenn Sie mehrere Nummern einer Person unter demselben
Kontaktnamen speichern möchten. Zum Korrigieren eines Eintrags
drücken Sie Ändern.
6. Wenn Sie fertig sind, drücken Sie Fertig. Zum Wechseln auf die
Ausgangsanzeige drücken Sie Zurück.
Wählen
Eine Nummer wählen
1. Wählen Sie in der Ausgangsanzeige mit / , um den Ruftyp
auszuwählen (Einzel-, Telefon- oder Nebenstellenruf).
2. Eine Nummer wählen.
3. Je nach Ruftyp drücken Sie die Sprechtaste oder .
Deutsch
Eine Nummer aus der Kontaktliste wählen
Drücken Sie auf Kontkt und suchen Sie die gespeicherte Nummer,
indem Sie (mit oder ) blättern oder indem Sie den ersten
Buchstaben des gewünschten Namens eingeben. Ist mehr als eine
Nummer unter diesem Namen gespeichert, wählen Sie die
gewünschte Nummer mit bzw. .
23

Deutsch
Einzelruf
Ein Einzelruf, auch Punkt-zu-Punkt-Ruf genannt, ist ein Gespräch
zwischen zwei Einzelpersonen. Dieses Gespräch kann von keinem
anderen Gerät mitgehört werden.
Einen Einzelruf im Wechselsprechverkehr einleiten
1. Wählen Sie in der Ausgangsanzeige mit / Einzelruf-Modus.
2. Wählen Sie im Einzelruf-Modus eine Nummer.
3. Drücken und halten Sie die Sprechtaste (PTT). Warten Sie auf den
Freiton (sofern konfiguriert), bevor Sie sprechen und geben Sie die
PTT zum Zuhören frei.
4. Zum Beenden des Rufs drücken Sie .
Solange die Sendesperre aktiviert ist, werden eingehende Einzelrufe
zwar angezeigt, können aber nicht beantwortet werden.
Einen Einzelruf im Wechselsprechverkehr empfangen
1. Das CM5000 wechselt auf den ankommenden Einzelruf über. In der
Anzeige wird die Anruferkennung und die Rufer-ID angezeigt.
2. Zum Beantworten eines ankommenden Rufs drücken Sie die
Sprechtaste.
3. Zum Abweisen oder Beenden des Rufs drücken Sie .
Ihr Funkgerät kann Sie auf einen ankommenden Ruf aufmerksam
machen. Wählen Sie dazu bitte die entsprechenden Einstellungen im
Töne-Menü.
Einen Einzelruf im Gegensprechverkehr einleiten
1. Wählen Sie in der Ausgangsanzeige mit Hilfe von /
Einzelruf-Modus.
2. Wählen Sie im Einzelruf-Modus eine Nummer.
3. Zum Rufen dieser Nummer drücken Sie .
4. Zum Beenden des Rufs drücken Sie .
Einen Einzelruf im Gegensprechverkehr empfangen
1. Das CM5000 wechselt auf den ankommenden Einzelruf über. In der
Anzeige wird die Anruferkennung und die Rufer-ID angezeigt.
24

2. Zum Beantworten eines ankommenden Rufs drücken Sie .
3. Zum Abweisen oder Beenden des Rufs drücken Sie .
Telefon- und Nebenstellenrufe
Im Telefon-Modus können Sie eine Telefonnummer im Festnetz
oder im Mobilfunknetz anrufen.
Im Nebenstellen-Modus (PABX) können Sie (Büro-)
Nebenstellennummern der Telefonanlage innerhalb der Firma
anrufen. Dieser Modus muss von Ihrem Netzbetreiber aktiviert
werden.
Im vorliegenden Dokument wird das Wort „Telefonnummer“
verwendet, wenn auf diese Nummern Bezug genommen wird.
Solange die Sendesperre aktiviert ist, werden eingehende Telefon- oder
Nebenstellenrufe zwar angezeigt, können aber nicht beantwortet
werden.
Durchführen eines Telefon- oder Nebenstellenrufs
1. Wählen Sie in der Ausgangsanzeige mit / Telefon- oder
Nebenstellen-Modus.
2. Wählen Sie im Telefon- oder Nebenstellenmodus eine
einprogrammierte Nummer aus der Kontaktliste oder wählen Sie
eine Nummer.
3. Drücken Sie kurz . Sie hören einen Rufton. Warten Sie, bis die
angerufene Person Ihren Ruf beantwortert.
Deutsch
4. Zum Beenden des Rufs drücken Sie .
25

Deutsch
Notrufmodus
Mit dem CM5000 können Sie Gruppennotrufe im Trunk-Modus
(TMO) oder im Direkt-Modus (DMO) senden und empfangen.
Wenn Ihr Gerät zum Betrieb über ein Gateway konfiguriert ist,
können Notrufe auch über das Gateway gesendet werden.
Ein Gruppennotruf kann an folgende Teilnehmer gesendet bzw. von
ihnen empfangen werden:
• gewählte Gruppe (TMO und DMO) (bei taktischem Notfall)
• vordefinierte Gruppe (bei nicht taktischem Notfall)
Erkundigen Sie sich bei Ihrem Netzbetreiber, welches der
ausgewählte Modus ist.
Die Leistungsmerkmale Notrufalarm und Notrufmikrofon müssen
von Ihrem Netzbetreiber konfiguriert werden.
Notrufen wird innerhalb des Systems Notfallpriorität eingeräumt.
Aufrufen oder Verlassen des Notruf-Modus
Zum Aufrufen des Notruf-Modus drücken Sie die Notruftaste und
halten Sie sie gedrückt.
Wird die Notruftaste gedrückt, sendet das CM5000 auch bei aktivierter
Sendesperre sofort. Das CM5000 darf sich beim Aufrufen des Notruf-Modus
NICHT in einem funkstrahlungsempfindlichen Bereich befinden.
Zum Verlassen des Notruf-Modus drücken Sie die Zurück-Taste
und halten Sie gedrückt. Ihr Funkgerät schaltet wieder auf die
Ausgangsanzeige zurück.
Notrufmikrofon
Sofern die Notrufmikrofon-Funktion von Ihrem Netzbetreiber in
Ihrem CM5000 programmiert wurde, können Sie einen
Gruppennotruf durchführen und mit der Zentrale (oder Mitgliedern
Ihrer Gruppe) sprechen, ohne dazu die Sprechtaste zu drücken
und gedrückt halten zu müssen.
Die Einschaltdauer des Mikrofons wird von Ihrem Netzbetreiber
programmiert. Das Mikrofon bleibt solange eingeschaltet, bis:
• die programmierte Notrufmikrofon-Einschaltdauer abläuft.
•Sie die Abgehoben-Taste drücken.
26

Beim Verlassen der Notrufmikrofon-Funktion wechselt das CM5000
wieder in den Notruf-Modus. Die Notrufmikrofon-Funktion ist damit
deaktiviert und die Sprechtaste funktioniert wieder wie gewohnt.
Wenn erforderlich, können Sie die Notrufmikrofon-Funktion wieder
aktivieren, indem Sie die Notruftaste erneut drücken und gedrückt
halten.
Einen Gruppennotruf ausführen
So leiten Sie einen Ruf im Notruf-Modus ein bzw. nehmen ihn
entgegen:
• Drücken Sie die Sprechtaste (PTT) und halten Sie sie gedrückt.
• Warten Sie auf den Freigabeton (sofern konfiguriert) und
sprechen Sie.
• Zum Zuhören lassen Sie die Sprechtaste los.
Deutsch
27

Nachrichten
Eine Statusnachricht senden
Wählen Sie die gewünschte Gruppe, drücken Sie die Menütaste
und wählen Sie Nachrichten > Sende Status aus. Wählen Sie den
Status aus und drücken Sie Senden.
Deutsch
Eine neue Nachricht senden
Drücken Sie die Menütaste und wählen Sie Nachrichten > Neue
Nachr aus. Schreiben Sie Ihre Nachricht. Wählen Sie den
Nachrichtenempfänger aus, indem Sie Ok drücken, oder geben Sie
eine Nummer ein. Wählen Sie Senden aus, um die neue Nachricht
zu senden.
Eine vom Benutzer definierte Nachricht senden
Drücken Sie die Menütaste und wählen Sie Nachrichten > Muster
aus. Blättern Sie zur gewünschten Mustervorlage und wählen Sie
Senden aus. Wählen Sie den Nachrichtenempfänger aus oder
geben Sie eine Nummer ein. Wählen Sie Senden aus.
Eine vordefinierte Nachricht senden
Drücken Sie die Menütaste und wählen Sie Nachrichten >
Vordefiniert aus. Blättern Sie zur gewünschten Mustervorlage und
wählen Sie sie aus. Drücken Sie die Menütaste und wählen Sie
Ändern aus, um die Nachricht zu bearbeiten. Geben Sie die
erforderlichen Informationen ein. Wählen Sie Senden aus oder
drücken Sie die Sprechtaste, um die Nachricht zu senden.
Ungelesene (neue) Textnachrichten
Drücken Sie die Menütaste und wählen Sie Nachrichten >
Empfangen. Blättern Sie zur Nachricht und wählen Sie die
Funktionstaste Lesen. Zum Lesen einer längeren Nachricht
drücken Sie Weiter, um die nächste Seite zu lesen, und Zurück, um
zur vorhergehenden Seite zurückzukehren.
Oder Sie drücken die Menütaste und wählen speichern/löschen/alle
löschen/weiterleiten.
Bei langen Textnachrichten sind die Optionen Beantworten,
Speichern und Weiterleiten nicht verfügbar.
28

Analoger TETRA/UHF-Gateway-Modus
U
Allgemein
Mit dem CM5000 kann eine Gateway-Verbindung zwischen dem
TETRA-Netz und einem UHF-Analogsystem hergestellt werden.
Jedesmal, wenn ein unverschlüsselter analoger Funkgerätbenutzer an
das TETRA-Netz sendet, wird ein hörbarer Warnton an alle TETRABenutzer der Gruppe gesendet.
Aufrufen des analogen TETRA/UHF-Gateway-Modus
Das CM5000 muss über eine analoge Funkgerätschnittstelle mit
einem analogen Funkgerät verbunden sein. Wählen Sie die
gewünschte TMO-Gruppe aus, bevor Sie den Analog-/DigitalModus aufrufen
Das CM5000 kann ausschließlich im Gruppen-Modus auf Analog/
Digital-Modus schalten.
Zum Aufrufen des analogen/digitalen Gateway-Modus verfahren Sie
wie folgt:
1. Drücken Sie in der
Ausgangsanzeige Menü und dann
die Nummerntaste 9. Die Anzeige
zeigt den im UHF-Funkgerät
gewählten aktuellen UHF-Kanal
an.
2. Wählen Sie den gewünschten
UHF-Kanal mit Hilfe der Auf-/AbNavigationstasten aus.
3. Zum Aufrufen des analogen/digitalen Gateway-Modus wählen Sie
Gte: Zur Rückkehr in den TMO- oder DMO-Modus wählen Sie Tet.
.
Deutsch
Verlassen des analogen TETRA/UHF GatewayModus
Zum Verlassen des analogen/
digitalen Gateway-Modus wählen
Sie in der UHF-Gateway-Anzeige
Esc.
U
29

Deutsch
Tipps & Tricks
Hintergrundbeleuchtung
Die Helligkeit der Hintergrundbeleuchtung wird mit der
Funktionstaste zur Hintergrundbeleuchtungsregelung eingestellt.
Menü-Kurzbefehle
• Sie können eine beliebige Menüoption aufrufen, indem Sie die
Menütaste und eine Nummerntaste drücken. (Menütaste und Taste
bitte unmittelbar nacheinander drücken!)
• Ihr Netzbetreiber konfiguriert Ihnen gerne Menü-Kurzbefehle.
• Sie können einen neuen Kurzbefehl auch selbst erstellen: Rufen Sie
die Menüoption auf, drücken und halten Sie die Menütaste gedrückt
und folgen Sie den Anweisungen am Display.
Textgröße
Zum Einstellen der Textgröße von Standard auf Zoomed drücken
Sie Menü > Einstellungen > Anzeige > Textgröße.
„Meine Gruppen“-Ordner
Sie können jede beliebige Gruppe (TMO oder DMO) auswählen und
Ihrem persönlichen Ordner hinzufügen.
Drücken Sie in der Ausgangsanzeige auf , um direkt auf den
Ordner „Meine Gruppen“ zuzugreifen.
Optionen (in der Ausgangsanzeige)
Anhand der Optionen der Ausgangsanzeige können Sie u.a. schnell
und einfach von einem Ordner zu einem anderen wechseln,
Gruppen auswählen oder zwischen TMO und DMO hin und her
schalten.
Einfache Menü-Navigation
Blättern Sie bei der Aufwärts-/Abwärtssuche durch ein Menü auch
einmal nach rechts und links (dadurch wird eine Option ausgewählt
oder auf die vorhergehende Menüebene geschaltet).
Verlassen des Menüs
Egal in welchem Menü Sie sich befinden - sobald Sie die
Aufgelegt-Taste drücken, kehren Sie zur Ausgangsanzeige zurück.
30

Mikrofon-
Anzeigesymbo le
Alphanumerisches
Display
Alphanumerisch
Aufgelegt-
Notruftaste
Funktionstasten
Menütaste
Navigationstaste
Enter-Taste
Drehschalter/
Einschalten
LED
Abgehoben/
Löschen-Taste
Ta st e
schlussan
Einen DMO-Gruppenruf einleiten
Rufen Sie DMO auf. Gehen Sie zur
gewünschten Gruppe. Drücken Sie den
Softkey Wählen (sofern konfiguriert).
Drücken und halten Sie die Sprechtaste.
Warten Sie auf den Freiton (sofern
konfiguriert) und sprechen Sie. Lassen Sie
die Sprechtaste zum Hören los.
Einen Gruppennotruf ausführen
Drücken Sie die Notruftaste und halten Sie
sie gedrückt. Drücken Sie die Sprechtaste
und halten Sie sie gedrückt. Warten Sie auf
den Freiton (sofern konfiguriert) und
sprechen Sie. Geben Sie die Sprechtaste
zum Hören frei. Wenn Sie die Funktion
„Notrufmikrofon“ verwenden, warten Sie,
bis die Meldung „Notmikro ein“ angezeigt
wird. Sprechen Sie dann, ohne die
Sprechtaste zu drücken.
Zum Verlassen des Notruf-Modus drücken
Sie die Zurück-Funktionstaste und halten
Drücken und halten Sie die Sprechtaste.
Warten Sie auf den Freiton (sofern
konfiguriert) und sprechen Sie. Lassen Sie
die Sprechtaste zum Hören los.
Repeater-Modus ist nur im TMO möglich.
aufzurufen.
Sie / .
Sie den SoftKey Wählen oder .
vorhergehende Menüebene zu wechseln.
Wahl von Betriebsmodus
Bündelfunk/Direkt/Gateway/
• Drücken Sie Zurück oder , um auf die
Repeater
Ein-/Ausschalten des CM5000
Zum Ein/Ausschalten des CM5000 drücken
Sie den Drehschalter und halten ihn
gedrückt.
Verwendung der Menüs des
CM5000
• Drücken Sie die Menütaste, um das Menü
• Zum Durchblättern des Menüs drücken
• Um eine Option auszuwählen, drücken
Kurzübersicht
Cleartone CM5000
Option und wählen Sie Trunk-Modus/
• Das Umschalten auf Gateway- oder
• Drücken Sie in der Ausgangsanzeige auf
sie gedrückt.
Direkt-Modus/Gateway-Modus/
Repeater-Modus.
Einen TMO-Gruppenruf einleiten
Gehen Sie von der Ausgangsanzeige zur
gewünschten Gruppe. Drücken Sie den
Softkey Wählen (sofern konfiguriert).
Deutsch

Deutsch
• Audiogruppensteuerung
Der Tonpegel kann für jeden Einzel- oder
Gruppenruf beliebig geregelt werden. Sie
können aber über das Menü für alle
Gruppenrufe auch automatisch den
Laut-Modus einstellen (Menütaste >
• Kombinierte Kontaktliste
Mehrere Nummern einer Person (Einzel-,
Handy-, Privat-, Büro-,
Nebenstellennummer oder andere) können
unter demselben Kontaktnamen
gespeichert werden.
• Textgröße
Zum Einstellen der Textgröße von Standard
auf Zoomed drücken Sie Menü >
Einstellungen > Anzeige > Textgröße.
• „Meine Gruppen“-Ordner
Sie können jede beliebige Gruppe (TMO
oder DMO) auswählen und Ihrem
persönlichen Ordner hinzufügen. Drücken
Sie in der Ausgangsanzeige auf , um
direkt auf den Ordner „Meine Gruppen“
zuzugreifen.
• PIN-Schutz
Zum Schutz des Netzbetriebs gegen
unbefugte Übergriffe wählen Sie im
Einstellungen > Audiogruppe).
Schreiben Sie Ihre Nachricht. Wählen Sie
Senden. Wählen Sie den
Nachrichtenempfänger aus oder geben Sie
eine Nummer ein.
Wählen Sie Senden aus oder drücken Sie
Eine neue Nachricht senden
Drücken Sie auf Menü und wählen Sie
Nachrichten > Neue Nachricht.
die Sprechtaste, um die neue Nachricht zu
senden.
Tipps & Tricks
• Hintergrundbeleuchtung
Sie können die Hintergrundbeleuchtung
deaktivieren (für versteckten
Funkgerätebetrieb) oder sie durch
Betätigen einer beliebigen Taste
automatisch einschalten.
•Menü-Kurzbefehle
Sie können eine beliebige Menüoption
aufrufen, indem Sie die Menütaste und
eine Nummerntaste drücken. (Menütaste
und Taste bitte unmittelbar nacheinander
drücken!)
Ihr Netzbetreiber konfiguriert Ihnen gerne
Hauptmenü Sicherheit > PIN-Schutz.
Menü-Kurzbefehle.
Sie können einen neuen Kurzbefehl auch
selbst erstellen: Rufen Sie die Menüoption
auf, drücken und halten Sie die Me nütaste
gedrückt und folgen Sie den Anweisungen
am Display.
Einen Einzelruf einleiten
Wählen Sie in der Ausgangsanzeige
mit oder . Einzelruf-Modus aus.
Wählen Sie eine Nummer.
Drücken Sie kurz die Sprechtaste. Sie
hören den Rufton. Der angerufene
Teilnehmer antwortet. Warten Sie, bis die
angerufene Person gesprochen hat.
Drücken Sie die Sprechtaste und halten
Sie sie gedrückt. Warten Sie auf den
Freiton (sofern konfiguriert) und sprechen
Sie. Geben Sie die Sprechtaste zum
Hören frei. Zum Beenden des Rufs drücken
Sie .
Beantworten eines Rufs
Ihr CM5000 weist Sie auf den
ankommenden Ruf hin und wechselt auf
den Rufüber. Drücken Sie die Sendetaste,
um den Ruf zu beantworten. Zum
Abweisen oder Beenden des Rufs drücken
Sie .
Eine Statusnachricht senden
den Status aus und drücken Sie Senden.
Wählen Sie die gewünschte Gruppe,
drücken Sie Menü und wählen Sie
Nachrichten > Sende Status. Wählen Sie

Table des matières
Informations sur la sécurité . . . . . . . . . . . . . . . . . . . . . . 5
Informations d’évacuation . . . . . . . . . . . . . . . . . . . . . . . 6
Présentation du CM5000 . . . . . . . . . . . . . . . . . . . . . . . . . 7
Commandes et indicateurs . . . . . . . . . . . . . . . . . . . . . . . . . . . . 7
Tonalités audio . . . . . . . . . . . . . . . . . . . . . . . . . . . . . . . . . . . . . . 8
Touches, sélecteur, boutons. . . . . . . . . . . . . . . . . . . . . . . . . . . . 10
Touches programmables. . . . . . . . . . . . . . . . . . . . . . . . . . . . 10
Bouton Menu. . . . . . . . . . . . . . . . . . . . . . . . . . . . . . . . . . . . . 10
Sélecteur rotatif . . . . . . . . . . . . . . . . . . . . . . . . . . . . . . . . . . . 10
Bouton d’urgence . . . . . . . . . . . . . . . . . . . . . . . . . . . . . . . . . 10
Témoin lumineux . . . . . . . . . . . . . . . . . . . . . . . . . . . . . . . . . . . . 11
Pour accéder aux options du menu . . . . . . . . . . . . . . . . . . . . . . 11
Pour revenir au niveau précédent . . . . . . . . . . . . . . . . . . . . . . . 11
Pour fermer le menu . . . . . . . . . . . . . . . . . . . . . . . . . . . . . . . . . 11
Liste des options du menu . . . . . . . . . . . . . . . . . . . . . . . . . . . . . 12
Pour créer des raccourcis du menu . . . . . . . . . . . . . . . . . 13
L’afficheur. . . . . . . . . . . . . . . . . . . . . . . . . . . . . . . . . . . . . . . . . . 13
Icônes d’état . . . . . . . . . . . . . . . . . . . . . . . . . . . . . . . . . . . . . 13
Icônes du menu. . . . . . . . . . . . . . . . . . . . . . . . . . . . . . . . . . . 14
Icônes de la boîte de messages . . . . . . . . . . . . . . . . . . . . . . 15
Icônes du répertoire . . . . . . . . . . . . . . . . . . . . . . . . . . . . . . . 15
Français
Mise en route . . . . . . . . . . . . . . . . . . . . . . . . . . . . . . . . . . 16
Marche/Arrêt . . . . . . . . . . . . . . . . . . . . . . . . . . . . . . . . . . . . . . . 16
Pour allumer avec le bouton Urgence . . . . . . . . . . . . . . . . . . . . 16
Pour allumer le CM5000 avec Suppression
d’émission activée (TXI). . . . . . . . . . . . . . . . . . . . . . . . . . . . . . . 16
Pour déverrouiller le CM5000 . . . . . . . . . . . . . . . . . . . . . . . . . . 17
Pour sélectionner le mode de fonctionnement . . . . . . 18
Pour activer le mode Système ou le mode Direct . . . . . . . . . . . 18
Modes Passerelle et Relais . . . . . . . . . . . . . . . . . . . . . . . . . . . . 19
1

Pour passer en mode Passerelle ou Relais . . . . . . . . . . . . . 19
Appels de groupe . . . . . . . . . . . . . . . . . . . . . . . . . . . . . . 20
Répertoire “Mes Groupes” . . . . . . . . . . . . . . . . . . . . . . . . . . . . . 20
Pour sélectionner le répertoire “Mes Groupes”. . . . . . . . . . . 20
Pour ajouter un groupe (Système / Direct) au
répertoire “Mes Groupes” . . . . . . . . . . . . . . . . . . . . . . . . . . . 20
Pour sélectionner un groupe . . . . . . . . . . . . . . . . . . . . . . . . . . . 20
En utilisant la recherche alphabétique . . . . . . . . . . . . . . . . . 20
En utilisant la recherche par répertoire . . . . . . . . . . . . . . . . . 21
Pour sélectionner un répertoire . . . . . . . . . . . . . . . . . . . . . . . . . 21
Appels de groupe Système . . . . . . . . . . . . . . . . . . . . . . . . . . . . 21
Français
Pour lancer un appel de groupe en mode Système . . . . . . . 21
Pour recevoir un appel de groupe en mode Système. . . . . . 21
Appels de groupe en mode Direct . . . . . . . . . . . . . . . . . . . . . . . 21
Pour lancer un appel de groupe en mode Direct . . . . . . . . . 22
Pour recevoir un appel de groupe en mode Direct . . . . . . . . 22
Pour quitter le mode Direct . . . . . . . . . . . . . . . . . . . . . . . . . . 22
Appels individuels, téléphoniques et PABX . . . . . . . . . 23
Pour créer un contact. . . . . . . . . . . . . . . . . . . . . . . . . . . . . . . . . 23
Composition . . . . . . . . . . . . . . . . . . . . . . . . . . . . . . . . . . . . . . . . 23
Pour composer un numéro . . . . . . . . . . . . . . . . . . . . . . . . . . 23
Pour appeler depuis le répertoire . . . . . . . . . . . . . . . . . . . . . 23
Appel individuel . . . . . . . . . . . . . . . . . . . . . . . . . . . . . . . . . . . . . 24
Pour lancer un appel individuel . . . . . . . . . . . . . . . . . . . . . . . 24
Pour recevoir un appel individuel . . . . . . . . . . . . . . . . . . . . . 24
Appels téléphoniques et PABX . . . . . . . . . . . . . . . . . . . . . . . . . 24
Pour lancer un appel téléphonique ou PABX . . . . . . . . . . . . 25
Mode Urgence . . . . . . . . . . . . . . . . . . . . . . . . . . . . . . . . . 26
Pour activer et désactiver le mode Urgence . . . . . . . . . . . . . . . 26
Fonction Micro ouvert (“hot mic”) (Système
uniquement) . . . . . . . . . . . . . . . . . . . . . . . . . . . . . . . . . . . . . . . . 26
Pour lancer un appel de groupe d’urgence . . . . . . . . . . . . . . . . 27
2

Messages . . . . . . . . . . . . . . . . . . . . . . . . . . . . . . . . . . . . . 28
Pour envoyer un message d’état . . . . . . . . . . . . . . . . . . . . . . . . 28
Pour envoyer un nouveau message . . . . . . . . . . . . . . . . . . . . . 28
Pour envoyer un message défini par l’utilisateur . . . . . . . . . . . . 28
Pour envoyer un message prédéfini . . . . . . . . . . . . . . . . . . . . . 28
Pour gérer les messages non-lus (nouveaux) . . . . . . . . . . . . . . 28
Mode Passerelle analogique TETRA/UHF . . . . . . . . . . . 29
Général . . . . . . . . . . . . . . . . . . . . . . . . . . . . . . . . . . . . . . . . . . . 29
Pour activer le mode Passerelle analogique TETRA/UHF. . . . . 29
Pour quitter le mode Passerelle analogique TETRA/UHF . . . . . 29
Conseils et astuces. . . . . . . . . . . . . . . . . . . . . . . . . . . . . 30
Intensité d’éclairage . . . . . . . . . . . . . . . . . . . . . . . . . . . . . 30
Raccourcis du menu . . . . . . . . . . . . . . . . . . . . . . . . . . . . 30
Taille du texte . . . . . . . . . . . . . . . . . . . . . . . . . . . . . . . . . . 30
Répertoire “Mes Groupes” . . . . . . . . . . . . . . . . . . . . . . . . 30
Options (affichage initial) . . . . . . . . . . . . . . . . . . . . . . . . . 30
Navigation facile dans le menu . . . . . . . . . . . . . . . . . . . . 30
Pour quitter un menu . . . . . . . . . . . . . . . . . . . . . . . . . . . . 30
Guide de référence rapide . . . . . . . . . . . . . . . . . . . . . . . 31
Français
© 2008 Motorola, Inc.
Tous droits réservés.
MOTOROLA et le logo stylisé M sont des marques déposées à l’US
Patent & Trademark Office. Tous les autres noms de produits ou de
services sont reconnus comme appartenant à leurs propriétaires
légitimes.
3

Français
4

Informations sur la sécurité
!
Copyright des logiciels
Les produits Motorola décrits dans ce manuel peuvent inclure des programmes informatiques
protégés par copyright, dans des mémoires à semi-conducteurs ou autres supports. La
législation des Etats-Unis, ainsi que celle d'autres pays, réservent à Motorola Europe et à
Motorola Inc. certains droits de copyright exclusifs concernant les programmes ainsi protégés,
sans limitations, notamment le droit exclusif de copier ou de reproduire, sous quelque forme que
ce soit, lesdits programmes. En conséquence, il est interdit de copier, reproduire, modifier, faire
de l'ingénierie inverse ou distribuer, de quelque manière que ce soit, les programmes
informatiques protégés par copyright contenus dans les produits décrits dans ce manuel sans
l'autorisation expresse et écrite des propriétaires des droits. En outre, l'acquisition de ces
produits se saurait en aucun cas conférer, directement, indirectement ou de toute autre
manière, aucune licence, aucun droit d’auteur, brevet, ou demande de brevet appartenant aux
propriétaires des droits, autres que la licence habituelle d’utilisation non exclusive qui découle
légalement de la vente du produit.
Ce Guide de référence explique le fonctionnement de base du
Terminal Mobile CM5000. Pour obtenir d’autres informations,
consultez votre revendeur ou le guide d’utilisation des fonctions
6866539D54_.
AVERTISSEMENT : Avant d’utiliser ce produit, lisez les
instructions de sécurité dans la brochure intitulée « Normes
de sécurité et d’exposition à l’énergie de radiofréquence »
6866537D37_ fournie avec votre CM5000.
ATTENTION !
Le modèle CM5000 est réservé à un usage professionnel pour des
raisons de conformité avec la réglementation ICNIRP sur
l’exposition aux hautes fréquences (HF). Avant d’utiliser ce produit,
vous devez lire les informations sur l’énergie électromagnétique HF
et les instructions d’utilisation dans la brochure «Sécurité des
équipements et exposition HF» (référence de publication Motorola
6866537D37_) pour connaître et appliquer les limites d’exposition à
l’énergie HF.
Gardez ce Guide d’utilisation et la brochure Sécurité et
Exposition à l’énergie électromagnétique dans un endroit sûr et
mettez-les à la disposition d’autres utilisateurs éventuels de votre
CM5000.
Français
5

Informations d’évacuation
Directive de l’Union Européenne (EU) sur les déchets
électriques et électroniques (WEEE)
La Directive WEEE de l’Union Européenne exige que les
produits électroniques et électriques vendus dans les pays
membres portent le symbole de la poubelle barrée (ou
selon les cas que ce symbole soit apposé sur l’emballage
du produit). Comme recommandé par la directive WEEE,
ce symbole signifie que les clients et les utilisateurs finaux des pays
de l’UE ne doivent pas évacuer cet équipement ou cet accessoire
Français
électronique et électrique avec les déchets domestiques.
Les clients et les utilisateurs finaux des pays de l’UE doivent
contacter leur fournisseur local ou un centre de réparation pour
obtenir des informations sur le système d’évacuation des déchets
électroniques et électriques disponible dans leur pays.
6

Présentation du CM5000
Commandes et indicateurs
Le tableau ci-dessous décrit le panneau avant de la radio. Les
chiffres renvoient à l’illustration imprimée à la deuxième page de
couverture
Élément Description
.
1 Sélecteur rotatif
Pour allumer et éteindre la radio et régler le niveau du
volume.
2 Connecteur du microphone
Permet de connecter un microphone de poing.
3 Touche(s) programmable(s)
Permet de sélectionner l’option affichée à l’écran.
4 Touche Menu
Pour ouvrir le menu principal.
5 Bouton d’urgence
Pour envoyer des alarmes d’urgence.
6 Touches de navigation
Pour faire défiler l’affichage et pour modifier le texte.
7 Touche Entrée
Permet de sélectionner l’option voulue.
8 Touche Effacer
Permet d’effacer un caractère et de revenir à l’écran
précédent.
9 Touches alphanumériques
Permet de saisir des caractères alphanumériques
pour composer des numéros d’appel, entrer des noms
et des numéros dans le carnet d’adresses, et pour
rédiger des messages textes.
10 Touche Raccrocher / Décrocher
Permet de lancer des appels et d’y répondre, de
terminer un appel en cours, d’envoyer des messages
d’état et des messages textes.
11 Témoin LED
Indique l’état opérationnel actuel du CM5000.
Français
7

Tonalités audio
= Tonalité aiguë; = Tonalité basse;
Description Ty pe Répétition
Veille
• Retour à l’affichage initial
• Retour à la couverture
• Retour au service intégral
Prêt à envoyer Une fois
Erreur de touche Une fois
• Confirmation de touche
• Echec de l’auto-test à la
mise sous tension du
Français
CM5000
• De hors-service à
en-service
Pendant un appel
Avertissement d’annulation
d’appel
Tonalité d’appel en attente
pendant un appel
téléphonique ou individuel
mis en attente
Données en connexion ou
Données déconnectées.
La tonalité d’autorisation de
parler retentit lorsque vous
appuyez sur l’alternat.
La tonalité “Voix autorisée
sans passerelle” retentit
lorsque vous appuyez sur le
bouton PTT. Cette tonalité
confirme que la passerelle
n’est plus disponible.
• Impossibilité de parler
• Système occupé
• Limite de temps
d’émission expirée
• Le CM5000 n’est pas
disponible ou est occupé.
• Appel déconnecté ou
interrompu par le réseau.
• Numéro composé erroné
Activation du mode Direct
Une fois
Une fois
Une fois
Toutes les six
secondes, jusqu’à la fin
de l’appel.
Une fois
Une fois
(Tonal. norm.)
Une fois
(Tonal. courte)
Deux fois
Une fois
Jusqu’à ce que vous
relâchiez l’alternat.
Une fois
Une fois
8

Description Ty pe Répétition
Désactivation du mode
Direct
Site local TMO – Entrer/sortir Une fois
Sonnerie de rappel
téléphonique (envoyer)
Occupé Toutes les 0,5 seconde
Message d’état envoyé au
dispacheur ou échec
Appels entrants
Message d’état reconnu par
le dispacheur
Votre CM5000 a reçu un
appel de groupe sans
passerelle (configuration
uniquement)
Réception d’appel d’un
groupe haute priorité
Message d’urgence envoyé
ou reçu
Echec Message d’urgence Quatre fois
Appel d’urgence reçu Une fois
Sonnerie téléphonique
(réception)
Appel individuel duplex
Appel individuel reçu Jusqu’à ce que l’appelé
Appel individuel sonnant
pour l’appelant
Sonnerie d’appel individuel
prioritaire préemptif
semi-duplex (PPC)
Sonnerie d’appel individuel
PPC duplex
Service restreint Une fois, lorsque vous
Nouveau message reçu Une fois
Selon le réglage choisi dans le
sous-menu Style de sonnerie
Une fois
Toutes les trois
secondes, jusqu’à ce
que l’appelé réponde
ou rejette l’appel, ou
que la limite de temps
d’émission expire.
Deux fois
Quatre fois
Une fois
Une fois
Deux fois
Jusqu’à ce que vous
répondiez ou que
l’appel soit rejeté.
réponde
Jusqu’à ce que l’appelé
réponde
Toutes les quatre
secondes jusqu’à ce
que vous répondiez ou
que l’appel soit rejeté.
Toutes les quatre
secondes jusqu’à ce
que vous répondiez ou
que l’appel soit rejeté.
accédez au service
restreint.
Français
9

Description Ty pe Répétition
Nouvel Appel de groupe Une fois
Généralités
Réglage du volume
(écouteur, clavier, hautparleur)
Réglage du volume –
sonnerie
Suppression d’émission
(TXI)
DTMF (0-9, #, *) pendant
l’appel
DTMF
Continu
Pendant le réglage du
volume
Une fois
Continu, jusqu’à ce que
l’utilisateur relâche la
touche.
Français
Touches, sélecteur, boutons
Touches programmables
Appuyez sur la touche inférieure ou supérieure pour
sélectionner l’option affichée à l’écran directement à côté de cette
touche.
Bouton Menu
Appuyez sur le bouton Menu pour ouvrir :
• Le menu (lorsque la radio n’est pas active). Le menu vous permet
de régler les paramètres de votre CM5000. Il contient les fonctions
de la radio organisées hiérarchiquement. Chaque option d’un menu
permet d’accéder à d’autres options, regroupées en sous-menus.
• Le menu contextuel permet de consulter une liste d’options dans le
menu sélectionné (lorsque l’icône est affichée).
Sélecteur rotatif
Le sélecteur rotatif permet d’allumer et d’éteindre le CM5000 et de
régler le niveau du volume. Pour allumer ou éteindre, appuyez et
maintenez ce sélecteur. Tournez-le dans le sens horaire pour
augmenter le volume.
Bouton d’urgence
Maintenez ce bouton pour passer en mode Urgence.
Lorsque le CM5000 est éteint, vous pouvez maintenir ce bouton
pour l’allumer directement en mode Urgence ou en mode standard
(selon la programmation).
10

Témoin lumineux
Le témoin lumineux indique l’état opérationnel du CM5000.
Témoin État
Vert fixe Émission
Vert clignotant En service
Rouge fixe Hors service / Désactivé
Rouge clignotant Connexion à un réseau
Orange fixe Suppression d’émission (TXI) activée
Orange clignotant Appel entrant
Sans indication Éteint
Pour accéder aux options du menu
1. Appuyez sur le bouton Menu.
2. Faites défiler jusqu’à l’élément requis et appuyez sur Sélect ou
sur pour sélectionner.
Pour revenir au niveau précédent
Appuyez sur Retour ou sur .
Pour fermer le menu
Appuyez sur .
Le CM5000 ferme le menu lorsque l’utilisateur n’appuie sur aucune touche
pendant un délai prédéterminé.
Français
11

Liste des options du menu
État envoi
Boîte de récept
Nouveau Msg
Modèles
Prédéfini
Messages
Contacts
Nouveau contact
Contacts existants
Sécurité
Protect. PIN
Modifier Code
Réglages données
Type sonnerie
Réglages
Régler volume
Régler sonnerie
Audio groupe
Tonalités
Affichage
Batterie
Mes infos
Suite…
Réglage groupes
Appels récents
Raccourcis
Réseaux
Site
Langue
PNC Mode
Boîte d’envoi
Français
Ce tableau constitue la structure du menu standard. Votre fournisseur
de services peut activer / désactiver certaines options du menu ou
changer leurs noms.
12

Pour créer des raccourcis du menu
Les raccourcis vous permettent d’accéder rapidement à des options
de menu fréquemment utilisées.
Création de raccourcis du menu
Naviguez dans le menu jusqu’à l’option souhaitée. Sélectionnez
l’option pour laquelle vous voulez créer un raccourci. Maintenez le
bouton Menu pendant que l’option est sélectionnée. Confirmez la
création du raccourci lorsque le système vous le demande.
Liste de raccourcis du menu
Pour voir les raccourcis déjà programmés, appuyez sur le bouton
Menu et sélectionnez Suite > Raccourcis > <Nom raccourci>.
Utilisation des raccourcis du menu
L’écran initial étant affiché, appuyez sur le bouton Menu puis sur la
touche numérique attribuée au raccourci.
L’afficheur
Pendant l’utilisation du CM5000, des icônes s’affichent à l’écran
pour indiquer les conditions opérationnelles suivantes.
Icônes d’état
Les icônes d’état sont affichées lorsque votre poste exécute
certaines opérations ou lorsque vous avez activé certaines
fonctions.
Icône Description
Niveau du signal
Indique le niveau du signal radio dans la zone de
communication Système ou Direct. Quatre barres indiquent le
plus fort signal possible. Moins il y a de barres, plus le signal
est faible. Vous pouvez essayer d’améliorer le niveau du signal
en vous déplaçant avec votre véhicule.
Nouveau message reçu
Vous venez de recevoir un nouveau message. Dès que vous
modifiez l’affichage, cette icône disparaît.
Nouveau(x) Message(s) dans la boîte de réception
Vous avez un ou des messages non lus dans la boîte de
réception. Dès que vous avez lu le ou les messages, cette
icône disparaît.
Toutes tonalités désactivées
Toutes les tonalités des avertissements sont désactivées. Les
appels entrants sont affichés à l’écran.
Français
13

Icône Description
Sans haut-parleur
Le haut-parleur est désactivé.
GPS
Affiché lorsque le CM5000 reçoit un signal GPS.
Données connectées
Affiché lorsque le CM5000 est en mode Données par paquets.
Urgence
Affiché lorsque le CM5000 est en mode Urgence.
Balayage
Affiché lorsque le CM5000 est en mode Balayage.
Mode Direct (DMO)
Français
Affiché lorsque le CM5000 est en mode Direct.
Mode Passerelle
Indique que le mode Passerelle est activé.
Indique que le CM5000 supporte une communication fixe par
Passerelle.
Mode Relais
Indique que le mode Relais est activé.
Indique que le CM5000 supporte une communication fixe par
Relais.
Icônes de menu
Les icônes suivantes permettent d’identifier les options du menu
d’un seul coup d’œil.
Icône de menu Description
Options du menu principal / contextuel
Affichées au-dessus du bouton Menu lorsque le menu principal /
contextuel est ouvert.
Messages
Envoyer les messages d’état
•
Envoyer les messages textes courts (texte libre ou modèles
•
définis ou prédéfinis par l’utilisateur)
• Recevoir les messages dans la Boîte Msg.
Répertoire
Ajouter, chercher, modifier, effacer des contacts dans le répertoire.
Sécurité
Pour activer / désactiver, vérifier les fonctions de sécurité, modifier
les mots de passe.
Réglages
Permet de personnaliser le CM5000.
Suite...
Pour accéder à d’autres options personnalisables du menu.
14

Icône de menu Description
Barre de défilement
Aide à la navigation lorsque les options occupent plus d’un écran.
Lorsque toutes les options sont affichées sur un seul écran, la barre
de défilement est vide.
Icônes de la boîte de messages
Les icônes suivantes signalent le statut des messages présents
dans la Boîte Msg.
Icône de la
boîte de
messages
Message non lu (nouveau)
Indique que ce message n’a pas encore été lu.
Message lu (ancien)
Indique que ce message a déjà été lu.
Information expéditeur dans la vue Message
Affiche le nom ou le numéro de l’expéditeur.
Heure et date dans la vue Message
Affiche l’heure et la date d’arrivée du message.
Description
Icônes du répertoire
Lorsque le répertoire est ouvert, les icônes suivantes peuvent être
affichées à côté de chaque contact pour indiquer le type de numéro
enregistré.
Icône du
répertoire
Numéro de radio individuel
Description
Français
Numéro de téléphone portable
Numéro de téléphone du domicile
Numéro de téléphone professionnel
Numéro PABX
Autre numéro de téléphone
Sélecteurs :
ce contact contient plus d’un numéro.
15

Mise en route
!!
!!
Marche/Arrêt
Pour allumer, maintenez le sélecteur rotatif enfoncé. Votre CM5000
exécute la procédure d’inscription et l’auto-test. Après l’inscription
réussie sur le système, le CM5000 est en service.
Pour éteindre, maintenez le sélecteur rotatif enfoncé. Vous
entendez une tonalité courte et le message Extinction est affiché.
Pour allumer avec le bouton Urgence
Maintenez le bouton Urgence pour allumer le CM5000. Le CM5000
Français
s’allume en mode Urgence ou en mode standard mode (selon la
programmation).
Pour allumer le CM5000 avec Suppression d’émission activée
La fonction Suppression d’émission (TXI) vous permet de
désactiver le mode Émission de votre poste avant d’entrer dans une
zone sensible aux hautes fréquences radio. Pour activer cette
fonction, appuyez sur le bouton Menu puis sur Suite...> Réseaux >
Mode TXI > Activer.
Attention
Même si le mode Suppression d’émission est activé, le CM5000 émet
immédiatement lorsque vous appuyez sur le bouton Urgence. Par
conséquent, le CM5000 NE DOIT PAS être dans une zone sensible aux
hautes fréquences radio lorsque vous activez le mode Urgence.
Le mode TXI restera actif au prochain allumage du CM5000. Le
système vous demande alors si vous voulez ou non quitter le mode
TXI
.
Attention
Vous devez vérifier que vous êtes sorti de la zone sensible aux hautes
fréquences radio avant de désactiver la Suppression d’émission.
Appuyez sur la touche Oui pour désactiver le mode TXI. Si le
CM5000 était précédemment utilisé en mode Système, il s’inscrira
sur le réseau. S’il était en mode Direct, il restera en mode Direct.
16

Appuyez sur la touche Non en mode Système et le CM5000
s’éteindra. Appuyez sur la touche Non en mode Direct et il restera
en mode Direct avec le mode TXI activé.
Pour déverrouiller le CM5000
Il est possible que CM5000 soit verrouillé lorsque vous l’allumez.
Pour le déverrouiller après la mise sous tension, entrez le code
dans l’invite affichée. Le CM5000 affiche l’écran d’accueil par
défaut.
Le code de déverrouillage défini en usine est : 0000. Votre
fournisseur de services peut le changer avant de vous livrer votre
terminal.
Français
17

Pour sélectionner le mode de fonctionnement
Pour activer le mode Système ou le mode Direct
Vous pouvez choisir l’une des méthodes suivantes pour passer en
mode Système ou mode Direct :
• Dans l’écran initial, appuyez sur Optns et sélectionnez Mode direct
si le CM5000 est en mode Système.
• Dans l’écran initial, appuyez sur Optns et sélectionnez Mode
réseau si le CM5000 est en mode Direct.
Français
• Appuyez sur le bouton Menu et sélectionnez Suite...> Réseaux >
Mode réseau, si le CM5000 est en mode Direct.
• Appuyez sur le bouton Menu et sélectionnez Suite...> Réseaux >
Mode direct, si le CM5000 est en mode Système.
• Appuyez sur la touche préprogrammée Système / Direct (selon la
programmation effectuée par votre fournisseur de services).
Vous pouvez lancer et recevoir les types d’appel suivants lorsque le
CM5000 est en mode Système :
• Appels de groupe
• Appels individuels
• Appels téléphoniques
• Appels PABX (appels destinés à divers postes internes sur un
standard téléphonique local (bureau))
• Appels d’urgence
Vous pouvez lancer et recevoir des appels de groupe lorsque le
CM5000 est en mode Direct. Ceci inclut les appels de groupe
d’urgence.
Le CM5000 revient à l’affichage initial après quelques secondes
d’inactivité.
Votre terminal peut vous avertir de la réception d’un appel entrant.
Vous pouvez sélectionner les paramètres d’avertissement dans le
menu Tonalités.
18

Modes Passerelle et Relais
En mode Passerelle, le relais de communication entre Système et
Direct est disponible. Les terminaux Direct communiquent avec le
système et vice-versa.
En mode Relais, le CM5000 re-transmet les informations reçues
d’un terminal Direct à un autre terminal Direct et permet d’étendre la
zone de couverture.
Pour passer en mode Passerelle ou Relais
Lorsque le CM5000 est en mode Système, vous pouvez passer en
mode Passerelle ou en mode Relais, de la façon suivante :
• À partir de l’écran d’accueil, appuyez sur Optns et sélectionnez
Mode passerelle ou Mode répéteur.
• Appuyez sur le bouton Menu et sélectionnez Suite... > Réseaux
> Mode passerelle ou Mode répéteur.
Français
19

Appels de groupe
Un appel de groupe est une communication entre vous et d’autres
personnes faisant partie d’un groupe. Un groupe se compose de
plusieurs utilisateurs prédéfinis de votre système de communication
et qui sont autorisés à recevoir et/ou à lancer un appel de groupe.
Les groupes sont organisés en répertoires. Chaque répertoire peut
contenir plusieurs groupes.
Répertoire “Mes groupes”
Vous pouvez organiser les groupes avec lesquels vous
Français
communiquez le plus souvent dans un répertoire appelé “Mes
groupes”.
Pour sélectionner le répertoire “Mes Groupes”
A partir de l’affichage initial, appuyez sur pour ouvrir directement
le répertoire.
Pour ajouter un groupe (Système / Direct) au répertoire “Mes Groupes”
1. Appuyez sur le bouton Menu et sélectionnez Suite > Réglage
groupes > Mes Groupes > Éditer Liste > [Nouv Grpe].
2. Sélectionnez un groupe par recherche alphabétique (“Mode réseau/
Mode direct abc”). Entrez le premier caractère du nom du groupe.
Ou sélectionnez un groupe par recherche de répertoire (“Mode
réseau/Mode direct doss.”). Sélectionnez le répertoire, puis
sélectionnez le groupe. Le groupe est ajouté au répertoire “Mes
groupes”.
Pour sélectionner un groupe
Lorsque vous naviguez dans le répertoire “Mes groupes” et que vous
sélectionnez un groupe Direct, votre terminal bascule entre mode
Système et mode Direct (ou vice-versa).
En utilisant la recherche alphabétique
A partir de l’affichage initial, appuyez sur Optns. Sélectionnez un
groupe par recherche alphabétique (“GA par abc”). Entrez le
premier caractère du nom du groupe. Sélectionnez le groupe.
20

En utilisant la recherche par répertoire
A partir de l’affichage initial, appuyez sur Optns. Sélectionnez un
groupe par liste de groupe (“GA par dossier”). Sélectionnez la liste
de groupe, puis sélectionnez le groupe.
Pour sélectionner un répertoire
A partir de l’affichage initial, appuyez sur Optns. Sélectionnez
Répertoire et sélectionnez la liste requise. L’afficheur indique le
dernier groupe sélectionné dans cette liste.
Appels de groupe Système
En mode Système, le CM5000 utilise l’infrastructure de votre
fournisseur de services.
Pour lancer un appel de groupe en mode Système
1. A partir de l’affichage initial et si le groupe requis est affiché,
maintenez l’Alternat enfoncé.
2. Attendez la tonalité d’autorisation de parole et parlez dans le
microphone. Pour écouter, relâchez l’Alternat.
Lorsque vous lancez un appel, tous les membres du groupe
sélectionné recevront l’appel de groupe (si leur terminal est allumé).
Le message “Pas de groupe” est affiché lorsque vous êtes hors de portée de
la zone normale de couverture du groupe sélectionné. Vous devez alors
choisir un autre groupe joignable à partir de votre position actuelle.
Pour recevoir un appel de groupe en mode Système
Si le CM5000 est libre, il reçoit l’appel de groupe. Pour répondre à
l’appel, maintenez l’Alternat.
Le CM5000 affiche le nom du groupe et le numéro de l’appel ou sa
désignation, s’il est déjà enregistré dans votre répertoire.
Français
Appels de groupe en mode Direct
En mode Direct, le CM5000 fonctionne sans passer par
l’infrastructure de communication de votre fournisseur de services.
Le mode Direct permet de communiquer avec d’autres terminaux
qui se trouvent aussi en mode Direct et qui utilisent la même
fréquence et le même groupe que votre CM5000.
Lorsque vous lancez un appel, les membres du groupe sélectionné
recevront l’appel de groupe (si leur terminal est allumé).
21

En mode Direct, le CM5000 peut communiquer avec le système et
vice-versa, si l’option Passerelle est activée sur le CM5000.
Pour lancer un appel de groupe en mode Direct
Sélectionnez un groupe dans la liste des groupes. Appuyez sur
l’Alternat et attendez la tonalité d’autorisation avant de parler dans
le microphone. N’oubliez pas de relâchez l’Alternat pour écouter.
Pour recevoir un appel de groupe en mode Direct
Lorsque la radio reçoit un appel de groupe, le CM5000 passe
automatiquement en mode Groupe et reçoit l’appel. Le nom
d’appelant du groupe est affiché.
Français
Pour quitter le mode Direct
Pour désactiver le mode Direct, appuyez sur Optns et sélectionnez
Mode réseau.
22

Appels Individuels, Téléphoniques et PABX
Pour créer un contact
1. L’écran d’accueil étant affiché, appuyez sur Contcs. Sélectionnez
[Nouveau contact].
2. Entrez le nom. Appuyez sur Ok pour confirmer.
3. Appuyez sur / et sélectionnez le type de numéro enregistré
(par exemple un numéro individuel).
4. Entrez le numéro (#). Appuyez sur ok
5. Continuez d’entrer d’autres types et d’autres numéros, puisque vous
pouvez enregistrer plusieurs numéros (Individuel, Portable,
Domicile, Professionnel, PABX, Autre) pour une même personne
sous un même nom. Pour modifier une entrée, appuyez sur Modif.
6. Lorsque vous avez terminé, appuyez sur Fait. Appuyez sur Retour
pour revenir à l’écran d’accueil.
Composition
Pour composer un numéro
1. À partir de l’écran d’accueil, sélectionnez un type d’appel (Individuel,
Téléphone ou PABX) avec les / .
2. Composez un numéro.
3. Appuyez sur l’Alternat ou selon le type d’appel.
Pour appeler depuis le répertoire
Appuyez sur Contcs et recherchez le numéro enregistré en faisant
défiler la liste ( ou ) ou en tapant le premier caractère du nom
du contact. Si plusieurs numéros sont associés à un même contact,
utilisez ou pour sélectionner le numéro.
Français
23

Appel individuel
Un appel individuel, également désigné par l'expression "appel
poste à poste", est un appel entre deux personnes. Aucun autre
terminal ne peut écouter cette conversation.
Pour lancer un appel individuel semi-duplex
1. À partir de l’écran d’accueil, sélectionnez Mode Individuel avec /
.
2. La radio étant en Mode Individuel, composez un numéro.
3. Appuyez sur l’Alternat. Attendez la tonalité d’autorisation de parler
(selon la configuration effectuée) avant de parler et relâcher
l’Alternat pour écouter.
Français
4. Pour terminer l’appel, appuyez sur .
Lorsque la Suppression d’émission est activée, la réception des appels
individuels est signalée, mais vous ne pouvez pas y répondre.
Pour recevoir un appel individuel semi-duplex
1. Le CM5000 prend l’appel individuel entrant. L’écran affiche la
notification d’appel entrant et l’identité de l’appelant.
2. Pour répondre à un appel entrant, appuyez sur l’Alternat.
3. Pour refuser ou terminer l’appel, appuyez sur .
Votre terminal peut vous avertir de la réception d’un appel entrant.
Vous pouvez sélectionner les paramètres d’avertissement dans le
menu Tonalités.
Pour lancer un appel individuel duplex
1. Sur l’écran d’accueil, sélectionnez Mode Individuel avec / .
2. Une fois en Mode Individuel, composez un numéro.
3. Appuyez sur pour lancer l’appel.
4. Pour terminer l’appel, appuyez sur .
Pour recevoir un appel individuel duplex
1. Le CM5000 prend l’appel individuel entrant. L’écran affiche la
notification d’appel entrant et l’identité de l’appelant.
2. Pour répondre à un appel entrant, appuyez sur .
24

3. Pour refuser ou terminer l’appel, appuyez sur .
Appels téléphoniques et PABX
Un appel de type Téléphone vous permet d’appeler un numéro de
téléphone fixe ou cellulaire / portable.
Un appel de type PABX (Autocommutateur privé) vous permet
d’appeler des numéros de poste sur un standard (bureau). Ce type
d’appel doit être activé par votre fournisseur de services.
Dans cette publication, nous désignons ces types de numéro par le
terme “numéro de téléphone”.
Lorsque la Suppression d’émission est activée, la réception d’un appel
téléphonique ou PABX entrant est signalée, mais vous ne pouvez pas y
répondre.
Pour lancer un appel téléphonique ou PABX
1. À partir de l’écran d’accueil, sélectionnez le mode Téléphone ou
PABX avec / .
2. La radio étant en Mode Téléphone ou PABX, sélectionnez un numéro
préprogrammé dans le répertoire ou composez un numéro.
3. Appuyez et relâchez . Vous entendez une sonnerie. Attendez
que l’appelé réponde à votre appel.
4. Pour terminer l’appel, appuyez sur .
Français
25

Mode Urgence
Le CM5000 vous permet d’envoyer et de recevoir des appels de
Groupe d’urgence en mode Système ou en mode Direct. Si votre
terminal est configuré pour utiliser une passerelle, vous pouvez
lancer des appels d’urgence en passant par cette passerelle.
Les appels de groupe d’urgence peuvent être lancés et reçus par
les abonnés suivants :
• Un groupe sélectionné (modes Système et Direct) (en cas d’urgence
tactique)
• Un groupe prédéfini (en cas d’urgence non-tactique)
Français
Contactez votre fournisseur de services pour savoir lequel de ces
deux modes est sélectionné.
Votre fournisseur de services doit avoir configuré les
caractéristiques de l’Alarme d’urgence et du Microphone ouvert.
Les appels d’urgence bénéficient de la priorité d’urgence sur le
système.
Pour activer et désactiver le mode Urgence
Pour activer le mode Urgence, maintenez le bouton Urgence.
Si vous appuyez sur le bouton Urgence, le CM5000 émet immédiatement,
même si l’option Suppression d’émission est activée. Lorsque le CM5000
entre en mode Urgence, il ne doit pas être dans une zone sensible aux
fréquences radio !
Pour quitter le mode Urgence, maintenez Quit. La radio affiche
l’écran d’accueil.
Fonction Micro ouvert (“hot mic”) (Système uniquement)
Si la fonction « Hot Microphone » (micro ouvert) a été programmée
sur votre CM5000 par votre distributeur, vous pouvez lancer un
appel de groupe d’urgence et parler au dispacheur (et aux membres
de votre groupe) sans utiliser et maintenir l’alternat (PTT).
Le microphone reste ouvert pendant le délai programmé par votre
distributeur. Il reste également ouvert jusqu’à ce que :
• Expiration du délai Micro ouvert.
• Pression sur la touche Raccroché.
26

A la fin de la période Micro ouvert, le CM5000 revient en mode
Urgence. La fonction Microphone ouvert est désactivée et le
fonctionnement de l’Alternat revient à la normale.
Au besoin, vous pouvez réactiver la fonction Micro ouvert en
maintenant le bouton Urgence.
Pour lancer un appel de groupe d’urgence
Pour lancer ou répondre à un appel lorsque le poste est en mode
Urgence :
• Appuyez et maintenez l’alternat (PTT).
• Attendez la tonalité Voix autorisée (si elle a été configurée) et
parlez.
• Relâchez l’alternat (PTT) pour écouter.
Français
27

Messages
Pour envoyer un message d’état
Sélectionnez le groupe requis, puis appuyez sur le bouton Menu et
sélectionnez Messages > État envoi. Sélectionnez État et appuyez
sur Envoi.
Pour envoyer un nouveau message
Appuyez sur le bouton Menu et sélectionnez Messages > Nouveau
Msg. Écrivez votre message. Appuyez sur Ok. Sélectionnez le
destinataire ou entrez directement l’adresse requise. Appuyez sur
Français
Envoi pour envoyer le message.
Pour envoyer un message défini par l’utilisateur
Appuyez sur le bouton Menu et sélectionnez Messages >
Modèles. Faites défiler et choisissez votre modèle. Sélectionnez
Envoi. Sélectionnez votre destinataire ou entrez un numéro.
Sélectionnez Envoi.
Pour envoyer un message prédéfini
Appuyez sur le bouton Menu et sélectionnez Messages >
Prédéfini. Faites défiler et choisissez votre modèle. Appuyez sur le
bouton Menu et sélectionnez Édit. pour changer le contenu du
message. Saisissez les informations requises. Appuyez sur Envoi
ou sur l’Alternat pour envoyer le message.
Pour gérer les messages non-lus (nouveaux)
Appuyez sur le bouton Menu et sélectionnez Messages > Boîte de
récept. Faites défiler pour afficher le message et sélectionnez la
touche de fonction Lire. Pour lire un message long, appuyez sur
Suite pour passer à la page suivante et sur Retour pour revenir à la
page précédente.
Appuyez sur le bouton Menu, puis choisissez : Enregistrer /
Supprimer / Supprimer tout / Répondre / Transférer.
Les options Enregistrer et Renvoyer ne sont pas disponibles avec la
fonction Répondre aux messages en texte long.
28

Mode Passerelle analogique TETRA/UHF
U
Général
Le CM5000 vous permet d’établir une connexion par passerelle
entre le réseau TETRA et un système analogique UHF.
Chaque fois qu’un utilisateur de radio analogique non cryptée émet en
direction du réseau TETRA, une tonalité d’avertissement audible est
envoyée aux utilisateurs TETRA du groupe.
Pour activer le mode Passerelle analogique TETRA/ UHF
Le CM5000 doit être connecté à une radio analogique par
l'intermédiaire d'une interface radio analogique.
Choisissez le groupe Système (TMO) avant d’activer le mode
Analogique/Numérique.
Le CM5000 peut uniquement passer du mode analogique au mode
numérique et vice-versa lorsqu’il est en mode Groupe.
Pour activer le mode Passerelle analogique/numérique :
1. À partir de l’écran d’accueil,
appuyez sur le bouton Menu puis
sur la touche alphanumérique 9.
L’écran affiche le canal UHF
actuellement sélectionné sur le
mobile UHF.
2. Sélectionnez le canal UHF requis
avec les touches de navigation haut/
bas.
3. Sélectionnez Passerelle (Psrl) pour activer le mode Passerelle
analogique/numérique. Sélectionnez Te t pour revenir en mode
Système ou Direct.
Français
Pour quitter le mode Passerelle analogique TETRA/ UHF
Pour quitter ce mode, sélectionnez
Esc. dans l’écran Passerelle UHF.
U
29

Conseils et astuces
Intensité d’éclairage
Vous pouvez régler l’intensité de l’éclairage avec la touche
Eclairage.
Raccourcis de menu
•
Vous pouvez aisément accéder à n’importe quelle option du menu en
appuyant sur le bouton Menu puis sur une touche numérique (mais
sans aucune pause entre ces deux pressions !)
• Vous pouvez demander à votre fournisseur de services de
programmer les raccourcis du menu.
Français
• Vous pouvez aussi définir un nouveau raccourci : choisissez l’option
dans le menu, maintenez le bouton Menu enfoncé et suivez les
instructions affichées.
Taille du texte
Pour régler la taille du texte de Standard à Zoom, appuyez sur
Menu > Réglages > Affichage > Taille texte.
Répertoire “Mes groupes”
Vous pouvez sélectionner n’importe quel groupe (Système ou
Direct) et l’ajouter à votre répertoire personnel.
A partir de l’affichage initial, appuyez sur vers le haut pour ouvrir
rapidement le répertoire “Mes groupes”.
Options (affichage initial)
Grâce aux options de l’affichage initial, vous pouvez aisément
changer de répertoire, sélectionner des groupes, basculer entre les
modes Système et Direct et utiliser d’autres fonctions.
Navigation facile dans le menu
Lorsque vous faites défiler les options des menus vers le haut ou le
bas, vous pouvez aussi utiliser la touche Droite et la touche
Gauche. (Cette commande sélectionne l’élément affiché ou revient
au niveau précédent).
Pour quitter un menu
Lorsqu’un menu est ouvert, vous pouvez le fermer en appuyant sur
la touche Raccrocher et revenir à l’affichage d’accueil.
30

configurée). Maintenez enfoncé
Connecteur du
microphone
Icônes de l’affichage
Afficheur
alphanumérique
Alphanumérique
Décrocher
Bouton
d’urgence
Touches
Touche Menu
Touche de navigation
Touche Entrée
Sélecteur
Marche
Témoin
Touches
Touche Effacer
rotatif /
LED
Raccrocher /
programmables
l’Alternat. Attendez la tonalité
Pour allumer et éteindre le
CM5000
d’autorisation de parole (si configurée)
Cleartone CM5000
et parlez. Relâchez l’Alternat pour
Pour allumer et éteindre le CM5000,
Guide de référence rapide
Pour lancer un appel de groupe
en mode Direct
Activez le mode Direct (DMO). Naviguez
jusqu’au groupe voulu. Appuyez sur la
touche de fonction Sélect (si elle est
configurée). Maintenez enfoncé
l’Alternat. Attendez la tonalité
d’autorisation de parole (si configurée)
et parlez. Relâchez l’Alternat pour
écouter.
Pour lancer un appel de groupe
d’urgence
Maintenez le bouton Urgence.
Maintenez l’Alternat. Attendez la
tonalité d’autorisation (si elle est
configurée) et parlez. Relâchez
l’Alternat pour écouter. Si vous utilisez
la fonction Micro ouvert, attendez que le
message Mic urgence actif soit affiché
et parlez sans appuyer sur l’Alternat.
Pour quitter le mode Urgence, exercez
une pression longue sur la touche de
écouter.
fonction Quit.
Français
/.
réseau/Mode direct/Mode
du CM5000
• Pour ouvrir le menu, appuyez sur le
bouton Menu.
• Pour faire défiler le menu, appuyez sur
appuyez sur le Sélecteur rotatif.
Pour utiliser le système de menu
appuyez sur Retour ou .
• Pour revenir au niveau précédent,
menu, appuyez sur .
• Pour sortir d’une liste d’options de
Pour activer le mode Système/
Direct/Passerelle/Relais
• Le mode Système est uniquement
disponible en mode Passerelle ou
Relais.
passerelle/Mode répéteur.
sur Optns et sélectionnez Mode
• À partir de l’écran d’accueil, appuyez
Pour lancer un appel de groupe
en mode Système
À partir de l’écran initial, naviguez
jusqu’au groupe voulu. Appuyez sur la
touche de fonction Sélect (si elle est

Français
• Contrôle Audio groupe
Pour envoyer un nouveau
Vous pouvez contrôler le niveau audio
d’un appel individuel ou de groupe. En
outre, vous pouvez aussi choisir
d’entendre tous les appels de groupe en
mode Audio fort (bouton Menu >
message
Appuyez sur le bouton Menu et
sélectionnez Messages > Nouveau
Msg. Écrivez votre message.
Sélectionnez Envoi. Sélectionnez votre
Affichage > Audio groupe).
destinataire ou entrez un
• Répertoire unifié
numéro.Sélectionnez Envoi, ou
Vous pouvez enregistrer plusieurs
numéros (Individuel, Portable, Domicile,
Professionnel, PABX, Autre) pour une
même personne sous le même nom.
• Taille du texte
appuyez sur l’Alternat pour envoyer le
nouveau message.
Conseils et astuces
• Intensité d’éclairage
Pour régler la taille du texte de Standard
à Zoom, appuyez sur Menu > Réglages
> Afficheur > Taille texte.
Vous pouvez désactiver l’éclairage
(fonctionnement discret) ou le laisser en
mode automatique (il s’active lorsque
• Répertoire “Mes groupes”
vous appuyez sur l'une des touches).
Vous pouvez sélectionner n’importe quel
• Raccourcis de menu
groupe (Système ou Direct) et l’ajouter à
Vous pouvez aisément accéder à
vers le haut pour ouvrir rapidement
votre répertoire personnel.
À partir de l’affichage initial, appuyez sur
le répertoire “Mes groupes”.
n’importe quelle option du menu en
appuyant sur le bouton Menu puis sur
une touche numérique (mais sans
aucune pause entre ces deux
• Protection PIN
Pour protéger l’accès au réseau,
sélectionnez Sécurité > Protect. PIN à
partir du menu principal.
pressions !)
Vous pouvez demander à votre
fournisseur de services de programmer
les raccourcis du menu.
Vous pouvez aussi définir un nouveau
raccourci : choisissez l’option dans le
menu, maintenez le bouton Menu et
suivez les instructions affichées.
Pour lancer un appel individuel
À partir de l’écran d’accueil,
sélectionnez Mode Individuel
avec ou . Composez un numéro.
Appuyez et relâchez l’Alternat. Vous
entendez une sonnerie. L’appelé
répond. Attendez que la personne
finisse de parler.
refuser ou terminer l’appel, appuyez
Maintenez l’Alternat enfoncé. Attendez
la tonalité d’autorisation (si elle est
configurée) et parlez.
Relâchez l’Alternat pour écouter.
Appuyez sur pour terminer l’appel.
Pour répondre à un appel
Le CM5000 prend l’appel individuel
entrant et vous avertit. Pour répondre à
l’appel, appuyez sur l’Alternat. Pour
sur .
Pour envoyer un message d’état
Sélectionnez le groupe requis, puis
appuyez sur le bouton Menu et
sélectionnez Messages > État envoi.
Sélectionnez Etat et appuyez sur Envoi.

Índice general
Información sobre seguridad . . . . . . . . . . . . . . . . . . . . 5
Información sobre eliminación . . . . . . . . . . . . . . . . . . . 6
Descripción general de CM5000 . . . . . . . . . . . . . . . . . . 7
Controles e indicadores . . . . . . . . . . . . . . . . . . . . . . . . . . . . . . 7
Tonos de las señales de audio . . . . . . . . . . . . . . . . . . . . . . . . . 8
Teclas, mandos y botones . . . . . . . . . . . . . . . . . . . . . . . . . . . . . 10
Teclas de función variable . . . . . . . . . . . . . . . . . . . . . . . . . . 10
Botón Menú . . . . . . . . . . . . . . . . . . . . . . . . . . . . . . . . . . . . . 10
Mando giratorio . . . . . . . . . . . . . . . . . . . . . . . . . . . . . . . . . . 11
Botón de emergencia . . . . . . . . . . . . . . . . . . . . . . . . . . . . . . 11
Indicador de estado (LED) . . . . . . . . . . . . . . . . . . . . . . . . . . . . 11
Acceso a los elementos de menú . . . . . . . . . . . . . . . . . . . . . . . 11
Regreso al nivel anterior . . . . . . . . . . . . . . . . . . . . . . . . . . . . . . 11
Salida de los elementos de menú . . . . . . . . . . . . . . . . . . . . . . . 11
Lista de elementos de menú . . . . . . . . . . . . . . . . . . . . . . . . . . . 12
Creación de accesos directos a elementos de menú . . . . . . 13
Pantalla . . . . . . . . . . . . . . . . . . . . . . . . . . . . . . . . . . . . . . . . . . . 13
Iconos de estado . . . . . . . . . . . . . . . . . . . . . . . . . . . . . . . . . 13
Iconos de menú . . . . . . . . . . . . . . . . . . . . . . . . . . . . . . . . . . 14
Iconos del buzón de entrada . . . . . . . . . . . . . . . . . . . . . . . . 15
Iconos de contactos . . . . . . . . . . . . . . . . . . . . . . . . . . . . . . . 15
Español
Procedimientos iniciales . . . . . . . . . . . . . . . . . . . . . . . . 16
Encendido/apagado . . . . . . . . . . . . . . . . . . . . . . . . . . . . . . . . . 16
Encendido del botón de emergencia . . . . . . . . . . . . . . . . . . . . . 16
Encendido con la función de inhibición de transmisión activada 16
Desbloqueo de CM5000 . . . . . . . . . . . . . . . . . . . . . . . . . . . . . . 17
Selección del modo de funcionamiento . . . . . . . . . . . . 18
Acceso a TMO o DMO . . . . . . . . . . . . . . . . . . . . . . . . . . . . . . . 18
Modos Gateway y Repetidor . . . . . . . . . . . . . . . . . . . . . . . . . . . 19
Acceso a los modos Gateway o Repetidor . . . . . . . . . . . . . 19
1

Llamadas de grupo . . . . . . . . . . . . . . . . . . . . . . . . . . . . . 20
Carpeta “Mis grupos” . . . . . . . . . . . . . . . . . . . . . . . . . . . . . . . . 20
Selección de un grupo . . . . . . . . . . . . . . . . . . . . . . . . . . . . . . . 20
Selección de una carpeta . . . . . . . . . . . . . . . . . . . . . . . . . . . . . 21
Llamadas de grupo en modo TMO . . . . . . . . . . . . . . . . . . . . . . 21
Llamadas de grupo en modo DMO . . . . . . . . . . . . . . . . . . . . . . 21
Español
Llamadas privadas, telefónicas y PABX . . . . . . . . . . . . 23
Creación de contactos . . . . . . . . . . . . . . . . . . . . . . . . . . . . . . . 23
Marcación . . . . . . . . . . . . . . . . . . . . . . . . . . . . . . . . . . . . . . . . . 23
Llamada privada . . . . . . . . . . . . . . . . . . . . . . . . . . . . . . . . . . . . 24
Llamadas telefónicas y PABX . . . . . . . . . . . . . . . . . . . . . . . . . . 24
Selección de la carpeta “Mis grupos” . . . . . . . . . . . . . . . . . . 20
Adición de un grupo (TMO/DMO) a la carpeta
"Mis grupos”
Uso de la búsqueda alfabética . . . . . . . . . . . . . . . . . . . . . . . 20
Uso de la búsqueda por carpetas . . . . . . . . . . . . . . . . . . . . 21
Realización de una llamada de grupo en modo TMO . . . . . 21
Recepción de una llamada de grupo en modo TMO . . . . . . 21
Realización de una llamada de grupo en modo DMO . . . . . 22
Recepción de una llamada de grupo en modo DMO . . . . . . 22
Salida del modo de funcionamiento Directo DMO . . . . . . . . 22
Marcación de un número . . . . . . . . . . . . . . . . . . . . . . . . . . . 23
Marcación mediante la lista de contactos . . . . . . . . . . . . . . 23
Realización de una llamada privada . . . . . . . . . . . . . . . . . . 24
Recepción de una llamada privada . . . . . . . . . . . . . . . . . . . 24
Realización de una llamada telefónica o PABX . . . . . . . . . . 25
. . . . . . . . . . . . . . . . . . . . . . . . . . . . . . . . . . . . . 20
Modo de emergencia . . . . . . . . . . . . . . . . . . . . . . . . . . . 26
Acceso al modo de emergencia y salida de él . . . . . . . . . . . . . 26
Función de micrófono de emergencia . . . . . . . . . . . . . . . . . . . . 26
Realización de una llamada de grupo de emergencia . . . . . . . 27
Mensajes . . . . . . . . . . . . . . . . . . . . . . . . . . . . . . . . . . . . . 28
Envío de un mensaje de estado . . . . . . . . . . . . . . . . . . . . . . . . 28
Envío de un mensaje nuevo . . . . . . . . . . . . . . . . . . . . . . . . . . . 28
Envío de un mensaje definido por el usuario . . . . . . . . . . . . . . 28
2
 Loading...