

Page 1

VERVE
CAM
VERVE
CAM+
User Guide
We aim to provide you with the best user
experience. Please check out the latest
software and user manual update from our
website: www.verve.life
en
Page 2

1. Here’s what you can do
The MOTOROLA VerveCam Ultra Portable Lifestyle
Video Camera is packed with the following features:
• Video recording in 2.5K at 30 fps and 135° field
of view
• Share videos in real time via Youtube live
stream
• Free
• Loop Recording within a set time frame
• Capture your favorite sequence over a set
• Take it 25m deep with included IP68 water
Hubble Connect for VerveCam app with
photo/video editing and social sharing
period of time
proof sports case
1 Here’s what you can do
en
Page 3

2. Box Contents
Ver ve Cam
•1 x Camera
• 1 x Micro USB cable
• 1 x Quick Start Guide
Ver ve Cam+
•1 x Camera
• 1 x Micro USB cable
• 1 x Quick Start Guide
•1 x Waterproof Case
•1 x Clip Mount
• 1 x Bumper & Lanyard
•1 x Universal Mount
Additional accessories for other home or outdoor
activities can be purchased separately from
www.verve.life
en
Box Contents 2
Page 4
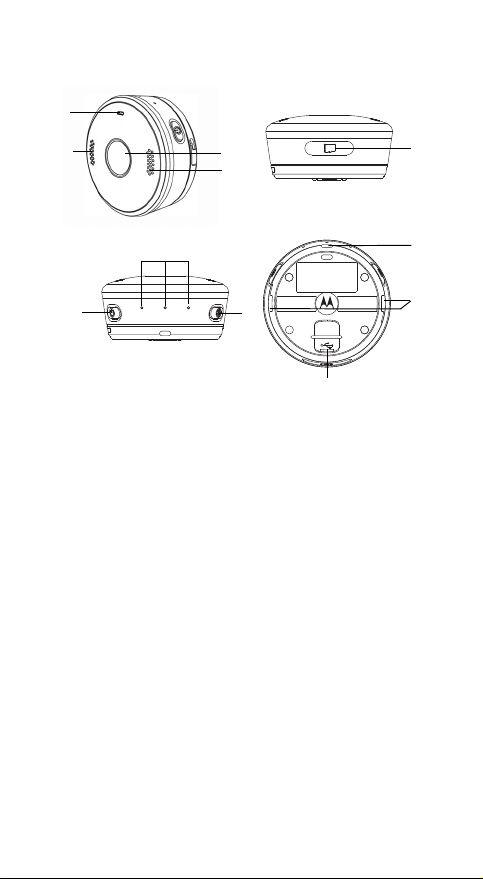
3. Your Camera at a Glance
3
5
6
7
4
8
9
10
11
1
2
1. LED Indicator - Blue / Red
2. Microphone
3. Camera Lens
4. Speaker
5. micro SD Card* Slot and Reset Button (micro SD
Card is not included.)
6. Power / Mode Button
7. Mode Indicators - White (Photo / Video /
Streaming)
8. Shutter / Select Button
9. Lanyard Hole
10. Locking Holes
11. micro-USB socket
* supports microSD cards up to 32GB.
3 Your Camera at a Glance
en
Page 5

4. Safety Instructions
WARNING
The Camera is compliant with all relevant
electromagnetic field standards and is, when
handled as described in the User’s Guide, safe to
use. Therefore, always read the instructions in this
User’s Guide carefully before using the product.
• Avoid letting the USB port come into contact with
liquid substances such as liquid soap or detergent.
• Do not immerse the Camera in water without its
waterproof case.
• Do not jump into water with the Camera or
subject it to high water pressure conditions such
as rapids or waterfalls, as this may affect its
waterproof performance.
• Keep the Camera away from excessive dust,
smoke, steam and sand.
• Do not charge the Camera when it is wet.
• Do not open the microSD slot cover underwater.
• Do not insert a wet microSD card into the Camera.
• Do not drop or use excessive force when handling
the Camera as this may cause damage to the
camera.
• Only use a power adapter with the suggested
rating of 5V 1A.
• Never use extension cords with power adapters.
• Do not touch the plug contacts with sharp or metal
objects.
• Keep this User's Guide for future reference.
en
Safety Instructions 4
Page 6

5. Charge the Battery
Battery life is about
1.5 hours when not
connected to Wi-Fi,
and 1 hour when
connected to Wi-Fi.
Connect the power adapter to a mains power socket and insert the plug into the micro-USB socket on the underside of the Camera. Only use the power adapter (5V 1A) with the micro-USB plug.
Note: If the Camera is OFF, the LED indicator lights
up in red when charging and goes off when the
battery is fully charged.
It takes about 6 hours to fully charge the battery for
the first time.
You can continue to take photos or record videos
when the Camera is charging.
The Camera will issue a voice prompt to warn you
that it is powering off when battery is low.
5.1 Check Battery Status
You can check the battery status of the Camera
from Hubble Connect for VerveCam app. The
battery status icon is shown on the top right corner
of the Viewfinder screen.
5 Charge the Battery
en
Page 7

6. Power On & Off the Camera
To p ow er ON th e C am e ra, hold down the POWER /
MODE button
lights up in blue.
To power OFF the Camera, hold down the POWER
/ MODE button
voice prompt indicating that the Camera is
powering off before the LED indicator goes off.
0 for 3 seconds. The LED indicator
0 for 3 seconds. You will hear a
en
Power On & Off the Camera 6
Page 8

7. Standby Mode
When the Camera is not connected to the power
supply or not connected to Hubble Connect for
Ver veC am app for more than 3 minutes, it will enter
standby mode. The LED indicator flashes in blue
once every 3 seconds.
Press any button on the Camera to exit standby
mode.
7 Standby Mode
en
Page 9

8. Connecting Devices
System Requirements:
Smartphone: iOS 8.3 (or higher) or Android™ 4.3 (or
higher)
Not supported on iPad and Android tablets.
Wi-Fi® requirements:
At least 2Mbps upload bandwidth per camera. Test
your Internet speed at: http://www.speedtest.net/
1. Download & Install Hubble Connect for Verve-
Cam app on your smartphone for free at the
App Store
2. Open the App.
3. Follow the in-app instructions to connect the
Camera with your smartphone.
4. The Camera ID is printed on the back of the
Camera. YOUR CAMERA’S DEFAULT
PASSWORD IS “00000000”.
5. When connected, you will see the home
screen.
Tap to enter Viewfinder screen where you
can take photos, record videos, record timelapse video, do loop recording or stream live
video.
Tap to enter the Camera roll, where you can
view, download, edit, share or delete photos
and videos.
To return to the home screen from any mode,
tap < on the top left of the screen.
®
or Google PlayTM.
en
Connecting Devices 8
Page 10
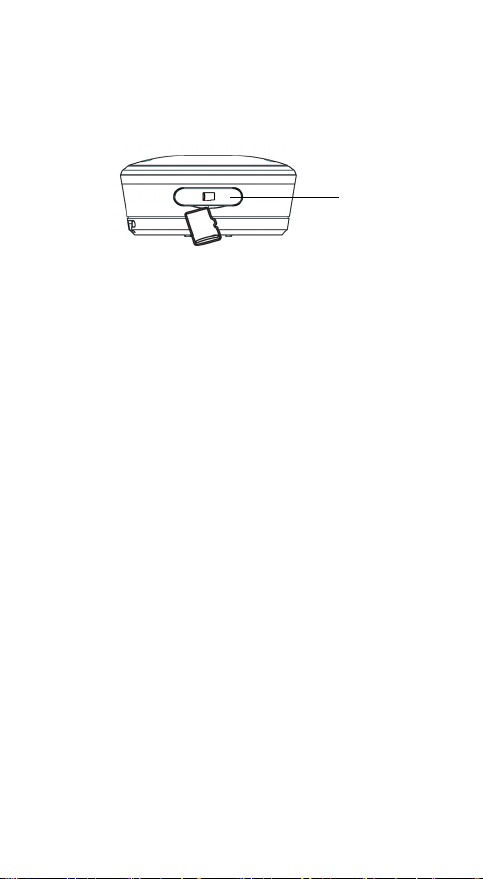
9. Insert microSD Card (not included)
Remove
waterproof
cover
Your Camera supports microSD cards with storage
capacities of up to 32GB.
1. Remove the waterproof cover, then insert a microSD card with the gold-plated side facing down into the card slot.
2. To remove the microSD card, push the card in to eject it.
Note:
The Camera will stop recording automatically and
issue a voice prompt to warn you when the memory
card is full.
The memory available will be displayed on the top
right corner of the Viewfinder screen.
9 Insert microSD Card (not included)
en
Page 11

10. Transfer files from the Camera to your Computer
Power on the Camera and make sure that the
Camera is disconnected from Hubble Connect for
Ver ve Ca m App.
To disconnect the Camera from the App, you can
close the App or turn off the Camera and turn it on
again.
Connect the Camera to your computer’s USB port.
Your computer will recognize the Camera as a mass
storage device. You can then drag and drop your
files, just like other external devices.
To exit mass storage mode, unplug the USB cable.
en
Transfer files from the Camera to your Computer 10
Page 12

11. Basic Operation of your Camera
11.1 Take a picture using the Camera
1. Hold down the POWER / MODE button 0 for
3 seconds to power ON the Camera.
The LED indicator lights up in blue.
2. Press the POWER / MODE button 0 to switch
to photo mode.
Photo mode indicator lights up in white.
3. Press the SHUTTER/SELECT button to take
photo.
You will hear a shutter sound and the blue LED
indicator flashes once.
Note:
Photos will be stored on the Camera’s memory
card.
You can also choose to save the photos to your
smartphone automatically. See “General Settings”
on page 25 to turn autosave to phone memory On
or Off.
The Camera will issue a voice prompt to warn you
when the memory card is full.
Whether you are taking a photo in bright sunlight or
a dimly lit room, you can change Camera settings
by selecting a specific mode via Hubble Connect
for VerveCam app. (see page 13)
11 Basic Operation of your Camera
en
Page 13

11.2 Record video using the Camera
1. Hold down the POWER / MODE button 0 for
3 seconds to power ON the Camera.
The LED indicator lights up in blue.
2. Press the POWER / MODE button 0 to switch
to video mode.
Video mode indicator lights up in white.
3. Press the SHUTTER/SELECT button to start
recording video.
You will hear a beep sound. The blue LED
indicator and the white video mode indicator
flash when video recording is in progress.
4. Press the SHUTTER/SELECT button to stop
video recording.
The blue LED indicator and the white video
mode indicator stop flashing.
Note:
Videos will be stored on the Camera’s memory
card.
The Camera will issue a voice prompt to warn you
when the memory card is full.
If the Camera is running out of power, the video will
be saved before the Camera powers OFF.
Whether you are recording a video in bright sunlight
or a dimly lit room, you can change Camera
settings by selecting a specific mode via Hubble
Connect for VerveCam app. (see page 15)
en
Basic Operation of your Camera 12
Page 14

12. Take Photos (via
VerveCam
Hubble Connect for
app)
Note: The App will remember the last used mode
and will go to that mode automatically when
connected.
Photos will be stored on the Camera’s memory
card.
1. Run Hubble Connect for VerveCam app on your smartphone.
2. Go to the viewfinder screen and tap
Camera
mode on the bottom panel.
3. Tap to take photo.
You will hear a shutter sound and the blue
LED indicator flashes once.
4. To change camera settings, tap to select the following options:
2688x1512 (16:9)
1920x1080 (16:9)
Resolution
Burst Shot
1280x720 (16:9)
2016x1512 (4:3)
1600x1200 (4:3)
1024x768 (4:3)
640x480 (4:3)
Off
3 fps
5 fps
10 fps
13 Take Photos (via Hubble Connect for VerveCam app)
en
Page 15

Timer
White Balance
OFF
2 Seconds
5 Seconds
10 Seconds
Auto
Daylight
Cloudy
Fluorescent
Underwater
Shade
Tu n g s t e n
en
Take Photos (via Hubble Connect for VerveCam app) 14
Page 16

13. Record Videos (via
for VerveCam
Hubble Connect
app)
Note: The App will remember the last used mode
and will go to that mode automatically when
connected.
Videos will be stored on the Camera’s memory
card.
1. Run Hubble Connect for VerveCam app on your smartphone.
2. Go to the viewfinder screen and tap
Video
mode on the bottom panel.
3. Tap to start recording video.
You will hear a beep sound.
The blue LED indicator and the white video
mode indicator flash when video recording is
in progress.
4. Tap again to stop video recording. The
blue LED indicator and the white video
mode indicator stop flashing.
5. To change video settings, tap to select the following options:
QHD (2.5k) 2560x1440 @ 30fps (16:9)
Full HD (1080p) 1920x1080 @60fps (16:9)
Resolution
Slow Motion
HD (720p) 1280x720 @120fps (16:9)
HD (720p) 1280x720 @60fps (16:9)
HD (720p) 1280x720 @30fps (16:9)
Full HD (1080p) 1920x1080 @30fps (16:9)
ON
OFF
15 Record Videos (via Hubble Connect for VerveCam app)
en
Page 17

White Balance
WDR
Auto
Daylight
Cloudy
Fluorescent
Underwater
Shade
Tu n g s t e n
OFF
ON
Wide Dynamic Range gives the camera the
ability to view Dark areas of the given image as
well as extremely lighted portions of the image,
or areas of high contrast.
en
Record Videos (via Hubble Connect for VerveCam app) 16
Page 18

14. Take Time Lapse Video (via
Connect for VerveCam
Note: The App will remember the last used mode
and will go to that mode automatically when
connected.
Time lapse photography is a way of filming
something in which many photographs are taken
over a long period of time and are shown quickly in a
series so that a slow action (such as sun rise, cloud
movements) appears to happen quickly.
Time lapse function is useful for nature photography
or for capturing busy scenes such as rush-hour traffic.
Time lapse video recording should be more than 5
minutes in duration.
This function can only be selected in Hubble
Connect for VerveCam app.
Hubble
app)
14.1 Set Time Lapse Video Interval
1. Run Hubble Connect for VerveCam app on
your smartphone.
2. In the viewfinder screen, tap to select
mode on the bottom panel.
3. Tap to select an interval (1, 2, 3, 5, 10, 30, 60
seconds).
Time Lapse
14.2 Set Time Lapse Video Resolution
1. Run Hubble Connect for VerveCam app on
your smartphone.
2. In the viewfinder screen, tap to select
mode on the bottom panel.
3. Tap to select a video resolution (2560 x 1440,
1920 x 1080, 1280x 720).
Time Lapse
17 Take Time Lapse Video (via Hubble Connect for VerveCam app)
en
Page 19

14.3 Record Time Lapse Video
1. Run Hubble Connect for VerveCam app on your smartphone.
2. In the viewfinder screen, tap to select
Time Lapse
mode on the bottom panel.
3. Tap again to start time lapse video
recording.
You will hear a beep sound. The blue LED
indicator and the white video mode indicator
flash when video recording is in progress.
4. To stop time lapse video recording, tap or
press the SHUTTER/SELECT button
on the
Camera.
The blue LED indicator and the white video
mode indicator stop flashing.
Note: Videos will be stored on the Camera’s memory card.
en
Take Time Lapse Video (via Hubble Connect for VerveCam app) 18
Page 20

15. Loop Recording (via
for VerveCam
Note: The App will remember the last used mode
and will go to that mode automatically when
connected.
Loop recording function allows you to record and
save video files in 5, 10, 20, 30 or 60 minutes looping
intervals. As long as the Camera has battery power,
videos will be recorded in a loop. At the end of a
looping interval, the Camera will continue to record
by erasing the oldest footage on that interval with the
newest. With this function, you no longer need to
worry that you will miss any important and special
moments should the memory card becomes full.
This function can only be selected in Hubble
Connect for VerveCam app.
app)
Hubble Connect
15.1 Set Loop Recording Interval
1. Run Hubble Connect for VerveCam app on your smartphone.
2. In the viewfinder screen, tap to select
Recording
3. Tap to select an interval (5 mins, 10 mins, 20 mins, 30 mins or 60 mins).
mode on the bottom panel.
Loop
15.2 Set Loop Recording Resolution
1. Run Hubble Connect for VerveCam app on your smartphone.
2. In the viewfinder screen, tap to select
Recording
3. Tap to select a video resolution (2560 x 1440, 1920 x 1080, 1280x 720).
mode on the bottom panel.
Loop
19 Loop Recording (via Hubble Connect for VerveCam app)
en
Page 21

15.3 Start Loop Recording
1. Run Hubble Connect for VerveCam
your smartphone.
2. In the viewfinder screen, tap to select
Recording
mode on the bottom panel.
3. Tap again to start loop recording.
You will hear a beep sound. The blue LED
indicator and the white video mode indicator
flash when loop recording is in progress.
4. To stop loop recording, tap
SHUTTER/SELECT button
or press the
on the Camera.
The blue LED indicator and the white video
mode indicator stop flashing.
Note: Videos will be stored on the Camera’s memory card.
app on
Loop
en
Loop Recording (via Hubble Connect for VerveCam app) 20
Page 22

16. Stream Live Videos (via
Connect for VerveCam
Hubble
app)
Note: The App will remember the last used mode
and will go to that mode automatically when
connected.
1. Run Hubble Connect for VerveCam
app on
your smartphone.
2. Go to the viewfinder screen and tap
Livestream
mode on the bottom panel.
3. There are 2 methods for Livestreaming:
Connect through WiFi network at home, or
connect through Mobile Hotspot when you
are outside.
Note that Hotspot connection consumes a
large amount of mobile data that is
chargeable by your mobile service operator.
4. Tap to select your wireless network and enter the password.
5. You will be prompted to sign in to your Google Account. If you do not have a Google Account, follow the in-app instructions to create an account.
6. Wait for the setup to complete. It may take up to a minute.
7. The screen will show if the setup is completed successfully.
8. Tap INVITATIONS to share the Youtube livestreaming link.
9. To disconnect from livestreaming, tap STOP.
21 Stream Live Videos (via Hubble Connect for VerveCam app)
en
Page 23

17. View, Edit, Share, Download & Delete Photos and Videos
17.1 View Photos
1. Run Hubble Connect for VerveCam app on
your smartphone.
2. Go to Camera Roll mode .
3. Tap on a photo to view it in full.
17.2 Edit Photo
1. Run Hubble Connect for VerveCam app on
your smartphone.
2. Go to Camera Roll mode .
3. Select a photo.
4. Tap the edit button .
5. Select one of the options to edit the photo and
save to phone memory:
Crop the photo.
Light: Drag the slider to the right/left
to increase/reduce the overall
brightness of the photo.
Color: Drag the slider to the right/left
to increase/reduce overall color intensity of the photo.
Select a filter for the photo
6. Tap Save.
en
View, Edit, Share, Download & Delete Photos and Videos 22
Page 24

17.3 View Videos
1. Run Hubble Connect for VerveCam app on your smartphone.
2. Go to Camera Roll mode .
3. Tap on a video to view it in full and tap to playback the video.
17.4 Trim Videos
1. Run Hubble Connect for VerveCam app on your smartphone.
2. Go to Camera Roll mode .
3. Select a video.
4. Tap the edit button and select the start and end of the video to trim it.
17.5 Share Photos
1. Run Hubble Connect for VerveCam app on your smartphone.
2. Go to Camera Roll mode .
3. Select a photo.
4. Tap .
17.6 Download Photos & Videos from Camera
to smartphone
1. Run Hubble Connect for VerveCam app on your smartphone.
2. Go to Camera Roll mode .
3. Select a photo or video.
4. Tap .
Note:
Video files that are longer than 5 minutes in dura tion will
take an extremely long time to download. We
recommend the use of cable connection or SD card to
transfer files to the PC.
23 View, Edit, Share, Download & Delete Photos and Videos
en
Page 25

17.7 Delete Photos & Videos
1. Run Hubble Connect for VerveCam app on your smartphone.
2. Go to Camera Roll mode .
3. Select a photo or video.
4. Tap .
en
View, Edit, Share, Download & Delete Photos and Videos 24
Page 26

18. General Settings
1. Run Hubble Connect for VerveCam app on your smartphone.
2. On the home screen, tap to access the
following settings:
Application
Settings
Camera
Settings
• Turn Viewfinder Grid On or Off
• Check App Information
• Disconnect/Forget Camera
• SD Memory: Turn autosave to
phone memory On or Off
• Format SD Card
• Check memory available on the
SD Card.
• Check Firmware version of Camera.
25 General Settings
en
Page 27

19. Reset the Camera
In the event that you experience a device issue or
you've forgotten the password you've set, you can
do a factory reset of your Camera using the Reset
button (located next to the microSD card slot).
To restore the camera to its factory default settings,
hold down the Reset button for 3 seconds. The 3
mode indicator LEDs will light up for about 30
seconds.
Restoring the Camera to its factory default settings
removes all data and settings you have made on the
Camera and the App installed on your smartphone.
Note that it will not erase the photos and videos you
have stored on the microSD card.
19.1 Default Settings of the Camera
Function Setting
Photo 4MP 133+- 3 degree FOV
Video 2560 x 1440 @ 30fps
Streaming: 1280 x 720
Streaming
Time Lapse
Loop Recording 5 mins
Connection WiFi: ON; BLE: ON
@30fps /
Video recording: OFF
Interval: 5sec / Duration:
60 mins
en
Reset the Camera 26
Page 28

20. App and Firmware Upgrades
20.1 App Upgrade
You can find the latest version of Hubble Connect
for VerveCam app by visiting the app store (e.g.:
iTunes App Store, Google Play
can see what's new with the app and install the latest
version.
Occasionally, the App Server will also send you a
notification that a latest version of the app is
available. While some of the upgrades simply keep
your system running efficiently, and some are critical
to system functionality. We strongly recommend
that you complete the upgrade as soon as possible.
Software Upgrade will only be performed in Wi-Fi
mode.
20.2 Firmware Upgrade
The Camera is BLE-enabled and has over-the-air
firmware upgrade capability. Firmware updates will
be sent to the Camera via Hubble Connect for
VerveCam app. Please follow the app instructions
for upgrade.
Go to Settings, select Camera Settings >
Camera Information > Update Firmware.
Note:
Firmware upgrades will not be performed
automatically. You need to confirm the upgrade by
following the procedures shown on the app. Your
Camera must be connected to Wi-Fi
upgrade.
TM
). From there, you
®
for firmware
®
27 App and Firmware Upgrades
en
Page 29

21. Camera Accessories
Bumper & Lanyard
Clip Mount
Waterproof Case
Universal Mount
The following accessories are included with your
VERVE CAM+.
en
Camera Accessories 28
Page 30

22. Optional Accessories
Suction Mount
Home Mount Stand
Remote Control Bike Mount
Helmet Mount
Head Mount
To enhance your use of the Camera, we provide the
following optional accessories, which can be
purchased separately:
29 Optional Accessories
en
Page 31

23. Disposal of the Device (Environment)
At the end of the product’s life cycle,
you should not dispose of this product
with normal household waste. Take this
product to a collection point for the
recycling of electrical and electronic
equipment. The symbol on the product, user's guide
and/or box indicates this.
Some of the product materials can be reused if you
take them to a recycling point. By reusing some parts
or raw materials from used products you make an
important contribution to the protection of the
environment.
Please contact your local authorities in case you need
more information on the collection points in your
area.
Dispose of the battery pack in an environmentallyfriendly manner according to your local regulations.
en
Disposal of the Device (Environment) 30
Page 32

24. Technical Specifications
®
Wi-Fi
Image sensor Colour 4MP sensor, OV4689
Lens f = 2.3mm, F = 2.4
LED 3 colours
Battery Built-in 640mAh
Memory Card Slot Micro SD card (support up to
Internal memory 1Gb DDR3, 256Mb SPI Flash
2.4G 802.11 b/g/n
2688 x 1520, CMOS
32GB SDHC)
31 Technical Specifications
en
Page 33

25. Help & more
If your product is not working properly....
1. Read this User's Guide or the Quick Start Guide.
2. Visit our website: www.verve.life/contact
3. Contact Customer Service at +44 (0) 844 557 0890(UK only)*
*Calls cost 7p per minute plus your telephone company's access charge
+44 (0) 8187 62092 (ROI)
E-mail: support@verve.life
Consumer Products and Accessories Limited Warranty
Thank you for purchasing this Motorola branded product
manufactured under license by Binatone Electronics
International LTD ("BINATONE").
What Does this Warranty Cover?
Subject to the exclusions contained below, BINATONE
warrants that this Motorola branded product ("Product") or
certified accessory ("Accessory") sold for use with this
product that it manufactured to be free from defects in
materials and workmanship under normal consumer usage for
the period outlined below. This Warranty is your exclusive
warranty and is not transferable.
THIS WARRANTY GIVES YOU SPECIFIC LEGAL RIGHTS,
AND YOU MAY HAVE OTHER RIGHTS THAT VARY BY
STATE, PROVINCE OR COUNTRY. FOR CONSUMERS
WHO ARE COVERED BY CONSUMER PROTECTION
LAWS OR REGULATIONS IN THEIR COUNTRY OF
PURCHASE OR, IF DIFFERENT, THEIR COUNTRY OF
RESIDENCE, THE BENEFITS CONFERRED BY THIS
LIMITED WARRANTY ARE IN ADDITION TO ALL RIGHTS
AND REMEDIES CONVEYED BY SUCH CONSUMER
PROTECTION LAWS AND REGULATIONS. FOR A FULL
UNDERSTANDING OF YOUR RIGHTS YOU SHOULD
CONSULT THE LAWS OF YOUR COUNTRY, PROVINCE OR
STATE.
Who is covered?
This Warranty extends only to th e first consumer purchaser, and is
not transferable.
What will BINATONE do?
BINATONE or its authorised distributor at its option and within
en
Help & more 32
Page 34

a commercially reasonable time, will at no charge repair or
replace any Products or Accessories that does not conform to
this Warranty. We may use functionally equivalent
reconditioned/ refurbished/ pre-owned or new Products,
Accessories or parts.
What Other Limitations Are There?
ANY IMPLIED WARRANTIES, INCLUDING WITHOUT
LIMITATION THE IMPLIED WARRANTIES OF
MERCHANTABILITY AND FITNESS FOR A PARTICULAR
PURPOSE, SHALL BE LIMITED TO THE DURATION OF THIS
LIMITED WARRANTY, OTHERWISE THE REPAIR OR
REPLACEMENT PROVIDED UNDER THIS EXPRESS
LIMITED WARRANTY IS THE EXCLUSIVE REMEDY OF THE
CONSUMER, AND IS PROVIDED IN LIEU OF ALL OTHER
WARRANTIES, EXPRESS OR IMPLIED. IN NO EVENT SHALL
MOTOROLA OR BINATONE BE LIABLE, WHETHER IN
CONTRACT OR TORT (INCLUDING NEGLIGENCE) FOR
DAMAGES IN EXCESS OF THE PURCHASE PRICE OF THE
PRODUCT OR ACCESSORY, OR FOR ANY INDIRECT,
INCIDENTAL, SPECIAL OR CONSEQUENTIAL DAMAGES
OF ANY KIND, OR LOSS OF REVENUE OR PROFITS, LOSS
OF BUSINESS, LOSS OF INFORMATION OR OTHER
FINANCIAL LOSS ARISING OUT OF OR IN CONNECTION
WITH THE ABILITY OR INABILITY TO USE THE PRODUCTS
OR ACCESSORIES TO THE FULL EXTENT THESE
DAMAGES MAY BE DISCLAIMED BY LAW.
Some jurisdictions do not allow the limitation or exclusion of
incidental or consequential damages, or limitation on the
length of an implied warranty, so the above limitations or
exclusions may not apply to you. This Warranty gives you
specific legal rights, and you may also have other rights that
vary from one jurisdiction to another.
Products Covered Length of Coverage
Consumer Products
Consumer Accessories
One (1) year
products original purchase by the first
consumer purchaser of the product.
Ninety (90) days
accessories original purchase by the
first consumer purchaser of the
product.
from the date of the
from the date of the
33 Help & more
en
Page 35

Consumer Products and
Accessories that are
Repaired or Replaced
The balance of the original warranty
or for Ninety (90) days
returned to the consumer, whichever
is longer.
from the date
Exclusions
Normal Wear and Tear.
Periodic maintenance, repair and
replacement of parts due to normal wear and tear are
excluded from coverage.
Batteries.
Only batteries whose fully charged capacity falls
below 80% of their rated capacity and batteries that leak are
covered by this Warranty.
Abuse & Misuse.
Defects or damage that result from: (a)
improper operation, storage, misuse or abuse, accident or
neglect, such as physical damage (cracks, scratches, etc.) to
the surface of the product resulting from misuse; (b) contact
with liquid, water, rain, extreme humidity or heavy
perspiration, sand, dirt or the like, extreme heat, or food; (c)
use of the Products or Accessories for commercial purposes
or subjecting the Product or Accessory to abnormal usage or
conditions; or (d) other acts which are not the fault of
MOTOROLA or BINATONE, are excluded from coverage.
Use of Non-Motorola branded Products and Accessories.
Defects or damage that result from the use of Non-Motorola
branded or certified Products or Accessories or other
peripheral equipment are excluded from coverage.
Unauthorised Service or Modification.
Defects or damages
resulting from service, testing, adjustment, installation,
maintenance, alteration, or modification in any way by
someone other than MOTOROLA, BINATONE or its
authorised service centres, are excluded from coverage.
Altered Products.
Products or Accessories with (a) serial
numbers or date tags that have been removed, altered or
obliterated; (b) broken seals or that show evidence of
tampering; (c) mismatched board serial numbers; or (d)
nonconforming or non-Motorola branded housings, or parts,
are excluded from coverage.
Communication Services.
Defects, damages, or the failure of
Products or Accessories due to any communication service or
signal you may subscribe to or use with the Products or
Accessories is excluded from coverage.
en
Help & more 34
Page 36

How to Obtain Warranty Service or Other Information?
To obtain service or information, please call:
+44 (0) 844 557 0890(UK only)*
*Calls cost 7p per minute plus your telephone company's access charge
+44 (0) 8187 62092 (ROI)
E-mail: support@verve.life
You will receive instructions on how to ship the Products or
Accessories at your expense and risk, to a BINATONE
Authorised Repair Centre.
To obtain service, you must include: (a) the Product or
Accessory; (b) the original proof of purchase (receipt) which
includes the date, place and seller of the Product; (c) if a
wa rr an ty ca rd wa s i nc lu de d i n y ou r b ox , a co mpl et ed wa rr an ty
card showing the serial number of the Product; (d) a written
description of the problem; and, most importantly; (e) your
address and telephone number.
These terms and conditions constitute the complete
warranty
agreement between you and BINATONE regarding the
Products or Accessories purchased by you, and supersede
any prior agreement or representations, including
representations made in any literature publications or
promotional materials issued by BINATONE or
representations made by any agent employee or staff of
BINATONE, that may have been made in connection with
the said purchase.
RECYCLING
This product bears the selective sorting symbol for
Waste electrical and electronic equipment (WEEE).
This means that this product must be handled pursuant
to European directive 2012/19/EU in order to be
recycled or dismantled to minimise its impact on the
environment.
User has the choice to give his product to a competent
recycling organisation or to the retailer when he buys a
new electrical or electronic equipment.
DC Voltage
35 Help & more
en
Page 37

BINATONE Electronics International Ltd.
Floor 23A, 9Des Voeux Road West,
Sheung Wan, Hong Kong.
Tel: +852 28027388 Fax: +852 28028138
Website: www.binatonetelecom.com
________________________________________ .
EC Declaration of Conformity
We the importer : BINATONE Telecom PLC
1 Apsley Way, London, NW2 7HF, UK
Declare under our sole responsibility that the following product
Type of equipment: WiFi Action camera
Model Name: Verve Cam (CA001)
Country of Origin: China
Brand: Motorola
This declaration of conformity is issued under the sole responsibility of the manufacturer.
The object of the declaration described above is in conformity with the relevant Union harmonization
legislation:
Applicable Directives
x Directive of Electromagnetic Compatibility 2014/30/EU
x Radio Equipment Directive 2014/53/EU
x
Battery Directive 2006/66/EC
x ROHS
Directive
2011/65/EU
Applicable Harmonized Standards
x EN55022:2010+AC:2011
x EN55024:2010
x EN300328v1.9.1, EN 301489-1 v1.9.2, EN301489-17 v2.2.1
x EN62311:2008
x
EN 60950-1: 2006 + A11:2009 + A1:2010 + A12:2011+A2:2013
Manufacturer / Importer
(signature of authorized person)
Signature:
Position: Product Manager
Full Name: Henry Leung
Date: 08 Jul 16
Page 38

www.motorolahome.com
www.verve.life
Manufactured, distributed, or sold by Binatone
Electronics International LTD., official licensee for this
product. MOTOROLA and the Stylised M Logo are
trademarks or registered trademarks of Motorola
Trademark Holdings, LLC. and are used under license.
Apple logo is a trademark of Apple Inc., registered in
the U.S. and other countries. App Store is a service
mark of Apple Inc. Google Play and Android are
trademarks of Google Inc. All other trademarks are the
property of their respective owners. © 2017 Motorola
Mobility LLC. All rights reserved.
UK_EN Version 2.0
Printed in China
Model number: CA001
 Loading...