

Page 1

LEX F10 Mission Critical
Handheld User Guide
TBD 2017
©
2017 Motorola Solutions, Inc. All rights reserved
CCCCCCCCCCC-A
Page 2

Page 3

CCCCCCCCCCC-A
Copyrights
Copyrights
The Motorola products described in this document may include copyrighted Motorola computer
programs. Laws in the United States and other countries preserve for Motorola certain exclusive rights
for copyrighted computer programs. Accordingly, any copyrighted Motorola computer programs
contained in the Motorola products described in this document may not be copied or reproduced in any
manner without the express written permission of Motorola.
©
2017 Motorola Solutions, Inc. All Rights Reserved
No part of this document may be reproduced, transmitted, stored in a retrieval system, or translated
into any language or computer language, in any form or by any means, without the prior written
permission of Motorola Solutions, Inc.
Furthermore, the purchase of Motorola products shall not be deemed to grant either directly or by
implication, estoppel or otherwise, any license under the copyrights, patents or patent applications of
Motorola, except for the normal non-exclusive, royalty-free license to use that arises by operation of
law in the sale of a product.
Disclaimer
Please note that certain features, facilities, and capabilities described in this document may not be
applicable to or licensed for use on a particular system, or may be dependent upon the characteristics
of a particular mobile subscriber unit or configuration of certain parameters. Please refer to your
Motorola contact for further information.
Trademarks
MOTOROLA, MOTO, MOTOROLA SOLUTIONS, and the Stylized M Logo are trademarks or
registered trademarks of Motorola Trademark Holdings, LLC and are used under license. All other
trademarks are the property of their respective owners.
European Union (EU) Waste of Electrical and Electronic Equipment (WEEE)
directive
The European Union's WEEE directive requires that products sold into EU countries must have the
crossed out trash bin label on the product (or the package in some cases).
As defined by the WEEE directive, this cross-out trash bin label means that customers and end-users
in EU countries should not dispose of electronic and electrical equipment or accessories in household
waste.
Customers or end-users in EU countries should contact their local equipment supplier representative or
service centre for information about the waste collection system in their country.
Send Feedback 3
Page 4

This page intentionally left blank.
Page 5

CCCCCCCCCCC-A
Contact Us
Contact Us
Motorola Solution Support Center
The Solution Support Center (SSC) is the primary Motorola Solutions support contact. Call:
• Before any software reload.
• To confirm troubleshooting results and analysis before removing and replacing a Field Replaceable
Unit (FRU) and Field Replaceable Entity (FRE) to repair the system.
For... Phone
United States Calls 800-221-7144
International Calls 302-444-9800
North America Parts Organization
For assistance in ordering replacement parts or identifying a part number, contact the Motorola Parts
organization. Your first response when troubleshooting your system is to call the Motorola SSC.
For... Phone
Phone Orders 800-422-4210 (US and Canada Orders)
For help identifying an item or part number, select
choice 3 from the menu.
302-444-9842 (International Orders)
Includes help for identifying an item or part number and
for translation as needed.
Fax Orders 800-622-6210 (US and Canada Orders)
Comments
Send questions and comments regarding user documentation to
documentation@motorolasolutions.com.
Provide the following information when reporting a documentation error:
• The document title and part number
• The page number with the error
• A description of the error
We welcome your feedback on this and other Motorola manuals. To take a short, confidential survey
on Motorola Customer Documentation, go to docsurvey.motorolasolutions.com or scan the following
QR code with your mobile device to access the survey.
Send Feedback 5
Page 6

This page intentionally left blank.
Page 7

Document History
Version Description Date
CCCCCCCCCCC-A
Document History
TBD Initial release of the LEX F10 Mission Critical Hand-
held User Guide.
December 2017
Send Feedback 7
Page 8

This page intentionally left blank.
Page 9

CCCCCCCCCCC-A
Contents
Contents
Copyrights................................................................................................................... 3
Contact Us................................................................................................................... 5
Document History....................................................................................................... 7
List of Figures............................................................................................................13
List of Tables............................................................................................................. 15
List of Procedures.....................................................................................................17
Chapter 1: About This Guide....................................................................................21
1.1 Related Information............................................................................................................... 21
1.2 Important Safety Information................................................................................................. 21
1.3 Notice to Users (FCC and Industry Canada)......................................................................... 22
Chapter 2: Getting Started........................................................................................23
2.1 LEX F10.................................................................................................................................23
2.2 What Is in the Box..................................................................................................................25
2.3 Battery Usage Guidelines...................................................................................................... 25
2.3.1 Battery Usage Verification and Optimization........................................................... 25
2.3.1.1 Extend the Life of Your Battery.................................................................. 26
2.3.2 Charging the Battery................................................................................................ 26
2.4 Inserting the SIM Card...........................................................................................................26
2.5 Phone Operations Without SIM Card.................................................................................... 27
2.6 Powering On the Device........................................................................................................ 27
2.7 Home Screen Overview.........................................................................................................28
Chapter 3: Device Settings.......................................................................................31
3.1 Setting Up the Device............................................................................................................ 31
3.2 Display Settings..................................................................................................................... 31
3.2.1 Modifying Display Settings.......................................................................................32
3.3 Selecting a Language............................................................................................................ 33
3.4 Setting Time and Date........................................................................................................... 33
3.5 Setting up the Lock Screen....................................................................................................34
3.6 Changing the Wallpaper........................................................................................................ 34
3.7 Adding Application Icons to the Home Screen...................................................................... 35
3.8 Creating Folders on the Home Screen.................................................................................. 35
3.9 Moving Icons and Folders from the Home Screen................................................................ 35
3.10 Removing Icons and Folders from the Home Screen..........................................................35
3.11 Using the Glove Mode......................................................................................................... 36
3.12 Viewing Device Details........................................................................................................ 36
Send Feedback 9
Page 10

CCCCCCCCCCC-A
Contents
3.13 Application Memory............................................................................................................. 36
3.13.1 Viewing Memory Used by Applications..................................................................37
Chapter 4: Wireless and Network Settings.............................................................39
4.1 Connecting to Wi-Fi Networks............................................................................................... 39
Adding New Networks.......................................................................................................39
Editing Networks............................................................................................................... 40
Forgetting Networks..........................................................................................................40
Enabling WPS For Routers...............................................................................................40
4.2 Connecting to Bluetooth Devices...........................................................................................40
Pairing a Bluetooth Device................................................................................................41
Editing Paired Bluetooth Device Settings......................................................................... 41
4.3 Optimizing Data Usage..........................................................................................................41
4.4 Activating Airplane Mode....................................................................................................... 42
4.5 Setting Up Tethering and Portable Hotspot........................................................................... 42
4.6 Setting Up Wi-Fi Hotspot....................................................................................................... 42
Activating Wi-Fi Hotspots..................................................................................................43
4.7 Activating Bluetooth Tethering...............................................................................................43
4.8 Setting Up VPN Connection.................................................................................................. 43
Connecting to a VPN Network.......................................................................................... 44
Editing VPN Network Details............................................................................................ 44
Deleting a VPN Network................................................................................................... 44
4.9 Managing Cellular Network....................................................................................................44
Chapter 5: Security Settings.................................................................................... 47
5.1 About Android™ Security........................................................................................................47
5.2 Managing Security Settings................................................................................................... 47
5.3 Locking Your Screen............................................................................................................. 48
5.4 Anti-Theft Protection.............................................................................................................. 48
5.5 Encrypting Your Phone Data................................................................................................. 49
5.6 Locking Your SIM Card..........................................................................................................49
5.7 Changing Your SIM PIN........................................................................................................ 49
5.8 Making Passwords Visible..................................................................................................... 50
5.9 Device Administrator Settings................................................................................................50
5.10 Managing Credential Certificates.........................................................................................50
5.11 Protecting Your Phone From Harmful Applications............................................................. 50
Chapter 6: Personal, Account, and System Settings............................................ 53
6.1 Setting Location Access........................................................................................................ 53
6.2 Managing Location Settings for Apps.................................................................................... 53
6.3 Backup and Reset Options.................................................................................................... 54
6.3.1 Backing Up the LEX F10 Device..............................................................................54
10 Send Feedback
Page 11

CCCCCCCCCCC-A
Contents
6.3.2 Erasing Device Data................................................................................................ 54
6.4 Managing Accounts............................................................................................................... 55
Adding Accounts............................................................................................................... 55
Removing Accounts.......................................................................................................... 55
6.5 Managing Account Sync........................................................................................................ 55
Configuring Auto-Sync for All Applications....................................................................... 56
Configuring Google Account Sync Settings...................................................................... 56
Sync a Google Account Manually..................................................................................... 56
Chapter 7: Contacts and Calls................................................................................. 57
7.1 Contact Management............................................................................................................ 57
7.1.1 Adding New Contacts.............................................................................................. 57
7.1.1.1 Adding Contacts From Phone Screen........................................................58
7.1.2 Viewing Contact Details........................................................................................... 58
7.1.3 Editing Contact Details.............................................................................................58
7.1.4 Searching Contacts..................................................................................................59
7.1.5 Deleting Contacts.....................................................................................................59
7.1.6 Sending SMS and MMS Messages from Contacts..................................................59
7.1.7 Importing SIM Card Contacts to Phone................................................................... 60
7.1.8 Exporting Phone Contacts to SIM Card .................................................................. 60
7.1.9 Exporting Phone Contacts to Storage......................................................................60
7.1.10 Sharing Contacts .................................................................................................. 61
7.1.11 Modifying Contact Settings.................................................................................... 61
7.1.12 Modifying Phonebook Settings.............................................................................. 62
7.2 Call Management...................................................................................................................62
7.2.1 Making Calls............................................................................................................ 63
7.2.2 Answering Incoming Calls........................................................................................63
7.2.3 Viewing Call History................................................................................................. 64
7.2.4 Deleting Call History................................................................................................ 64
7.2.5 Modifying Call Settings ........................................................................................... 64
7.2.6 Setting Ringtones.....................................................................................................65
7.2.7 Adjusting Device Volume......................................................................................... 65
7.2.8 Activating Vibrate Mode........................................................................................... 65
7.2.9 Setting Up Voicemail................................................................................................65
7.2.10 Enabling Dial Pad and Touch Tones..................................................................... 66
7.2.11 Editing Quick Responses.......................................................................................66
7.2.12 Monitoring Fixed Dial Numbers..............................................................................67
7.2.13 Setting TTY Mode.................................................................................................. 67
7.2.14 Setting DTMF Tones..............................................................................................68
7.2.15 Setting Call Forwarding..........................................................................................68
Send Feedback 11
Page 12

CCCCCCCCCCC-A
Contents
7.2.16 Activating Call Waiting........................................................................................... 68
7.2.17 Internet Calling.......................................................................................................68
7.2.17.1 Adding SIP Accounts............................................................................... 69
7.2.17.2 Making Internet Calls............................................................................... 69
Chapter 8: Messages and E-mails........................................................................... 71
8.1 Sending SMS and MMS Messages....................................................................................... 71
8.1.1 MMS Attachment Types...........................................................................................72
8.2 Deleting Messages................................................................................................................ 72
8.3 Modifying Message Settings..................................................................................................73
8.3.1 Message Settings.................................................................................................... 73
8.4 Setting Up E-mail Accounts................................................................................................... 74
Chapter 9: Collaboration with LMR Radios............................................................ 75
9.1 Switching Between PSX PTT App and LMR Radio for PTT Communications...................... 75
9.2 Pairing Radio with the LEX Device ....................................................................................... 76
9.3 Unpairing Radio from the LEX Device................................................................................... 77
9.4 Sending PTT Audio................................................................................................................78
Chapter 10: Applications..........................................................................................79
10.1 Applications......................................................................................................................... 79
10.2 Using the Flashlight............................................................................................................. 80
10.3 Taking Screen Shots........................................................................................................... 81
10.4 Managing Downloads.......................................................................................................... 81
10.5 Camera................................................................................................................................ 81
10.5.1 Taking Photos........................................................................................................ 82
10.5.2 Recording Videos...................................................................................................82
10.6 Multimedia Player................................................................................................................ 83
10.7 Calendar.............................................................................................................................. 83
10.7.1 Modifying Calendar Settings.................................................................................. 83
10.8 Clock....................................................................................................................................84
10.8.1 Modifying Clock Settings........................................................................................84
10.8.2 Setting Alarms........................................................................................................84
10.9 Calculator.............................................................................................................................85
Chapter 11: Accessories.......................................................................................... 87
11.1 LEX F10 Accessories.......................................................................................................... 87
Appendix A: Technical Specifications.................................................................... 89
12 Send Feedback
Page 13

CCCCCCCCCCC-A
List of Figures
List of Figures
Figure 1: LEX F10 Controls and Indicators............................................................................................ 24
Figure 2: PSX Cockpit Sidebar Menu.....................................................................................................76
Figure 3: Push to Talk Screen................................................................................................................ 76
Figure 4: Bluetooth Pairing Code Prompt...............................................................................................77
Send Feedback 13
Page 14

This page intentionally left blank.
Page 15

CCCCCCCCCCC-A
List of Tables
List of Tables
Table 1: LEX F10 Controls and Indicators..............................................................................................24
Table 2: Status Bar Icons....................................................................................................................... 28
Table 3: Device Administrator Settings.................................................................................................. 50
Table 4: MMS Attachment Types........................................................................................................... 72
Table 5: Message Settings..................................................................................................................... 73
Table 6: Applications.............................................................................................................................. 79
Table 7: LEX F10 Accessories............................................................................................................... 87
Table 8: Technical Specifications........................................................................................................... 89
Send Feedback 15
Page 16

This page intentionally left blank.
Page 17

CCCCCCCCCCC-A
List of Procedures
List of Procedures
Charging the Battery ..............................................................................................................................26
Inserting the SIM Card ...........................................................................................................................26
Powering On the Device ........................................................................................................................27
Setting Up the Device ............................................................................................................................31
Modifying Display Settings .................................................................................................................... 32
Selecting a Language ............................................................................................................................33
Setting Time and Date ...........................................................................................................................33
Setting up the Lock Screen ................................................................................................................... 34
Changing the Wallpaper ........................................................................................................................ 34
Adding Application Icons to the Home Screen ...................................................................................... 35
Creating Folders on the Home Screen .................................................................................................. 35
Moving Icons and Folders from the Home Screen ................................................................................ 35
Removing Icons and Folders from the Home Screen ............................................................................35
Using the Glove Mode ........................................................................................................................... 36
Viewing Device Details .......................................................................................................................... 36
Viewing Memory Used by Applications ................................................................................................. 37
Connecting to Wi-Fi Networks ............................................................................................................... 39
Adding New Networks ........................................................................................................................... 39
Editing Networks ....................................................................................................................................40
Forgetting Networks .............................................................................................................................. 40
Enabling WPS For Routers ................................................................................................................... 40
Connecting to Bluetooth Devices .......................................................................................................... 40
Pairing a Bluetooth Device .................................................................................................................... 41
Editing Paired Bluetooth Device Settings .............................................................................................. 41
Optimizing Data Usage ..........................................................................................................................41
Activating Airplane Mode .......................................................................................................................42
Setting Up Tethering and Portable Hotspot ...........................................................................................42
Setting Up Wi-Fi Hotspot ....................................................................................................................... 42
Activating Wi-Fi Hotspots ...................................................................................................................... 43
Activating Bluetooth Tethering ...............................................................................................................43
Setting Up VPN Connection .................................................................................................................. 43
Connecting to a VPN Network ...............................................................................................................44
Editing VPN Network Details ................................................................................................................. 44
Deleting a VPN Network ........................................................................................................................44
Managing Cellular Network ................................................................................................................... 44
Managing Security Settings ...................................................................................................................47
Send Feedback 17
Page 18

CCCCCCCCCCC-A
List of Procedures
Locking Your Screen ............................................................................................................................. 48
Encrypting Your Phone Data ................................................................................................................. 49
Locking Your SIM Card ......................................................................................................................... 49
Changing Your SIM PIN ........................................................................................................................ 49
Making Passwords Visible .....................................................................................................................50
Managing Credential Certificates .......................................................................................................... 50
Protecting Your Phone From Harmful Applications ............................................................................... 50
Setting Location Access ........................................................................................................................ 53
Managing Location Settings for Apps ....................................................................................................53
Backing Up the LEX F10 Device ........................................................................................................... 54
Erasing Device Data ..............................................................................................................................54
Managing Accounts ............................................................................................................................... 55
Adding Accounts ....................................................................................................................................55
Removing Accounts ...............................................................................................................................55
Managing Account Sync ........................................................................................................................55
Configuring Auto-Sync for All Applications ............................................................................................ 56
Configuring Google Account Sync Settings ...........................................................................................56
Sync a Google Account Manually ..........................................................................................................56
Adding New Contacts ............................................................................................................................ 57
Adding Contacts From Phone Screen ................................................................................................... 58
Viewing Contact Details .........................................................................................................................58
Editing Contact Details .......................................................................................................................... 58
Searching Contacts ............................................................................................................................... 59
Deleting Contacts .................................................................................................................................. 59
Sending SMS and MMS Messages from Contacts ............................................................................... 59
Importing SIM Card Contacts to Phone .................................................................................................60
Exporting Phone Contacts to SIM Card .................................................................................................60
Exporting Phone Contacts to Storage ................................................................................................... 60
Sharing Contacts ................................................................................................................................... 61
Modifying Contact Settings ....................................................................................................................61
Modifying Phonebook Settings .............................................................................................................. 62
Making Calls .......................................................................................................................................... 63
Answering Incoming Calls ..................................................................................................................... 63
Viewing Call History ...............................................................................................................................64
Deleting Call History .............................................................................................................................. 64
Modifying Call Settings .......................................................................................................................... 64
Setting Ringtones .................................................................................................................................. 65
Adjusting Device Volume .......................................................................................................................65
Activating Vibrate Mode .........................................................................................................................65
18 Send Feedback
Page 19

CCCCCCCCCCC-A
List of Procedures
Setting Up Voicemail ............................................................................................................................. 65
Enabling Dial Pad and Touch Tones ..................................................................................................... 66
Editing Quick Responses ...................................................................................................................... 66
Monitoring Fixed Dial Numbers ............................................................................................................. 67
Setting TTY Mode ..................................................................................................................................67
Setting DTMF Tones ............................................................................................................................. 68
Setting Call Forwarding ......................................................................................................................... 68
Activating Call Waiting ...........................................................................................................................68
Adding SIP Accounts .............................................................................................................................69
Making Internet Calls .............................................................................................................................69
Sending SMS and MMS Messages .......................................................................................................71
Deleting Messages ................................................................................................................................ 72
Modifying Message Settings ..................................................................................................................73
Setting Up E-mail Accounts ...................................................................................................................74
Switching Between PSX PTT App and LMR Radio for PTT Communications ...................................... 75
Pairing Radio with the LEX Device ........................................................................................................76
Unpairing Radio from the LEX Device ...................................................................................................77
Sending PTT Audio ............................................................................................................................... 78
Using the Flashlight ............................................................................................................................... 80
Taking Screen Shots ............................................................................................................................. 81
Managing Downloads ............................................................................................................................ 81
Taking Photos ........................................................................................................................................82
Recording Videos .................................................................................................................................. 82
Modifying Calendar Settings ..................................................................................................................83
Modifying Clock Settings ....................................................................................................................... 84
Setting Alarms ....................................................................................................................................... 84
Send Feedback 19
Page 20

This page intentionally left blank.
Page 21

CCCCCCCCCCC-A
About This Guide
Chapter 1
About This Guide
Topic paragraph
Related Links
Related Information on page 21
Important Safety Information on page 21
Notice to Users (FCC and Industry Canada) on page 22
1.1
Related Information
The documentation includes:
• MN003610A01-A LEX F10 Mission Critical Handheld Quick Start Guide – describes how to get the
device up and running.
• MN003609A0-A LEX F10 Regulatory Guide – describes how to safely use the device.
• LEX F10 Mission Critical Handheld User Guide (this guide) – describes how to use the device.
• LEX F10 Mission Critical Handheld Service Provisioning Guide – provides technical instructions on
how to activate, provision, and configure the device.
• PSX Push-to-Talk (PTT) Client Application WAVE7000 PSX Push-to-Talk for Mobile Devices
manual – describes how to use the WAVE PTT application that offers services over 4G, 3G, or WiFi
network.
NOTICE: If this user guide is not accessible by the TechDocs app on your LEX, contact your
device technician or system administrator who can obtain assistance from Motorola
Solutions to load user guides to your LEX device.
Return to Process
About This Guide on page 21
1.2
Important Safety Information
RF Energy Exposure and Product Safety Guide for Portable Two-Way Radios.
NOTICE:
ATTENTION! This radio is restricted to Occupational use only. Before using the radio, read the
RF Energy Exposure and Product Safety Guide for Portable Two-Way Radios which contains
important operating instructions for safe usage and RF energy awareness and control for
Compliance with applicable standards and Regulations.
For a list of Motorola-approved antennas, batteries, and other accessories, visit http://
www.motorolasolutions.com/APX.
Return to Process
About This Guide on page 21
Send Feedback 21
Page 22

CCCCCCCCCCC-A
Chapter 1: About This Guide
1.3
Notice to Users (FCC and Industry Canada)
This device complies with Part 15 of the FCC rules and RSS 210 of the Industry Canada rules.
The LEX F10 device operates under the following conditions:
• This device may not cause harmful interference.
• This device must accept any interference received, including interference that may cause undesired
operation.
• Changes or modifications made to this device, not expressly approved by Motorola, could void the
authority of the user to operate this equipment.
Return to Process
About This Guide on page 21
22 Send Feedback
Page 23

CCCCCCCCCCC-A
Getting Started
Chapter 2
Getting Started
You can learn about the features of the LEX F10 device, and how to set up the device before first
power up.
Related Links
LEX F10 on page 23
What Is in the Box on page 25
Battery Usage Guidelines on page 25
Inserting the SIM Card on page 26
Phone Operations Without SIM Card on page 27
Powering On the Device on page 27
Home Screen Overview on page 28
2.1
LEX F10
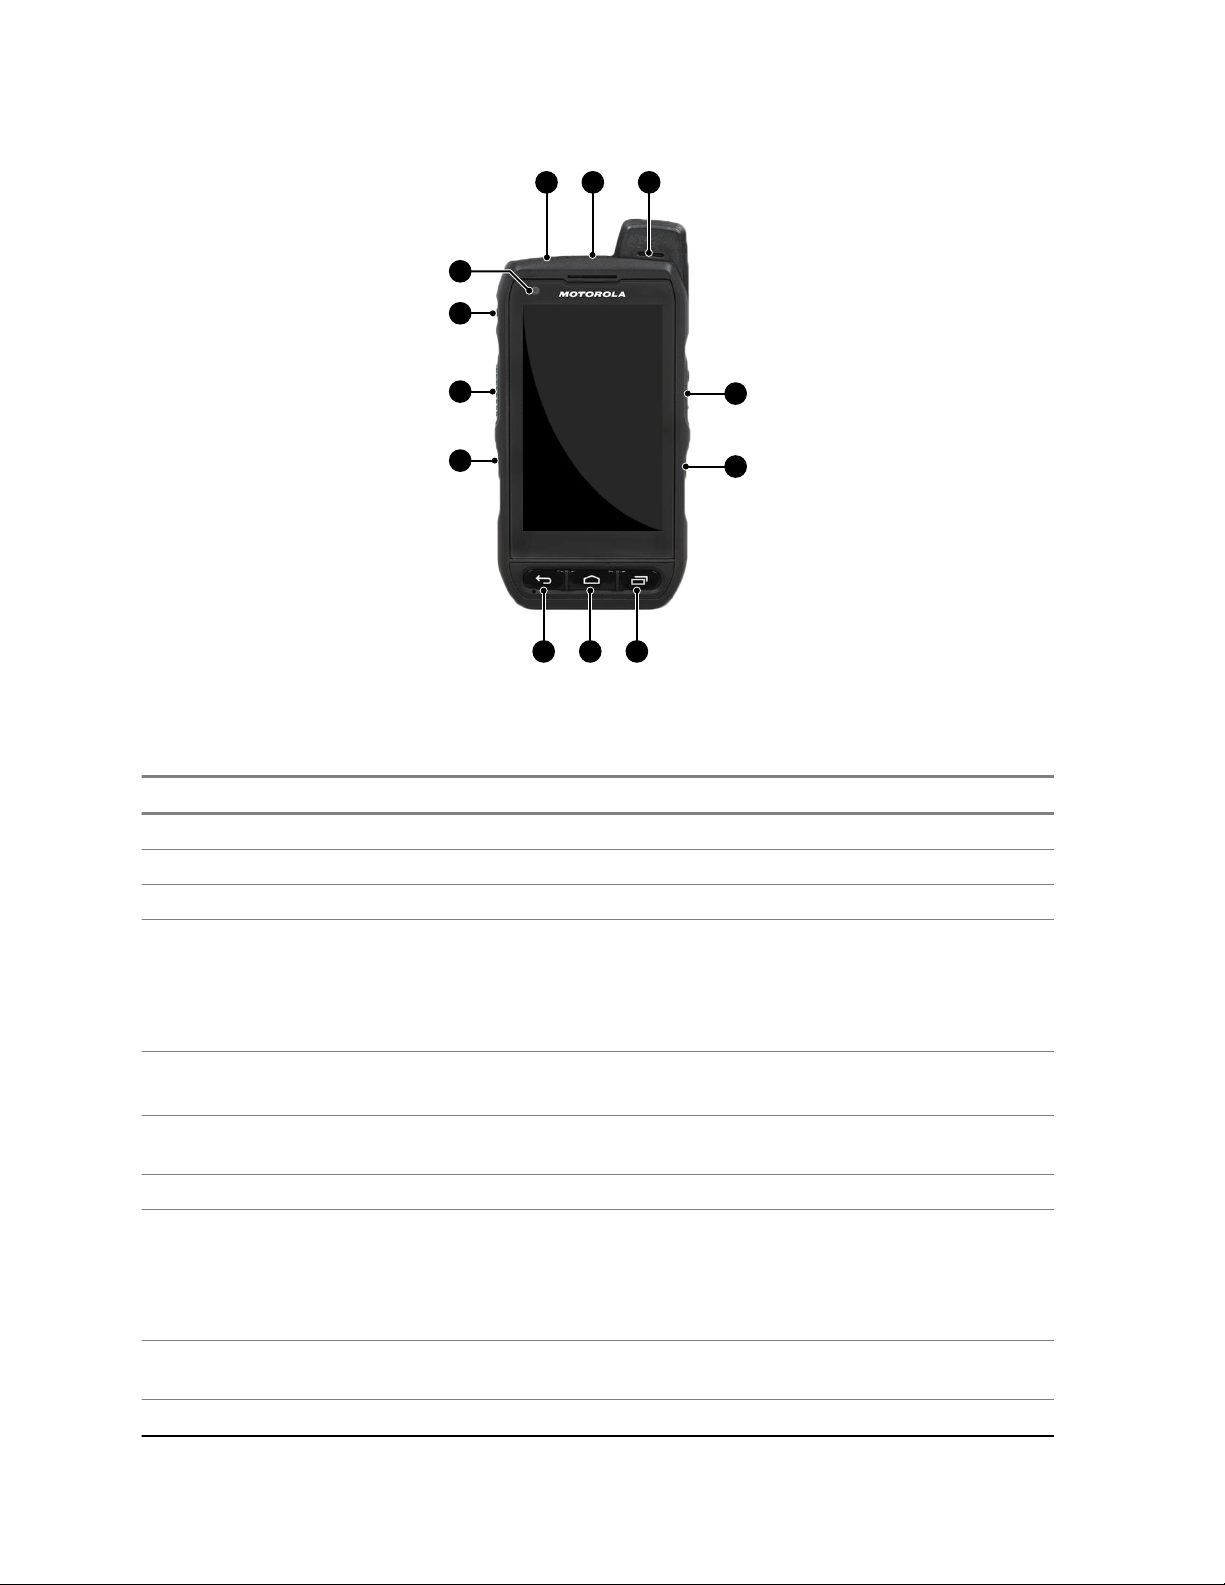
The LEX F10 features, for example loud speaker, PTT button, Emergency Button, and Headset port,
are shown and described below.
Send Feedback 23
Page 24
LEX_F10_Controls_and_Indicators_A
10
8
9
2
7
3
11
456
12
1
CCCCCCCCCCC-A
Chapter 2: Getting Started
Figure 1: LEX F10 Controls and Indicators
Table 1: LEX F10 Controls and Indicators
Number Description
1 Loud speaker
2 Volume Up/Down buttons—increase or decrease audio volume.
3 Emergency Button—triggers an emergency alert.
4 Recent Apps
Short Press: Displays a list recently opened apps. To open an app, select it from the
list. To close an application, swipe the application to the left or the right.
Double press: Launches the option menu of the currently open app.
5 Home—short press on any app to show the home screen; long press to open Google
Now™.
6 Back—opens the previous screens in working sequence until the home screen ap-
pears.
7 Programmable button
8 PTT button—enables Push-to-Talk (PTT) services over a broadband network and can
also be interconnected to Project 25 Land Mobile Radio (LMR) networks. The PTT application offers calls, alerts, group calls, Talk Group calls, and Talk Group monitoring
and scanning. For PTT button and application operations, see the WAVE 7000 Push-
9 Power/Screen On/Off—press and hold to turn on the device. Press to turn the screen
to-Talk for Mobile Devices manual.
on or off.
10 Front-facing camera—captures live video for video calls.
Table continued…
24 Send Feedback
Page 25

Number Description
11 SIM card slot
12 Headset port.
Return to Process
Getting Started on page 23
2.2
What Is in the Box
The Motorola LEX F10 phone box contains the following items:
• LEX F10 phone with a built-in, rechargeable battery
• Quick Start Guide
• Regulatory Guide
• Multi-tool screwdriver
• Wall charger with USB connector
CCCCCCCCCCC-A
Chapter 2: Getting Started
Return to Process
Getting Started on page 23
2.3
Battery Usage Guidelines
You can make sure your battery is maintained properly, and optimize its usage by following the battery
usage guidelines.
Return to Process
Getting Started on page 23
Related Links
Battery Usage Verification and Optimization on page 25
Charging the Battery on page 26
2.3.1
Battery Usage Verification and Optimization
You can check battery usage and close some applications to save battery power. From the App
Drawer, select Settings → Device → Battery.
The current battery level (charging or not charging) is displayed at the top of the screen. The discharge
graph at the top of the Battery screen shows the battery level over time since you last charged the
device, and how long you have been running on battery power.
The list at the bottom of the screen shows the breakdown of battery usage for individual apps and
services. Touch any listed items for more details. The details screen for some apps includes buttons
that allow you to adjust settings affecting power usage, or stop the application completely.
NOTICE: If you stop some apps or services, your device may not work correctly
Send Feedback 25
Page 26

CCCCCCCCCCC-A
Chapter 2: Getting Started
Return to Process
Battery Usage Guidelines on page 25
Related Links
Extend the Life of Your Battery on page 26
2.3.1.1
Extend the Life of Your Battery
Follow these tips to extend your phone’s battery life.
• If you are not using Wi-Fi, Bluetooth, or GPS, use the Settings to turn them off. The GPS setting is
located in Settings > Personal > Location.
• Reduce the screen brightness and set a shorter sleep time-out (15seconds). The display settings
are located in Settings > Device > Display. The option Adaptive brightness optimizes the brightness
level for the available light. 14
• If you are travelling and do not have access to use mobile data or Wi-Fi network, switch to Airplane
mode: Drag the notification bar to access the airplane mode. Then touch to enable Airplane mode.
Return to Process
Battery Usage Verification and Optimization on page 25
2.3.2
Charging the Battery
The battery delivered with your mobile phone is not fully charged. We recommend charging it fully.
NOTICE: It may take 4 hours for the battery to charge completely.
Procedure:
1 Insert the charger plug into a power outlet.
2 Insert the charging connector to the charging port of the device.
The charging port is located at the bottom of the phone, under the back cover.
3 When the charging animation stops, disconnect the charger from the device.
Return to Process
Battery Usage Guidelines on page 25
2.4
Inserting the SIM Card
Insert the SIM card by following the steps below.
Procedure:
1 Using the screwdriver in the multi-tool, remove screw A and remove the headset port cover.
26 Send Feedback
Page 27
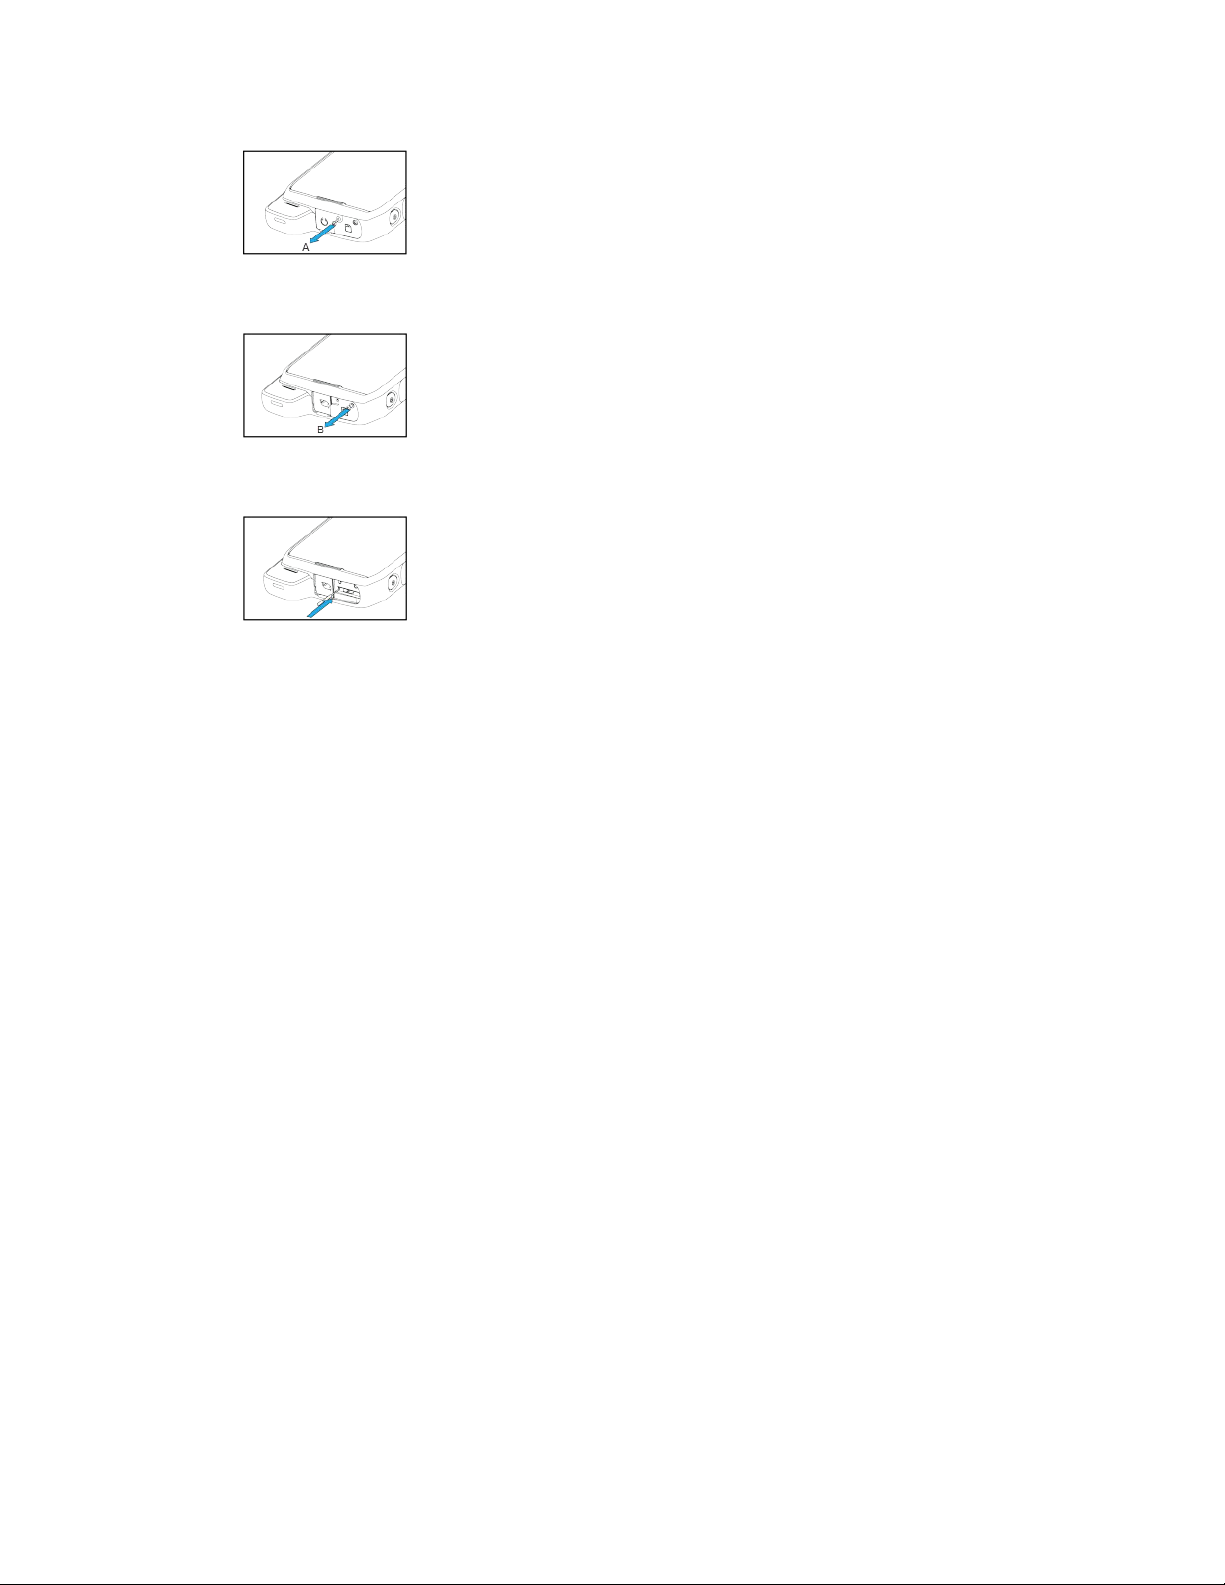
2 Remove screw B and remove the SIM cover.
3 Insert the pin into the pinhole and remove the tray.
CCCCCCCCCCC-A
Chapter 2: Getting Started
The SIM card tray pops out.
4 Insert the pin into the loop on top of the SIM card tray.
5 Insert the SIM card in the tray and return the tray into the slot by pushing it in.
6 Reattach both the covers and, using the screwdriver, fix the screws in place.
Return to Process
Getting Started on page 23
2.5
Phone Operations Without SIM Card
You can perform the following operations without inserting a SIM card in your phone.
• Make an emergency call.
• View and modify all settings except a few data usage- and mobile network-related settings.
• Activate and share files through Bluetooth.
• Activate and access the Internet, and all your synced accounts using Wi-Fi connectivity.
• Access your phone book, files, multimedia files, all tools and applications.
Return to Process
Getting Started on page 23
2.6
Powering On the Device
Prerequisites: Ensure that a valid SIM card is inserted in your device.
Procedure:
Press and Hold the POWER/LOCK key for 2 seconds.
Send Feedback 27
Page 28
CCCCCCCCCCC-A
Chapter 2: Getting Started
When the device is switched on, it tries to register with the network. After successful registration,
the name of the service provider is displayed on the Notification panel.
Return to Process
Getting Started on page 23
2.7
Home Screen Overview
The home screen is a starting point to access all the features of the device.
The home screen can have multiple panels. Swipe left or right to move between them.
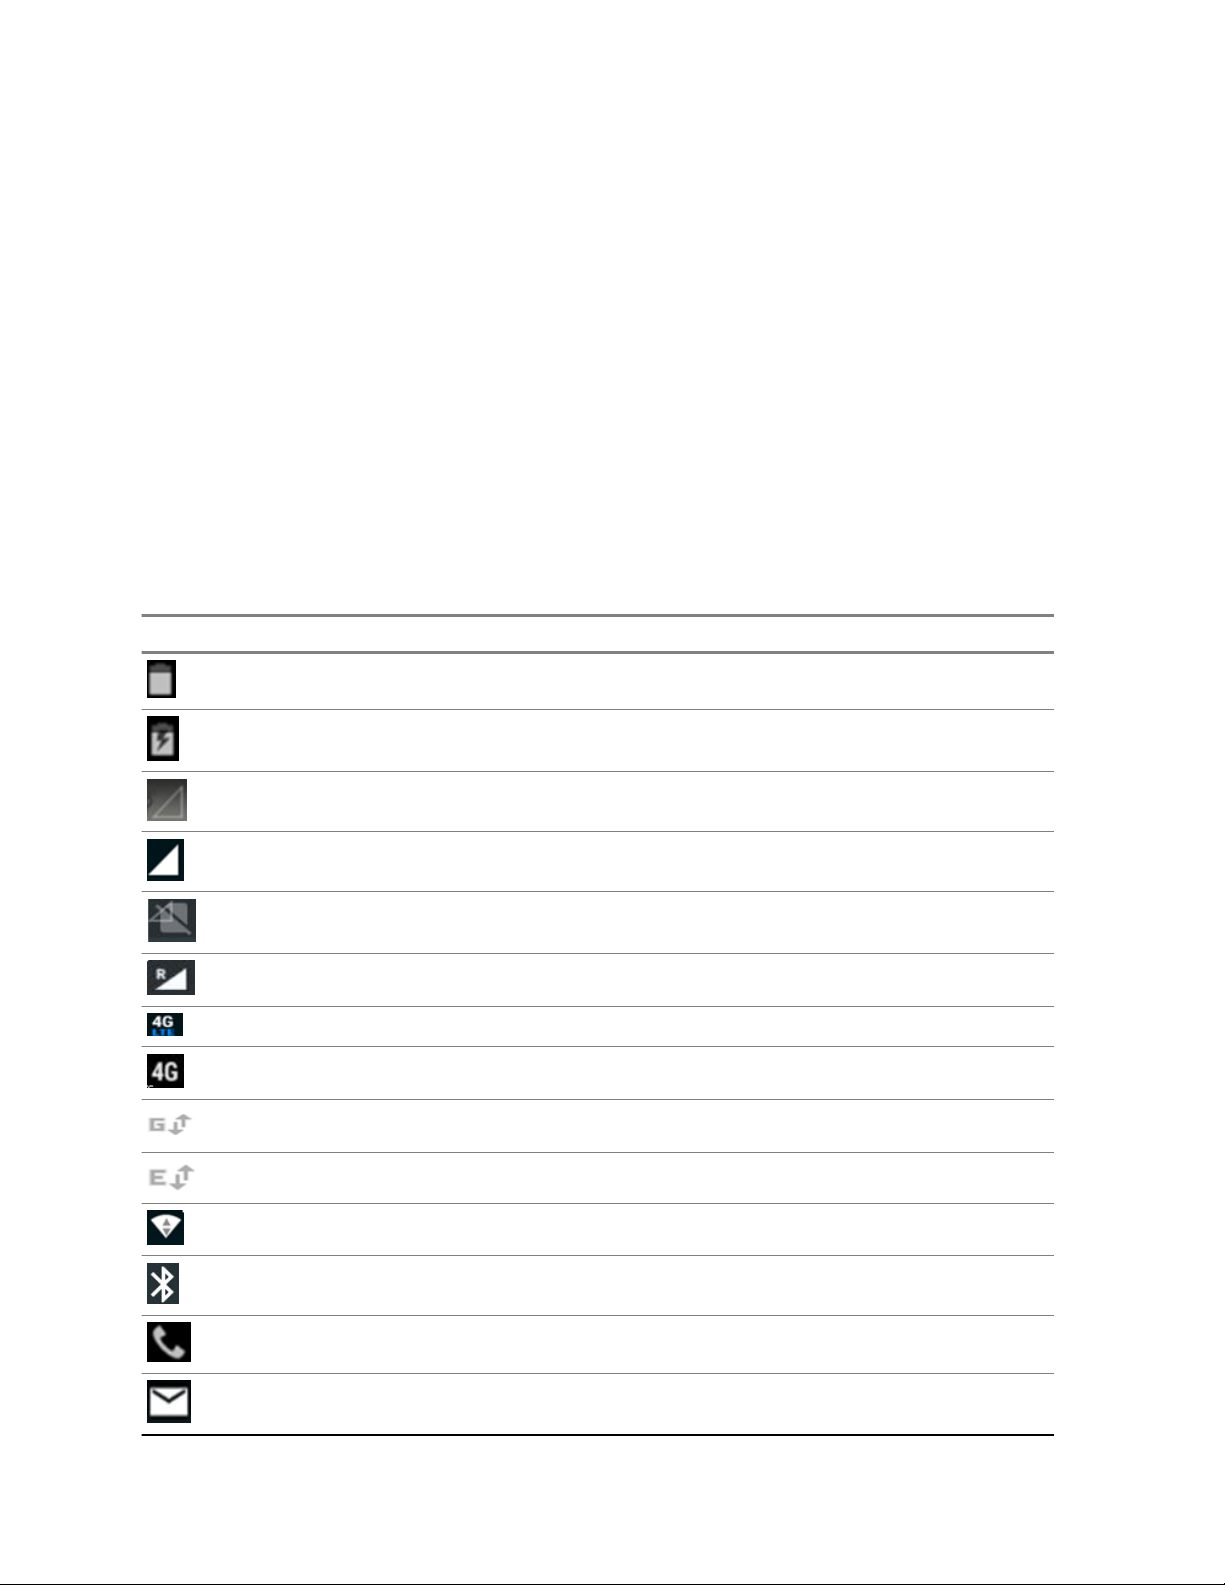
The icons displayed in the status bar at the top of the screen provide information about the status of
the device. Details such as time and date, battery level, data service, Wi-Fi connectivity and network
status are displayed when the phone is in standby mode. Other indicators such as Bluetooth
connectivity status, airplane mode, alarm and call forwarding are displayed, if the features are
activated.
Table 2: Status Bar Icons
Icon Description
Battery level indicator
Battery charging in progress
No signal
Signal strength
No SIM card
Roaming
4G LTE network connected
HSPA or UMTS network connected
GPRS network connected
EDGE network connected
Wi-Fi connected
Bluetooth activated
Call in progress
New E-mail
Table continued…
28 Send Feedback
Page 29

Icon Description
FM Radio
Missed call
New SMS or MMS
Alarm activated
Silent mode activated
Vibration mode activated
Flight mode activated
Error/information notification—attention required
Screenshot captured
CCCCCCCCCCC-A
Chapter 2: Getting Started
Return to Process
Getting Started on page 23
Music is played
Device storage space is running out
Send Feedback 29
Page 30

This page intentionally left blank.
Page 31

CCCCCCCCCCC-A
Device Settings
Chapter 3
Device Settings
You can modify device settings, such as display settings, change your device wallpaper, and lock
screen to personalize your LEX device.
Related Links
Setting Up the Device on page 31
Display Settings on page 31
Selecting a Language on page 33
Setting Time and Date on page 33
Setting up the Lock Screen on page 34
Changing the Wallpaper on page 34
Adding Application Icons to the Home Screen on page 35
Creating Folders on the Home Screen on page 35
Moving Icons and Folders from the Home Screen on page 35
Removing Icons and Folders from the Home Screen on page 35
Using the Glove Mode on page 36
Viewing Device Details on page 36
Application Memory on page 36
3.1
Setting Up the Device
The first time you turn on your device, you are guided through a setup process.
Procedure:
1 Choose the language you want your device to operate in.
2 Connect to a Wi-Fi network available in your area.
3 Sign-in with a Google™ Account.
If you have a Gmail account, use the same e-mail address and password to sign-in. By signing
in, all your e-mail, contacts, calendar events, and other data associated with that account will be
synced to your device. If you have more than one Google Account, you can add them later.
If you do not have a Google Account, you can create one during the setup process or skip this
step and return to it later.
Return to Process
Device Settings on page 31
3.2
Display Settings
You can activate and modify the display settings.
Brightness
It is recommended to set Adaptive brightness to ON, so that the display brightness is adjusted
automatically. This will also optimize the battery power consumed.
Send Feedback 31
Page 32

CCCCCCCCCCC-A
Chapter 3: Device Settings
Wallpaper
Set the wallpaper for your home screen. You can select from one of the following Wallpaper
collections:
• Google Now Launcher includes images that are pre-bundled with the phone.
• Live Wallpapers includes animated wallpapers.
• Photos includes the photos taken from phone camera, screenshots, and downloaded photos.
When device is rotated
Allows you to enable or disable automatic screen rotation.
Sleep
Set the sleep time so that the backlight turns off after specified time of phone inactivity. This setting
will also help you to optimize battery power.
Daydream
Enable this option to activate daydream while the device is docked, charging, or either after
specified time of phone inactivity.
After you turn Daydream on, choose what your device will display from the list below. You can
always test your Daydream by choosing Start Now at the bottom of the screen.
Clock
Displays the device's digital or analog clock. Touch the Settings icon next to Clock to choose
between analog and digital. You can also set the Clock to Night mode so the screen is not very
bright.
Colors
Displays changing colors on the screen.
News & Weather
Displays the Google weather information.
Photo Frame
Shows a slideshow of photos from your device. Touch the additional settings icon next to Photo
Frame to choose photos from the display.
Photo Table
Shows a collage of photos from your device. Touch the additional settings icon next to Photo Table
to choose the photos from the display. Once the Daydream starts, you can touch and hold an
image to move it around the screen, or swipe it away to hide it.
NOTICE: Your Daydream starts when your device goes into Sleep mode, but it does not
display if you shut off your screen using the power button. Once your device is charging or
in a dock, let it go into Sleep mode on its own. By default, your device may only Daydream
when it is docked. If you want your device to Daydream whenever it is plugged in, make
sure to set When to Daydream as Either or While charging.
Photos
Shows photos from your device such as Camera, Screenshots. Touch the additional settings icon
next to Photos to choose the photos to be displayed.
Return to Process
Device Settings on page 31
Related Links
Modifying Display Settings on page 32
3.2.1
Modifying Display Settings
You can modify the default display settings to personalize your device display.
32 Send Feedback
Page 33

CCCCCCCCCCC-A
Chapter 3: Device Settings
For the list and description of available display settings, see Display Settings on page 31.
Procedure:
1 From the Home screen, tap → .
2 Tap Display.
3 Adjust the display settings.
Return to Process
Display Settings on page 31
3.3
Selecting a Language
In the Personal settings window, you can select the device’s language.
Procedure:
1 From the Home screen, tap
2 Tap Language, and select a language from the dropdown list.
Return to Process
Device Settings on page 31
3.4
→ Language & input.
Setting Time and Date
You can set and display the date and time on the device. You can also select the display format.
Procedure:
1 From the Home screen, tap .
2 Go to System → Date & Time.
3 To set the clock to 24-hour format, tap Use 24-hour format.
4 To set a date format, tap Choose date format, and tap the format you want to set.
5 Set the date and time by performing one of the following actions:
If… Then…
If you want to synchronize the date and
time with the network provided time,
enable the Automatic date and time option.
If you want to set the date and time manually,
Send Feedback 33
perform the following actions:
a Tap Set date.
b Select the day, month, and year.
c Tap OK.
d Tap Set time.
e Select the time.
f Tap OK.
Page 34

CCCCCCCCCCC-A
Chapter 3: Device Settings
6 Set the time zone by performing one of the following actions:
If… Then…
If you want to synchronize the time zone with
the network provided time zone,
If you want to set the time zone manually, perform the following actions:
Return to Process
Device Settings on page 31
3.5
enable the Automatic time zone option.
a Tap Select time zone.
b Select the time zone you want to set.
Setting up the Lock Screen
Lock your device screen to protect it from unauthorized access.
Procedure:
1 From the Home screen, tap → .
2 Scroll down and tap Security, located under Personal settings.
3 Tap Screen lock , and configure the lock screen by selecting one of the following options:
• None: Disables the screen lock.
• Slide: When the screen is locked with the slide, slide your finger across the screen to unlock
it.
• PIN: Provide your PIN value (minimum four numbers) to set up PIN lock. When the screen is
locked with PIN, provide your correct PIN value to unlock the screen.
• Pattern: Draw your pattern to setup the pattern lock. When the screen is locked with pattern,
provide the correct pattern to unlock it.
• Password: Provide your password to setup the password lock. When the screen is locked
with password, provide your correct password to unlock the screen.
Return to Process
Device Settings on page 31
3.6
Changing the Wallpaper
You can set an image or a photo stored in your device as your home screen wallpaper.
Procedure:
1 Tap and hold the home screen.
2 From the context menu, select Wallpapers.
3 Perform one of the following actions:
• Tap My Photos to display photos taken using device's camera.
• Tap Live Wallpapers to display animated wallpapers.
• Tap Wallpapers to display pre-bundled images.
34 Send Feedback
Page 35

4 Tap a photo or image.
5 Tap Set wallpaper.
Return to Process
Device Settings on page 31
3.7
Adding Application Icons to the Home Screen
Procedure:
1 From the Home screen, tap .
2 Drag the application icon to the Home screen.
Return to Process
Device Settings on page 31
3.8
Creating Folders on the Home Screen
CCCCCCCCCCC-A
Chapter 3: Device Settings
Folders help you organize your files.
Procedure:
1 Tap and hold an icon on the Home screen.
2 Drag and position it on another icon you want to include in the same folder.
3 Hold for about 2 seconds. Both the icons are grouped together in an unnamed folder.
4 Tap the folder and rename it.
Return to Process
Device Settings on page 31
3.9
Moving Icons and Folders from the Home Screen
Procedure:
1 Drag the application icon to the new location.
2 To move it to another home screen, drag it to the side of the screen.
Return to Process
Device Settings on page 31
3.10
Removing Icons and Folders from the Home Screen
When and where to use:
Send Feedback 35
Page 36

CCCCCCCCCCC-A
Chapter 3: Device Settings
NOTICE: Deleting a downloaded application icon from the home screen will not delete the
application. You must go to Settings → Devices → Apps → Downloaded, select a particular
application and uninstall it.
Procedure:
1 Touch and hold the application icon.
2 Drag and drop the icon on X Remove.
Return to Process
Device Settings on page 31
3.11
Using the Glove Mode
The LEX device is equipped with a glove touch screen.
Procedure:
1 From the Home screen, tap → .
2 Scroll down and tap Accessibility.
3 Select the checkbox next to Glove mode.
Return to Process
Device Settings on page 31
3.12
Viewing Device Details
You can view the device details, such as system updates, status, model number, Android version,
Kernel, and baseband versions.
Procedure:
1 From the Home screen, tap
2 Go to System → About phone.
Return to Process
Device Settings on page 31
3.13
→ .
Application Memory
You can use the Apps screen to adjust several aspects of the way your device uses memory.
Downloaded
Displays apps downloaded from Google Play™ or other sources.
Running
Displays all apps, processes, and services that are currently running or that have cached
processes, and how much RAM each application uses. The graph at the bottom of the Running tab
shows the total RAM in use and the available. You can select SHOW CACHED PROCESSES or
SHOW RUNNING SERVICES to switch back and forth.
36 Send Feedback
Page 37

CCCCCCCCCCC-A
Chapter 3: Device Settings
All
Displays all applications that are pre-bundled with Android and downloaded from Google Play or
other sources.
The following can help you optimize your phone memory:
• Uninstall applications that are not required.
• Delete unwanted files that are downloaded or created.
• Transfer files to your computer that would be required for later use.
• Remove offline content from Google Play and stream it via a Wi-Fi or mobile network.
Return to Process
Device Settings on page 31
Related Links
Viewing Memory Used by Applications on page 37
3.13.1
Viewing Memory Used by Applications
You can monitor the memory usage for each of the applications installed on your device.
Procedure:
1 From theHome screen, tap → .
2 Go to Device settings → Apps
Return to Process
Application Memory on page 36
Send Feedback 37
Page 38

This page intentionally left blank.
Page 39

CCCCCCCCCCC-A
Wireless and Network Settings
Chapter 4
Wireless and Network Settings
Configuring the wireless and network settings on the LEX F10 device allows you to, for example,
connect your LEX F10 device to Wi-Fi networks, to Bluetooth devices, to optimize data usage, and to
set up VPN connections.
Related Links
Connecting to Wi-Fi Networks on page 39
Connecting to Bluetooth Devices on page 40
Optimizing Data Usage on page 41
Activating Airplane Mode on page 42
Setting Up Tethering and Portable Hotspot on page 42
Setting Up Wi-Fi Hotspot on page 42
Activating Bluetooth Tethering on page 43
Setting Up VPN Connection on page 43
Managing Cellular Network on page 44
4.1
Connecting to Wi-Fi Networks
Wi-Fi is a wireless network technology that provides Internet access at distance up to 100 feet,
depending on the Wi-Fi router and surroundings. You can access Internet when you connect your LEX
F10 to a Wi-Fi network.
Procedure:
1 From the Home screen or Apps menu ( ), tap Settings ( ).
2 Tap Wi-Fi, located under Wireless and Networks settings.
The device searches for wireless networks in the area and lists them.
3 Scroll through the list and select the desired network.
4 Enter the password (if it is a secured network) and tap Connect.
5 To verify the password before connecting, enable Show password.
NOTICE: It is always recommended to make your Wi-Fi router secure and to connect
your device to a secure network.
Return to Process
Wireless and Network Settings on page 39
Adding New Networks
When and where to use: You can add a Wi-Fi Network that does not broadcast its name (SSID), or is
currently out of range.
Procedure:
1 In the Wi-Fi settingsscreen, select Add network.
Send Feedback 39
Page 40

CCCCCCCCCCC-A
Chapter 4: Wireless and Network Settings
2 Enter the following details:
• Network SSID: The wireless network ID
• Security: Set the security type to None, WEP, WPA/WPA2 PSK, 802.1x EAP
3 Enable Show Advanced Options to set the Proxy details and IP settings.
Editing Networks
Procedure:
1 Touch and hold the connected network.
2 Select Modify Network.
The network setting details, such as connection status, signal strength, link speed, security type,
IP address, and password are displayed.
3 Save the settings by tapping Save.
Forgetting Networks
You can disconnect your device from a remembered wireless network.
Procedure:
1 Touch and hold the connected network.
2 Select Forget Network.
The device disconnects from the selected network. You are prompted for the password if you try
to connect to the same network again.
Enabling WPS For Routers
Wi-Fi Protected Setup (WPS) allows you to connect to a secure Wi-Fi network without entering
Network SSID or password.
Procedure:
1 In the Wi-Fi screen, tap Options and select Advanced.
2 To set up a secure Wi-Fi network, select WPS Push Button.
3 Press the WPS button in your router, when prompted.
4.2
Connecting to Bluetooth Devices
Using Bluetooth, you can perform the following tasks:
• Transfer media files and contacts between Bluetooth-enabled mobile devices.
• Access Internet through a Bluetooth device.
• Use Bluetooth connected headphones for playing media files.
Bluetooth is a short-range wireless communication technology used to communicate between the
devices over a distance of about 8 meters.
Return to Process
Wireless and Network Settings on page 39
40 Send Feedback
Page 41

CCCCCCCCCCC-A
Chapter 4: Wireless and Network Settings
Pairing a Bluetooth Device
The LEX F10 device can receive and send data when paired with other Bluetooth-enabled devices.
Prerequisites: Ensure that Bluetooth is enabled on both devices, and that the device you want to pair
your LEX F10 with is in discoverable mode.
Procedure:
1 1. From the Home screen or Apps Menu ( ), tap Settings ( ).
2 Tap Bluetooth, located under Wireless & Networking settings.
3 Enable Bluetooth by adjusting the slidebar to the ON position.
The device searches for available Bluetooth-enabled devices and lists them.
4 Scroll through the list and tap a device name.
The Bluetooth pairing request dialog box displays.
5 Compare the pass keys in both devices and tap Pair on both devices.
The device is added to the Paired devices list.
Editing Paired Bluetooth Device Settings
Procedure:
1 Tap the Settings icon ( ) located next to a paired Bluetooth device.
2 Rename the device by tapping Rename.
3 To unpair the device, tap Unpair.
4 To play media files over Bluetooth, tap Media audio.
5 To access the Internet, tapInternet access.
4.3
Optimizing Data Usage
Data usage refers to the amount of data used by your device during Internet access. The data usage
charges are dependent on the plan provided by your service provider. To monitor your data usage,
adjust the data usage settings.
Procedure:
1 From the Home screen or Apps Menu ( ), tap Settings ( ).
2 Tap Data Usage, located under Data usage (
3 To use cellular data network to access the Internet, turn on Cellular Data.
4 To preset your data usage limit and to set an alert before reaching the preset limit, enable Set
cellular data limit
5 Set the data usage limit by dragging the orange bar.
Cellular data will be disabled once you reach this limit. You will not be able to access the
Internet. You receive a notification once you reach the set data usage limit.
) settings.
Send Feedback 41
Page 42

CCCCCCCCCCC-A
Chapter 4: Wireless and Network Settings
6 Drag the black bar to set data usage warning. When your data usage reaches this level, a
notification displays.
Return to Process
Wireless and Network Settings on page 39
4.4
Activating Airplane Mode
When your phone is set to airplane mode, you do not have network or mobile data connectivity. You
can access your camera, media files and other features that do not require mobile data connectivity.
Procedure:
1 From the Home screen or Apps menu ( ), tap Settings ( ).
2 Tap More located under Wireless & Networks settings.
3 Enable Airplane mode.
Return to Process
Wireless and Network Settings on page 39
4.5
Setting Up Tethering and Portable Hotspot
You can share your mobile Internet connection with a computer or with other devices. You can also
turn your mobile device into a portable Wi-Fi hotspot and share its Internet connection with up to 5
other devices at once.
Prerequisites: Connect your device to a computer with a USB cable.
Procedure:
1 From the Home screen or Apps menu (
2 Tap More located under Wireless & Networks Settings.
3 Tap Tethering & Portable hotspot.
4 Enable USB tethering.
Return to Process
Wireless and Network Settings on page 39
4.6
), tap Settings ( ).
Setting Up Wi-Fi Hotspot
You can turn your device into a portable Wi-Fi hotspot for up to 10 other devices.
Procedure:
1 Tap More located under Wireless & Networks settings.
2 Tap Tethering & Portable hotspot.
3 Enter Network SSID, security details, and password, and tap Save.
42 Send Feedback
Page 43

Return to Process
Wireless and Network Settings on page 39
Activating Wi-Fi Hotspots
Procedure:
CCCCCCCCCCC-A
Chapter 4: Wireless and Network Settings
1 From the Home screen or Apps menu (
2 Tap More located under Wireless & Networks settings.
3 Tap Tethering & Portable hotspot.
4 Enable Portable Wi-Fi hotspot.
4.7
), tap Settings ( ).
Activating Bluetooth Tethering
You can set up your phone to share its Internet connection using Bluetooth.
Procedure:
1 Go to Settings (
2 Pair your phone with the other device you want to share an Internet connection with.
3 Set up the other device to get its network connection via Bluetooth.
NOTICE: Refer to the document that comes with the device.
4 Go back to the Settings menu.
5 Tap More located under Wireless & Networks Settings.
6 Tap Tethering & Portable hotspot.
7 Enable Bluetooth Tethering.
), turn on Bluetooth.
Return to Process
Wireless and Network Settings on page 39
4.8
Setting Up VPN Connection
Virtual private networks (VPNs) allow entry into secured local networks from the outside. Corporations,
schools, and other institutions use VPNs to grant access to local network resources when people are
not on campus or connected to a wireless network.
Procedure:
1 From the Home screen or Apps Menu (
2 Tap More located under Wireless & Networks settings.
3 Tap VPN.
NOTICE: Ensure lock screen PIN or password is set.
Send Feedback 43
), tap Settings ( ).
Page 44

CCCCCCCCCCC-A
Chapter 4: Wireless and Network Settings
4 Tap Add network ( ).
Edit VPN Profile screen is displayed.
5 Enter the following details:
• Name: VPN connection name.
• Type: Select the connection type.
• Server address: Address of the secure server for connection.
• PPP encryption: Enable to perform a secure point-to-point encryption between your device
and the VPN server.
6 To enter DNS server details, select Advanced.
Return to Process
Wireless and Network Settings on page 39
Connecting to a VPN Network
Procedure:
1 Tap the required VPN name from the list of VPN networks configured.
2 Enter the required credentials.
3 Tap Connect.
When the phone is connected to the VPN network, status icon and notifications are displayed in
the Home screen.
Editing VPN Network Details
Procedure:
1 In the list of VPNs configured, tap and hold the VPN profile you want to edit.
2 Tap Edit profile.
3 Modify the required information.
4 Tap Save.
Deleting a VPN Network
Procedure:
1 Tap and hold the VPN profile you want to delete from the list of VPNs configured.
2 Tap Delete profile.
4.9
Managing Cellular Network
You can manage a cellular network by viewing and modifying your cellular network settings.
Procedure:
1 From the Home screen or Apps menu ( ), tap Settings ( ).
2 Tap More located under Wireless & Networks Settings.
44 Send Feedback
Page 45

CCCCCCCCCCC-A
Chapter 4: Wireless and Network Settings
3 Tap Cellular network.
4 To transmit data over other mobile networks when leaving the area covered by your regular
carrier, enable Data roaming.
5 To view, add, and edit the network access points, tap Access Point Names.
6 Tap Search for AT&T Microcell.
Return to Process
Wireless and Network Settings on page 39
Send Feedback 45
Page 46

This page intentionally left blank.
Page 47

CCCCCCCCCCC-A
Security Settings
Chapter 5
Security Settings
You can protect your device data by configuring security settings, such as screen lock, phone data
encryption, credential certificates, and more.
Related Links
About Android Security on page 47
Managing Security Settings on page 47
Locking Your Screen on page 48
Anti-Theft Protection on page 48
Encrypting Your Phone Data on page 49
Locking Your SIM Card on page 49
Changing Your SIM PIN on page 49
Making Passwords Visible on page 50
Device Administrator Settings on page 50
Managing Credential Certificates on page 50
Protecting Your Phone From Harmful Applications on page 50
5.1
About Android™ Security
Android takes a multi-layered approach to device security.
Prevent
Google Play store apps are constantly virus-scanned to ensure they are safe to install on your
device. You can also install apps from other verified sources.
Control
App sandboxes keep apps from accessing other parts of your device operating system, or each
other, unless you allow them to do so (during the installation process). Screen lock and encryption
helps to prevent the device from unauthorized access.
Defend
Once identified, dangerous apps can be removed remotely.
Return to Process
Security Settings on page 47
5.2
Managing Security Settings
You can activate and protect your phone from unauthorized access by configuring the security settings.
Procedure:
1 From the Home screen or Apps menu ( ), tap Settings ( ).
2 Tap Security located under Personal settings.
Send Feedback 47
Page 48

CCCCCCCCCCC-A
Chapter 5: Security Settings
Return to Process
Security Settings on page 47
5.3
Locking Your Screen
Enabling Screen Lock on your device helps you protect data on your LEX F10.
Procedure:
1 Tap Screen lock and select one of the following options to configure lock screen:
• None: Disables the screen lock.
• Slide: When the screen is locked with the slide, slide your finger across the screen to unlock
it.
• Pattern: Draw your pattern to set up the pattern lock. When the screen is locked with pattern,
provide the correct pattern to unlock it.
• PIN: Provide your PIN value (minimum four numbers) to set up PIN lock. When the screen is
locked with PIN, provide your correct PIN value to unlock the screen.
• Password: Provide your password to setup the password lock. When the screen is locked
with password, provide your correct password to unlock the screen.
NOTICE: When the screen is locked, you can answer an incoming call without unlocking
the screen.
a Touch the Center icon ( ) and slide over one of these icons:
Icons Description
Answer the call.
Reject the call.
Disconnect the call and respond with a default text message from a list of quick response text messages.
2 The screen is locked automatically if you set the Automatically lock option.
3 For the screen to lock after you press the power button, enable Power button instantly locks.
4 To display specific owner info on the lock screen, enable Show Owner Info on lock screen in
Owner Info.
You can modify this whenever required.
Return to Process
Security Settings on page 47
5.4
Anti-Theft Protection
The anti-theft protection setting helps to protect your user data and user-affiliated data when your
device is stolen.
The anti-theft protection setting provides the following features for the authorized account users:
48 Send Feedback
Page 49

CCCCCCCCCCC-A
Chapter 5: Security Settings
• Remotely locate a device through an authorized account.
• Remotely lock a device through an authorized account.
• Remotely wipe-out user data.
• Prevent flashing unauthorized software.
NOTICE: If you configured your Gmail account on the lost device, you can log into Android
Device Manager (ADM) with the same Gmail id as in the device and erase the content using
ADM command.
Return to Process
Security Settings on page 47
5.5
Encrypting Your Phone Data
You can encrypt your accounts, phone settings, downloaded applications, contacts, messages data,
and media files.
Procedure:
1 To encrypt your phone data, tap Encrypt phone.
You need a numeric PIN or password to decrypt the data every time you turn ON the device.
NOTICE: Encryption takes at least an hour depending on the amount of data to be
encrypted. Ensure that your device is fully charged before you encrypt it.
Return to Process
Security Settings on page 47
5.6
Locking Your SIM Card
You can activate and set a SIM lock to protect your SIM card from unauthorized access.
Procedure:
1 Tap Set up SIM/RUIM card lock.
2 Enable Lock SIM card.
To disable this option you must enter your SIM lock PIN.
Return to Process
Security Settings on page 47
5.7
Changing Your SIM PIN
To ensure your SIM card remains secure, you can change your SIM PIN periodically.
Procedure:
1 Tap Change SIM PIN. Enter the old PIN and tap OK.
2 Enter the new PIN and re-enter the same value when asked.
3 Tap OK.
Send Feedback 49
Page 50

CCCCCCCCCCC-A
Chapter 5: Security Settings
Return to Process
Security Settings on page 47
5.8
Making Passwords Visible
You can ensure that you enter the correct password by making passwords visible while entering.
Procedure:
To view the password while entering, enable Make passwords visible.
Return to Process
Security Settings on page 47
5.9
Device Administrator Settings
As a device administrator, from Android Device Manager, you can erase all data from the device,
change the screen unlock password, or lock your device screen.
Table 3: Device Administrator Settings
Setting Definition
Erase all data Used to perform factory reset. Factory reset
erases data from your device without warning.
Change the screen unlock password Allows you to change the screen unlock pass-
word.
Lock the screen You can control how and when the device
screen locks.
Return to Process
Security Settings on page 47
5.10
Managing Credential Certificates
You can view, install, verify and manage the certificates installed in your device.
Procedure:
1 To view the verified system and user certificates, tap Trusted Credentials.
2 If you want to install the certificates from storage, tap Install from Storage.
Return to Process
Security Settings on page 47
5.11
Protecting Your Phone From Harmful Applications
Some applications can harm your device. It is recommended to verify apps in order to prevent harmful
software from being installed on your device
50 Send Feedback
Page 51

CCCCCCCCCCC-A
Chapter 5: Security Settings
Procedure:
1 To disable unknown sources applications from being installed on your device, disable Unknown
sources.
2 If you want to install applications from unknown sources, enable Verify apps under Settings →
Security to verify if the application is safe for installation.
Return to Process
Security Settings on page 47
Send Feedback 51
Page 52

This page intentionally left blank.
Page 53

CCCCCCCCCCC-A
Personal, Account, and System Settings
Chapter 6
Personal, Account, and System
Settings
You can configure personal, account, and system settings, such as location access, backup and reset
options, account management, and more.
Related Links
Setting Location Access on page 53
Managing Location Settings for Apps on page 53
Backup and Reset Options on page 54
Managing Accounts on page 55
Managing Account Sync on page 55
6.1
Setting Location Access
If you enable Location services, your location information is displayed in all your accounts.
When and where to use:
Procedure:
1 From the Home screen or Apps menu ( ), tap Settings ( ).
2 Tap Location located under Personal settings.
3 Turn the Location slider to the ON position.
4 Set one of the following modes:
• High accuracy: High accuracy mode uses GPS, Wi-Fi, and cellular networks to get the
highest-accuracy location for your device. It uses assistance data to help estimate your
location faster and more accurately.
• Battery Saving: Battery saving mode allows your device to estimate your location using low
battery-intensive location sources, such as Wi-Fi and cellular networks. It uses assistance
data to help estimate your location faster and more accurately.
• Device only: Device only mode allows your device to estimate your location using GPS. This
mode may use more battery power and take longer to determine your location.
NOTICE: When the location information is turned OFF, your device location is not shared
with any apps.
Return to Process
Personal, Account, and System Settings on page 53
6.2
Managing Location Settings for Apps
You can view and force stop the apps that are accessing or have recently accessed your location.
Send Feedback 53
Page 54

CCCCCCCCCCC-A
Chapter 6: Personal, Account, and System Settings
Procedure:
1 In the Location screen, view the list of applications that are accessing or recently accessed the
location data of your phone, under Recent location requests.
2 Tap an application to view the application page. You can stop the application, or uninstall it.
• High battery use: This app receives location information from sources that may use more
battery power.
• Low battery use: This app receives location information from only low battery-intensive
sources.
NOTICE: Selecting an app brings you to its app info page, where you can view app
permissions or uninstall an app.
Return to Process
Personal, Account, and System Settings on page 53
6.3
Backup and Reset Options
If you need to replace your device or erase its data, you can restore your data for any accounts that
were previously backed up.
Return to Process
Personal, Account, and System Settings on page 53
Related Links
Backing Up the LEX F10 Device on page 54
Erasing Device Data on page 54
6.3.1
Backing Up the LEX F10 Device
You can back up data and connect to one or more of your Google accounts using Android backup
services.
Procedure:
1 From the Home screen or Apps menu (
2 Tap Backup & reset located under Personal settings.
3 Enable Back up my data.
4 To add a backup account on your device, tap Backup account.
Return to Process
Backup and Reset Options on page 54
), tap Settings ( ).
6.3.2
Erasing Device Data
You can erase all of your data from the device.
Procedure:
1 Go to Settings and tap Backup &Reset.
54 Send Feedback
Page 55

CCCCCCCCCCC-A
Chapter 6: Personal, Account, and System Settings
2 Tap Factory Data reset.
3 Tap Reset phone → Erase everything.
All of your data is erased from your device, including your Google Account, any other accounts,
your system and app settings, and any downloaded applications.
Postrequisites: After resetting your device, you will need to re-enter the same information requested
when you first set up the device. If you have been backing up your data to a Google Account, you can
restore it during the setup process.
Return to Process
Backup and Reset Options on page 54
6.4
Managing Accounts
You can link an existing Google account to your phone to organize and access your personal
information from any computer or mobile device.
Return to Process
Personal, Account, and System Settings on page 53
Adding Accounts
Procedure:
1 From the Home screen or Apps menu ( ), tap Settings ( ).
2 Tap Accounts located under Account settings and select Add account.
3 Select the type of account.
You can create a Corporate, Google or POP3/IMAP account.
4 Perform the on-screen instructions.
The Google account will be displayed in the path: Settings → Accounts → Google.
Removing Accounts
You can remove any account and all information associated with it from your device, including e-mail,
contacts, settings, and other data backed up in that account.
Procedure:
1 Tap Settings.
2 Tap Type of account, for example Google.
3 Tap the account you want to remove.
4 Tap Menu → Remove account.
6.5
Managing Account Sync
Return to Process
Personal, Account, and System Settings on page 53
Send Feedback 55
Page 56

CCCCCCCCCCC-A
Chapter 6: Personal, Account, and System Settings
Configuring Auto-Sync for All Applications
Procedure:
To control auto-sync for all apps that use it, open Settings → Wireless & Networks → Data
usage → Menu and check or uncheck Auto-sync data.
If this option is not checked, you may be able to use an app’s tool to sync data manually. You
can also sync manually to collect messages, e-mail, and other recent information. Leaving autosync off can help extend your battery life, but will prevent you from receiving notifications when
updates occur.
Configuring Google Account Sync Settings
You can configure the settings of your Google account synchronization.
Procedure:
1 Go to Settings → Accounts → Google.
• Indicates that some or all account data is configured to sync automatically.
•
Indicates that no account data is configured to sync automatically.
2 Tap the account which sync settings has to be changed.
3 If your account is set to auto-sync, you can check or uncheck items as needed. If auto-sync is
off which is located under Settings → Accounts → Options → Auto-sync.
Sync a Google Account Manually
Procedure:
1 Go to Settings → Accounts → Google.
2 Tap the account which data you want to sync.
3 Tap Menu → Sync now.
56 Send Feedback
Page 57

CCCCCCCCCCC-A
Contacts and Calls
Chapter 7
Contacts and Calls
Related Links
Contact Management on page 57
Call Management on page 62
7.1
Contact Management
You can use the phonebook to maintain phone numbers of your contacts. This feature enables you to
add, delete, dial phone numbers, send SMS and MMS messages.
The contacts application is located at Applications (
NOTICE: You can tap and drag the scroll bar on your phone screen to scroll through the
contacts.
Return to Process
Contacts and Calls on page 57
Related Links
Adding New Contacts on page 57
Viewing Contact Details on page 58
Editing Contact Details on page 58
Searching Contacts on page 59
Deleting Contacts on page 59
Sending SMS and MMS Messages from Contacts on page 59
Importing SIM Card Contacts to Phone on page 60
Exporting Phone Contacts to SIM Card on page 60
Exporting Phone Contacts to Storage on page 60
Sharing Contacts on page 61
Modifying Contact Settings on page 61
Modifying Phonebook Settings on page 62
→ Contacts .
7.1.1
Adding New Contacts
Procedure:
1 From the Home screen, tap
2 Tap , and enter the contact details.
3 Add the new contact by tapping .
The new contact is added.
Send Feedback 57
.
Page 58

CCCCCCCCCCC-A
Chapter 7: Contacts and Calls
Return to Process
Contact Management on page 57
Related Links
Adding Contacts From Phone Screen on page 58
7.1.1.1
Adding Contacts From Phone Screen
Procedure:
1 From the Home screen or Apps menu (
2 Tap Call Options ( .
3 Tap New Contact.
4 Enter the contact details and tap .
Return to Process
Adding New Contacts on page 57
7.1.2
Viewing Contact Details
Procedure:
1 From the Home screen , tap
2 View the contact details by tapping the contact.
Return to Process
Contact Management on page 57
7.1.3
.
Editing Contact Details
), tap Phone ( ).
Procedure:
1 From the Home screen, tap .
2 Tap the contact you want ot modify.
3 Tap .
4 Edit the required details, and tap
Return to Process
Contact Management on page 57
58 Send Feedback
.
Page 59

7.1.4
Searching Contacts
You can use the search option to quickly find specific contacts from the list.
Procedure:
CCCCCCCCCCC-A
Chapter 7: Contacts and Calls
1 From the Home screen, tap
2 Tap and perform one of the following actions:
• If you want to browse by name, enter the first few letters of the contact name.
• If you want to browse by phone number, enter the first few digits of the contact phone
number.
All contacts that contain the text entered in the search field are displayed.
Return to Process
Contact Management on page 57
7.1.5
.
Deleting Contacts
You can remove contacts from the device memory.
Procedure:
1 From the Home screen, tap
2 Tap the contact you want to delete.
3 Tap Options, and select Delete.
4 Delete the contact by tapping OK.
.
Return to Process
Contact Management on page 57
7.1.6
Sending SMS and MMS Messages from Contacts
You can send SMS and MMS messages to the contacts.
Procedure:
1 From the Home screen, tap
2 Locate and tap the contact you want to message.
3 Open the Message screen by tapping
4 3. Type in the message.
5
Tap to attach a multimedia file.
NOTICE: When you add an attachment, the message is automatically converted to a
multimedia message (MMS).
Send Feedback 59
.
.
Page 60

CCCCCCCCCCC-A
Chapter 7: Contacts and Calls
6 Send the message by tapping .
Return to Process
Contact Management on page 57
7.1.7
Importing SIM Card Contacts to Phone
Procedure:
1 From the Home screen , tap
2 Tap Options and select Import/Export.
3 Tap Import from SIM card.
The list of contacts stored in your SIM card displays.
4 Tap the contact you want to move to the phone and tap OK.
The contacts are exported to the SIM card.
Return to Process
Contact Management on page 57
7.1.8
.
Exporting Phone Contacts to SIM Card
You can export your contacts to the SIM card, so that they can be accessed on other devices with your
SIM card inserted.
Procedure:
1 From the Home screen, tap
2 Tap Options and select Import/Export.
3 Tap Export to SIM card.
4 Check the contacts you want to export to the SIM card and tap OK.
.
Return to Process
Contact Management on page 57
7.1.9
Exporting Phone Contacts to Storage
You can export your phone contacts to storage to make sure they are not deleted during factory reset.
The contacts can also be accessed on other devices using your internal storage card.
Procedure:
1 From the Home screen, tap .
2 Tap Options and select Import/Export.
3 Tap Export to storage.
60 Send Feedback
Page 61

4 In the Export Contacts pop-up, tap OK.
The contacts are exported to the internal storage as a .VCF file.
Return to Process
Contact Management on page 57
7.1.10
Sharing Contacts
You can send contact information by MMS, Bluetooth, Drive and E-mail.
Procedure:
CCCCCCCCCCC-A
Chapter 7: Contacts and Calls
1 From the Home screen, tap
2 Tap Options and select Import/Export.
3 Tap Share visible contacts.
4 Select one of the following options to share the contacts and tap Just Once to select the
transfer mode each time or Always to send the contacts using the same method:
• Bluetooth: Send the contact details to a Bluetooth device paired with your phone. Select the
Bluetooth device to share the contact.
• E-mail: Send the contact details as an e-mail message. Ensure to setup your e-mail account
before sending e-mail messages. Else you are requested to setup the e-mail account.
• Messaging: Send a contact as a multimedia message to any mobile phone.
• Gmail: Send the contact details as an e-mail using your configured Gmail account.
• Drive: Save and share the contact details through Google Drive™.
5 To share a single contact, perform the following:
a Scroll to the required contact and tap the contact to view the contact details.
b Tap Options and select Share.
c Select the sharing options like Bluetooth, Drive, E-mail, Gmail or Messaging and share the
contact.
Return to Process
.
Contact Management on page 57
7.1.11
Modifying Contact Settings
You can set ringtone, enable voice mail, and place the contact on homescreen.
Procedure:
1 From the Home screen, tap
2 View the contact details by scrolling and tapping on the contact of your choice.
3 Tap
a If you want to set a specific ringtone for a contact, tap Set ringtone.
b If you want to forward all incoming calls from a contact to your voicemail box, enable All
Send Feedback 61
and tap Options.
calls to voicemail.
.
Page 62

CCCCCCCCCCC-A
Chapter 7: Contacts and Calls
4 Scroll to the required contact and tap the contact to view the contact details.
5 Tap Options and select Place on Home screen for quick access.
Return to Process
Contact Management on page 57
7.1.12
Modifying Phonebook Settings
You can sort the contacts to be displayed.
Procedure:
1 From the Home, tap
2 Tap Options → Settings and select one of the following options:
• If you want to sort contact names by first name or last name, select Sort list by.
• If you want to choose whether the first name or the last name is displayed first, select View
contact names.
Return to Process
Contact Management on page 57
7.2
.
Call Management
Return to Process
Contacts and Calls on page 57
Related Links
Making Calls on page 63
Answering Incoming Calls on page 63
Viewing Call History on page 64
Deleting Call History on page 64
Modifying Call Settings on page 64
Setting Ringtones on page 65
Adjusting Device Volume on page 65
Activating Vibrate Mode on page 65
Setting Up Voicemail on page 65
Enabling Dial Pad and Touch Tones on page 66
Editing Quick Responses on page 66
Monitoring Fixed Dial Numbers on page 67
Setting TTY Mode on page 67
Setting DTMF Tones on page 68
Setting Call Forwarding on page 68
Activating Call Waiting on page 68
Internet Calling on page 68
62 Send Feedback
Page 63

7.2.1
Making Calls
Procedure:
CCCCCCCCCCC-A
Chapter 7: Contacts and Calls
1 From the Home screen or Apps menu (
The Phone screen with Speed Dial, Recents, and Contacts is displayed.
2 To dial a number, use one of the following options:
If… Then…
If you want to make a call using Speed
Dial,
If you want to make a call using Recents, perform the following actions:
If you want to make a call using Contacts
application,
), tap Phone ( ).
perform the following actions:
a Tap the Speed Dial tab.
b Tap the contact you want to call.
a Tap the Recents tab.
b Tap the contact you want to call.
perform the following actions:
a Tap the Contacts tab.
b From the saved contacts list, tap the con-
tact you want to call.
c Tap .
Return to Process
Call Management on page 62
7.2.2
Answering Incoming Calls
Procedure:
To answer/reject an incoming call, touch the white phone icon ( ) and slide over one of these
icons:
Icons Description
Answer the call.
Reject the call.
Disconnect the call and respond with a default text message from a list of quick response text messages.
Return to Process
Call Management on page 62
Send Feedback 63
Page 64

CCCCCCCCCCC-A
Chapter 7: Contacts and Calls
7.2.3
Viewing Call History
Procedure:
1 From the Home screen or Apps menu (
2 Tap the RECENTS tab and select View full call history.
3 To view all incoming, outgoing, and missed calls, tap All.
If you want to view missed calls only, tap Missed.
Return to Process
Call Management on page 62
7.2.4
), tap Phone ( ).
Deleting Call History
Procedure:
1
From the Home screen or Apps menu ( ), tap Phone ( ).
2 Tap the RECENTS tab and select View full call history.
3 Tap Options (
4 Tap Clear call log.
Return to Process
Call Management on page 62
).
7.2.5
Modifying Call Settings
You can change the incoming call ringtone, set phone to vibrate while ringing, activate voicemail, and
other settings.
When and where to use: To view and modify call settings,
Procedure:
1 From the Home screen or Apps menu ( ), tap Phone ( ).
2 Tap Call Options (
3 Tap Settings.
Return to Process
Call Management on page 62
).
64 Send Feedback
Page 65

CCCCCCCCCCC-A
Chapter 7: Contacts and Calls
7.2.6
Setting Ringtones
To communicate with you, your device uses sounds and vibrations including ringtones, notifications,
alarms, and navigation feedback. You can customize any of these sounds, as well as control their
volume and the volume for music, videos, games, and other media.
Procedure:
1 From the Home screen or Apps menu (
2 Tap Sound & notification located under Device settings.
3 Tap Phone ringtone and, from the list of ringtones, select the ringtone you want to set.
4 Tap OK to set the ringtone.
Return to Process
Call Management on page 62
7.2.7
), tap Settings ( ).
Adjusting Device Volume
Procedure:
Set the volume by performing one of the following:
• To set the master volume for music, ringtones, notifications, and alarms separately, tap
Volumes.
• To raise or lower the volume of the currently playing sounds, use the physical volume
control button on the phone.
Return to Process
Call Management on page 62
7.2.8
Activating Vibrate Mode
Procedure:
1 Set the phone on vibration mode while ringing by tapping Call Settings → General Settings →
Sounds and vibrate.
2 Enable Also vibrate for calls.
3 To turn off the vibration mode, disable Also vibrate for calls.
Return to Process
Call Management on page 62
7.2.9
Setting Up Voicemail
When and where to use:
Send Feedback 65
Page 66

CCCCCCCCCCC-A
Chapter 7: Contacts and Calls
Context for the current task
Procedure:
1 From the Home screen or Apps menu ( ), tap Phone ( ).
2 Tap Options → Settings.
3 Under Call Settings, tap Options.
4 View or enter the following details:
• Setup: Enter your voicemail number.
• Sound: Set alert tone for voicemail message.
• Vibrate: Enable this option to receive a vibrating alert for voicemail messages.
Return to Process
Call Management on page 62
7.2.10
Enabling Dial Pad and Touch Tones
When and where to use:
Context for the current task
Procedure:
1 From the Home screen or Apps menu ( ), tap Settings ( ).
2 Tap Sound & notification ( ).
3 Tap Other sounds.
4 Enable Dial pad tones and Touch sounds.
These tones are played while entering a number in dialpad.
Return to Process
Call Management on page 62
7.2.11
Editing Quick Responses
The quick responses are the messages that can be used to reject the call with a message.
Procedure:
1 From the Home screen or Apps menu ( ), tap Phone ( ).
2 Tap Options → Settings.
3 Tap General Settings.
The list of quick responses displays.
4 In the Other menu, tap Quick Response.
5 Tap on the required quick responses from the list to edit that particular message and tap OK to
save the message to the list.
66 Send Feedback
Page 67

CCCCCCCCCCC-A
Chapter 7: Contacts and Calls
6 While an incoming call arrives,touch the message icon to open a list of quick responses or the
option to write your own message. Touch one to send it to the caller immediately and the call
gets disconnected.
Return to Process
Call Management on page 62
7.2.12
Monitoring Fixed Dial Numbers
FDN (fixed dialing numbers) is a SIM card-enabled feature. It restricts outgoing calls only to phone
numbers which are listed in the FDN list. This feature can be activated only if PIN2 is entered. Contact
your network operator if you do not have a PIN2. Set up your phone to place outgoing calls only to the
fixed dialing numbers (FDN) that you save on the phone’s SIM card.
Procedure:
1 From the Home screen or Apps menu (
2 Tap Options → Settings.
3 Tap Call Settings.
4 Tap Fixed Dialing Numbers.
Change PIN2 allows you to change the PIN number supplied with the SIM card.
5 Tap FDN list and add numbers. Tap on Options > Add contact and enter the details of the
contact and tap Save.
Return to Process
Call Management on page 62
7.2.13
), tap Phone ( ).
Setting TTY Mode
If you enable TTY mode, hearing-impaired individuals can send and receive phone calls as text over
the phone.
Procedure:
1 In the Call settings screen, tap TTY mode to view and modify TTY mode settings.
2 Set one of the following options:
• TTY Off: disables TTY mode.
• TTY Full: enables TTY mode for both incoming and outgoing calls.
• TTY HCO: enables TTY mode only for incoming calls.
• TTY VCO: enables TTY mode only for outgoing calls.
Return to Process
Call Management on page 62
Send Feedback 67
Page 68

CCCCCCCCCCC-A
Chapter 7: Contacts and Calls
7.2.14
Setting DTMF Tones
Procedure:
In the Call settings screen, tap on DTMF tones and set the DTMF tone length to Normal or
Long.
Return to Process
Call Management on page 62
7.2.15
Setting Call Forwarding
You can forward your incoming calls to a number in the contacts list or to a new number if your network
operator supports this service. The device can be set to redirect incoming calls to a specified number.
Procedure:
1 To access call forwarding settings, in Call Settings, tap Call forwarding.
2 Select one of the following call forwarding options:
• If you want to forward all incoming calls to a predesignated number, select Always forward.
• If you want to forward calls when your phone is busy, select Forward when busy.
• If you want to forward calls when you do not answer incoming calls, select Forward when
unanswered.
• If you want to forward calls when your phone is switched off or it is out of coverage area,
select Forward when unreachable.
3 Enter a specific number and tap Enable.
Return to Process
Call Management on page 62
7.2.16
Activating Call Waiting
When call waiting is enabled and the phone is in some other call, the new incoming call is displayed
and the user can switch to a new incoming call.
Procedure:
1 To activate call waiting, in the Call settings screen, tap Additional settings.
2 Enable Call waiting.
Return to Process
Call Management on page 62
7.2.17
Internet Calling
You can make and receive calls over Internet rather than over your cellular network. To place a call
over Internet, the device must be configured to use an Internet calling account.
68 Send Feedback
Page 69

CCCCCCCCCCC-A
Chapter 7: Contacts and Calls
After you set up the account, making an Internet call is not different than making any other call.
However, you must be connected to a Wi-Fi network.
Return to Process
Call Management on page 62
Related Links
Adding SIP Accounts on page 69
Making Internet Calls on page 69
7.2.17.1
Adding SIP Accounts
Internet calling is based on the Session Initiation Protocol (SIP) for voice calls on Internet Protocol (IP)
network.
When and where to use:
To add a SIP account and configure your incoming and outgoing preferences:
Procedure:
1 From the Home screen or Apps menu (
2 Tap Options → Settings → Call Settings → Phone Account Settings → SIP Accounts.
3 Create a new SIP account by tapping Add Acoount.
4 Enter the required information and tap Save.
Return to Process
Internet Calling on page 68
7.2.17.2
), tap Phone ( ).
Making Internet Calls
You can make and receive calls over the Internet.
Procedure:
1 From the Home screen or Apps menu (
2 Tap Options → Settings → Call Settings → Phone Account Settings → Use SIP Calling.
3 A dialog with the following options displays:
• For all calls: If this option is selected and when the phone is connected to Wi-Fi network or
mobile Internet, each dialed call becomes an Internet call.
• Only for SIP calls: If this option is selected, only SIP call can be dialed.
), tap Phone ( ).
Return to Process
Internet Calling on page 68
Send Feedback 69
Page 70

This page intentionally left blank.
Page 71

CCCCCCCCCCC-A
Messages and E-mails
Chapter 8
Messages and E-mails
SMS and MMS are convenient and inexpensive means of communication. You can send a text
message to other people via SMS service.
MMS allows you to send messages by including multimedia content such as pictures, audio files, and
videos.You can use the Messaging in your phone to send an SMS and MMS message to other mobile
phones or any other equipment that can receive SMS and MMS.
Related Links
Sending SMS and MMS Messages on page 71
Deleting Messages on page 72
Modifying Message Settings on page 73
Setting Up E-mail Accounts on page 74
8.1
Sending SMS and MMS Messages
You can send text messages and multimedia messages from the device.
When and where to use:
Context for the current task
Procedure:
1 Go to Apps Menu → Messaging.
2 Tap New Message.
3 In the To field, enter the contact name or a phone number.
4
To add an attachment, tap and select the attachment type.
See MMS Attachment Types on page 72.
NOTICE: When you add an attachment, the message is automatically converted to a
multimedia message (MMS).
5 Type in the message and press Send.
Return to Process
Messages and E-mails on page 71
Related Links
MMS Attachment Types on page 72
Send Feedback 71
Page 72

CCCCCCCCCCC-A
Chapter 8: Messages and E-mails
8.1.1
MMS Attachment Types
Short reference description.
Table 4: MMS Attachment Types
Attachment Type Description
Pictures Attach a photo from the device memory.
Capture picture Take a new photo using the mobile camera and
attach.
Videos Attach a video from the device memory.
Capture video Take a new video using the camcorder and at-
tach.
Audio Attach an audio file from the device memory.
Record audio Record a new audio using the sound recorder
and attach.
Slideshow Create new slideshow or edit the existing slides
and attach.
Contact Vcard Attach a contact available on the device.
Return to Process
Sending SMS and MMS Messages on page 71
8.2
Deleting Messages
When and where to use:
Context for the current task
Procedure:
1 From the home screen, go to Messaging
2 Perform one of the following actions:
If… Then…
If you want to delete all messages, perform the following actions:
a Go to Options
b TapDelete all Threads.
c Tap Delete.
If you want to delete a specific conversation, Perform the following actions:
a Select a conversation.
b Tap Delete.
If you want to delete a single message,
72 Send Feedback
Page 73

Return to Process
Messages and E-mails on page 71
8.3
Modifying Message Settings
You can modify message settings on your device.
Procedure:
1 Go to Messaging → Options → Settings.
2 Modify the message settings.
See Message Settings on page 73.
Return to Process
Messages and E-mails on page 71
Related Links
Message Settings on page 73
CCCCCCCCCCC-A
Chapter 8: Messages and E-mails
8.3.1
Message Settings
You can customize the way you want to view and filter the messages. You can also set the default
messaging application.
Table 5: Message Settings
Setting Description
SMS enabled > Default SMS app Set the default messaging application.
Delete old messages Delete the old messages automatically when
the storage limit is reached.
Text message limit Set the maximum number of SMS messages
stored on the device.
Multimedia message limit Set the maximum number of MMS messages
stored on the device.
MMS size limit Set the size limit for multimedia messages.
Notification Enable notification alert for incoming messages.
Sound Set the alert tone for incoming messages.
Vibrate Enable vibrate alert for incoming messages.
Manage SIM card messages Manages the text messages (SMS) stored in
the SIM card.
Return to Process
Modifying Message Settings on page 73
Send Feedback 73
Page 74

CCCCCCCCCCC-A
Chapter 8: Messages and E-mails
8.4
Setting Up E-mail Accounts
You must configure your e-mail account to access your e-mail box and e-mail services.
When and where to use:
Repeat this procedure to set up multiple accounts.
Procedure:
1 Task step.
2 In the Accounts tab, tap Add account.
3 In the Address field, enter a valid e-mail address.
4 In the Password field, enter the password for the e-mail account.
5 Follow on-screen instructions.
6 Select the type of account.
Return to Process
Messages and E-mails on page 71
74 Send Feedback
Page 75

CCCCCCCCCCC-A
Collaboration with LMR Radios
Chapter 9
Collaboration with LMR Radios
Radio Services is a free application available on the device that enables the LEX device to connect
with a Land Mobile Radio (LMR).
NOTICE: If you cannot access features described in this chapter, contact your device
technician for more information.
Bluetooth-equipped devices can communicate without wires, using frequency-hopping spread
spectrum (FHSS) radio frequency (RF) to transmit and receive data in the 2.4 GHz Industry Scientific
and Medical (ISM) band (802.15.1).
Bluetooth operates within a range of 10 meters (32 feet) line of sight. This is an unobstructed path
between your radio and your Bluetooth enabled device.
You can connect your LEX device with a Land Mobile Radio (LMR). The supported LMR radios are as
follows:
• APX 7000
• APX 8000
Related Links
Switching Between PSX PTT App and LMR Radio for PTT Communications on page 75
Pairing Radio with the LEX Device on page 76
Unpairing Radio from the LEX Device on page 77
Sending PTT Audio on page 78
9.1
Switching Between PSX PTT App and LMR Radio for PTT Communications
The LEX device supports Push-To-Talk (PTT) communications in two different modes – PTT via Land
Mobile Radio (LMR), or Broadband PTT via PSX PTT solution. The LEX device can operate in only
one of these modes at a time. You can switch between the two modes using the PSX Cockpit
application.
Prerequisites: Obtain the PSX Cockpit application from Motorola Support.
Procedure:
1 From the Home screen, tap
2 Display the PSX Cockpit sidebar menu by tapping .
3 In the PSX Cockpit sidebar menu, tap the PTT that you currently use.
→ .
Send Feedback 75
Page 76

CCCCCCCCCCC-A
Chapter 9: Collaboration with LMR Radios
Figure 2: PSX Cockpit Sidebar Menu
4 In the Push to Talk screen, choose the PTT that you want to use:
• If you want to use the LMR radio for PTT communications, select Radio.
• If you want to make Broadband PTT calls via the PSX PTT application, select WAVE.
Figure 3: Push to Talk Screen
Choosing LMR or WAVE not only sets your choice for PTT functionality, but configures the
emergency button priority when initiated with the power button.
Selecting Radio enables the Radio Services application and disables the PSX PTT application
automatically.
Selecting WAVE enables the PSX PTT application and disables the Radio Services application
automatically.
5 Tap OK.
Return to Process
Collaboration with LMR Radios on page 75
9.2
Pairing Radio with the LEX Device
You can pair the LEX device with a Land Mobile Radio (LMR) to send and receive PTT calls. The
devices remember each other and automatically resume connection when they are on and within
connection range.
Prerequisites:
Verify whether your LMR radio is supported for pairing with the LEX device. For the list of supported
radios, see Collaboration with LMR Radios on page 75.
Turn on Bluetooth on the LEX device and on the radio. For more information, see .
76 Send Feedback
Page 77

CCCCCCCCCCC-A
Chapter 9: Collaboration with LMR Radios
Ensure the LEX device is not paired with any previously paired Bluetooth devices. For more
information, see .
Procedure:
1 From the Home screen, tap → .
2 In the Secure Pairing window, tap Pair.
3 In the Bluetooth window, set the Bluetooth slidebar to the ON position.
4
Tap → Refresh and select the radio from the list of available devices.
NOTICE: Ensure the LMR Radio is in discoverable mode.
The Bluetooth pairing code prompt appears.
Figure 4: Bluetooth Pairing Code Prompt
5 Compare the pairing code on the LEX device with the code on the LMR radio and tap Pair.
6 On the LMR radio, select Accept.
The LMR radio is paired with your LEX device.
Return to Process
Collaboration with LMR Radios on page 75
9.3
Unpairing Radio from the LEX Device
The user can follow this procedure to unpair the LEX device from the Land Mobile Radio (LMR).
Procedure:
1
From the Home screen, tap → .
2 In the Radio Services window, tap
Return to Process
Collaboration with LMR Radios on page 75
→ Unpair and tap OK.
Send Feedback 77
Page 78

CCCCCCCCCCC-A
Chapter 9: Collaboration with LMR Radios
9.4
Sending PTT Audio
The PTT button serves to send audio.To send PTT audio, you can press the PTT button on the LEX
device or on the LMR radio paired with your LEX device. Audio is always routed via the LMR radio.
Procedure:
1 On the LEX device, press and hold the PTT button.
NOTICE: For the image of the PTT button, see LEX F10 on page 23.
The LMR radio transmits audio as long as you press the PTT button.
Return to Process
Collaboration with LMR Radios on page 75
78 Send Feedback
Page 79

CCCCCCCCCCC-A
Applications
Chapter 10
Applications
The applications installed on your device allow you to, for example, take pictures, record and view
media files, and to create events.
Normally, you access the applications from the Home screen by clicking the icon.
Related Links
Applications on page 79
Using the Flashlight on page 80
Taking Screen Shots on page 81
Managing Downloads on page 81
Camera on page 81
Multimedia Player on page 83
Calendar on page 83
Clock on page 84
Calculator on page 85
10.1
Applications
The Apps screen displays icons for all installed applications.
Table 6: Applications
Icon Description
AOSP WebKit Browser —use to access the
Internet or agency intranet.
Calendar—use to manage events and appointments. For more information, see Calendar on
page 83.
Calculator —provides the basic and scientific
arithmetic functions. For more information, see
Calculator on page 85.
Camera / Video Recorder—take photos or record videos. For more information, see Camera
on page 81.
Clock / Alarms—use to set an alarm, stopwatch, or timer. For more information, see
Clock on page 84.
Contacts—use to manage contact information.
For more information, see Contact Management
on page 57.
Chrome™—use to access Internet.
Table continued…
Send Feedback 79
Page 80

CCCCCCCCCCC-A
Chapter 10: Applications
Icon Description
Downloads—lists all downloads files.
Email—use to send and receive email.
Gmail—use to send and receive email.
Google Drive™—access to files anywhere
through secure cloud storage and file backup
for your photos, videos, files and more.
Google Search—the fastest, easiest way to
find what you need on the web and on your device.
Messaging—send SMS and MMS messages.
See Messages and E-mails on page 71 for
more information.
Motorola TechDocs—use to view device ondevice documentation.
Return to Process
Applications on page 79
10.2
Using the Flashlight
Phone—use to make phone calls. See Call
Management on page 62 for more information.
Google Play Movies & TV—allows you to buy
or rent the newest movies and TV shows.
Google Play Music—access music stored on
the device.
Google Play Store—Google app store for Android devices where you can enjoy games,
apps, movies, and more.
Radio Services—use to pair the LEX device
with Land Mobile Radio (LMR). See Collabora-
tion with LMR Radios on page 75.
Settings—use to configure the device.
YouTube—view videos and music, upload orig-
inal content, and share with the world.
You can enable the flashlight from either Home screen or lock screen.
Procedure:
1 Drag the notification bar.
2 Tap flashlight .
80 Send Feedback
Page 81

CCCCCCCCCCC-A
Chapter 10: Applications
Return to Process
Applications on page 79
10.3
Taking Screen Shots
You can take screen shots of the currently displayed screen.
Procedure:
Press the POWER BUTTON and VOLUME DOWN button simultaneously.
The screen shot is saved in the device memory, and screen shot capture icon ( ) displays in
the status bar.
Return to Process
Applications on page 79
10.4
Managing Downloads
You can download, install, and view your applications,media files, when your phone is connected to the
Internet through Wi-Fi or mobile data. You can download files from Google, or other sources.
When and where to use:
Use the Downloads app to view, reopen, or delete the downloaded files.
Procedure:
1 Manage application downloads by tapping Apps menu ( ) → Downloads ( ).
2 Open an item by tapping it.
3 Tap headings for earlier downloads to view them.
4 Check the items you want to share.
5 Tap the Share icon and choose a sharing method from the list.
6 Check items you want to delete and tap the Trash icon.
7 At the top of the screen, tap the 3 horizontal lines to sort your downloads by name, by date
modified, or by size.
Return to Process
Applications on page 79
10.5
Camera
The LEX F10 has a main camera with 8MP (mega pixel) auto focus and a front camera VGA (Fixed
focus) for taking pictures. These pictures are saved in Photos (
Return to Process
Applications on page 79
Send Feedback 81
) in your phone memory.
Page 82

CCCCCCCCCCC-A
Chapter 10: Applications
Related Links
Taking Photos on page 82
Recording Videos on page 82
10.5.1
Taking Photos
You can take photos in normal or panoramic mode. The photos are saved on your device.
Procedure:
1 From the Apps menu, tap Camera (
The camera screen with touch controls ( ) displays.
2 Tap ( ) and select one of the following modes:
If… Then…
If you want to take a picture in normal
mode,
If you want to take a picture in panoramic
mode,
).
perform the following:
a Tap .
b Tap the Shutter .
c Zoom in and out by using the pinch ges-
perform the following:
a Tap .
b Tap the Shutter .
c Start capturing the picture from the left
tures.
most edge of the image and move towards the right most edge.
3 Change camera settings , such as flash, exposure, and others, by tapping the circle to the
right of the shutter .
Return to Process
Camera on page 81
10.5.2
Recording Videos
You can record videos with the LEX F10 device. The video files are saved on your device.
Procedure:
1 From the Apps menu, tap Camera (
The camera screen with touch controls ( ) displays.
2 Tap .
82 Send Feedback
).
Page 83

3 Tap Video ( ).
4 To shoot a video, tap the Shutter ( ).
5 To stop recording, tap .
CCCCCCCCCCC-A
Chapter 10: Applications
6 Change video settings
of the shutter .
Return to Process
Camera on page 81
10.6
, such as flash, exposure, and others, by tapping the circle to the right
Multimedia Player
You can play music files and voice memos stored in your phone using the Play Music application.
Return to Process
Applications on page 79
10.7
Calendar
With the Calendar application, you can set appointments, schedule reminders when required, set alerts
and repeat specific settings.
Return to Process
Applications on page 79
Related Links
Modifying Calendar Settings on page 83
10.7.1
Modifying Calendar Settings
You can modify the way your events display in the calendar application. Tasks can be viewed on daily
and weekly basis.
Procedure:
1 In the Home screen, tap the Apps menu ( ).
2 Tap Calendar ( ).
3 To change the calendar view, choose Day, Week, Month, Agenda from the top of the screen in
a drop-down list.
4 View the list of available options by tapping Options:
• New event: When Google calendar is synced with your Google account, new event can be
generated using the Google account.
• Refresh: Refresh the calendar for the updates.
• Search: You can search for a particular event.
Send Feedback 83
Page 84

CCCCCCCCCCC-A
Chapter 10: Applications
• Calendars to display: Displays the account with which the calendar is synced or not.
• Settings: Displays the General settings of the calendar.
From any of the calendar views, enable the following functions:
• Read or edit event details: Displays the event details and allows you to edit them.
• Manage events and calendar: You can tap icons across the top of the screen or the menu
to search or create events, return to today, or adjust settings.
Return to Process
Calendar on page 83
10.8
Clock
You can use the Clock application to set alarms and to personalize clock settings, such as automatic
home clock, or date and time settings.
Return to Process
Applications on page 79
Related Links
Modifying Clock Settings on page 84
Setting Alarms on page 84
10.8.1
Modifying Clock Settings
When and where to use:
Context for the current task
Procedure:
1 In the Home screen, tap .
2 Tap Clock ( ).
3 Go to settings and adjust the following options:
• Style: Allows you to choose between an analog or a digital clock.
• Automatic home clock: Allows you to check your home time when traveling.
• Change Date & Time: Allows you to change date and time.
Return to Process
Clock on page 84
10.8.2
Setting Alarms
You can set an alarm for a particular time. The alarm works even if the phone is in silent mode.
Procedure:
1 In the Home screen, tap .
84 Send Feedback
Page 85

CCCCCCCCCCC-A
Chapter 10: Applications
2 Tap Clock ( ).
3 Tap the alarm activation icon on the top of the screen.
4 To set a simple alarm, tap Add Alarm ( ).
5 Enter the time and tap Done.
6 To set a reoccuring alarm, enable the checkbox Repeat. Select each day in a week by tapping
that particular day.
7 To set the alarm tone, tap on Ringtone list, select ringtone and tap OK.
Return to Process
Clock on page 84
10.9
Calculator
You can use the calculator application to perform simple mathematical operations.
You can access advanced calculator options by swiping the screen from right to left.
Return to Process
Applications on page 79
Send Feedback 85
Page 86

This page intentionally left blank.
Page 87

CCCCCCCCCCC-A
Accessories
Chapter 11
Accessories
You can use multiple accessories associated with your LEX device, for example a rugged vehicle
cradle and mount, a soft carry pouch, a six unit multi-slot charger, and others.
Related Links
LEX F10 Accessories on page 87
11.1
LEX F10 Accessories
Learn more about LEX F10 accessories available.
Table 7: LEX F10 Accessories
Part Number Availability Accessory
PMLN7740A Aftermarket Magnetic USB to MICRO USB
Adapter
PMPN4328A Aftermarket Rugged Vehicle Cradle and
Mount
PMPN4329A Aftermarket USB Car Charger with Coiled
Cable
PMLN7738A Aftermarket Industrial-Grade Polycarbon-
ate Holster
PMPN4330A Aftermarket 6 Unit Multi-Slot Charger
HKLN4662A In-Box/Aftermarket Multi-Tool Screwdriver
HKLN4663A Aftermarket MSI Main Lens Anti Impact
Film
HKTN4012A In-Box/Aftermarket Wall Charger with USB Con-
nector
HKLNXXXXA Aftermarket USB Cable (Standalone)
New Part Number In-Box/Aftermarket Screw M1.6X3.5 SIM cover
black
Return to Process
Accessories on page 87
Send Feedback 87
Page 88

This page intentionally left blank.
Page 89

CCCCCCCCCCC-A
Technical Specifications
Appendix A
Technical Specifications
Table 8: Technical Specifications
Item Specification
Physical
Dimensions (H x W x D) 137 x 3.8 x 20.8 mm
Weight 280 g (9.87 Oz) including standard battery
Durability Continues to run after multiple drops to concrete from a height of 2
meters.
Display Screen size and pixels: 4.0” (480 x 800)
Colors: 16.7 million
Brightness: 700nits
Touch: Glove and wet fingers capacitive multi touch
Number of Physical Keys
Operating Temperature -4°F to 131°F (-20°C to +55°C)
Storage Temperature -40°F to 185°F (-40°C to +85°C)
Hardware
Processor Qualcomm MSM8926 1.2GHz
Memory 2 GB RAM
Receiver HAC Compliant
Antenna
3 keys on front (Menu, Home, Back)
2 keys on left side (PTT, Apps)
2 keys on right side (Volume, Alarm)
1 key on top (Power/Lock)
32 GB eMMC
1GB LPDDR
12 GB Storage
1 Internal MISO antenna for LTE (CSFB is required)
2 LTE Antennas 0 and 1 should be identical and must have an an-
tenna performance difference of less than 3dB
3 Antenna Isolation between LTE Antennas 0 and 1 must be great-
er than 10 dB
Camera
Flash LED Flash with torchlight functionality
Send Feedback 89
Rear 8MP Camera with Auto Focus
Front 1MP Camera with Fixed Focus
Table continued…
Page 90

CCCCCCCCCCC-A
Appendix A: Technical Specifications
Item Specification
Sensors
Proximity Sensor
Ambient Light Sensor
Accelerometer Sensor
E-Compass Sensor
Ports
5-pin water-proof magnetic USB2.0, High Speed, OTG
3.5 mm 4 pole water-proof Audio Jack (stereo)
Accessory/Charging Port
Micro-SIM
Battery Standard - 4800mAh
Microphone 2 Microphones with noise cancellation.
Software
Operating System Android 5.1.1.
Google, Google Play, Android, and other marks are trademarks of
Google Inc.
Messaging
SMS/MMS
Email (Corporate Sync, POP3, IMAP, Push Email)
Web HTML5/WAP 2.0 compliant AOSP WebKit Browser; Chrome Brows-
er.
2G/3G
Standards FDD-LTE/UMTS/GSM
Bands 2,4,5,7,14,17
Frequencies
UMTS: 850 MHz, 1900 MHz
GSM: 850 MHz, 1900 MHz
Wi-Fi
Operating Band 2.4 GHz, 5 GHz
Standards 802.11 a/b/g/n/r with hotspot functionality (Max 5 connections)
Personal Area Networks
Bluetooth
BT Core 4.0 BLE (Low Energy) Secure Connections
Profiles:
Advanced Audio Distribution Profile (A2DP)
Hands Free Profile (HFP)
Headset Profile (HSP)
Human Interface Device Profile (HID)
Serial Port Profile (SPP)
Generic Access Profile (GAP)
Service Discovery Application Profile (SDAP)
Generic Objet Exchange Profile (GOEP)
Object Push Profile (OPP)
Generic Audio/Video Distribution Profile (GAVDP)
Table continued…
90 Send Feedback
Page 91

Item Specification
Message Access Profile (MAP)
Audio/Video Remote Control Profile (AVRCP)
Phone Book Access Profile (PBAP)
File Transfer Profile (FTP)
Personal Area Networking Profile (PAN)
NFC Security element integration
Supports secure access in card mode
Supports Mifare classic and other NFC forum tags in reader mode
GPS
CCCCCCCCCCC-A
Appendix A: Technical Specifications
Location Services
Standalone GPS
Assisted GPS (aGPS)
GLONASS
Device Management
Remote Management and
Configuration
Supports OMA-DM (Open Mobile Alliance Device Management)
Video and Imaging
Supported Formats MPEG-4 (.mp4)
3gpp (.3gp)
H.263
H.264
Formats supported for playback, streaming and recording
NOTICE: Video and images are time stamped for evidence documentation.
Audio
Supported Formats
MP3 (.mp3)
AAC (.aac)(.m4a)
ACC+ (.m4a)(.mp4)(.m4b)(.m4v)
eAAC
AMR-NB (.amr)(.3ga)
AMR-WB (.awb)
Output
Dual 1.1 Watt Front-Facing Speakers
3.5 mm 4 pole water-proof Audio Jack (stereo) supporting stereo
headset, PTT button, and call button
Bluetooth (A2DP stereo)
Input Double Noise and Echo Cancelling Microphones
Accessories
Send Feedback 91
Page 92

This page intentionally left blank.
 Loading...