

Page 1

Page 2

Page 3

. . . . .
Motorola, Inc. makes no representations or warranties with respect to the contents or use of
this manual and specifically disclaims any warranties, express or implied, of merchantability
or fitness for any specific purpose. Further, Motorola, Inc. reserves the right to revise this
publication and to make any modifications to its content, at any time, without obligation to
notify any party, person, or entity of such revisions or changes.
Personal Communications Sector
Wireless Messaging Division
1500 Gateway Blvd.
Boynton Beach, FL 33426-8292
MOTOROLA, the Stylized M logo and all other trademarks indicated as such herein are
trademarks of Motorola, Inc. ® Reg. U.S. Pat. & Tm. Off.
STrueSync, Starfish and the Stylized Starfish Logo are registered trademarks of Starfish Software, Inc., a wholly owned independent subsidiary of Motorola, Inc. U.S. Patent Nos.
D388,776 (TrueSync Desktop only), 5.519,606 and 5,778,346. Other patents pending.
All other product or service names are the property of their respective owners.
© 2002 Motorola, Inc. All rights reserved. Printed in the U.S.A.
6881037B45-B
3
Page 4

SOFTWARE LICENSE AGREEMENT
This is a legal agreement between you, the end-user, and Motorola, Inc., (“Motorola”). The
Wisdom™ Operating System (“Wisdom OS”), the Applications preinstalled in your
Accompli
™
model 009, and the PC Partner, (collectively “Software”), are licensed by
Motorola to you, and any subsequent transferee of the Software for use only under the terms
set forth here. Please read this Software License Agreement (“Agreement”). By installing,
copying or using the Software, you agree to be bound by all the terms of this Agreement. If
you do not agree with the terms of this Agreement, promptly return the Accompli 009 and the
unused Software to the place from which you obtained them for a full refund.
GRANT OF LICENSE
Motorola grants you a limited, non-exclusive, revocable license to use the executable-code
version of the Wisdom OS and the Applications for your personal use on a single Motorola
Accompli 009; and Motorola grants you a limited, non-exclusive, revocable license to use the
executable code version of the PC Partner for your personal use on a single personal
computer. All rights not expressly granted to you are reserved by Motorola.
COPYRIGHT
The Software is owned by Motorola and is protected by United States copyright laws and
international treaty provisions. You acknowledge that no title to any intellectual property in
the Software is transferred to you.
LIMITATIONS
Except as otherwise explicitly permitted in this Agreement, you may not: a.) modify, translate
or adapt the Software or create derivative works of the Software or any part thereof; b.)
decompile, disassemble, reverse engineer, or otherwise attempt to derive the source code of
the Software; c.) copy (except to install the Wisdom OS and the Applications into a single
Motorola Accompli 009; and except to make one archival back-up copy of the PC Partner),
re-distribute, encumber, sell, rent, loan, lease, sub-license, assign or otherwise transfer your
rights to the Software; or d.) remove or alter any trademark, logo, copyright, or other
proprietary notices in the Software. You may transfer all your rights to the Software under this
Agreement to another person by transferring, on a permanent basis, to such other person the
Motorola Accompli 009 on which the Wisdom OS and Applications are installed, or by
transferring, on a permanent basis, to such other person the personal computer on which the
PC Partner is installed; provided that you retain no copy of the Software and that the
transferee agrees to all the terms of this Agreement.
4 Accompli 009 User’s Guide
Page 5

HIGH RISK ACTIVITIES
The Software is not fault-tolerant and is not designed, manufactured or intended for use in
hazardous environments requiring fail-safe performance, such as in the operation of nuclear
facilities, aircraft navigation or communication systems, air traffic control, implantable human
medical devices, external human life-support machines, explosives control devices,
submarines, weapons systems, or in controlling the operation of moving motor vehicles, in
which the failure of the Software could lead directly to death, personal injury, or severe
physical or environmental damage ("High Risk Activities"). You agree not to use the Software
in High Risk Activities.
U. S. GOVERNMENT RESTRICTED RIGHTS
The U. S. Government acknowledges Motorola’s representation that the Software and its
documentation were developed at private expense and no part of them is in the public
domain and that the Software is Restricted Computer Software as that term is defined in
Clause52.227-19(FAR) and is Commercial Computer Software as that term is defined in
Subpart 227.471 DFARS).
RESTRICTED RIGHTS LEGEND
Where applicable, use, duplication or disclosure by the U. S. Government is subject to
restrictions as set forth in subparagraph(c) (1) (ii) of the Rights of Technical Data and
Computer Software clause at DFARS 252.227-7013. Contractor/manufacturer is Motorola
Inc., 1303 E. Algonquin Rd., Schaumburg, IL 60196.
. . . . .
ENGLISH EXPORT LAW ASSURANCES
You hereby agree to comply fully with all applicable international and national laws that apply
to this software, including the U.S. Export Administration Regulations. You hereby agree to
comply with all end-user and destination restrictions issued by the U.S. and other
government agencies. You agree that you will not export the Software without the
appropriate U.S. export license or other appropriate export authorization that may be
required by any other government agency.
GENERAL
This Agreement will be governed by the laws of the State of Illinois, U.S.A., except for that
body of law dealing with conflicts of law.
5
Page 6

LIMITED WARRANTY
Motorola warrants that each copy of the Software will be free from physical defects in the
media that tangibly embodies the copy for a period of ninety (90) days from the date the
product accompanying the Software was purchased by you. Motorola, at its option, will at no
charge repair or replace the media of the Software that contains defects in materials or
workmanship in the media. No updates are provided. Motorola makes no warranty or
representation that the Software will meet your requirements or will work in combination with
any hardware or applications software products provided by third parties, that the operation
of the Software will be uninterrupted or error free, or that all defects in Software will be
corrected. The entire risk as to the quality and performance of the Software is with you.
EXCEPT FOR THE ABOVE NINETY (90) DAY WARRANTY, THE SOFTWARE IS
PROVIDED WITHOUT FURTHER WARRANTY OF ANY KIND, EITHER EXPRESS OR
IMPLIED, INCLUDING, BUT NOT LIMITED TO, THE WARRANTIES OF TITLE, NONINFRINGEMENT, MERCHANTABILITY, AND FITNESS FOR A PARTICULAR PURPOSE.
NO ORAL OR WRITTEN INFORMATION OR ADVICE GIVEN BY MOTOROLA, ITS
EMPLOYEES, DISTRIBUTORS, DEALERS OR AGENTS SHALL INCREASE THE SCOPE
OF THE ABOVE WARRANTIES OR CREATE ANY NEW WARRANTIES. SOME
JURISDICTIONS DO NOT ALLOW THE EXCLUSION OF IMPLIED WARRANTIES, SO THE
ABOVE EXCLUSION MAY NOT APPLY TO YOU. IN THAT EVENT, ANY IMPLIED
WARRANTIES ARE LIMITED IN DURATION TO NINETY (90) DAYS FROM THE DATE OF
DELIVERY OF THE SOFTWARE. THIS WARRANTY GIVES YOU SPECIFIC LEGAL
RIGHTS. YOU MAY HAVE OTHER RIGHTS, WHICH VA RY FROM STATE TO STATE.
LIMITATION OF LIABILITY
REGARDLESS OF WHETHER ANY REMEDY SET FORTH IN THE WARRANTY FAILS OF
ITS ESSENTIAL PURPOSE, IN NO EVENT WILL MOTOROLA BE LIABLE TO YOU FOR
ANY SPECIAL, CONSEQUENTIAL, INDIRECT, INCIDENTAL OR SIMILAR DAMAGES,
INCLUDING LOST PROFITS OR LOST DATA ARISING OUT OF THE USE OR INABILITY
TO USE THE SOFTWARE OR ANY DATA SUPPLIED THEREWITH EVEN IF MOTOROLA
OR ANYONE ELSE HAS BEEN ADVISED OF THE POSSIBILITY OF SUCH DAMAGES,
OR FOR ANY CLAIM BY ANY OTHER PARTY. SOME JURISDICTIONS DO NOT ALLOW
THE LIMITATION OR EXCLUSION OF LIABILITY FOR INCIDENTAL OR
CONSEQUENTIAL DAMAGES SO THE ABOVE LIMITATION OR EXCLUSION MAY NOT
APPLY TO YOU. IN NO CASE SHALL THE LIABILITY OF MOTOROLA EXCEED THE
PRICE PAID FOR THE SOFTWARE.
TERM
This Agreement is effective until terminated. This Agreement will terminate, and the license
granted to you by this Agreement will be revoked, immediately, without any notice from
Motorola, if you fail to comply with any provision of this Agreement. Upon termination, you
must destroy the Software.
6 Accompli 009 User’s Guide
Page 7

GENERAL SAFETY INSTRUCTIONS
This section contains important information on safe and efficient operation. Read this
information before using your Motorola wireless device.
The information provided in this document supersedes the general safety information
contained in user guides published prior to July 2000. For information regarding radio use in a
hazardous atmosphere please refer to the Factory Mutual (FM) Approval Manual Supplement
or Instruction Card, which is included with devices that offer this capability.
RF OPERATIONAL CHARACTERISTICS
Your device contains a transmitter and a receiver. When it is ON, it receives and transmits
radio frequency(RF) energy. The device operates in the frequency range of 900 MHz to 1990
MHz and employs digital modulation techniques. When you communicate with your device,
the system handling your call controls the power level at which your device transmits. The
output power level typically may vary over a range from 0.063 watts to 1.58 watts.
Exposure To Radio Frequency Energy
Your Motorola wireless device is designed to comply with the following national and
international standards and guidelines regarding exposure of human beings to radio
frequency electromagnetic energy:
• United States Federal Communications Commission, Code of Federal Regulations; 47
CFR part 2 sub-part J
• American National Standards Institute (ANSI) / Institute of Electrical and Electronic
Engineers (IEEE) C95. 1-1992
• Institute of Electrical and Electronic Engineers (IEEE) C95.1-1999 Edition
• National Council on Radiation Protection and Measurements (NCRP) of the United
States, Report 86, 1986
• International Commission on Non-Ionizing Radiation Protection (ICNIRP) 1998
• National Radiological Protection Board of the United Kingdom 1995
• Ministry of Health (Canada) Safety Code 6. Limits of Human Exposure to Radio
frequency Electromagnetic Fields in the Frequency Range from 3 kHz to 300 GHz, 1999
• Australian Communications Authority Radio communications (Electromagnetic
Radiation - Human Exposure) Standard 1999 (applicable to wireless phones only)
General Safety Instructions 7
Page 8

Safety
To assure optimal device performance and make sure human exposure to radio frequency
electromagnetic energy is within the guidelines set forth in the above standards, always
adhere to the following procedures:
Electromagnetic Interference/Compatibility
Antenna Care
Use only the supplied or an approved replacement antenna.
modifications, or attachments could damage the phone and may violate FCC regulations.
DO NOT hold the antenna when the device is “IN USE.”
quality and may cause the device to operate at a higher power level than needed.
Unauthorized antennas,
Holding the antenna affects call
Body-worn operation
To maintain compliance with FCC RF exposure guidelines, if you wear a device on your
body when transmitting, always place the device in
holder, holster, case, or body harness.
exceed FCC RF exposure guidelines.
the antenna is at least one inch (2.5 cm) from your body when transmitting
Use of non-Motorola-approved accessories may
If you do not use a body-worn accessory, ensure
a Motorola-supplied or approved clip,
.
Data operation
When using any data feature of the device, with or without an accessory cable,
the antenna of the device at least one inch (2.5 cm) from the body.
ELECTROMAGNETIC INTERFERENCE/COMPATIBILITY
Note
Nearly every electronic device is susceptible to electromagnetic interference (EMI) if
inadequately shielded, designed or otherwise configured for electromagnetic compatibility.
Facilities
To avoid electromagnetic interference and/or compatibility conflicts, turn off your device in
any facility where posted notices instruct you to do so. Hospitals or health care facilities may
be using equipment that is sensitive to external RF energy.
Aircraft
When instructed to do so, turn off your device when on board an aircraft. Any use of an
electronic device must be in accordance with applicable regulations per airline crew
instructions.
position
8 Accompli 009 User’s Guide
Page 9

Operational Warnings
Medical Devices
Pacemakers
The Health Industry Manufacturers Association recommends that a minimum separation of 6
inches (15 centimeters) be maintained between a handheld wireless device and a
pacemaker. These recommendations are consistent with the independent research by, and
recommendations of, Wireless Technology Research.
Persons with pacemakers should:
• ALWAYS keep the device more than six inches (15 centimeters) from their pacemaker
when the device is turned ON.
• Not carry the device in the breast pocket.
• Use the ear opposite the pacemaker to minimize the potential for interference.
• Turn the device OFF immediately if you have any reason to suspect that interference
is taking place.
. . . . .
Hearing Aids
Some digital wireless devices may interfere with some hearing aids. In the event of such
interference, you may want to consult your hearing aid manufacturer to discuss alternatives.
Other Medical Devices
If you use any other personal medical device, consult the manufacturer of your device to
determine if it is adequately shielded from RF energy. Your physician may be able to assist
you in obtaining this information.
OPERATIONAL WARNINGS
Use While Driving
Check the laws and regulations on the use of wireless devices in the area where you drive.
Always obey them.
When using your wireless device while driving, please:
• Give full attention to driving and to the road.
• Use hands-free operation, if available.
• Pull off the road and park before making or answering a call if driving conditions so
require.
General Safety Instructions 9
Page 10

Safety
Operational Cautions
For Vehicles with Airbags
Do not place a portable wireless device in the area over an air bag or in the air bag
deployment area. Air bags inflate with great force. If a portable radio is placed in the air bag
deployment area and the air bag inflates, the device may be propelled with great force and
cause serious injury to occupants of the vehicle.
Potentially Explosive Atmospheres
Turn off your device prior to entering any area with a potentially explosive atmosphere,
unless it is a device especially qualified for use in such areas as "Intrinsically Safe" (for
example, Factory Mutual, CSA, or UL Approved). Do not remove, install, or charge batteries
in such areas. Sparks in a potentially explosive atmosphere can cause an explosion or fire
resulting in bodily injury or even death.
Note The areas with potentially explosive atmospheres referred to above include fueling
areas such as below decks on boats, fuel or chemical transfer or storage facilities,
areas where the air contains chemicals or particles, such as grain, dust or metal powders, and any other area where you would normally be advised to turn off your vehicle
engine. Areas with potentially explosive atmospheres are often but not always posted.
Blasting Caps and Areas
To avoid possible interference with blasting operations, turn off your device when you are
near electrical blasting caps, in a blasting area, or in areas posted: “Turn off two-way radio”.
Obey all signs and instructions.
OPERATIONAL CAUTIONS
Antennas
Do not use any portable wireless device that has a damaged antenna. If a damaged antenna
comes into contact with your skin, a minor burn can result.
Batteries
All batteries can cause property damage and/or bodily injury such as burns if a conductive
material such as jewelry, keys, or beaded chains touch exposed terminals. The conductive
material may complete an electrical circuit (short circuit) and become quite hot. Exercise care
in handling any charged battery, particularly when placing it inside a pocket, purse, or other
container with metal objects.
10 Accompli 009 User’s Guide
Page 11

Operational Cautions
Follow these additional guidelines to ensure the safe use of your Accompli 009 and
accessories.
Battery Safety
• Do not dispose of the rechargeable Lithium-Ion battery in fire. Batteries can explode
when exposed to fire.
• To prevent injury or burns, do not allow metal objects to contact or short circuit the
battery terminals.
• Recharge the battery only with the recommended Motorola battery charger. Charging
this battery by any other method or with a product not approved by Motorola may
cause damage to the battery.
• Do not charge other batteries in the Motorola battery charger. Charging other batteries
can cause those batteries to burst or explode, resulting in personal injury or property
damage.
Battery Charger Safety
• Do not expose the charger to rain or snow.
. . . . .
• Use of an attachment not recommended or sold by Motorola may result in a risk of fire,
electric shock, or injury to persons.
• Make sure the cord is located where it will not be stepped on, tripped over, pinched, or
subjected to damage or stress.
• If you need to use an extension cord, make sure:
• The pins on the plug of the extension cord are the same number, size, and shape
as those on the plug of the charger.
• The extension cord is properly wired and in good electrical condition.
• The cord size is 18AWG for lengths up to 100 feet and 16AWG for lengths up to
150 feet.
• Do not operate the charger with a damaged cord, transformer block, or prongs; replace
them immediately.
• Do not operate the charger if it has been damaged in any way; take it to a qualified
service technician.
• Do not disassemble the charger; if service or repair is required, call Motorola at 1800-548-9954. Incorrect reassembly can result in a risk of electrical shock or fire.
• Maximum ambient temperature around the power supply must not exceed 40 C (104 F).
• Keep battery contacts clean. Do not allow dirt or sticky substances to accumulate on
the contacts. If you need to clean the contacts, unplug the charger to reduce the risk
General Safety Instructions 11
Page 12

Safety
of electrical shock. Use a slightly dampened cloth to clean the contacts. Let the
contacts dry before plugging the charger into an AC outlet.
• Do not immerse in water.
Agency Approvals
AGENCY APPROVALS
The Accompli 009 has been approved for use by the Federal Communications Commission
(FCC) and Underwriters Laboratories, Inc. (UL). The charger base has been FCC approved
and the transformer has been UL approved.
CLEANING YOUR ACCOMPLI 009
To clean smudges and grime from the exterior of your device, use a soft, non-abrasive cloth
moistened in a mild soap and water solution. Do not immerse in water. Do not use alcohol or
other cleaning solutions.
CARE AND MAINTENANCE
The Motorola Accompli 009 is durable, reliable, and can provide years of dependable
service; however they are precision electronic products. Water and moisture, excessive heat,
and extreme shock may damage the device. Do not expose your device to these conditions.
If repair is required, the Motorola Service Organization, staffed with specially trained
technicians, offers repair and maintenance facilities throughout the world.
To protect the operating system, applications, and data on your Accompli 009, ensure that
the PC from which you download files is protected by up-to-date virus protection software.
Remember to archive your data as needed.
You can protect your device purchase with an optional extended warranty covering parts and
labor. For more information about limited warranties, please contact either your Cellular
Service Provider, retailer, or Motorola, Inc., at 1-800-548-9954. For repairs, call Motorola,
Inc., at 1-800-548-9954 in the U.S. or 1-800-323-9685 in Canada. In the U.S., to contact
Motorola, Inc., on your TTY, call 1-800-793-7834.
QUESTIONS?
For questions about the use of your Accompli 009, call 1-800-548-9954 or 1-800-793-7834
(TTY) in the U.S. For questions pertaining to your mobile service, contact your Cellular
Service Provider. For information about other Motorola products, please visit our website at
www.motorola.com
12 Accompli 009 User’s Guide
Page 13

CONTENTS
General Safety Instructions 7
RF Operational Characteristics 7
Electromagnetic Interference/Compatibility 8
Operational Warnings 9
Operational Cautions 10
Agency Approvals 12
Cleaning Your Accompli 009 12
Care and Maintenance 12
Questions? 12
Welcome 19
Messaging Service Instructions 19
Using this Manual 20
Getting Assistance 20
Using Accompli 009 21
The Flip™ Keypad Cover 21
The LED indicator 21
The Keyboard 22
The Home Screen 24
The Battery and Charger 26
The SIM Card 28
The Desktop Holder 28
The Holster 29
Other Accessories 30
Turning your Accompli 009 On and Off 30
The Accompli 009 as a Phone 31
Configuring Your Accompli 009 32
Setting Preferences 34
Beaming Items 34
Receiving Incoming Items 35
Contents 13
Page 14

Contents
Accompli 009 Features 37
Using Categories 37
Using Cut, Copy, and Paste 39
Inserting Text 40
Sending Information 41
Marking Private Entries 42
GO TO FEATURE 42
Using Trashcan 42
Using Find 44
Using Express 46
Using the RF Modem 47
Using the WAP micro browser 49
Using Help 51
SMS 53
Receiving New Text Messages 53
Creating and Sending New SMS Messages 54
Receiving Messages 55
About Folders 58
Working with Folders 60
About SMS Message Rules 61
About Cell Broadcast Rules 63
Setting Message Preferences 64
Using Common Accompli 009 Features with SMS 65
Phone 67
Setting Phone Preferences 67
Network Selection 69
Call Forwarding 71
Call Barring 72
Fixed Dialing 73
Call Metering 74
Show Cellular Service Provider Services 76
About Your SIM Card 76
Setting SIM Entries 77
Making and Receiving Phone Calls 79
Call Waiting and Call Holding 82
Conference Calling 83
14 Accompli 009 User’s Guide
Page 15

Viewing Call History 84
Calling Voicemail 85
Contacts 87
Entering Contacts 87
Looking up Contact Entries 89
Setting Contact Preferences 91
Creating a Mailing List 92
Using Common Accompli 009 Features with Contacts 92
Calendar 95
Viewing Events 95
Adding an Event 96
Receiving Event Reminders 98
Editing an Event 98
Deleting Events 98
Setting Calendar Preferences 99
Using Common Accompli 009 Features with Calendar 100
. . . . .
Tasks 101
Creating a Task 101
Editing a Task 102
Prioritizing Tasks 102
Viewing a Task 102
Marking a Task as Completed 103
Deleting Tasks 104
Sorting Tasks 105
Using Common Accompli 009 Features with Tasks 105
Memos 107
Viewing a Memo 107
Composing and Editing Memos 107
Deleting Memos 108
Using Common Accompli 009 Features with Memos 109
Contents 15
Page 16

Contents
Ringtones 111
About Ringtone Alerts 111
Playing Ringtone Alerts 111
Turning Ringtone Alerts On and Off 112
Composing or Editing Ringtone Alerts 113
Deleting Ringtone Alerts 113
Using Alert Script Language 114
Sample Alert Script Language Alerts 120
Alert Script Language Quick Reference 121
Alarm Clock 123
Setting Alarms 123
Turning Alarms On and Off 124
Setting Alarm Clock Options 124
About Alarm Sounding Mode 125
Calculator 127
The Calculator Screen 127
Calculator Buttons 127
Keyboard Shortcuts 128
Using Calculator 128
About Formulas 129
Setting Calculator Options 130
Control Panel 131
About Control Panel 132
About Accompli 133
Alert settings 133
AutoType 133
Battery Status 134
Beaming Settings 134
Clean-Up 135
Date and Time 135
Deleting Add-On Applications 135
Device Security 136
Font Sizes 136
Home Screen Manager 137
16 Accompli 009 User’s Guide
Page 17

Key Clicks 138
Memory Manager 138
Owner Information 139
Phone Setup 140
Printer Setup 141
Privacy Options 141
Quick Text 142
Quiet Time 143
Service Provider 143
Signature 144
TrueSync and Partner Settings 144
Transmit Status 145
email 147
setting service provider information 147
Setting Up Email 147
Managing Accounts 149
Working with email 149
Reading Email 150
Writing Email 152
Email Folders 154
. . . . .
Entertainment 157
Nitroman 157
Phinny 158
SameGame 161
Ship2Ship 163
Mines 2001 165
Draw 21 168
THIS MODEL PHONE MEETS THE GOVERNMENT'S REQUIREMENTS FOR EXPOSURE TO
RADIO WAVES. 171
Limited Warranty For GSM Handsets 179
How to get Warranty Service 180
Conditions 180
What is not covered by the warranty 181
Patent Information 182
Contents 17
Page 18

Contents
18 Accompli 009 User’s Guide
Page 19

CHAPTER 1
WELCOME
Congratulations! Your new Motorola Accompli™ 009 personal communicator is about to
change the way you communicate. The Accompli model 009 can offer you quick access to
essential information. You can benefit from the extended reach of the Internet and email,
make and receive telephone calls, interface with your desktop computer applications and
enjoy the convenience and portability of SMS messaging. This feature-rich device can
provide real wireless business and PIM solutions — all in a single, well-designed device that
fits right in the palm of your hand.
Note Internet and email connectivity are network and subscription dependent features and
may not be available in all areas.
The Accompli 009 includes user-upgradeable system software and applications that place
you in control of your personal communications. Using the high-resolution graphics display,
you can now send messages, control incoming messages, and customize the device with
applications that you select. You can also beam information to other devices or printers that
support infrared (IR) beaming.
Offering power in an ultra-portable package, the Accompli 009 features 9 MB of total memory.
Driven by Motorola’s Wisdom™
book processing, sequential name searching, and message transfer and data synchronization
with a compatible desktop or notebook computer.
Note The Accompli 009 is designed to synchronize with basic features of the initial release of
many popular Personal Information Management (PIM) software and hardware products.
Operating System, the device is capable of rapid address
MESSAGING SERVICE INSTRUCTIONS
To begin messaging service, contact your wireless messaging service provider for activation
instructions.
Welcome 19
Page 20

Chapter 1
Using this Manual
USING THIS MANUAL
This manual uses several conventions to differentiate between keyboard keys on your
Accompli 009 and buttons you select from an Accompli 009 application screen.
Specific conventions are also used to highlight additional helpful information in the form of
tips, notes, and cautions. Before you begin using this manual, make certain you are familiar
with these conventions:
Keys you
press
Buttons you
select
TIP
Note
Caution
When you are instructed to press a single key on the Accompli 009 keyboard, the key name appears in small caps. For example:
Press N
AVDISK down to see more information.
When you are instructed to select a button, press the
the button and then press the
Identifies actions you can perform to increase your ease of use and efficiency.
Provides further information about the procedural step or feature.
Identifies actions that can cause loss of data or damage to the product.
GETTING ASSISTANCE
The Accompli Personal Communicator model 009 comes with a variety of support tools. To
become familiar with the product, we recommend that you go through the Quick Start Guide,
this User’s Guide, and the interactive demo included on the CD before attempting installation
or operation.
In the event that you need further assistance, Motorola offers a variety of technical support
options. Most problems can be resolved using FAQs listed at
http://motorola.com/consumer/support
http://techsupp.starfish.com/motorola.
Motorola provides free customer support for non-technical matters, which include questions
regarding product availability, features, specifications, and parts replacement. Technical
support for software is available on a complimentary basis for 90 days from the date of your
first technical support call. After 90 days, there will be a charge for such assistance.
TAB key to highlight
ENTER key to select it.
. TrueSync-specific FAQs can be obtained at
20 Accompli 009 User’s Guide
Page 21

CHAPTER 2
USING ACCOMPLI 009
The lightweight, wearable design of the Accompli 009 allows you to open the Flip™ keypad
cover and read your messages or make a phone call while the device is still in the belt holster.
Audible and vibrating alerts notify you of incoming and waiting messages. The keyboard
provides text entry capabilities that allow you to send full text messages. All this is combined
with the ability to add applications, upgrade current applications, and, with the infrared
interface in the Motorola Desktop Holder, synchronize your PIM information with your desktop
computer.
Note The Accompli Personal Communicator model 009 displays a blank screen to conserve
energy during periods of inactivity. Press any key to awaken the device.
THE FLIP™ KEYPAD COVER
The front keypad cover on the Accompli 009 houses and protects its TFT screen. Opening the
cover awakens the display screen, while closing the cover puts the screen into sleep mode.
When in sleep mode, your Accompli 009 continues to work for you. It receives and stores
incoming messages for access at your convenience. You can set loud or soft audible or
vibrating alerts to notify you when messages are received. If you do not want to be alerted
when new messages arrive, you can set the alert mode to silent.
THE LED INDICATOR
The LED indicator on the front of the device provides you with the following information:
Incoming call Alternating Red and Green Flashing LED
In Service Flashing Green LED
No Service Flashing Red LED
Roaming Flashing Yellow LED
Using Accompli 009 21
Page 22
Chapter 2
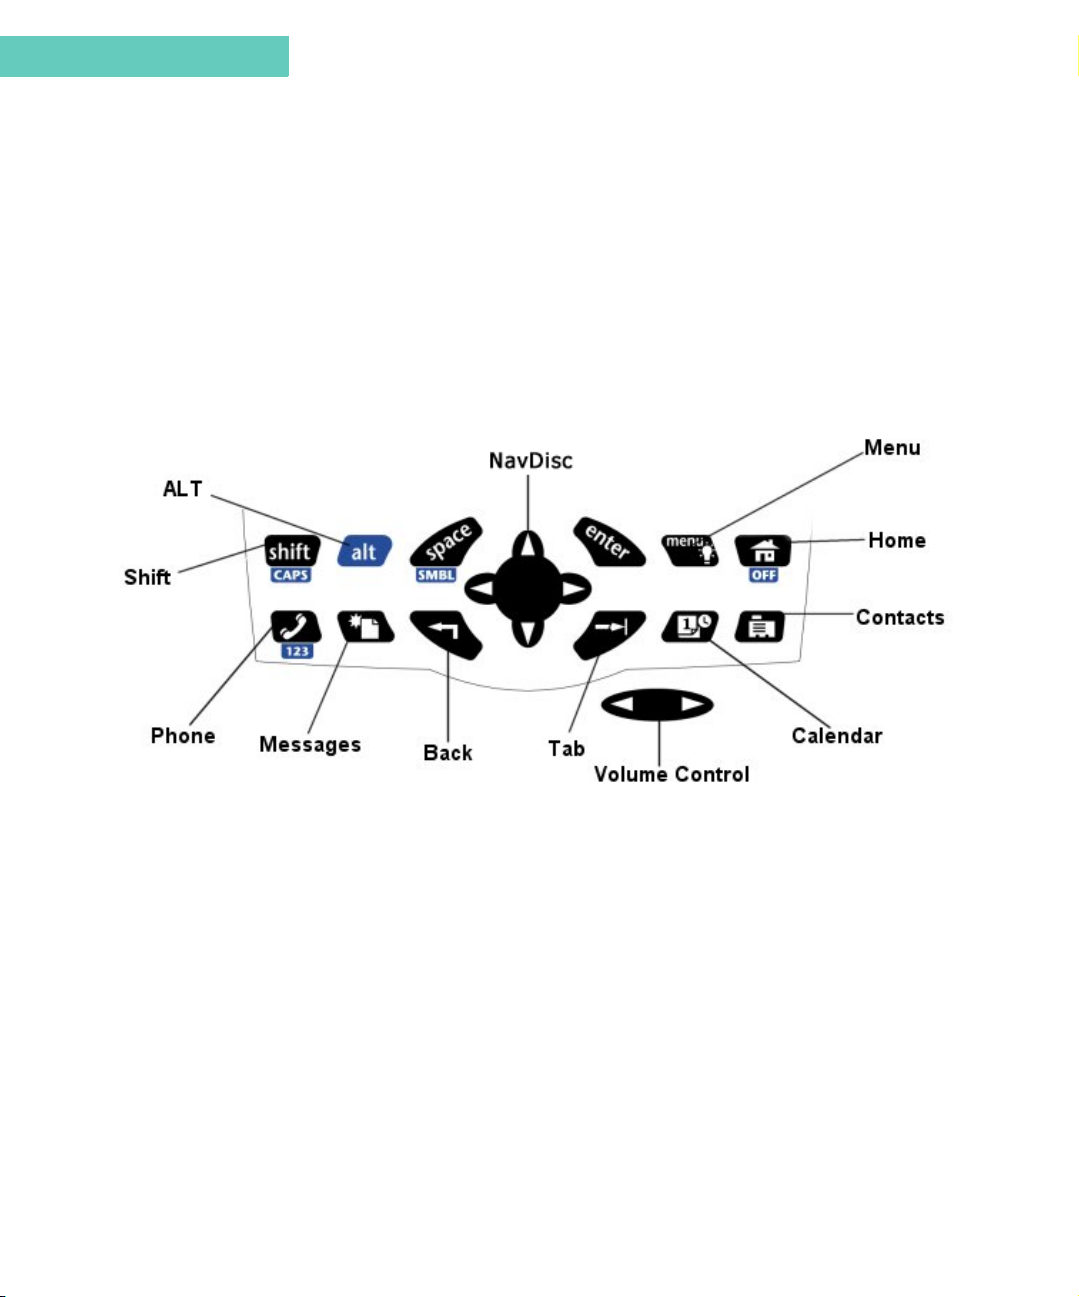
THE KEYBOARD
The Accompli 009 comes with a keyboard with easy-to-use navigation keys and special
function keys. In addition, the Phone application includes a Numlock mode that enables the
dark blue keys on the left side of the keyboard to operate as a numeric keypad.
Navigation Keys
To navigate through the Accompli 009 applications, become familiar with the following keys
and their functions.
The Keyboard
Special control keys and key combinations provide access to additional functions.
SHIFT Capitalizes the next letter typed or types a character color-coded
ALT Activates “alt-mode” to insert the character (or take the action)
ENTER Inserts a paragraph return in text or acts as a SELECT key on non-
SPACE Inserts a space in text.
22 Accompli 009 User’s Guide
white above the top row of numbered keys.
Press
ALT, SHIFT to activate Caps Lock.
color-coded blue below certain keys.
text fields.
Press
ALT, space to see a list of additional character symbols.
Page 23

The Keyboard
MENU In the Browser application, displays a Browser menu. In all other
applications, moves the cursor to the toolbar.
Hold down the
MENU key for a few seconds to turn on screen illumi-
nation.
HOME Returns to the Home screen.
Press
ALT, then press HOME to turn off your device.
Press and hold the
HOME key to beam your vCard information to a
compatible device.
BACK Cancels input for the current screen and goes back to the previous
screen.
N
AVDISK Moves the cursor within a field, in the direction of the arrow you
press. In a text field, moves the cursor between characters. On the
toolbar, moves between toolbar buttons.
TAB Moves the cursor between fields.
Press
ALT, TAB to tab backward.
. . . . .
PHONE Launches the Phone application.
Press
ALT, Phone to activate Number Lock mode. When in Number
Lock mode, the dark blue keys on the left side of the keypad act as
a 12-digit numeric keyboard.
Press the Phone hot key to toggle between Dial and One Touch Dial
operation.
MESSAGES Launches the SMS application and displays the Send SMS Mes-
sage To screen.
CALENDAR Launches the Calendar application.
CONTACTS Launches the Contacts application.
Press and hold the Contacts hot key to beam your vCard information to a compatible device.
VOLUME CONTROL Increases and decreases the volume level. When the volume con-
trol is pressed, a pop-up displays showing the current volume level
and a beep sounds through the headset to indicate the current volume level.
Using Accompli 009 23
Page 24
Chapter 2
The Home Screen
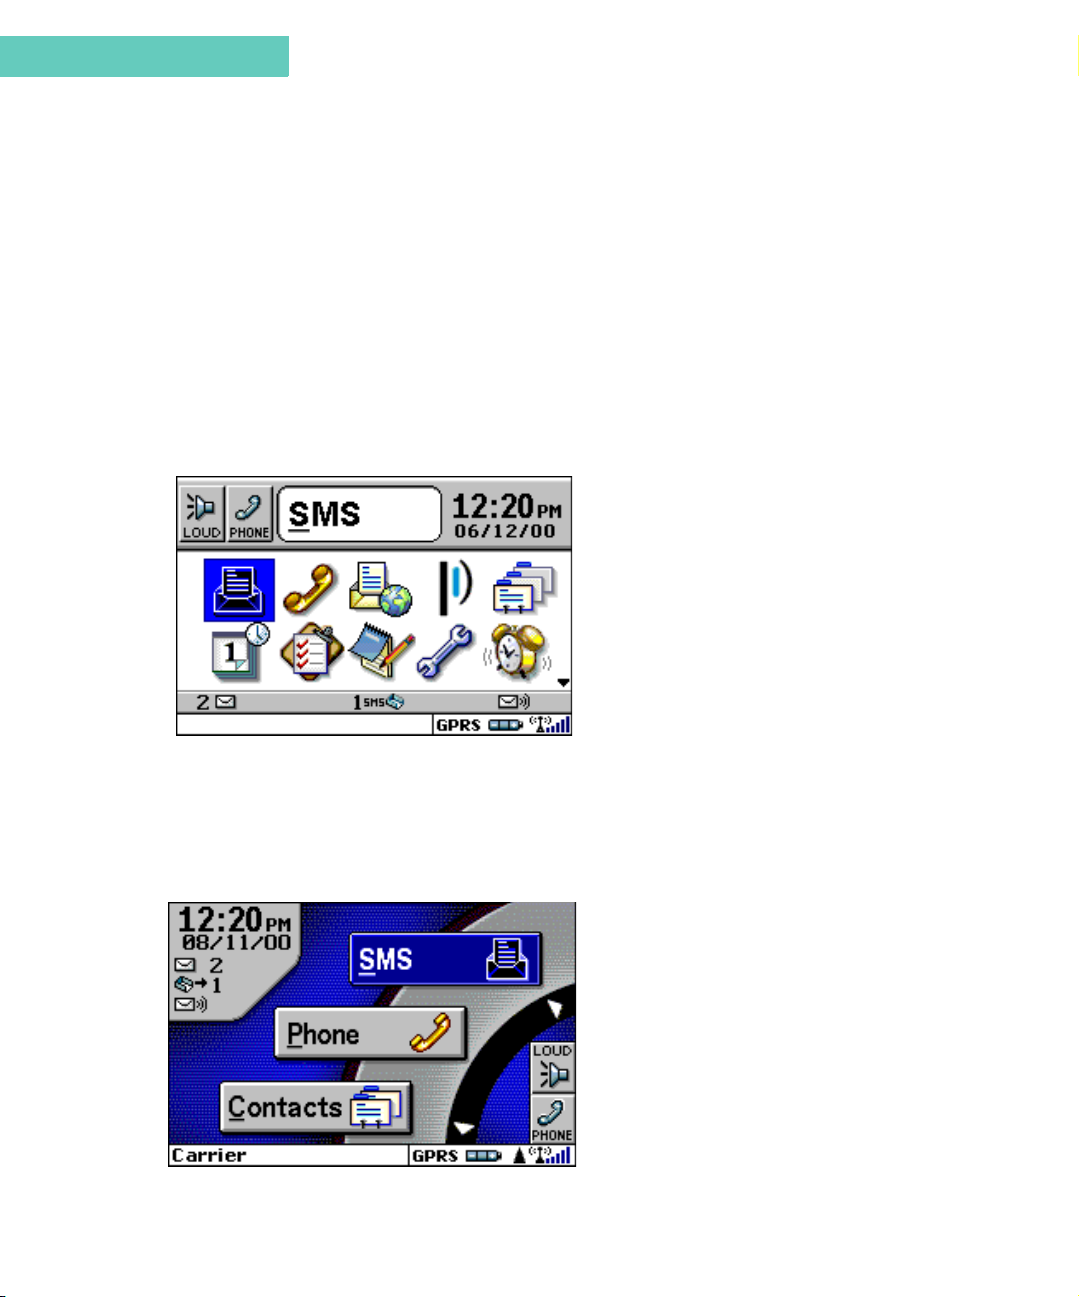
THE HOME SCREEN
The Home screen provides quick access to both pre-loaded applications and those you add
yourself. The Accompli 009 enables you to choose between two Home screen formats: the
Menu Wheel or Desktop. (See “Home Screen Manager” on page 137 for instructions on
setting preferences for Home screen formats.)
The Desktop
To launch applications from the Desktop, press the NAVDISK in any direction to move
between applications. Press the
ENTER key to launch the highlighted application.
The Menu Wheel
To launch applications from the Menu Wheel, press the NAVDISK down to spin the wheel and
display the next three applications. Continue pressing N
applications in succession. Press
24 Accompli 009 User’s Guide
AVDISK down to display all
ENTER to launch the highlighted application.
Page 25
The Home Screen
Note Type the first letter of the application’s name. The Home screen displays the first appli-
cation beginning with the letter you typed. If more than one application starts with the
same letter, the shortcut takes you to the first occurrence of the letter. Press the letter
again to move to the next occurrence of the letter.
You can also launch certain applications by pressing the numeric hot key that appears
next to the application icon. You can assign numeric hot keys for up to nine applications. See “Home Screen Manager” on page 137 for instructions on assigning numeric
hot keys.
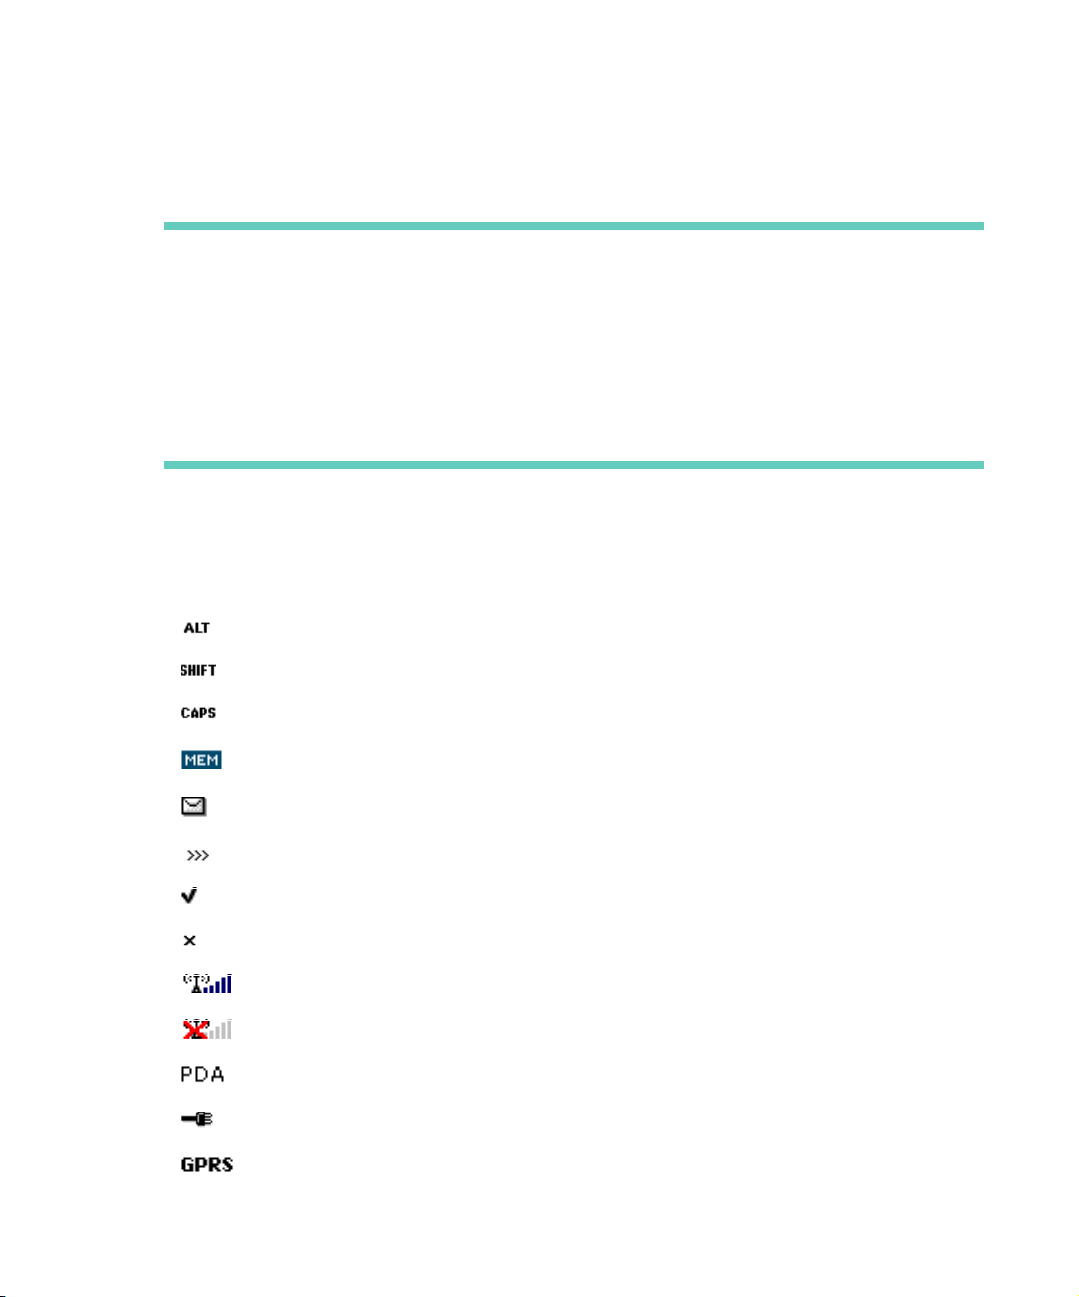
The Status Line
The Home screen contains a status line that includes graphic indicators for the following
conditions.
. . . . .
Alt mode is on
Shift mode is on
Caps lock is on
Low memory
New message is waiting
Message is waiting to be sent
Message has been sent
Message could not be sent
Signal strength indicator
No signal
PDA Mode - Transceiver off
Device is charging
GPRS is currently available
Using Accompli 009 25
Page 26
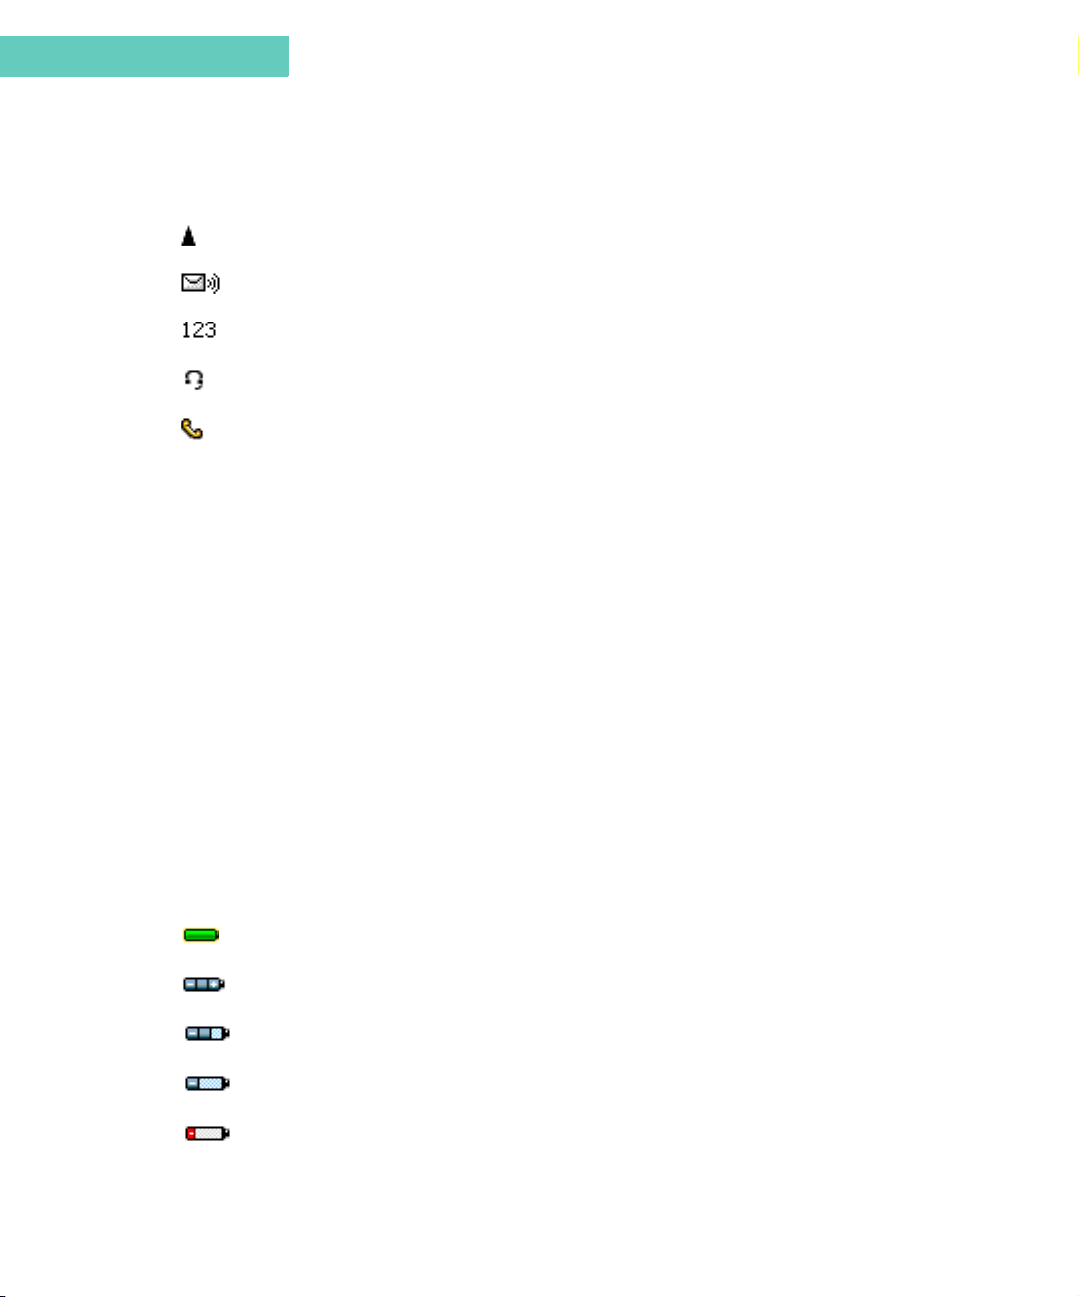
Chapter 2
Currently roaming. If in the home zone, nothing displays
Unread voice message(s) waiting
Keypad’s in "Numlock" mode
Earpiece is plugged in
Voice call is in progress
The Battery and Charger
THE BATTERY AND CHARGER
Motorola batteries and chargers are made from some of the highest-quality materials
available. The battery and charger included with the Accompli 009 come with a one-year
limited warranty and should provide good performance well beyond the initial warranty
period. However, rechargeable batteries do not last forever. At some point, batteries wear out
and must be replaced. The rechargeable batteries that power this product must be disposed
of properly and may need to be recycled. Contact your local recycling center for proper
disposal methods. Never dispose of batteries in a fire because they may explode.
Batteries, as well as other Motorola Accompli 009 accessories, can be purchased through
your dealer, or by calling Motorola direct at 1-800-548-9954. For complete details on the
limited warranty, see “Limited Warranty For GSM Handsets” on page 179.
Determining the Battery Power
A status indicator at the bottom of the Home screen displays a four-level graphic indicator of
the remaining power in the rechargeable battery.
Fully charged (displays while plugged into charger.)
Full
2/3
1/3
Low
26 Accompli 009 User’s Guide
Page 27
The Battery and Charger
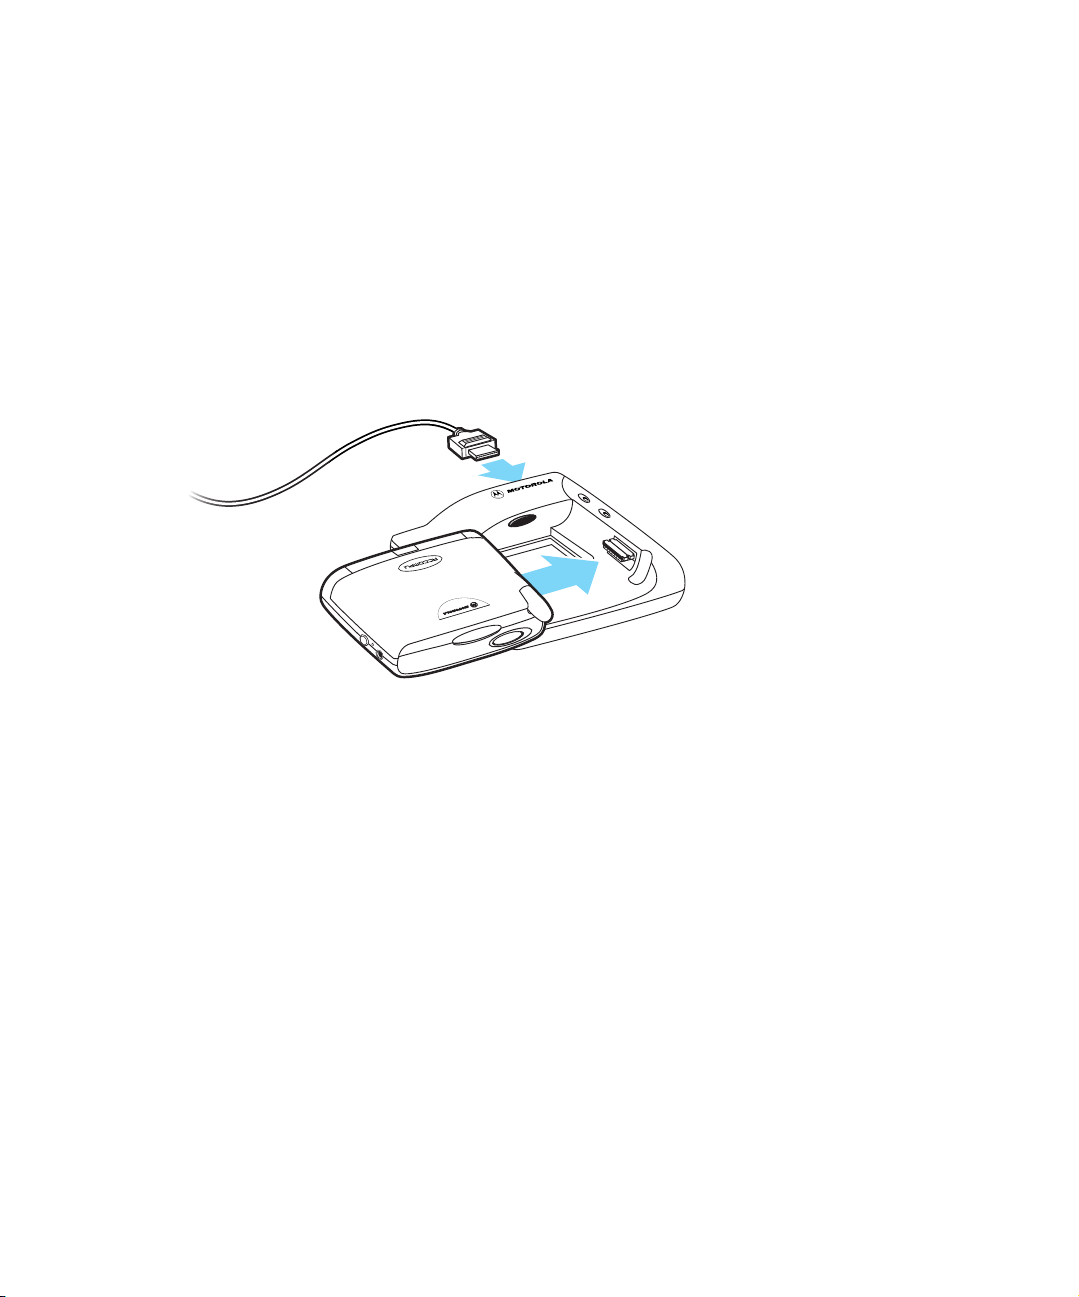
1. I
l
Recharging the Battery
Recharging can be accomplished by placing your Accompli 009 in the desktop holder. For
optimum performance, use the recommended Motorola equipment.
. . . . .
nsert the rapid charger
connector into the back of the
desktop holder.
2. P
ug the rapid charger into an
electrical outlet.
3. Slide your device, face up, into
the desktop holder. A red light
appears indicating that the
battery is charging.
(If the red light flashes for more
than 20 seconds, your battery
may be defective.)
4. A green LED indicator on the
desktop holder indicates that the
battery is charged.
Before leaving on a trip, make sure the battery and any extra batteries are fully charged.
Recharging the battery to full charge usually takes about two hours or less per battery. All
rechargeable batteries experience self-discharge, meaning that a small amount of energy
discharges every day as a battery sits on the shelf.
Replacing the Battery
If your battery’s performance has degraded (e.g., the battery’s charge lasts only half as long
as when it was new), consider replacing your battery with a new Motorola battery.
Using Accompli 009 27
Page 28

Chapter 2
1. T
The SIM Card
urn the device over and press the battery door tab in,
lift the door up, and remove the battery.
THE SIM CARD
Your device uses a SIM card, which contains your phone number, service details and
memory for storing phone numbers and messages. You will not be able to make or receive
calls if you do not have a SIM card, which uses GSM technology, inserted in your phone.
2. Align the battery so that the gold contacts
on the battery match the gold contacts in
the battery compartment.
3. Insert the battery at an angle toward the
edge of the device. Press the battery into
place.
4. Slide the battery door back into place.
1. With the battery removed from the device, slide the
small SIM gate in the direction of the arrow and lift
it up.
2. Place the SIM card face down, making sure the
gold connectors on the card meet the connectors
on the device.
3. Close the SIM gate and replace the battery in the
device.
For additional information, see “About Your SIM Card” on page 76.
THE DESKTOP HOLDER
The Accompli 009 includes a desktop holder with an infrared (IR) port. The desktop holder is
used to transfer data to and from your computer or when synchronizing your Accompli 009
PIM applications with your desktop PIM applications.
28 Accompli 009 User’s Guide
Page 29
The Holster
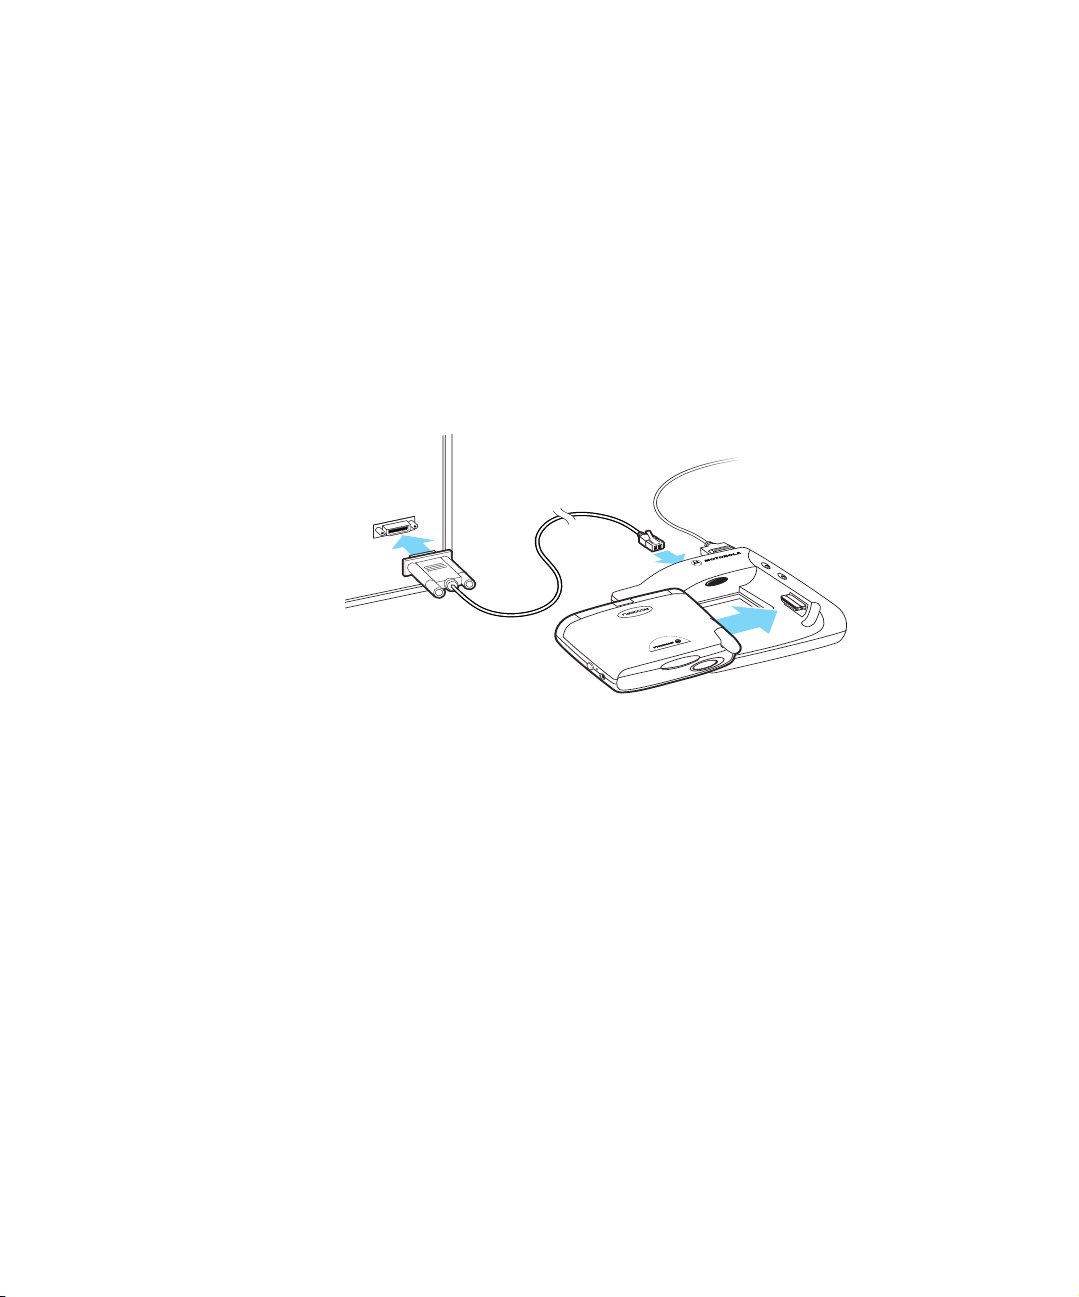
Connecting the Desktop Holder to Your Computer
The IR port in the desktop holder aligns with the IR port on your Accompli 009, enabling data
transmission. The desktop holder is connected to your computer with the Motorola-provided
RS232 null modem cable.
. . . . .
1. Connect one end
of the data cable
to your
computer’s
9-pin serial port.
2. Connect the
other end of the
cable to the 9-pin
connector in the
back of the desktop
holder.
THE HOLSTER
3. Slide your Accompli
009 into the
desktop holder.
Start the Desktop
applications to
begin IR
communication
with your device.
The durable clip-on holster allows you to comfortably wear your Accompli 009 on your belt or
pocket. The holster has been designed for your convenience and is not meant to secure your
device under all circumstances. Additional accessories are also available. For more
information, call 1-800-548-9954.
Using Accompli 009 29
Page 30

Chapter 2
Other Accessories
OTHER ACCESSORIES
The following accessories have been designed to work with your Motorola Accompli model
009. Additional accessories may be available and are packaged separately. Please refer to
your local service provider or retail outlet for more information.
Speaker Phone (SYN8788A)
Allows you to use your device as a convenient handsfree phone.
Leather Carrying Case (SYN9131A)
Protects the device’s surface and can be worn on your belt.
Data Cable (SKN6330A)
RS-232 Data Cable for wireless connection between device and PC. Visit
www.motorola.com/accompli009 for more information.
TURNING YOUR ACCOMPLI 009 ON AND OFF
The rechargeable battery in your Accompli 009 allows you to leave the device turned on 24
hours a day. Actual battery life will vary, depending upon usage. It is recommended that you
recharge your battery every 2 - 3 days. Turning your device off at night will lengthen the time
of your battery's charge.
Note Incoming messages are stored by the messaging service until your device is turned on
and ready to receive messages. Turn your device off at night when you do not want to
receive messages, and place the device in the plugged-in desktop holder so that it is
fully charged and ready for use the next morning.
To turn on your device:
• Briefly press and hold any key.
To turn off your device:
•Press
ALT, then press HOME.
30 Accompli 009 User’s Guide
Page 31

THE ACCOMPLI 009 AS A PHONE
It’s easy to use your device as a phone when you use the provided earpiece for hands-free
communication. The earpiece is equipped with a send/end button that allows you to answer a
call or disconnect one by briefly pressing and holding a button when the earpiece is
connected.
Connecting the Earpiece to the Device
1. Open the Flip Keypad Cover.
2. Plug the earpiece into the left side of the device,
in the first port.
3. Adjust the volume using the Volume Control
button on the front of the device.
The Accompli 009 as a Phone
. . . . .
The Smart Button
The Smart button is located on the right-hand side of your device, directly in front of the
charger port. Like the send/end button on the earpiece, the Smart button can be used to
answer an incoming call and to end a connected call. This enables you to keep the device in
its holster while you receive and complete calls.
To answer an incoming call, press the Smart button and hold it for a moment until the call is
connected. To disconnect a call, press the Smart button again.
Using Accompli 009 31
Page 32

Chapter 2
Configuring Your Accompli 009
CONFIGURING YOUR ACCOMPLI 009
The first time you start the device, the Welcome Tour appears. The tour helps you to become
familiar with the basics of using your Accompli 009. You can also review the Welcome tour by
selecting the Welcome application from the Home screen.
At the end of the tour, you are asked to perform the following setup tasks:
• Enter the correct time and date.
• Enter your signature so that it can be automatically appended to all messages you send.
• Enter your owner information so you can send it or beam it to other devices.
In addition, make certain the following are set correctly:
• Alert volume
• Transmit status
• Phone preferences
• Service Provider information
Setting Time and Date
Although your Accompli 009 comes pre-configured, you might need to set the correct time
and date when you first receive your device. You can also set the display format for the time
and date.
See Chapter 13, “Control Panel,” for step-by-step instructions on setting the time and date.
Creating Your Signature
This function allows you to create a signature that is automatically appended to each SMS
message you send.
See Chapter 13, “Control Panel,” for step-by-step instructions on creating your signature.
Entering Your Owner Information
Your owner information is like an electronic business card. After you enter your owner
information, you can send that information to another compatible device that supports vCard
format or beam to another Accompli 009 Personal Communicator.
See Chapter 13, “Control Panel,” for step-by-step instructions on entering your owner
information.
Setting Alerts
You can select a default alert for each application that plays alerts. You can select or change
alert settings at the Control Panel. See “Alert settings” on page 133.
32 Accompli 009 User’s Guide
Page 33

Configuring Your Accompli 009
Setting the Alert Volume Level
The Home screen displays the current volume level for alerts. You can set the alert volume
level directly from the Home screen. Press
ENTER to choose from the following volume levels:
Loud - Sets all audible alerts to the loud volume.
Soft - Sets all audible alerts to the soft volume.
Vibrate - Sets all alerts to vibrate without changing the individual alert setting.
Silent - Silences all alerts without changing the settings.
TAB to move to the volume level indicator. Press
Setting Transmit Status
Before attempting to place a phone call or send and receive messages, ensure that your
device is set to the proper transmission mode.
The Home screen displays the current transmit status. You can set the transmit status
directly from the Home screen. Press
ENTER to choose from the following:
TAB to move to the transmit status indicator and press
. . . . .
Phone - Voice and data calls can be made.
PDA - Voice and data calls cannot be made.
Setting Phone Preferences
You can set phone preferences that willl determine how your phone makes and receives
calls.
See “Setting Phone Preferences” on page 67 for instructions on setting up your phone.
Entering Service Provider Information
Before you can use the Email application, you must make certain that your CSD or GPRS
service provider information is set up correctly.
See “Service Provider” on page 143 for steps on entering Service Provider information.
Using Accompli 009 33
Page 34

Chapter 2
Setting Preferences
SETTING PREFERENCES
Preferences enable you to customize your device to suit your individual needs. You can set
preferences for the whole device or for a specific application.
To set preferences that affect the whole device:
1
On the Home screen, select Controls.
2
Press the NAVDISK to move to the desired option, and then press the ENTER key.
See Chapter 13, “Control Panel,” for step-by-step instructions on setting device preferences.
To set preferences that affect a specific application:
1
On the Home screen, select the desired application.
2
Select the Settings button from the toolbar.
BEAMING ITEMS
You can beam your owner information (vCard), other contact information, messages, and
other items from your device to other compatible devices with infrared ports, even printers.
When beaming to another device, make certain to aim the IR port on the back of your device
toward the IR port on the other device. The maximum distance between the devices should
be no more than about 2.6 meters (8.5 feet).
To beam your owner information:
Press and hold the
34 Accompli 009 User’s Guide
HOME key or the Contacts hot key.
Page 35

To beam contact information and other items:
1
From within any application, highlight the item you want to beam.
2
Select the Send item button.
3
On the Send item slide-over, highlight either Beam to device, or Beam to printer, and
then select the OK button.
RECEIVING INCOMING ITEMS
When you receive a message or other incoming item sent over-the-air or beamed to your
Accompli 009, a pop-up alerting you to the message appears.
To scroll through the entire message:
Press the N
To perform an action on the message or item:
1
Press TAB to move to the spin list.
2
Press the NAVDISK left or right to display the desired option.
3
Press ENTER to perform the action.
When you are finished acting on the incoming message or item, the screen that you were
viewing prior to receiving the new item redisplays. See Chapter 4, “SMS,” for additional
information about working with incoming messages.
AVDISK up or down.
Receiving Incoming Items
. . . . .
Using Accompli 009 35
Page 36

Chapter 2
Receiving Incoming Items
36 Accompli 009 User’s Guide
Page 37

CHAPTER 3
ACCOMPLI 009 FEATURES
The Accompli 009 includes a number of common features that make the Personal Information
Management (PIM) applications easier to use. Once you learn to use a feature in one
application, you can be confident of how the feature will work in many of the other PIM
applications. For example, many of the PIM applications included with your Accompli 009
contain the following common features and functions:
• Categories
• Cut, Copy, and Paste
• Insert Text
• Send
• Private Entries
• "Go To" Feature
This chapter explains how to use these features with any of the Accompli 009 applications in
which they are supported.
In addition, this chapter includes information about the following applications available from
the Home screen:
• Trashcan
•Find
• Express
• RF Modem
• WAP micro browser
•Help
USING CATEGORIES
Several of the Accompli applications use categories to help you manage entries and track
information. For example, you may assign contact entries, mailing lists, memos, and tasks to
a category. By organizing your entries in this way, you can quickly view and work with just
those entries that pertain to a particular category within an application.
Although your Accompli applications include several common categories, such as General,
Business, and Personal, you can create custom categories to fit your individual needs.
Accompli 009 Features 37
Page 38

Chapter 3
Using Categories
You can also rename or delete most categories. You cannot, however, rename or delete the
General category.
To add a category:
1
From the main Contacts, Tasks, or Memos screen, select the Categories button from the
toolbar.
2
From the application Categories screen, select New Category.
3
Type the name of the new category that you want to create.
4
Select the OK button from the toolbar.
To rename a category:
1
From the main application screen, select the Categories button.
2
From the application Categories screen, highlight the category name that you want to
change
Note You cannot rename the General category in any application, or the Calls category in
the Tasks application.
3
Select the Rename category button from the toolbar.
4
Change the category name.
5
Select the OK button from the toolbar.
To delete a category:
1
From the main application screen, select the Categories button from the toolbar.
2
From the application Categories screen, highlight the category name that you want to
delete.
Note You cannot delete the General category in any application, or the Calls category in the
Tasks application.
3
Select the Delete category button from the toolbar.
4
If there are entries in the category you are deleting, determine what to do with those
entries. You can choose one of the following actions:
• Put in trash
• File in another category
• Cancel the Delete category action
38 Accompli 009 User’s Guide
Page 39

USING CUT, COPY, AND PASTE
You can cut, copy, and paste information from Accompli messaging and PIM applications
using the following hot keys.
Using Cut, Copy, and Paste
. . . . .
Cut
Copy
Paste
ALT, X
ALT, C
ALT, V
To cut text from a field you can type in:
1
Position the cursor at the starting point of the text to be copied.
2
Press and then release the SHIFT key.
3
Use the NAVDISK to highlight the text.
4
Press the ALT key, then type X to cut the highlighted text. The text is deleted from the
current text box and copied to the clipboard.
To copy text from a field you can type in:
1
Position the cursor at the starting point of the text to be copied.
2
Press and then release the SHIFT key.
3
Use the NAVDISK to highlight the text.
4
Press the ALT key, then type C to copy the highlighted text. The text is copied to the
clipboard.
To copy text from a field you cannot type in:
1
Press the ALT key, then type Z to start highlight mode.
2
Position the cursor at the starting point for the text that you want to copy.
3
Press and then release the SHIFT key.
4
Use the NAVDISK to highlight the text.
5
Press the ALT key, then type C to copy the highlighted text. The text is copied to the
clipboard.
To paste text into a field you can type in:
1
Position the cursor where you want to insert the copied text.
2
Press the ALT key, then type V to paste the highlighted text.
Accompli 009 Features 39
Page 40

Chapter 3
Inserting Text
INSERTING TEXT
To save you time when composing and editing messages, contact entries, calendar events,
tasks, or memos, you can insert any of the following:
• Text from another Accompli application
• Current date and time
• Your signature
• Quick Text entries
To insert the current date/time, your signature, or Quick Text in SMS, Contacts, Calendar, Tasks, or Memos:
1
Position the cursor at the point where you want to insert the text.
2
Select the Insert text button from the toolbar.
3
Using the NAVDISK, highlight one of the following:
• The current date/time
• My signature
• A Quick Text entry
4
Select the OK button from the toolbar.
To insert text from an application:
1
Position the cursor at the point where you want to insert the text.
2
Select the Insert text button from the toolbar.
3
Select …from application.
4
Highlight the application containing the text that you want to insert.
5
Select the OK button from the toolbar.
6
Narrow your search criteria by doing one of the following:
• If you selected Tasks, Memos, or Contacts, choose the category for the item
containing the text that you want to insert.
• If you selected Calendar, choose the date of the calendar event containing the text
that you want to insert.
• If you selected SMS, choose the folder containing the message text you want to
insert.
7
Using the NAVDISK, scroll through the list of items in the selected category, date, or
folder and highlight the item containing the text that you want to insert.
8
Select the OK button from the toolbar.
40 Accompli 009 User’s Guide
Page 41

SENDING INFORMATION
The Personal Information Management (PIM) applications enable you to send contact
entries, calendar events, tasks, and memos from your Accompli 009 to someone else using
the Send function.
When you send information, you can choose to:
• Send as an SMS message.
• Beam the information to other compatible devices that support infrared (IR) beaming.
Note You cannot beam an entire category of information from your device to another com-
patible device.
To send information as a formatted item:
1
From the Contacts, Calendar, Tasks, or Memos application, select the item to send.
2
Select the Send button from the toolbar.
3
Select use SMS.
4
Select the recipients from the Contact list.
5
Type the message text that you want to accompany the item.
6
Using the NAVDISK, highlight the recipient name and the sendable address to which you
want to send the message.
7
Select the Send button from the toolbar.
To beam PIM information to a compatible device or printer:
1
From the Contacts, Calendar, Tasks, or Memos application, select the item that you want
to beam.
2
Select the Send button from the toolbar.
3
Aim the IR port on the back of your device at the IR port on the other device or printer.
4
Select either Beam to device or Beam to printer.
To beam a category to a compatible printer:
1
From the Contacts, Calendar, or Tasks application, select the category (or day in Calendar) that you want to print.
2
Highlight any item in the category.
3
Select the Send button from the toolbar.
4
Aim the IR port on the back of your device at the IR port on the printer.
5
Select Beam category to printer. See “Printer Setup” on page 141 for more information.
Sending Information
. . . . .
Accompli 009 Features 41
Page 42

Chapter 3
Marking Private Entries
MARKING PRIVATE ENTRIES
Many of the Accompli applications enable you to mark entries as private. If you mark an entry
as private, you can control when the entry is visible with a setting in Privacy Options in
Control Panel.
To mark items as private:
When creating a new entry or editing an existing entry in your Accompli applications, select
the Private check box.
To show or hide private entries:
1
Select Controls from the Home screen.
2
Select the Privacy Options icon.
3
Do one of the following:
• To make all private items visible, choose Show.
• To hide all items marked private, choose Hide.
4
Select the Save settings button from the toolbar.
Note When you move private entries on your device to a desktop PIM application (Contacts,
Tasks, Memos, and Calendar) during synchronization, the item is not marked as private on the desktop.
If you move the item from the desktop PIM application back to your device, make certain to edit the item and select the Private check box to restore the private setting.
GO TO FEATURE
The Go To feature is a keyboard shortcut that provides a quick and easy way to select items
from a list.
When the screen displays a list of items, you can select an item in that list by pressing the
key that corresponds to the first letter of the item in the list that you want to select.
For example, if you are looking at a list of memos that you typed. The list contains the
following items:car, boat jet, motorcycle, train. To select the item jet press J on the keyboard.
USING TRASHCAN
When you delete items on your Accompli 009, many of them are moved to the Trashcan
before being permanently deleted. You can view the items in the Trashcan, permanently
discard them, specify Trashcan settings that determine how often items in the Trashcan
42 Accompli 009 User’s Guide
Page 43

Using Trashcan
should be deleted, or recover items from the Trashcan and restore them to the originating
application.
The following application items are moved to the Trashcan when deleted.
• SMS (Msg)
• Contacts (Ctct)
• Calendar events (Cal)
• Tasks (Task)
• Memos (Memo)
• Email (Eml)
• Ringtone Alerts (Alrt)
• Calculator formulas (Form)
• Quick Text (Qtxt)
Items can be restored from the Trashcan until the Trashcan is emptied. The Trashcan is
emptied whenever you request, when memory is low, or based on the settings that you
assign.
. . . . .
To view items in Trashcan:
1
Select the Trashcan application from the Home screen.
2
Using the NAVDISK, scroll through the items in the Trashcan and highlight the item you
want to view.
Note The originating application associated with the deleted item displays in parentheses on
the left of the Trashcan list screen.
3
Select the View item button from the toolbar.
To restore items from Trashcan:
1
Select the Trashcan application from the Home screen.
2
Highlight the item that you want to remove from Trashcan and restore.
3
Select the Restore item button from the toolbar. The main Trashcan screen is
redisplayed without the restored item.
Note If you restore messages after their corresponding folder has been deleted, they are
restored to the Inbox. If you restore items that belonged to a category that has been
deleted, they are restored to the General category.
Accompli 009 Features 43
Page 44

Chapter 3
Using Find
To permanently delete all items in Trashcan:
1
Select the Trashcan application from the Home screen.
2
Select the Empty Trashcan button from the toolbar.
3
If you are sure you want to delete all items in Trashcan, select the OK button.
Caution Items deleted from the Trashcan cannot be recovered.
4
The main Trashcan screen is redisplayed without any items.
To specify Trashcan settings:
1
Select the Trashcan application from the Home screen.
2
Select the Settings for Trashcan button from the toolbar.
3
Type the number of days that you want deleted items to remain in the Trashcan before
they are permanently discarded.
4
Select the OK button from the toolbar to save your settings and return to the main
Trashcan screen.
USING FIND
Find enables you to search for words or phrases from within or across any of the Accompli
009 PIM applications and the messaging applications. Find searches through the data
contained in your applications and returns a list of all entries, by application, that contain the
text you specified.
To find a word or phrase:
1
Select the Find application from the Home screen.
2
In the Text to find box, type the text that you want to search for. The search is not case
sensitive.
3
From the Look in field, select the application that you want to search. You can search
any or all of the following Accompli 009 applications:
• Calendar
• Contacts
•Email
•Memos
•SMS
•Tasks
4
If you want Find to search through any deleted items in the Trashcan, select the Also
look in Trashcan option.
44 Accompli 009 User’s Guide
Page 45

Using Find
5
Select the Find now button from the toolbar. Find searches for the text you requested
and displays, by application, the number of items matching the word or phrase you
specified.
6
Review the list of applications containing found items and select the application whose
items you want to view.
7
To view the details for a found item, highlight the item and select the View item button
from the toolbar.
. . . . .
Accompli 009 Features 45
Page 46

Chapter 3
Using Express
TIP To close the Find application and open the application associated with a found item, view
the found item and select the Go to item toolbar button. The associated application will
open with the found item displayed in View mode.
8
When you are finished reviewing the item, press the HOME key to return to the Home
screen.
USING EXPRESS
The Express application enables you to quickly send information to recipients over-the-air or
to beam information directly to other compatible devices and printers that support infrared
(IR) beaming.
The information you can send or beam to other users includes:
• Your owner information (known as a vCard when beamed)
• A calendar event (known as vCalendar when beamed)
• Contact information
• A Ringtone alert.
•A memos
• A message
•A task
To quickly beam or send other information:
1
Select the Express application from the Home screen.
2
Highlight the information type you want to send.
Note If you choose New Message, the Send SMS Message To screen appears. See “Creat-
ing and Sending New SMS Messages” on page 54 for additional information.
3
Select one of the following buttons from the toolbar.
• Send item
•Beam item
•Print item
4
From the Choose an item pop-up for the information type you selected, narrow your
search criteria by doing one of the following:
46 Accompli 009 User’s Guide
Page 47

Using the RF Modem
• If you selected Contact info, Memo, or Task, choose the category for the item that
you want to send.
• If you selected Calendar event, choose the date of the scheduled event that you
want to send.
• If you selected Message, choose the folder containing the message text you want to
send.
5
Using the NAVDISK, scroll through the item list and highlight the item that you want to
send.
6
Select the OK button on the toolbar.
7
Do one of the following:
• If you chose to send the item to recipients, from the Send item to screen, highlight
the contact name of the person to whom you are sending the item and select Send.
• If you chose to beam or print the item, aim the IR port on the back of your
communicator to the IR port on the other device or printer.
. . . . .
USING THE RF MODEM
The RF Modem application enables you to communicate through a wired environment using
your Accompli 009, a data cable, and a PC. To use RF Modem, visit
www.mot.com/accompli009
009 modem as described below.
To install the downloaded Accompli 009 modem:
1
On the Windows taskbar, click Start>Settings>Control Panel.
2
Double-click Modems, then click Add.
3
Select the Don’t detect my modem; I will select it from a list option. Then click Next.
4
Click Have Disk and then click Browse.
5
Locate the directory to which you saved the Accompli009.inf file and click Open.
6
Click OK, then click Next.
7
Select the port(s) to which you want to install the Accompli 009 modem and click Next.
8
Once the modem is successfully installed, click Finish.
Verifying RF Modem Settings
The RF Modem settings on your Accompli 009 and the Accompli 009 modem settings on
your PC must match in order to ensure a proper connection.
and download the Accompli 009 modem. Install the Accompli
Accompli 009 Features 47
Page 48

Chapter 3
Using the RF Modem
To check your Accompli 009 modem settings on your PC:
1
On the Windows taskbar, click Start>Settings>Control Panel.
2
Double-click Modems.
3
On the Modem Properties dialog box, select the Accompli 009 modem, then click
Properties.
4
Make certain the maximum speed is set to 38400.
5
Click the Connection tab to verify the data bits, parity, and stop bits settings.
6
Click the Advanced button to verify the flow control settings.
7
Click OK to save any changes you make.
To change the RF Modem application settings on your device:
1
Select the RF Modem application from the Home screen.
2
On the toolbar, select the Settings button.
3
Select the appropriate settings in the spin boxes. The options and defaults are as
follows:
Connection Type Cable
Bits per Second 38400 is recommended
Data Bits 8 (default) and 7
Parity None (default), Even and Odd
Stop Bits 1 (default) and 2
Flow Control None (default), Hardware, and Software
4
Select the Save button from the toolbar to save any changes you have made.
To access the RF Modem application:
1
Select the RF Modem application from the Home screen.
2
Select Connect from the toolbar.
3
To disconnect, select Disconnect from the toolbar.
To restore RF Modem default settings:
1
Select the RF Modem application from the Home screen.
2
On the toolbar, select the Settings button.
3
Select the Default button from the toolbar.
48 Accompli 009 User’s Guide
Page 49

Using the WAP micro browser
USING THE WAP MICRO BROWSER
The WAP micro browser allows you to use your Accompli 009 to access information, such as
flight information, email, and directions, on the Internet just as you would from your desktop.
Some websites offer information in a format designed especially for access through a
wireless device. Using the WAP micro browser will give you instant access to that
information. You must be in Phone mode to use WAP Browser.
Connecting to the WAP micro browser
You can connect to the WAP micro browser one of the following ways:
• GPRS (general packet radio service) network
• CSD (circuit-switched data) line
The type of network you set up will determine how you will access the WAP micro browser to
connect to the wireless sites. You may need to acquire some information from your Internet
Service Provider to complete these steps.
To set up the WAP micro browser for a GPRS or CSD network:
1
Select the WAP micro browser application from the Home screen.
2
Press the MENU key.
3
Highlight Setup from the menu and press ENTER.
4
Highlight the first available slot, and press TAB to highlight the Edit button. Press ENTER.
5
Highlight one of the three profiles and press ENTER.
6
Press tab twice to highlight the Edit option and press ENTER.
7
Highlight the Profile Name option and press ENTER.
8
Type in a name for this provider. For example, “GPRS profile” or “CSD profile” may help
you distinguish this setup in the future.
. . . . .
TIP If you make a typo during text entry, press BKSP to erase the incorrect character. To
erase all of the characters in the text entry field, press SHIFT, then BKSP.
9
Press ENTER.
10
Highlight the WAP Settings option and press ENTER.
11
If necessary, enter the IP address and port information provided by your Internet Service
Provider in the appropriate fields. Your Service Provider may have already configured
this information for you.
12
In the Idle Time Out box, specify a time period, in seconds, that the WAP micro browser
can remain idle without disconnecting.
Accompli 009 Features 49
Page 50

Chapter 3
13
Press the NAVDISK up.
14
Press TAB to highlight the Back button and press ENTER.
15
Highlight the Data Bearer option and press ENTER.
16
Select either the GPRS or CSD connection.
17
If necessary, enter the appropriate data bearer settings obtained from your Service
Provider in the appropriate fields and press
Using the WAP micro browser
ENTER. Your Service Provider may have
already configured this information for you.
18
To exit from the setup, press HOME.
Note When you are finished adding or updating profile information, reset the browser by
pressing MENU, selecting the Advanced option, and then selecting Reset.
Once the WAP micro browser is configured, press the Menu key to explore the WAP micro
browser options available to you.
Using Web Favorites
The Web Favorites option enables you to enter up to 10 of your favorite web URLs for quick
access later.
To enter a Web Favorites URL:
1
Select the WAP micro browser application from the Home screen.
2
Press the MENU key.
3
Highlight Web Favourites and press ENTER.
4
Highlight the first available slot, and press TAB to highlight the Edit button. Press ENTER.
5
Type the URL of your favorite web site, and press TAB to highlight the Ok button. Press
ENTER.
To access a Web Favorites URL:
1
Select the WAP micro browser application from the Home screen.
2
Press the MENU key.
3
Highlight Web Favourites and press ENTER.
4
Highlight the URL of the website you want to visit.
5
Press TAB to highlight the Go button and then press ENTER.
TIP You can also access a web favorite from anywhere within the WAP micro browser appli-
cation by pressing
to visit.
50 Accompli 009 User’s Guide
ALT, then B, and then the number of the web favorite URL you want
Page 51

Using Help
USING HELP
To assist you with learning certain features and functions of the Accompli applications, an
online Help application is available from the Home screen. You can also access certain help
topics directly from the application with which they are associated by selecting the Help
button on the toolbar.
. . . . .
Accompli 009 Features 51
Page 52

Chapter 3
Using Help
52 Accompli 009 User’s Guide
Page 53

CHAPTER 4
SMS
SMS provides many of the same robust features you are accustomed to using in desktop email messaging applications, along with added features that make sending and receiving
messages easy and more useful.
RECEIVING NEW TEXT MESSAGES
When a new message arrives, a New Message pop-up displays to alert you that you have
received a new message. You can choose to read the message when it arrives, reply to the
message, delete the message, or dismiss the message without taking any action.
To respond to a New Message alert:
When the New Message pop-up appears, choose one of the following options for the new
message:
OK Marks the message as read. If you have more than one new mes-
sage, the next message displays. Otherwise, closes the pop-up.
Reply Displays the Choose Reply pop-up. (See “Replying to Messages”
on page 56.)
Call If an SMS message sender’s phone number is known, attempts to
call the sender. Otherwise, a No Phone Number Found pop-up
message displays.
Put in trash Moves the message to the Trashcan. (See “Using Trashcan” on
page 42.)
Remind me later Reminds you of the unread message based on the time interval
you specify in Settings for Messages. (See “Setting Message Preferences” on page 64.)
Exit Closes the New Message pop-up and leaves the message marked
as unread.
SMS 53
Page 54

Chapter 4
Creating and Sending New SMS Messages
CREATING AND SENDING NEW SMS MESSAGES
The QWERTY keyboard provides a familiar key layout, enabling you to quickly type and send
your message.
To compose and send an SMS message:
1
Select the Write new message button from the toolbar on the SMS Messages screen.
Note SMS messages can only be 160 characters in length, including message addressing. If
the message you compose exceeds the 160 character limit, a message displays in the
status line indicating that your message will be sent in multiple parts.
2
Address the message by doing one of the following:
• From the Send SMS Message To screen, highlight the name of the contact to whom
you are sending the message. With the contact name highlighted, press the N
right to sequence through the Send to... addresses for the contact entry. Choose the
address that you want to use for this message and press the
mark appears to the left of the selected address. Repeat for each recipient to whom
you are sending the message.
• Select the Address from SIM card button on the toolbar, select a recipient’s address,
and select the OK button from the toolbar.
• Select New Contact to add a new address entry to you Contacts list.
3
Select the OK button from the toolbar.
4
Type your message.
5
When you are finished composing a message, select the Send button from the toolbar.
AVDISK
ENTER key. A check-
Entering a One-Time Address
On occasion, you may want to send a message to an individual one time only. Since you
don't anticipate ever sending a message to the recipient again, you may not want to add
them to your contact list.
To enter a one-time recipient address:
1
Select the Write new message button from the toolbar on the SMS Messages screen.
2
Select One-Time Address.
3
In the Device type field, select one of the following:
• Email address (if the gateway is not configured, the email address will not be
available)
• Phone number
• Fax number
54 Accompli 009 User’s Guide
Page 55

Receiving Messages
4
Type the number or address for the recipient.
5
Select the OK button from the toolbar, and press ENTER to clear the confirmation box.
6
Select the OK button at the Send SMS Messages To screen.
7
Compose your message as described above and select the Send button from the
toolbar.
Scheduling a Delayed Send
Messages and message replies can be composed at your convenience and then scheduled
for automatic transmission at a later time. When you choose the recipients for your message,
you can specify the delay sending options for the message.
To schedule a delayed message send:
1
After composing a message, on the Send SMS To or Reply To screen, select the Delay
sending button from the toolbar.
2
In the Time field, type the time when you want to send the message.
. . . . .
Note Press the NAVDISK left or right in either the Time or Date field to increment or decre-
ment the time and date.
3
In the Date field, type the date you want to send the message.
4
Select the OK button on the toolbar to accept the schedule.
RECEIVING MESSAGES
Messages you receive are stored in system folders or in personal folders that you create.
You can choose to respond to a message when it first arrives, or to store it in a folder so that
you can work with it later.
You can do the following with the messages stored in your Inbox or personal folders:
• View the message
• Reply to the message
• Forward the message
• Attempt to call the sender of a message
• Move the message to another folder
• Delete the message
For more information about working with message folders, see “About Folders” on page 58.
SMS 55
Page 56

Chapter 4
Receiving Messages
Reading Messages
Incoming messages can be read when they are first received, or stored in the appropriate
folder to be read at a later time.
To read a stored message:
1
Select the SMS application from the Home screen.
2
Select the folder containing the message.
3
Select the message.
4
Select the OK button from the toolbar to return to the Messages list, or press the HOME
key to return to the Home screen.
Replying to Messages
Responding to messages is fast using QuickText replies you create or custom replies you
type using the QWERTY keyboard.
See“Quick Text” on page 142 for step-by-step instructions on creating and modifying Quick
Text replies.
To send a custom reply:
1
Select the folder containing the message to reply to.
2
Highlight the message.
3
With the message highlighted, or while viewing the message, select the Reply button
from the toolbar.
4
From the Choose Reply screen, select Compose Reply.
5
Type your response, then select the Send message button from the toolbar. The
Sending Reply pop-up appears.
To send a Quick Text reply
1
Select the folder containing the message to reply to.
2
Select the message.
3
With the message selected, or while viewing the message, select the Reply button from
the toolbar.
4
From the Choose Reply screen, highlight the reply you want to send.
5
Select the Send reply button from the toolbar. The Sending Reply pop-up appears.
Forwarding Messages
Your Accompli 009 enables you to share your received messages without retyping them.
Simply forward the message to an address in Contacts. Your signature is inserted at the
beginning of the forwarded message.
56 Accompli 009 User’s Guide
Page 57

Receiving Messages
To forward a message:
1
Highlight the message you want to forward.
2
Select the Forward message button on the toolbar.
3
Select the contact to whom you want to forward the message.
4
Select the OK button on the toolbar.
5
(Optional) Write a brief comment or explanation above the original message or
document.
6
Select the Send message button on the toolbar.
Moving Messages to Folders
To help you manage the mail that you send and receive, you can move messages into
folders you create.
To move a message to a folder:
1
From the folder view, highlight the message you want to move.
2
Select the Move message button from the toolbar.
3
On the Move Message To slide-over, choose the folder where you want to store this
message.
4
Select the OK button from the toolbar.
. . . . .
Deleting Messages
Messages can be deleted from either a folder view or a message view. Deleted messages
are moved to the Trashcan, where they are permanently erased when the Trashcan is
emptied. For more information, see “Using Trashcan” on page 42.
To delete a message from a Folder view:
1
From the Messages list, highlight the message to be deleted.
2
Select the Put in trash button from the toolbar.
TIP To delete all read messages in the Inbox, select the Put all read messages in trash but-
ton from the toolbar.
To delete a message from a Message view:
• While reading the message, select the Put in trash button from the toolbar.
SMS 57
Page 58

Chapter 4
About Folders
ABOUT FOLDERS
If there are unread messages in any of the folders, an envelope appears to the left of the
folder icon, and the number of unread messages follows the name of the folder. The system
folders are as follows:
The Inbox automatically stores all messages that you receive (unless they are
routed to another folder through a message rule), until you move them to another
folder or delete them.
The Cell Broadcast folder automatically stores all cell broadcast messages.
The Drafts folder stores unfinished or partially composed messages that haven’t
been sent yet.
The Outbox contains all messages that you have attempted to send, but that have
not yet been sent successfully. Once the status of a message changes to Sent, it
is moved to the Sent folder.
The SIM Archive folder contains all messages stored in the SIM card memory.
The Sent Messages folder contains all messages that have been sent successfully.
You can have up to 200 folders, including system folders. See “Creating New Folders” on
page 60 for more information.
About the Inbox
The Inbox receives incoming messages transmitted to your Accompli 009. Messages that
appear in the Inbox can have one of the following four conditions:
The message has not been read.
The message was replied to.
The message was forwarded.
The message was read.
Unread messages appear at the top of the list, followed by replied to, forwarded, and read
messages.
58 Accompli 009 User’s Guide
Page 59

About Folders
Additional folders that you create provide the same view and functions as the Inbox.
About the Cell Broadcast Folder
Cell Broadcast Messages are general messages, broadcast to a group of phones and are
stored in the Cell Broadcast folder. These messages are broadcast in numbered channels
and, in general, each channel will tend to carry one particular type of information.
See “About Cell Broadcast Rules” on page 63 for more information.
About the Drafts Folder
The Drafts folder contains partial or unfinished messages that you save for later editing and
transmission. You can choose to save draft messages on your device or on the SIM card.
When a message in the Drafts folder is opened, you will be prompted to select a recipient for
the message. Then the Write SMS Message screen is displayed so that you can edit or
complete the message.
About the Outbox
The Outbox acts as a holding area for unsent messages.
. . . . .
Items in the Outbox are sorted by date and time, with the most recent message appearing
first. If the message was created today, the time appears next to the message; otherwise, the
date the message was created appears.
Messages that appear in the Outbox are categorized into five types:
The message is waiting to be sent.
The message is being sent.
The message could not be sent. Transmitter is off or you are out of range. Message will be sent again automatically.
The message will be sent later based on the delayed send time you specified.
The message could not be sent.
Once the message is sent successfully, the message is moved to the Sent Folder.
About the SIM Archive Folder
The SIM Archive folder contains all SMS messages stored in the SIM card memory.
SMS 59
Page 60

Chapter 4
Working with Folders
About the Sent Messages Folder
The Sent Messages folder stores all SMS messages that were sent successfully.
Items in the Sent Messages folder appear in the order in which they were sent, most recent
at the top. If the message was sent on the current day, the time appears after the Sent
Successfully status icon. Otherwise, the date appears.
You can add the text of a sent message to the Quick Text database so that it can be used as
a Quick Text reply.
All sent messages remain in the Sent Messages folder until a scheduled cleanup of the
folder takes place or until you delete them.
WORKING WITH FOLDERS
You can create, rename, and delete personal folders at any time. You cannot, however,
delete or rename system folders. But you can change cleanup options for either personal or
system folders any time you choose.
Creating New Folders
You can create personal folders to receive specific types of messages. Incoming messages
are automatically routed to your personal folder based upon routing rules that you define.
To create a new personal folder:
1
Select the SMS application from the Home screen.
2
Select the New folder button from the toolbar.
3
Type the name of the new folder in the Name field.
4
If you want to make this a private folder, select the Private check box. See “Marking
Private Entries” on page 42 for more information about private entries.
5
Select one of the following storage options for the folder:
• Keep all messages
• Discard messages older than the number of days you specify
• Set folder limit to store only the number of messages you indicate. If the number of
messages exceeds the limit you set, older messages will be deleted as new ones
arrive. Choose whether to permanently delete the messages or move them to the
Trashcan.
6
Select the Save changes button from the toolbar.
To edit personal folder settings:
1
Select the SMS application from the Home screen.
2
Highlight the folder that you want to modify.
60 Accompli 009 User’s Guide
Page 61

About SMS Message Rules
3
Select the Edit folder settings button from the toolbar.
4
Modify the folder name and storage options, as applicable.
Note You cannot rename system folders.
5
Select the Save changes button from the toolbar to save your changes.
To delete a personal folder:
1
Select the SMS application from the Home screen.
2
Highlight the personal folder that you want to delete.
Note You cannot delete the Inbox, Outbox, Sent Messages folder, or SMS Draft folder.
3
Select the Delete folder button from the toolbar.
4
If the folder contained messages, choose one of the following options:
• Save messages in Inbox
• Put messages in trash
• Cancel delete action
. . . . .
ABOUT SMS MESSAGE RULES
The Message Rules feature enables you to set routing rules and message alert options for
incoming messages that contain specific keywords or text you specify. When incoming
messages arrive, your device looks to see whether the message meets the rule criteria. If so,
the message is routed to a folder you specify and the appropriate alert sounds.
The keywords associated with the rule are displayed as the name of the rule. Each rule in the
list is preceded by a number indicating its priority. The priority determines the order in which
the rule is executed when a new message arrives. You can change the message priority by
moving the rule up or down in the list.
Creating Message Rules
When you create a new rule, you specify the text that you want your device to look for when
incoming messages arrive, specify the folder where you want to place messages meeting the
rule criteria, and make decisions about how you want to be alerted when messages arrive
that meet the rule criteria.
SMS 61
Page 62

Chapter 4
About SMS Message Rules
To create a message rule:
1
Select the SMS application from the Home screen.
2
Select the Message rules button from the toolbar.
3
Select New Rule.
4
In the If message contains text box, type the rule text.
5
In the Store in field, select the folder to store messages that meet the rule.
6
In the Play field, select the alert that you want to sound when you receive incoming
messages matching this rule.
7
If you want the specified alert to override the device settings for silent mode, vibrate
mode, or Quiet Time settings, select the Play regardless of volume level option.
8
If you want to receive alert reminders every two minutes for unread messages meeting
this rule, select the Beep until read option.
9
If you want incoming messages matching this rule to appear in a New Message pop-up
box, select the Display pop-up when received option.
10
Select the Save rule button from the toolbar to save the new message rule.
Editing Message Rules
You can change routing rule options for incoming messages anytime.
To edit a message rule:
1
Select the SMS application from the Home screen.
2
Select the Message rules button from the toolbar.
3
On the Message Rules list, highlight the message rule you want to modify.
4
Select the Edit rule button from the toolbar.
5
Change the message rule options as appropriate.
6
Select the Save rule button from the toolbar to save your changes.
Deleting Message Rules
You can delete most of the message rules you create. However, Cell Broadcast rules cannot
be deleted from the device, only from the active view. You can choose to reactivate this rule
in the Cell Broadcast Settings screen.
To delete a message rule:
1
Select the SMS application from the Home screen.
2
Select the Message rules button from the toolbar.
3
On the Message Rules list, highlight the message rule you want to delete.
4
Select the Delete rule button from the toolbar.
62 Accompli 009 User’s Guide
Page 63

ABOUT CELL BROADCAST RULES
Cell Broadcast Messages are general messages, broadcast to a group of phones. These
messages are broadcast in numbered channels and, in general, each channel will tend to
carry one particular type of information.
Typical cell broadcast channels may provide information on local weather conditions, traffic
reports, or stock market prices. Please contact your network provider for a list of available
channels and the information they supply.
Note Availability of this service requires support from your Cellular Service Provider.
Creating Cell Broadcast Rules
When you create a new Cell Broadcast rule, you specify the Broadcast channel you want to
receive and make decisions about how you want to be alerted when Cell Broadcast
messages arrive. Be aware that your Accompli 009 device limits the number of messages
stored in the Cell Broadcast folder to 50.
You can set up to five Cell Broadcast rules.
To create a Cell Broadcast rule:
1
Select the SMS application from the Home screen.
2
Select the Cell Broadcast folder.
3
Select the Settings button from the toolbar.
4
Toggle the Cell Broadcast option to On.
5
Highlight one of the five Cell Broadcast channels you want to set and select the Edit
channel rules button on the toolbar.
6
In the Channel Number field, replace the default number with the appropriate channel
index number. Contact your network provider for a list of available channels.
7
In the Play field, select the alert that you want to sound when you receive Cell Broadcast
messages.
8
If you want the specified alert to override the device settings for silent mode, vibrate
mode, or Quiet Time settings, select the Play regardless of volume level option.
9
If you want incoming Cell Broadcast messages to appear in a New Message popup box,
select the Display pop-up when received option.
10
If you want to receive alert reminders every two minutes for unread messages meeting
this rule, select the Reminder beep option.
11
Select the Save rule button from the toolbar to save the new rule.
About Cell Broadcast Rules
. . . . .
SMS 63
Page 64

Chapter 4
Setting Message Preferences
SETTING MESSAGE PREFERENCES
The Message Settings feature enables you to specify message alert and reminder options
for received messages. In addition, you can specify the SMS settings that are required to
enable you to send SMS messages.
Using Message Settings, you can choose to receive alert reminders every two minutes about
messages that were not read at the time they arrived and continue to be unread. You can
also enable and disable receiving Cell Broadcast messages.
Note The default message alert and reminder options you specify in Message Settings are
overridden by any message alert or reminder options you choose when creating a new
message rule.
To set message preferences:
1
Select the SMS application from the Home screen.
2
Select the Settings for messages button from the toolbar.
3
In the Remind Me Later spin box, specify how long to wait before reminding you again
about the message. You can choose a time period between 5 minutes and 2 hours.
4
Choose whether to receive incoming Cell Broadcast messages.
5
In the Reminder beep field, select one of the following reminder options:
• Beep for the number of hours you specify
• Beep until read
• No reminder beep
6
Select the Save settings button from the toolbar to save your message settings.
To set SMS message preferences:
1
Select the SMS application from the Home screen.
2
Select the Settings for messages button from the toolbar.
3
On the Message Settings screen, select the Settings for SMS button on the toolbar.
4
Type the Message Service Center number provided by your Cellular Service Provider.
5
In the Gateway field, type the gateway number provided by your Cellular Service
Provider. If you do not specify a gateway, you will not be able to select email addresses
from the Select SMS Recipients screen.
6
In the Expiry period field, specify the maximum time, in hours, that your unforwarded
messages are to remain with the Message Service Center before being deleted.
64 Accompli 009 User’s Guide
Page 65

Using Common Accompli 009 Features with SMS
USING COMMON ACCOMPLI 009 FEATURES WITH SMS
SMS enables you to use a number of common Accompli 009 features, including the
following:
• Cut, copy, and paste text from other messages or Accompli 009 PIM applications.
• Insert text from another message or an Accompli 009 PIM application.
• Beam SMS message information to another compatible device or printer that supports
IR communication.
• Restore deleted messages from the Trashcan, if the Trashcan has not been emptied
since the item was put in trash.
Note Messages restored from the Trashcan return to the user folder they were deleted from.
If that folder no longer exists, the message is restored to the Inbox.
For more information about using these common features, see Chapter 3, “Accompli 009
Features.”
. . . . .
SMS 65
Page 66

Chapter 4
Using Common Accompli 009 Features with SMS
66 Accompli 009 User’s Guide
Page 67

CHAPTER 5
PHONE
Your Accompli 009 provides unrivaled power in mobile phone technology and is packed with
features that put you in control.
The Phone application provides the following features:
• SIM card support
• Direct dialing, automatic dialing, one-touch dialing, or fixed dialing
• Conference calling
• Call waiting, call holding, and call transferring
• Call forwarding and call barring
• Call history and call metering
• Personal Information Management during call
Note The Phone application requires an active SIM Card. See “About Your SIM Card” on
page 76 for more information.
SETTING PHONE PREFERENCES
Phone Setup enables you to set a number of preferences that enable you to control how the
Phone application works. These preferences include:
• Selecting a network
• Specifying call forwarding options
• Specifying call barring options
• Fixed dialing
• Call meters
• Display carrier services
Phone 67
Page 68

Chapter 5
Setting Phone Preferences
Setting Up Your Phone Using Control Panel
Using Phone Setup in the Control Panel application, you can switch between two phone
lines, specify which phone format to use, indicate whether to allow call waiting, edit your
voicemail phone number, and determine whether to restrict your phone number so that it
does not display on a recipient’s caller ID (if applicable).
To set Phone Setup preferences:
1
Select Controls from the Home screen.
2
Select the Phone setup icon.
Select the Phone Setup button on the toolbar.
3
4
Choose whether to use Line 1 or Line 2.
Note Availability depends on the type and settings of the SIM card, your subscription to this
feature, or both.
5
Select Dial or One-Touch Dial as the default format to use when the Phone application
launches.
6
If you want to be notified when another call is waiting, select On in the Call Waiting field.
Otherwise, select Off.
Note Availability of this feature depends on your Cellular Service Provider.
7
If provided by your Cellular Service Provider, review the voicemail retrieval number.
Otherwise, type your voicemail retrieval number.
Note Availability of this feature depends on your Cellular Service Provider.
8
If you do not want your phone number displayed by a recipient’s caller ID, select the
Restrict ID on Next Call option.
Note Check with your Cellular Service Provider to see whether this feature is supported.
9
Select the OK button to return to the Phone Setup screen.
68 Accompli 009 User’s Guide
Page 69

NETWORK SELECTION
Network Selection enables you to register with an available GSM network, select an
appropriate network band, locate and register with new networks, specify a preferred
network, and set network preferences.
Selecting a Network
In order for your Accompli 009 to make and receive phone calls, it must register with one of
the available networks. The Phone application can handle either of the following network
types:
• GSM900/1800
• GSM1900
The Phone application automatically searches for the last network used. If, for any reason,
this network is unavailable, Phone attempts to register with a new network.
When it is necessary to register with a new network, a list of networks is generated. The list is
sorted in the following order:
• The Home network
• Networks from a preferred list
• A random list of other networks found above a certain signal strength.
Any forbidden networks, stored in the SIM card, will be displayed but cannot be selected.
Network Selection
. . . . .
Changing Network Bands
The country where you purchased your Accompli 009 determines the default band that it
uses. When purchased in the United States, the GSM 1900 band defaults. When purchased
elsewhere, the GSM 900/1800 band may default. When you travel abroad, remember to
change to an appropriate band.
When you select a new band, the Phone application displays a confirmation message and
then automatically searches all the available networks. It then attempts to register with a
preferred network within the selected band.
To change the network band:
1
Select Controls from the Home screen.
2
Select the Phone setup icon.
3
Select the Network Selection button from the toolbar. The Network Selection screen is
displayed.
4
In the Band option box, select one of the following options:
• GSM 900/1800
• GSM 1900
Phone 69
Page 70

Chapter 5
5
Press the TAB key to register with a new network.
6
Select the Exit screen button from the toolbar.
Network Selection
Finding a New Network
This feature enables you to locate and register with a new network. When the registration
attempt is made, your current network is excluded from the list of those available. If the
attempt fails, the Phone application will then try to re-register with the previous network.
When your home network is not accessible, Phone automatically searches for another
available and authorized network in the order of preference indicated on the SIM Card list.
To register with a new network:
1
Select Controls from the Home screen.
2
Select the Phone Setup icon.
3
Select the Network Selection button from the toolbar.
4
Select the Register selected network button from the toolbar.
Making a Network Preferred
This option enables you to add a network to your preferred list.
To add a new network code:
1
Select Controls from the Home screen.
2
Select the Phone Setup icon.
3
Select the Network Selection button from the toolbar.
4
From the Network selection list, highlight the network that you want to mark as preferred.
5
Select the Add to preferred button from the toolbar.
6
When the confirmation message appears, select Yes.
7
When complete, a confirmation message displays, letting you know that registration with
the network was successful.
Setting Network Search Preferences
Use this feature to set preferences for how the Phone application searches for new network
bands. You can choose to search for an available network automatically or manually.
In the automatic mode, the Phone application attempts to register with the first network in a
sorted list. If successful, the network name is displayed. If unsuccessful, the Phone
application will attempt to register with the next network in the list. If it fails to register with
any of the listed networks, it will start at the beginning of the list based on the frequency you
define.
70 Accompli 009 User’s Guide
Page 71

Call Forwarding
In the manual mode, the Phone application presents you with a sorted list of networks. Select
a network from the list and the Phone application will try to register with the selected network.
To set Network search settings:
1
Select Controls from the Home screen.
2
Select the Phone Setup icon.
3
Select the Network Selection button from the toolbar.
4
Select the Settings button from the toolbar.
5
In the Registration type option box, select Automatic or Manual.
6
In the Frequency option box, choose one of the four options. Your selection here tells
Phone how long to wait before attempting to re-register after a registration attempt has
failed. Choose from the following:
• Slow search
• Medium search
• Fast search
• Continuous search
7
Select the Save settings button from the toolbar.
. . . . .
CALL FORWARDING
Call forwarding is a network feature. If your phone is unavailable, or you do not wish to
receive incoming calls, incoming calls can be forwarded to other phone numbers. You can
set call forwarding options for voice calls, incoming fax calls, and data calls.
To set up call forwarding:
1
Select Controls from the Home screen.
2
Select the Phone setup icon.
3
Select the Call Forwarding Options button from the toolbar.
4
In the option box on the Voice tab, choose from the following options:
All voice calls Forwards all incoming voice calls to a single phone number
Detailed forwarding
unconditionally.
If you choose this option, specify a forward to phone number.
Forwards voice calls to different numbers, depending upon the
current status of your phone.
If you choose this option, specify a forward to phone number for
each of the conditions.
Phone 71
Page 72

Chapter 5
5
Select the Next Page button from the toolbar to move to the Fax tab.
6
If you want to forward incoming fax calls, select the Forward to option and specify the
Call Barring
forwarding phone number.
7
Select the Next Page button from the toolbar to move to the Data tab.
8
If you want to forward data calls, select the Forward to option and specify the forwarding
phone number.
9
When you are finished, select the Save changes button from the toolbar.
To cancel call forwarding:
1
Select Controls from the Home screen.
2
Select the Phone Setup icon.
3
Select the Call forwarding button from the toolbar.
4
Select the Cancel call forwarding button from the toolbar.
5
When the “Cancel call forwarding?” message box appears, select Yes.
6
Select the Save changes button from the toolbar.
CALL BARRING
Call barring is a network feature that can be used to selectively block outgoing and incoming
calls.
If you change the barring setting, you may be asked to enter your barring password. There
will be a short delay while the phone notifies the network of the new setting. When the
change has been made by the network, the phone displays a confirmation message.
The initial password will be supplied to you by your Cellular Service Provider when you
subscribe to this service.
To enable call barring:
1
Select the Controls from the Home screen.
2
Select the Phone setup icon.
3
Select the Call Barring Options button from the toolbar. The Call Barring screen
displays.
4
Select the Enable call barring option.
5
In the Bar incoming calls option box, choose one of the following:
• When roaming
• All calls
•Off
72 Accompli 009 User’s Guide
Page 73

Fixed Dialing
6
In the Bar outgoing calls option box, choose one of the following:
• International calls
• International calls except home
• All outgoing calls
•Off
7
Select the OK button from the toolbar.
To change your call barring password:
1
On the Call Barring screen, select the Change password button from the toolbar.
2
In the Enter password box, type your new password.
3
Select the Save changes button to save your password changes.
To cancel call barring:
1
Select Controls from the Home screen.
2
Select the Phone setup icon.
3
Select the Call Barring Options button from the toolbar.
4
Deselect the Enable call barring option.
5
Select the OK button from the toolbar.
. . . . .
FIXED DIALING
Note Availability of the Fixed Dialing feature depends on the type of SIM Card. Fixed dialing
can also be affected by the Call Blocking Setting.
This feature allows you to limit use of your phone to a pre-defined list of telephone numbers
or, if you wish, to a list of country codes, area codes, or other prefixes of your choosing.
When Fixed Dialing is switched on, the only numbers that can be dialed from your phone are
those stored (or whose prefix is stored) in the Fixed Dial list. This list is stored in your SIM
Card memory.
Once you enable Fixed Dialing, you will only be able to redial those numbers that appear in
your Fixed Dial list.
To set up your Fixed Dial list:
1
Select the Phone application from the Home screen.
2
Select the Fixed Dialing button from the toolbar.
3
Select New Entry.
4
Type the contact name and number in the Name and Number fields.
Phone 73
Page 74

Chapter 5
5
Specify the SIM Card memory location for the entry. Memory locations 1 through 40 are
Call Metering
available for Fixed Dial entries.
TIP When setting up your Fixed Dial list, you may want to reserve the first nine locations for
phone numbers you wish to One-Touch Dial.
6
Select the OK button from the toolbar.
7
Type your SIM PIN2 security code and select the OK button from the toolbar.
Note The default SIM PIN2 security code is **52*. See page Chapter 5-78 for instructions on
changing the default SIM PIN2 code.
To edit a Fixed Dial entry:
1
Select the Phone application from the Home screen.
2
SSelect the Fixed Dialing button from the toolbar.
3
From the Fixed Dialing list, select the entry that you want to change.
4
Select the Edit button from the toolbar.
5
Make your changes to the entry and select the Save changes button from the toolbar.
When you are using Fixed Dialing in conjunction with One-Touch Dialing, the One-Touch
Fixed Dial screen appears when the Phone application is launched from the Home screen.
CALL METERING
Phone has an internal metering system that provides you with individual and total call times
and costs. The meter can be displayed during a phone call and audible tones can be
generated to indicate the passage of call time.
Note Call charges are only available if you receive the Advice of Charge service from your
Cellular Service Provider. If you do not receive this service, then only time meters are
available.
Phone provides two programmable audible call timers:
• The “Single” alert call timer will sound once during a call, after a preset time has
elapsed.
• The “Repeating” timer will sound regular beeps during a call, at preset intervals.
74 Accompli 009 User’s Guide
Page 75

Call Metering
To show call time meters:
1
Select the Phone application from the Home screen.
2
Select the Call Meters button from the toolbar.
3
Review the time totals. When you are finished, select the OK button from the toolbar.
To set preferences for call metering:
1
From the Call Meters screen, select the Settings button from the toolbar.
2
From the In Call Display box, specify the type of timer you want to appear when making
a phone call. Choose from the following options:
• Call timer
• Lifetime timer
• Call charges
• Total charges
• Credit remaining
•None
3
Type the change rate, in units per minute, to use when calculating call charges.
4
To set a limit for call charges, select the Use charge limit option and specify the limit.
5
Select the Call Meter Settings - Audible tab.
6
Select one of the following options for audible call timers:
. . . . .
Single A beep will sound once after the number of minutes you specify
has elapsed.
Repeating Beeps will sound at regular intervals based on the number of min-
utes you specify.
None Disables audible alerts.
7
Select the Call Meter Settings - Resets tab.
8
If you want to reset call meters at regular monthly intervals, choose the interval and
select the meter options you want reset.
9
Select the OK button from the toolbar.
To reset time meters:
1
From the Call Meters screen, select the Set up Call Meters button from the toolbar.
2
Select the Reset timers button from the toolbar.
3
If you are certain you want to reset the time meters, select Yes when the confirmation
dialog displays.
Phone 75
Page 76

Chapter 5
Show Cellular Service Provider Services
SHOW CELLULAR SERVICE PROVIDER SERVICES
This option displays a list of phone numbers and services provided by your Cellular Service
Provider.
Note Availability depends on the type and settings of the SIM card, your subscription to this
feature, or both.
To show services:
1
Select the Phone application from the Home screen.
2
Select the Show Services button from the toolbar.
3
To call a provided service, select the service, and then select the Call button from the
toolbar.
4
When you are finished, select the Exit screen button from the toolbar.
ABOUT YOUR SIM CARD
Your SIM (Subscriber Identity Module) card was supplied by your Cellular Service Provider
when you purchased your Accompli 009. You will not be able to make or receive calls if you
do not have a SIM card inserted in your phone.
Note GSM Service Providers allow you to make emergency calls without a SIM card
inserted. Contact your Service Provider for more details.
The SIM card is a “Smart Card” that contains your phone number, service details, and
memory for storing contact numbers and messages. You can therefore use your SIM card in
other compatible GSM handsets and you will be charged for the call.
Like a bank card or credit card, you should keep your SIM card secure. Do not bend or
scratch your card, and avoid exposure to static electricity or water.
GSM Emergency Calls
In case of an emergency, you can use your Accompli 009 to make an emergency call. In the
United States, dial 911. Outside of the United States, dial the GSM standard number, 112.
Provided that your phone has found a network, you will be able to make an emergency call.
The call can be made regardless of any security codes and, depending on the network, with
or without a SIM card inserted.
The emergency call will be directed to a central emergency operator.
76 Accompli 009 User’s Guide
Page 77

To dial the GSM emergency number in the U.S.
1
Select the Phone application from the Home screen.
2
Type 9 1 1 and press Enter.
SETTING SIM ENTRIES
The SIM Card Numbers screen allows you to manage all of the phone numbers stored in the
memory of your SIM card. Phone numbers appear in alphabetical order by name; numbers
without a corresponding name are sorted at the top of the list. When a name is highlighted
the corresponding number is shown in the area above the toolbar.
From this screen, all SIM card functions can be set, including editing phone entries, deleting
an entry, dialing an entry, and selecting an entry to save as a Contact. The Personal
Identification Number (PIN) settings can also be configured from this screen.
Note The SIM Card is not available when you are in Fixed Dialing mode.
Setting SIM Entries
. . . . .
To add a SIM card entry:
1
From the Phone screen, select the SIM card button on the toolbar
2
Highlight New Entry from the list. Press Enter.
3
Type the name for the new entry in the Name box.
4
Type the number for the new entry in the Number box.
5
In the Memory location option box, select the number corresponding to the location
where you would like to save the number. This feature is SIM card dependent, and only
available location numbers will appear for selection.
6
Select OK to complete the new entry.
To edit a SIM card entry:
1
From the Phone screen, select the SIM card button on the toolbar.
2
Highlight the SIM card entry you want to change.
3
Select the Edit SIM button from the toolbar.
4
Change the SIM card information, as appropriate.
5
Select the OK button from the toolbar to save your changes.
PIN Features
When the SIM card Personal Identification Number (PIN) setting is enabled, you are
prompted to enter the correct PIN when you turn your device on and when you switch from
PDA mode to Phone mode. This is the PIN1 code. The PIN2 code controls your access to
Phone 77
Page 78

Chapter 5
Setting SIM Entries
advanced phone features, such as Fixed Dialing and Call Metering. Both of these numbers
can be set from the SIM Card Phone Numbers screen.
To change SIM Card PIN1:
1
Select the Phone application from the Home screen.
2
Select the SIM Card button from the toolbar.
3
Select the Change PIN Code button from the toolbar.
If the Require SIM card PIN option is checked, the PIN will be required to access the
SIM card each time the phone is turned on.
4
Type the old PIN number to access the PIN number change screen. The default PIN
security code is **5*.
5
Type the new PIN in the New PIN field. This must be a number between 4 and 8 digits in
length.
6
Retype the new PIN in the Confirm new PIN field.
7
Select OK to save your changes.
To change SIM Card PIN2:
1
Select the Phone application from the Home screen.
2
Select the SIM Card button from the toolbar.
3
Select the Change PIN2 Code button from the toolbar.
4
Type the old SIM PIN2 number. The default SIM PIN2 security code is **52*.
5
Type the new SIM PIN2 number. The number must be between 4 and 8 digits.
6
Retype the new SIM PIN2 number in the Confirm SIM PIN2 box.
7
Select OK to save your changes.
Unblocking your phone
If you receive the “blocked” message, you will need to enter an unblock code and key
sequence on the Dial screen before you can use the phone.
Note The 6-digit PIN unblocking code will have been provided with your SIM card by your
Cellular Service Provider.
To unblock your phone:
1
Press the Phone hot key and make sure the Dial screen is displayed.
2
Type * * 0 5 *, followed by the unblock code, and then press ENTER.
3
Type the new PIN in the New PIN field. This must be a number between 4 and 8 digits in
length.
78 Accompli 009 User’s Guide
Page 79

Making and Receiving Phone Calls
4
Retype the new PIN in the Confirm new PIN field.
5
Select OK to return to the SIM Card Entries screen.
Warning If this operation is performed incorrectly 8 times in a row, your SIM card will
become permanently blocked.
Copying a SIM Entry to Contacts
A SIM entry can be selected to be saved into the Contacts application. This will allow you to
save address book information to your business and personal contacts.
To copy a new entry into Contacts:
1
Select the Phone application from the Home screen.
2
Select the SIM Card button from the toolbar.
3
Highlight the SIM entry that you want to copy to Contacts.
4
Select the Copy to Contacts button from the toolbar.
5
Choose whether to store the phone number as a work, home, main, or mobile phone
number.
6
Select the OK button from the toolbar.
. . . . .
MAKING AND RECEIVING PHONE CALLS
The Phone application provides you with several ways to make a phone call:
• Using the numeric keys
• Using automatic redial
• Using one-touch dialing
In addition, you can make a phone call from within the Contacts or SMS application.
Depending on the preferred Phone format you select in Phone Setup, either the Dial or OneTouch Dial screen appears when you launch the Phone application from the Home screen or
using the Phone hot key.
Making a Phone Call
It will not be possible to make a phone call unless you are in an area where there is a
GSM900, 1800, or 1900 service. When a service has been found, a series of rising bars
displays next to the antenna icon, indicating the signal strength.
When the Phone application is launched from the Home screen, the Dial or One-Touch Dial
screen appears, depending on the Phone format option you choose in Phone Setup.
Phone 79
Page 80

Chapter 5
Making and Receiving Phone Calls
To make a phone call using Dial:
1
Select the Phone application from the Home screen.
2
Use the number keys at the top of the keyboard to enter the phone number. Optionally,
with NumLock on, you can also use the dark blue phone pad keys on the left side of the
keyboard to enter the number.
Note If you make a mistake while entering the phone number, press the BKSP key to remove
the incorrect digit(s) or use the NAVDISK to insert a missing a digit.
TIP If you need to enter in an alpha-coded phone number (i.e., 800-MOTOROLA, turn
Numlock off and use the alpha keys to enter the “number.” The alpha keys are translated into their corresponding number.
3
Press the ENTER key or select the Dial Number button from the toolbar.
4
You can act on the current call by selecting one of the following options from the spin list:
End call Disconnects the call and hangs up.
Hold Puts the call on hold.
Mute Toggles mute on and off.
Hide Hides the In-Call pop-up, but does not disconnect the call.
To make a phone call using One-Touch Dialing:
1
Select the Phone application from the Home screen.
2
Do one of the following:
• Briefly press and hold the numeric key corresponding to a Speed Dial number.
• Highlight an entry in your One-Touch Dial list, then select the OK button from the
toolbar.
• Select Dial and type the phone number you want to call. Select the OK button from
the toolbar.
80 Accompli 009 User’s Guide
Page 81

Making and Receiving Phone Calls
To make a phone call from the Contacts List:
1
Open the Contacts application from the Home screen.
2
Select a contact name from the Contacts List.
3
Press the hotkey number on the keypad corresponding to the contact number. One of
the following happens.
• If the contact information is a telephone number, the Phone application will
automatically dial the number.
• If the contact information is an email address, the SMS application will open and
allow you to compose an SMS message to be sent to the selected email address in
the Contacts List.
Automatic Redialing
If your call attempt does not succeed, the Automatic Redial pop-up is displayed for five
seconds.
If you choose Yes, the number is automatically redialed up to 10 times. A short ring tone
indicates that the call was connected.
. . . . .
If you choose No, the number will not be automatically redialed and the previous screen is
displayed.
Receiving a Phone Call
When you receive a phone call, the LED on the front of the device flashes alternating red and
green and a pop-up displays showing that you are receiving an incoming call. If known, the
name and telephone number of the incoming call is displayed. Once connected, the timer
increments showing the length of the call.
To receive a phone call, make certain that:
• Your Accompli 009 is turned on and unlocked, which may require you to enter your SIM
PIN
• You are in an area where there is GSM900, 1800, or 1900 service
• Your Call Forwarding and Call Blocking settings are not set to forward or block incoming
calls
To respond to an incoming call:
When a new call arrives, you can choose to answer the call by doing one of the following:
• Press the Smart Button on the side of the device
• If the earpiece is not plugged in, plug in the earpiece. The call is automatically
answered.
• If the earpiece is already plugged in when the call is received, press and hold the
send/end button on the earpiece
Phone 81
Page 82

Chapter 5
Choose one of the following options from the Incoming Call pop-up option box:
Answer Answers the call and changes the status to Connected.
Hold Answers the call, but immediately places the call on hold.
Drop Mutes the ringer and dismisses the Incoming Call pop-up.
Call Waiting and Call Holding
CALL WAITING AND CALL HOLDING
Your Accompli 009 supports the GSM options of Call Waiting and Call Holding. When you are
connected to a phone call and you receive a new call, an Incoming Call pop-up appears. The
Incoming Call pop-up displays the caller’s name and number (if known).
Note To use these features, you must turn on the Call waiting option in Phone Setup.
From the Incoming Call pop-up screen, you can choose to put a call on hold, drop a call,
send the new call to voicemail, or link the calls in a three-way conference.
To respond to another incoming call:
When the Incoming Call pop-up appears, choose from the following options:
Answer Places the current call on hold and connects to the incoming call.
Hold new Answers the incoming call, but immediately places it on hold.
Send to voicemail
Drop new Mutes the ringer and drops the incoming call.
Drop current Hangs up on the current call and connects to the incoming call.
Link calls Joins the incoming call with your current call.
Working with Two Calls
If you have two calls connected, you can switch between the active call and the call that is on
hold, join the callers in a three-way conference, transfer the current call to the call that is on
hold, or disconnect either the current call or the call on hold.
82 Accompli 009 User’s Guide
Sends the incoming call directly to voicemail.
Page 83

Conference Calling
When the Two Calls pop-up appears, choose from the following options:
Switch Toggles between the current call and the call that is on hold.
End current call Hangs up on the connected call.
End held call Hangs up on the call that is on hold.
Link calls Joins the two calls in a three-way conference.
. . . . .
Transfer to held
call
Mute Toggles the phone between mute and unmute.
Hide Hides the Two Calls pop-up.
Transfers the current caller to the caller who is on hold and disconnects you automatically when the transfer completes successfully.
CONFERENCE CALLING
If you choose to link an incoming call with your current call, the Conference Call pop-up
appears. The Conference Call pop-up enables you to link up to five calls in one conversation.
You can link either to incoming calls or to calls that you initiate.
Note You must subscribe to both Conference Call and Call Waiting Supplementary Services
to be able to use this feature.
To initiate a conference call:
1
Place the active call on hold, by selecting Hold from the spin box.
2
Select New Call from the spin box and dial the new phone number.
3
Once the new call is connected, select Link Calls from the spin box to merge the calls.
To add an incoming call to a conference call:
• Select the Link Calls option from the spin box to link your incoming call to the connected
conference members.
To end a conference call:
• Select the End Conference option from the spin list to disconnect all members of the
conference call.
Phone 83
Page 84

Chapter 5
Viewing Call History
VIEWING CALL HISTORY
Call History enables you to review the last ten calls made in three categories: Received,
Made, and Missed. If the call number is in Contacts, the name and phone number type are
displayed; otherwise, only the number displays. The date of each call displays in the right
column and the timestamp for the highlighted call appears in the status bar.
If the call number is on the SIM card, the caller’s name and phone number are displayed.
To view call history:
1
Select the Phone application from the Home screen.
2
Select the Call History button from the toolbar.
3
From the Last 10 Calls spin box, choose one of the following:
• Received
• Missed
• Made
4
When you are finished reviewing call history, choose the Exit screen button from the
toolbar.
84 Accompli 009 User’s Guide
Page 85

CALLING VOICEMAIL
This option enables you to make a call to the current voicemail number entered in Phone
Settings in Control Panel.
Note Availability of this feature depends on your Cellular Service Provider.
To call your voicemail:
1
Select the Phone application from the Home screen.
2
Select the Dial VoiceMail button from the toolbar and press ENTER.
TIP Pauses can be inserted into a string of numbers to allow the called number time to
react to certain activities, such as dialing voice mail, an extension or mailbox, and your
password.
To insert a pause into a phone number, insert a comma (,) in the desired location. For
example, if your voicemail number is 555-6789, your mailbox number is 123, and your
password is, 4004, then dial: 5556789,123,4004 and press
number calls the voicemail system. When the call is answered, there is a pause before
the extension or mailbox is entered, and another pause before the password is
entered.
Calling Voicemail
. . . . .
ENTER. The first part of the
Phone 85
Page 86

Chapter 5
Calling Voicemail
86 Accompli 009 User’s Guide
Page 87

CHAPTER 6
CONTACTS
The Contacts application is a convenient electronic address book that enables you to store
contact information about your personal and business contacts.
Using Contacts, you can:
• Enter up to five telephone numbers and e-mail addresses, plus home and work
addresses, fax numbers, and device information for each contact entry.
• Record up to four additional pieces of information about each contact, such as spouse
name, birthday, or whatever else might be important to you.
• Attach notes that provide additional information about your contacts.
• Organize your contact entries into categories so that you can quickly locate them based
on category, such as business contacts or personal contacts.
• Organize contacts into groups, called mailing lists.
• Dial a contact directly using their contact information.
• Compose an SMS message to a selected contact.
• Send contact information to a compatible device or printer.
• Copy a contact to your SIM card.
• Add domain names for wireless addresses.
ENTERING CONTACTS
You can enter contact information for individuals and businesses. You can even organize your
contacts into groups and establish mailing lists so that you can quickly send messages to an
entire group of individual contacts at one time.
To enter a contact:
1
Select the Contacts application from the Home screen.
2
Select New Contact.
3
Type the contact’s first name, last name, company name, and title in the appropriate
fields.
Note If you enter a contact, but do not specify a first, last, or company name, the contact will
appear at the top of the Contacts list and the Choose Recipients list as “unnamed.”
4
In the Category field, choose a category for the contact.
Contacts 87
Page 88

Chapter 6
Entering Contacts
Note You can also create a new category for a contact. See “Using Categories” on page 37
for more information.
5
To make this a private contact entry, select the Private check box.
6
(Optional) Enter the following additional information for this contact entry:
• All telephone numbers
• Main, work, home, alternate, and web e-mail addresses
• Device type and wireless address
• Home and work fax number
• Work address
• Home address
• Up to four additional pieces of information for the contact
TIP To move between tabs, highlight the current tab icon and press the NAVDISK left or right.
Press ALT-NAVDISK to move between tabs when the tab icon is not highlighted.
7
To write notes about the contact, select the Notes button from the toolbar.
8
When you are finished typing information about this contact, select the Save contact
button from the toolbar.
To edit a contact entry:
1
Select the Contacts application from the Home screen.
2
From the Category field, choose the category of the contact whose address information
you want to edit.
3
Using the NAVDISK, scroll through the list of contacts and highlight the contact name.
TIP Type the first several characters of the contact name to quickly scroll to the names
beginning with those characters.
4
Select the View item button from the toolbar.
5
Select the Edit item button from the toolbar.
6
Edit the information for the contact.
7
Select the Save contact button from the toolbar to save your changes and redisplay the
main Contacts screen.
88 Accompli 009 User’s Guide
Page 89

Looking up Contact Entries
Deleting a Contact Entry
A well-maintained address book provides quick access to the contact information you need.
Delete contact entries for individuals or businesses that you no longer contact.
You can delete contacts from your Accompli 009 in either of the following ways:
• Delete a contact entry directly from the main Contacts screen.
• Delete a contact entry after opening and reviewing it in the View Contacts screen.
Caution Deleted contact information cannot be recovered.
To delete a contact from the main Contacts screen:
1
Select the Contacts application from the Home screen.
2
From the Category field, choose the category of the contact that you want to display. If
you want to see all of the contacts that you have entered, change the category to All.
3
Using the NAVDISK, scroll through the list of contacts and highlight the contact that you
want to delete.
4
Select the Put in trash button from the toolbar. The main Contacts screen reappears
without the contact.
. . . . .
LOOKING UP CONTACT ENTRIES
When you open the Contacts application from the Home screen, the main Contacts screen
displays all of your contact entries in alphabetical order.
Note Whether the entries are sorted by last name, first name, or company name depends
on the settings you choose in Contacts Settings. See “Setting Contact Preferences” on
page 91.
To scroll through the list of contacts, use the N
type the first few characters of the contact name. To see all of the address information
available for the contact, use the following procedure.
AVDISK. To quickly scroll to a specific contact,
Contacts 89
Page 90

Chapter 6
Looking up Contact Entries
To look up contact information:
1
Select the Contacts application from the Home screen.
2
From the Category field, choose the category of the contact or mailing list for whom you
want to look up address information.
TIP Type the first several characters of the contact name to quickly scroll to the names
beginning with those characters.
3
Using the NAVDISK, scroll through the list of contacts and highlight the contact entry you
want to view.
4
Select the View item button from the toolbar.
TIP If this entry contains more contact information than can be displayed on one screen,
press the NAVDISK down to display the remaining information.
5
Select the OK button from the toolbar to return to the main Contacts screen.
To make a phone call or send from the Contacts List:
1
Select the Contacts application from the Home screen.
2
From the Category field, choose the category of the contact or mailing list for whom you
want to look up address information.
3
Using the NAVDISK, scroll through the list of contacts and highlight the contact entry you
want to view.
4
Select the View item button from the toolbar.
5
Press the hotkey number on the keypad corresponding to the contact number. One of
the following happens.
• If the contact information is a telephone number, the Phone application will
automatically dial the number.
• If the contact information is an email address, the SMS application will open at the
screen were you can compose an SMS message to be sent to the selected email
address in the Contacts List.
90 Accompli 009 User’s Guide
Page 91

SETTING CONTACT PREFERENCES
You can choose to sort contacts by last name, first name, or company name. If a contact
entry does not contain the name you choose to sort by, the contact entry is sorted by the next
available name.
For example, if you choose to sort by last name, then first, and the contact entry does not
include a last name, the entry is sorted alphabetically by first name. If the contact entry does
not contain a first name, the company name is used to determine the sort order.
The following chart summarizes what happens to the sort order in the three sorting
alternatives when a field is empty:
Choose... To sort the contact list alphabetically by...
Last, First If the contact entry does not include either last or first name, the
company name is displayed.
First, Last The company name does not display in the sort list, unless it is the
only name available for the entry.
Setting Contact Preferences
. . . . .
Company, Last The first name does not appear in the sort list, unless it is the only
name available for the entry.
Contacts provides four custom fields that you can rename to identify additional information
about your contact entries. This enables you to record information such as spouse name,
birthday, anniversary, or whatever information you choose to record for your contact entries.
To set contact preferences:
1
Select the Contacts application from the Home screen.
2
Select the Settings for Contacts button from the toolbar.
3
Choose the format to use when showing contact entries. You can choose one of the
following options:
• Last, First
• First Last
• Company, Last
4
(Optional) Rename the four Custom field names with field names of your choice.
5
Select the Save settings button from the toolbar.
Contacts 91
Page 92

Chapter 6
Creating a Mailing List
CREATING A MAILING LIST
If you frequently send messages to the same group of contacts, you can create a mailing list
to make it easier to address messages to the group. Instead of addressing the message to
each contact individually, you can address the message to the mailing list.
To create a mailing list:
1
Select the Contacts application from the Home screen.
2
Select New Mailing List.
3
In the List name field, type the name for the mailing list as you want it to appear in the
Contacts list.
4
In the Category field, choose a category for the mailing list.
TIP You can also create a new category for a mailing list. See “Using Categories” on page
37 for more information.
5
To make this mailing list entry private, select the Private check box.
6
Select Add Addresses to List.
7
Highlight the first contact name that you want to include in the mailing list.
8
With the contact name highlighted, press the NAVDISK right to cycle through the Send
to... addresses for the contact entry. Highlight the address that you want to use for this
contact and press
ENTER. A checkmark appears to the left of the selected address.
TIP You can choose multiple addresses for a contact.
9
Repeat steps 7 and 8 for each contact you want to include in the mailing list.
10
When you are finished adding contacts to the list, select the OK button from the toolbar,
then select the Save mailing list button to save the mailing list.
USING COMMON ACCOMPLI 009 FEATURES WITH CONTACTS
Contacts enables you to use a number of common Accompli 009 features, including the
following:
• Define new categories for organizing your contact entries and mailing lists into logical
groups.
• Cut, copy, and paste text from other contact entries, mailing lists, Accompli 009 PIM
applications, or the clipboard.
• Insert text from another contact entry or application.
92 Accompli 009 User’s Guide
Page 93

Using Common Accompli 009 Features with Contacts
• Beam contact or mailing list information to another device or printer that supports IR
communication or send as an SMS message.
• Restore deleted contacts from the Trashcan, if the Trashcan has not been emptied since
the item was put in trash.
For more information about using these common features, see Chapter 3, "Accompli 009
Features."
. . . . .
Contacts 93
Page 94

Chapter 6
Using Common Accompli 009 Features with Contacts
94 Accompli 009 User’s Guide
Page 95

CHAPTER 7
CALENDAR
Calendar enables you to record appointments, meetings, birthdays, anniversaries, and other
events that you don't want to forget.
Using Calendar, you can:
• Create calendar entries for scheduled appointments, all-day events, or special days.
• View your appointments for a specific date or see all calendar events for an entire week
or month at a glance.
• Create recurring events for appointments that repeat.
• Set Calendar preferences, including a default view and event reminder options.
• Beam your calendar events to other compatible hand-held devices or printers that
support IR communication. See “Printer Setup” on page 141 for a list of supported
printers.
VIEWING EVENTS
Calendar has three different views from which you can choose. You can easily navigate
among these views or go directly to a specific calendar date.
TIP To view calendar entries for a specific day, select the Jump to date toolbar button from
any calendar view.
Use the following toolbar buttons to select the desired view:
Day View
Week View
Month View
Using Settings for Calendar, you can choose which view you want to use as the default when
you open the Calendar application.
Calendar 95
Page 96

Chapter 7
Adding an Event
Day View
This view displays a list of appointments for a specific date with a single timeline column
showing appointments and conflicts. Press the N
previous day.
Week View
A weekly view shows seven timeline columns, with appointment blocks in gray and conflicts
in black.
Month View
This view displays a monthly calendar that uses various symbols to indicate scheduled
events. Press the N
AVDISK left, right, up, or down to move between days and months.
ADDING AN EVENT
You add new events from the Day View screen. If you are viewing your calendar using the
Week View or the Month View, you must first select Day View before adding a new calendar
entry.
You can indicate that an event is recurring, and specify a schedule for how often it occurs
and when it should stop repeating. By setting reminders and alerts, you can tell your
Accompli 009 to play an alert to remind you of a scheduled event.
AVDISK left or right to view the next or
To add an event:
1
Select the Calendar application from the Home screen.
2
From the Day View screen, select New Event.
3
In the Subject field, type a brief description of this event.
4
Choose one of the following event types for this calendar entry:
•Event
• All-day event
• Special day
5
If you want to make this event a private entry, select the Private check box.
6
In the Date field, type the date of the event.
TIP Press the NAVDISK left or right to increment or decrement the displayed date.
96 Accompli 009 User’s Guide
Page 97

Adding an Event
7
If this is an all-day event, choose the number of days. If this is an Event, type the starting
and ending time for the event. Calendar assumes that time entries between noon and 7
are PM, and 8 through 11 are AM.
TIP You can use the NAVDISK to increment or decrement the time by 15 minutes.
8
Select the Location tab.
9
In the Location field, type the place for the event or leave this field blank.
10
Select the Repeat Options tab.
11
In the Event occurs field, choose a frequency for how often this event repeats.
12
If you selected an option other than Once in step 11, specify how often and for how long
the event will repeat.
• In the Every field, specify the interval.
• In the End date field, type the date that this event will stop repeating.
• If this is a weekly event that occurs some weekdays, but not all, select the On check
boxes for the weekdays this event occurs.
or
• If this is a monthly event, specify whether the event repeats on this date, or on this
day.
13
Select the Alert Options tab.
14
In the Reminder field, type the time, prior to the event, that you want to receive a
reminder alert.
15
In the Alert field, select the alert for this event reminder.
16
If you want the event reminder to sound even if the device is in silent mode, vibrate
mode, or in Quiet Time, select the Play regardless of volume level option.
17
If you want to record additional information about this event, select the Notes for event
button from the toolbar.
18
Type any additional information that you want to record about this event in Notes.
19
Select the Save note button from the toolbar to save your note.
20
Select the Save event button from the toolbar to save your entry.
. . . . .
Calendar 97
Page 98

Chapter 7
Receiving Event Reminders
RECEIVING EVENT REMINDERS
Prior to the start time for a scheduled event, you will receive an event reminder pop-up.
Event reminders play based on the options you set when you created the event.
To reply to event reminders:
• When the event reminder pop-up appears, choose one of the following options:
OK Closes the currently displayed event reminder pop-up.
Remind me in... Redisplays the event reminder pop-up based on the time inter-
val you specify.
Exit Closes all event reminder pop-ups.
EDITING AN EVENT
Calendar entries can be updated as information about your scheduled events changes.
To edit an event:
1
Select the Calendar application from the Home screen.
2
In Day view, highlight the event that you want to edit.
Note If you wish to edit an event that occurs on a different day, use the Jump to button from
the toolbar to go to that date.
3
Select the View event button from the toolbar.
4
Select the Edit event button from the toolbar.
5
Modify the event information as desired. If the event is recurring, you can choose to
apply the changes to all occurrences of the event.
6
Select the Save event button from the toolbar to save your modifications and return to
the Day View.
DELETING EVENTS
You can delete events in Calendar in either of the following ways:
• Delete a calendar entry from the Day View screen.
• Delete a calendar entry after opening and reviewing it in the Event View screen.
98 Accompli 009 User’s Guide
Page 99

Setting Calendar Preferences
To delete a calendar entry:
1
Select the Calendar application from the Home screen.
2
In Day View, highlight the event that you want to delete.
Note If you wish to delete an event that occurs on a different day, use the Jump to button
from the toolbar to go to that date.
3
Select the Put in trash button from the toolbar.
To review and then delete an event:
1
Select the Calendar application from the Home screen.
2
In Day View, highlight the event that you want to delete.
Note If you wish to view, then delete, an event that occurs on a different day, use the Jump to
button from the toolbar to go to that date.
. . . . .
3
Select the View event button from the toolbar.
4
Review the event and then select the Put in trash button from the toolbar. The Day View
reappears without the event.
SETTING CALENDAR PREFERENCES
Using Settings for Calendar you can select which calendar view you want to display as the
default when you launch Calendar, as well as when events are removed from Calendar,
when you want to receive reminders about events, and whether you want the alert to sound
until read.
To set Calendar view preferences:
1
Select the Calendar application from the Home screen.
2
Select the Settings for Calendar button from the toolbar.
3
In the Always open Calendar to field, choose a default view for Calendar.
4
In the Remove events field, choose one of the following options for removing events
from Calendar:
• After the event occurs
• 1 week after the event occurs
• 30 days after the event
• 90 days after the event
Calendar 99
Page 100

Chapter 7
5
In the Reminder field, select the time in hours and minutes prior to the event that you
Using Common Accompli 009 Features with Calendar
want to receive an alert.
6
If you want event reminders to continue to play until read, select the Beep until reminder
is read option.
7
Select the Save settings button to save your settings and return to a Calendar view.
USING COMMON ACCOMPLI 009 FEATURES WITH CALENDAR
Calendar enables you to use a number of common features, including the following:
• Cut, copy, and paste event information to or from another event or another Accompli 009
PIM application.
• Insert text from another event or another Accompli 009 PIM application.
• Beam calendar events to other hand-held devices or printers that support IR
communications.
• Restore deleted events from the Trashcan, if the Trashcan has not been emptied since
the item was put in trash.
For more information about using these common Accompli 009 features, see Chapter 3,
"Accompli 009 Features."
100 Accompli 009 User’s Guide
 Loading...