

Page 1
Motion FlexDock
for the LE-Series
INSTALLATION GUIDE
GUIDE D'INSTALLATION
INSTALLATIONSHANDBUCH
Page 2
The Motion Computing® FlexDock for the
LE-Series (referred to as Motion FlexDock in
this document) provides a convenient way to set
up your Motion Tablet PC on a desk or other
flat surface. It also lets you rotate the Motion
Tablet PC from portrait to landscape mode and
to adjust the viewing angle to meet a wide
variety of application needs. The display
orientation of the Motion Tablet PC
automatically adjusts as you rotate the Motion
Tablet PC. The unique design lets you write on
the unit at any angle and also stores flat for travel.
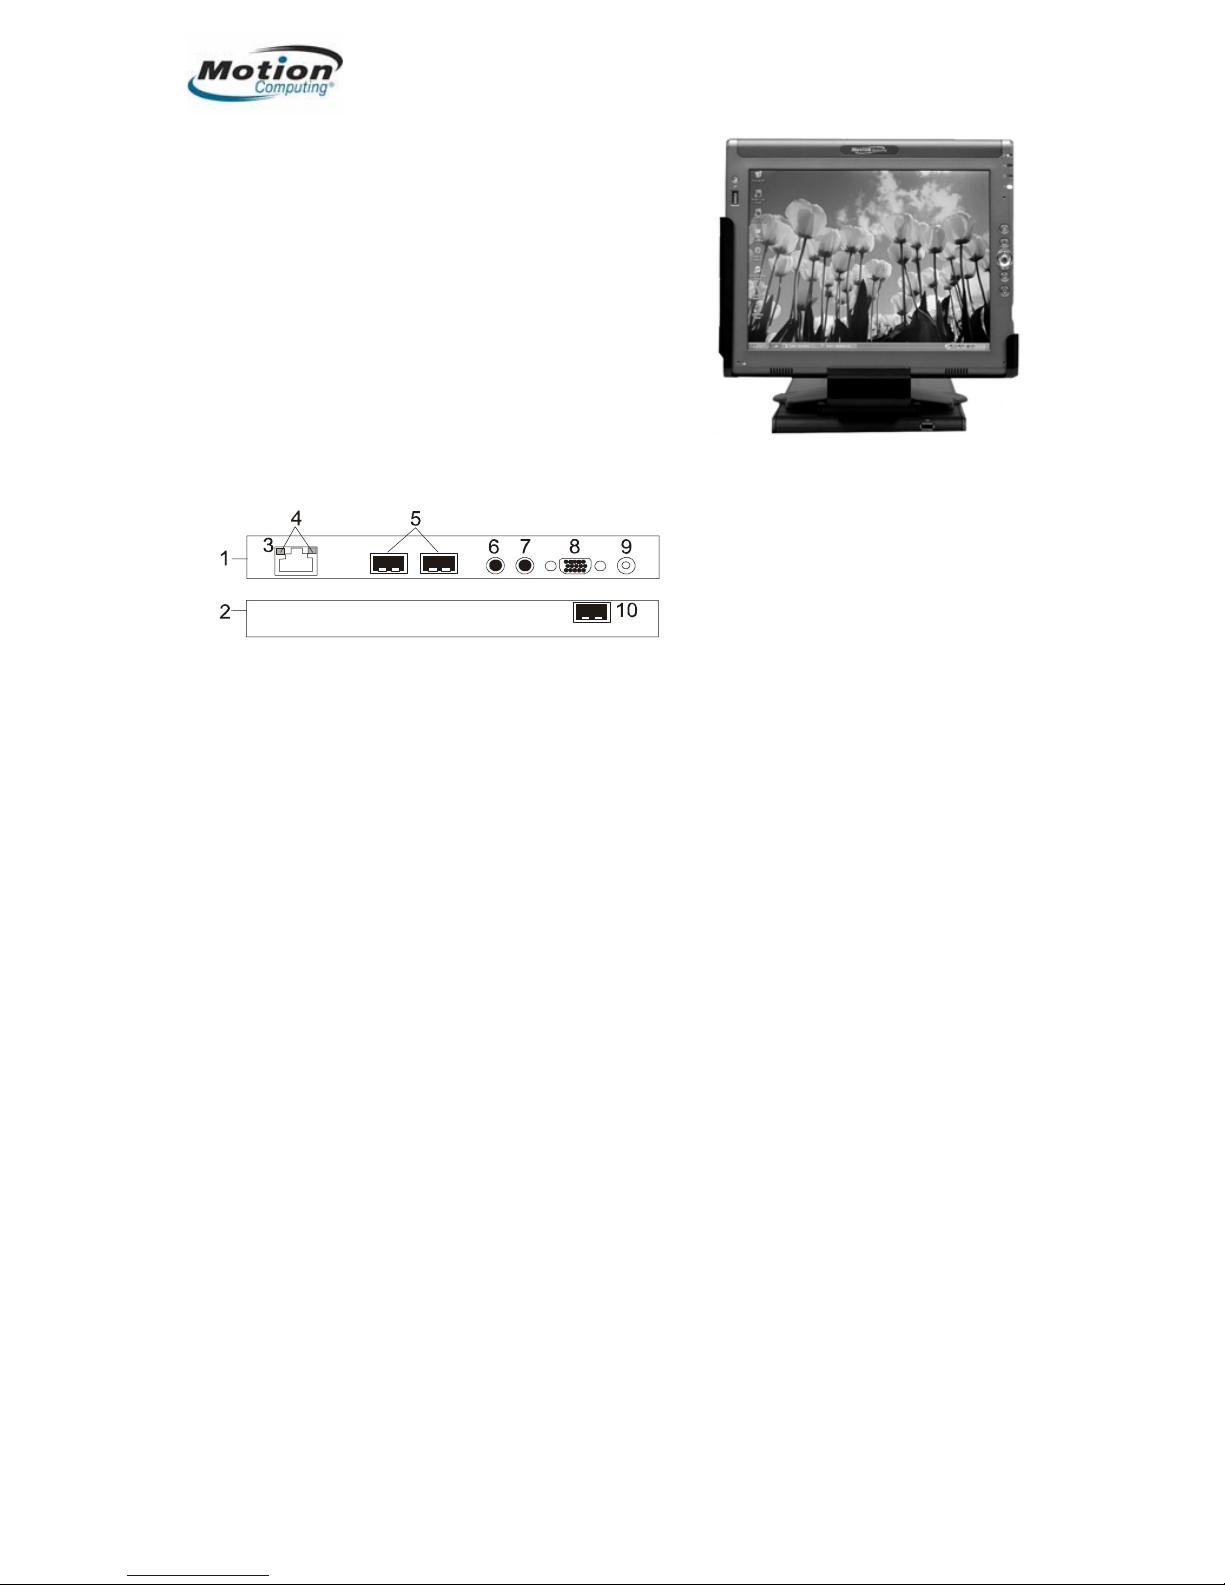
Motion FlexDock: (1) Back of FlexDock; (2) Front of FlexDock; (3) RJ-45/Ethernet port; (4) RJ-45 LEDs; (5) USB ports;
(6) Microphone jack; (7) Audio-out/Headphone jack; (8) VGA/External Monitor connector; (9) Power jack; (10) USB port
NOTE: The USB ports on the Motion FlexDock support USB 2.0.
Docking the Motion Tablet PC in the Motion FlexDock
1. Remove the Motion FlexDock from the box. Lift the top part and slide the
crossbar on the Motion FlexDock forward to set the desired viewing angle.
2. Verify that the Motion FlexDock is in landscape mode with the Motion
Computing logo horizontal and the docking connector on the bottom.
3. Be sure that the plastic cover on the Docking Connector is removed from the
Motion Tablet PC. With the Docking Connector of the Motion Tablet PC
pointing down, gently slide the Motion Tablet PC into the Motion FlexDock.
4. Plug the AC Power Adapter into the Motion FlexDock and then to an external
power supply. (You can also power the Motion FlexDock with adapters for the
Motion Tablet PC or the Auto/Plane Adapter.)
5. Start up the Tablet PC by sliding the power button in a downward motion.
6. If this is the first time you’ve used your Motion Tablet PC, when the Microsoft®
Windows® XP startup window appears, enter the information as prompted and
follow the onscreen instructions to complete the installation.
7. Test the screen rotation by turning the Motion Tablet PC counterclockwise in the
Motion FlexDock. The Motion FlexDock will sense the change and automatically
adjust the screen to portrait orientation.
8. Install any optional equipment you’ve purchased. We recommend that you install
each accessory one at a time, waiting about 2 minutes before connecting the next
one to ensure successful discovery and installation.
2 INSTALLING THE MOTION FLEXDOCK FOR THE LE-SERIES
Page 3

MOTION FLEXDOCK - LE-SERIES
Locking the Motion Tablet PC and Motion FlexDock
The Motion FlexDock has an opening over the universal security slot on the side of
the Motion Tablet PC through which you can insert a lock (not provided) into a
universal security lock slot. This provides physical asset security when the Motion
Tablet PC is docked in the Motion FlexDock.
(Optional) Connecting an Optical Disc Drive
Before connecting an AC-powered optical disc drive (such as the Motion USB
DVD/CD-RW) to the Motion FlexDock, verify that this drive is connected to AC
power and that the device is turned on. Then connect the drive’s USB cable to the
Motion FlexDock. For more information, see the installation guide packaged with
the drive.
(Optional) Connecting an External Monitor
You can connect the Motion FlexDock to a VGA monitor
for presentations or to mirror or extend your display to
another monitor. To mirror a display means to clone or
show the same information on both screens. Extending a
display provides an extended work area, allowing you to use
both screens. For more information about setting up the
external monitor, see the online user guide on your Motion
Tablet PC or go to the support page of the Motion
Computing website at www.motioncomputing.com/support
.
1. Plug the monitor cable into the VGA port on the Motion FlexDock.
2. Plug the monitor into a power outlet and turn it on. Windows XP will recognize
the monitor and search for its hardware driver. (You may need to install the
driver from the CD supplied by the monitor’s manufacturer.)
3. To mirror the Motion Tablet PC display, do the following:
a. Open the Motion Dashboard.
b. Select the Mirror Display radio button under External Monitor. This
setting automatically creates an identical display on the external monitor.
4. To set up an extended display, do the following:
a. Open the Motion Dashboard.
b. Select the Extend Display radio button under External Monitor. Use this
feature when you want to simultaneously open applications on two
monitors and significantly expand your workspace without hiding open
documents under layers of other work.
(Optional) Connecting Microphones, Headphones or Speakers
You can connect powered speakers or headphones to the audio out/headphone jack
and a standard analog microphone to the microphone jack.
(Optional) Connecting an Ethernet Connector
To connect a LAN, use an RJ-45 Ethernet connector and not an RJ-11 telephone
connector (which will damage the RJ-45 Ethernet port on the Motion FlexDock).
INSTALLING THE MOTION FLEXDOCK FOR THE LE-SERIES 3
Page 4

THIS PRODUCT COMES WITH A LIMITED WARRANTY: TO SEE DETAILS ABOUT THIS LIMITED WARRANTY,
GO TO WWW.MOTIONCOMPUTING.COM.
Safety: For general safety information, see the Safety and Regulatory Guide packaged with your Tablet PC.
Product Support: For service and support, go to www.motioncomputing.com/support.
FCC Notice (United States): This equipment has been tested and found to comply with the limits for a Class B
digital device, pursuant to part 15 of the FCC rules. These limits are designed to provide reasonable protection
against harmful interference in a residential installation. This equipment generates, uses and can radiate radio
frequency energy and, if not installed and used in accordance with the instructions, may cause harmful interference
to radio communications. However, there is no guarantee that interference will not occur in a particular installation. If
this equipment does cause harmful interference to radio or television reception, which can be determined by turning
the equipment off and on, the user is encouraged to try to correct the interference by one or more of the following
measures:
x Reorient or relocate the receiving antenna.
x Increase the separation between the equipment and the receiver.
x Connect the equipment into an outlet on a circuit different from that to which the receiver is connected.
x Consult the dealer or an experienced radio/TV technician for help.
IC Notice (Canada): All Motion FlexDocks are classified by the Industry Canada (IC) Interference-Causing
Equipment Standard #3 (ICES-003) as Class B digital devices. This classification is located on the label on the
bottom of the Motion FlexDock. Look for a statement on the label similar to the following: Canada ICES-003,
Class/Classe B. This Class B (or Class A, if so indicated on the registration label) digital apparatus meets the
requirements of the Canadian Interference-Causing Equipment Regulations.
Cet appareil numérique de la Classe B (ou Classe A, si ainsi indiqué sur l’étiquette d’enregistration) respecte toutes
les exigences du Règlement sur le Matériel Brouilleur du Canada.
CE Notice (European Notice): The Conformité Européne symbol found on the Motion FlexDock indicates
compliance to the EMC Directive and the Low Voltage Directive of the European Union. This means that the Tablet
PC or FlexDock meets the following technical standards: EN 55022 (CISPR22), EN 55024 (CISPR 24) (IEC 61000
4-2, 4-3, 4-3, 4-5, 4-6, 4-8, 4-11), EN 61000 3-2 (IEC 61000 3-2), EN 61000 3-3 (IEC 61000 3-3), EN60950
(EN60950-1/A11;2004).
PATENTS: The Motion Computing products and services may be covered by one or more of the following protected
inventions. Additional patents may also be pending. US PATENTS: D480, 730, and 6,856,506. OTHER PATENTS:
GB3009545, GB3009546, AUS154529, AUS154837, CAN101617, CAN101618, FR027692, FR027691, J1188539,
J1216404. For more information, see www.motioncomputing.com/info/patents
.
4 INSTALLING THE MOTION FLEXDOCK FOR THE LE-SERIES
Page 5

MOTION FLEXDOCK - LE-SERIES
La station d'accueil Motion Computing®
FlexDock pour LE-Series (appelée "Motion
FlexDock" dans le présent document) constitue
une solution pratique pour installer votre
tablette PC Motion sur un bureau ou sur une
autre surface plane. Elle vous permet également
de faire pivoter la tablette PC Motion du mode
Portrait en mode Paysage et de régler l'angle de
vue en fonction de vos besoins applicatifs.
L'orientation de l'écran de la tablette PC Motion
s'adapte automatiquement lorsque vous faites
pivoter celle-ci. La conception unique de l'unité vous permet d'écrire sur celle-ci à
partir de n'importe quel angle et de la ranger à plat lorsque vous voyagez.
Motion FlexDock : (1) Arrière de FlexDock ; (2) Avant de FlexDock ; (3) Port RJ-45/Ethernet ; (4) LED RJ-45 ;
(5) Ports USB ; (6) Prise micro ; (7) Prise Sortie audio/Casque ; (8) Connecteur VGA/Moniteur externe ;
(9) Prise d'alimentation ; (10) Port USB
REMARQUE : les ports USB de la station d'accueil Motion FlexDock prennent USB 2.0 en charge.
Ancrage de la tablette PC Motion avec la station d'accueil Motion
FlexDock
1. Retirez la station d'accueil Motion FlexDock de la boîte. Levez la partie
supérieure et faites glisser la barre transversale de la station Motion FlexDock
vers l'avant afin de régler l'angle de vue souhaité.
2. Vérifiez que la station Motion FlexDock est en mode Paysage. Le logo Motion
Computing doit est horizontal et le connecteur de liaison doit se trouver en bas.
3. Vérifiez à ôter le capuchon en plastique du connecteur de liaison de la tablette PC
Motion. Orientez ce connecteur vers le bas et faites doucement glisser la tablette
PC Motion dans la station d'accueil Motion FlexDock.
4. Branchez l'adaptateur secteur à la station Motion FlexDock, puis à une prise
externe. (Vous pouvez également alimenter la station d'accueil Motion FlexDock
à l'aide d'adaptateurs pour la tablette PC Motion ou de l'adaptateur voiture/avion.)
5. Démarrez la tablette PC en faisant glisser l'interrupteur vers le bas.
6. Si vous utilisez votre tablette PC Motion pour la première fois, lorsque la fenêtre
d'accueil Microsoft® Windows® XP, suivez les instructions à l'écran pour entrer
les informations requises et terminer l'installation.
7. Testez la rotation de l'écran en faisant pivoter la tablette PC Motion dans le sens
contraire des aiguilles d'une montre dans la station Motion FlexDock. La station
Motion FlexDock détecte le changement et règle automatiquement l'écran en
mode Portrait.
INSTALLING THE MOTION FLEXDOCK FOR THE LE-SERIES 5
Page 6

8. Installez les éventuels équipements en option que vous avez achetés. Nous vous
recommandons d'installer un accessoire à la fois, en attendant environ deux
minutes avant de connecter le suivant, afin de vous assurer que la détection et
l'installation se déroulent correctement.
Verrouillage de la tablette PC Motion et de la station d'accueil Motion
FlexDock
La station d'accueil Motion FlexDock présente une ouverture au-dessus de l'emplacement
universel de verrou situé sur le côté de la tablette PC Motion. Vous pouvez y introduire un
verrou (non fourni). Il est ainsi possible de protéger votre équipement physiquement
lorsque la tablette PC est ancrée dans la station Motion FlexDock.
Connexion d'un lecteur de disques optiques (en option)
Avant de connecter un lecteur de disques optiques sur secteur (tel que le lecteur
DVD/CD-RW USB de Motion) à la station d'accueil Motion FlexDock, vérifiez
qu'il est branché sur secteur et sous tension. Ensuite, branchez le câble USB du
lecteur à la station Motion FlexDock. Pour plus d’informations, reportez-vous au
guide d'installation fourni avec le lecteur.
Connexion d'un moniteur externe (en option)
Vous pouvez connecter la station d'accueil Motion FlexDock à
un moniteur VGA pour illustrer vos présentation ou pour
mettre en miroir/étendre le contenu de votre écran sur un autre
moniteur. Mettre un écran en miroir signifie cloner ou afficher
les mêmes informations sur les deux écrans. Par contre, si
vous étendez l'écran, vous obtenez un espace de travail plus
vaste, qui vous permet d'utiliser les deux écrans. Pour obtenir
de plus amples informations sur l'installation d'un moniteur
externe, reportez-vous au manuel de l'utilisateur en ligne de votre tablette PC
Motion ou rendez-vous sur la page d'assistance du site Web de Motion Computing,
à l'adresse www.motioncomputing.com/support
.
1. Branchez le câble du moniteur dans le port VGA de la station d'accueil Motion
FlexDock.
2. Connectez le moniteur à une prise de courant et activez-le. Windows XP
reconnaît le moniteur et recherche son pilote matériel. (Il se peut que vous
deviez installer le pilote à partir du CD fourni par le fabricant du moniteur.)
3. Pour créer un miroir de l'écran de la tablette PC, procédez comme suit :
a. Ouvrez Motion Dashboard.
b. Cochez la case Miroir de l'écran dans Moniteur externe. Ce réglage crée
automatiquement un affichage identique sur le moniteur externe.
4. Pour obtenir un écran étendu, procédez comme suit :
a. Ouvrez Motion Dashboard.
b. Cochez la case Ecran étendu dans Moniteur externe. Utilisez cette
fonction lorsque vous souhaitez ouvrir simultanément des applications
sur deux moniteurs pour accroître sensiblement votre espace de travail
sans devoir cacher des documents ouverts derrière d'autres travaux.
6 INSTALLING THE MOTION FLEXDOCK FOR THE LE-SERIES
Page 7

MOTION FLEXDOCK - LE-SERIES
Connexion d'un micro, d'un casque ou d'un haut-parleur (en option)
Vous pouvez connecter un haut-parleur ou un casque sous tension à la prise sortie
audio/casque et un micro analogique standard à la prise micro.
Branchement d'un connecteur Ethernet (en option)
Pour vous connecter à un LAN, utilisez un connecteur Ethernet RJ-45, et non une
prise téléphone RJ-11 (sans quoi vous risquez d'endommager le port Ethernet de la
station d'accueil Motion FlexDock).
CE PRODUIT EST FOURNI AVEC UNE GARANTIE LIMITEE : POUR OBTENIR DE PLUS AMPLES INFORMATIONS
SUR CETTE GARANTIE LIMITE, RENDEZ-VOUS SUR LE SITE WWW.MOTIONCOMPUTING.COM.
Sécurité : Pour obtenir des informations générales en matière de sécurité, reportez-vous au Guide des conseils de
sécurité et réglementations fourni avec la tablette PC.
Assistance technique : Pour obtenir une assistance technique ou des informations sur nos services, rendez-vous
sur le site www.motioncomputing.com/support/support_documentation.asp
Avis FCC (Etats-Unis) : Cet équipement a été testé et déclaré conforme aux limites imposées aux appareils
numériques de classe B en vertu du chapitre 15 des règles FCC. Ces limites ont été calculées de manière à fournir
une protection raisonnable contre les interférences nuisibles dans une installation résidentielle. Cet équipement
génère, utilise et irradie de l’énergie en fréquence radio et, s’il n’est pas installé et utilisé conformément aux
instructions, il peut provoquer des interférences radio nuisibles aux communications radio. Toutefois, il n’existe
aucune garantie que de telles interférences ne se produiront dans une installation particulière. Si l’équipement
engendre des interférences nuisibles à la réception radio ou télévisuelle, ce qui peut être déterminé en mettant
l’équipement successivement hors et sous tension, l’utilisateur est encouragé à tenter d’y remédier en ayant recours
à l’une des mesures suivantes :
x Réorienter ou déplacer l’antenne de réception.
x Augmenter l’espace entre l’équipement et le récepteur.
x Connecter l’équipement à une prise placée sur un circuit autre de celui du récepteur.
x Consulter le revendeur ou un technicien radio/TV expérimenté pour obtenir de l'aide.
Avis IC (Canada) : Toutes les stations d'accueil Motion FlexDocks sont classifiées comme appareils numériques de
classe B en vertu de la norme ICES-003 (Interference-Causing Equipment Standard #3) d'IC (Industry Canada). Cette
classification figure sur l'étiquette apposée au bas de l'appareil Motion FlexDock. Sur l'étiquette, vous verrez une mention
ressemblant à celle-ci : Canada ICES-003, Class/Classe B. This Class B (or Class A, if so indicated on the registration
label) digital apparatus meets the requirements of the Canadian Interference-Causing Equipment Regulations.
Cet appareil numérique de la Classe B (ou Classe A, si ainsi indiqué sur l’étiquette d’enregistrement) respecte toutes
les exigences du Règlement sur le Matériel Brouilleur du Canada.
Avis CE (Union européenne) : Le symbole Conformité Européenne présent sur la station d'accueil Motion
FlexDock indique que celle-ci est conforme aux directives européennes relatives à la compatibilité
électromagnétique et aux basses tensions. En d'autres termes, la tablette PC ou la station d'accueil FlexDock
répond aux normes techniques suivantes : EN 55022 (CISPR22), EN 55024 (CISPR 24) (IEC 61000 4-2, 4-3, 4-3,
4-5, 4-6, 4-8, 4-11), EN 61000 3-2 (IEC 61000 3-2), EN 61000 3-3 (IEC 61000 3-3), EN60950 (EN609501/A11;2004).
BREVETS : Les produits et services de Motion Computing peuvent être protégés par l'une des inventions brevetées
suivantes. D'autres brevets peuvent être en cours de certification. BREVETS AUX ETATS-UNIS : D480, 730 et
6,856,506. AUTRES BREVETS : GB3009545, GB3009546, AUS154529, AUS154837, CAN101617, CAN101618,
FR027692, FR027691, J1188539, J1216404. Pour plus d'informations, consultez le site
www.motioncomputing.com/info/patents
.
INSTALLING THE MOTION FLEXDOCK FOR THE LE-SERIES 7
Page 8

Das Motion Computing® FlexDock für die
LE-Serie (in diesem Dokument als Motion
FlexDock bezeichnet) bietet eine bequeme
Methode zum Aufstellen Ihres Motion Tablet PC
auf einem Schreibtisch oder einer anderen
ebenen Oberfläche. Auf diese Weise können Sie
den Motion Tablet PC von Hochformat in
Querformat drehen und den Betrachtungswinkel
ändern, um einer Vielzahl an Anforderungen
gerecht zu werden. Die Ausrichtung der Anzeige
des Motion Tablet PC wird automatisch
angepasst, während Sie den Motion Tablet PC
drehen. Dank des einmaligen Designs können Sie in jedem Winkel auf dem Gerät
schreiben und es zum Transportieren flach aufbewahren.
Motion FlexDock: (1) Rückseite des FlexDock; (2) Vorderseite des FlexDock; (3) RJ-45/Ethernet-Anschluss;
(4) RJ-45-LEDs; (5) USB-Anschlüsse; (6) Mikrofonbuchse; (7) Audio-Out/Kopfhörer-Buchse;
(8) VGA/External Monitor-Anschluss; (9) Netzstecker; (10) USB-Anschluss
HINWEIS: Die USB-Anschlüsse am Motion FlexDock unterstützen USB 2.0.
Andocken des Motion Tablet PC an Motion FlexDock
1. Nehmen Sie das Motion FlexDock aus der Verpackung. Heben Sie den oberen
Teil an und schieben Sie die Querleiste am Motion FlexDock nach vorne, um den
gewünschten Betrachtungswinkel einzustellen.
2. Stellen Sie sicher, dass der Motion FlexDock im Querformat und das Motion
Computing-Logo horizontal ausgerichtet sind und der Dockinganschluss nach
unten zeigt.
3. Achten Sie darauf, dass die Kunststoffabdeckung am Dockinganschluss des Motion
Tablet PC entfernt wird. Halten Sie den Dockinganschluss des Motion Tablet PC
nach unten und schieben Sie den Motion Tablet PC sanft in den Motion FlexDock.
4. Schließen Sie den Netzstecker am Motion FlexDock und dann an eine Steckdose
an. Sie können den Motion FlexDock auch mit den Motion Tablet PC- oder
Auto/Flugzeug-Adaptern betreiben.
5. Starten Sie den Tablet PC, indem Sie den Netzschalter nach unten schieben.
6. Wenn Sie den Motion Tablet PC zum ersten Mal starten, wird die
Willkommensseite von Microsoft® Windows® XP angezeigt. Geben Sie hier die
gewünschten Informationen ein und befolgen Sie die Anleitungen auf dem
Bildschirm, um die Installation abzuschließen.
7. Testen Sie die Bildschirmrotation, indem Sie den Motion Tablet PC im Motion
FlexDock gegen den Uhrzeigersinn drehen. Der Motion FlexDock erkennt die
Drehung und stellt die Anzeige automatisch auf Hochformat ein.
8 INSTALLING THE MOTION FLEXDOCK FOR THE LE-SERIES
Page 9

MOTION FLEXDOCK - LE-SERIES
8. Installieren Sie nun gegebenenfalls zusätzliche Geräte, die Sie erworben haben.
Es empfiehlt sich, Zubehör einzeln zu installieren und jeweils zwei Minuten zu
warten, bis Sie das nächste anschließen. Hierdurch wird sichergestellt, dass das
Gerät entdeckt und erfolgreich installiert wird.
Sperren des Motion Tablet PC und Motion FlexDock
Am Motion FlexDock befindet sich über dem universellen Sicherheits-Slot an der
Seite des Motion Tablet PC eine Öffnung, an der Sie ein Sicherheitsschloss (nicht im
Lieferumfang enthalten) befestigen können. Auf diese Weise ist Ihr Motion Tablet PC
vor unerwünschtem Zugriff gesichert, wenn er am Motion FlexDock angedockt ist.
(Optional) Anschließen eines optischen Laufwerks
Bevor Sie ein mit Netzstrom betriebenes optisches Laufwerk (z. B. das Motion USB
DVD/CD-RW) am Motion FlexDock anschließen, stellen Sie sicher, dass dieses
Laufwerk an eine Steckdose angeschlossen und eingeschaltet ist. Schließen Sie dann
das USB-Kabel des Laufwerks am Motion FlexDock an. Weitere Informationen
finden Sie im dem Laufwerk beiliegenden Installationshandbuch.
(Optional) Anschließen eines externen Monitors
Sie können den Motion FlexDock für Präsentationen oder eine
Spiegelung bzw. Erweiterung der Anzeige an einen VGAMonitor anschließen. Beim Spiegeln einer Anzeige wird die
Anzeige geklont, d. h. auf beiden Bildschirmen werden
dieselben Informationen angezeigt. Beim Erweitern der
Anzeige wird der Arbeitsbereich vergrößert, sodass Sie beide
Bildschirme verwenden können. Weitere Informationen zum
Einrichten eines externen Monitors finden Sie im OnlineBenutzerhandbuch Ihres Motion Tablet PC oder auf der Motion Computing Website
unter www.motioncomputing.com/support
.
1. Schließen Sie das Monitorkabel am VGA-Anschluss des Motion FlexDock an.
2. Schließen Sie den Monitor an eine Steckdose an und schalten Sie ihn ein.
Windows XP erkennt den Monitor und sucht nach einem Hardwaretreiber.
Möglicherweise müssen Sie den Treiber von der CD installieren, die vom
Hersteller des Monitors beigelegt wurde.
3. So spiegeln Sie die Anzeige des Motion Tablet PC:
a. Öffnen Sie das Motion Dashboard.
b. Aktivieren Sie unter „Externer Monitor“ die Option „Anzeige spiegeln“.
Diese Einstellung erstellt auf dem externen Bildschirm automatisch eine
identische Anzeige.
4. So richten Sie die erweiterte Anzeige ein:
a. Öffnen Sie das Motion Dashboard.
b. Aktivieren Sie unter „Externer Monitor“ die Option „Anzeige
erweitern“. Verwenden Sie diese Funktion, wenn Sie auf beiden
Monitoren gleichzeitig Anwendungen öffnen und somit Ihren
Arbeitsbereich erweitern möchten, sodass geöffnete Dokumente nicht
hinter anderen Fenstern verborgen werden.
INSTALLING THE MOTION FLEXDOCK FOR THE LE-SERIES 9
Page 10

(Optional) Anschließen von Mikrofonen, Kopfhörern oder Lautsprechern
Sie können mit Netzstrom betriebene Lautsprecher oder Kopfhörer an den AudioOut/Kopfhörer-Buchsen und ein standardmäßiges analoges Mikrofon an der
Mikrofonbuchse anschließen.
(Optional) Ethernet-Anschluss
Um die Verbindung zu einem LAN herzustellen, verwenden Sie einen RJ-45
Ethernet-Stecker und keinen RJ-11-Telefonstecker, da dieser den RJ-45 EthernetAnschluss am Motion FlexDock beschädigt.
DIESES PRODUKT UNTERLIEGT EINER EINGESCHRÄNKTEN GEWÄHRLEISTUNG: WEITERE
EINZELHEITEN ZU DIESER EINGESCHRÄNKTEN GEWÄHRLEISTUNG FINDEN SIE UNTER
WWW.MOTIONCOMPUTING.DE.
Sicherheit: Allgemeine Sicherheitsinformationen finden Sie im Sicherheits- und Vorschriftshandbuch zu Ihrem
Tablet PC.
Produktsupport: Für Service und Support besuchen Sie www.motioncomputing.de/support.
FCC-Erklärung (USA): Die Prüfung dieses Geräts hat ergeben, dass die Grenzwerte für ein digitales Gerät der
Klasse B, gemäß Teil 15 der FCC-Bestimmungen, eingehalten werden. Diese Grenzwerte wurden festgelegt, um
einen angemessenen Schutz gegen Störungen bei der Installation in Wohnbereichen zu bieten. Das Gerät nutzt
Hochfrequenzenergie und kann diese erzeugen und abstrahlen. Dies kann zu Störungen im Funkwellenempfang
führen, wenn das Gerät nicht entsprechend den Anleitungen installiert und betrieben wird. Es gibt jedoch keine
Garantie dafür, dass bei einer bestimmten Installation keine Störungen auftreten. Kommt es durch das Gerät zu
Störungen im Radio- oder Fernsehempfang, was sich durch Ein- oder Ausschalten des Geräts feststellen lässt, sollte
der Benutzer versuchen, die Störung durch eine oder mehrere der folgenden Maßnahmen zu beheben:
x Empfangsantenne neu ausrichten oder versetzen.
x Abstand zwischen Gerät und Empfänger erhöhen.
x Gerät an einen Ausgang eines anderen Stromkreises anschließen, an dem der Empfänger nicht angeschlossen ist.
x Einen Händler oder einen erfahrenen Rundfunk- und Fernsehtechniker zurate ziehen.
IC-Erklärung (Kanada): Alle Motion FlexDocks werden entsprechend der kanadischen IC-Norm Nr. 3 für
störungsverursachende Geräte (Industry Canada (IC) Interference-Causing Equipment Standard #3, ICES-003) als digitale
Geräte der Klasse B klassifiziert. Diese Klassifizierung befindet sich auf dem Etikett an der Unterseite Ihres Motion FlexDock.
Lesen Sie die Erklärung auf dem Etikett, die ungefähr wie folgt lautet: Canada ICES-003, Class/Classe B. Dieses digitale
Gerät der Klasse B (oder Klasse A, falls so auf dem Registrierungsetikett vermerkt) entspricht den kanadischen
Bestimmungen für störungsverursachende Geräte (Canadian Interference-Causing Equipment Regulations).
Cet appareil numérique de la Classe B (ou Classe A, si ainsi indiqué sur l’étiquette d’enregistration) respecte toutes
les exigences du Règlement sur le Matériel Brouilleur du Canada.
CE-Kennzeichnung (Europa): Die Kennzeichnung mit dem Conformité Européne-Symbol auf dem Motion FlexDock
gibt an, dass dieses Gerät den Bestimmungen der EMV-Richtlinie sowie der Richtlinie für Niederspannungsgeräte der
Europäischen Union entspricht. Dies bedeutet, dass der Tablet PC oder der FlexDock den folgenden technischen
Normen entspricht: EN 55022 (CISPR22), EN 55024 (CISPR 24) (IEC 61000 4-2, 4-3, 4-3, 4-5, 4-6, 4-8, 4-11), EN
61000 3-2 (IEC 61000 3-2), EN 61000 3-3 (IEC 61000 3-3), EN60950 (EN60950-1/A11;2004).
PATENTE: Die Motion Computing-Produkte und -Dienstleistungen können einem oder mehreren der folgenden
geschützten Erfindungen unterliegen. Weitere Patente sind angemeldet. US-PATENTE: D480, 730 und 6,856,506.
ANDERE PATENTE: GB3009545, GB3009546, AUS154529, AUS154837, CAN101617, CAN101618, FR027692,
FR027691, J1188539, J1216404. Weitere Informationen finden Sie unter
http://www.motioncomputing.com/info/patents.asp.
10 INSTALLING THE MOTION FLEXDOCK FOR THE LE-SERIES
Page 11

MOTION FLEXDOCK - LE-SERIES
INSTALLING THE MOTION FLEXDOCK FOR THE LE-SERIES 11
Page 12

© Motion Computing, Inc. All rights reserved. February, 2005. P/N 024-02-0074 Rev. A02
Motion Computing and the Motion logo are registered trademarks of Motion Computing, Inc. Microsoft and Windows
are registered trademarks of Microsoft Corporation in the United States and other countries. All other trademarks and
registered trademarks are the properties of their respective owners.
© Motion Computing, Inc. Tous droits réservés. Février 2005.
Motion Computing et le logo Motion sont des marques déposées de Motion Computing, Inc. Microsoft et Windows
sont des marques déposées de Microsoft Corporation aux Etats-Unis et dans d'autres pays. Toutes les autres
marques commerciales et marques déposées appartiennent à leurs propriétaires respectifs.
© Motion Computing, Inc. Alle Rechte vorbehalten. Februar 2005.
Motion Computing und das Motion-Logo sind eingetragene Marken von Motion Computing, Inc. Microsoft und
Windows eingetragene Marken der Microsoft Corporation in den USA und anderen Ländern. Alle anderen Marken
und eingetragenen Marken sind Eigentum ihrer jeweiligen Inhaber.
12 INSTALLING THE MOTION FLEXDOCK FOR THE LE-SERIES
 Loading...