

Page 1
40730MCZ Rev1:9225 47507 MEE pump - Jon 10/10/08 16:02 Page 1
Precise Steam Iron steam/spray shot
Please read and keep these instructions
Jemné žehlení s napařováním/výstřik páry
Přečtěte si tyto pokyny a uschovejte je
g
∂
Page 2

40730MCZ Rev1:9225 47507 MEE pump - Jon 10/10/08 16:02 Page 2
0 This appliance is not intended to be
g
IMPORTANT
SAFEGUARDS
When using your flatiron, basic
afety precautions should always be
s
followed, including the following:
• READ ALL INSTRUCTIONS
EFORE USING.
B
Use iron only for its intended use.
1
To protect against a risk of electric
2
shock, do not immerse the iron,
cord or plug in water or other
liquids.
3 The iron should always be turned to
‘Off’ before plugging or unplugging
from outlet. Never yank cord to
disconnect from outlet; instead,
grasp plug and pull to disconnect.
4 Do not allow cord to touch hot
surfaces. Let iron cool completely
before putting away. Loop cord
loosely around iron when storing.
5 Always disconnect iron from
electrical outlet when filling with
water or emptying and when not in
use.
6 Do not operate iron with a damaged
cord or if the iron has been
dropped, damaged or leaking. To
avoid the risk of electric shock, do
not disassemble the iron, take it to a
qualified serviceman for
examination and repair. Incorrect
reassembly can cause a risk of
electric shock when the iron is
used.
7 Close supervision is necessary for
any appliance being used by or near
children.
8 Do not leave iron unattended while
connected or on an ironing board.
9 Burns can occur from touching hot
metal parts, hot water, or steam.
Use caution when you turn a steam
iron upside down – there may be
hot water in the reservoir.
1
used by young children or infirm
ersons unless they have been
p
adequately supervised by a
responsible person to ensure they
an use the appliance safely.
c
1 Young children should be
1
supervised to ensure that they do
ot play with the appliance.
n
Other safety
considerations
Always locate your iron away from
•
the edge of the worktop/ironing
board.
• Ensure that the iron is used on a
firm, flat surface.
• Do not use the iron in a bathroom.
• WARNING: Do not place the iron
onto a metal tray or metal
surface whilst in use.
• Do not touch hot surfaces, use
handles or knobs.
• Do not fill above the MAX mark,
otherwise water may be ejected.
• Allow to cool before putting on or
taking off parts and before cleaning.
• Do not use outdoors.
• Do not place the iron on or near a
hot gas or electric burner or in a
heated oven.
• Do not use the vertical steam on
clothes being worn.
• Always disconnect the iron from the
electrical socket when filling with
water or emptying and when not in
use.
• When placing the iron on its heel,
ensure that the surface on which
the heel is placed is stable.
Treating scalds
• Run cold water over the affected
area immediately. Do not stop to
remove clothing, get medical help
quickly.
2
Page 3
40730MCZ Rev1:9225 47507 MEE pump - Jon 10/10/08 16:02 Page 3
Electrical requirements
Check that the voltage on the rating
late of your appliance corresponds
p
with your house electricity supply
which must be A.C. (Alternating
urrent).
C
ARNING: This appliance must
W
be earthed.
UK only
f the socket outlets in your home
I
are not suitable for the plug
upplied with this appliance, the
s
plug should be removed and the
ppropriate one fitted.
a
WARNING: The plug removed
from the mains lead, if severed,
must be destroyed as a plug
with bared flexible cord is
hazardous if engaged into a live
socket outlet.
Where used, should the fuse in the
13 amp plug require changing, a 13
amp BS1362 fuse must be fitted.
WARNING: This appliance must
be earthed.
g
INSTRUCTIONS FOR USE
Temperatre guide
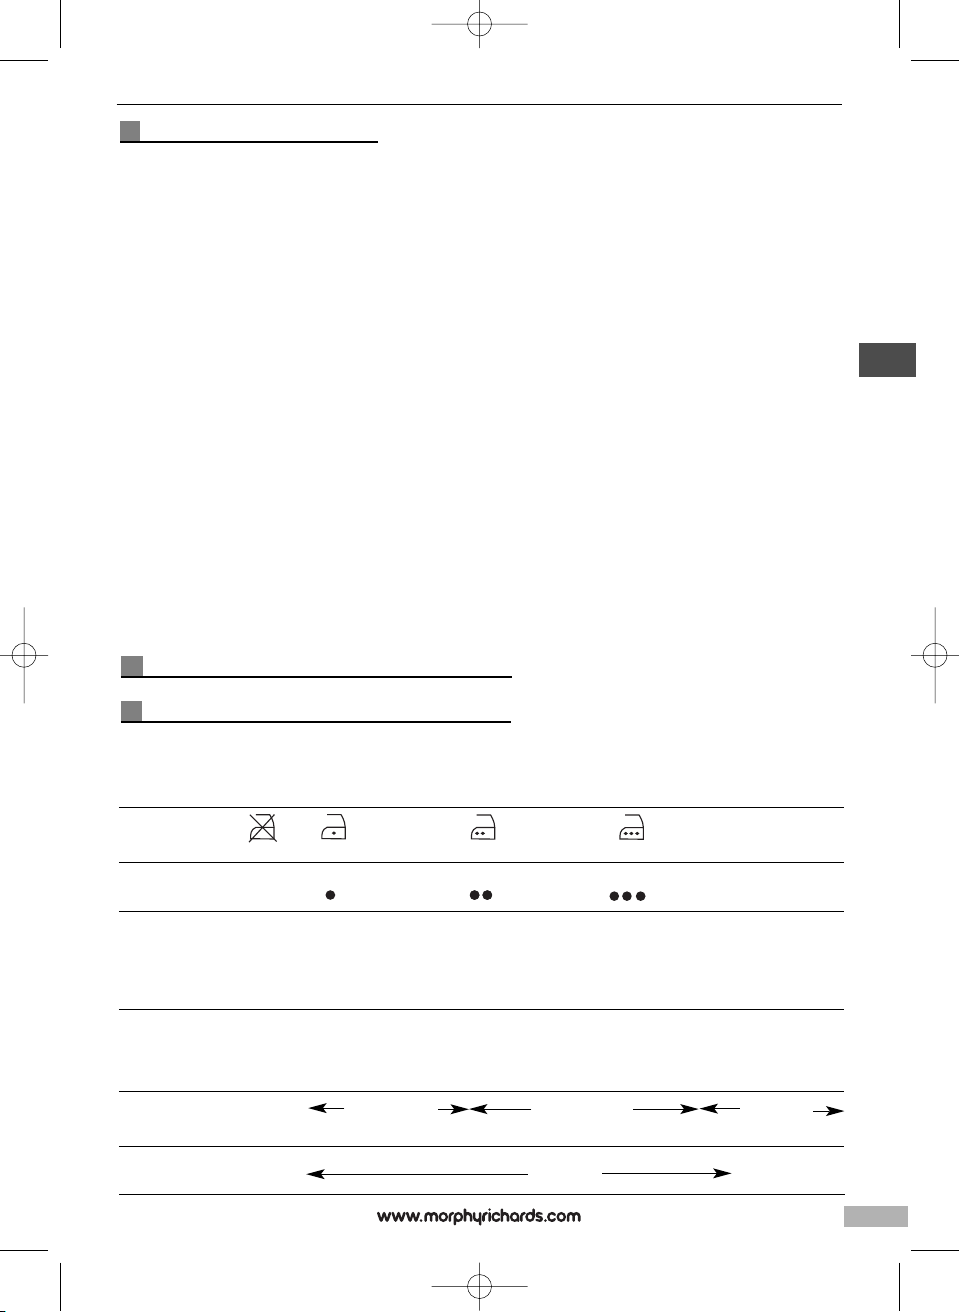
Heat setting markings on the adjustable control dial of all Morphy Richards irons match those of the
International Textile Care Labelling Code.
Symbol
Control knob
positions
Fabric
Ironing
With water in tank
Without water in tank
Do not iron
at all
(120˚C Max) Cool
Nylon, Acetates
e.g. Acrilan
Courtelle, Orlon
Triacetates, e.g.
Tricel/Polyester
Iron on wrong side
if moisture required
use damp cloth
(Not Acetate)
Dry and spray
(160˚C Max) Warm
Wool, Polyester
mixtures e.g.
Polyester/Cotton
Steam/spray/
shot of steam
Dry ironing
(210˚C Max) Hot
Cotton, Linen
Rayon, Rayon
mixtures,
e.g. Rayon/Linen
Fabrics requiring this
setting usually require
steam pressing for heavy
cotton, denim etc.
‘Max setting’
Self clean
3
Page 4
40730MCZ Rev1:9225 47507 MEE pump - Jon 10/10/08 16:02 Page 4
¤
‹
fl
›
⁄
‡
„
Â
350
300
00
4
‚
·
Getting the best from your
new iron....
Safety first
Caution must be used when
handling this appliance as it does
get very hot. Always switch off the
unit and allow to cool before
cleaning or storing.
Self cleaning button
Your iron will give the best ironing
results and will last longer if you use
the self clean feature at least once a
month.
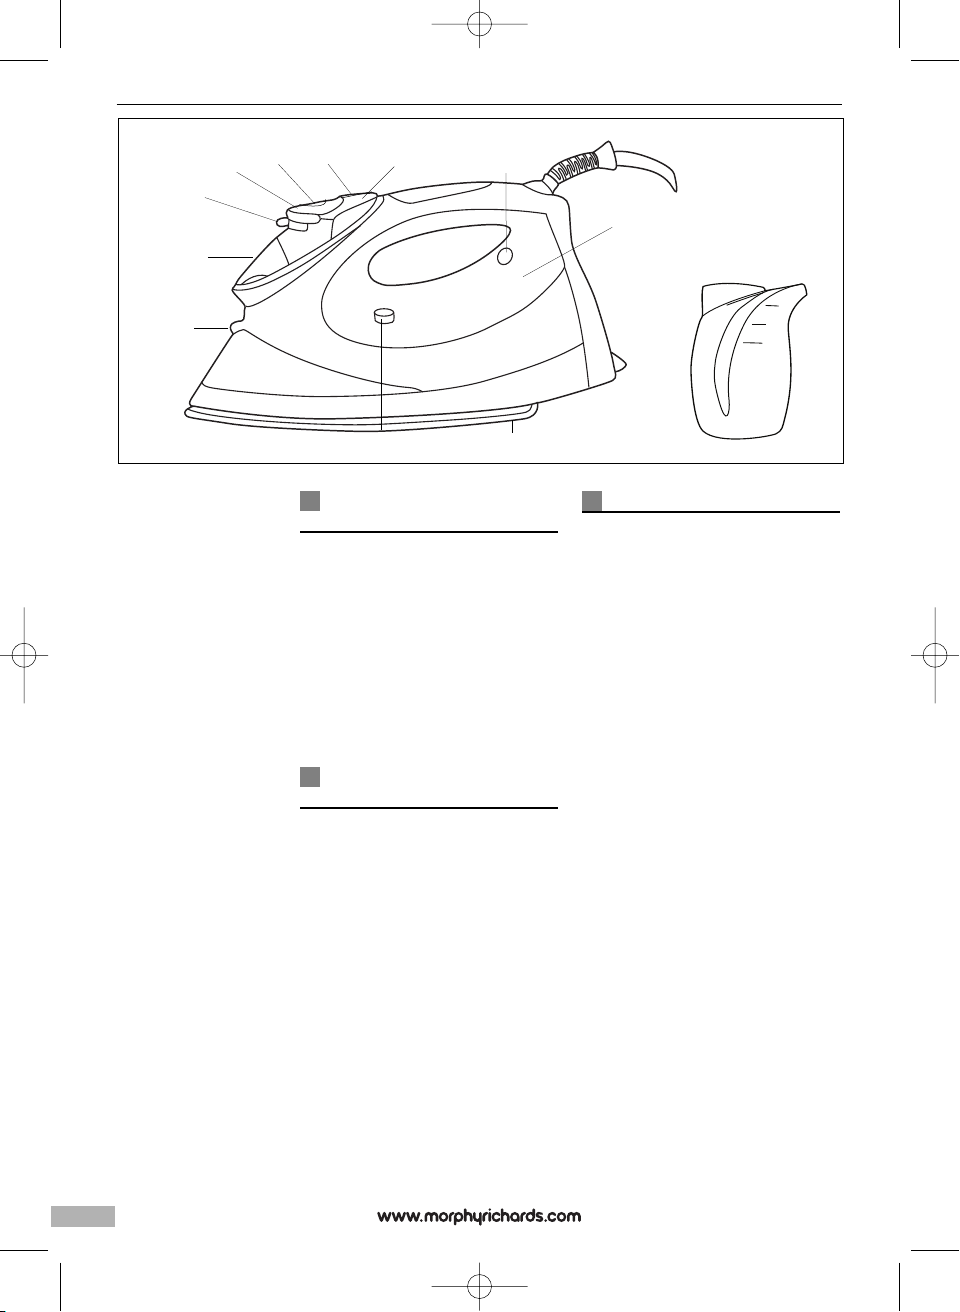
COMPONENTS OF
YOUR IRON
⁄ Steam to dry iron selector switch
¤ Temperature control dial
‹ Steam level indicator window
› Spray button
fi Shot of steam button
fl Temperature indicator light
‡ Water tank
(illuminated certain models)
· Soleplate
‚ Self-clean button
„ Spray nozzle
‰ Filling hole with cap
 Filler cup (300ml)
BEFORE USE
Sort out the items to be ironed
according to the type of fabric. This
will minimise the frequency of
temperature adjustment for different
garments.
Note: The steam facility should only
be used on garments which are
suitable for ironing at the 2 and 3
dot settings.
Textiles and clothes are supposed
to carry ironing instructions. If they
don’t you should follow the fabric
guide on page 3, but be sure to test
the temperature by ironing the hem
of the garment or similar area first.
If you turn the control dial down
from a hot setting to a cooler
setting, wait until the iron
temperature has stabilised before
you continue ironing.
Delicate fabrics such as silk,
wool,velour, etc, are best ironed
with an ironing cloth to prevent
shine marks.
4
Page 5
40730MCZ Rev1:9225 47507 MEE pump - Jon 10/10/08 16:02 Page 5
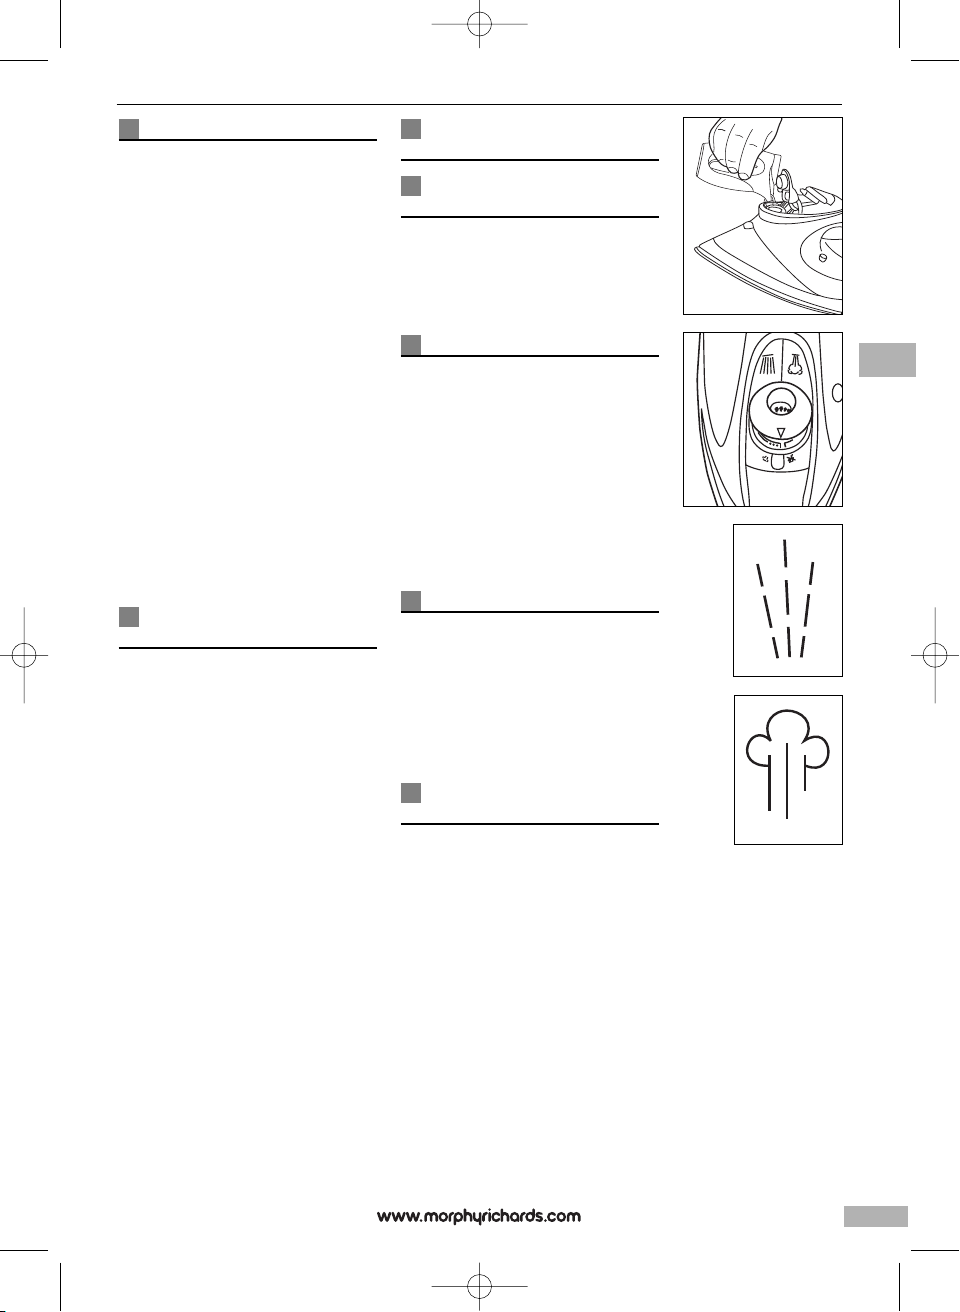
FILLING
1 Make sure that the iron is not
lugged in, then set the steam to
p
dry iron selector switch ⁄ to
the ‘0’ position before filling the iron
ith water.
w
Lift up the filler cap and fill the tank
2
‡ with water through the filling hole
‰
(300ml). A Â After filling replace
he filler cap. In hard water areas
t
the use of distilled or demineralised
ater is recommended.
w
ARNING: Never use battery
W
topping up fluid or water
containing any substances like
starch, or sugar, or defrosted
water from a refrigerator.
3 Always pour out the remaining
water after use.
WARNING: When filling your iron
with tap water always use the
beaker provided. Never fill
directly under the tap.
A
, using the beaker provided
TEMPERATURE
CONTROL
Plug in the iron and switch on. Set
the temperature control dial ¤ to
the temperature required, but don’t
start ironing immediately.
If you wait a few minutes, the iron
will stabilise at the required setting.
Your Morphy Richards iron is fitted
with an indicator light fl which will
go on and off while you are ironing.
This is perfectly normal as it shows
that the iron is maintaining the heat
setting you have chosen.
It is always a good idea to begin
with cool fabrics and work up to
higher settings.
An iron heats up quicker than it
cools down so you’ll save time and
electricity.
B
FEATURES OF YOUR
IRON
Temperature indicator
light
The indicator light fl shows that
he iron is warming up. When the
t
required temperature is reached the
ight will go out and will cycle on-off
l
during operation.
Dry ironing
ou can use your iron as a dry iron
Y
only. Make sure the steam to dry
iron selector switch ⁄ is set to the
symbol.
Any temperature setting may be
used depending on the garment.
The spray feature may be used
provided there is water in the tank
(see filling section). You do not need
to put any water in the tank when
dry ironing only.
C
Spray
Press the spray button › and aim
the spray of water at stubborn
creases. You can do this whilst dry
ironing providing there is water in
the tank. When using the water
spray it may be necessary to push
the button a few times to get the
spray pump primed.
Automatic variable
D
steam
Fill the iron with water as described
in the filling section, and insert the
plug into the electrical socket.
1 Set the steam to dry iron selector
switch to steam.
2 Select the temperature required by
turning the temperature control dial
¤ to the desired setting. The
amount of steam required is
automatically selected and is
displayed in window ‹.
Press the shot of steam button fi
to obtain a burst of extra steam for
ironing out creases in heavy
material such as denim.
A
B
g
C
D
5
Page 6

40730MCZ Rev1:9225 47507 MEE pump - Jon 10/10/08 16:02 Page 6
E
F
G
he shot of steam can be used
T
whilst dry ironing, providing there is
ater in the tank, and the
w
temperature control is set within the
steam range.
Do not use shot of steam at
emperatures below the steam
t
range (1-DOT) shown on the control
ial.
d
ote: For optimum steam quality,
N
do not operate the shot more than
hree times in succession.
t
Vertical steam
Hold the iron in a vertical position
between 1cm and 2cm away from
the item E. Press the shot of steam
button fi, this will create vertical
steam. This feature is especially
useful for removing creases from
hanging clothes, curtains, wall
hanging, etc.
Note; For optimum steam quality,
do not operate the shot more than
three times in succession.
No drip system
Your iron is fitted with a no drip
system which is designed to
prevent water escaping from the
soleplate when the iron is too cold.
During use, the no drip system may
emit a loud click, particularly during
heat-up or whilst cooling down. This
is perfectly normal and indicates
that the system is functioning
correctly.
Auto shut-off
(certain models only)
If your iron is fitted with the auto
shut-off function it will automatically
shut down after a set period.
If the iron is left unattended in the
horizontal position it will shut down
after 1 minute. When this occurs,
the indicator light will flash and a
beep will be heard.
If it is left in the vertical position it
will shut down after 8 minutes.
o reactivate the iron gently shake
T
it, the temperature indicator light will
ome on indicating the iron is
c
warming up and wait for the iron to
heat-up as normal.
LIFE LONG ANTI- SCALE
SYSTEM
The life long anti-scale system
educes scale deposits and helps
r
prolong the life of the iron.
(certain models only)
EMPTYING AND
STORING
When you have finished ironing,
unplug your iron. Ensure that the
steam to dry iron selector switch ⁄
is set at the position, lift up the
fill cap and empty any remaining
water out of the filling hole F.
Do not store in the box, but in an
upright position, so that any drops
of water remaining cannot leak out
and discolour the soleplate G.
Important: The flex can be damaged
if wound too tightly around the iron
after use. Make a loose loop with
the flex and wrap it around the iron.
The iron must be cool before
winding the flex and storing on its
heel.
MAINTENANCE
Self clean feature
1 Half fill the iron with water.
2 Place the iron on its heel.
3 Connect to a mains supply outlet
4 Turn the temperature dial to ‘MAX’
setting
5 The pilot light will glow indicating
the irons switched on.
6 The pilot light will go off when the
required temperature is reached.
7 Wait for one more cycle;
(pilot light glows and goes off.)
8 Turn the temperature dial in anti-
clockwise direction to ‘Min’
6
Page 7

40730MCZ Rev1:9225 47507 MEE pump - Jon 10/10/08 16:02 Page 7
Disconnect the iron from mains
9
supply outlet.
10 Hold the iron horizontally over
a sink.
11 Press and hold down the Self-
leaning button.
C
2 Steam and boiling hot water will
1
drain from the holes in the the
oleplate washing away the scale
s
and minerals that have built up
nside the Steam Chamber.
i
3 Gently move the iron back and forth
1
until the water tank is empty.
14 When Self-Cleaning is complete,
release the Self-Cleaning button.
15 Rest your steam iron back on its
heel and allow to fully cool down.
16 Wipe the soleplate with a cold
damp cloth.
WARNING: Keep hands and
body away from the hot water.
WARNING: Do not attempt to
descale the soleplate with
descaling products.
To clean a stainless
steel soleplate
To keep the soleplate of your iron
clean and free of limescale, we
recommend that you use one of the
gentle chrome, silver or stainless
steel cleaners that are generally
available. Always follow the
manufacturers instructions. To clean
off melted man-made fibres set the
iron at 3 dot position and pass it
over a clean piece of cotton which
will draw the deposit off the surface.
To clean a coated
soleplate
In the unlikely event of any manmade fibre fusing to the soleplate,
et the iron at the 3 dot position and
s
pass it over a clean piece of cotton
hich will draw the deposit off the
w
surface.
Do not use scouring powder or
olution as this could cause
s
damage to the coating.
(certain models only)
To clean the exterior
Allow the iron to cool and wipe over
with a damp cloth and mild
detergent, then wipe with a dry
cloth.
g
7
Page 8

40730MCZ Rev1:9225 47507 MEE pump - Jon 10/10/08 16:02 Page 8
YOUR TWO YEAR
GUARANTEE
the retailers receipt as proof of
urchase. Staple your receipt to this
p
back cover for future reference.
Please quote the following
nformation if the product develops
i
a fault. These numbers can be
ound on the base of the product.
f
odel no. Serial no.
M
ll Morphy Richards products are
A
individually tested before leaving the
factory. In the unlikely event of any
appliance proving to be faulty within
28 days of purchase it should be
returned to the place of purchase
for it to be replaced.
If the fault develops after 28 days
and within 24 months of original
purchase, you should contact the
Helpline number quoting Model
number and Serial number on the
product, or write to Morphy
Richards at the address shown. You
may be asked to return a copy of
proof of purchase.
Subject to the exclusions set out
below (see Exclusions) the faulty
appliance will then be repaired or
replaced and dispatched usually
within 7 working days of receipt.
If for any reason this item is
replaced during the 2 year
guarantee period, the guarantee on
the new item will be calculated from
original purchase date. Therefore it
is vital to retain your original till
receipt or invoice to indicate the
date of initial purchase.
To qualify for the 2 year guarantee
the appliance must have been used
according to the manufacturers
instructions. For example kettles
should have been regularly
descaled.
It is important to retain
EXCLUSIONS
Morphy Richards shall not be liable
o replace or repair the goods under
t
the terms of the guarantee where:
The fault has been caused or is
1
attributable to accidental use,
isuse, negligent use or used
m
contrary to the manufacturers
ecommendations or where the fault
r
has been caused by power surges
r damage caused in transit.
o
The appliance has been used on a
2
voltage supply other than that
tamped on the products.
s
3 Repairs have been attempted by
persons other than our service staff
(or authorised dealer).
4 Where the appliance has been used
for hire purposes or non domestic
use.
5 Morphy Richards are not liable to
carry out any type of servicing work,
under the guarantee.
6 Plastic filters for all Morphy
Richards kettles and coffee makers
are not covered by the guarantee.
This guarantee does not confer any
rights other than those expressly set
out above and does not cover any
claims for consequential loss or
damage. This guarantee is offered
as an additional benefit and does
not affect your statutory rights as a
consumer.
8
Page 9

40730MCZ Rev1:9225 47507 MEE pump - Jon 10/10/08 16:02 Page 9
AUSTRALIAN WARRANTY
This appliance is guaranteed for 2
ears against faulty material,
y
components and workmanship.
his warranty is in addition and
T
does not affect your statutory rights.
Proof of purchase must be
roduced for any warranty benefit.
p
n the unlikely event of any
I
appliance proving to be faulty,
ecurely pack and return the item to
s
the place of purchase accompanied
y the original receipt or invoice.
b
NOT COVERED BY THIS
WARRANTY
• If the appliance has not been used
in accordance with the
manufacturers’ recommendations or
Instructions.
• If the fault is deemed to be caused
by abuse, misuse, neglect,
modifications or in proper use and
or care
Eg: Kettles: Excessive build up of
scale.
Toasters: Excessive build up of
crumbs or foreign matter etc.
• Connection to incorrect voltage to
that stamped on the product
• Unauthorised repairs
• Appliance used other than for
domestic purposes.
• Excluding bags, filters, glass,
carafes, and cutting blades.
• Freight and insurance costs.
(Australian only)
f for any reason this item is
I
replaced during the 2 year
uarantee period, the guarantee on
g
the new item will be calculated from
original purchase date. Therefore it
s vital to retain your original receipt
i
or invoice to indicate the date of
riginal purchase.
o
orphy Richards’s policy is to
M
continually improve quality design
nd product quality. The company
a
therefore reserves the right to
hange any specifications or to
c
carry out modifications as deemed
orthy at any time.
w
The Australian supplier ASKO
Appliances reserves the right to
repair, modify, exchange or replace
the faulty appliance with the same
or similar model or product of
equivalent value.
g
9
Page 10

40730MCZ Rev1:9225 47507 MEE pump - Jon 10/10/08 16:02 Page 10
0 Tento spotřebič není určen k
∂
Důležité bezpečnostní
pokyny
Při používání žehličky se musí vždy
održovat základní bezpečnostní
d
opatření včetně následujících:
• PŘED POUŽITÍM SI
ROSTUDUJE VŠECHNY
P
POKYNY.
1 Používejte žehličku pouze k účelu,
e kterému je určena.
k
2 Nevkládejte ani neponořujte
žehličku, kabel ani zástrčku do nebo
ani jiné tekutiny, abyste se chránili
před rizikem úrazu elektrickým
proudem.
3 Před odpojením žehličky ze zásuvky
by vždy měla být vypnutá. Při
odpojování ze zásuvky nikdy
netahejte za kabel, místo toho
uchopte zástrčku a vytáhněte ji.
4 Zabraňte styku kabelu s horkými
povrchy. Před odložením nechte
žehličku úplně vychladnout. Před
uložením oviňte kabel volně kolem
žehličky.
5 Při plnění vodou nebo
vyprazdňování a když žehličku
nepoužíváte, vždy ji odpojte od
elektrické zásuvky.
6 Nepoužívejte žehličku s
poškozeným kabelem, nebo pokud
byla upuštěna nebo je poškozená
nebo netěsní. Nedemontujte
žehličku, předejte ji kvalifikovanému
servisnímu technikovi ke kontrole a
opravě, vyhnete se tak úrazu
elektrickým proudem. Nesprávná
montáž může způsobit riziko úrazu
elektrickým proudem při používání
žehličky.
7 Při používání jakéhokoliv spotřebiče
v blízkosti dětí je nutný přísný dozor.
8 Nenechávejte žehličku bez dozoru,
jestliže je připojená k síti nebo na
žehlicím prknu.
9 Při kontaktu s horkými kovovými
částmi, horkou vodou nebo párou
mohou vzniknout popáleniny. Při
obracení žehličky vzhůru nohama
bud’te opatrní, v nádrži na vodu
může být horká voda.
1
používání malými dětmi nebo
emohoucími osobami bez
n
náležitého dozoru zodpovědné
osoby, která zaručí, že jej mohou
ezpečně používat.
b
1 Na malé děti se musí dohlížet, aby
1
bylo jisté, že si se spotřebičem
ebudou hrát.
n
Další bezpečnostní
pokyny
Vždy umisťujte žehličku dále od
•
okraje pracovní plochy/žehlicího
prkna.
• Ujistěte se, že žehlička je používána
na pevném, rovném povrchu.
• Nepoužívejte žehličku v koupelně.
• VAROVÁNÍ: Během používání
nepokládejte žehličku na kovový
tác nebo kovový povrch.
• Nedotýkejte se horkých povrchů,
používejte držadla nebo ovládací
prvky.
• Neplňte žehličku nad značku MAX,
jinak by mohla vystříknout vařící
voda.
• Před vkládáním nebo odstraňováním
součástí a před čištěním nechte
žehličku vychladnout.
• Nepoužívejte venku.
• Neumisťujte žehličku na horký
plynový nebo elektrický vařič, do
jeho blízkosti nebo do trouby.
• Nepoužívejte svislé napařování na
oděvech oblečených na osobách.
• Při plnění vodou nebo
vyprazdňování, nebo když žehličku
nepoužíváte, vždy ji odpojte od
elektrické zásuvky.
• Při pokládání žehličky na patu se
ujistěte, že povrch, na kterém pata
stojí, je dostatečně stabilní.
Ošetření opařenin
• Zasažené místo ihned vložte pod
tekoucí studenou vodu. Nezdržujte
se svlékáním oděvu, ihned
vyhledejte lékařskou pomoc.
10
Page 11

40730MCZ Rev1:9225 47507 MEE pump - Jon 10/10/08 16:02 Page 11
Elektrické požadavky
Zkontrolujte, zda napětí na
ýkonovém štítku spotřebiče
v
odpovídá síťovému napětí v
domácnosti, které musí být střídavé.
VAROVÁNÍ:Tento spotřebič musí
ýt uzemněný.
b
ouze Velká Británie
P
Pokud zásuvky v domácnosti
evyhovují zástrčce dodané s tímto
n
spotřebičem, zástrčka se musí
dstranit a nahradit vhodným
o
typem.
VAROVÁNÍ: Dojde-li k poškození
zástrčky odstraněné ze síťového
kabelu, musí se zničit, protože
zástrčka s odkrytým kabelem je
po zapojení do zásuvky pod
proudem nebezpečná.
Jestliže je třeba vyměnit 13A
pojistku v zástrčce, musí se místo ní
nainstalovat 13A pojistka BS1362.
Jak nejlépe využít vaši
novou žehličku...
Bezpečnost na prvním místě
Při manipulaci s tímto spotřebičem
e třeba být opatrný, protože se
j
velmi ohřívá. Před čištěním nebo
ložením přístroj vždy vypněte a
u
nechte vychladnout.
Tlačítko samočištění
ehlička bude poskytovat nejlepší
Ž
výsledky a vydrží vám déle, pokud
unkci samočištění použijete
f
alespoň jednou měsíčně.
Návod k použití
Pokyny pro volbu teploty/tkaniny
Značky pro nastavování teploty na žehličce odpovídají značkám v mezinárodních předpisech pro značení v
údržbě textilu.
Na textilu a oděvech by měly být pokyny pro žehlení, ale pokud nejsou, použijte tyto pokyny pro tkaniny.
Nezapomeňte vyzkoušet nastavenou teplotu tak, že nejprve vyžehlíte lem oděvu nebo podobné místo.
∂
Symbol
studená (120 °C max.) teplá (160 °C max.) horká (210 °C max.) nastaveníʼ
Polohy Vůbec
otočného nežehlete
ovladače
Tkanina Nylon, acetáty, Vlna, kombinace Bavlna, len
Žehlení Žehlete na rubu, Tkaniny vyžadující toto
S vodou v nádrži Nasucho Pára/postřik/výstřik páry Proudové
Bez vody v nádrži Žehlení nasucho
např. Acrilan polyesteru, např. Rayon, kombinace
triacetáty Olonu, polyester/bavlna Rayonu,
e.g. Tricel/polyester e.g. Rayon/len
je-li vyžadována vlhkost, nastavení obvykle
použijte vlhkou látku vyžadují parní žehlení
(ne acetát) pro silnou bavlnu,
a pára čištění
džínovinu atd.
‘maximální
11
Page 12

40730MCZ Rev1:9225 47507 MEE pump - Jon 10/10/08 16:02 Page 12
Součásti žehličky
⁄ Volicí spínač přívodu páry pro
ehlení nasucho
ž
¤ Otočný regulátor teploty
‹ Okénko indikace hladiny páry
Tlačítko postřiku
›
fi Tlačítko pro výstřik páry
Indikační kontrolka teploty
fl
‡ Vodní nádrž
svítí u některých modelů)
(
· Žehlicí plocha
Tlačítko samočištění
‚
„ Rozprašovací tryska
Plnicí otvor s víkem
‰
 Plnicí víko (300 ml)
Před použitím
Roztřid’te jednotlivé žehlené oděvní
součásti podle typu tkaniny.Tím
minimalizujete četnost nastavování
teploty pro různé oděvní součásti.
Poznámka: Napařování by se mělo
používat na oděvech, které lze žehlit
s nastavením na 2 nebo 3 tečky.
Na textilu a oděvech by měly být
pokyny pro žehlení.V opačném
případě byste se měli řídit
průvodcem tkanin na straně 11;
nezapomeňte nejprve vyzkoušet
teplotu žehlení na lemu oděvu nebo
podobném místě.
Pokud otočíte regulátor z horkého
na chladnější nastavení, počkejte,
dokud se teplota žehličky neustálí, a
teprve poté pokračujte v žehlení.
Jemné tkaniny, jako je hedvábí, vlna,
velur atd. se nejlépe žehlí na
žehlicím prkně, aby se zabránilo
vzniku lesků.
PLNĚNÍ
1 Zkontrolujte, zda žehlička není
připojena, pak nastavte volicí spínač
přívodu páry pro žehlení nasucho ⁄
do polohy ‘0’, až poté naplňte
žehličku vodou.
2 Zvedněte krytku plnicího hrdla a
naplňte nádrž ‡ vodou skrze plnicí
otvor ‰ pomocí odměrné kádinky
(300 ml). A Â Po naplnění krytku
plnicího hrdla nasad’te zpět. V
oblastech s tvrdou vodou se
doporučuje používat destilovanou
nebo demineralizovanou vodu.
A
AROVÁNÍ: Nikdy nepoužívejte k
V
doplňování vodu z akumulátorů
ebo vodu obsahující jakékoliv
n
látky jako škrob nebo cukr, ani
vodu z odmražené ledničky.
3 Po použití vždy vylijte zbývající vodu.
VAROVÁNÍ: Při plnění žehličky
odou z vodovodu vždy používejte
v
dodanou nádobu. Nikdy neplňte
ehličku přímo z kohoutku.
ž
REGULACETEPLOTY
Připojte žehličku a zapněte ji.
Nastavte otočný regulátor teploty ¤
na požadovanou teplotu, ale
nezačněte hned žehlit.
Pokud několik minut počkáte,
žehlička se stabilizuje na
požadovaném nastavení. Žehlička
Morphy Richards je vybavena
indikační kontrolkou fl, která se
během žehlení rozsvěcuje a zhasíná.
To je zcela normální, protože to
signalizuje, že žehlička udržuje vámi
nastavenou teplotu.
Vždy je vhodné začít s chladnými
tkaninami a pokračovat k vyšším
hodnotám.
Žehlička se ohřívá rychleji, než se
ochlazuje, takže ušetříte čas a
energii.
B
FUNKCE ŽEHLIČKY
Indikační kontrolka teploty
Indikační kontrolka fl zobrazuje, že
se žehlička e zahřívá. Když je
dosažena požadovaná teplota,
kontrolka zhasne a bude se během
práce rozněcovat a zhasínat.
Žehlení nasucho
Žehličku můžete použít k žehlení
nasucho. Zkontrolujte, zda je volicí
spínač přívodu páry pro žehlení
nasucho ⁄ nastaven na symbol .
Lze použít jakékoliv nastavení teploty
v závislosti na oděvu. Za
předpokladu, že je v nádrži voda, lze
používat postřik (viz část plnění). Při
žehlení na sucho není nutné nalévat
do nádrže vodu.
12
Page 13

40730MCZ Rev1:9225 47507 MEE pump - Jon 10/10/08 16:02 Page 13
Postřik
Stiskněte tlačítko postřiku › a
n
nepoddajné záhyby. Můžete to
provádět při žehlení na sucho za
p
použití vodního postřiku bude
m
tlačítko, aby se naplnilo stříkací
č
Automatická pára
Naplňte žehličku vodou způsobem
p
zasuňte zástrčku do elektrické
zásuvky.
1 Nastavte volicí spínač přívodu páry
pro žehlení nasucho do polohy pro
páru.
2 Zvolte požadovanou teplotu
otočením regulátoru teploty ¤ na
požadované nastavení. Objem
vyžadované páry se volí automaticky
a zobrazí se v okně ‹.
Stisknutím tlačítka pro výstřik páry
fi získáte proud páry navíc pro
žehlení přehybů na silném materiálu,
například džínovině.
Výstřik páry lze použít při žehlení na
sucho za předpokladu, že v nádrži je
voda a regulátor teploty je nastaven
na rozsah pro páru.
Nepoužívejte výstřik páry při nižších
teplotách, než je rozsah pro páru na
otočném regulátoru (1 tečka).
Poznámka: Nepoužívejte výstřik páry
vícekrát než třikrát za sebou,
napařování tak bude mít optimální
kvalitu.
C
amiřte stříkající vodu na
ředpokladu, že v nádrži je voda. Při
ožná nutné několikrát stisknout
erpadlo.
D
opsaným v části věnované plnění a
Svislé napařování
Držte žehličku ve svislé poloze jeden
až dva centimetry od položky E.
Stiskněte tlačítko pro výstřik páry
fi, tím vznikne svislý proud páry.
Tato funkce je vhodná zejména k
odstraňování přehybů ze zavěšených
oděvů, závěsů, nástěnných čalounů
atd.
Poznámka: Nepoužívejte výstřik páry
vícekrát než třikrát za sebou,
napařování tak bude mít optimální
kvalitu.
Systém na ochranu před
kapáním
Žehlička je vybavena systémem na
ochranu před kapáním, který brání
nikání vody ze žehlicí plochy, když
u
je žehlička příliš chladná.
Během používání se ze systému
ůže ozvat hlasité cvaknutí, zejména
m
při ohřívání nebo ochlazování. Je to
cela normální a znamená to, že
z
systém funguje správně.
Automatické vypnutí
pouze některé modely)
(
Je-li žehlička vybavena funkcí
automatického vypnutí, po
nastavené době se automaticky
vypne.
Je-li žehlička ponechána v klidu ve
vodorovné poloze, vypne se po 1
minutě. Když k tomu dojde,
indikační kontrolka problikává a ozve
se zvukový signál.
Je-li ponechána ve svislé poloze,
vypne se po 8 minutách.
Chcete-li ji znovu aktivovat, lehce jí
zatřeste, aby se rozsvítil indikátor
teploty signalizující zahřívání
žehličky, a počkejte, až se žehlička
zahřeje jako obvykle.
Systém dlouhodobé
ochrany proti usazování
vodního kamene
(pouze některé modely)
Systém dlouhodobé ochrany proti
usazování vodního kamene omezuje
usazování vodního kamene a
prodlužuje životnost žehličky.
VYPRAZDŇOVÁNÍ A
UKLÁDÁNÍ
Až skončíte se žehlením, odpojte
žehličku od sítě. Zajistěte, aby volicí
spínač přívodu páry pro žehlení
nasucho ⁄ byl nastaven do polohy
, zvedněte krytku plnicího hrdla a
vyprázdněte zbývající vodu otvorem
F.
Neukládejte žehličku do krabice, ale
ve svislé poloze, aby nemohly
uniknout žádné kapky zbylé vody a
zabarvit žehlicí plochu G.
∂
13
Page 14

40730MCZ Rev1:9225 47507 MEE pump - Jon 10/10/08 16:02 Page 14
ůležité: Pokud po použití ovinete
D
kabel příliš těsně kolem žehličky,
ohl by se poškodit. Oviňte kabel ve
m
volných smyčkách kolem žehličky.
Před navinutím kabelu a uložením na
atce musí být žehlička studená.
p
ÚDRŽBA
Funkce samočištění
1 Naplňte žehličku z poloviny vodou.
2 Položte žehličku na patu.
3 Připojte napájecí kabel do zásuvky.
4 Zapněte regulátor teploty do polohy
‘MAX’.
5 Hlavní kontrolka se rozsvítí a
signalizuje, že žehlička je zapnutá.
6 Hlavní kontrolka zhasne, když je
dosažena požadovaná teplota.
7 Vyčkejte ještě jeden další cyklus;
(kontrolka se rozsvítí a zhasne).
8 Otočte regulátor teploty proti směru
hodinových ručiček ve směru ‘Min’.
9 Odpojte žehličku od napájecí
zásuvky.
10 Podržte žehličku vodorovně nad
umyvadlem.
11 Stiskněte a podržte tlačítko
samočisticí funkce.
12 Pára a horká vařící voda začne
vytékat z otvorů v žehlicí ploše a
omyje vodní kámen a minerály, které
se usadily uvnitř parní komory.
13 Opatrně pohybuje žehličkou tam a
zpět, dokud voda z nádrže nevyteče.
14 Když je samočištění dokončeno,
uvolněte tlačítko samočištění.
15 Položte parní žehličku na patu a
nechte ji zcela vychladnout.
16 Otřete žehlicí plochu studeným
mokrým hadrem.
VAROVÁNÍ: Udržujte ruce a tělo
mimo dosah horké vody.
VAROVÁNÍ: Nepokoušejte se
odstraňovat vodní kámen ze
žehlicí plochy pomocí výrobků na
odstraňování vodního kamene.
Vyčištění nerezové žehlicí
plochy
Chcete-li udržet žehlicí plochu čistou
a bez vodního kamene,
oporučujeme použít některý ze
d
všeobecně dostupných, jemných
rostředků na čištění chrómu, stříbra
p
nebo nerezové oceli. Vždy se řiìte
okyny výrobce. Chcete-li odstranit
p
roztavená umělá vlákna, nastavte
ehličku na tři tečky a přejeìte jí po
ž
čistém kusu bavlny, čímž se stáhnou
bytky z povrchu.
z
Vyčištění povlakované
žehlicí plochy
(pouze některé modely)
V nepravděpodobném případě, že se
na žehlicí plochu přilepí roztavené
umělé vlákno, nastavte žehličku na
tři tečky a přejed’te jí po čistém kusu
bavlny, čímž se stáhnou zbytky z
povrchu.
Nepoužívejte čisticí prášky nebo
roztoky, protože by mohly poškodit
povlak.
Čištění vnějšího povrchu
Nechte žehličku vychladnout a otřete
ji vlhkou látkou a slabým saponátem,
potom ji otřete suchou látkou.
14
Page 15

40730MCZ Rev1:9225 47507 MEE pump - Jon 10/10/08 16:02 Page 15
DVOULETÁ
ZÁRUKA
Musíte si uschovat stvrzenku od
prodejce jako doklad o nákupu.
tvrzenku připevněte sešívačkou na
S
zadní obal pro budoucí referenční
čely.
ú
okud se výrobek porouchá,
P
poznamenejte si následující
nformace.Tato čísla najdete na
i
základně výrobku.
Č. modelu
ériové č.
S
Všechny výrobky Morphy Richards
procházejí před opuštěním továrny
individuální kontrolou.
V nepravděpodobném případě, že se
prokáže závada, se musí výrobek do
28 dnů od data koupě vrátit do
místa, kde byl zakoupen, aby se
mohl vyměnit.
Pokud dojde k závadě po 28 dnech
a do 24 měsíců od data původní
koupě, musíte kontaktovat Morphy
Richards a uvést číslo modelu a
sériové číslo výrobku nebo napsat
společnosti Morphy Richards na
uvedenou adresu.
Budete požádáni, abyste vrátili
výrobek (v náležitém, bezpečném
balení) společně s kopií dokladu o
nákupu na níže uvedenou adresu.
S výjimkou níže uvedených případů
(1 - 6) bude vadný výrobek obvykle
během sedmi pracovních dnů od
data přijetí opraven nebo vyměněn a
odeslán zpět.
Pokud bude výrobek z jakéhokoliv
důvodu během dvouleté záruční
lhůty vyměněn, záruka na nový
výrobek se bude počítat od data
původní koupě. Proto je velmi
důležité, abyste uschovali původní
stvrzenku nebo fakturu
s vyznačeným datem původní
koupě.
Platnost dvouleté záruky na
spotřebič je podmíněna používáním
podle pokynů výrobce. Například
spotřebiče se musí zbavovat
vodního kamene a filtry se musí
udržovat v čistém stavu podle
pokynů.
Společnost Morphy Richards
nebude povinna opravit nebo
vyměnit výrobek podle záručních
odmínek v následujících případech:
p
Závada byla způsobena nebo
1
zaviněna nevhodným, chybným
nebo nedbalým používáním nebo
oužíváním způsobem, který je
p
v rozporu s doporučeními výrobce,
ebo proudovými nárazy v síti či
n
poškozením při přepravě.
2 Spotřebič byl napájen jiným napětím,
ež jaké je uvedeno na výrobku.
n
Došlo k pokusu o opravu jinými
3
osobami než naším servisním
ersonálem (nebo autorizovaným
p
prodejcem).
4 Spotřebič se pronajímal nebo
používal k jiným účelům než
v domácnosti.
5 Společnost Morphy Richards
neodpovídá za žádné opravy
prováděné v záruční lhůtě.
6 Záruka se nevztahuje na spotřební
materiály, například sáčky, filtry a
skleněné karafy.
Tato záruka nepropůjčuje žádná jiná
než výše uvedená práva a
nevztahuje se na žádné reklamace
týkající se následných ztrát nebo
škod.Tato záruka je nabízena jako
další výhoda a nemá vliv na vaše
zákonná práva spotřebitele.
∂
15
Page 16

40730MCZ Rev1:9225 47507 MEE pump - Jon 10/10/08 16:02 Page 16
g For electrical products sold within the European
Community.
t the end of the electrical products useful life it
A
hould not be disposed of with household waste.
s
Please recycle where facilities exist.
Check with your Local Authority or retailer for
recycling advice in your country.
ro elektr ické výrobky prodávané v Evropském
∂
P
společenství.
Elektrické výrobky se po skončení životnosti nesmí
vyhazovat do domovního odpadu.
Nechte je recyklovat v příslušných zařízeních.
nformace o recyklaci ve vaší zemi si zjistěte od
I
místních úřadů nebo prodejce.
g Morphy Richards products are intended for
household use only.
orphy Richards has a policy of continuous
M
improvement in product quality and design.
The Company, therefore, reserves the right to
change the specification of its models at any time.
he After Sales Division,
T
Morphy Richards Ltd, Mexborough, South Yorkshire,
England, S64 8AJ
Helpline (office hours) UK 0844 871 0953
Republic of Ireland 1800 409119
∂
Výrobky Morphy Richards jsou určeny pouze k
použití v domácnostech.
Morphy Richards usiluje o neustálé zdokonalování
kvality a provedení.
Proto si vyhrazuje právo kdykoliv změnit specifikace
svých modelů.
RN40730MCZ Rev 1 09/08
16
 Loading...