

Page 1

g
f
d
i
}
∂
Soup Maker
Please read and keep these instructions
Soupière électrique
Veuillez lire et conserver ces instructions
Suppenbereiter
Lesen Sie diese Bedienungsanleitung und heben Sie sie gut auf
Soup Maker
Leggere e conservare le presenti istruzioni
Przyrząd do przygotowania zupy
Prosimy zapoznać się z niniejszą instrukcją obsługi i zachować ją do wykorzystania w przyszłości
Výrobník polévky
Přečtěte si tyto pokyny a uschovejte je
FP501014MEE Rev2.qxp_Morphy Richards Instruction Book 10/08/2015 20:11 Page 1
Page 2

2
Health And Safety
The use of any electrical appliance requires the following common sense safety rules.
Please read these instructions carefully before using the product.
• Appliances can be used by persons with reduced physical,
sensory or mental capabilities or lack of experience and
knowledge if they have been given supervision or instruction
concerning use of the appliance in a safe way and if they
understand the hazards involved.
• This appliance shall not be used by children. Keep the
appliance and its cord out of the reach of children. Children
shall not play with the appliance.
• Always disconnect the appliance from the supply if it is left
unattended and before assembling, disassembling or cleaning.
• This appliance is intended to be used in household and similar
applications such as: farm houses, by clients in hotels, motels
and other residential type environments, bed and breakfast
type environments. It is not suitable for use in staff kitchen
areas in shops, offices and other working environments.
• If the supply cable is damaged, it must be replaced with a
special cable assembly available from the manufacturer or its
service agent in order to avoid a hazard.
• WARNING: The mixing blades are very sharp. Handle with care
when using and cleaning. For care and cleaning refer to the
Care and Cleaning section.
• This appliance is not intended to be operated by means of an
external timer or separate remote control system.
g
FP501014MEE Rev2.qxp_Morphy Richards Instruction Book 10/08/2015 20:11 Page 2
Page 3

3
In addition, we offer the following safety advice.
Location
• Always locate your appliance away from the edge of a
worktop.
• Ensure that the appliance is used on a firm, flat surface.
• Do not use the appliance outdoors, or near water.
Mains Cable
• The mains cable should reach from the socket to the base unit
without straining the connections.
• Do not let the mains cable hang over the edge of a
worktop where a child could reach it.
• Do not let the cable run across an open space e.g.
between a low socket and table.
• Do not let the cable run across a cooker or toaster or other hot
area which might damage the cable.
Personal Safety
• WARNING: To protect against fire, electric shock and
personal injury, do not immerse cord, plug and appliance in water
or any other liquid.
• WARNING: Avoid contact with moving parts.
• Extreme caution must be observed when moving an
appliance with hot contents.
• Do not use product with wet or moist hands
Treating Scalds
• Run cold water over the affected area immediately. Do not stop to
remove clothing, get medical help quickly.
Other Safety Considerations
• If the mains lead of this appliance is damaged do not use it.
Telephone Morphy Richards helpline for advice.
• The use of accessory attachments not recommended by the
manufacturer may cause damage to the unit.
• Do not place the appliance on or near heat sources such as gas
or electric stove, ovens, or burners.
• Keep the appliance and the cable away from heat, direct
sunlight, moisture, sharp edges and the like.
• When using the unit, ensure the lid is in place before switching on.
• Do not remove the lid until the blade has stopped.
• After one operation cycle, you must allow the appliance to cool
down completely, then clean the appliance to
prevent burning.
• Do not operate the appliance for making soup
continuously.
• Be careful if hot liquid is poured into the Soup Maker as it can be
ejected out of the appliance due to sudden steaming.
Electrical Requirements
Check that the voltage on the rating plate of your
appliance corresponds with your house electricity supply which
must be A.C. (Alternating Current).
WARNING: THIS APPLIANCE MUST BE EARTHED.
Should the fuse in the mains plug require changing a 13 amp
BS1362 fuse must be fitted.
g
FP501014MEE Rev2.qxp_Morphy Richards Instruction Book 10/08/2015 20:11 Page 3
Page 4
4
5
1
2
3
9
8
7
4
10
11
12
13
15
16
14
17
18
6
4
3
2
1
FP501014MEE Rev2.qxp_Morphy Richards Instruction Book 10/08/2015 20:11 Page 4
Page 5
5
g
f
d
i
}
∂
6
5
8
7
10
9
Heating Blending Resting Completed
11
12
13
FP501014MEE Rev2.qxp_Morphy Richards Instruction Book 10/08/2015 20:11 Page 5
Page 6

6
Congratulations on choosing your new Morphy Richards Soup Maker with Serrator Blade technology. With its
revolutionary, unique design the Serrator Blade is designed to give you superior cutting performance for longer.
How does the Serrator blade work?
Specially developed by our in-house designers the Serrator Blade has been created to outperform standard
plain edge blades. The perfect serration has been carefully selected and rigourously tested to give you
superior performance and us the confidence that the Serrator Blade will give you years of satisfaction.
Our new precision Serrator Blades stay sharper up to 12x longer than standard blades.
*** Independently tested by CATRA using the International Standard Cutting Test System to ISO 8442.5 vs a standard plain edge blade.
FP501014MEE Rev2.qxp_Morphy Richards Instruction Book 10/08/2015 20:11 Page 6
Page 7

7
Introduction
The Sauté & Soup Maker from Morphy Richards is quick and
easy to use. To create a soup bursting with fresh flavours select
the Sauté setting, then add your ingredients to sauté – onions,
bacon lardons, garlic or ginger – the foundation of your
delicious soup has begun. Then simply add your remaining
ingredients to the large 1.6L capacity jug, place on the lid and
select from either the Smooth or Chunky cooking settings.
The easy to use control panel features an LED countdown
display that shows exactly how long your soup has left to cook
while you just sit back and let your soup maker do the hard
work for you.
The Smooth programme blends and gently cooks soup in just
21 minutes, while the Chunky programme cooks wholesome
soup with a thicker consistency in 28 minutes. If once cooked
your soup is a little too chunky for your liking, just press the
Blend button and the premium Serrator blending blades will
blend your soup until the texture is to your preferred taste.
The Sauté & Soup Maker also has a pause function which
allows you to add seasoning, crème fraîche, herbs or cream at
any stage during the cooking process. Simply lift the Lid off
your Sauté & Soup Maker - this disconnects the programme
cycle and stops the blade rotation. Add your seasoning and/or
additional ingredients. Refit the Lid and the timer programme
will restart with the same time left on the
programme.
Remember to visit www.morphyrichards.co.uk to register your
product’s two year guarantee.
Contents
Health And Safety 2
Serrator Blade 3
Introduction 4
Features 5
Before First Use 6
How To Use Your Soup Maker 6
Using Your SoupMaker 7
LED Screen 8
What To Sauté 8
The Benefits Of Homemade Soup 9
What Makes Your Soup Maker So Special? 9
A Dream To Clean 9
Any Questions? 10
Contact Us 10
Recipes 11
Recipes - Sauté 12
Recipes - Soup 13
Recipes - Juice 14
Guarantee 14
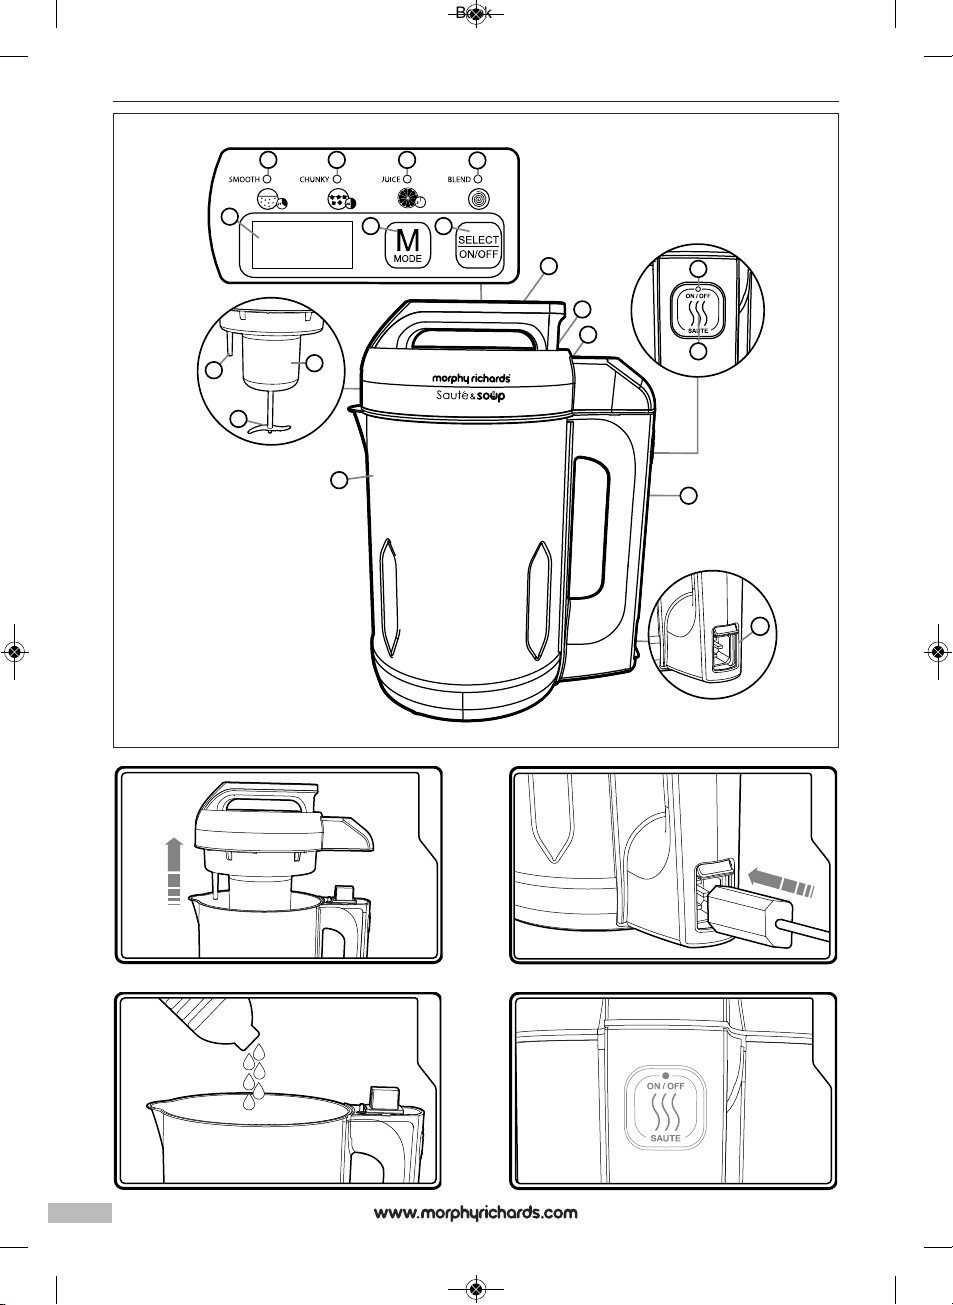
Features
(1) Control Panel
(2) Lid Handle
(3) Lid
(4) Jug
(5) Jug Handle
(6) Power Socket
(7) Over Fill Sensor
(8) Motor Housing
(9) Serrator Blade
(10) Smooth Function Indicator
(11) Chunky Function Indicator
(12) Juice Function Indicator
(13) Blend Function Indicator
(14) LED Screen
(15) Mode Button
(16) Select On/Off Button
(17) Sauté Function Indicator
(18) Sauté Button
Before First Use
Remove all packaging and cardboard fitments before use.
It is important to clean your Sauté & Soup Maker before first
use or if it has not been used for a long period of time. See the
‘Dream to clean’ section for more information.
When you first use your Sauté & Soup Maker you may notice
some smoke/vapour emitting from the Lid, this is normal and is
simply grease that is used on some parts of the appliance
during the manufacturing process. After using a few times this
will stop.
How To Use Your Soup Maker
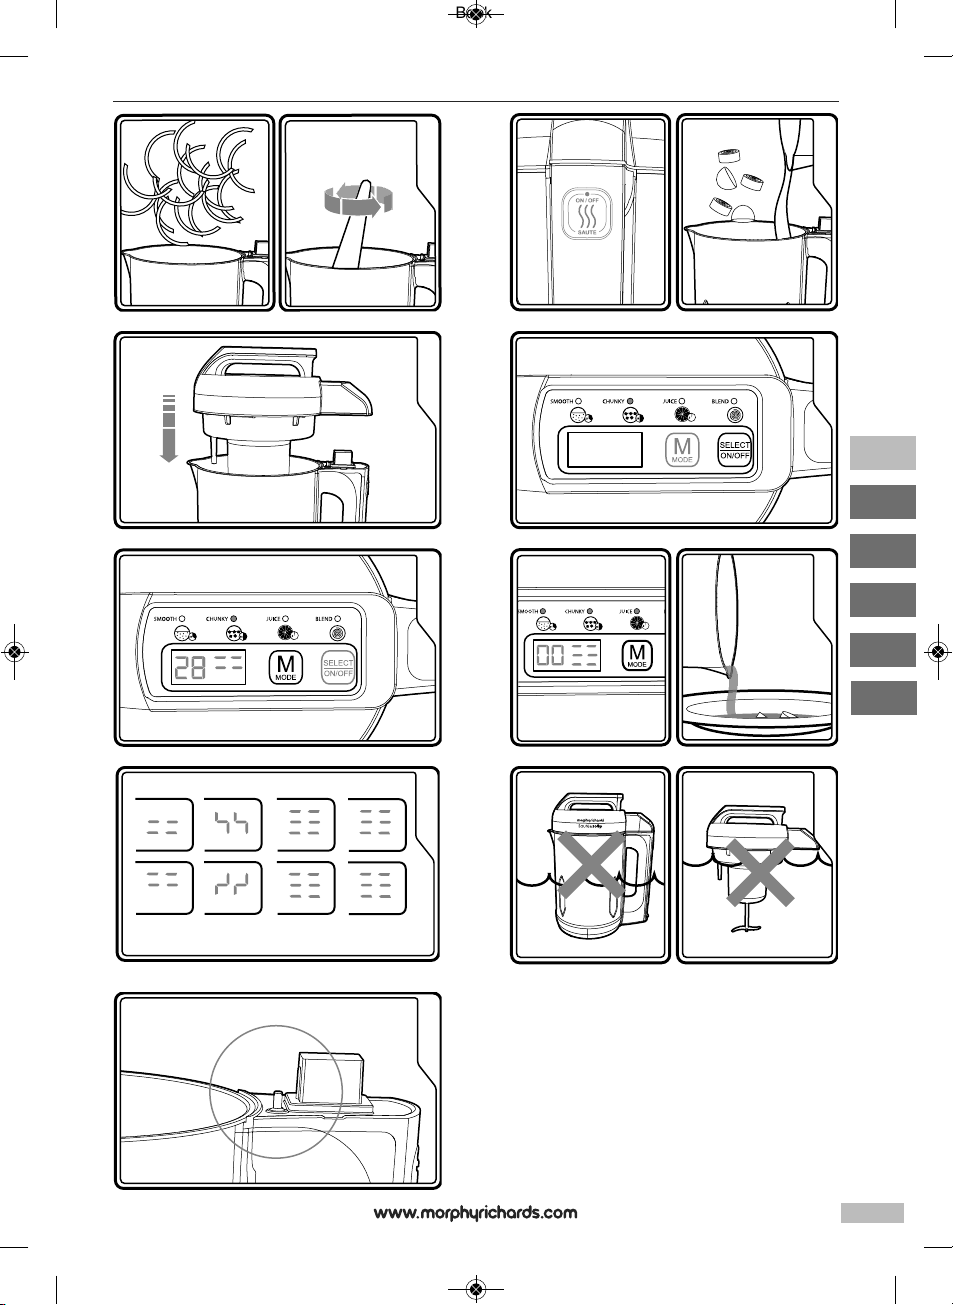
1 Remove the Lid (3), be careful not to touch the Serrator Blade (9).
WARNING: Sharp Blades
2 Plug your Soup Maker into the mains. The Sauté Function
Indicator (17) will illuminate red.
3 Add oil or butter to the Jug (4). If sautéing in
butter, we recommend adding a small amount of oil to stop the
butter from burning.
4 Press the Sauté Button (18), the Sauté Function Indicator will
change to green. The Jug will begin to heat up.
5 After a minute, add the ingredients for sautéing to the Jug. Stir
with a wooden spatula to help even cooking and to prevent
sticking or burning. Do not replace the Lid.
6 When finished, press the Sauté Button again, the Sauté Function
Indicator will turn red. Add the rest of the ingredients to the jug.
7 Place the Lid onto the Jug ensuring it
is securely in place. A beep will be heard, the icons will flash in
sequence.
8 Press the Mode Button (15) to select the
programme, (see ‘Using your Soup Maker’). The icon will
illuminate.
9 start the Soup Maker, press the Select On/Off Button (16). The
Soup Maker will beep and begin the cooking process. The
cooking time will be displayed and start to count down.
g
FP501014MEE Rev2.qxp_Morphy Richards Instruction Book 10/08/2015 20:11 Page 7
Page 8

10 When finished, the Soup Maker will beep for 60 seconds and all
four icons will flash.
Unplug from the mains, remove the Lid and pour the fresh soup
into a bowl.
WARNING
WHEN REMOVING AND REPLACING THE LID (3), BE
CAREFUL NOT TO SCRAPE THE BLADE ON THE SIDE OF THE
JUG (4) TO PREVENT DAMAGE TO THE NON-STICK COATING.
Using Your Soup Maker
Your Soup Maker has 5 programmes.
Select your choice of programme:
Sauté... (17)
The sauté function heats the cooking Jug up so food such as
onions or bacon lardons can be sautéed before the rest of the
ingredients are added to the soup. Simply remove the Lid, add
your oil, press the Sauté Button, heat for a minute, add your
ingredients and stir. The Sauté function is only available when
the Lid (2) is removed from the Jug (3). The Sauté function will
be deactivated when the Lid is attached. Note: Do not use the
Sauté function for more than 10 minutes.
Smoothly does it... (10)
The smooth soup programme is perfect for
delicious soup recipes requiring a smooth
consistency, such as roast tomato & basil soup. The programme
ensures the ingredients are blended to the right consistency
and gently cooked at the right temperature. The programme
lasts for 21 minutes and then your soup is ready to serve and
enjoy!
Get chunky! (11)
The chunky soup programme is perfect for rustic soup recipes
requiring a chunkier consistency. The programme allows the
ingredients to be heated for longer to ensure the chunky
ingredients are fully cooked. The programme lasts for 28
minutes, and then your soup is ready to serve and enjoy! For
chunky soup there is no blending process, just heating. It is
therefore
recommended that you cut any vegetables into small dice sized
pieces. If your soup is a little too chunky after cooking, select
the blend function to achieve the desired consistency.
Juice it! (12)
The juice setting on the Soup Maker is ideal for making
smoothies or milkshakes from fresh
ingredients. The programme lasts for 2 minutes before your
drink is ready to serve. The juice
setting does not heat the ingredients.
Note: Do not place ice cubes in the Soup Maker.
A perfect blend! (13)
The blend setting allows you to further blend the soup to your
desired consistency, if required. This function works without
additional heating of the soup.
To access this function after cooking, select the Blend function
with the Mode Button (15) and press and hold the Select On/Off
Button (16) to blend.
Add it!
If you have started either of the Smooth or Chunky soup
programmes and realise you have
forgotten to add a certain ingredient or you want to add herbs,
spices or additional seasoning, you can. Simply remove the Lid
(3) and add the
ingredients, then replace the Lid and continue with the
programme.
Do not remove the Lid during the blending process to prevent
splashing, (see the LED screen section).
Do not use the function to add large quantities of vegetables or
any ingredients that will require the full programme time to cook
correctly.
Cancelling or changing programmes
If you have selected a programme incorrectly and the Select
On/Off Button (16) has been pressed, or you want to cancel the
programme, simply press the Select On/Off Button and hold for
2 seconds, the icons will flash. Press the Mode Button (15) to
select the correct programme and press the Select On/Off
button to restart.
LED Screen (14)
Your Soup Maker utilises 3 different processes to create fresh
soups and drinks; heating, resting and blending. Each of these
processes are
highlighted during the programme with a small animation on the
LED Screen.
Heating 11
The heating animation will appear in motion when the Soup
Maker is heating the contents of the Jug.
Blending 11
The blending animation will be displayed when the Mixing
Blade is in use. When switching from heating to blending the
Soup Maker will make a single audible beep.
Do not remove the Lid (3) while your Soup Maker is blending.
Resting 11
During the programmes the Soup Maker will
occasionally ‘rest,’ at which point no animation will be shown.
The timer on the LED Screen will continue to count down. This
is normal.
Once the process is completed the Soup Maker will beep for
60 seconds and the screen will
display the ‘completed’ icon.
Completed 11
When completed, your Soup Maker will show the same
animation as resting, but the timer will be at ‘0’ and all four
icons on the panel will flash.
8
FP501014MEE Rev2.qxp_Morphy Richards Instruction Book 10/08/2015 20:11 Page 8
Page 9

9
What To Sauté?
Sautéing is ideal for onions or bacon lardons, where
they become softened, browned or caramelised with heat. You
can also use the sauté setting to make croutons for your soup.
The sauté setting should only be used for a
period of 5-10 minutes. It should not be used for longer than 10
minutes.
Do not use the sauté function for raw meat with the exception
of bacon lardons and small quantities of minced meat (up to
100g), Do not use for warming liquid, sauces, fresh or tinned
tomatoes, sugar, fruit, or sugared or starchy foods.
The Sauté function is only available when the Lid (2) is
removed from the Jug (3). The Sauté function will be
deactivated when the Lid is attached.
The Benefits of Homemade Soup
Homemade soup tastes great, costs so little and is a healthy,
sustaining meal.
Scratch it!
Scratch cooking is the best way to prepare wholesome food
that the whole family loves. It gives you complete control over
the food you eat, because it involves cooking from the most
basic ingredients and helps you to avoid all the
preservatives, flavourings and other additives found in
processed foods.
Batch it!
Batch cooking is great because it allows you to cook up a
batch of wholesome food and pack it away in meal-sized
portions that can be
refrigerated or frozen, locking away all the taste and nutrients
ready to enjoy later in the week.
Don’t waste it!
In the UK we waste up to 8.3 million tonnes of food every year,
most of which could have been eaten. Whether it is cooked
chicken from Sunday lunch or a tomato tucked away at the
back of the fridge, you can always rustle-up a fantastic
homemade soup recipe using the leftover food that might
normally go to waste.
Soup nutrition
Homemade soup couldn’t be better for you, and depending on
the recipe can provide a full range of nutrients including
vitamins, minerals,
carbohydrate and fibre. Best of all, homemade soup is simply
delicious!
What Makes Your Soup Maker So Special?
Making fresh homemade soup in the comfort of your own
kitchen couldn’t be quicker when using your Soup Maker.
One jug cooking
The Sauté Function allows you to sauté your ingredients before
cooking your soup all in the same cooking Jug. A simple idea,
reducing mess and washing up.
Sautéing in the same Jug as cooking, also improves the soup
as flavours are retained.
Works in a flash!
All you have to do is prepare your ingredients, transfer them
into your Soup Maker and select smooth or chunky setting.
After sautéing, the smooth soup programme blends and gently
cooks the soup in 21 minutes. The chunky soup programme
takes just 28 minutes before it’s ready to enjoy!
Space saver
We know that space is a valuable commodity in your kitchen.
Your Soup Maker is compact with a simple design so it fits
easily on any worktop space.
A Dream To Clean 12
Your Sauté & Soup Maker is not dishwasher safe, but it is
simple and easy to clean. After use,
simply wash the Motor Housing (8) and Serrator Blade (9) with
warm water, and wipe with a sponge. DO NOT immerse in
water. The inside of the Soup Maker Jug (4) can also be
cleaned with warm soapy water and a sponge. If food is burned
on, allow to soak and then wipe away with a sponge. Wipe the
outside of the appliance with a soft, damp cloth, then dry.
Certain foods can burn if in contact with the base heating
element. If this happens, fill the Soup Maker with hot soapy
water and allow to soak for 15 minutes. Any burnt on food can
then easily be removed with a soft sponge cleaning pad. Do
not use a metal scouring pad as this will scratch the coating.
WARNING: The inside surface of the Jug has a durable nonstick coating for easy cleaning. Do not use any metal utensils,
to stir or remove food from this product.
After cleaning, dry all parts thoroughly.
WARNING: DO NOT immerse the lid or jug in water, as they
contain electrical components that can be damaged by water.
Do not allow water to get onto the electrical connections. Dry
thoroughly before use.
When removing and replacing the Lid (3), be careful not to
scrape the blade on the side of the Jug (4) to prevent damage
to the non-stick coating.
g
FP501014MEE Rev2.qxp_Morphy Richards Instruction Book 10/08/2015 20:11 Page 9
Page 10

10
Any Questions?
If you have any questions about the use of your Soup Maker,
check the list below where we have answered some of the more
common frequently-asked-questions (FAQ’s). If you require
further help, please contact our Helpline: 0344 871 0944.
Can I remove the lid mid-cycle?
Yes, to add ingredients or seasoning if required. See ‘Add It’ on
page 8 for more information.
Can I use my Soup Maker to make anything other than soup
or drinks?
No. The 5 available programmes are set to make perfect soup
and drinks from scratch. Follow the recipes and adapt them to
your own taste.
Can I use raw meat in soup recipes made in my Soup Maker?
Aside from bacon or small amounts of minced meat (100g), no.
You should first cook meat separately before transferring into
your Soup Maker with additional ingredients from your recipe,
as the Soup Maker is only designed to gently sauté bacon or
onions, then heat the soup. You should not use the sauté
function to brown raw meat, other than bacon or minced meat.
What is the capacity of my Soup Maker?
The capacity of your Soup Maker is 1.6L. Ensure you do not fill
your Soup Maker above the MAX line, otherwise the overfill
detector will cut the power to the Serrator Blade (9) and the
LED screen (14) will display ‘E1’. If this happens,
simply remove some of your ingredients so the MAX fill mark is
not exceeded and wipe clean the Over Fill Sensor (7) on the Lid
(3). Ensure your ingredients (including liquid) are above the MIN
line, failure to do this will impair the blending function.
Can I change the times on the smooth and chunky soup
settings?
No. The times for these settings are pre-set.
Can I reheat soup I have already made, or reheat
tinned/carton soup?
No. The programmes are set to make perfect soup from
scratch. The soup could burn to the base of the element
causing damage to the product.
Can I make cold soups like gazpacho in my Soup Maker?
Yes, but you will first need to cook the soup using either the
chunky or smooth soup setting. Then simply allow to cool or
refrigerate before enjoying.
What if my Soup Maker stops working?
Your Soup Maker is fitted with a safety thermostat, which cuts
the power and stops the product from working to prevent
overheating if it is used continuously on 3 or more cycles. If this
happens, remove any food from the jug and allow the Soup
Maker to cool for 30 minutes and you can continue making your
soup.
If the blend function is used continuously for more than 20
seconds a safety cut out will cut the power to prevent
overheating. When this happens wait for 10 seconds before reusing the blend function.
What if food burns on the base of my Soup Maker? 13
Due to the starch and sugars present in some foods, a slight
burning may occur if they are placed in direct contact with the
inside base of the Jug (4). To prevent this, add half a cup of
water or stock to the Soup Maker before placing in any solid
ingredients. Then top up with the remaining liquid specified in
your recipe.
What if the Sauté function stops working?
The Sauté function works only with the Lid removed (see page
6). Press the Sauté Button (17), the Sauté Indicator (16) should
turn green.
If the Sauté Indicator on the Jug Handle (4) remains red, press
the plunger on top of the Jug Handle to re-activate the function.
This plunger should remain in the ‘up’ position when the Lid (2)
is removed
Contact Us
Helpline
If you are having a problem with your appliance, please call our
Helpline, as we are more likely to be able to help than the store
you purchased the item from.
Please have the product name, model number and serial
number to hand when you call to help us deal with your enquiry
quicker.
UK Helpline: 0344 871 0944
IRE Helpline: 1800 409 119
Spares: 0344 873 0710
Talk To Us
If you have any questions or comments, or want some great
tips or recipe ideas to help you get the most out of your
products, join us online:
Blog: www.morphyrichards.co.uk/blog
Facebook: www.facebook.com/morphyrichardsuk
Twitter: @loveyourmorphy
Website: www.morphyrichards.com
FP501014MEE Rev2.qxp_Morphy Richards Instruction Book 10/08/2015 20:11 Page 10
Page 11

11
Recipes
We have developed 15 recipes for you to use in your new Soup Maker, from rich hearty
soups to refreshing smoothies.
The Chunky Setting (11) only cooks the ingredients, it will not chop them. If after
cooking, the soup is a little too chunky for your taste, you can use the Blend Setting (13)
to help break down some of the chunks.
To access this function, you will need to unplug your Soup Maker before replugging into
the mains. This resets the Soup Maker, allowing you to select the Blend Setting with the
Mode Button (15). When highlighted, press and hold the Select On/Off Button (16) to
blend the contents of the Jug.
The recipes have been developed to fit within the minimum and maximum working
levels of the Soup Maker (1.3-1.6L).
g
FP501014MEE Rev2.qxp_Morphy Richards Instruction Book 10/08/2015 20:11 Page 11
Page 12

12
Sauté Recipes
Butternut Squash, Chilli and Coconut Soup
Preparation time: 15 minutes
Cooking time: 30 minutes
Setting: Chunky
Serves 4
Ingredients:
•
2 tbsp olive oil
•
500g butternut squash,
de-seeded, peeled and cut into small cubes
•
1 medium onion (approx 100g), chopped
• 3 garlic cloves, sliced
• 1 tsp ground cumin
• 1/2-1 large red chilli to taste, finely chopped, seeds
removed.
• 1 tsp fresh ginger, grated
• 800ml vegetable stock, made from 2 stock cubes
• 200ml coconut milk
• Juice of 1 lime
• 10g fresh coriander, chopped
• Salt and pepper
Method:
1 Add the oil to the Jug and press the Sauté Button.
2 After a minute, add the butternut squash and sauté for 3-4
minutes, stirring every so often.
3 Add the onion, garlic, ground cumin and red chilli, continue to
cook for a further 5 minutes until the ingredients start to soften.
4 Turn off the sauté function by pressing the Sauté Button. Add the
remaining ingredients, stir with a wooden spoon or spatula to
evenly distribute.
5 Place the lid on the Jug and select the Chunky Setting.
6 Once ready season to taste and serve. If you would like a smooth
soup simply select the Blend Setting then press and hold the
Select On/Off Button to blend the soup until the desired
consistency is achieved.
Winter Lamb and Lentil Broth
Preparation time: 20 minutes
Cooking time: 33 minutes
Setting: Chunky
Serves 4
Ingredients:
• 2 tbsp olive oil
• 75g raw minced lamb
• 1 medium onion, (approx 100g)
finely chopped
• 2 garlic cloves, crushed
• 1 small carrot (approx 50g) finely chopped
• 1 potato, (approx 115g) finely chopped
• 1 medium turnip (approx 100g) finely chopped
• 1 tbsp plain flour
• 1 (400g) tin of lentils, drained
• ½ tsp fresh rosemary, chopped
• 2 bay leaves
• 1 tsp Worcestershire sauce
• 1 tbsp fresh parsley, chopped
• 900ml lamb stock, made from 2 stock cubes
Method:
1 Press the Sauté button and heat the olive oil in the Soup Maker
Jug for 1 minute. Sauté the lamb mince for 2-3 minutes, stirring
frequently with a wooden spoon until evenly browned.
2 Add the onion, garlic, carrot, potato and turnip to the Jug and
sauté for 4 minutes stirring as necessary. Turn off the sauté
function by pressing the Sauté Button.
3 Stir in the plain flour, then add the rest of the ingredients and
stock up to the maximum level. Season with salt and milled
pepper, and stir with a wooden spoon or spatula. Place the Lid on
the Jug and select the Chunky Setting.
4 When complete, season to taste and remove bay leaves before
serving.
Chicken and Mushroom Soup
Preparation time: 20 minutes
Cooking time: 30 minutes
Setting: Smooth
Serves 4
Ingredients:
• 2 tbsp olive oil
• 1 onion (approx 100g), finely chopped
• 240g mushrooms, thinly sliced
• 1 garlic clove, crushed
• 100g cooked chicken,
shredded
• 1 potato (approx 115g), peeled and finely diced
• 10g fresh parsley, chopped
• salt and pepper
• 1L chicken stock
Garnish:
• a little whipping cream
Method:
1 Press the Sauté Button. Heat the oil in the Jug for 1 minute and
then add the onion. Sauté, stirring all the time with a wooden
spoon or spatula for 2 minutes until soft but not brown.
1 Add the mushrooms and garlic and sauté for a further couple of
minutes until the mushrooms have softened. Turn off the sauté
function by pressing the Sauté Button.
3 Add the chicken, potato, parsley and seasoning and enough stock
FP501014MEE Rev2.qxp_Morphy Richards Instruction Book 10/08/2015 20:11 Page 12
Page 13

13
up to the maximum level on the Jug.
4 Place the Lid on the Jug and select the Smooth Setting.
5 When complete, season to taste and serve with a swirl of cream
(if desired).
• To make fresh chicken stock. Simply place a chicken carcass in a
medium pan, cover with water, add a vegetable stock cube, 5
peppercorns and a bay leaf. Bring to the boil then simmer for 1
hour. Strain through a fine sieve or muslin cloth.
Soup Recipes
Roast Tomato and Basil Soup
Preparation time: 30 minutes
Cooking time: 21 minutes
Setting: Smooth
Serves: 4
Ingredients:
• 8 very ripe tomatoes (approx 640g), cut in half
• 2 red onions (approx 215g), cut into 6 wedges
• 4 garlic cloves
• 1 tbsp olive oil
• 1 tbsp balsamic vinegar
• Salt and ground black pepper
• 750ml chicken stock, made from stock cube
• 2 tsp tomato puree
• 1 tsp brown sugar
• 10g fresh basil leaves
Method:
1 Pre-heat the oven to 200ºC / Gas mark 6.
2 Place the tomatoes skin side up into a roasting tin with the red
onions and garlic. Drizzle over the olive oil, balsamic vinegar and
season with salt and pepper. Roast for 20-30 minutes or until
softened and slightly charred.
3 Carefully place the vegetables into the Soup Maker with the
chicken stock, add the tomato puree, brown sugar and fresh basil.
4 Place the Lid on the Jug and select the Smooth Setting. Once the
soup is ready, season to taste and serve.
Really Quick and Easy Pea,
Ham and Mint Soup
Preparation time: 5 minutes
Cooking time: 21 minutes
Setting: Smooth
Serves 4
Ingredients:
• 600g frozen peas
• 20g fresh mint, leaves only
• 225g good quality cooked ham, chopped/shredded
• 1 potato (approx 100g), finely diced
• 800ml hot ham stock, from cube
• Salt and ground black pepper
• 2 tbsp olive oil
• 3 rounded tbsp, crème fraiche
Method:
1 Place the peas, mint, ham, potato and hot stock into the Soup
Maker. Place the Lid on the Jug and select the smooth setting.
2 When the soup is ready, season with a little salt and milled pepper
add the olive oil and crème fraiche and select the Blend Setting.
Press and hold the Select On/Off Button to blend the soup for 20
seconds before serving.
French Style Pistou
Preparation time: 15 minutes
Cooking time: 28 minutes
Setting: Chunky
Serves 4
Ingredients:
• 1 courgette (approx 150g), cut into small dice
• 1 small potato (approx 70g), cut into small dice
• 1 small onion (approx 70g), finely chopped
• 1 carrot (approx 50g), cut into small dice
• 1 tin of chopped tomatoes (400g)
• 50g petit pois
• 50g spaghetti, broken into small pieces
• 50g French beans, cut into 1cm pieces
• 650ml of vegetable stock
• 1 tbsp tomato puree (mix into the stock)
• salt and ground black pepper
To serve:
• pesto
• Parmesan cheese
Method:
1 Place ingredients into the Soup Maker, pour over the vegetable
stock/ tomato puree mix, season with salt and pepper, mix
ingredients together with a wooden spoon or spatula to evenly
distribute.
2 Place the Lid on the Jug and select the Chunky Setting.
3 Serve straight away with a spoonful of pesto and freshly grated
Parmesan cheese.
Basic Vegetable Soup
Preparation time: 5 minutes
Cooking time: 21 minutes
Setting: Smooth
Serves: 4
Ingredients:
• 700g assorted vegetables, diced (Bagged mixed
vegetables from the
g
FP501014MEE Rev2.qxp_Morphy Richards Instruction Book 10/08/2015 20:11 Page 13
Page 14

14
supermarket is ideal)
• Water (to MAX mark)
• 2 chicken or vegetable stock cubes
• salt and ground black pepper
Method:
1 For a quick smooth soup fill the Soup Maker past the MIN mark
with a selection of diced vegetables (using ready prepared
chopped
vegetables is ideal.)
2 Add the vegetable or chicken stock cubes and fill to the max mark
with water.
3 Place the Lid on the Jug and select the smooth setting. Once the
soup is ready, season to taste and serve.
Bacon Lardons
Preparation time: 1 minute
Cooking time: 10 minutes
Setting: Sauté
Ingredients:
• 1tbsp oil
• 100g bacon lardons
Method:
1 Add the oil to the Jug and press the Sauté Button.
2 After one minute, add the bacon lardons, stir with a wooden
spoon or spatula until coated in the oil.
3 Arrange into a single layer on the bottom of the Jug and allow to
cook until crisp and brown, turning occasionally.
4 Turn off the sauté function by pressing the Sauté Button.
Juice Recipes
Strawberry and Pineapple Smoothie
Preparation time: 5 minutes
Mixing time: 2 minutes
Setting: Juice
Makes: 1.1L
Ingredients:
• 300g fresh strawberries
• 250g fresh pineapple
• 450g low fat strawberry
yogurt
• 150ml semi skimmed milk
• 1 scoop (approx 35g) of vanilla ice cream
Method:
1 Prepare and hull the strawberries, cutting any large ones in half.
Chop the pineapple into chunks.
2 Place ingredients into the Soup Maker, stir thoroughly.
3 Place the Lid on the Jug and select the Juice Setting. Simply wait
for 2 minutes until the Soup Maker has finished.
4 Serve straight away.
Chocolate Banana Smoothie
Preparation time: 5 minutes
Mixing time: 2 minutes
Setting: Juice
Makes: 1.5L
Ingredients:
• 2x 450g cartons low fat vanilla
yogurt
• 300-400ml semi skimmed milk (according to taste)
• 2 ripe bananas, peeled and thinly sliced
• 150g-200g good quality dark chocolate (according to taste)
Method:
1 Melt the chocolate, either in a microwave or over a pan of hot
water.
2 Meanwhile, place the other ingredients into the jug, adding the
melted chocolate last.
3 Stir thoroughly.
4 Place the Lid on the Jug and select the Juice Setting. Simply wait
for 2 minutes until the Soup Maker has finished.
Lifetime Blade Guarantee
The 'Serrator Blade' is warranted to be free from defects in
materials and workmanship for life. This warranty covers the
original purchaser only and is not assignable or
transferable to any other party. This warranty is available to
consumers who use the 'Serrator Blades' for non-commercial
household purposes. This warranty does not cover any damage
caused by accident, misuse or any use other than as described
in your owner's manual, or damage resulting from failure to
maintain and clean this product as specified in your owner's
manual.
THIS SECTION IS ONLY APPLICABLE FOR
CUSTOMERS IN UK AND IRELAND
REGISTERING YOUR TWO YEAR GUARANTEE
Your standard one year guarantee is extended for an additional
12 months when you register the product within 28 days of
purchase with Morphy Richards. If you do not register the
product with Morphy Richards within 28 days, your product is
guaranteed for 1 year. To validate your 2 year guarantee register
with us online at www.morphyrichards.co.uk
N.B. Each qualifying product needs to be registered with
Morphy Richards individually. Please refer to the one year
guarantee for more information.
YOUR ONE YEAR GUARANTEE
It is important to retain the retailer’s receipt as proof of
purchase. Staple your receipt to this back cover for future
reference. Please quote the following information if the product
develops a fault. These numbers can be found on the base of
the product.
Model no.
FP501014MEE Rev2.qxp_Morphy Richards Instruction Book 10/08/2015 20:11 Page 14
Page 15

15
Serial no.
All Morphy Richards products are individually tested before
leaving the factory. In the unlikely event of any appliance
proving to be faulty within 28 days of purchase, it should be
returned to the place of purchase for it to be replaced. If the
fault develops after 28 days and within 12 months of original
purchase, you should contact the Helpline number quoting
Model number and Serial number on the product, or write to
Morphy Richards at the address shown. You may be asked to
return a copy of proof of purchase. Subject to the exclusions
set out below (see Exclusions), the faulty appliance will then be
repaired or replaced and dispatched usually within 7 working
days of receipt. If, for any reason, this item is replaced during
the 1 year guarantee period, the guarantee on the new item will
be calculated from original purchase date. Therefore it is vital to
retain your original till receipt or invoice to indicate the date of
initial purchase. To qualify for the 1 year guarantee, the
appliance must have been used according to the instructions
supplied. For example, crumb trays should have been emptied
regularly.
EXCLUSIONS
Morphy Richards shall not be liable to replace or repair the
goods under the terms of the guarantee where:
1 The fault has been caused or is attributable to accidental use,
misuse, negligent use or used contrary to the manufacturer’s
recommendations or where the fault has been caused by power
surges or damage caused in transit.
2 The appliance has been used on a voltage supply other than that
stamped on the products.
3 Repairs have been attempted by persons other than our service
staff (or authorised dealer).
4 The appliance has been used for hire purposes or non domestic
use.
5 The appliance is second hand.
6 Morphy Richards are not liable to carry out any type of servicing
work, under the guarantee.
7 Plastic filters for all Morphy Richards kettles and coffee makers
are not covered by the guarantee.
8 Batteries and damage from leakage are not covered by the
guarantee.
9 The filters have not be cleaned and replaced as instructed.
This guarantee does not confer any rights other than those
expressly set out above and does not cover any claims for
consequential loss or damage. This guarantee is offered as an
additional benefit and does not affect your statutory rights as a
consumer.
YOUR INTERNATIONAL TWO YEAR
GUARANTEE
This appliance is covered by two-year repair or replacement
warranty.
It is important to retain the retailers receipt as proof of
purchase. Staple your receipt to this back cover for future
reference.
Please quote the following information if the product develops a
fault. These numbers can be found on the base of the product.
Model no.
Serial no.
All Morphy Richards products are individually tested before
leaving the factory. In the unlikely event of any appliance
proving to be faulty within 28 days of purchase it should be
returned to the place of purchase for it to be replaced.
If the fault develops after 28 days and within 24 months of
original purchase, you should contact your local distributor
quoting Model number and Serial number on the product, or
write to your local distributor at the addresses shown.
You will be asked to return the product (in secure, adequate
packaging) to the address below along with a copy of proof of
purchase.
Subject to the exclusions set out below (1-9) the faulty
appliance will then be repaired or replaced and dispatched
usually within 7 working days of receipt.
If for any reason this item is replaced during the 2-year
guarantee period, the guarantee on the new item will be
calculated from original purchase date. Therefore it is vital to
retain your original till receipt or invoice to indicate the date of
initial purchase.
To qualify for the 2-year guarantee the appliance must have
been used according to the manufacturers instructions. For
example, appliances must have been descaled and filters must
have been kept clean as instructed.
The local distributor shall not be liable to replace or repair the
goods under the terms of the guarantee where:
1 The fault has been caused or is attributable to accidental use,
misuse, negligent use or used contrary to the manufacturers
recommendations or where the fault has been caused by power
surges or damage caused in transit.
2 The appliance has been used on a voltage supply other than that
stamped on the products.
3 Repairs have been attempted by persons other than our service
staff (or authorised dealer).
4 Where the appliance has been used for hire purposes or non
domestic use.
5 The appliance is second hand.
6 The local distributor are not liable to carry out any type of
servicing work, under the guarantee.
7 The guarantee excludes consumables such as bags, filters and
glass carafes.
8 Batteries and damage from leakage are not covered by the
guarantee.
9 The filters have not be cleaned and replaced as instructed.
This guarantee does not confer any rights other than those
expressly set out above and does not cover any claims for
consequential loss or damage. This guarantee is offered as an
additional benefit and does not affect your statutory rights as a
consumer.
g
FP501014MEE Rev2.qxp_Morphy Richards Instruction Book 10/08/2015 20:11 Page 15
Page 16

16
AUSTRALIAN WARRANTY
This appliance is guaranteed for 2 years against faulty material,
components and workmanship.
This warranty is in addition and does not affect your statutory rights.
Proof of purchase must be produced for any warranty benefit.
In the unlikely event of any appliance proving to be faulty, securely
pack and return the item to the place of purchase accompanied by
the original receipt or invoice.
Our goods come with guarantees that cannot be excluded under
the Australian Consumer Law. You are entitled to a replacement or
refund for a major failure and for compensation for any other
reasonably foreseeable loss or damage. You are also entitled to
have the goods repaired or replaced if the goods fail to be of
acceptable quality and the failure does not amount to a major
failure.
NOT COVERED BY THIS WARRANTY
(Australian only)
• If the appliance has not been used in accordance with the
manufacturers’ recommendations or Instructions.
• If the fault is deemed to be caused by abuse, misuse, neglect,
modifications or in proper use and or care
Eg: Kettles: Excessive build up of scale.
Toasters: Excessive build up of crumbs or foreign matter etc.
• Connection to incorrect voltage to that stamped on the product.
• Unauthorised repairs.
• Appliance used other than for domestic purposes.
• Excluding bags, filters, glass, carafes, and cutting blades.
• Freight and insurance costs.
If for any reason this item is replaced during the 2 year
guarantee period, the guarantee on the new item will be
calculated from original purchase date. Therefore it is vital to
retain your original receipt or invoice to indicate the date of
original purchase.
Morphy Richards’s policy is to continually improve quality
design and product quality. The company therefore reserves the
right to change any specifications or to carry out modifications
as deemed worthy at any time.
The Australian supplier reserves the right to repair, modify,
exchange or replace the faulty appliance with the same or
similar model or product of equivalent value.
FP501014MEE Rev2.qxp_Morphy Richards Instruction Book 10/08/2015 20:11 Page 16
Page 17

17
Santé et Sécurité
L’utilisation de tout appareil électrique requiert du bon sens ainsi que le respect des règles de sécurité suivantes.
Lisez attentivement ces instructions avant d’utiliser le produit.
• Les appareils électriques peuvent être utilisés par des personnes
ayant des capacités physiques, mentales et sensorielles réduites ainsi
que celles manquant d’expérience et de connaissances lorsqu’elles
ne sont sous la surveillance et les instructions d’une personne
responsable de leur sécurité et comprennent les risques encourus.
• Cet appareil ne doit pas être utilisé par des enfants. Tenez l’appareil et
le cordon hors de portée des enfants. Les enfants ne doivent pas
jouer avec l’appareil.
• Déconnectez toujours l’appareil du secteur lorsque vous laissez celuici sans surveillance, et avant tout assemblage, désassemblage ou
nettoyage.
• Cet appareil est destiné à une utilisation ménagère, mais également à
des applications similaires comme les suivantes : utilisation dans des
fermes, par des clients d’hôtels, dans des motels et autres types de
résidences, dans des hébergements de type bed and breakfast.
Celui-ci ne peut être utilisé dans la zone de repos des employés de
boutiques, bureaux et autres environnements de travail.
• Afin de prévenir tout risque, remplacez le cordon d’alimentation
endommagé par un autre cordon disponible auprès du fabricant ou
un de ses agents de service.
• AVERTISSEMENT : Les lames de mixage sont très tranchantes.
Manipulez-les avec précaution lors de l’utilisation et du nettoyage de
l’unité. Pour l’entretien et le nettoyage, reportez-vous à la section
Entretien et nettoyage de ce manuel.
• Cet appareil n’a pas été conçu pour être utilisé par le biais d’une
minuterie externe ou d’une télécommande externe
.
f
f
FP501014MEE Rev2.qxp_Morphy Richards Instruction Book 10/08/2015 20:11 Page 17
Page 18

18
Les dispositifs de sécurité supplémentaires suivants ont été intégrés ŕ
l’appareil.
Emplacement
• Installez toujours l’appareil au centre du plan de travail.
• Assurez-vous d’utiliser l’appareil sur une surface solide et plane.
• N’utilisez jamais l’appareil ŕ l’extérieur ou prčs d’une source d’eau.
Cordon d’alimentation
• Le cordon d’alimentation ne doit pas ętre tendu lorsqu’il relie la
base de l’unité et la prise de courant.
• Ne laissez pas le cordon d’alimentation dépasser du bord d’un
plan de travail, ŕ un endroit oů un enfant pourrait l’atteindre.
• Ne faites jamais le cordon traverser un espace ouvert, par
exemple entre une prise murale basse et une table.
• Ne faites pas passer le câble sur une cuisiničre, un grille-pain ou
une autre surface chaude qui pourrait l’endommager.
Sécurité personnelle
• AVERTISSEMENT Pour vous protéger des risques d’incendie,
d’électrocution et de blessure, ne plongez pas le cordon
d’alimentation, la fiche électrique ou l’appareil lui-męme dans
l’eau ou dans d’autres liquides.
• AVERTISSEMENT Évitez de toucher les pičces mobiles.
• Soyez extręmement prudent lorsque vous déplacez un appareil
dont le contenu est chaud.
• N’utilisez pas l’appareil lorsque vos mains sont mouillées ou
humides.
Traitement des brűlures
• Faites couler immédiatement de l’eau froide sur la brűlure. Ne
prenez pas le temps de vous changer, appelez rapidement un
médecin.
Autres consignes de sécurité
• Lorsque le cordon d’alimentation de cet appareil est endommagé,
ne l’utilisez pas. Appelez le service aprčs-ventes de
Morphy Richards pour demander conseil.
• Utiliser des accessoires non recommandés par le fabricant peut
endommager l’appareil.
• Ne placez pas l’appareil sur ou prčs de sources de chaleur telles
que des cuisiničres électriques, des fours ou des brűleurs.
• Tenez l’appareil et son cordon d’alimentation éloignés de la
chaleur, des rayons du soleil, de l’humidité, des rebords
tranchants des autres risques similaires.
• Lorsque vous utilisez l’appareil, assurez-vous que le couvercle est
bien installé avant de le mettre sous tension.
• Ne retirez pas le couvercle avant l’immobilisation de la lame.
• Aprčs un cycle d’utilisation, vous devez impérativement laisser
l’appareil entičrement refroidir, puis le nettoyer afin d’éviter que
des dépôts ne brűlent.
• N’utilisez pas l’appareil pour faire de la soupe en continu.
• Attention lorsque vous versez du liquide chaud ŕ l’intérieur de
votre soupičre électrique, car il pourrait ętre éjecté de l’appareil en
raison d’une soudaine formation de vapeur.
Exigences relatives ŕ l’électricité
Vérifiez que la tension indiquée sur la plaque signalétique de
l’appareil correspond ŕ l’alimentation électrique de votre domicile,
qui doit ętre de type courant alternatif (C.A.).
AVERTISSEMENT : CET APPAREIL DOIT ĘTRE MIS Ŕ LA
TERRE.
Si le fusible de la prise secteur doit ętre changé, utilisez un fusible
de remplacement (modčle BS1362) de 13 ampčres.
FP501014MEE Rev2.qxp_Morphy Richards Instruction Book 10/08/2015 20:11 Page 18
Page 19

19
Félicitations pour avoir choisi notre nouvel appareil de préparation culinaire Morphy Richards avec lame
dentelée. Grâce à son design unique et révolutionnaire, la lame dentelée offre des performances de
découpe supérieures, pendant plus longtemps.
Comment fonctionne la lame dentelée ?
Spécialement conçue en interne par nos concepteurs, la lame dentelée a été conçue pour surpasser les
performances des lames standard à fil droit. Sa dentelure parfaite a été soigneusement mise au point et
rigoureusement testée, afin de vous offrir des performances supérieures et de nous garantir que la lame
dentelée vous donne satisfaction pendant des années.
Nos nouvelles lames dentelées de précision restent plus tranchantes jusqu’à
12 x plus longtemps que les lames standard, vous garantissant les mêmes performances à vie.
*** Indépendamment testée par le CATRA en comparant un systčme de découpe normalisé au niveau international selon
la norme ISO 8442.5 et une lame ŕ bord plat.
Nouvelle
(Certains modèles uniquement)
lame dentelée
LA LAME RESTE TRANCHANTE
12 FOIS PLUS LONGTEMPS
QUE LES LAMES
STANDARDS ***
Serrator Lame dentelée
Lame standard
Tranchant
Durée de vie de la lame
f
FP501014MEE Rev2.qxp_Morphy Richards Instruction Book 10/08/2015 20:11 Page 19
Page 20

20
Introduction
La soupière électrique avec fonction Faire sauter de Morphy
Richards est rapide et facile à utiliser. Pour confectionner une
soupe regorgeant d’arômes rafraîchissants, sélectionnez le
mode Faire sauter, ajoutez ensuite vos ingrédients pour faire
revenir les – oignons, les lardons, l’ail ou le gingembre, – la base
de votre délicieuse soupe est désormais établie. Ajoutez ensuite
les ingrédients restants dans le grand récipient de 1,6 litre,
installez le couvercle puis sélectionnez le mode Soupe
onctueuse ou Soupe avec morceaux.
Le panneau de commande est doté d’un écran DEL avec
minuteur indiquant avec précision le temps de cuisson restant
pour votre soupe, vous pouvez alors vous reposez et laissez la
soupière électrique faire le travail.
Le programme Soupe onctueuse mixe et cuit délicatement la
soupe en seulement 21 minutes, tandis que le programme
Soupe avec morceaux cuit une soupe saine et davantage
consistante en 28 minutes. Lorsque vous pensez que la soupe
contient trop de morceaux après l’avoir cuite, appuyez
simplement sur le bouton Mixage pour que les lames dentelées
de qualité ajustent la soupe à la texture désirée.
La soupière électrique avec fonction Faire sauter dispose
également d’une fonction de mise en pause, celle-ci permet
l’ajout d’assaisonnements, de crème fraîche ou d’herbes à tout
moment de la recette. Il vous suffit simplement de relever le
couvercle de la soupière électrique avec fonction Faire sauter,
cette action permet d’interrompre le cycle de cuisson et
immobilise la lame. Ajoutez votre assaisonnement et/ou d’autres
ingrédients supplémentaires. Replacez le couvercle, la minuterie
reprend à partir du moment où vous avez retiré le couvercle.
N’oubliez pas de visiter notre site www.morphyrichards.co.uk
pour enregistrer votre produit et bénéficier de la garantie de
deux ans.
Sommaire
Santé et Sécurité 20
Lame dentelée 22
Introduction 20
Caractéristiques 20
Avant la première utilisation 20
Mode opératoire de la soupière électrique 20
Utiliser la soupière électrique 21
Écran DEL 21
Comment faire sauter des aliments 22
Les bénéfices d’une soupe maison 22
Qu’est-ce qui rend votre soupière électrique si spéciale ? 22
Un rêve à nettoyer 22
Des questions ? 23
Nous contacter 23
Recettes 24
Recettes - Avec ingrédients à faire d’abord revenir 25
Recettes - Soupes 26
Recettes - Jus 28
Garantie 28
Caractéristiques
(1) Panneau de commande
(2) Poignée du couvercle
(3) Couvercle
(4) Récipient
(5) Poignée du récipient
(6) Prise électrique
(7) Détecteur de remplissage excessif
(8) Carter du moteur
(9) Lame dentelée
(10) Indicateur du mode Soupe onctueuse
(11) Indicateur du mode Soupe avec morceaux
(12) Indicateur du mode Jus
(13) Indicateur du mode Mixage
(14) Écran DEL
(15) Bouton Mode
(16) Bouton Sélection Marche/Arrêt
(17) Indicateur du mode Faire sauter
(18) Bouton Faire sauter
Avant la première utilisation
Retirez les cales en carton et tous les autres emballages de
protection avant utilisation.
Il est important de nettoyer votre soupière électrique avant la
première utilisation ou après une période de non utilisation
prolongée. Reportez-vous à la section « Un rêve à nettoyer »
pour plus d’informations.
Lors de la première utilisation de la soupière électrique avec
fonction Faire sauter, de la fumée/vapeur peut être émise
depuis le couvercle. Ce phénomène est normal, il est dû à la
brûlure de la graisse utilisée durant le processus de fabrication.
Ce phénomène disparaît au bout de quelques utilisations.
Mode opératoire de la soupière électrique
1 Retirez le couvercle (3), veillez ŕ ne pas toucher la lame dentelée
(9). AVERTISSEMENT : Lames tranchantes
2 Raccordez la soupière électrique ŕ une prise de courant.
L’indicateur du mode Faire sauter (17) s’allume en rouge.
3 Ajoutez de l’huile ou du beurre dans le récipient (4). Si vous faites
revenir l’aliment dans du beurre, nous vous recommandons
d’ajouter une petite quantité d’huile afin de ne pas faire brűler le
beurre.
4 Appuyez sur le bouton Faire sauter (18), l’indicateur du mode Faire
sauter s’allume en vert. Le récipient commence ŕ chauffer.
5 Au bout d’une minute, ajoutez les ingrédients ŕ faire revenir dans
le récipient. Remuez ŕ l’aide d’une spatule en bois afin de garantir
une cuisson uniforme et d’empęcher que les aliments ne collent
ou ne brűlent sur la surface du récipient. Ne replacez pas le
couvercle.
6 Lorsque vous avez terminé, appuyez ŕ nouveau sur le bouton Faire
sauter, l’indicateur de la fonction Faire sauter s’illumine en rouge.
Ajoutez les reste des ingrédients dans le récipient.
7 Remettez le couvercle sur le récipient en vérifiant qu’il est
fermement installé. Un bip est émis, les icônes clignotent par
ordre séquentiel.
8 Appuyez sur le bouton Mode (15) pour sélectionner le programme,
FP501014MEE Rev2.qxp_Morphy Richards Instruction Book 10/08/2015 20:11 Page 20
Page 21

21
(consultez la section ‘Utiliser votre soupière électrique’). L’icône
s’allume.
9 Mettez en marche la soupière électrique, appuyez sur le bouton
Sélection Marche/Arręt (16). La soupière électrique émet un bip, le
processus de cuisson démarre. La durée de cuisson restante
s’affiche.
10 Une fois le processus terminé, la soupière émet un bip pendant
60 secondes, les quatre icônes clignotent. Débranchez l’appareil
du secteur, retirez le couvercle puis versez la soupe fraîche dans
un bol.
AVERTISSEMENT
LORS DU RETRAIT ET DE L’INSTALLATION DU COUVERCLE
(3), VEILLEZ Ŕ NE PAS RAYER LA PAROI DU RÉCIPIENT (4)
AVEC LA LAME, CAR CELA POURRAIT ENDOMMAGER LE
REVĘTEMENT ANTI-ADHÉSIF DU RÉCIPIENT.
Mode opératoire de la soupière électrique
Votre soupière électrique dispose de 5 programmes.
Sélectionnez le programme de votre choix :
Faire sauter... (17)
La fonction Faire sauter chauffe le récipient afin de pouvoir faire
revenir des oignons et des lardons avant l’ajout des autres
ingrédients dans la soupe. Il vous suffit de retirer le couvercle,
d’ajouter de l’huile, d’appuyer sur la touche Faire sauter, de
laisser le récipient chauffer pendant une minute, d’ajouter les
ingrédients et de remuer. La fonction Faire sauter est
seulement disponible lorsque le couvercle (2) n’est pas
installé sur le récipient (3). La fonction Faire sauter est
désactivée lorsque le couvercle est installé. Remarque :
N’utilisez pas la fonction Faire sauter pendant plus de 10
minutes.
Pour une soupe onctueuse... (10)
Le mode Soupe onctueuse est idéal pour confectionner de
délicieuses recettes de soupe nécessitant une texture
onctueuse, comme par exemple une soupe aux tomates rôties
et au basilic. Le programme assure le mixage des ingrédients à
la consistance voulue et leur cuisson en douceur à la bonne
température. Au bout de 15 minutes, la soupe est prête à
servir et à déguster !
Servez-la avec des gros morceaux ! (11)
Le programme Soupe avec morceaux (9) est parfait pour les
recettes de soupes rustiques qui doivent avoir une consistance
plus grossière. Le programme chauffe les ingrédients plus
longtemps pour garantir une cuisson parfaite des morceaux. Au
bout de 28 minutes, la soupe est prête à servir et à déguster !
Pour les soupes avec morceaux, il n’y a pas de mixage.
L’appareil assure uniquement la cuisson. Il est donc
recommandé de bien couper les légumes en petits dés.
Lorsque votre soupe contient trop de morceaux après la
cuisson, sélectionnez la fonction Mixage pour obtenir la
consistance désirée.
Pour confectionner des jus ! (12)
Le mode Jus de la soupière électrique est idéal pour
confectionner des smoothies et des milkshakes à partir
d’ingrédients frais. Au bout de 2 minutes, la boisson est prête
à servir et à déguster ! Le mode Jus ne permet pas de chauffer
les ingrédients.
Remarque : N’insérez pas de glaçons dans la soupière
électrique.
Un mixage parfait ! (13)
Cette fonction vous permet de mixer davantage la soupe pour
obtenir la consistance souhaitée. Il n’y a pas de cuisson
supplémentaire de la soupe.
Pour activer cette fonction après la cuisson, sélectionnez le
mode Mixage en utilisant le bouton Mode (15) puis pressez et
maintenez enfoncé le bouton Sélection Marche/Arrêt (16) pour
mixer.
Il est toujours temps d’ajouter les ingrédients !
Lorsque vous avez déjà démarré le programme Soupe
onctueuse ou Soupe avec morceaux et réalisez que vous avez
oublié d’ajouter un ingrédient ou souhaitez ajouter des herbes,
des épices ou un autre assaisonnement, il est toujours possible
de le faire. Il vous suffit de retirer le couvercle (3), d’ajouter les
ingrédients, de replacer le couvercle et de poursuivre le
programme.
Afin de prévenir toute éclaboussure, ne retirez pas le
couvercle durant le processus de mixage (consultez la
section Écran DEL).
N’utilisez pas cette fonction pour ajouter de grandes quantités
de légumes ou d’autres ingrédients, car cela nécessiterait un
réajustement de la durée du programme pour garantir une
cuisson adéquate.
Annuler ou modifier des programmes
Lorsque vous avez sélectionné le programme de manière
incorrecte et avez appuyé sur le bouton Sélection Marche/Arrêt
(16), ou lorsque vous souhaitez annuler le programme, il vous
suffit simplement d’appuyer sur le bouton Sélection
Marche/Arrêt et de maintenir celui-ci enfoncé pendant 2
secondes, les icônes clignotent. Appuyez sur le bouton Mode
(15) pour sélectionner le programme adéquat puis appuyez sur
le bouton Sélection Marche/Arrêt pour le redémarrer.
Écran DEL (14)
Votre soupière électrique emploie 3 processus différents pour la
confection de soupes et boissons fraîches : il s’agit de la
cuisson, du repos et du mixage. Chacun de ces processus
sont indiqués durant le programme par le biais d’une petite
animation sur l’écran DEL.
Cuisson 11
L’animation de cuisson s’affiche lorsque la soupière électrique
cuit le contenu du récipient.
Mixage 11
L’animation de mixage s’affiche lors de l’utilisation de la lame
de mixage. La soupière électrique émet un bip lors du passage
de la cuisson au mixage.
Ne retirez pas le couvercle (3) pendant le mixage.
Repos 11
Durant les programmes, la soupière électrique se ‘repose’ de
f
FP501014MEE Rev2.qxp_Morphy Richards Instruction Book 10/08/2015 20:11 Page 21
Page 22

22
temps en temps, aucune animation n’est affichée à l’écran. La
minuterie affichée sur l’écran DEL continue de mesurer le
temps restant. Ceci est normal.
Une fois le processus terminé, la soupière électrique émet un
bip pendant 60 secondes, l’écran affiche le message
‘Terminé’.
Fin 11
Une fois le programme terminé, la soupière électrique affiche
une animation identique à l’état de repos, mais la minuterie
affiche ‘0’ et les quatre icônes du panneau clignotent.
Que faire revenir ?
Le mode Faire sauter est idéal pour les oignons et les lardons,
il permet de les ramollir, de les dorer ou de les caraméliser.
Vous pouvez également utiliser le mode Faire sauter pour
confectionner des croûtons pour votre soupe.
Vous devez uniquement utiliser la fonction Faire sauter pendant
5 à 10 minutes. Son utilisation ne doit pas excéder 10 minutes.
N’utilisez pas la fonction Faire sauter avec de la viande crue,
ŕ l’exception des lardons fumés et de petites quantités de
viande hachée (jusqu’ŕ 100 g). Ne l’utilisez pas pour cuire des
liquides, des sauces, des tomates fraîches ou en conserve,
du sucre, des fruits ou des aliments sucrés ou contenant de
l’amidon.
La fonction Faire sauter est uniquement disponible lorsque le
couvercle (2) est retiré du récipient (3). La fonction Faire
sauter est désactivée lorsque le couvercle est installé.
Les avantages de la soupe maison
La soupe faite maison est délicieuse, bon marché, saine et
consistante.
Cuisinez !
Cuisiner est la meilleure manière de préparer des aliments
sains et équilibrés que toute la famille adorera. Cela vous
permet de garder entièrement le contrôle sur ce que vous
mangez, parce que vous allez cuisiner à partir des ingrédients
les plus simples. Vous éviterez ainsi les conservateurs, les
agents aromatisants et autres additifs peut recommandables
que l’on trouve dans les aliments transformés.
Préparez de grosses quantités !
La cuisson en grosses quantités est géniale parce qu’elle vous
permet de préparer une certaine quantité d’une alimentation
équilibrée et de la conditionner en portions-repas que vous
pouvez réfrigérer ou congeler. Vous conservez ainsi tout le goût
et toute la valeur nutritive de votre préparation pour en profiter
plus tard dans la semaine.
Ne jetez pas !
Au Royaume-Uni, on jette chaque année jusqu’à 8,3 millions de
tonnes de nourriture dont une bonne partie aurait pu être
consommée. Qu’il s’agisse d’un poulet rôti du déjeuner du
dimanche ou une tomate traînant dans le frigo, vous pouvez
toujours cuisiner une recette de soupe géniale en utilisant les
restes de nourriture que l’on jette habituellement.
Soupe et nutrition
Il n’y a rien de meilleur que la soupe maison et, selon la recette,
une soupe peut vous apporter un éventail complet de
nutriments revigorants : vitamines, minéraux, glucides et fibres
notamment. Mais surtout, une soupe maison est tout
simplement délicieuse !
Qu’est-ce qui rend votre soupière électrique si
spéciale ?
Rien de plus rapide en effet que de préparer des soupes
fraîches faites maison dans le confort de votre propre cuisine si
vous utilisez votre soupière électrique.
Une cuisson avec un seul récipient
La fonction Faire sauter vous permet de faire revenir des
ingrédients avant la cuisson de vos soupes dans le même
récipient. Une idée simple, réduisant le désordre et la quantité
de vaisselle à nettoyer.
Faire revenir les ingrédients dans le même récipient permet
également de préserver toutes les saveurs.
Des soupes prętes en un éclair !
Tout ce que vous avez à faire, c’est de préparer les ingrédients
que vous avez choisis, de les verser dans votre soupière
électrique et de choisir votre style de soupe Soupe onctueuse
ou Soupe avec morceaux. Une fois sautés, le programme
Soupe onctueuse mixe et cuit la soupe en douceur en 21
minutes. Si vous choisissez le programme soupe avec
morceaux, il ne faut que 28 minutes pour que la soupe soit
prête à déguster !
Un appareil peu encombrant
Nous savons que l’espace est précieux dans la cuisine.
Compacte et de conception simple, votre soupière électrique
trouve aisément sa place sur n’importe quel plan de travail.
Un ręve à nettoyer
12
La soupière électrique avec fonction Faire sauter ne passe pas
au lave-vaisselle mais elle est simple et facile à nettoyer. Après
utilisation, nettoyez le carter du moteur (8) et la lame dentelée
(9) avec de l’eau chaude, essayez avec une éponge. Ne
plongez pas l’appareil dans l’eau. Vous pouvez également
nettoyer l’intérieur du récipient (4) avec de l’eau savonneuse
chaude et une éponge. S’il y a des résidus d’aliments brûlés,
faites-les tremper, puis enlevez-les avec une éponge. Essuyez
l’extérieur de l’appareil avec un chiffon doux et humide, puis
séchez-le.
Certains types d’aliments peuvent brűler s’ils sont en contact
avec la résistance chauffante au fond de l’appareil. Si cela se
produit, remplissez la soupière électrique d’eau savonneuse
très chaude et laisser tremper pendant 15 minutes. Vous
viendrez facilement à bout de tout aliment brűlé avec une
éponge grossière. N’utilisez pas de tampon à récurer en
métal, sous peine de rayer le revętement du récipient.
AVERTISSEMENT La paroi intérieure du récipient est équipée
d’un revętement anti adhésif durable qui facilite le nettoyage.
N’utilisez pas d’ustensiles en métal pour remuer ou retirer
des aliments contenus dans ce produit.
Après le nettoyage, séchez soigneusement toutes les pièces.
FP501014MEE Rev2.qxp_Morphy Richards Instruction Book 10/08/2015 20:11 Page 22
Page 23

23
AVERTISSEMENT : NE PLONGEZ PAS le couvercle ni le
récipient dans l’eau. Ces pièces contiennent des composants
électriques qui peuvent ętre endommagés au contact de
l’eau. Faites attention de ne pas mouiller les connexions
électriques. Séchez soigneusement les pièces avant
utilisation.
Lors du retrait et de l’installation du couvercle (3), veillez à ne
pas rayer la paroi interne du récipient (4) afin de ne pas
endommager le revętement anti-adhésif.
Des questions ?
Si vous avez des questions à propos de l’utilisation de votre
soupière électrique, reportez-vous à la liste qui suit. Vous y
trouverez les réponses aux questions les plus fréquemment
posées (FAQ). Pour toute assistance supplémentaire, contactez
notre service d’assistance : 0344 871 0944.
Puis-je retirer le couvercle en cours de programme ?
Oui, pour ajouter des ingrédients ou un assaisonnement lorsque
cela est requis. Consultez la section ‘Il est toujours temps
d’ajouter les ingrédients’ pour tout complément d’information.
Puis-je utiliser ma soupière électrique pour confectionner des
plats autres que les soupes et les boissons ?
Non. Les 5 programmes disponibles sont uniquement destinés
à la confection de soupes parfaites à partir d’ingrédients.
Suivez les recettes et adaptez-les à votre goût.
Puis-je utiliser de la viande crue avec la soupière électrique ?
Non, sauf les lardons et les petites quantités de viande hachée
(jusqu’à 100 g). Vous devez d’abord cuire la viande séparément
avant d’utiliser celle-ci dans la soupe avec les autres
ingrédients de la recette, car la soupière électrique est
uniquement conçue pour faire revenir des petites quantités de
lardons fumés et d’oignons avant de cuire la soupe. Vous ne
devez pas utiliser la fonction Faire sauter pour cuire de la
viande crue autre que les lardons fumés et la viande hachée.
Quelle est la capacité de la soupière électrique ?
La capacité de la soupière électrique est de 1,6 litre. Veillez à ne
pas remplir votre soupière électrique au-dessus de l’indication
MAX. Dans le cas contraire, le détecteur de remplissage
excessif coupera l’alimentation électrique de la lame dentelée
(9), et l’écran DEL (14) affichera le message ‘E1’. Si cela se
produit, il suffit de retirer une partie des ingrédients de façon à
ne pas dépasser l’indication MAX et d’essuyer le détecteur de
remplissage excessif (7) situé sur le couvercle (3). Assurez-vous
que la préparation (incluant les liquides) se trouve au-dessus de
l’indication MIN, autrement la fonction de Mixage ne pourra pas
fonctionner.
Puis-je modifier la durée des programmes Soupe onctueuse
et Soupe avec morceaux ?
Non. Les durées de ces modes sont prédéfinies en usine.
Puis-je utiliser la soupière électrique pour réchauffer une
soupe réalisée par moi-męme ou réchauffer une soupe
achetée en conserve/toute pręte ?
Non. Les programmes sont conçus exclusivement pour la
confection de soupes à partir d’ingrédients frais. La soupe peut
brûler sur la résistance inférieure et endommager le produit.
Puis-je préparer des soupes froides comme les gaspachos
dans ma soupière électrique ?
Oui, mais vous devrez d’abord cuire la soupe en utilisant le
mode Soupe onctueuse ou Soupe avec morceaux. Ensuite, il
vous suffira de laisser la soupe refroidir ou de la mettre au
réfrigérateur avant de la déguster.
Que dois-je faire si ma soupière électrique cesse de
fonctionner ?
Votre soupière électrique est équipée d’un thermostat qui
coupe l’alimentation électrique et arrête l’appareil pour prévenir
toute surchauffe si vous l’utilisez de façon continue sur 3 cycles
ou plus. Si cela se produit, retirez les aliments du récipient et
laissez la soupière électrique refroidir pendant 30 minutes,
vous pouvez ensuite poursuivre l’élaboration de votre soupe.
Lorsque vous utilisez la fonction Mixage de manière continue
pendant plus de 20 secondes, un dispositif de sécurité coupe
l’alimentation électrique pour prévenir toute surchauffe. Si cela
se produit, patientez pendant 10 secondes avant de réutiliser la
fonction de mixage.
Que faire lorsqu’un aliment brűle sur la résistance inférieure
de ma soupière électrique ? 13
En raison de l’amidon et du sucre présents dans certains
aliments, une légère brûlure peut se produire lorsque ceux-ci
sont en contact avec la résistance inférieure du récipient (4).
Pour éviter ce problème, versez une demi-tasse d’eau ou de
bouillon dans la soupière électrique avant d’y introduire des
ingrédients solides. Complétez ensuite avec le restant du
liquide préconisé dans votre recette.
Que faire lorsque la fonction Faire sauter s’arręte
automatiquement ?
La fonction Faire sauter fonctionne uniquement lorsque le
couvercle est retiré (consultez la page 6). Appuyez sur la
fonction Faire sauter (17), l’indicateur de la fonction Faire sauter
(16) s’allume en vert.
Lorsque l’indicateur de la fonction Faire sauter de la poignée du
récipient (4) reste allumé en rouge, appuyez sur le pistonplongeur situé sur la partie supérieure de la poignée du
récipient pour réactiver la fonction. Ce piston-plongeur doit
rester en position supérieure lorsque le couvercle (2) est retiré.
Nous contacter
Service d’assistance
Si vous rencontrez un problème avec votre appareil, veuillez
appeler notre service d’assistance. Nous pourrons certainement
vous aider plus efficacement que le magasin où vous avez
acheté l’article.
Munissez-vous du nom de produit, du numéro de modèle et du
numéro de série de l’appareil lorsque vous nous appelez. Cela
nous aidera à traiter plus rapidement votre demande.
Dialoguer avec nous
Pour toute question ou commentaire, ou pour recevoir plus
d’astuces et des idées de recettes et profiter au maximum de
votre appareil, vous pouvez nous contacter en ligne :
Blog : www.morphyrichards.co.uk/blog
Facebook : www.facebook.com/morphyrichardsuk
Twitter : @loveyourmorphy
Site Internet : www.morphyrichards.com
f
FP501014MEE Rev2.qxp_Morphy Richards Instruction Book 10/08/2015 20:11 Page 23
Page 24

24
Recettes
Nous avons conçu 15 recettes que vous pourrez utiliser avec votre nouvelle soupière électrique, vous
pourrez alors confectionner des soupes saines et consistantes et des smoothies rafraîchissants.
Le mode Soupe avec morceaux (11) permet uniquement de cuire les ingrédients, il ne permet en aucun
cas de les découper. Lorsque la soupe contient trop de morceaux, utilisez la fonction Mixage (13) pour
rendre la soupe davantage onctueuse.
Pour activer cette fonction, il est nécessaire de débrancher la soupière électrique de la prise de courant et
de la raccorder à nouveau. Cette opération permet de réinitialiser la soupière électrique et de sélectionner
la fonction Mixage avec le bouton Mode (15). Une fois sélectionnée, pressez et maintenez enfoncé le
bouton Sélection Marche/Arrêt (16) pour mixer le contenu du récipient.
Les recettes ont été conçues pour maintenir la préparation entre les capacités de fonctionnement MIN et
MAX de la soupière électrique (de 1,3 litre à 1,6 litre).
FP501014MEE Rev2.qxp_Morphy Richards Instruction Book 10/08/2015 20:11 Page 24
Page 25

25
Recettes de soupe avec ingrédients à faire
revenir
Soupe de courge musquée, piment rouge et
noix de coco
Durée de préparation : 15 minutes
Durée de cuisson : 30 minutes.
Mode : Avec morceaux
Pour 4 personnes
Ingrédients :
• 2 c. à soupe d’huile d’olive
• 500 g de courge musquée épépinée, pelée et coupée en petits
cubes
• 1 oignon de taille moyenne (env. 100 g), haché
• 3 gousses d’ail émincées
• 1 c. à café de cumin moulu
• 1 piment rouge ou une moitié de piment rouge finement haché et
épépiné pour le goűt.
• 1 c. à café de gingembre frais râpé
• 800 ml de bouillon de légumes réalisé avec deux cubes de
bouillon
• 200 ml de lait de noix de coco
• Le jus d’un citron vert
• 10 g de coriandre fraîche hachée
• Sel et poivre
Préparation :
1 Versez l’huile dans le récipient puis appuyez sur le bouton Faire
sauter.
2 Au bout d’une minute, ajoutez la courge musquée et faites-la
revenir pendant 3 à 4 minutes en remuant régulièrement.
3 Ajoutez l’oignon, l’ail, le cumin moulu et le piment rouge,
continuez de cuire pendant 5 minutes, jusqu’à ce que les
ingrédients commencent à se ramollir.
4 Désactivez la fonction Faire sauter en appuyant sur le bouton
Faire sauter. Ajoutez le reste des ingrédients, remuez à l’aide
d’une cuillère ou d’une spatule en bois afin de les répartir de
manière uniforme.
5 Placez le couvercle sur le récipient puis sélectionnez le mode
Avec morceaux.
6 Une fois la cuisson terminée, assaisonnez, goűtez, puis servez.
Pour obtenir une soupe davantage onctueuse, il vous suffit
simplement de sélectionner la fonction Mixage, puis de presser et
de maintenir enfoncé le bouton Sélection Marche/Arręt pour mixer
la soupe jusqu’à la consistance désirée.
Bouillon d’agneau d’hiver aux lentilles
Durée de préparation : 20 minutes
Durée de cuisson : 33 minutes
Mode : Avec morceaux
Pour 4 personnes
Ingrédients :
• 2 c. à soupe d’huile d’olive
• 75 g de viande d’agneau hachée et crue
• 1 oignon de taille moyenne (env. 100 g) finement émincé
• 2 gousses d’ail écrasées
• 1 petite carotte (env. 50 g) finement hachée
• 1 pomme de terre (env. 115 g) finement hachée
• 1 navet de taille moyenne (env. 100 g) finement haché
• 1 c. à soupe de farine
• 1 (400 g) boîte de lentilles égouttées
• ˝ c. à café de romarin frais haché
• 2 feuilles de laurier
• 1 c. à café de sauce Worcestershire
• 1 c. à soupe de persil frais haché
• 900 ml de bouillon d’agneau réalisé à partir de 2 cubes
Méthode :
1 Appuyez sur le bouton Faire sauter puis faites chauffer l’huile
d’olive dans le récipient pendant une minute. Faites revenir la
viande d’agneau hachée pendant 2 à 3 minutes en remuant
souvent avec une cuillère en bois jusqu’à ce que la viande soit
dorée uniformément.
2 Ajoutez l’oignon, l’ail, les carottes, les pommes de terre et les
navets dans le récipient puis faites-les revenir pendant 4 minutes,
en remuant suffisamment. Désactivez la fonction Faire sauter en
appuyant sur le bouton Faire sauter.
3 Ajoutez la farine en remuant, ajoutez ensuite le reste des
ingrédients en terminant par le bouillon (ne dépassez pas
l’indication MAX). Assaisonnez avec du sel et du poivre du moulin
puis remuez en utilisant une cuillère ou une spatule en bois.
Placez le couvercle sur le récipient puis sélectionnez le mode
Avec morceaux.
4 Une fois terminé, assaisonnez selon vos préférences et retirez les
feuilles de laurier avant de servir.
f
FP501014MEE Rev2.qxp_Morphy Richards Instruction Book 10/08/2015 20:11 Page 25
Page 26

26
Soupe au poulet et aux champignons
Durée de préparation : 20 minutes
Durée de cuisson : 30 minutes.
Mode : Soupe onctueuse
Pour 4 personnes
Ingrédients :
• 2 c. à soupe d’huile d’olive
• 1 oignon (env. 100 g) finement émincé
• 240 g de champignons finement émincés
• 1 gousse d’ail écrasée
• 100 g de poulet cuit et effiloché
• 1 pomme de terre (env. 115 g) pelée et coupée en très petits dés
• 10 g de persil frais haché
• sel et poivre
• 1 litre de bouillon de volaille
Garniture :
• un peu de crème fraîche
Méthode :
1 Appuyez sur le bouton Faire sauter. Dans le récipient, faites
chauffer l’huile pendant une minute puis ajoutez les oignons.
Faites-les revenir en remuant sans arręt à l’aide d’une cuillère ou
d’une spatule en bois pendant 2 minutes, jusqu’à ce qu’ils se
ramollissent, mais sans brunir.
1 Ajoutez les champignons et l’ail puis faites revenir pendant
plusieurs minutes, jusqu’à ce que les champignons aient ramolli.
Désactivez la fonction Faire sauter en appuyant sur le bouton
Faire sauter.
3 Ajoutez le poulet, les pommes de terre, le persil et
l’assaisonnement, ajoutez du bouillon jusqu’à l’indication MAX si
nécessaire.
4 Placez le couvercle sur le récipient puis sélectionnez le mode
Soupe onctueuse.
5 Une fois terminé, assaisonnez selon vos préférences puis servez
avec un nuage de crème (selon vos goűts).
• Pour réaliser un bouillon de volaille frais. Placez simplement une
carcasse de poulet dans une casserole moyenne, couvrez d’eau,
ajoutez un bouillon-cube de légumes, 5 grains de poivre et une
feuille de laurier. Portez à ébullition puis laissez mijoter pendant 1
heure. Filtrez dans une passoire fine ou dans une étamine passebouillon.
Recettes de soupe
Soupe de tomates rôties au basilic
Durée de préparation : 30 minutes.
Durée de cuisson : 21 minutes
Mode : Soupe onctueuse
Pour : 4
Ingrédients :
• 8 tomates très műres (env. 640 g) coupées en deux
• 2 oignons rouges (env. 215 g) coupés en 6 quartiers
• 4 gousses d’ail
• 1 c. à soupe d’huile d’olive
• 1 c. à soupe de vinaigre balsamique
• Sel et poivre noir moulu
• 750 ml de bouillon de volaille préparé à partir d’un cube de
bouillon
• 2 c. à café de purée de tomates
• 1 c. à café de cassonade
• 10 g de feuilles de basilic fraîches
Méthode :
1 Préchauffez le four à 200 şC/Thermostat 4.
2 Disposez les tomates, peau vers le haut, dans un plat à rôtir avec
les oignons rouges et l’ail. Arrosez d’huile d’olive et de vinaigre
balsamique, assaisonnez de sel et de poivre du moulin. Faites rôtir
pendant 20 minutes jusqu’à ce que les ingrédients soient ramollis
et légèrement carbonisés.
3 Placez délicatement les légumes dans le récipient de la soupière
électrique et ajoutez le bouillon de volaille, ajoutez ensuite la
purée de tomates, la cassonade et le basilic frais.
4 Placez le couvercle sur le récipient puis sélectionnez le mode
Soupe onctueuse. Dès que la soupe est pręte, assaisonnez à
votre goűt et servez.
FP501014MEE Rev2.qxp_Morphy Richards Instruction Book 10/08/2015 20:11 Page 26
Page 27

27
Soupe de pois au jambon et à la menthe
vraiment rapide et facile à préparer
Durée de préparation : 5 minutes
Durée de cuisson : 21 minutes
Mode : Soupe onctueuse
Pour 4 personnes
Ingrédients :
• 600 g de pois surgelés
• 20 g de menthe fraîche, uniquement les feuilles
• 225 g de jambon cuit de qualité, haché/effiloché
• 1 pomme de terre (env. 100 g) coupée en très petits dés
• 800 ml de bouillon de jambon chaud réalisé à partir d’un cube
• Sel et poivre noir moulu
• 2 c. à soupe d’huile d’olive
• 3 c. à soupe bombées de crème fraîche
Méthode :
1 Placez les pois, le menthe, le jambon, la pomme de terre et le
bouillon chaud dans la soupière électrique. Placez le couvercle sur
le récipient puis sélectionnez le mode Soupe onctueuse.
2 Une fois la soupe pręte, assaisonnez-la avec du sel et du poivre
du moulin, ajoutez de l’huile d’olive et de la crème fraîche, puis
sélectionnez le mode Mixage. Pressez et maintenez enfoncé le
bouton Sélection Marche/Arręt pour mixer la soupe pendant 20
secondes avant le service.
Pistou à la française
Durée de préparation : 15 minutes
Durée de cuisson : 28 minutes
Mode : Avec morceaux
Pour 4 personnes
Ingrédients :
• 1 courgette (approx 150g) découpée en petits dés
• 1 petite pomme de terre (env. 70 g) découpée en petits dés
• 1 petit oignon (env. 70 g) finement émincé
• 1 carotte (env. 50 g) découpée en petits dés
• 1 boîte de tomates hachées (400 g)
• 50 g de petit pois
• 50 g de spaghettis brisés en petits morceaux
• 50 g de haricots verts coupés en morceaux de 1 cm
• 650 ml de bouillon de légumes
• 1 c. à soupe de purée de tomates (à incorporer au bouillon)
• Sel et poivre noir moulu
Pour servir :
• Pesto
• Parmesan
Méthode :
1 Placez les ingrédients dans la soupière électrique, versez dessus
le mélange de bouillon de légumes et de purée de tomates,
assaisonnez de sel et de poivre du moulin, mélangez les
ingrédients ensemble en utilisant une cuillère ou une spatule en
bois pour les répartir uniformément.
2 Placez le couvercle sur le récipient puis sélectionnez le mode
Avec morceaux.
3 Servez aussitôt avec une cuillerée de pesto et de parmesan
fraîchement râpé.
Soupe de légumes simple
Durée de préparation : 5 minutes
Durée de cuisson : 21 minutes
Mode : Soupe onctueuse
Pour : 4
Ingrédients :
• 700 g d’assortiment de légumes découpés en dés (un pack de
légumes disponible en supermarché est idéal)
• Eau (verser jusqu’à l’indication MAX)
• 2 cubes de bouillon de volaille ou de légumes
• Sel et poivre noir moulu
Méthode :
1 Pour une soupe rapide et fluide, versez les dés de légumes en
dépassant l’indication MIN du récipient (il est recommandé
d’utiliser des dés de légumes déjà préparés.)
2 Ajoutez les cubes de bouillon de légumes ou de poulet puis
remplissez le récipient d’eau jusqu’à l’indication MAX.
3 Placez le couvercle sur le récipient puis sélectionnez le mode
Soupe onctueuse. Dès que la soupe est pręte, assaisonnez à
votre goűt et servez.
f
FP501014MEE Rev2.qxp_Morphy Richards Instruction Book 10/08/2015 20:11 Page 27
Page 28

28
Recettes de jus de fruits
Smoothie fraise-ananas
Durée de préparation : 5 minutes
Durée de mixage : 2 minutes
Mode : Jus
Quantité : 1,1 litre
Ingrédients :
• 300 g de fraises fraîches
• 250 g d’ananas frais
• 450 g de yaourt à la fraise allégé
• 150 ml de lait demi-écrémé
• 1 boule (env. 35 g) de glace à la vanille
Méthode :
1 Préparez et équeutez les fraises, en découpant en deux les plus
grosses. Coupez l’ananas en morceaux.
2 Placez les ingrédients dans la soupière électrique, mélangez
vivement.
3 Placez le couvercle sur le récipient puis sélectionnez le mode Jus.
Il vous suffit ensuite de patienter 2 minutes, le temps que le
programme se termine.
4 Servez tout de suite.
Smoothie chocolat banane
Durée de préparation : 5 minutes
Durée de mixage : 2 minutes
Mode : Jus
Quantité : 1,5 litre
Ingrédients :
• 2 packs de 450 g de yaourt à la vanille allégé
• 300 à 400 ml de lait demi-écrémé (selon vos goűts)
• 2 bananes műres, épluchées et finement émincées
• 150 g à 200 g de chocolat noir de qualité (selon les goűts)
Méthode :
1 Mélangez le chocolat, en utilisant un four à micro-ondes ou un
bain-marie.
2 Pendant ce temps, placez les autres ingrédients dans le récipient,
en ajoutant le chocolat fondu en dernier.
3 Mélangez vivement.
4 Placez le couvercle sur le récipient puis sélectionnez le mode Jus.
Il vous suffit simplement d’attendre 2 minutes pour terminer le
programme.
Lames garanties à vie
La « lame dentelée » est garantie sans défaut de matériau ni de
fabrication, à vie. Cette garantie est réservée à l’acheteur
d’origine et n’est ni cessible ni transférable à aucune autre
partie. Cette garantie est réservée aux clients utilisant les «
lames dentelées » à des fins ménagères et non commerciales.
Cette garantie ne couvre aucun dommage causé par accident,
utilisation indue, ni aucune utilisation autre que celle
mentionnée dans le manuel du propriétaire, ni aucun dommage
résultant d’un mauvais entretien ou nettoyage de ce produit,
comme indiqué dans le manuel de l’utilisateur.
Votre garantie de deux ans
Pour la clientèle en France
Il est important de conserver le ticket de caisse comme preuve
d’achat. Agrafez votre ticket de caisse à cette notice
d'utilisation; vous pourrez ainsi l’avoir sous la main
ultérieurement.
Merci de donner les informations ci-dessous si votre appareil
tombe en panne. Vous trouverez ces références à la base de
l’appareil.
Numéro du modèle
Numéro de série
Tous les produits Morphy Richards sont testés individuellement
avant de quitter l’usine.
Si un problème survient dans les 24 mois qui suivent l’achat
d’origine, vous devez contacter le magasin où vous avez
acheté votre appareil muni de votre ticket de caisse, celui ci le
renverra à Glen Dimplex France pour expertise.
Sous réserve des exclusions indiquées ci-dessous (1 à 9),
l’appareil défectueux sera alors réparé ou remplacé et
réexpédié dans un délai de 15 jours ouvrables maximum à
compter de son arrivée.
Si, pour quelque raison que ce soit, l’article est remplacé
pendant la période de garantie de deux ans, la période de
garantie du nouvel article sera calculée à partir de la date
d’achat d’origine. Vous devez donc absolument conserver votre
ticket de caisse ou votre facture d’origine pour indiquer la date
d’achat.
Pour bénéficier de la garantie de deux ans, l’appareil doit avoir
été utilisé conformément aux instructions du fabricant. Par
exemple, les fers doivent avoir été détartrés et les filtres doivent
avoir été nettoyés selon les instructions.
Morphy Richards ne sera pas dans l’obligation de remplacer ou
réparer les articles aux termes de la garantie dans les
circonstances suivantes :
1 Si le problème provient d’une utilisation accidentelle, d’une
utilisation abusive ou négligente, ou si l’appareil a été utilisé de
manière contraire aux recommandations du fabricant, ou encore
lorsque le problème provient de sautes de puissance ou de
dégâts occasionnés en transit.
2 Si l’appareil a été utilisé sur une alimentation électrique dont la
tension est différente de celle qui est indiquée sur l’appareil.
3 Si des personnes autres que nos techniciens (ou l’un de nos
revendeurs agréés) ont tenté de faire des réparations.
FP501014MEE Rev2.qxp_Morphy Richards Instruction Book 10/08/2015 20:11 Page 28
Page 29

29
4 Si l’appareil a été loué ou utilisé dans un contexte non
domestique.
5 Si l’appareil est d’occasion.
6 Morphy Richards n’est pas dans l’obligation de réaliser des
travaux d’entretien, quels qu’ils soient, aux termes de la garantie.
7 La garantie exclut les consommables tels que les sacs, les filtres
et les carafes en verre.
8 Les batteries et les dégâts provoqués par leur fuite ne sont pas
couverts par la garantie.
9 Les filtres n’ont pas été nettoyés ou remplacés suivant les
instructions.
Cette garantie ne confère aucun droit à l’exception de ceux qui
sont expressément indiqués ci-dessus, et ne couvre aucune
réclamation pour dommages immatériels ou indirects. Cette
garantie est offerte comme avantage supplémentaire et n’a
aucune incidence sur vos droits légaux en tant que
consommateur.
Pour la clientèle en Belgique
Les produits de Morphy Richards sont produits conformément
les normes de qualité, agrée international. Au-dessus vos droits
légaux, Morphy Richards vous garantit qu’à partir d’achat ce
produit sera sans défauts de fabrication ou de matériels
pendant une période de deux ans.
Il est important de conserver votre bon d’achat comme preuve.
Agrafez votre ticket à cette notice d’installation.
Veuillez mentionner ces informations ci-dessous si votre
appareil tombe en panne. Vous trouverez ces informations sur la
base de l’appareil.
Numéro du modèle
Numéro de série
Si, pour quelque raison que ce soit, l’article est remplacé
pendant la période de garantie (deux ans), la période de
garantie du nouvel article sera calculée à partir de la date
d’achat d’origine. Il est donc très importants de conserver votre
bon d’achat original afin de connaître la date initiale d’achat.
Cette garantie vaut uniquement quand l’appareil a été utilisé
conformément aux instructions du fabricant. Par exemple, les
appareils doivent être détartrés et les filtres doivent être tenus
propre selon le mode d’emploi.
Morphy Richard ne sera pas dans l’obligation de remplacer ou
réparer les articles aux termes de la garantie dans les
circonstances suivantes
1 Si le problème, prévient d’une utilisation accidentelle, d’une
utilisation abusive ou négligente, ou si l’appareil a été utilisé de
manière contraire aux recommandations du fabricant, ou encore
lorsque le problème provient de source de puissance ou de
dégâts occasionnés en transit.
2 Si l’appareil a été utilisé sur une alimentation électrique dont la
tension est différente de celle qui est indiquée sur l’appareil.
3 Si des personnes, autres que nos techniciens (ou revendeurs
agrées) ont tenté de faire des réparations.
4 Si l’appareil a été loué ou utilisé dans un contexte non
domestique.
5 Si l’appareil est d’occasion.
6 Morphy Richards n’est pas dans l’obligation de réaliser des
travaux d’entretien, quels qu’ils soient, aux termes de la garantie.
7 La garantie ne couvre pas les sachets, filtres et brocs en verre.
8 Les batteries et les dégâts provoqués par leur fuite ne sont pas
couverts par la garantie.
9 Les filtres n’ont pas été nettoyés ou remplacés suivant les
instructions.
Cette garantie ne confère aucun droit à l’exception de ceux qui
sont expressément indiqués ci-dessus, et ne couvre aucune
réclamation pour dommages immatériels ou indirects. Cette
garantie est offerte comme avantage supplémentaire et n’a
aucune incidence sur vos droits légaux en tant que
consommateur.
f
FP501014MEE Rev2.qxp_Morphy Richards Instruction Book 10/08/2015 20:11 Page 29
Page 30

30
Gesundheit und Sicherheit
Für die Benutzung elektrischer Haushaltsgeräte sind folgende Regeln zur Wahrung der Sicherheit einzuhalten.
Vor der Verwendung des Geräts bitte die Bedienungsanleitung aufmerksam lesen.
• Dieses Gerät kann von Personen, deren körperliche oder geistige
Unversehrtheit oder deren Wahrnehmungsfähigkeit eingeschränkt ist,
sowie von Personen mit mangelnden Kenntnissen oder Erfahrung benutzt
werden. Dies gilt nur unter der Voraussetzung, dass sie beaufsichtigt
werden oder dass sie eine Einweisung in die sichere Nutzung des Geräts
und die damit verbundenen Gefahren erhalten haben.
• Dieses Gerät darf nicht von Kindern benutzt werden. Gerät und Netzkabel
nicht in Reichweite von Kindern aufbewahren. Kinder dürfen mit dem
Gerät nicht spielen.
• Vor dem Zusammensetzen, Zerlegen oder Reinigen und wenn das Gerät
unbeaufsichtigt bleibt, stets den Netzstecker aus der Steckdose ziehen.
• Dieses Gerät ist für die Verwendung im Haushalt und ähnliche
Anwendungen vorgesehen, z. B.: Bauernhöfe, von Kunden in Hotels,
Motels oder anderen wohnungsähnlichen Räumlichkeiten, Pensionen und
vergleichbaren Unterbringungsmöglichkeiten. Es eignet sich nicht für
Personalküchenbereiche in Geschäften, Büros und anderen
Arbeitsumgebungen.
• Wenn das Netzkabel beschädigt ist, muss es zur Gefahrenvermeidung
durch eine spezielle Kabeleinheit ausgetauscht werden, die vom Hersteller
oder seinem Kundenservice erhältlich ist.
• WARNUNG: Die Schneiden sind sehr scharf. Bei der Benutzung und
Reinigung vorsichtig vorgehen. Anleitungen zur Pflege und Reinigung
finden sich im entsprechenden Abschnitt.
• Dieses Gerät ist nicht für den Betrieb über eine externe
Zeitschaltvorrichtung oder eine separate Fernsteuerung vorgesehen.
d
FP501014MEE Rev2.qxp_Morphy Richards Instruction Book 10/08/2015 20:11 Page 30
Page 31

31
Außerdem enthält der Text folgende Sicherheitshinweise.
Aufstellungsort
• Das Gerät stets weit entfernt von der Kante einer Arbeitsplatte
aufstellen.
• Das Gerät auf einer fest stehenden, flachen Oberfläche benutzen.
• Das Gerät darf nicht im Freien oder in der Nähe von Wasser
benutzt werden.
Netzkabel
• Das Netzkabel muss spannungsfrei von der Steckdose bis zum
Unterteil des Geräts verlegt sein.
• Das Netzkabel nicht über die Kante einer Arbeitsplatte
herabhängen lassen. Ein Kind könnte daran ziehen.
• Das Kabel nicht über eine offene Fläche verlegen, z. B. zwischen
einer tief angebrachten Steckdose und einem Tisch.
• Das Netzkabel nicht über eine warme Herdplatte, einen Toaster
oder andere heiße Flächen verlegen, da das Kabel sonst
beschädigt werden kann.
Eigene Sicherheit
• WARNUNG: Zum Schutz vor Feuer, elektrischen Schlägen und vor
Verletzungen dürfen weder das Kabel, noch der Stecker oder das
Gerät in Wasser oder andere Flüssigkeiten getaucht werden.
• WARNUNG: Berühren Sie keine beweglichen Teile.
• Beim Transportieren von Geräten mit heißem Inhalt sehr vorsichtig
vorgehen.
• Das Gerät nicht mit feuchten oder nassen Händen benutzen.
Behandlung von Verbrennungen
• Verbrennungen unverzüglich mit kaltem Wasser kühlen. Mit dem
Kühlen der Wunde auch beim Ausziehen von Kleidungsstücken
nicht aufhören und rasch einen Arzt rufen.
Weitere Anmerkungen zur Sicherheit
• Gerät nicht verwenden, wenn das Netzkabel des Geräts
beschädigt ist. Weitere Hilfe erhalten Sie telefonisch bei
Morphy Richards.
• Der Einsatz von Zubehörein- oder -aufsätzen, die vom Hersteller
nicht empfohlen werden, können zu Schäden am Gerät führen.
• Das Gerät nicht auf oder dicht neben Wärmequellen aufstellen,
wie z. B. Gas- oder Elektroherde oder Herdplatten.
• Das Gerät und das Kabel vor Wärme, direkter Sonnenbestrahlung,
Feuchtigkeit, scharfen Kanten und ähnlichen Gefahrenquellen
fernhalten.
• Bei der Benutzung sicherstellen, dass der Deckel vor Einschalten
des Geräts angebracht ist.
• Den Deckel nicht abnehmen, solange sich die Messer noch
bewegen.
• Nach einem Durchlauf das Gerät vollständig abkühlen lassen und
danach reinigen, um Einbrennen zu verhindern.
• Das Gerät darf nicht ununterbrochen zur Zubereitung von Suppen
verwendet werden.
• Vorsicht beim Eingießen heißer Flüssigkeiten in den
Suppenbereiter, da diese durch plötzliches Verdampfen aus dem
Gerät spritzen können.
Elektrischer Anschluss
Stellen Sie sicher, dass die auf dem Typenschild des Geräts
angegebene Spannung mit der Haushaltsspannung Ihrer
Elektrizitätsversorgung übereinstimmt; es muss eine
Wechselstromspannung (abgekürzt AC) sein.
WARNUNG: DIESES GERÄT MUSS GEERDET WERDEN.
Falls die Sicherung in dem Sicherungshalter ausgetauscht werden
muss, ist eine Sicherung mit 13 A gemäß BS1362 zu verwenden.
d
FP501014MEE Rev2.qxp_Morphy Richards Instruction Book 10/08/2015 20:11 Page 31
Page 32

32
Herzlichen Glückwunsch zum Erwerb Ihrer neuen Morphy Richards Küchenmaschine mit SerratorSchneiden Technologie. Dank ihres revolutionären und einzigartigen Designs kann die Serrator-Schneide
langfristig mit hervorragenden Schneidergebnissen überzeugen.
Funktionsweise der Serrator-Schneide?
Die Serrator-Schneide wurde speziell von unseren hauseigenen Designern entworfen, um
Standardschneiden mit geraden Kanten leistungsmäßig zu übertreffen. Der perfekte Schnitt wurde
sorgfältig ausgewählt und ausgiebig getestet, um Ihnen eine Hochleistungsschneide zu präsentieren. Wir
sind zuversichtlich, dass Sie mit der Serrator-Schneide über mehrere Jahre zufrieden sein werden.
Unsere neue hochpräzise Serrator Schneide bleibt bis zu
12x länger schärfer als Standardschneiden: eine Schneidleistung auf Lebenszeit.
*** Die Schneide wurde vom CATRA-Prüfinstitut einem unabhängigen Test, unter Anwendung des International
Standard Cutting Testsystems nach ISO 8442.5, unterzogen und mit einer Standardschneide verglichen.
Neue
(Nur bestimmte Modelle) Schneide
BLEIBT
12X LÄNGER SCHÄRFER
ALS STANDARDSCHNEIDEN***
Serrator Schneide
Standardschneide
Schärfegrad
Lebensdauer der Schneide
FP501014MEE Rev2.qxp_Morphy Richards Instruction Book 10/08/2015 20:11 Page 32
Page 33

33
Einführung
Der Sauté- & Suppenbereiter von Morphy Richards kann schnell
und leicht eingesetzt werden. Wählen Sie die Sauté-Einstellung,
um eine absolut wohlschmeckende und frische Suppe zu
kreieren, fügen Sie anschließend ihre Zutaten zum sautieren
hinzu, wie z. B. –Zwiebeln, Speckwürfel, Knoblauch oder Ingwer
– und die Basis Ihrer absolut köstlichen Suppe hat gerade ihren
Anfang genommen. Fügen Sie danach alle anderen Zutaten in
die große 1,6 l fassende Kanne, setzen den Deckel auf und
wählen entweder die Einstellung „Cremige Suppe“ oder
„Stückige Suppe“ aus.
Das sehr einfache handzuhabende Bedienfeld besitzt eine LEDZeitanzeige, mit der die verbleibende Zubereitungszeit der
Suppe exakt angezeigt werden kann und Sie sich so gemütlich
anderen Dingen zuwenden können, während der Supperbereiter
die harte Arbeit für Sie übernimmt.
Die Einstellung „Cremige Suppe“ vermengt die Suppe
schonend und bereitet sie in nur 21 Minuten zu, während die
Suppe mithilfe der Einstellung „Stückige Suppe“ im Ganzen und
mit einer festeren Konsistenz in 28 Minuten zubereitet wird.
Sollte die Suppe nach der Zubereitung etwas zu stückig sein,
drücken Sie einfach die Mixertaste und die erstklassigen
Serrator-Schneiden werden die Stücke in der Suppe je nach
Geschmack weiter zerkleinern.
Der Sauté- & Suppenbereiter besitzt auch eine Pause-Funktion,
damit Gewürze, Crème Fraîche, Kräuter oder Sahne zu einem
beliebigen Zeitpunkt während der Zubereitung einfach
zugegeben werden können. Heben Sie einfach den Deckel ihres
Sauté- & Suppenbereiters an - das laufende Programm wird
unterbrochen und der Schneidvorgang gestoppt. Fügen Sie
Gewürze und/oder weitere Zutaten hinzu. Nach dem Aufsetzen
des Deckels wird das Programm mit gleicher Programmdauer
fortgesetzt.
Vergessen Sie nicht, Ihre zweijährige Produktgarantie unter
www.morphyrichards.co. anzumelden.
Inhalt
Gesundheit und Sicherheit 30
Serrator-Schneide 32
Einführung 33
Eigenschaften 33
Vor der ersten Verwendung 34
Bedienung Ihres Suppenbereiters 34
Der Umgang mit Ihrem Suppenbereiter 34
LED-Anzeige 35
Wass soll sautiert werden? 35
Die Vorzüge hausgemachter Suppe 35
Was ist das Besondere an Ihrem Suppenbereiter? 36
Einfache Reinigung 36
Noch Fragen? 36
Kontakt 37
Rezepte 38
Rezepte - Sauté 39
Rezepte - Suppen 40
Rezepte - Säfte 41
Garantie 41
Eigenschaften
(1) Bedienfeld
(2) Deckelgriff
(3) Deckel
(4) Kanne
(5) Kannengriff
(6) Netzbuchse
(7) Überlaufsensor
(8) Motorgehäuse
(9) Serrator-Schneide
(10) Anzeige „Cremige Suppe“
(11) Anzeige „Stückige Suppe“
(12) Anzeige „Säfte“
(13) Anzeige „Zerkleinern“
(14) LED-Anzeige
(15) Modustaste
(16) Ein-/Aus-Taste
(17) Anzeige „Sauté“
(18) Taste „Sauté“
d
FP501014MEE Rev2.qxp_Morphy Richards Instruction Book 10/08/2015 20:11 Page 33
Page 34

34
Vor der ersten Verwendung
Entfernen Sie das gesamte Verpackungsmaterial vor dem ersten
Gebrauch.
Es ist wichtig, dass Sie Ihren Sauté- & Suppenbereiter vor dem
ersten Gebrauch oder nach längerem Nichtgebrauch reinigen.
Weitere Informationen können Sie dem Abschnitt „Reinigung
und Pflege“ entnehmen.
Wenn Sie Ihren Sauté- und Suppernbereiter das erste Mal
verwenden, kann es vorkommen, dass eine geringe Menge an
Qualm/Rauch aus dem Deckel austritt. Dieser Vorgang ist
normal, da während der Herstellungsphase einige Teile mit
einem Fettfilm überzogen wurden. Diese Qualm-/Rauchbildung
wird nach einigen Einsätzen verschwinden.
Bedienung Ihres Suppenbereiters
1 Deckel entfernen (3) und dabei wenn möglich nicht die Serrator-
Schneide (9) berühren. WARNUNG: Scharfe Schneiden
2 Den Suppenbereiter mit dem Stromnetz verbinden. Die Anzeige
„Sauté“ (17) leuchtet rot.
3 Öl oder Butter in die Kanne (4) geben. Beim Sautieren mit Butter
empfehlen wir die Zugabe von etwas Öl, damit die Butter nicht
anbrennt.
4 Beim Drücken der Taste „Sauté“ (18), wechselt die Anzeige
„Sauté“ auf grün. Die Kanne wird aufgeheizt.
5 Geben Sie nach einigen Minuten die Zutaten für das Sautieren in
die Kanne. Verwenden Sie einen Kochlöffel aus Holz, um ein
gleichmäßiges Sautierergebnis zu erzielen und ein Anhaften bzw.
Anbrennen zu vermeiden. Setzen Sie den Deckel nicht ab.
6 Drücken Sie nach der Fertigstellung erneut die Taste „Sauté“;
diese leuchtet danach rot auf. Geben Sie die restlichen Zutaten in
die Kanne.
7 Setzen Sie den Deckel wieder auf die Kanne, achten Sie darauf,
dass er fest aufsitzt. Es wird ein Signalton ausgegeben und die
Symbole leuchten nacheinander auf.
8 Drücken Sie die Modustaste (15), um das Programm
auszuwählen, (siehe „Der Umgang mit Ihrem Suppenbereiter“ ).
Die Taste wird aufleuchten.
9 Drücken Sie die Ein-/Aus-Taste (16), um Ihren Suppenbereiter
einzuschalten. Der Suppenbereiter gibt einen Signalton aus und
der Garvorgang beginnt. Die Gardauer wird angezeigt und die Zeit
wird heruntergezählt.
10 Nach Beendigung wird der Suppenbereiter 60 Sekunden lang
einen Signalton ausgeben und alle vier Symbole werden blinken.
Ziehen Sie den Netzstecker des Geräts aus der Steckdose,
entfernen den Deckel und gießen die frische Suppe in eine
Schüssel.
VORSICHT:
BEIM ABHEBEN DES DECKELS (3) DARAUF ACHTEN, DASS
DIE SCHNEIDE NICHT DIE INNENSEITE DER KANNE (4)
BERÜHRT, DAMIT DIE ANTI-HAFTBESCHICHTUNG NICHT
BESCHÄDIGT WIRD.
Der Umgang mit Ihrem Suppenbereiter
Ihr Suppenbereiter besitzt 5 Programme.
Wählen Sie Ihr gewünschtes Programm aus:
Sauté... (17)
Mithilfe der Sauté-Funktion wird die Kanne aufgeheizt, so dass
beispielsweise Zwiebeln oder Speckwürfel noch vor der Zugabe
der restlichen Zutaten zur Suppe sautiert werden. Entfernen Sie
einfach den Deckel, geben das Öl hinzu, drücken die Taste
Sauté, die Aufheizphase läuft eine Minute lang und geben Sie
anschließend einfach Ihre Zutaten hinzu und rühren sie unter.
Die Sauté-Funktion steht nur dann zur Verfügung, wenn der
Deckel (2) nicht auf der Kanne (3) aufgesetzt ist. Die SautéFunktion wird ausgeschaltet, sobald der Deckel aufgesetzt
wurde. Hinweis: Verwenden Sie die Sauté-Funktion nicht
länger als 10 Minuten.
Cremig... (10)
Das Programm „Cremige Suppe“ ist ideal für delikate
Suppenrezepte, die eine cremige Konsistenz erfordern, wie z. B.
eine Rösttomaten-Basilikumsuppe. Das Programm sorgt dafür,
dass die Zutaten auf die richtige Konsistenz zerkleinert und bei
korrekter Temperatur zubereitet werden. Ihre Suppe ist nach
einer Programmdauer von 21 Minuten servierfertig; lassen Sie
es sich schmecken!
Stückig! (11)
Das Programm „Stückige Suppe“ ist ideal für die Zubereitung
von eher rustikalen Suppenrezepten, die eine grobere
Konsistenz erfordern. Das Programm erhitzt die Zutaten länger,
um sicherzustellen, dass die stückigen Zutaten vollständig
gegart werden. Ihre Suppe ist nach einer Programmdauer von
28 Minuten servierfertig; lassen Sie es sich schmecken! Für
stückige Suppen gibt es keinen Mixervorgang, sie werden
lediglich erhitzt. Daher wird empfohlen, Gemüse in kleine Würfel
zu schneiden. Sollte Ihre Suppe nach dem Garen zu
grobstückig sein, wählen Sie einfach die Mixerfunktion, um die
gewünschten Konsistenz nachträglich zu erzielen.
Entsaften! (12)
Die Suppenbereiter-Funktion „Säfte“ ist ideal für die Herstellung
von Smoothies oder Milchshakes aus den frischesten Zutaten.
Die Herstellung eines servierfertigen Drinks dauert nur 2
Minuten. Bei der Verwendung der Funktion „Säfte“ werden die
Zutaten nicht erhitzt.
Hinweis: Geben Sie keine Eiswürfel in den Suppenbereiter.
Die perfekte Konsistenz! (13)
Mithilfe der Mixerfunktion können Sie Ihre Suppe noch weiter
zerkleinern, um die gewünschte Konsistenz zu erhalten. Bei
dieser Funktion wird die Suppe nicht weiter erhitzt.
Sie können die Mixerfunktion nach dem Garvogang mithilfe der
Modustaste (15) auswählen und den Mixer starten, in dem Sie
FP501014MEE Rev2.qxp_Morphy Richards Instruction Book 10/08/2015 20:11 Page 34
Page 35

35
die Ein-/Aus-Taste (16) gedrückt halten.
Einfach hinzugeben!
Falls Sie bereits das Programm „Cremige Suppe“ oder
„Stückige Suppe“ gestartet haben und Ihnen erst danach
einfällt, dass Sie einige Zutaten oder Gewürze vergessen
haben, können Sie diese ohne Probleme noch hinzufügen.
Nehmen Sie einfach den Deckel (3) ab und geben die Zutaten
hinzu, setzen Sie danach den Deckel wieder auf und das
Programm wird fortgesetzt.
Nehmen Sie den Deckel während des Mixervorgangs nicht ab,
um Spritzer zu vermeiden (siehe Abschnitt LED-Anzeige).
Verwenden Sie die Funktion nicht, um größere Mengen an
Gemüse oder anderen Zutaten hinzuzufügen, da solche Zutaten
eine komplette Programmdauer für einen punktgenauen
Garvorgang erfordern.
Programme abbrechen oder ändern
Falls Sie ein falsches Programm ausgewählt haben und die Ein/Aus-Taste bereits gedrückt wurde, oder das Programm
abgebrochen werden soll, drücken Sie die Ein-/Aus-Taste für
mind. 2 Sekunden und das Symbol blinkt auf. Drücken Sie die
Modustaste (15), um das korrekte Programm auszuwählen und
anschließend die Ein-/Aus-Taste, für einen Neustart.
LED-Anzeige (14)
Ihr Suppenbereiter nutzt 3 unterschiedliche Phasen, nämlich die
Aufheiz-, Ruhe- und Mixerphase, um frische Suppen und Drinks
zuzubereiten. Jede dieser Phasen wird während des
Programms mithilfe einer kleinen Animation auf der LED
Anzeige hervorgehoben.
Aufheizphase 11
Die Animation für das Aufheizen wird abgespielt, während der
Suppenbereiter den Kanneninhalt aufheizt.
Mixerphase 11
Die Animation für das Mixen wird abgespielt, während Mixer
den Kanneninhalt zerkleinert. Während des Wechsels von der
Aufheizphase in die Mixerphase gibt der Suppenbereiter einen
Signalton aus.
Entfernen Sie nicht den Deckel (3), solange sich Ihr
Suppenbereiter in der Mixerphase befindet.
Ruhephase 11
Der Suppenbereiter wird während des Programmablaufes
zeitweise„ruhen“ und hierbei keine Animation abspielen. Der
Timer auf der LED-Anzeige wird weiter herunterzählen. Das ist
völlig normal.
Nach Abschluss des Vorgangs wird der Suppenbereiter für 60
Sekunden einen Signalton ausgeben und auf der Anzeige
erscheint das Symbol „Beendet“.
Beendet 11
Nach Abschluss spielt der Suppenbereiter die gleiche
Animation wie für die Ruhephase ab, der Timer aber wird „0“
anzeigen und alle 4 Anzeigensymbole werden blinken.
Was sollte sautiert werden?
Das Sautieren ist ideal für Zwiebeln oder Speckwürfel, da sie
unter Zufuhr von Hitze entweder gedämpft, gebräunt oder
karamelisiert werden. Die Sauté-Funktion kann auch verwendet
werden, um Croutons für Ihre Suppen zuzubereiten.
Die Sauté-Funktion sollte nur für eine Dauer von 5-10 Minuten
eingesetzt werden. Sie sollte nicht länger als 10 Minuten
eingesetzt werden.
Verwenden Sie die Sauté-Funktion nicht zusammen mit
rohem Fleisch, außer mit Speckwürfeln oder kleineren
Hackfleischmengen (bis zu 100 g). Die Funktion ist ebenso
ungeeignet für das Erwärmen von Flüssigkeiten, Soßen,
frischen Tomaten bzw. Dosentomaten, Zucker, Früchten oder
gezuckerten sowie stärkehaltigen Lebensmitteln.
Die Sauté-Funktion ist nur dann Verfügbar, wenn der Deckel
(2) nicht auf der Kanne (3) augfesetzt ist. Die Sauté-Funktion
wird ausgeschaltet, sobald der Deckel aufgesetzt wurde.
Die Vorzüge hausgemachter Suppe
Eine hausgemachte Suppe schmeckt einfach großartig, kostet
so wenig und bildet eine sehr gesunde und nachhaltige
Mahlzeit.
Kochen ohne Fertigprodukte!
Kochen ohne Fertigprodukte ist die beste Garantie, gesunde
und nahrhafte Gerichte zuzubereiten, die der ganzen Familie
schmecken! Sie haben dabei völlige Kontrolle über Ihr Essen,
denn Sie kochen ausschließlich mit Grundzutaten und
vermeiden dabei alle Konservierungsstoffe, Geschmacksstoffe
und anderen unerwünschten Zusatzstoffe, die in verarbeiteten
Lebensmitteln enthalten sind.
Kochen von größeren Mengen!
Sie können eine größere Menge eines gesunden Rezeptes
zubereiten und sie in kleinere Portionen aufteilen, die dann im
Kühlschrank oder in der Tiefkühltruhe aufbewahrt werden, bis
sie später in der Woche gebraucht werden. Geschmack und
Nährstoffe des Gerichts bleiben so erhalten.
Kein Verschwendung mehr!
In Großbritannien verschwenden wir bis zu 8,3 Millionen Tonnen
Lebensmittel pro Jahr, von denen die meisten verzehrt hätten
werden können. Sei es nun das Brathuhn vom Sonntagsessen
oder eine Tomate von der hintersten Ablage des Kühlschranks;
Sie werden immer fantastische hausgemachte Suppenrezepte
mithilfe von übrig gebliebenen Lebensmitteln zaubern können,
die sonst in den Biomüll wandern würden.
Gesunde Suppen
Hausgemachte Suppen sind äußerst gesund und bieten je nach
Rezept ein volles Aufgebot an gesundheitsfördernden
Nährstoffen, einschließlich Vitaminen, Mineralstoffen,
Kohlenhydraten und Ballaststoffen. Aber das Beste daran ist,
dass hausgemachte Suppe so lecker schmeckt!
d
FP501014MEE Rev2.qxp_Morphy Richards Instruction Book 10/08/2015 20:11 Page 35
Page 36

36
Was ist das Besondere an Ihrem
Suppenbereiter?
Mit Ihrem Suppenbereiter gelingt die Zubereitung von frischer,
hausgemachter Suppe in Ihrer eigenen Küche im
Handumdrehen.
Nur eine Kanne
Mithilfe der Sauté-Funktion können Sie Ihre Zutaten noch vor
dem Kochen sautieren, bevor Sie Ihre Suppe in
einundderselben Kanne zubereiten. Eine einfache Idee, um den
Aufwand und den damit verbundenen Abwasch zu reduzieren.
Das Sautieren und Kochen in derselben Kanne verbessert
darüber hinaus auch das Aroma der Suppe.
Blitzschnelle Zubereitung!
Sie brauchen nur Ihre ausgewählten Zutaten vorbereiten, diese
in den Suppenbereiter geben und die gewünschte
Suppeneinstellung wählen - cremig oder stückig. Nach dem
Sautieren mixt und kocht das Programm „Cremige Suppe“ die
Suppe schonend in 21 Minuten. Mit dem Programm „Stückige
Suppe“ können Sie Ihre Suppe schon nach 28 Minuten Garzeit
servieren!
Raumsparend
Wir wissen, dass Stellfläche in der Küche ein wichtiges
Kriterium ist. Ihr Suppenbereiter ist kompakt und einfach
gestaltet und daher ideal auch bei kleinen Raumgegebenheiten
Einfache Reinigung 12
Der Suppenbereiter ist nicht spülmaschinenfest, lässt sich
jedoch einfach reinigen. Reinigen Sie nach dem Gebrauch
einfach das Motorgehäuse (8) und die Serrator-Schneide (9) mit
warmen Wasser und einem Schwamm. TAUCHEN SIE DAS
GERÄT NICHT unter Wasser. Das Innere des Suppenbereiters
(4) kann auch mit warmer Seifenlauge und einem Schwamm
gereinigt werden. Wenn etwas angebrannt ist, lassen Sie es in
Wasser einweichen und wischen Sie die Reste mit einem
Schwamm ab. Wischen Sie die Außenflächen des Geräts mit
einem weichen, trockenen Tuch sauber.
Bestimmte Lebensmittel brennen an, wenn sie mit dem
Heizelement im Boden des Geräts in Berührung kommen.
Sollte dies vorkommen, füllen Sie den Suppenbereiter mit
heißer Seifenlauge und lassen Sie diese 15 Minuten einwirken.
Angebrannte Speisen lassen sich danach mit einem weichen
Scheuerschwamm leicht entfernen. Verwenden Sie jedoch
keinen Metallscheuerschwamm, damit der Boden nicht zerkratzt
wird.
WARNUNG: Die Innenseite der Kanne ist mit einer beständigen
Anti-Haftbeschichtung für eine einfache Reinigung versehen.
Verwenden Sie zum Rühren oder Entfernen von Speisen in bzw.
aus diesem Produkt keine Metallgegenstände.
Trocknen Sie alle Teile nach der Reinigung gründlich ab.
WARNUNG: Den Deckel oder die Kanne NIE in Wasser
eintauchen, da diese Teile elektrische Komponenten enthalten,
die durch das Eindringen von Wasser beschädigt werden
können. Lassen Sie kein Wasser auf die elektrischen
Anschlüsse gelangen. Vor Gebrauch gründlich trocknen.
Beim Abheben und wieder Aufsetzen des Deckels (3) darauf
achten, dass die Schneide nicht die Innenseite der Kanne (4)
berührt, damit die Anti-Haftbeschichtung nicht beschädigt wird.
Noch Fragen?
Sollten Sie noch Fragen zur Bedienung Ihres Suppenbereiters
haben, schauen Sie in der nachstehenden Liste nach, in der wir
die am häufigsten gestellten Fragen beantwortet haben. Für
weitere Unterstützung und Beratung, wenden Sie sich bitte an
unsere Helpline. 0344 871 0944.
Kann ich den Deckel während einer Programmphase
entfernen?
Ja, falls Zutaten oder Gewürze hinzugefügt werden sollen.
Siehe „Einfach hinzugeben!“.
Kann ich mit dem Suppenbereiter auch andere Dinge als
Suppen oder Drinks zubereiten?
Nein, die 5 verfügbaren Programme sind ausschließlich für die
Zubereitung von delikaten Suppen und Drinks vorgesehen.
Befolgen Sie die Rezepte oder passen Sie diese nach Ihrem
eigenen Geschmack an.
Kann ich rohes Fleisch aufgrund eines Rezeptes in den
Suppenbereiter geben?
Nein, abgesehen von Speck oder kleineren Hackfleischmengen
(100 g). Sie sollten das Fleisch zuerst separat garen, bevor Sie
es in den Suppenbereiter geben und weitere Zutaten nach
Rezept hinzufügen, da der Suppenbereiter nur für das sanfte
Sautieren von Speck oder Zwiebeln vorgesehen ist, sowie das
anschließende Aufheizen der Suppe. Die Sauté-Funktion ist
nicht für das Anbräunen von rohem Fleisch vorgesehen, außer
Speck oder Hackfleisch.
Wie groß ist das Fassungsvermögen meines
Suppenbereiters?
Das Fassungsvermögen beträgt 1,6 l. Achten Sie darauf, dass
Sie den Suppenbereiter nicht über die MAX-Füllmarkierung
hinaus befüllen, denn sonst schaltet der Überfüllmelder die
Serrator-Schneide (9) aus und auf der LED-Anzeige wird „E1“
angezeigt. Falls dies vorkommt, nehmen Sie einfach einen Teil
der Zutaten heraus, so dass die MAX-Füllmarkierung nicht
überschritten wird, und wischen Sie den Überfüllmelder (7) am
Deckel (3) ab. Achten Sie drauf, dass alle Zutaten (inkl.
Flüssigkeiten) die MIN-Füllmarkierung erreichen, da sonst die
Mixerfunktion beeinträchtigt werden kann.
Kann ich die Dauer der Programme „Cremige Suppe“ oder
„Stückige Suppe“ ändern?
Nein. Die Dauer für diese Programme ist fest voreingestellt.
Kann ich eine bereits fertige Suppe, bzw. eine Dosen- oder
Tütensuppe, wieder aufwärmen?
Nein. Die Programme sind für diese Art von Suppen nicht
vorgesehen. Die Suppe könnte am Boden des Geräts
anbrennen und es beschädigen.
Kann ich in meinem Suppenbereiter auch kalte Suppen, z.B.
Gazpacho, zubereiten?
Ja, aber Sie müssen die Suppe zuerst mit dem Programm für
cremige bzw. stückige Suppen kochen. Lassen Sie sie dann vor
dem Servieren einfach abkühlen, oder stellen Sie sie in den
Kühlschrank.
Was kann ich tun, wenn mein Suppenbereiter nicht mehr
funktioniert?
FP501014MEE Rev2.qxp_Morphy Richards Instruction Book 10/08/2015 20:11 Page 36
Page 37

37
Ihr Suppenbereiter verfügt über einen Sicherheitsthermostat,
der die Stromzufuhr unterbricht und das Gerät abschaltet, um
eine Überhitzung zu verhindern, wenn es mindestens 3 mal
hintereinander verwendet wird. Wenn dies vorkommt, nehmen
Sie alle Lebensmittel aus der Kanne und lassen Sie den
Suppenbereiter 30 Minuten lang abkühlen. Anschließend
können Sie mit der Zubereitung der Suppe fortfahren.
Wenn die Mixerfunktion über 20 Sekunden lang ununterbrochen
verwendet wird, wird der Strom durch eine
Sicherheitsabschaltung getrennt, um eine Überhitzung zu
verhindern. Wenn dies vorkommt, warten Sie 10 Sekunden lang,
bevor Sie die Mixerfunktion erneut benutzen.
Was kann ich tun, wenn Lebensmittel am Boden des Geräts
anbrennen? 13
Aufgrund von stärke- oder zuckerhaltigen Lebensmitteln kann
es vorkommen, dass diese leicht anbrennen, wenn sie direkt mit
dem Kannenboden (4) in Berührung kommen. Um dies zu
vermeiden, geben Sie eine halbe Tasse Wasser oder Brühe in
den Suppenbereiter, bevor Sie feste Zutaten hineingeben. Füllen
Sie danach die restliche Flüssigkeit gemäß Angaben in Ihrem
Rezept ein.
Was kann ich tun, wenn die Sauté-Funktion nicht mehr
funktioniert?
Die Sauté-Funktion kann nur verwendet werden, wenn der
Deckel nicht aufgesetzt ist (siehe Seite 6). Drücken Sie die
Sauté-Taste (17) und der Sauté-Anzeige (16) leuchtet grün.
Sollte die Sauté-Anzeige auf dem Kannengriff (4) immer noch
rot aufleuchten, drücken Sie den Kolben oben auf dem
Kannengriff, um die Funktion erneut zu aktivieren. Der Kolben
sollte nach Entfernen des Deckels (2) immer noch sichtbar sein
und in dieser Position verbleiben.
Kontakt:
Helpline
Sollten Sie ein Problem mit Ihrem Gerät haben, wenden Sie sich
bitte telefonisch an unsere Helpline, da wir Ihnen sehr
wahrscheinlich besser helfen können, als der Händler, bei dem
Sie das Gerät erworben haben.
Halten Sie den Gerätenamen sowie die Modell- und
Seriennummer bereit, wenn Sie uns anrufen, damit Ihnen
schneller geholfen wird.
Sprechen Sie mit uns
Haben Sie Fragen oder Anregungen oder benötigen Sie
großartige Tipps oder Rezeptideen, um unsere Geräte optimal
zu nutzen, beteiligen Sie sich online:
Blog: www.morphyrichards.co.uk/blog
Facebook: www.facebook.com/morphyrichardsuk
Twitter: @loveyourmorphy
Webseite: www.morphyrichards.com
d
FP501014MEE Rev2.qxp_Morphy Richards Instruction Book 10/08/2015 20:11 Page 37
Page 38

38
Rezepte
Wir haben für Sie 15 Rezepte zusammengestellt, die Sie zusammen mit Ihrem neuen Suppenbereiter
verwenden können, von reichhaltigen Suppen bis hinzu erfrischenden Smoothies.
Bei der Einstellung „Stückige Suppe“ werden die Zutaten nur gekocht und nicht zerkleinert. Sollte die
Suppe für Ihren Geschmack etwas zu stückig ausfallen, können Sie mithilfe der Mixerfunktion (13) einige
Stücke zerkleinern.
Um diese Funktion zu verwenden, müssen Sie den Suppenbereiter zuerst vom Stromnetz trennen und
das Gerät danach wieder in die Steckdose stecken. Der Suppenbereiter wird zurückgesetzt und mithilfe
der Modustaste (15) kann die Mixerfunktion ausgewählt werden. Drücken und halten Sie, sobald die Taste
leuchtet, die Ein-/Aus-Taste (16), um den Inhalt der Kanne zu zerkleinern.
Die Rezepte wurden speziell an die minimalen und maximalen Füllstände des Suppenbereiters (1,3-1,6 l)
ausgerichtet.
FP501014MEE Rev2.qxp_Morphy Richards Instruction Book 10/08/2015 20:11 Page 38
Page 39

39
d
Sauté-Rezepte
Butternusskürbissuppe mit Chili und
Kokosnuss
Zubereitungsdauer: 15 Minuten
Garzeit: 30 Minuten
Einstellung: Stückig
Portionen 4
Zutaten:
• 2 EL Olivenöl
• 500 g Butternusskürbis, entsamt, geschält und in kleine Würfel
geschnitten
• 1 mittelgroße Zwiebel (ca. 100 g), gehackt
• 3 Knoblauchzehen, in Scheiben geschnitten
• 1 Teelöffel gemahlener Kreuzkümmel
• 1/2-1 große rote Chilischoten je nach Geschmack, fein gehackt
und entsamt
• 1 Teelöffel frischer Ingwer, gerieben
• 800 ml Gemüsebrühe, zubereitet aus 2 Gemüsebrühewürfeln
• 200 ml Kokosnussmilch
• Saft von 1 Limone
• 10 g frischer Koriander, gehackt
• Salz und Pfeffer
Zubereitung:
1 Öl in die Kanne geben und die Sauté-Taste drücken.
2 Nach ca. einer Minute den Butternusskürbis hinzufügen und 3-4
Minuten lang sautieren und ständig umrühren.
3 Zwiebel, Knoblauch, Kreuzkümmel sowie die rote Chilischote
hinzufügen und für weitere 5 Minuten garen, bis die Zutaten weich
werden.
4 Die Sauté-Funktion durch Drücken der Sauté-Taste ausschalten.
Die restlichen Zutaten hinzugeben und gut mit einem Holzlöffel
umrühren bzw. alles gleichmäßig verteilen.
5 Den Deckel auf die Kanne aufsetzen und die Einstellung „Stückig“
auswählen.
6 Wenn die Suppe fertig ist, nach Belieben abschmecken und
servieren. Sollten Sie eine cremigere Suppe bevorzugen, wählen
Sie einfach die Mixerfunktion aus und halten danach die Ein-/AusTaste gedrückt, bis die gewünschte Konsistenz erreicht wurde.
Winterlammsuppe mit Linsen
Zubereitungsdauer: 20 Minuten
Garzeit: 33 Minuten
Einstellung: Stückig
Portionen 4
Zutaten:
• 2 EL Olivenöl
• 75 g rohes Lammhackfleisch
• 1 mittelgroße Zwiebel (ca. 100 g), fein gehackt
• 2 Knoblauchzehen, zerdrückt
• 1 kleine Karotte (ca. 50 g), fein gehackt
• 1 Kartoffel (ca. 115 g), fein gehackt
• 1 mittelgroße Steckrübe (ca. 100 g), fein gehackt
• 1 Esslöffel Weizenmehl
• 1 Dose (400 g) Linsen, abgegossen
• ½ Teelöffel frischer Rosmarin, gehackt
• 2 Lorbeerblätter
• 1 Teelöffel Worcestershire-Sauce
• 1 EL frische Petersilie, gehackt
• 900 ml Lammbrühe, zubereitet aus 2 Brühwürfeln
Zubereitung:
1 Die Sauté-Taste drücken und das Olivenöl in der
Suppenbereiterkanne für 1 Minute erhitzen. Das Lammfleisch für
2-3 Minuten sautieren und ständig mit einem Holzlöffel umrühren,
bis es gleichmäßig gebräunt ist.
2 Zwiebel, Knoblauch, Karotte, Kartoffel und Steckrübe hinzugeben
und für 4 Minuten sautieren, dabei je nach Bedarf umrühren. Die
Sauté-Funktion durch Drücken der Sauté-Taste ausschalten.
3 Das Weizenmehl einrühren und anschließend die restlichen
Zutaten hinzufügen und bis zum MAX-Füllstand mit Brühe
auffüllen. Mit Salz und frisch gemahlenem Pfeffer würzen und mit
einem Holzlöffel umrühren. Den Deckel auf die Kanne aufsetzen
und die Einstellung „Stückige Suppe“ auswählen.
4 Wenn die Suppe fertig ist, nach Belieben abschmecken und vor
dem Servieren die Lorbeerblätter entfernen.
Hähnchen-Pilz-Suppe
Zubereitungsdauer: 20 Minuten
Garzeit: 30 Minuten
Einstellung: Cremig
Portionen 4
Zutaten:
• 2 EL Olivenöl
• 1 Zwiebel (ca. 100 g), fein gehackt
• 240 g Champignons, in dünne Scheiben geschnitten
• 1 Knoblauchzehe, zerdrückt
• 100 g gekochtes Hähnchenfleisch, zerkleinert
• 1 Kartoffel (ca. 115 g), geschält und in Würfel geschnitten
• 10 g frische Petersilie, gehackt
• Salz und Pfeffer
• 1 l Hühnerbrühe
Garnierung:
• etwas Schlagsahne
Zubereitung:
1 Die Sauté-Taste drücken Das Öl in der Kanne für 1 Minute
aufheizen und die Zwiebel hinzugeben. Sautieren und ständig mit
einem Holzlöffel für 2 Minuten umrühren, bis die Zwiebel goldgelb
ist, aber nicht braun.
1 Champignons und Knoblauch hinzufügen und für einige Minuten
FP501014MEE Rev2.qxp_Morphy Richards Instruction Book 10/08/2015 20:11 Page 39
Page 40

40
sautieren, bis die Champignons weich sind. Die Sauté-Funktion
durch Drücken der Sauté-Taste ausschalten.
3 Hähnchenfleisch, Kartoffel, Petersilie, Gewürzen zugeben und
ausreichend Brühe bis zum MAX-Füllstand der Kanne hinzufügen.
4 Den Deckel auf die Kanne setzen und die Einstellung „Cremige
Suppe“ auswählen.
5 Wenn die Suppe fertig ist, nach Belieben abschmecken und mit
einem Klecks Schlagsahne servieren (je nach Geschmack).
• Zubereitung von frischer Hühnerbrühe. Eine Hähnchenkarkasse in
eine mittelgroße Pfanne geben, mit Wasser bedecken, einen
Gemüsebrühewürfel sowie 5 Pfefferkörner und ein Lorbeerblatt
hinzugeben. Zum Kochen bringen und anschließend für 1 Stunde
köcheln lassen. Durch ein feines Sieb oder Gaze abgießen.
Suppen-Rezepte
Geröstete Tomatensuppe mit Basilikum
Zubereitungsdauer: 30 Minuten
Garzeit: 21 Minuten
Einstellung: Cremig
Portionen: 4
Zutaten:
• 8 überreife Tomaten (ca. 640 g), in Hälften geschnitten
• 2 rote Zwiebeln (ca. 215 g), je in 6 Schnitze geschnitten
• 4 Knoblauchzehen
• 1 Esslöffel Olivenöl
• 1 Esslöffel Balsamico-Essig
• Salz und gemahlener schwarzer Pfeffer
• 750 ml Hühnerbrühe, zubereitet aus Brühwürfeln
• 2 TL Tomatenmark
• 1 TL brauner Zucker
• 10 g frisches Basilikum, nur Blätter
Zubereitung:
1 Den Backofen auf 200 °C/Gasofen auf Stufe 6 vorheizen.
2 Die Tomaten mit der Haut nach oben zusammen mit Zwiebeln und
Knoblauch auf ein Backblech legen. Mit Olivenöl und BalsamicoEssig beträufeln und mit Salz und frisch gemahlenem Pfeffer
würzen. 20-30 Minuten lang rösten, bis alles weich und leicht
angekohlt ist.
3 Das Gemüse vorsichtig in den Suppenbereiter zusammen mit der
Hühnerbrühe geben, Tomatenmark, braunen Zucker und das
frische Basilikum hinzufügen.
4 Den Deckel auf die Kanne setzen und die Einstellung „Cremige
Suppe“ auswählen. Wenn die Suppe fertig ist, nach Belieben
abschmecken und servieren.
Blitzschnelle, einfache Erbsensuppe mit
Schinken und Minze
Zubereitungsdauer: 5 Minuten
Garzeit: 21 Minuten
Einstellung: Cremig
Portionen 4
Zutaten:
• 600 g Tiefkühlerbsen
• 20 g frische Minze, nur Blätter
• 225 g gekochten Qualitätsschinken, gehackt/zerkleinert
• 1 Kartoffel (ca. 100 g), fein gewürfelt
• 800 ml heiße Schinkenbrühe, zubereitet aus Brühwürfeln
• Salz und gemahlener schwarzer Pfeffer
• 2 EL Olivenöl
• Ca. 3 EL Crème Fraiche
Zubereitung:
1 Erbsen, Minze, Schinken, Katroffel und die heiße Brühe in den
Suppenbereiter geben. Den Deckel auf der Kanne aufsetzen und
die Einstellung „Cremige Suppe“ auswählen.
2 Wenn die Suppe fertig ist, mit etwas Salz und frisch gemahlenem
Pfeffer würzen, das Olivenöl sowie die Crème Fraiche hinzufügen
und die Mixerfunktion auswählen. Die Ein-/Aus-Taste drücken und
gedrückt halten und die Suppe für ca. 20 Sekunden zerkleinern,
anschließend servieren.
Französische Pistou-Suppe
Zubereitungsdauer: 15 Minuten
Garzeit: 28 Minuten
Einstellung: Stückig
Portionen 4
Zutaten:
• 1 Zucchini (ca. 150 g), klein gewürfelt
• 1 kleine Kartoffel ( ca. 70 g), klein gewürfelt
• 1 kleine Zwiebel (ca 70 g), fein gehackt
• 1 Karotte (ca. 50 g), klein gewürfelt
• 1 Dose gehackte Tomaten (400 g)
• 50 g feine Erbsen
• 50 g Spaghetti, in kleine Stücke gebrochen
• 50 g Brechbohnen, in 1 cm große Stücke geschnitten
• 650 ml heiße Gemüsebrühe
• 1 Esslöffel Tomatenmark (in die Brühe mischen)
• Salz und gemahlener schwarzer Pfeffer
Zum Servieren:
• Pesto
• Parmesankäse
Zubereitung:
1 Zutaten in den Suppenbereiter geben, Gemüsebrühe-
FP501014MEE Rev2.qxp_Morphy Richards Instruction Book 10/08/2015 20:11 Page 40
Page 41

41
Tomatenmarkmischung darüber gießen, mit Salz und frisch
gemahlenem Pfeffer würzen. Zutaten mit einem Kochlöffel oder
Spatel vermischen, um sie gleichmäßig zu verteilen.
2 Den Deckel auf die Kanne aufsetzen und die Einstellung „Stückige
Suppe“ auswählen.
3 Mit einem Löffel Pesto und frisch geriebenem Parmesankäse
sofort servieren.
Einfache Gemüsesuppe
Zubereitungsdauer: 5 Minuten
Garzeit: 21 Minuten
Einstellung: Cremig
Portionen: 4
Zutaten:
• 700 g ausgewähltes Gemüse, gewürfelt (Abgepacktes
Mischgemüse aus dem Supermarkt ist ideal)
• Wasser (bis zum MAX-Füllstand)
• 2 Hühner- oder Gemüsebrühewürfel
• Salz und gemahlener schwarzer Pfeffer
Zubereitung:
1 Zur Zubereitung einer schnellen, cremigen Suppe den
Suppenbereiter mit zur 1 Liter-Füllmarkierung mit verschiedenem,
in Würfel geschnittenem Gemüse (bereits vorbereitetes gehacktes
Gemüse ist dafür ideal geeignet) füllen.
2 Die Hühner- oder Gemüsebrühewürfel hinzufügen und das Wasser
bis zum MAX-Füllstand einfüllen.
3 Den Deckel auf der Kanne aufsetzen und die Einstellung „Cremige
Suppe“ auswählen. Wenn die Suppe fertig ist, nach Belieben
abschmecken und servieren.
Saft-Rezepte
Erdbeer-Ananas-Smoothie
Zubereitungsdauer: 5 Minuten
Mixerzeit: 2 Minuten
Einstellung: Saft
Mengen: 1,1 l
Zutaten:
• 300 g frische Erdbeeren
• 250 g frische Ananas
• 450 g fettarmer Erdbeerjoghurt
• 150 ml teilentrahmte Milch
• 1 Löffel (ca. 35 g) Vanilleeis
Zubereitung:
1 Erdbeeren entkernen und größere Stücke halbieren. Ananas in
Stücke schneiden.
2 Die Zutaten in den Suppenbereiter geben und gut umrühren.
3 Den Deckel auf die Kanne aufsetzen und die Einstellung „Saft“
auswählen. 2 Minuten warten, bis der Suppenbereiter fertig ist.
4 Sofort servieren.
Schokoladen-Bananen-Smoothie
Zubereitungsdauer: 5 Minuten
Mixerzeit: 2 Minuten
Einstellung: Saft
Mengen: 1,5 l
Zutaten:
• 2 x 450 g fettarmer Vanillejoghurt (Tetrapack)
• 300-400 ml teilentrahmte Milch (je nach Geschmack)
• 2 reife Bananen, geschält und in dünn geschnitten
• 150-200 g dunkle Qualitätsschokolade (je nach Geschmack)
Zubereitung:
1 Schokolade schmelzen, entweder in der Mikrowelle oder über
einem Topf heißen Wasser.
2 Die anderen Zutaten in der Zwischenzeit in die Kanne geben und
die Schokolade zum Schluss hinzufügen.
3 Gründlich umrühren.
4 Den Deckel auf die Kanne aufsetzen und die Einstellung „Saft“
auswählen. 2 Minuten warten, bis der Suppenbereiter fertig ist.
Garantie auf Lebensdauer für die Schneide
Für die „Serrator-Schneide“ gilt eine lebenslange Garantie bei
Material- und Verarbeitungsfehlern. Diese Garantie schließt nur
den Erstkäufer ein und ist nicht auf andere Personen
übertragbar. Die Garantie gilt nur für Verbraucher, die die
„Serrator-Schneiden“ rein für private Zwecke und nicht
gewerblich gebrauchen. Von dieser Garantie ausgeschlossen
sind Falschgebrauch, Missbrauch oder jeder anderer nicht in
diesem Handbuch beschriebene Gebrauch, oder Schäden
durch eine nicht nach den Angaben des Handbuchs
durchgeführte Wartung bzw. Reinigung.
GESETZLICHE GEWÄHRLEISTUNG
Für dieses Gerät gilt eine Gewährleistung von 2 Jahren.
Als Kaufnachweis sollte die Quittung des Fachhändlers
aufgehoben werden. Heften Sie Ihren Beleg an die Rückseite
dieser Unterlagen.
Sollte an diesem Gerät ein Fehler auftreten, sind immer
nachfolgende Angaben mitzuteilen. Diese Angaben sind auf der
Unterseite des Geräts zu finden.
Modellnr.
Seriennr.
Vor dem Verlassen des Werks werden alle Morphy Richards
Produkte geprüft. Sollte einmal der Fall auftreten, dass sich ein
Gerät innerhalb der Gewährleistung als fehlerhaft erweist,
wenden Sie sich bitte an unsere Service-Hotline
Falls das Gerät während der 2-jährigen Gewährleistung aus
welchem Grund auch immer ausgetauscht wird, wird zur
Berechnung der Restgarantie für das neue Gerät das Original-
Kaufdatum zugrunde gelegt. Aus diesem Grunde ist es
besonders wichtig, den Original-Kaufbeleg bzw. die Rechnung
aufzubewahren, um das Datum des ursprünglichen Kaufs
nachweisen zu können.
d
FP501014MEE Rev2.qxp_Morphy Richards Instruction Book 10/08/2015 20:11 Page 41
Page 42

42
Damit die 2-jährige Gewährleistung geltend gemacht werden
kann, muss das Gerät im Einklang mit den Anweisungen des
Herstellers benutzt worden sein. Beispielsweise muss das Gerät
entkalkt worden sein und gemäß den Anweisungen gereinigt
werden.
Morphy Richards übernimmt keine Verpflichtung zur Reparatur
oder zum Austausch der Waren im Rahmen der
Garantiebedingungen, wenn:
1 der Fehler auf einen versehentlich Gebrauch, Missbrauch,
unachtsamen Gebrauch oder auf einen Gebrauch zurückzuführen
ist, der den Empfehlungen des Herstellers entgegenwirkt oder
wenn der Fehler durch Stromspitzen oder durch Transportschäden
verursacht wurde.
2 das Gerät mit einer Spannung versorgt wurde, die nicht auf dem
Typenschild abgedruckt ist.
3 von anderen Personen als unserem Reparatur- und
Wartungspersonal (oder von einem unserer Vertragshändler)
Reparaturversuche unternommen wurden.
4 wenn das Gerät für Vermietungszwecke oder nicht allein für
private Zwecke gebraucht wurde.
5 das Gerät aus zweiter Hand stammt.
6 Morphy Richards kann nicht dafür haftbar gemacht werden,
Reparaturarbeiten im Rahmen der Gewährleistung auszuführen.
7 Verbrauchsmaterialien wie Tüten, Filter und Glaskaraffen sind von
der Gewährleistung ausgeschlossen.
8 Batterien und Schäden aufgrund undichter Batterien sind von der
Gewährleistung ausgeschlossen.
9 die Filter nicht gemäß Anleitung gereinigt und ausgewechselt
wurden
Diese Gewährleistung erkennt Ihnen ausschließlich die Rechte
zu, die ausdrücklich in den oben genannten Bestimmungen
niedergelegt sind und erstreckt sich nicht auf Forderungen
infolge eines Verlustes oder einer Beschädigung. Diese
Gewährleistung wird als zusätzliche Leistung angeboten und
greift Ihre gesetzlich zuerkannten Rechte als Verbraucher nicht
an.
FP501014MEE Rev2.qxp_Morphy Richards Instruction Book 10/08/2015 20:11 Page 42
Page 43

43
Salute e sicurezza
Per utilizzare un qualunque apparecchio elettrico, è necessario seguire delle basilari regole di sicurezza dettate dal buon senso.
Leggere queste istruzioni con attenzione prima di utilizzare il prodotto.
• Questi elettrodomestici possono essere usati da persone con
ridotte capacità fisiche, sensoriali o mentali o con scarsa
esperienza e conoscenza solo sotto supervisione o se istruite circa
l’uso dell’apparecchio in tutta sicurezza e se sono in grado di
comprendere i rischi che il suo utilizzo implica.
• Evitare che i bambini utilizzino questo elettrodomestico. Mantenere
l’elettrodomestico e il cavo lontano dalla portata dei bambini.
Evitare
che i bambini giochino con l’elettrodomestico.
• Scollegare sempre l’alimentazione se l’elettrodomestico viene
lasciato incustodito prima del montaggio, dello smontaggio o della
pulizia.
• Questo elettrodomestico è destinato ad un uso domestico e
applicazioni simili, quali: abitazioni di campagna; clienti in alberghi,
motel, e altri ambienti di tipo residenziale e ambienti tipo bed and
breakfast. Non è adatto per essere utilizzato da personale nelle
zone adibite a cucina, in negozi, uffici e altri ambienti di lavoro.
• Se il cavo di alimentazione è danneggiato, esso deve essere
sostituito con un gruppo cavo speciale fornito dal costruttore o dal
suo rappresentante dell’assistenza, al fine di evitare pericoli e rischi.
• AVVERTENZA: Le lame metalliche sono molto affilate. Maneggiare
con cura durante l’uso e la pulizia. Per la pulizia e la manutenzione,
fare riferimento alle apposite sezioni.
• L’elettrodomestico non è indicato per l’uso con controllo mediante
timer esterno o sistema separato di controllo a distanza.
i
d
i
FP501014MEE Rev2.qxp_Morphy Richards Instruction Book 10/08/2015 20:11 Page 43
Page 44

44
A ciň si aggiungono anche importanti consigli di sicurezza, riportati di
seguito.
Luogo di utilizzo
• Posizionare sempre l’apparecchio lontano dal bordo di un piano di
lavoro.
• Verificare che l’elettrodomestico venga utilizzato su una superficie
stabile e piana.
• Non utilizzare l’elettrodomestico all’esterno o vicino all’acqua.
Cavo di alimentazione di rete
• Il cavo di alimentazione, che collega la presa a muro alla base
dell’apparecchio, deve essere sufficientemente lungo in modo da
non tendere le connessioni.
• Non lasciare che il cavo di alimentazione penda dal bordo di un
piano di lavoro dove un bambino potrebbe raggiungerlo.
• Non lasciare che il cavo dell’alimentazione attraversi uno spazio
aperto, come per esempio uno spazio tra una presa posta in
basso e un tavolo.
• Fare attenzione a non far correre il cavo sopra una cucina a gas o
un tostapane o altre zone calde che potrebbero danneggiarlo.
Sicurezza personale
• AVVERTENZA: per evitare incendi, scosse elettriche e lesioni
personali, non immergere il cavo, la spina o l’elettrodomestico in
acqua o in altri liquidi.
• AVVERTENZA: non toccare le parti in movimento.
• Porre estrema attenzione quando si sposta l’apparecchio con
contenuto caldo.
• Non utilizzare l’apparecchio con le mani umide o bagnate
Trattamento delle scottature
• Far scorrere immediatamente acqua fredda sull’area interessata.
Non perdere tempo a togliere i vestiti, chiamare subito un medico.
Altre informazioni di sicurezza
• Se il cavo di alimentazione dell’elettrodomestico --- danneggiato,
non usarlo. Contattare l’assistenza telefonica Morphy Richards per
istruzioni.
• L’utilizzo di accessori non consigliati dal produttore potrebbe
danneggiare l’apparecchio.
• Non posizionare l’apparecchio sopra oppure vicino a superfici
calde, quali forni elettrici o a gas o fornelli.
• Tenere l’apparecchio e il cavo lontani da fonti di calore, dalla luce
diretta del sole, dall’umidità, da bordi appuntiti e simili.
• Durante l’utilizzo dell’apparecchio, assicurarsi che il coperchio sia
in posizione prima di metterlo in funzione.
• Non togliere il coperchio fino a quando la lama non ha smesso di
ruotare.
• Dopo un ciclo di funzionamento, prima di pulire l’apparecchio,
bisogna farlo raffreddare completamente per evitare scottature.
• Per preparare le minestre/zuppe, non far funzionare l’apparecchio
continuamente.
• Fare attenzione a non versare liquidi nel Soup Maker, perché
potrebbero essere espulsi dall’apparecchiatura per improvvisa
evaporazione.
Requisiti elettrici
Controllare che la tensione indicata sulla targhetta dei dati
dell’elettrodomestico corrisponda a quella dell’abitazione, che
deve essere a corrente alternata (C.A.).
AVVERTENZA: L’APPARECCHIO DEVE ESSERE COLLEGATO
A TERRA.
Qualora il fusibile nella presa da 13 A dovesse essere sostituito,
installare un fusibile BS1362 da 13 A.
FP501014MEE Rev2.qxp_Morphy Richards Instruction Book 10/08/2015 20:11 Page 44
Page 45

45
Congratulazioni per aver scelto un nuovo apparecchio per la preparazioni alimentari Morphy Richards con
tecnologia Serrator Blade. Con il suo design rivoluzionario ed esclusivo, Serrator Blade è stato progettato
per fornire prestazioni di taglio migliori per un maggior periodo di tempo.
Come funziona la lama Serrator?
La lama Serrator, messa a punto appositamente dai nostri designer interni, è stata creata per superare le
prestazioni di taglio delle lame standard dal bordo normale. La perfetta dentellatura è stata scelta con cura
e rigorosamente testata oltre che per fornire prestazioni superiori per darci la sicurezza di una clientela
soddisfatta per moltissimi anni a venire.
Le nostre nuove lame di precisione Serrator rimangono affilate fino
a 12 volte più a lungo delle lame standard, conservando nel tempo le stesse ottime prestazioni.
* ** Rispetto alle normali lame piane, esse sono state sottoposte a specifici test indipendenti da CATRA,
conformemente all’International Standard Cutting Test System della ISO 8442.5.
Nuova lama
(solo alcuni modelli)
RESTA AFFILATA
12 volte PIU’ A LUNGO
DELLE LAME
STANDARD***
Lama Serrator
Lama standard
Affilatura
Durata della lama
i
FP501014MEE Rev2.qxp_Morphy Richards Instruction Book 10/08/2015 20:11 Page 45
Page 46

46
Introduzione
L’apparecchio Sauté & Soup Maker di Morphy Richards è facile
e pronto da usare. Per creare una minestra ricca di sapori
freschissimi, selezionare la regolazione Sauté, quindi
aggiungere gli ingredienti al sauté (soffritto) – cipolle, lardelli di
pancetta, aglio o zenzero – così avrà inizio la realizzazione della
vostra deliziosa minestra. Quindi, aggiungere semplicemente gli
ingredienti nella grande caraffa da 1,6 l, collocare sul coperchio
e selezionare le impostazioni di cottura Smooth (fluido e
omogeneo) o Chunky (a pezzetti).
Il pannello di comando, di facile utilizzo, presenta una
visualizzazione temporizzata a LED che mostra esattamente
quanto tempo manca al termine della cottura della minestra,
mentre voi vi rilassate e lasciate fare alla macchina il lavoro
difficile.
Il programma Smooth mescola e cuoce delicatamente la
minestra in appena 21 minuti, mentre il programma Chunky
cuoce una minestra genuina con una consistenza più densa in
28 minuti. Se al termine della cottura la minestra risulta un po’
troppo pastosa per i vostri gusti, basta premere il pulsante
Blend e le lame di alta qualità Serrator effettueranno un ulteriore
mix della minestra fino ad ottenere la consistenza desiderata.
L’apparecchio Sauté & Soup Maker possiede anche una
funzione pausa che consente di aggiungere condimenti, crème
fraîche, erbe aromatiche o panna in qualsiasi momento della
cottura. Basta sollevare il coperchio dalla macchina Sauté &
Soup Maker, infatti, in questo modo si disinserisce il ciclo del
programma e si arresta la rotazione delle lame. Aggiungere il
condimento e/o altri ingredienti. Rimettere il coperchio e il
programma del timer ricomincerà dallo stesso orario impostato
precedentemente.
Non dimenticate di visitare il sito www.morphyrichards.co.uk
per registrare la garanzia di due anni sul prodotto.
Sommario
Salute e sicurezza 43
Lama Serrator 45
Introduzione 46
Funzioni 46
Prima di utilizzare l’elettrodomestico la prima volta 47
Come utilizzare la macchina Soup Maker 47
Uso di SoupMaker 47
Schermo LED 48
A proposito di Sauté 48
I vantaggi della minestra fatta in casa 48
Cosa rende la vostra macchina per fare le minestre/zuppe così
speciale? 49
Un sogno da pulire 49
Qualche domanda? 49
Contatti 50
Ricette 51
Ricette - Sauté (soffritto) 52
Ricette - Minestra/zuppa 53
Ricette - Succhi 54
Garanzia 54
Funzioni
(1) Pannello di controllo
(2) Maniglia del coperchio
(3) Coperchio
(4) Caraffa
(5) Maniglia della caraffa
(6) Presa di corrente
(7) Sensore di eccessivo riempimento
(8) Alloggiamento motore
(9) Lama Serrator
(10) Spia funzione Smooth
(11) Spia funzione Chunky
(12) Spia funzione Succhi
(13) Spia funzione Mix
(14) Shermo LED
(15) Pulsante Modalità
(16) Pulsante di selezione On/Off
(17) Spia funzione Sauté
(18) Pulsante Sauté
FP501014MEE Rev2.qxp_Morphy Richards Instruction Book 10/08/2015 20:11 Page 46
Page 47

47
Prima di utilizzare l’elettrodomestico la prima
volta
Prima dell’uso, rimuovere tutto il materiale e i cartoni di
imballaggio.
Prima di iniziare a utilizzare l’apparecchio Sauté & Soup Maker,
è necessario pulirlo. Lo stesso vale quando l’apparecchio non
viene utilizzato per lungo tempo. Per maggiori informazioni,
consultare la sezione dedicata alla pulizia (Un sogno da pulire).
Quando si utilizza per la prima volta l’apparecchio Sauté &
Soup Maker è possibile notare del fumo/vapore che fuoriesce
dal coperchio, si tratta di una cosa del tutto normale in quanto
provocata dal grasso applicato per lubrificare alcune parti
dell’elettrodomestico durante la fabbricazione. Dopo alcuni
minuti cesserà.
Come utilizzare la macchina Soup Maker
1 Togliere il coperchio (3), fare attenzione a non toccare la lama
Serrator (9). AVVERTENZA: Lame affilate
2 Collegare Soup Maker alla presa di corrente. La spia funzione
Sauté (17) si accende rossa.
3 Aggiungere olio o burro alla caraffa (4). Se si fa il soffritto con il
burro, consigliano di aggiungere un po’ d’olio per impedire al
burro di bruciare.
4 Premere il pulsante Sauté (18), la spia funzione Sauté diventa
verde. La caraffa comincia a riscaldarsi.
5 Dopo un minuto, aggiungere gli ingredienti per il soffritto nella
caraffa. Mescolare con una spatola di legno per favorire una
cottura omogenea e impedire l’adesione o la bruciatura. Non
mettere ancora il coperchio.
6 Al termine, premere di nuovo il pulsante Sauté, la spia funzione
Sauté diventa rossa. Aggiungere il resto degli ingredienti alla
caraffa.
7 Ora mettere il coperchio alla caraffa, assicurandosi che sia ben
fissata. Si udirà un bip e le icone lampeggeranno in sequenza.
8 Premere il pulsante Modalità (15) per selezionare il programma,
(vedere ‘Uso di Soup Maker’). L’icona si illumina.
9 Avviare Soup Maker, premere il pulsante di selezione On/Off
(acceso/) (16). Soup Maker emette un bip e comincia la cottura.
Viene visualizzato il tempo di cottura e ha inizio la
temporizzazione alla rovescia.
10 Al termine, Soup Maker emette un bip per 60 secondi e tutte e
quattro le icone lampeggiano. Staccare la spina dalla presa di
corrente, togliere il coperchio e versare la minestra pronta in una
bacinella.
AVVERTENZA:
QUANDO SI TOGLIE E RIMETTE IL COPERCHIO (3), FARE
ATTENZIONE A NON GRATTARE LA LAMA A LATO DELLA
CARAFFA (4) PER EVITARE DI DANNEGGIARE IL
RIVESTIMENTO ANTIADERENTE.
Uso di Soup Maker
Soup Maker ha 5 programmi.
Scegliere il programma desiderato:
Sauté... (17)
La funzione sauté scalda la caraffa di cottura di modo che gli
alimenti come le cipolle o i lardelli di pancetta possono essere
soffritti prima che il resto degli ingredienti venga aggiunto alla
minestra/zuppa. Basta togliere il coperchio, aggiungere l’olio,
premere il pulsante Sauté, scaldare per un minuto, aggiungere
gli ingredienti e mescolare. La funzione Sauté è disponibile
solamente quando il coperchio (2) viene tolto dalla caraffa (3).
La funzione Sauté viene disattivata quando si fissa il
coperchio. Nota: Non utilizzare la funzione Sauté per piů di 10
minuti alla volta.
Lo fa fluidamente... (10)
Il programma per minestre e zuppe fluide ed omogenee è
perfetto per preparare deliziose ricette che richiedono una
consistenza fluida, come la zuppa di pomodori arrosto e
basilico. Il programma si assicura che gli ingredienti vengano
mescolati fino a raggiungere la giusta consistenza e cotti
delicatamente alla corretta temperatura. Il programma dura 21
minuti, dopodiché la vostra minestra è pronta da servire e
gustare!
Facciamola sostanziosa! (11)
Il programma per zuppe e minestre con ingredienti a pezzetti è
perfetto per preparare ricette rustiche che richiedono una
consistenza più sostanziosa. Il programma consente di
riscaldare più a lungo gli ingredienti per essere sicuri che i loro
pezzi vengano cotti completamente. Il programma dura 28
minuti, dopodiché la vostra minestra è pronta da servire e
gustare! Le minestre con ingredienti a pezzetti non richiedono
nessun mix, basta il calore. Pertanto si consiglia di tagliare le
verdure a dadini piccoli. Se la minestra/zuppa è un po’ troppo
la funzione di mescolatura per ottenere la consistenza voluta.
Facciamo il succo! (12)
L’impostazione succo di Soup Maker è ideale per fare frappé o
frullati con ingredienti freschi. Il programma dura 2 minuti,
dopodiché la bevanda è pronta per essere servita. La
regolazione Succo non scalda gli ingredienti.
Nota: Non mettere cubetti di ghiaccio in Soup Maker.
Un mix perfetto! (13)
La regolazione di consente di mixare ulteriormente la
zuppa/minestra per portarla, se necessario, alla consistenza
desiderata. Questa funzione non prevede di dover ulteriormente
scaldare la minestra/zuppa.
Per accedere a questa funzione dopo la cottura, selezionare la
funzione di mescolatura (Blend) con il pulsante Modalità (15) e
tener premuto il pulsante On/Off (16) per attivarla.
i
FP501014MEE Rev2.qxp_Morphy Richards Instruction Book 10/08/2015 20:11 Page 47
Page 48

48
Aggiungilo!
Se si è già avviato il programma di preparazione Smooth o
Chunky e ci si rende conto di aver dimenticato un certo
ingrediente o si aggiungere erbe aromatiche, spezie o altro
condimento, è possibile farlo. Basta togliere il coperchio (3) e
aggiungere gli ingredienti, quindi rimettere il coperchio e
continuare con il programma.
Non togliere il coperchio durante la fase di mescolatura per
evitare spruzzi, (vedi sezione LED).
Non utilizzare questa funzione per aggiungere grandi quantità di
verdure o ingredienti che richiederebbero l’intera durata del
programma per una corretta cottura.
Annullare o cambiare i programmi
Se si è sbagliato a scegliere un programma e si è premuto il
pulsante On/Off (16) o si desidera annullare il programma, è
sufficiente premere il pulsante On/Off e premuto per 2 secondi,
in tal modo le icone lampeggeranno. Premere il pulsante
Modalità (15) per selezionare il programma corretto e poi
premere il pulsante On/Off per riavviare.
Schermo LED (14)
Soup Maker utilizza 3 diverse procedure per realizzare
zuppe/minestre fresche e bevande; riscaldamento, riposo e
mescolatura. Ognuna di queste procedure è evidenziata
durante l’esecuzione del programma con una piccola
animazione sullo schermo LED.
Riscaldamento 11
L’animazione relativa al riscaldamento appare in quando Soup
Maker sta scaldando il contenuto della caraffa.
Mescolatura 11
L’animazione relativa alla mescolatura viene visualizzata quando
si utilizza la relativa lama per il mix. Quando si passa dalla
funzione di riscaldamento a quella di mescolatura, Soup Maker
emette un unico bip udibile.
Non togliere il coperchio (3) mentre Soup Maker sta
mescolando.
Riposo 11
Durante l’esecuzione dei programmi, Soup Maker di tanto in
tanto entra in fase di ‘riposo,’ in tal caso non verrà visualizzata
nessuna animazione. Il timer sullo schermo LED continuerà la
sua temporizzazione alla rovescia. È normale.
Una volta terminata l’operazione, Soup Maker emetterŕ un bip
per 60 secondi e lo schermo visualizzerŕ l’icona ‘Terminato’.
Terminato 11
Al termine, Soup Maker mostrerà la stessa animazione di quella
di riposo, ma il timer verrà impostato a ‘0’ e tutte e quattro le
icone del pannello lampeggeranno.
E per il Sauté?
Preparare soffritti è ideale per le cipolle o i lardelli di pancetta,
perché vengono ammorbiditi, rosolati o caramellati dal calore.
Si può anche utilizzare l’impostazione sauté per ottenere
crostini per la propria zuppa.
L’impostazione sauté deve essere utilizzata solo per un periodo
di 5-10 minuti. Non usarla mai per più di 10 minuti.
No usare la funzione sauté per la carne cruda, ad eccezione
dei lardelli di pancetta e piccole quantitŕ di carne macinata
(fino a 100 g), inoltre, non utilizzarla per scaldare liquidi, salse,
pomodori freschi o in scatola, zucchero, frutta o cibi
zuccherati o contenenti amido.
La funzione Sauté è utilizzabile solo quando il coperchio (2) è
tolto dalla caraffa (3). La funzione Sauté viene disattivata
quando si fissa il coperchio.
I vantaggi della minestra/zuppa fatta in casa
La minestra/zuppa fatta in casa ha un ottimo sapore, costa
poco ed è un pasto salutare e sostanzioso.
Improvvisare dal nulla!
Cucinare improvvisando è il modo migliore per preparare cibi
sani e genuini che tutta la famiglia ama. Consente di avere il
completo controllo sul cibo che si mangia, perché implica
cucinare partendo dagli ingredienti più strettamente di base ed
evitando tutti i conservanti, aromatizzanti ed altri additivi che
vengono aggiunti ai cibi prodotti industrialmente.
Dosiamo!
Cucinare in porzioni è un’ottima soluzione perché consente di
cucinare una porzione di cibo genuino e confezionarlo in dosi
per pasto che possono essere refrigerate o congelate,
conservando tutto il sapore ed i nutrienti, pronte per essere
gustate durante la settimana.
Nessuno spreco!
Nello UK sprechiamo fino a 8,3 milioni di tonnellate di cibo ogni
anno, la maggior parte del quale avrebbe potuto essere
mangiato. Che si cucini il pollo avanzato la domenica o un
pomodoro riposto sul fondo del frigo, è sempre possibile
improvvisare una fantastica ricetta di minestra/zuppa fatta in
casa utilizzando il cibo avanzato che normalmente andrebbe .
Valore nutrizionale di zuppe e minestre
Le minestre fatte in casa sono quanto di meglio possa esserci
perché, in base alla ricetta preparata, possono fornire un’ampia
gamma di sostanze nutrienti, comprese le vitamine, i minerali, i
carboidrati e le fibre. E più di tutto, la minestra fatta in casa è
semplicemente squisita!
FP501014MEE Rev2.qxp_Morphy Richards Instruction Book 10/08/2015 20:11 Page 48
Page 49

49
Cosa rende la vostra macchina per fare le
minestre/zuppe cosě speciale?
Preparare una minestra fatta in casa con prodotti freschi e nel
confort della propria cucina, è la cosa più veloce che si possa
fare con Soup Maker.
Per cucinare basta una caraffa
La funzione Sauté permette di soffriggere gli ingredienti prima
di cuocere la minestra utilizzando lo stesso di cottura. Un’idea
semplice: ridurre il disordine e le stoviglie da lavare.
Fare il soffritto nella stessa caraffa usata per la cottura inoltre
migliora la minestra, perché i sapori vengono trattenuti.
Al lavoro in un lampo!
Tutto quello che c’è da fare è preparare gli ingredienti, trasferirli
in Soup Maker e scegliere tra le impostazioni Smooth o Chunky.
Dopo aver fatto saltare gli ingredienti, il programma per la
minestra/zuppa liquida e omogenea procede alla mescolatura e
cuoce delicatamente la minestra in 21 minuti. Il programma per
la preparazione di zuppe e più dense e pastose (pezzetti di
verdure) invece richiede appena 28 minuti prima che esse siano
pronte da gustare!
Salvaspazio
Sappiamo che lo spazio è un bene prezioso in cucina. Soup
Maker è compatto ed ha un design semplice per poter stare
facilmente ovunque sul piano di lavoro.
Un sogno da pulire
12
Sauté & Soup Maker non è adatto per il lavaggio in
lavastoviglie, ma è veramente facile da pulire. Dopo l’uso, lavare
semplicemente l’alloggiamento motore (8) e la lama Serrator (9)
in acqua calda e pulire con una spugna. NON immergere in
acqua. Anche l’interno della caraffa di Soup Maker (4) può
essere pulito in acqua e sapone calda con una spugna. Se si
nota del cibo bruciato, lasciare in immersione e
successivamente pulire con una spugna. Pulire l’esterno
dell’elettrodomestico con un panno soffice e umido, poi
asciugare.
Alcuni cibi possono bruciare se entrano in contatto con
l’elemento riscaldante della base. Se capita, riempire Soup
Maker con acqua e sapone e lasciare in ammollo per 15
minuti. Il cibo bruciato eventualmente residuo puň essere
facilmente rimosso con una spugna morbida. Non usare
pagliette perché graffierebbero il rivestimento.
AVVERTENZA: La superficie interna della caraffa di cottura ha
un rivestimento antiaderente resistente e duraturo che facilita
la pulizia. Non usare utensili metallici per mescolare o togliere
il cibo da questo apparecchio.
Dopo la pulizia, asciugare a fondo tutte le parti lavate.
AVVERTENZA: NON immergere il coperchio o la caraffa in
acqua, perché contengono componenti elettrici che possono
danneggiarsi. Evitare assolutamente che l’acqua penetri nei
collegamenti elettrici. Asciugare perfettamente prima dell’uso.
Quando si toglie e si rimette il coperchio (3), fare attenzione a
non graffiare la lama sul lato della caraffa (4) per evitare di
danneggiare il rivestimento antiaderente.
Qualche domanda?
Se avete qualche domanda sull’uso di Soup Maker, controllate
la lista di verifica che segue nella quale riportiamo le risposte
ad alcune delle domande più frequenti (FAQ). In caso di
necessità d’aiuto, contattare la nostra assistenza telefonica:
0344 871 0944.
Posso togliere il coperchio a metŕ ciclo di cottura?
Si, per aggiungere ingredienti o condimenti. Per maggiori
informazioni, vedere ‘Aggiungi’ a pagina 8.
Posso usare Soup Maker per preparare qualcos’altro che non
siano e bevande?
No. I 5 programmi disponibili sono appositamente concepiti per
fare minestre/zuppe e bevande perfette da zero. Seguire le
ricette e adattarle a propri gusti.
Posso usare la carne cruda per le ricette delle minestre con
Soup Maker?
A parte la pancetta o piccole quantità di carne trita (100 g), no.
Bisogna cuocere la carne separatamente prima di metterla in
Soup Maker con gli ingredienti aggiuntivi della propria ricetta,
perché Soup Maker è progettato esclusivamente per far saltare
delicatamente la pancetta o le cipolle e poi per cuocere la
minestra. Non si deve usare la funzione Sauté per rosolare la
carne cruda ma solo la pancetta e la carne macinata.
Che capacitŕ ha Soup Maker?
La capacità di Soup Maker è di 1,6 l. Assicurarsi di non
riempire Soup Maker oltre la linea MAX, altrimenti il rilevatore di
sovrappieno stacca la corrente a Serrator Blade (9) e lo
schermo LED (14) visualizza ‘E1’. Se succede, è sufficiente
togliere un po’ di ingredienti, di modo che il segno MAX non
venga superato, poi pulire con il sensore di sovrappieno (7) sul
coperchio (3). Assicurarsi che gli ingredienti () superino la linea
MIN, in caso contrario la funzione di mescolatura sarebbe
compromessa.
Posso cambiare gli orari delle impostazioni per minestra
Smooth e Chunky?
No. Questi orari sono predefiniti.
Posso far riscaldare la minestra/zuppa giŕ preparata o far
riscaldare le minestre/zuppe in scatola/cartone?
No. I programmi sono impostati . La minestra potrebbe bruciare
alla base dell’elemento riscaldante causando danni
all’apparecchio.
Posso preparare zuppe fredde come il gazpacho con Soup
Maker?
Si, ma si dovrà prima cuocere la zuppa utilizzando
l’impostazione per zuppe Chunky o Smooth. Quindi lasciar
raffreddare o refrigerare prima di gustare.
Cosa faccio se Soup Maker smette di funzionare?
Soup Maker è dotato di un termostato di sicurezza che
interrompe la corrente e arresta la macchina, per prevenire il
surriscaldamento, se viene utilizzata continuamente per 3 o più
cicli. Se capita, togliere tutto il cibo dalla caraffa e far
raffreddare Soup Maker per 30 minuti prima di continuare.
Se si utilizza la funzione di mescolatura in modo continuo per
più di 20 secondi, un interruttore automatico di sicurezza
interrompe l’alimentazione per impedire il surriscaldamento.
Quando ciò si verifica, aspettare 10 secondi prima di riutilizzare
i
FP501014MEE Rev2.qxp_Morphy Richards Instruction Book 10/08/2015 20:11 Page 49
Page 50

50
la medesima funzione.
Cos faccio se trovo cibo bruciato sul fondo di Soup Maker?
13
A causa dell’amido e degli zuccheri presenti in alcuni alimenti,
si può verificare una leggera bruciatura nel caso si trovassero a
contatto con la base interna della caraffa (4). Per prevenirla,
aggiungere mezza tazza d’acqua o di brodo a Soup Maker
prima di inserire ingredienti solidi. Quindi riempire con il liquido
rimanente indicato dalla ricetta.
Cosa faccio se la funzione Sauté smette di funzionare?
La funzione Sauté si attiva solo se è stato tolto il coperchio
(vedi pag. 6). Premere il pulsante Sauté (17), la spia Sauté (16)
dovrebbe tornare verde.
Se la spia Sauté sulla maniglia della caraffa (4) resta rossa,
premere il pulsante alla sommità della maniglia della caraffa per
riattivare la funzione. Questo pulsante deve restare in posizione
‘up’ (su) quando il coperchio (2) è rimosso
Contatti
Assistenza telefonica
In caso di problemi col vostro elettrodomestico, vi invitiamo a
contattare il nostro Servizio di assistenza telefonica, in quanto
saremo in grado di fornirvi un’assistenza più mirata rispetto a
quella fornita dal punto vendita.
Vi consigliamo di tenere a portata di mano il nome del prodotto,
il numero del modello e il numero di matricola per consentirci di
gestire la vostra chiamata nel minor tempo possibile.
Parlatene con noi
Per eventuali domande o commenti, o semplicemente se volete
dei suggerimenti o delle idee di ricette per sfruttare al meglio il
vostro elettrodomestico, seguiteci online:
Blog: www.morphyrichards.co.uk/blog
Facebook: www.facebook.com/morphyrichardsuk
Twitter: @loveyourmorphy
FP501014MEE Rev2.qxp_Morphy Richards Instruction Book 10/08/2015 20:11 Page 50
Page 51

51
Ricette
Abbiamo messo a punto 15 ricette che potete usare con il vostro nuovo Soup Maker,
dalle ricche minestre corpose ai freschi frullati.
L’impostazione Chunky (11) serve solo a cucinare gli ingredienti, essa non li sminuzza.
Se dopo la cottura la minestra risulta un po’ troppo pastosa per i vostri gusti, potete
usare l’impostazione Blend (13) per frantumare ulteriormente alcuni pezzi.
Per accedere a questa funzione, bisogna prima staccare la spina di Soup Maker dalla
presa di corrente e poi reinserirla. In tal modo si effettua il reset di Soup Maker,
consentendovi di selezionare l’impostazione Blend con il pulsante Modalità (15). Se
illuminato, tener premuto il pulsante On/Off (16) per mescolare il contenuto della caraffa.
Le ricette sono state studiate per rientrare nei limiti delle capacità minima e massima di
Soup Maker (1,3-1,6 l).
i
FP501014MEE Rev2.qxp_Morphy Richards Instruction Book 10/08/2015 20:11 Page 51
Page 52

52
Ricette per Sauté (soffritti)
Brodo invernale di agnello con lenticchie
Tempo di preparazione: 20 minuti
Tempo di cottura: 33 minuti
Impostazione: A pezzetti
Per 4 persone
Ingredienti:
• 2 cucchiai di olio di oliva
• 75 g di agnello macinato crudo
• 1 cipolla media, (ca. 100 g) finemente tritata
• 2 spicchi d’aglio schiacciati
• 1 piccola carota (ca. 50 g) finemente tritata
• 1 patata, (ca. 115 g) finemente tritata
• 1 rapa media (ca. 100 g) finemente tritata
• 1 cucchiaio di farina
• 1 (400g) scatola di lenticchie, sgocciolate
• ˝ cucchiaino di rosmarino fresco, tritato
• 2 foglie di alloro
• 1 cucchiaino di salsa Worcestershire
• 1 cucchiaio di prezzemolo fresco tritato
• 900 ml di brodo d’agnello, fatto aggiungendo 2 dadi di carne
Metodo di preparazione:
1 Premere il pulsante Sauté e scaldare l’olio d’oliva nella caraffa di
Soup Maker per 1 minuto. Far soffriggere il trito di agnello per 2-3
minuti, mescolando frequentemente con un cucchiaio di legno
fino a leggera rosolatura.
2 Aggiungere la cipolla, l’aglio, la carota, la patata e la rapa nella
caraffa e soffriggere per 4 minuti mescolando quanto basta.
Disinserire la funzione sauté premendo il pulsante Sauté.
3 , poi aggiungere il resto degli ingredienti e aggiungere brodo fino
al livello massimo. Salare e aggiungere pepe macinato, quindi e
mescolare con un cucchiaio o spatola di legno. Mettere il
coperchio sulla caraffa e selezionare l’impostazione Chunky.
4 Al termine , condire a e togliere le foglie di alloro prima di servire.
Zuppa di pollo ai funghi
Tempo di preparazione: 20 minuti
Tempo di cottura: 30 minuti
Impostazione: Smooth
Per 4 persone
Ingredienti:
• 2 cucchiai di olio di oliva
• 1 cipolla (ca. 100 g), finemente tritata
• 240 g di funghi, affettati sottili
• 1 spicchio d’aglio schiacciato
• 100 g di pollo cotto, sminuzzato
• 1 patata (ca. 115 g), pelata e fatta a dadini fini
• 10 g di prezzemolo fresco, tritato
• Sale e pepe
• 1 l di brodo di pollo
Contorno:
• un po’ di panna montata
Metodo di preparazione:
1 Premere il pulsante Sauté. Scaldare l’olio nella caraffa per 1
minuto e poi aggiungere la cipolla. Soffriggere, mescolando
continuamente con un cucchiaio o spatola di legno per 2 minuti
fino ad ammorbidimento ma senza far rosolare.
1 Aggiungere i funghi e l’aglio e far soffriggere per un altro paio di
minuti fino a che i funghi si ammorbidiscono. Disinserire la
funzione sauté premendo il pulsante Sauté.
3 Aggiungere il pollo, la patata, il prezzemolo e il condimento, poi
aggiungere il brodo fino al livello massimo della caraffa.
4 Mettere il coperchio sulla caraffa e scegliere l’impostazione
Smooth.
5 Al termine, condire a piacimento e servire con un ricciolo di panna
(se preferite).
• Per preparare un brodo di pollo fresco. Mettere semplicemente
una carcassa di pollo in una padella media, coprire con acqua,
aggiungere un dado vegetale, 5 grani di pepe nero e una foglia di
alloro. Portare a ebollizione, poi lasciar bollire per 1 ora. Filtrare
con un setaccio fine o un panno di mussola.
FP501014MEE Rev2.qxp_Morphy Richards Instruction Book 10/08/2015 20:11 Page 52
Page 53

53
Ricette per zuppe
Zuppa di pomodori arrosto e basilico
Tempo di preparazione: 30 minuti
Tempo di cottura: 21 minuti
Impostazione: Smooth
Serve: 4
Ingredienti:
• 8 pomodori molto maturi (ca. 640 g), tagliati a metŕ
• 2 cipolle rosse (ca. 215g), tagliate in 6 spicchi
• 4 spicchi di aglio
• 1 cucchiaio di olio d’oliva
• 1 cucchiaio di aceto balsamico
• Sale e pepe nero macinato
• 750 ml di brodo di pollo, fatto con dado di carne
• 2 cucchiaini di concentrato di pomodoro
• 1 cucchiaio di zucchero di canna
• 10 g di foglie di basilico fresco
Metodo di preparazione:
1 Preriscaldare il forno a 200°C / gas regolato sul 6.
2 Mettere i pomodori con la pelle rivolta in alto in una teglia per
arrosti con le cipolle rosse e l’aglio. Versare un filo di olio d’oliva,
l’aceto balsamico e condire con sale e pepe. Far arrostire per 2030 minuti o fino a che il contenuto non si è ammorbidito e
leggermente carbonizzato.
3 Aggiungere con cura le verdure in Soup Maker con il brodo di
pollo, aggiungere il concentrato di pomodoro, lo zucchero di
canna e basilico fresco.
4 Mettere il coperchio sulla caraffa e scegliere l’impostazione
Smooth. Una volta che la zuppa è pronta, condire a piacere e
servire.
Minstra di piselli, prosciutto e menta facile e
velocissima
Tempo di preparazione: 5 minuti
Tempo di cottura: 21 minuti
Impostazione: Smooth
Per 4 persone
Ingredienti:
• 600 g di piselli surgelati
• 20 g di menta fresca, solo le foglie
• 225 g di prosciutto cotto di buona qualitŕ, trinciato/sminuzzato
• 1 patata (ca. 100 g), a dadini piccoli
• 800 ml di brodo di prosciutto caldo, ottenuto con un dado
• Sale e pepe nero macinato
• 2 cucchiai di olio d’oliva
• 3 cucchiai tondi di crème fraiche
Metodo di preparazione:
1 Mettere i piselli, la menta, il prosciutto, la patata e il brodo caldo in
Soup Maker. Mettere il coperchio sulla caraffa e scegliere
l’impostazione Smooth.
2 Quando la minestra è pronta, condire con un po’ di sale e pepe
macinato, aggiungere l’olio d’oliva e la crème fraiche e poi
selezionare l’impostazione Blend (mix). Tener premuto il pulsante
On/Off per mescolare la minestra per 20 secondi prima di servire.
Minestra di verdure base
Tempo di preparazione: 5 minuti
Tempo di cottura: 21 minuti
Impostazione: Smooth
Serve: 4
Ingredienti:
• 700 g di verdure assortite, a dadini (il mix di verdure in busta del
supermercato è ideale)
• Acqua (fino al livello MAX)
• 2 dadi per brodo di pollo o vegetale
• Sale e pepe nero macinato
Metodo di preparazione:
1 Per una minestra veloce e omogenea, riempire Soup Maker oltre il
segno di livello MIN con verdure a dadini a scelta (usare le verdure
a pezzetti giŕ pronte è ideale).
2 Aggiungere i dadi per brodo di pollo o vegetale e riempire con
acqua fino al segno di livello Max.
3 Mettere il coperchio sulla caraffa e scegliere l’impostazione
Smooth. Una volta che la zuppa è pronta, condire a piacere e
servire.
i
FP501014MEE Rev2.qxp_Morphy Richards Instruction Book 10/08/2015 20:11 Page 53
Page 54

54
Ricette per succhi
Frullato di fragole e ananas
Tempo di preparazione: 5 minuti
Tempo di mescolatura: 2 minuti
Impostazione: Succo
Volume: 1,1 l
Ingredienti:
• 300 g di fragole fresche
• 250 g di ananas fresco
• 450 g di yogurt di lamponi a basso contenuto di grassi
• 150 ml di latte parzialmente scremato
• 1 misurino (ca. 35 g) di gelato alla vaniglia
Metodo di preparazione:
1 Preparare e mondare le fragole, tagliando a metŕ quelle piů
grandi. Tagliare a pezzi l’ananas.
2 Mettere gli ingredient in Soup Maker e mescolare a fondo.
3 Mettere il coperchio alla caraffa e scegliere l’impostazione Juice.
Attendere semplicemente per 2 minuti finché Soup Maker non ha
finito.
4 Servire immediatamente.
Garanzia a vita della lama
La lama ‘Serrator’ è garantita priva di difetti dei materiali e di
produzione per tutta la sua durata. Questa garanzia copre solo
l’acquirente originale e non è trasferibile o cedibile a terzi.
Questa garanzia è disponibile per i clienti che usano le lame
“Serrator” per scopi domestici, non commerciali. Questa
garanzia non copre eventuali danni causati da incidenti, uso
improprio o qualsiasi uso diverso da quello descritto nel nostro
manuale utente o per danni derivanti da mancata
manutenzione e pulizia come specificato nel manuale utente.
GARANZIA DI DUE ANNI
Questo elettrodomestico è coperto da una garanzia di due anni
per la riparazione o la sostituzione.
È importante conservare la ricevuta del rivenditore a titolo di
prova di acquisto. Appuntare la ricevuta sulla retrocopertina del
presente manuale per futuro riferimento.
Indicare le informazioni riportate di seguito se si verifica
un’anomalia sul prodotto. Questi numeri sono riportati sulla
base del prodotto.
N. modello
N. di serie
Tutti i prodotti Morphy Richards sono testati singolarmente
prima di lasciare lo stabilimento. Nell’improbabile eventualità
della comparsa di un difetto entro 28 giorni dall’acquisto, si
consiglia di restituire il prodotto dove è stato acquistato per
richiederne la sostituzione.
Se il problema si manifesta dopo 28 giorni ed entro 24 mesi
dall’acquisto, contattare il rivenditore più vicino, citando il
numero di modello e il numero di matricola riportati sul
prodotto oppure scrivergli all’indirizzo indicato.
Verrà richiesto di rispedire il prodotto (in un imballaggio idoneo
e sicuro) unitamente alla copia della prova d’acquisto.
Fatte salve le esclusioni sotto riportate (1-9), l’elettrodomestico
difettoso viene riparato o sostituito e spedito di solito entro 7
giorni lavorativi dal ricevimento.
Se per qualsiasi motivo questo articolo viene sostituito entro il
periodo di garanzia di 2 anni, la garanzia sul nuovo prodotto
sarà calcolata a decorrere dalla data dell’acquisto iniziale. È
pertanto importante conservare la ricevuta o fattura originale
per poter dimostrare la data dell’acquisto.
Per usufruire della garanzia di due anni, l’elettrodomestico deve
essere stato usato nel modo indicato dal produttore. Ad
esempio, è necessario disincrostare l’elettrodomestico e tenere
puliti i filtri nel modo indicato.
Morphy Richards o il rivenditore di zona non sono tenuti a
sostituire o riparare i prodotti, come indicato dalle disposizioni
di garanzia, se:
1 Il guasto è stato causato o è attribuibile a un uso accidentale,
improprio, negligente o contrario alle istruzioni del produttore
oppure il guasto è stato causato da sovratensioni momentanee o
dal trasporto.
2 L’elettrodomestico è stato utilizzato a una tensione diversa da
quella indicata su di esso.
3 Le riparazioni sono state eseguite da persone diverse dal
personale tecnico Morphy Richards (o rivenditori autorizzati).
4 L’elettrodomestico è stato noleggiato oppure non impiegato per
uso domestico.
5 L’elettrodomestico è di seconda mano.
6 Morphy Richards o il rivenditore di zona non sono tenuti ad
eseguire alcun tipo di intervento di assistenza ai sensi della
garanzia.
7 I sacchetti, i filtri e le caraffe di vetro non sono coperti dalla
garanzia.
8 Le batterie e i danni dovuti a perdite non sono coperti dalla
garanzia.
9 I filtri non sono stati puliti e sostituiti come da istruzioni.
La presente garanzia non conferisce alcun diritto diverso da
quelli sopra elencati e non copre alcuna richiesta di danni o
perdite consequenziali. La presente garanzia viene offerta a titolo
di vantaggio aggiuntivo e non incide sui diritti del consumatore
previsti dalla legge.
FP501014MEE Rev2.qxp_Morphy Richards Instruction Book 10/08/2015 20:11 Page 54
Page 55

55
i
Bezpieczeństwo i ochrona zdrowia
Użytkowanie każdego urządzenia elektrycznego wymaga przestrzegania następujących podstawowych zasad bezpieczeństwa.
Przed rozpoczęciem używania tego urządzenia należy uważnie przeczytać te instrukcje.
• Urządzenie mogą obsługiwać osoby o ograniczonych zdolnościach
fizycznych, sensorycznych lub umysłowych bądź nieposiadające
odpowiedniej wiedzy i doświadczenia, jeśli będą one nadzorowane lub
zostaną poinstruowane w zakresie bezpiecznego korzystania
z urządzenia i będą świadome związanych z tym zagrożeń.
• To urządzenie nie może być używane przez dzieci. Urządzenie i kabel
zasilający należy trzymać w miejscu niedostępnym dla dzieci. Należy
dopilnować, aby dzieci nie używały tego urządzenia do zabawy.
• Zawsze należy odłączać urządzenie od źródła zasilania, jeśli urządzenie
jest pozostawiane bez nadzoru, przed montażem, demontażem lub
czyszczeniem.
• Urządzenie to jest przeznaczone do zastosowań domowych
i podobnych: gospodarstwa, klienci hoteli, moteli oraz innych obiektów
mieszkalnych, miejsca zakwaterowania. Urządzenie nie jest
przeznaczone do zastosowań profesjonalnych lub przemysłowych, tzn.
w kuchniach, zakładach, biurach lub innych placówkach przemysłowych.
• Jeśli kabel zasilający ulegnie uszkodzeniu, musi zostać wymieniony na
odpowiedni specjalny kabel przez producenta lub autoryzowany punkt
serwisowy.
• OSTRZEŻENIE: Metalowe ostrza są bardzo ostre. Podczas użytkowania
i czyszczenia zachowaj szczególną ostrożność. Informacje na temat
konserwacji i czyszczenia zamieszczono części Konserwacja i
czyszczenie.
• Do urządzenia nie należy podłączać zewnętrznych wyłączników
czasowych ani systemów zdalnego sterowania.
}
}
FP501014MEE Rev2.qxp_Morphy Richards Instruction Book 10/08/2015 20:11 Page 55
Page 56

56
Ponadto poniżej podajemy porady dotyczące bezpiecznego
użytkowania urządzenia.
Umieszczanie urządzenia
• Zawsze umieszczaj urządzenie z dala od krawędzi blatu.
• Upewnij się, że urządzenie stoi na stabilnej, płaskiej powierzchni.
• Nie korzystaj z urządzenia na wolnym powietrzu ani w pobliżu
wody.
Przewód zasilający
• Po podłączeniu do gniazda elektrycznego przewód zasilający nie
powinien być naprężony.
• Przewód zasilający nie może zwisać z blatu w miejscu, w którym
byłby w zasięgu dziecka.
• Przewód zasilający nie może zwisać swobodnie, np. między nisko
umieszczonym gniazdem elektrycznym a stołem.
• Przewód zasilający nie może leżeć na kuchence ani innej gorącej
powierzchni, na której mógłby ulec uszkodzeniu.
Bezpieczeństwo osób
• WARNING: Aby uniknąć pożaru, porażenia prądem oraz obrażeń
ciała, nie zanurzaj przewodu zasilającego, wtyczki ani samego
urządzenia w wodzie ani w żadnej innej cieczy.
• WARNING: Unikaj styczności z ruchomymi częściami.
• Podczas przenoszenia urządzenia z gorącą zawartością należy
zachować szczególną ostrożność.
• Nie obsługuj urządzenia mokrymi ani wilgotnymi rękami.
Pierwsza pomoc przy oparzeniach
• Natychmiast umieść poparzone miejsce pod zimną, bieżącą
wodą. Nie próbuj zdejmować ubrania, zadzwoń szybko po pomoc
medyczną.
Inne uwagi dotyczące bezpieczeństwa
• Jeśli przewód zasilający urządzenia ulegnie uszkodzeniu, nie
używaj go. W celu uzyskania porady zadzwoń na infolinię firmy
Morphy Richards.
• Korzystanie z dodatkowych przystawek niezalecanych przez
producenta może doprowadzić do uszkodzenia urządzenia.
• Nie umieszczaj urządzenia w pobliżu źródeł ciepła, takich jak
kuchenki lub palniki gazowe albo elektryczne.
• Urządzenie i przewód zasilający powinny znajdować się z dala od
miejsc o wysokiej temperaturze, bezpośredniego światła
słonecznego, wilgoci, ostrych krawędzi itp.
• Przed włączeniem urządzenia upewnij się, czy pokrywka jest
dobrze zamknięta.
• Nie zdejmuj pokrywki dopóki ostrze pracuje.
• Po zakończeniu programu należy odczekać aż urządzenie
całkowicie ostygnie. Dopiero wtedy można rozpocząć czyszczenie
i mycie urządzenia.
• Nie należy używać tego urządzenia do ciągłego przygotowywania
posiłków.
• Podczas wlewania gorących płynów do przyrządu do
przygotowania zup należy zachować ostrożność, ponieważ mogą
one pryskać z urządzenia pod wypływem wrzenia.
Wymagania elektryczne
Należy upewnić się, że napięcie podane na tabliczce znamionowej
urządzenia odpowiada napięciu w gniazdku sieciowym
doprowadzającym prąd przemienny.
OSTRZEŻENIE: URZĄDZENIE WYMAGA UZIEMIENIA.
Jeśli wystąpi konieczność wymiany bezpiecznika 13 A we
wtyczce, należy go wymienić na bezpiecznik 13 A o oznaczeniu
BS1362.
FP501014MEE Rev2.qxp_Morphy Richards Instruction Book 10/08/2015 20:11 Page 56
Page 57

57
Gratulujemy wyboru nowego urządzenie Morphy Richards do przygotowywania żywności z technologią
ząbkowanego ostrza. Rewolucyjna i wyjątkowa konstrukcja ząbkowanego ostrza zapewnia najwyższą jakość
rozdrabniania oraz imponującą trwałość.
Jak działa ząbkowane ostrze?
Ząbkowane ostrze, które zostało opracowane przez naszych specjalistów, zostało opracowane z myślą o
zapewnieniu znacznie większej wydajności rozdrabniania niż standardowe płaskie ostrza. Perfekcyjnie
dobrane ząbkowanie powierzchni zostało starannie wybrane oraz przetestowane, aby zapewnić najwyższą
możliwą wydajność pracy oraz wieloletnią eksploatację.
Nasze nowe ząbkowane ostrze pozostaje ostre do
12 razy dłużej niż standardowe ostrza, zapewniając wieloletnią eksploatację.
*** Niezależnie przetestowane przez CATRA przy użyciu Międzynarodowego systemu testowania cięcia oraz normy
ISO 8442.5 vs standardowe ostrze.
Nowe
(Tylko niektóre modele) ostrze ząbkowane
DŁUŻEJ POZOSTAJE OSTRE
12 RAZY DŁUŻEJ
NIŻ W PRZYPADKU
STANDARDOWYCH
OSTRZY***
Ząbkowane ostrze
Standardowe ostrze
Ostrość
Trwałość ostrza
}
FP501014MEE Rev2.qxp_Morphy Richards Instruction Book 10/08/2015 20:11 Page 57
Page 58

58
Wstęp
Przyrząd do przygotowania zupy i smażenia w małej ilości
tłuszczu firmy Morphy Richards jest szybki i łatwy w użyciu. Aby
przygotować zupę o świeżym smaku, wybierz ustawienie
Smażenie w małej ilości tłuszczu, a następnie dodaj składniki
do smażenia, czyli – cebulę, boczek, czosnek lub imbir –, które
będą podstawą pysznej zupy. Następnie dodaj pozostałe
składniki do dużego dzbanka o pojemności 1,6 l, nałóż pokrywę
i wybierz ustawienie zupa kremowa lub gęsta.
Łatwy w obsłudze panel sterowania jest wyposażony w
wyświetlacz LED, który pokazuje dokładnie, ile czasu pozostało
do zakończenia gotowania zupy, podczas którego można
odpocząć, a urządzenie samo wykona ciężką pracę.
Program Zupa kremowa umożliwia miksowanie i delikatne
gotowanie zupy przez 21 minut, natomiast program Zupa gęsta
pozwala ugotować zdrową zupę o gęstszej konsystencji w 28
minut. Jeśli po ugotowaniu zupa jest zbyt gęsta, wystarczy
nacisnąć przycisk miksowania, a wysokiej jakości ząbkowane
ostrza zmiksują zupę, aż do uzyskania preferowanej
konsystencji.
Przyrząd do przygotowania zupy i smażenia w małej ilości
tłuszczu posiada również funkcję pauzy, która pozwala na
dodawanie przypraw, creme fraiche, ziół lub śmietany na
każdym etapie procesu gotowania. Wystarczy podnieść
pokrywę przyrządu do przygotowania zupy i smażenia w małej
ilości tłuszczu - przez co wyłącza się wykonywanie programu i
zatrzymuje się ostrze. Dodaj przyprawy i/lub dodatkowe
składniki. Po ponownym założeniu pokrywy timer zostanie
uruchomiony ponownie z tym samym pozostałym czasem
wykonywanego programu.
Aby zarejestrować produkt i otrzymać dwuletnią gwarancję,
prosimy odwiedzić witrynę www.morphyrichards.co.uk.
Spis treści
Bezpieczeństwo i ochrona zdrowia 55
Ząbkowane ostrze 55
Wstęp 58
Wyposażenie 58
Przed pierwszym użyciem 58
Jak korzystać z przyrządu do przygotowania zupy 58
Obsługa przyrządu do przygotowywania zupy 59
Ekran LED 59
Co można smażyć w małej ilości tłuszczu 60
Atuty domowej zupy 06
Co sprawia, że ten przyrząd do przygotowywania zup jest
wyjątkowy? 60
Bajecznie prosty w czyszczeniu 60
Pytania? 61
Kontakt 61
Przepisy 62
Przepisy - Smażenie w małej ilości tłuszczu 63
Przepisy - Zupy 64
Przepisy - soki 64
Gwarancja 65
Wyposażenie
(1) Panel sterowania
(2) Uchwyt pokrywy
(3) Pokrywa
(4) Dzbanek
(5) Uchwyt dzbanka
(6) Gniazdo zasilania
(7) Czujnik przepełnienia
(8) Obudowa silnika
(9) Ząbkowane ostrze
(10) Wskaźnik funkcji Zupa kremowa
(11) Wskaźnik funkcji Zupa gęsta
(12) Wskaźnik funkcji Sos własny
(13) Wskaźnik funkcji miksowania
(14) Ekran LED
(15) Przycisk Mode (tryb)
(16) Przycisk Wł./|Wył.
(17) Wskaźnik funkcji smażenia w małej ilości tłuszczu
(18) Przycisk smażenia w małej ilości tłuszczu
Przed pierwszym użyciem
Przed pierwszym użyciem usuń całe opakowanie i elementy
wyposażenia.
Przed pierwszym użyciem oraz w przypadku dłuższej przerwy
w użytkowaniu urządzenie należy koniecznie oczyścić.
Aby uzyskać więcej informacji, zobacz pozycję „Bajecznie
prosty w czyszczeniu”.
Podczas pierwszego użycia przyrządu do przygotowania zupy
i smażenia w małej ilości tłuszczu, spod pokrywy, może
wydobywać się trochę dymu/pary. Jest to normalne zachowanie
powodowane przez smar używany w niektórych częściach
urządzenia w trakcie procesu produkcyjnego. Po kilku użyciach
nie będzie to miało miejsca.
Jak korzystać z przyrządu do przygotowania
zupy
1 Zdejmij pokrywę (3), uważając, by nie dotykać ząbkowanego
ostrza (9). OSTRZEŻENIE: Ostre ostrza
2 Podłącz przyrząd do przygotowania zupy do gniazda
elektrycznego. Wskaźnik smażenia w małej ilości tłuszczu (17)
zapali się na czerwono.
3 Dodaj oleju lub masła do dzbanka (4). Do smażenia w małej ilości
masła zaleca się dodanie niewielkiej ilości oleju, aby zapobiec
spaleniu się masła.
4 Naciśnij przycisk smażenia w małej ilości tłuszczu (18). Wskaźnik
funkcji smażenia w małej ilości tłuszczu zmieni kolor na zielony.
Dzbanek zacznie się podgrzewać.
5 Po minucie dodaj do dzbanka składniki do smażenia. Mieszaj
drewnianą łopatką, aby umożliwić równomierne gotowanie i aby
zapobiec przyklejeniu się lub przypaleniu składników. Nie
zakładaj pokrywy.
6 Po zakończeniu gotowania naciśnij ponownie przycisk smażenia w
małej ilości tłuszczu. Wskaźnik funkcji smażenia w małej ilości
tłuszczu zaświeci się na czerwono. Dodaj resztę składników do
dzbanka.
7 Załóż pokrywkę na dzbanek, taka by była dobrze nałożona.
FP501014MEE Rev2.qxp_Morphy Richards Instruction Book 10/08/2015 20:11 Page 58
Page 59

59
Słychać będzie sygnał dźwiękowy, a ikony będą migać po kolei.
8 Naciśnij przycisk Mode (tryb) (15), aby wybrać program, (patrz
„Korzystanie z przyrządu do przygotowania zupy”). Ikona
podświetli się.
9 włącz Przyrząd do przygotowania zupy, naciśnij przycisk Wł./Wył.
(16). Przyrząd do przygotowania zupy wyda dźwięk i rozpocznie
się proces gotowania. Będzie wyświetlany czas gotowania i
rozpocznie się odliczanie.
10 Po zakończeniu gotowania przyrząd do przygotowania zupy
będzie wydawać dźwięk przez 60 sekund, a wszystkie cztery
ikony będą migać. Wyjmij wtyczkę z gniazdka, zdejmij pokrywę i
wlej świeżą zupę do miski.
OSTRZEŻENIE
PODCZAS ZDEJMOWANIA ORAZ ZAKŁADNIA POKRYWY (3)
NALEŻY UWAŻAĆ, ABY NIE PORYSOWAĆ OSTRZEM
ŚCIANEK DZBANKA (4) I NIE USZKODZIĆ POWŁOKI
ZAPOBIEGAJĄCEJ PRZYWIERANIU.
Korzystanie z przyrządu do przygotowania
zupy
Przyrząd do przygotowania zupy ma 5 programów.
Wybierz odpowiedni program:
Smażenie w małej ilości tłuszczu... (17)
Funkcja smażenia w małej ilości tłuszczu podgrzewa dzbanek,
dzięki czemu można podsmażyć takie składniki jak cebula i
boczek, zanim doda się resztę składników zupy. Wystarczy
zdjąć pokrywę, dodać olej, naciśnąć przycisk smażenia w małej
ilości tłuszczu, podgrzewać przez minutę, dodać składniki i
wymieszać. Funkcja smażenia w małej ilości tłuszczu jest
dostępna tylko wtedy, gdy pokrywa (2) jest zdjęta z dzbanka
(3). Funkcja smażenia w małej ilości tłuszczu wyłącza się, gdy
założona zostanie pokrywa. Uwaga: Nie należy korzystać z
funkcji smażenia w małej ilości tłuszczu przez dłużej niż 10
minut.
Zupa kremowa (10)
Program Zupa kremowa doskonale nadaje się do przepisów na
smaczne zupy wymagające kremowej konsystencji, np. zupa ze
smażonych pomidorów z bazylią. Program zapewnia
zmiksowanie składników w celu uzyskania odpowiedniej
konsystencji oraz delikatne podgrzanie do odpowiedniej
temperatury. Program trwa 21 minut, a następnie zupa jest
gotowa do podania.
Zupa gęsta (11)
Program Zupa gęsta idealnie nadaje się do przepisów na
wiejskie zupy wymagające gęstej konsystencji. Ten program
zapewnia, że składniki są podgrzewane przez dłuższy czas,
dzięki czemu większe składniki są w pełni dogotowane.
Program trwa przez 28 minut, a następnie zupa jest gotowa do
podania. W przypadku zupy gęstej nie ma etapu miksowania,
jedynie podgrzewanie. W związku z tym zalecamy
poszatkowanie warzyw na małe kawałki i plasterki.. Jeśli po
ugotowaniu zupa jest zbyt gęsta, należy wybrać funkcję
miksowania w celu osiągnięcia pożądanej konsystencji.
Soki (12)
Ustawienie Soki w przyrządzie do przygotowania zupy idealnie
nadaje się do przygotowywania koktajli lub koktajli mlecznych
ze świeżych składników. Program trwa 2 minuty, a następnie
napój jest gotowy do podania. Podczas wykonywania
ustawienia Soki składniki nie są podgrzewane.
Uwaga: W przyrządzie do przygotowania zupy nie wolno
umieszczać kostek lodu.
Doskonałe miksowanie (13)
Jeśli chcesz uzyskać bardziej kremową konsystencję, możesz
mocnej zmiksować zupę. Ta funkcja działa bez dodatkowego
podgrzewania zupy.
Aby uzyskać dostęp do tej funkcji po ugotowaniu zupy, należy
wybrać funkcję miksowania za pomocą przycisku Mode (Tryb)
(15) i naciśnąć przycisk Wł./Wył. (16).
Dodawanie składników!
Jeśli po włączeniu programu Zupa kremowa lub Zupa gęsta
okaże się, że zapomniano dodać jednego ze składników lub że
należy dodać zioła czy przyprawy, to można to zrobić.
Wystarczy zdjąć pokrywę (3) i dodać składniki, a następnie
założyć pokrywę i kontynuować program.
Nie zdejmuj pokrywy podczas miksowania, aby zapobiec
rozpryskiwaniu, (patrz rozdział Ekran LED).
Nie należy korzystać z funkcji, aby dodać duże ilości warzyw
lub jakichkolwiek składników, które wymagają pełnego czasu
programu do prawidłowego zagotowania.
Anulowanie lub zmiana programów
Jeśli wybrany został nieprawidłowy program i użytkownik
nacisnął przycisk Wł./Wył. (16) lub jeśli chce anulować program,
wystarczy nacisnąć i przytrzymać przycisk Wł./Wył. przez 2
sekundy, ikony będą migać. Naciśnij przycisk Mode (Tryb) (15),
aby wybrać odpowiedni program, a następnie przycisk Wł./Wył.,
aby ponownie uruchomić urządzenie.
Ekran LED (14)
Przyrząd do przygotowania zupy wykorzystuje trzy różne
procesy, pozwalające przygotować świeże zupy i napoje:
podgrzewanie, stan spoczynku i miksowanie. Każdy z tych
procesów jest przedstawiony w czasie programu za pomocą
niewielkiej animacji na ekranie LED.
Podgrzewanie 11
Animacja podgrzewania uruchamia się, gdy przyrząd do
przygotowania zupy podgrzewa zawartość dzbanka.
Miksowanie 11
Animacja miksowania wyświetlana jest, gdy używane jest ostrze
do miksowania. Podczas przełączania z podgrzewania na
miksowanie przyrząd do przygotowania zupy wyda pojedynczy
sygnał dźwiękowy.
Nie należy zejmować pokrywy (3), gdy wykonywane jest
miksowanie.
}
FP501014MEE Rev2.qxp_Morphy Richards Instruction Book 10/08/2015 20:11 Page 59
Page 60

60
Stan spoczynku 11
Podczas wykonywania programów przyrząd do przygotowania
zupy może od czasu do czasu przejść w stan spoczynku i nie
będzie wyświetlać żadnej animacji. Timer na ekranie LED będzie
kontynuować odliczanie. Jest to normalne działanie.
Po zakończeniu programu przyrząd do przygotowania zupy
wyda dźwięk przez 60 sekund, a na ekranie wyświetli się
ikona „Zakończone”.
Zakończone 11
Po zakończeniu gotowania przyrząd do przygotowania zupy
pokaże tę samą animację jak w w stanie spoczynku, ale na
zegarze wyświetli się wartość “0”, a wszystkie cztery ikony na
panelu będą migać.
Co można smażyć w małej ilości tłuszczu?
Smażenie w małej ilości tłuszczu idealnie nadaje się do
podsmażania cebuli i boczku, dzięki czemu są bardziej miękkie,
zarumienione lub skarmelizowane za pomocą ciepła.
Ustawienie smażenia w małej ilości tłuszczu można również
wykorzystać do zrobienia grzanek do zupy.
Ze smażenia w małej ilości tłuszczu można korzystać tylko
przez 5-10 minut. Nie wolno tego robić przez dłużej niż 10
minut.
Nie wolno używać funkcji smażenia w małej ilości tłuszczu do
smażenia surowego mięsa, z wyjątkiem boczku i małych ilości
mięsa mielonego (do 100 g). Nie wolno używać urządzenia do
podgrzewania płynów, sosów, świeżych lub konserwowych
pomidorów, cukru, owoców oraz produktów skrobiowych i
posłodzonych.
Funkcja smażenia w małej ilości tłuszczu jest dostępna tylko
wtedy, gdy pokrywa (2) jest zdjęta z dzbanka (3). Funkcja
smażenia w małej ilości tłuszczu wyłącza się, gdy założona
zostanie pokrywa.
Atuty domowej zupy
Zupa domowa świetnie smakuje, niewiele kosztuje i jest
zdrowym i dodającym sił posiłkiem.
Gotowanie z wykorzystaniem podstawowych składników
Gotowanie z wykorzystaniem podstawowych składników jest
najlepszym sposobem przygotowywania zdrowych, odżywczych
potraw, które pokocha cała rodzina. Zapewnia ono pełną
kontrolę nad spożywanymi posiłkami, ponieważ obejmuje
gotowanie na bazie podstawowych składników i pomaga
uniknąć wszelkich substancji konserwujących, dodatków
smakowych oraz innych sztucznych dodatków, które występują
w przetwarzanej żywności.
Porcjowanie żywności
Porcjowanie żywności to doskonały pomysł, ponieważ
umożliwia przygotowanie porcji pełnowartościowej żywności i
zapakowanie jej w formie porcji jednoposiłkowych, które
następnie mogą być przechowywane w lodówce lub
zamrożone, zachowując w ten sposób wszystkie smaki i
składniki odżywcze, którymi można rozkoszować się po kilku
dniach.
Nie marnuj żywności!
W Wielkiej Brytanii marnujemy rocznie nawet 8,3 mln ton
żywności. Większość tej żywności mogłaby być spożyta. Bez
względu na to, czy jest to gotowany kurczak z niedzielnego
obiadu czy pomidor schowany z tyłu lodówki, zawsze można
stworzyć fantastyczny przepis na domową zupę z
wykorzystaniem resztek jedzenia, które normalnie może się
zmarnować.
Spożywanie zup
Nie ma nic lepszego niż domowa zupa, a w zależności od
przepisu można zapewnić organizmowi pełną gamę składników
odżywczych, w tym witaminy, minerały, węglowodany i błonnik.
Ale najważniejsze jest to, że domowa zupa jest po prostu
przepyszna!
Co sprawia, że ten przyrząd do
przygotowywania zup jest wyjątkowy?
Przygotowanie świeżej domowej zupy w zaciszu własnej kuchni
nigdy nie trwało tak krótko jak przy pomocy naszego przyrządu
do zup.
Gotowanie w jednym dzbanku
Funkcja smażenia w małej ilości tłuszczu pozwala podsmażyć
składniki przed gotowaniem zupy w tym samym dzbanku.
Prosty pomysł, ograniczający bałagan i ilość naczyń do mycia.
Smażenie w tym samym dzbanku co gotowanie daje lepsze
rezultaty, dzieki temu że wszystkie smaki zostają zachowywane.
Posiłek w mgnieniu oka!
Jedyne, co musisz zrobić, to przygotować składniki, przełożyć
je do przyrządu do przygotowania zupy i wybrać ustawienie
Zupa kremowa lub Zupa gęsta. Program zupy kremowej
oznacza zmiksowanie i łagodne podgrzewanie zupy przez 21
minut. Program zupy gęstej trwa tylko 28 minut, a następnie
można rozkoszować się pyszną potrawą!
Oszczędność miejsca
Wiemy, że w kuchni przestrzeń jest cenną rzeczą. Nasz
przyrząd do przygotowania zupy ma niewielkie rozmiary i prostą
budowę, dzięki czemu bez trudu zmieści się na kuchennym
blacie.
Bajecznie prosty w czyszczeniu
12
Przyrządu do przygotowania zupy nie można myć w zmywarce,
ale jego umycie jest bardzo łatwe. Po użyciu wystarczy umyć
obudowę silnika (8) i ząbkowane ostrze (9) ciepłą wodą i
wytrzeć gąbką. NIE ZANURZAJ w wodzie. Środek dzbanka
przyrządu do przygotowania zupy można również umyć ciepłą
wodą z płynem oraz gąbką. Jeśli zupa przypali się, przyrząd
należy pozostawić do odmoczenia, a następnie usunąć
zabrudzenia za pomocą gąbki. Przetrzeć urządzenie z zewnątrz
miękką, suchą szmatką, a następnie wysuszyć.
Określone rodzaje potraw mogą przywierać do podstawy z
grzałką. W takim przypadku należy nalać do przyrządu
gorącej wody z płynem i pozostawić do odmoczenia na 15
minut. Następnie przypalone pozostałości można łatwo
usunąć za pomocą szorstkiej gąbki. Nie stosuj metalowej
drucianej gąbki, ponieważ zarysuje ona powłokę urządzenia.
FP501014MEE Rev2.qxp_Morphy Richards Instruction Book 10/08/2015 20:11 Page 60
Page 61

61
WARNING: Wewnętrzna powierzchnia dzbanka posiada trwałą
powłokę zapobiegającą przywieraniu, która ułatwia
czyszczenie. Nie należy stosować żadnych metalowych
naczyń w celu mieszania lub usunięcia żywności z urządzenia.
Po umyciu wszystkie części należy dokładnie osuszyć.
OSTRZEŻENIE: NIE zanurzaj pokrywki ani dzbanka w wodzie,
ponieważ elementy te zawierają podzespoły elektryczne, które
mogą ulec uszkodzeniu na skutek kontaktu z wodą. Nie
dopuść do zamoczenia wodą styków elektrycznych. Osusz
dokładnie urządzenie przed użyciem.
Podczas zdejmowania i zakładania pokrywy (3) należy uważać,
aby nie porysować ostrzem ścianek dzbanka (4) i nie
uszkodzić powłoki zapobiegającej przywieraniu.
Pytania?
W przypadku jakichkolwiek pytań dotyczących obsługi
przyrządu do przygotowywania zup, zapoznaj się z poniższą
listą najczęściej zadawanych pytań. Jeśli potrzebujesz dalszej
pomocy, skontaktuj się z naszą infolinią: 0344 871 0944.
Czy można zdjąć pokrywę w połowie wykonywania programu?
Tak, aby dodać składniki i przyprawy, jeśli jest to wymagane.
Patrz rozdział „Dodawanie składników” na stronie 8, aby uzyskać
więcej informacji.
Czy przyrząd do przygotowania zupy można wykorzystać do
innych potraw niż zupy czy napoje?
Nie. 5 dostępnych programów jest przeznaczonych do robienia
doskonałych zup i napojów od podstaw. Należy postępować
zgodnie z przepisami i dostosowywać je do własnych
upodobań.
Czy mogę korzystać z surowego mięsa w przepisach na zupę
w moim przyrządzie do przygotowania zupy?
Oprócz boczku lub małych ilości mięsa mielonego (100 g), nie.
Najpierw należy ugotować mięso oddzielnie, a następnie
przełożyć je do przyrządu z dodatkowymi składnikami podanymi
w przepisie, ponieważ przyrząd ten jest przeznaczony tylko do
delikatnego podsmażenia boczku lub cebuli i gotowania zupy.
Nie należy korzystać z funkcji smażenia w małej ilości tłuszczu
do zarumieniania surowego mięsa, innego niż boczek lub mięso
mielone.
Jaka jest pojemność przyrządku do przygotowania zupy?
Jego pojemność wynosi 1.6 l. Upewnij się, że przyrząd do
przygotowania zupy nie jest wypełniony powyżej linii MAX,
w przeciwnym razie czujnik przepełnienia odetnie zasilanie
ząbkowanego ostrza (9), a na ekranie LED (14) wyświetli się
komunikat „E1”. Jeśli tak się stanie, , wystarczy usunąć niektóre ze
składników, tak aby linia MAX nie została przekroczona, i wytrzeć
czujnik przepełnienia (7) znajdujący się na pokrywie. Upewnij się, że
składniki (w tym płyny) przekraczają linię MIN, niespełnienie tego
warunku wpłynie negatywnie na funkcję miksowania.
Czy mogę zmienić czasy ustawień Zupa kremowa i Zupa
gęsta?
Nie. Czasy programów są stałe.
Czy mogę podgrzać zupę już ugotowaną lub podgrzać zupę
z puszki/kartonu?
Nie. Programy są ustawione w taki sposób, aby umożliwić
przygotowanie doskonałej zupy od podstaw. Zupa mogłaby się
przypalić, powodując uszkodzenie produktu.
Czy w przyrządzie do przygotowania zupy można robić zimne
zupy, np. gazpacho?
Tak, ale trzeba najpierw ugotować zupę przy użyciu ustawienia
Zupa kremowa lub Zupa gęsta. Następnie przed podaniem zupy
należy schłodzić ją lub wstawić do lodówki.
Co będzie, jeśli przyrząd do przygotowania zupy przestanie
działać?
Przyrząd do przygotowania zupy jest wyposażony w termostat
zabezpieczający, który odcina dopływ zasilania i uniemożliwia
działanie urządzenia, aby zapobiec przegrzaniu, jeśli produkt jest
używany w sposób ciągły przez 3 lub więcej cykli. Jeśli tak się
stanie, należy usunąć potrawę z dzbanka, poczekać 30 minut,
aby urządzenie ostygło, a następnie można dalej gotować zupę.
Jeśli funkcja miksowania jest używana w sposób ciągły dłużej
niż 20 sekund, układ zabezpieczający odłączy dopływ zasilania,
aby zabezpieczyć przed przegrzaniem urządzenia. W takim
przypadku przed ponownym użyciem funkcji miksowania należy
odczekać 10 sekund.
Co zrobić w przypadku przypalenia się żywności do podstawy
przyrządu? 13
Skrobia i cukry, które występują w niektórych składnikach, mogą
powodować nieznaczne przypalanie potraw, jeśli znajdą się
bezpośrednio na spodzie dzbanka (4). Aby temu zapobiec,
należy dodać pół filiżanki wody lub bulionu do przyrządu do
zupy przed umieszczeniem w nim innych stałych składników.
Następnie należy dolać pozostałą ilość wody lub rosołu, zgodnie
z przepisem.
Co się stanie, jeśli funkcja smażenia w małej ilości tłuszczu
przestanie działać?
Funkcja smażenia w małej ilości tłuszczu działa tylko wtedy, gdy
zdjęta jest pokrywa (patrz strona 6). Naciśnij przycisk smażenia
w małej ilości tłuszczu (17), wskaźnik tej funkcji (16) zaświeci się
na zielono.
Jeśli wskaźnik funkcji smażenia w małej ilości tłuszczu na
uchwycie dzbanka (4) pozostaje czerwony, należy nacisnąć tłok
w górnej części uchwytu dzbanka, aby ponownie włączyć tę
funkcję. Tłok ten powinien pozostać w pozycji “do góry”, gdy
zdjęta jest pokrywa (2).
Kontakt
Infolinia
W przypadku problemów z urządzeniem prosimy o kontakt
z naszą infolinią. Będziemy w stanie zapewnić lepszą pomoc i
doradztwo niż sklep, w którym ten produkt został zakupiony.
Należy przygotować nazwę produktu, numer modelu oraz numer
seryjny — podanie tych danych podczas rozmowy pomoże nam
szybciej rozwiązać problem.
Porozmawiaj z nami
W przypadku jakichkolwiek pytań lub komentarzy lub w celu
uzyskania wspaniałych porad lub przepisów, umożliwiających
pełne wykorzystanie urządzenia, zapraszamy do kontaktu online:
Blog: www.morphyrichards.co.uk/blog
Facebook: www.facebook.com/morphyrichardsuk
Twitter: @loveyourmorphy
Strona WWW: www.morphyrichards.com
}
FP501014MEE Rev2.qxp_Morphy Richards Instruction Book 10/08/2015 20:11 Page 61
Page 62

62
Przepisy
Opracowaliśmy 15 przepisów do użycia w nowym przyrządzie do przygotowania zupy, od
bogatych w składniki zup po orzeźwiające koktajle.
Ustawienie Zupa gęsta (11) pozwala tylko gotować składniki, bez miksowania. Jeśli po
ugotowaniu zupa jest zbyt gęsta, można użyć ustawienia miksowania (13), aby posiekać niektóre
kawałki.
Aby uruchomić tę funkcję, trzeba odłączyć przyrząd od źródła zasilania, a następnie ponownie
podłączyć. Dzięki temu urządzenie zostanie zresetowane, umożliwiając wybranie ustawienia
miksowania za pomocą przycisku Mode (Tryb) (15). Naciśnij i przytrzymaj przycisk Wł./Wył. (16),
aby zmiksować zawartość dzbanka.
Przepisy zostały opracowane w taki sposób, aby podane w nich ilości mieściły się w
minimalnych i maksymalnych poziomach roboczych przyrządu do przygotowania zupy
(1,3 - 1,6 l).
FP501014MEE Rev2.qxp_Morphy Richards Instruction Book 10/08/2015 20:12 Page 62
Page 63

63
Przepisy wykorzystujące smażenie w małej
ilości tłuszczu
Zupa z jagnięciny i bulion z soczewicą
Czas przygotowania: 20 minut
Czas gotowania: 33 minut
Ustawienie: Zupa gęsta
Porcja dla 4 osób
Składniki:
• 2 łyżki oliwy z oliwek
• 75 g surowej mielonej jagnięciny
• 1 średnia cebula, (około 100 g) drobno posiekana
• 2 ząbki czosnku, wyciśniętego
• 1 mała marchewka (około 50 g), drobno posiekana
• 1 ziemniak, (około 115 g) drobno posiekany
• 1 średnia rzepa (około 100 g) drobno posiekana
• 1 łyżka stołowa zwykłej mąki
• 1 (400 g) puszka soczewicy, osuszonej
• ½ łyżeczki świeżego rozmarynu, posiekanego
• 2 listki laurowe
• 1 łyżeczka sosu worcestershire
• 1 łyżka natki pietruszki, posiekanej
• 900 ml bulionu z jagnięciny, z 2 kostek bulionu
Sposób przyrządzenia:
1 Naciśnij przycisk smażenia w małej ilości tłuszczu i podgrzej oliwę
z oliwek w dzbanku przez 1 minutę. Podsmaż mielone mięso
z jagnięciny przez 2-3 minuty, często mieszając drewnianą łyżką,
aż równomiernie się zarumieni.
2 Dodaj cebulę, czosnek, marchew, ziemniaki i rzepę do dzbanka
i smaż przez 4 minuty, w razie konieczności mieszając. Wyłącz
funkcję smażenia w małej ilości tłuszczu, naciskając przycisk tej
funkcji.
3 Wmieszaj mąkę, a następnie dodaj resztę składników i bulion do
maksymalnego poziomu. Dopraw solą i zmielonym pieprzem
i mieszaj drewnianą łyżką lub łopatką. Załóż pokrywę na dzbanek
i wybierz ustawienie Zupa gęsta.
4 Po zakończeniu dopraw do smaku i usuń liście laurowe przed
podaniem.
Rosół z grzybami
Czas przygotowania: 20 minut
Czas gotowania: 30 minut
Ustawienie: Zupa kremowa
Porcja dla 4 osób
Składniki:
• 2 łyżki oliwy z oliwek
• 1 cebula (około 100 g), drobno posiekana
• 240 g drobno posiekanych grzybów
• 1 ząbek czosnku, wyciśnięty
• 100 g ugotowanego kurczaka, posiekanego
• 1 ziemniak (około 115 g), obrany i drobno pokrojony w kostkę
• 10 g poszatkowanej świeżej pietruszki
• Sól i pieprz
• 1 l bulionu drobiowego
Przybranie:
• trochę śmietany kremówki
Sposób przyrządzenia:
1 Naciśnij przycisk smażenia w małej ilości tłuszczu. Rozgrzej olej w
dzbanku przez 1 minutę, a następnie dodaj cebulę. Smaż, cały
czas mieszając drewnianą łyżką lub łopatką przez 2 minuty, aż
cebula będzie miękka, ale nie brązowa.
1 Dodaj grzyby i czosnek i smaż przez kolejne kilka minut, aż grzyby
staną się miękkie. Wyłącz funkcję smażenia w małej ilości
tłuszczu, naciskając przycisk tej funkcji.
3 Dodaj kurczaka, ziemniaki, przyprawy i pietruszkę i bulion do
maksymalnego poziomu na dzbanku.
4 Załóż pokrywę i wybierz ustawienie Zupa kremowa.
5 Po zakończeniu gotowania dopraw do smaku i podawaj z kleksem
śmietany (w razie potrzeby).
• Przygotowanie świeżego rosołu drobiowego. Wystarczy umieścić
tuszę kurczaka w średnim garnku, zalać wodą, dodać kostkę
bulionu warzywnego, 5 ziarenek pieprzu i liść laurowy. Doprowadź
do wrzenia, a następnie gotuj na wolnym ogniu przez 1 godzinę.
Przecedź przez drobne sito lub gazę.
}
FP501014MEE Rev2.qxp_Morphy Richards Instruction Book 10/08/2015 20:12 Page 63
Page 64

64
Przepisy na zupy
Zupa ze smażonych pomidorów z bazylią
Czas przygotowania: 30 minut
Czas gotowania: 21 minut
Ustawienie: Zupa kremowa
Danie dla (osób): 4
Składniki:
• 8 bardzo dojrzałych pomidorów (około 640 g), przeciętych na pół
• 2 czerwone cebule (ok. 215 g), pokroić na 6 kawałków
• 4 ząbki czosnku
• 1 łyżka oliwy z oliwek
• 1 łyżka octu balsamicznego
• Sól i zmielony czarny pieprz
• 750 ml bulionu drobiowego z kostki
• 2 łyżeczki przecieru pomidorowego
• 1 łyżeczka brązowego cukru
• 10 g świeżych liści bazylii
Sposób przyrządzenia:
1 Nagrzej piekarnik do temperatury 200 °C lub ustaw piekarnik
gazowy w pozycji 6.
2 Ułóż pomidory na blasze do pieczenia skórką do góry, razem
z czerwoną cebulą i czosnkiem. Skrop całość oliwą, octem
balsamicznym oraz przypraw solą i pieprzem. Piecz przez
20 minut, aż pomidory zmiękną i lekko się spieką.
3 Ostrożnie włóż warzywa do dzbanka z bulionem drobiowym,
dodaj koncentrat pomidorowy, brązowy cukier i świeżą bazylię.
4 Załóż pokrywę i wybierz ustawienie Zupa kremowa. Gdy zupa
będzie gotowa, dopraw do smaku i podaj.
Bardzo szybka zupa grochowa z szynką i
miętą
Czas przygotowania: 5 minut
Czas gotowania: 21 minut
Ustawienie: Zupa kremowa
Porcja dla 4 osób
Składniki:
• 600 g mrożonego grochu
• 20 g świeżych liści mięty (tyko liście)
• 225 g dobrej jakości szynki gotowanej, posiekanej/rozdrobnionej
• 1 ziemniak(około 100 g), drobno pokrojony w kostkę
• 800 ml gorącego bulionu z szynki, z kostki
• Sól i zmielony czarny pieprz
• 2 łyżki oliwy z oliwek
• 3 zaokrąglone łyżki, crème fraiche
Sposób przyrządzenia:
1 Umieść groch, miętę, szynkę, ziemniaka i gorący bulion
w dzbanku urządzenia. Załóż pokrywę na dzbanek i wybierz
ustawienie Zupa kremowa.
2 Gdy zupa będzie gotowa, dopraw odrobiną soli i zmielonego
pieprzu, dodaj oliwy z oliwek i creme fraiche, a następnie wybierz
ustawienie miksowania. Naciśnij i przytrzymaj przycisk Wł./Wył,
aby zmiksować zupę przez 20 sekund przed podaniem.
Podstawowa zupa warzywna
Czas przygotowania: 5 minut
Czas gotowania: 21 minut
Ustawienie: Zupa kremowa
Danie dla (osób): 4
Składniki:
• 700 g różnych warzyw, pokrojonych w kostkę (idealnie nadają się
worki mieszanych warzyw z supermarketu)
• Woda (do poziomu MAX)
• 2 kostki bulionu drobiowego lub warzywnego
• sól i zmielony czarny pieprz
Sposób przyrządzenia:
1 Aby przygotować szybką kremową zupę, napełnij przyrząd do zup
wybranymi posiekanymi warzywami powyżej poziomu MIN
(idealnie do tego nadają się gotowe mieszanki warzywne).
2 Dodaj kostki bulionu drobiowego lub warzywnego i wypełnij
dzbanek wodą do poziomu max.
3 Załóż pokrywę na dzbanek i wybierz ustawienie Zupa kremowa.
Gdy zupa będzie gotowa, dopraw do smaku i podaj.
Przepisy na soki
Koktajl ananasowo-truskawkowy
Czas przygotowania: 5 minut
Czas miksowania: 2 minuty
Ustawienie: Sok
Porcje: 1,1 l
Składniki:
• 300 g świeżych truskawek
• 250 g świeżego ananasa
• 450 g jogurtu truskawkowego o niskiej zawartości tłuszczu
• 150 ml częściowo odtłuszczonego mleka
• 1 kulka (ok. 35 g) lodów waniliowych
Sposób przyrządzenia:
1 Przygotuj truskawki, przecinając duże na dwie części. Pokrój
ananasa na kawałki.
2 Włóż składniki do dzbanka i dokładnie wymieszaj.
3 Załóż pokrywę na dzbanek i wybierz ustawienie Sok. Odczekaj 2
minuty, aż urządzenie zakończy pracę.
4 Podawaj od razu.
FP501014MEE Rev2.qxp_Morphy Richards Instruction Book 10/08/2015 20:12 Page 64
Page 65

65
Dożywotnia gwarancja na ostrze
Gwarantujemy, że „ząbkowane ostrze” będzie dożywotnio wolne
od wszelkich wad materiałowych i produkcyjnych. Ta gwarancja
obejmuje tylko oryginalnego nabywcę i nie podlega
przeniesieniu lub przypisaniu na inne strony trzecie. Ta
gwarancja jest dostępna dla klientów, którzy używają
„ząbkowanych ostrzy” wyłącznie do niekomercyjnych
zastosowań domowych. Ta gwarancja nie obejmuje uszkodzeń
spowodowanych wypadkiem, nieprawidłową eksploatacją lub
użytkowaniem w sposób niezgodny z zaleceniami zawartymi w
instrukcji obsługi. Gwarancja nie obejmuje również uszkodzeń
spowodowanych nieprawidłową konserwacją lub czyszczeniem
produktu, zgodnie z zaleceniami zawartymi w instrukcji obsługi.
DWULETNIA GWARANCJA
Niniejsze urządzenie jest objęte dwuletnią gwarancją,
upoważniającą do naprawy lub wymiany.
Zachowaj paragon ze sklepu jako dowód zakupu. Aby móc
skorzystaç z niego w przyszłości, przymocuj swój paragon do
tylnej okładki tej instrukcji za pomocą zszywacza.
Jeśli urządzenie okaże się wadliwe, prosimy podaç następujące
informacje. Informacje umieszczone poniżej znajdują się na
podstawie obudowy urządzenia.
Model
Numer seryjny
Przed opuszczeniem fabryki wszystkie produkty Morphy
Richards są indywidualnie testowane. Jeżeli urządzenie okaże
się wadliwe, należy je zwróciç do punktu sprzedaży w ciągu 28
dni od daty zakupu, w celu wymiany.
Jeśli urządzenie okaże się wadliwe po 28 dniach, lecz przed
upływem 24 miesięcy od daty zakupu, należy skontaktowaç się
z lokalnym dystrybutorem, podając model i numer seryjny
urządzenia, lub napisaç do lokalnego dystrybutora, wysyłając
list na podany adres.
Zostaniesz poproszony o dostarczenie, na poniższy adres,
urządzenia (w odpowiednim opakowaniu zabezpieczającym)
wraz z kopią dowodu zakupu.
Jeśli powód wystąpienia wady urządzenia jest inny niż podane
poniżej (1-9), zostanie ono naprawione lub wymienione oraz
odesłane w ciągu 7 dni roboczych od daty otrzymania.
Jeśli z jakiegoś powodu urządzenie zostanie wymienione w
ciągu 2 lat gwarancji, gwarancja nowego urządzenia będzie
liczona od momentu nabycia oryginalnego produktu. Dlatego
też należy zachowaç oryginalny paragon lub fakturę z
umieszczoną datą zakupu urządzenia.
Aby dwuletnia gwarancja obowiązywała, urządzenie musi byç
użytkowane zgodnie z instrukcją eksploatacji wydaną przez
producenta. Na przykład niektóre urządzenia muszą byç
regularnie odkamieniane, a filtry należy utrzymywaç w czystości
według zaleceƒ producenta.
Morphy Richards lub lokalny dystrybutor nie dokona naprawy
ani wymiany urządzenia w ramach gwarancji, jeśli:
1 Wada została spowodowana lub jest związana z przypadkową,
niewłaściwą, niedbałą lub niezgodną z zaleceniami producenta
eksploatacją urządzenia albo jest wynikiem skoków napięcia lub
niewłaściwego transportu.
2 Urządzenie zostało podłączone do źródła zasilania o innym
napięciu niż oznaczono na urządzeniu.
3 Dokonano prób naprawy urządzenia przez osoby nienależące do
personelu serwisowego firmy Morphy Richards (lub
autoryzowanego sprzedawcy urządzenia).
4 Urządzenie było przedmiotem wypożyczania lub było użytkowane
w celach innych niż przewidziane w gospodarstwie domowym.
5 Urządzenie pochodzi z wtórnego rynku.
6 Firma Morphy Richards lub lokalny dystrybutor nie wykonuje, w
ramach niniejszej gwarancji, żadnych czynności serwisowych.
7 Gwarancja nie obejmuje materiałów eksploatacyjnych, np.
worków, filtrów czy szklanych karafek.
8 Baterie oraz szkody powstałe w wyniku ich wycieku nie podlegają
gwarancji.
9 Baterie oraz szkody powstałe w wyniku ich wycieku nie podlegają
gwarancji.
Niniejsza gwarancja nie nadaje żadnych praw innych niż te
wyraźnie określone powyżej oraz nie pokrywa roszczeƒ
związanych ze stratami lub uszkodzeniami wynikającymi z
eksploatacji urządzenia. Niniejsza gwarancja stanowi
dodatkową korzyśç i nie narusza praw konsumenckich
użytkownika.
}
FP501014MEE Rev2.qxp_Morphy Richards Instruction Book 10/08/2015 20:12 Page 65
Page 66

66
Ochrana zdraví a bezpečnost
Použití jakéhokoliv elektrického spotřebiče vyžaduje dodržování následujících bezpečnostních opatření.
Před použitím tohoto spotřebiče si pozorně přečtěte tyto pokyny.
• Spotřebiče mohou být používány osobami se sníženými
fyzickými, smyslovými či mentálními schopnostmi nebo
nedostatečnými zkušenostmi a znalostmi za předpokladu, že
mají zajištěný dohled nebo byly poučeny o bezpečném
používání spotřebiče a chápou související rizika.
• Tento spotřebič nesmí používat děti. Uchovávejte spotřebič
včetně kabelu mimo dosah dětí. Děti si nesmí se
spotřebičem hrát.
• Před sestavováním, rozebíráním, čištěním nebo ponecháním
spotřebiče bez dozoru jej vždy odpojte od napájení.
• Tento spotřebič je určen k používání v domácnostech a
podobných situacích, např.: na chalupách, v hotelech, motelech
a dalších obytných prostředích včetně ubytovacích zařízení.
Není vhodný k používání v kuchyňkách pro zaměstnance
v obchodech, kancelářích a jiných pracovních prostředích.
• Pokud se poškodí napájecí kabel, musí se nahradit speciální
sestavou kabelu dodanou výrobcem nebo servisním
zástupcem, aby se předešlo riziku.
• VAROVÁNÍ: Mixovací čepele jsou velmi ostré. Při používání a
čištění buďte opatrní. Informace o péči a čištění naleznete v
části Péče a čištění.
• Tento spotřebič není určen k ovládání prostřednictvím externího
časovače nebo samostatného dálkového ovládacího systému.
∂
FP501014MEE Rev2.qxp_Morphy Richards Instruction Book 10/08/2015 20:12 Page 66
Page 67

67
Dále nabízíme následující bezpečnostní doporučení.
Umístění
• Spotřebič vždy umisťujte dále od okraje pracovní plochy.
• Ujistěte se, že spotřebič je používán na pevném, rovném povrchu.
• Nepoužívejte spotřebič venku nebo v blízkosti vody.
Síťový kabel
• Síťový kabel by měl dosáhnout od zásuvky k podstavci
spotřebiče, aniž by docházelo k namáhání přípojek.
• Nenechávejte síťový kabel viset přes okraj pracovní plochy, kde by
na něj mohly dosáhnout děti.
• Nenechávejte kabel vést otevřeným prostorem, např. mezi zásuvkou
u země a stolem.
• Nenechávejte kabel procházet přes sporák, toustovač nebo jiná
horká místa, která by ho mohla poškodit.
Osobní bezpečnost
• VAROVÁNÍ: Neponořujte kabel, zástrčku nebo spotřebič do vody
ani jiných tekutin, abyste zabránili požáru, úrazu elektrickým
proudem a zranění.
• VAROVÁNÍ: Vyhýbejte se kontaktu s pohybujícími se součástmi.
• Při přemisťování spotřebiče s horkým obsahem je nutné dávat
velký pozor.
• Nepoužívejte přístroj s mokrýma nebo vlhkýma rukama.
Léčba opařenin
• Zasažené místo ihned vložte pod tekoucí studenou vodu.
Nezdržujte se svlékáním oděvu, ihned vyhledejte lékařskou
pomoc.
Další bezpečnostní pokyny
• Pokud je síťový kabel spotřebiče poškozený, spotřebič
nepoužívejte. Zavolejte na linku podpory Morphy Richards a
požádejte o radu.
• Používání příslušenství, které není doporučeno výrobcem, může
přístroj poškodit.
• Nepokládejte spotřebič na zdroje tepla, například plynové nebo
elektrické sporáky, kamna nebo vařiče, ani do jejich blízkosti.
• Chraňte spotřebič a kabel před teplem, přímým slunečním
světlem, vlhkostí, ostrými hranami apod.
• Při použití přístroje se před zapnutím ujistěte, že má víko na svém
místě.
• Víko nesnímejte, dokud se čepel nezastaví.
• Po jednom provozním cyklu musíte nechat spotřebič zcela
vychladnout a potom ho umýt, abyste zabránili připálení.
• Nepoužívejte spotřebič k nepřetržité přípravě polévky.
• Pokud vléváte do polévkovače horkou tekutinu, dávejte pozor,
protože v důsledku náhlého odpaření by mohla vychrlit ze
spotřebiče.
Požadavky na napájení
Zkontrolujte, zda napětí na výkonovém štítku spotřebiče odpovídá
síťovému napětí v domácnosti, které musí být střídavé.
VAROVÁNÍ: TENTO SPOTŘEBIČ MUSÍ BÝT UZEMNĚNÝ.
Když je třeba vyměnit síťovou pojistku, použijte 13A pojistku
BS1362.
∂
FP501014MEE Rev2.qxp_Morphy Richards Instruction Book 10/08/2015 20:12 Page 67
Page 68

68
Gratulujeme vám k volbě nového výrobníku polévky Morphy Richards vybaveného technologií čepele Serrator.
Čepel Serrator s revolučním, jedinečným designem je navržena tak, aby si zachovala prvotřídní ostrost delší
dobu.
Jak čepel Serrator funguje?
Čepel Serrator byla speciálně navržena našimi vlastními designéry tak, aby předčila standardní čepele s
rovným ostřím. Skvělé ozubení bylo pečlivě zvoleno a odzkoušeno tak, aby vám poskytlo prvotřídní výkon a
nám důvěru, že čepel Serrator bude po dlouhé roky uspokojovat vaše požadavky.
Naše nové, precizní čepele Serrator vydrží ostré až 12x déle než standardní čepele.
*** Nezávisle testováno organizací CATRA s využitím mezinárodního standardního systému pro zkoušky řezáním
podle normy ISO 8442.5 ve srovnání se standardní čepelí s rovným ostřím.
Nová
(pouze některé modely)
VYDRŽÍ OSTRÁ
12x DÉLE
NEŽ STANDARDNÍ
ČEPELE ***
epel Serrator
Standardní čepel
Ostrost
Životnost čepele
FP501014MEE Rev2.qxp_Morphy Richards Instruction Book 10/08/2015 20:12 Page 68
Page 69

69
Úvod
Restovací výrobník polévky od společnosti Morphy Richards
nabízí rychlé a snadné používání. Chcete-li připravit polévku
překypující čerstvou chutí, zvolte nastavení Sauté (Restování)
a potom přidejte přísady k orestování – cibuli, proužky slaniny,
česnek nebo zázvor – tím vytvoříte základ své lahodné polévky.
Potom do velké konvice o objemu 1,6 l jednoduše přidejte
zbývající přísady, zavřete víko a zvolte Smooth (Jemná) nebo
Chunky (Hutná).
Jednoduchý ovládací panel je vybaven odpočítávacím displejem
LED, který ukazuje přesný čas do konce přípravy polévky, takže
se můžete pohodlně usadit a počkat, než za vás výrobník
polévky odvede namáhavou práci.
Program Smooth (Jemná) namíchá a uvaří jemnou polévku za
pouhých 21 minut, zatímco program Chunky (Hutná) připraví
výživnou polévku s hustější konzistencí za 28 minut. Pokud je již
uvařená polévka trochu hutnější, než máte rádi, stačí stisknout
tlačítko Blend (Mixování) a prvotřídní mixovací čepele Serrator
vám namixují polévku s konzistencí přesně podle vaší chuti.
Restovací výrobník polévky má také funkci pozastavení, která
vám umožní v jakékoliv fázi vaření přidat koření, zakysanou
smetanu, bylinky nebo smetanu. Stačí zvednout víko
restovacího výrobníku polévky – tím se přeruší cyklus programu
a zastaví se otáčení čepele. Přidejte vlastní koření a/nebo další
přísady. Vraťte víko zpět na místo a časovač se restartuje se
stejným zbývajícím časem programu.
Nezapomeňte také navštívit web www.morphyrichards.co.uk
a-registrovat si dvouletou záruku na svůj výrobek.
Obsah
Ochrana zdraví a bezpečnost 66
Čepel Serrator 68
Úvod 69
Vlastnosti 69
Před prvním použitím 69
Jak používat výrobník polévky 69
Používání výrobníku polévky 70
Displej LED 70
Co restovat 71
Výhody domácí polévky 71
Čím je váš výrobník polévky tak speciální? 71
Jednoduché čištění 71
Nějaké dotazy? 89
Kontaktujte nás 89
Recepty 90
Recepty - restování 91
Recepty - polévka 93
Recepty - přílohy 95
Recepty - šťáva 95
Záruka 97
Vlastnosti
(1) Ovládací panel
(2) Držadlo víka
(3) Víko
(4) Konvice
(5) Držadlo konvice
(6) Napájecí zásuvka
(7) Snímač přeplnění
(8) Kryt motoru
(9) Čepel Serrator
(10) Indikátor funkce Smooth (Jemná)
(11) Indikátor funkce Chunky (Hutná)
(12) Indikátor funkce Juice (Šťáva)
(13) Indikátor funkce Blend (Mixování)
(14) Displej LED
(15) Tlačítko režimu
(16) Tlačítko Select On/Off (Volicí spínač)
(17) Indikátor funkce Sauté (Restování)
(18) Tlačítko Sauté (Restování)
Před prvním použitím
Před použitím odstraňte veškerý obalový materiál a kartónové
výplně.
Je důležité, abyste restovací výrobník polévky vyčistili před
prvním použitím nebo v případě, že se delší dobu nepoužíval.
Další informace naleznete v kapitole „Péče a čištění“.
Při prvním použití restovacího výrobníku polévky možná
zaznamenáte, že z víka vychází trochu kouře/páry; jedná se
o normální jev způsobený pouze tukem, který byl použit na
některých částech spotřebiče během výroby. Po několika
použitích ustane.
Jak používat výrobník polévky
1 Sejměte víko (3) a dejte pozor, abyste se nedotkli čepele Serrator
(9). VAROVÁNÍ: Ostré čepele
2 Zapojte výrobník polévky do síťové zásuvky. Indikátor funkce
Sauté (Restování) (17) se rozsvítí červeně.
3 Vložte do konvice (4) olej nebo máslo. Pokud restujete na másle,
doporučujeme přidat trochu oleje, aby se zamezilo připalování
másla.
4 Stiskněte tlačítko Sauté (Restování) (18) a indikátor funkce Sauté
(Restování) změní barvu na zelenou. Konvice se začne ohřívat.
5 Po jedné minutě přidejte do konvice přísady pro restování.
Míchání dřevěnou lopatkou pomůže dosáhnout vyrovnanějšího
restování a zabránit přilnutí nebo připečení. Nevracejte víko na
své místo.
6 Až budete hotovi, znovu stiskněte tlačítko Sauté (Restování) a
indikátor funkce Sauté (Restování) změní barvu na červenou.
Přidejte do konvice zbývající přísady.
7 Uzavřete konvici víkem a ujistěte se, že víko pevně drží na místě.
Ozve se pípnutí a ikony budou postupně blikat.
8 Tlačítkem režimu (15) zvolte program (viz „Používání výrobníku
polévky“). Rozsvítí se příslušná ikona.
9 Stisknutím tlačítka Select On/Off (Volicí spínač) (16) spusťte
výrobník polévky. Výrobník polévky pípne a zahájí vaření. Zobrazí
se délka vaření a spustí se odpočet.
∂
FP501014MEE Rev2.qxp_Morphy Richards Instruction Book 10/08/2015 20:12 Page 69
Page 70

70
10 Po skončení bude výrobník polévky 60 sekund pípat a všechny
čtyři ikony budou blikat. Odpojte spotřebič od sítě, sejměte víko a
nalijte čerstvou polévku do mísy.
VAROVÁNÍ
PŘI SNÍMÁNÍ A NASAZOVÁNÍ VÍKA (3) DÁVEJTE POZOR,
ABYSTE ČEPELÍ NEPOŠKRÁBALI BOČNÍ STRANU KONVICE
(4) A NEPOŠKODILI TEFLONOVÝ POVLAK.
Používání výrobníku polévky
Výrobník polévky má 5 programů.
Zvolte požadovaný program:
Restování... (17)
Funkce restování ohřívá konvici na vaření, aby bylo možné
orestovat například cibuli nebo plátky slaniny, než budou do
polévky přidány zbývající přísady. Jednoduše sejměte víko,
přidejte olej, stiskněte tlačítko Sauté (Restování), nechte konvici
minutu ohřívat, přidejte přísady a míchejte. Funkce Sauté
(Restování) je k dipozici pouze v případě, že z konvice (3) bylo
sejmuto víko (2). Po nasazení víka se funkce Sauté (Restování)
vypne. Poznámka: Nepoužívejte funkci Sauté (Restování) déle
než 10 minut.
Nejlépe jemná... (10)
Program jemné polévky je ideální pro recepty na lahodnou
polévku, která má mít jemnou konzistenci, například polévka
z pečených rajčat a bazalky. Tento program zaručuje, že přísady
budou smíchány se správnou konzistencí a opatrně uvařeny při
správné teplotě. Program trvá 21 minut a ihned po skončení
bude polévka připravena k podávání a konzumaci!
Do hutna! (11)
Program hutné polévky je ideální pro recepty na selskou
polévku vyžadující hutnější konzistenci. Tento program zaručuje,
že přísady budou ohřívány déle, aby se větší kousky důkladně
provařily. Program trvá 28 minut a ihned po skončení bude
polévka připravena k podávání a konzumaci! Hutná polévka se
nemixuje, pouze se vaří. Proto se doporučuje nakrájet veškerou
zeleninu na kostičky. Pokud je polévka po uvaření trochu moc
hutná, zvolte funkci mixování, abyste dosáhli požadované
konzistence.
Štáva! (12)
Nastavení šťávy na výrobníku polévky je ideální pro přípravu
ovocných nebo mléčných koktejlů z čerstvých přísad. Tento
program trvá 2 minuty a potom je nápoj připraven k podávání.
Nastavení šťávy neohřívá přísady.
Poznámka: Nevkládejte do výrobníku polévky kostky ledu.
Dokonalá směs! (13)
Nastavení směsi umožňuje dále mixovat polévku k dosažení
požadované konzistence podle potřeby. Tato funkce pracuje
bez dalšího ohřívání polévky.
Chcete-li zpřístupnit tuto funkci po vaření, tlačítkem režimu (15)
zvolte funkci Blend (Mixování) a podržením tlačítka Select
On/Off (Volicí spínač) (16) spusťte mixování.
Přidat!
Jestliže jste spustili program na přípravu polévky Smooth
(Jemná) nebo Chunky (Hutná) a potom jste si uvědomili, že jste
zapomněli vložit nějakou přísadu, nebo chcete přidat bylinky,
koření či další dochucovací prostředky, můžete to napravit.
Jednoduše sejměte víko (3), přidejte přísady, potom zavřete
víko a pokračujte v programu.
Během mixování nesnímejte víko, aby nedošlo k rozstříknutí
(viz část věnovanou displeji LED).
Tuto funkci nepoužívejte k přidávání velkého množství zeleniny
nebo jakýchkoliv přísad, které budou ke správnému uvaření
vyžadovat délku celého programu.
Zrušení nebo změna programu
Pokud jste zvolili nesprávný program a stiskli tlačítko Select
On/Off (Volicí spínač) (16), nebo chcete zrušit program,
jednoduše stiskněte tlačítko Select On/Off (Volicí spínač) a
podržte ho 2 sekundy; ikony budou blikat. Tlačítkem režimu (15)
to vyberte správný program a restartujte ho stisknutím tlačítka
Select On/Off (Volicí spínač).
Displej LED (14)
Výrobník polévky využívá k přípravě čerstvých polévek a nápojů
tři procesy: ohřev, vyčkávání a mixování. Každý z nich je během
programu signalizován malou animací na displeji LED.
Ohřev 11
Pohyblivá animace ohřevu se zobrazuje tehdy, když výrobník
polévky ohřívá obsah konvice.
Mixování 11
Animace mixování se zobrazuje během používání mixovací
čepele. Při přechodu od ohřevu k mixování se z výrobníku
polévky ozve jedno pípnutí.
Během mixování nesnímejte víko (3).
Vyčkávání 11
V průběhu programů bude výrobník polévky občas „vyčkávat“;
během vyčkávání se nebude zobrazovat žádná animace.
Časovač na displeji LED bude pokračovat v odpočítávání.
Takovéto chování je normální.
Jakmile je proces dokončen, výrobník polévky bude 60
sekund pípat a na obrazovce se zobrazí ikona „dokončeno“.
Dokončeno 11
Po dokončení bude výrobník polévky zobrazovat stejnou
animaci jako při vyčkávání, ale časovač bude ukazovat hodnotu
„0“ a všechny čtyři ikony na panelu budou blikat.
FP501014MEE Rev2.qxp_Morphy Richards Instruction Book 10/08/2015 20:12 Page 70
Page 71

71
Co restovat?
Ideálními potravinami k restování jsou cibule nebo plátky
slaniny, které působením tepla změknou, zhnědnou nebo
karamelizují. Funkci restování můžete použít také k přípravě
osmažených kostiček do polévky.
Restování by se mělo používat pouze po dobu 5-10 minut.
Nemělo by se používat déle než 10 minut.
Funkci restování nepoužívejte na syrové maso vyjma plátků
slaniny a malých množství mletého masa (do 100 g).
Nepoužívejte ji k ohřívání tekutin, omáček, čerstvých nebo
konzervovaných rajčat, cukru, ovoce, ani cukernatých nebo
škrobovitých potravin.
Funkce Sauté (Restování) je k dipozici pouze v případě, že
konvice (3) není zakryta víkem (2). Po nasazení víka se funkce
Sauté (Restování) vypne.
Výhody domácí polévky
Domácí polévka má výbornou chuť, je velmi levná a patří mezi
zdravá a výživná jídla.
Narychlo!
Vaření narychlo je nejlepším způsobem přípravy prospěšného
jídla, které miluje celá rodina. Poskytuje úplnou kontrolu nad
potravinami, které jíte, protože vaření je založeno na používání
základních přísad, pomáhá vám vyhnout se všem
konzervantům, dochucovadlům nebo jiným přísadám
v potravinových polotovarech.
Navařte si do zásoby!
Vaření do zásoby je velmi výhodné, protože si kvalitní pokrm
připravíte pouze jednou, pak jej zabalíte do potravinových
balíčků, které lze zchladit nebo zmrazit a zachovat tak veškerou
chuť a živiny, kterých si potom můžete užívat celý týden.
Hlavně neplýtvat!
Ve Velké Británii se každoročně vyplýtvá 8,3 miliónů tun
potravin, většinu z nich by však bylo možné sníst. Vždy si
můžete připravit fantastickou domácí polévku ze zbytků v
kuchyni, které byste normálně vyhodili, ať se jedná o pečené
kuře od nedělního oběda, nebo o osamělé rajče zastrčené
vzadu v ledničce.
Živiny v polévce
Není nad domácí polévku, která může v závislosti na vybraném
receptu může nabídnout celou řadu živin, včetně vitamínů,
minerálů, uhlohydrátů a vlákniny. Ale ze všeho nejlepší je, že
domácí polévka je prostě lahodná!
Čím je váš výrobník polévky tak speciální?
Příprava čerstvé domácí polévky v pohodlí vlastní kuchyně
nemůže být rychlejší, než při použití výrobníku polévky.
Příprava v jedné konvici
Funkce Sauté (Restování) umožňuje orestovat přísady před
vařením polévky, a to ve stejné varné konvici. Jednoduchý
nápad, který omezuje nepořádek a nároky na mytí.
Při restování ve stejní konvici, v níž se vaří, zůstanou zachovány
příchuti, což zlepšuje chuť polévky.
Bleskově hotová práce!
Vše, co musíte udělat, je připravit si přísady, vložit je do
výrobníku polévky a vybrat nastavení pro jemnou nebo hutnou
polévku. Program pro jemnou polévku po orestování rozmixuje
a pozvolna uvaří polévku za 21 minut. Program na hutnou
polévku trvá pouhých 28 minut a pak už si můžete pochutnávat
na polévce!
Úspora prostoru
Jsme si vědomi toho, že místo v kuchyni bývá velmi cenné.
Výrobník polévky má kompaktní rozměry a jednoduchou
konstrukci, takže se snadno vejde kamkoliv na kuchyňskou
linku.
Jednoduché čištění
Restovací výrobník polévky nelze sice mýt v myčce nádobí, jeho
čištění je však jednoduché. Po použití stačí omýt kryt motoru (8)
a čepel Serrator (9) teplou vodou a otřít houbou.
NEPONOŘUJTE do vody. Vnitřek konvice výrobníku polévky (4)
lze mýt také teplou mýdlovou vodou a houbou. Pokud jsou
uvnitř připálené zbytky potravin, nechte je odmočit a potom je
setřete houbou. Vnější povrch spotřebiče otřete měkkým,
suchým hadrem a potom ho nechte uschnout.
Některé potraviny se mohou připálit, pokud se dostanou do
styku s topným tělesem základny. Pokud k tomu dojde,
naplňte výrobník polévky horkou mýdlovou vodou a nechte
vše 15 minut odmočit. Připálené zbytky potravin lze snadno
odstranit měkkou houbou na nádobí. Nepoužívejte kovovou
drátěnku, protože by poškrábala povlak.
VAROVÁNÍ: Vnitřní povrch konvice je potažen trvanlivým
teflonovým povlakem pro snadné čištění. Nepoužívejte kovové
náčiní k míchání ani k odstraňování jídla z tohoto výrobku.
Po vyčištění důkladně všechny součásti vysušte.
VAROVÁNÍ: NEPONOŘUJTE víko nebo konvici do vody,
protože obsahují elektrické součásti, které by mohly být
poškozeny vodou. Zabraňte styku vody s elektrickými
kontakty. Před použitím důkladně vysušte.
Při snímání a nasazování víka (3) dávejte pozor, abyste čepelí
nepoškrábali stěnu konvice (4) a nepoškodili tak teflonový
povlak.
∂
FP501014MEE Rev2.qxp_Morphy Richards Instruction Book 10/08/2015 20:12 Page 71
Page 72

72
Nějaké dotazy?
Pokud máte ohledně použití výrobníku polévky nějaké dotazy,
podívejte se na seznam níže, kde jsou některé z běžných
dotazů již zodpovězeny. Pokud potřebujete další pomoc,
obraťte se na linku podpory: 0344 871 0944.
Mohu sejmout víko během cyklu?
Ano, v případě, že potřebujete přidat přísady nebo koření.
Více informací najdete v části „Přidat“.
Mohu používat výrobník polévky k přípravě něčeho jiného než
polévky nebo nápojů?
Ne. Připravených 5 programů je určeno k přípravě dokonalé
polévky a nápojů od surovin po konečný výsledek. Řiďte se
recepty a přizpůsobte je vlastní chuti.
Mohu ve výrobníku polévky používat syrové maso uváděné
v receptech na polévku?
Ne, kromě slaniny nebo malých množství mletého masa (100 g).
Maso byste měli uvařit samostatně a teprve potom ho vložit do
výrobníku polévky společně s dalšími přísadami podle receptu,
protože výrobník je určen pouze k lehkému restování slaniny
nebo cibule a následnému vaření polévky. Funkci restování
byste neměli používat k restování syrového masa vyjma slaniny
nebo mletého masa.
Jaký je objem výrobníku polévky?
Výrobník polévky má objem 1,6 l. Dávejte pozor, abyste neplnili
výrobník polévky nad rysku MAX, jinak detektor přeplnění
přeruší napájení čepele Serrator (9) a na displeji LED (14) se
zobrazí „E1“. V takovém případě jednoduše odeberte část
přísad, aby obsah nepřesahoval rysku MAX, a otřete snímač
přeplnění (7) na víku (3). dbejte na to, aby byly přísady
(včetně tekutiny) nad ryskou MIN, jinak dojde k narušení
funkce mixování.
Mohu měnit časy v nastavení pro jemnou a hutnou polévku?
Ne. Časy v těchto nastaveních jsou pevně dané.
Mohu přihřát hotovou polévku nebo ohřát polévku
z plechovky/krabice?
Ne. Programy jsou nastavené na přípravu dokonalé polévky od
surovin po konečný výsledek. Polévka by se mohla připálit
k základně topného článku, což by poškodilo výrobek.
Mohu ve výrobníku polévky připravovat studené polévky, jako
je gazpacho?
Ano, ale nejprve ji budete muset uvařit s nastavením na jemnou
nebo hutnou polévku. Pak ji před konzumací jednoduše nechte
vychladnout nebo umístíte do ledničky.
Co když výrobník polévky přestane pracovat?
Výrobník polévky je vybaven bezpečnostním termostatem, který
odpojí napájení a vypne spotřebič, aby zabránil jeho přehřívání,
pokud se používá nepřetržitě po dobu 3 nebo více cyklů. Pokud
k tomu dojde, vyjměte z konvice všechen obsah a nechte
výrobník polévky 30 minut chladnout; potom můžete
pokračovat v přípravě polévky.
Pokud budete funkci mixování používat nepřetržitě po dobu
delší než 20 sekund, bezpečnostní systém odpojí napájení, aby
zabránil přehřívání. Když k tomu dojde, vyčkejte 10 sekund, než
začnete funkci mixování znovu používat.
Co když se jídlo připálí k základně výrobníku polévky? 13
Protože v některých potravinách se vyskytuje škrob a cukry,
může dojít k mírnému připálení, pokud se tyto přísady dostanou
do přímého styku s vnitřkem základny konvice (4). Aby tomu
bylo možné zabránit, přidejte do výrobníku polévky půl hrnku
vody nebo vývaru, až poté přidejte tuhé přísady. Pak doplňte
zbývající objem tekutiny podle receptu.
Co když přestane pracovat funkce restování?
Funkce restování funguje pouze se sejmutým víkem (viz str. 6).
Stiskněte tlačítko Sauté (Restování) (17); indikátor Sauté
(Restování) (16) by se měl rozsvítit zeleně.
Pokud indikátor Sauté (Restování) na držadle konvice (4)
zůstane svítit červeně, reaktivujte tuto funkci stisknutím pístu na
horní straně držadla konvice. Po sejmutí víka (2) by měl tento
píst zůstat v „horní“ poloze.
Kontaktujte nás
Linka podpory
Pokud máte se svým přístrojem problémy, kontaktujte nás na
lince podpory, budeme vám patrně schopni pomoci lépe, než v
obchodu, kde jste přístroj zakoupili.
Před telefonátem si připravte název výrobku, modelové číslo a
sériové číslo, urychlíte tak vyřízení svého dotazu.
Promluvte si s námi
Pokud máte nějaké dotazy nebo komentáře, nebo chcete získat
některé vhodné tipy či recepty, abyste svůj výrobek mohli
využívat co nejlépe, spojte se s námi online:
Blog: www.morphyrichards.co.uk/blog
Facebook: www.facebook.com/morphyrichardsuk
Twitter: @loveyourmorphy
Webové stránky: www.morphyrichards.com
FP501014MEE Rev2.qxp_Morphy Richards Instruction Book 10/08/2015 20:12 Page 72
Page 73

73
Recepty
Vytvořili jsme pro vás 15 receptů, podle nichž si můžete ve svém výrobníku polévky
připravovat různé pokrmy a nápoje od vydatných polévek po osvěžující ovocné koktejly.
Nastavení Chunky (Hutná) (11) slouží pouze k vaření, přísady se nemixují. Pokud je na
vás uvařená polévka příliš hutná, můžete kousky poněkud rozmělnit pomocí nastavení
Blend (Mixování) (13).
K použití této funkce je třeba, abyste výrobník polévky nejprve odpojili od sítě a potom
znovu připojili. Tím se výrobník polévky resetuje a pak budete moci tlačítkem režimu (15)
vybrat nastavení Blend (Mixování). Až bude toto nastavení zvýrazněno, stiskněte a
podržte tlačítko Select On/Off (Volicí spínač) (16), abyste rozmixovali obsah konvice.
Recepty byly vyvinuty tak, aby vyhovovaly objemu mezi minimální a maximální hladinou
výrobníku polévky (1,3–1,6 l).
∂
FP501014MEE Rev2.qxp_Morphy Richards Instruction Book 10/08/2015 20:12 Page 73
Page 74

74
Recepty s restováním
Zimní jehněčí vývar s čočkovou
Doba přípravy: 20 minut
Doba vaření: 33 minut
Nastavení: Chunky (Hutná)
Počet porcí 4
Přísady:
• 2 polévkové lžíce olivového oleje
• 75 g syrového mletého hovězího masa
• 1 středně velká cibule (přibl. 100 g), jemně nakrájená
• 2 stroužky česneku, rozmačkané
• 1 malá mrkev (přibl. 50 g), jemně nakrájená
• 1 brambora (přibl. 115 g), jemně nakrájená
• 1 středně velký tuřín (přibl. 100 g), jemně nakrájený
• 1 polévková lžíce hladké mouky
• 1 konzerva čočky (400 g), bez nálevu
• ½ kávové lžičky čerstvého rozmarýnu, nakrájeného
• 2 bobkové listy
• 1 kávová lžička Worcesterové omáčky
• 1 polévková lžíce čerstvé petržele, nakrájené
• 900 ml jehněčího vývaru ze 2 kostek
Postup:
1 Stiskněte tlačítko Sauté (Restování) a 1 minutu ohřívejte v konvici
výrobníku polévky olivový olej. Restujte mleté jehněčí maso po dobu 2-3
minut za častého míchání dřevěnou vařečkou, dokud rovnoměrně
nezhnědne.
2 Přidejte do konvice cibuli, česnek, mrkev, bramboru a tuřín a restujte 4
minuty; míchejte podle potřeby. Stisknutím tlačítka Sauté (Restování)
vypněte funkci restování.
3 Přimíchejte hladkou mouku, potom přidejte zbytek přísad a doplňte
vývarem do maximální hladiny. Ochuťte obsah solí a mletým pepřem a
zamíchejte ho dřevěnou vařečkou nebo lopatkou. Zakryjte konvici víkem a
zvolte nastavení Chunky (Hutná).
4 Po dokončení podle chuti dochuťte a před podáváním vyjměte bobkové
listy.
Kuřecí polévka s houbami
Doba přípravy: 20 minut
Doba vaření: 30 minut
Nastavení: Smooth (Jemná)
Počet porcí 4
Přísady:
• 2 polévkové lžíce olivového oleje
• 1 cibule (přibl. 100 g), jemně nakrájená
• 240 g hub nakrájených na tenké plátky
• 1 stroužek česneku, rozmačkaný
• 100 g vařeného kuřete, sekaného
• 1 brambora (přibl. 115 g), oloupaná a jemně nakrájená
• 10 g čerstvé petržele, nakrájené
• Sůl a pepř
• 1 l kuřecího vývaru
Pro ozdobení:
• trochu šlehačky
Postup:
1 Stiskněte tlačítko Sauté (Restování). Jednu minutu ohřívejte olej v konvici a
potom přidejte cibuli. Dvě minuty restujte za stálého míchání dřevěnou
vařečkou nebo lopatkou, dokud nezměkne, ale nerestujte do hněda.
1 Přidejte houby a česnek a restujte dalších několik minut, dokud houby
nezměknou. Stisknutím tlačítka Sauté (Restování) vypněte funkci restování.
3 Přidejte kuře, bramboru, petržel a koření a doplňte vývarem do maximální
hladiny konvice.
4 Zakryjte konvici víkem a zvolte nastavení Smooth (Jemná).
5 Po dokončení podle chuti dochuťte a podávejte s trochou šlehačky (pokud
chcete).
• Příprava čerstvého kuřecího vývaru. Jednoduše vložte zbytky kuřete do
středně velkého hrnce, zaplavte je vodou, přidejte kostku rostlinného
vývaru, 5 kuliček pepře a bobkový list. Přiveďte k varu a potom 1 hodinu
zvolna vařte. Protlačte přes jemné síto nebo kus mušelínové látky.
Recepty na polévku
Polévka z pečených rajčat a bazalky
Doba přípravy: 30 minut
Doba vaření: 21 minut
Nastavení: Smooth (Jemná)
Porce: 4
Přísady:
• 8 velmi zralých rajčat (přibl. 640 g), rozkrájených na půlky
• 2 červené cibule (přibl. 215 g), nakrájené na 6 kousků
• 4 stroužky česneku
• 1 polévková lžíce olivového oleje
• 1 polévková lžíce balzámového octa
• Sůl a mletý černý pepř
• 750 ml kuřecího vývaru z kostky
• 2 kávové lžičky rajčatového protlaku
• 1 kávová lžička hnědého cukru
• 10 g čerstvých lístků bazalky
Postup:
1 Předehřejte troubu na 200 °C/stupeň 6 u plynové trouby.
2 Vložte rajčata slupkou nahoru na pečící plech, společně s červenou cibulí
a česnekem. Pokropte olivovým olejem, balzámovým octem a ochuťte solí
a pepřem. Pečte 20-30 minut nebo tak dlouho, dokud vše nezměkne a
není lehce připálené.
3 Opatrně vložte zeleninu do výrobníku polévky s kuřecím vývarem a
přidejte rajčatový protlak, hnědý cukr a čerstvou bazalku.
4 Zakryjte konvici víkem a zvolte nastavení Smooth (Jemná). Jakmile je
polévka připravena, ochuťte podle potřeby a podávejte.
FP501014MEE Rev2.qxp_Morphy Richards Instruction Book 10/08/2015 20:12 Page 74
Page 75

75
Skutečně rychlá hrachová polévka se šunkou a
mátou
Doba přípravy: 5 minut
Doba vaření: 21 minut
Nastavení: Smooth (Jemná)
Počet porcí 4
Přísady:
• 600 g mraženého hrášku
• 20 g čerstvé máty, pouze lístky
• 225 g kvalitní vařené šunky, nakrájené/nasekané
• 1 brambora (přibl. 100 g), jemně nakrájená
• 800 ml horkého šunkového vývaru z kostky
• Sůl a mletý černý pepř
• 2 polévkové lžíce olivového oleje
• 3 plné polévkové lžíce zakysané smetany
Postup:
1 Naplňte výrobník polévky hráškem, mátou, šunkou, bramborou a horkým
vývarem. Zakryjte konvici víkem a zvolte nastavení Smooth (Jemná).
2 Až bude polévka hotová, dochuťte ji trochou soli a mletého pepře,
přidejte olejový olej a zakysanou smetanu a zvolte nastavení Blend
(Mixování). Před podáváním stiskněte tlačítko Select On/Off Button (Volicí
spínač) a podržte ho 20 sekund, abyste rozmixovali polévku.
Základní zeleninová polévka
Doba přípravy: 5 minut
Doba vaření: 21 minut
Nastavení: Smooth (Jemná)
Porce: 4
Přísady:
• 700 g zeleninové směsi nakrájené na kostičky (ideální je balená
zeleninová směs ze supermarketu)
• Voda (po značku MAX)
• 2 kostky kuřecího nebo zeleninového vývaru
• Sůl a mletý černý pepř
Postup:
1 Chcete-li rychle získat jemnou polévku, naplňte výrobník polévky po
značku MIN vybranou zeleninou nakrájenou na kostičky (ideální je
prodávaná krájená zelenina).
2 Přidejte kostky zeleninového nebo kuřecího vývaru a doplňte konvici
vodou po značku MAX.
3 Zakryjte konvici víkem a zvolte nastavení Smooth (Jemná). Jakmile je
polévka připravena, ochuťte podle potřeby a podávejte.
Recepty na šťávy
Jahodový a ananasový koktejl
Doba přípravy: 5 minut
Doba mixování: 2 minuty
Nastavení: Juice (Šťáva)
Hotové množství: 1,1 l
Přísady:
• 300 g čerstvých jahod
• 250 g čerstvého ananasu
• 450 g nízkotučného jahodového jogurtu
• 150 ml polotučného mléka
• 1 naběračka (přibl. 35 g) vanilkové zmrzliny
Postup:
1 Připravte a odstopkujte jahody, velké kusy rozkrojte na polovinu.
Rozsekejte ananas na kousky.
2 Vložte přísady do výrobníku polévky a důkladně je promíchejte.
3 Zakryjte konvici víkem a zvolte nastavení Juice (Šťáva). Potom stačí
počkat 2 minuty, než výrobník polévky dokončí přípravu.
4 Ihned podávejte.
Celoživotní záruka na čepele
„Čepel Serrator“ zaručuje celoživotní bezvadné dílenské zpracování a
kvalitu použitých materiálů. Tato záruka platí pouze pro původního
kupce a není postupitelná ani převoditelná na žádnou další stranu. Tato
záruka je k dispozici zákazníkům, kteří používají „čepele Serrator“ k
nekomerčním domácím účelům. Tato záruka nekryje poškození
způsobené nehodou, špatným používáním či jakýmkoliv jiným
používáním, než které je uvedeno ve vašem návodu k použití, nebo
poškození, které je výsledkem špatné údržby nebo nedostatku čištění
tohoto výrobku, jak je uvedeno ve vašem návodu k použití.
DVOULETÁ ZÁRUKA
Na tento spotřebič se vztahuje dvouletá záruka opravy nebo výměny.
Musíte si uschovat stvrzenku od prodejce jako doklad o nákupu.
Stvrzenku připevněte sešívačkou na zadní obal pro budoucí referenční
účely.
Pokud se výrobek porouchá, poznamenejte si následující informace.
Tato čísla najdete na základně výrobku.
Č. modelu
Sériové číslo
Všechny výrobky Morphy Richards procházejí před opuštěním továrny
individuální kontrolou. V nepravděpodobném případě, že se prokáže
závada, se musí výrobek do 28 dnů od data koupě vrátit do místa, kde
byl zakoupen, aby se mohl vyměnit.
Pokud dojde k závadě po 28 dnech a do 24 měsíců od data původní
koupě, musíte kontaktovat místního prodejce a uvést číslo modelu a
sériové číslo výrobku nebo napsat místnímu prodejci na uvedené
adresy.
Budete požádáni, abyste vrátili výrobek (v náležitém, bezpečném
balení) společně s kopií dokladu o nákupu na níže uvedenou adresu.
S výjimkou níže uvedených případů (1-9) bude vadný výrobek obvykle
∂
∂
FP501014MEE Rev2.qxp_Morphy Richards Instruction Book 10/08/2015 20:12 Page 75
Page 76

g Morphy Richards products are intended for household use only.
See usage limitations within the location sub-heading in the impor tant safety instructions.
Morphy Richards has a policy of continuous improvement in product quality and design.
The Company, therefore, reserves the right to change the specification of its models at any time.
The After Sales Division,
Morphy Richards Ltd, Mexborough, South Yorkshire, England, S64 8AJ
Helpline (office hours) UK 0845 871 0960 Republic of Ireland 1800 409119
o Glen Dimplex Australia
Unit 1, 21 Lionel Road, Mount Waverley, Victoria 3149
T : 1300 556 816
E : sales@glendimplex.com.au
Glen Dimplex New Zealand
38 Harris Road, East Tamaki, Auckland, New Zealand
T : 09 2748265
E : sales@glendimplex.co.nz
f Les produits Morphy Richards sont conçus pour unusage exclusivement domestique. Voir les
limitations d’usage dans le sous-titre Positionnement des Consignes de sécurité importantes.
Morphy Richards s’engage à mener une politique d’amélioration continue en termes de qualité et
de conception. Le fabricant se réserve donc le droit de modifier sans préavis la spécification de ses
modèles.
Glen Dimplex France
Zl Petite Montagne Sud
12 rue des Cevennes
91017 EVRY - LISSES Cedex
www.glendimplex.fr
T : + 33 (0)1 69 11 11 91 F : + 33 (0)1 60 86 15 24
d Morphy Richards Produkte sind nur für den Einsatz im Haushalt vorgesehen. Ständige
Verbesserungen an der Produktqualität und dem Design gehören zur Philosophie von Morphy
Richards. Aus diesem Grunde behält sich die Firma das Recht vor, die Angaben zu ihren Modellen
jederzeit zu ändern.
T : 00800 444 00 888 F : 06071 37048
E : morphyrichards-de@teknihall.com
i I prodotti Morphy Richards sono concepiti esclusivamente per uso domestico. Vedere le limitazioni
d’uso nel sottotitolo delle impor tanti istruzioni di sicurezza. Morphy Richards è costantemente
impegnata a migliorare la qualità e il design dei propri prodotti, pertanto si riserva il dir itto di
modificare le specifiche dei diversi modelli in qualunque momento.
PER ASSISTENZA TECNICA:
HELPLINE 199.193.328 LUN-VEN 9,30-13,00 e 14,30-17,30.
Costo della chiamata 14,26 cent. di Euro al minuto IVA inclusa (da rete fissa).
E : assistenza@necchi.it F : +39-0693496270
I prodotti Morphy Richards sono distribuiti in Italia da:
Necchi Spa, Via Cancelliera 60 00040 Ariccia (RM).
} Produkty Morphy Richards są przeznaczone wyłącznie do użytku domowego. Zapoznaj się z
informacjami na temat ograniczonego uźytkowania urzàdzenia, które znajdujà się w podrozdziale
instrukcji dotyczàcych bezpieczeňstwa. Morphy Richards prowadzi politykę ciągłej poprawy jakości
i wzoru produktów. Firma zastrzega sobie prawo zmiany specyfikacji modeli w dowolnej chwili.
Proteas Sp. Z o.o.
Ul Sarmacka 9/45
02-972 Warsaw
Poland
T : 0048 666 555603
∂ Výrobky Morphy Richards jsou určeny pouze k použití v domácnostech. Podívejte se na omezení
použití v podtitulku umístění v důležitých bezpečnostních pokynech.
Morphy Richards usiluje o neustálé zdokonalování kvality a provedení.
Proto si vyhrazuje právo kdykoliv změnit specifikace svých modelů.
Tauer Elektro a.s.
Milady Horákové 4
568 02 Svitavy
T : +420 461 540 130
F : +420 461 540 133
NZ
během sedmi pracovních dnů od data přijetí opraven nebo vyměněn a
odeslán zpět.
Pokud bude výrobek z jakéhokoliv důvodu během dvouleté záruční lhůty
vyměněn, záruka na nový výrobek se bude počítat od data původní koupě.
Proto je velmi důležité, abyste uschovali původní stvrzenku nebo fakturu s
vyznačeným datem původní koupě.
Platnost dvouleté záruky na spotřebič je podmíněna používáním podle
pokynů výrobce. Například spotřebiče se musí zbavovat vodního kamene a
filtry se musí udržovat v čistém stavu podle pokynů.
Společnost Morphy Richards nebo místní prodejce nebudou povinni opravit
nebo vyměnit výrobek podle záručních podmínek v následujících případech:
1 Závada byla způsobena nebo zaviněna nevhodným, chybným nebo nedbalým
používáním nebo používáním způsobem, který je v rozporu s doporučeními
výrobce, nebo proudovými nárazy v síti či poškozením při přepravě.
2 Spotřebič byl napájen jiným napětím, než jaké je uvedeno na výrobku.
3 Došlo k pokusu o opravu jinými osobami než naším servisním personálem
(nebo autorizovaným prodejcem).
4 Spotřebič se pronajímal nebo používal k jiným účelům než v domácnosti.
5 Spotřebič je z druhé ruky.
6 Společnost Morphy Richards ani místní prodejce neodpovídají za žádné opravy
prováděné v záruční lhůtě.
7 Záruka se nevztahuje na spotřební zboží jako sáčky, filtry a skleněné karafy.
8 Baterie a poškození způsobené jejich vytečením není zárukou pokryto.
9 Filtry nebyly čištěny a měněny podle pokynů.
Tato záruka nepropůjčuje žádná jiná než výše uvedená práva a nevztahuje se
na žádné reklamace týkající se následných ztrát nebo škod. Tato záruka je
nabízena jako další výhoda a nemá vliv na vaše zákonná práva spotřebitele.
g For electrical products sold within the European Community.
At the end of the electrical products useful life it should not be disposed of with
household waste.
Please recycle where facilities exist.
Check with your Local Authority or retailer for recycling advice in your country.
f Pour les appareils électriques vendus dans la Communauté européenne.
Lorsque les appareils électriques arrivent à la fin de leur vie utile, il ne faut pas les jeter
à la poubelle.
Il faut les recycler dans des centres spécialisés, s’ils existent.
Consultez la municipalité ou le magasin où vous avez acheté l’appareil pour obtenir des
conseils sur le recyclage dans votre pays.
d Für elektrische Artikel, die in der europäischen Gemeinschaft verkauft werden.
Am Ende der Nutzungsdauer sollte das Gerät nicht im regulären Hausmüll entsorgt
werden.
Bitte einer Recycling-Sammelstelle zuführen.
Informationen über geeignete Recycling-Annahmestellen erhalten Sie bei Ihrer Stadt-
bzw. Ortsverwaltung.
i Per gli elettrodomestici venduti all’interno della Comunità europea.
Al termine della vita utile, non smaltire l’elettrodomestico nei rifiuti domestici.
Riciclarlo laddove esistano le strutture.
Verificare con la Locale Autorità o con il dettagliante in merito alle possibilità di
riciclaggio nel proprio paese.
} Dla produktów elektrycznych sprzedawanych na terenie Wspólnoty Europejskiej.
Po zakończeniu okresu uźywalności produktów elektrycznych, nie naleźy ich wyrzucać
wraz z odpadkami pochodzącymi z gospodarstwa domowego.
Jeźeli istnieją odpowiednie zakłady zajmujące się utylizacją, produkty naleźy poddać
recyklingowi.
W celu uzyskania porady na temat recyklingu w Twoim kraju zwróć się do miejscowych
władz lub lokalnego sprzedawcy.
∂ Pro elektrické výrobky prodávané v Evropském společenství.
Elektrické výrobky se po skončení životnosti nesmí vyhazovat do domovního odpadu.
Nechte je recyklovat v příslušných zařízeních.
Informace o recyklaci ve vaší zemi si zjistěte od místních úřadů nebo prodejce.
FP501014MEE Rev 2 8/15
FP501014MEE Rev2.qxp_Morphy Richards Instruction Book 10/08/2015 20:12 Page 76
 Loading...