

Page 1
FP48992 MUK Rev 3
* Register online for your 2 year guarantee. See the back of this instruction book for details, (UK and Ireland customers only).
www.facebook.com/loveyourhome
@loveyourmorphy
www.morphyrichards.co.uk/blog
For competitions, product hints and tips
and more join us at
Please read and keep these instructions for future use
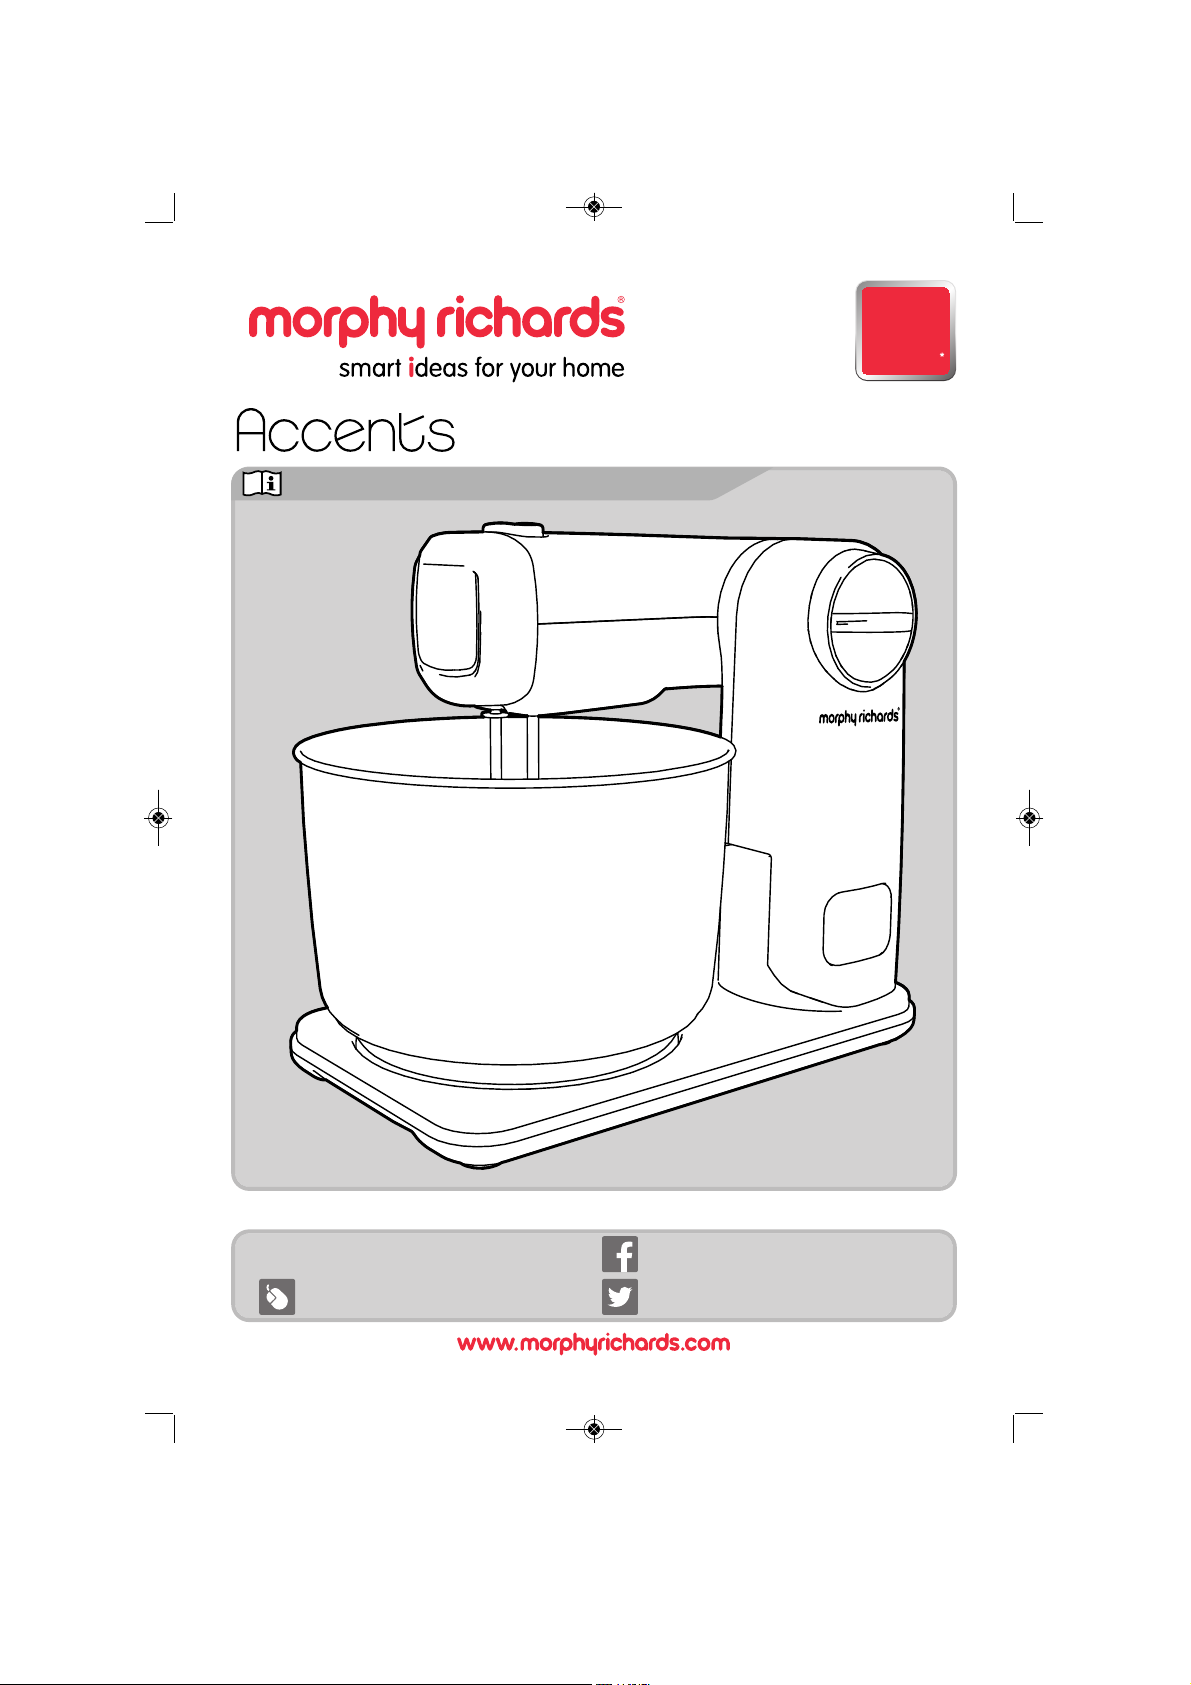
Folding Stand Mixer
GUARANTEE
2
YEAR
48992 rev3_Layout 1 11/03/2014 14:21 Page 1
Page 2

2
The use of any electrical appliance requires the following common sense safety rules.
Please read these instructions carefully before using the product.
•
This appliance can be used by persons with reduced physical,
sensory or mental capabilites, or lack of experience and
knowledge, if they have been given supervision or instruction
concerning the use of the appliance in a safe way and understand
the hazards involved.
•
Children shall not play with the appliance.
•
The appliance shall not be used by children.
•
Keep the appliance and its cord out of reach of children.
• Ensure the attachments have stopped rotating before lifting the
mixer head upwards.
Health and Safety
Location
• This appliance is intended to be used in household and
similar applications such as:
farm houses;
by clients in hotels, motels and other residential type
environments;
bed and breakfast type environments.
It is not suitable for use in staff kitchen areas in shops,
offices and other working environments.
• Always locate your appliance away from the edge of the
worktop.
• Do not place the bowl used with the appliance on a
highly polished wooden surface as damage may occur to
the surface.
• Do not place the appliance on or near a hot surface, such
as a hot plate or radiant rings or near a naked flame.
Mains cable
• Do not let the mains cable hang over the edge of the
worktop where a child could reach it.
• Do not let the lead run across an open space e.g.
between a low socket and a table.
• Do not let the cable run across a cooker or other hot area
which might damage the cable.
• The mains cable should reach from the socket to the
base unit without straining the connections.
• The power cord cannot be replaced. Contact the service
centre for advice.
Personal safety
• Avoid touching moving parts. Keep hands, hair,
clothing and utensils away from the rotating parts during
operation to prevent personal injury and/or damage to
the appliance.
• WARNING: To protect against the risk of electric shock,
NEVER immerse the appliance body in water or in any
other liquid and always ensure the electrical connections
are kept dry.
Other safety considerations
• Do not operate any appliance with a damaged cord or
plug or after the appliance malfunctions or has been
damaged in any manner.
• The use of attachments or tools not recommended or
sold by Morphy Richards may cause fire, electric shock
or injury.
• Do not use the appliance for anything other than it’s
intended purpose.
• Unplug from the outlet when not in use, or when left
unattended, and before assembling, disassembling or
cleaning.
• Caution: In order to avoid a hazard due to the inadvertent
resetting of the thermal cut out, this appliance must not
be supplied through an external switching device, such
as a timer or connected to a circuit that is regularly
switched on and off by the utility.
• Do not mix for longer than the time periods
recommended in ‘Usage’ on page 5.
Electrical requirements
Check that the voltage on the rating plate of your
appliance corresponds with your house electricity supply
which must be A.C. (Alternating Current).
Should the fuse in the mains plug require changing, a 3
amp BS1362 fuse must be fitted.
48992 rev3_Layout 1 11/03/2014 14:21 Page 2
Page 3
3
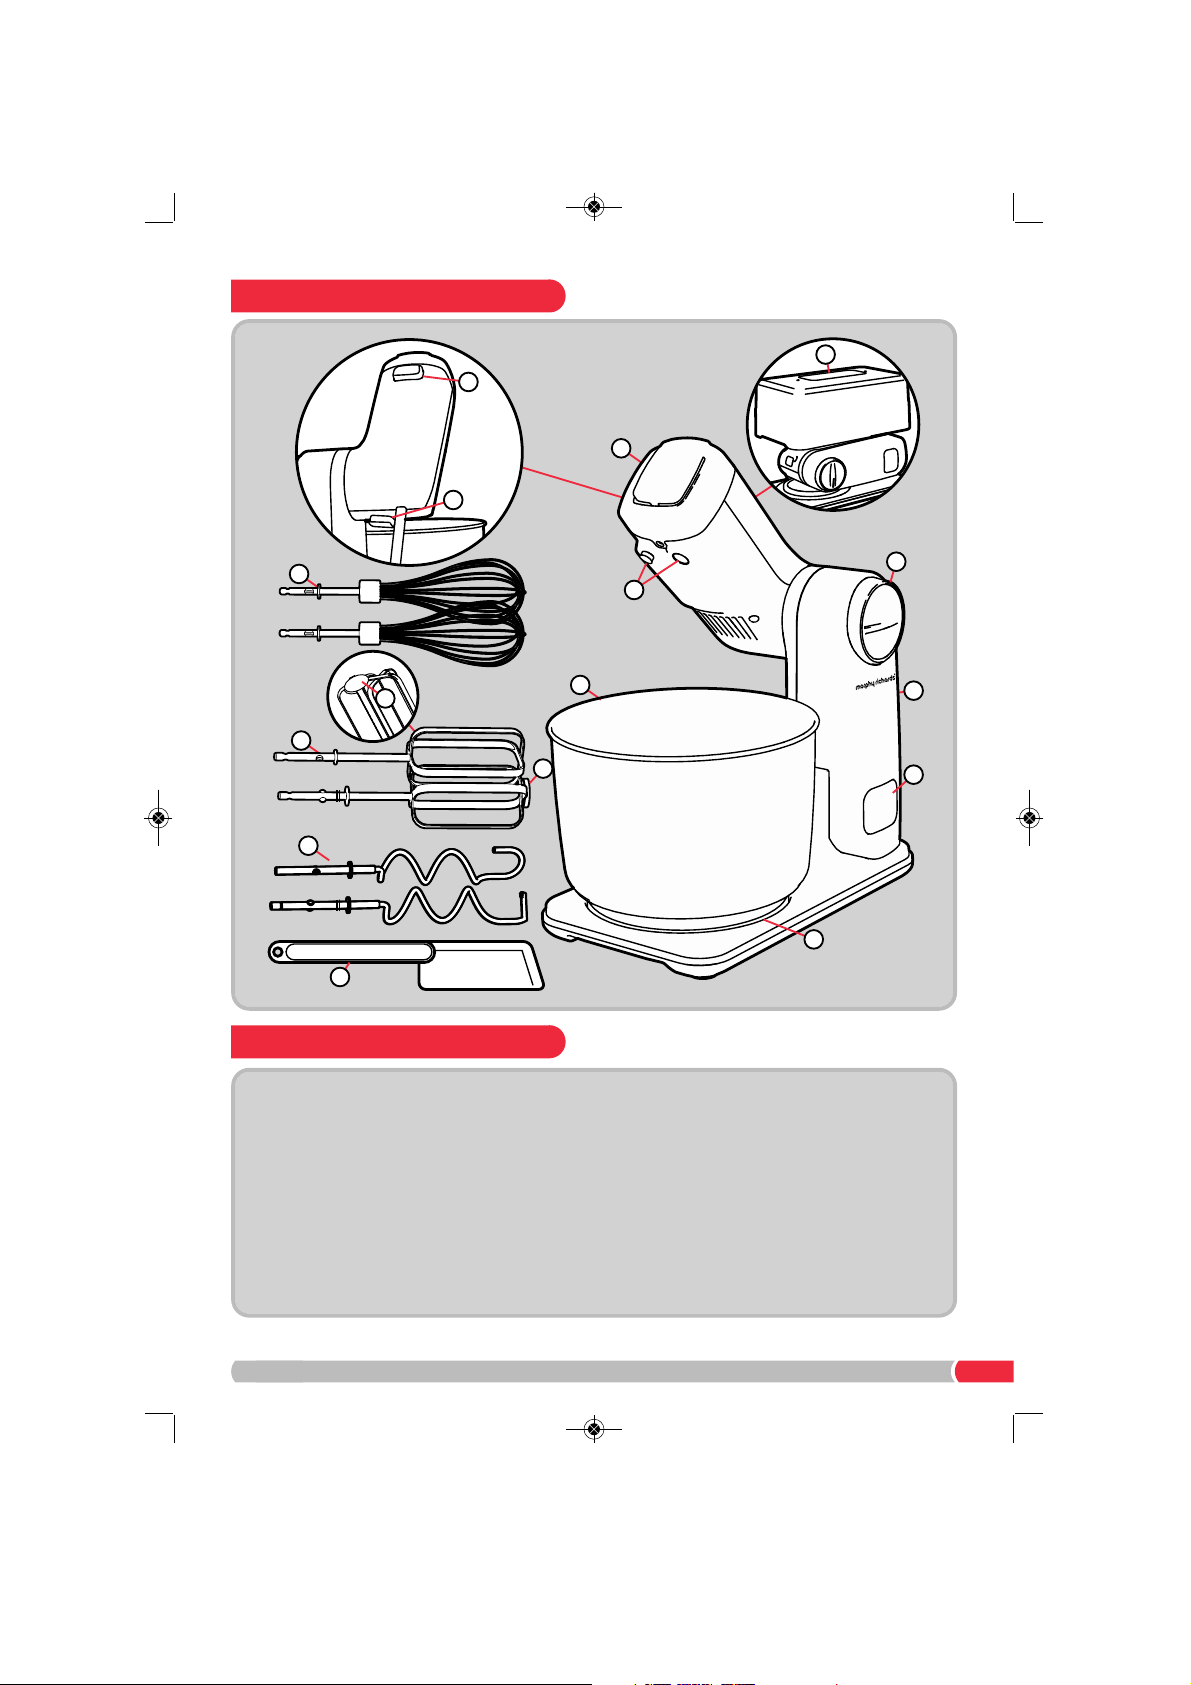
Features
(1) Head Unit
(2) Sockets
(3) Speed Control
(4) Mixing Bowl
(5) Base Unit Arm
(6) Folding Button
(7) Rotating Base
(8) Attachment Release
Button
(9) Head Unit
Release Button
(10) Storage Lid
(11) Whisks
(12) Beaters
(13) Drive Plate
(14) Dough Hooks
(15) Spatula
5
4
12
14
11
1
3
6
8
9
2
13
7
10
13
15
8
9
1
01
21
11
31
4
2
31
5
3
6
41
51
7
Product overview
48992 rev3_Layout 1 11/03/2014 14:21 Page 3
Page 4

4
5
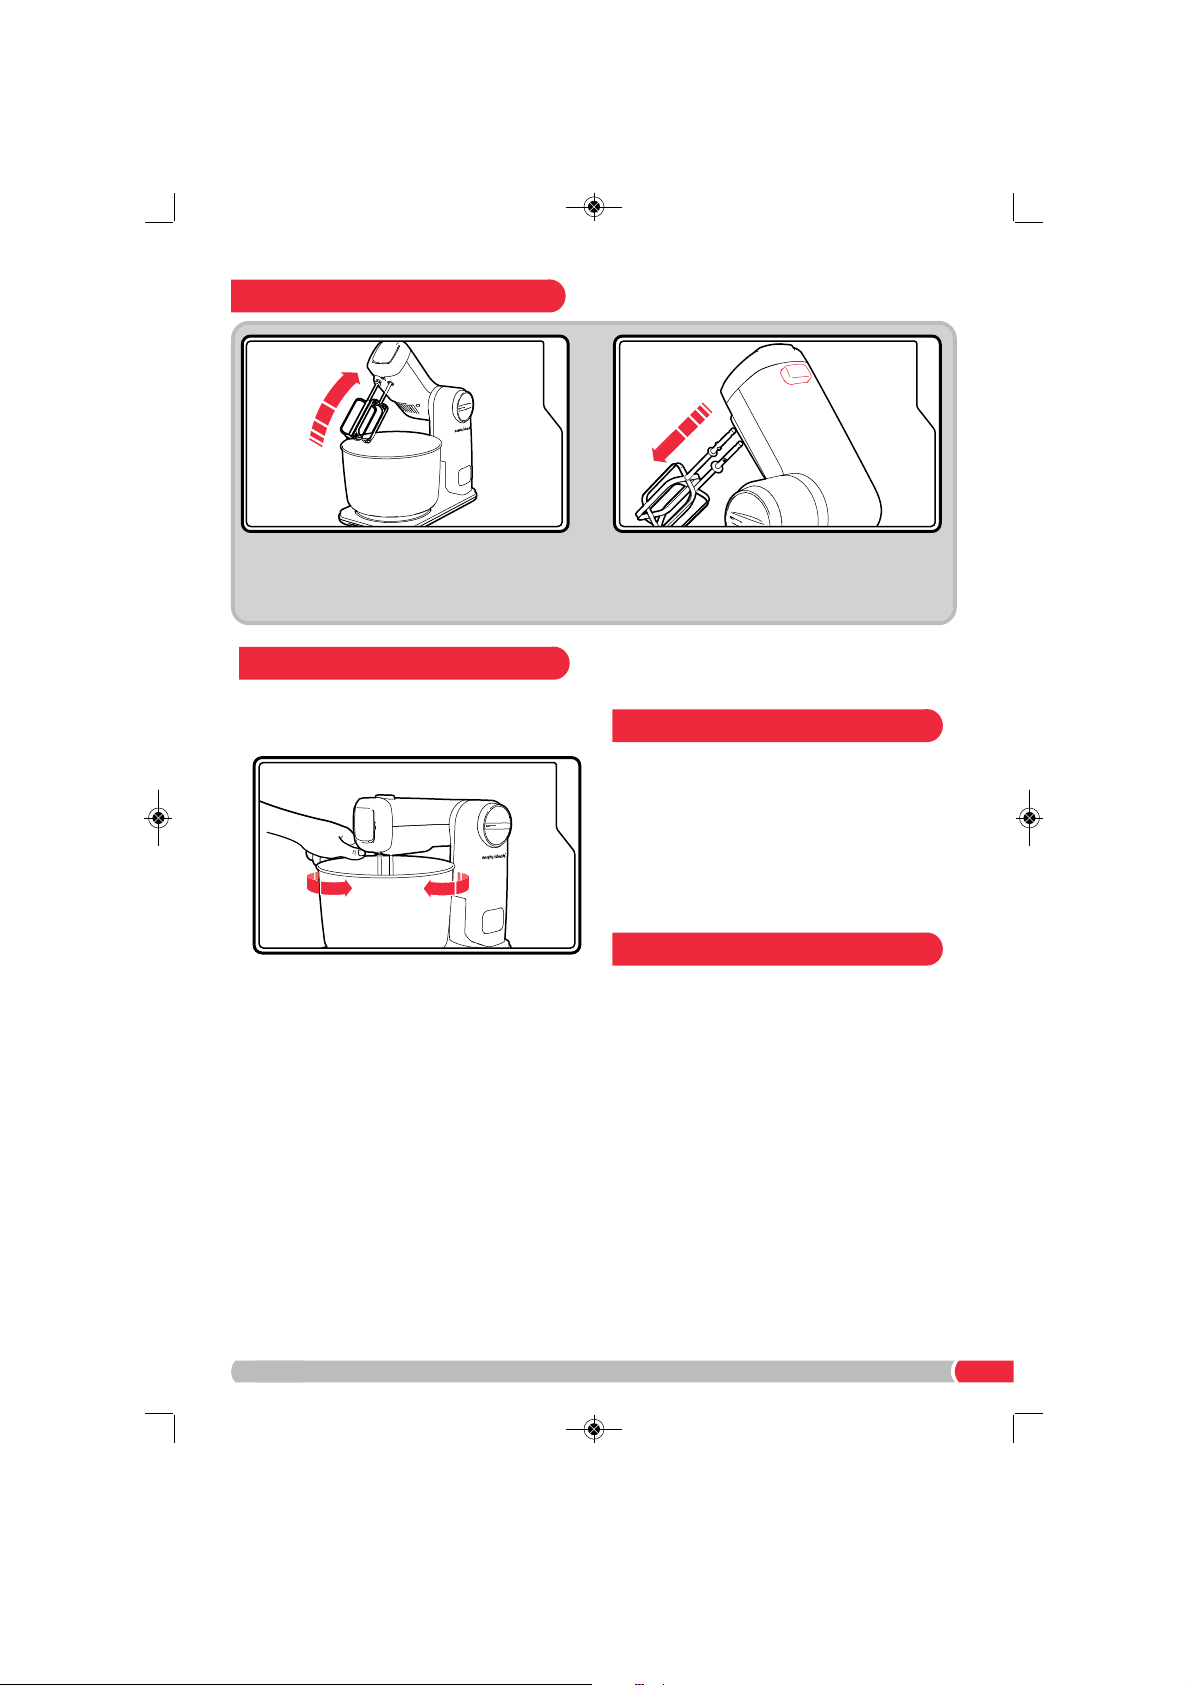
Press the Head Unit Release Button (9) to
lower the attachments into the Mixing Bowl.
The Head Unit will lock into place.
4
Add your ingredients to the Mixing Bowl (4).
Place the Mixing Bowl onto the Rotating Base
(7).
2
Rotate the Head Unit (1) into place. It will
lock into the upright position.
1
Remove the Storage Lid (10). Lift the Base Unit
Arm (5) into the upright position. It will lock
into place.
Using your Stand Mixer
6
Plug the Stand Mixer into the mains. Turn the
Speed Control (3) to position 1 to start the
Stand Mixer, increase the speed as required.
Before using your Accents Folding Stand Mixer for the first time, wash the Mixing Bowl (4), attachments
(11),(12),(14) and Spatula (15) in warm soapy water. Dry thoroughly before use.
Before first use
33
Insert the required attachment (11),(12) or (14),
into the Sockets (2), ensure they are inserted in
the correct Sockets, (please see page 6 for
more information).
48992 rev3_Layout 1 11/03/2014 14:21 Page 4
Page 5
5
Using your Stand Mixer
8
Press the Attachment Release Button (8) to
remove the attachments from the Stand Mixer.
Clean and fold for Storage.
7
When your mixing is compete, turn the mixer
off. Press the Head Unit Release Button (9)
and lift the Head Unit. The Head Unit will lock
in the upright position.
• Your Folding Stand Mixer has a unique Mixing
Bowl (4) rotating system which allows the user to
fully control the mixing process.
• The Mixing Bowl is self rotating for ease of mixing
light ingredients. During the mixing process
however, it will be necessary to control the speed
of the Mixing Bowl; rotate manually by using your
hand on the side of the bowl to either slow it
down or to turn it clockwise & anticlockwise to
aid mixing.
• You can also rotate the bowl in the opposite
direction (anticlockwise), ingredients will be
incorporated further for a more effective mix for
some recipes. See individual recipes where this is
advised.
• During mixing, ingredients may splash or cling to
the side of the Mixing Bowl, turn the Speed
Control (3) to the ‘Off’ position, using the Spatula
(15) scrape the side of the Mixing Bowl
incorporating this into the centre of the Mixing
Bowl, continue mixing.
• When individual ingredients are added it may be
necessary to scrape the side of the bowl further,
always turn the Mixer off first.
Your mixer features a safety cut out designed to
protect the motor from overheating. After 6
minutes of continuous use to prevent overheating
you will need to switch off your stand mixer and
leave to cool for 10 minutes, especially important
when mixing heavier mixtures. If your machine
cuts out during mixing turn the Speed Control (3)
to the ‘Off’ position and leave to cool for 10
minutes.
Do not overfill the Mixing Bowl
(4) as damage to
the mixer could occur. Maximum quantity - 1Kg
of combined dry & wet ingredients should be
sufficient for most mixing operations with the
Beaters (12).
For preparing dough with the Dough Hooks
(14)
do not use more than 350g of flour.
If at any point you hear the mixer labouring,
increase the speed. If required remove some of
the mixture if it is overloaded or the mixture is too
thick.
Important
Usage
Capacity
48992 rev3_Layout 1 11/03/2014 14:21 Page 5
Page 6

6
Recipes
Method:
1 Preheat the oven to 170
o
C / Gas mark 3. Grease baking trays or line
with parchment.
2 Sift together the flour, bicarbonate of soda and salt; set aside.
3 Attach the Beater Attachments to the Mixer. In the Mixing Bowl,
add the melted butter, brown sugar and caster sugar and beat until
well blended. Start on speed 1, increasing to speed 3 if required.
Part way through mixing, it may be necessary to stop the Mixer and
scrape the sides of the bowl down using the Spatula.
4 Beat in the vanilla, egg and egg yolk until light and creamy using
speeds 1-3.
5 Using speed 1, mix in the sifted ingredients until just blended.
Part way through mixing, it may be necessary to stop the Mixer and
scrape the sides of the bowl down using the Spatula.
6 Stir in the chocolate chips by hand using a wooden spoon. Drop
cookie dough onto the prepared baking trays, for each cookie use
around 4 tablespoons of dough (for smaller cookies, drop 1
rounded tablespoonful and adjust baking time as necessary). Do
not flatten the dough. Cookies should be about 8cm apart.
7 Bake for 15 to 17 minutes in the preheated oven, or until the edges
are lightly toasted. Allow to cool on the baking trays for a few
minutes before transferring to wire racks to cool completely.
Ingredients:
• 250g plain flour
•1/
2tsp bicarbonate of soda
•1/
2tsp salt
• 170g unsalted butter, melted
• 200g dark brown soft sugar
• 100g caster sugar
• 1tbsp vanilla extract
• 1 egg
• 1 egg yolk
• 325g chocolate chips
Chocolate chip cookies
Serves 18
Your Stand Mixer comes with three mixing
attachments, each is designed for a specific task.
Whisks (11)
Use the Whisk attachments for whisking eggs and
cream. Don’t use the whisk for heavy mixtures
(like fruit cake or cookie dough).
Beaters (12)
Use the Beaters for mixing cake mixes, cookie
dough and creamed potatoes.
One of the Beaters is fitted with a Drive Plate (13)
which helps the bowl rotate during use. This
Beater also has a red band on the shaft. Ensure
this Beater is fitted to the raised Socket (2) with
the RED interior. Otherwise your stand mixer may
not work correctly.
Note: Depending on the ingredients being mixed,
the bowl may require some assistance to rotate.
Manually turn the bowl to help incorporate the
ingredients.
Dough Hook (14)
Use the Dough Hooks for pastry mixtures.
Dough Hooks need to be fitted correctly or they
will not knead the dough. Ensure the Dough Hook
with the flat end and the red band on the shaft is
fitted to the raised Socket
(2) with the RED
interior.
The Dough Hooks are designed so they cannot
be fitted incorrectly.
Not suitable for heavy dough.
Attachments
48992 rev3_Layout 1 11/03/2014 14:21 Page 6
Page 7

7
Method:
1 Place the softened butter, salt and sugar in the Mixing Bowl, attach
the Beater Attachments and cream the sugar and butter until fluffy
and pale in colour. Start on speed 1, increasing to speed 3. Part
way through mixing, it may be necessary to stop the Mixer and
scrape the sides of the bowl down using the Spatula.
2 Crack the eggs into a small bowl and lightly whisk. Slowly add the
eggs a bit at a time to the butter mixture, mixing well.
Use speed 1-3. Add a little of the flour with the eggs to prevent the
mixture from curdling. Part way through mixing, it may be necessary
to stop the Mixer and scrape the sides of the bowl down using the
Spatula.
3 Remove the Mixing Bowl and Beaters and sieve the flour over the
creamed butter, return to the Mixer, attach the Dough Hooks. Using
speeds 1-3 slowly mix in the flour into the batter, do not over mix.
Once the pastry comes together stop mixing.
4 Turn the pastry out on to a lightly floured work surface, divide the
pastry in half, do not knead the pastry, just push it together. Cover
each piece with cling film and make it airtight. Place in the fridge for
30 minutes or until firm.
5 Preheat the oven to 190ºC / Gas mark 5. Grease a 25cm fluted
loose bottom tin. Place the tin onto a baking tray.
6 Roll out the pastry until it's big enough to generously fit the tin,
leaving excess pastry falling over the sides of the tin onto the
baking tray underneath the tin - don't trim at this stage.
7 Line the pastry with greaseproof paper and fill with baking beans.
Trim the excess pastry using a sharp knife. Bake the pastry case
blind for about 15-20 minutes or until the pastry is pale golden and
dried out - remove the paper and beans for the last five minutes.
8 Lower the oven heat to 150
o
C / Gas mark 2.
9 In the Mixing Bowl, add all the filling ingredients and attach the
beater attachments. Using speed 1 beat until smooth.
10Pour into cooled crust and bake for 30 minutes. Leave to cool
before adding the meringue topping.
11Raise the oven heat to 180
o
C / Gas mark 4.
12Place the egg whites and cream of tartar in the Mixing Bowl and
insert the Whisk Attachments.
13Whisk on maximum speed until at the soft peak stage. This takes
about 3 minutes. During mixing hold the Mixing Bowl steady and
turn clockwise and anticlockwise to allow the ingredients to mix
thoroughly. It may be necessary to stop the unit and scrape the
sides of the bowl a few times to make sure all the ingredients are
incorporated.
14Gradually beat in the sugar, over a period of 3 minutes, 1tsp at a
time, until stiff.
15Spread over the cooled filling; seal to edge of the pie crust. Bake
for 15 minutes or until meringue is golden brown.
16Leave to cool before serving.
For the pastry:
• 460g plain flour
• 280g good quality unsalted
butter at room
temperature (cut into
pieces)
• 120g unrefined caster sugar
• 2 eggs
• Pinch of salt
For the filling:
• 2x397g tins condensed milk
• 250ml lemon juice
• 2tsp grated lemon zest
• 6 egg yolks
For the meringue topping:
• 6 egg whites
•1/
2tsp cream of tartar
• 125g sugar
Lemon meringue pie
48992 rev3_Layout 1 11/03/2014 14:21 Page 7
Page 8

8
Recipes
Method:
1 Pre heat the oven to 175ºC / Gas Mark 3-4.
2 Attach the Beater Attachments to the Mixer. Grease and flour a
9x13 inch pan.
3 Mix the group 1 ingredients: Mix the cocoa with the bicarbonate of
soda and add to the bowl along with the oil and water.
4 Mix on speed 1 until well blended and thickened.
5 Mix in the sugar, eggs and oil until thoroughly mixed.
6 During mixing hold the Mixing Bowl steady and turn clockwise and
anticlockwise to allow the ingredients to mix thoroughly. It may be
necessary to stop the mixer and scrape the sides of the bowl a few
times to make sure all the ingredients are incorporated.
7 Add the flour, vanilla and salt and mix until just incorporated, do not
over mix.
8 Spread evenly into the prepared pan and bake for 35-40 minutes or
until a skewer comes out clean.
9 Allow to cool before cutting into squares.
Ingredients:
Group1:
• 80g cocoa powder
• ½tsp bicarbonate of soda
• 80ml vegetable oil
• 120ml boiling water
Group2:
• 440g caster sugar
• 2 eggs
• 80ml vegetable oil
• 190g plain flour
• 1tsp vanilla essence
• ¼tsp salt
Fudge brownies
Method:
1 Boil the potatoes for 30 minutes until soft.
2 Drain well and crush lightly with a fork to break up the potatoes.
3 Place in the Mixing Bowl and insert the Beater Attachments.
4 Beat on speed 3 for about 1 minute.
5 Add the other ingredients and beat for a further minute on speed
5-6 until creamy.
6 During mixing hold the Mixing Bowl steady and turn clockwise and
anticlockwise to allow the ingredients to mix thoroughly. It may be
necessary to stop the unit and scrape the sides of the bowl a few
times to make sure all the ingredients are incorporated.
Ingredients:
• 725g potatoes, peeled and
cut into chunks
• 100ml warm milk
• 1½tsp butter
• 1½tsp salt
Creamed potatoes
48992 rev3_Layout 1 11/03/2014 14:21 Page 8
Page 9

9
Method:
1 Place all ingredients in the Mixing Bowl.
2 Using the Beater Attachments, mix on speed 1 until light and
creamy.
3 During mixing hold the bowl steady and turn anticlockwise to allow
the ingredients to mix thoroughly. It may be necessary to stop the
Mixer and scrape the sides of the Mixing Bowl using the Spatula a
few times to make sure all the ingredients are incorporated.
Ingredients:
• 75g butter
• 500g icing sugar
• pinch of salt
• 3-4tbsp milk
• 1½tsp vanilla
Buttercream
Method:
1 Heat oven to 190
o
C / Gas Mark 5. Lightly grease two 20cm
sandwich tins and line with non-stick baking paper.
2 Add all the ingredients to the Mixing Bowl and attach the Beater
Attachments.
3 Beat all the cake ingredients together until you have a smooth, soft
batter. Use speed 1 initially then increase to speed 3. Part way
through mixing, it may be necessary to stop the Mixer and scrape
the sides of the bowl down using the Spatula.
4 Divide the mixture between the tins, smooth the surface with the
Spatula or the back of a spoon, then bake for about 20 minutes
until golden and the cake springs back when pressed. Turn out onto
a cooling rack and leave to cool completely.
5 Attach the Whisk Attachments to the Mixer and whip the cream for
around 3 minutes starting at speed 1 and increasing to full speed.
6 Spread the jam over the bottom of one of the sponges, top with the
cream and sandwich the second sponge on top. Dust with a little
icing sugar before serving.
Ingredients:
• 200g caster sugar
• 200g softened butter, cut into
pieces
• 4 eggs, beaten
• 200g self-raising flour, sifted
• 1tsp baking powder
• 2tbsp milk
For the filling:
• 300ml whipping cream
• 1 jar of strawberry jam
Victoria sandwich cake
Method:
1 Place cream in the Mixing Bowl and insert the Whisk Attachments.
2 Whip on speed 4-5 until desired thickness is achieved.
(Guide time: 3-4 minutes). During mixing hold the Mixing Bowl
steady and turn clockwise and anticlockwise to allow the
ingredients to mix thoroughly. It may be necessary to stop the mixer
and scrape the sides of the bowl a few times to make sure all the
ingredients are incorporated.
Ingredients:
• 200ml whipping cream*
*Min - 200ml
*Max - 600ml
Whipped cream
48992 rev3_Layout 1 11/03/2014 14:21 Page 9
Page 10
10
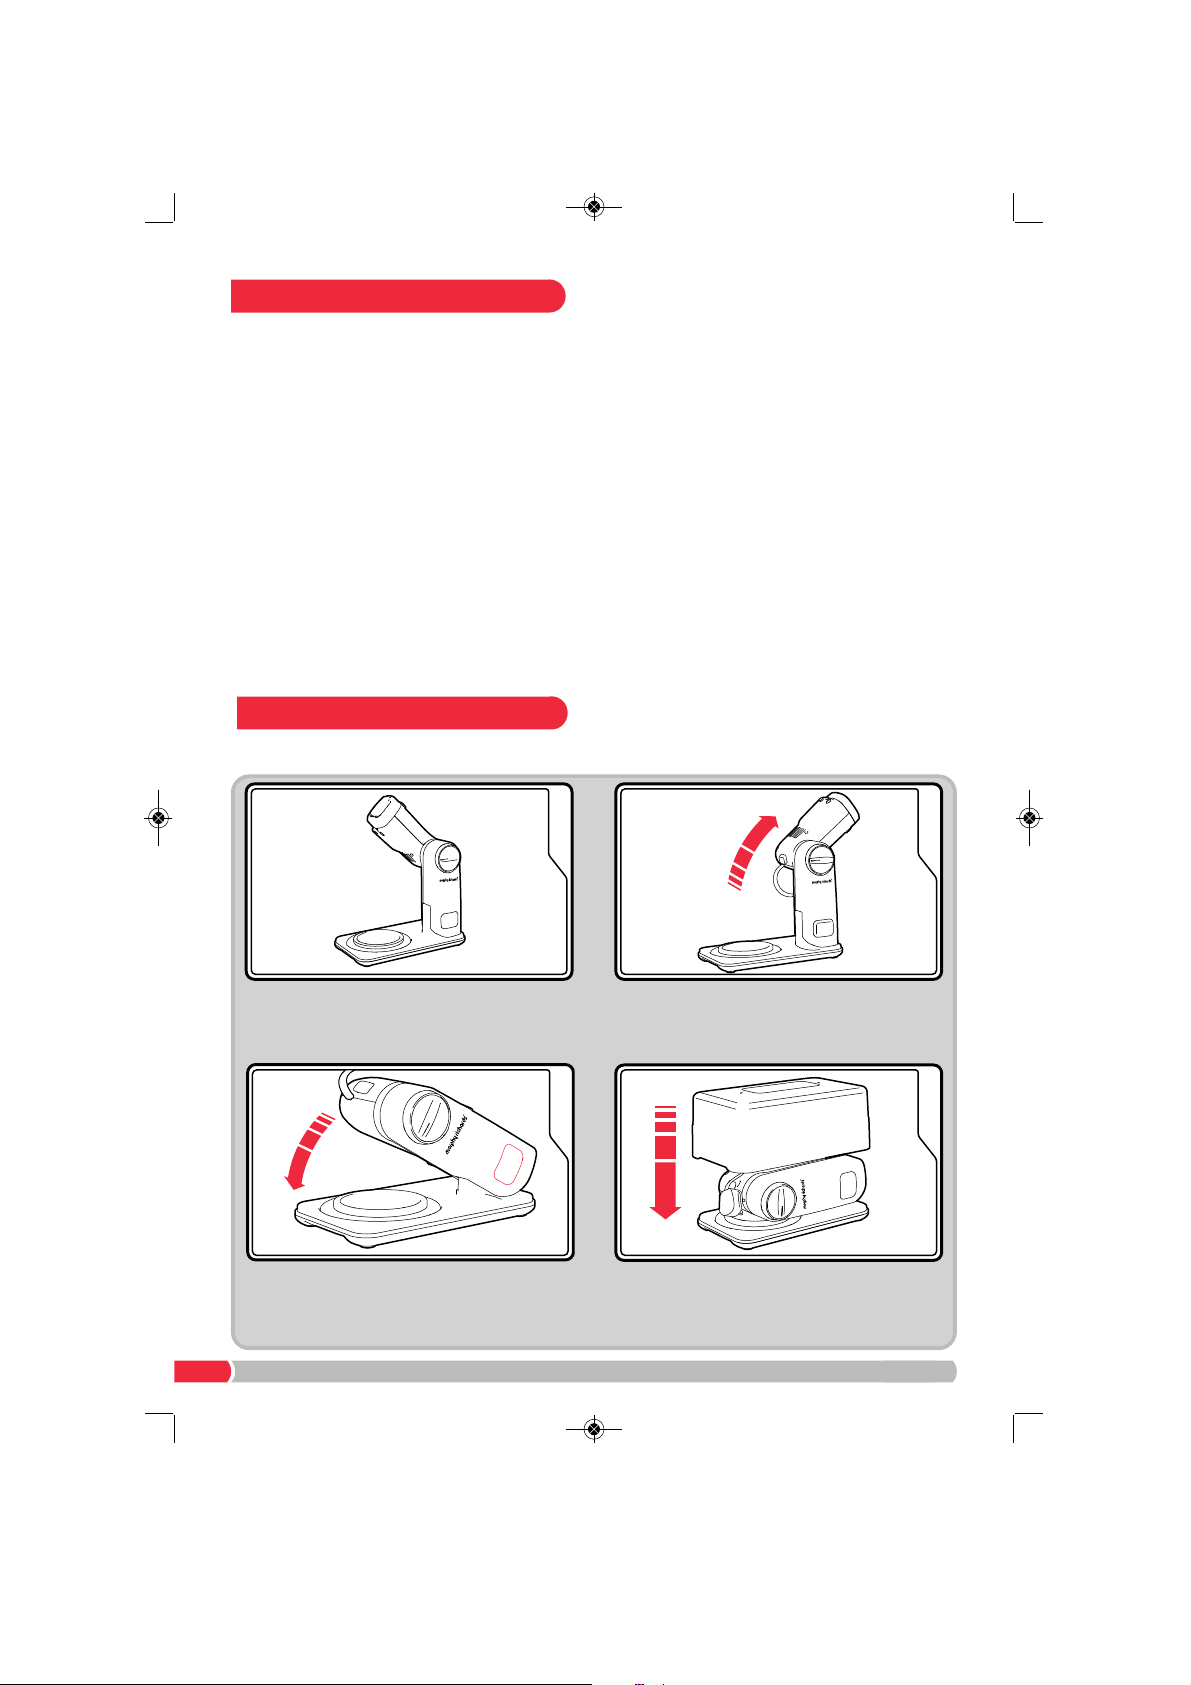
4
Curl the power cord up next to the mixer.
Cover with the Storage Lid (10). Store the
Mixing Bowl and attachments separately.
2
Press the Head Unit Release Button (9) and
gently pull the Head Unit (1) back. The Head
Unit will rotate back into the folded position.
1
The Speed Control (3) must be set to ‘0’ for the
Base Unit Arm (5) to fold down. Ensure the
Mixer is switched off with the attachments and
Mixing Bowl (4) removed.
3
Press the Folding Button (6) on the Base Unit
Arm (5), fold the mixer down onto the base.
Placing a piece of packaging foam between the
arms and base is recommended for protection.
Your Folding Stand Mixer can be folded down after use for easy storage in a cupboard or other area.
To fold your mixer, follow these steps.
Storage
Recipes
Method:
1 Pre heat the oven to 150ºC / Gas Mark 2.
2 Place the egg whites in the Mixing Bowl and insert Whisk
Attachments.
3 Whisk on maximum speed until at the soft peak stage. This takes
about 3 minutes. During mixing hold the Mixing Bowl steady and turn
clockwise and anticlockwise to allow the ingredients to mix thoroughly.
It may be necessary to stop the unit and scrape the sides of the bowl
a few times to make sure all the ingredients are incorporated.
4 Gradually beat in the sugar, over a period of 3 minutes, 1tsp at a time,
until stiff.
5 Shape spoonfuls of the mixture onto baking sheets lined with non
stick baking paper and bake in the oven for 15 minutes.
6 Lower the temperature to 110
o
C / Gas Mark ¼ and cook for a further
2-3 hours until crisp and dry.
Ingredients:
• 3 large egg whites*
• 120g caster sugar
*Min - 3 egg whites, use 40g of
caster sugar per egg white.
Meringues
48992 rev3_Layout 1 11/03/2014 14:21 Page 10
Page 11

11
Notes
• Before cleaning, switch the Mixer off and unplug
from the mains.
• Ensure the Mixer has cooled completely before
using.
• To clean the Main Unit, use a damp cloth. Do not
immerse in water. Do not use any abrasive or
solvent-based cleaner.
• Wash the attachments (11),(12),(14), Spatula (15)
and Mixing Bowl (4) in hot soapy water. Dry
thoroughly.
• The Accessories and Mixing Bowl are dishwasher
safe, place on the top shelf on a cool wash only.
• WARNING: Never immerse the motor unit in
water or other liquid.
Helpline
If you are having a problem with your appliance,
please call our Helpline, as we are more likely to
be able to help than the store you purchased the
item from.
Please have the product name, model number
and serial number to hand when you call to help
us deal with your enquiry.
UK Helpline: 0844 871 0960
IRE Helpline: 1800 409 119
Spares: 0844 873 0726
Talk To Us
If you have any questions or comments, or want
some great tips or recipe ideas to help you get
the most out of your products, join us online:
Blog: www.morphyrichards.co.uk/blog
Facebook: www.facebook.com/morphyrichardsuk
Twitter: @loveyourmorphy
Website: www.morphyrichards.com
Contact usCare and cleaning
48992 rev3_Layout 1 11/03/2014 14:21 Page 11
Page 12

IF YOU ARE HAVING A PROBLEM
WITH ONE OF OUR PRODUCTS, CALL
OUR HELPLINE:
UK: 0844 871 0960
EIRE: 1800 409 119
SPARES: 0844 873 0726
Your standard one year guarante e is extended for an
additional 12 months when you register the product within
28 days of purchase with Morphy Richards. If you do not
register the product with Morphy Richards within 28 days,
your product is guaranteed for 1 year. To validate your
2 year guarantee register with us online at
www.morphyrichards.co.uk
Or call our customer registration line
UK 0844 871 0962
IRE 1800 409 119
N.B. Each qualifying product needs to be registered with
Morphy Richards individually.
Please note that the 2 year guarantee is only available in
the UK and Ireland. Please refer to the one year guarantee
for more information.
It is important to retain the retailer’s receipt as proof of
purchase. Staple your receipt to this back cover for future
reference.
Please quote the following information if the product
develops a fault. These numbers can be found on the base
of the product.
Model no.
Serial no.
All Morphy Richards products are individually tested before
leaving the factory. In the unlikely event of any appliance
proving to be faulty within 28 days of purchase, it should
be returned to the place of purchase for it to be replaced.
If the fault develops after 28 days and within 12 months of
original purchase, you should contact the Helpline number
quoting Model number and Serial number on the product,
or write to Morphy Richards at the address shown.
You may be asked to return a copy of proof of purchase.
Subject to the exclusions set out below (see Exclusions),
the faulty appliance will then be repaired or replaced as
appropriate and dispatched usually within 7 working days
of receipt.
If, for any reason, this item is replaced or repaired during
the 1 year guarantee period, the guarantee on the new
item will be calculated from or igina l purchase date.
Therefore it is vital to retain your original till receipt or
invoice to indicate the date of initial purchase.
To qualify for the 1 year guarantee, the appliance must
have been used according to the instructions supplied.
For example, crumb trays should have been emptied
regularly.
Morphy Richards shall not be liable to replace or repair the
goods under the terms of the guarantee where:
1 The fault has been caused or is attributable to accidental
use, misus e, n egligent use or used contra ry t o th e
manufacturer’s recommendations or where the fault has
been caused by power surges or damage caused in
transit.
2 The appliance has been used on a voltage supply other
than that stamped on the products.
3 Repairs have been attempted by persons other than our
service staff (or authorised dealer).
4 The appliance has been used for hire purposes or non
domestic use.
5 The appliance is second hand.
6 Morphy Richards reserves the right not to carry out any
type of servicing under the guarantee at its discretion
7 Plastic filters for all Morphy Richards kettles and coffee
makers are not covered by the guarantee.
8 Batteries and damage from leakage are not covered by
the guarantee.
• This guarantee does not confer any rights other than those
expressly set out above and does not cover any claims for
consequential loss or damage. This guarantee is offered
as an additional benefit and does not affect your statutory
rights as a consumer. Morphy Richards prod ucts are
intended for household use only. See usage limitations
within the location safety instructions.
Morphy Richards has a policy of continuous improvement
in product quality and design. The company, therefore
reserves the right to change the specification of
it’s models at any time.
For electrical products sold within t he
Europea n Community. At t he end of the
electrical products useful life, it should not be
disposed of with household waste.
Please recycle where facilities exist. Check with
your Loca l Authority or retailer for
recycling advice in your country
Exclusions
Registering your 2 year
guarantee
Your 1 year guarantee
Disclaimer
48992 rev3_Layout 1 11/03/2014 14:21 Page 12
FP48992 MUK Rev3 3/14
The After Sales Division
Morphy Richards Ltd
Mexborough, South Yorkshire,
England, S64 8AJ
Helplines (office hours)
UK 0844 871 0960
Spare Parts 0844 873 0726
Republic of Ireland 1800 409 119
www.morphyrichards.com
 Loading...