

Page 1

Two year guaranteeTwo year guarantee
Two year guarantee
Two year guaranteeTwo year guarantee
Compact food processorCompact food processor
Compact food processor
Compact food processorCompact food processor
This guarantee is valid in the UK and Ireland
only. It is in your interest to retain the retailers receipt
as proof of purchase. Please quote the following
information if the product develops a fault. These
numbers can be found on the base of the product.
Model No. Serial No.
All Morphy Richards products are individually tested
before leaving the factory. In the unlikely event of any
appliance proving to be faulty within 28 days of
purchase it should be returned to the place of purchase
for it to be replaced.
If the fault develops after 28 days and within 24
months of original purchase, you should contact the
Helpline number quoting Model number and Serial
number on the product, or write to the address below.
You will be asked to return the product (in secure,
adequate packaging) to the address below along with a
copy of proof of purchase. Subject to the exclusions
set out below (see ‘Exclusions’) the faulty appliance will
then be repaired or replaced and dispatched usually
within 7 working days of receipt.
If for any reason this item is replaced during the 2
year guarantee period, the guarantee on the new item
will be calculated from original purchase date. Therefore
it is vital to retain your original till receipt or invoice to
indicate the date of initial purchase.
To qualify for the 2 year guarantee the appliance
must have been used according to the
The After Sales Division, Morphy Richards Ltd, Mexborough, South Yorkshire, England, S64 8AJ
Helpline (office hours) on : 0870 060 2612, Republic of Ireland 1800 409119
Morphy Richards Website: www.morphyrichards.co.uk
manufacturers instructions. For example kettles
should have been regularly descaled or an iron cord
should have been stored as recommended by the
instructions.
EXCLUSIONS
Morphy Richards shall not be liable to replace
or repair the goods under the terms of the
Guarantee where:
1 The fault has been caused or is attributable to
accidental use, misuse, negligent use or used
contrary to the manufacturers recommendations
or where the fault has been caused by power
surges or damage caused in transit.
2 The appliance has been used on a voltage
supply other than that stamped on the
products.
3 Repairs have been attempted by persons other
than our service staff (or authorised dealer).
4 Where the appliance has been used for hire
purposes or non-domestic use.
5 Morphy Richards are not liable to carry out any
type of servicing work, under the guarantee.
6 Plastic filters for all Morphy Richards kettles
and coffee makers are not covered by the
guarantee.
This guarantee does not confer any rights other
than those expressly set out above and does not
cover any claims for consequential loss or damage.
This guarantee is offered as an additional benefit
and does not affect your statutory rights as a
consumer.
Page 2

IMPORTANTIMPORTANT
IMPORTANT
IMPORTANTIMPORTANT
SAFEGUARDSSAFEGUARDS
SAFEGUARDS
SAFEGUARDSSAFEGUARDS
When using electrical appliances, basic safety
precautions should always be followed,
including the following:
1 Read all the instructions.
2 IMPORTANT: The metal blade, disc
attachments are very sharp. Always take
care when handling them, especially
when removing them from the bowl and
when cleaning.
3 To protect against risk of electrical shock
do not put appliance in water or any other
liquid.
4 Close supervision is necessary when
any appliance is used near children.
Never allow a child to use this
product.
5 Unplug from the socket when not in use,
before putting on or taking off attachments, and before cleaning.
6 Avoid touching moving parts. Keep
hands, hair, clothing as well as spatulas
and other utensils away from processor
tools during operation, to prevent
personal injury and/or damage to the
appliance. NEVER PUT YOUR FINGERS
INTO THE FEED TUBE. Always use the
food pusher.
7 Do not operate any appliance with a
damaged lead or plug, or after an
appliance has malfunctioned, or has been
dropped or damaged in any way. Contact
Morphy Richards for advice on examination, repair or electrical or mechanical
adjustment.
8 The use of attachments or tools not
recommended or sold by Morphy
Richards may cause fire, electric shock
or injury.
9 Do not use outdoors.
10 DO NOT let the mains lead overhang the
edge of the table or work-top, or touch
hot surfaces.
11 Never immerse the processor body in water
or any other liquid. All tools and attachments
should be removed before cleaning.
12 DO NOT PLACE THE APPLIANCE ON OR NEAR
A HOT GAS OR ELECTRIC HOB, OR IN A
HEATED OVEN.
13 Do not overfill the processor. This could
cause damage to the motor.
14 Do not process for longer than the time
periods recommended.
15 When using the processor, do not remove the
lid until the blade has stopped rotating.
16 Always remove the tool before emptying the
processor bowl of its contents.
17 Should the mains lead of the appliance need
replacing, do not attempt this repair yourself
as special tools are required. Contact Morphy
Richards for advice on service or repair.
SAVE THESESAVE THESE
SAVE THESE
SAVE THESESAVE THESE
INSTRUCTIONSINSTRUCTIONS
INSTRUCTIONS
INSTRUCTIONSINSTRUCTIONS
Electrical RequirementsElectrical Requirements
Electrical Requirements
Electrical RequirementsElectrical Requirements
Check that the voltage on the rating plate of
your appliance corresponds with your house
electricity supply which must be A.C.
(Alternating Current).
For appliances supplied with fitted plug.
If the socket outlets in your home are not
suitable for the plug supplied with this appliance the plug should be removed and the
appropriate one fitted.
IMPORTANT : THE PLUG REMOVED FROM
THE MAINS LEAD, IF SEVERED, MUST BE
DESTROYED AS A PLUG WITH BARED
FLEXIBLE CORD IS HAZARDOUS IF ENGAGED
INTO A LIVE SOCKET OUTLET.
Should the fuse in the 13 amp plug require
changing a 3 amp BS1362 fuse must be fitted
2
Page 3

FeaturesFeatures
Features
FeaturesFeatures
Speed control dial
Pulse operation button
Base assembly
Drive shaft
Cover safety interlock
Processing bowl
Cover
Feeder tube
Food pusher
Large citrus press
Small citrus press
Citrus strainer
Citrus press drive gear
Citrus press support post
Chopping blade
Dough blade
Plate holding disk
Grating plate
18
Slicing plate
19
Spatula
20
Unpacking and using your machine
for the first time.
Carefully unpack you new processor
attachments, checking them against the
illustrations below. Remove any stickers
(except for the serial label) and wash all the
parts which are safe to immerse in water.
Never immerse the processor body in
water or any other liquid. It may be wiped
over with a clean, damp cloth - but only when
unplugged from the electrical outlet.
Your food processor has two citrus
press attachments
1 To separate the citrus press attachments
press the release button on both sides of
the large citrus press.
2 Gently pull the attachments apart.
20
18
19
3
Page 4

Operating controlsOperating controls
Operating controls
Operating controlsOperating controls
The food processor control knob has three
settings:
O = Off
I = Low speed
I I = High speed
The compact food processor has a variable
speed control dial
either low speed when less power is needed
or high speed if full power is required. The
speed selector can be adjusted whilst the
processor is in use.
Pulse allows greater control over the texture
of the food produced. To operate simply press
the pulse button until the food has reached
the desired texture.
Food processorFood processor
Food processor
Food processorFood processor
which can be set to
4 Position the food
pusher into
the feed tube if
required.
5 Before plugging
the processor in
ensure that the
bowl and cover
are fitted
correctly. (The machine will not operate if
the assembly is incorrect).
6 Select the
desired speed
using the speed
control dial .
Fitting and usingFitting and using
Fitting and using
Fitting and usingFitting and using
the toolsthe tools
the tools
the toolsthe tools
Setting up
Using the following instructions, assemble the
food processor as follows.
1 Drop the
processing bowl
onto the base
assembly by
rotating the bowl
clockwise until
you hear a click.
Ensure that all
three interlocks on the bowl engage with
the base unit.
2 The blades and disc holder can now be
placed into the bowl. Refer to ‘fitting and
using the tools’ section which follows.
Place food into the processor.
3 Holding the cover
by the feed
tube, fit the cover
by rotating
clockwise firmly
until the cover,
bowl and the base
unit interlock.
Safety
interlock
All tools which are fitted within the processor
bowl must be firmly connected to the
hexagonal drive shaft in the centre of the
processor bowl. Always adjust the tools until
you are sure that they are correctly fitted.
Metal and plastic
blades
1 With the
processor bowl
already fitted,
place the blade
over the
hexagonal drive
shaft of the processor. Lightly turn the
tool until it engages onto the drive and the
blades are close to the bottom of the
bowl and level.
2 Holding the cover by the feed tube, fit the
cover by
rotating
clockwise.
Ensure that the
safety interlock
has clicked into
place.
Safety
interlock
4
Page 5
Slicing, and grating plates
1 With the processor
bowl already fitted,
place the slicing or
grating plates into the
plate holding disc. The
plates should be placed
into the disc as shown
and clicked into place.
(will only fit one way)
2 Place the plate holding disc onto the shaft
(with the thinner end at the top) onto the
central drive
shaft of the
bowl and
check that it
is firmly fixed
in place.
3 Holding the
cover by the
feed tube, fit
the cover by rotating clockwise. Ensure
that the safety interlocks have clicked into
place. (see setting up the processor)
4 Plug in the processor.
PLEASE NOTE: When using these
discs, never introduce the fingers
into the feed tube. Always use the
food pusher.
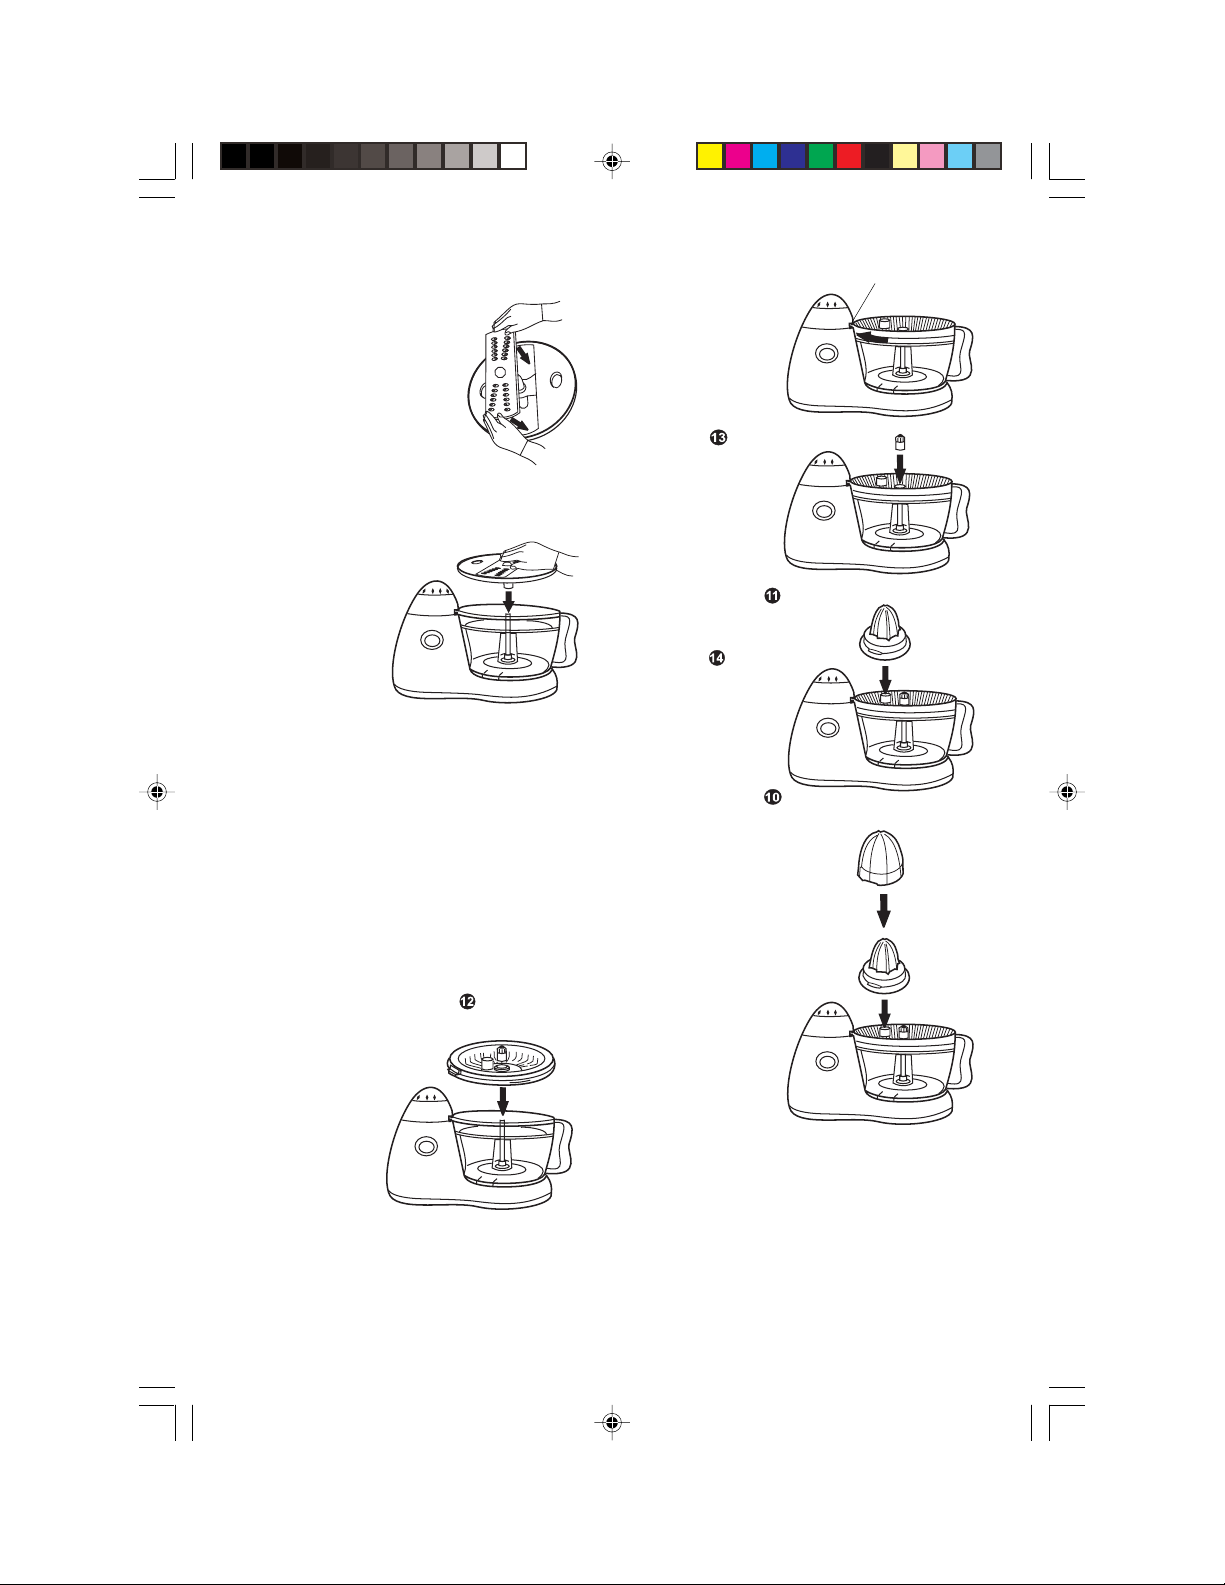
Using the citrus pressUsing the citrus press
Using the citrus press
Using the citrus pressUsing the citrus press
1 With the empty processor bowl locked in
place, drop the strainer into the top of
the processor bowl.
2 Turn the strainer clockwise until the
strainer locks
into the safety
interlock.
A click will be
heard.
3 Drop the citrus
press drive
gear onto
the drive
shaft.
4 Drop the small
citrus press
into the citrus
press support
post .
5 If the large
citrus press
is required
drop the large
citrus press
over the small
citrus press.
6 Plug in the
processor and
select the
speed
required.
Safety interlock
Dismantling
after use
1 Unplug the
processor.
2 Remove the processor bowl cover by
turning anti-clockwise.
3 Carefully remove the blade/disc and
shaft/citrus juicer. Remember - the metal
tools are very sharp.
4 Unlock and remove the processor bowl.
5
Page 6

Hints and tips
• The metal blade can be used for chopping
meat, fish, vegetables, cheese etc,
setting the speed to maximum.
• For finer chopping, increase the length of
time you process.
• For coarse chopping, use the pulse
button for a few seconds and monitor
food texture.
• Pre-cut larger pieces to make them fit into
the feed tube. When chopping hard foods
(e.g. meat, cheese) cut into 1 inch/2.5cm
cubes.
• For grating place food horizontally into the
feed tube, for slicing place the food
vertically.
RecipesRecipes
Recipes
RecipesRecipes
Chopping bladeChopping blade
Chopping blade
Chopping bladeChopping blade
Smoked Mackerel Pate
200g (8oz) smoked mackerel,
free from bone and skin
90ml (3 ½ floz double cream, crème fraiche
Seasoning optional: black pepper,
chopped parsley,
1 tbsp tomato ketchup,
two ripe tomatoes free from skin and pips,
1 tbsp lemon juice.
Place metal chopping blade in processor bowl.
Add smoked mackerel and required seasoning and
blend until smooth. Add cream/crème fraiche,
incorporate into the mixture by using the pulse button.
Stop blending when all ingredients are combined.
Serve accompanied with hot toast.
This recipe can be used for smoked trout or
salmon trimmings. It can also be used for fresh
salmon, where 50g (2oz) of cucumber can be
incorporated with the selected seasoning. Serves 4.
Beefburgers
25g (1oz) finely chopped onion
15ml (1tbsp) vegetable oil
225g (8oz) lean beef, cubed
1 small egg beaten
100g (4oz) breadcrumbs
30ml (2tbsp) cold water/milk
5ml (1tsp) dry mustard powder
5ml (1tsp) dried herbs
Salt and black pepper
Using the metal blade finely chop the onion.
Cook the onion in the fat, then allow to cool. Place
the beef into the processor bowl and chop until finely
minced (15-20 seconds). The pulse button can be
used to achieve the desired consistency. Add the
onion and the rest of the ingredients and incorporate
into the mixture using the pulse button. Divide the
mixture into four even sized pieces and using a little
flour make into balls, flatten and shape round.
Shallow fry in hot fat on both sides, reduce the heat
after the first few minutes, making certain that they
are cooked right through.
Bolognaise sauce
Serves 4
Preparation time 10 minutes
Cooking time 30 minutes
200g beef
50g bacon
1 onion
1 carrot
1 clove garlic
1 celery stick
1 tablespoon of olive oil
1 can of tomatoes
2 teaspoons tomato puree
1 beef stock cube
100ml water
salt and pepper to taste
few sprigs of thyme, parsley and bay leaf
Dice the beef and the bacon and chop using the
chopping blade at maximum speed for 15-20 seconds
and put to one side.
Peel the carrot, celery, garlic and onion and cut
into pieces. Using the chopping blade, chop at
maximum and put to side. Put the tomatoes in the
processor bowl and chop using the ‘pulse’ button and
add the tomato puree.
Heat the oil in a pan and brown the vegetable
mixture for approximately 5 minutes. Add the meat
and mix. Add the tomato mixture, beef stock and
season with herbs, salt and pepper.
Leave to cook for 30 minutes on a low heat,
stirring occasionally. Serve with pasta.
6
Page 7

Banana fritters
Serves 4
Preparation time 15 minutes
Cooking time 15 minutes
4 bananas
10g dry yeast
100g flour
150ml light lager
4 tablespoons of oil
Dilute the yeast with 3 tablespoons of water. Put
the flour in the processor bowl and add diluted yeast.
Mix using the chopping blade at minimum speed for
20 seconds.
Whilst the processor is still working, gradually
pour in the lager through the feeder tube and increase
the speed to maximum. Mix for 30 seconds or until
mixture is smooth.
Leave the mixture to stand for 30 minutes.
Slice the banana. Heat a tablespoon of oil in a
frying pan, dip the bananas into the mixture and cook
(both sides) for 30 seconds.
Serve with an ice cream of your choice.
Mayonnaise
2 egg yolks
5ml (1tsp) mustard powder
300ml (½ pint) oil
Salt and pepper
15ml (1tbsp) white wine vinegar
Place the metal blade in the food processor bowl.
Add eggs, mustard and 1 tbsp oil, process for 5
seconds. Add the remaining oil through the feed tube,
so that it is gradually incorporated.
Note: It is important that all ingredients must be at
room temperature. Should the mixture curdle, switch
off the machine and transfer the mixture to a
separate jug. Place another yolk in the processor bowl
and slowly add the curdled mixture, followed by the
remaining oil.
Put the flour in the processor bowl, add a pinch of
salt and the butter cubes. Using the dough blade, mix
at maximum speed for apporximately 10 seconds.
Whilst keeping the processor on, add the water
through the feeder tube and knead for further 15
seconds on maximum speed or until the mixture
forms into a pastry ball. Remove the pastry and
stand for 30 minutes in a cool place.
Roll out the pastry in a 25cm greased flan dish
and place in a pre-heated oven at 210°C/Gas mark 7
for 15 minutes.
Chop the bacon and dry fry in a pan until lightly
browned. Dry any excess fat with a kitchen towel.
Beat the eggs using the plastic dough blade for 20
seconds at maximum speed.
Add milk, cream, salt, pepper and ground nutmeg.
Whisk for a further 15 seconds.
Evenly sprinkle the bacon across the pre-cooked
pastry base and pour the mixture on top. Replace the
dish in the oven and cook for a further 30 minutes.
Victoria Sandwich
Preparation time 5 mins
baking time 25 mins
150g (6oz) margarine
150g (6oz) caster sugar
3 eggs
150g (6oz) self raising flour
Place the dough blade in the processor bowl. Add
the cubed margarine, sugar, eggs and flour and
process for a few seconds until the mixture is
smooth. Grease and line two 7”/18cm sandwich tins
and place mixture into prepared tins. Bake until well
risen, golden brown and firm to the touch.
Fan oven: 150-160°C
Conventional oven: 170-180°C
Gas Mark 4
Variations: coffee – 1 tbsp instant coffee, mixed
with water; Chocolate – 2 tbsp cocoa powder, mixed
with water; orange/lemon – add grated rind of 1 fruit
and 1 tbsp juice.
Dough bladeDough blade
Dough blade
Dough bladeDough blade
Quiche Lorraine
Serves 4
Preparation time 15 minutes
Cooking time 45 minutes
Filling
120g bacon
2 eggs, 100ml milk
130g fresh cream
Ground nutmeg Salt and pepper to taste
Pastry
70g butter
130g flour
40ml water
salt
Shortcrust pastry
350g (12oz) plain flour
175g (6oz) butter or hard margarine
Pinch of salt
45ml (3tbsp) cold water (approx)
Place the dough blade in the processor bowl. Put
flour and salt in processor bowl and process for 2
seconds to sift. Add fat, cut into small pieces, and
process for 5-10 seconds. Add water gradually and
process until the pastry forms a ball. Leave pastry
in a cool place for 30 minutes before using. Makes
350g (12oz) pastry.
7
Page 8

Fruit cake
100g (4oz) butter or margarine
100g (4oz) caster sugar
2 eggs, beaten
225g (8oz) self raising flour
60-90ml (4-6 tbsp) milk
5ml (1tsp) mixed spice
225g (8oz) dried fruit
Using the dough blade, place the cubed
margarine and sugar into the processor bowl. Mix until
soft and creamy, scraping down the sides of the bowl
as necessary. Add eggs, one at a time, scraping
down after each addition. Add the sieved flour, spice
and milk and mix on a slow speed until all the
ingredients are just incorporated. Add the fruit and
pulse to incorporate. Turn the mixture into a greased
and lined 7” (18cm) round cake tin. Bake for 1-1 ¼
hours.
Fan oven: 150°C
Conventional oven: 170°C
Gas mark 3
Cleaning the processor
and attachments
1 Switch the processor off and unplug
from the electrical socket.
2 The lid, pusher, bowl and processor tools
can be washed in hot, soapy water.
Note: extreme care must be taken
when washing the metal chopping
blade, as this item is extremely
sharp.
3 The processor bowl, cover, pusher,
blades and metal plates may be washed
in a dishwasher.
4 Never immerse the processor body
in water or any other liquid. It may be
wiped over with a clean, damp cloth – but
only when unplugged from an electrical
outlet.
White bread
5ml (1tsp) yeast
150ml ( ¼ pint) warm water
2.5ml ( ½ tsp) sugar
250g (9oz) strong plain white flour
5ml (1tsp) salt
Mix the yeast with the warm water and sugar and
leave for 10 minutes. Place the dough blade in the
processor bowl and put the flour and salt in the bowl.
With the machine on a low setting, add the yeast
mixture through the feed tube. Increase the speed
and process for 1 minute, or until the dough is
smooth and supple. Cover and leave to rise in a
warm place for about an hour or until double in size.
Turn dough on to a lightly floured surface and
knead lightly to remove the air bubbles. Shape into a
rectangle and place in a greased 1lb loaf tin. Cover
and leave in a warm place to prove for 30-35
minutes.
Fan oven: 200°C
Conventional oven: 220°C
Gas mark 7
Morphy Richards has a policy of continuous improvement in product quality and design.
Morphy Richards products are intended for household use only.
The Company, therefore, reserves the right to change the specification of its models at any time.
Morphy Richards Limited, Mexborough,
444/8502/50 Rev 3
South Yorkshire, England, S64 8AJ
 Loading...