


‘Short Cuts’ Cordless hair clipper
‘Trim & Shape’ beard trimmer
Model 20012
Instructions

Thank you for buying your new Morphy Richards, Mark Hill cordless male hair trimmers. Please
read these instructions carefully before use and keep in a safe place for future reference.
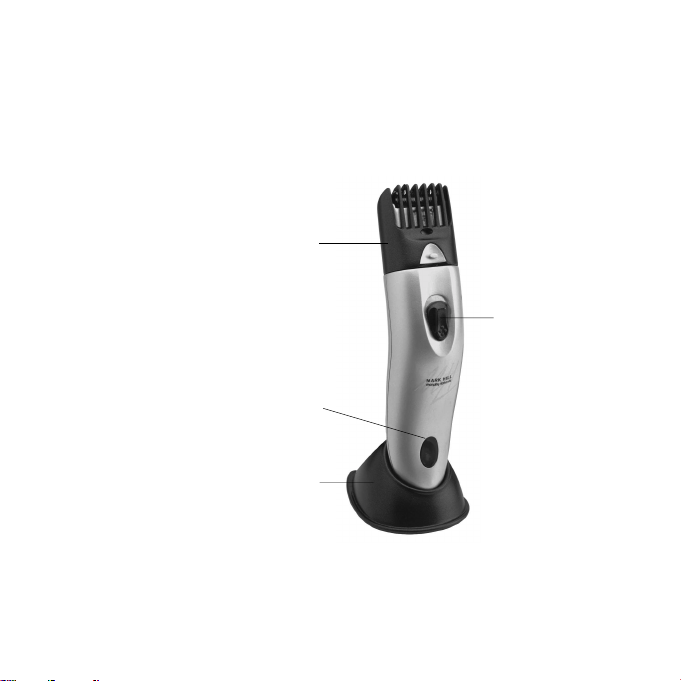
Key Features for
your clippers
Short length
comb attachment
On/off switch
7” comb
Trimming
scissors
Blade
cleaning
brush
Recharging stand
Recharging
indicator light
Large length
comb attachment
1ncludes
• Ergonomic shape for comfortable cutting
• 2 unique comb attachment with 10 cutting lengths
• Can be used both cordless or with mains adaptor (included)
• Durable steel blades
2
5” comb
Blade oil

Attachment combs
Your clipper comes with 2 adjustable
attachment combs with 5 settings each.
• Small attachment comb is adjustable to
the following hair lengths.
1
/8”, 1/4”,
3
/8”,
5
/8”,
3
/4”
4mm, 8mm, 12mm, 16mm, 20mm
• Large attachment comb is
adjustable to the following hair lengths:
1”, 1 1/8”, 1 1/4”, 1 1/2”, 1 5/8”
24mm, 28mm, 32mm, 36mm, 40mm
Each hair length option is clearly
marked on the outside surface of each
attachment arm. Y ou may use your hair
clipper with or without a comb attachment
depending on the desired haircut.
Instructions for use
1 Hold the desired
comb at the two
grip points, teeth
facing up. (fig 1)
(fig 1)
2 Slide the arms of the comb attachment
carefully into the grooves of the clipper
body until the comb teeth sit firmly
against the clipper blade. (fig 2) Push
down on the
comb attachment
until it snaps into
the clipper grip
points creating a
‘clicking’ sound.
3 Choose desired
length setting by
pressing both grip points firmly with the
thumb and forefinger and align the
length indicator on the attachment
comb arms with the notch mark on the
unit. There will be an audible click as
the attachment comb slides into each
setting (fig 3). Note both grip points
must be pressed
and held
simultaneously to
(fig 3)
move the
attachment comb
up and down.
4 Once the desired
setting is chosen,
release the grip points to lock the
comb into position.
5 Turn the power on by sliding the power
switch up.
3
(fig 2)

For even cutting, allow the comb
attachment cutter to cut its way through the
hair. Do not force it quickly.
Comb hair frequently to remove trimmed
hair and to check for uneven strands.
To remove the comb attachment
1 Lower the comb attachment to the
lowest position.
2 Hold the unit in your hand with the
power switch facing the palm of your
hand.
3 With your thumb press upwards along
the centre of the
comb. The comb
attachment will
pop out (fig 4).
BEC"
Charging
Before first use be
sure to fully charge
the clipper.
1 Plug the smallend
of the power
adaptor into the
clipper body and
plug the adaptor
into the electrical
socket (fig 5).
BEC#
2 The clipper can also
be charged when
positioned in the
stand. Plug the
small end of the
adaptor into the
recharging stand
(fig 6) and
plug the adaptor into the electrical
socket.
3 The red power light will illuminate when
charging. When the power switch is
turned on, the light will go dark. A full
charge will take approximately 7 hours.
BEC$
Cordless use
Be sure the unit is fully charged.
1 Unplug the adaptor from the clipper unit
and slide the power switch to turn the
power on.
Should you notice a drop in power during
cordless use, simply plug the appliance in
and use it directly from the electrical socket.
When finished clipping, turn the clipper off
by sliding the power switch down.
If the clipper has not been used for a
considerable length of time, recharge it
completely before use.
4
Corded use
1 Be sure the power switch is in the off
position.
2 Plug the clipper into the electrical
socket.
3 Slide the power switch to the on
position. When finished clipping, turn
the clipper off by sliding the power
switch down.
Key Features for your
trimmers
Comb attachment with
5 cutting lengths
On/off switch
Recharging
indicator light
Storage stand
Includes
• Ergonomic shape for comfortable cutting
• 1 unique comb attachment with 5 cutting lengths
• Mains operated (adaptor provided) and rechargeable for your convenience
5

Operating your trimmer
1 Push the on/off switch upward to
operate and down to turn off the
trimmer. Before using the trimmer
charge the unit overnight.
Make sure the charging indicator light is
on showing correct charging.
To Recharge
1 Use only the adaptor (charger) provided.
2 Charge takes 8 hours.
3 Connect plug to trimmer and plug
adaptor into the electrical socket.
4 When charging, the recharging indicator
will light up showing correct recharging.
Attachment comb
(trimming guide)
Y our male grooming system provides 1
adjustable attachment comb.
Provides 5 settings of cutting length
2mm, 5mm, 8mm, 11mm and 14mm.
Trim against the direction of the hair
growth. Start at a longer setting (11mm or
14mm) to prevent accidentally trimming hair
too short.
As you become familiar with the setting,
adjust the guide to the desired trimming
length.
To trim beards
1 Comb hair outward so they are at a
maximum height and in
the same direction.
2 With the trimming
guide in place, set the
guide to the desired
setting.
3 Slide the On/off switch
to the ‘on’ position and
begin trimming.
(figure 1)
To trim outer edge of beard
and add definition
1 Hold the trimmer
diagonally with the front
of trimmer facing away
from you.
2 Start at the chin and
move back towards the
ear. (figure 2) Follow
the jawbone to cut away longer hairs on
the outer edge of the beard.
To define the beard line
1 Hold the trimmer vertically with the
front of the trimmer facing you.
2 Start with the trimmed edge of the
beard and with a downward motion,
trim the area directly under the
beard line.
6
To thin and taper beard
1 Use the moustache comb to hold hairs
in place while trimming.
2 Hold the trimmer with front facing away
from you. Trim hair ends using an
upward motion.
To trim moustache
(with trimming guide)
1 Ensure that the trimming guide is in
place to avoid over trimming the hair.
2 Comb hairs outward to the maximum
height and in the same direction.
3 Set the trimming guide to the desired
setting.
4 Hold the trimmer vertically with the
front facing you and trim hairs using a
downward motion following the
direction of your hair growth or you
may trim against your hair growth.
Without trimming
guide
1 Place a finger on the
upper lip only to lift
hair up, away from
the skin. Trim hairs
using an upward
motion.
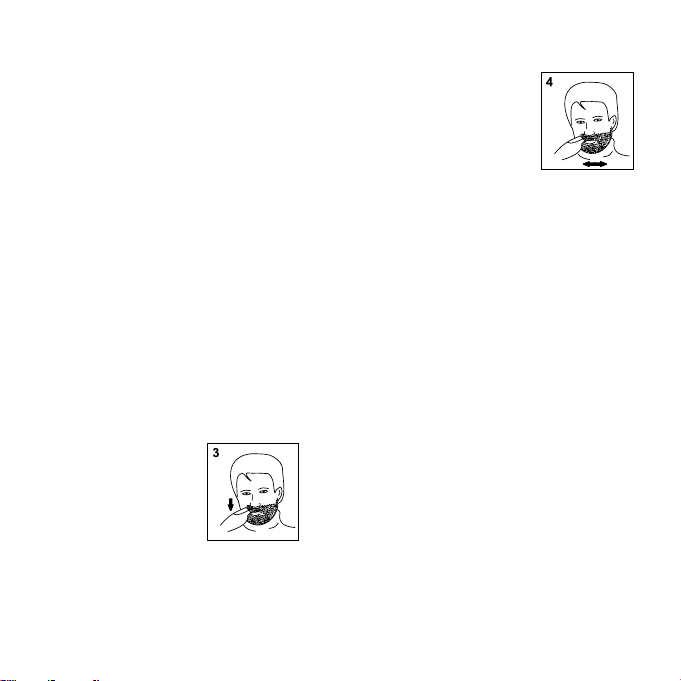
2 After achieving desired length, use a
downward motion to blend
moustache hairs. (figure 3)
3 Hold trimmer perpendicular as shown
and move cutters
sideways to achieve
the desired line above
the lip. (figure 4)
To trim side burns
1 Comb side burns
following the direction of your hair
growth.
2 Trim side burns using a downward
motion.
Stubble look
1 Position trimmer guide to the 2mm
setting and hold the trimmer
horizontally with the front of the
trimmer facing downwards or upwards.
2 Trim hairs using a downward or upward
motion following the direction of your
hair growth.
Note : For an even closer stubble look,
remove the trimmer guide and repeat
the same procedure.
Trimmer & clipper Oil
(use blade oil)
1 To lubricate the blades use one or
two drops of oil and spread over
the cutters. Do not over oil. Excess oil
will cause damage to your product.
7

Important safeguards
When using your appliance, basic
safety precautions should always be
followed.
1 Read all instructions carefully.
2 Use the appliance for its intended use
only.
3 To protect against the risk of electric
shock, do not immerse the appliance in
water or other liquids.
4 Before use, make certain blades are
aligned properly.
5 Do not use this appliance with damaged
or broken combs or with teeth missing
from the blades as injury may occur.
6 Never use the trimmer on wet hair.
7 Switch off before placing down.
8 Switch off before fitting or removing
attachments.
9 In the interests of environmental safety
dispose of batteries safely.
8

Care and maintenance for
trimmer & clippers
• Never clean, remove or replace trimmer
guide with the motor on.
• Do not apply any pressure to cutters.
• Do not touch the cutters with hard
objects as thismay damage the cutter.
• Do not use while bathing, showering or
immersing the unit in water or other
liquids as damage to the trimmer may
occur.
• Never use harsh or corrosive cleaners
such as benzene or bleach.
9

Two Year Guarantee
It is in your interest to retain the retailers receipt as proof of purchase. Please quote the model
number if the product develops a fault. This number can be found on the handle of the product.
All Morphy Richards products are individually tested before leaving the factory. In the unlikely
event of any appliance proving to be faulty within 28 days of purchase it should be returned to the
place of purchase for it to be replaced.
If a fault develops after 28 days and within 24 months of original purchase, you should contact the
helpline number quoting the model number of the product, or write to the address below. You will
be asked to return the product (in secure packaging) to the address below along with a copy of
proof of purchase.
The After Sales Division
Morphy Richards Ltd
Mexborough
South Y orkshire
England
S64 8AJ
Helpline (8:30-5:00 Mon-Thur/ 8:30-4:00 Fri) UK (local rate) 08450 777700,
Republic of Ireland 1800 409119
Morphy Richards Website www.morphyrichards.co.uk
Morphy Richards products are intended for household use only. Morphy Richards has a policy of
continuous improvement in product quality and design. The Company, therefore, reserves the right to
change the specification of its models at any time.
446/8001/44 Rev 1
Imported by : Morphy Richards Ltd, Talbot Road, Mexborough, S64 8AJ
 Loading...