

Page 1
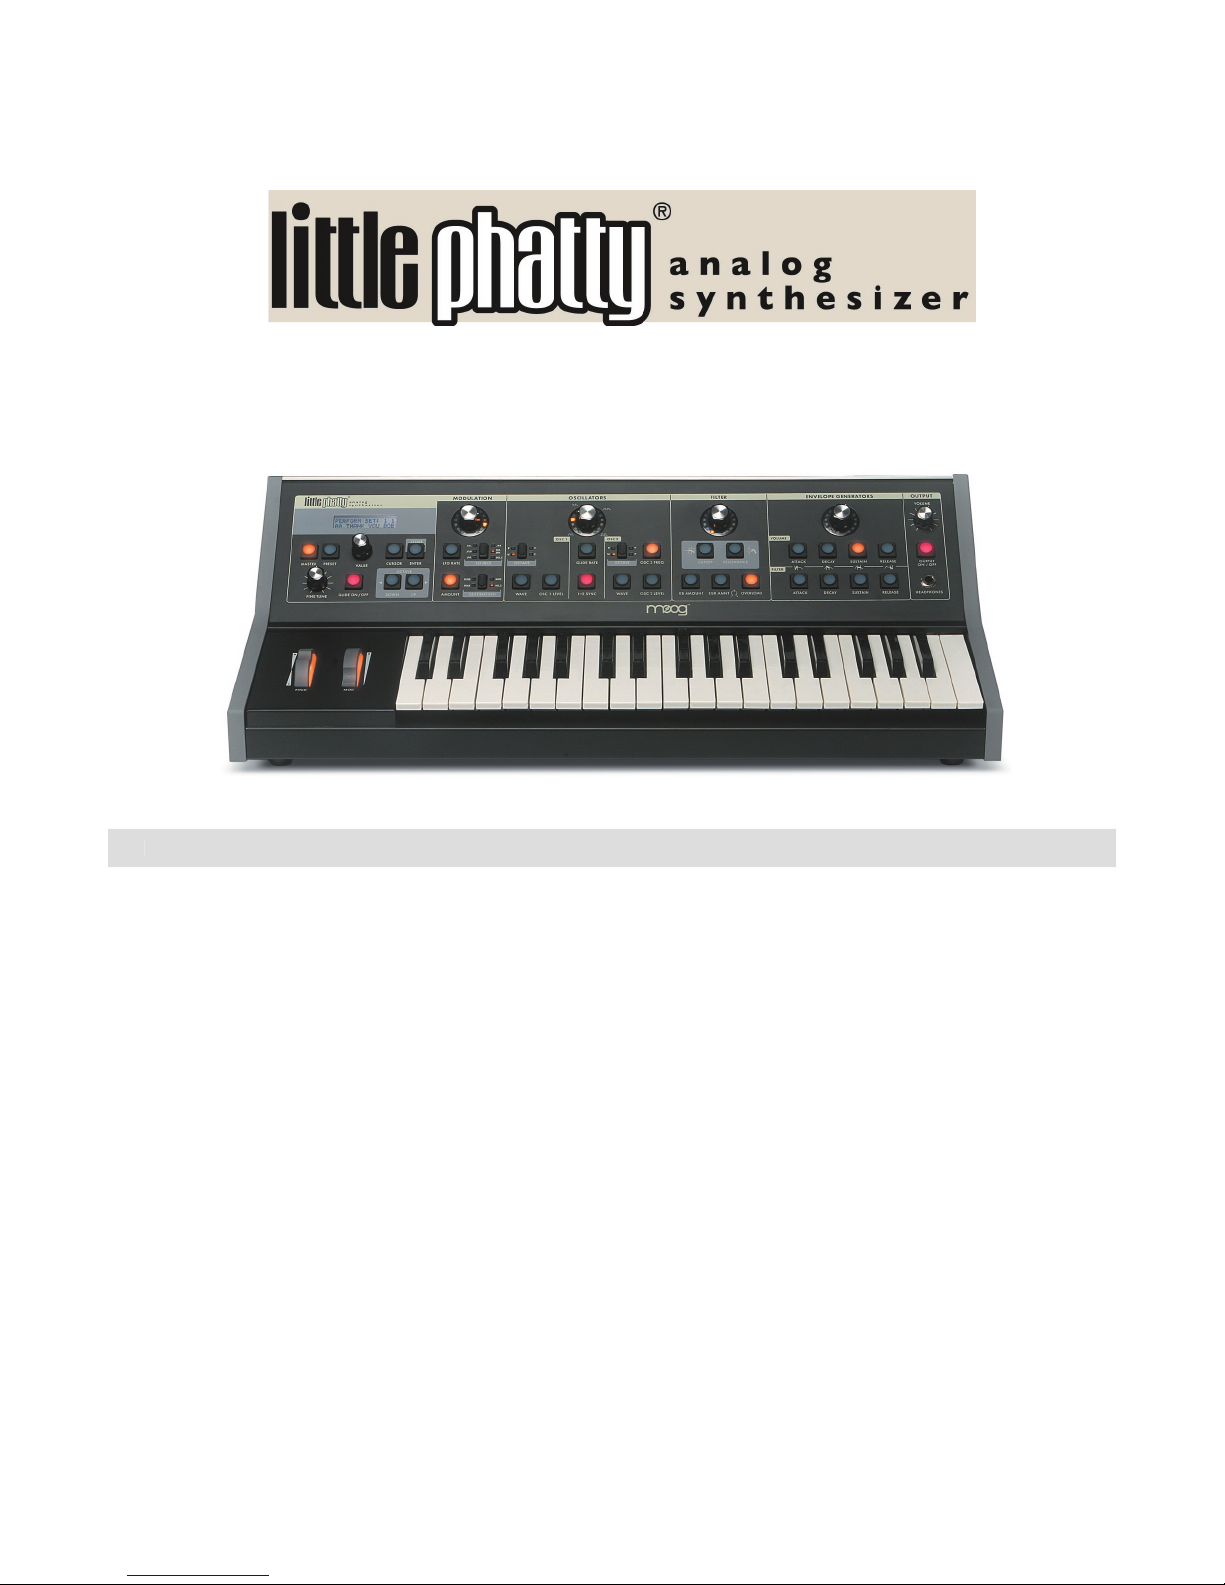
Table of Contents
THE BASICS
5
Setup and Connections ........................................
5
Overview and Features ........................................
7
Signal Flow ....................................................................
9
THE COMPONENTS
A. Oscillator Section ................................................
C. Envelope Generators Section .....................
G. Input/Output Panel ............................................
20
THE USER INTERFACE
23
25
A. Menus ........................................................................
25
C. System Exclusive .................................................
APPENDICES
A – Master Mode Menu Flow Chart ......................
46
47
C – Tutorial .............................................................................
48
53
54
54
G – Using the CP-251 with the Little Phatty .....
55
57
GLOSSARY ......................................................................................
58
Page 3
Page 2

chosen to be a Moog customer. We look forward to serving you with this product and many more Moog
The Little Phatty Stage Edition is a great performance synth. If you read through
this manual carefully and
The Little Phatty sounds great and is intuitively easy to use. We are hoping you are reading this manual after
a week or so of sleepless but blissful nights of playing the Little Phatty. The Phatty user interface was de-
signed to have you up and running in a matter of minutes.
The Little Phatty is built with care and pride by our team in Asheville, N.C. If you have a chance to come to
the beautiful mountains of Western North Carolina, call and come by and see us. We would be happy to
take you on a tour of the factory.
The look of the Stage Edition is something we hope you appreciate as well. Moog products are known for
their durability and we are con dent the Phatty will uphold that tradition. One of the new features of the
aspect of the product.
for the product. The Engineering team of Cyril Lance, Steve Dunnington, and Mike Peio made it happen.
The design of any product is always the product of many minds but the Phatty design starts with Axel
The software for the LP was developed by the team of Chuck Carlson, Cyril Lance, and Peter Ning. Thanks
to Barry Darnell, one hard working dude, for our board designs. Thanks also to our Beta unit testers: Amos
sign process: Brian Kehew, Roger O’Donnell, Tom Brislin, Nigel Hopkins, Michael Vallarella, Keiichi Goto, Tomo
the success of this project. And nally, nobody takes more pride in what they do than the production folks
at Moog Music led by Mike Peio, Plant Manager.
you and expect this product will provide a lifetime of musical enjoyment.
Page 4 Page 5
Page 3

LP User’s Manual - The Basics
The Setup and Connections section below explains how to unpack, setup and connect the Little Phatty, and
The Components section offers detailed explanations of the components that create and modify sound.
and subtractive synthesis.
well as the MIDI Interface Speci cation, Appendix D.
Throughout the manual you will see icons that point out additional information:
This icon indicates an important note concerning the operation of the Little Phatty.
This icon indicates a useful performance or programming tip.
This icon indicates technical information for the advanced user or the technically curious.
The Little Phatty is shipped with the following items:
2. Power cord
4. Warranty registration card
What you will need
2. A 1⁄4” instrument cable and ampli er, or a pair of headphones
Setup and Connections
Page 4

LP User’s Manual - The Basics
Page 7
LP User’s Manual - The Basics
Set up
You will need a sturdy keyboard stand or table that will support a 22 lb. analog synthesizer and will not
topple if you play hard. Use caution when lifting the Little Phatty out of the carton, and be sure to save the
carton and all packing material in case you need to ship the Little Phatty for any reason.
cord.
The Little Phatty’s universal power supply will operate with a power source from 90 to 250 Volts AC,
50/60Hz.
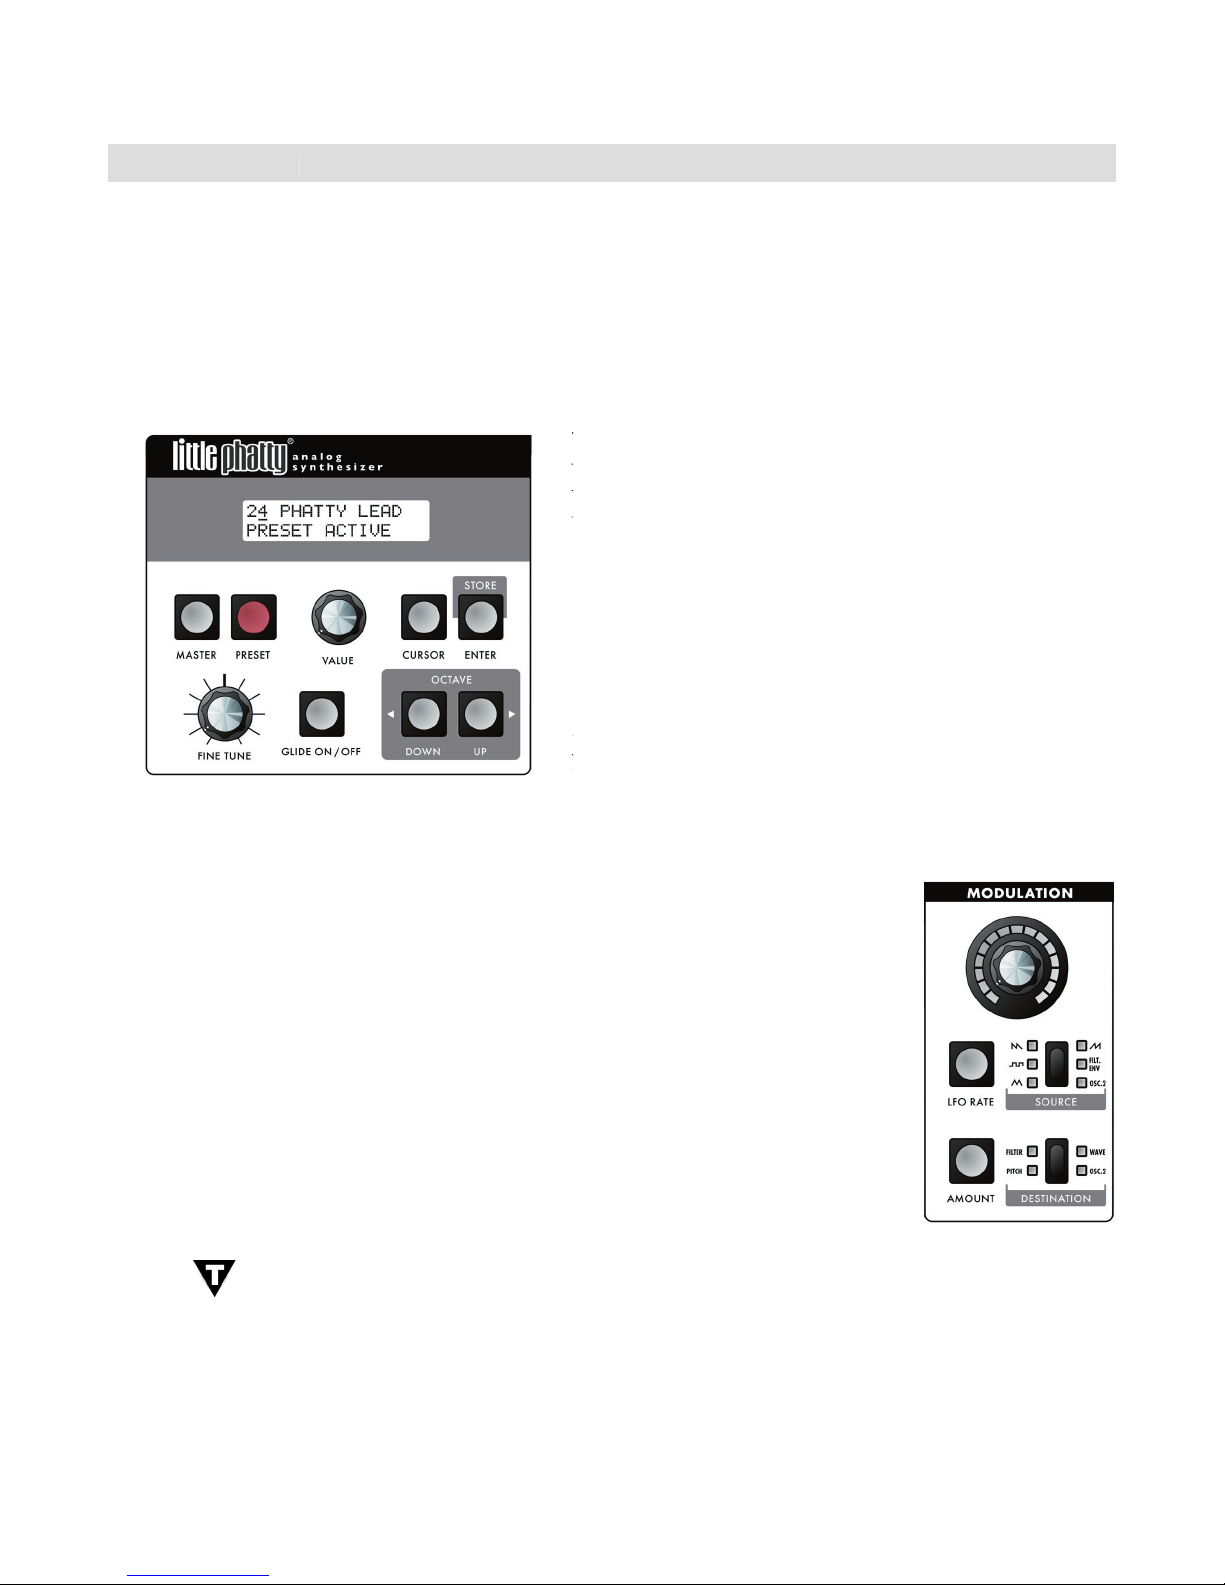
Turn the power on. You will see the LCD screen light up and display the message:
Version X.x
After a few seconds the start-up screen disappears and the current preset will appear in the display. The
button will be illuminated in amber, the name of the current preset location and preset name will be
displayed on the top line of the LCD screen, and the message ‘PRESET ACTIVE’ will be displayed on the lower
Set the Little Phatty’s Volume control to minimum before connecting to an ampli er or headphones. Adjust the
ampli er level for a comfortable listening level, and then slowly bring up the Little Phatty’s volume. Make sure
the
Output ON/OFF
switch is illuminated red – this means the output is turned on.
Start Playing!
VALUE
dial to scroll through the presets. All preset locations (00 – 99) are loaded with sounds from
the factory. There are a total of 100 locations in memory for presets – all are user programmable. Note that
once a preset is called up, you can tweak the parameters to your liking using the front panel controls. Any
changes made to the current preset will cause the
button to change its illumination from amber to red,
and the lower line of the LCD screen will change to ‘PANEL ACTIVE’.
to return to the original sound, press
button until you change presets. If you wish to save your changes – refer to the
section on Storing Presets on page 23. Any changes made to a preset will be lost if they are not saved once you
change to a new preset.
Warranty registration
web site at www.moogmusic.com and click on the “Product Register” tab. If you complete all the requested
and 125 degrees F), but the LP’s voltage controlled oscilators (VCOs) may not remain in tune.
The LP’s VCOs use a heated chip design that take a short time to warm up. The warm up period
Page 6
Page 5
LP User’s Manual - The Basics
The Little Phatty (LP for short) is a monophonic analog synthesizer that is a descendant of the classic Minimoog
analog envelope generators and a exible modulation matrix. The LP’s front panel has four variable-function
edit controls for real time adjustment of the Modulation, Oscillator, Filter and Envelope Generator parameters,
the controls for Preset selection and management, adjustment of global parameters, and System Exclusive MIDI
function and utilities. The LP features 100 factory preset sounds, which can be modi ed or replaced by your
own sounds.
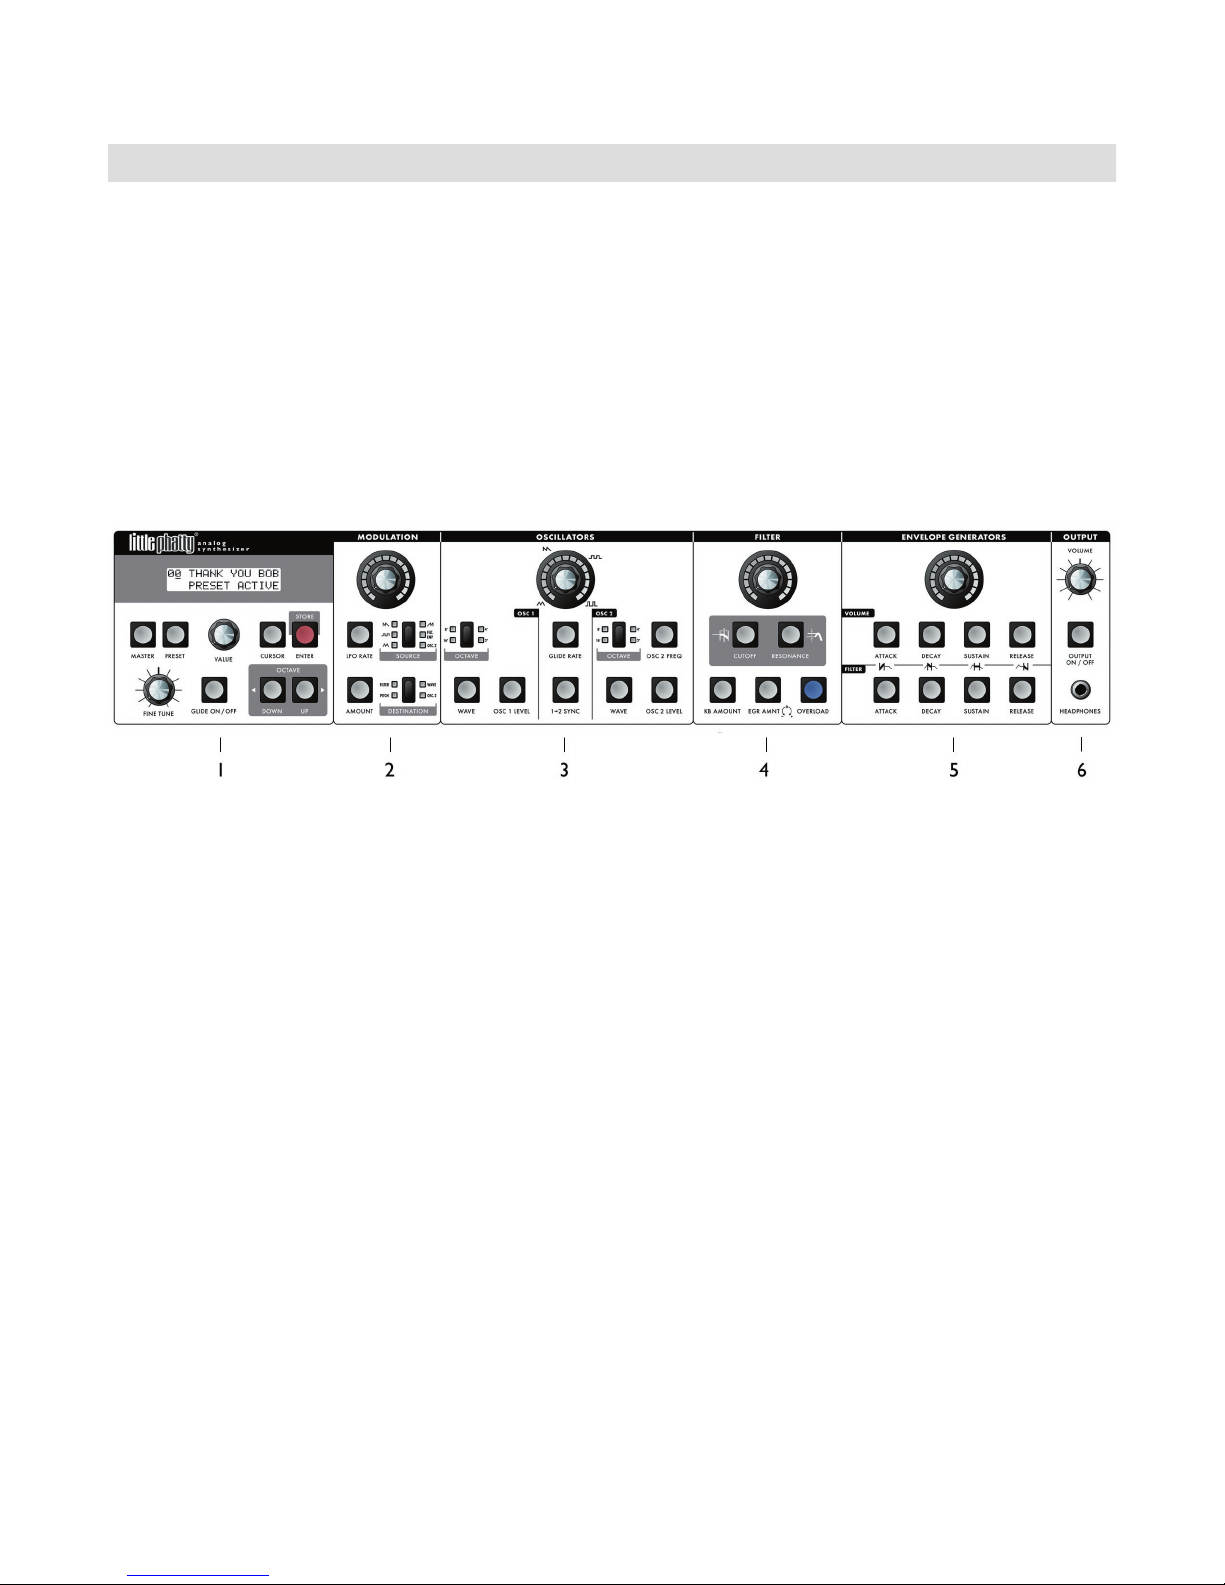
The LCD display and User Interface - provides controls to access presets and other software functions.
The Fine Tune control is located here, along with switches for Glide On/Off and Octave transpose.
2.
The Modulation section - features a programmable modulation matrix. The Modulation section has
controls to select the modulation Source (LFO Triangle, LFO Square, LFO Sawtooth, LFO Ramp,
through the Modulation Wheel; when the Mod Wheel is all the way forward the Mod Source passes to
the Mod Destination at the level set by the Mod Amount.
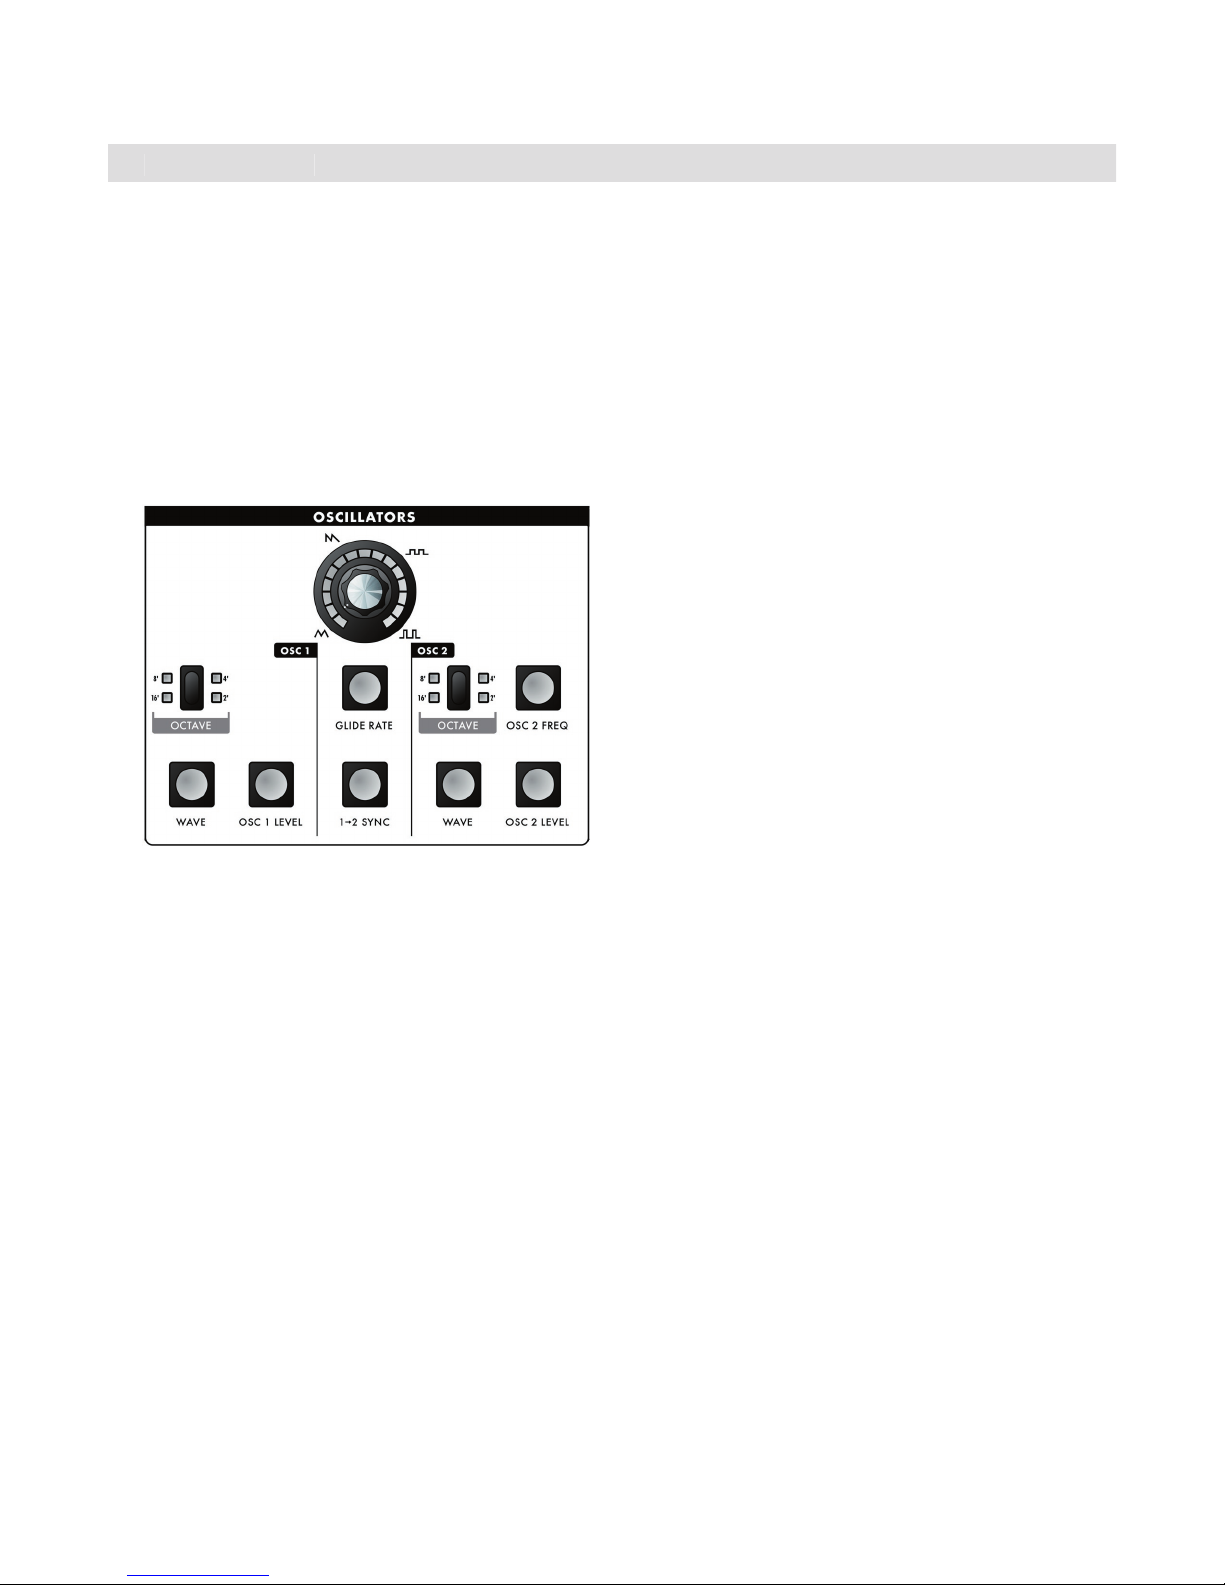
The Oscillators section - features two analog oscillators, each with individual Octave, Level and Wave-
form controls. Additional controls are provided for tuning the second oscillator relative to the rst,
setting the Glide Rate, and engaging Oscillator Sync. The oscillator outputs are summed together along
with the External Audio Input and routed to the Filter section.
4.
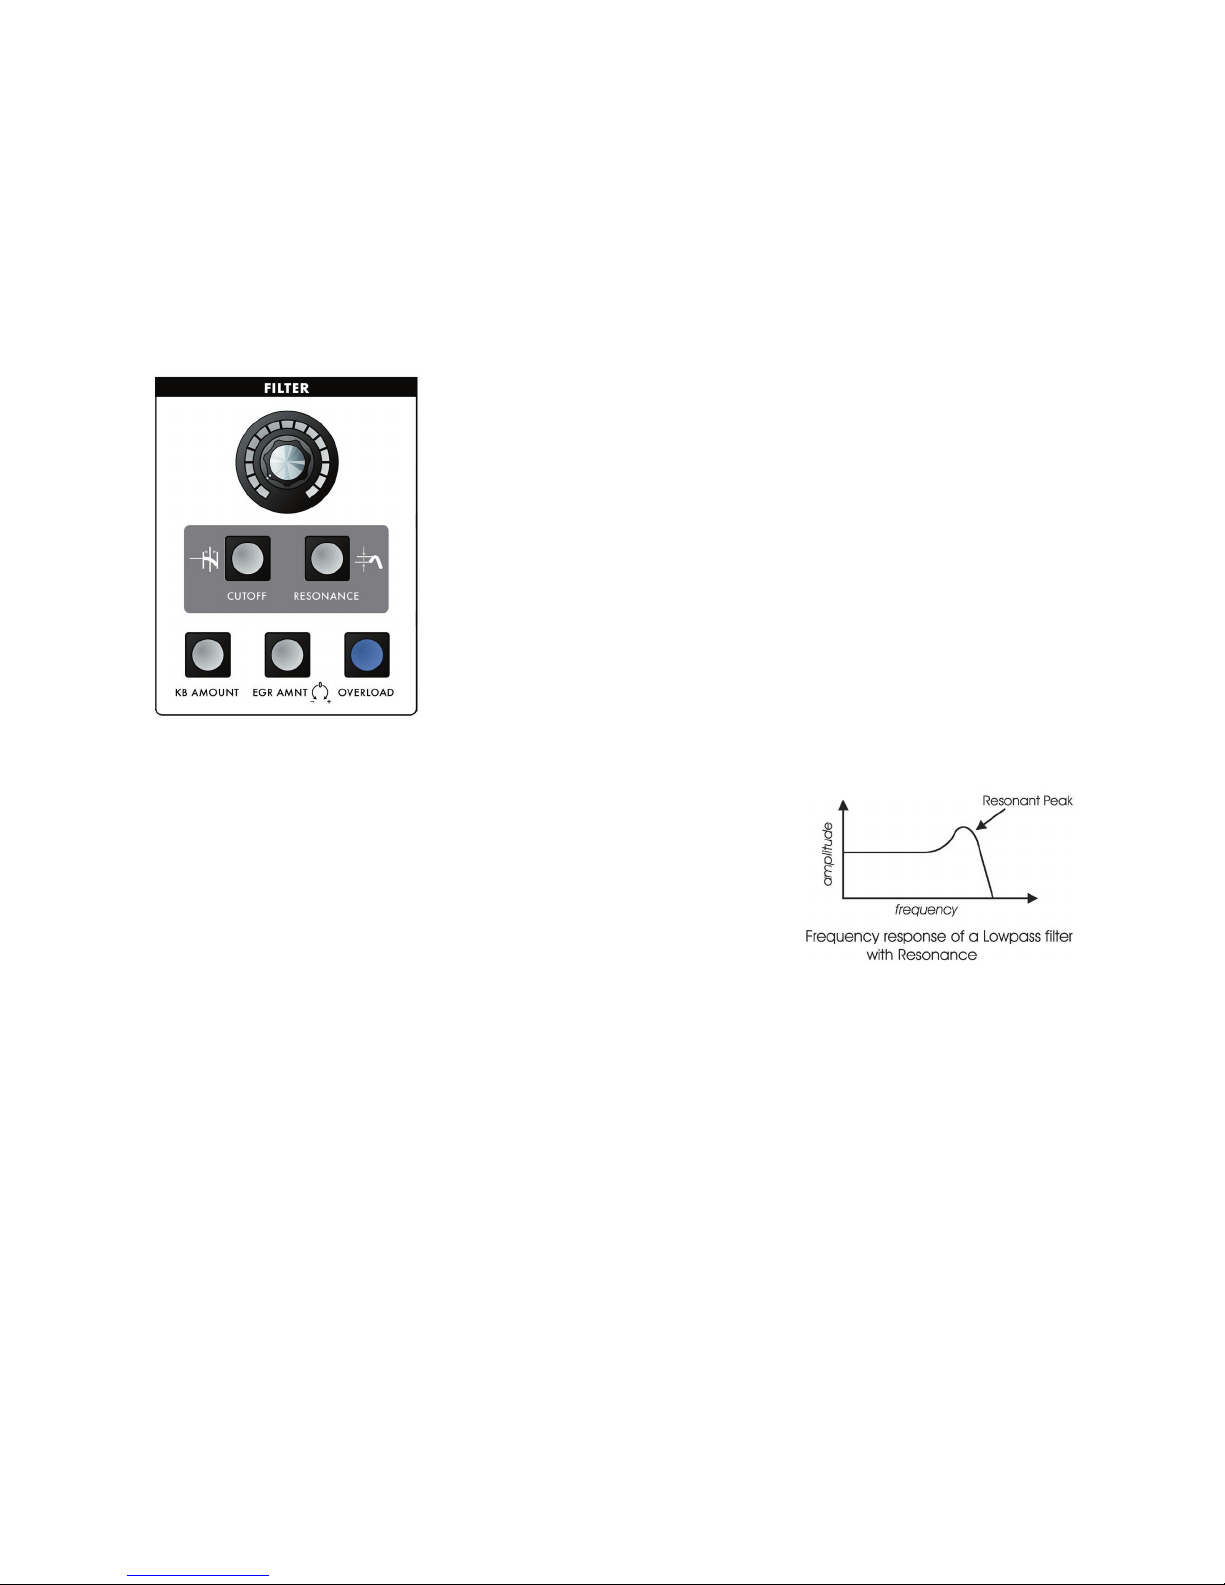
The Filter section - features the classic Moog 24 dB/Octave ‘ladder lter’, and includes controls for
adjusting Cutoff Frequency, Resonance, Keyboard Amount, Envelope Amount, and Overload. The output
of the Filter is routed to the output Voltage Controlled Ampli er (VCA), which is controlled by the
Volume Envelope Generator.
5.
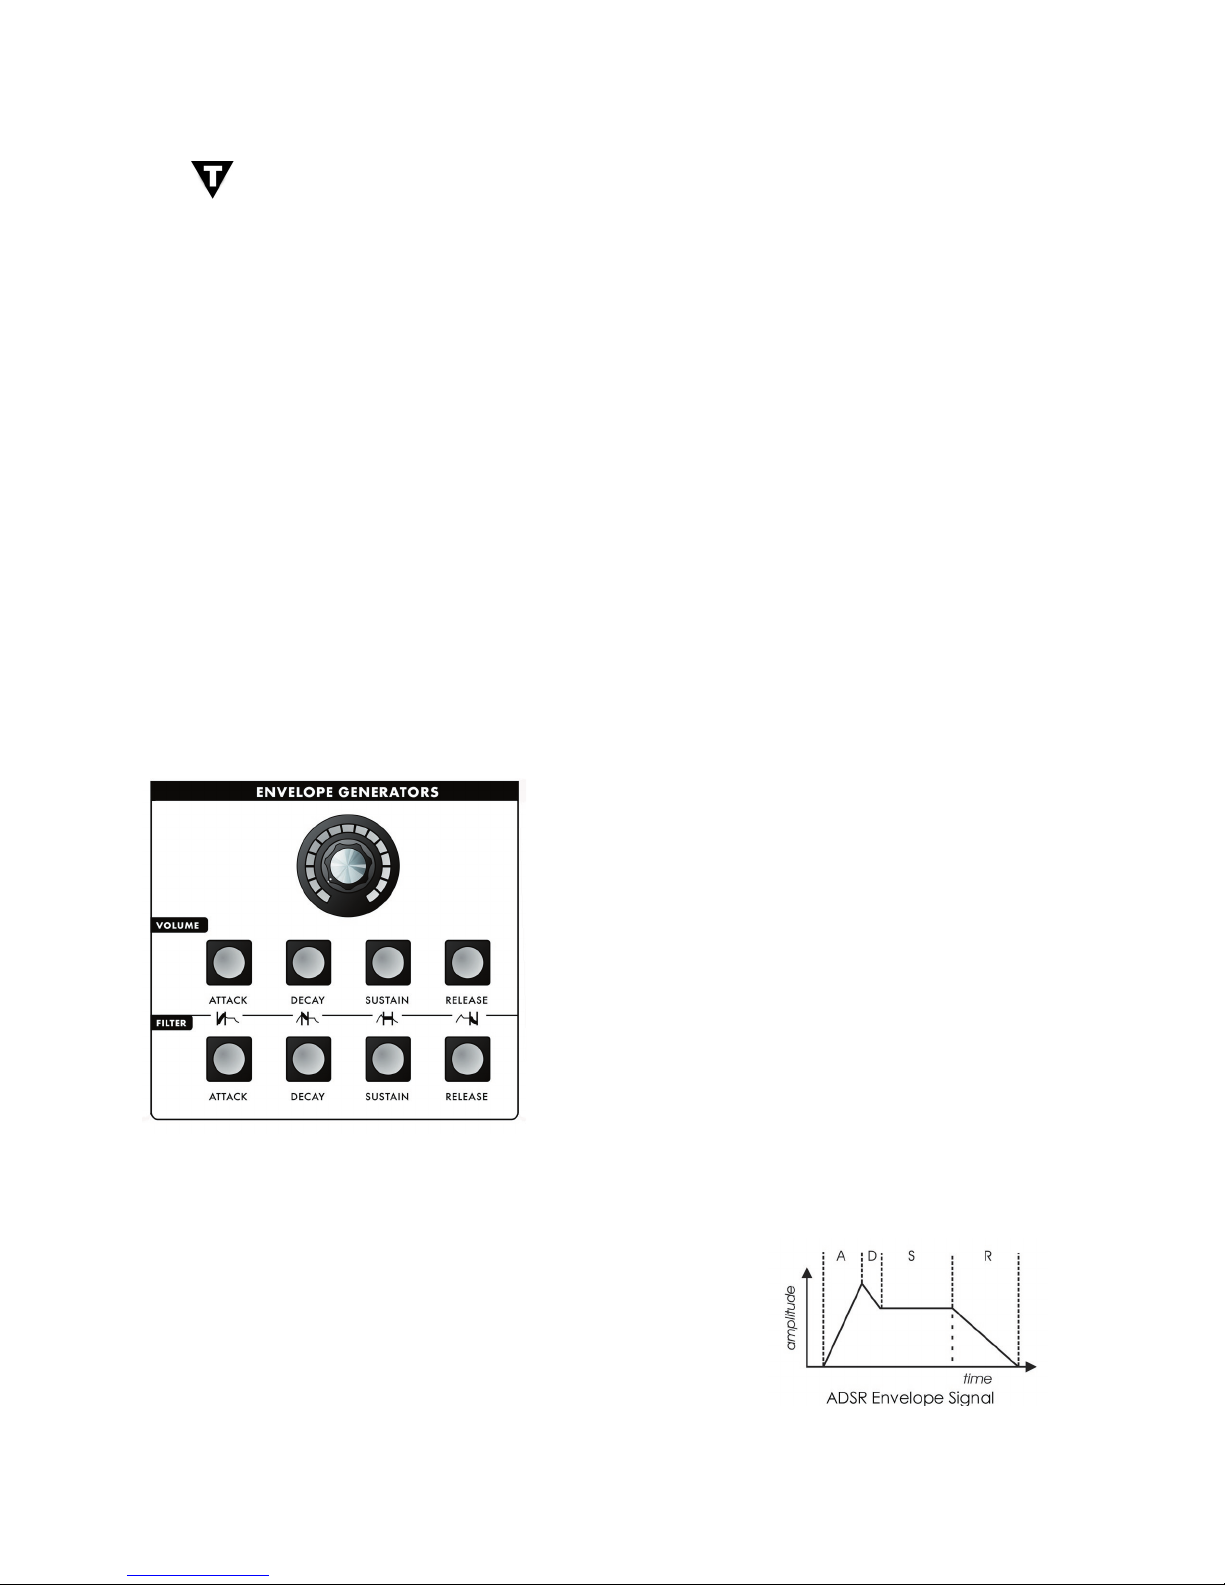
The Envelope Generator (EG) section - contains two ADSR-style envelopes, one for the Filter and one
for the Volume. The EG section includes controls for adjusting the Attack, Decay, Sustain and Release
Page 7
Page 6
LP User’s Manual - The Basics
Page 9
LP User’s Manual - The Basics
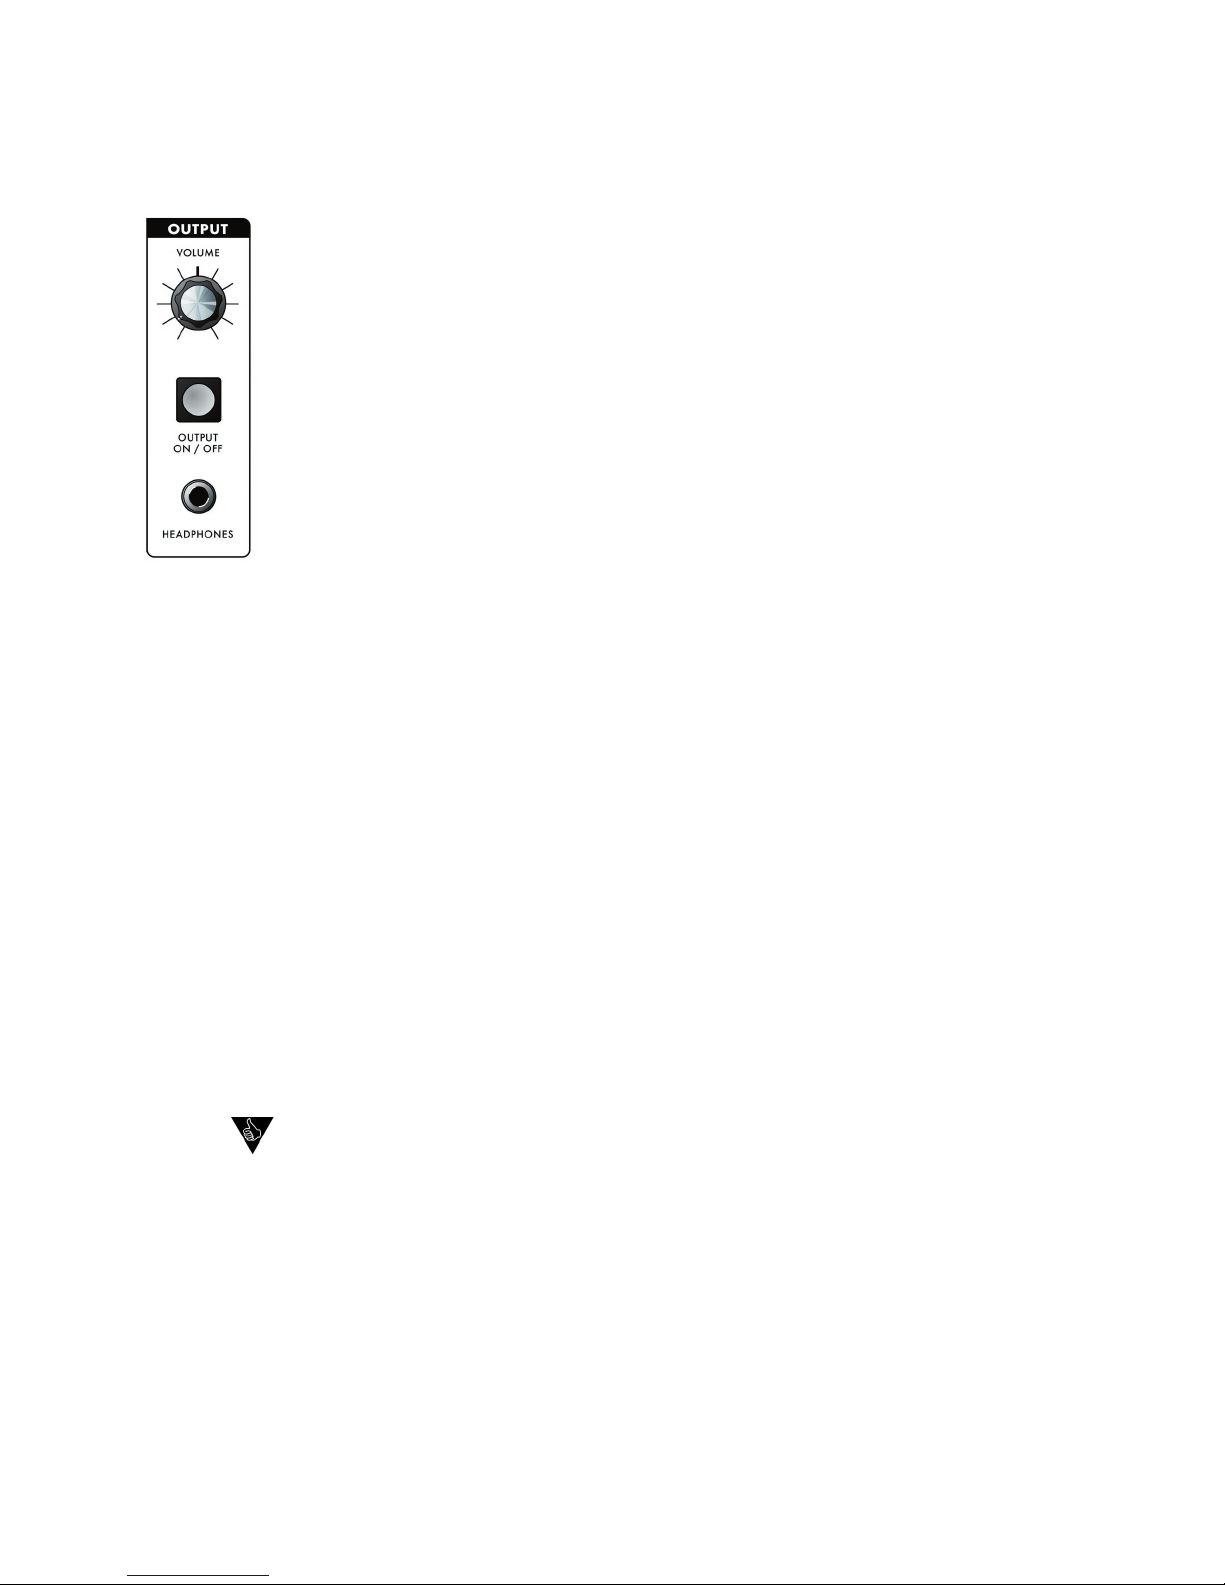
The Output section - includes controls for adjusting the Master Volume, a switch to toggle the output
on and off, and a headphone jack. The Master Volume is used for setting the levels of both the output
and the headphones. The Output On/Off switch affects the Audio Output, but not the headphones.
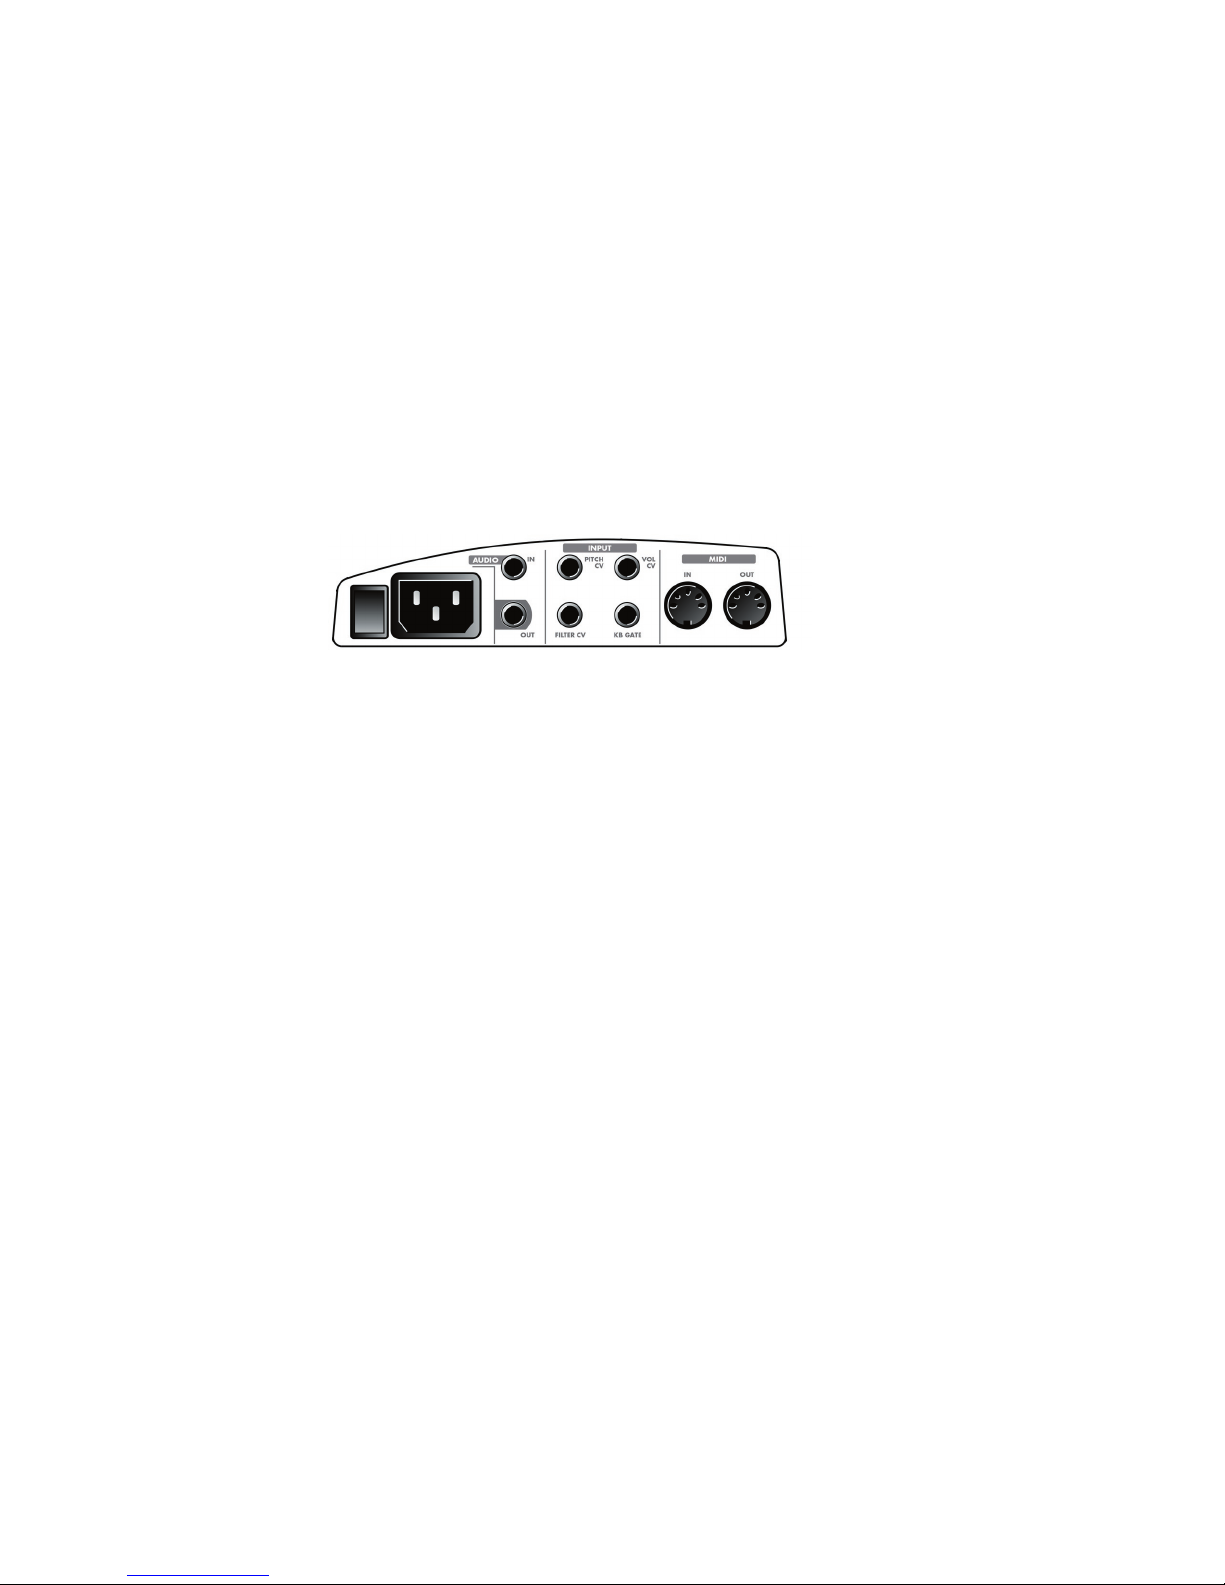
Side Panel:
The side panel provides connections for Power, MIDI, Control Voltage Input and Audio I/O:
2.
Audio jacks – provides monophonic audio input and audio output connections. The Audio Input jack
allows external signals to be processed by the Little Phatty.
signal. These inputs allow the LP to be controlled from expression pedals, or CV devices like the
Page 8
Page 7
LP User’s Manual - The Basics
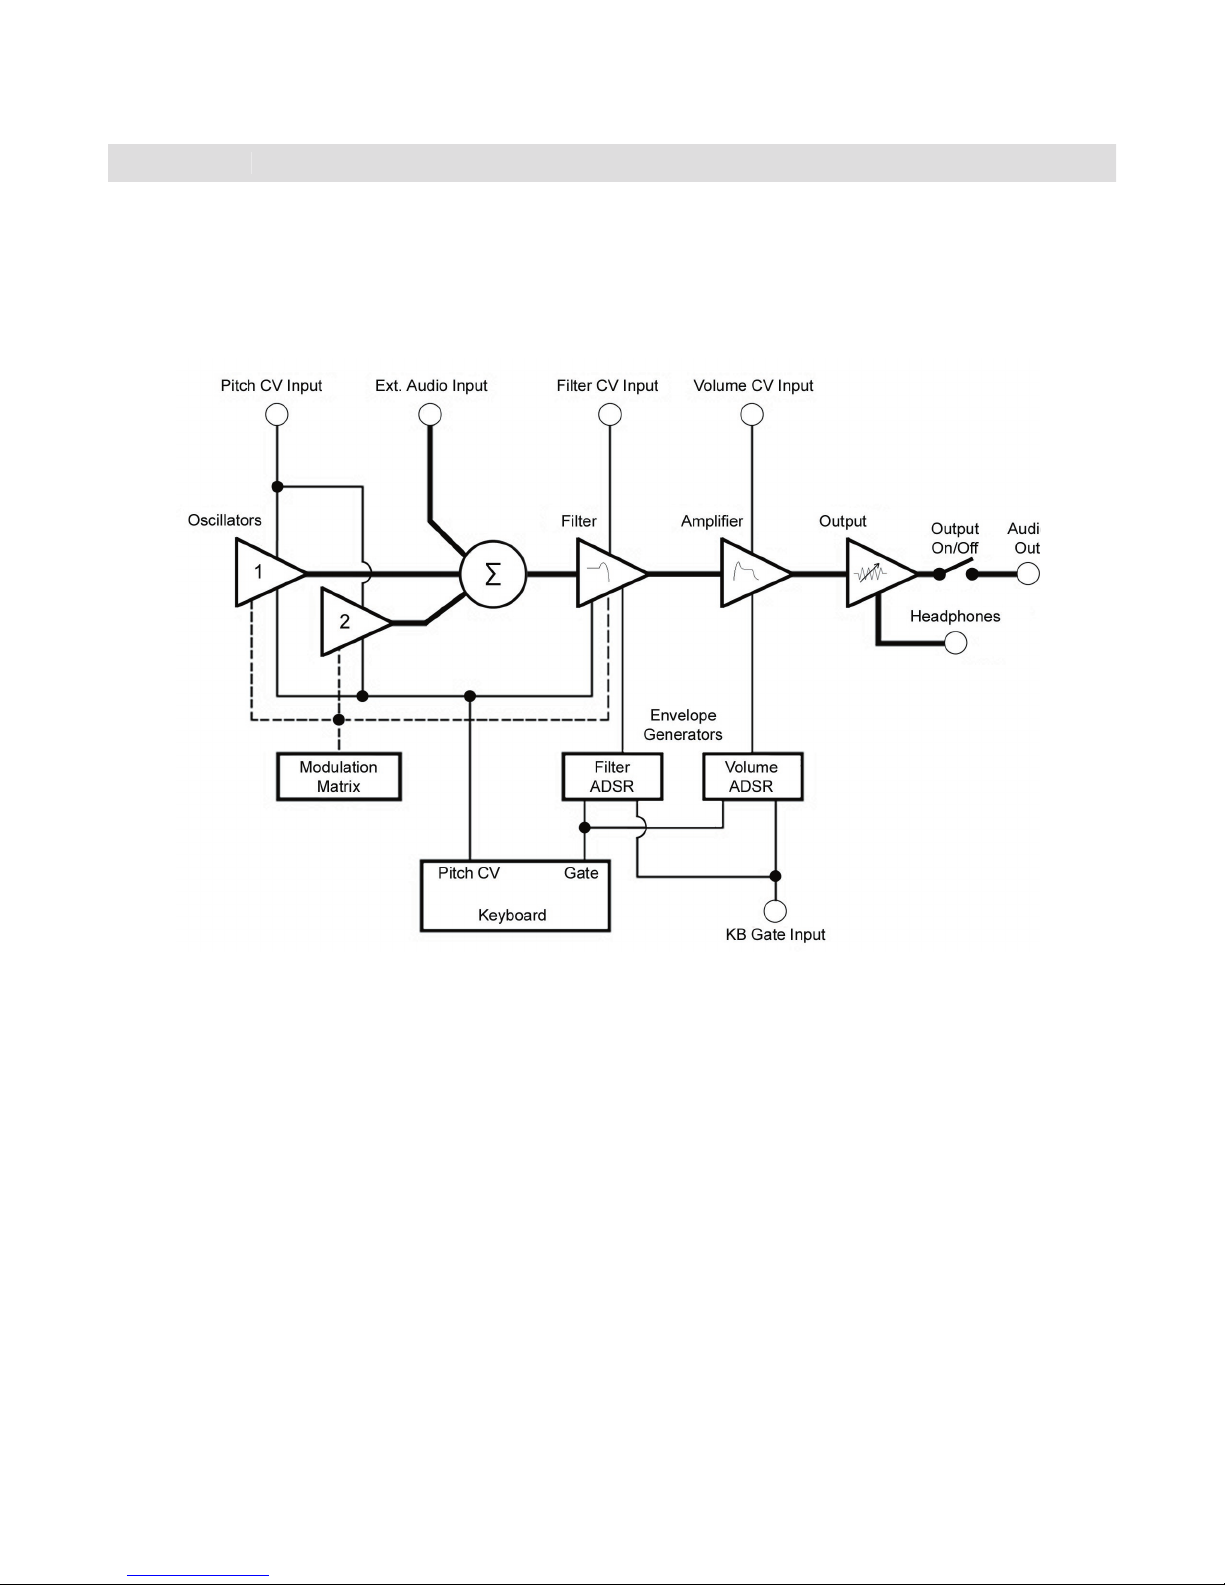
To understand the operation of the Little Phatty, take a look at the diagram below. The diagram shows the
ow of the audio, control voltage and modulation signals in the Little Phatty. Heavy lines are used to indicate
audio signals, which ow from left to right. Lighter lines indicate the control voltages (CV’s), which ow from
the top and bottom. Dotted lines indicate programmable modulation routings.
and are mixed together with the external audio input signal. This combined audio signal is passed to the
ADSR envelope. The signal then passes to the ampli er stage, where the Volume ADSR envelope shapes it.
The keyboard is the main control source of the Little Phatty. Each time a key is pressed, the keyboard
also applied to the Filter to control the lter cutoff. The Gate signal is used to simultaneously trigger the
shown), or through the CV and Gate trigger connections. The resulting sound depends on the various
Signal Flow
Page 9
Page 8
LP User’s Manual - The Basics
The LP has two operating modes: Master and Preset.
A complete list of the Master mode functions and parameters is shown on page 25.
controls. The Preset mode is the main operating mode for editing and playing the LP. Information
on Preset mode is found on page 23.
When the LP is powered on, it starts up in Preset mode. In
When the LP is powered on, it starts up in Preset mode. In
this mode, you select presets using the
this mode, you select presets using the
VALUE
encoder. Press
the
the
VALUE
encoder to increment by single presets, or rotate
the encoder to step through the presets in either direction.
the encoder to step through the presets in either direction.
button changes from amber to red, indicating that you
are editing the preset sound. By pressing the
are editing the preset sound. By pressing the
button
you can toggle between the preset (stored) and edited (panel)
you can toggle between the preset (stored) and edited (panel)
sounds. Note that once you change preset numbers, any
changes to the previous preset will be lost unless the changes
are saved.
one for each of the four sound shaping sections (Modulation, Oscillators, Filter, and
approximately the stored or edited value of the current parameter. The parameters
for each section are chosen by pushing the switch for the desired parameter in that
section. That switch then becomes illuminated in amber. Only one parameter can be
activated at a time for editing in each section.
Some parameters offer multiple selections (such as the Modulation SOURCE switch,
shown at right). Pressing that switch advances through the six possible Modulation
sources. For the On/Off type switches like GLIDE ON/OFF (above), 1-2 SYNC or
and goes out when the parameter is turned off.
TECH NOTE:
The LP’s editing controls are actually analog potentiometers. When
certain key parameters are selected, the analog control signal is switched to control
that parameter directly. This is called RAC™ (Real Analog Control). RAC gives the LP a
to the analog control signal path; straight to the synthesizer circuits. In the Stage Edition,
Page 10
Page 9
LP User’s Manual - The Components
of the Filter, Envelope Generator and Output sections. Then we’ll cover the Modulation section, the Key-
A. The Oscillator Section
The Oscillators are the main sound source of the Little Phatty. The oscillators in the LP are analog Voltage
The Components
are adjusted by their variable waveform (Wave)
controls. There is also a switch for syncing Oscillator
2 to Oscillator 1, and a control for adjusting the glide
The frequencies of the oscillators are controlled by a
The keyboard creates a voltage that allows the
oscillators to be played in an equal tempered scale.
The glide circuit can be switched in between the
control (Oscillator 2), the Pitch Bend Wheel, the
and the output of the Mod Matrix when the “Pitch”
destination is selected.
OCTAVE
that selects the relative frequency range. To select the octave,
simply press the switch. Each press of the switch advances the setting, as indicated by the corresponding
on the keyboard is A440.
OSC LEVEL
that allows the analog edit control to adjust the oscillator
Page 11
Page 10

LP User’s Manual - The Components
Page 13
LP User’s Manual - The Components
Waveform:
WAVE
that allows the analog edit control to modify the waveform.
The waveform is continuously variable from triangle, to sawtooth, to square, to rectangular. The waveform
edit control for the oscillator section indicates the knob positions to obtain the triangle, sawtooth, square
and skinniest pulse waveforms.
changes. By limiting the modulation between the square and thin
analog synthesizer sound. Although the waveforms can be set from
the front panel individually for each oscillator, modulation is applied
to both waveform controls simultaneously. When using modulation,
that it becomes silent.
Sync:
This is an ON/OFF type switch that
1-2 SYNC
switch is lit. With sync
on, Oscillator 2 is synchronized (synced) to Oscillator 1, forcing Oscillator 2 to restart its waveform from
the beginning each time Oscillator 1 starts a new waveform cycle.
The effect is noticeable if the synced Oscillator is a higher frequency
than the Reset Oscillator. The main frequency heard is that of the
2 Frequency control to hear this effect. Depending on how it is ap-
OSC 2 FREQ
that allows the analog edit control to adjust the frequency
of Oscillator 2 relative to Oscillator 1. The pitch of Oscillator 2 can be adjusted up or down 7 semitones
slightly out of tune. Note that Oscillator 1 does not have a frequency control because it is designed to
serve as a reference oscillator
When this is selected, the analog edit
control is used to set the glide rate (portamento) between notes. A Glide switch on the User Interface
the lowest C to the highest C on the keyboard).
Additional CV control:
The
PITCH
jack on the side-panel is a CV input for external control of the oscillator pitch. This input
controls the frequencies of both oscillators. A 1-volt change of this voltage will change the pitch by
The jack accepts -5 to +5 volts, or an expression pedal like the EP-1.
A steady control voltage applied to the PITCH jack will offset the base
Page 12
Page 11
LP User’s Manual - The Components
quencies while allowing others to pass through unaffected. An important term to understand regarding
lters is “Cutoff Frequency”. This is the point at which frequencies begin to be rejected. The LP features
a lowpass lter, which behaves as its name indicates: it allows low frequencies to pass and rejects high
frequencies.
Another important aspect of lters is the cutoff slope. The cutoff slope
de nes how well the lter rejects signals above the cutoff frequency.
The cutoff slope is measured in decibels per octave (dB/Octave), and is
speci ed as a multiple of six. A 6dB/Octave slope (the simplest pos-
sible lter design) exhibits a gentle roll-off with a minimum rejection of
frequencies above the cutoff. By comparison, a 12dB/Octave slope is
twice as steep, and rejects frequencies above the cutoff twice as fast.
An 18dB/Octave slope is steeper still, with a corresponding frequency
of frequencies above the cutoff point. The classic Moog lter is a 24dB/
The Moog lter also features a parameter called Resonance. This
This gives the lter a character that can sound vocal, buzzy or zappy,
depending on how it’s used. When the resonance is turned up past
about 3 o’clock on the analog edit dial, the lter begins to self-oscillate
at the cutoff frequency, producing a sine wave tone.
The KB AMOUNT parameter allows you to set the degree to which the lter cutoff frequency tracks the
off will rise by an octave each time you play an octave higher on the keyboard. This setting allows you to
AMOUNT is set to zero, the lter cutoff remains at the value determined by the analog edit control, regard-
cutoff to follow the glide of the notes being played (when GLIDE is switched ON). Using the KB AMOUNT
control, you can adjust the amount of Glide that will affect the lter cutoff.
The EGR AMNT parameter allows you to set the degree to which the Filter EG affects the lter cutoff
frequency. The EGR AMNT parameter is bi-polar, meaning the Filter EG can affect the lter cutoff either in
a positive or negative way.
A positive amount will cause the Filter EG to raise the cutoff frequency, while a
Page 13
Page 12

LP User’s Manual - The Components
Page 15
LP User’s Manual - The Components
clipping as the amount is increased. The results you get with OVERLOAD will depend on the settings of
the oscillator waves and levels, and the lter cutoff and the lter resonance settings in addition to Overload
amount. Overload is not the same distortion you’d get from a fuzz box – it must be played with to get the
edginess to the sound.
When the
switch is selected, the analog edit control is used to adjust the lter cutoff frequency.
The cutoff frequency is adjustable from about 20 Hz to 16 Khz.
As the edit control is rotated clockwise, the
cutoff frequency is increased, allowing more of the signal harmonics to pass through the lter.
When the
switch is selected, the analog edit control is used to adjust the lter resonance.
end of the signal as the Cutoff control is turned down. As Resonance is increased, the lter begins to form
a peak at the cutoff frequency. This emphasizes harmonics near the cutoff frequency, and can result in a ‘wah-
wah’ effect when resonance is set fairly high and the lter cutoff is varied. As the resonance is turned up the
the cutoff frequency.
When the
KB AMOUNT
switch is selected, the analog edit control is used to adjust the amount of post-
glide keyboard voltage that is routed to the lter cutoff frequency. When the edit control is rotated fully
clockwise, the lter cutoff follows the key played on the keyboard. A higher key will cause a higher cutoff
frequency. This allows a sound to retain its brightness as it is played higher on the keyboard.
When the
switch is selected, the analog edit control adjusts the amount of the Filter Envelope
the legend on the panel, so the amount is 0 when the edit control dial is at the 12 o’clock position. Rotat-
When the
OVERLOAD
switch is selected, the analog edit control adjusts the amount of pre- lter and post-
lter clipping. Overload can be used to warm up sounds and give them a distinctive tonal edge. Advancing
the edit control increases the amount of clipping from the subtle warmth of soft clipping to the ‘growl’ pro-
vided by the beginnings of hard clipping. When set to 100%, Overload adds a volume boost of about +6dB.
Additional CV control:
The
jack on the side-panel is a CV input for external control of the lter cutoff parameter. The jack
accepts -5 to +5 volts, or an expression pedal like the EP-1. A voltage applied to this jack is added to the
setting of the lter cutoff control. A one-volt change in the control voltage will change the cutoff frequency
of the lter by about one octave.
Page 14
Page 13
LP User’s Manual - The Components
TECH NOTES:
differently. Asymmetrical clipping circuits tend to produce tones with unique richness and character.
2. The Overload circuit has no effect on the sound when the analog edit control is set fully counter-
clockwise. Advancing the control gradually introduces the effect, starting with a gentle overdrive-like
quality that becomes increasingly aggressive and edgy as the control reaches 100%. Because the
Overload uses clipping, some sounds, such as a squarewave with the lter cutoff all the way up,
aren’t affected much by increasing the Overload amount. Try sounds tuned to intervals other than
3. The name “Overload” came from the Overload indicator on the Minimoog, where if the output
was patched back into the audio input the Overload indicator would go on. Mixing the Audio in
would provide a “fatter” sound by increasing the level of signal coming out of the mixer and going
envelope – a shape that de nes the changes that occur in a sound over time. An envelope can de ne any
aspect of change in a sound – volume, timbre, or pitch. The circuits that create envelope control signals in
synthesizers are called Envelope Generators (EGs).
The Little Phatty has two identical EG circuits. When trig-
gered, these circuits produce time-var ying control voltages
specify this progression are the Attack, Decay, Sustain and
Attack determines the character of the onset of the sound.
The Attack control adjusts the time it takes when a key is
fade-in time). The Decay control adjusts the second stage
the full level to the level set by the Sustain control. The
envelope will stay at the sustain level as long as a key is held
down. When the key is released, the Release control de-
termines how long it takes for the sound to fade out (see
ADSR Envelope Signal below).
The Little Phatty has one EG dedicated to the lter (to control
the cutoff frequency), and one EG dedicated to the ampli er
Page 15
Page 14

LP User’s Manual - The Components
Page 17
LP User’s Manual - The Components
Attack:
When the
ATTACK
switch is selected, the analog edit control is used to adjust the Attack time of the corre-
sponding envelope from 1 msec to 10 seconds.
When the
switch is selected, the analog edit control is used to adjust the Decay time of the cor-
Sustain:
When the
SUSTAIN
switch is selected, the analog edit control is used to set the Sustain level of the corre-
sponding envelope.
When the
switch is selected, the analog edit control is used to adjust the Release time (the time
for the envelope to return to zero) from 1 msec to 10 seconds.
Additional Control:
The
jack on the side panel is a trigger input that accepts a footswitch (momentary, normally
closed like the Moog FS-1) or a gate signal. Pressing the footswitch or applying a gate signal (+5V) causes
or sustain a note using your foot without playing the keyboard – useful if you want to free-up
Page 16
Page 15

LP User’s Manual - The Components
synthesis. The LP’s Modulation section opens up a world of modulation possibili-
ties that were not available on the original Minimoog. The Modulation section
allows you to select from six modulation sources, four destinations, and set the
To try out a simple modulation effect, make the following settings:
- Set the LFO RATE to 6 Hz (about 11 o’clock on the analog edit control)
- Set the SOURCE to Triangle wave
- Set the DESTINATION to Pitch
- Set the AMOUNT to 50%
These settings will produce a vibrato effect with variable depth when the
Section Controls:
When the
switch is selected, the analog edit control is used to adjust the frequency of the LFO.
The frequency is adjustable from 0.2 Hz to 500 Hz.
Since the LFO rate extends well into the audio range,
this allows the LFO to be used for clangorous (FM-like) modulations.
Amount:
When the
AMOUNT
switch is selected, the analog edit control is used to adjust the maximum amount of
Source:
The
SOURCE
switch selects the source of the modulation. Each time the switch is pressed, it advances to
the next modulation source, as indicated by the corresponding LED. Four of the selections allow you to use
the LFO as a modulation source. When any of the LFO waves is selected, the associated LED will ash in
time with the LFO rate. The available Source selections are:
- LFO Sawtooth Wave
- LFO Square Wave
- LFO Triangle Wave
- LFO Ramp Wave
- Filt. Env. (Filter Envelope)/Sample & Hold
- Osc 2 (Oscillator 2)/Noise
The
switch selects the destination of the modulation. The modulation destination is chosen
- Filter (affects lter cutoff)
- Pitch (affects the pitch of both oscillators)
- Wave (affects the waveform of both oscillators)
- Osc 2 (affects the pitch of Oscillator 2)
Page 17
Page 16
LP User’s Manual - The Components
Page 19
LP User’s Manual - The Components
The Little Phatty has a single monophonic audio output. The level of the audio output
signal while keeping the Headphone signal active.
Section Controls:
Volume:
VOLUME
is the main volume control. Rotating the control fully clockwise produces the maximum output.
stored with the preset.
The
OUTPUT ON/OFF
switch controls the audio that appears at the audio output jack. This switch has no
effect on the Headphone jack. This arrangement allows you to monitor and adjust the sound of the LP using
OUTPUT ON/OFF
switch
to turn off the output if you are using the LP as a controller and wish to control external gear without hear-
The
jack is a 1/4” headphone output for use with standard headphones. The Volume control
adjusts the level at this jack.
Additional CV control:
The
VOLUME
jack on the side panel is a CV input for external control of the
The jack accepts
a positive control voltage from 0 to 5 Volts, or an expression pedal like the Moog EP-1. A voltage of 0 volts
silences the LP, and a voltage of 5 volts corresponds to the output level set by the Volume control.
The headphone volume can be scaled using the System Utilities
and your desired Output Volume setting.
Page 18
.
Page 17
LP User’s Manual - The Components
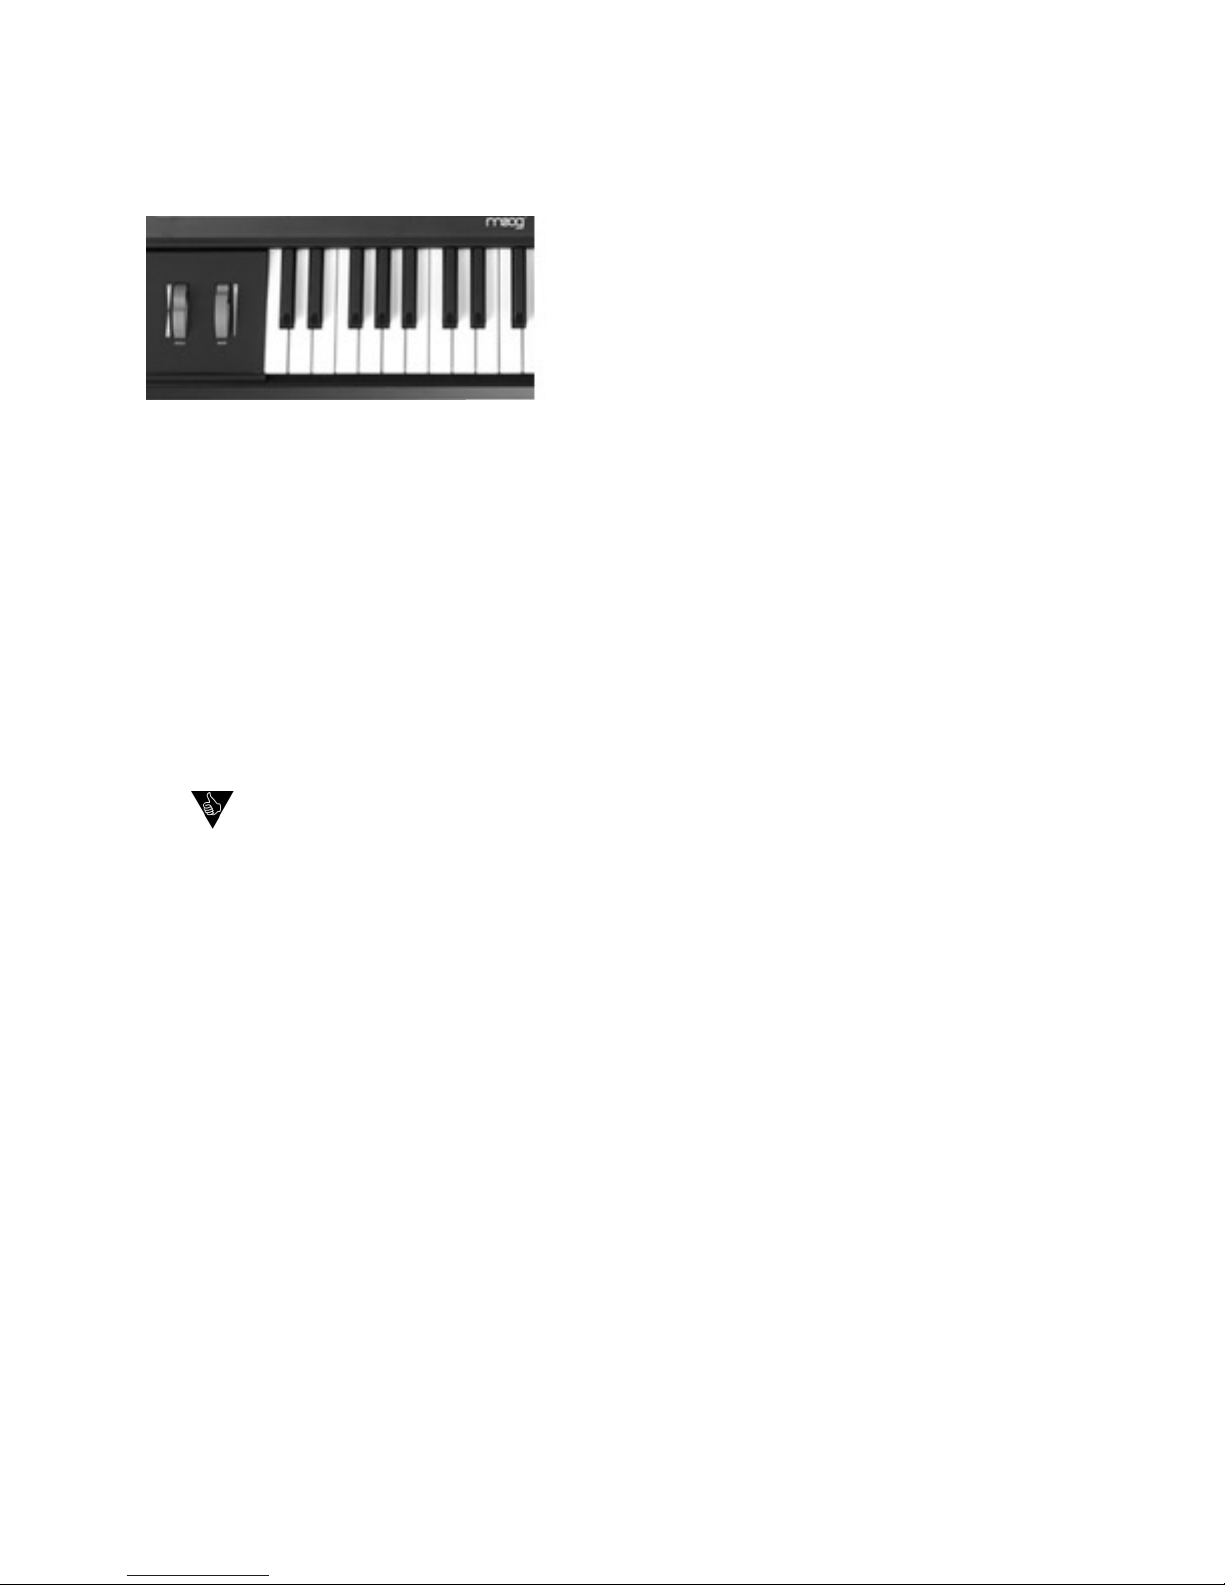
The Little Phatty has a 37-note keyboard (3 octaves,
tons, the keyboard has a playable range of 7 octaves.
The keyboard produces velocity control voltages, and
transmits MIDI Note On and Note Off messages poly-
To the left of the keyboard is the Left Hand
Wheel controls.
This spring-loaded control affects the pitch of both oscillators.
The amount of pitch bend can be set for
each direction (UP/DOWN) independently via the Advanced Preset Menu (see page 31) and saved in each
This control sets the amount of modulation that is sent to the modulation destination of the Modulation
sound. As you explore the presets, don’t forget to try the Modulation Wheel to hear this added effect on
the sound.
the key to breathing musical life into your performances. For example, a small amount of
or it can control something less expected, like EG-swept oscillator sync. Although the
actual performance technique with these controls is beyond the scope of this manual, we
Page 19
Page 18

LP User’s Manual - The Components
Page 21
LP User’s Manual - The Components
The Side Panel provides all of the input and
output connects. In addition to the Audio Out-
for MIDI, and the power connector and power
switch.
This is a standard AC power inlet, Use only a power cord designed to mate with this receptacle. The Little
– Do not alter the power connector in any way. Doing so can
Audio IN:
The Audio In jack allows an external audio source to be mixed with the LP’s VCOs, and then routed to the
lter for processing. The LP has no provisions for adjusting the level of this input, it must be controlled ex-
ternally. The audio input is designed to distor t as the level of the external audio gets very high, adding color
to the sound.
Audio OUT:
The Audio Out jack provides an unbalanced line-level signal for connecting to an ampli er or mixer.
These are connections for MIDI In and Out. There is no MIDI thru function.
The Pitch, Filter and Volume CV jacks supply power and will accept an expression pedal such as the
–5 to +5 Volts.
The KB Gate Input accepts a footswitch (a momentary, normally-closed footswitch like the
To hear the external audio signal without having to hold down a key on the keyboard, plug a
dummy plug (or a patch cord with nothing connected to the other end) into the KB Gate jack.
This will leave the keyboard gate open, and the volume envelope will remain at its Sustain
turn the envelope Decay parameter down below 12:00 in order for the Sustain level to remain
constant. If you notice that the volume of the external signal begins to slowly fade away, check
to be sure the envelope Decay parameters are not set too high.
2. The LP’s Audio Input is not limited to processing monophonic signals - it can work well for
Audio In jack. Now you have a POLYPHONIC source that is being affected by the LP’s Filter,
Overload and EGR circuits.
Page 20
Page 19

The Interface Panel is located on a far left of the instrument. The Interface Panel provides a status display
and controls for all of the Little Phatty’s software functions and instrument settings.
The status display is an LCD screen located in the center
of the panel above the section controls. When the LP is
rst powered on, the screen will display the message:
Version X.x
The message will stay on the screen for a few seconds,
and then the screen will display the active preset. This
was powered down.
Section Controls:
switch places you in Master mode. In this mode, the
VALUE
knob is used to scroll
through the Master mode menus for the Little Phatty. For a list of the Master mode menus, see page 25.
switch places you in Preset mode. In this mode, the
VALUE
knob is used to select the
switch also functions as ‘compare’ button, allowing you to toggle between stored and
edited presets. For more on Preset Mode, see page 23.
Value:
The
VALUE
knob is a continuous rotary encoder used to access menus and options, and select presets.
VALUE
knob will adjust numeric values UP or DOWN, or toggle
amongst discrete options. The encoder has a built-in push button (called the
VALUE
switch) that is used to
advance through the presets in Performance Sets and for stepping though Master menu.
This also is used
for stepping through values (presets, master mode values). When naming a preset, the
VALUE
switch acts
as a backspace control.
The
switch is used to navigate around the display. In Master mode, the cursor is used to advance
through the parameters in the display, allowing you to make edits and changes. In Preset Mode, the cursor
tion). Press
to get into cursor mode, and press
or
to exit cursor mode.
The
button is used to enter changes and store edited presets in PRESET mode and to
execute SysEx and System Utility functions in MASTER mode.
LP User’s Manual - The Components
Page 21
Page 20

LP User’s Manual - The Components
The
control is used to tune the Little Phatty’s oscillators + /– 3 semitones for matching an
external reference pitch.
The
switch enables or disables the glissando effect between notes. Glide is ON when the
switch LED is lit. The glide rate is set using the
control in the oscillator section.
The
OCTAVE UP
and
OCTAVE DOWN
switches affect the octave selection for both oscillators. The
cordingly. Pressing the same switch a second time will adjust the octave again and change the illumination
from amber to red, indicating that a two-octave change has been selected. The Octave settings are stored
Page 22
Page 21

LP User’s Manual - The User Interface
VALUE
knob. As the
VALUE
display and is immediately available to be auditioned (you
do not need to ‘activate’ the preset to hear it). Pressing
VALUE
and turning the knob will advance by increments
of ten.
You can use the front panel controls to edit the sound at
any point. Changing any of the front panel controls will
automatically switch the lower part of the display from
light also changes
sound you hear is an edited version of the stored preset
You can toggle between the stored and edited sound by pressing the
button. This acts like a
the COMPARE function, the
button will alternate colors and the LCD will display either ‘PRESET
ACTIVE’ (the original sound) or ‘PANEL ACTIVE’ (the edited sound).
Storing Presets
To store a preset, press the
button. This button doubles as the
STORE
button in Preset mode as
of a stored preset (Preset Active).
When you press
STORE
eld, which gives you the chance to back out of the store operation
you change if your mind. Use the
key to toggle between
these elds. To save your preset, use the
VALUE
knob to select the
desired memory location where the preset will be saved.
button to toggle the YES/NO eld, then use the
VALUE
STORE
will simply return you to Preset mode without any action. You
can also press the
selected, pressing
STORE
will save the preset to the desired memory
Page 23
Page 22

LP User’s Manual - The User Interface
Page 25
LP User’s Manual - The User Interface
When you press STORE, the LCD will display the ‘PRESET STORED’
the desired location and scrolling through the character list. To change a preset name, press the
VALUE
ter or number. Press the
button again to move the cursor forward to the next letter, or press
the
VALUE
switch to move the cursor backwards. Repeat this action until all desired characters have been
changed.
All characters are uppercase only.
button once to select the rst character in the
VALUE
knob to select a new character as shown. Use the
button to advance to the next letter, then use the
VALUE
desired name change is complete. When nished, press the
STORE
with the ‘Save to’ message as described above. Select the desired
STORE
to save the new name.
when the preset is recalled. By saving your presets with this in mind, you can have the
four analog edit controls automatically set to the desired parameters when the preset is
Page 24
Page 23

LP User’s Manual - The User Interface
for sending and receiving data.
To enter master mode, press the
button. By
default, the rst master menu entry is Performance Sets.
When switching between the Master and Preset modes,
the last used master menu entry appears.
When the master menu is active, the
VALUE
knob is used
to scroll through menu entries. To change a particular
CURSOR
button to enable
the parameter for editing. The selected parameter will be
VALUE
knob is now used to change the
changed as the display is updated (i.e. if you scroll through
values and settle on something new, you don’t have to do
anything to activate that new entry).
key will step
through the parameters. You can also press the
button to disable the
mode. At this
VALUE
knob allows you to step through the menu entries again. When you reach the end of the
VALUE
knob will wrap back to the rst entry.
A. Master Mode Menus
convenient access. There are four banks of Performance Sets contain-
set up a sequence of 8 presets in each bank. This allows you to easily
switch between these assigned presets in the order they are set up.
tially through the bank by pressing the
VALUE
switch, or use the
CURSOR
button to highlight the bank or preset, then use the
VALUE
rd
preset in Performance
Set 1 is Preset 24 - LEAD. For more on Performance Sets and how to
con gure them, see page 42.
Page 25
Page 24

LP User’s Manual - The User Interface
Page 27
LP User’s Manual - The User Interface
ADVANCED PRESET:
Advanced Presets is a set of menus that allows you to access
additional parameters for each preset. These parameters are stored
available:
- Filter Poles (1-4)
- EGR Release
- Trigger Options
- Keyboard Priority
- Filter Sensitivity
- Additional LFO Modulation Sources (2)
- Pitch Bend options
- Secondary Modulation destinations.
- Pot Mapping
ANALOGUE MODE:
Analogue mode controls the way the analog edit controls work. In
SNAP mode, the parameter will ‘snap’ instantaneously to the current
stays constant until the potentiometer passes through
the current
value. In TRACK mode, the parameter value moves in the same di-
To change modes, use the
button
to highlight the parameter, then use the
VALUE
knob to set the new
Values:
The Keyboard Priority menu allows you to select from 3 differ-
ent types of keyboard priority.
to sound, a setting of HIGH NOTE causes the highest key pressed
to sound, and a setting of LAST NOTE causes the most recent key
the new parameter value.
Values:
the default is LAST NOTE
Page 26
Page 25

LP User’s Manual - The User Interface
This menu is used to select the LP’s MIDI In and Out channels. The LP
can only send and receive on one channel at a time, but each channel
can be set independently. To change the MIDI channel, use the
SOR
button to highlight the desired parameter, then use the
VALUE
Values:
the default values are 1 for both MIDI In and MIDI Out
This menu item is used to enable or disable the LP’s transmission
status of either parameter use the
button to highlight the
VALUE
knob to set the new parameter value.
Values:
the default values are ON for both SND and RCV
also receive MIDI. It does not disable any MIDI transmitting or receiv-
are using a MIDI sequencer and have both IN and OUT connected,
and the sequencer passes the IN through to the OUT.
The Tune parameter is used to enable or disable the
When the Tune parameter is set to ON, the
panel control
works normally to tune the LP. In his mode, you can use the
VALUE
to the numerical value and rotating the
VALUE
knob (the adjustment
value is from -2048 to +2047, representing roughly +/- a third).
When the Tune parameter is set to OFF, the position of the
TUNE
panel control is stored and the control itself is disabled. This
feature prevents accidental bumping of the
during performance.
Page 27
Page 26

LP User’s Manual - The User Interface
Page 29
LP User’s Manual - The User Interface
When the Tune parameter is set to AUTO, the AutoTune function is
engaged and the display changes as shown. AutoTune works to keep
the LP in tune by automatically making ne adjustments to the Fine
Tuning CV.
When AutoTune is enabled, the display shows the actual value of the
the note that you are tuning to, cursor over to the Note value in
the display and use the
VALUE
knob for precise adjustments. Hitting
another note on the keyboard will set that note as the new target for
tuning. You can exit out this menu by hitting the
or
current tuning.
Values:
Tune - ON, OFF, AUTO; the default is ON
Output ON/OFF
button status will not change, however). The reason for muting the output is that
AutoTune uses a special Calibration Preset tone which isn’t very musical. The LP’s output will remain
start playing.
AutoTune has a special ‘timeout’ feature that waits 15 seconds after you stop playing
time, you will see it change:
AUTO …
AUTO 60.12
The LP will continue to autotune while you are playing until you disable it in the menu, or until you
switch off the power.
Page 28
Page 27

LP User’s Manual - The User Interface
eters using the
VALUE
knob. Each LP parameter stored has a value
from zero to 4095. In Precision Mode that value is displayed on the
second line on the screen.
To edit a parameter in Precision Mode, press the corresponding
will see that parameter name along with its value on the display. To
edit with the
VALUE
knob, press the
button and rotate the
VALUE
knob. Each click of the
VALUE
knob results in a change of one
value. Pressing the
VALUE
knob while simultaneously rotating it will
change the value in increments of 10, allowing for faster editing.
the preset must be stored (see “Preset Mode” on page 23).
To exit
or
button. The last edited
Values:
The default parameter is Volume Attack
SYSEX MENU:
SYSEX (System Exclusive) is a set of commands to transmit and
SYSTEM UTILITIES:
System Utilities is a set of commands used to issue an ‘ALL NOTES
system exclusive message, perform a system reboot, restore
factory default values or perform various system calibrations on the
PERFORMANCE TIP: You can quickly change a global parameter during performance by
rst entering Master Mode and select the desired parameter menu using the VALUE knob
change, press Master. The desired menu item will be displayed, allowing you to quickly make
adjustments.
Page 29
Page 28

LP User’s Manual - The User Interface
Page 31
LP User’s Manual - The User Interface
The Advanced Preset menu provides a set of additional programming parameters for each preset. These
This menu allows you choose the number of Filter Poles for the
gentle 6db/octave (1 pole) to a steep 24db/octave (4 poles). To select
the number of Filter Poles, use the
button to highlight the
VALUE
knob to set the new parameter value.
Values:
This menu allows you to turn the EGR Release parameter ON and
of both the lter and volume envelopes. To change the status, use the
VALUE
knob
to set the new parameter value.
Values:
The Gate menu allows you to select how the envelopes are triggered
when more than one key is pressed on the keyboard. A setting of
A setting of LEGATO OFF will retrigger the envelope
on a new note from the current EGR level.
A setting of EGR RESET
will force the envelope generators to start from 0 volts each time a
button
to highlight the parameter, then use the
VALUE
knob to set the new
Values:
The Filter Sensitivity menu allows you to select how the keyboard
velocity will affect the lter cutoff frequency. Positive values increase
the velocity sensitivity. This will raise the lter cutoff as the keys are
struck harder, mimicking the properties of acoustic instruments.
frequency as the keys are struck harder.
To change the parameter, use
the
VALUE
Values:
-8... 0... +8
Page 30
Page 29

LP User’s Manual - The User Interface
This menu allows you to select one of two modulation options that
will be used when the FILT ENV source is selected on the front panel
the parameter, use the
then use the
VALUE
knob to set the new parameter value.
Values:
This menu allows you to select one of two modulation options that
will be used when the OSC2 source is selected on the front panel
the
VALUE
Values:
The Pitch Bend menu allows you to individually set the positive and
semitones. To change either parameter, use the
button to
VALUE
knob to select the new
Values:
This menu allows you to program a secondary destination for
those offered on the front panel (the primary modulation). The
AMOUNT
control speci es both the primary and
secondary modulation amounts - there is no separate amount control
for the secondary modulation. To program a secondary modulation
destination, use the
VALUE
knob to set the new parameter value.
Values:
Page 31
Page 30

LP User’s Manual - The User Interface
Page 33
LP User’s Manual - The User Interface
The Pot Mapping menu allows you to make arbitrary MIDI Continuous
on the front panel (MOD, OSC, FILT, and EGR). Additionally, the four
or combined MIDI control. Among its many possibilities, Pot Mapping
allows you to ‘reprogram’ the four panel knobs to control any of the
control of Filter Cutoff, Resonance, Overload and EG Amount, all at the
same time.
To set up Pot Mapping, press the
CURSOR
button and use the
VALUE
CURSOR
button again to move to the next eld and select
the desired MIDI CC parameter.
button once more to select whether the assign-
CURSOR
button again will return you back to the
the active parameter in that section. For example, suppose Pot
CC#10. To activate Pot Mapping, you would press the button that is
currently active (i.e. lit) in the Modulation section. The button will turn
off (now no button in the Modulation group will be illuminated), and
the Modulation knob will now send MIDI CC#10 information when
Values:
the normal CC assignments in that section. For example, in the Modulation section, the LFO Rate
will revert to sending the normal MIDI CC’s #03 and #06.
that you want to control independently of the LP. You could program Pot Mapping to have the
With this setup, you press the active control in the Mod section (either the LFO Rate or Amount
switch) to engage Pot Mapping without affecting your LP’s sound or state. Now when you adjust the
the MOD control, it sends MIDI CC#xx out to your external MIDI device, but has no effect on the LP’s
sound engine.
Page 32
Page 31

LP User’s Manual - The User Interface
SysEx menus are a set of commands to transmit and receive selected presets, bulk dumps and rmware
dumps. To enable SysEx menus, press the
button. This will highlight the menu options shown
on the second line of the display. Once highlighted, use the
VALUE
knob to scroll through the menus. To
activate a command, press the
button.
SEND CURRENT PRESET:
This option allows you to send the current preset (system exclusive
data format) for archiving a preset in the LP’s memory. This requires
another LP or computer with a MIDI interface and a program that can
accept a SysEx dump. You must enable the device that is to receive the
SysEx data. Once the remote device is enabled, press
to start
the data transfer.
When
is pressed, the LCD will brie y display the ‘SENDING
CUR PRESET’
display will return to the SYSEX menu.
SEND ALL PRESETS:
This option allows you to send the system exclusive data for archiving
the complete bank of presets in the LP’s memory. To complete this
command, enable the device that is to receive the SysEx data. Once
the remote SysEx device is enabled, press
to start the data
transfer.
When
is pressed, the LCD will brie y display the ‘SENDING
ALL PRESETS’ message shown and the
button will stay lit until
the data transfer is complete. When the operation has nished, the
display will return to the SYSEX menu.
This option allows you to save the entire state of the LP (including all
global data, performance set data and preset data) for later recovery.
To execute a bulk dump, enable the device that is to receive the SysEx
data. Once your remote SysEx device is enabled, press
to start
the data transfer.
When
is pressed, the LCD will brie y display the ‘SENDING
button will stay lit until
the data transfer is complete. When the operation has nished, the dis-
Page 33
Page 32

LP User’s Manual - The User Interface
Page 35
LP User’s Manual - The User Interface
This option allows you to backup the operating system via SysEx data.
To execute this command, enable the device that is to receive the
SysEx data. Once you have enabled your remote SysEx device, press
to start the data transfer.
When
is pressed, the LCD will display the ‘SENDING FIRM-
WARE SYSEX’ message shown, and the
button will stay lit until
the SysEx transfer is complete When the operation has nished, the
display will return to the SYSEX menu.
The LP is able to receive System Exclusive data at any time without any special prior setup. SysEx les are
will display the status of SysEx data transfers as follows:
SINGLE PRESETS:
The LP will brie y display a ‘RECEIVING SINGLE PRESET’ message
whenever a single preset is transmitted via SysEx. The preset will
automatically be stored at the current preset location. For example, if
the current preset location is 31 when the SysEx is received, the new
ALL PRESETS:
The LP will display a ‘RECEIVING ALL PRESETS’ message when a bank
of presets is transmitted. The transmitted bank will replace the current
The LP will display a ‘RECEIVING BULK DUMP’
dump is transmitted.
The LP will display a ‘RX FIRMWARE’ message when a rmware
second line of the display as the transmission executes. After the rm-
ware update is completed, the LP will automatically reset.
Page 34
Page 33

LP User’s Manual - The User Interface
System Utilities provides a set of useful commands, including a command to send an “All Notes Off ’ mes-
sage, a command to perform an operating system reboot, and a command to restore factory default values
and presets.
ALL NOTES OFF:
The rst System Utilities option is ‘ALL NOTES OFF’. This command
active notes and controllers. This command is the equivalent of a ‘panic
command, simply press the
button. You do not have to enable
the menu using the
button.
The LCD will brie y display an ’ALL NOTES OFF’ message while the
data command is transmitted. When complete, the screen will return
to the System Utilities menu. To select other System Utilities options,
button, and then use the
VALUE
knob to scroll
through the menus.
The Headphone Volume option allows you to scale the headphone
volume in relationship to the output volume. Since headphones can
vary widely in their ef ciency to reproduce sound, this control allows
you to set the headphone volume to a comforable listening level rela-
tive to the Output Volume control. The parameter values are from 0
VERSION:
This menu option displays the current operating system version.
This option performs a master reboot of the LP, similar to turning the
You will be asked to con rm this operation (Yes/No). If you are unsure,
select NO and press
to return to the System Utilities menu
without any action. If you are sure, use the
VALUE
knob to change
from NO to YES and press
This will reboot the system.
Page 35
Page 34

LP User’s Manual - The User Interface
Page 37
LP User’s Manual - The User Interface
This option allows you to restore the global default values, perfomance
sets and all factory presets. When you are ready to execute this opera-
tion, press
to activate.
You will be asked to con rm this operation (Yes/No). If you are
to return to the System Utili-
ties menu without any action. If you are sure, use the
VALUE
knob to
change from NO to YES and press
This will restore the fac-
tory default global values, performance presets and factory presets.
While the restore process is taking place, the LCD will brie y display
a ‘RESTORING FACTORY DEFAULTS’ message. When complete, the
screen will return to the System Utilities menu.
wish to save prior to performing this action.
Page 36
Page 35

LP User’s Manual - The User Interface
a. The LP must be at a stable and constant temperature during calibration. You should allow the LP to
warm up 30 minutes before beginning any calibrations.
c. The LP is calibrated at the factory. The Note Calibration operation is not necessary unless the LP
goes out of tune. The Note Calibration overwrites the current calibration lookup table (LUT). Performing a
d. You can exit out of a calibration at any time by pressing the MASTER button. For the Note Calibration
operation, only those notes that have already been calibrated will be saved. The remaining notes will
e. Note Calibration is not meant for overall tuning drifts, such as if the LP is 10 cents sharp. Small tuning
drifts are best taken care of using the AutoTune function (see the Local Mode/Tune menu, page 28)
f. If you perform a Note Calibration, it is highly recommended that you also perform the Oscillator 2
without the expense and hassle of shipping the LP back to the fac-
tory for calibration. The LP’s calibration utilities allow you to perform
tion is stored in the LP’s EEPROM and referenced when playing a note
to guarantee that the LP’s oscillators will be in tune. Other calibrations
ensure that variable controls such as the pitch wheel and oscillator 2
detuning function predictably and precisely.
To access the calibration options, press
VALUE
Page 37
Page 36

LP User’s Manual - The User Interface
Page 39
LP User’s Manual - The User Interface
This calibration option allows you to select Pitch Wheel calibration.
This is a manual calibration that should only be performed if you are
experiencing trouble with the pitch wheel and believe it needs recali-
to access the Pitch Wheel calibration menu.
You will be asked if you wish to proceed. Use the
VALUE
knob to se-
YES and press
When Pitch Wheel calibration is enabled, the display appears as shown.
The values displayed indicate the minimum, middle and maximum posi-
tions of the pitch wheel.
When you see this display, perform the following operations:
wards you). The left-hand number will go to some minimum value.
2.) Move the Pitch Wheel to the maximum position (all the way
towards the panel). The right-hand number will go to some maximum
value.
The middle number should settle around 2048 (+/-20).
This completes the Pitch Wheel calibration. To exit the calibration,
to return to the System Utilities Calibration menu or press
to exit the calibration and return to the highest level of the
System Utilities menu.
Page 38
Page 37

LP User’s Manual - The User Interface
This calibration option allows you to select Note calibration. This
calibrates individual notes exactly for each oscillator and octave setting.
to access the Note calibration menu.
The Note calibration menu will be displayed, allowing you to set the
calibration range. The default note range is MIDI notes 12 - 116. For
every one of these notes, the pitches are calibrated at each of the
octave settings, from 16’ to 2’. To change the range, use the
VALUE
knob to
select the MIDI note value. Then press
to complete. By specifying a narrower range of notes (for example, just the range of the LP
shorten the calibration time.
You will be asked if you wish to proceed. Use the
VALUE
knob to se-
YES and press
displayed are
the MIDI note number being calibrated, the calibration
value
and the actual
01 cents sharp). Note calibration will proceed through the speci ed
then oscillator 2.
When Note calibration is complete, the message ‘SUCCESSFUL’ will
appear on the display and the new calibration values will be stored in
the LP’s EEPROM. To exit the calibration,
to return to
the System Utilities Calibration menu or press
to exit the
calibration and return to the highest level of the System Utilities menu.
Only those notes that have been calibrated up to that point will be saved. The remaining
operation in this manner may result in inaccurate tuning.
Page 39
Page 38

LP User’s Manual - The User Interface
Page 41
LP User’s Manual - The User Interface
This option allows you to select Pitch Wheel Amount calibration. This
calibrates the Pitch Wheel Amount parameter to precise semitone val-
to access the Pitch Wheel
Amount calibration menu.
You will be asked if you wish to proceed. Use the
VALUE
knob to
select YES or NO, then press
change your mind about performing this calibration, select NO and
Calibration will begin, and the display will appear as shown. The rst
example, +2 means ‘plus two semitones’). The second number is the
calibration value (this is the value stored in the LP’s EEPROM), and the
third number is the actual measured note, which is displayed in MIDI
and the actual measured note is 36 cents sharp). All Pitch Amount
calibrations are based on MIDI note 60, so for a calibration value of +2,
the target note value is 62.00. As the calibration operation proceeds,
the calibration values will increment rst through all of the positive
When the calibration is complete, the message ‘SUCCESSFUL’ will ap-
to return to the
System Utilities Calibration menu or press
to exit the calibra-
tion and return to the highest level of the System Utilities menu.
Page 40
Page 39

LP User’s Manual - The User Interface
This option allows you to select OSC2 Frequency Calibration. This
calibrates the
OSC2_FREQ
control so that turning the editing dial all
the way CCW turns OSC2 down exactly a fth (-7 semitones) and
turning all the way CW turns OSC2 up exactly a fth (+7 semitones).
to access the OSC2 Frequency Calibration menu.
You will be asked if you wish to proceed. Use the
VALUE
knob to se-
YES and press
the value stored in the LP’s EEPROM), and the third number is the
actual measured note, which is displayed in MIDI Note Number Cents
actual measured value is 37 cents sharp). When calibration starts, the
change as the note climbs to 67.00, at which point it has calibrated the
at which point it has calibrated the minimum value (-7 semitones).
When the calibration is complete, the message ‘SUCCESSFUL’ will ap-
to return to the
System Utilities Calibration menu or press
to exit the calibra-
tion and return to the highest level of the System Utilities menu.
Page 41
Page 40

LP User’s Manual - The User Interface
Page 43
LP User’s Manual - The User Interface
situation or to enhance your productivity in a studio environment.
quence of sounds that doesn’t necessarily match up to the preset locations. Performance Sets gives you the
ability to set up sequences of sounds that you can step through easily and quickly during a performance.
The LP has four Performance Sets located in the Master menu. Each Performance Set contains eight preset
entries, so set 1 has an array of 8 presets; set 2 has an array of 8 presets, etc. Viewed as a table, the
SET
24
5802892301
2
02035105069207
08
9956574876
4
44
454647
The rst entry in Set 1 above is Preset 24; the second entry is Preset 58, and so on. Performance Sets allow
you to sequence up to 32 presets for your speci c needs. Once the Performance Sets are con gured, you
can call up a set and step though the sequence using the
VALUE
switch.
The example on the right shows the preset stored
– SUPERCHUNK). To step through this sequence,
VALUE
switch. Each press will advance to
the next preset in the sequence. After the eighth pre-
set is reached, the next press of the
VALUE
switch will
cycle back to the rst preset in Performance Set 3.
To return to Preset mode, press the
button.
The preset displayed will be the last preset selected in
the Performance Set.
button again will return to the
SET
00010203040506
07
08
09
20
23
2526272829
Page 42
Page 41

LP User’s Manual - The User Interface
To edit a Performance Set, use the
CURSOR
key to select the Performance SET number (1-4), ENTRY
button
once to highlight the SET number for editing. Press the
button a second time to advance to the
The number is changed by rotating the
VALUE
knob. For this example,
we’ll change the SET number to 1, and then advance to the next pa-
button.
The ENTRY value is now ready to be changed. Using the
VALUE
CURSOR
VALUE
the
button.
This places us back where we started in Performance Sets. There are no parameters highlighted, and the
button is lit. Preset 23 - LUCKY MAN is the active preset, ready for playing.
To return to Preset mode, press the
button. The preset displayed will be the last preset selected in
the Performance Set.
button again will return you to the last used master menu entry.
Page 43
Page 42

LP User’s Manual - The User Interface
Page 45
LP User’s Manual - The User Interface
When you adjust any one of the LP’s four analog edit controls, MIDI Continuous Controller (CC) mes-
sages are transmitted on the MIDI Out jack. The information contained in these MIDI messages varies
according to the parameter each edit control is assigned. For example, when the panel lter CUTOFF
switch is selected, the edit control in the Filter Section generates MIDI CC data corresponding to the
The following chart lists the default MIDI CC data that is generated for each front panel control.
a. The MIDI CC assignments shown for each section are over-ridden when Pot
does not transmit this MIDI message.
Page 44
Page 43

LP User’s Manual - The User Interface
SECTION
CONTROL
CC
VALUE/RANGE
CURSOR
GLIDE ON/OFF
Turns Glide ON/OFF
0-63 OFF, 64-127 ON
OCTAVE UP
Octave increment switch
OCTAVE DOWN
Octave decrement switch
Modulation
Adjusts the LFO frequency
0 – 127
AMOUNT
Adjusts the modulation amount
0 – 127
SOURCE
Selects the modulation source
0, 16, 32, 48, 64, 80
Selects the modulation destination
0, 16, 32, 48
OSC 1 OCTAVE
Sets the octave of oscillator 1
74
0, 32, 48, 64
WAVE
Sets the waveform of oscillator 1
9
0 – 127
OSC 1 LEVEL
Adjusts the volume level of oscillator 1
0 – 127
GLIDE RATE
Sets the portamento rate time
5
0 – 127
Turns oscillator sync ON/OFF
77
0-63 OFF, 64-127 ON
OCTAVE
Sets the octave of oscillator 2
75
0, 32, 48, 64
OSC 2 FREQ
Adjusts the frequency of oscillator 2
0 – 127
WAVE
Sets the waveform of oscillator 2
0 – 127
OSC 2 LEVEL
Adjusts the volume level of oscillator 2
0 – 127
CUTOFF
Adjusts the lter cutoff frequency
0 – 127
Adjusts the lter resonance parameter
0 – 127
Adjusts the amount of pitch CV affecting the cutoff
0 – 127
Adjusts the EG amount affecting the cutoff
27
0 – 127
OVERLOAD
Adjusts the amount of lter overdrive
0 – 127
ATTACK
Adjusts the lter envelope attack time
23
0 – 127
Adjusts the lter envelope decay time
0 – 127
SUSTAIN
Sets the lter envelope sustain level
25
0 – 127
Adjusts the lter envelope release time
26
0 – 127
ATTACK
Adjusts the volume envelope attack time
28
0 – 127
Adjusts the volume envelope decay time
29
0 – 127
SUSTAIN
Sets the volume envelope sustain level
0 – 127
Adjusts the volume envelope release time
0 – 127
Page 45
Page 44

LP User’s Manual - Appendices
Page 47
LP User’s Manual - Appendices
Appendix A - MASTER MODE Menus
which are individually stored with each preset, all Master Mode menu parameters effect the LP globally.
Advanced Presets are
stored individually with
each preset.
Page 46
Page 45

LP User’s Manual - Appendices
Appendix B - The Calibration Preset
SECTION
VALUE
Modulation
0
AMOUNT
0
SOURCE
SQUARE
WAVE
OSC 1 OCTAVE
WAVE
2048
OSC 1 LEVEL
4095
GLIDE RATE
OFF
OCTAVE
OSC 2 FREQ
2048
WAVE
2048
OSC 2 LEVEL
0
CUTOFF
4095
0
2701
2048
OVERLOAD
0
ATTACK
0
0
SUSTAIN
2048
0
ATTACK
0
0
SUSTAIN
4095
0
The LP has a speci c Calibration Preset that is stored in a non-volatile memory location labeled ‘CA’ (this
also useful as a default starting point for preset development. Note that the Calibration Preset cannot be
saved to the CA memory location, but it can be saved to any other preset location (00-99).
The tables below list the default values of the Calibration Preset (bold text is used to indicate Precision
SECTION
VALUE
ON
GATE
0
OSC2
OFF
Page 47
Page 46

LP User’s Manual - Appendices
Page 49
LP User’s Manual - Appendices
Appendix C - Tutorial
of sound and synthesis.
Sound is simply the audible change in air pressure. When we perceive
sound, our ears are responding to variations in air pressure that hap-
called the Frequency, which is measured in cycles per second, or Hertz
the low end) to about 20,000 Hz (on the high end). The frequency of
a sound corresponds to its pitch. A low frequency corresponds to a
A second perception of sound is its volume or loudness. Loud sounds
create big uctuations in air pressure, while soft sounds create small
uctuations. The measurement of these uctuations is called the
Amplitude, which is measured in Decibels (dB).
A third perception of sound is its tone color, also known as its timbre. There is no standard of measurement
for timbre, so instead we use familiar terms to describe the tone color of a sound – bright or dull, buzzy or
er an example: if the base pitch is 100 Hz, harmonics will occur at 200 Hz (2 x 100), 300 Hz (3 x 100), 400
they decrease as the frequency goes up, so a 200hz harmonic will be louder than a 300Hz harmonic, which
will be louder than a 400Hz harmonic, and so on. Note that there are some sounds that contain overtones
that are not mathematically related to the base pitch. These include the ‘metallic’ sounds created by percus-
sion instruments like cymbals, gongs and chimes, and noise sounds like wind or white noise. The overtones
of these sounds are called ‘inharmonic’, as they don’t t neatly into a mathematical relationship with the base
timbre) to create new sounds and simulate existing ones. This process is called Synthesis. There are a
distortion and additive to name but a few), but the method used most often is called Subtractive Synthesis.
to achieve the desired sound.
A synthesizer design based on subtractive synthesis typically consists of three main components and three
auxiliary components. The main components are the Oscillator, Filter and Ampli er, and the auxiliary
components are the Keyboard controller, Envelope Generator, and Low Frequency Oscillator.
Page 48
Page 47

LP User’s Manual - Appendices
The Oscillator is the starting point of Subtractive Synthesis, for it is here that the initial sound is created. The
oscillator creates electrical vibrations which function in a manner similar to the strings of a guitar; they create the
signal source that the rest of the system will use to modify and shape the sound. The key oscillator parameters
are pitch and waveform.
The pitch of the oscillator is primarily determined by the keyboard, which creates speci c pitches based on an
equal-tempered scale (more about the keyboard later).
The waveform determines the harmonic richness of the audio signal. There are four basic waveforms common
to most synthesizers: sawtooth, square, triangle and sine.
The sawtooth wave is the richest sounding of the four waves. It contains all
of the harmonics, and has a bright, buzzy sound. Sawtooth waves are ideal
for brass and string sounds, bass sounds and rich accompaniments.
The square wave possesses a hollow sound compared to the sawtooth,
owing to the fact that it contains only odd harmonics. This hollow
characteristic is ideal for distinctive lead and sustained (pad) sounds.
An interesting aspect of the square wave is that the waveshape can be
changed to make the top and bottom parts asymmetrical, creating a pulse
wave. By changing the shape of the wave, new harmonics are introduced.
for creating lush pads. Many synthesizers allow you to dynamically control
the shape, or ‘width’ of the pulse wave using modulation sources such as a
The Subtractive Synthesis Model
Page 49
Page 48

LP User’s Manual - Appendices
Page 51
LP User’s Manual - Appendices
triangle wave has a soft, slightly buzzy sound that is suitable for high-
The sine wave is the purest waveform of them all. It has no harmonics,
so it produces a very pure tone. Because of this, sine waves generally
aren’t used as primary audio signals, but are often used to reinforce or
enhance other waves. They are also used as modulation sources.
Synthesizers often have more than one oscillator, and each oscillator usually has its own frequency and
waveform and level (volume) parameters. Several oscillators make possible rich and complex sound source
con gurations. Some synthesizers also permit external audio signals to serve as sound sources, allowing you
to combine them with the oscillators, or process the external audio by itself using the synthesizer compo-
The combined sound sources are routed to the Filter, the circuit that removes frequencies. Although there
are several types of lters, the Little Phatty offers just one, but it’s a very important one: the Lowpass lter.
works to remove high frequency signals is called the Cutoff frequency.
Above the cutoff, frequencies are gradually reduced according to the
lter’s ‘slope’, which is a measure of how well the lter works. The
slope of a lter is expressed in decibels per octave (dB/Oct). The Little
synthesis.
Another important lter parameter is the lter resonance. Resonance ampli es the frequencies at the
cutoff frequency, emphasizing any signal frequencies that appear there. It’s possible to adjust the resonance
control to the point where the lter actually oscillates. When this occurs, the oscillation frequency is the
same as the cutoff frequency.
The Filtered signal is routed to the Ampli er, which controls the gain (volume) of the signal. The Ampli er
controls the articulation of a sound, turning it on and off as you play. The Ampli er is usually paired with
an Envelope Generator (described below). The gain of the ampli er follows the contours of the Envelope
The Oscillator, Filter and Ampli er are voltage controlled, meaning that they respond to changes in voltages.
voltage, the higher the cutoff frequency. For the Ampli er, this means the higher the voltage, the greater the
volume. Since each of the three main components respond to a voltage, the entire synthesis system thus
components, like Envelope Generators and Low Frequency Oscillators (which generate control voltages) to
further vary the sound.
Page 50
Page 49

LP User’s Manual - Appendices
whenever a key is pressed. The level of the control voltage signal is a function of which key is pressed - the
The keyboard’s control voltage signal is commonly routed to the oscillators to control the pitch, and it can also
trigger signal is routed to the Envelope Generators to trigger the envelopes.
The second
auxiliary component is the Envelope Generator, or EG. The
voltage that is typically used to control the gain of the ampli er, or the
cutoff frequency of the lter. Many synthesizers, including the Little
ampli er and lter circuits.
The EG is triggered from a Gate signal that is generated every time a
according to the control settings.
The LP’s Envelope Generators have four stages that can be set individually:
Attack – The time to go from zero volts to the maximum voltage (the fade in time).
Sustain – The maximum level of the envelope after completing the attack and decay stages (if the
stages, and the Release control has no effect.
The last auxiliary component is the Low Frequency Oscillator, also known
as the LFO. The LFO operates like the main oscillators in almost all
to send modulation control signals to the main components. For example,
varying the pitch of the oscillator. If you send that same LFO signal to
the ampli er, and you’ll get tremolo. LFO’s are used to create cyclical
variations in the sound, making the sound more dynamic and interesting.
Page 51
Page 50

LP User’s Manual - Appendices
Page 53
LP User’s Manual - Appendices
So there you have it - the six basic components that make up a synthesizer based on the subtractive
synthesis model. Keep in mind that most ‘subtractive’ synthesizers often include more than one of each
component. This is especially true of the oscillators and envelope generators (the Little Phatty has two of
each), but may also be true of lters, ampli ers and LFO’s. For example, the Moog Voyager has three oscilla-
tors, two lters, two ampli ers, an LFO, two extensive modulation sections, and the Voyager’s third oscillator
can act as an additional LFO. Synthesizers that offer more than one of each type of component provide
a broader palette for sound creation, resulting in sounds with a greater complexity, variation, and depth.
So what is the best way to con gure and program these synthesis components effectively? The answer
could ll a book’s worth of explanations and examples. Two such recommended books on this subject are:
You can also learn a lot from examining the factory presets in detail. The Little Phatty’s presets were crafted
As with all musical instruments, practice, exploration and experimentation are an important par t of achiev-
Page 52
Page 51

LP User’s Manual - Appendices
Appendix D - MIDI Implementation Chart
Version 1.0
TRANSMITTED
Altered
X
X
* Note priority is user selectable
24-108
0-127
The transmitted note numbers follow the
transposition, the transmitted range is
48 – 84 (C3-C6)
Velocity
X
X
After touch
True Number
00 - 99
00 - 99
System Exclusive
System Commands
Song Position
Song Selection
Tune
X
X
System Real Time
Commands
Aux messages
All Notes Off
Active Sense
System Reset
X
X
X = No
Page 53
Page 52

LP User’s Manual - Appendices
Page 55
LP User’s Manual - Appendices
Appendix E - Service and Support Information
speci cations at the time of shipment for a period of one year from the date of purchase. During the war-
tory basis. This warranty covers defects that Moog Music determines are no fault of the user. In countries
outside of the USA, contact the Moog authorized distributor listed on our web site (www.moogmusic.com)
for service.
c
You must obtain prior approval in the form of an RMA (Return Material Authorization) number from Moog
original inner packing including the foam inserts. The warranty will not be honored if the product is not
charges paid.
What we will do
transport. If the product has been abused, damaged in transit, or is out of warranty, we will contact you with
an estimate of the repair cost.
you do not have web access, ll out the all the information on the included warranty card and mail to:
Attn: New Product Registration
2004-E Riverside Dr.
Asheville, N.C. USA 28804
Appendix F - Caring for the Little Phatty
of the wood end caps can be cleaned with a guitar polish, or a ne furniture polish. Heed the safety warnings
at the beginning of the manual. Don’t drop the unit. If you are shipping your Little Phatty to the factor y for
servicing, we recommend using the original shipping carton, or an ATA approved Road Case. Shipping the Little
AN IMPORTANT NOTE ABOUT SAFETY: Do not open the chassis. There are no user
serviceable parts in the Little Phatty. Maintenance of the Little Phatty synthesizer should be
Page 54
Page 53

LP User’s Manual - Appendices
The Moogerfooger® CP-251 Control Processor makes an ideal companion to the Little Phatty synthesizer.
The CP-251 provides an LFO with two waveforms (Triangle/Square), a Sample & Hold circuit with two out-
expands the sonic palate of the LP, allowing for the creation of interesting new sonic textures.
and try these ideas!
Simple con gurations using the LFO from the CP-251:
To create a steady Vibrato effect:
- Using a 1/4’ patch cable, connect the CP-251 LFO Triangle output to an Attenuator Input.
- With another 1/4’ patch cable, connect the Attenuator Output to the LP’s Pitch CV jack.
on the dial (a very low amount). This con guration will produce the mild pitch wavering known as vibrato.
Setting the LFO Rate considerably higher will result in wild FM textures.
To create Tremolo:
- Using a 1/4’ patch cable, connect the CP-251 LFO Triangle output to an Attenuator Input
- With another 1/4’ patch cable, connect the Attenuator Output to the LP’s Volume CV jack.
dial. This will produce the pulsating amplitude modulation known as tremolo. Adjust the LFO Rate to taste.
To produce Timbral Modulation:
- Using a 1/4’ patch cable, connect the CP-251 LFO Triangle output to an Attenuator Input
- With another 1/4’ patch cable, connect the Attenuator Output to the LP’s Filter CV jack.
on the dial. This will produce a pleasing tone modulation as the lter cutoff frequency is modulated. Setting
the LFO Rate considerably higher will result in wild timbral textures, while a very low setting will create a
slowly evolving lter sweep. For a “random stepping” lter effect, use the S&H Out 1 in place of the LFO
Triangle out.
the LP’s Pitch, Filter and Volume inputs all at once, or split the modulation signal using the multiple jack and
any interval desired and have it ready any time you need it. Here’s the connection:
- Connect the EP-1 to an Attenuator Input.
- With another 1/4’ patch cable, connect the Attenuator Output to the LP’s Pitch CV jack.
Appendix G - Using the CP-251 with the Little Phatty
Page 55
Page 54

LP User’s Manual - Appendices
Page 57
LP User’s Manual - Appendices
To set the transposition interval, press the EP-1footpedal all the way down and slowly adjust the Attenuator
on the CP-251 while striking a note on the LP. The pitch will go up as you raise the Attenuator level. Rock
the EP-1 pedal between full up and full down positions to hear the difference in pitch, and adjust the Attenu-
ator until the desired interval is reached. This will give you a foot-activated transposition controller you can
You can use the CP-251 Noise source as a control voltage by simply routing it to any of the LP’s CV inputs
- Using a 1/4” patch cable, connect the CP-251 Noise output to an Attenuator input.
- With another 1/4” patch cable, connect the Attenuator output to one of the LP’s CV jacks.
This will allow you to raise or lower the Noise level as desired, adding just a touch of noise to add realism to
a sound, or a blast of noise for extreme sonic effect.
voltage signal, giving a result similar to using the Modulation Mix control on the original Minimoog:
- Using a 1/4” patch cable, connect the LFO Triangle output to the CP-251 Mixer 1 input
- Using another 1/4” patch cable, connect the Noise output to the CP-251 Mixer 2 input
- With another 1/4” patch cable, connect the Mixer “+” output to the LP’s Filter CV jack.
Set the CP-251 Mixer 1 and Mixer 2 inputs to ‘5’ on the dial, and set the Master level to ‘10’. Adjust the Mix-
er 1 and 2 levels to balance the LFO and Noise signals, and use the Master level to set the effect intensity.
You can also use the Mixer’s Offset Voltage control by itself to provide an additional steady CV signal, or
combine it with the LFO and Noise. An interesting effect is to mix the LFO and Noise source together with
a negative offset (set the Mixer Offset control to about 9 o’clock) and route the Mixer Output to the LP
tive offset voltage) while the combined LFO/Noise signal is introduced.
an existing sound (for example, creating the illusion of ‘breath’ in an instrument) or process the noise just by
then into the LP’s Audio In jack. Noise never sounded so good!
We’ve just scratched the Surface
These are just a few of the synthesis possibilities afforded by the Little Phatty and the CP-251. Other CV
equipment like our Moogerfooger® analog effects can be added to expand the sonic potential of the
always connect a source to a destination, and that you shouldn’t combine multiple CV to a single destination
without a mixer. We encourage you to experiment, as there are many possibilities for exploring synthesis
– whether you are trying to duplicate a sound or effect you heard, or if you are trying to make a sound that
Page 56
Page 55

LP User’s Manual - Appendices
Appendix F - Speci cations
Type:
synthesizer w/100 presets
Synth Engine:
Wave: Continuously variable
(triangle/sawtooth/square/pulse)
Wave: Continuously variable
(triangle/sawtooth/square/pulse)
distortion, adds +6dB signal
Attack Time: 0.001 to 10 seconds
Sustain Level: 0 to 100%
Source: LFO triangle, LFO square,
Amount: 0 to 100%
Transmits polyphonic MIDI Note On/Off
with velocity
Analog Edit Potentiometers (4)
Selection/Navigation controls:
Value encoder (with pushswitch)
Side Panel:
AC Power Inlet (universal power supply,
Audio Out
Volume CV: 0 to +5V
Outputs:
26.75” x 14.75” x 6.75”
Weight:
22lb (9.9 kg)
Operating System;
Speci cations subject to change without notice
Page 57
Page 56

LP User’s Manual - Glossary
Page 59
LP User’s Manual - Glossary
ADSR – Abbreviation for Attack, Decay, Sustain and Release, the four stages of an envelope control voltage
Amplitude – The strength of a sound’s vibration measured in Decibels (dB). Amplitude corresponds to the
control signals for parameters such as volume, vibrato and panning.
sound. In the case of pitch, pressing a key on the keyboard sends a control voltage that determines the
the CV, the higher the gain, or volume).
volume) over time. For example, when a string is plucked, its amplitude is suddenly very loud, but then
dies out gradually. This describes the Volume envelope of the sound. We observe that the initial part of
the plucked sound is very bright, but then the brightness fades away. This describes the Tonal envelope
contour. We also hear the frequency of the sound go slightly higher when the string is plucked, and then
drop slightly as the note fades. This is the pitch envelope contour. A synthesizer can create these kinds
of changes by applying electrically generated envelopes to oscillators (affecting pitch), lters (affecting
tone) and ampli ers (affecting volume).
varying signal that can be applied to any voltage-controlled circuit. The Envelope Generators in the
to as ADSR. The Attack, Decay and Release segments are speci ed as time parameters, while the
Sustain segment is a simply a level setting. Attack speci es the onset time of the envelope. For example,
the sound of a plucked string starts suddenly, meaning its volume envelope has a fast attack time. Decay
speci es how quickly the onset of the envelope fades into the sustained portion. Sustain is the level at
which the envelope sustains after the initial transient (the attack and decay portion). Finally, Release de-
termines how long the envelope takes to fade away. An Envelope Generator uses a trigger to start and
stop the ADSR envelope. This trigger is called a gate signal, and it’s produced whenever a key is pressed
on the keyboard. The gate signal turns on and stays on as long as a key is held down. When the key
envelope signal moves through the Attack and Decay segments and settles at the Sustain level as long as
the gate signal is on. When the gate goes off, the release segment of the envelope begins. A new gate
signal retriggers the Envelope Generator.
.
Page 58
Page 57

LP User’s Manual - Glossary
digital memory used to store information, even after the power is turned off. In the Little Phatty, the
A lter has a cutoff frequency that determines the point at which frequencies begin to be removed. A
frequency are removed and frequencies above the cutoff are passed through. A bandpass lter has two
cutoff frequencies that de ne a frequency band, outside of which the frequencies are removed.
two terms are not always interchangeable. Frequency is an objective measurement of a sound, while pitch
such as a bass; a high frequency sound corresponds to a high-pitched sound such as a piccolo. In music, a
change in pitch of one octave higher equals a doubling of the frequency.
oscillator to modulate the frequency of another. In FM, the modulating oscillator is called the ‘modulator’,
while the other oscillator is known as the ‘carrier’. The carrier oscillator is the one you hear. When
the modulator frequency is very low (about 6Hz), the effect is described as vibrato. As the modulator
frequency is raised into the audio range, new modulation frequency components are created, and the effect
a Glide Rate control determines the speed of the glide between notes.
a sound its particular character. This corresponds to the musical term timbre or tone color. A harmonic
sound, such as a vibrating string, is one in which the harmonics are mathematically related by what is called
the harmonic series. These sounds are typically pleasing to the ear and generally the consecutive vibrations
which the harmonics are not mathematically related. Their waveforms look chaotic. White noise is an
Page 59
Page 58

LP User’s Manual - Glossary
Page 61
LP User’s Manual - Glossary
source of modulation. For instance, an LFO with a triangle waveform, set to about 6 Hz and modulating
the pitch of a VCO results in vibrato. Changing the LFO waveform to a square wave will result in a trill.
An LFO modulating a VCA with a triangle wave creates tremolo.
and an amount. This could be as simple as the lter cutoff of a VCF (a modulation destination) being
changed by the front panel cutoff control (the source), or as complex as mixing multiple CVs together to
or less). Noise can be used as either an audio or modulation source. When used as an audio source, noise
can be used by itself to synthesize explosions or wind noises, or can be mixed with other waveforms to
create noise artifacts, such as breath sounds. When used as a modulation source, noise can introduce
equivalent of a vibrating reed, or string. When ampli ed, an oscillator produces a pitched sound whose
frequency is determined by one or more control voltages. Changes to these voltages correspond to
changes in pitch. An oscillator’s vibration can have different shapes or waveforms, such as a triangle,
sawtooth, or square wave. The Little Phatty has two oscillators for generating sounds.
attenuation to the lter response, so while a single pole lter has a 6dB/Octave response, a 4-pole lter (like
the one in the Little Phatty) has a 24dB/Octave response.
Sample and Hold (S&H) – A circuit that generates a random control voltage at regular intervals. Traditional
sample and hold circuits employ white noise as a signal source, taking periodic samples of this signal
and holding that sample (a voltage level) until the next sample is taken. Since the signal source is noise
controlled by a low frequency oscillator (LFO). By adjusting the speed of the LFO, the speed of the S&H
circuit can be varied. In the Little Phatty, digital circuitry is used to simulate an equivalent S&H circuit, and
the LFO Rate control sets the speed. The S&H output is available as a programmable modulation source.
Page 60
Page 59

LP User’s Manual - Glossary
Sound – Audible vibrations of air pressure. For electronic sounds such as those produced by a synthesizer,
as sound.
Subtractive synthesis – A method of creating tones using harmonically rich (bright) source material, and then
Synthesis – The generation of sound by electronic means, where programmer/performer has the ability to
change the pitch, volume, timbre and articulation.
Timbre – Pronounced ‘tamber’, it refers to the quality of a sound by its overtones. An unprocessed sawtooth
wave has a bright timbre, while a triangle wave has a mellow timbre.
Tremolo – Technically a form of low frequency amplitude modulation, tremolo is a smooth audible pulsing of
volume. In synthesizers, tremolo is produced when a 5-6Hz LFO triangle or sine wave signal is applied to a
voltage controlled ampli er.
Waveform – The shape of an oscillator’s vibration. This determines its timbre. Commonly used waveforms
timbres. A sawtooth has the greatest number of harmonics, and sounds bright and buzzy. A square wave
sounds muted and utelike.VCA – Short for Voltage Controlled Ampli er, a VCA is an ampli er circuit
where the gain is a function of the control voltage. In the Little Phatty, the VCA is paired with the Volume
ADSR envelope generator to specify the articulation of a sound. Another CV source for the VCA in the
VCF – Short for Voltage Controlled Filter, a VCF is a lter circuit where the lter cutoff frequency is a function of
the control voltage. A VCF is used to control the timbre of a sound. In the Little Phatty, the VCF is paired
with the Filter ADSR envelope generator for dynamic control. Other CV sources for the VCF include the
VCO – Short for Voltage Controlled Oscillator, a VCO is an oscillator circuit where the oscillator frequency is
a function of the control voltage. In the Little Phatty, the VCO is primarily controlled from the keyboard.
Vibrato – Technically a very low frequency modulation, vibrato is a smooth, mild pitch warble. In synthesizers,
vibrato is produced when a 5-6Hz LFO triangle or sine wave signal is applied to a voltage controlled
oscillator, causing the pitch to deviate slightly above and below the base frequency.
Page 61
 Loading...