

Page 1

USER MANUAL
RKP-II
Radial Piston Pump
CA53461-001; Version 2, January 2010
Page 2

Copyright
© 2010 Moog GmbH
Hanns-Klemm-Strasse 28
71034 Böblingen
Germany
Telephone:+49 7031 622-0
Fax: +49 7031 622-191
Email: sales@moog.com
Website
Address: http://www.moog.com/Industrial
All rights reserved.
No part of the User Manual may be reproduced in any way or form (print, photocopy, microfilm or by any other
means) or edited, duplicated or distributed with electronic systems without our prior written consent.
Offenders will be held liable for the payment of damages.
We reserve the right to make changes.
A User Manual RKP-II(CA53461-001; Version 2, January 2010) © 2010 Moog GmbH
Page 3

Table of Contents
Table of Contents
Copyright ...................................................................................................................................................A
List of Tables .............................................................................................................................................iv
List of Figures .............................................................................................................................................v
1 General Information..................................................................................1
1.1 Information on the User Manual................................................................................................. 1
1.1.1 Target Groups................................................................................................................ 1
1.1.1.1 Operator.................................................................................................... 1
1.1.1.2 Trained Staff.............................................................................................. 1
1.1.2 Subject to Change and Validity...................................................................................... 1
1.1.3 Completeness ................................................................................................................ 1
1.1.4 Safe Keeping.................................................................................................................. 1
1.1.5 Warning Labels ........................................ ... ... .................................................... ............ 2
1.1.6 Symbols.......................................................................................................................... 2
1.2 Supplemental Documentation.................................................................................................... 2
1.3 Environmental Safety.................................................................................................................. 3
1.3.1 Emissions....................................................................................................................... 3
1.3.2 Disposal.......................................................................................................................... 3
1.4 Responsibilities........................................................................................................................... 4
1.5 Warranty and Liability................................................................................................................. 5
1.6 Trademarks .................................................................................................................................. 6
2 Safety .........................................................................................................7
2.1 Intended Use................................................................................................................................ 7
2.2 Organizational Measures............................................................................................................ 8
2.2.1 Safe Operation............................................................................................................... 8
2.2.2 Selecting and Qualifying Staff........................................................................................ 8
2.2.3 Structural Modifications.................................................................................................. 9
2.2.4 Work Safety.................................................................................................................... 9
2.3 General Safety Instructions...................................................................................................... 10
2.3.1 Specific Phases of Operation................... ... ................................................... .... ... ... ... . 10
2.3.1.1 Mounting.................................................................................................. 10
2.3.1.2 Start Up ................................................................................................... 10
2.3.1.3 Maintenance and Repairs ...................................... ... .... ... ... ... ... .... ... ... ... . 10
2.3.2 Operating Hydraulic Equipment ................................................................................... 10
2.3.2.1 Safety Devices for Limiting Pressure ...................................................... 10
© 2010 Moog GmbH User Manual RKP-II (CA53461-001; Version 2, January 2010) i
Page 4

Table of Contents
3 Product Description................................................................................11
3.1 Configuration ............................................................................................................................. 11
3.2 Scope of Delivery....................................................................................................................... 12
3.3 Nameplate................................................................................................................................... 13
3.4 Functional Description.............................................................................................................. 14
3.5 Compensator Operation............................................................................................................ 15
3.5.1 Adjustable Pressure Compensator, F1, F2 .................................................................. 16
3.5.2 Hydraulically Driven Remote Pressure Compensator, H1............................................ 17
3.5.3 Remote Pressure Compensator with
Mooring Control, H2 .............................................. ... ... ................................................. 18
3.5.4 Load Sensing Compensator, J1.................................. .... ... ... ... ... .... ... ... ... .... ... ... ... ... .... 19
3.5.5 Load Sensing Compensator with p-T Control Notch, R1....................................... ... .... 20
3.5.6 Mechanical Stroke Adjustment, B1...............................................................................21
3.5.7 Servo Control, C1......................................................................................................... 22
3.5.8 Power Control, S1 ........................................................................................................23
3.5.9 Power Control, S2 ........................................................................................................25
4 Technical Data ........................................................................................ 27
4.1 General Technical Data...................................... ... ... ... .... ... ... .................................................... 27
4.2 Operating Conditions............................... ................................................................................. 28
5 Transport and Storage ........................................................................... 29
5.1 Unpacking the Pump................................................................................................................. 29
5.2 Transporting the Pump .............................................................................................................29
5.3 Storing the Pump....................................................................................................................... 31
5.4 Preserving the Pump................................................................................................................. 32
6 Mounting ................................................................................................. 33
6.1 Preparing for mounting............................................................................................................. 33
6.2 Installing the Pump................ ... ... ... .... ... ... ................................................................................. 34
6.3 Planning Lines .......................................................................................................................... 35
6.4 Connecting Pipes ...................................................................................................................... 36
6.5 Electrically connecting the pump ............................................................................................37
6.6 Arranging Multiple Pumps........................................................................................................37
6.6.1 Determining the through drive torque........................................................................... 37
6.6.2 Attaching the Adapter Flange....................................................................................... 40
ii User Manual RKP-II (CA53461-001; Version 2, January 2010) © 2010 Moog GmbH
Page 5

Table of Contents
7 Operation.................................................................................................43
7.1 Initial Pump Set-Up.................................................................................................................... 43
7.1.1 Filling up the Pump....................................................................................................... 44
7.1.2 Adjusting the Compensator.......................................................................................... 44
7.1.2.1 Hydraulically Driven Remote Pressure
Compensator, H1 .................................................................................... 45
7.1.2.2 Load Sensing Compensator with p-T Control
Notch, R1 .................................. ... .... ... ... ... ... ........................................... 45
7.1.2.3 Mechanical Stroke Adjustment................................................................ 46
7.1.2.4 Servo Control, C1.................................................................................... 47
7.1.2.5 Power Control, S1, S2............................................................................. 48
7.1.2.6 Limiting the Maximum Flow..................................................................... 49
7.2 Performing Functions Tests..................................................................................................... 49
7.3 Operating the Pump ................. ... ... ... ... .... ... .................................................... ... ... ... ... .... .......... 50
7.3.1 Start up......................................................................................................................... 51
7.3.2 Flushing the Pump ....................................................................................................... 51
7.4 Placing the Pump out of Operation ........................ ... ... .................................................... ... ... . 52
7.5 Reconnecting the Pump ........................................................................................................... 52
8 Maintenance and Repairs.......................................................................53
8.1 Monitoring.................................................................................................................................. 53
8.2 Trouble-shooting....................................................................................................................... 54
8.3 Moog Service Addresses.......................................................................................................... 54
9 Demounting.............................................................................................55
9.1 Demounting the Pump ...... ... .... ... ... ... ... .... ... ... .................................................... ... .................... 55
10 Spare Parts, Accessories, Repairs........................................................57
11 Index.........................................................................................................59
12 Appendix..................................................................................................61
12.1 Abbreviations, Symbols and Code Letters ............................................................................. 61
12.2 Tightening Torque..................................................................................................................... 63
© 2010 Moog GmbH User Manual RKP-II (CA53461-001; Version 2, January 2010) iii
Page 6

List of Tables
List of Tables
Tab. 1: Supplemental Documentation............................................................................................................2
Tab. 2: Description of the Compensator Options............................................ ... ... ....................................... 15
Tab. 3: General Technical Data................................................................................................................... 27
Tab. 4: Operating Conditions....................................................................................................................... 28
Tab. 5: Preservation Conditions................................................................................................................... 31
Tab. 6: Storage Conditions .......................................................................................................................... 31
Tab. 7: Permissible Through Drive Torques ................................................................................................ 37
Tab. 8: Nominal width for Control Line Hose ...............................................................................................45
Tab. 9: Nominal width for Control Line Hose ...............................................................................................45
Tab. 10: Mechanical Stroke Adjustment .................................................... ... .... ... .......................................... 46
Tab. 11: Adjustment Torque Servo Control....................................................................................................47
Tab. 12: Nominal width for Control Line Hose ............................................................................................... 48
Tab. 13: Adjustments Limiting the Maximum Flow......................................................................................... 49
Tab. 14: Flushing Quantity............................................................................................................................. 51
Tab. 15: Monitoring ........................................................................................................................................ 53
Tab. 16: Trouble-shooting.............................................................................................................................. 54
Tab. 17: Abbreviations, Symbols and Code Letters....................................................................................... 61
Tab. 18: Tightening Torquefor mounti ng screws . .... ... ... .................................................... ... ..........................63
Tab. 19: Tightening Torque for sealing plugs................................................................................................. 63
Tab. 20: Tightening Torque for straight screw-in fittings................................................................................ 63
iv User Manual RKP-II (CA53461-001; Version 2, January 2010) © 2010 Moog GmbH
Page 7

List of Figures
List of Figures
Fig. 1: Configuration Radial Piston Pump RKP-II....................................................................................... 11
Fig. 2: Scope of Delivery............................................................................................................................. 12
Fig. 3: Nameplate for Radial Piston Pump RKP-II...................................................................................... 13
Fig. 4: Cross Section Radial Piston Pump RKP-II...................................................................................... 14
Fig. 5: Adjustable pressure compensator, F1, F2....................................................................................... 16
Fig. 6: Hydraulically Driven Remote Pressure Compensator, H1............................................................... 17
Fig. 7: Pressure Compensator with Mooring Control, H2........................................................................... 18
Fig. 8: Load sensing compensator, J1........................................................................................................ 19
Fig. 9: Load Sensing Compensator with p-T Control Notch, R1................................................................. 20
Fig. 10: Mechanical stroke adjustment, B1................................................................................................... 21
Fig. 11: Servo control, C1............................................................................................................................. 22
Fig. 12: Power control, S1 ............................................................................................................................ 23
Fig. 13: Characteristic V = 32 cm
Fig. 14: Characteristic V = 63 cm
Fig. 15: Characteristic V = 100 cm
3
/U ............................................................................................................ 24
3
/U ............................................................................................................ 24
3
/U .......................................................................................................... 24
Fig. 16: Power control, S2 ............................................................................................................................ 25
Fig. 17: Transporting Pump with Lifting Tackle............................................................................................. 30
Fig. 18: Transporting Multiple Pumps with Lifting Tackle ............................................................................. 31
Fig. 19: Radial Piston Pump with Heavy Through Drive and Add-On Radial Piston Pump.......................... 38
Fig. 20: Radial piston pump with tandem mounted gear pump using SAE-A adapter. ................................. 39
Fig. 21: Radial piston pump with tandem mounted gear pump using SAE-B adapter .............. .................... 39
Fig. 22: Adapter flange SAE-A with 9-tooth shaft......................................................................................... 40
Fig. 23: Adapter flange SAE-B with 13-tooth shaft....................................................................................... 41
Fig. 24: Adapter flange SAE-C with 14-tooth shaft....................................................................................... 42
Fig. 25: Servo Control, C1............................................................................................................................ 47
Fig. 26: Power Control, S1, S2..................................................................................................................... 48
Fig. 27: Limiting the Maximum Flow............................................................................................................. 49
© 2010 Moog GmbH User Manual RKP-II (CA53461-001; Version 2, January 2010) v
Page 8

For your Notes.
List of Figures
vi User Manual RKP-II (CA53461-001; Version 2, January 2010) © 2010 Moog GmbH
Page 9

1 General Information Information on the User Manual
1 G eneral Information
1.1 Information on the User Manual
The User Manual at hand refers solely to the radial piston pumps in the series
RKP-II and is an integral part of the product. It describes the intended use and
safe application of the product in all phases of operation.
1.1.1 Target Groups
1.1.1.1 Operator
with the radial piston pump has read the User Manual and its supplemental
documentation, and that it is observed accordingly, especially the relative
safety and warning instructions.
Ö Chap. "1.4 Responsibilities", Page 4
1.1.1.2 Trained Staff
The trained staff must read the User Manual and its important supplemental
documentation and must observe and follow the instructions, especially the
respective safety and warning instructions.
1.1.2 Subject to Change and Validity
The information in this User Manual is valid as of the date this version of the
User Manual is released. Version number and release date of this User Manual
are noted in the footer.
The User Manual at hand is subject to change at any time and such may be
made without justification.
Information on the User
Manual
Target Group: OperatorAmong other things, the operator must ensure that the trained staff working
Target Group: Trained
Staff
Subject to Change and
Validity of the User
Manual
1.1.3 Completeness
The User Manual is only complete along with the supplemental do cumen tation
relevant for each particular application.
Ö Chap. "1.2 Supplemental Documentation", Page 2
1.1.4 Safe Keeping
The User Manual at hand and any and all relevant supplemental
documentation for each respective application must always be kept safe ly in an
easily accessible location and be available at all times in the vicinity of the
radial piston pump or close to the machinery the pump is assigned to.
Completeness of the User
Manual
Safe Keepingfor the User
Manual
© 2010 Moog GmbH User Manual RKP-II (CA53461-001; Version 2, January 2010) 1
Page 10

Supplemental Documentation 1 General Information
1.1.5 Warning Labels
Warning Labels
Symbols
DANGER Denotes safety instructions, which are meant to warn of
an imminent danger of death or serious bodily injury or of
significant property damage.
Non-observance of these safety instructions will inevitably lead
to death, serious injuries (crippling injuries) or significant
damage to property!
WARNING Denotes safety instructions, which are meant to warn of
possible danger of death or serious bodily injury or of
possible significant property damage.
Non-observance of these safety instructions may lead to
death, serious injuries (crippling injuries) or significant damage
to property!
CAUTION Denotes safety instructions, which are meant to warn of
the risk of slight injuries or minor property damage.
Non-observance of these safety instructions may lead to slight
injuries or minor damage to property!
1.1.6 Symbols
Denotes important instructions
Supplemental
Documentation
• or - Denotes lists
Ö Denotes reference to another chapter, another page, table or
figure in the User Manual as well as supplemental
documentation
1., 2., … Denotes steps in a process, which are to be carried out one
after another
1.2 Supplemental Documentation
The supplemental documentation listed here is an integral part of the
scope of delivery.
Supplemental Documentation Description
Order data sheet / bill of delivery Includes item numbers, item names, quantities
User Manual RKP II Explosion-proof ATEX supplemental instructions in the event that the
Application Instruction RKP-D with CAN
Bus Interface
Catalog Radial Piston Pump for lowflammability fluids
radial piston pump is suitable for operation in
explosive areas (included in the scope of delivery)
User Manual for the radial piston pump with digital onboard electronics (if required, included in the scope of
delivery)
Supplemental instructions for operation with lowflammability fluids (if required, included in the scope of
delivery)
Tab. 1: Supplemental Documentation
2 User Manual RKP-II (CA53461-001; Version 2, January 2010) © 2010 Moog GmbH
Page 11

1 General Information Environmental Safety
1.3 Environmental Safety
1.3.1 Emissions
If operated properly according to instructions, typically no dangerous emissions
emanate from the radial piston pump.
1.3.2 Disposal
When disposing of the radial piston pump, its spare parts or accessories,
packaging material no longer needed, hydraulic fluid or additives and
substances needed for cleaning purpose s , the resp ective country-specific
waste disposal regulations as amended must be observed!
In some cases, the items to be disposed of must be disassembled
professionally and be separated according to their materials and then be
disposed of in the respective waste stream or recycling location accordingly.
Incorporated in the radial piston pumps are, among other things, the following
substances or materials:
• Electronic components Ö Application Instruction RKP-D with CAN Bus
Interface
• Adhesive and potting compounds
• Parts with galvanized surfaces
• Hydraulic fluid
• Various metals and plastics
Environmental Safety:
Emissions
Environmental Safety:
Disposal
© 2010 Moog GmbH User Manual RKP-II (CA53461-001; Version 2, January 2010) 3
Page 12

Responsibilities 1 General Information
1.4 Responsibilities
Responsibility of the
manufacturer and that of
the operator of the
machinery
The manufacturer and the operator of the machinery are both responsible to
see that the planning and execution of the work performed with and to the
radial piston pump as well as all interactions with the radial piston pump are
carried out in accordance with the instructions given in this User Manual and in
the relevant supplemental documentation for each respective application.
The manufacturer and the operator of the machinery are responsible in detail
for the following:
• Staff selection and training
Ö Chap. "2.2.2 Selecting and Qualifying Staff", Page 8
• Intended use
Ö Chap. "2.1 Intended Use", Page 7
• Safe operation
Ö Chap. "2.2.1 Safe Operation", Page 8
• Taking required work safety measures for the respective application and
monitoring
Ö Chap. "2.2.4 Work Safety", Page 9
• Observing the relevant manufacturer's safety standards and those of the
operator of the machinery for each respective application
• Observing the relevant regulations applicable nationally and
internationally, as well as applicable standards and directives (such
as, e. g., EU Machine Directive and the regulations by the Employer's
Liability Association, TÜV or VDE) as amended in their current version
when designing, assembling and operating the ma ch ine ry with all of th e
installed components.
• Installing a suitable safety system for limiting the pressure in the hydraulic
connections
Ö Chap. "2.3.2.1 Safety Devices for Limiting Pressure", Page 10
• Using only radial piston pumps in technically flawless condition and safe
for operation
• Preventing unauthorized structural modifications, repairs and
maintenance work to be carried out or such that are unprofessionally
performed.
Ö Chap. "2.2.3 Structural Modifications", Page 9
Ö Chap. "10 Spare Parts, Accessories, Repairs", Page 57
• Defining and adhering to application specific inspection and servicing
instructions
• Adhering to all technical data during storage, transport, assembly,
disassembly, connecting, start-up, configuring, operating, cleaning,
repairing or performing any troubleshooting, especially the ambient
conditions as well as to the data of the hydraulic fluid in use.
• Proper storage, transport, assembl y, disassembly, connection, start-up,
configuration, operation, cleaning, repairing, performing any
troubleshooting or disposal
• Easily accessible and available safe keeping of the
• Manual as well as the relevant supplemental do cumentation for each
respective application.
Ö Chap. "1.1.4 Safe Keeping", Page 1
• This User Manual and the relevant supplemental documentation for each
respective application are to be added to the User Manual of the
machinery.
4 User Manual RKP-II (CA53461-001; Version 2, January 2010) © 2010 Moog GmbH
Page 13

1 General Information Warranty and Liability
1.5 Warranty and Liability
In principle, our general terms and conditions for delivery and payment apply.
These shall be available to the buyer at the latest at the time the sales contract
is completed.
Among other things, warranty and liability claims are excluded for personal
injury or property damage should they be the result of one or more of the
following causes:
• Work performed with and to the radial piston pump or handling the radial
piston pump by users not qualified for the job
Ö Chap. "2.2.2 Selecting and Qualifying Staff", Page 8
• Use in violation with regulations
Ö Chap. "2.1 Intended Use", Page 7
• Unsafe operation
Ö Chap. "2. 2. 1 Safe Operation", Page 8
• Failing to take required work safety measures for the respective
application
Ö Chap. "2. 2. 4 Work Safety", Page 9
• Not adhering to the instructions in User Manual at hand or to the relevant
supplemental documentation for the respective application
• Non-observance of the relevant manufacturer's safety standards and
those of the operator of the machinery for each respective application
• Non-observance of the relevan t re gu lat ion s ap plicable nationally and
internationally, or standards and directives (such as, e. g., EU Machine
Directive and the regulations by the Employer's Liability Association, TÜV
or VDE) as amended in their current version when designing, assembling
and operating the machinery with all of the installed components.
• Failure to install a suitable safety system for limiting the pressure in the
hydraulic connections
Ö Chap. "2.3.2.1 Safety Devices for Limiting Pressure", Page 10
• Using radial piston pumps that are not in technically flawless condition or
not safe for operation
• Unauthorized or improperly performed modifications to the design or
repairs and maintenance work
Ö Chap. "2. 2. 3 Structural Modifications", Page 9
Ö Chap. "8 Maintenance and Repairs", Page 53
• Not adhering to the inspection and maintenance instructions from the
manufacturer and the operator of the machinery.
• Not adhering to all technical data during storage, transport, assembly,
disassembly, connecting, start-up, configuring, operating, cleaning,
repairing or resolving any possible failures, especially to the ambient
conditions as well as to the data of the hydraulic fluid in use.
Ö Chap. "4 Technical Data", Page 27
• Improper storage, transport, assembly, disassemb ly, connection, start-up,
configuration, operation, cleaning, repairing, resolving any possible
failures or disposal
• Use of unsuitable or defective accessories or rather unsuitable or
defective spare parts
Ö Chap. "10 Spare Parts, Accessories, Repairs", Page 57
• Catastrophic events beyond our control or acts of God
Limits to Warranty and
Liability
© 2010 Moog GmbH User Manual RKP-II (CA53461-001; Version 2, January 2010) 5
Page 14

Trademarks 1 General Information
1.6 Trademarks
Trademarks Moog™ and Moog Authentic Repair Service™ are registered trademarks of
Moog Inc. and its subsidiaries.
All product and company names listed in the User Manual are possibly
protected trademarks of their respective manufacturer, the use of which
by third parties for their own purposes may be in vi ola tio n of the
manufacturer's rights.
A missing ® or ™ symbol may not be interpreted to mean that the name is
a brand name that can be used unrestricted.
6 User Manual RKP-II (CA53461-001; Version 2, January 2010) © 2010 Moog GmbH
Page 15

2 Safety Intended Use
2Safety
2.1 Intended Use
Intended UseThe Radial Piston Pump RKP-II is a work machine used to produce hydraulic
displacement. Certain versions of the radial piston pumps are fitted with an
additional safety function for locking (not a hermetic sealing function) the
hydraulic displacement.
Use Environment:
The radial piston pump is designed to control and regulate pressures and
displacements in commercial applications.
Obvious Misuse:
Operating the unit outside of the specifically defined application and
environmental conditions
in relationship to:
• Operating pressure
• Temperature
• Speed and rotational direction
• Operational environmental pressure
• Shock / vibration
• Electromagnetic interference resistance
• Operating fluids (viscosity, cleanliness class, chemical ingredients)
• Protection class
• Electrical and electromagnetic connections
• Operation in explosion hazardous areas if not permitted for such use
For incorporating into superordinate levels of machinery, the following
applies:
• The Radial Piston Pump is only to be operated as a component for a
complete superordinate system, e. g. in a machinery set up.
• The Radial Piston Pump is designed to be used with the specified
operating fluid. Use with any other operating fluid requires our express
approval.
• The efficient, reliable and safe operation of the Radial Piston Pump
requires quality project planning as well as professional execution,
transport, storage, mounting, demounting, electrical and hydraulic
connections, start-up, configuration, operation, cleaning and servicing.
The Radial Piston Pump may not be put into operation until the following
has been assured:
• The superordinate level machinery with all of its installed components
adheres to the relevant, nationally and internationally applicable
regulations, standards and directives (such as the EU Machine Directive
and the applicable regulations by the Employer's Liability Insurance
Association, TÜV or VDE) as amended.
• The Radial Piston Pump and all other installed compo n ents ar e in
technically sound and fail-safe condition.
© 2010 Moog GmbH User Manual RKP-II (CA53461-001; Version 2, January 2010) 7
Page 16

Organizational Measures 2Safety
For its intended use, the following applies:
• Observance of the User Manual
• Handling the Radial Piston Pump safely
Ö Chap. "2.2.1 Safe Operation", Page 8
• Adhering to the inspection and maintenance instructions from the
manufacturer and the operator of the machinery.
• Following all of the corresponding relevant sup p lem en ta l documentation
in accordance with the application
• Observing the relevant manufacturer's safety standards and those of the
operator of the machinery for each respective application
• Observing the relevant regulations applicable nationally and
internationally, as well as applicable standards and directives (such as,
e. g., the EU Machine Directive and the applicable regulations by the
Employer's Liability Insurance Association, TÜV or VDE) as amended.
2.2 Organizational Measures
2.2.1 Safe Operation
It is the responsibility of the manufacturer and the operator of the
machinery to ensure safe operation of the Radial Piston Pump.
Safe Operation The basic requirement for safe handling and trouble free operation involves
observing the following:
• All relevant safety instructions and user manuals
• All safety instructions or the relevant supplemental documentation for the
respective application
• All safety instructions pertaining to the relevant manufacturer's safety
standards and those of the operator of the machinery for each respective
application
• All relevant nationally and internationally applicable safety and accident
prevention regulations, standards and directives, such as the safety
instructions of the Employer's Liability Insurance Association, TÜV or
VDE, in particular the following standards for the safe operation of
machines:
- EN ISO 12100
-EN982
Following the safety instructions and the safety and accident prevention
regulations, standards and directives helps to prevent accidents, machine
failure and property damage!
2.2.2 Selecting and Qualifying Staff
Selecting and Qualifying
Staff
8 User Manual RKP-II (CA53461-001; Version 2, January 2010) © 2010 Moog GmbH
WARNING Incorrect handling of the Radial Piston Pump!
May lead to severe personal injury and property damage.
• Any and all work to the Radial Piston Pump may only be
performed by user's qualified to do so and those
authorized.
Page 17

2 Safety Organizational Measures
Qualified UsersQualified users are skilled professionals, who have been trained to carry out
these tasks and who have the required knowledge and experience. In
particular, such skilled professionals must be licensed to operate, ground and
label machines, systems and electric circuits in accordance with applicable
safety standards. Project planners must be familiar with the safety concepts for
automated technology.
2.2.3 Structural Modifications
Structural ModificationsIn order to prevent damage to the Radial Piston Pump or to any of its
accessories, structural modifications to the equipment may only be performed
by us or by an authorized service location.
Ö Chap. "8.3 Moog Service Addresses", Page 54
Among other things, warranty and liability claims shall be excluded for personal
injury or property damage, if they are the result of unauthorized or improperly
carried out structural modifications or tampering with the equipment in any
other way.
Ö Chap. "1.5 Warranty and Liability", Page 5
2.2.4 Work Safety
Certain components in an equipment system may be the
cause of magnetic field and cause interference to sensitive
devices.
• Maintain the respective device-related safety clearance.
CAUTION Danger! Toppling Objects!
Toppling tools and accessories may lead to bodily injury.
• Wear suitable protective work equipment such as, e. g.,
safety shoes.
CAUTION Risk of Burns!
The Radial Piston Pump and the hydraulic connection lines
may get very hot during operation and may lead to burns on
skin contact.
• Wear suitable protective work equipment such as, e. g.,
work gloves.
CAUTION Noise Exposure!
When operating the machinery, the operator may be exposed
to loud noise, which can lead to hearing damage.
• The operator / manufacturer must take suitable measures
to protect against noise, such as, for example, instructing
the use of ear protection.
Work SafetyWARNING Danger! Magnetic Fields!
CAUTION Hazardous Operating Fluid!
When exposed to hazardous operating fluid, skin contact or
inhaling may lead to bodily injury.
• Wear suitable protective work equipment such as, e. g.,
work gloves.
© 2010 Moog GmbH User Manual RKP-II (CA53461-001; Version 2, January 2010) 9
Page 18

General Safety Instructions 2Safety
2.3 General Safety Instructions
General Safety
Instructions
General Safety
Instructions for specific
phases of operation
• Any and all work to the Radial Piston Pump may only be performed by
user's qualified to do so and those authorized.
Ö Chap. "2.2.2 Selecting and Qualifying Staff", Page 8
• The technical data and especially the information shown on the Radial
Piston Pump's nameplate are to be observed and adhered to.
Ö Chap. "4 Technical Data", Page 27
2.3.1 Specific Phases of Operation
2.3.1.1 Mounting
• During mounting, make sure that all connections, plug s an d so cke ts ar e
tightly sealed to prevent substances from penetrating into the Radial
Piston Pump.
• The Radial Piston Pump must be completely filled with operating fluid.
• Before mounting, the Radial Piston Pump must have adjusted to room
temperature and it may not contain any condensation.
2.3.1.2 Start Up
• All hydraulic and electric connections must be in use or closed off.
• Never put the Radial Piston Pump into operation until after all mounting
steps have been completed.
General Safety
Instructions when
operating hydraulic
equipment
2.3.1.3 Maintenance and Repairs
• Maintenance and repair work as well as servicing work is to be carried out
according to schedule and to the regularly specified times.
• Secure the machinery from being started up during maintenance and
repair.
• Make sure the machinery is not under pressure during maintenance
work.
2.3.2 Operating Hydraulic Equipment
2.3.2.1 Safety Devices for Limiting Pressure
DANGER Risk of injury and property damage as a result of excess
pressure!
Excess pressure in the machinery may damage parts of the
machine and as a result may lead to severe injuries.
• In order to limit the machinery to the maximum
permissible operating pressure, it is crucial to install a
pressure limitation valve directly at the pump output line.
10 User Manual RKP-II (CA53461-001; Version 2, January 2010) © 2010 Moog GmbH
Page 19

3 Prod uct Description Configuration
3 Product Description
3.1 Configuration
Configuration
Pos. Description
1 Control piston
2 Rolling bearing
3 Drive shaft
4Drain Port
5 SAE piping connection
6 Sliding stroke ring
7 Slipper pad with working piston
8 Housing
9 Compensator
Fig. 1: Configuration Radial Piston Pump RKP-II
© 2010 Moog GmbH User Manual RKP-II (CA53461-001; Version 2, January 2010) 11
Page 20

Scope of Delivery 3 Product Description
3.2 Scope of Delivery
Scope of Delivery
Pos. Description
1 Radial Piston Pump RKP-II
2Cap
3 Flange cover
4 Transport protection for shaft ends
Fig. 2: Scope of Delivery
When pump stages are delivered, the through-drive is closed with a cap.
The caps are not suitable for operational purposes.
Included in the scope of delivery:
• Radial piston pump RKP-II with flange covers, caps and transport
protection for the shaft ends, preserved
• User manual with additional documentation
12 User Manual RKP-II (CA53461-001; Version 2, January 2010) © 2010 Moog GmbH
Page 21

3 Prod uct Description Nameplate
3.3 Nameplate
Nameplate
Pos. Marking Additional Information
1 Revision status
2 Rotation direction
3 Type key Ö Catalog Radial Piston Pump RKP-II
4 displacement
5 Maximum revolutions for low noise operation
6 Maximum operating pressure
7 Date of manufacture in the format MM/YY
8 Model number
Fig. 3: Nameplate for Radial Piston Pump RKP-II
In the case of multiple pumps, each individual pump has its own
nameplate.
© 2010 Moog GmbH User Manual RKP-II (CA53461-001; Version 2, January 2010) 13
Page 22

Functional Description 3 Product Description
3.4 Functional Description
Functional Description The shaft (Pos. 11) transfers the drive torque to the star-shaped cylinder b lock
(Pos. 7), free of any axial forces, via a crossdisc coupling (Pos. 10). The
cylinder block is hydrostatically supported on the control journal (Pos. 6). The
radial pistons (Pos. 5) in the cylinder block run against the stroke ring (Pos. 3)
through hydrostatically balanced slipper pads (Pos. 4). The pistons and slipper
pads are joined by ball and socket joints and locking rings. The slipper pads
are guided in the stroke ring by two retaining rings (Pos. 2) and, when running,
are held against the stroke ring by centrifugal force and oil pressure.
As the cylinder block rotates, the pistons reciprocate due to the eccentric
positioning of the stroke ring, the piston stro ke being twice the eccentricity. The
eccentric position of the stroke ring is controlled by two diametrically opposed
control pistons (Pos. 1, Pos. 8) and the pressure compensator (Pos. 9).
The oil flow to and from the pump passes thro ugh th e pump p orts and in to and
out of the pistons through the porting in the control journal. The bearing
supporting the drive shaft is only subjected to external forces. The
compensator setting limits the system pressure and adjusts the pump flow
between zero and full flow to maintain the set pressure.
Fig. 4: Cross Section Radial Piston Pump RKP-II
14 User Manual RKP-II (CA53461-001; Version 2, January 2010) © 2010 Moog GmbH
Page 23
3 Prod uct Description Compensator Operation
3.5 Compensator Operation
Compensator OperationThe Radial Piston Pump RKP-II enables a variety of compensator options to be
used. This ensures maximum flexibility.
The following options are described in more detail later on:
No. Compensator Option Description/Characteristics/Application
1 Adjustable pressure
compensator, F1, F2
2 Remote Pressure
Compensator, H1
3 Remote Pressure Compensator
with MooringControl, H2
hydraulically adjustable
4 Load sensing compensator, J1
Combined pressure and flow
compensator
5 Load sensing compensator
with p-T control notch, R1
Combined pressure and flow
compensator with p-T control notch
6 Mechanical stroke adjustment, B1For displacement systems with fixed flow volume
7 Servo control, C1 The Pump displacement can be adjusted with a
8 Constant Horsepower
Control, S1
(force comparison system)
9 Remote Constant Horsepower
Control, S2
wtih pressure and flow limiter,
with superimposed pressure and
displacement limitation, controlled
hydraulically
RKP-D Radial piston pump with digital on-board electronics
Tab. 2: Description of the Compensator Options
For constant pressure systems with a fixed
pressure settings
Ö Chap. "3.5.1 Adjustable Pressure Compensator,
F1, F2", Page 16
For constant or variable pressure systems with
remote pressure setting
Ö Chap. "3.5.2 Hydraulically Driven Remote Pressure Compensator, H1", Page 17
For constant pressure systems with variable
pressure setting for mooring control
Ö Chap. "3.5.3 Remote Pressure Compensator
with Mooring Control, H2", Page 18
For displacement systems with variable volume
flow and loadsensing pressure control
(hydro-mechanical compensator concept)
Ö Chap. "3.5.4 Load Sensing Compensator, J1",
Page 19
As described in 4 plus: active reduction of pressure
peaks during dynamic control processes
Ö Chap. "3.5.5 Load Sensing Compensator with pT Control Notch, R1", Page 20
settings, which can be changed manually if needed
Ö Chap. "3.5.6 Mechanical Stroke Adjustment,
B1", Page 21
hand lever or an actuator
Ö Chap. "3.5.7 Servo Control, C1", Page 22
Automatic reduction of displacement in the event of
an increasing load so that the capacity of the drive
motor is not exceeded
Ö Chap. "3.5.8 Power Control, S1", Page 23
As described in 8 plus: an adjustable maximum
limit setting for pressure and displacement
Ö Chap. "3.5.9 Power Control, S2", Page 25
Ö Application Instruction RKP-D with CAN Bus
Interface
All compensators are pre-set at the factory.
Information on setting the compensators:
Ö Chap. "7.1.2 Adjusting the Compensator", Page 44
© 2010 Moog GmbH User Manual RKP-II (CA53461-001; Version 2, January 2010) 15
Page 24
Compensator Operation 3 Product Description
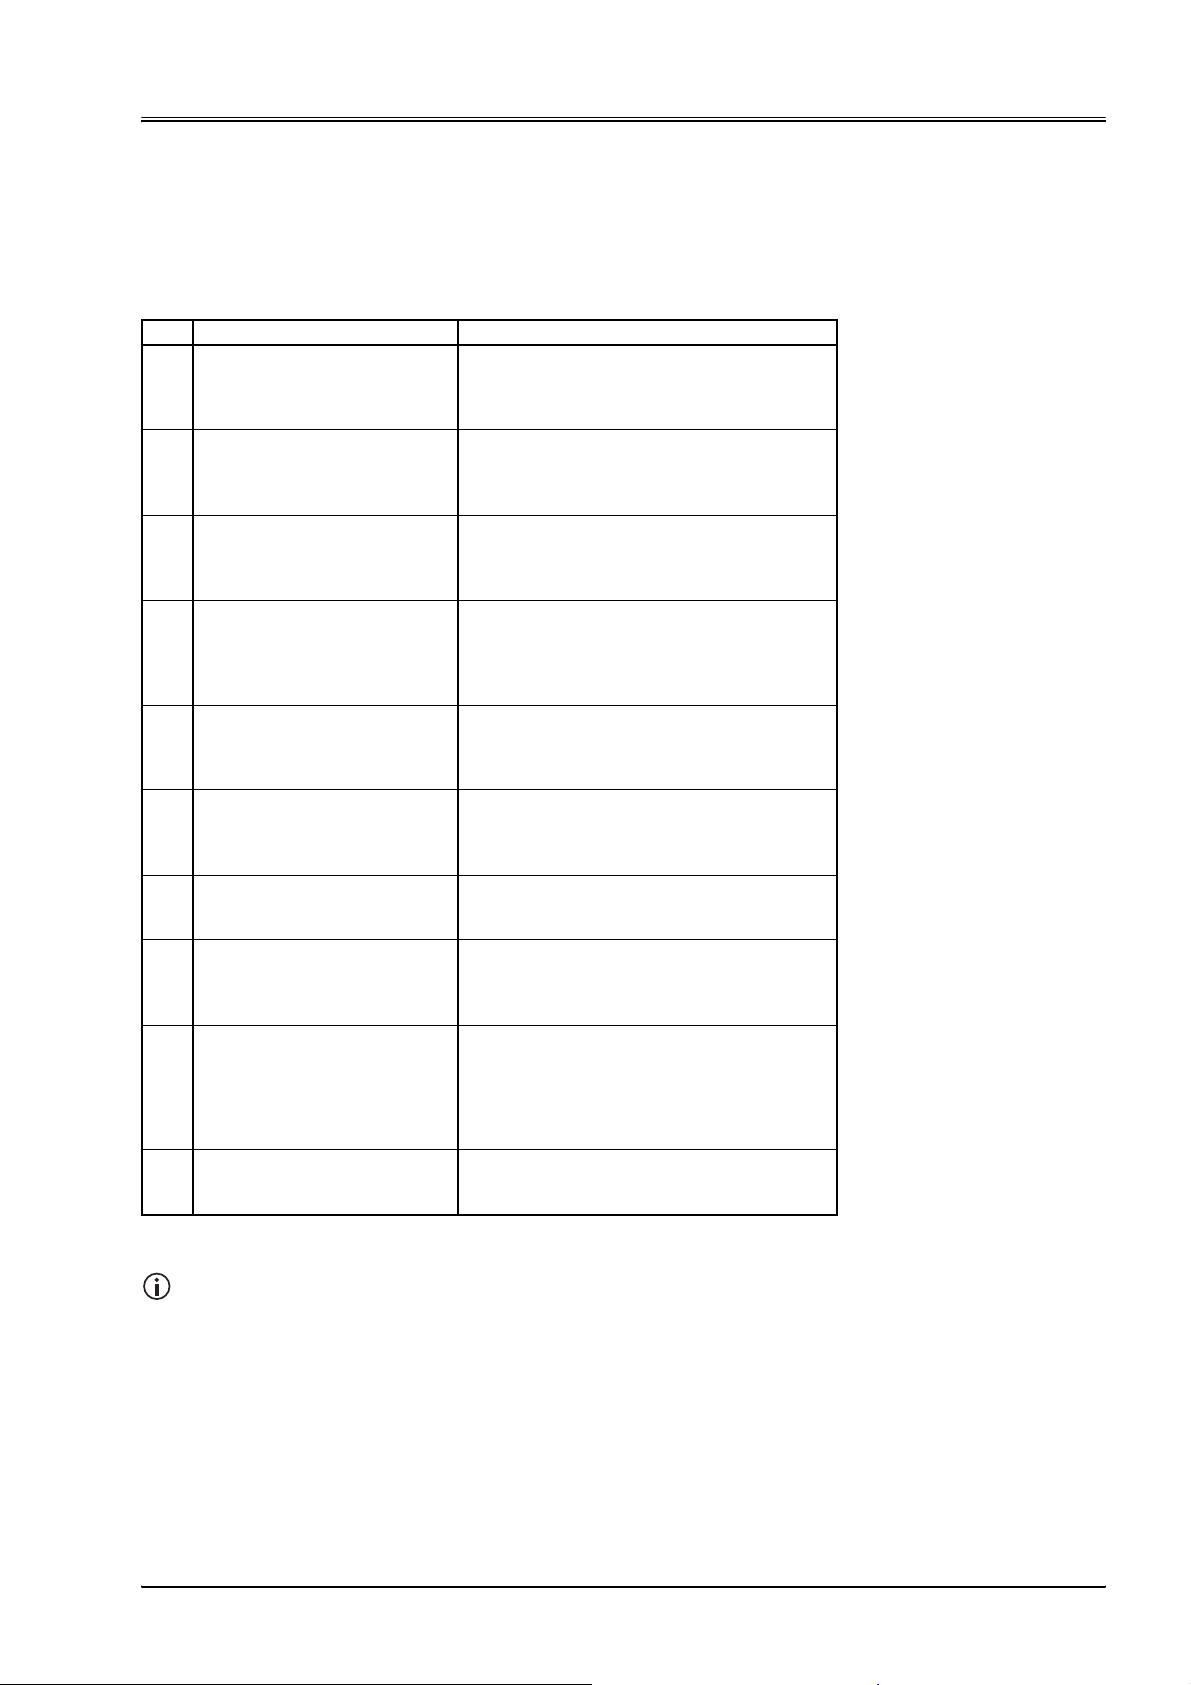
3.5.1 Adjustable Pressure Compensator, F1, F2
Adjustable Pressure
Compensator, F1, F2
Pressure range:
F1: 30–150 bar
F2: 80–350 bar
Pos. Description
1 Safety valve p = p
2 Control piston 2
3 Control piston 1
4 Adjustment of zero stroke
5 Valve spool
6 Valve spri ng
7 Adjustment screw
8 Locknut for the adjustment screw
9 Setting the adjustment screw
16 User Manual RKP-II (CA53461-001; Version 2, January 2010) © 2010 Moog GmbH
+ 30 bar
max.
Fig. 5: Adjustable pressure compensator, F1, F2
Page 25
3 Prod uct Description Compensator Operation
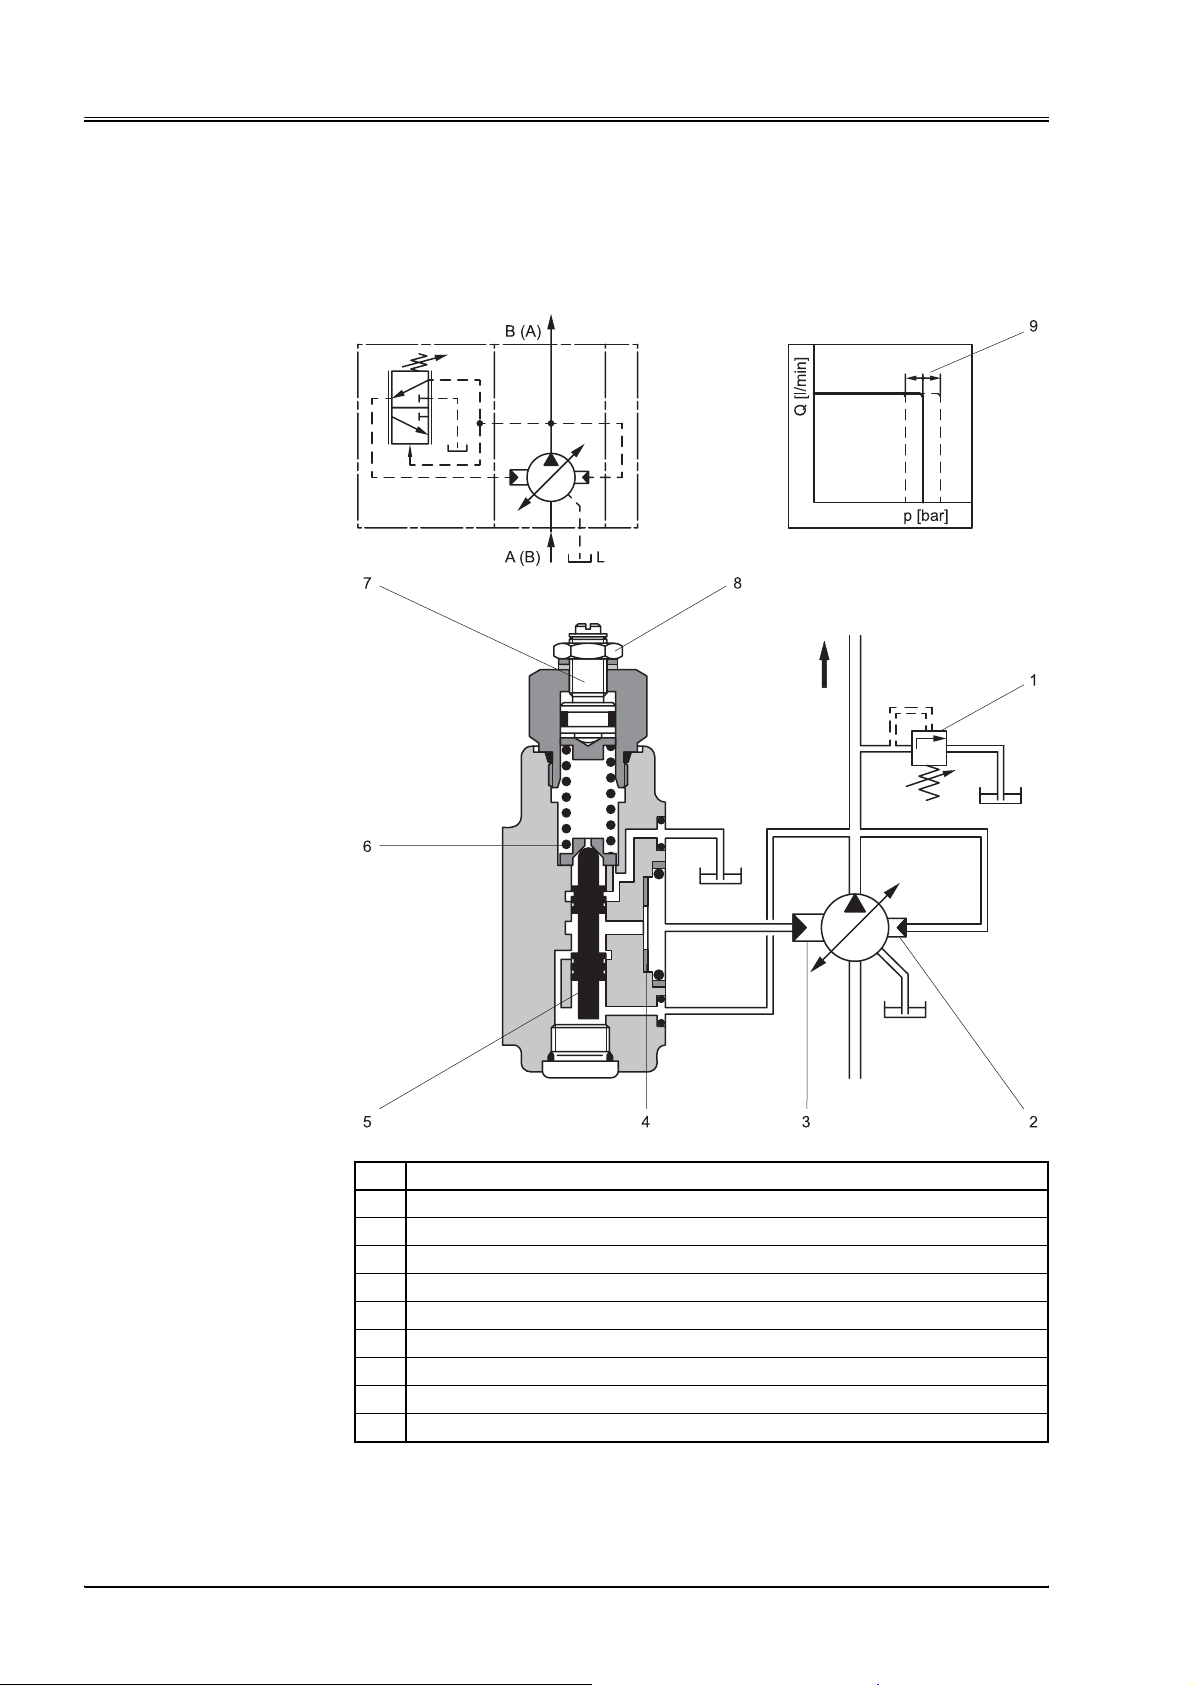
3.5.2 Hydraulically Driven Remote Pressure
Compensator, H1
Pressure pilot valve:
Manually adjustable or proportional pressure valve Q = 1–1.5 l/min.
Hydraulically Driven
Remote Pressure
Compensator, H1
Pos. Description
1 Safety valve p = p
2 Control piston 2
3 Control piston 1
4 Adjustment of zero stroke
5 Pilot pressure valve
6 Valve spool
7Orifice
8p
9 Locked adjustment screw
10 Locknut for the adjustment screw
11 Set a pilot valve
© 2010 Moog GmbH User Manual RKP-II (CA53461-001; Version 2, January 2010) 17
spring
min.
Fig. 6: Hydraulically Driven Remote Pressure Compensator, H1
max.
+ 30 bar
Page 26

Compensator Operation 3 Product Description
3.5.3 Remote Pressure Compensator with
Mooring Control, H2
Remote Pressure
Compensator with
Mooring Control, H2
The pressure compensator with Mooring control has an intermediate plate
inserted between the pump body and the pressure compensator. The
intermediate plate enables the pump's absorption operation.
Pos. Description
1 Control piston 2
2 Control piston 1
3 Intermediate plate
4 Pilot pressure valve:
5 Valve spool
6Orifice
min.
spring
Fig. 7: Pressure Compensator with Mooring Control, H2
7p
8 Locked adjustment screw
9 Intermediate plate
10 Locknut for the adjustment screw
18 User Manual RKP-II (CA53461-001; Version 2, January 2010) © 2010 Moog GmbH
Page 27

3 Prod uct Description Compensator Operation
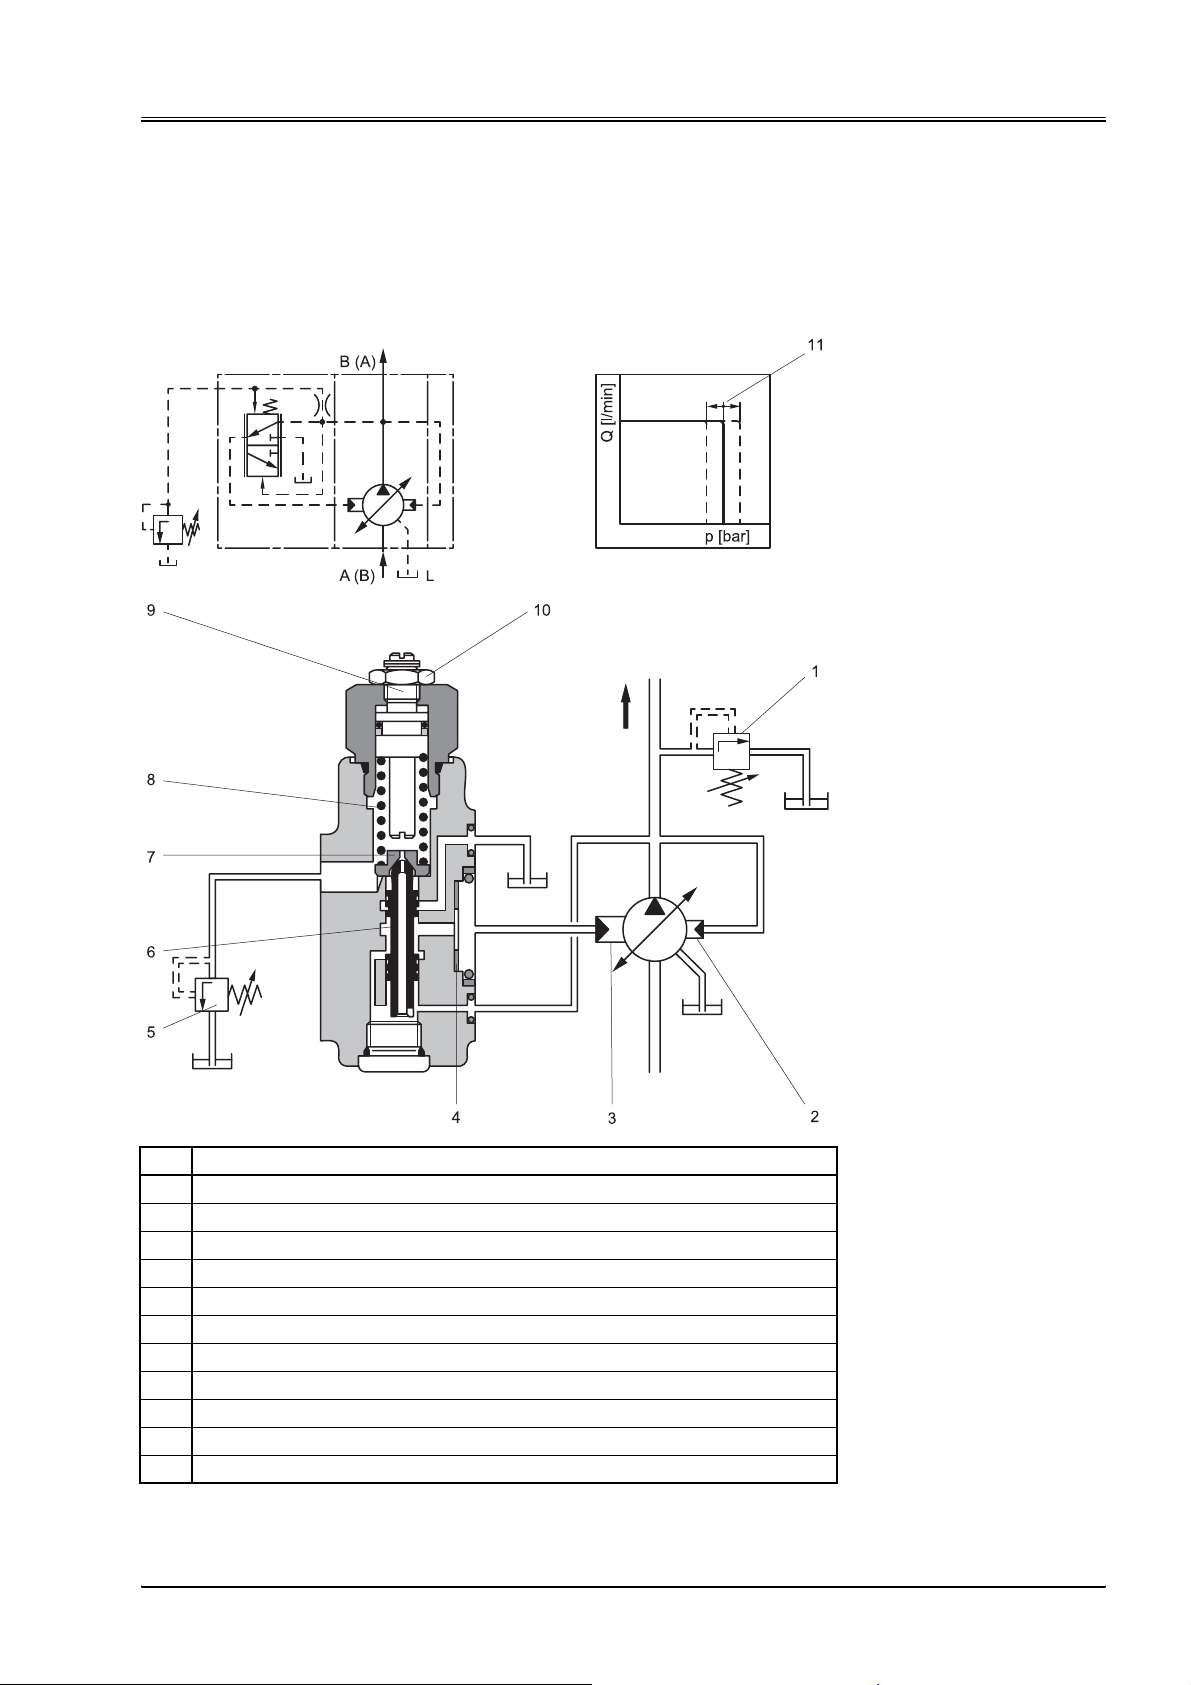
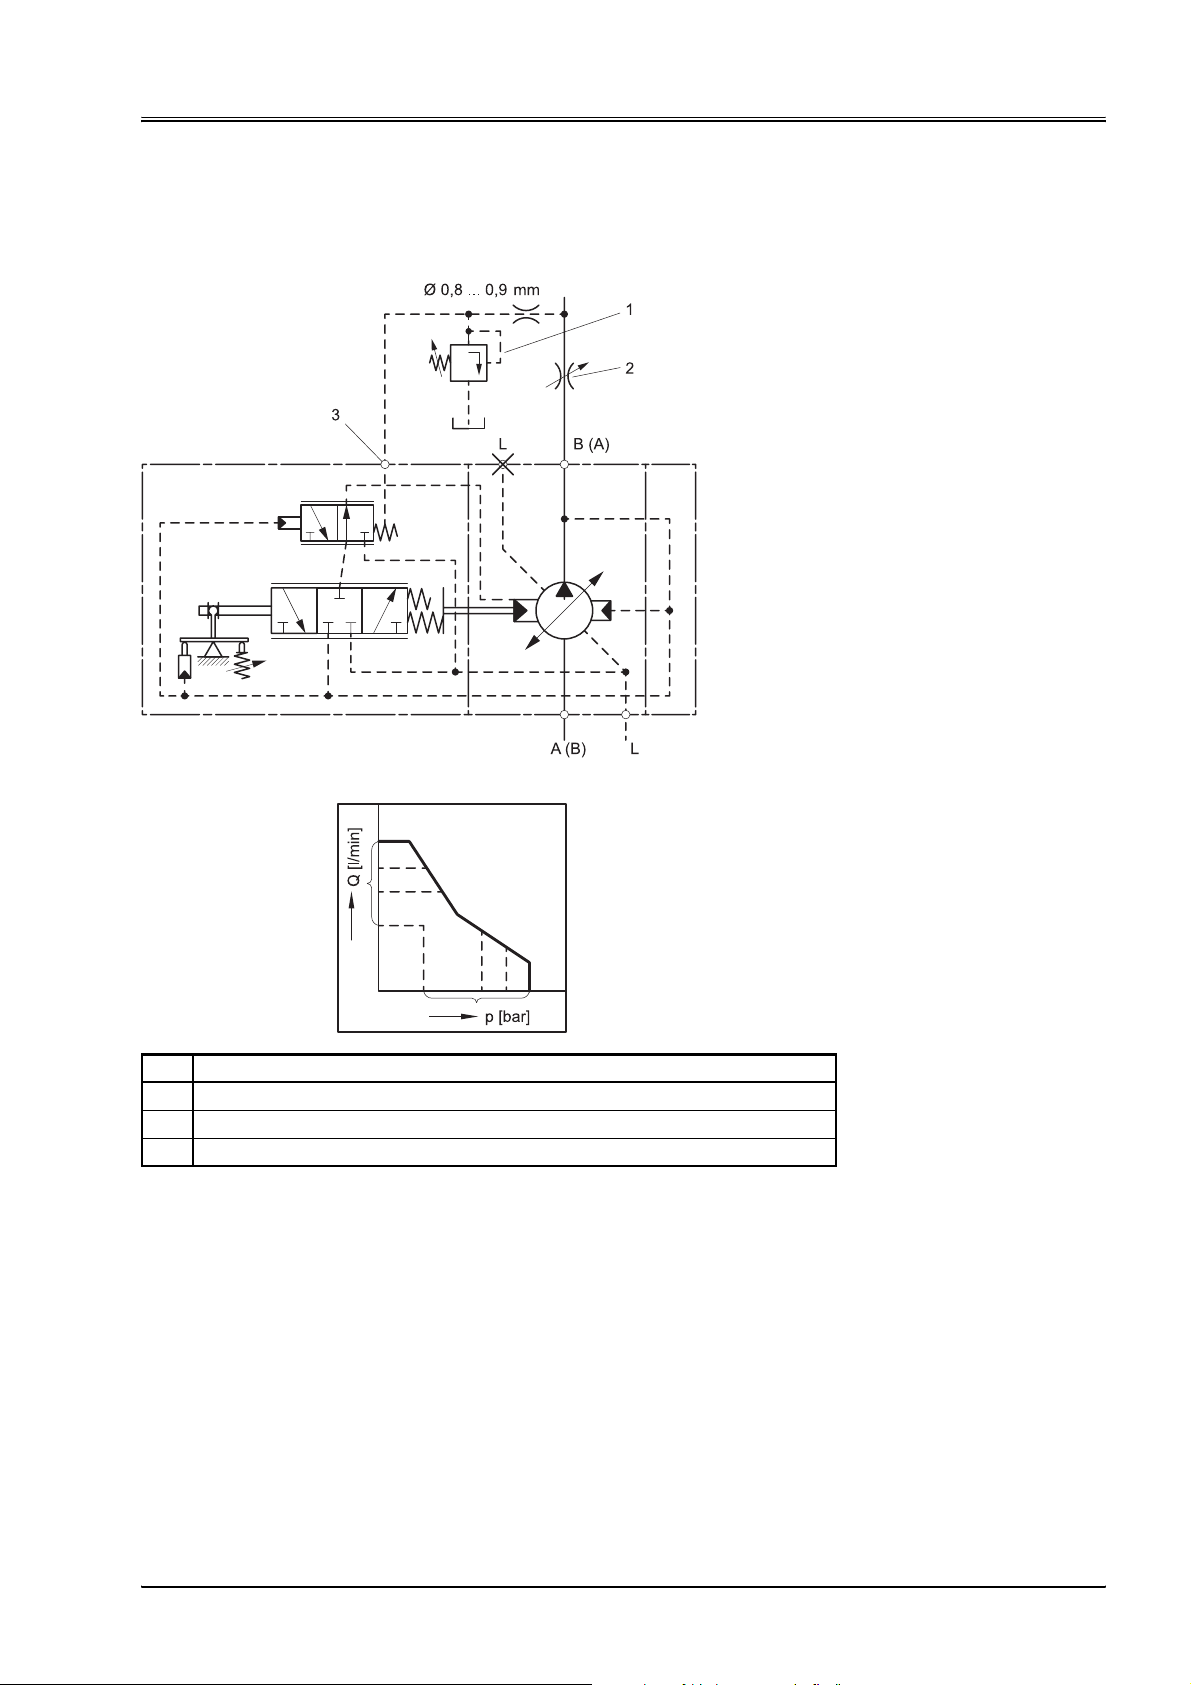
3.5.4 Load Sensing Compensator, J1
Metering orifice:
Manually remote adjustable orifice valve or proportional orifice valve.
Pressure pilot valve:
Manually remote adjustable proportional pressure valve Q = 1–1.5 l/min.
Load Sensing
Compensator, J1
Pos. Description Pos. Description
1 Metering orifice for flow control 8 Δp spring
2 Safety valve p = p
3 Control piston 2 10 Locknut for the adjustment screw
4 Control piston 1 11 Set at pilot valve
5 Adjustment of zero stroke 12 Set at metering throttle
6 Pilot pressure valve: 13 Orifice Ø 0.8 ... 0.9 mm
7 Valve spool
© 2010 Moog GmbH User Manual RKP-II (CA53461-001; Version 2, January 2010) 19
+ 30 bar 9 Locked adjustement screw
max.
Fig. 8: Load sensing compensator, J1
Page 28

Compensator Operation 3 Product Description
3.5.5 Load Sensing Compensator with p-T Control
Notch, R1
Load Sensing
Compensator with p-T
Control Notch, R1
Metering orifice:
Manually remote adjustable orifice valve or proportional orifice valve.
Pressure pilot valve:
Manually remote adjustable proportional pressure valve Q = 1–1.5 l/min.
For multiple pumps feeding in one common line, only one compensator with a
p-T control notch may be used. This compensator must be set to the hig her Δp
value.
Pos. Description Pos. Description
1 Metering orifice for flow control 8 Δp spring
2 Safety valve p = p
3 Control piston 2 10 Orifice Ø 0.8 ... 0.9mm
4 Control piston 1 11 Locknut for the adjustment screw
5 Adjustment of zero stroke 12 Set at pilot valve
6 Pilot pressure valve: 13 Set at metering throttle
7Valve spool
Fig. 9: Load Sensing Compensator with p-T Control Notch, R1
20 User Manual RKP-II (CA53461-001; Version 2, January 2010) © 2010 Moog GmbH
+ 30 bar 9 Locked adjustment screw
max.
Page 29

3 Prod uct Description Compensator Operation
3.5.6 Mechanical Stroke Adjustment, B1
Mechanical Stroke
Adjustment, B1
Pos. Description
1 Adjustment screw
2 Seal nut
Fig. 10: Mechanical stroke adjustment, B1
© 2010 Moog GmbH User Manual RKP-II (CA53461-001; Version 2, January 2010) 21
Page 30

Compensator Operation 3 Product Description
3.5.7 Servo Control, C1
Servo Control, C1
Pos. Description Pos. Description
1 Stroke ring 4 Adjustment lever for control shaft
2 Pilot spool 5 Control piston 1
3 Spool sleeve 6 Control piston 2
Fig. 11: Servo control, C1
22 User Manual RKP-II (CA53461-001; Version 2, January 2010) © 2010 Moog GmbH
Page 31

3 Prod uct Description Compensator Operation
3.5.8 Power Control, S1
Power Control, S1
Pos. Description Pos. Description
1 Control piston 2 6 Pilot spool
2 Control piston 1 7 Rocker
3 Adjustment screw (fixed setting, do
not modify)
4 Sensing piston 9 Spring 2
5 Adjusting screw (fixed set ting, do not
modify)
Fig. 12: Power control, S1
8 Spring 1
© 2010 Moog GmbH User Manual RKP-II (CA53461-001; Version 2, January 2010) 23
Page 32

Compensator Operation 3 Product Description
Characteristics for Power Control, S1
Fig. 13: Characteristic V = 32 cm3/U
Fig. 14: Characteristic V = 63 cm3/U
Fig. 15: Characteristic V = 100 cm3/U
Approximation to the power hyperbola by means of two springs.
Referenced on n = 1450 1/min.
For other revolutions, the following applies:
n⋅
P
N
P
----------------- -=
1450
24 User Manual RKP-II (CA53461-001; Version 2, January 2010) © 2010 Moog GmbH
Page 33
3 Prod uct Description Compensator Operation
3.5.9 Power Control, S2
Hydraulically operated power control with superimposed pressure and
displacement limitation
Power Control, S2
Pos. Description
1 Pressure p setting
2 Flow control Q setting
3 Control port
Fig. 16: Power control, S2
© 2010 Moog GmbH User Manual RKP-II (CA53461-001; Version 2, January 2010) 25
Page 34

Compensator Operation 3 Product Description
For your notes.
26 User Manual RKP-II (CA53461-001; Version 2, January 2010) © 2010 Moog GmbH
Page 35
4 Technical Data General Technical Data
4 Technical Data
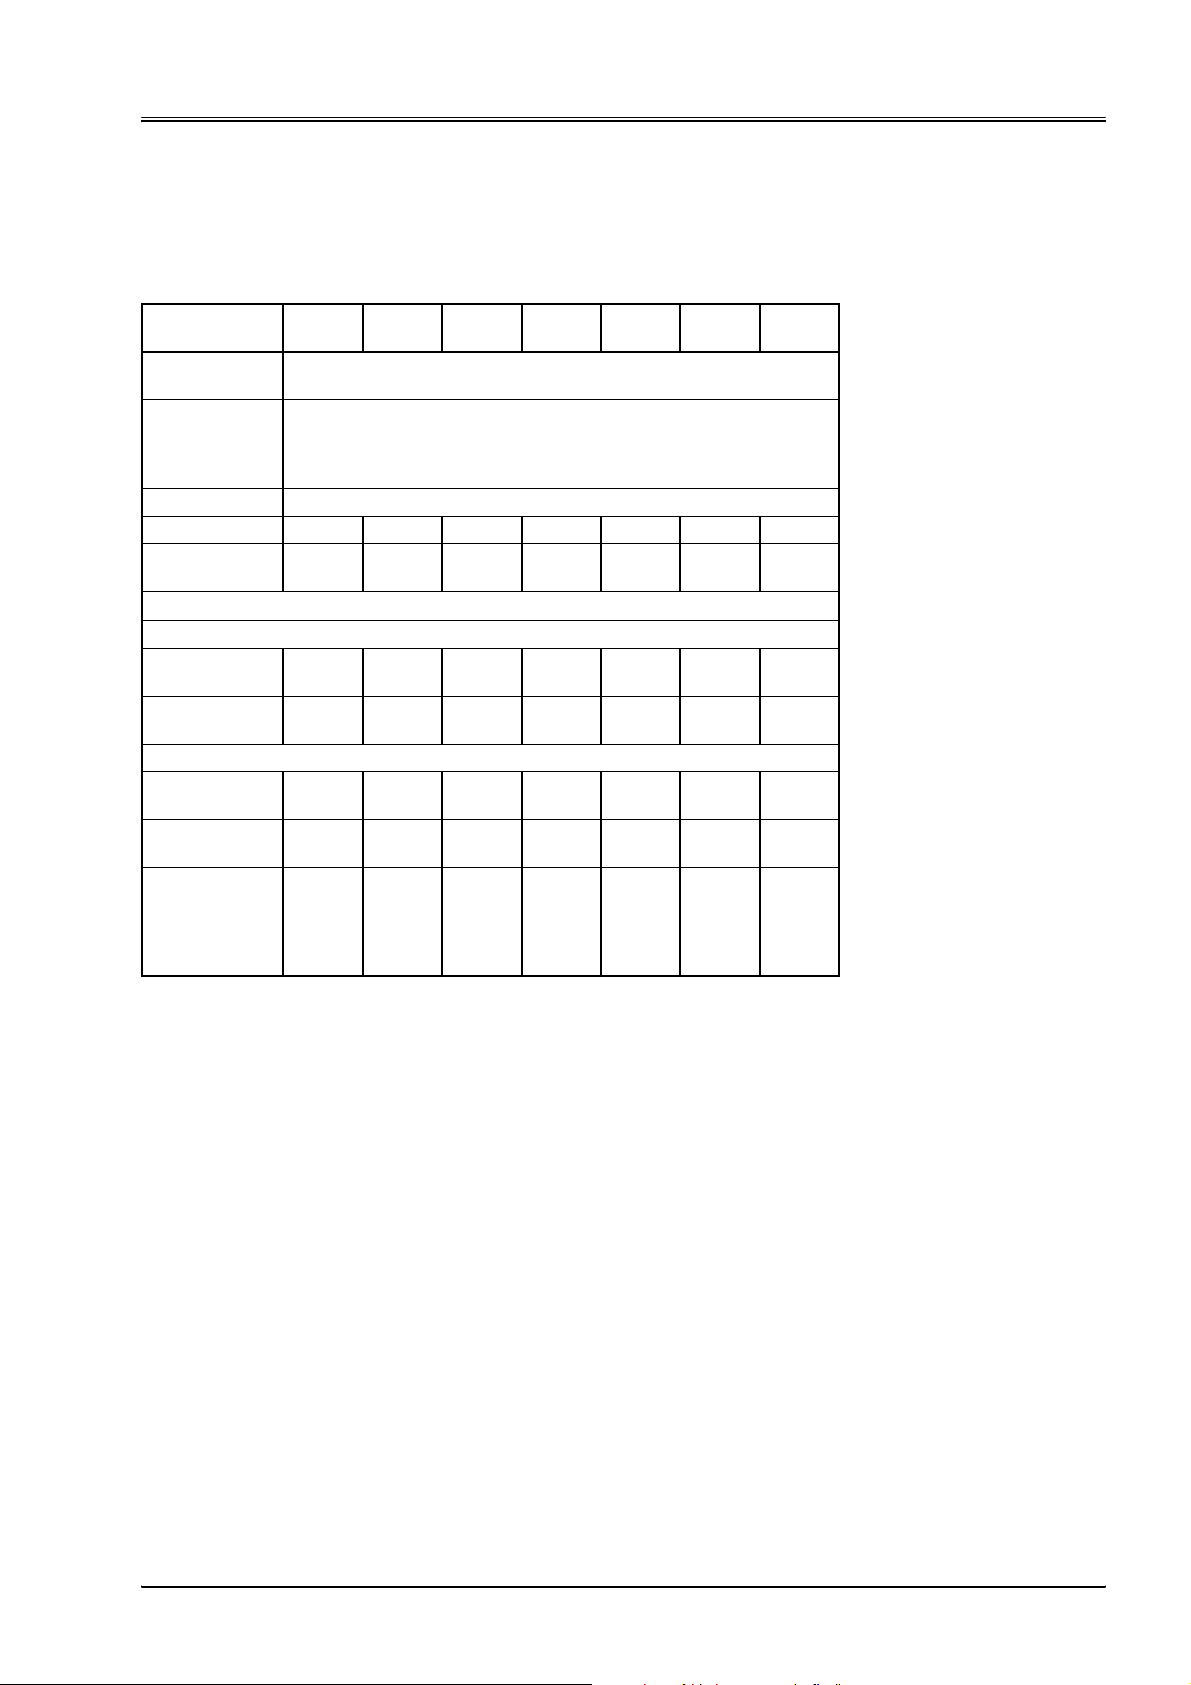
4.1 General Technical Data
Displacement
3
[cm
/R] 19 32 45 63 80 100 140
Type of
construction
Type of mounting End mounting, centering and hole-circle diameter
Mounting position optional
Weight [kg] 22 33 33 71 71 71 103
Mass moment of
inertia [kg/cm
Line connections
Pressure port
Medium pressure
version
High-pressure
version
Suction port
Medium pressure
version
High-pressure
version
Recommended
pipe OD
Drain pipes
(lightweight
version) [mm]
Radial Piston Pump for open circuits with various control devices
as per ISO 3019/2 (metric)
Attachment flange as per ISO 3019/1 (dimensions in inches)
Attachment flange as per ISO 3019/2 (metric)
2
17.7 61 61 186.3 186.3 186.3 380
]
3/4"
3000 psi1"3000 psi1"3000 psi
3/4"
6000 psi1"6000 psi
3/4"
3000 psi
3/4"
6000 psi
15 (5/8") 18 (3/4") 18 (3/4") 22 (7/8") 22 (7/8") 22 (7/8") 22 (7/8")
1 1/2"
3000 psi
1 1/2"
3000 psi
Tab. 3: Gene ral Technical Data
– 1 1/4"
1 1/2"
3000 psi2"3000 psi2"3000 psi2"3000 psi
–2"
1 1/4"
3000 psi
6000 psi
3000 psi2"3000 psi
1 1/4"
3000 psi
1 1/4"
6000 psi
1 1/4"
6000 psi
––
––
1 1/2"
6000 psi
2 1/2"
3000 psi
General Technical Data
© 2010 Moog GmbH User Manual RKP-II (CA53461-001; Version 2, January 2010) 27
Page 36
Operating Conditions 4 Technical Data
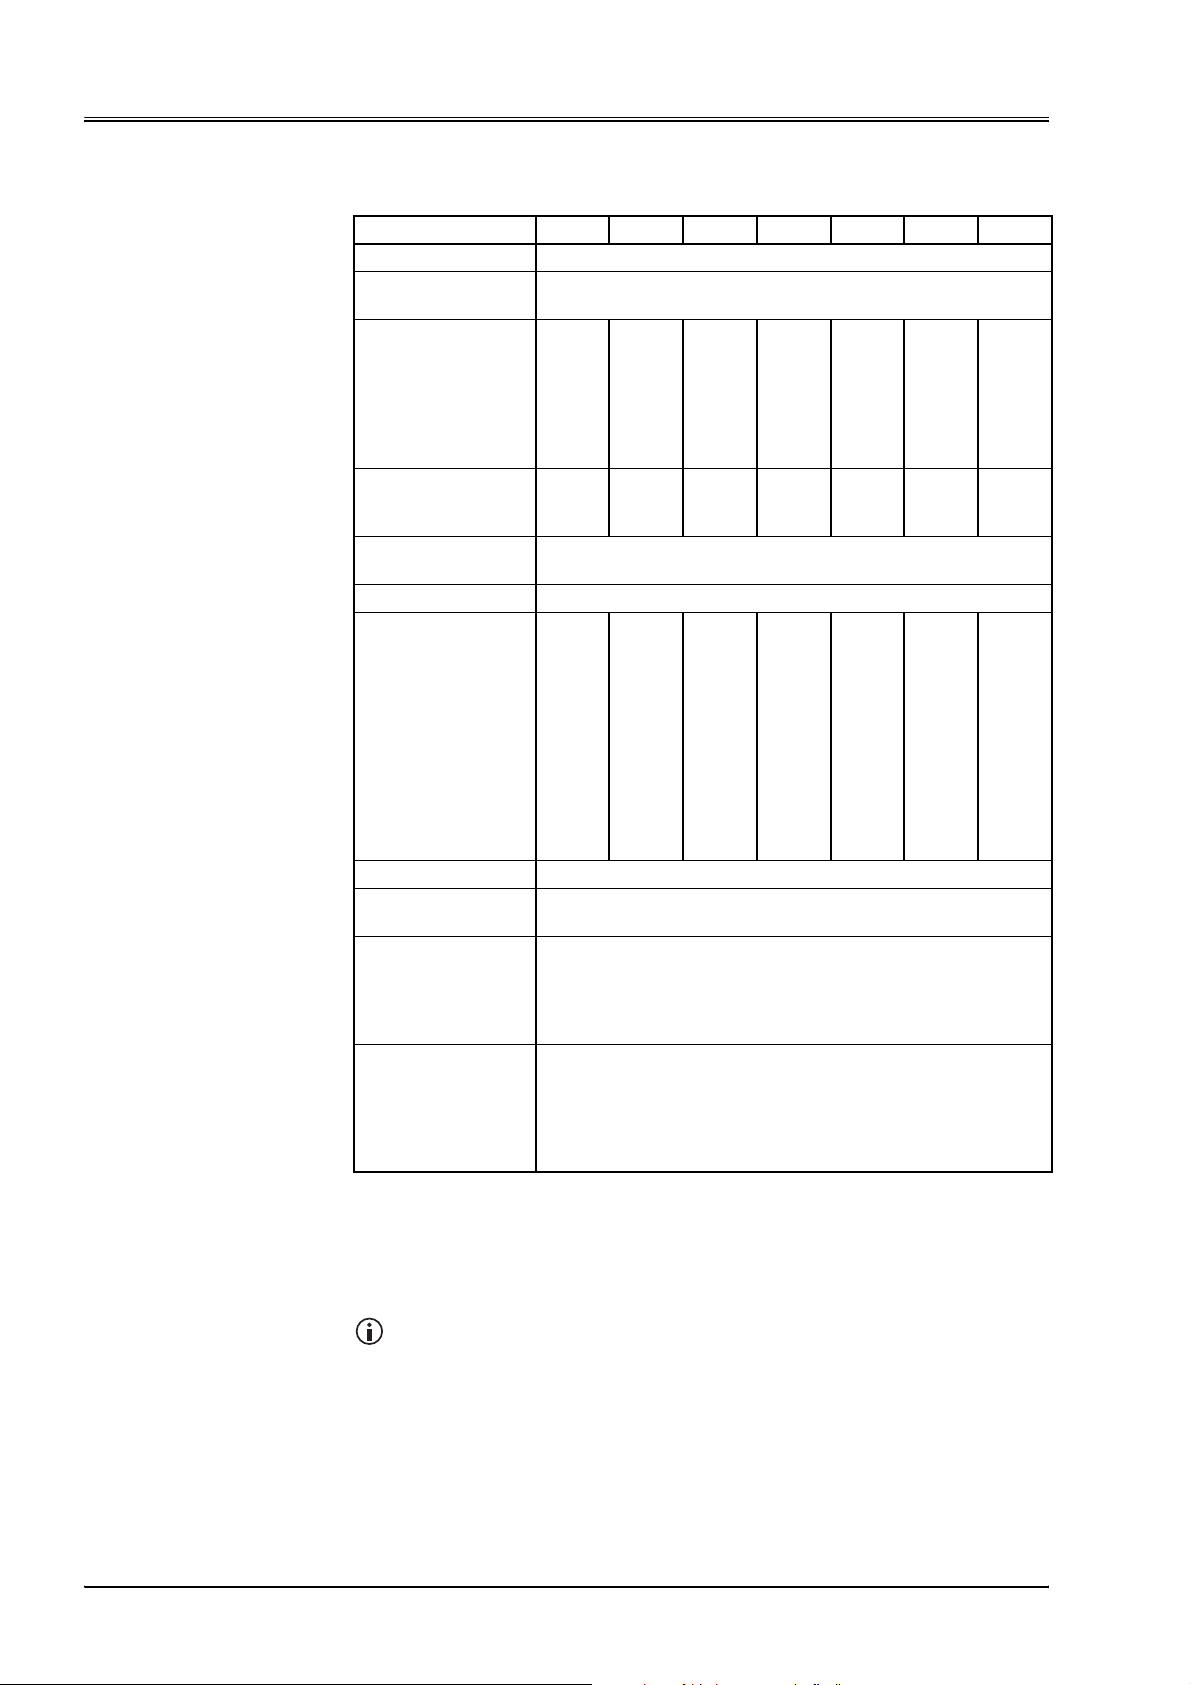
4.2 Operating Conditions
Operating Conditions
Displacement [cm3/R]1932456380100140
Drive type Direct drive with coupling (for other drive types, please contact us)
Ambient temperature
-15 °C up to 60 °C
range
Max. speed at inlet
pressure
0.8 bar abs. [min
-1
Max. speed for inlet
pressure
1 bar abs. [min
-1
]
Max. speed for
low noise operation
-1
[min
]
Min. inlet pressure
2700
]
2900
1800 1800 1800 1800 1800 1800 1800
0.8 bar absolute at pump inlet
2500
2900
1800
2100
2100
2300
1500
1800
1500
1800
1500
1800
suction port
Max. housing pressure 2 bar (1 bar above atmosphere)
Standard version:
Continuous pressure
[bar]
Maximum pressure
280
1
315
350
280
315
350
280
315
350
280
315
350
280
315
350
280
315
350
280
315
350
[bar]
Peak pressure [bar]
–
–
–
High-pressure version:
Continuous pressure
[bar]
Max. pressure
1
[bar]
350
385
420
350
385
420
–
–
–
350
385
420
350
385
420
–
–
–
Peak pressure [bar]
Hydraulic fluid Mineral oil as per DIN 51 524
Hydraulic fluid
-15 °C up to 80 °C
temperature range
Viscosity Permissible operating range 12 up to 100 mm
Recommended operating range 16 up to 46 mm
Hydraulic fluid for viscosity class ISO VG 46 or VG 32
Max. viscosity 500 mm
electric motor 1800 min
2
/s during start-up using
-1
2
/s
2
/s
Filtering NAS 1638, Class 9;
ISO 4406, Class 20/18/15
Achievable using filter fineness β
20
= 75
2
NAS 1638, class 7;
ISO 4406, class 18/16/13; with elektro-hydraulic control (RKP-D)
Tab. 4: Operating Conditions
1
Maximum pressure as per DIN 24312
2
Dirt particle retention rate > 20 µm is 1:75, meaning 98.67 %
For special fluids, such as, e.g., HFA, HFC and emulsions, in part other
values apply with regard to pressure, visco sity , tem p er at ur e an d filte rin g .
Information on these values can be found in the following supplemental
documentation:
ÖCatalog Radial Piston Pump for fire-resistant Fluids
28 User Manual RKP-II (CA53461-001; Version 2, January 2010) © 2010 Moog GmbH
Page 37
5 Transport and Storage Unpacking the Pump
5 Transport and Storage
For pumps in explosive areas, observe the supplementary docume ntation
as well:
Ö User Manual RKP II Explosion-Proof
For any and all tasks to be performed on the pumps, appr opriate person al
protective equipment should be worn.
Ö Chap. "2. 2. 4 Work Safety", Page 9
5.1 Unpacking the Pump
CAUTION Individual parts may fall out!
If the original packaging is opened improperly, individual parts
may fall out and be damaged or lead to injuries of a worker.
• Place the pump in its original packaging on a stable
surface.
• Only open the original packaging from the top.
• Dispose of the packaging material in accordance with
locally applicable regulations.
Procedure:
1. Rem o ve or igin a l pack ag in g.
Transport and Storage
Unpacking the Pump
2. Inspect product and contents according to the purchase order.
3. Check that the packing slip and delivered product match.
4. In the event of transport damage or defects, inform the manufacturer or
the supplier.
5. Store original packaging for later use or dispose of it in accordance with
locally applicable regulations.
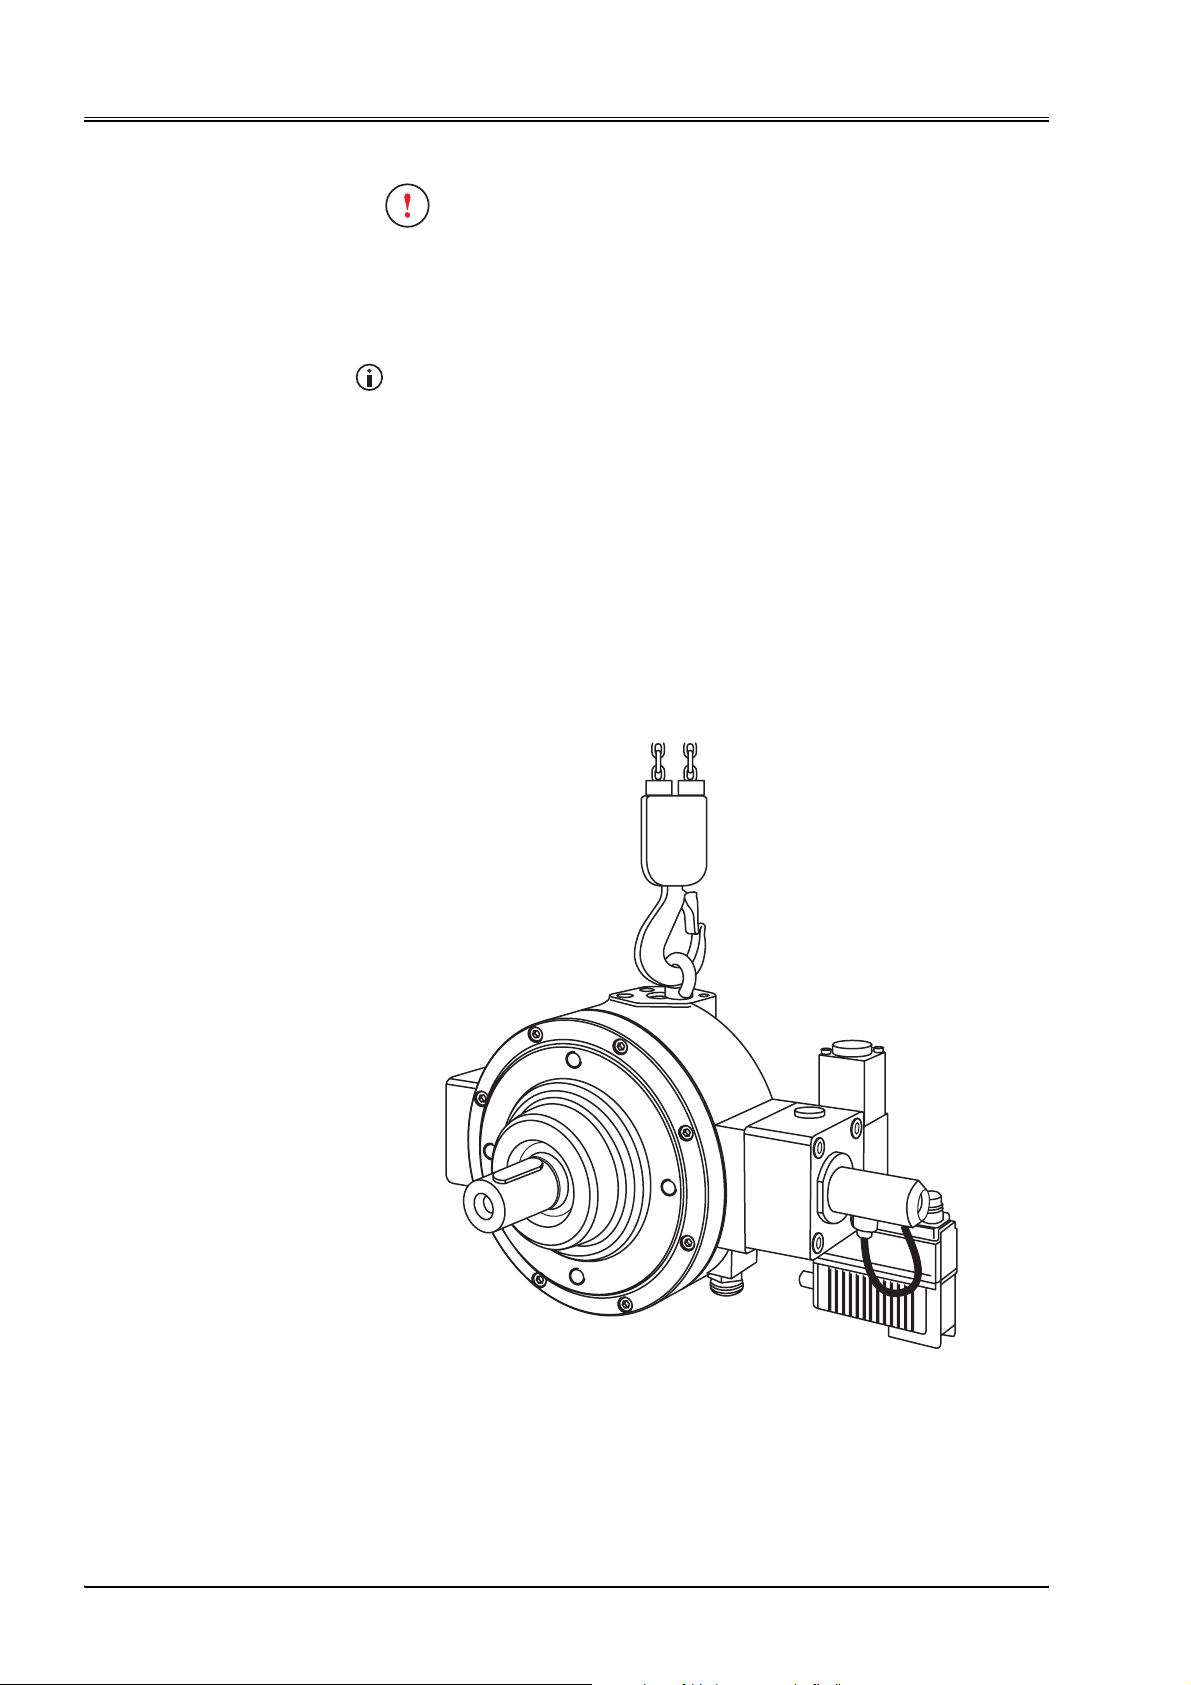
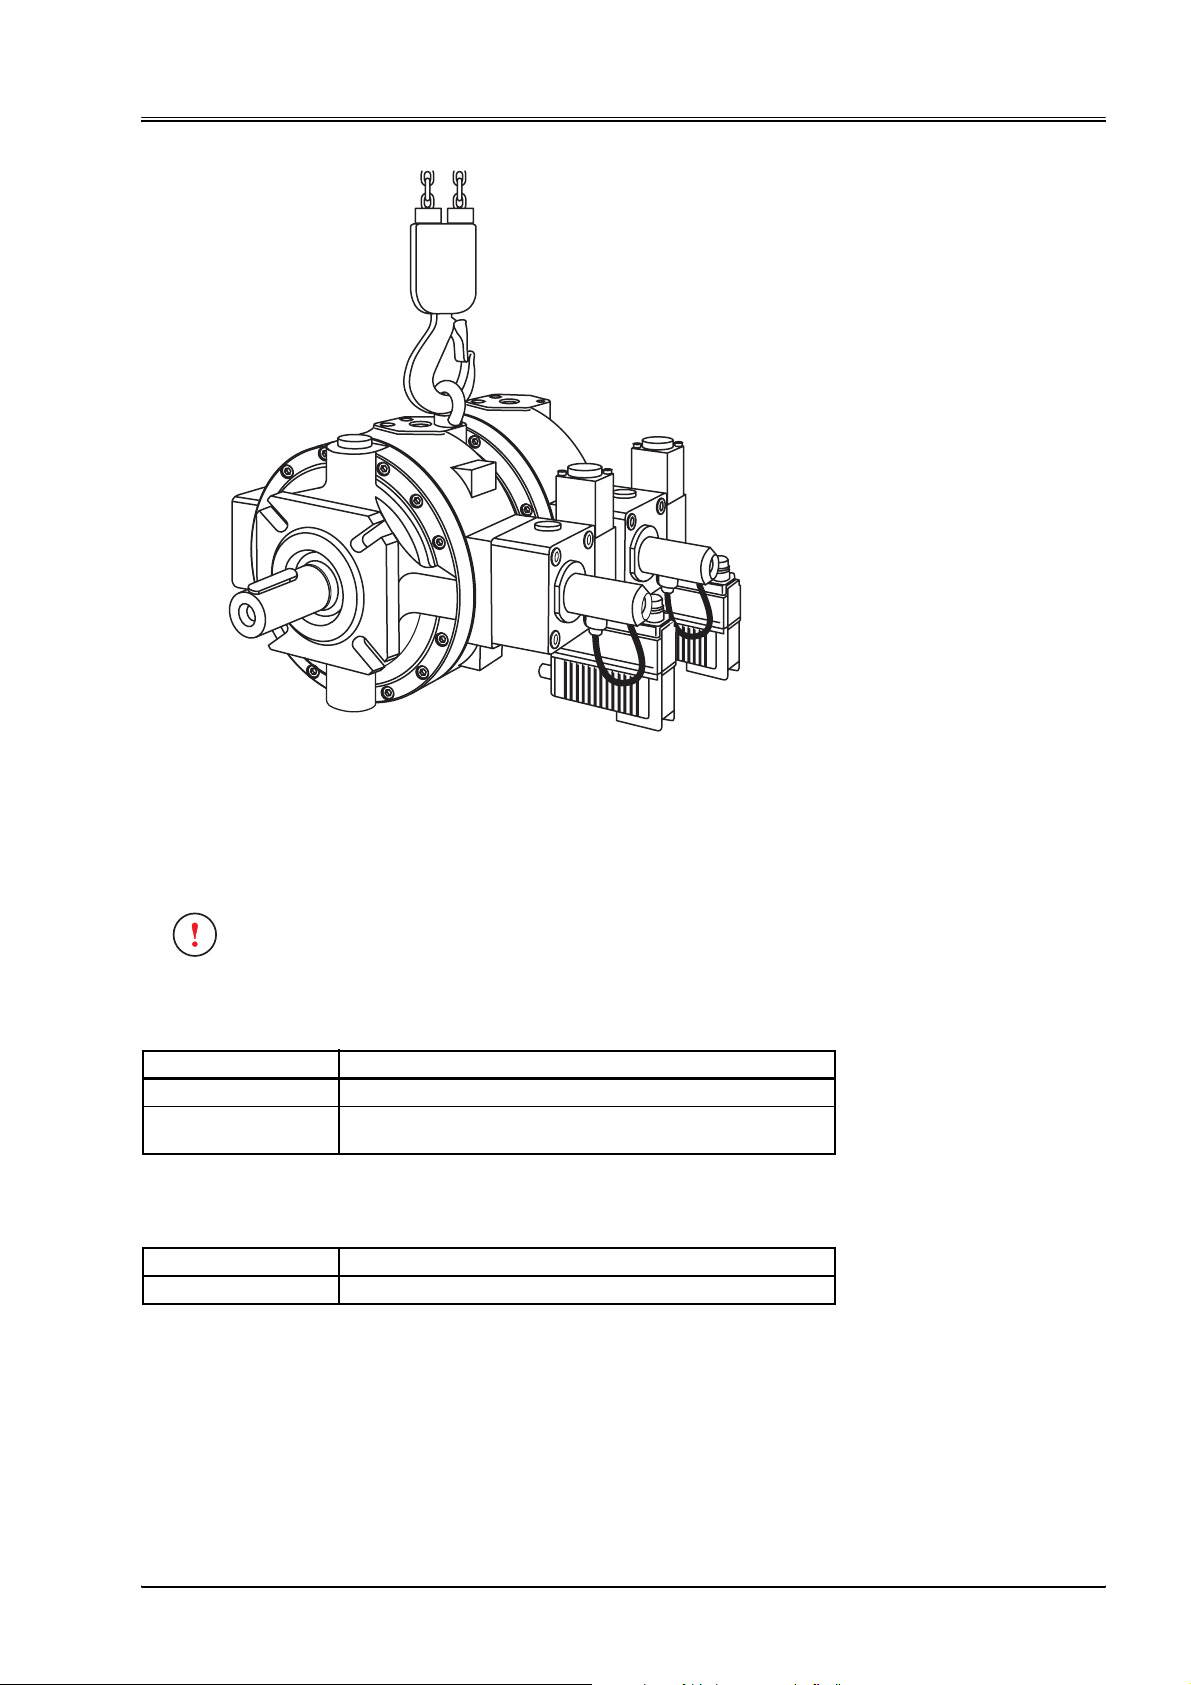
5.2 Transporting the Pump
DANGER Risk of crushing!
The pump may topple over during transport and lead to
crushing injuries.
• Select lifting tackle to correspond with the overall weight
of the pump.
• Attach the lifting tackle to the pump properly.
• Avoid all areas below the floating load.
CAUTION Damage to the drive shaft!
During transport, impact and blows to the drive shaft may
damage the pump.
• Do not bang objects against the drive shaft.
• Do not place or set objects onto the drive shaft.
• Do not exceed permissible axial and radial forces to the
drive shaft.
Transporting the Pump
© 2010 Moog GmbH User Manual RKP-II (CA53461-001; Version 2, January 2010) 29
Page 38
Transporting the Pump 5 Transport and Storage
CAUTION Damage to the attached parts!
Any heavy weight on the attached parts, for example the
compensator, during transport may result in damage to such.
• Do not attach lifting tackle to the attached parts during
transport.
• Make sure that the attached parts do not collide with other
objects during transport.
For multiple pumps, add up the weights of the individual pumps.
Procedure:
1. Determine the weight and the dimensions of the pump.
Ö Catalog Radial Piston Pump RKP-II
Ö Chap. "4 Technical Data", Page 27
2. Attach suitable lifting tackle to the pump.
- Mount the ring bolts into the attachment flange of the pressure side.
- If the center of gravity is off-center (e. g. for multiple pumps with
pump stages of the same weight): Attach the ring bo lts to th e exterior
pumps.
3. Lift the pump carefully and transport it with supervision.
Fig. 17: Transporting Pump with Lifting Tackle
30 User Manual RKP-II (CA53461-001; Version 2, January 2010) © 2010 Moog GmbH
Page 39
5 Transport and Storage Storing the Pump
Fig. 18: Transporting Multiple Pumps with Lifting Tackle
5.3 Storing the Pump
CAUTION Damage to Property!
Storing the pump improperly may lead to property damage.
• Store the pump as instructed and if necessary,
preserve it.
Preservation Conditions
Storage Duration Preservation
up to twelve months not required
> 1 year required
Ö Chap. "5.4 Preserving the Pump", Page 32
Tab. 5: Preservation Conditions
Storage Conditions
Storage Duration Measures
> 1 year Visual inspection
Tab. 6: Storage Conditions
Storing the Pump
Pre-Conditions:
• Pump has been demounted. Ö Chap. "9.1 Demounting the Pump",
Page 55
© 2010 Moog GmbH User Manual RKP-II (CA53461-001; Version 2, January 2010) 31
Page 40
Preserving the Pump 5 Transport and Storage
Procedure:
1. Inspect to assure that all openings have been closed using flange covers
or caps.
2. Chec k to as sur e that tran sp o rta tio n pr ot ec tio n me a ns are attached to the
pump's drive shaft.
3. Mak e cer ta in th at the storage space
- Is clean, dry, frost-protected and free of corrosives and vapors.
- Has a consistent temperature (temperature difference < 10 °C).
4. Depending on storage duration: preserve the pump
Ö Tab. 5, Page 31
5. Check the storage conditions
Ö Tab. 6, Page 31
6. After delivery: No steps need to be taken.
7. After demounting: Pour a small amount of mineral oil into the pump's
interior.
5.4 Preserving the Pump
Preserving the Pump
The pump should only be preserved on the exterior.
WARNING Damage to Property!
Improper preservation or no preservation at all may cause
corrosion to the pump.
• If required, properly preserve the pump
Ö Chap. " Preservation Conditions", Page 31
Pre-Conditions:
• Pump has been demounted.
Ö Chap. " 9. 1 Demounting the Pump", Page 55
• Pump is clean and dry.
• All openings are closed using flange covers or caps.
Procedure:
1. Apply corrosion preventative (Castrol SafeCoat DW 18X) evenly to the
pump's exterior surface.
2. Allow the pump to dry.
Before the initial set-up of the pump, it does not need to be de-preserved.
32 User Manual RKP-II (CA53461-001; Version 2, January 2010) © 2010 Moog GmbH
Page 41
6 Mounting Preparing for mounting
6 Mounting
For pumps in explosive areas, the supplementary document ation should
also be observed: Ö User Manual RKP II Explosion-Proof
For any and all tasks to be performed on the pump, suitable personal
protective equipment should be worn.
Ö Chap. "2. 2. 4 Work Safety", Page 9
DANGER Risk of injury and property damage as a result of leaking
operating fluid!
Any operating fluid that sprays out under high pressure
because of improper mounting may lead to serious injury or
property damage.
• Only trained personnel should be allowed to mount the
pump.
• Check the cleanliness of the mounting surface.
• Observe the tightening torques for the fasteners.
Ö Chap. "12.2 Tightening Torque", Page 63
• Use only specified fasteners (quantity/type).
• Make sure the proper flange and screws are being used
as per standard (e. g. SAE).
• Check for the existence and use of the proper O-rings.
• Use the correct sealant based on the operating fluid.
• Mount all connections to be hydraulically sealed.
• Do not exceed the maximum operatin g pr es sur e in the
system.
• Do not exceed the maximum body pressure.
Mounting
DANGER Serious bodily injury!
Starting-up the machine/equipment during the mounting
process may lead to serious bodily injuries or death.
• Make sure that the machine/equipment cannot be
switched on.
6.1 Preparing for mounting
The pump is pre-assembled at the factory.
Procedure:
1. Pump has been unpacked.
Ö Chap. "5.1 Unpacking the Pump", Page 29
2. The required supplementary documentation is at hand.
3. The hydraulic plans from the machine / equipment manufacturer have
been made available.
4. The required standard tools and mounting material are at hand.
Preparing for mounting
© 2010 Moog GmbH User Manual RKP-II (CA53461-001; Version 2, January 2010) 33
Page 42

Installing the Pump 6 Mounting
6.2 Installing the Pump
Installing the Pump
WARNING Risk of Crushing!
During mounting, the pump may topple over and crush body
parts.
• Select lifting tackle to correspond with the overall weight
of the pump.
• Attach the lifting tackle to the pump properly.
Ö Chap. "5.2 Transporting the Pump", Page 29
• Avoid all areas below the floating load.
WARNING Risk of injury and poisoning by dangerous operating fluid!
Leaks from dangerous operating fluid may lead to serious
injuries.
• Check to ensure that the operating fluid in use does not
pose a risk.
• Make sure that the machine / equipment is at zero
pressure and idle.
• Wear protective work equipment such as, e. g., work
gloves. Ö Chap. "2.2.4 Work Safety", Page 9
DANGER Risk of Death by Electrocution!
Contact with hot parts may lead to severe injuries and even
death.
• Make sure that the machine / equipment is idle.
CAUTION Damage to Property from Soiling!
Removing end caps to the pump connections may lead to
soiling and as a result property damage.
• Do not remove end caps until shortly before mounting.
WARNING Risk of injury and property damage as a result of
vibration!
Vibrations from machines / equipment parts may lead to bodily
injury or property damage.
• Uncouple the pump using suitable antivibration elements.
Pre-Conditions:
• Mounting area is freely accessible.
• Machine / equipment is at zero pressure and idle.
• Operation fluid matches the information on the order data sheet.
• Standard tools and mounting material are at hand.
• Supplementary documentation is available.
• The specified rotation of the pump corresponds with the drive motor.
The pump's mounting position is optional.
34 User Manual RKP-II (CA53461-001; Version 2, January 2010) © 2010 Moog GmbH
Page 43

6 Mounting Planning Lines
Procedure:
1. Mount the specified half of the coupling to the pump's drive shaft as per
the information provided by the coupling manufacturer.
The threaded bore on the pump's drive shaft can be used to mount
the coupling.
2. Make sure that the connection and mounting surfaces are clean.
- If not, clean the connection and mounting surfaces using suitable
cleaning agents.
- Use suitable cleaning rags.
- Do not allow the cleaning agent to penetrate into the hydraulic
circulation loop.
3. Ensure that the coupling hub is tightened to the drive shaft or that the
drive shaft is lubricated continuously to pre vent wear from vibration.
4. Transport the pump to the mounting location.
5. Mount the coupling to the drive according to the information provided by
the coupling manufacturer.
Only bolt the pump down after the coupling has been mounted
correctly.
6. Faste n th e pu m p with the couplin g at the mo u nt ing loca tio n. Tigh te n th e
mounting screws with the adequate tighte n ing tor qu e crosswise.
Ö Chap. "12.2 Tightening Torque", Page 63
7. For bell housing mounting: Check the coupling's axial clearance as per
the information provided by the coupling manufacturer.
8. For mounting a flange: Align the pump supports in the direction of the
drive.
9. For elastic couplings: After completing the mounting, check the drive to
make sure it does not vibrate.
6.3 Planning Lines
In order to minimize the development of noise from the transmission of
structure-borne noise, observe th e follo win g:
• Use hoses instead of pipes.
• Secure pipes with elastic clamps.
Suction Line
WARNING Damage to property from cavitation!
Lack of pressure in the suction line may lead to the formation
of air bubbles in the operating fluid and as a result may lead to
severe damage to the pump.
• Configure the layout of the suction lines so that the inlet
pressure cannot be any lower than the minimum of
0.8 bar absolute at the suction port.
• Ensure that the operating fluid has the correct viscosity.
Planning Lines
• Short suction lines with wide inside diameters are needed to ensure that
the noise output is low.
• Suction speed < 1 m/sec.
© 2010 Moog GmbH User Manual RKP-II (CA53461-001; Version 2, January 2010) 35
Page 44

Connecting Pipes 6 Mounting
• Avoid sharp angles and screwed pipe joints (danger of air intake and
dispersion, high flow resistance). Use curved pipes or hoses instead.
• Maintain the minimum inlet pressure.
• Only reduce the length of the suction line at the pump entry.
• If a suction filter (min. 0.15 mm mesh aperture) or a shut-off valve is used,
install the devices below the fluid level.
Pressure Line
• Ensure sufficient stability.
• Inspect the tightening torques of the screws.
Drain Line
• Install the drain line so that the pump housing is always completely filled
with pressure fluid (use the upper connection).
• It should lead directly into the tank separated from the other return lines.
• The end of the line must be below the fluid line in the tank, even at the
lowest fluid level.
• The distance from the suction line should be as large as possible. Do not
place a filter, cooler or non-return valve in the drain line. Max. length 3 m.
• Pressure at the drain line max. 2 bar absolute (1 bar above atmosphere).
• The recommended outside diameter of the pipe used as a drain line
(lightweight version): Ö Tab. 3, Page 27
Connecting Pipes
6.4 Connecting Pipes
For the pump, the connections do not depend on the direction of the
rotation.
Procedure:
For securing the control and leak oil port and the suction and pressure
flange, the appropriate screw connections must be used.
1. Remove the end caps from each connection.
2. Clean the sealing surfaces and the lines.
3. Connect the lines in accordance with the block diagram (suction line A,
pressure line B). Ö Chap. "12.2 Tightening Torque", Page 63
4. For pumps with load sensing compensator with p-T control notch
- The compensator's tank line may not be combined with the pump's
leak oil line.
5. For multiple pump arrangements, which are equipped with the "load
sensing compensator with p-T control notch", in the event that a circular
flow is required:
- Only connect the tank line to the tank at the compensator of the first
pump to activate the p-T control notch.
- Close off the compensators' t-connections for the add-on pumps.
36 User Manual RKP-II (CA53461-001; Version 2, January 2010) © 2010 Moog GmbH
Page 45

6 Mounting Electrically connecting the pump
6.5 Electrically connecting the pump
The pump's electrical is connected throug h th e contr o l unit:
Ö Application Instruction RKP-D with CAN Bus Interface
6.6 Arranging Multiple Pumps
6.6.1 Determining the through drive torque
Additional pump stages can be mounted axially to the pump and as a result, all
pumps can be driven by the same shaft. Available for multiple mounting
purposes are radial piston pumps (the maximum size to be selected sho uld be
equal to pump stage 1) or other pumps with adapter flanges for SAE-A, SAE-B
or SAE-C. For the maximum permissible through drive torque of the added
pumps, see the table below. Ö Tab. 7, Page 37
Through Drive Torque for Added RKP, SAE-A, SAE-B or SAE-C Adapters
Pump Stage 1 Pump Stage 2
RKP-II RKP-II SAE-A SAE-B SAE-C
3
Size [cm
19 90 Nm – – – 90 Nm – –
32/45 185 Nm 185 Nm – – 110 Nm 185 Nm –
63/80/100 400 Nm 400 Nm 400 Nm – 110 Nm 280 Nm 400 Nm
140 400 Nm 400 Nm 400 Nm 620 Nm 110 Nm 280 Nm 620 Nm
/R] 19 32
45
63
80
100
140 – – –
Electrically connecting the
pump
Arranging Multiple
Pumps, Determining the
through drive torque
Tab. 7: Permissible Through Drive Torques
The required through drive torque to drive the added on pumps should be
determined by using the following variables:
V [cm3/R] : Displacement
p [bar] : Pressure
η
[%] : Hydro-mechanical efficiency
hm
M [Nm] : Through drive torque
Through Drive Torque of Pump Stage 1 to 2:
n
⋅
V
ipi
M1159,
⋅=
∑
i2=
-----------------
η
hm
i
Example:
Based on a pump combination
RKP 63 + RKP 63 + RKP 32 + AZP 16
280 bar, 210 bar, 150 bar, 50 bar
this would mean:
Formula for Through Drive
Torque for Multiple Pumps
© 2010 Moog GmbH User Manual RKP-II (CA53461-001; Version 2, January 2010) 37
Page 46

Arranging Multiple Pumps 6 Mounting
Design of the first through drive
The pressure and the current flow for the first pump have no effect on the
torque transferred by the through drive. According to the formula shown above,
this torque is the result of
V
⋅
2p2
M
1
M
= 1,59 · (63 · 210 / 95 + 32 · 150 / 93 + 16 · 50 / 90) Nm
1
= 318 Nm
M
1
⎛⎞
159,
------------------- -
⋅=
η
⎝⎠
hm
2
V
⋅
3p3
------------------- -
η
hm
3
V
⋅
4p4
------------------- -++
η
hm
4
The variable 318 Nm is below the threshold value of 400 Nm listed in the table
for adding on an RKP 63 to an RKP 63.
Design of the second through drive
159,
M
2
= 1,59 · (32 · 150 / 93 + 16 · 50 / 90) Nm
M
2
= 96 Nm
M
2
------------------- -
⋅=
η
⎝⎠
hm
V
⋅
3p3
⎛⎞
V
⋅
4p4
------------------- -+
η
3
hm
4
Again in this case, the variable 96 Nm is below the respective threshold value
of 400 Nm for the through drive for the arr angement of an RKP-II 63 to an RKPII 32.
Design of the third through drive
ζ
In the same manner, 14 Nm is obtained for the torque required to drive the
added on gear pump. As a result, the through drives of these pump
arrangements are permissible with the specified pressure values.
Section Diagram Multiple
Pumps
Section Diagram Multiple Pumps
Fig. 19: Radial Piston Pump with Heavy Through Drive and Add-On Radial Piston Pump
38 User Manual RKP-II (CA53461-001; Version 2, January 2010) © 2010 Moog GmbH
Page 47

6 Mounting Arranging Multiple Pumps
Fig. 20: Radial piston pump with tandem mounted gear pump using SAE-A adapter
Fig. 21: Radial piston pump with tandem mounted gear pump using SAE-B adapter
© 2010 Moog GmbH User Manual RKP-II (CA53461-001; Version 2, January 2010) 39
Page 48
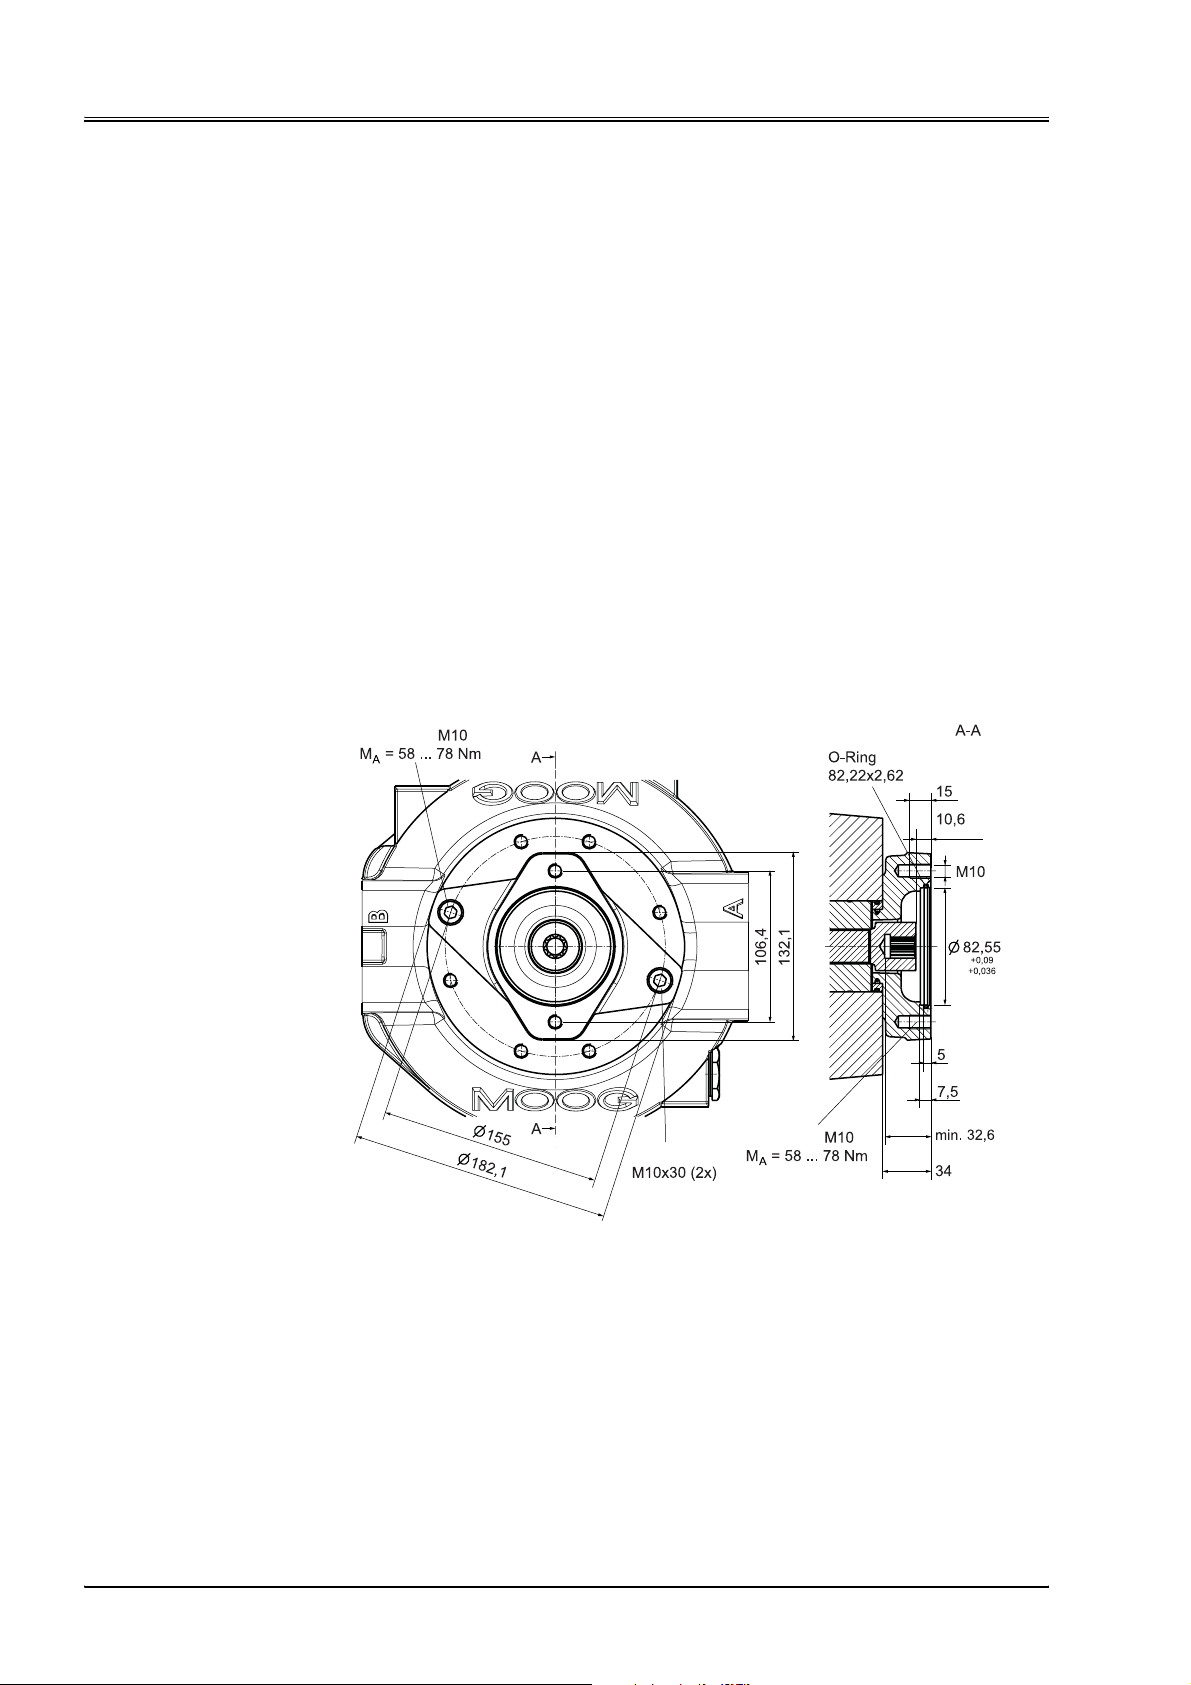
Arranging Multiple Pumps 6 Mounting
6.6.2 Attaching the Adapter Flange
Pre-Conditions:
Attaching the Adapter
Flange
• The centering diameters of both the adapter flange and the add-on pump
match.
• The dimensions of the through drive shaft match with the add-on pump.
• The flange diameters of both the adapter flange and the add-on pump
match.
• The connection surfaces are clean.
Procedure:
1. Attach the adapter flange to the add-on pump without damaging the
O-rings.
2. Bolt the adapter flange to the pump:
- Observe the tightening torques of the fasteners.
Ö Chap. "12.2 Tightening Torque", Page 63
For adding on a pump, the following adap ter fl an ge s ar e av aila ble :
Adapter flange SAE-A with 9-tooth shaft
Thread
Profile
Shaft end
Bolt
Fig. 22: Adapter flange SAE-A with 9-tooth shaft
Thread
for add-on pump
Flange Code: 82-2
Shaft Code: 16-4
Spline as per: ANSI B92.1 9T 16/32 DP Flat root side fit
Conditions for
attachment: RKP with heavy-duty through drive
The adapter includes through drive shaft, seals (HNBR), intermediate ring for
RKP 63–140 and two fastening screws.
40 User Manual RKP-II (CA53461-001; Version 2, January 2010) © 2010 Moog GmbH
Page 49
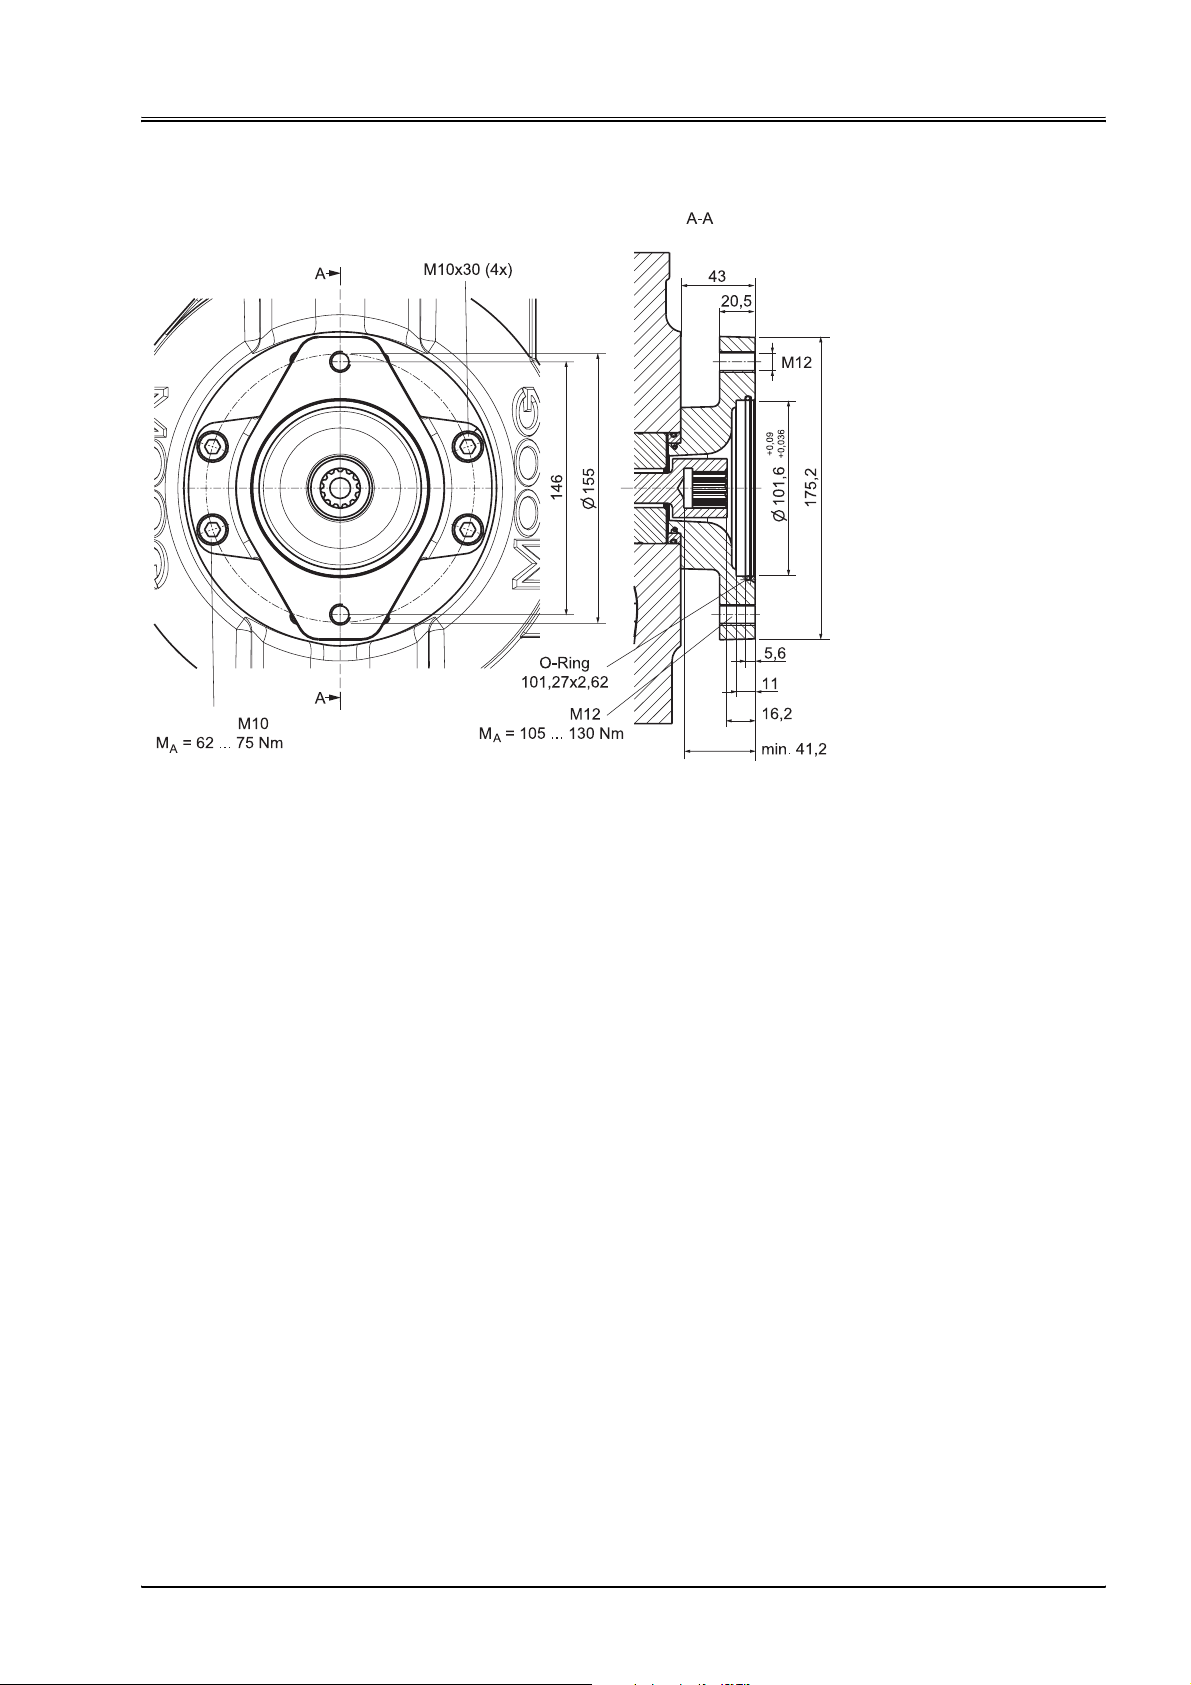
6 Mounting Arranging Multiple Pumps
Adapter flange SAE-B with 13-tooth shaft
Profile
Bolt
Thread
Fig. 23: Adapter flange SAE-B with 13-tooth shaft
Thread
for add-on pump
Shaft end
Flange Code: 101-2
Shaft Code: 22-4
Spline as per: ANSI B92.1 13T 16/32 DP Flat root side fit
Conditions for
attachment: RKP with heavy-duty through drive
The adapter includes through drive shaft, seals (HNBR), intermediate ring for
RKP 63–140 and four fastening screws.
© 2010 Moog GmbH User Manual RKP-II (CA53461-001; Version 2, January 2010) 41
Page 50
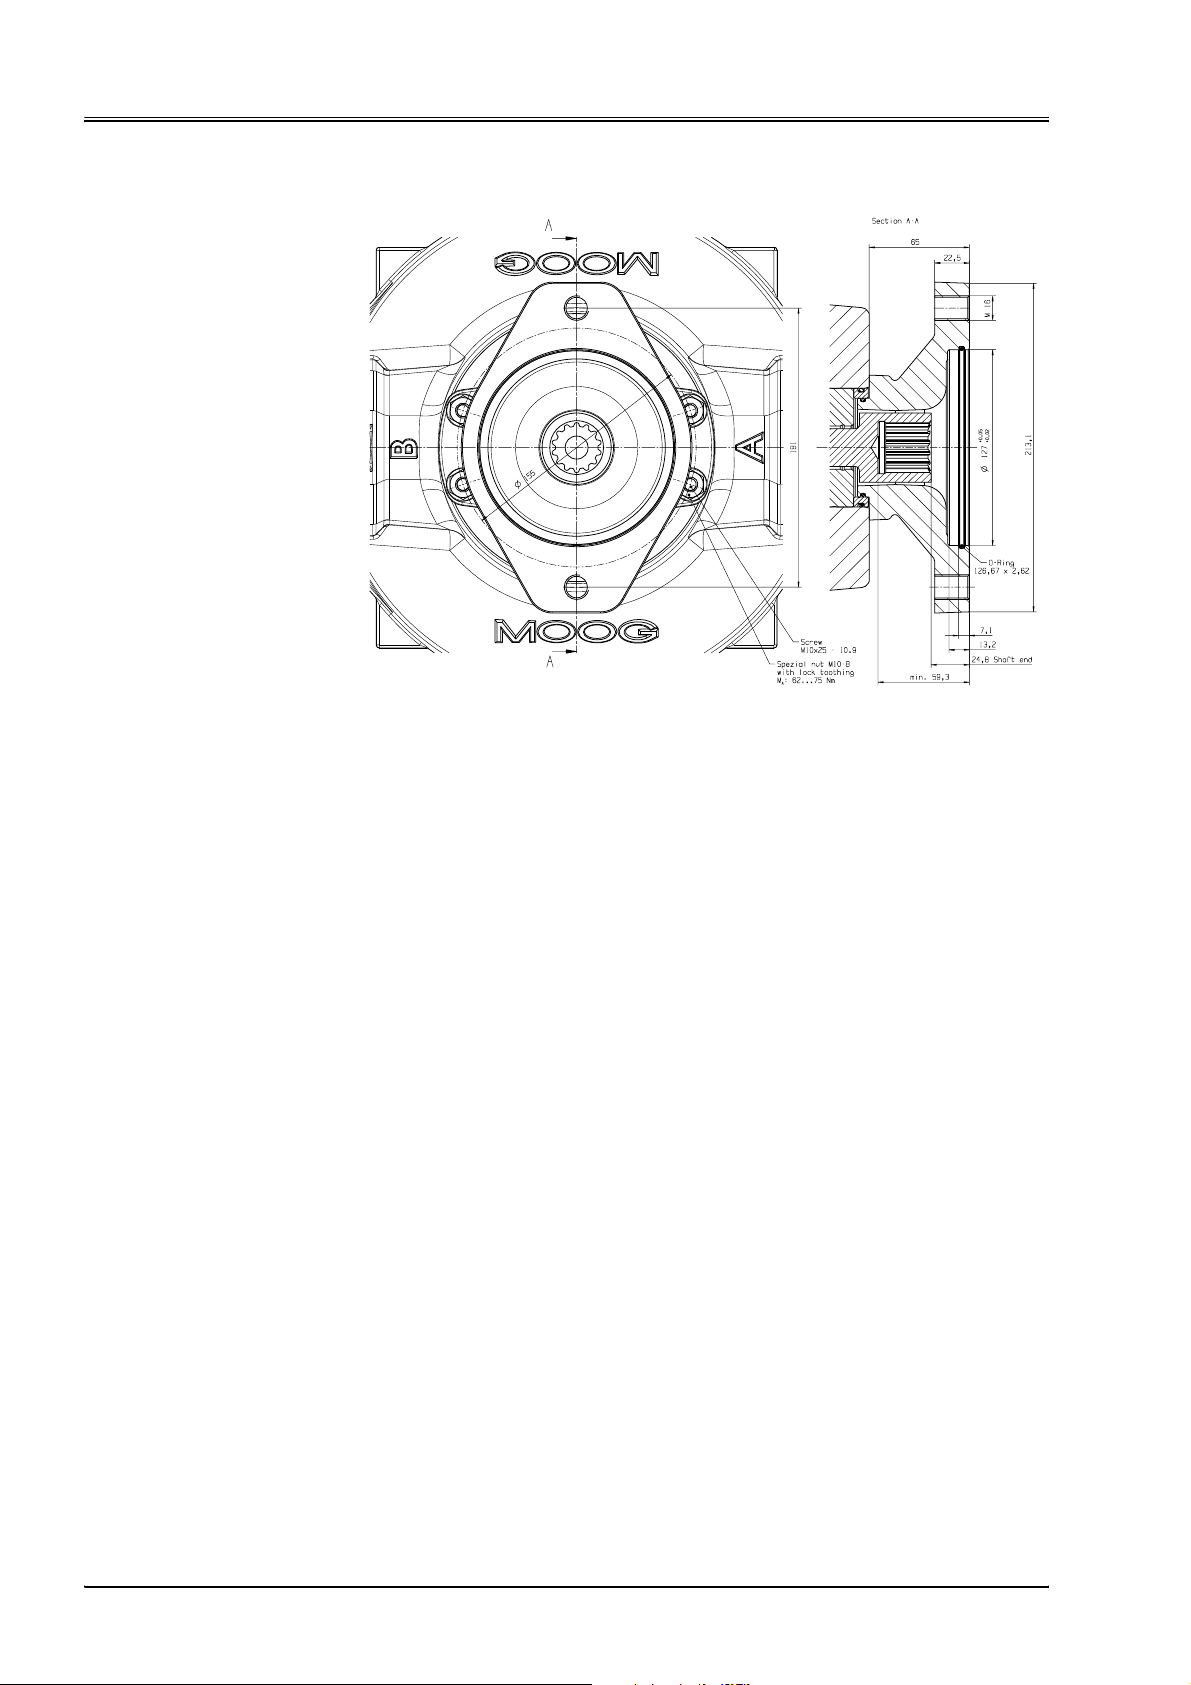
Arranging Multiple Pumps 6 Mounting
Adapter flange SAE-C with 14-tooth shaft
Fig. 24: Adapter flange SAE-C with 14-tooth shaft
Flange Code: 127-2
Shaft Code: 32-4
Toothing to: ANSI B92.114T 12/24DP Flat root side fit
Conditions for
attachment: RKP with heavy-duty through-drive
Adaptor including through-drive shaft, seals (HNB-R), intermediate ring for
RKP 140 and 4 fastening screws and special nut.
42 User Manual RKP-II (CA53461-001; Version 2, January 2010) © 2010 Moog GmbH
Page 51
7 Operation Initial Pump Set-Up
7 Operation
For pumps in explosive areas, observe the supplementary docume ntation
as well:
Ö User Manual RKP II Explosion-proof
For any and all tasks to be performed on the pumps, appr opriate person al
protective equipment should be worn.
Ö Chap. "2. 2. 4 Work Safety", Page 9
7.1 Initial Pump Set-Up
CAUTION Damage to the pump!
Setting up the pump for initial operation without the required
basic mechanical and hydraulic knowledge may result in
damage to the pump.
• The pump may only be set up initially by qualified
personnel.
DANGER Risk of injury and property damage as a result of blows or
impact!
Unexpected and uncontrolled movement of the machine /
equipment may lead to severe injury or property damage.
• Only trained personnel should be allowed to initially
set-up the pump.
• Have the equipment manufacturer or operator assure that
no uncontrolled signals are being transmitted to the pump .
• Have the equipment manufacturer or the operator assure
that a pump malfunction (e. g. piston jam caused by crud)
is recognized so that a malfunction of the axle / machine /
equipment can be prevented.
• Ascertain that all plug connections are wired and
allocated correctly.
• Make sure that all hydraulic ports are connected correctly.
• Make certain that the rotational direction of the drive
motor is correct.
• Check for correct drive shaft connection to the drive
motor.
• Have the equipment manufacturer or operator assure that
customer specific parameters were loaded correctly.
Operation
Initial Pump Set-Up
WARNING Risk of poisoning and injury!
Contact with the operating fluid can cause health problems,
such as injury to eyes, damage to the skin or inhalation
poisoning.
• Before initial set-up, check the lines and connection ports
for any damage.
• Adhere to the operating fluid manufacturer's safety
instructions.
© 2010 Moog GmbH User Manual RKP-II (CA53461-001; Version 2, January 2010) 43
Page 52
Initial Pump Set-Up 7Operation
WARNING Risk of injury and property damage as a result of fire!
Easily inflammable operating fluid may cause fire.
• Keep the pump away from any open flames.
WARNING Risk of Burns!
Pump parts run hot while in operation.
• Do not touch the pump while it is running.
WARNING Risk of injury and property damage as a result of
engaging or winding!
Freely accessible rotating machine / equipment parts may le ad
to severe injuries or property damage as a result of engaging
or winding.
• Use suitable protective devices to ensure that access to
the drive shaft is blocked.
7.1.1 Filling up the Pump
Filling up the Pump
Multiple pump circuits
Adjusting the
Compensator
The pump must be completely filled with operating fluid before initial
operation.
Procedure:
1. Fill the pump through the leakage oil port with operating fluid
completely.
For vertical installation: Before operation the pump housing of all pump
stages must be filled completely with hydraulic fluid via the leakage
connection.
7.1.2 Adjusting the Compensator
Information on the compensator functions:
Ö Chap. " 3. 5 Compensator Operation", Page 15
All compensators are pre-set at the factory. In this section, information on
the parameters needed to adjust the compensators is provided.
The following information is the same for F, H, J and R compensators:
Tightening torque for the lock nuts of the adjusting screw for adjusting the
compensator pressure: SW 19 = 10 Nm + 5 Nm
Procedure:
1. Depending on the compensator, refer to the respective subchapter.
2. If required: Adjust the compensator according to the information provided
in the subchapter.
3. For G compensators: Adjust the compensator using the lockable
adjustment knob.
44 User Manual RKP-II (CA53461-001; Version 2, January 2010) © 2010 Moog GmbH
Page 53
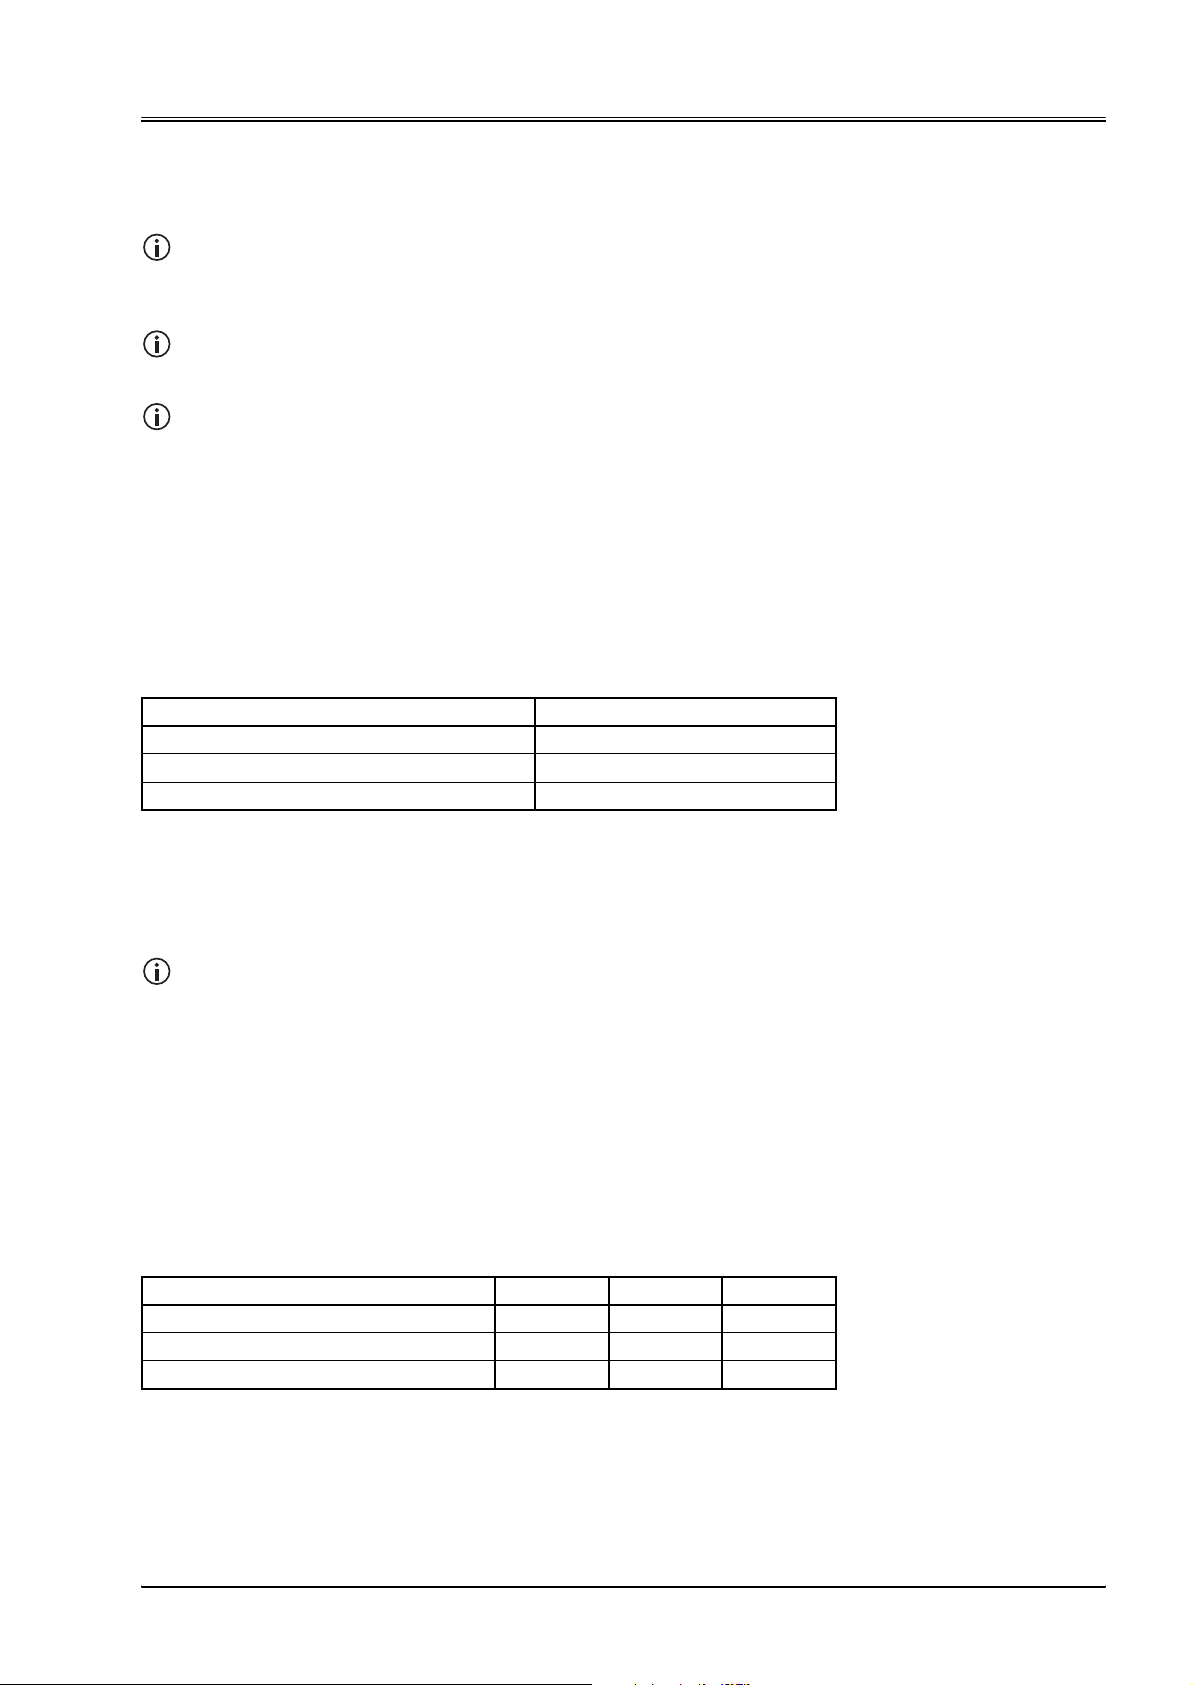
7 Operation Initial Pump Set-Up
7.1.2.1 Hydraulically Driven Remote Pressure
Compensator, H1
Information on the compensator:
Ö Chap. "3.5.2 Hydraulically Driven Remote Pressure Compensator, H1",
Page 17
The information in this section also applies to: Ö Chap. "3.5.4 Load Sensing Compensator, J1", Page 19
When high dynamics are required for flow control, orifice and control flow
volume, contact us to discuss application specific compensator
adjustments.
Default Compensator Settings
Δp = 10 bar + 2 bar or Δp = 20 bar + 2 bar
Hose for Control Line
The following information are recommended values:
Hose length approx. 800 mm
Pump Type NW [mm]
RKP-II 19 6
RKP-II 32, 45 8
RKP-II 63, 80, 100 10
Tab. 8: Nominal width for Control Line Hose
7.1.2.2 Load Sensing Compensator with p-T Control
Notch, R1
Information on the compensator:
Ö Chap. "3.5.5 Load Sensing Compensator with p-T Control Notch, R1",
Page 20
Default Compensator Settings
RKP-II 16–100: Δp = 10 bar + 2 bar
RKP-II 140: Δp = 13 bar + 2 bar
Hose for Control Line
The following information provides recommended values:
Hose length approx. 800 mm
Pump Type NW [mm] D1 [mm] D2 [mm]
RKP-II 19, 32, 45 6 0.9 1.2
RKP-II 63, 80, 100 8 0.9 1.2
RKP-II 140 8 0.8 1.1
Tab. 9: Nominal width for Control Line Hose
© 2010 Moog GmbH User Manual RKP-II (CA53461-001; Version 2, January 2010) 45
Page 54

Initial Pump Set-Up 7Operation
7.1.2.3 Mechanical Stroke Adjustment
Information on stroke adjustments:
Ö Chap. "3.5.6 Mechanical Stroke Adjustment, B1", Page 21
When adjusting the required flow volume, make sure that the stroke ring is
held tight between the two adjustment screws.
Upon delivery, the pump is set to V
The information in the following table refers to Ö Fig. 10, Page 21
Displacement V [cm3/U] 19 32 45 63 80 100 140
Pos.1 WS8 = 15Nm + 5Nm WS8 = 25Nm + 5Nm
Pos. 2 WS 24 = 200 Nm ± 10 Nm
ΔV for 1 mm adjusting screw travel
(pitch 1.5 mm/R)
Tab. 10: Mechanical Stroke Adjustment
3.6 5.6 6.5 8.9 11.3 11.5
Procedure:
1. Set the adjusting screws of the mechanical stroke adjustment and
tighten them.
- Tightening torque Ö Tab. 10, Page 46
2. Secure the adjusting screws with SEAL-Lock
(M16x1.5).
- Tightening torque M
= 200 Nm ± 10 Nm.
A
3. Attach a note that the seal capacity can no longer be guaranteed after
loosening them five times.
- If required: replace SEAL-Lock
.
max.
®
sealing nut.
®
sealing nuts SW 24
46 User Manual RKP-II (CA53461-001; Version 2, January 2010) © 2010 Moog GmbH
Page 55
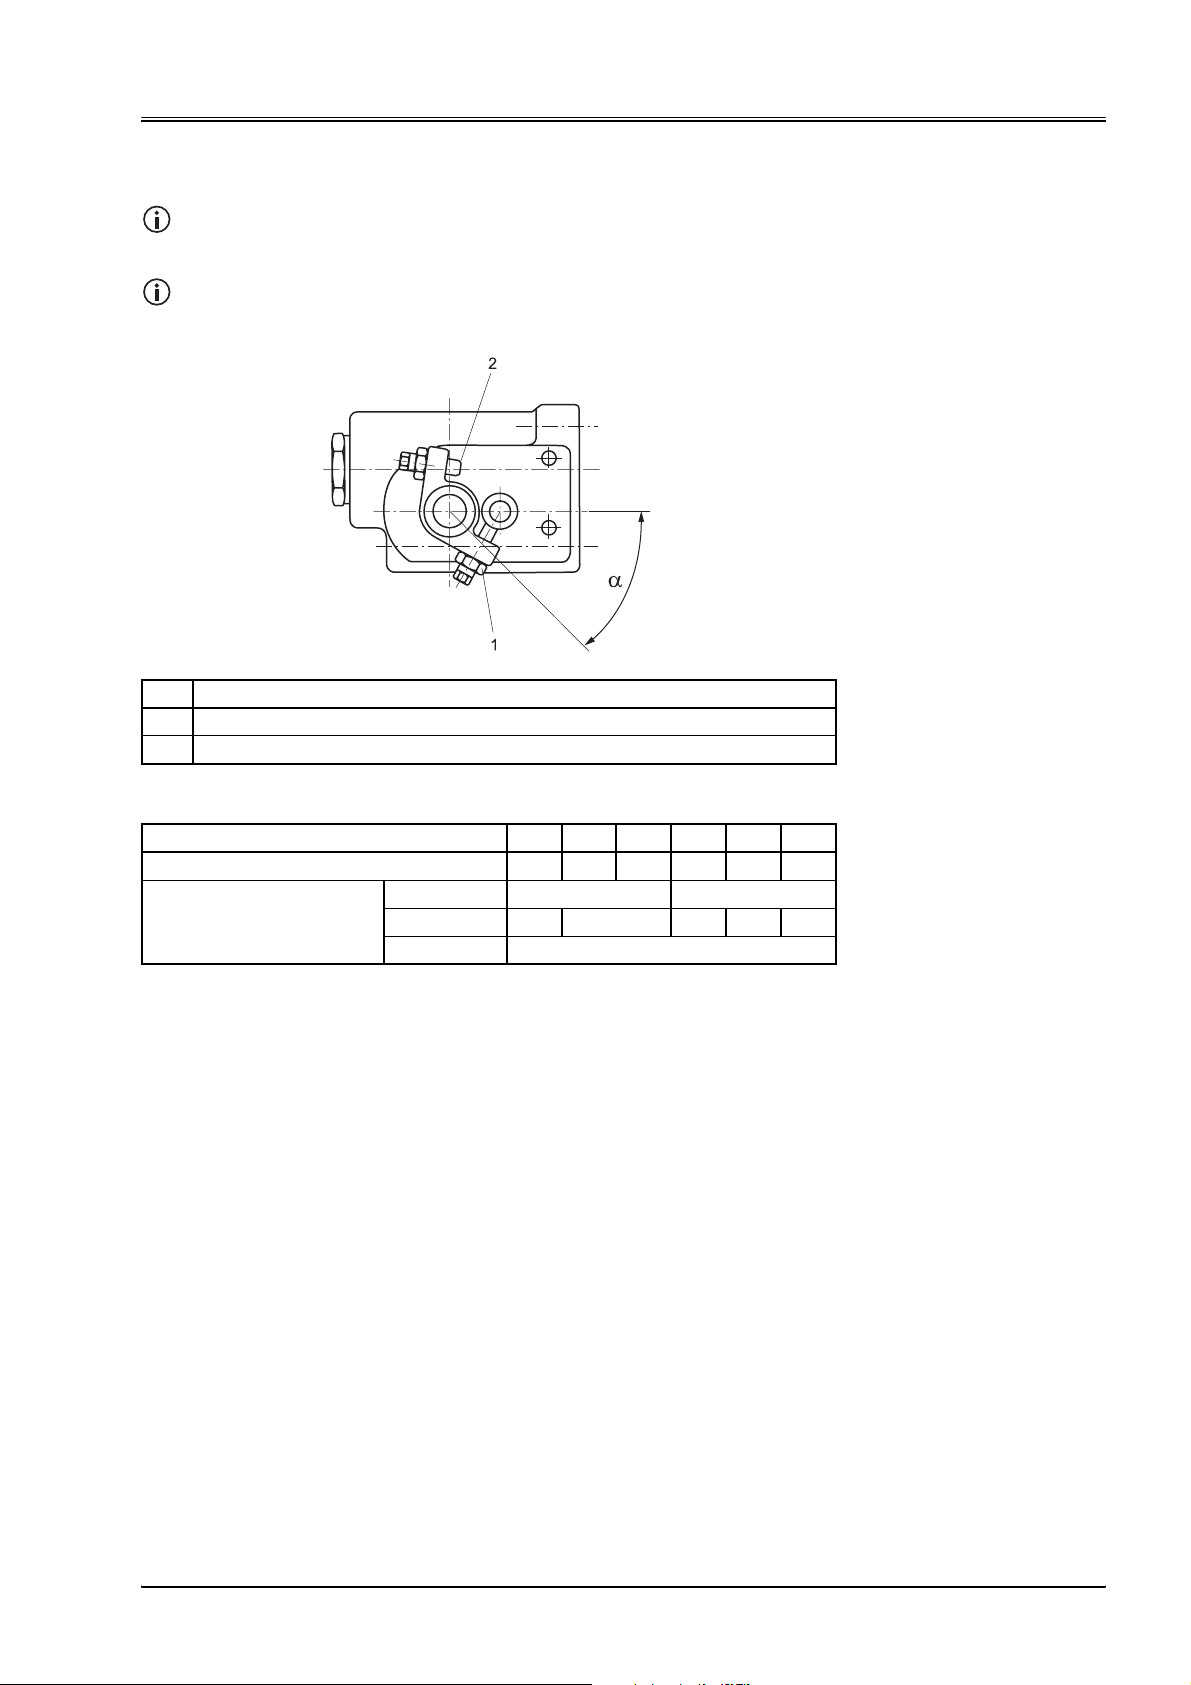
7 Operation Initial Pump Set-Up
7.1.2.4 Servo Control, C1
Information about the Servo Control:
Ö Chap. "3.5.7 Servo Control, C1", Page 22
The zero position and the end position are set at the factory. Manual or
mechanical operations are performed using the adjustment lever.
Pos. Description
1 Zero position (set at the factory)
2 End position / ±V
Displacement V [cm3/R] 1932456380100
Angle α [°] 444757445656
Control torque M [Nm] Zero position 1.2 1.6
(set at the factory)
max.
Fig. 25: Servo Control, C1
End position 1.6 1.7 2.4 2.6 2.6
max. 8
Tab. 11: Adjustment Torque Servo Control
Procedure:
1. Regulate the pump's flow volume by positioning the adjustment lever.
© 2010 Moog GmbH User Manual RKP-II (CA53461-001; Version 2, January 2010) 47
Page 56
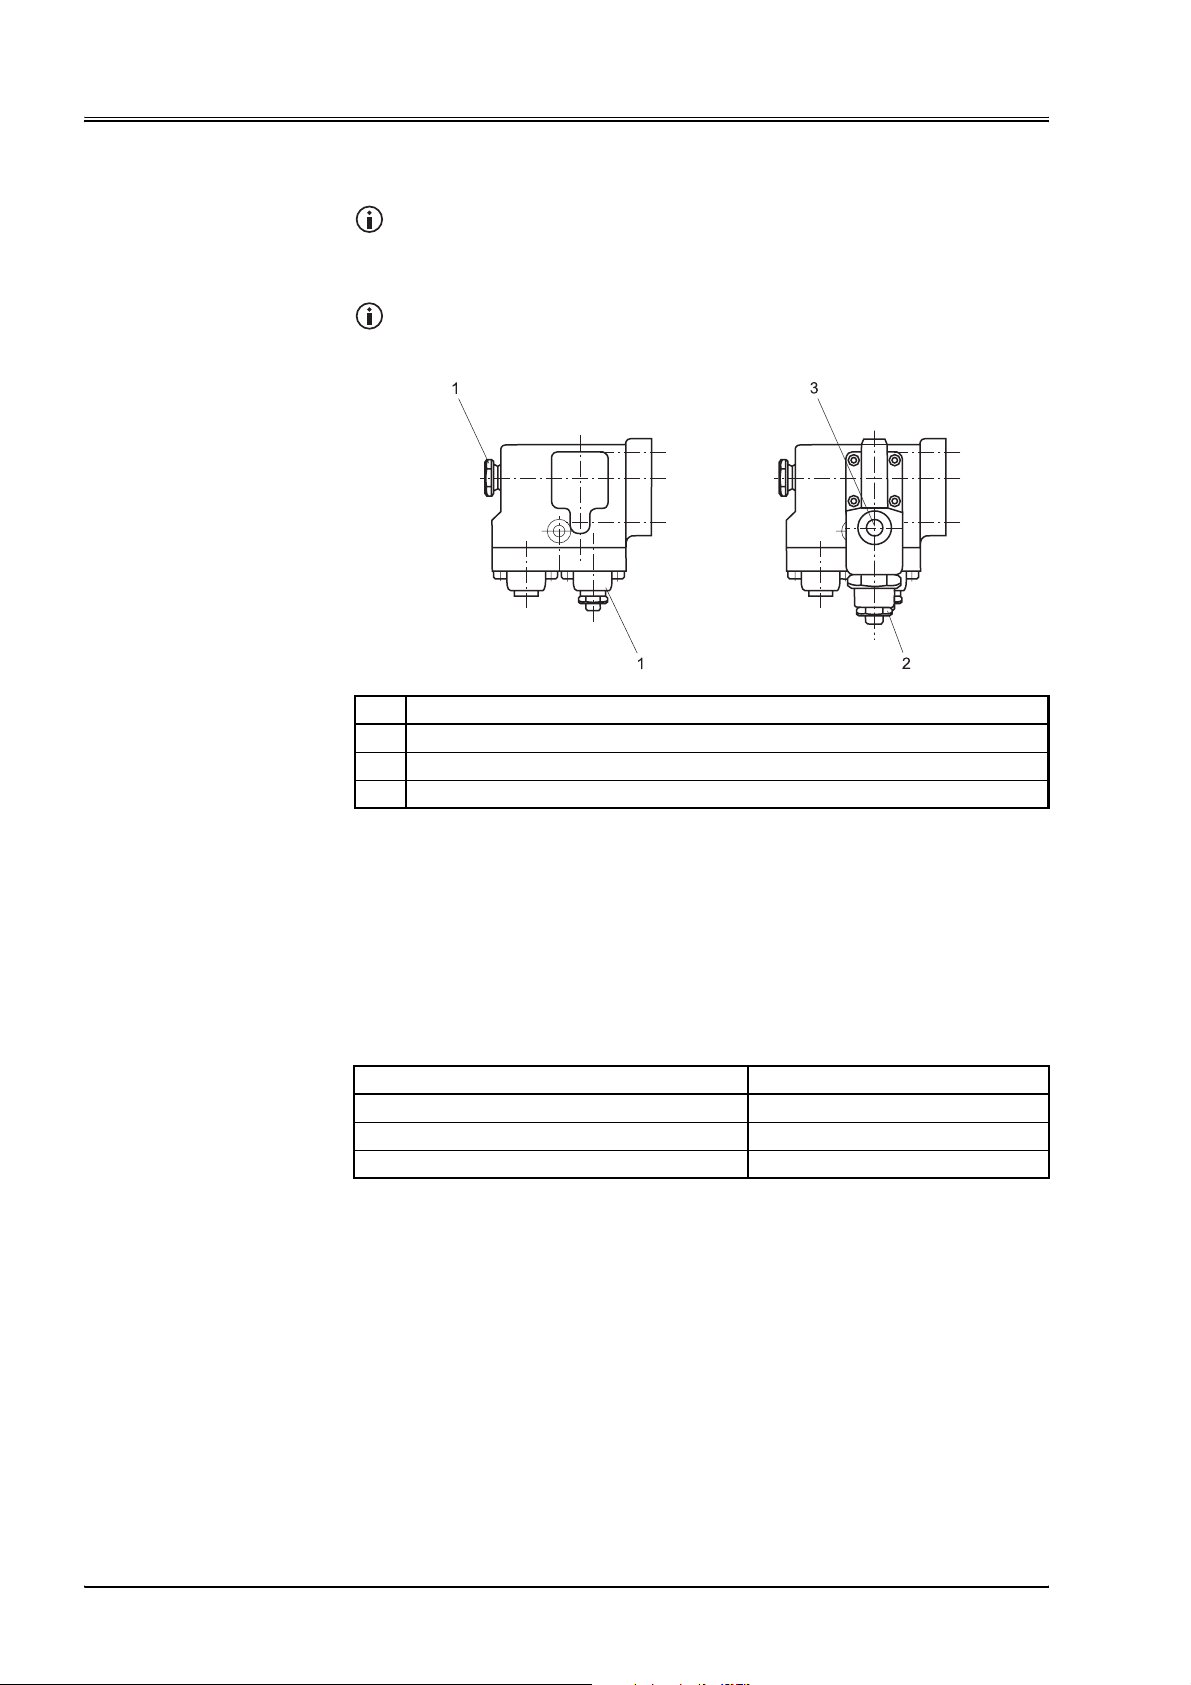
Initial Pump Set-Up 7Operation
7.1.2.5 Power Control, S1, S2
Information on the power control:
Ö Chap. " 3. 5.8 Power Control, S1", Page 23
Ö Chap. " 3. 5.9 Power Control, S2", Page 25
The power control settings are set at the factory and may not be
changed!
Pos. Description
1 Power control setting (set at the factory; may not be changed)
2 Pressure decrease (set at the factory Δp = 10 bar + 2 bar)
3 Control port G 1/4"
Fig. 26: Power Control, S1, S2
Default Compensator Settings
Δp = 10 bar + 2 bar
Hose for Control Line
The following information provides recommended values:
Hose length approx. 800 mm
Pump Type NW [mm]
RKP-II 19 6
RKP-II 32, 45 8
RKP-II 63, 80, 100 10
Tab. 12: Nominal width for Control Line Hose
48 User Manual RKP-II (CA53461-001; Version 2, January 2010) © 2010 Moog GmbH
Page 57
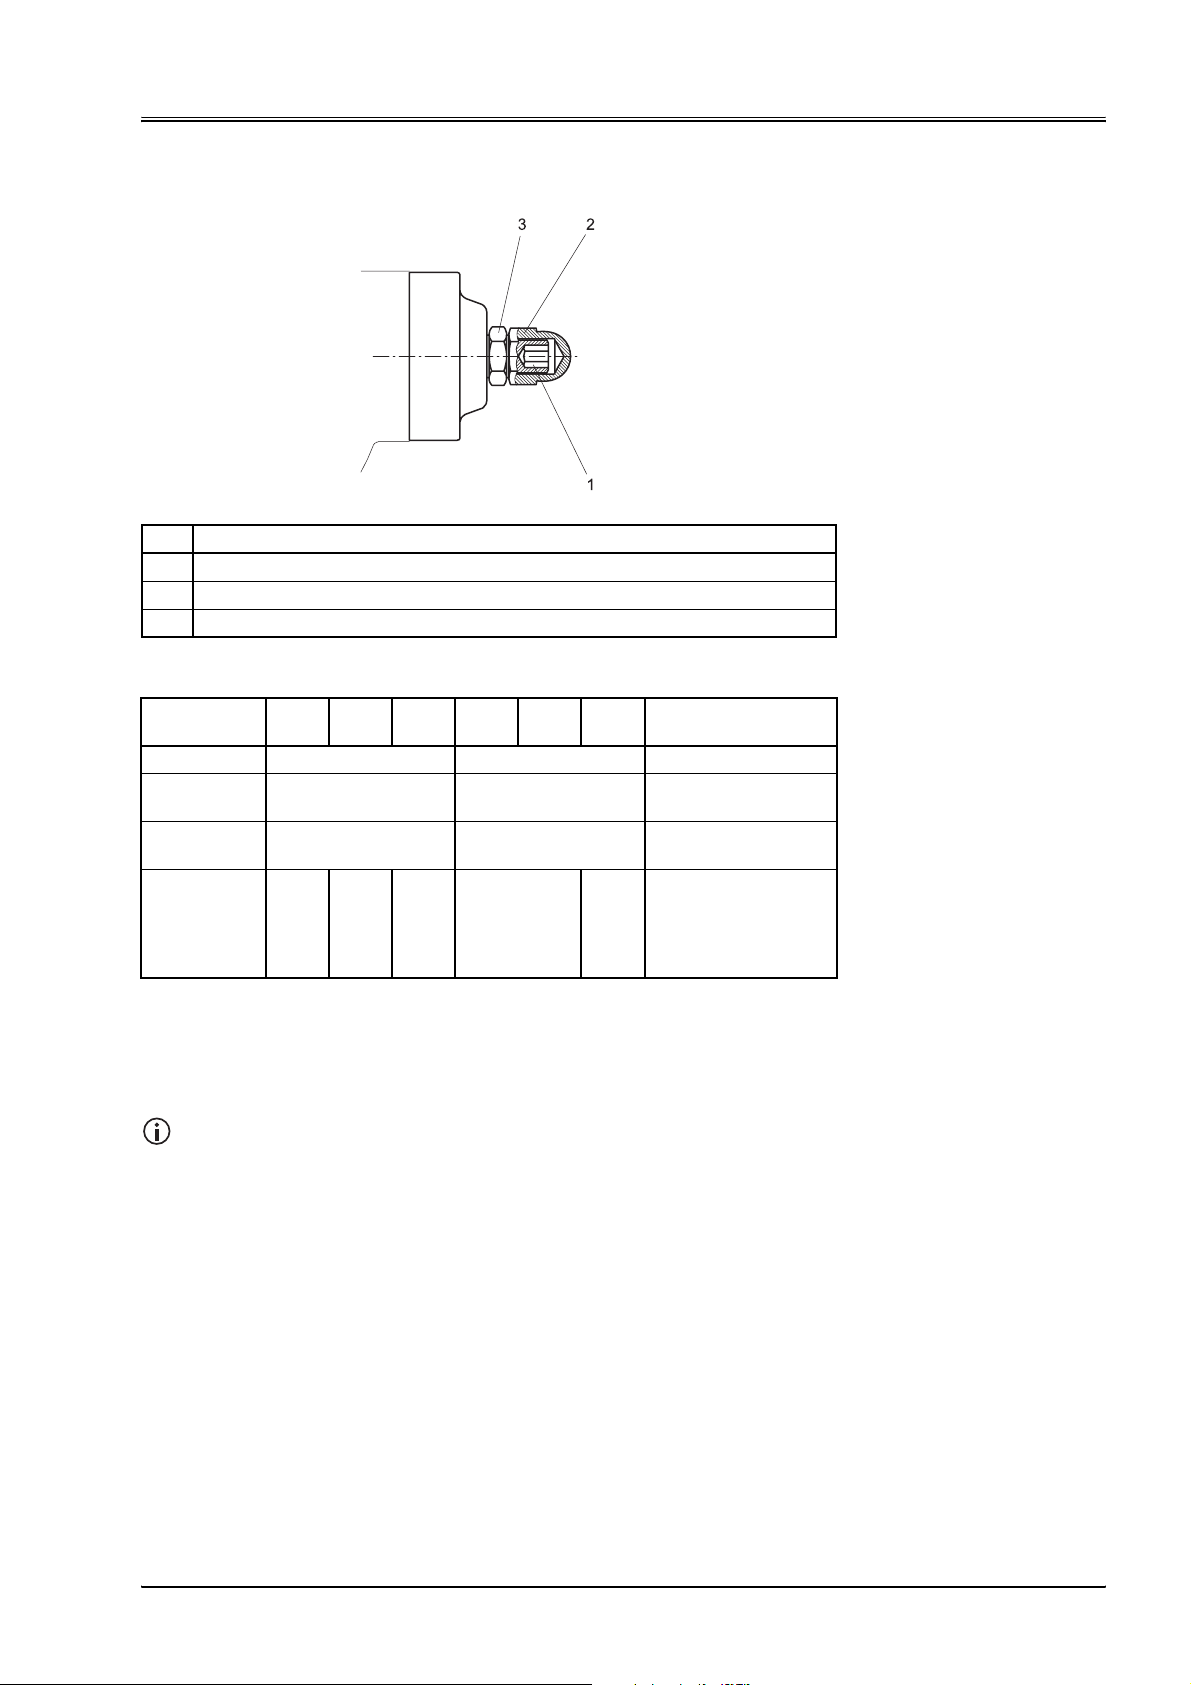
7 Operation Performing Functions Tests
7.1.2.6 Limiting the Maximum Flow
Pos. Description
1 Adjustment mandrel
2 Cap nut
3 Lock nut
Fig. 27: Limiting the Maximum Flow
Displacement
3
V [cm
/R] 1932456380100 140
Pos.1 WS 8 WS 12 WS 10
Pos. 2 WS 24 = 40 Nm +
Pos. 3 WS 24 = 50 Nm +
ΔV for 1 mm
adjusting
screw travel
(pitch
1.5 mm/R)
10 Nm
10 Nm
3.6 5.6 6.5 8.9 11.3 11.5
Tab. 13: Adjustments Limiting the Maximum Flow
WS 32 = 80 Nm +
10 Nm
WS 32 = 90 Nm +
10 Nm
WS 27 = 80 Nm +
10 Nm
WS 27 = 90 Nm +
10 Nm
7.2 Performing Functions Tests
The functions tests is performed to ensure that the pump has been
installed into the machine / equipment properly.
Pre-Conditions:
• Initial set-up of the pump is complete: Ö Chap. "7.1 Initial Pump Set-Up",
Page 43
• The end caps on the through drive of the pump stages have been
removed.
• It has been assured that the pump is being supplied with operating fluid.
• The pump has been visually inspected, with particular attention given to
the lines and port connections.
Performing Functions
Tests
Procedure:
1. Carry out the functions test in accordance with the instructions provided
by the machine / equipment manufacturer.
© 2010 Moog GmbH User Manual RKP-II (CA53461-001; Version 2, January 2010) 49
Page 58

Operating the Pump 7 Operation
2. In doing so, watch especially for:
- Noise development
- Any exterior leaks
7.3 Operating the Pump
Operating the Pump DANGER Bodily injuries and property damage!
Incorrectly setting the pump in operation may lead to
unexpected and uncontrolled movements of the machine /
equipment and as a result may lead to bodily injuries or
property damage.
• Only trained personnel should be allowed to operate the
pump.
• Have the equipment manufacturer or operator a ssure that
no uncontrolled signals are being transmitted to the pump.
• Have the equipment manufacturer or the operator assure
that a pump malfunction (e. g. piston jam caused by crud)
is recognized so that a malfunction of the axle / machine /
equipment can be prevented.
WARNING Risk of Burns!
Pump parts run hot while in operation.
• Do not touch the pump while it is running.
WARNING Damage to Property!
Operating the pump without operating fluid will result in the
pump running dry and damage to the pump.
• Only start up the pump when the pump housing is
completely filled with operating fluid.
WARNING RKP-D:
The protective conductor connection, if provided, is connected
to the electronics housing or valve body. The insulation
materials employed are designed for use in the safety extralow-voltage range. The field bus circuit connections, if
provided, are only functionally galvanically isolated from other
connected circuits. To comply with safety regulations requires
isolation from the mains according to EN 61558-1 and EN
61558-2-6 and limiting all voltages according to EN60204-1.
We recommend using SELV/PELV power supplies.
50 User Manual RKP-II (CA53461-001; Version 2, January 2010) © 2010 Moog GmbH
Page 59

7 Operation Operating the Pump
7.3.1 Start up
Start upPre-Conditions:
• Pump has been filled. Ö Chap. "7.1.1 Filling up the Pump", Page 44
• The temperature of the operating fluid in the tank does not exceed the
pump temperature by more than 25 °C.
Procedure:
If the temperature of the operating fluid in the tank exceeds the pump
temperature by more than 25 °C, the pump should only be switched on in
short intervals of 1 to 2 seconds until it has heated up.
It is forbidden to blow off the shaft seal directly with compressed-air.
It is also forbidden to spray and f lush the shaft seal directly with
pressurized fluids.
1. Start up the drive motor.
2. Check the rotational direction of the drive motor.
3. Operate the pump at low pressure until the hydraulic system has been
de-aerated.
4. For pumps with HF fluids: Run the pump for approx. one hour at low
pressure (30–50 bar).
7.3.2 Flushing the Pump
If the pump is operated for longer periods of time at low pressure without
delivery (t > 15 min, p < 30 bar, Q = 0 l/min) it will be necessary to flush
the pump to dissipate the heat.
Procedure:
1. The flushing line must be connected to the pump's lowest leakage
connection.
2. Flush the pump using operating fluid quantities depending on pump size:
Displacement V [cm3/R] 19 32 45 63 80 100 140
Flushing quantity [l/min] 4–6 6–8
Tab. 14: Flushing Quantity
Flushing the Pump
© 2010 Moog GmbH User Manual RKP-II (CA53461-001; Version 2, January 2010) 51
Page 60

Placing the Pump out of Operation 7 Operation
7.4 Placing the Pump out of Operation
Placing the Pump out of
Operation
DANGER Risk of injury and property damage as a result of blows or
impact!
Unexpected and uncontrolled movement of the machine /
equipment may lead to severe injury or property damage.
• Only trained personnel should be allowed to remove the
pump.
• Have the equipment manufacturer or operator a ssure that
no uncontrolled signals are being transmitted to the pump.
• Make sure that the drive motor cannot start up.
WARNING Risk of injury and poisoning by dangerous operating fluid!
Leaking operating fluid may lead to severe personal injury and
property damage.
• Only trained personnel should be allowed to place the
pump out of operation.
Pre-Conditions:
• The drive motor has been switched of and is secu red from being switch ed
back on.
• Machine / equipment is at zero pressure and idle.
• Pump has cooled down.
Procedure:
1. Close the fittings on the suction and pressure side.
2. Completely drain the pump through the leakage oil port.
3. Depending on what is required:
- Remove the pump:
Ö Chap. "9.1 Demounting the Pump", Page 55
- Storing the Pump:
Ö Chap. "5.3 Storing the Pump", Page 31
7.5 Reconnecting the Pump
Reconnecting the Pump Pre-Conditions:
• If the pump was stored: Measures were carried out that were necessary
because of the duration of storage. Ö Tab. 6, Page 31
• Pump is installed. Ö Chap. "6 Mounting", Page 33
Procedure:
1. Carry out all steps applicable for the initial set-up of the pump.
Ö Chap. "7.1 Initial Pump Set-Up", Page 43
52 User Manual RKP-II (CA53461-001; Version 2, January 2010) © 2010 Moog GmbH
Page 61

8 Maintenance and Repairs Monitoring
8 Maintenance and Repairs
For pumps in explosive areas, the supplementary document ation should
also be observed:
Ö User Manual RKP II Explosion-proof
For any and all tasks to be performed on the pump, suitable personal
protective equipment should be worn.
Ö Chap. "2. 2. 4 Work Safety", Page 9
8.1 Monitoring
Tasks Intervals
Check pump for leakage Daily
Check pump for noises Daily
Check that fasteners are tightened Monthly
Check the machine's operating temperature
at constant operating conditions
Check the machine's operating fluid level Daily
Check the operating fluid quality Annually or every 2000
Tab. 15: Monitoring
Weekly
operating hours
Maintenance and Repairs
Monitoring
© 2010 Moog GmbH User Manual RKP-II (CA53461-001; Version 2, January 2010) 53
Page 62

Trouble-shooting 8 Maintenance and Repair s
8.2 Trouble-shooting
Trouble-shooting
Should repairs be needed because of any trouble with the pump, these
should only be carried out by one of our service technicians or by an
authorized service location.
Ö Chap. "2.2.3 Structural Modifications", Page 9
Ö Chap. "8.3 Moog Service Addresses", Page 54
Trouble Cause Repair
Radial Piston Pump
Peculiar noises Cavitation,
Pump is sucking air,
speed is too high,
mechanical damage
Flow volume too low
or non-existent
Pressure too low or
non-existent
Fluctuations in the
pressure or
displacement
Pump does not cut off,
leakage in the pump,
comparing performance of drive
motor and pump shows no match,
wear caused by dirt,
engine damage
Pump does not cut off,
leakage in the pump,
comparing performance of drive
motor and pump shows no match,
wear caused by dirt,
engine damage
Pump is sucking air,
leakage in the pump,
wear caused by dirt,
engine damage
unstable compensator
Configure the inlet suction so that
the pressure in the suction line is
not below minimum,
limit the speed settings,
contact us and have damaged
parts replaced
Check inlet suction,
check for wear,
check adjustable parts,
contact us and have damaged
parts replaced
Check cut-off,
seal leaky lines,
check actuation,
contact us and have damaged
parts replaced
Seal leaking areas,
check the configuration of the
antivibration orifice and if
necessary, use the correct
antivibration orifice,
check the dimensions of the
control oil hose and if necessary,
replace with the correct control oil
hose, contact us and have
damaged parts replaced
Tab. 16: Trouble-shooting
8.3 Moog Service Addresses
Moog Service Addresses
54 User Manual RKP-II (CA53461-001; Version 2, January 2010) © 2010 Moog GmbH
Visit www.moog.com/worldwide to find the location nearest you for
application engineering, repairs and service.
Page 63

9 Demounting Demounting the Pump
9 Demounting
For pumps in explosive areas, the supplementary document ation should
also be observed:
Ö User Manual RKP II Explosion-Proof
For any and all tasks to be performed on the pumps, appr opriate person al
protective equipment should be worn.
Ö Chap. "2. 2. 4 Work Safety", Page 9
9.1 Demounting the Pump
In this segment, instructions are given on how to dismantle the pump to
prepare it for shipping to us or to one of our authorized service locations
for pump repairs to be performed and not on how to disassemble the
pump.
WARNING Risk of crushing!
During demounting, the pump may topple over and crush body
parts.
• Select lifting gear appropriate for the overall weight of the
pump.
• Attach the lifting gear to the pump properly.
Ö Chap. "5.2 Transporting the Pump", Page 29
• Avoid all areas below the floating load.
Demounting
Demounting the Pump
WARNING Risk of injury and poisoning by dangerous operating fluid!
Leaks from dangerous operating fluid may lead to serious
injuries.
• Check to ensure that the operating fluid in use does not
pose a risk.
• Make sure that the machine / equipment is at zero
pressure and zero voltage.
• Wear protective work equipment such as, e. g., work
gloves. Ö Chap. "2.2.4 Work Safety", Page 9
WARNING Risk of death by electrocution!
Contact with live parts may lead to severe injuries and even
death.
• Make sure that the machine / equipment is at zero
voltage.
CAUTION Damage to property from contamination!
Missing end caps to the pump connections may lead to
contamination and resulting damage to property.
• Replace the end caps immediately af te r demo u nt i ng the
lines on the pump.
© 2010 Moog GmbH User Manual RKP-II (CA53461-001; Version 2, January 2010) 55
Page 64

Demounting the Pump 9Demounting
Pre-Conditions:
• The pump is idle:
Ö Chap. "7.4 Placing the Pump out of Operation", Page 52
• Demounting location is freely accessible.
• Machine / equipment is at zero pressure and zero voltage.
• Operating fluid has been inspected for risks and any necessary safety
precautions have been taken.
• Standard tools are available.
• Supplementary documentation is available.
Procedure:
1. Remove the electrical connections from the pump:
Ö Application Instruction RKP-D with CAN Bus Interface
2. Place the collecting tray for leaking operating fluid underneath the pump.
3. Remove the lines from the pump.
4. Completely drain the pump.
5. Attach the end caps and the flange covers to the pump.
6. Attach suitable lifting tackle to the pump.
Ö Chap. "5.2 Transporting the Pump", Page 29
7. Detach the pump with the coupling from the drive motor.
8. Place the pump onto a firm and stable surface.
9. Detach the lifting gear from the pump.
10. Detach the coupling from the pump's drive shaft in accordance with the
instructions provided by the coupling manufacturer.
11. Attach transport protection means for shaft ends to the pump's drive shaft.
56 User Manual RKP-II (CA53461-001; Version 2, January 2010) © 2010 Moog GmbH
Page 65
10 Spare Parts, Accessories, Repairs
10 Spare Parts, Accessories, Repairs
The operator is not authorized to install spare parts and accessories.
Repairs or other structural modifications to the pump may only be carried
out by us or by an authorized service repair shop.
Ö Chap. "2. 2. 3 Structural Modifications", Page 9
For all tasks described in this User Manual, commercially available
standard tools may be used.
CAUTION Property damage to the pump or equipment!
Unsuitable or defective accessories or spare parts may lead to
pump or machine / equipment failure as a result of damage.
• We recommend: Only use original accessories or spare
parts.
• All warranties and liability claims shall be void for injuries
or property damage as a result of using unsuitable or
defective accessories or spare parts.
Ö Chap. "1.5 Warranty and Liability", Page 5
1. For repairs to the pump:
Ö Chap. "9.1 Demounting the Pump", Page 55
2. Package the pump for transport to our facility or to an authorized service
repair shop, preferably in its original packaging material.
Ö Chap. "8.3 Moog Service Addresses", Page 54
Spare Parts, Accessories
Tools
RepairsSteps to be taken when carrying out repair work:
© 2010 Moog GmbH User Manual RKP-II (CA53461-001; Version 2, January 2010) 57
Page 66

For your notes.
10 Spare Parts, Accessories, Repairs
58 User Manual RKP-II (CA53461-001; Version 2, January 2010) © 2010 Moog GmbH
Page 67

11 Index A…P
A B C D E F G H I J K L M N O P Q R S T U V W X Y Z
11 Index
A
Accessories 57
Arranging multiple pumps
Attaching the adapter flange 40
Determining the through drive torque 37
D
Demounting 55
Demounting the Pump 55
Duplication of the User Manual is strictly
prohibited A
E
Environmental Safety
Disposal 3
Emissions 3
G
General Safety Instructions
Operating hydraulic equipment 10
Specific phases of operation 10
General safety instructions 10
I
Information on the User Manual 1
Supplemental Documentation 2
Symbols 2
Target Groups 1
Warning Labels 2
Initial Pump Set-Up
Adjusting the Compensator 44
Filling up the pump 44
Intended use 7
M
Maintenance and Repairs 53
Monitoring 53
Moog Service Addresses • 54
Trouble-shooting 54
Manufacturer's Address A
Moog GmbH Address A
Mounting 33
Arranging multiple pumps 37
Connecting pipes 36
Electrically connecting pump • 37
Installing the pump 34
Planning lines 35
Preparing for mounting 33
N
Nameplate 13
O
Operating the pump
Flushing the pump 51
Start up 51
Operation 43
Initial Pump Set-Up 43
Operating the pump 50
Performing Functions Tests 49
Placing the Pump out of Operation 52
Reconnecting the Pump 52
Organizational measures
Safe operation 8
Selecting and qualifying staff 8
Structural modifications 9
Work Safety 9
P
Product Description
Configuration 11
Functional Description 14
Nameplate 13
Scope of Delivery 12
A B C D E F G H I J K L M N O P Q R S T U V W X Y Z
© 2010 Moog GmbH User Manual RKP-II (CA53461-001; Version 2, January 2010)) 59
Page 68

R…W 11 Index
A B C D E F G H I J K L M N O P Q R S T U V W X Y Z
R
Repairs 57
Reproduction of the User Manual is
strictly prohibited A
Responsibilities 4
S
Spare parts 57
T
Technical Data 27
General Technical Data 27
Operating Conditions 28
Tools 57
Trademarks 6
Transport and Storage 29
Preserving the Pump 32
Storing the pump 31
Transporting the Pump 29
Unpacking the Pump 29
U
User Manual
Copyright A
Duplication strictly prohibited. A
Protected by Copyright A
Reproduction strictly prohibited. A
Reservation to make changes A
W
Warranty and Liability 5
A B C D E F G H I J K L M N O P Q R S T U V W X Y Z
60 User Manual RKP-II (CA53461-001; Version 2, January 2010)) © 2010 Moog GmbH
Page 69
12 Appendix Abbreviations, Symbols and Code Letters
12 Appendix
12.1 Abbreviations, Symbols and Code
Letters
Abb. Explanation
Symbol for filter efficiency
β
x
Δp Symbol for pressure change
Δp
N
ν Symbol for viscosity
A Connection port (consumer load connection)
ANSI American National Standards Institute (http://www.ansi.org)
ATEX Atmosphère explosible (synonymous for the EU Directive pertaining to
B Connection port (consumer load connection)
DOrifice
D1, D2 Orifice diameter
DIN Deutsches Institut für Normung e. V. (http://www.din.de)
EN Europa-Norm (=European Standard)
EU European Union
HFA Special operating fluid: consists of approx. 95% water
HFC Special operating fluid: water-based polymer solution
HNBR Hydrogenated NitrileButadieneRubber
ISO International Organization for Standardization (http://www.iso.org)
M Symbol for through-drive torque
M
A
n Revolution speed
n
max.
NW NominalWidth
η
hm
p Symbol for pressure (Pressure)
p
min.
p
max.
p
Symbol for nominal pressure
N
Symbol for maximum operating pressure
p
n
p Connection port (pressure connection)
Q Symbol for displacement
Q Symbol for a pump's delivery rate
R Revolution
SAE American series of standards (parallel to DIN-EN standards)
WS Wrenchsize
t Symbol for time
T Symbol for temperature
T Connection port (Tank connection)
TÜV Technischer Überwachungsverein
3
/R] Displacement
V[cm
V Symbol for volume (e. g. tank capacity)
V Symbol for delivery volume
Symbol for nominal pressure change
explosion protection)
(sealant material, such as e. g.: o-rings)
Tightening torque
Max. revolution speed
Symbol for hydraulic-mechanical efficiency
Symbol for minimum pressure
Symbol for maximum pressure
Tab. 17: Abbreviations, Symbols and Code Letters (Part 1 of 2)
Abbreviations, Symbols
and Code Letters
© 2010 Moog GmbH User Manual RKP-II (CA53461-001; Version 2, January 2010) 61
Page 70

Abbreviations, Symbols and Code Letters 12 Appendix
Abb. Explanation
V
max.
Symbol for maximum delivery volume
ΔV Change in pump displacement
VDI Verein Deutscher Ingenieure e. V. (http://www.vdi.de)
VDE Verband der Elektrotechnik Elektronik Informationstechnik e. V.
(http://www.vde.de)
X Connection port (control pressure connection)
L Connection port (leakage connection)
Tab. 17: Abbreviations, Symbols and Code Letters (Part 2 of 2)
62 User Manual RKP-II (CA53461-001; Version 2, January 2010) © 2010 Moog GmbH
Page 71
12 Appendix Tightening Torq ue
12.2 Tightening Torque
The data on the tightening torque in this segment is considered as reference values only. Preference should be given to the data provided by
each manufacturer of the particular machine part!
Flange for Suction and Pressure Connection
Flanges with corresponding screws and sealing elements are to be used in accordance with the information provided by the flange manufacturer.
Respective tightening torques should be gathered from the information provided by the flange manufacturer or as per standard ISO 6162.
Mounting Screws
As per DIN 13 or ISO 68, in individual cases, tightening torques should be
checked in accordance with VDI 2230.
Mounting screws for SAE-A, SAE-B and SAE-C flange:
Adapter Flange Type Thread Size Max. Permissible Tightening Torque
SAE-A M 10 58 ... 78 Nm
SAE-B M 10 62 ... 75 Nm
SAE-C M 10 62 ... 75 Nm
Tab. 18: Tightening Torquefor mounting screws
Sealing Plugs Form E with ED Seal (Reference Values)
Tightening Torque
Thread Size Max. Permissible Tightening Torque
M 18x1.5 65 Nm (+10%)
M 22x1.5 90 Nm (+10%)
M 26x1.5 135 Nm (+10%)
G 1/4" 30 Nm (+10%)
G 3/8" 60 Nm (+10%)
Tab. 19: Tightening Torque for sealing plugs
Straight Screw-in Sockets Form E with ED Seals (Reference Values)
Thread Size Max. Permissible Tightening Torque
M 18x1.5 70 Nm (+10%)
M 22x1.5 125 Nm (+10%)
M 26x1.5 180 Nm (+10%)
G 1/4" 35 Nm (+10%)
G 3/8" 70 Nm (+10%)
Tab. 20: Tightening Torque for straight screw-in fittings
© 2010 Moog GmbH User Manual RKP-II (CA53461-001; Version 2, January 2010) 63
Page 72

MOOG.COM/INDUSTRIAL
For the location nearest you, contact
moog.com/industrial/globallocator.
Argentina +54 11 4326 5916 info.argentina@moog.com
Brazil +55 11 3572 0400 info.braz il@moog.com
Canada +1 716 652 2000 info.canada@moog.com
China +86 21 2893 1600 info.china@moog.com
Germany +49 7031 622 0 info.germany@moog.com
Finland +358 10 422 1840 info.finland@moog.com
France +33 1 4560 7000 info.france@moog.com
United Kingdom +44 1684 296600 info.uk@moog.com
Hong Kong +852 2 635 3200 info.hongkong@moog.com
India +91 80 4057 6605 info.india@moog.com
Ireland +353 21 451 9000 info.ireland@moog.com
Italy +39 0332 421 111 info.italy@moog.com
Japan +81 463 55 3767 info.japan@moog.com
Korea +82 31 764 6711 info.korea@moog.com
Luxembourg +352 40 46 401 info.luxembourg@moog.com
Netherlands +31 252 462 000 info.thenetherlands@moog.com
Norway +47 64 94 19 48 info.norway@moog.com
Russia +7 8 31 713 1811 info.russia@moog.com
Sweden +46 31 680 060 info.sweden@moog.com
Switzerland +41 71 394 5010 info .s wi tz erla n d@ m o o g. co m
Singapore +65 6773 6238 info.singapore@moog.com
Spain +34 902 133 240 info.spain@moog.com
South Africa +27 12 653 6768 info.southafrica@moog.com
USA +1 716 652 2000 info.usa@moog.com
© 2010 Moog GmbH
User Manual RKP-II
(CA53461-001; Version 2, January 2010)
All rights reserved.
We reserve the right to make changes.
 Loading...