

Page 1
Pow er Supply
Please conne ct the d esig nate d AC ada pter t o an AC ou tlet o f the co rrect vol tage .
Be su re to only us e an AC ad apte r whic h supp lies 9 V DC, 20 0mA .
Unplug the AC po wer ad apte r when n ot in us e or dur ing el ectr ical s torms.
Loc ation
To av oid defor mati on, di scol orat ion, o r othe r seri ous da mage, do no t
expose this un it to th e foll owin g cond itio ns:
Direct sunli ght
Magnetic fie lds
Exc essive du sty or d irty l ocat ion
Str ong vibra tion s or sho cks
Radio Freque ncy In terf eren ce
Radios and tel evis ions p lace d near by may e xper ienc e reception int erfe renc e.
Ope rate this u nit at a s uita ble di stan ce fro m radi os and t elev isions.
Cle aning
Clean only wit h a soft , dry cl oth. I f nece ssar y, sli ghtl y mois ten the cloth.
Do not use abras ive cl eans er, cl eani ng alc ohol , pain t thin ners, wax ,
solvents, cl eani ng flu ids, o r chem ical -imp regn ated w iping clo ths.
FCC c ertific atio n
Thi s device co mpli es wit h Part 1 5 of the F CC Rul es. Op erat ion is s ubject
to th e followi ng two c ondi tion s:
T his de vice m ay not c ause h armful in terf eren ce.
This devi ce must accept any interference rec eived, inclu ding interfe rence
tha t may cause u ndes ired o pera tion .
Heat sources
Ext reme temp erat ure or h umid ity
High humidit y or moi stur e
Main Feature
Can capture un ique g uita r tona l qual itie s thro ugh sa mpling techno logy .
Can be used as an in divi dual E Q peda l.
7 preset slots t o stor e EQ and s ampl ed gui tar so unds .
Switch betwe en TRU E BYPA SS or BU FFER B YPAS S.
Fir mware upg rade able v ia USB .
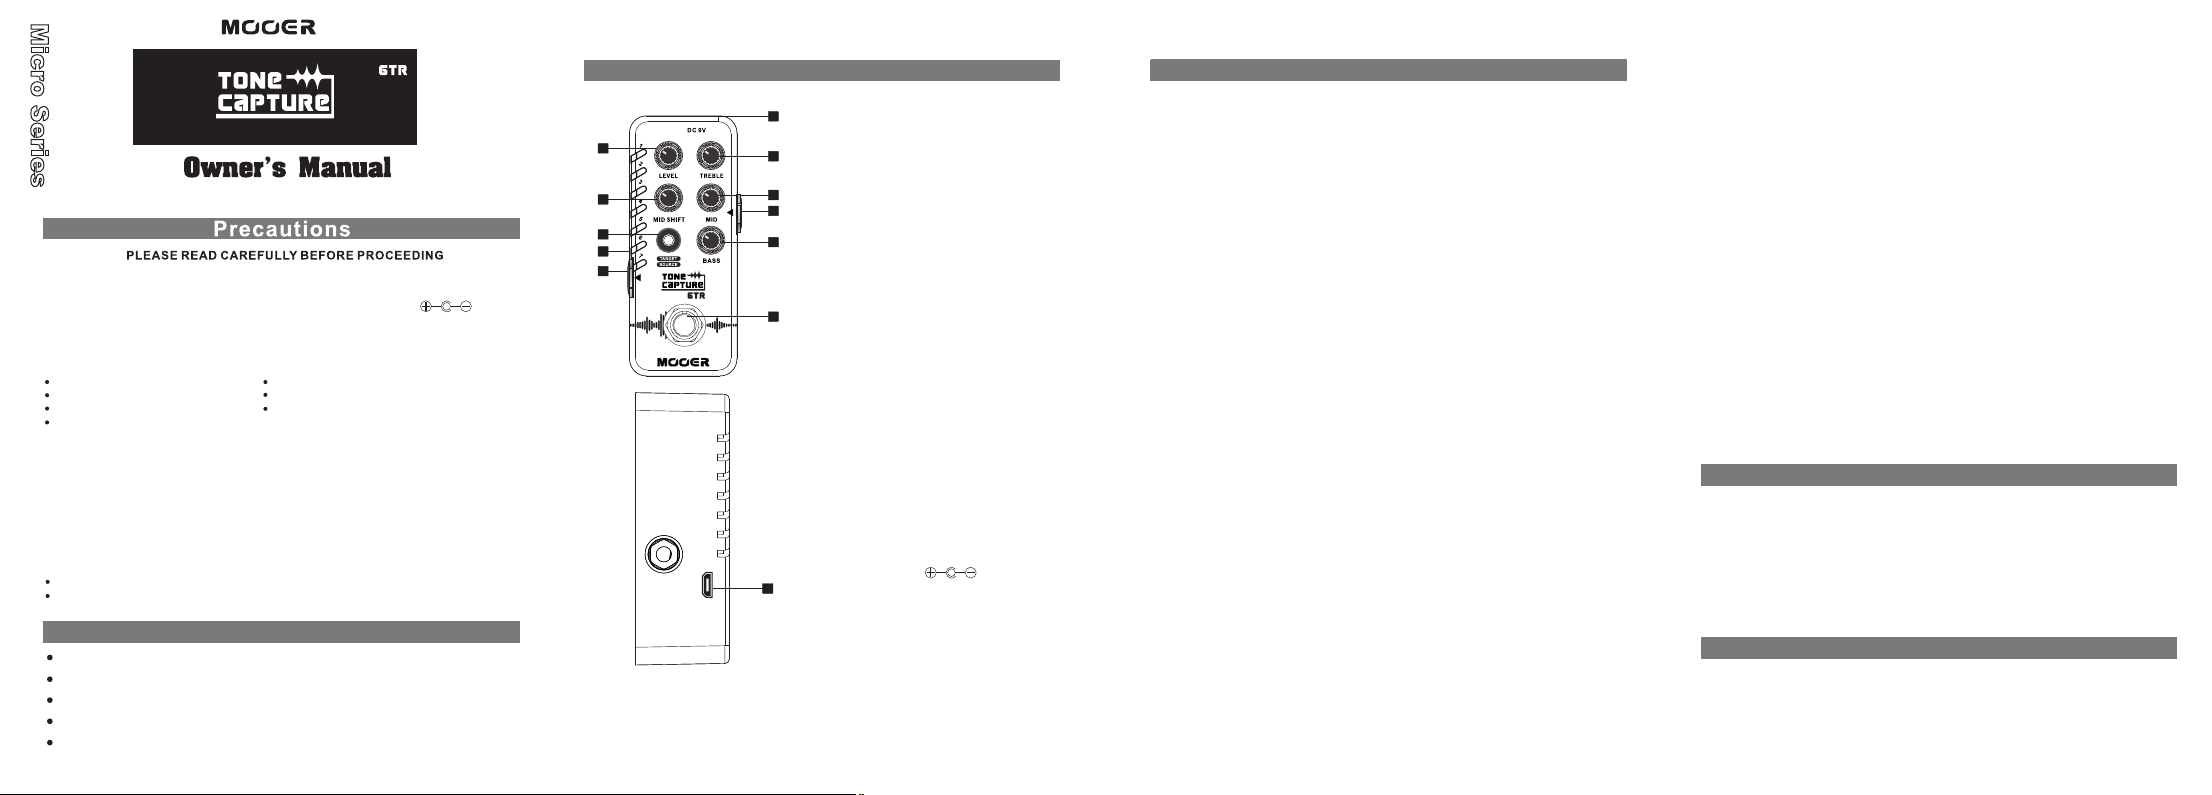
Layout
11
1. Fo otswi tch:
10
9
2
3
4
USB
• Swi tch On/ Off
• Sam pling
6
2. RE D/BLU E LED But ton:
• Pre ss to sel ect sam pling m ode, pr esets .
7
5
3. LE D indic ator:
•Ind icate s the cur rent sl ot
8
4. Ou tput:
•¼ mo no jack .
5. In put:
•¼ mo no jack .
1
6. TR EBLE
•Adj ust Hig h frequ ency
7. MI D SHIFT :
•Adj ust Mid f reque ncy adj ustme nt
8. BA SS:
•Adj ust Low f reque ncy
9. MI D:
•Adj ust Mid f reque ncy
10. L EVEL:
•Vol ume con trol
11. D CIN:
•Con nect a 9V D C 200mA
Cen tre pin n egati ve
pow er supp ly
12
12. U SB port :
•Con nect to t he PC for f irmwa re
upd ate via U SB cabl e.
Paramete r savin g and ed itin g
•Pow er on the p edal, p ress th e LED but ton to ch oose a pr eset sl ot. If the re is alr eady
a sto red pre set fil e, the LE D indic ator wi ll stay re d. If the sl ot is bla nk, the L ED
ind icato r will bl ink.
GTR CA PTUR E
•Th e TO NE CAPT URE Gui tar Peda l can sam ple any g uitar, p rovid ed it has s ome for m
of pi ckup, and crea te a deta iled di gital G uitar m odel us ing MOO ER’s pro priet ary no nlin ear IR te chnol ogy. Th is is ach ieved by c ompar ing the d iffere nces be tween t he
“SO URCE” (t he guit ar you wan t to use) a nd the gu itar be ing sam pled or t he “TARGET ”
(th e guita r you want i t to soun d like) . A complex calcu latio n then en sues an d an
unc anny di gital r ecrea tion of your “TARGE T” guita r tone is b orn. Act ivatin g the TONE
CAP TURE wi th your n ewly cre ated gu itar mo del wil l insta ntly tr ansfo rm the to ne of you r
“SO URCE” in to that o f your “TARG ET”. The gu itar mo del can t hen be tw eaked ev en
fur ther fo r use wit h other “SOURC E” instrumen ts or even t o creat e somet hing co mplet ely
new.
TARGE T
•Aft er powering on , conne ct the TARGE T guita r (the gu itar yo u inten d to samp le),
the n press a nd hold t he footswitc h. The butt on ligh t will tu rn red in dicat ing it is i n
the TARG ET acqu isiti on mode. Pr ess the f ootsw itch ag ain, an d TARG ET samp ling
beg ins ind icate d by the th e LED ind icato rs illu minat ing in or der. Duri ng this p roces s,
we re comme nd play ing an op en chor d first a nd then p laying acros s the ful l range o f
the i nstru ment. (T he wide r the cove rage, t he bett er the re sult wi ll be.) Wh en all 7
LED s are lit a nd the li ght sto ps flas hing, t he samp ling wi ndow is c losed . Pressi ng
the s witch d uring o r after s ampli ng can te rmina te the sa mplin g proce ss. Press t he
swi tch aga in to sta rt the s ampli ng proc ess over. If you are no t happy w ith the s ample ,
pre ss the switch ag ain to st art ove r.
SOU RCE
•Pre ss the LE D butto n, it wil l turn bl ue to ent er the SO URCE sa mplin g mode.
Con nect th e INPUT t o the gui tar you wa nt to use w ith the TARG ET samp le (SOU RCE).
Sho rt pres s the swi tch to st art SO URCE ca pture. Ag ain, we r ecomm end pla ying an o pen
cho rd firs t and the n playing acro ss the fu ll rang e of the in strum ent or pl ay as clo se as
pos sible t o what wa s played i n TARGET mod e. P ressi ng the sw itch du ring th e sampl ing
pro cess ca n termi nate th e sampl ing pro cess. Press the s witch a gain to s tart sampli ng
aga in and af ter the s ampli ng is fin ished , press t he switch to res ample .
Instructions
操作 说明
MUT E
•Aft er SOUR CE and TARGE T are sam pled, p ress an d hold th e footswitch t o
mut e the out put.
Sav ing
•Aft er the SO URCE sa mplin g is fini shed, p ress th e LED but ton to co nfirm t he samp ling
res ult and c hoose a s ave slot . At t his tim e, the LE D indic ator wi ll star t to fla sh to ind icate
the c urren t slot. Press and h old the L ED Butt on to save t he samp ling fi le.
Del ete
•The s ampli ng file s can be de leted b y press ing the L ED Butt on whil e the effect is of f.
The L ED flas hes qui ckly an d stops , indic ating t hat the d eleti on is com plete d.
TRU E/BU FFER BY PA SS
•Unp lug the p ower supply. Press and hol d the foo tswit ch whil e poweri ng on the u nit.
Whe n the LED i ndica tor lig hts up in a scend ing ord er (1-7 ), the pe dals is i n buffer
byp ass mod e. I f the LED i ndica tor lig hts up in d escen ding or der (7- 1), the p edal
is in t rue byp ass mod e.
Factory r eset
• Unp lug the p ower supply, pre ss and ho ld the LE D Butto n, then p ower on .
The p edal wi ll rese t.
Fir mware up date
•Unp lug the p ower supply, pre ss and ho ld the fo otswitch and L ED
But ton sim ultan eousl y, power on the peda l to ente r firmwa re upda te mode .
Instructions
Inp ut: 1/4" m ono jac k (impe dance 2 .2M Ohm s)
Out put: 1/4 " mono ja ck (imp edanc e 100Oh ms)
Powe r supp ly: 9V DC t ransf ormer ( inter nal neg ative ex terna l), MOO ER Micr o
Powe r is reco mmend ed
Cur rent Dr aw: 200m A
Dim ensio ns: 93.5 mm(D) x 4 2mm(W ) x 52mm( H)
Weight: 155 g
Acc esso ries : User M anual
*Di sclai mer: Pa ramet ers may u pdate w ithou t notic e.
Page 2
智能吉他听感捕获单块
电源 供应
请使 用正确的 交流电源 插座连接 电源变 压器。
请使 用内负外 正 的9V电源变 压器,否 则将会 导致设备损坏, 着火或 者其他问题。
不使 用时或雷 雨天时请 拔下电源 。
连接
连接 设备或断 开连接前 ,请务必 关闭电 源及其他 设备,避 免故障和 损害其 他设
备。 另外,移 动本机前 请断开所 有连接 线及电源 线。
放置 场所
为防 止变形、 变色,及 其他严重 损坏, 请避免以 下情况:
•阳 光直射 •靠近热源
•磁 场 •高温 潮湿
•多 尘或不洁 的地方 •湿度较 大
•强 烈震动或 摇晃
电器 干扰
在使 用本机时 ,请确保 使用时远 离收音 机和电视 机,以免 造成干扰 。
清洁
清洁 本机时, 请使用干 燥柔软或 稍微湿 润的抹布 。请勿使 用粗糙的 清洁粉 、酒精、
涂料 稀释剂、 蜡、溶剂 、清洁剂 及化学 试剂等浸 渍擦拭。
操作
请勿 暴力使用 开关及控 制元件。
请勿 让纸屑、 金属制品 及其他物 体落入 机内。
请勿 摔落以及 让本机受 到冲击和 过度按 压。
可以通 过采样学习 捕获不同的 吉他音色
可以作 为独立的EQ效 果器使用
提供7个预 置位置存储E Q以及采样的 吉他音色
可切换T RUE BYPAS S或者BUFF ER BYPAS S
可通过U SB进行固件 升级
11
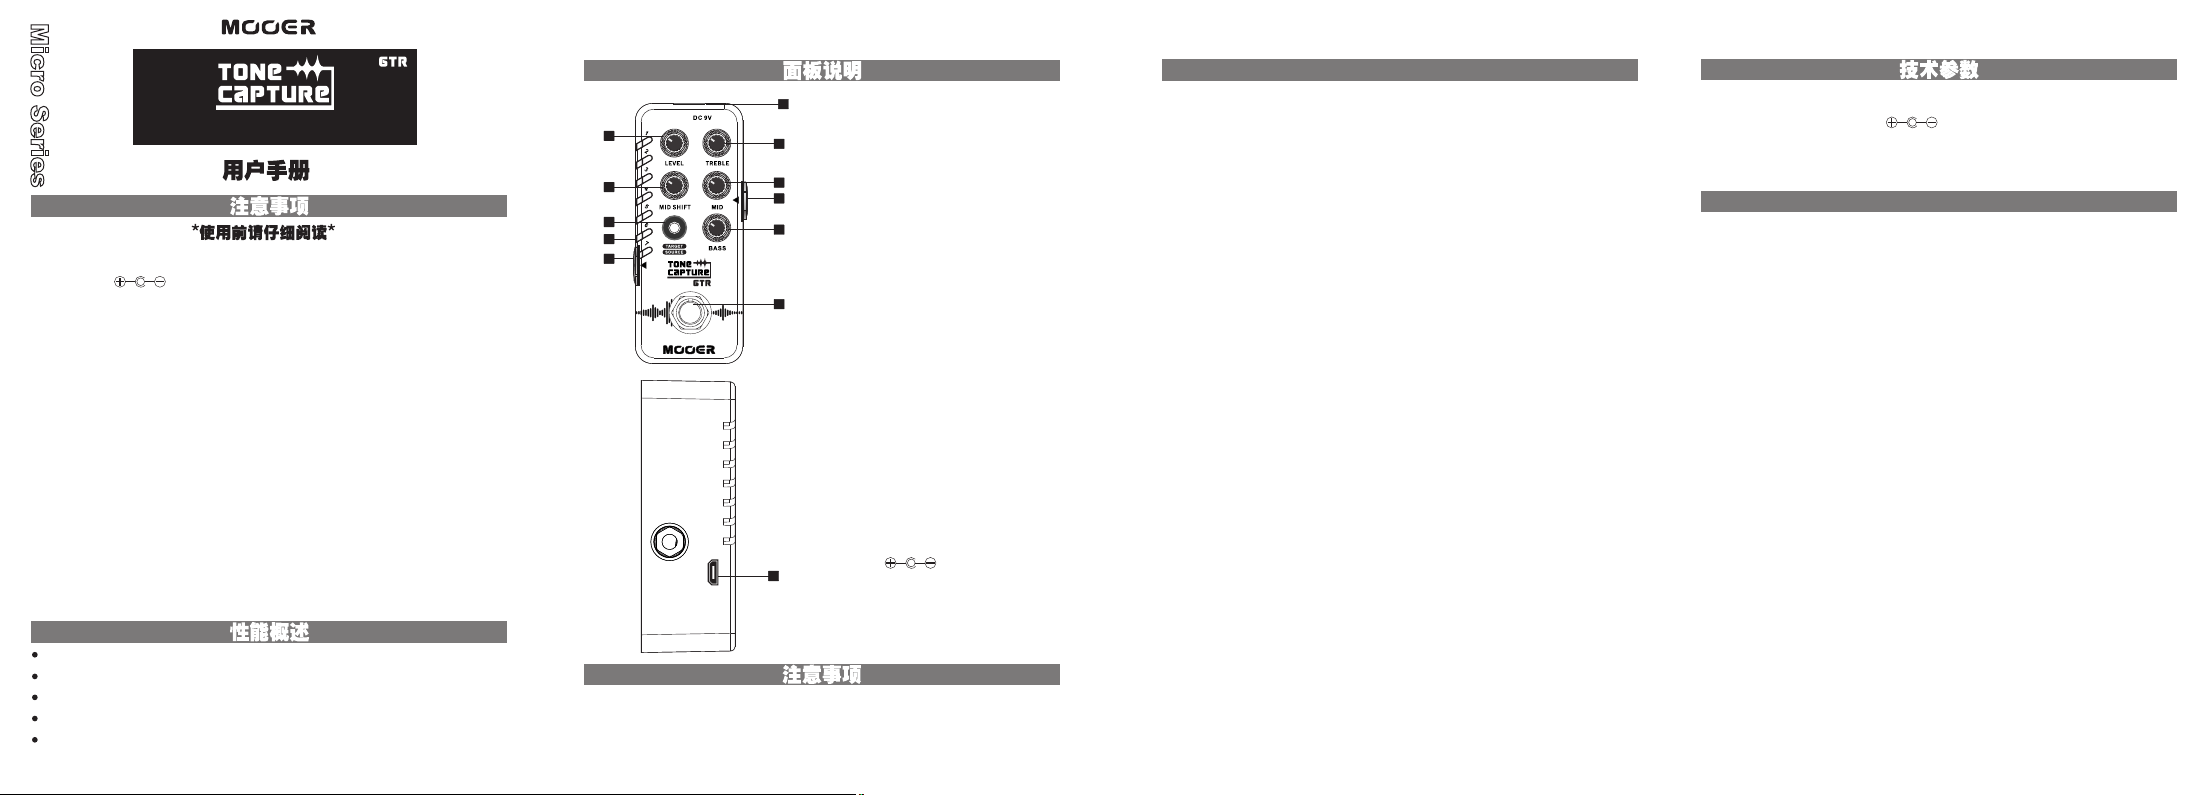
1. 踩钉 :
10
9
2
3
4
USB
在TARG ET和SOU RCE阶段,采样失败或直接跳过学习阶段等非正常操作将对最后的学习
结果产 生影响。建 议按正常的 步骤和方法 来操作得到 你想要的学 习结果。
开关效 果器以及进 行采样学习 操作
6
2. 双色 带灯按键:
指示灯 具有蓝红双 色提示及关 闭状态
7
PRE SET切换、 保存以及ca pture采 集模式切 换
5
3. LE D指示灯:
通过闪 烁亮灭状态 提示不同的 功能操作
8
4. OU TPUT输出 :
1/4 ”单声道音频 接口,连接 输出信号
5. IN PUT输入:
1/4 ”单声道音频 接口,连接 输入信号
1
6. TR EBLE旋钮 :
高频调 节
7. MI D旋钮:
中频调 节
8. BA SS旋钮:
低频调 节
9. MI D SHIF T旋钮:
中频扫 频范围调节
10. L EVEL旋钮 :
音量调 节
11. 电 源接口
使用9V直 流变压器
(内负 外正 ,200m A)
12
12. U SB接口:
可连接 电脑进行固 件升级
操作说明
操作 说明
参数调 整以及保存
开启效果器,使用带灯按键选择一个预置位置,如果该预置位置有保存音色文件,LED灯为长亮;
如果没有保存音色文件,LED灯则为缓慢闪烁。调整参数后长按带灯按键,LED灯快速闪烁后停止
即保存成功。(LED长亮状态下改变参数LED会闪烁提示参数已发生改变)
GTR CAPTURE
1. TARGET
连接电源开机后,连接你想获得音色的吉他(TARGET)。长按踩钉,此时按键灯变为红色提示进入
TARGET采集模式。再次短按踩钉,LED指示灯会逐个点亮提示开始采集。在此过程中任意弹奏一段
乐句,(覆盖的音域越广效果就会越好)直到7个LED指示灯全部点亮闪烁停止,采样完成。
采样过程中按下踩钉可终止采样进程,再次按下踩钉重新开始采样;采样结束后可按下踩钉重新采样。
2. SOURCE
短按带灯按键,按键灯变为蓝色提示进入SOURCE采集模式。
请将INPUT与您常用的吉他(SOURCE)连接。短按踩钉开始SOURCE采集,弹奏一段与TARGET
采集时较为接近的乐句,乐句越相似,采样学习结果越好。采样过程中按下踩钉可终止采样进程,
再次按下踩钉重新开始采样;采样结束后可按下踩钉重新采样。
3. MUTE
SOURCE和TARGET采样完成后长按踩钉可激活MUTE功能(可避免拔插吉他连接线带来的冲击声)
4. 音色调整
SOURCE采样结束后,可以通过面板的旋钮对音量以及EQ进行调整以达到预期的音色。
5. 储存音色
SOU RCE采样结 束后短按 带灯按键 即生成学 习结果并 进入采样 储存模式 。此时LE D会开始闪 烁提示
当前储 存位置,长 按带灯按键 ,LED指示灯 快速闪烁后 长亮即保存 成功。切换 通道或者短 按踩钉即
放弃本 次学习。
6. 删除音色
在选择 的预置音色 位置关闭效 果器,长按 带灯按键,L ED灯快速闪 烁后停止即 提示已删除 该位置
存储的 音色文件。
BYPASS 模式切换
断开单 块的电源, 按住踩钉不 放同时连接 电源。根据 开机时LED闪 烁的次序可 判断即将切 换的
BYPAS S模式。1-7顺 序时,为BU FFER B YPASS; 7 -1顺序时 ,为TRU E BYPASS。 默认设置 为
TRU E BYPASS。效 果器链较长 时,建议使 用BUFFE R BYPASS模 式减少信 号损失。
恢复出厂设置
断开电 源按住带灯 按键,再连 接电源开机 ,松开按键 后,LED灯会 全部闪烁然 后停止即恢 复出厂
设置, 此时将清除 所有用户保 存的音色。
固件升级
断开电 源时,按住 按键灯和踩 钉,再连接 电源开机, 将进入固件 升级模式, 可以连接电 脑进行
固件升 级操作。
输入: 1/ 4”单声道音 频接口(阻 抗2.2M Oh ms)
输出: 1/ 4”单声道音 频接口(阻 抗100Oh ms)
电源供 给: 9V直流变压 器(内负外 正 ),推荐使 用Mooe r Micr o Power
工作电 流: 200mA
尺寸: 93 .5mm( D) x 42mm (W) x 52 mm(H )
重量: 15 5g
附件: 用户 手册
*免责声明:参 数更新恕 不另行通知。
 Loading...