

Page 1
Pitch Pedal
Owner’s Manual
Precautions
* PLEASE READ CAREFULLY BEFORE PROCEEDING *
Power Supply
Please connect the designated AC adapter to an AC outlet of the correct
voltage.
Please be sure to use only an AC adapter which supplies 9V DC, 300 mA,
center minus.
Unplug the AC power adapter when not using or during electrical storms.
Connections
Always turn off the power of this and all other equipment before connecting
or disconnecting, this will help prevent malfunction and / or damage to other
devices. Also make sure to disconnect all connection cables and the power
cord before moving this unit.
Location
To avoid deformation, discoloration, or other serious damage, do not
expose this unit to the following conditions:
Direct sunlight
Heat sources
Magnetic fields
Extreme temperature or humidity
Excessive dusty or dirty location
High humidity or moisture
Strong vibration or shock
Interference with other electrical devices
Radios and televisions placed nearby may experience reception
interference. Operate this unit at a suitable distance from radios and
televisions.
Cleaning
Clean only with a soft, dry cloth. If necessary, slightly moisten the cloth.
Do not use abrasive cleanser, cleaning alcohol, paint thinners, wax,
solvents, cleaning fluids, or chemical-impregnated wiping cloths.
Handling
Do not apply excessive force to the switches or controls.
Do not let paper, metallic, or other objects into this unit.
Take care not to drop the unit, and do not subject it to shock or excessive
pressure.
Main Features
3 Pitch Modes: Harmony, Pitch Shift, Detune
Precise polyphonic pitch shifting
±2 oct pitch range
Pedal journey can be set at will
Memory function for saving parameters
Full metal shell
Heavyduty footswitch
True Bypass
AC adapter 9V DC power supply
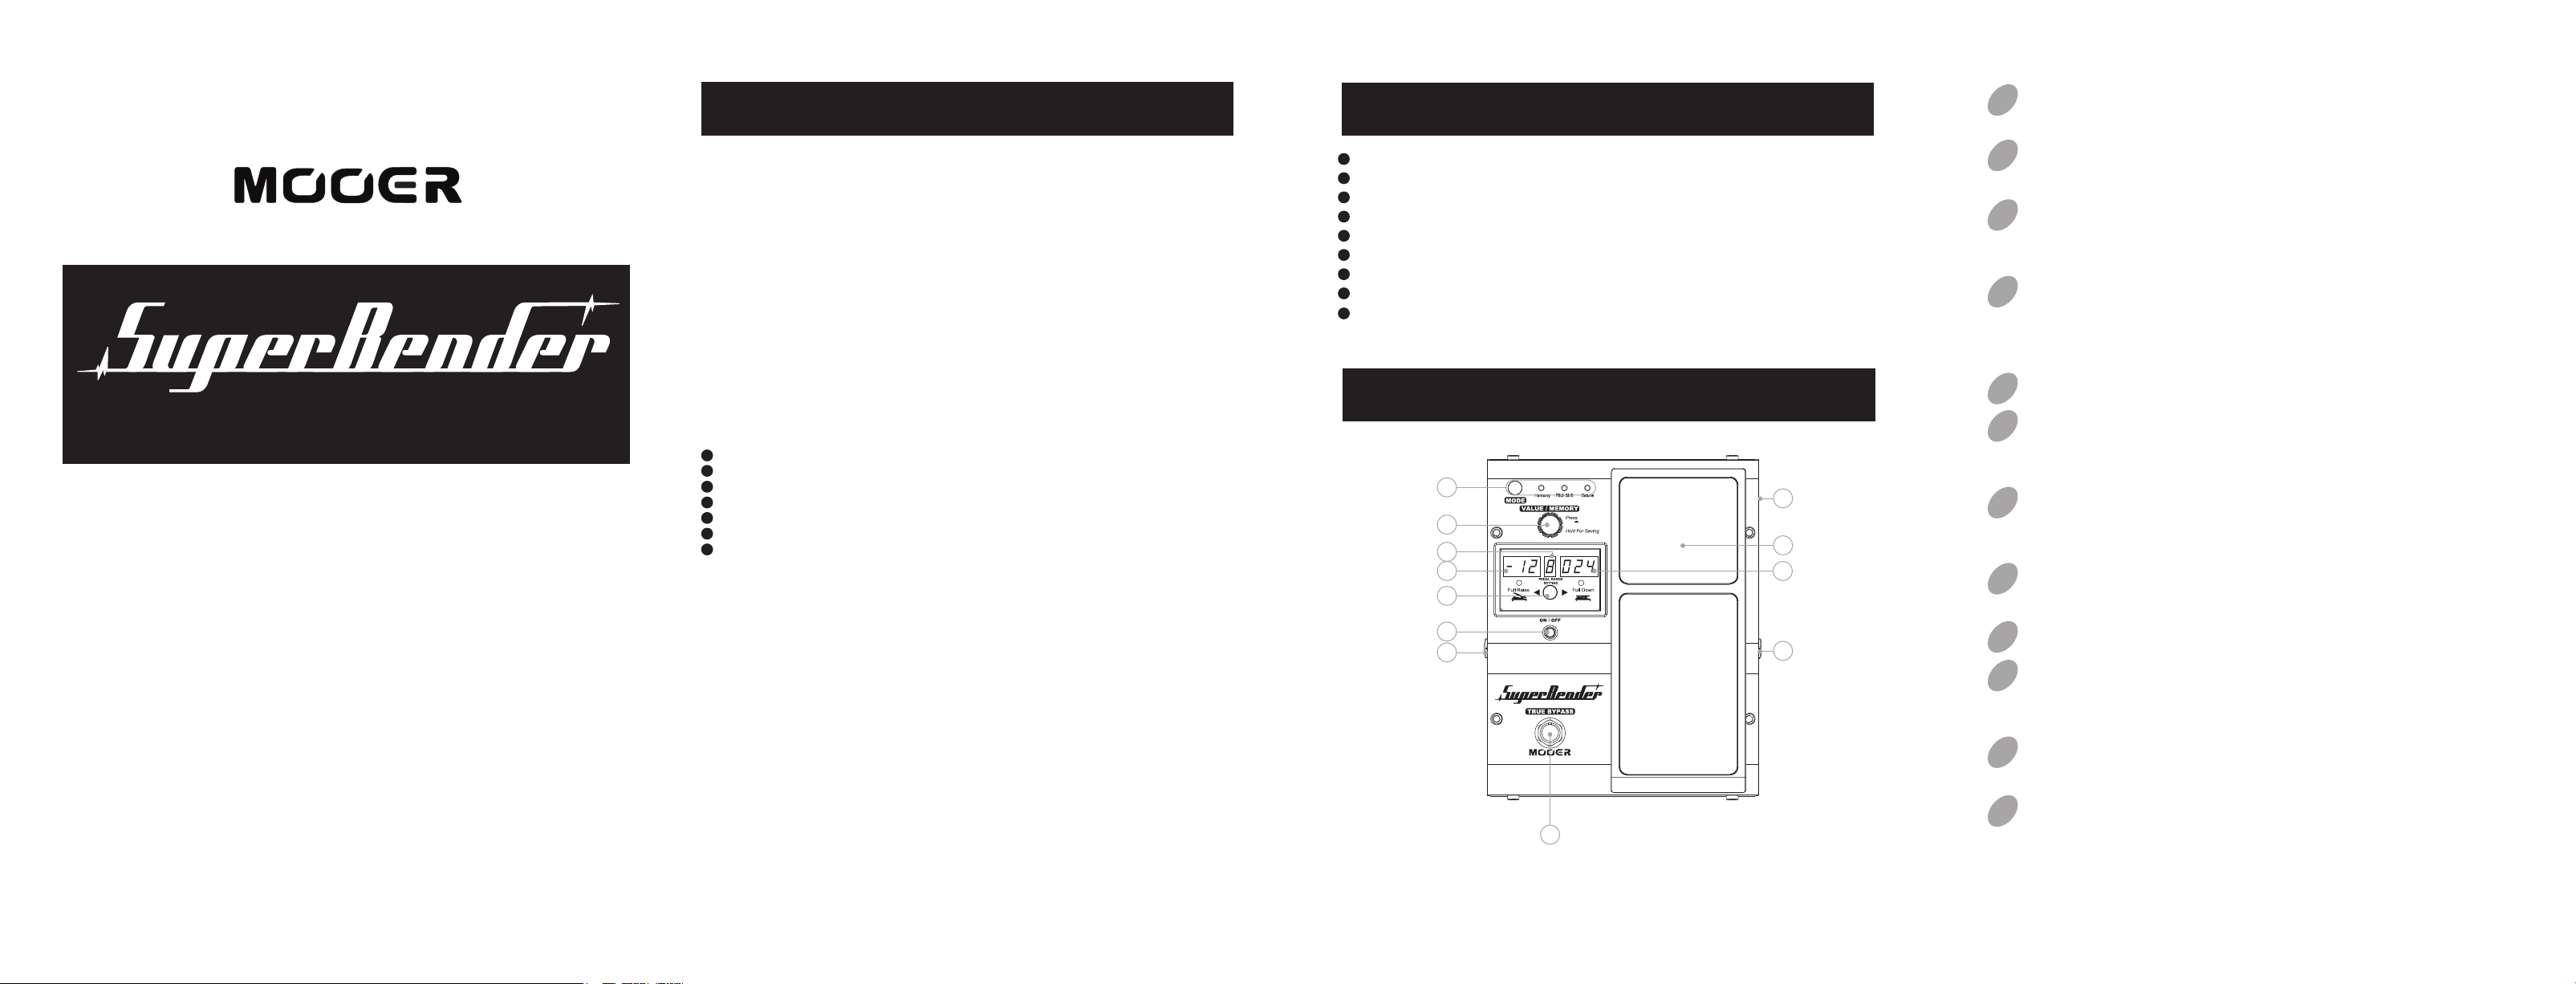
Panel Instruction
3
4
5
6 7
8
2
12
1
10
9
11
TRUE BYPASS Footswitch: Push down the footswitch to
01
switch between effects and bypass status.
02
ON/OFF LED: Instructs effects or bypass status of Super Bender,
when the LED is lit up, the effects is on.
03
MODE Select Button and LED: Press the button to select
effect mode, the corresponding LED will be lit up to instruct the
current mode.
04
VALUE/MEMORY Encoder with Button: Dial the knob to
set pitch range (detune depth range) or change memories. Press
the button to switch state or ensure storing. Hold the button to
enter store function.
05
MEMORY Display: Instructs the memory position.
06
Full Raise Display and LED: Instructs the pitch range setting
value of full raised pedal status. The corresponding LED will be lit
up to instruct the current setting state.
07
Full Down Display and LED: Instructs the pitch range setting
value of full down pedal status. The corresponding LED will be lit
up to instruct the current setting state.
08
PEDAL RANGE SETTING Button: Press the button to select
setting object.
09
Pedal: Controls the pitch and detune depth in real-time.
10
DC 9V Power Jack: For power supply, use a 9-volt DC
regulated AC adapter, 300mA (plug polarity is positive on the
barrel and negative in the center).
11
INPUT Jack: 1/4” mono audio jack, for connecting guitar, bass,
keyboard, electronic drum, microphone, or other instruments.
12
OUTPUT Jack: 1/4” mono audio jack, outputs the effects signal.
Page 2

Operation
Pedal Reset
Specification Connection
Basic Using
01
Power On
Plug the cable of AC Adapter (9V, 300mA, center negative) into the
[DC 9V] Jack will turn the device on.
02
Selecting Modes
Press [MODE] button to select effect mode, the corresponding LED
will be lit up to instruct the current mode.
03
Setting Pedal Range
Press [PEDAL RANGE SETTING] button to select pedal setting
status. Choose “Full Raise” to set how much pitch will be bent when
the pedal was completely uplifted; choose “Full Down” to set how
much pitch will be bent when the pedal was completely pressed
down.
Rotate [VALUE/MEMORY] knob to change pitch value (change
detune depth in Detune Mode), the setting range is semitones to
semitones ( ~ in Detune Mode).
Memory
01
Using Memory
Super Bender has 10 memories for storing all parameters. Press
[VALUE/MEMORY] button to switch to Memory state, the memory
number ( ~ ) will appear on the middle display, rotate
[VALUE/MEMORY] knob to change memory.
When in memory state, press [VALUE/MEMORY] button to exit.
Storing
02
Hold [VALUE/MEMORY] button to store a memory, then the memory’s
number on the middle display will begin to flash, at that time, rotate
[VALUE/MEMORY] knob to change patch number, when you got the
expectant position, press [VALUE/MEMORY] button again to confirm
the memory storing, the memory’s number on the display will stop
flashing.
The responsivity of the pedal on Super Bender can be reset as necessary.
If the effect change seems insufficient when pushing the pedal down, or if
the tone changes excessively even when the pedal is only lightly pushed,
or if the factual pitch range is not the same as the setting value, adjust the
pedal as follows:
a. Hold down [TRUE BYPASS] footswitch while power on, the indication
" " will appear on the LED display, and then release the [TRUE
BYPASS] footswitch.
b. Fully raise the pedal then push the pedal fully down and release it.
c. Press [VALUE/MEMORY] button, the indication " " will appear
on the LED display, the Pedal Reset adjustment is complete, and Super
Bender will return to the normal using status. If the indication " " is
shown, repeat the procedure from step b.
Factory Reset
Factory Reset function will initialize all setting of Super Bender. All the
memories will be erased and overwritten by the presets.
To do the factory reset, conform to the following instructions:
Hold down the [MODE] and [VALUE/MEMORY] button simultaneously
while power on, “ ” will appear on the display and last flashing.
At that time, press [VALUE/MEMORY] button to confirm, “ ” will
be flashing in a faster speed for 2 seconds, then turn to display “ ”
at a steady status for 3 second, then back to the normal state, the factory
reset operation have been done.
Note: If you want to quit Factory Reset halfway, hold [MODE] buon for 2
seconds, then the Factory Reset will be canceled.
No. of Effect Types:
Preset Patch Memory:
Guitar Input:
Input impedance:
Output:
Output impedance:
Power requirements:
Dimensions:
Weight:
Accessories:
3 (Harmony, Pitch Shift, Detune)
10 Memories
1/4" monaural jack
1 M ohms
1/4" monaural jack
100 ohms
AC adapter 9V DC, 300 mA (center minus plug)
210 mm (D) x 161 mm (W) x 63 mm (H)
1360 g
Owner’s Manual, AC adapter(DC 9V)
Troubleshooting
Can not power on
Check power connection.
------ Make sure the power is connected correctly.
Check the adapter.
------ Make sure the adapter is the one supplied with the unit.
No sound or low volume
Check connection of cables.
------ Make sure all the cables are connected firmly.
Check the volume of guitar and amplifier.
------ Make sure each equipment’s volume is set to an appropriate level.
High noise
Check the adapter.
------ Make sure the adapter is the one supplied with the unit.
Check the cables.
------ Make sure the cables are connected firmly and have no quality
problem.
01
Basic Connection
02
Connecting OverDrive or Distortion Effects
If you are using an OverDrive/Distortion pedal, have the device connected
in front of Super Bender.
OverDrive
Distortion
MOOER AUDIO CO.,LTD
www.mooeraudio.com
 Loading...