

Page 1

V2
Page 2

CONTENTS
PRECAUTIONS
INTRODUCTION
MAIN FEATURES
PEDAL LAYOUT
INTERNAL SIGNAL CHAIN
CONTROLS
Channel controls
Master Controls
Footswitches / Channel selection / Saving Presets
CHANNEL SELE CTION
BANK SELE CTION
BOOST
NOISE GATES
FX LOOP
MODE A (ser ial)
MODE B (A/B )
TONE CAPTURE
TONE CAPTURE operation
CHANGING PREAMP MODELS
PREA MP MODELS
MIDI
CAB SIM
....................................................................
..............................................................
............................................................................
....................................................................
...............................................................
.........................................................
.......................................................
......................................................
..........................................
...........................................................
......................................................
......................................................
.............................................
.................................................
..........................................................
....................................................
......................................................
......................................................
..................................
...........................................
03-04
05-09
...................
12-14
15-17
16-17
..............................
18-20
19-20
22-24
01
02
02
05
06
07
08
08
09
10
11
13
14
21
CAB MODEL
MIC MODEL
MOBILE APP
FIRMWARE UPDATE
SPECIFICATIONS
...............................................................
................................................................
.............................................................
................................................
.....................................................
23
24
25
26
27
Page 3
PRECAUTIONS
PLEASE READ CAREFULLY BEFORE PROCEEDING
Power Supply
Please con nect the design ated AC adapter to an AC ou tlet of the correct voltage.
Please be sure to use only an AC adapter which supplies 12V DC1 A, ,
center neg ative. Unplug the AC power adapter when not in use or during electrical
storms.
Connections
Always turn off the power o f this and all other equipment before connecting or
disconne cting, this wil l help prevent malfunction and / or damage to other devices.
Also make sure to disconnect all connection cables and the power co rd before
moving this unit.
Cleaning
Clean only with a soft, dry cloth. If necessary, slightly moisten the cloth.
Do not use abrasive cleanser, cleaning alcohol, paint thinners, wax, solvents, cleaning
fluids, or chemical-impregnated wiping cloths.
Interference with other electrical devices
Radios and televisions placed nearby may experience reception interference.
Operate this unit at a suitable distance from radios and televisions.
Location
To avoid deformation, discoloration, or other serious damage, do not expose this unit to
the following conditions:
Direct sunlight
Magnetic fields
Excessive dusty or dirty location
Strong vibrations or shocks
Heat sources
Extreme temperature or humidity
High humidity or moisture
FCC certification
This device complies with Part 15 of the FCC Rules. Operation is subject to the following
two conditions:
that may cause undesired operation.
1
Page 4

INTRODUCTION
PREAMP LIV E has been design ed from the ground up to be the ultimate digital
preamp modeller for use in a live situation. Ever y control feature has been carefully
thought ou t to provide the best experience for live performan ce.
Based on our popular range of MICRO PREAMPS, PREAMP LIVE lets you carry 12
independent preamp channels of your choice everywhere you go for a whole array of
different amp tones right at your feet.
Added to the 12 preamp s is a dual position booster, a fully programmable effects lo op,
full chann el switching control, MIDI IN and OUT, dedicated headphone connection,
multiple o utputs with opt ional cab simulation and IR loading capabilities.
If that wasn’t enoug h, you can also use MOOER’s TONE CAPTURE to capture your
own amplifiers a nd even make some experiments to create brand new amplifiers to
find that elu sive tone you’ve been c hasing.
MAIN FEATURES
Contains 1 2 independent preamp channels with easy and familiar switching
controls
Pre and Post BO OSTER for each cha nnel
Easily acc essible global controls for fast setup in different live situations
Optional i ndependent sp eaker cab sim for each output and IR loading via the
software
Fully programmable effects loop with serial and A/B modes. For use with
external effects or comb ining with your head/combo’s own preamp
TONE CAPTURE for sampling you r rea l amplifiers tonal characteristics and
creating new digit al preamp models
Dedicate d headphone out put for using as a stand-alone practice unit
Fully ma ppable MIDI IN and MIDI OUT for integration with other equipment
USB and Blue tooth for connecting to PC, MAC and MOBILE APP for
deep editi ng
2
Page 5
PEDAL LAYOUT
01 02 03 04 05 06
FRONT PANEL
07
08
INPU T OUTP UT
12
RETU RN
SEND
13 14 15 16 17 18 19
11
BACK PANEL
LIFT
GND
XLROU T
MIDII N
OUT
MIDIO UT
PHON ES
DCIN
USB
12V1A
20 21 22
10
09
3
Page 6

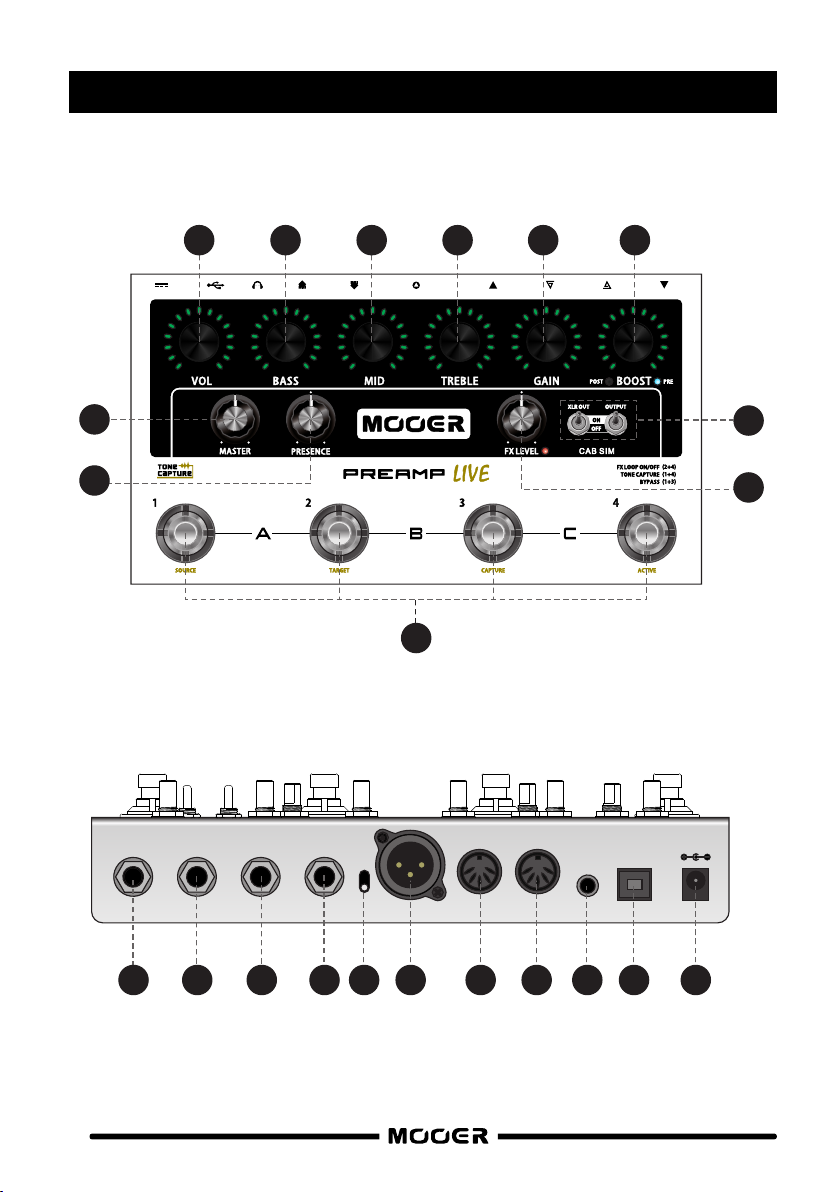
PEDAL LAYOUT
VOL
01
Adjusts the preamp channel volume
BASS
02
Adjusts the preamp channel low frequencies
MID
03
Adjusts the preamp channel middle frequencies
TREBLE
04
Adjusts the preamp channel high frequencies
GAIN
05
Adjusts the preamp channel gain
BOOST
06
Rotate to adjust the boost level for the preamp channel
Press to change the boost to pre (before the preamp input) or post (after the preamp volume)
Press and hold to access pre and post noise gates. (LED's will turn yellow)
MASTER
07
Adjusts the master output volume of PREAMP LIVE
PRESENCE
08
Adjusts the master presence (brightness) of PREAMP LIVE
FX LEVEL
09
Adjusts the master output level of the effects send
CAB SIM
10
Toggles speaker cabinet simulation on/off. Each output has an independent toggle switch for activating speaker cabinet
simulation. Turn CAB SIM on if this output is being sent direct (DI) to a full frequency monitor, PA system or audio interface.
FOOTSWITCH 1-4
11
See the section of this manual for more info… “Footswitches / Channel selection / Saving Presets”
INPUT
12
Connect your instrument using a standard ¼” jack cable
SEND
13
Connect to your external effects input
RETURN
14
Connect to your external effects output
OUTPUT
15
Connect to a power amp or direct to a PA system or audio interface
GROUND LIFT
16
Use to eliminate ground hum when using XLR OUT
XLR OUT
17
Connect to a power amp or direct to a PA system or audio interface
MIDI IN
18
Connect to an external device’s MIDI OUT to remotely control the PREAMP LIVE
MIDI OUT
19
Connect to an external devices MIDI IN to control it using PREAMP LIVE
PHONES
20
Connect directly to your headphones
USB
21
Connect to a computer to change preamp models, programme MIDI settings, edit channel settings using the proprietary
editing software and update PREAMP LIVE’s firmware
DC IN
22
Con nect to p ower supply 12 V DC 1A
4
Page 7

INTERNAL SIGNAL CHAIN
FX LOOP
MOOE B
A/B
FX LOOP
MOOE A
Seri al
CONTROLS
PREAMP LIVE has been designed primarily with live performance in mind.
The controls have been laid out to feel intuitive, familiar, easy to navigate and
adjust on the fly.
Channelcontrols
OUT
Master controls
Footswitches
For sake of this manual I’ve separated the controls into 3 distinct groups.
Let’s have a look at each group seperately.
5
Page 8
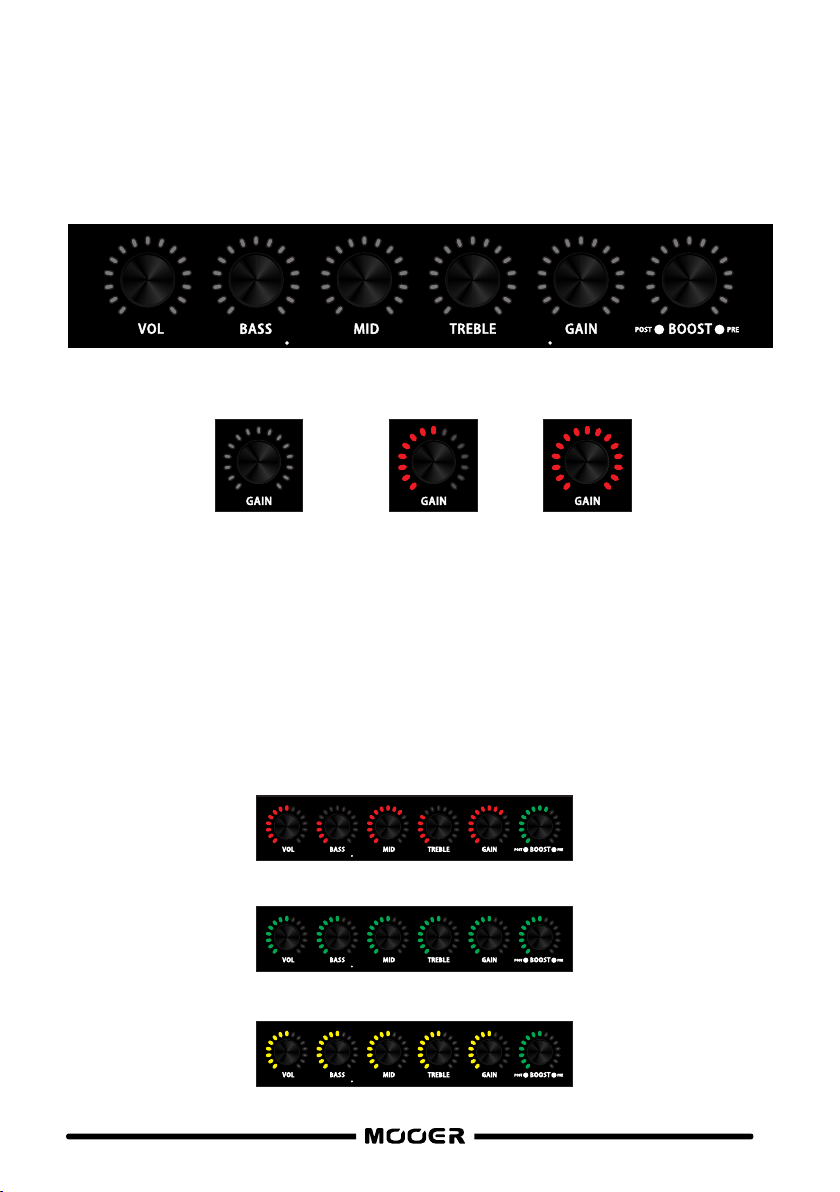
Channel controls
All of these knobs cont rol parameter settings th at are specific to each Preamp chan nel .
The LED’s surroun ding these controls show the current value of each parameter
(See “PEDAL LAYOUT” section of this manual).
The LED ’s surro und ing the cont rol knobs, disp lay the curr ent settings
0% 50% 100%
Simply rota te th e Knob for the parame ter s etting you wish to ad jus t
(See “BOOST” section of t his m anu al for more o n the B OOST).
If yo u are happy with your tone and you want to keep it, then remember to save your changes.
Press a nd hold the fo ots witch for yo ur current ly se lected cha nnel for abo ut 1 se cond.
The sur rounding L ED wi ll flash to con firm saving .
The LED c olour display s which bank i s currently sel ected
BANK A = RED
BANK B = GR EEN
BANK C = YELLO W
6
Page 9

Master Controls
All of the master controls are global settings which are independent from the PREAMP channels
and remain fixed during operation unless adjusted. This provides an easy way to incorporate
PREAMP LIVE into various different setups without having to adjust the channel settings
you’ve saved.
FX LOOP
MOOE A
Seri al
MASTER-
PRESENCE-
FX LOOP
MOOE B
A/B
Adj ust s the overa ll output volume of PREA MP LI VE
Adjusts the overall brightness of PREAMP LIVE.
This is great for compensating for the difference between dark and
bright power amps when using PREAMP LIVE in different venues.
FX LEVEL-
Setup the send level of the effects loop and leave it in place.
This allows easy integration of external effects units or even external
preamps with the programmable effects loop.
More on that in the FX LOOP section of this manual…..
CAB SIM-
Independently tog gle s pea ker cabinet si mul ati on on/off for the differen t
outputs of PREAM P LIV E.
This makes connecting one output to your on-stage backline (no cab sim)
and one output direct to the PA (with cab sim) ver y easy.
Each prea mp channel can hav e it’s own cab sim a ssign ed from a list withi n the
offici al software. You can als o import your own IR fi les to replace som e of the
default c ab sims.
7
Page 10

Footswitches / Channel selection / Saving Presets
There ar e 12 channels in total inside PREAMP LIVE. These are organised in to 3 ba nks with 4
channels on each. So you could conside r eac h ban k almost like a differ ent 4 channel head and
each foo tswitch of the PREA MP LI VE as a d ifferent channel within that he ad.
BANK A
1 2 3 4
G
GA
AS ST
AT
UK G
S S
OL
T
AT
IO
IO
N
N
D
CL
S
D A
UK G
O
L
D B
BANK B
1 2 3 4
Blue
U
U
S CLAS
K
no
CL
G
OLD
S
IC O
D
BANK C
1 2 3 4
BR
O
WN
DS
Ca
Ca
TW
l
li M
i
M
k
k
3 C
S
OU
N
D 3
DS
3
DS
L
O STO
TWO
STONE D
N
E C
L
The channel selecti on lo gic of PREAMP LIVE is based on the same contro l methods you might
find on a tra dit ion al 4 channel tube amplifier.
CHANNE L SELECTION
Press a footswitch to select a chan nel
S
FOOTSWITCH 1 = Channel 1 FOOTSWITCH 2 = Channel 2 FOOTSWITCH 3 = Channel 3 FOOTSWITCH 4 = Channel 4
The LED s urrounding th e footswit ch tells us which c hannel we ar e on.
8
Page 11

BANK SELECTION
To sel ect a BANK press the 2 footsw itches marked at eithe r side of the BAN K you wish to sel ect.
The LED’s surrounding the CHANNEL CONTROLS will change colour to indi cate which bank is
sel ected
BANK A = FOO TSWITCH 1 + 2
BANK B = FOOTSWITC H 2 + 3
BANK C = FOOTSWITC H 3 + 4
The col our of the CHA NNE L CONTRO L LED’s will in dic ate which BA NK is curren tly s elected.
After s electing a d iffere nt bank the PR EAMP LIV E will wait fo r you to selec t a cha nnel withi n
that ba nk before ch ang ing the soun d.
RED
GREEN
YELLOW
Saving
All Set tings are sa ved p er channel . Thi s includes a ll of t he Channel c ontrols, B oos t settings
+ statu s, Noise Gat e set tings and FX L OOP on/off sta tus.
Selec t a Preamp Cha nne l
Dial in y our tone
Press a nd hold the fo ots witch for yo ur current ly se lected cha nnel for aro und 1 s econd.
The sur rounding L ED wi ll flash to con firm saving
Duplic ate channel
You can copy your current channel to any other channel position withi n Preamp Live.
WARNING th is will overwrite all channel settin gs, Bo ost settings + status , Noise Gate
settings, FX LOOP status and Preamp Model of the target ch annel. The previous Pream p
model will not be recoverable wi thout using the suppo rting software.
Selec t the channe l you w ish to copy an d duplicat e
Press a nd hold the fo ots witch of the t arget chan nel y ou wish to ove rwrite for 3 s eco nds
The sur rounding L ED wi ll flash to con firm overwr iti ng
9
Page 12

BOOST
A/B
FX LOOP
MOOE B
PREAMP LIVE is ful ly eq uip ped with 2 different boosters. A PRE BOOST a nd a POST BOOST.
You can make and save independen t boo st settings for each preamp channel. H ere’s where
they are in the signal chain.
FX LOOP
MOOE B
A/B
FX LOOP
MOOE A
Seri al
Boost can be set to PRE or PO ST by pressing the BOOST control knob.
PRE BOOST comes before the PREAMP in the signal chain a nd wi ll ad d more saturation by
pushing the fron t end of the preamp and boosting the volume, just like a clean overdrive p eda l
wou ld. The PRE BOOST al so ad ds a bit of mid hump to you r gui tar s ignal to fatten things u p.
POST BOOST Comes after the PREAMP in the signal chain so it simply adds more volume when
engaged. The POST BOOST is completely transparent and has a boost range of 0dB - 6dB.
Press the footswitch of your currently se lected PREAMP CHANNEL to toggle the boost ON/OFF.
=O FFGRE EN = ONRED
10
Page 13

NOISE GATES
Seria l
FX LOOP
MOOE A
POST
N. GATE
Seria l
FX LOOP
MOOE A
POST
N. GATE
Preamp l ive has 2 adjustable noise gates per ch ann el. PRE and POST.
Both can be used simult ane ous ly if needed.
POST
FX LOOP
MOOE B
A/B
FX LOOP
MOOE A
Seri al
Press and hol d the B OOST control t o access the noise gates. The surrou ndi ng LED’s will turn
yel low to indicate the noise gate level.
Press th e BOO ST contro l to to ggl e between PRE or POST noise gate
PRE NOI SE GATE
This noise gate comes after the input of PR EAMP live but befo re the PREAMP model
within the signal chain. Use this to eliminate noi se fro m external devices that are
connected to the input
POST NOISE GAT E
This noise gate comes after the preamp model in the signal chain. Use this to eliminate
unwanted noise caused by high gain preamp settings.
N.GATE
Effe cts LOO P
MOD E A (SERI AL)
Effe cts LOO P
MOD E B (A/B)
When the effec ts lo op is s et to MODE A (SERIAL) the POST NG will be befo re the effects loop.
When the effec ts lo op is s et to MODE B (A/B) the POST NG will be after the effects loop.
After setting your desired noise ga te levels, press and hold the BOOST control to exit the noise
gate setup. The noise gate s etu p wil l automatically exit a fter 5 seconds.
Rem emb er to s ave your channel if you wish to keep the se se tti ngs
Please note - B oth n ois e gates will be complete ly di sabled on each channel by default
11
Page 14

FX LOOP
FX LOOP
MOOE B
A/B
FX LOOP
MOOE A
Seri al
Preamp l ive has an advan ced , programmable eff ects loop which has 2 different mod es.
Simultaneously press and release foo tswitches 2 + 4 to toggle th e effects loop on/off
Press a nd hold foot swi tches 2 + 4 for se veral seco nds t o change the F X LOOP mode.
The LED beside the FX LEV EL co ntrol will illuminate to show when the FX LOOP is active and
it’s colour depic ts wh ich F X LOOP MODE is selected.
MOD E A ( serial) = GRE EN MOD E B (A/ B) = RED
The FX LEVEL contr ol will adjust the send level +/- 5dB.
Please n ote - The on/off status of the effects loop c an be saved per pr eamp chan nel b ut the
FX LOOP M ODE is a global seng.
12
Page 15

MODE A (se rial)
FX LOOP
MOOE A
Seri al
MODE A is a traditional serial FX LOOP that comes after the PREAMP section of PREAMP LIVE.
This is ideal for using external effects units that you want to switch in and out with different preamp
channels.
Pow er AMP
XLR O UT
MIXIN G CONSOLE
OUP UT
Ret urn
Sen d
Inp ut
When the effec ts lo op is s et to MODE A (SERIAL) the POST NG will be befo re the effects loop.
13
Page 16

MODE B (A/ B)
FX LOOP
MOOE B
A/B
MODE B is a special FX LOOP t hat will bypass the d igi tal p reamp section of PREAMP LIVE and
replace it wi th th e ana log preamp section of your amplifier. This allows you t o con nect PREAMP
LIVE up to an amplifier he ad or c omb o with 4 cables and use the preamp sec tio n of th e head/
combo instead of the di git al PR EAMP when the FX LOOP is active.
For example, I can use a digital preamp on channels 1, 2 and 4 and use the preamp
from my amplifier head or combo on channel 3 by activating the effects loop
(in MODE B) on channel 3.
Inp ut
Sen d
Ret urn
Out put
Ret urn
Sen d
When the effec ts lo op is s et to MODE B (A/B) the POST NG will be after the effects loop.
14
Page 17

TONE CAPTURE
FX LOOP
MOOE B
A/B
FX LOOP
MOOE A
Seri al
PREAMP LIVE has a ver y interesting special feature called TONE CAP TURE. TO NE CAPTURE
allows you to cre ate an advanced EQ stage based on feedback sampling o f exte rnal equipme nt.
The primary application for t his function is to try an d replicate the sound of your favourite
amplifiers (or preamp pedal) by combini ng on e of th e MOOER PREAMP models with a
TONE CAPTURE E Q you have create d by sampling yo ur am p.
Every c hannel of PR EAM P LIV E is capable o f storing it’s own ton e capture EQ w hic h can
then be e xported an d sha red with fri ends using t he of fici al softwar e.
TONE CAPTURE Connections
Inpu t
Send
Retu rn
Outp ut
Retu rn
Send
The ampl ifier must h ave an effec ts loop or “p rea mp out” to work. It must have a spea ker lo ad
con nected at all m es during the capture pro cess. DO NO T con nect the speaker out put of your
amplifi er to P REA MP L IVE.
15
Page 18

TONE CAPTURE operatio n
1. Select a P REA MP CH ANNEL that you thin k mos t clo sely matches that of you r target
amplifier in tonal cha racteristics. Tweak the settings to further match the sound you want.
2. Simult ane ous ly press footswitches 1 + 4 on PREAMP LIVE to ent er TONE CAPTURE mode.
If the ch annel does n ot ha ve a tone capt ure alread y sav ed in memory t hen footsw itc h
3 will be i lluminat ed ye llow and flas hing on/off.
If the ch annel alre ady h as a tone capt ure stored i n mem ory then foo tswitch 3 wi ll be
yello w and in a solid s tat us.
To clear a to ne capture f rom c hannel mem ory, press and hold foo tswitch 3 un til it starts
flashi ng.
3. Pres s footswit ch 1 (S OURCE) to li sten to your PREA MP LI VE channel
4. Pres s footswit ch 2 (TARGE T) to listen t o the e xternal am plifier
16
Page 19

5. Pre ss footsw itc h 3 (CAPTURE) and play your guit ar wh ilst the CHANNEL CONTROL LED’s
countdown . Tr y and p lay all over the fretb oard and reach as big a note rang e as po ssible to
get the best capture results.
When the capture process has finished, footswitch 3 LED’s will stop flashing and remain solid.
6. Pre ss footsw itc h 3 to listen to the PREAMP LIVE channel combi ned w ith your newly
created TONE CAPTURE. The tone capture you just crea ted w ill b e automatically stored
to channel memory should you wi sh to use it.
You ca n now toggle b etween SOURCE , TARG ET and CAPTU RE to c ompare the d iff erence
in tone u sing foots wit ches 1, 2 and 3.
7. Pr ess foots witch 4 (ACTIVE) to activa te the tone capture on the preamp ch annel.
You can us e this footswitch to toggle the tone capture on/off from the tone ca pture mod e
at any time . The tone capture on/off state is a sa veable pa rameter for every preamp
cha nnel.
8. Simult ane ous ly press footswitches 1 + 4 to exit tone capture mode. You can now t weak
the EQ and gain parameters further. Don’t fo rget to save your prea mp channel before
changing if you wish to keep th e set tin gs.
17
Page 20

CHANGING PREAMP MODELS
Preamp L ive contains 12 PREAMP channel s in to tal . By de fault the prea mp ch annels that ship
with the unit are as follows….
BANK A
1 2 3 4
G
GA
U
AS S
T
ATI
O
K
S ST
GO
AT
ION
N
C
D
L
S
LD
U
K
GO
LD
A
B
BANK B
1 2 3 4
B
U
S CLAS
UK
G
O
SI
C
O
D
lueno
CL
L
D DS
BROWN
SOU
1 2 3 4
Ca
Cal
li
M
k
3
CL
ND
3 DS
BANK C
i
M
k3
D
S
T
WO
S
T
ON
To chan ge the PREAM P mod els and/or o rganise th eir c hannel all ocation, d own load
the sof tware from and con nect PREAM P LIV E to your comp uter via www.m ooeraudi o.c om
USB or to y our mobile d evi ce via BLUET OOTH.
1 2
1 2
1 2
3
4
3
4
3
4
SERIAL
2. Ope n the PRE AMP dro p down me nu
5. Blu eno UG 30
A
B
C
1. Sel ect the c hanne l you wish to edit
E CL
T
W
O
S
T
ONE
DS
1. Gas S tatio n Clean
2. Gas S tatio n Dist
3. UK Go ld Clea n
4. UK Go ld Dist
5. Blu eno UG 30
6. US Cl assic O D
7. US Go ld 100 Di st
8. Bro wn Soun d 3 CH3
9. Cal i-MK 3 De ep Clea n
10. Ca li-MK 3 R hythm
11. Two St one Cor al Clea n
12. Two S tone Co ral OD
3. Sel ect the n ew PREA MP model 4. Pre ss the SAV E button
You can organise your P REAMP channels howeve r you like and even have mu ltiples of
the same PREAMP model o n diff erent channels so you can set them up differently.
18
Page 21

PREAM P MODELS
PREAMP LIVE has 50 different preamp models available within the
software.
Preamp Model
01
Gas Station C lean
02
Gas Station D ist
03
UK Gold Clean
04
UK Gold Dist
05
Blueno UG 30
06
US Classic OD
US Gold 100 Dis t
07
08
Brown Sound 3 C h3
09
Cali-MK 3 Dee p Clean
10
Cali-MK 3 Rhy thm
Two Stone Cor al Clean
11
Two Stone Cor al OD
12
Day Tripper C lean
13
Day Tripper O D
14
Black Night C lean
15
Black Night D ist
16
US Classic Cl ean
17
VHS Clean
18
VHS Rhythm
19
VHS Lead
20
Doctor3 B
21
Doctor3 A
22
Original SourceNo.
Diezel Hagen
Marshall JCM900
Bruno Underground 30
Fender Blues Deluxe
Friedman Be100
EVH 5150
Mesa Boogie Mark III
Two Rock Coral
Vox AC30
ENGL E650 Blackmore
Fender Blues Deluxe
Diezel Vh4
DR.Z Maz38
®
®
®
®
®
®
®
®
®
®
®
®
®
Pl ease No te : All m anu fa cture rs and br an d names m entio ne d above a re not
af filia te d with MO OER or PR EAM P LIVE
19
Page 22

PREAM P MODELS
23
24
25
26
27
28
29
30
31
32
33
34
35
36
37
38
39
40
41
42
43
44
45
46
47
48
49
50
51~62
Preamp Model
Eagle FB Ch2
Brown Sound 3 Ch2
Brown Sound 3 Ch1
US Gold 100 Clean
US Gold 50 A
US Gold 50 B
Power-Zone Cle an
Power-Zone Dis t
Cali JP A
Cali JP B
Cali JP C
Cali LS Ch1
Cali LS Ch2
Cali-MK 3 Clean
Cali-MK 3 Lead
Petey Satch Clea n
Petey Satch Crun ch
Petey Satch Ultr a
Mr Smith Clean
Mr Smith Dist
Randy Devil Clea n
Randy Devil Lead
Regal Tone Lead
Regal Tone Rhyth m
Regal Tone Tweed
Two Stone Cardef f
Shittcow Clean
Shittcow Dist
EMPTY
Original SourceNo.
®
Engl Fireball 100
®
EVH 5150
Friedman Be100
Friedman Smallbox 50
Koch Powertone
Mesa Boogie JP-2C
Mesa Boogie Lonest ar
Mesa Boogie Mark III
Pea vey J SX
Pea vey J SX Cr unc h
Pea vey J SX Ul tra
PRS ARCHON
Randall Satan
Tone King Fa lco n Lead
Tone King Fa lco n Rhythm
Tone King Fa lco n Twee d
Two Ro ck Ca rdi ff
VHT PIT TBU LL
®
®
®
®
®
®
®
®
®
®
®
®
®
®
®
Pl ease No te : All m anu fa cture rs and br an d names m entio ne d above a re not
af filia te d with MO OER or PR EAM P LIVE
20
Page 23

MIDI
1
0
122
1
Preamp L IVE h as a very si mple and straight-fo rward MIDI functiona lit y. It can send an d receive
MIDI PC signals to chan ge Ch ann els/Presets. The PC signals are fully mappa ble w ith in the
PREAMP LIVE soft ware.
MIDI IN
01
02
1. Select t he MI DI ch annel that PREAMP LIVE receives PC signal changes on
2. Choose a n inc omi ng PC signal
3. Select t he Ch ann el that PREAMP LIVE will swit ch to w hen receiving the PC signal
03
MIDI OUT
OUT
02
1. Select t he MI DI ch annel that PREAMP LIVE transmi ts PC s ign al changes on
2. Select a p reamp channel on PREAMP LIVE
3. Choose t he PC s ign al that PREAMP LIVE will transmi t whe n the c hannel is selected
on the device.
MIDI OUT/T HRU … Sel ecting THRU on this button will cha nge t he MI DI OUT por t int o a
MIDI THRU p ort. When set to THRU, PREAMP LIVE will not transmit any MIDI data whe n
a channel is selected o n the d evice. However it will a llow data coming into the device from
the MIDI IN to be passed th rough to other devi ces c onnected to the MIDI OUT port.
01
03
21
Page 24

CAB SIM
Each pre amp c han nel within PREAMP LIVE can have it’s own ca b sim a ssigned from a list
within the official sof tware. Optional power amp modelling is also available.
LI VE
OFF
V1. 0.0
2.V.C hampe r 1x8
18
A
B
C
17
17
122
1 2
1 2
1 2
OUT
SERIAL
3
4
3
4
3
4
1
1
0
ST UD IO
You can import your own I R file s to replace some of the default cab sims in the CA B MOD EL
drop down menu.
26.B .SVT 1x 15
2.V.C hampe r 1x8
27.B .SVT.S 1x 15
28.B .SVT 4x 10
OFF
29.B .SVT.S 4x 10
30.B .SVT 8x 10
31. EM PTY
32. EM PTY
33. EM PTY
2.V.C hampe r 1x8
34. EM PTY
35. EM PTY
36. EM PTY
37. EM PTY
_
+
_
+
_
+
_
+
_
+
_
+
_
+
22
Page 25

SPEAKER CAB MODELS
PREAMP LIVE has 30 different native CAB models available within
the software.
MODEL BASED ON
Champer 1x8
V.Ch amper 1 x8
Prince.B 1x10
Prince.S 1x10
65DLX 1x12
57DLX 1x12
Kitty 1x12
AC15 1x12
Twinverb.S 2x12
Twinverb.B 2x12
Matchbox 2x12
AC30.B 2x12
AC30.S 2x12
Superverb 4x10
59Baseman 4x10
1960AG 4x12
1960BT 4x12
1960BV 4x12
UK.Citrus 4x12
Solo.L 4x1 2
Solo.S 4x12
Rect.S 4x12
Rect.T 4x12
German.V 4x12
German.G 4x12
B.svt 1x15
B.svt.S 1x15
B.svt 4x10
B.svt.S 4x10
B.svt 8x10
Fender Champ Silver face
Fender Vibro C hamp Silverface
Fender Princeton Tweed
Fender 65'princeton reve rb
Fender 65 deluxe reve rb
Fender 57 tweed deluxe
Bad cat
Vox AC15C1
Fender 70'twin reve rb silv erfac e
Fender 67'twin reve rb blac kface
Matchless chiefta in
Vox V212H Alnico blue
Vox AC30 Jimi212 Silver bell
Fender 64'super rev erb
Fender 59'bassman Tweed
Marshall 1960A Green back
Marshall 1960B G12T- 75
Marshall 1960B V30
Orange ppc412
Soldano 4x12 Lucky
Soldano 4x12 Slant
Mesa boogie recto sta ndard
Mesa boogie recto tra ditio nal
Diezel Rearloaded V30
Diezel Rearloaded G12-65 Herit age
Ampeg svt 15E
Ampeg svt 15E (Subkic k)
Ampeg svt 410HE
Ampeg svt 410HE(Sub kick)
Ampeg svt 810E
Pl ease No te : All m anu fa cture rs and br an d names m entio ne d above a re not
af filia te d with MO OER or PR EAM P LIVE
23
Page 26

MICRO PHONE MODELS
PREAMP LIVE has 11 different microphone models available within
the software.
MODEL BASED ON
Shure SM 57 Dynamic
SM58
MD421
MD441
U47
U87
RodeNT1
MXL2001P
MXL2003
C3000
C4000B
Pl ease No te : All m anu fa cture rs and br an d names m entio ne d above a re not
af filia te d with MO OER or PR EAM P LIVE
Shure SM 58 Dynamic
Sennheiser MD 421 Dynamic
Sennheiser MD 441U Dynamic
Neumann U47
Neumann U87
Rode NT-1
Marshall MXL 2001P
Marshall MXL 2003
AKG C3000
AKG C4000B
24
Page 27

MOBILE APP
PREAMP LIV E is equipped wit h an integrated wireless module for connect ing
with your mobile devices via the official MOOER PREAMP LIVE mobile app.
The mobile a pp allows you to edi t all of your preamp channel parameter settings,
programme midi and change the preamp models on the go.
To connect to t he mobile app
Power on PR EAMP LIVE and wa it for it to finish boo ting up
Put PREAM P LIVE into bypa ss mode by simulta neous ly pressing
footswi tches 1+3. Thi s will allow the PRE AMP LIVE to be dis cover able by
the mobil e app.
Open the mo bile app and allow i t to turn o n Bluetooth
Connect t o your PREAMP LI VE using the OPTION > DEVIC E menu within
the app
25
Page 28

FIRMWARE UPDATE
Your PREAMP LIVE may need a firmware update to operate
correctly with the software. If a firmware update is required then boot
PREAMP LIVE into update mode to receive the firmware update from
the computer software.
Ensure PREAMP LIVE is NOT powered on
Connect PREAMP LIVE to a computer via USB
Press and hold footswitches 1 + 2
Connect power to PREAMP LIVE
After PREAMP LIVE has finished booting up, release the footswitches
Open the software to install the latest firmware on your PREAMP LIVE
Windows and MAC software can be downloaded from
www.mooeraudio.com
Mobile apps are available from and GooglePlay Apple AppStore
26
Page 29

SPECIFICATIONS
Pream p Chann els: 12
Input: 1/4'' mono audio jack (impedance 500k)
Outputs: 1 x 1/4'' mono audio jack (impedance100Ω)
1 x XLR balanced out (impedance100Ω)
1 x 3.5mm headphone jack (impedance10Ω)
Effects Loop: Mode 1 Serial ~ Mode 2 A/B
Effects Send: 1/4'' mono audio jack (impedance100Ω)
Effects Retur n: 1/4'' mono audio jack (impedance 500k)
MIDI IN & OUT: 5 pin DIN conne ctor
USB: Type-B Female Connector
Sampling rat e: 88.2KHz
Sampling accuracy : 24bit
Signal to noise ratio : 103dB
IM PULSE RES PO NS E SP EC
Format: .WAV
Sampling rat e: 44.1KHz
Sampling accuracy : 24bit
Max sample length: 23.2ms/1024 Po ints
Power requiremen ts: 9V-12V DC 1A
Dimensions: 230mm x 130mm x 54mm
Weig ht: 1 .18Kg
Acces sorie s: 1 x USB Cable
1 x 12V Power Supply
27
Page 30

MOOER AUDIO CO.,LTD
Shenzhen, China
www.mooeraudio.com
 Loading...