

Page 1
Portable Guitar Effects
Precautions
* PLE ASE R EAD CAREFULLY BEFORE PROCEEDING *
Pow er Suppl y
Please connect the designated AC adapter to an AC outlet of
the c orrect voltage.
Please be sure to use only an AC adapter which supplies 9V
DC, 300 mA, center minus.
Unplug the AC power adapter when not using or during
electrical storms.
Con nections
Always turn off th e pow er of t his a nd al l oth er eq uip men ts
before connecting or disconnecting, this will help prevent
malfunction and / or damage to other devices. Also make
sure to disconnect all connection cables and the power cord
before moving this unit.
Loc ation
To avoid deformation, discoloration, or other serious
damage, do not expose this unit to the following conditions:
Direct sunlight
Hea t sou rces
Mag netic fi elds
Ext rem e tem perature or humidity
Exc ess ive dusty or dirty location
Hig h humidity or moisture
Str ong v ibration or shock
Int erference with other electrical devices
Radios and televisions placed nearby may experience
reception interference. Operate this unit at a suitable
distance from radios and televisions.
Cle aning
Clean only with a soft, dry cloth. If necessary, sli ght ly
moisten the cloth. Do not use abrasive cleanser, cleaning
alcohol, paint thinners, wax, solvents, cleaning fluids, or
chemical-impregnated wiping cloths.
Handling
Do not apply excessive force to the switches or controls.
Do not let paper, metallic, or other objects into this unit.
Take care not to drop the unit, and do not subject it to shock
or excessive Pressure.
Main Features
5 Eff ects Mo dules & 1 5 Eff ects Typ es
16 Pr ese t Pa tch es & 16 Use r Patch es
40 Drum Rh ythms a nd Tuning Fu nct ion
1 /8” Pho nes Jac k & 1/8 ” AU X In Ja ck
DC 9V Ada pter or AA A/L R0 3 bat tery (x 2) powe r
s upply
Power On
Pow er On
Plug the cable of AC Adapter (9V, 300m A, ce nte r min us) i nto
the [DC 9V] Jack, or using batteries (AAA/LR03 x 2), then
use the POWER Switch to turn the device on.
power switch
For i nstalling batteries.
DC IN
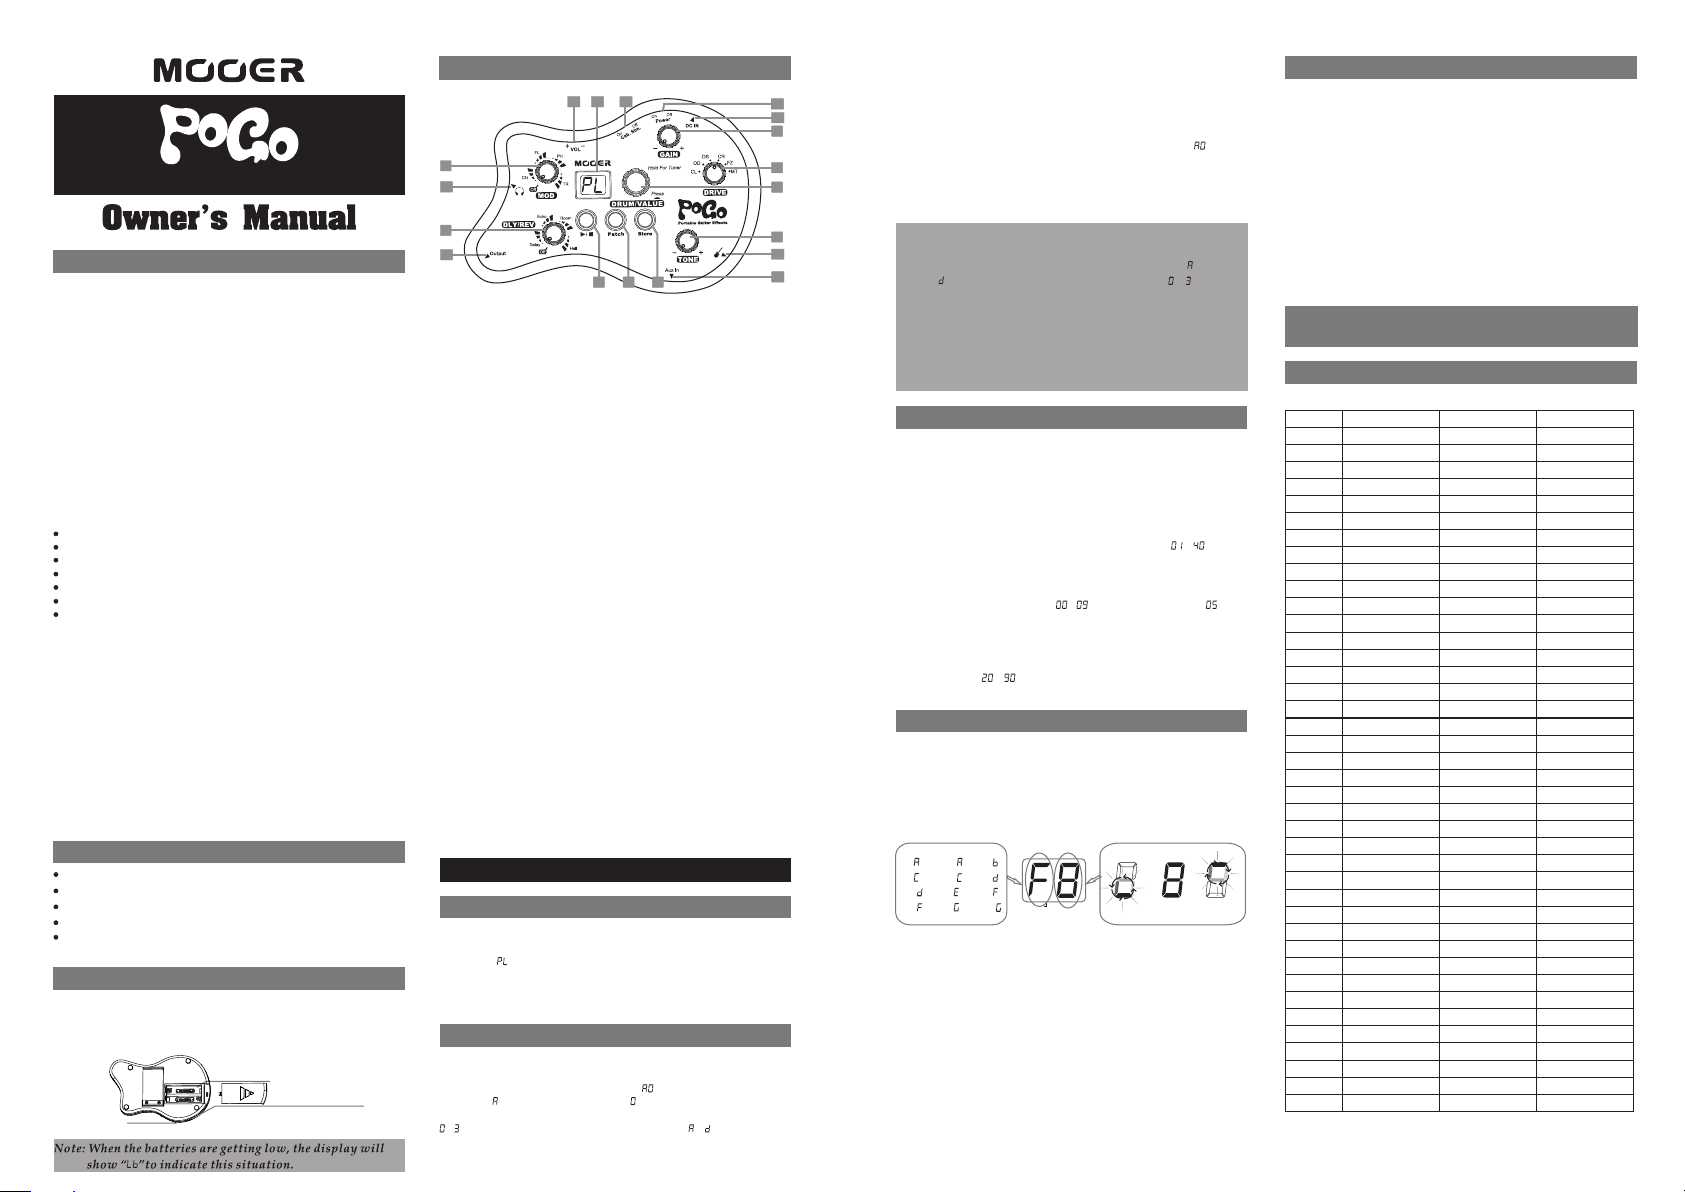
Panel Instruction & Basic Operation
10
12
13
8
17
9
15
3
1
2
1. PL AY/S TOP Bu tto n wit h LED :
Pre ss th is bu tto n to start/stop the drum rhythm. When the
dru m rhy thm is playing, the LED will be lit up.
2. Pa tch Button wi th LE D:
Pre ss th is bu tto n to enter/exit Patch status. When entering
Pat ch st atu s, th e LED will be lit up.
3. St ore B utton:
Pre ss th is bu tto n to store patch, press again to confirm.
4. DR UM/VALU E Kno b wit h But ton :
Pre ss th e button to switch between 3 Drum items and
Pla y/P atc h sta tus. Rotate this knob to select Drum
par ame ters/Patches. Hold the button to enter tuner.
5. DR IVE Swit ch: Select effec ts be twe en Cl ean /Ov erd riv e/
Dis tor tion/Crunch/Fuzz/Metal.
6. GA IN Kn ob: Ad just the gain of the DRIVE eff ect s.
7. TO NE Kn ob: Ad jus t the b rig htn ess o f the s oun d.
8. MO D Kno b: Se lect Modulation eff ect s (be twe en Ch oru s/
Fla nger/Phaser/Tre mol o) an d adj ust m odu lat ion r ate ( tur n
clo ckw ise to increase).
9. DLY /RE V Kno b: Se lec t Del ay/ Rev erb e ffects (between
Dig ita l Delay/Echo Delay/Room Reverb/Hall Reverb) and
adj ust delaytime or reverb level (turn clockwise to
inc rease).
10. Cab.Sim. Switch: Turn on/turn off th e Cab ine t Sim ula tor,
the C ab. Sim . wil l bring more dynamics to your sound
whe n usi ng headphones.
11. POWER Switch: Turn on/turn off the p owe r.
12. VOL Di al: C ont rol t he ou tpu t vol ume .
13. Display: Instruct the operation information of POGO.
14. INPUT Jack: 1/4 mono audio jack, for connecting guitar.
15. OUTP UT Jack: 1/4 mo no audio jack, for connecting
gui tar a mplifier.
16. AUX In J ack : 1/8 s ter eo au dio j ack , for c onn ect ing
ext ern al mu sic players.
17. PHONES Jack: 1/8 st ere o audio jack, for connecting
hea dph ones.
18. DC IN Jack: For power supply, us e a 9-v olt D C reg ula ted
AC ada pter, 300mA (plug polarity is positive on the barrel
and n ega tive in the center).
”
”
”
”
11
18
6
5
4
7
14
16
Detailed Functions
Play
PLAY Mode
Aft er po wer on, POGO will enter PLAY Mo de, L ED sc ree n
displays [ ].
In PL AY mod e, th e effects of guitar sound is according to all
the k nobs and switches on the device, what you see is what
you get.
Patch
Ent er Patch Mode
In PL AY Mod e, pr ess [ Pat ch] b utt on to e nte r Pat ch mo de
(Pa tch button’s LED will be lit up). [ ] will display on the LED
scr een, “ ” is a Patch Bank and “ ” is the patch number, each
bank has 4 patches. POGO has 16 Preset Patches (Bank
~ ) and 1 6 Use r Patches for editing (Bank ~ ).
Selecting Patches
In Pa tch Mode, rotate [DRUM/VALUE ] Kno b clo ckw ise t o
select patches forward. Rotate [DRUM/ VAL UE] K nob
anticlockwise will switch patches in the opposite order.
Storing/C opying Patches
Press [Store] button once, the patch's number (eg. [ ]) will
display on the LED and begin to flash, rotate [DRUM/VAL UE]
to ch ange the patch number, when you got the expectant
position, press [Store] button again to confirm the patch
sto ring, the patch’s num ber o n the d isp lay w ill s top f las hin g.
Not e: To canc el the stor e proce ss, pre ss [Pat ch] or [D RUM
/VALU E] button , well th en the pa tch wil l not be sa ved.
Not e: An edi ted pat ch can be s tored i n a user ba nk (
~ ), it c an not be s tored i n a prese t patch ( ~ ) .
Not e: Stor ing an ex istin g patch i n anoth er loca tion ca n
cre ate a cop y.
Not e: In Pat ch Mode , you can 't adju st the pa ramet ers in
rea l-tim e, adju st any kn ob or swi tch (e xcept P OWER
Swi tch and V OL Dial )wil l not cha nge the c urren t
eff ects.
Drum Rhythm
Start/Stop Drum Rhythm
Press [Play/Stop] button will start the drum rhythm (
Sto p] button’s LED will be lit up). When the rhythm is playing,
press [Play/Stop] button again to stop.
Selecting Drum Rhythm Typ es
Press [DRUM/VAL UE] b utt on to e nte r Dru m sta tus , LED
scr een will show the rhythm type firstly, the n rot ate t he
[DRUM/VALU E] kn ob to s ele ct th e rhy thm t ype ( ~ ) .
Adjusting Drum Rhythm Vol ume
Press [DRUM/VAL UE] b utt on ag ain , LED s cre en wi ll sh ow
the drum rhythm volume, then rotate [DRUM/VALU E] kn ob to
change the rhythm volume ( ~ , the default value is ).
Changing Dr um Rhythm Temp o
Press [DRUM/VAL UE] b utt on tw ice , the n umb er di spl aye d in
LED indicates the tempo of drum rhythm, then rotate [DRUM
/VAL UE] k nob t o cha nge t emp o. Th e ran ge of t he di spl ayi ng
tempo value is ~ , indicate the real tempo 60~270 BPM,
each rhythm has its own default tempo value.
[Pl ay/
Tuner
Ent ering Tun ing M ode
Hold [DRUM/VALU E] bu tto n 2 sec ond s to en ter t uni ng mo de.
Tuni ng
Play one guitar string at a time, and adjust the guitar pitch as
LED’s in str uct ion .
The le ft side s hows th e curre nt pitc h.
#
A -
ACD F -
Qui t Tune r
When in tuning mode, press [DRUM/VALUE ] but ton t o qui t
tuning state. POGO will return to the previous status.
.
#
C -
.
#
E-
.
#
G-
.
BANK PATC H
BDF-
#
#
G -
.
The ri ght sid e indic ates ho w much th e tunin g
is off.
The in dicat ion rol ls fast er, the mo re the pi tch
is off.
Fla t Cor rect Sha rp
Specification
No. o f Eff ect Modu les: 5 Modules
No. o f Eff ect Types : 15 Typ es
Preset Patch Memory: 16 Patches (4 Banks, each bank has
4 patches)
User Patch Memory: 16 Patches (4 Banks, each bank has 4
patches)
Gui tar I npu t: 1/ 4” mo naural jack
Out put :: 1/ 4” mo naural jack
Pho nes : 1/8” stereo jack
Aux I n: 1/ 8” stereo jack
Pow er requirements: AC adapter 9V DC(center minus
plug), or 2 AAA/LR03 batteries
Dim ensions: 128.5mm (W) × 84mm (D) × 45mm (H)
Wei ght : 160 g
Accessories: Owner's Manual
* Disclaimer: Any sp eci fic ation’s update won 't be
amended in this manu al.
Appendix
D
rum R
h
yth
m L
T
y
p
Ha
Bre
D
rum n’ B
Bos
M
M
M
M
M
e
8
Beat1
8Bea
8Bea
8
Beat4
8Be
at
16Beat
16
B
e
at
16Bea
16Bea
16Beat5
3/4
B
eat
/
6
8
Be
P
o
p
Fun
k
r
d Ro
Met
al
Pu
n
k
H
i
p Hop
T
ri
p H
D
ance
a
k B
B
l
u
e
J
a
z
z
Sw
i
n
usion
F
R
ae
egg
La
t
i
n
Co
u
n
t
s
anova
R
u
m
b
Tang
Polka
Wo
r
l
e
t
r
o 2
e
t
r
o 3/
etr
o 4
e
t
r
o 5
et
r
o 6/
M
t
e
r
t
2
t
3
5
1
2
t
3
t
4
a
t
c
o
p
e
a
s
g
r
y
a
o
d
/
/
/
o
No.
0
02
03
0
05
06
07
08
09
1
1
12
1
1
1
1
17
18
1
2
2
2
2
2
2
2
2
2
29
30
31
32
33
34
3
3
3
3
39
4
1
4
0
1
3
4
5
6
9
0
1
2
3
4
5
6
7
8
5
6
7
8
0
Tim
k
at
ss
4
4
4
4
8
e Sig
N
4/4
4
4/4
4/4
4/
4
4/
4/4
4
4/4
3/4
6
4/4
4/
4
4/4
4/4
4
4/
4/4
4/
4
4/4
4/
4/4
4/
4/4
4/
4/
4
4/
4
4
4
2/4
3/4
4/4
5/
6
on
nat ur
/
4
4
/
4
4
/
4
/
8
4
/
4
/
4
4
4
/
4
4
4
4
4
/
4
4
/
4
/
4
/
4
4
/
8
ist
e
D
efa
u
l
t Te
m
po
1
2
0 B
PM
M
120 BP
1
2
0 BPM
1
2
0 B
P
M
0 BPM
12
M
120 BP
0 BP
12
M
M
120 BP
20 BPM
1
120 BPM
1
2
0 B
P
M
0 BP
12
M
1
2
0 B
PM
10
8 B
PM
M
135 BP
12
0 B
P
M
1
6
2 BPM
96 BPM
M
84 BP
1
2
0 B
PM
15
6 B
P
M
M
180 BP
1
0
8 B
P
M
0 B
12
P
M
144 BPM
12
0 B
P
M
9
0 B
P
M
35 BP
1
M
1
14 BPM
120 BP
M
5 BP
13
M
120 BPM
20 BPM
1
1
0
8 B
PM
120 BPM
PM
120 B
1
2
0 BPM
M
120 BP
1
2
e
0 BPM
120 B
PM
 Loading...