

Page 1
Po r table Guit ar Ef fec ts
Page 2

⽬录
Precau tio ns
Main Fea tur es
Panel la yout
Operat ion al Guidan ce
Pre set Sel ectio n
Tone S etti ng
Tone S avin g
Qui ck Recal l Button s
Tap Temp o
Rhy thm Set ting
Tune r
AUX I N
Sys tem Set ting
Connec tio ns
Batter ies
Effect s Exp lanatio n
Specif ica tions
Trouble sho oting
Patch Li st
Contents
01
01
02
04
04
05
06
07
07
08
08
09
09
11
12
13
15
15
16
Page 3

Precautions
Pow er Supp ly:
Ple ase con nect th e desig nated AC a dapte r to an AC out let of th e corre ct volt age.
Ple ase be su re to use o nly an AC ad apter w hich su pplie s 9V DC(± 10%), ,
300 mA,ce nter ne gativ e. Unpl ug the AC po wer ada pter wh en not in u se or dur ing
ele ctric al stor ms.
Con necti ons:
Alw ays tur n off the p ower a nd all o ther e quipm ent bef ore con necti ng or
dis conne cting .
Thi s will he lp prev ent mal funct ion and d amage t o any of th e devic es. Mak e sure
to un plug al l conne ction c ables a nd powe r cords b efore m oving t his uni t.
Loc ation :
To avoi d defor matio n, disc olora tion, o r other s eriou s damag e, do not e xpose
thi s unit to t he foll owing c ondit ions:
Dir ect sun ligh t
Mag netic fi elds
Exc essiv ely dust y or di rty loc atio n
Str ong vib ratio n or shoc k
Int erfer ence wi th othe r elect rical d evice s and Cle aning :
Rad ios and t elevi sions p laced n earby m ay expe rienc e recep tion in terfe rence .
Ope rate th is unit a t a suita ble dis tance f rom rad ios and t elevi sions .
Cle an only w ith a sof t, dry cl oth.
FCC c ertif icati on
Thi s devic e compl ies wit h Part 15 o f the FCC R ules. O perat ion is su bject
to th e follo wing tw o condi tions :
Th is devi ce may no t cause h armfu l inter feren ce.
This devic e must acce pt any interfere nce received , includ ing interfer ence
tha t may cau se unde sired o perat ion.
*Pl ease re ad careful ly bef ore p roce edi ng*
Hea t sourc es
Ext reme te mpera ture or h umidi ty
Hig h humid ity or mo istur e
Main Features
99 Fa ctory p reset s and 99 us er pres ets
2 Auto w ah effe cts
10 Ov erdri ve and di stort ion eff ects
7 Amp mo dels
11 Mod ulat ion eff ects
5 Dif fere nt del ays
4 Rev erb typ es
40 Dr ums pat terns a nd 10 met ronom es
Tap tem po func tiona lity
4 Qui ck reca ll pres et slot s
Very s mall co mpact s ize
Lar ge and sm all inp ut and out put jack s
For e asy int egrat ion wit h most au dio
equ ipmen t and com puter s
Touch pa nel oper ation
Can b e opera ted by bat tery or DC
pow er supp ly
01
Page 4
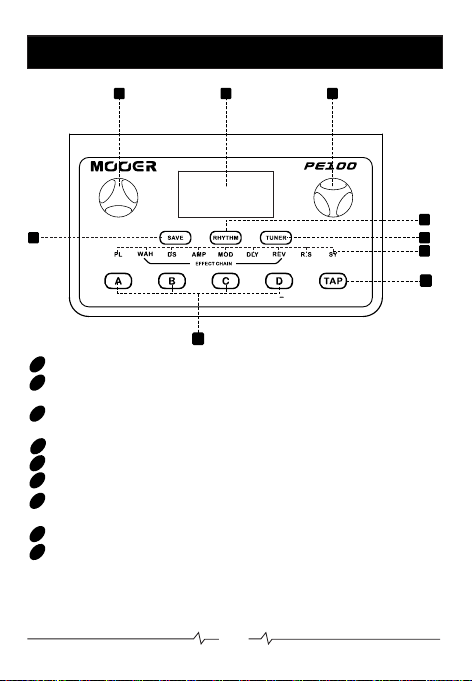
Panel Layout
1 2
4
MODE
EFFECT
3
VALUE
ON/OFF
8
MOD E:Con trol fo r scrol ling th rough t he vari ous pag es in the m enu
01
LCD D ispla y: Disp lays th e User In terfa ce and pr ovide s all inf ormat ion
02
for p reset s and par amete rs
VALU E:Co ntro l for adj ustin g vario us para meter s and sel ectio ns with in
03
the U ser Int erfac e.
SAVE : Pres s to ent er pres et savi ng page
04
05
RHY THM:P ress to a ccess D rum mac hine an d Metro nome
TUN ER: Pre ss to acc ess gui tar tun er
06
EFF ECTS CH AIN:I ndica tes the o perat ional s tatus o f the dif fere nt
07
eff ect bl ocks a nd the cu rrent ly sele cted pa ge with in the Us er Inte rface
Qui ck Reca ll butt ons:Q uickl y recal ls 4 of you r favor ite pre sets
08
TAP: Tap te mpo con trol fo r use wit h the dru m machi ne, met ronom e and
09
del ay effe cts
02
5
6
7
9
Page 5
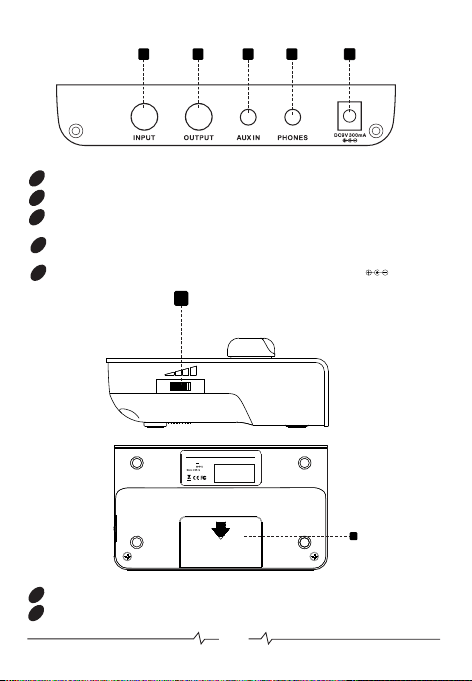
10 11 12 13 14
INP UT:1/4” m ono aud io jack f or conn ectin g instr ument
10
OUT PUT:Aud io outp ut 1/4” m ono aud io jack
11
AUX I N:Ste reo lin e in for co nnect ion to ex terna l devic es such a s mp3
12
pla yer for a udio pl aybac k.
HEA DPHON ES: Ste reo lin e out for c onnec ting to a h eadse t or othe r
13
ext ernal a udio eq uipme nt
DC IN :Conn ects to t he supp lied po wer ada ptor( DC 9V, 300 mA, )
14
15
Portab le Guit ar Effc ts
Remval of screws or the serial number
00
:ART NOPE1
label will void warranty
9V,300mA
Adapter:
Polarity :
Mas ter Volu me: Ad just s the ma ster ou tput vo lume of t he devi ce
15
Bat tery ha tch: In sert 2 x AAA ba tteri es for ba ttery o perat ion
16
03
16
Page 6

Operational Guidance
Preset Selection
01
Pow er
Con nect th e suppl ied pow er adap tor to th e DC-IN j ack loc ated on t he rear s ide.
(9V, 3 00mA, ), P luggi ng a Jack c able in to the in put wil l activ ate the p ower
whe n using b atter ies.
02
Mas ter of Gu itar Vol ume
Adj ust the m aster o utput v olume
03
Pre set Sel ectio n
Rot ate the MO DE contr ol until " PL" is hi ghlig hted br ightl y on the "EF FECTS CH AIN'
pan el. The L CD Disp lay wil l indica te the inf ormati on of the c urren t prese t(P or U) . P
sta nds for f actor y prese t, U stan ds for us er Pres et. Rot ating t he Value co ntrol wh ilst
on th e Preset p age will s croll t hroug h the var ious pre sets.
3
1
2
4
1
Pre set num ber
MODE
2
Pre set nam e
EFFECT
ON/OFF
3
Bat tery ca pacit y
04
VALUE
4
Dru m speed
Page 7

Note:Th e effects chain display pan el will illuminate to indi cate which effects bloc ks
are curren tly active within the sele cted preset
Mor e deta ils wil l be list ed on pa ge 16.
Tone Settings
The re are 6 ef fect b lock s cont aini ng 39 ty pes of e ffect s in PE10 0's eff ect Ch ain.
Eac h effec t bloc k prov ides a d iffer ent kin d of effe ct.
PL = Pr eset Mo de
WAH = Wa h Wah eff ects
DS = Ov erdri ve and Di stort ion eff ects
AMP = Amplif ier Simula tion mode ls
MOD = M odula tion ef fect s
01
Eff ect Cha in
Rot ate the ' MODE' c ontro l to scro ll thro ugh the E dit pag es of the v ariou s
Eff ect bl ocks w ithi n the 'E ffect C hain’
Eff ect edi ting
02
Aft er sel ectin g the effec t bloc k you wish to ed it us ing t he MO DE co ntrol , the LCD
scr een will d ispla y the eff ect mod el, the o n/off s tatus , all of th e vario us setti ngs and
par amete rs of tha t effec t.
Rot ate the VA LUE co ntro l to sel ect yo ur des ired m odel.
Pre ss the VAL UE con trol t o scro ll thr ough t he par amete rs.
Aft er sele cting t he para meter y ou wish t o edit, r otate t he VALUE c ontr ol to ad just
it' s value .
03
Eff ect On/ Off
Whi le on an ef fect b lock s edit p age, p ress t he D qui ck reca ll butt on to swi tch tha t
eff ect bl ock on o r off wit hin the p reset .
DLY = De lay eff ects
REV = R everb e ffect s
R.S = Rhythm(Drum mach ine and Metronomes)
SY = Sy stem s etti ngs
05
Page 8

Tone saving
The t one can b e saved a s a User pr eset
Pre ss the SAV E butt on
01
Rotate the VALUE knob to select which preset num ber you wish to save your tone in.
02
You can save your tone in any user preset U01 to U99. When you have selected your
desired preset slot press the VALUE control to continue.
Now y ou can ed it the na me of the p reset . Rotat e the VALU E cont rol to
03
scr oll thr ough th e chara cters . Press t he VALUE c ontr ol to se lect a
cha racte r and mov e onto th e next ch aract er in the p reset n ame.
04
Onc e you hav e finis hed ent ering t he pres et name p ress th e SAVE but ton ag ain
to sa ve the pr eset.
If yo u wish to c ancel t he savi ng proc edure a t any tim e durin g this pr ocess ,
05
sim ply rot ate the M ODE con trol to e xit the s aving p age.
Not es: P01 t o P99 are fo r factor y prese ts only a nd can no t be used to s tore cu stom
use r prese ts. You can on ly save cu stom ton es in U01 -U99.
06
Page 9

Quick recall buttons
The Q UICK RE CALL bu ttons A, B,C,D p rovid e an easy w ay to ins tantl y store a nd
rec all 4 of yo ur favo rite pr esets .
To stor e a prese t in a quic k recal l slot ma ke sure t hat PL is h ighli ghted u sing th e
MOD E contr ol.
Nav igate t o the pre set you w ish to st ore in th e quick r ecall s lot usi ng the VAL UE
con trol
Hol d the qui ck reca ll butt on (A,B ,C,D) w here yo u wish to s ave the p reset , for mor e
tha n 1 secon d.
The q uick re call bu tton wi ll flas h 3 times t o confi rm you ha ve succ essfu lly sto red
the p reset w ithin t hat slo t.
To quic kly rec all tha t prese t at any ti me just p ress th e corre spond ing "qu ick rec all
but ton" wh ilst PL i s highl ighte d on the EF FECTS C HAIN di splay.
Not es: If th e scree n shows U NSAVED i n PL mode , the qui ck reca ll butt on can no t
sav e the ton e.
TAP TEMPO
Tap Tempo h as 2 ope rati ons
Whil e you are not us ing the RHYTH M func tion TAP is highlig hted red. Pr essing th e
01
TAP butto n two or mor e times will sy nchron ize the Delay ti me with your inp utted
temp o.
Whi le you are usin g the RHY THM funct ion TAP is highli ghted blu e. Press ing the
02
TAP butto n two or mor e time s will sync hroni ze the drum pa tterns an d metr onomes
spe ed with your in putted te mpo
07
Page 10

Rhythm settings
The P E100 co ntain s 40 drum p atter ns and 10 m etron omes.
Pre ssing t he RHYT HM butt on at any t ime wil l start o r stop th e drum pa ttern s
01
and m etron omes.
Rot ate the M ODE con trol un til R.S i s highl ighte d
02
03
Rot ate the VA LUE co ntro l to cho ose th e DRUM o r METR ONOM E.
Pre ss the VAL UE con trol t o high ligh t the rh ythm p aram eter a nd rota te the
04
VALU E knob t o choo se whi ch rhy thm yo u want .
05
Pre ss the VAL UE con trol a gain a nd rot ate it t o edit t he spe ed, th e range i s
BPM 40 to BPM 260.
06
Pre ss the VALU E contr ol once m ore and r otate i t to edit t he play back vo lume of
the r hythm .
Tuner
Pre ss the TUN ER butto n at any ti me to acce ss the tun ing func tion pa ge. The tu ner is
set t o A=44 0Hz as sto ck, rot ate the VAL UE contr ol to cha nge thi s calib ratio n.
Pre ss the VALU E contr ol to hig hligh t the byp ass/m ute par amete r, rotat e the VALUE
con trol to s witch b etwee n muted tu ning and b ypasse d tuning .
Pre ssing t he TUNER b utton ag ain wil l retur n you to th e same pag e you were i n when
you f irst ac cesse d the tun ing func tion pag e.
08
Page 11

AUX IN
Con nect th e outpu t of your f avori te exte rnal au dio dev ice, su ch as mp3 p layer,
to th is inpu t using a m ini ste reo jac k.
System settings
Rot ate the M ODE con trol un til SY is s elec ted. Th e syste m setti ngs inc lude th e
OUT PUT typ e, LCD B ( brig htne ss), LC D M (inve rt colo rs), RE SET (fa ctory R ESET) .
01
Sel ect OUT PUT usi ng the VAL UE con trol , you ca n choo se line o ut or amp
out d epend ing on wh at equi pment y ou wish t o conn ect yo ur PE10 0 to.
09
Page 12

Rot ate th e VALUE c ontrol to LCD B , pres s it. Rot ate the VA LUE con trol t o
02
edi t the bri ghtne ss of the LC D displ ay scre en.
Rot ate the VA LUE co ntro l to LCD M , pres s it. Rot ate the VA LUE con trol to i nvert
03
the L CD disp lay scr eens co lors.
To perfo rm a full fa ctory r eset of t he PE10 0 rotat e the VALUE c ontro l to high light
04
RESE T and pr ess it. Nex t you wi ll be asked " are you sure t o restor e factor y settin g"
sele ct “YES” to pe rform a fac tory rese t. Select “N o” to cancel a nd return t o the
syst em setting s page .
10
Page 13

Connections
MOD E
11
EFFEC T
VALUE
ON/OF F
Page 14

Batteries
Turn o ff PE10 0 and op en the b atte ry com part ment .
01
Equ ip two AAA si ze batt eries a nd clos e the bat tery co mpart ment.
02
The P E100 wi ll powe r on usin g batte ries wh en some thing i s conne cted to t he
03
inp ut Jack
Por table G uitar E ffcts
Remval of screws or the serial number
00
:ART NOPE1
label will void warranty
9V,300mA
Adapter:
Polarity :
12
Page 15

Effect Explanation
01
WAH
Nam e
TOUC H WAH
FUN KY MONK EY
02
S
D
A dyna mical ly resp onsiv e autow ah effe ct
Time b ased Aut o Wah effe ct.
Nam e
FLE X BOOST
PRE AMP OD
TUB E DRIVE
JUI CER DRI VE
MOD ERN OD
DIS TORTIO N
HOG F UZZ
MOD ERN FUZ Z
META L CLUB
ACO USTI C
*NO TES: All p roduc t name ca lled th eir com pany, he re is onl y used in t his pr oduct
sim ulati on effe ct of ton e types .
03
AMP
Bas ed on MOO ER FLEX B OOST bo ost pe dal.
Bas ed on DOD O verdr ive Pre amp/2 50 over drive p edal
Bas ed on IBA NEZ TS9 (TUBE S CREA MER) ov erdri ve peda l.
Bas ed on MOO ER THE JU ICER ov erdr ive ped al.
The o verdr ive of bo ostin g the mid dle and g ain.
Hi- gain di stort ion ped al.
Bas ed on ELE CTRO- HARMO NIX HOG 'S FOOT f uzz pe dal.
Hi- gain fu zz peda l
Bas ed on IBA NEZ SM- 7(SMA SH BOX) d istor tion pe dal.
Aco ustic g uitar p edal.
Nam e
F.CL EAN
JAZ Z CLEA N
BAS SMAN
BRI TISH 30
BRI TISH 80 0
USA S TAR
USA B LACK
*NO TES: All p roduc t name ca lled th eir com pany, he re is onl y used in t his pr oduct
sim ulati on effe ct of ton e types .
Bas ed on FEN DER TWI N REVER B
Bas ed on ROL AND Jc1 20
Bas ed on FEN DER BAS SMAN
Bas ed on VOX Ac 30
Bas ed on MAR SHALL JC M 800
Bas ed on MES A BOO GIE LON ESTAR SP ECIAL
Bas ed on MES A BOO GIE MAR K V
Spe cific ation s
Spe cific ation s
Spe cific ation s
13
Page 16

04
MOD
Nam e
CHO RUS
FL ANGE R
T.FL ANGER
PHA SER
STE P PHASE R
TRE MOLO
PITC H
VIB RATO
FILT ER
RIN G MOD
STU TTER
05
DLY
Nam e
DIG ITAL
ANA LOG
DYN AMIC
ECH O
TAPE E CHO
06
REV
Nam e
ROO M
HAL L
CHU RCH
PL ATE
Thi s effec t creat es a shin ing dim ensio nal sou nd.
Thi s effec t produ ces an un dulat ing and f loati ng soun d.
Thi s effec t produ ces an vo cal und ulati ng and fl oatin g sound .
Thi s effec t creat es a puls ing-l ike sou nd.
Thi s effec t creat es a deep p ulsin g-lik e sound .
Thi s effec t perio dical ly infl uence s the vol ume of th e signa l.
Thi s effec t produ ces a sou nd whic h sound s like a pi tch.
Thi s effec t produ ces an in tense v ibrat o sound .
Thi s effec t produ ces a swe eping f ilter s ound.
Thi s effec t produ ces a sou nd whic h sound s like a ri ng bell .
Thi s effec t rhyth mical ly cuts y our sou nd simi lar to a ki llswi tch.
Spe cific ation s
Spe cific ation s
Rep eats th e signa l with no s pecia l proce ssing , creat es
the m ost cle an dela y sound .
Sim ulate s analo g delay e quipm ent, pr oduce s a warm an d
vin tage de lay sou nd.
The d elay so und is lo w while p layin g, but in creas es when
pla ying st ops.
Sim ulate s the sou nd of a rea l Echo, a uthen tic and n atura l
del ay soun d.
Sim ulate s a vinta ge Tape Ech o machi ne
Spe cific ation s
Sim ulate s the aco ustic s of a room
Sim ulate s the aco ustic s of a conc ert hal l.
Sim ulate s the aco ustic s of a big ch urch.
Sim ulate s Plate r everb erati on.
14
Page 17
Specifications
No. o f Effec t Modul es: 6 mod ules
No. o f Effec t Type s: 39 Effe ct type s
Pre set Pat ch Memo ry: 99 p atche s
Use r’s Pre set Pat ch Memo ry: 99 p atche s
Inp ut Jack: 1 /4” mo no aud io jac k
Out put Jac k: 1/4 ” mono au dio jac k
Hea dphon e out: 1/8 ” ster eo aud io jac k
AUX I N: 1/8 ” stere o audio j ack
Pow er requ ireme nts: AC adap ter 9V DC,3 00mA,
Dim ensio ns: 137 mmX81 mmX32 mm
Wei ght: 2 30g
Acc essor ies: O wner ’s Manu al,AC ad apte r 9V DC.
Troubleshooting
Can n ot powe r on:
Che ck powe r conne ction ——Mak e sure th e power i s conne cted co rrect ly.
Che ck the ad apter ——Mak e sure th e adapt er’s t ype is D C 9V/3 00mA /
No so und or lo w volum e:
Che ck conn ectio n of cabl es——M ake sur e all the c ables a re conn ected f irmly.
Che ck the on /off sw itch a nd the v olum e sett ing of a mp—— Make s ure ea ch
equ ipmen t’s vol ume is s et to an a ppro pria te lev el.
Hig h noise :
Che ck the ad apter ——Mak e sure th e adapt er’s t ype is D C 9V/3 00mA /
Che ck the ca bles— —Make s ure the c ables a re conn ected f irmly a nd have n o
qua lity pr oblem
15
Page 18

Patch List
No.
P01
P02
P03
P04
P05
P06
P07
P08
P09
P10
P11
P12
P13
P14
P15
P16
P17
P18
P19
P20
P21
P22
P23
P24
P25
Nam e of pres et
DS CL EAN
GRE EN
BL ACK
OC FU ZZ
FL FU ZZ
PH FU ZZ
LOST F UZZ
LOST 1
LOST 2
SLOW D ANCE
CL ASSIC P URPLE
GL ASS
BIG H AIR
BLU E SPRIN G
OLD B RIT META L
CHO RUS ORG AN
SEN SUOUS
SUM MER 69
69 LE AD
TUM BLEWE ED
COW BOY LEA D
VOC AL INDU STR
WALK I N THE WO
COC K ROCK
BRE ATHE
16
No.
P26
P27
P28
P29
P30
P31
P32
P33
P34
P35
P36
P37
P38
P39
P40
P41
P42
P43
P44
P45
P46
P47
P48
P49
P50
Nam e of pres et
DAVE F LAVOR
SUR FING RH YTHM
SUR FING LE AD
RAN DY
AGG RESSI VE
AMA NI RHYT HM
AMA NI SOLO
GAR Y TRACK
NO HE SITATE
TRU E LOVE
GOL DEN AGE R HYTHM
GOL DEN AGE S OLO
LOVE R
OCE AN SKY
JTM 45
JTM 45 SOLO
JTM 45 ELEC TRON
JTM 45 WAH
BRI TISH
BRI TISH ME TAL
BRI TISH OD
BRI TISH DE LAY
BRI TISH CH
BRI TISH SO LO
BSM
Page 19

P51
P52
P53
P54
P55
P56
P57
P58
P59
P60
P61
P62
P63
P64
P65
P66
P67
P68
P69
P70
P71
P72
P73
P74
P75
No.
Nam e of pres et
BSM S OLO
BSM S OLO2
BSM WA H
BSM C RUNCH
BSM O D
BSM V IB
BSM R HYTHM
JC SO LO
JC ME TAL
JC OD
JC CH ORUS
JC PO ST
JC CL EAN
TWI N REV SOL O
TWI N REV1
TWI N REV2
TWI N REV3
TWI N REV4
REV ERB ONLY
CH CL EAN
FIN E
CON FUSIO N
PH CL EAN
BP RE VERB
HOT WA H
17
No.
P76
P77
P78
P79
P80
P81
P82
P83
P84
P85
P86
P87
P88
P89
P90
P91
P92
P93
P94
P95
P96
P97
P98
P99
Nam e of pres et
EL ANGER W AH
LA SER WAH
CIC ADA
FLU TTERI NG
AUR ORA
ELE CTRIC
POP C LEAN
VOO DOO CHI LD
HAP PY BLUE S
HAI R METAL
JUS T PUNK
ROTATIN G WIND
ROC K MONKE Y
JAZ Z CLUB
ROC K SOUND
JST F IGHTE R
MEM ORY
CRU NCHER
NAR ROW
COL LAPSE
MID -NIGH T
DRE AM STRE AM
SWE ET TALKI NG
CLOC K TOWER
Page 20

MOOER AUDIO CO.,LTD
Shenzhen, China
www.mooeraudio.com
 Loading...