

Page 1

User’s Guide
MAMA
₪
KIDS ₪ TOUR ₪ CITY ₪ URBAN ₪ BMX
Page 2
2
© GuideXpert, Dalibor Sevcik, www.guideXpert.net. All rights reserved.
manual
MIMI, RAINBOW, ...
Congratulation on the purchase of your
new quality bicycle. We have done our
best to ensure that you will always reach
your destination safely, comfortably and
reliably.
Your Montego team wish you enjoyable
cycling.
Contents:
At a glance
Description of parts ... 3
Good habits
Check before every ride ... 5
The essentials
Brakes, gears, light ... 6
Make yourself comfortable
Adjusting the bike ... 10
Special situations
Care, luggage, kids, transport ... 17
Troubleshooting / break-down help
Tyres, brakes, gears, bell ... 21
Maintenance ... 29
Index ... 30
Handover receipt ... 31
Bike licence ... 32
Terms of warranty ... 33
Keep this manual for
future reference.
MAMA
Liberty 3
Liberty 7
KIDS
Mimi
Rainbow
Rocket
Free Spirit
Scout
Wild Rose
Lizard
T
OUR
Villager 7
Villager 21
Traveller
Voyager
CITY
Avantgard+
Heritage 7
Society
Distinction
Status
Elite
URBAN
Barrow
Legend
Divine
Daily Urban
Daily Classic
BMX
Turbo
Downtown
Graffi ti
Voodoo
You and your children are
much safer when wearing
a helmet.
Key to symbols
Models MONTEGO
Technical note
Warning
Info
The following part is
valid for models listed
Hint
Edition 02/2010
Page 3
3
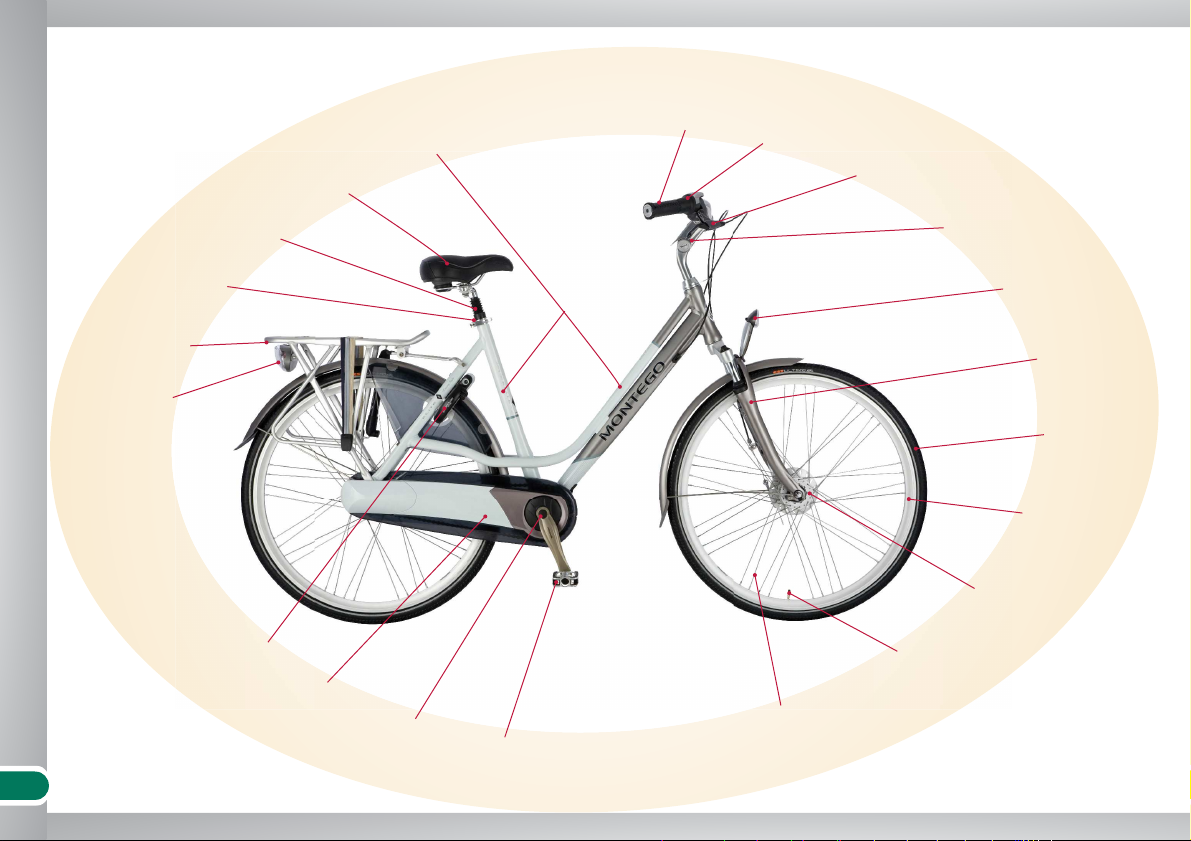
At a glance
At a glance
Seat
Frame
Handlebar
Shift lever
Brake lever
Front light
Tyre
Rim
Hub
Valve
Spoke
Crankset
Chainguard
Rear light
Rack
Quick-release/
seat post clamp
Seat post
Pedal
Stem
Fork
Bikes with a hub gear system
Lock
Page 4
4
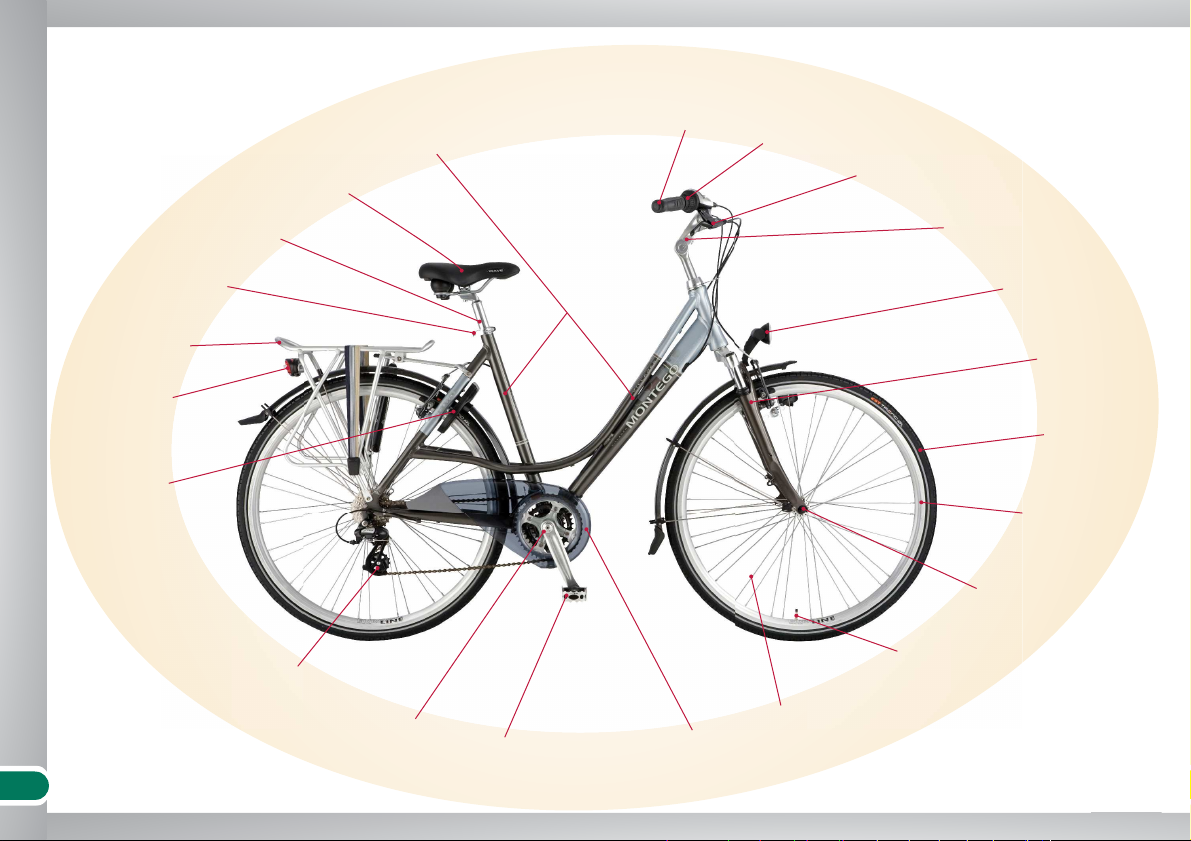
At a glance
Seat
Frame
Handlebar
Shift lever
Brake lever
Front light
Tyre
Rim
Wheel nut
Valve
Spoke
Crankset
Chainguard
Rear light
Rack
Quick-release/
seat post clamp
Seat post
Pedal
Stem
Fork
Bikes with derailleur gears
Lock
Rear derailleur
Page 5
5
Good habits
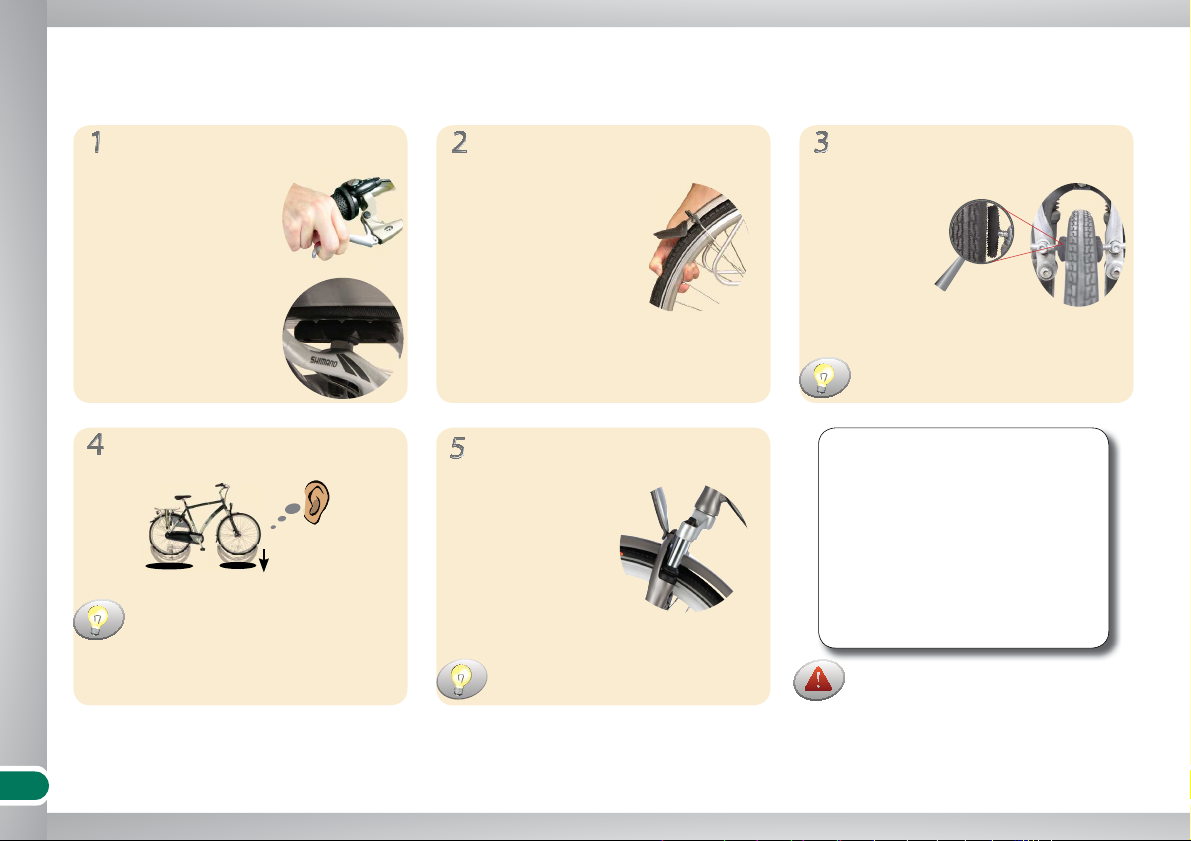
Test the brakes
Good habits
... a short start-up check for more safety and comfort
Check the tyres
Check for rattling
Check the wheels’ rotation
Test the suspension fork
Feels normal?
Right pressure?
Smooth and regular?
At maximum pull the
lever doesn‘t touch
the handlebar
All blocks touch
along the whole
length
Checklist
1) Brakes OK ü
2) Tyres OK ü
3) Wheel rotation OK ü
4) No unusual noises ü
5) Suspension visibly OK ü
Don’t use your bike if any of these
points are in doubt — consult an
expert. Using a bicycle that is not in
good working order may result in
serious injuries.
Sit on the bike to test this.
Observe the distance between the
rotating wheel and the brake pads.
Drop your bike from a few inches‘
height onto the fl oor and listen for
any clatter.
If there is any, tighten all bolts and
nuts.
Page 6
6
The essentials
Avantgard+, Distinction, Divine, Downtown, Elite, Free Spirit, Graffi ti, Heritage 7, Legend, Liberty 3, Liberty 7, Lizard, Mini, Scount, Society, Status, Traveller, Turbo,
Villager 21, Villager 7, Voodoo, Voyager:
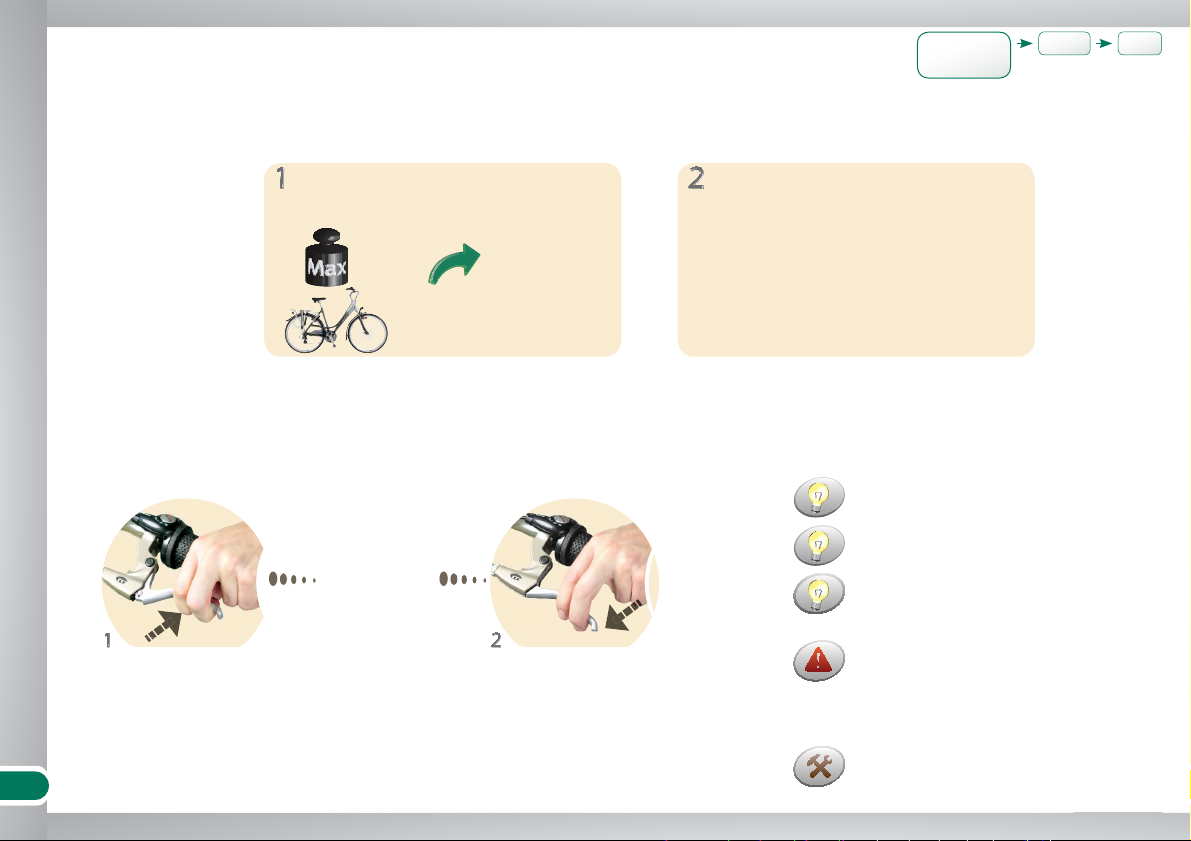
Max ...... Kg
The essentials
Braking
Basic knowledge
... to pedal and stop correctly.
Front + rear
pull the lever release the lever
Remember which lever operates the
front brake and which the rear brake.
Ideally use both front and rear brakes
simultaneously.
No grease, oil or wax on the brake
pads or rims.
Preferably brake short and hard
instead of long to prevent overheating
of the components.
Longer braking could cause the hub
brakes to overheat and subsequently
fail. As soon as you note the braking
force is getting weak, stop and let the
brakes cool down.
Braking
Gear
shifting
Lights
on / off
slow down or
stop
Bike licence
(Page 32)
Respect maximum overall
weight
Use the bike for designed purpose only
Only on streets, public roads and
tarred bicycle paths; not under
extreme conditions; no sport riding
or competitions.
Page 7
7
The essentials
Free Spirit, Lizard, Mimi, Rainbow, Rocket, Scout, Turbo, Wild Rose:
Barrow, Daily Classic, Daily Urban, Free Spirit, Lizard, Mimi, Rainbow, Rocket, Scout, Turbo, Wild Rose:
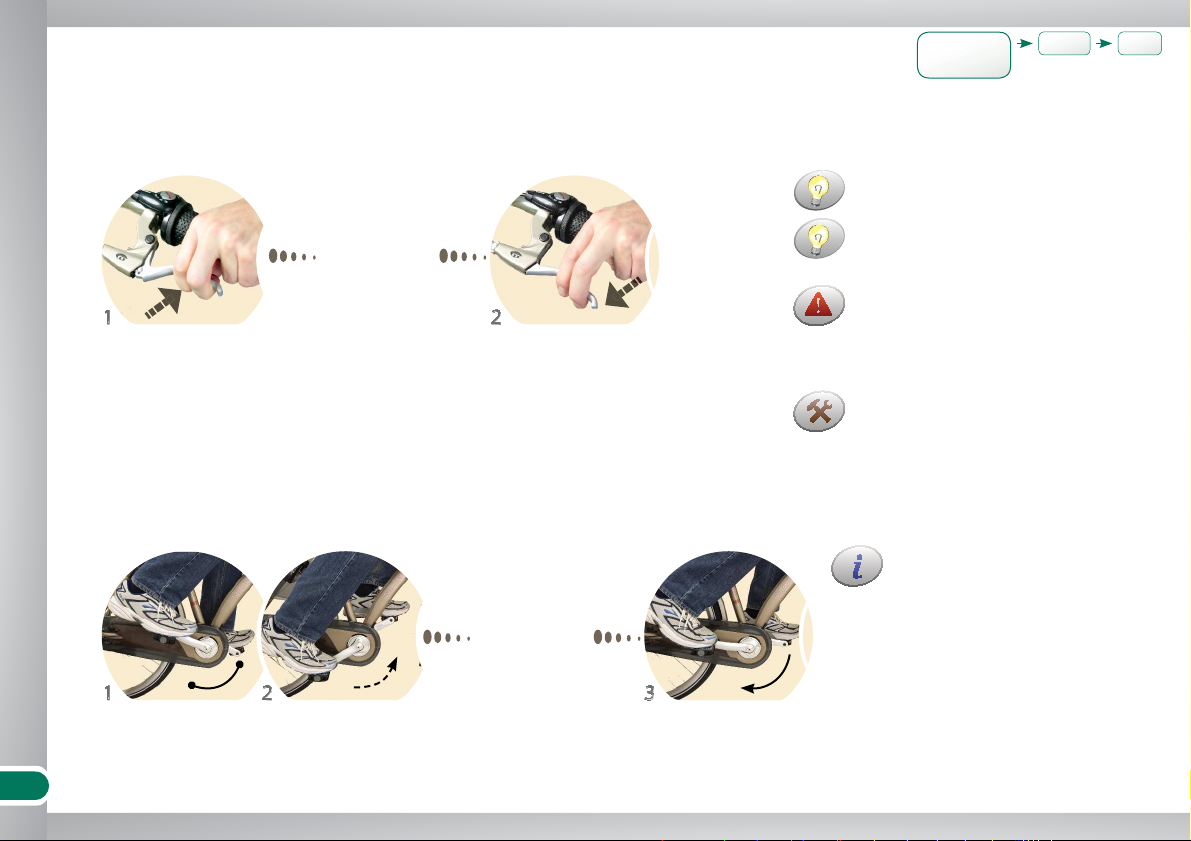
Front
Rear (coaster brake)
The strongest braking is achieved
in the horizontal pedal position.
Interrupt pedalling Pedal carefully back-
wards
Pedal forwards a little
(freewheel) or restart
pedalling
slow down or
stop
Braking
Gear
shifting
Lights
on / off
Ideally use both front and rear brakes
simultaneously.
No grease, oil or wax on the brake
pads or rims.
Preferably brake short and strong
instead of long to prevent overheating
of the components.
Longer braking could cause the hub
brakes to overheat and subsequently
fail. As soon as you note the braking
force is getting weak, stop and let the
brakes cool down.
pull the lever release the lever
slow down or
stop
Page 8
8
The essentials
Avantgard+, Barrow, Distinction, Divine, Elite, Heritage 7, Legend, Liberty 3, Liberty 7, Lizard, Society, Status, Villager 21, Villager 7, Wild Rose:
Traveller, Voyager:
Daily Classic, Daily Urban, Downtown, Free Spirit, Graffi ti, Mimi, Rainbow, Rocket, Scout, Turbo, Voodoo:
û
û
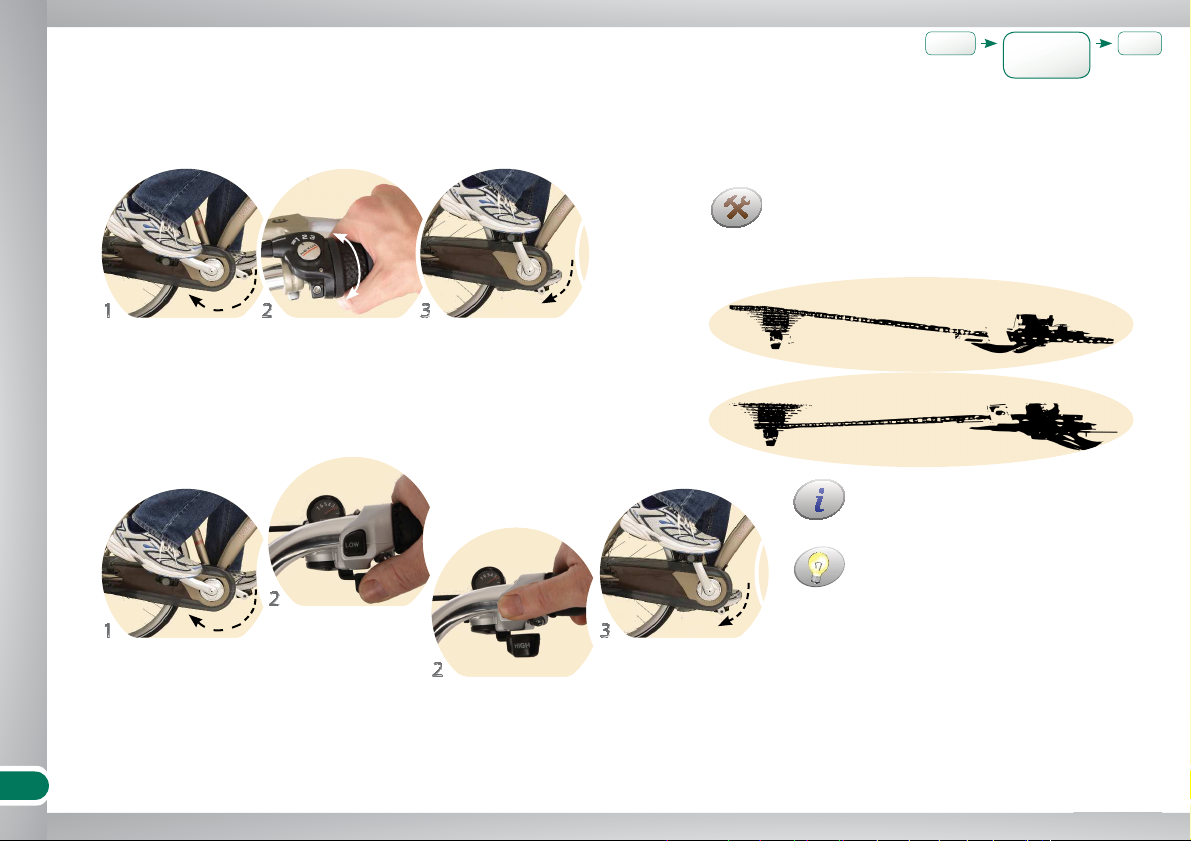
Gear shifting
Single speed
The most effective pedalling frequency is about 60 - 70 revolutions per
minute; much less downhill.
Avoid using extreme gear ratios with the
derailleur gears (big in front — big in rear; small
in front — small in rear). These hugely increase
the wear on the chain.
The lightest pedalling (e.g. uphill) is
with the smallest chainring in front
and the largest chainring at the rear.
Braking
Gear
shifting
Lights
on / off
Slow pedalling down
Slow pedalling down
Twist the grip up to
a click
Press the LOW button
Push the HIGH lever
Pedal lightly until the
gear shifts
Pedal lightly until the
gear shifts
Page 9
9
The essentials
2x
Avantgard+, Barrow, Daily Classic, Daily Urban, Distinction, Divine, Elite, Heritage 7, Legend, Liberty 3, Liberty 7, Lizard, Mimi 20", Society, Status, Wild Rose:
Free Spirit 20", Scout 20", Traveller, Villager 21, Villager 7, Voyager:
Downtown, Free Spirit 16", Graffi ti, Mimi 16", Rainbow, Rocket, Scount 16", Turbo, Voodoo:
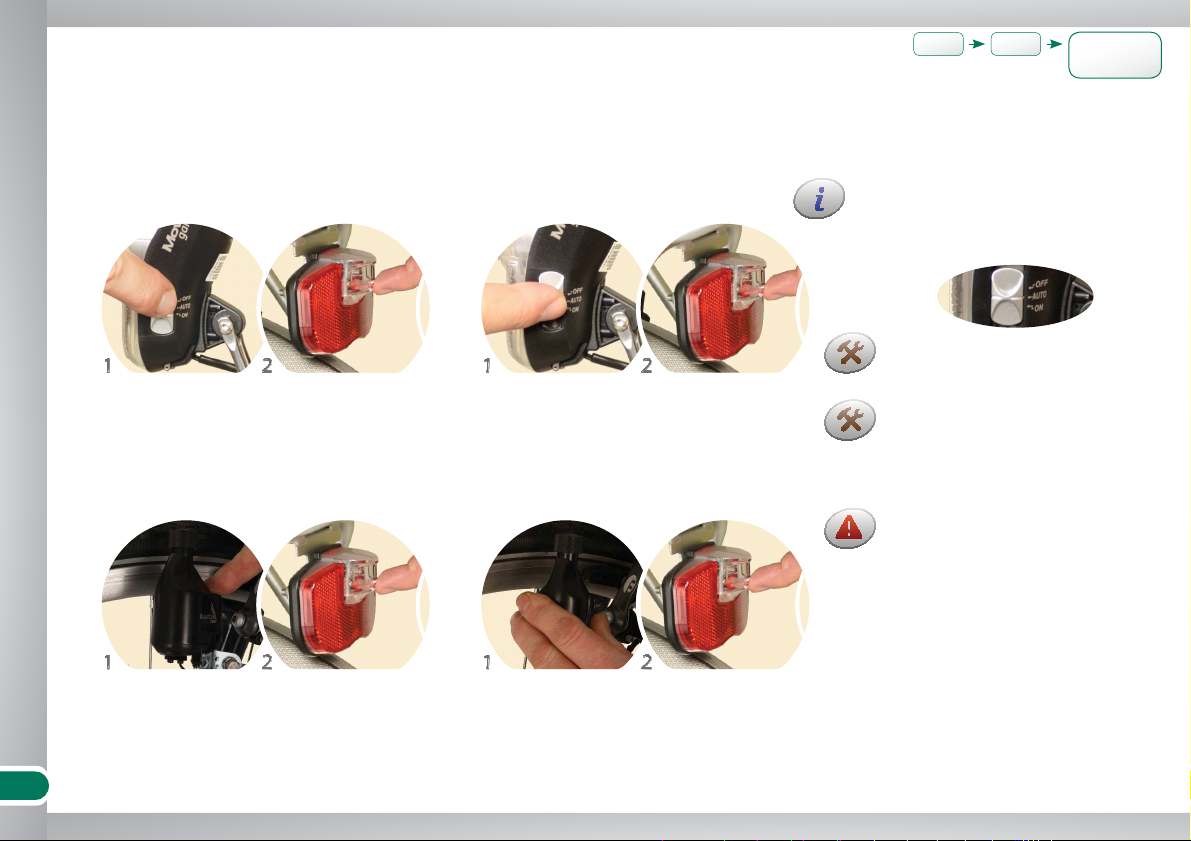
Lights on / off
On
front
front
front
front
rear
rear
rear
rear
On
Off
Off
Front light illuminates only while
riding (hub dynamo), rear light
also when standing (battery).
“Smart” rear light has three
states: on (1x press), auto (2x
press) and off (3x). In AUTO the
light turns on automatically when
it is dark (at night or in tunnels).
Position AUTO: The front light turns
on automatically when it is dark (at
night or in tunnels).
No lights
Braking Gear
shifting
Lights
on / off
Shift the switch to ON
Press the button —
dynamo touches the
wheel
Press the button
Press the button
Shift the switch to OFF
Pull the dynamo from
the wheel
Press the button twice
Press the button
Don't turn the dynamo on or off
while riding — risk of accident.
Page 10
10
Make yourself comfortable
Make yourself comfortable
... adjustments for comfort, effi ciency and safety.
Saddle height
For correct adjustment, how it feels is
more important than general rules.
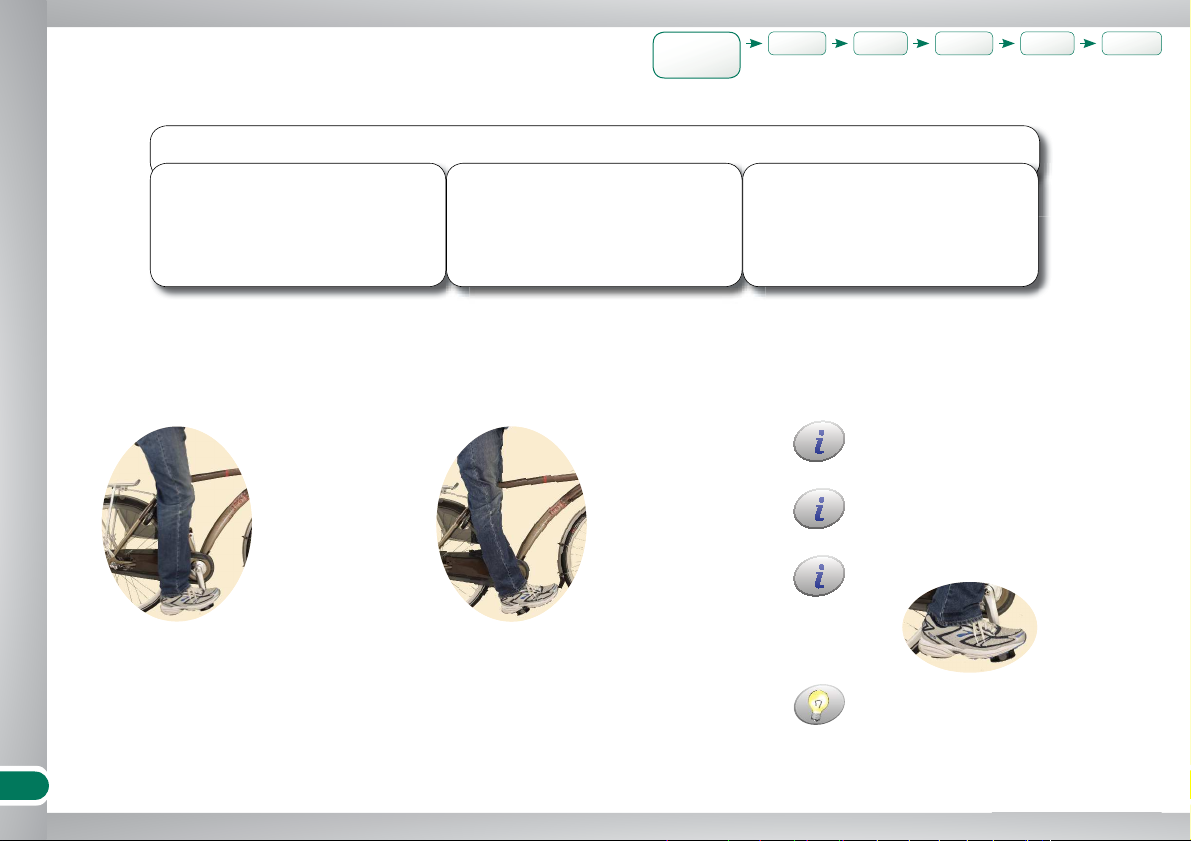
Ideal height Height test
- Pedal in the lowest position
- Heel on the pedal
- Leg completely straight
(Knee slightly bent)
In special conditions, such as slippery
roads, it is sensible to lower the
saddle height for increased safety.
Optimum foot position on the pedal:
It is important that children can easily
reach the fl oor with both feet to avoid
falling.
Saddle
height
Handlebar
height
Saddle
position
Handlebar
tilt
Brake
levers
Suspension
fork
Checklist: Adjustments
1) SADDLE
Height • ü
Tilt • ü
Horizontal position • ü
2) HANDLEBAR
Height • ü
Tilt • ü
3) BRAKE LEVERS
Tilt and position • ü
4) SUSPENSION FORK
Rigidity • ü
Page 11
11
Make yourself comfortable
û
Children's saddle height should be
adjusted every 2-3 months.
Keep the inside part of the seat post
well greased.
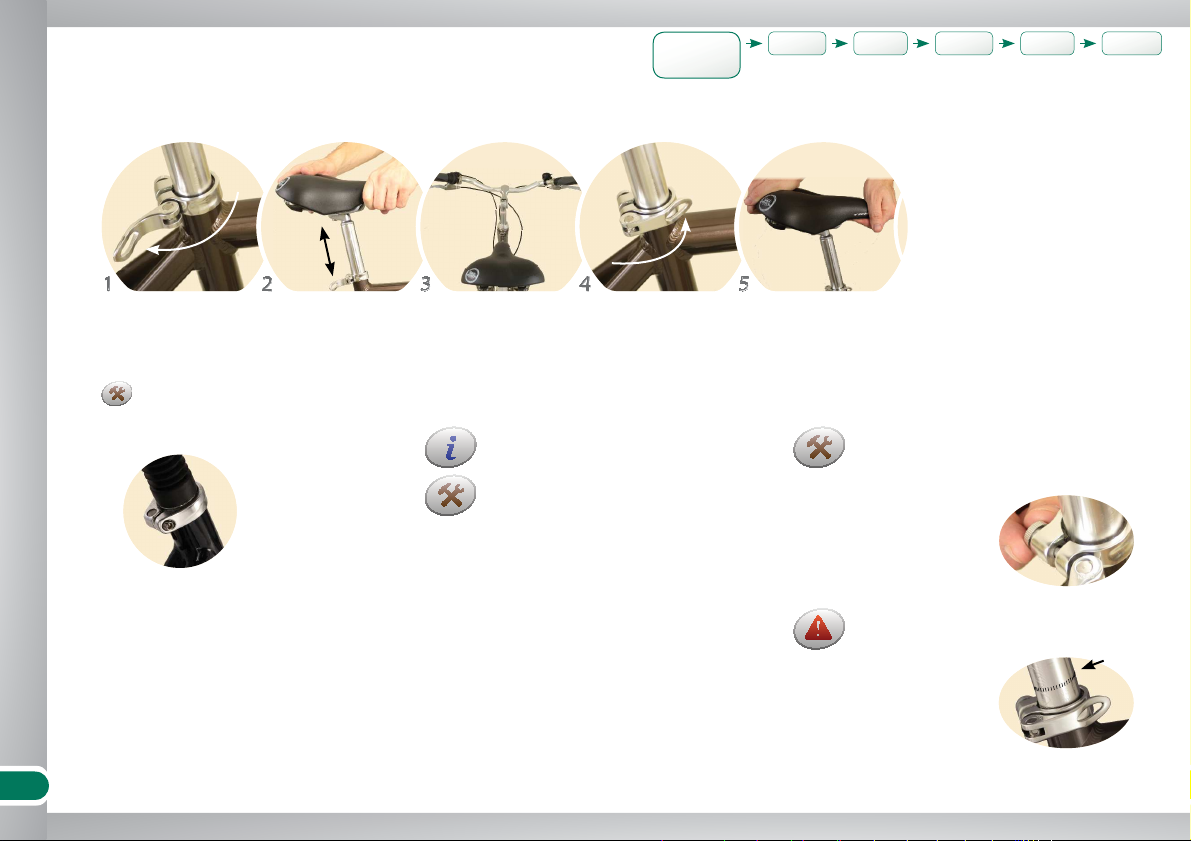
Do not pull out the seat post beyond
the “Minimum insert” sign — it could
break!
The quick-release lever should be very
hard to move towards the end. If it
moves too easily, tighten the opposite
nut a little.
Changing the saddle height
Open quick-release /
loosen the nut
Change the height
(twist the saddle a bit)
Check the alignment Close the quick-release
/ tighten the nut
Check it's tight by
twisting
Alternatively to the
quick-release, some
bicycles are equipped
with an Allen screw.
Saddle
height
Handlebar
height
Saddle
position
Handlebar
tilt
Brake
levers
Suspension
fork
Page 12
12
Make yourself comfortable
A
Avantgard+, Distinction, Elite, Heritage 7, Liberty 3, Liberty 7, Society, Status, Traveller, Villager 21, Villager 7, Voyager:
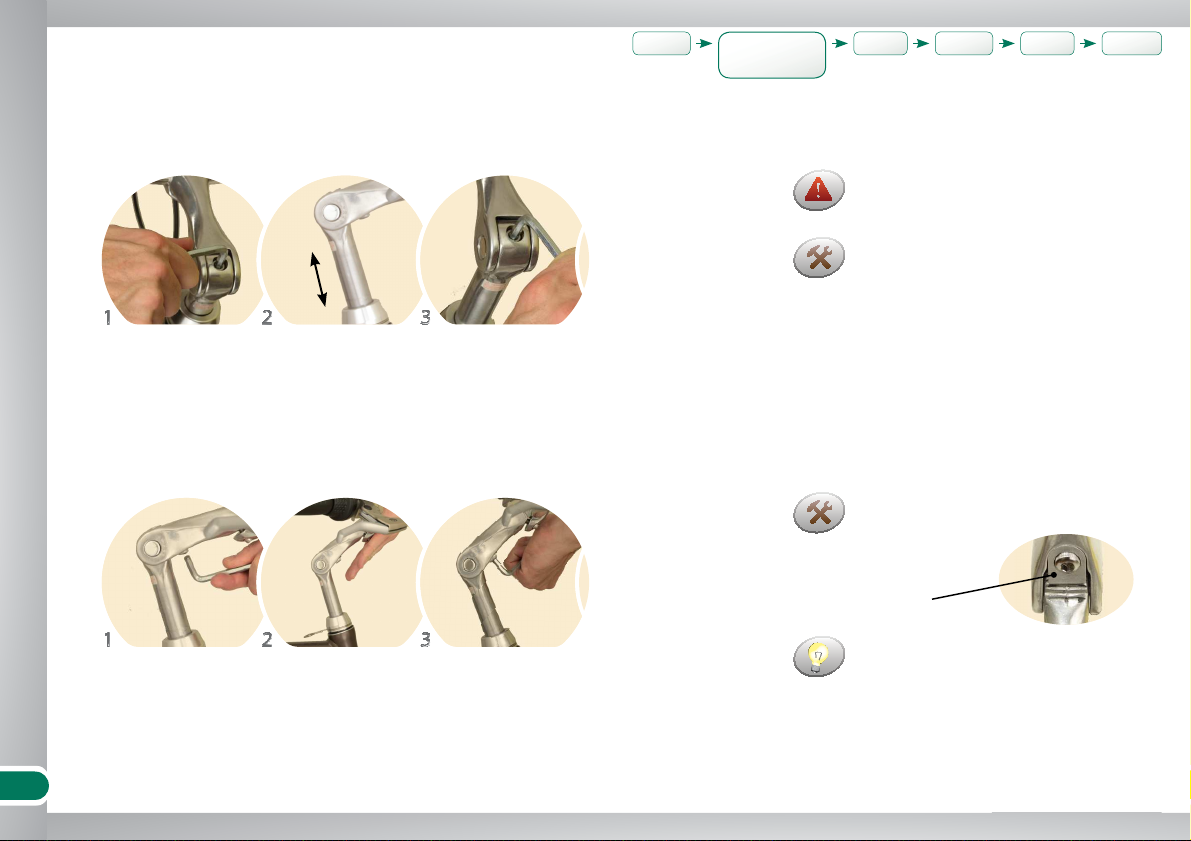
Handlebar height
Loosen the screw
Loosen the screw
suffi ciently
Tighten the screw
Tighten the screw
Adjust the height
Adjust the height
Stem tilt is adjustable in stages by one
or more dent.
Move the stem upwards fi rst to loosen
the pad (A) and only then downwards.
Steerer tube height
Stem tilt
Do not pull out the steerer tube
beyond the “Minimum insert” sign — it
could break or damage the frame!
With the model BARROW, the handlebar
height should only be changed by an
expert.
Handlebar
height
Saddle
height
Saddle
position
Handlebar
tilt
Brake
levers
Suspension
fork
ü
Page 13
13
Make yourself comfortable
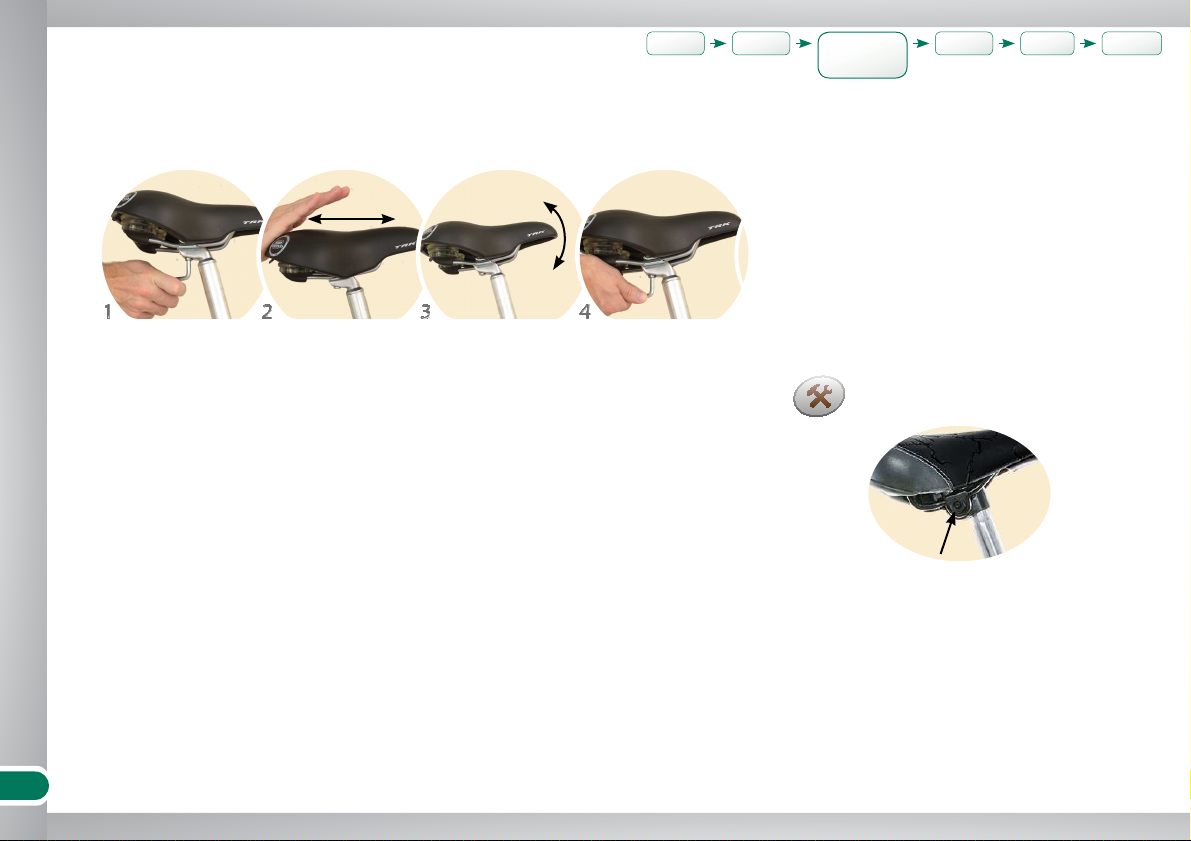
Saddle position
Adjusting horizontal position and tilt
Daily Classic, Kids and BMX bicycles
have the nut to be loosened on the
side.
Saddle
position
Saddle
height
Handlebar
tilt
Brake
levers
Suspension
fork
Handlebar
height
ü ü
Loosen the screw Adjust the tilt Tighten the screwShift the saddle
Page 14
14
Make yourself comfortable
üû
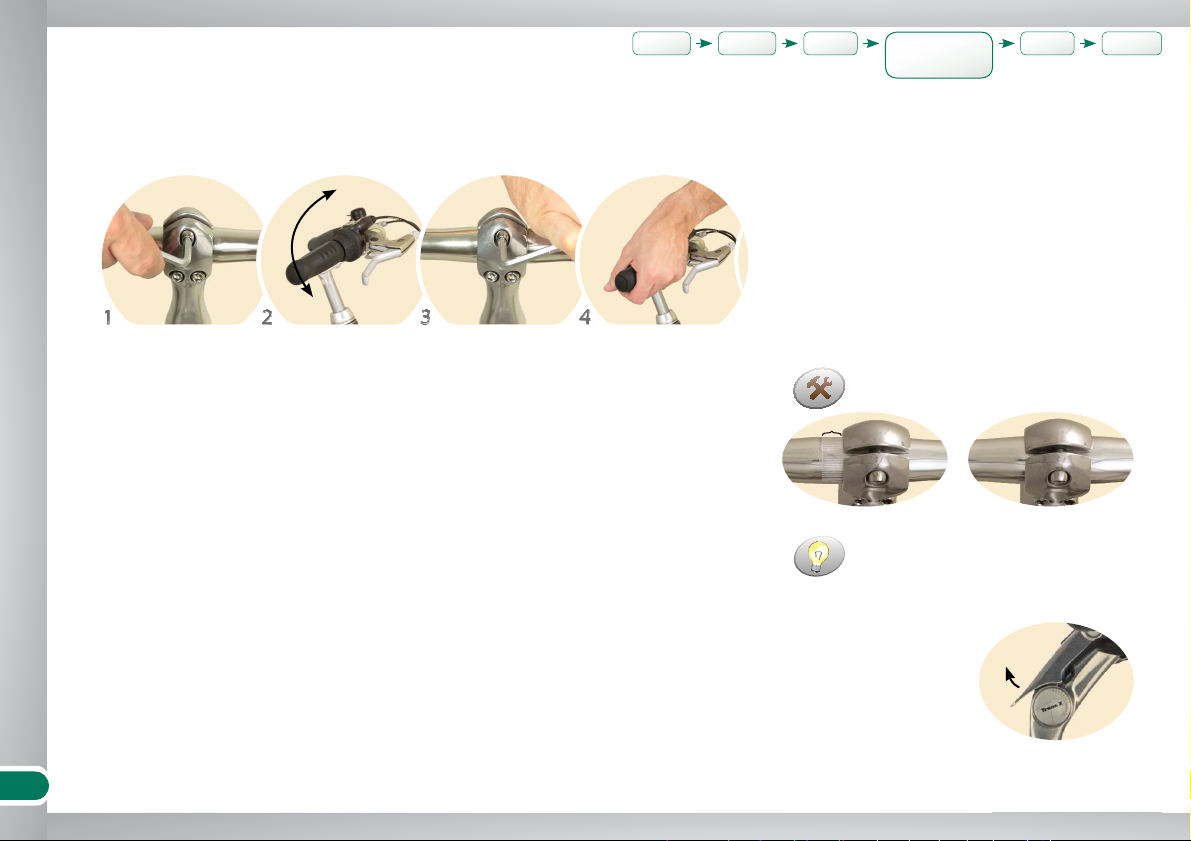
Handlebar tilt
Loosen the screw Tighten the screw Check it's tightTwist the handlebar
Make sure the handlebar is fi xed
exactly in the middle.
With models VOYAGER and ELITE you can
change the handlebar tilt without
tools; the stem lever can be opened
and closed with bare hands.
Tilt adjustment
Handlebar
tilt
Saddle
height
Brake
levers
Suspension
fork
Handlebar
height
Saddle
position
ü ü ü
Page 15
15
Make yourself comfortable
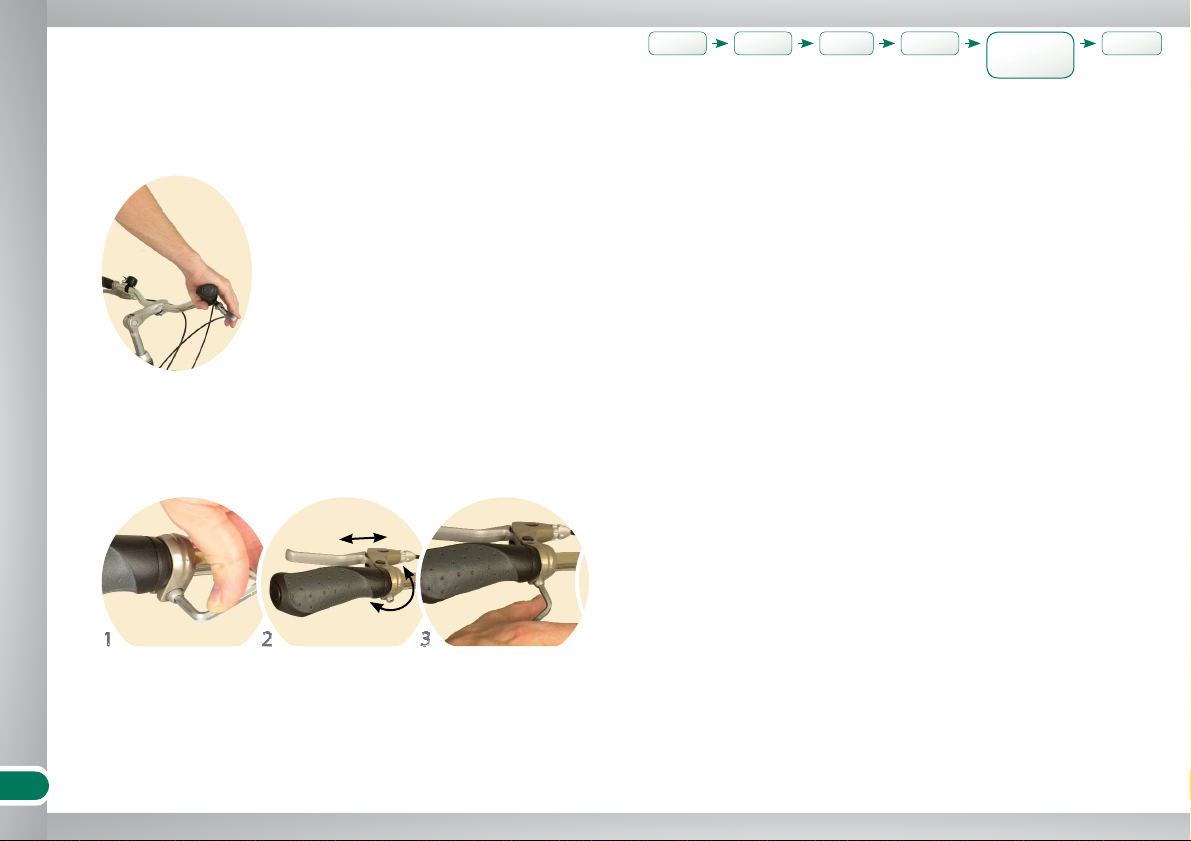
Brake levers
Loosen the screw Turn / shift the lever Tighten the screw
Ideal tilt
Changing the tilt
(Forearm and lever are in one line)
Brake
levers
Handlebar
tilt
Saddle
height
Suspension
fork
Handlebar
height
Saddle
position
ü ü ü ü
Page 16
16
Make yourself comfortable
Distinction, Elite, Heritage 7, Lizard, Society, Status, Traveller, Villager 21, Villager 7, Voyager, Wild Rose:
Avantgard+, Barrow, Daily Classic, Daily Urban, Divine, Downtown, Free Spirit, Graffi ti, Legend, Liberty 3, Liberty 7, Mimi, Rainbow, Rocket, Scout, Turbo, Voodoo:
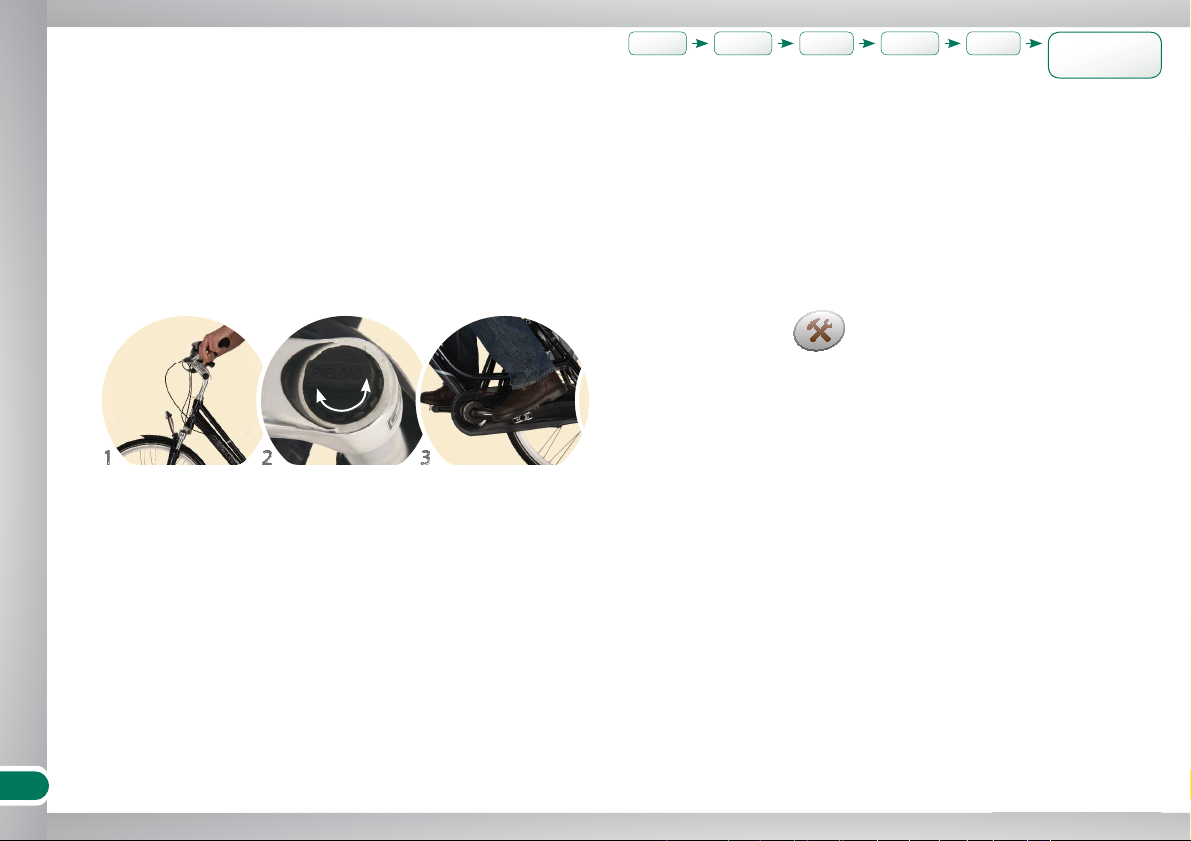
Suspension fork
Get on the bike and
test
Turn the cap in direc-
tion of + or -
Test ride
Turning in direction of + (plus)
increases the rigidity, in direction of
- (minus) decreases the rigidity.
The suspensions go down approximately 10% when sitting on the bike •
The suspensions should never reach the lowest end of their track•
No suspension fork
Adjusting the rigidity
Optimum rigidity
Suspension
fork
Brake
levers
Handlebar
tilt
Saddle
height
Handlebar
height
Saddle
position
ü ü ü ü ü
Page 17
17
Special situations
û
Max ...... Kg
Special situations
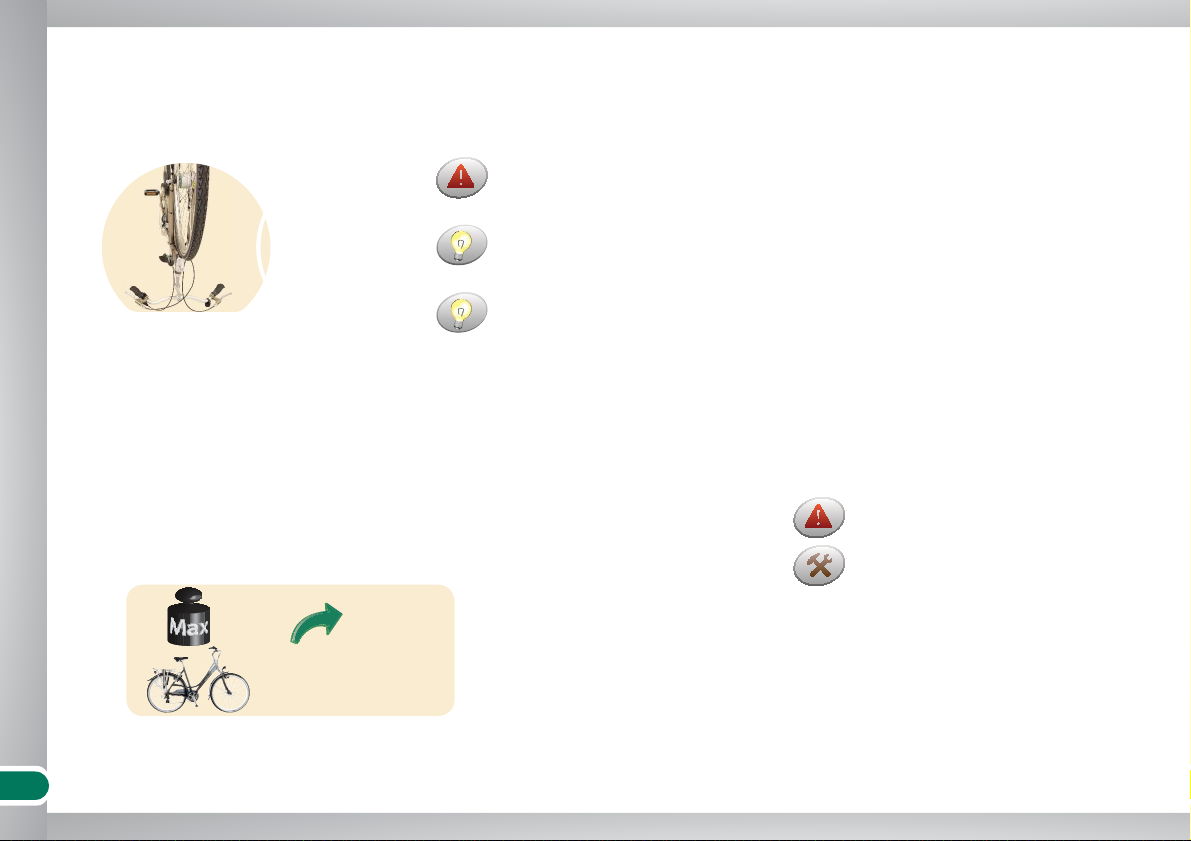
This position could put exceeding pressure on the handlebar and the seat
post and damage them.
Measure the total height of your car
including the bicycle to pass securely
through car-park gates or tunnels.
Adjust the car speed to the altered
aerodynamics of your car.
... know what is needed.
Avoid transporting upsi-
de down.
Transporting the bicycle by car
Riding with baggage
Optimum loading
Distribute the load (as close to the •
ground as possible)
Do not overload the bicycle•
Use panniers, bags and baskets only
with suitable racks!
Bike licence
Racks have a maximum load of 25 Kg.
Page 18
18
Special situations
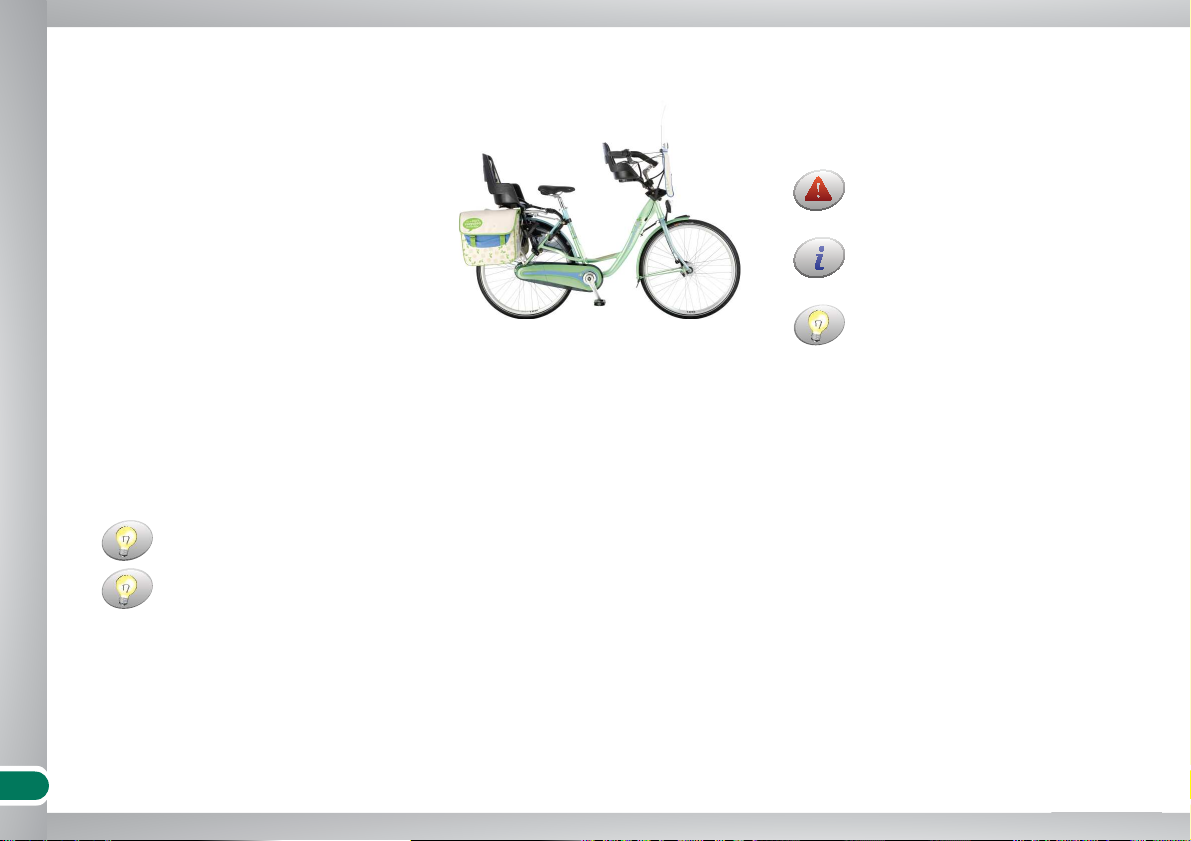
Riding with children
Child seat
Trailer
Use only suitable seats with foot •
straps
The child should wear a helmet•
Always fasten your child securely•
Fasten your child in the trailer•
Even in trailers your child should •
always wear a helmet
Do not overload the bicycle (see •
Bike licence)
A windshield (for the front seat) could
make your child more comfortable.
A long pole with a fl ag makes trailers
more conspicuous.
With a rear-view mirror you can check
your child during the ride.
The bike becomes unstable! Mounting
and dismounting requires particular
attention and practice.
Check on the bike licence whether
child carriers are allowed on your
bike.
Page 19
19
Special situations
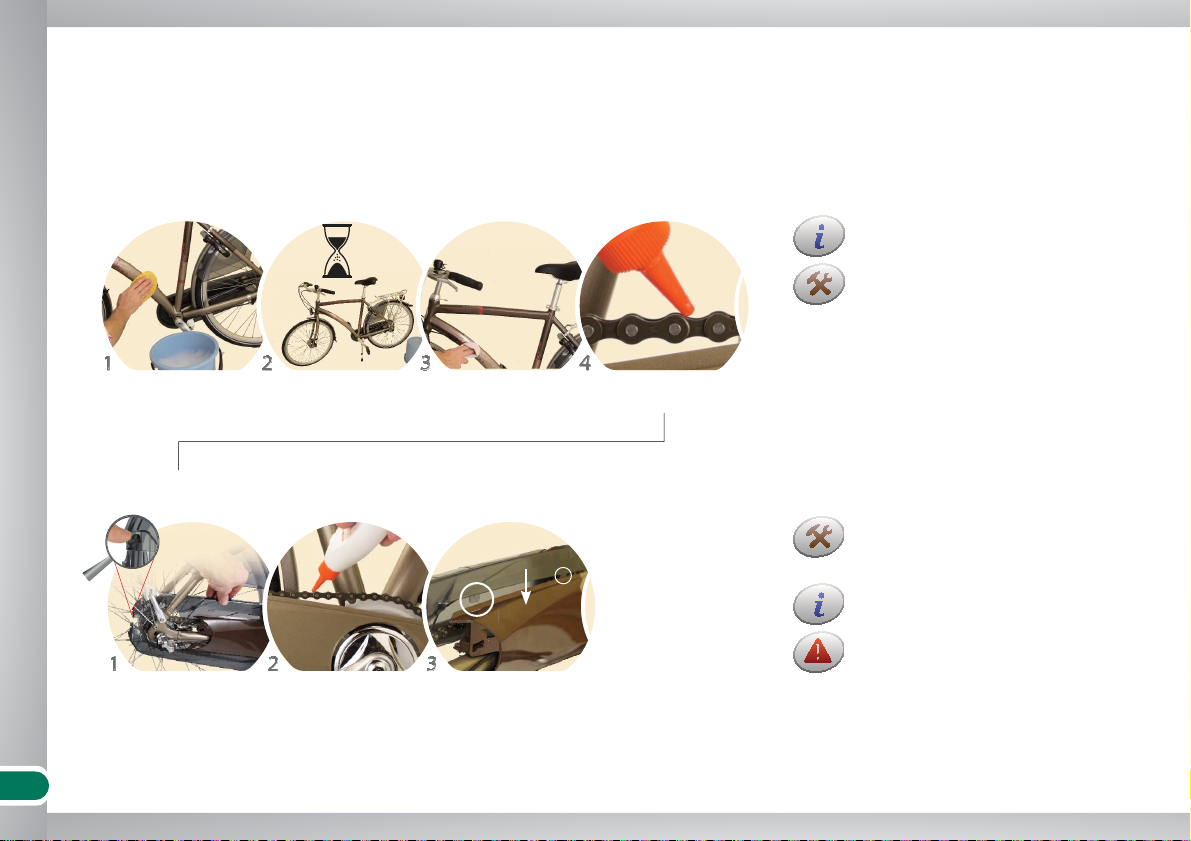
Cleaning the bicycle
Use a hose or a bucket of water•
Use a sponge or a large brush•
Cleaning is also a good opportunity to
closely check for cracks or scratches.
Salt from winter roads, dirt or mud
damage the materials and impair the
functionality of brakes and other
parts.
Don't get chemicals or oil on the brake
pads or rim sides — brakes could fail.
Clean and grease the chain especially
after rides on wet roads and in rain.
The chain is the part that needs the
most frequent care. A worn chain can
damage chainrings and sprockets.
Open and remove the
chaincase
Grease the chain
(rotate the pedals by
hand)
Put the chaincase back
Clean all parts Cover the frame with
hard wax
Grease the chainLet dry
Greasing the chain
Page 20
20
Special situations
Avantgard+, Daily Classic, Daily Urban, Distinction, Divine, Elite, Free Spirit, Heritage 7, Legend, Liberty 3, Liberty 7, Mimi, Scout, Society, Status, Traveller, Villager 21, Villager 7, Voyager, Wild Rose:
Storing the bicycle
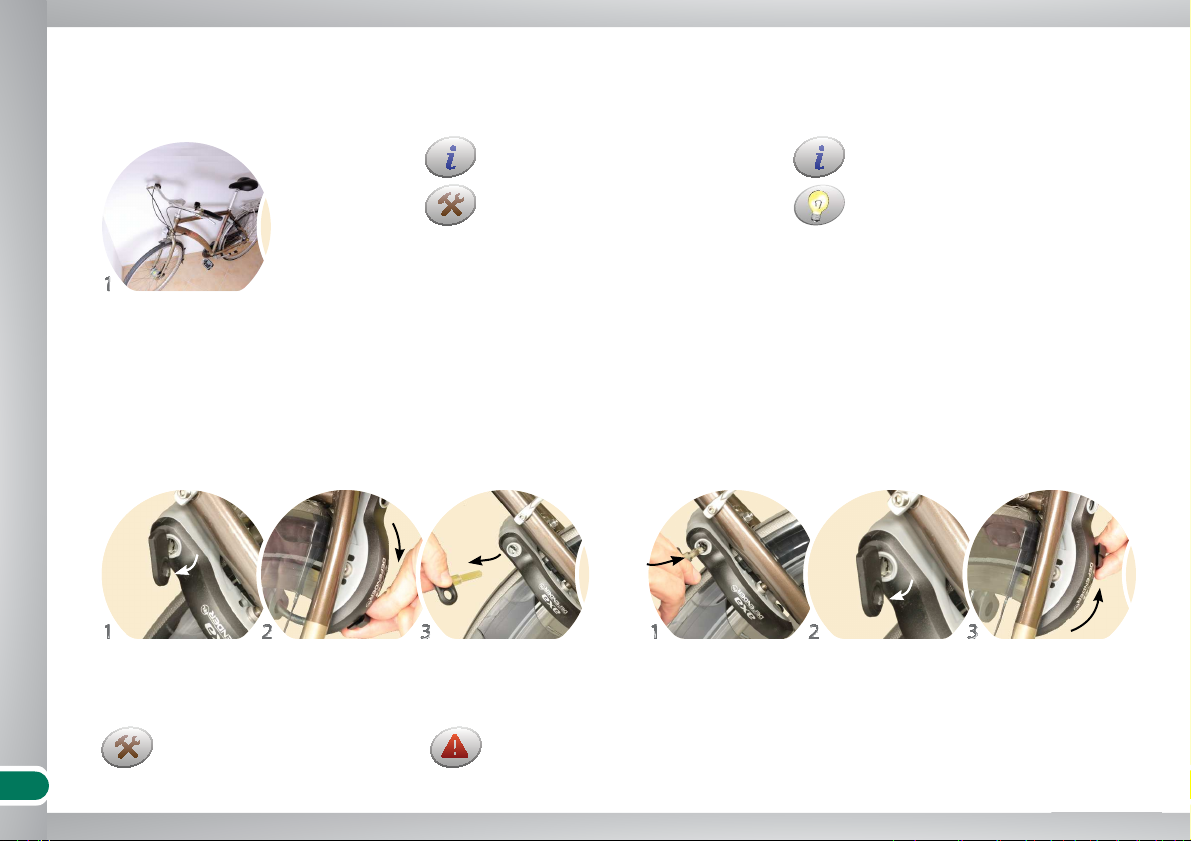
Using the lock
Locking Unlocking
Shift the handle downTurn the key Turn the keyInsert the key Pull out the handle
until it clicks
Remove the key
The key can be removed only
when the lock is locked.
If you leave your bike unlocked, it
could be stolen or someone could close
the lock and take the key away.
If you hang the bike, the tyres will not
get damaged even if the air is lost.
Clean, dry and polish the bicycle
before storing it, e.g. for the winter.
Infl ated tubes slowly lose air over
time. Long periods standing on fl at
tyres could damage the tyres.
Check the air pressure monthly over
the storage period.
Store in a dry and airy
place
Page 21
21
Troubleshooting / break-down help
Downtown, Graffi ti, Legend, Turbo, Voodoo:
Avantgard+, Daily Classic, Daily Urban, Distinction, Divine, Elite, Free Spirit, Heritage 7, Liberty 3, Liberty 7, Lizard, Mimi, Rainbow, Rocket, Scout, Society, Status, Traveller,
Villager 21, Villager 7, Voyager, Wild Rose:
... ...
... ...
Troubleshooting / break-down help
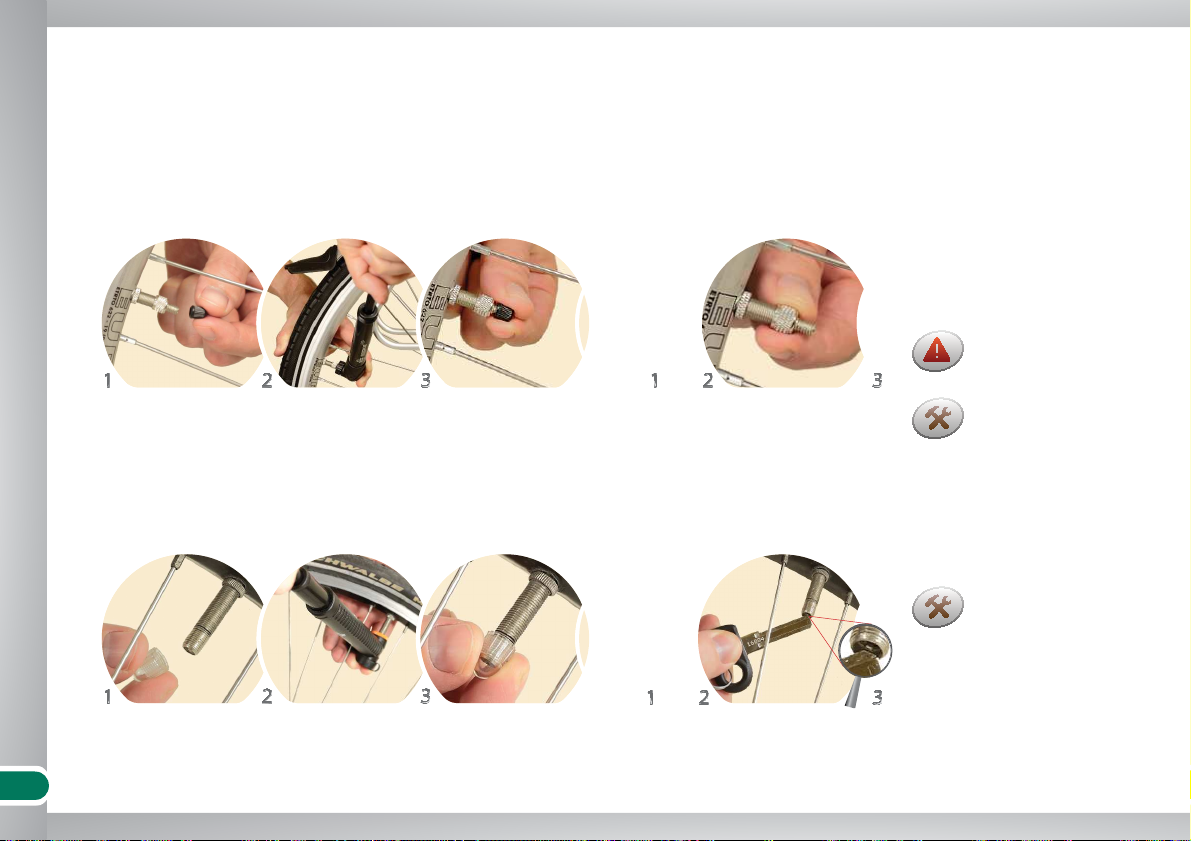
Infl ating a tyre
... getting you back on your bike as soon as possible.
Remove the cap
Remove the cap
Higher air pressure
means less rolling
resistance, but also
less comfortable
riding.
Lower air pressure
means more rolling
resistance, but more
ride comfort.
Air-pumps designed
for different valve
types will not work
with this type.
An overinfl ated tyre
could burst — risk of
accident!
Defl ating
Defl ating
Infl ate
Infl ate
Loosen the nutTighten the cap
Tighten the cap Press the stem inside
(e.g. with the lock key)
Page 22
22
Troubleshooting / break-down help
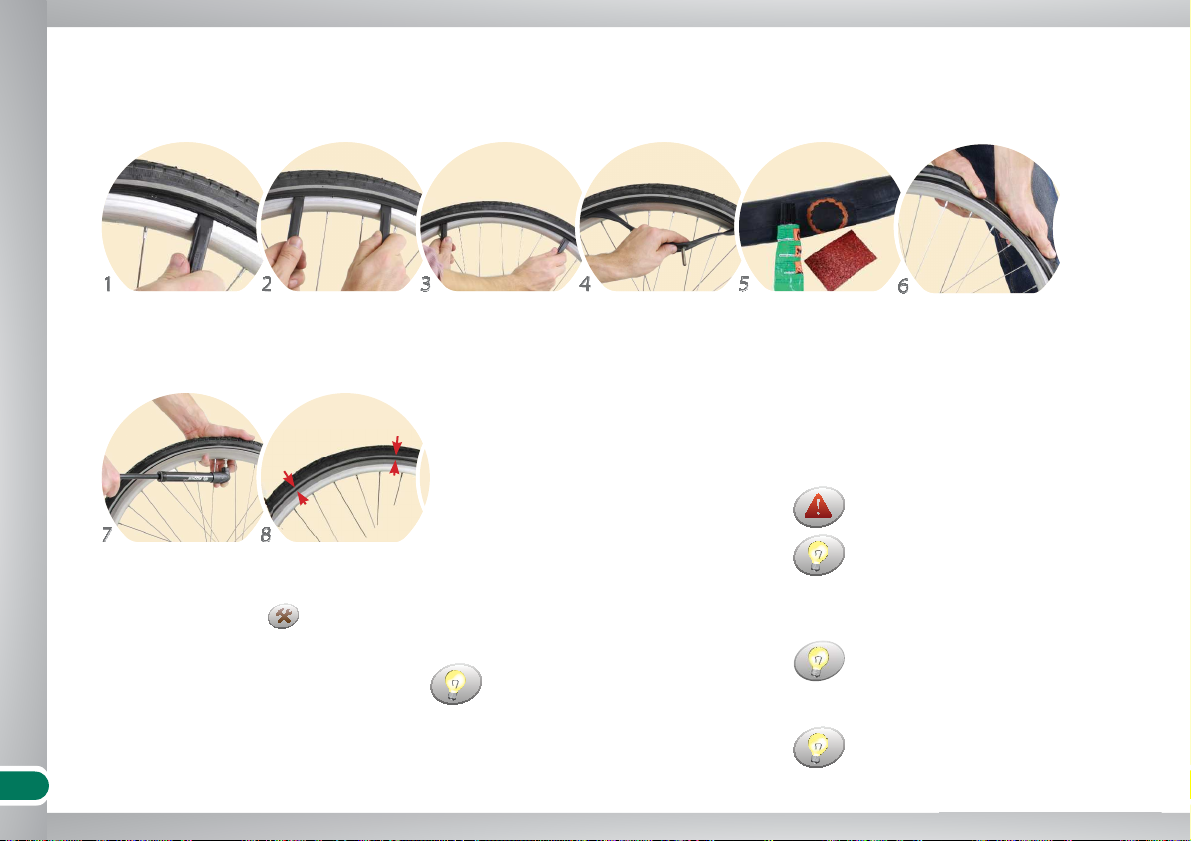
Repairing a puncture (on the road)
To fi nd the puncture you can pass a
slightly infl ated tube by your ear and
listen for the air coming out, or dip it
into a bucket of water and watch for
bubbles.
The objects that caused the puncture
could still be in the tyre and cause
further damage. Also check the inside
of the tyre.
Lever tyre over the rim
(second spot)
Lever tyre edge over
the rim (one spot)
Repair the tube Insert the tube and
mount the tyre back on
the rim
Pull the tube out
(partly)
Lever as much edge
as needed (shift both
levers apart slowly)
There could be more than one
punctures. Check the whole inner tube
for more holes.
The distance
between the
control line and the
rim must be
constant.
The inner tube cannot remain
squashed between tyre and rim.
Punctures can also be repaired on the
road, if you always take a repair kit
(or a spare inner tube) and an
air-pump along with you.
A puncture repair spray can also help
you to fi nish your ride.
Check the tyre positionInfl ate the tyre
Page 23
23
Troubleshooting / break-down help
Traveller, Villager 21, Villager 7, Voyager:
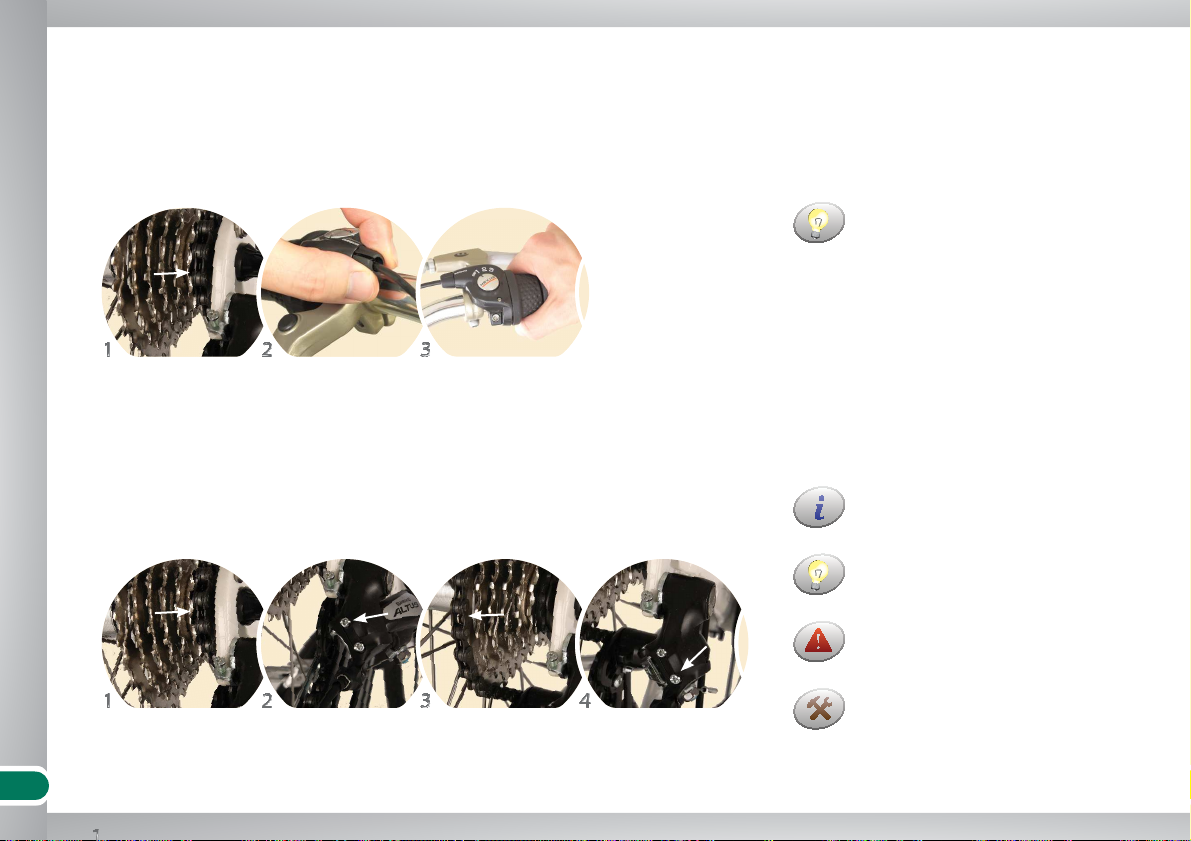
Chain falls off the sprockets
There are two adjusting screws on the
rear derailleur: H (High gear) for the
smallest sprocket and L (Low gear) for
the limit stop on the side of the
largest sprocket.
Change gear to the
smallest sprocket
Change gear to the
largest sprocket
... Adjusting the limit stops on the rear derailleur
... Adjust the cable on the handlebar
Turn the screw marked
"H"
Turn the screw marked
"L"
Gear shifting problems
Noises / gear shifting not precise
Change gear to the
smallest sprocket
Test the gear shiftingTurn the adjusting nut
in or out
To test the gear shifting without
riding, lift the rear wheel a bit and
turn the pedals by hand.
Check that the derailleur isn't bent.
This easily happens when the bicycle
falls or simply when parking.
This adjustment is very sensitive.
Consult an expert if your attempts
fail.
A bent derailleur could get into the
spokes and cause a serious damage to
the wheel, frame or other parts.
Page 24
24
Troubleshooting / break-down help
Traveller, Villager 21, Voyager
A wrong adjustment can cause the
chain to block — risk of accident!
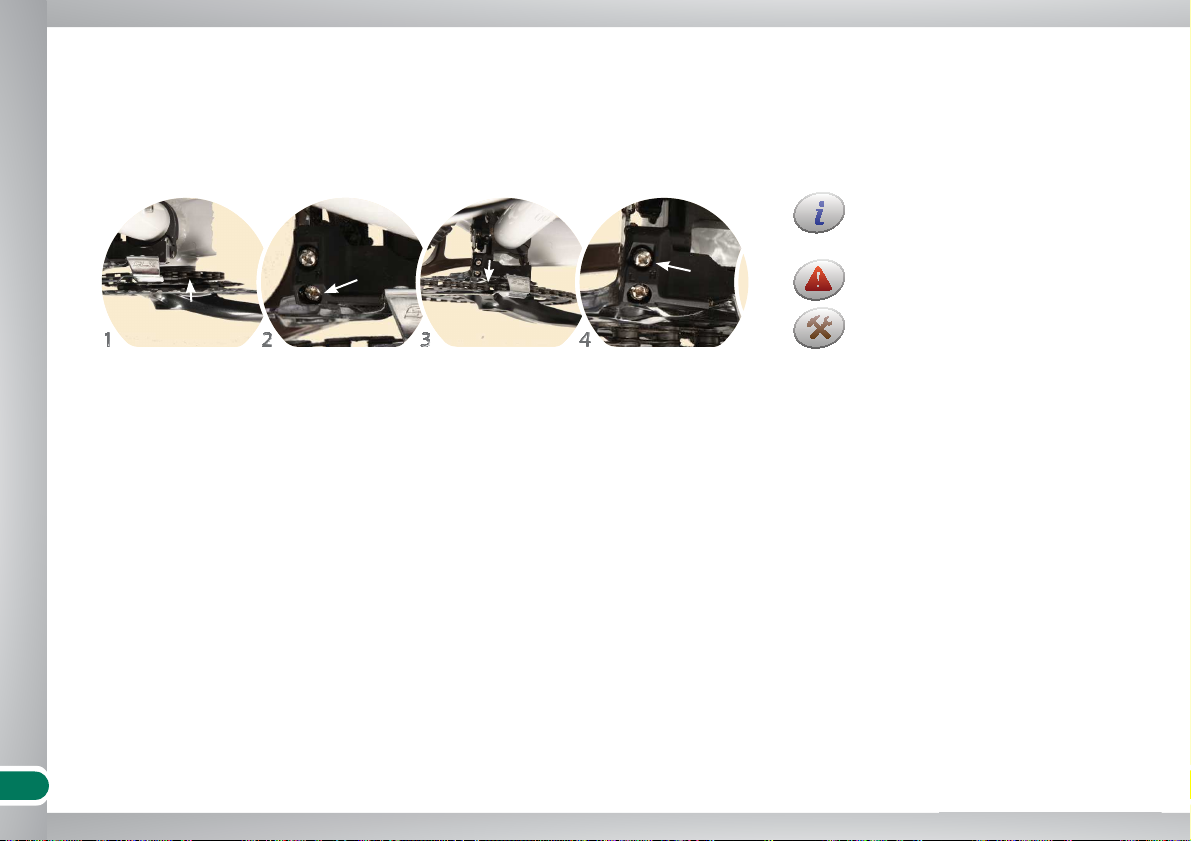
Chain falls off the chainrings
... Adjusting the limit stops
Change gear to the
smallest chainring
Change gear to the
largest chainring
Turn the screw marked
"L"
Turn the screw marked
"H"
There are two adjusting screws on the
front derailleur: H (High gear) for the
largest chainring and L (Low gear) for
the limit stop on the side of the
smallest chainring.
This adjustment is very sensitive.
Consult an expert if your attempts
fail.
Page 25
25
Troubleshooting / break-down help
Downtown, Free Spirit, Graffi ti, Lizard, Mimi, Rainbow, Rocket, Scout, Traveller, Turbo, Villager 21, Villager 7, Voodoo, Voyager, Wild Rose:
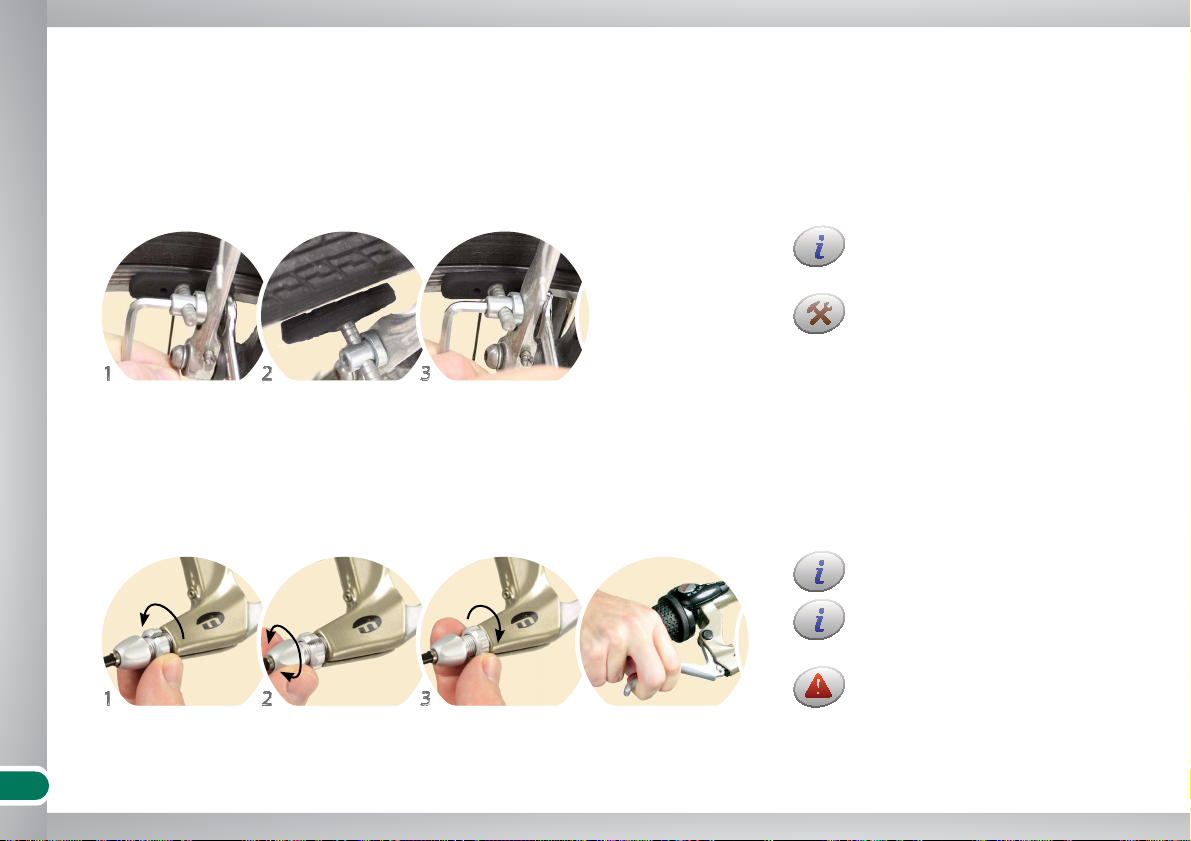
Brake problems
Rim brakes squeak
Braking is ineffi cient
Loosen the brake pad
Loosen the counternut Tighten or loosen the
adjusting nut
Tighten the counternut
Tighten the brake padAlign to touch at the
front fi rst
Test
If this doesn‘t help, check (and
replace) the brake pads or consult an
expert right away.
When the brake pad is already
touching at the front, its rear part
should still stay at about 1mm
distance.
Also clean any dirt or oil from the
brake pads and rims.
... Adjust the cable on the handlebar
If this doesn‘t suffi ce, adjust additionally the cable directly on the brake or
consult an expert right away.
Replace any damaged cables immediately, even if only a few wires are
loose — risk of accident!
... Change the alignment of the brake pads
Page 26
26
Troubleshooting / break-down help
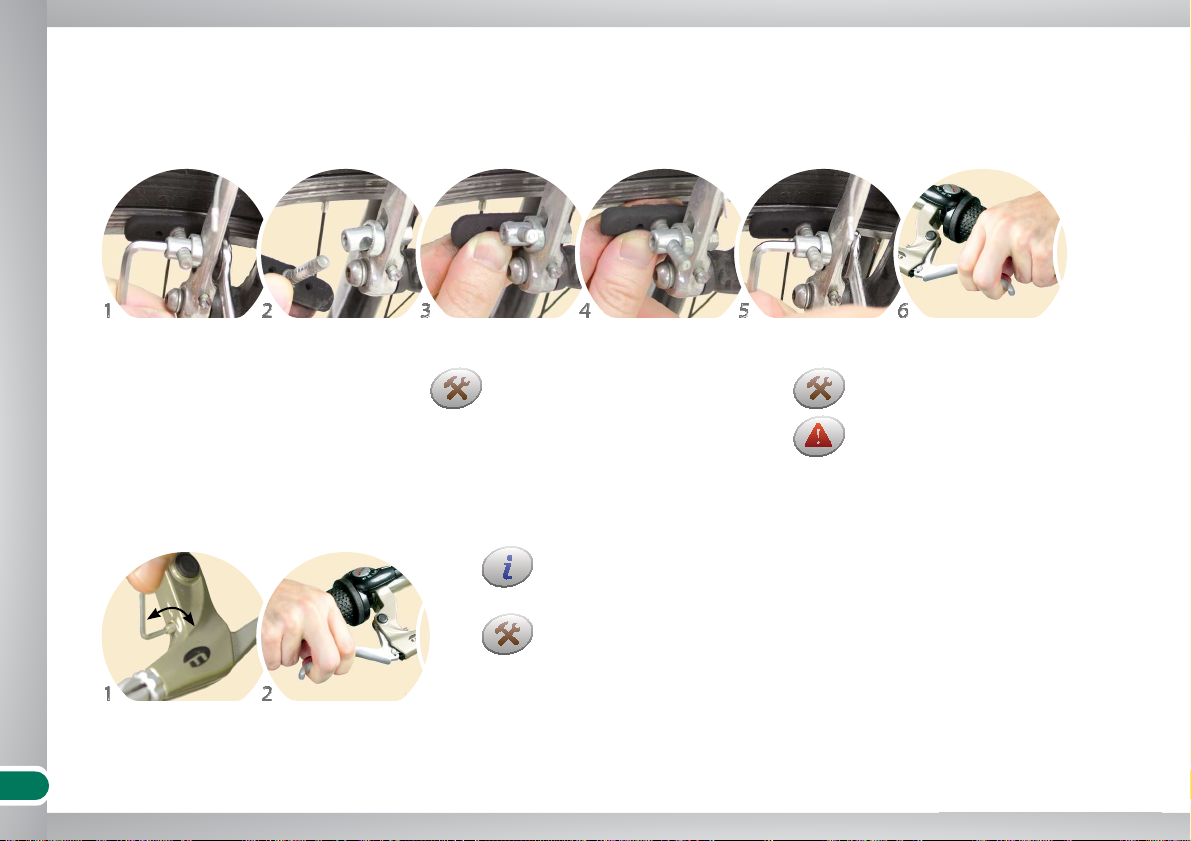
Downtown, Free Spirit, Graffi ti, Lizard, Mimi, Rainbow, Rocket, Scout, Traveller, Turbo, Villager 21, Villager 7, Voodoo, Voyager, Wild Rose:
Loosen the bolt Place the new pad Align the pad Tighten the bolt Test the brakeRemove the old pad
Replace the brake pads as soon as you
notice any damage or excessive wear.
Use only matching brake pads.
Changing brake pads
Turn the adjustment
screw
Test
This changes only the free movement
(play) of the lever before it starts
braking, not the braking force.
Pulling the lever all the way to the
handlebar should be impossible.
Change the brake lever's play
When the brake pad is already
touching at the front, its rear part
should still stay at about 1mm
distance.
Page 27
27
Troubleshooting / break-down help
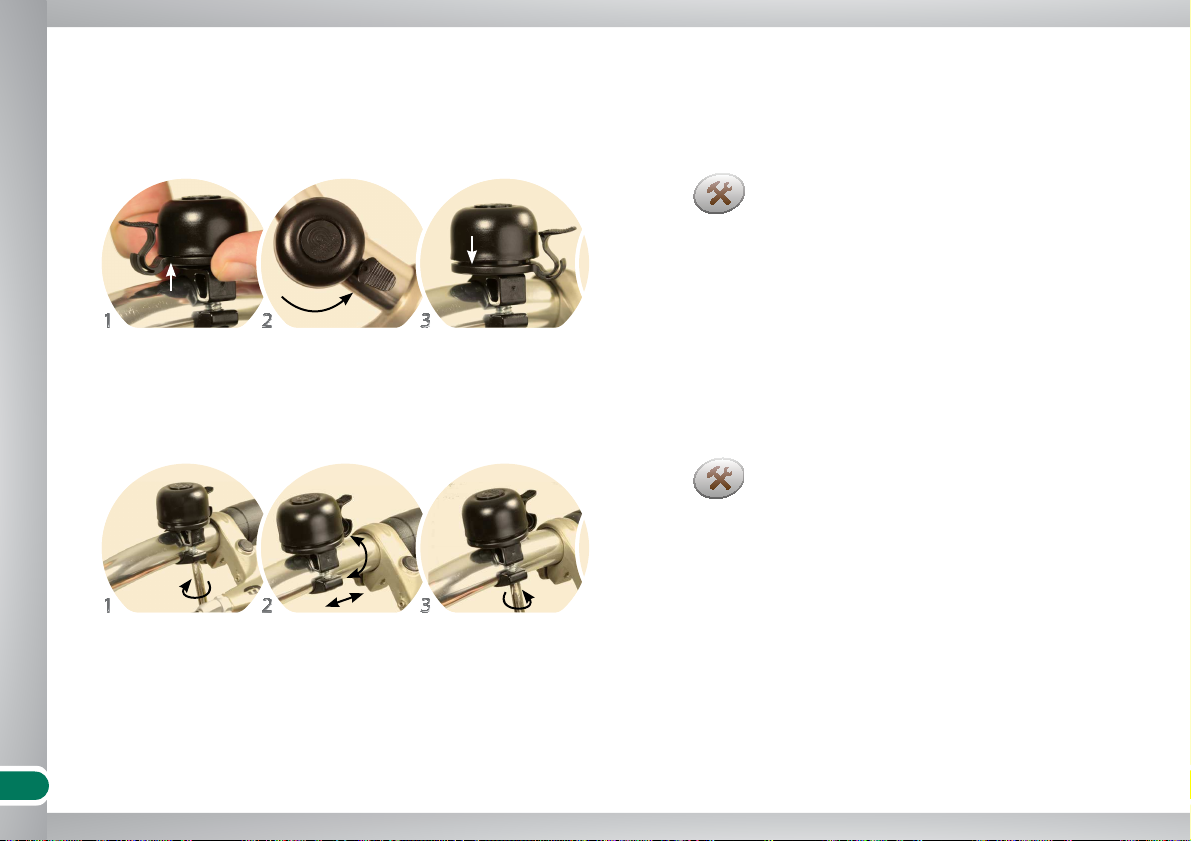
The bell lever can be turned to 12
positions around the bell.
You need a cross-point screwdriver.
Adjust the bell position
Turning the lever
Adjusting position and tilt
Loosen the screw Shift / turn the bell Tighten the screw
Press and hold the
bottom ring upwards
Turn to desired position Release the bottom
ring
Page 28
28
Troubleshooting / break-down help
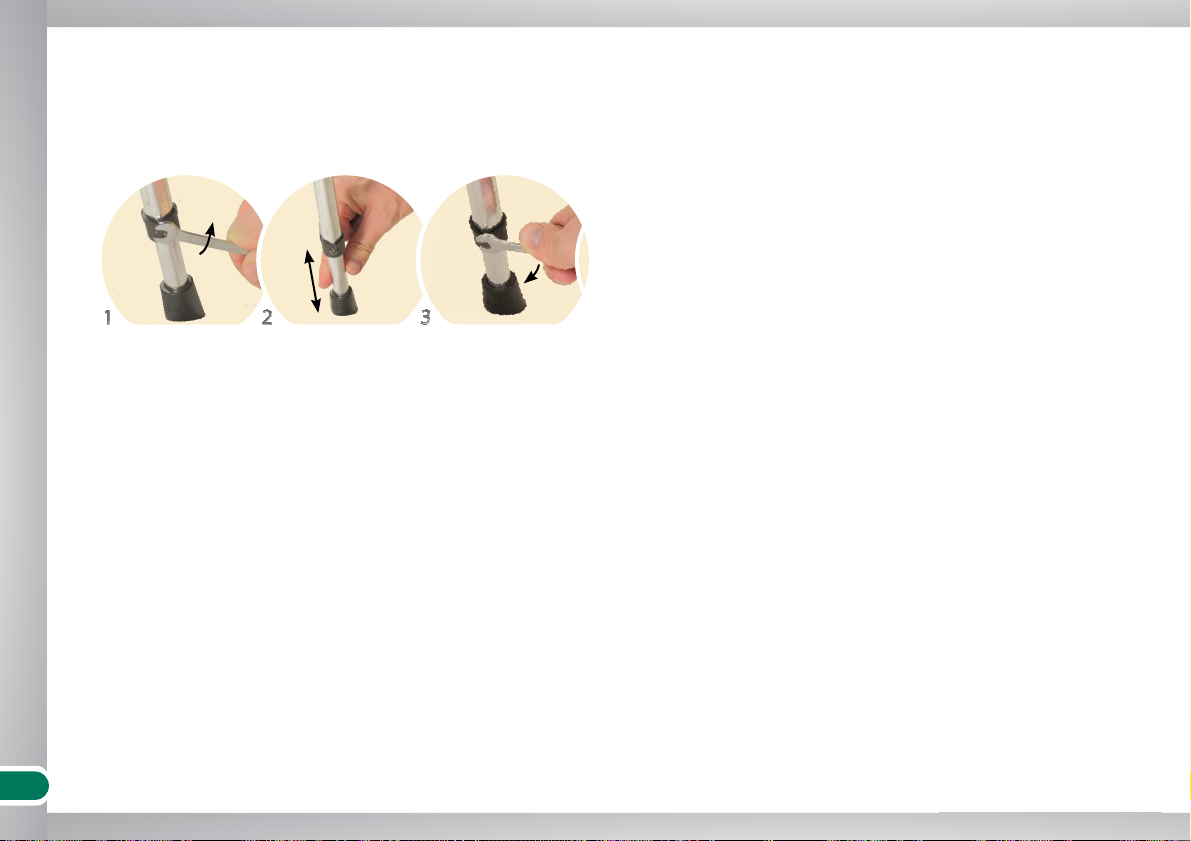
Adjust the length
Loosen the screw Shift the lower part in
or out
Tighten the screw
Improve kickstand stability
Page 29
29
Maintenance
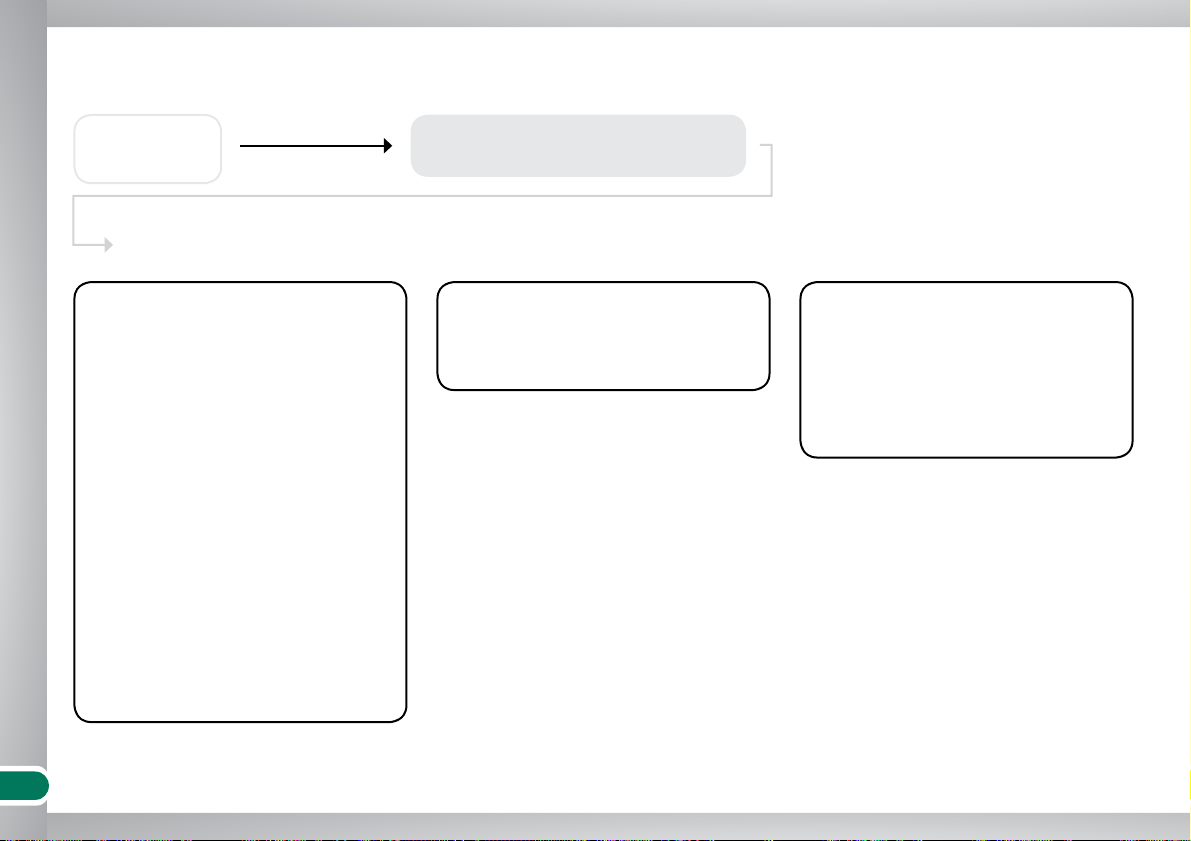
Purchase
First inspection
(by your dealer or a bicycle workshop)
4 - 12 weeks
Maintenance
Once a month
Grease the chain ü
Grease the derailleurs (front, rear) ü
Clean the brake pads ü
Tighten
All nuts, bolts and screws ü
Suspension fork * ü
Pedals ü
Check
Tread of the tyres ü
Brake cables ü
Play of the suspension fork * ü
Play of the headset ü
Chain (state, tension) ü
Trueness of wheels (rotation) ü
Tension of the spokes ü
Play of the hubs ü
Play of the bottom bracket ü
Tightness of the saddle bolt ü
Position of valves ü
Every 6 months
Polish the frame ü
Polish all metal surfaces, except ü
brakes and rim sides
Once a year *
Maintain the suspension fork * ü
Regrease the headset bearing * ü
Regrease the hubs * ü
Regrease the seat post * ü
Disassemble and when needed ü
regrease all cables *
* Should be done by a professional.
This time plan is valid if you ride 1,000-2,000 km a year on tarred roads.
Regular maintenance:
Page 30
30
Index
Index
A
Air pressure. see Tyre
B
Baggage 17, 32
Bell 27
Bike licence 2, 6, 17, 18, 32
Brake 3, 4, 10, 11, 12, 13, 14, 15,
25, 29
C
Chain 8, 19, 23, 24, 29
Chainguard, chaincase 3, 4, 19
Chainring 8, 24
Child seat 18
Cleaning 19
Crankset 3, 4
D
Derailleur 4, 8, 23, 24
F
Fork 3, 4, 32
Frame 3, 4, 12, 19, 23, 32, 33
Front light. see Lights
G
Gear, gear shifting 3, 8, 23, 24
H
Handlebar 3, 4, 12, 14, 17, 23,
25, 31
Helmet 2, 18
Hub 3
K
Kickstand 28
L
Lock 3, 4, 20
Lights 3, 4, 9
M
Maintenance 29
P
Pedal 3, 4, 7, 8, 10
Puncture 22
Q
Quick-release 3, 4
R
Rack 3, 4
Rear light. see Lights
Rim 3, 4, 25
S
Seat 3, 4, 10, 11, 13, 31
Seat post 3, 4
Shift lever, shifting 3, 4, 8, 23, 24
Spoke 3, 4, 23
Sprocket 23
Steerer tube 12
Stem 3, 4, 12
Storing 20
Suspension fork 5, 16, 29. see also
Fork
T
Trailer 18
Tyre 3, 4
V
Valve 3, 4, 21, 22
W
Weight, load 6, 18
Page 31
31
Handover receipt
Handover receipt
Brakes front and rear
Pedals
Wheels (trueness/spoke tension/tyre pressure)
Handlebars/stem (position/bolts checked with torque
wrench)
Saddle/seat post (height and position of saddle adjusted to
suit customer, bolts checked with torque wrench)
Lighting
Suspension fork (adjusted to suit customer)
Gears (limit stops adjustment, function)
Test ride
Others:
I confi rm that I have received the bicycle in proper order along
with the accompanying documents specifi ed below and that I have
been instructed on the proper use of the bicycle.
User‘s guide
Suspension fork
Suspension seatpost
Brakes
Other:
One copy stays with the retailer
Retailer's stamp, contact information and signature
Handover
date:
The bicycle was delivered to the customer ready for use, i.e.
after completion of assembly, inspection, and operational
checks as listed below.
Retailer Customer
Name
Address
Phone (, fax)
E-mail
Date, signature
Page 32
Bike licence
Bike licence
Manufacturer Montone Cycling B.V.
Brand Montego
Bike identication no.
Colour
Frame no.
Frame type
Frame size
Fork manufacturer/brand
Fork model
Fork serial no.
Maximum overall load
(including rider,
baggage and bicycle)
Child seats allowed
Permissible trailer load
yes
no
Allocation of brake levers
front wheel brake
rear wheel brake
Retailer: stamp, signature
right lever
left lever
right lever
left lever
Size of wheels / tyres
Special equipment
32
One copy stays with the retailer
Page 33
Terms of warranty
Montone Cycling B.V.
Terms of warranty
5-year warranty
Frame and solid front fork
2-year warranty
All bicycle components, except those which fall under normal wear.
NOT covered under warranty
Items under normal wear and tear and those which require replacing,
such as tyres, chains, sprockets, chainwheels, brake pads, grips etc. are
not covered.
Warranty will also be refused if damage is deemed to have been caused
by misuse or accident.
The complete warranty terms can be found at www.montegoetsen.nl
33
Page 34

Montego etsen
Salland 2
1948 RE Beverwijk
+31 (0) 251 267287
www.montegoetsen.nl
 Loading...