


RXW-12
R
x
2
R
x
1
R
x
8
R
x
6
R
x
centre
RXW-12
R
x
series
o w n e r s m a n u a l
RXW12 manual.indd 1 18/08/2009 10:03:59
CONTENTS
Introduction 1
Important Safety Instructions 2
Re-cycling 4
RoHS Declaration of Conformity 4
Unpacking 4
Spiked Foot Assembly 5
Amp Panel and Controls 6
Positioning/Initial Set Up 9
Set Up 9
Specification 10
Trouble Shooting 11
Guarantee and Service 12
Claims under this Guarantee 12
EC Declaration of Conformity 13
Data Protection 14
Owner Information 14
INTRODUCTION
Thank you for your purchase of the Monitor Audio RXW-12 subwoofer, which has been designed
and constructed using quality systems and materials to provide years of enjoyment, reliability and
pride of ownership.
Music is and should be a natural enhancement of life. It stimulates the imagination, changes your
mood, helps you relax, and provides endless hours of entertainment. At Monitor Audio we pride
ourselves in attempting to make the listening experience as close as possible to the original ‘music’
production.
Please read through this manual to familiarise yourself with any safety advice and how to set up
your subwoofer to achieve the very best listening experience.
Please retain this manual for future reference.
monitoraudio.co.uk 1
RXW12 manual.indd 2-1 18/08/2009 10:03:59
IMPORTANT SAFETY INSTRUCTIONS
1. Read these instructions.
2. Keep these instructions.
3. Heed all warnings.
4. Follow all instructions.
5. Do not use this apparatus with water.
6. Clean only with a dry cloth. Great care and attention has gone into the
materials chosen to produce the RXW-12. A gentle wipe with a dry, clean cloth
is all that is required to remove any dust. Treat it as you would a fine piece of
furniture because that is how they have been designed.
7. Do not block any ventilation openings. Install in accordance with the
manufacturers instructions.
8. Do not install near any heat source, such as radiators, heat registers, stoves,
or other apparatus (including amplifiers) that produce heat.
9. Do not defeat the purpose of the polarised or grounding type plug. A
polarised plug has two blades with one wider than the other. A grounding type
plug has two blades and a third grounding prong. The wider blade or the third
prong are provided for your safety. If the provided plug does not fit your outlet,
consult an electrician for replacement of the obsolete outlet.
10. Protect the power cord from being walked on or pinched particularly at
plugs, convenience receptacles, and the point where they exit from the apparatus.
11. Where the mains plug or an appliance coupler is used as the disconnect
device, the disconnect device shall remain readily operable
12. Only use attachments/ accessories specified by the manufacturer.
13. Use only with the cart, stand, tripod, bracket, or table specified by the
manufacturer or sold with the apparatus. When a cart is used, use caution when
moving the cart/ apparatus combination to avoid injury from tip-over.
15. Refer all servicing to qualified service personnel. Servicing is required when
the apparatus has been damaged in any way, such as power supply cord or plug
is damaged, liquid has been spilled or objects have fallen onto the apparatus,
the apparatus has been exposed to rain or moisture, does not operate normally
or has been dropped.
16. This apparatus shall not be exposed to dripping or splashing water and
that no object filled with liquids such as vases shall be placed on the apparatus.
17. This exclamation point within an equilateral triangle is intended to alert
the user to the presence of important maintenance (servicing) instructions in the
literature accompanying the appliance.
WARNING
• TO PREVENT FIRE OR SHOCK HAZARD, DO NOT USE THIS PLUG WITH AN
EXTENSION CORD, RECEPTACLE OR OTHER OUTLET UNLESS THE BLADES CAN
BE FULLY INSERTED TO PREVENT BLADE EXPOSURE
• TO PREVENT FIRE OR SHOCK HAZARD, DO NOT EXPOSE THIS APPLIANCE TO
RAIN OR MOISTURE
• TO PREVENT ELECTRIC SHOCK, MATCH WIDE BLADE PLUG TO WIDE SLOT AND
FULLY INSERT.
This lightning flash with an arrow head symbol, within an equilateral
triangle, is intended to alert the user to the presence of un-insulated
“dangerous voltage” within the product’s enclosure that may be of
sufficient magnitude to constitute a risk of electric shock to the
persons.
Warning: To reduce the risk of electric shock, do not remove cover
(or back), no user-serviceable parts inside. Refer servicing to
qualified service personnel.
This exclamation point within an equilateral triangle is intended to
alert the user to presence of important maintenance (servicing)
instructions in the literature accompanying the appliance.
14. Unplug this apparatus during lightening storms, or when unused for long
periods of time.
RXW12 manual.indd 2-3 18/08/2009 10:04:00
This is a “Class II”, “double insulated apparatus”. This apparatus
must NOT have a safety connection to Earth.
monitoraudio.co.uk 3Silver RXW-122
RE-CYCLING
Correct Disposal of Waste Electrical and Electronic Equipment (WEEE) by User
in Private Households in the EU.
This symbol on the product or accessories indicates that they must not be
disposed of with your household wastes throughout the EU. To prevent possible
harm to the environment or human health from uncontrolled waste disposal,
recycle it responsibly to promote the sustainable reuse of material resources.
Instead it is your responsibility to dispose of your waste equipment by handing
it over to a designated WEEE collection point for recycling. The separate
collection and recycling of your waste equipment will help conserve natural resources and ensure
that it is recycled in a manner that protects human health and the environment.
For more specific information about where you can take your equipment for recycling please contact
your local city/council office, your local waste disposal service or the outlet where you purchased
your Silver RXW-12 product.
ROHS DECLARATION OF CONFORMITY
Directive 2002/95/EC of the European Parliament and of the Council on
the reduction of the use of certain hazardous substances in electrical and
electronic equipment, January2003.
Background
The RoHS directive restricts the use of Lead (Pb), Cadmium (Cd), Mercury (Hg), hexavalent
Chromium (CrVI), polybrominated biphenyl (PBB) compounds, and polybrominated diphenyl ether
(PBDE) compounds in electrical and electronic equipment sold in the European Union.
UNPACKING
Care must be taken at all times when handling the RXW-12 due to the weight of
the product. We recommend a two-person lift wherever appropriate.
A feature of the RXW-12 is the exposed drive unit. Great care must be exercised
at all times to ensure it is not damaged during unpacking and when finally sited in
the room. Any physical damaged caused to the drive unit by not complying with
this requirement will not be covered by warranty.
The mains power cord(s) and feet assemblies are contained separately in the packaging and should
be removed prior to unpacking the product.
To remove the RXW-12 from its carton place some protective material on the floor and having
removed any loose items (mains lead(s) and feet) from the top of the packaging, carefully invert the
carton. Also see the icons printed on the carton. Gradually pull the carton upwards to expose the
subwoofer, which will be presented with its base uppermost. Remove fixing tape from bag and
expose the base/cabinet. Before turning your RXW-12 over so that it is the correct orientation, you
must decide how you will be using the feet:
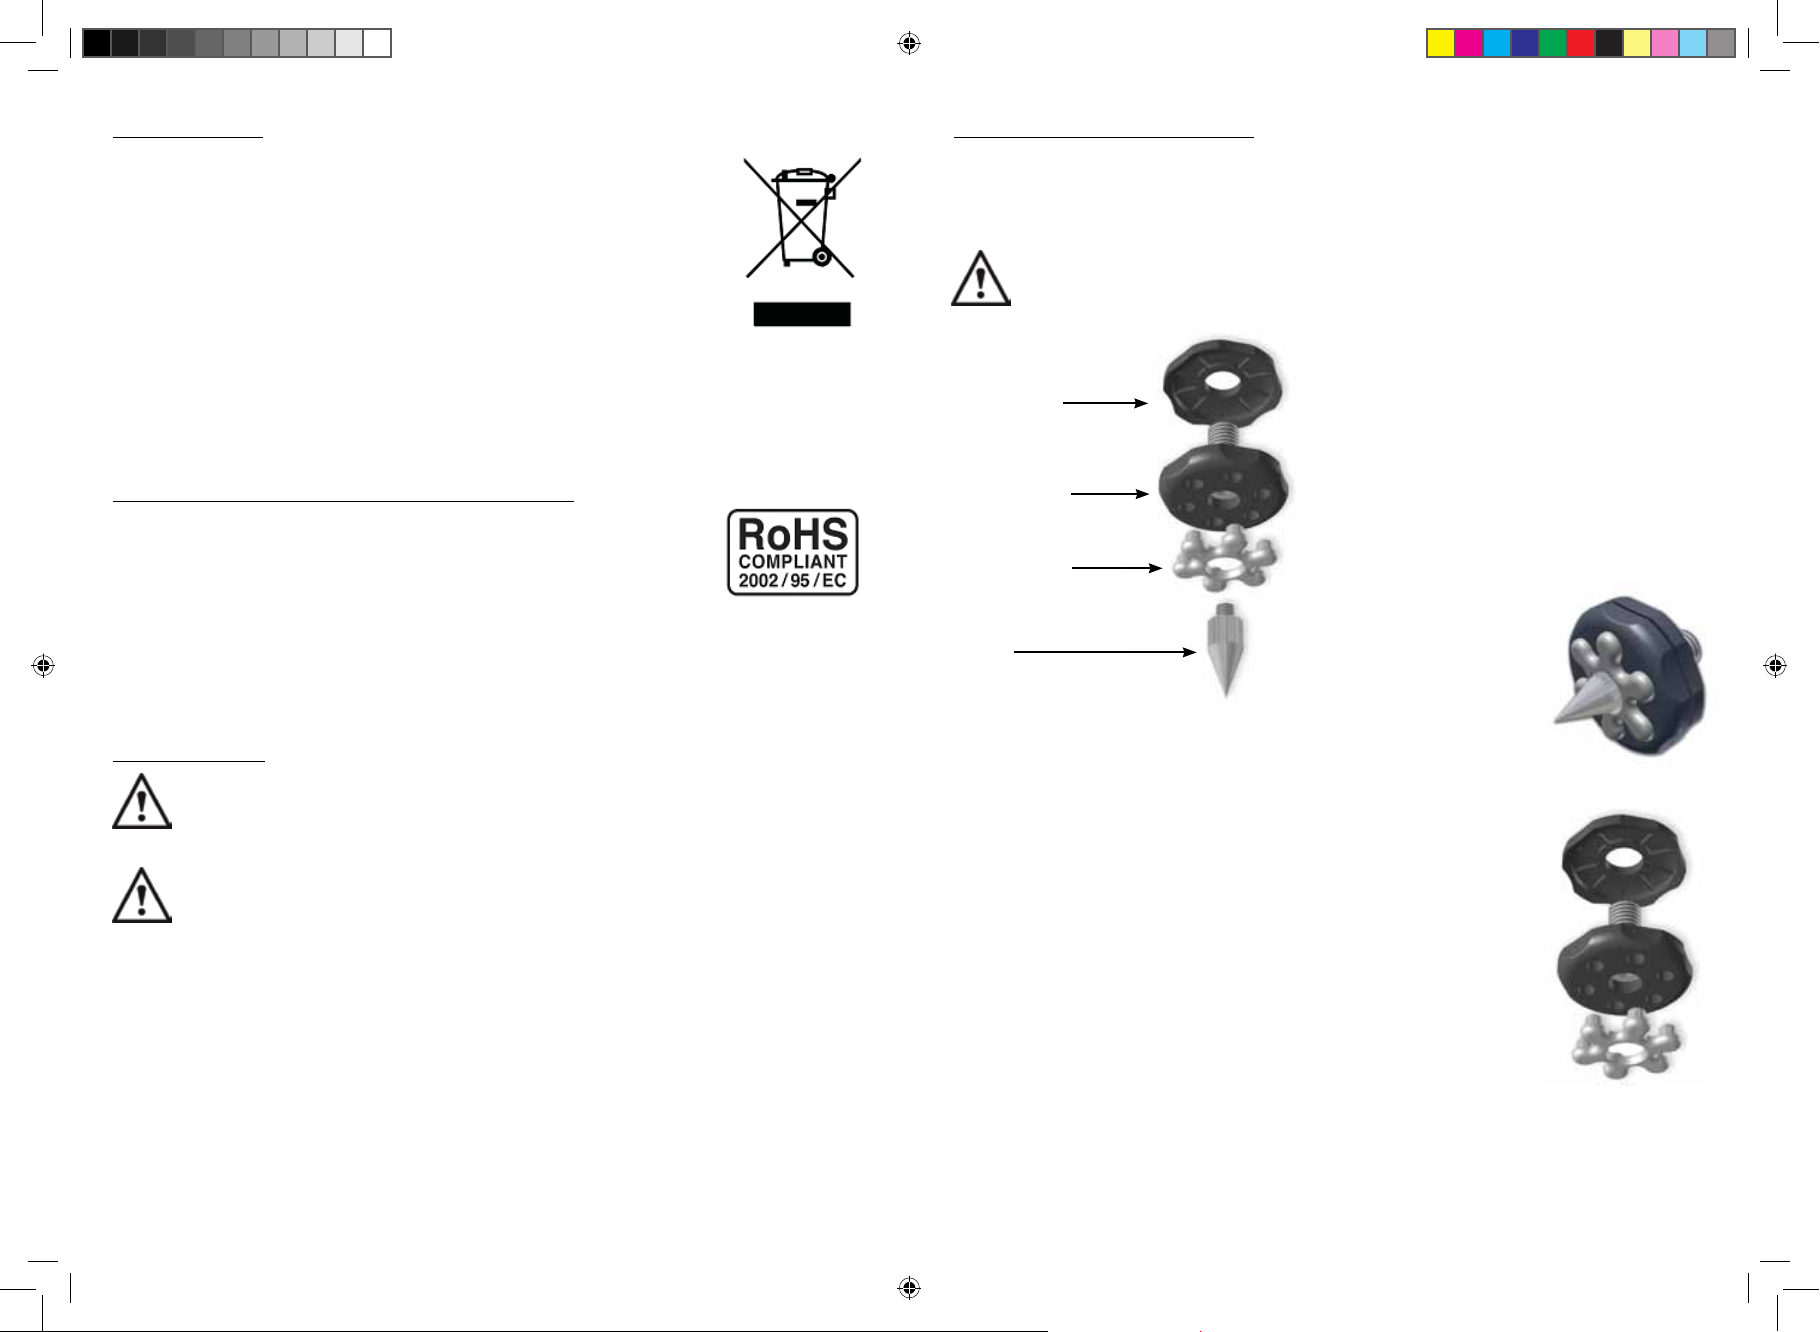
SPIKED FOOT ASSEMBLY
For Carpeted Floors
The Silver RX spiked foot assembly encorporates a spike for use on carpeted floors and also, a
soft polymer pad (for use on wooden or tiled floors).
Please ensure there are no hidden wires under the carpet that could be damaged by the
spikes.
The foot comes fully assembled for use on
carpeted floors. All that is required is fixing into
the bottom of the cabinet. This is achieved by
Locking Nut
Main Threaded
Assembly
Polymer Pad
Spike
simply screwing the feet fully into the 4-threaded
insert in the underside of the cabinet. If your
carpet has a very thick pile, remove the soft
polymer pad from the foot to ensure the spike
goes right through the carpet into the floor. With
great care turn your cabinet the right way up.
Place the cabinet in your desired location, and
check that it is level on all sides. If it is slightly
uneven, unscrew the spike at the lowest point
and check again.
Continue this process until
the cabinet is fully level.
Use the locking nut on the
foot to fix the foot in place
and to stop any unwanted
vibrations.
Spiked Foot Fixing For Wooden/Hard Floors
For use on solid floors or where spikes are inappropriate, it is possible to use
the foot without the spike. To use the foot in this manner carefully grip the
knurled portion of the spike and rotate anti clockwise to unscrew the spike
fully.
You may find it easier to first remove the polymer pad so as to gain more
purchase on the spike.
The pad should be replaced before carrying out the levelling operation
previously described.
monitoraudio.co.uk 5Silver RXW-124
RXW12 manual.indd 4-5 18/08/2009 10:04:07
 Loading...