

Page 1
This instruction sheet explains in detail how to fix your Radius 225/
Radius 250 to the wall by using the wall fixing plate. This product
has been designed using the most up-to-date computer technology
to provide you with a secure fixing for your loudspeakers, whether
you want to position them horizontally or vertically. It has also
been designed to ensure that the exceptional sound quality is
maintained.
Please remember to always read the instructions first as they
are sequenced to provide a safe way of working.
WARNING: For safety reasons do not attempt to fix these
speakers to your wall if you are unsure of your ability to
provide asecureand safe fixing.
You willneedto determine; the structure of the wall,where to fit the
bracket andif your loudspeaker cable isgoing tobe run through the
wall and out through the cable hole in the fixing plate. If unsure,
please obtainthe services of acompetent qualified tradesperson.
WARNING: Ensure that there are no water pipes or electricity
cables running behind where the wall bracket is going to be
secured. Work from securesteps and avoid trailing wires.
ALWAYS CONNECT YOUR CABLES TO THE LOUDSPEAKERS
BEFORE CONNECTING THEM TO THE AMPLIFIER
Radius 225/ 250 Wall Plate Fixing Instructions
©Monitor Audio 2005
1
Page 2
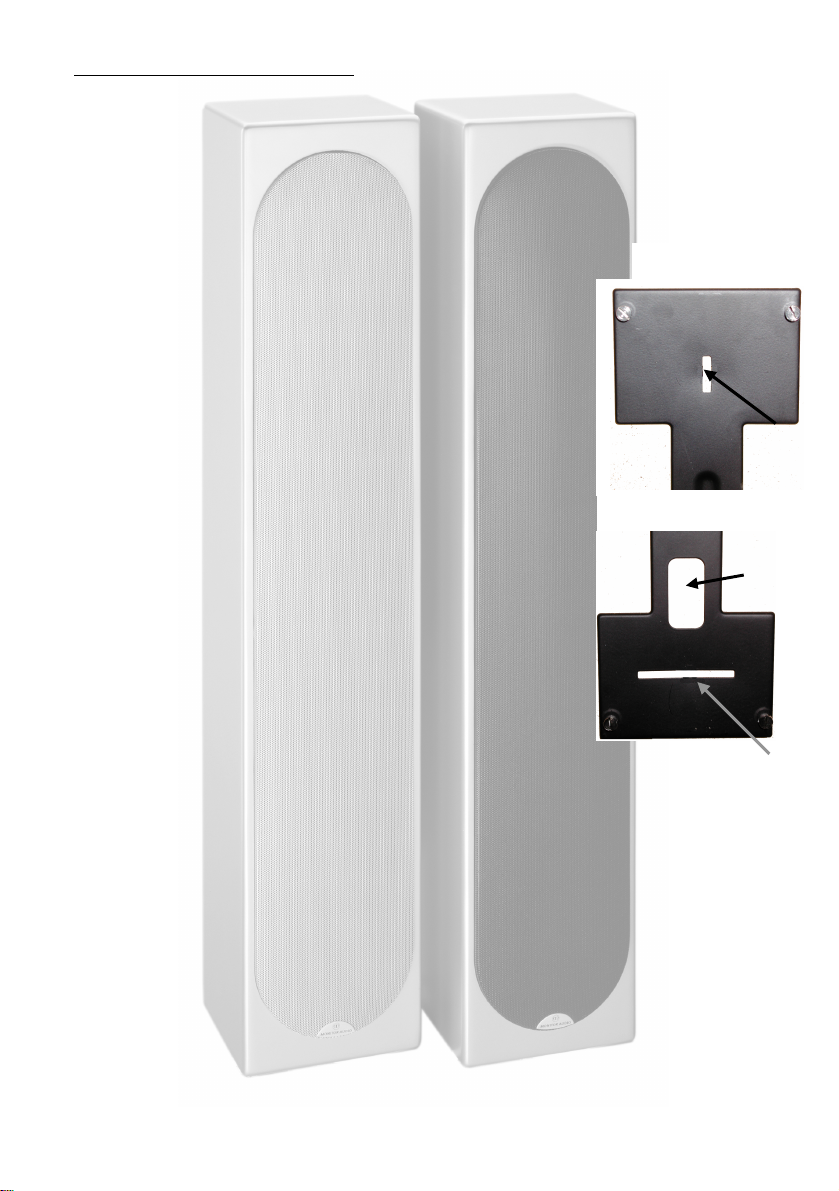
Slot
Bottom
Section
Top
Section
Slot
FIXING INSTRUCTIONS
1. Decide where you are going to position your Radius 225/ 250
loudspeakers. You can position them horizontally (centre
channel) orvertically (left/ right, front/ rear).
NOTE: The loudspeaker will drop 6mm when placed on the
fixing plate, therefore, take that into account when considering
fixing.
2. Hold the fixing plate to the wall (in the
desired location), and mark the fixing
positions in the two long thin slots. The
centres of the two fixing points are 474mm
apart for the Radius 225 and 624mm for the
Radius 250.
3. For fixing to plasterboard (sheet-rock) or a
solid wall use a suitable 6.5mm (1/4”) drill
Fixing
bit. Drill the two positions deep enough to
accept the wall plugs provided, this should
through
be 30mm (1 1/8”). Insert the wall plugs into
the wall. If your cable has been run through
the wall, feed it through the hole (indicated
above) in your wall fixing plate and then
screw the bracket to the wall using the
25mm (1”) screws provided.
Fixing
3a.For fixing to a wooden wall/structure, use a 2mm drill bit
to drill 2 pilot holes and use 25mm screws to secure the
bracket.
4. Connect your cables to the terminals on the loudspeaker. We
recommend that you use just bare wire into the through hole in
the terminals, and tighten the securingnut.
5. Hook your loudspeaker onto the locating lugs on the fixing
plate. Ensure all four are lined up correctly before pushing
down intoplace.
Radius 225/ 250 Wall Plate Fixing Instructions
©Monitor Audio 2005
2
Cable
hole
 Loading...