

Page 1

MONGOOSE PENTACLE M-1
USER GUIDE
Welcome
Thank you for choosing the MONGOOSE PENTACLE M1 Alarm system for you motorcycle. The system provides
many unique features designed to increase the protection of your machine or to customize its operation to meet your
individual requirements.
Some of these features can only be adjusted by your dealer and are dependent on local regulations. For these
reasons, we advise you to discuss the options available with your installing dealer.
We also advise you read this manual carefully and keep it safe for future reference.
You remote control
MONGOOSE PENTACLE M1 systems come supplied with 2 remote controls as standard. It is possible to add up
to 4 extra remote controls (6 in total).
ENGLISH
Standard Conversion completed
What the buttons do:
There are two buttons on your transmitter.
The GREY button controls the main arm/disarm functions of the system.
The BLACK button controls secondary functions such as movement sensor deletion (Ferry Mode) and panic/
locate.
Combinations of these buttons control further functions (described later in the manual).
Should you wish to change the operation of the alarm from the factory default setting, refer to the relevant section
within this manual for information on how this effects the operation of the system. If you require further guidance you
should contact your installing dealer.
Changing your remote control battery
Each remote control contains a single longlife lithium battery (CR1616). This battery will normally last least 12
months. Normal range for the remote control is around 10 meters. As the battery within the remote control comes to
the end of its life, you will notice a reduction in its range and the battery should be replaced.
1
Moto Alarm System
Page 2

1. To replace the battery remove the small screw from the ‘key end’ of the
remote and split the two halves of the case.
NOTE: Take care not to lose the screw and ignition key blade/transponder if
the key conversion has already been carried out.
2. Lift the printed circuit board from the remote.
3. Slide out the circular CR1616 battery from its holder nothing the polarity.
4. Maintaining the polarity of the battery, slide the new battery into the battery
holder.
5. Fit the PCB into the rubberized holder and check an OE transponder chip
is still located within the top half of the casing.
6. Fit the assembly into the top casing so the GREY and BLACK buttons drop
into their respective holes. At this stage it is a good idea to press the
remote control buttons to check they are operating correctly, this will be
shown by the LED on the remote control illuminating.
7. Refit the ignition key blade into its holder, if required.
8. Clip the bottom half of the casing to the top half, replace and tighten the
screw holding the two halves securely.
Operating the alarm system
This section explains fully how the alarm system works.
Arming the system
Passive arming
Unless the unit has been placed in ‘winter’ mode, the system will always passive arm 45 seconds after the
ignition is turned OFF.
When the ignition is turned OFF the LED will light continuously before emitting a set of increasing rate beeps in the
last 5 seconds.
The LED changes to flashing to indicate the system is activated.
When set to the factory default the system passively arms the immobiliser and ignition trigger only.
If you wish to make the alarm fully arm passively you can do this via the software switches covered within the
customization section of this manual.
Moto Alarm System
2
Page 3

Fully arming the alarm system
To fully the alarm system to give movement, nudge, trigger switch and battery backup coverage, press the
GREY button on the remote control within 45 seconds of turning the ignition off. The indicators will flash
twice.
NOTE: It is possible for your dealer to add Arm/Disarm beeps to the system via the customization software
switches so the system gives audible signals also when it is armed/disarmed.
NOTE: The inclusion of arm and disarm indication beeps is strictly forbidden in all EU countries.
The LED will start to flash 5 seconds after the alarm is armed and will be fully active after 20 seconds.
If you have changed the default settings within the software section and selected FULL passive arming of both the
alarm and immobiliser, the alarm will automatically arm along with the immobiliser.
You can still arm it instantly by pressing the GREY button of the remote within the first 45 seconds after turning off
the ignition.
If the system has passively armed as an immobiliser and you wish to arm it fully, simply press the GREY
button TWICE. The first press disarms the system, the second arms is fully.
Press to arm 2 flashes, LED flashes 5 seconds after arming. System is fully armed after 20 seconds.
Arming the system without the movement sensor (‘Ferry’ Mode).
To arm the alarm system but have both the movement and nudge sensors turned off; press the BLACK button
within 10 seconds of arming the system with the GREY button.
The indicators will flash twice to indicate the alarm has been armed and then indicators will flash three further
times to confirm the movement sensors have been turned OFF.
The system will still have immobilized the machine and the alarm will react if the machine is hotwired, the supply
to the alarm is tampered with or one of the trigger switches is activated.
If you press the BLACK button after more than 10 seconds of arming the alarm nothing will happen and the alarm
will still remain fully armed with the movement sensors ON.
This process has to be carried out EVERY time you wish the alarm to be in ‘Ferry’ mode.
NOTE: If you have selected full passive arming and wish to have the alarm in ‘Ferry’ mode you must arm the alarm
as started above. The alarm cannot be put into ‘Ferry’ mode after it has ‘PASSIVE’ armed.
ENGLISH
Press to arm 2 flashes
Press within 10 seconds 3 flashes
3
Moto Alarm System
Page 4

Disarming the system
To disarm the system from the armed state, simply press the GREY button on the remote control.
The unit will then flash the indicators once to indicate it has been disarmed.
Turn the ignition on within 45 seconds or the system automatically rearm in the same state as it was armed
prior to disarming.
NOTE: Each time the system is disarmed the LED will flash to signify the total number of remote controls, coded
into the system. This ensures you will always know you are in possession of all remote controls capable of operating
your system.
If you find there are extra, unknown remote controls coded into your alarm, your dealer can exclude these from the
unit. Your dealer may levy a small charge at their own discretion for this service.
Press to disarm Flash once, LED flash according to number of remote coded to the alarm.
Disarming the system after it has been triggered
If the system has been triggered in your absence, a long audible tone will be heard when the alarm system is
disarmed using the transmitter.
The system includes a diagnostic mode, which allows you to identify the circuit that triggered the alarm system.
After the long audible tone, the siren will beep and the LED will flash a number of times to indicate what triggered
the alarm system.
Diagnostic chart
No. of Beeps Reason
1 The Positive or Negative supply to the alarm has been lost (the fuse may have blown)
2 The alarm has detected the ignition being turned on whilst armed
3 Movement Detection – Motorcycle has been moved
4 Shock Sensor Detection – Motorcycle has been nudged too may times
5 Trigger switch 1 has been initiated
6 Trigger switch 2 has been initiated
The Alarm system stores the last five triggers within their memory. This can only be accessed by an installer to
assist them in servicing your system.
Automatic re'arming
To ensure the machine remains covered at the level chosen the last time you armed it, when the system is
disarmed it automatically starts a 45 second countdown after which the system will automatically rearm at the
SAME level as it was last armed in (i.e. passive immobiliser, full alarm or full alarm minus movement sensors).
Moto Alarm System
4
Page 5

If the ignition is turned or one of the trigger switches is operated (e. q. seat removed if the switch is fitted to it)
within the 45 seconds countdown period, the unit will passively immobilize.
NOTE: If full passive arming has been selected and the ignition is turned ON/OFF the alarm will rearm fully.
If one of the trigger switches has been operated the alarm will only immobilise.
Silent arming/disarming
If you have asked your dealer to select the arm/disarm tones you can still arm or disarm the system without
the tones on a oneoff basis.
To armdisarm silently, simply press the BLACK button of the remote control followed by the GREY button.
The system will arm or disarm for this one operation and only flash the indicators.
NOTE: The inclusion of the arm and disarm indication beeps is strictly forbidden in all EU countries.
Press BLACK Press GREY Flashes only
‘Sleep’ mode
The alarm system uses a small amount of current during operation.
However the system includes three level sleep procedures to reduce the current consumption of the system as the
motorcycle battery starts to discharge. This system reduces the risk of damaging the machine’s battery through being
left in a discharged state. The levels of sleep are as follows:
ENGLISH
Level 1 – Switching Point 11.5 Volts
The LED flash rate is slowed to once every 10 seconds.
The receiver is switched off unless the LED is turned on, (i.e. the alarm system will only disarm as the LED flashes).
All other features remain unchanged.
Level 2 – Switching Point 10.5 Volts
The LED flash rate is slowed to once every 30 seconds and the brightness of the LED is reduced
The Siren will give a low level audible beep every 60 seconds to warn you of a potential battery failure.
Shock Sensor is turned off (the movement sensor remains turned on).
The receiver is switched off and the remote will not turn off the alarm until the ignition is turned ON.
Level 3 – Switching Point 9.8 Volts
The LED is turned OFF.
The Siren Beep is turned off.
The internal battery backup is turned off.
If you wish to disarm the alarm, in sleep levels two and three, turn the ignition on and press the GREY button
on the remote control.
5
Moto Alarm System
Page 6

Hazard warning lights
This is a hazard light warning feature for motorcycles even if they do not have a hazardwarning switch.
Pressing both the GREY and BLACK buttons of the remote control for 3 seconds when the ignition is OFF and
the alarm system is armed will start the hazard warning lights.
NOTE: If the motorcycle battery voltage is too low to maintain this feature, the lights will flash 5 times and then
stop.
To turn off the hazards either press both buttons again for 3 seconds (leaves the system armed) or press the
GREY button to disarm the alarm system and turn off the hazard lights.
NOTE: For safety reasons the hazard light feature cannot be used with the ignition turned on.
Press and hold GREY and BLACK at the same time
‘Panic/locator’ feature
Press and hold the BLACK button of the remote for 3 seconds with the ignition switched OFF to enter ‘panic/
locator’ mode.
The siren will sound and the indicators will flash until any button is pressed on the remote control to turn the panic/
locator mode off.
When triggered, the alarm system reverts to the original state held before the button was pressed to activate the
panic/locate mode.
Press and hold BLACK button for three seconds
Winter mode
The purpose of this mode is to enable you to leave the machine for long periods of time with the alarm drawing an
absolute minimum current (250µA) from the machine’s battery. In this mode the alarm system is no longer active and
it leaves the machine immobilized only.
Should you decide to place the machine in this state, we strongly advise you to use further measures to protect
your machine with quality physical security.
NOTE: The machine’s battery will still naturally discharge over time so we advise you to check its condition
periodically.
Moto Alarm System
6
Page 7

Entering ‘Winter’ mode
From the disarmed state, press both buttons on the transmitter for 10 seconds with the ignition ON until
you hear a beep, after the ignition is switched OFF the alarm unit will go into winter sleep mode.
The unit will now be completely shut down leaving the machine and current usage below 250mA.
Ignition
ON
Press Grey button One flash, one beep
Ignition
OFF
One beep Press both buttons for 10 seconds
Exiting ‘Winter’ mode
To reactive the alarm system the ignition has to be switched ON and the alarm will give a series of increasing
rate beeps which last for 5 seconds. Within this time press the GREY button on the remote control or the alarm
system will trigger.
Once the unit has woken up it will come back as a fully armed alarm/immobiliser. This ensures that if the machine
is attacked by a third party, it is fully protected.
The PIN override system
ENGLISH
The MONGOOSE PENTACLE M1 Alarm have a PINdisarming feature. As a new product there is no PIN number
programmed into the alarm, therefore we strongly recommend you enter own 4 digit number as one of your
first priorities.
NOTE: If you do not enter a PIN number and lose or damage you remote control whilst out, you will not be able to
disarm your alarm without accessing your second remote control.
Entering a new PIN code
To initialize the PIN number the following procedure should be followed:
1. Disarm the alarm system using the remote control. The LED will flash to signify how many remote controls are
coded into the alarm.
2. Immediately after this, turn the ignition ON, OFF and ON within 5 seconds.
3. Press both buttons on the remote control within 10 seconds of turning the ignition back ON until the siren
beeps confirmation (3 seconds).
4. Turn the ignition OFF and ON.
5. The LED fitted to the machine will flash rapidly for 3 seconds.
6. After 3 seconds the flashes will slow and a beep ill be heard with each slow flash.
7
Moto Alarm System
Page 8

Count the number of slow flashes or beeps from the siren until it equals the first digit of the required PIN and
turn the ignition OFF and ON. If you wish to enter a zero turn the ignition OFF and ON immediately after the rapid
flashes stop (i.e. before the first slow flash).
7. The LED will again start to flash rapidly for 3 seconds and then start to flash slowly along with the beeps.
Count the number of flashes or beeps from the siren unit until it equals the second digit of the required
PIN and turn the ignition OFF and ON.
8. Repeat the process for the 3rd and 4th digits.
9. Once you have entered 4 numbers, the siren will beep one long tone to indicate their entry. You then have
to confirm your selected PIN number by entering it again.
10. Turn the ignition ON and repeat the above procedure with the same PIN.
11. Once re'entered, turning the ignition OFF completes the procedure. If the PIN is confirmed correctly, then
the alarm system will give 2 short tones. If the PIN is confirmed incorrectly, then the alarm system will give
3 long tones.
Note:
a) You can disarm the alarm system with the transmitter at any time.
b) If the ignition is left off and no action is taken within 3 minutes, the alarm system reverts to normal mode.
c) If the ignition is left on for more than 10 seconds,the alarm will revert to disarmed mode.
d) There is no default PIN, therefore you must set a PIN to disarm the system in the event of remote control loss or
failure.
e) The number 0000 cannot be used even if initialized.
Please write your PIN code here and on your credit card instructions and store in a secure location
Moto Alarm System
8
Page 9

Entering a new PIN code
To initialize the PIN number the following procedure should be followed:
ENGLISH
You can disarm the alarm with
the transmitter at anytime
9
DON’T WORRY IF YOU GET IT WRONG
If ignition is left OFF and no
action is taken within 3
minutes, the alarm will
revert to service mode
If ignition is left ON for more
than 10 seconds, the alarm
will revert to disarmed mode
Moto Alarm System
Page 10

Changing your PIN
The PIN can be changed at any time simply by repeating the above procedure. The original PIN will be deleted and
the new PIN will disarm the alarm.
NOTE:
1. The factory set PIN is 0000. This PIN will not operate the alarm so it is important you set your own personal PIN.
2. You cannot set a PIN without a valid remote control.
3. If you do not set a PIN you will not be able to disarm the system should you lose or damage your remote control.
4. The PIN is also required to add further remote controls or change the operation of the alarm via the software
switches.
5. Should you require your dealer to change any settings or add a new remote control you should inform them of
your PIN. They will be able to carry out customization of the unit but they will have to overwrite your existing PIN
and you will have to reenter your preferred number.
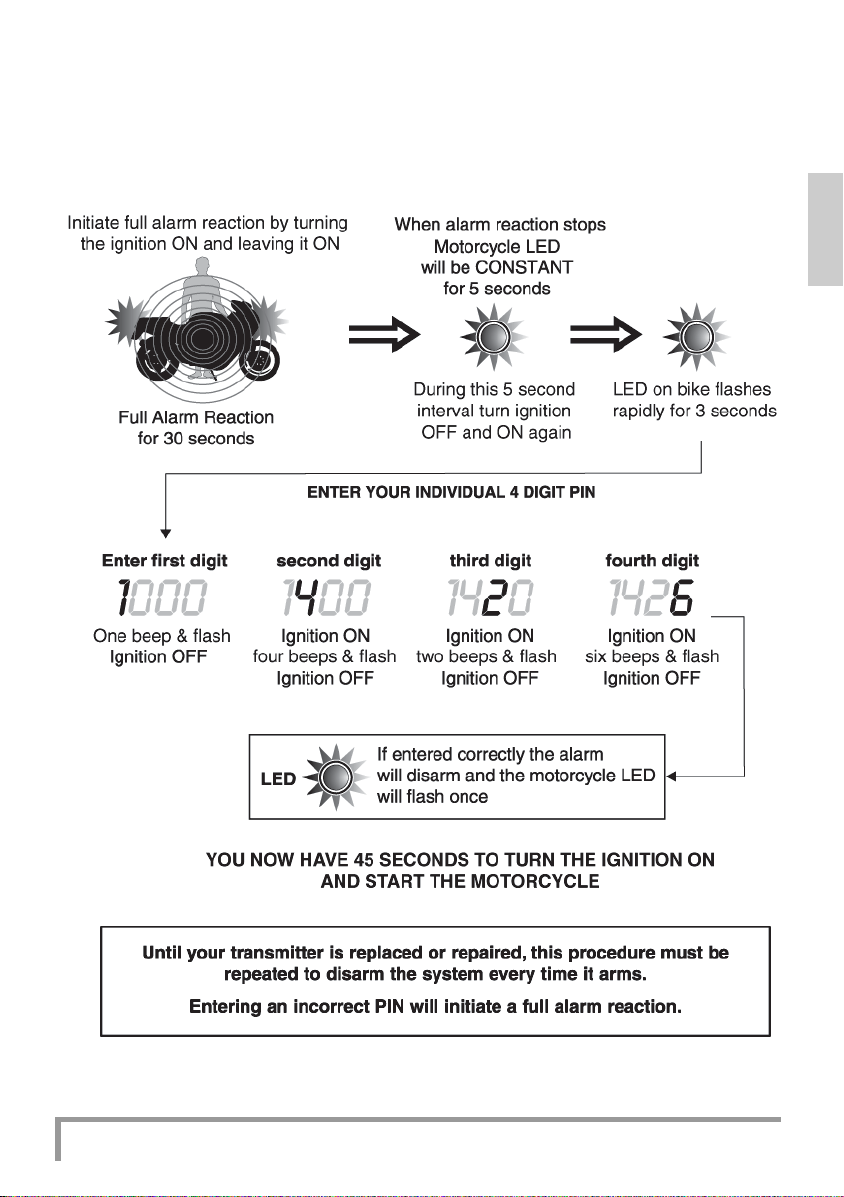
Disarming the system with your PIN
If the transmitter is lost or damaged, or the transmitter battery is flat, the system can be overridden by your chosen
four digit PIN (Personal Identification Number) used in conjunction with the ignition switch. The PIN procedure can
only be used after a full alarm reaction has been initiated.
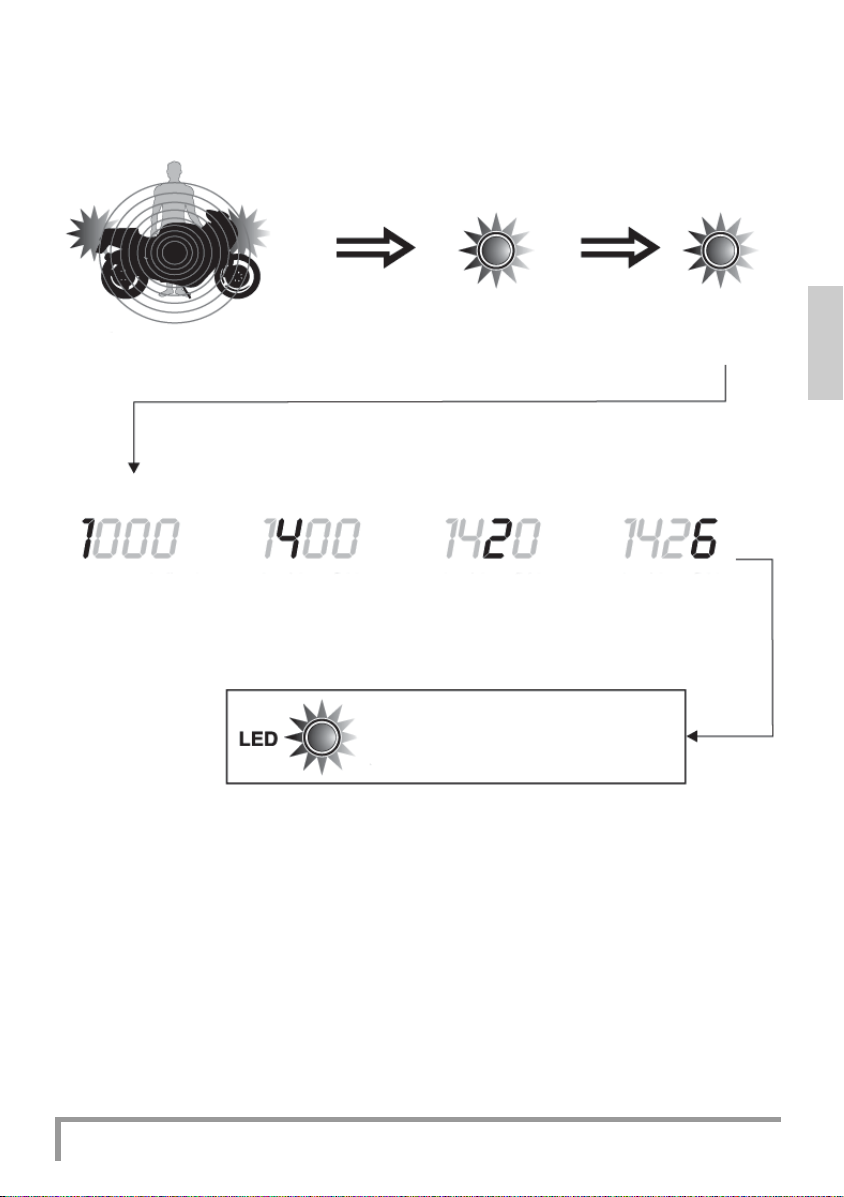
The procedure is as follows: '
1. Turn the ignition ON to initiate an alarm reaction, (immediate if the alarm is armed, or after 10 seconds, if the
immobiliser only is armed).
2. The alarm will sound for 30 seconds and the indicators will flash for 30 seconds. Do not turn the ignition OFF
during the sounding phase.
3. When the alarm reaction stops, the motorcycle LED will be on constantly for 5 seconds. During this 5second
period, turn the ignition OFF and ON.
4. The override procedure will start immediately, indicated by rapid flashes of the LED for 3 seconds which then
slows to the slow flash combined with beeps as detailed within the PIN entry section above.
5. Count the number of SLOW flashes from the LED or beeps from the siren unit until it equals the first digit
of the PIN code and then turn the ignition OFF and ON. Again if you have selected Zero as your first PIN
number you must turn the ignition OFF and ON immediately after the rapid flashes stop.
6. The system will then return to the rapid LED flash sequence for 3 seconds and then go to slow flashes/
beeps. Count the number of flashes or beeps from the siren unit until it equals the second digit of the PIN
code and then turn the ignition OFF and ON.
7. Repeat the sequence to enter the 3rd and 4th PIN numbers.
If entered correctly, the alarm will disarm and the motorcycle indicators will flash once.
NOTE: As soon as the alarm system is disarmed, the passive arming alarm (if selected) and passive arming
immobiliser periods will begin. Therefore, the ignition must be switched ON within the 45second arming period,
otherwise the alarm system (if selected) and the immobiliser will passive arm.
Moto Alarm System
10
Page 11
Entering an incorrect PIN code will initiate a full alarm reaction.
If an incorrect PIN code is entered three times the unit cannot be disarmed by the PIN number for 2 minutes.
If you have done this the LED will give double flashes when the third incorrect code is entered until the lockout
time has expired.
ENGLISH
11
Moto Alarm System
Page 12

Adding extra remote controls
All systems come with two remote controls preprogrammed into the alarm unit.
You can have up to a maximum of six remote controls operating the system at any one time.
To add a new remote control use the following sequence:
a) Disarm the alarm system using either a transmitter or PIN code (please note the code 0000 cannot be used).
b) Immediately after the LED flashes to signify the number of remotes coded into it, turn the ignition ON, OFF,
ON, OFF and ON within 7 seconds.
c) The LED will enter rapid flash for 3 seconds and then start flashing the LED slowly and beeping the siren as
previously described.
d) Enter the PIN number as previously described.
e) When the PIN number has been entered correctly, the siren will give a long tone (1 second).
f) Immediately after the long tone turn the ignition back ON.
g) Within 15 seconds press the GREY button on a new transmitter to teach it to the system.
h) The LED will immediately flash with the number of the remote control coded into the system (if this is a new
transmitter, the number will be the total number of transmitters currently coded into the system).
i) Should you require more remote controls to be coded into the system, press the GREY button on each transmitter
required, leaving no more than 15 seconds between presses.
j) The transmitter memory is a stack with six locations operating on a first in first out basis. There is no limit to the
number of transmitters which can be taught at one time but the 7th transmitter will replace 1st, 8th will replace
2nd etc.
k) Turn the Ignition OFF and leave it OFF for 15 seconds to exit transmitter learn mode you will hear, two long
tones to indicate learn mode has been exited.
l) Alternatively, if you want to enter the software switches to customize the system to your preferred settings
turn the Ignition OFF, wait for two beeps and then turn it back ON (see next section ‘Customising the
system’).
Removing lost or stolen remote controls
Lost or stolen remote controls can be removed from your system.
Should you wish to exclude a remote control, take all remaining transmitters with the machine to your chosen
dealer for them to carry out the service.
NOTE: If you do not code in a remote control at this stage, or find your lost transmitter, it can be simply added by
following the normal coding in procedure.
Customising the system
It is possible to change the operation of the security system to suit your requirements (see transmitter learn
procedure for details on how to enter the software switches).
Once you have entered the software switch section
Moto Alarm System
12
Page 13

1. Press the GREY button on the transmitter to move forward through the table to Switch 2 (two beeps will be
heard when the switch is selected).
2. Press the BLACK button on the remote control to move backwards through the table to Switch 1 (One beep will
be heard when the switch is selected).
3. If 3 beeps are heard you have entered Switch 3, which requires a special engineer’s code to enter. Exit this area
by pressing the Grey button to enter Switch 1 again and wait for the confirmation beep. Changing the passive
arming settings (passive immobiliser or full passive arming)
Switch Function Default setting Method of altering setting/accepting setting
Number
Listen for the correct number of beeps and press both buttons to enter the software switch
1 Change siren tone (eight tones available) Siren 1 Sequential
GREY button = Next tone
BLACK button = Previous tone
BOTH Buttons = Accept tone
2 Full passive arming alarm/passive Off GREY button/LED ON = Full passive alarm
immobiliser selection BLACK button/LED OFF = Passive immobiliser
BOTH buttons = Accept arming method a
3 Select engineer software switches Operable by installation engineer only
Changing the siren tone
1. Once you have found the siren tone selection (Switch 1), press both the Grey and Black buttons on the remote
control to select the switch and the siren will beep once to confirm you have entered siren tone selection.
ENGLISH
2. Press the Grey button on the remote control and the siren will start to sound at a reduced volume.
Each subsequent press of the Grey button will change the siren tone to the next. If you press the Black button it will
return to the previous.
3. Once you have decided the siren tone you require press both the Grey and Black buttons of the remote control
to select it and you will return to the software switch selection.
Changing the passive arming settings (passive immobiliser or full passive arming)
1. Once you have found the passive arming selection (Switch 2), press BOTH buttons on the remote control to
select the switch. A triple beep will be heard confirming you have entered the switch.
2. The factory default setting for this switch is OFF. If you wish to turn ON, full passive arming of both the alarm and
immobiliser press the GREY button on the remote control and the System LED will be lit to confirm you have selected
full passive arming. If you wish to return to the standard passive immobiliser setting, press the BLACK button and the
LED will be OFF to confirm the setting.
3. Once you have set the alarm to your arming preference press BOTH buttons of the remote control to confirm
the setting, a double beep will be heard and you will return to the software switch selection.
To exit software switch selection simply turns the ignition OFF completely.
13
Moto Alarm System
Page 14

How to remove your machine’s battery
You can remove the battery at any time when the system is in the ‘immobilised only’ or in ‘winter mode’.
Winter mode also stops the remotes operating the system making this setting better.
If the alarm system has been armed, the internal battery backup system is also turned on and disconnection of
the battery will cause the alarm system to sound.
If you have changed the standard default setting of the alarm to full passive arming the easiest way to remove the
machine’s battery is to select ‘winter mode’ prior to removal of the battery.
Ignition
ON
Press GREY button
Press both buttons for
10 seconds until beep
Disconnect
battery
Ignition
OFF
Special features (Dealer selectable only)
The following features can only be accessed by your dealer. Should you wish to have a setting changed from the
factory default please discuss this with your dealer first. The factory default settings have been chosen to deliver the
optimum performance from the system.
The factory default settings are in bold text.
NOTE: The inclusion of arm and disarm indication beeps is strictly forbidden in all EU countries.
Moto Alarm System
14
Page 15

No. Feature Setting available
1 Erase OTHER transmitter codes (Save This switch remotes except the one being used to carry out
Code of Transmitter Being used) the process. Any remotes required to operate the system
MUST be recoded after carrying out this function.
2 Return Software Switches to Default This setting returns ALL software switches to the factory
defaults, including customer set switches
3 System Diagnostics with Event Memory Gives last five trigger types in reverse order
4 Movement Sensor Adjustment 4 settings 20, 30, 40, 5
5 Shock Sensor Adjustment 10 settings
Default setting level 8
6 Arm / Disarm Tones On/Off
7 Panic On/Off
8 Nudge sensor Off
On Continuous warnaway with no trigger
Trigger on first nudge detection
1 Warnaway and trigger on second nudge
2 Warnaway and trigger on third nudge
3 Warnaway and trigger on fourth nudge
4 Warnaway and trigger on fifth nudge
0
Extending your security
Extra siren/Pager output
This system contains a supplementary output, which becomes positive only when the siren is sounding. This wire
is identified by a green and yellow tag on the end.
ENGLISH
The position of this wire is detailed on your certificate of installation.
This output can be used to drive extra sirens, pagers or telephone dialers. Your dealer can give you advice
regarding any extras you may wish to add along with costs.
Warning: Do not connect the extra siren wire directly to your motorcycle horn. Should you do this,
the output may be damaged.
Covering accessories
You alarm system has a secondary trigger input, which in certain instances may be able to be connected to the
side stand or to be used to offer some protection to detachable luggage etc, by looping an extension cable through it.
This is not part of the standard installation so please discuss this with your dealer.
15
Moto Alarm System
Page 16

Garage security
Your alarm system can be extended to give protection to your garage whilst the machine is parked within it.
There are two methods available, a remote linked passive infrared detector system and a hardwired magnetic
contact system.
The kit contains three magnetic reed switches along with all the cables and fixings required to carry out the
installation to most normal garages. Extra switches are available if required.
For this kit to work the alarm must be armed.
Moto Alarm System
16
Page 17

MONGOOSE PENTACLE M-1
Руководство пользователя
Вступление
Благодарим Вас за выбор нашей сигнализации MONGOOSE PENTACLE M1для Вашего мотоцикла. Сигна
лизация MONGOOSE PENTACLE M1 разработана для установки на мотоциклы с номинальным напряжением в
бортовой сети 12В и с заземленным отрицательным выводом аккумуляторной батареи. Сигнализация пред
назначена для звукового и оптического оповещения о попытке несанкционированного использования транс
портного средства, блокировки работы двигателя, а также для выполнения ряда сервисных функций. Внима
тельно изучите настоящее руководство, это поможет Вам наиболее полно использовать охранные, противо
угонные и сервисные возможности сигнализации.
Пульты дистанционного управления
Пульт дистанционного управления представляет собой миниатюрный радио передатчик, питающийся от 3
вольтовой батарейки (тип CR 1616), которой хватает примерно на 1 год эксплуатации. Существенное сниже
ние дальности приема системой команд передатчика говорит о необходимости замены батарейки. На пульте
расположены две кнопки управления и светодиодный индикатор. При нажатии на любую из кнопок передатчик
формирует и передает кодированную команду, которая меняется при каждом новом нажатии кнопок, предот
вращая таким образом возможность перехвата кода Вашей сигнализации кодграббером.
РУССКИЙ
Пульт управления Пульт управления, совмещенный
с ключом зажигания
Назначение кнопок пульта
Серая кнопка – постановка/снятие с охраны
Черная кнопка – включение режимов паники, поиска, транспортировки.
17
Охранная система для мотоциклов
Page 18

Замена элемента питания пульта управления
1. Для замены элемента питания открутите винт на пульте и разъедините
половинки корпуса.
2. Извлеките электрическую плату из корпуса пульта.
3. Выньте элемент питания из держателя, запомнив полярность.
4. Вставьте новый элемент питания в держатель, соблюдая полярность.
5. Поместите плату в резиновом кожухе обратно в корпус пульта так, что
бы кнопки попали в предназначенные для них отверстия. Убедитесь,
что при нажатии на кнопки загорается светодиод. ВНИМАНИЕ! Если в
корпусе пульта был установлен транспондерный чип от заводской ох
ранной системы, убедитесь, что он находится на своем месте перед
окончательной сборкой пульта!
6. Установите ключ зажигания в корпус пульта (если был установлен).
7. Соедините верхнюю и нижнюю крышки пульта и защелкните их.
8. Закрутите винт.
Правила пользования
Постановка на охрану
Автоматическая постановка на охрану
Режим охраны всегда автоматически включается через 45 секунд после выключения зажигания. Как только
зажигание выключено, светодиод загорится в постоянном режиме на 45 секунд. За 5 секунд до окончания
периода автоматической постановки сирена подаст несколько звуковых сигналов возрастающего тона. Свето
диод начнет мигать, показывая, что сигнализация встала на охрану.
Автоматически включается один из двух режимов охраны:
1. Режим иммобилайзера (заводская установка). В этом режиме активируются блокировки двигателя, тре
вога включится только при включении зажигания. Другие зоны охраны не активируются.
2. Режим полной охраны. Чтобы после автоматической постановки активировался режим полной охраны,
его надо включить с помощью функции №2 в таблице пользовательского программирования.
Примечание: Если программно выбрана автоматическая постановка в режим полной охраны, светодиод
после выключения зажигания не загорится, и сирена будет подавать звуковые сигналы в соответствии с
программной установкой №6 таблицы установочного программирования. Постановку на охрану подтвер
дят две вспышки индикаторных фонарей.
Примечание: Для временного отключения автоматической постановки можно включить режим зимнего
хранения.
Охранная система для мотоциклов
18
Page 19

Дистанционная постановка на охрану
Для включения режима полной охраны с включением всех датчиков, входов концевых выключателей и
подключением встроенного автономного питания используйте дистанционную постановку на охрану. Для ди
станционной постановки на охрану нажмите не позднее чем через 45 секунд после выключения зажигания
серую кнопку пульта дистанционного управления. Индикаторные фонари мигнут дважды, через 5 секунд
начнет мигать светодиод, и включится режим полной охраны.
Примечание 1: С помощью функции №6 в таблице установочного программирования можно включить
звуковые сигналы подтверждения постановки на охрану.
Примечание 2: Если Вы программно включили переход системы в режим полной охраны (функции №2 в
таблице пользовательского программирования) при автоматической постановке на охрану, то режим полной
охраны будет включаться как после дистанционной, так и после автоматической постановки. Если же после
автоматической постановки задан режим иммобилайзера, то для постановки сигнализации в режим полной
охраны после автоматической постановки нажмите серую кнопку дважды: первый раз для отключения иммо
билайзера и второй раз – для постановки на охрану.
Примечание 3: При постановке в охрану система запоминает положение основного и дополнительного
концевых выключателей, тревога включается при изменении их состояния.
РУССКИЙ
Нажать для поста
новки на охрану
Две вспышки фонарей. Свето
диод горит 5 секунд, затем на
чинает мигать, включается ре
жим полной охраны.
Постановка на охрану с отключенными датчиками (режим транспортировки)
Для постановки сигнализации на охрану с отключенными датчиками наклона и удара нажмите черную
кнопку не позднее чем через 10 секунд после нажатия серой кнопки. Индикаторные фонари мигнут дважды,
подтверждая постановку на охрану, а затем еще три раза, сообщая о том, датчики отключены. При охране с
отключенными датчиками сигнализации попрежнему контролирует включение зажигание, концевые выклю
чатели и прерывание питания.
Примечание: Постановка на охрану с отключенными датчиками возможна только с пульта управления. При
автоматической постановке на охрану отключить датчики описанным выше способом нельзя.
Нажать для поста
новки на охрану
Нажать не позднее,
чем через 10 се
кунд
Две вспышки фонарей
Три вспышки фонарей
19
Охранная система для мотоциклов
Page 20

Снятие с охраны
Чтобы снять сигнализацию с охраны, нажмите серую кнопку пульта управления. Индикаторные фонари
мигнут один раз, сигнализация снимется с охраны.
Не позднее чем через 45 секунд включите зажигание. Иначе сигнализация автоматически вернется в ре
жим охраны.
Примечание: Каждый раз после снятия с охраны светодиод системы соответствующим количеством вспы
шек сообщит Вам о количестве пультов управления, запрограммированных в память охранной системы. Если
Вы обнаружите лишние пульты управления, их можно удалить из памяти системы с помощью функции №1 в
таблице установочного программирования.
Нажать для снятия
с охраны
Одна вспышка фонарей. Одна се
рия вспышек светодиода, показы
вающая количество пультов управ
ления, записанных в память сигна
лизации
Снятие сигнализации с охраны после включения тревоги
Если в Ваше отсутствие включалась тревога, при снятии с охраны Вы услышите длинный звуковой сигнал.
Память тревог
Сигнализация имеет функцию памяти тревог, которая позволит Вам узнать причину тревоги после снятия
с охраны.
После длинного звукового сигнала соответствующее количество сигналов сирены и вспышек светодиода
сообщит Вам о причине, вызвавшей включение тревоги.
Количество вспышек/ Причина тревоги
звуковых сигналов
1 Отключение основного питания или перегорание предохранителя
основного питания
2 Включалось зажигание
3 Срабатывал датчик наклона
4 Срабатывал датчик удара (включалась полная тревога)
5 Основной концевой выключатель был замкнут (разомкнут)
6 Дополнительный концевой выключатель был замкнут
Примечание: Ваша сигнализация имеет функцию памяти пяти последних тревог, посмотреть которые мож
но с помощью функции №3 в таблице установочного программирования. При необходимости провести такую
диагностику обратитесь к Вашему установщику.
Автоматическая перепостановка на охрану
Если в течение 45 секунд после снятия с охраны Вы не включили зажигание, сигнализация автоматически
вернется в тот режим охраны, который предшествовал снятию (режим иммобилайзера, режим полной охраны
или режим охраны с отключенными датчиками).
Охранная система для мотоциклов
20
Page 21

Если в течение 45 секунд любой из концевых выключателей изменял свое состояние или зажигание было
включено и выключено, сигнализация включит режим иммобилайзера.
Примечание: Если программно выбран режим полной охраны при автоматической постановке, и зажига
ние в течение 45 секунд было включено и выключено, то по истечении 45 секундного периода сигнализация
перейдет в режим полной охраны. Если же зажигание оставалось выключенным, но любой из концевых вык
лючателей изменял свое состояние, сигнализация перейдет в режим иммобилайзера.
Тихая постановка/снятие с охраны
При сохранении заводской установки постановка и снятие сигнализации с охраны всегда, если не включа
лась тревога, производится без звукового подтверждения. Однако если при установке сигнализации Вы вклю
чили звуковые сигналы подтверждения, Вы можете их выключить для каждого конкретного случая постановки
или снятия с охраны.
Чтобы при программно включенных звуковых сигналах подтверждения поставить/снять сигнализацию с
охраны без звукового подтверждения, перед нажатием серой кнопки нажмите черную кнопку – сигнализация
подтвердит постановку/снятие с охраны только вспышками фонарей.
Нажать черную кнопку Нажать серую кнопку Вспышки фонарей
Режим энергосбережения
Сигнализация имеет специальный режим энергосбережения, который автоматически включается при дли
тельной стоянке для минимизации разряда мотоциклетного аккумулятора. Режим имеет три уровня, которые
включаются последовательно.
РУССКИЙ
Уровень 1 – включается при напряжении аккумулятора 11,5В
Понижается частота мигания светодиода до 1 раза в 10 секунд.
Приемник сигнализации выключается и включается на прием только в момент вспышки светодиода. (Т.е.
снять сигнализацию с охраны можно только в момент, когда светодиод загорается)
Все остальные функции сигнализации работают нормально.
Уровень 2 – включается при напряжении аккумулятора 10,5В
Частота мигания светодиода понижается до 1 раза в 30 секунд, понижается яркость свечения.
Сирена каждые 60 секунд подает тихий звуковой сигнал, предупреждая Вас, что батарея разряжена.
Датчик удара выключается (датчик наклона остается включенным).
Приемник выключается и сигнализацию нельзя снять с охраны до включения зажигания.
Уровень 3 – включается при напряжении аккумулятора 9,8В
Светодиод выключается.
Звуковые сигналы выключаются.
Встроенная батарея автономного питания выключается.
Для снятия сигнализации с охраны при включенном 2 или 3 уровне энергосбережения включите
зажигание и нажмите серую кнопку пульта управления.
21
Охранная система для мотоциклов
Page 22

Включение аварийной сигнализации
MONGOOSE PENTACLE M1 позволяет включить аварийную сигнализацию, даже если Ваш мотоцикл не
оборудован такой функцией. При выключенном зажигании и включенном режиме охраны одновременно на 3
секунды нажмите черную и серую кнопки пульта управления, индикаторные фонари начнут мигать.
ВНИМАНИЕ! Прекращение мигания фонарей после пяти вспышек означает, что аккумулятор вашего мо
тоцикла сильно разряжен и включение аварийной сигнализации отменено системой во избежание дальней
шего разряда.
Для отключения аварийной сигнализации либо еще раз на три секунды нажмите обе кнопки пульта управ
ления (сигнализация при этом останется на охране), либо нажмите серую кнопку для снятия сигнализации с
охраны и одновременного выключения аварийной сигнализации.
Нажать и удерживать одновременно черную и серую кнопки
Паника/поиск
При выключенном зажигании нажмите и удерживайте в течение 3 секунд черную кнопку пульта управления
для включения режима паники/поиска. Включится сирена и мигание индикаторных фонарей.
Для выключения режима паники/поиска нажмите любую кнопку пульта управления.
После выключения режима паники/поиска сигнализация остается в том же режиме (охрана или без охра
ны), в котором находилась до включения режима.
Нажать и удерживать черную кнопку в течение 3 секунд
Зимний режим
Зимний режим предназначен для понижения энергопотребления сигнализации от аккумулятора мотоцик
ла до минимального уровня (250µА) и рекомендован к применению в случае, если транспортное средство не
используется в течение длительного периода времени. В этом режиме все функции сигнализации за исключе
нием иммобилайзера (блокировки двигателя) отключаются.
При активизации зимнего режима рекомендуется дополнительно использовать механические противо
угонные средства.
Примечание: Включение зимнего режима не предохраняет аккумуляторную батарею от естественного са
моразряда. Несмотря на включенный зимний режим, рекомендуется периодически проверять состояние акку
муляторной батареи.
Охранная система для мотоциклов
22
Page 23

Включение зимнего режима
При выключенной охране и включенном зажигании нажмите обе кнопки на пульте управления и удержи
вайте их в течение 10 секунд (до звукового сигнала). Выключите зажигание – сигнализация войдет в зимний
режим, потребление тока сигнализацией от аккумуляторной батареи снизится до 250µА.
Включить
зажигание
Нажать серую
кнопку
Выключить
зажигание
Охрана
отключена
Звуковой
сигнал
Нажать и удерживать обе
кнопки в течение 10 секунд
Выключение зимнего режима
Для выключения зимнего режима просто включите зажигание, сирена в течение 5 секунд будет подавать
звуковые сигналы возрастающего тона. В течение этих 5 секунд нажмите серую кнопку пульта управления.
Если кнопка пульта не нажата до окончания серии звуковых сигналов, включится тревога.
Как только включено зажигание сигнализация из зимнего режима переходит в режим охраны/иммобилай
зера, таким образом, даже при включенном зимнем режиме сигнализация продолжает охранять Ваше транс
портное средство.
PIN код
В целях повышения секретности управления для снятия сигнализации с охраны используется PIN код,
состоящий из четырех цифр, который программируется пользователем.
ВНИМАНИЕ! Сигнализация не имеет заводской установки PIN кода, поэтому мы настоятельно рекомен
дуем Вам запрограммировать свой собственный PIN код в начале эксплуатации системы. Если этого не сде
лать, то при потере или порче пультов управления у Вас не будет возможности снять сигнализацию с охраны.
РУССКИЙ
Первоначальное программирование PIN кода
1. Снимите сигнализацию с охраны с помощью пульта дистанционного управления.
2. В течение 5 секунд после снятия с охраны включите, выключите и снова включите зажигание.
3. Не позднее чем через 10 секунд после включения зажигания нажмите и удерживайте до звукового сигна
ла (примерно в течение 3 секунд) обе кнопки пульта управления.
4. После звукового сигнала выключите и снова включите зажигание.
5. Светодиод системы будет мигать быстрыми вспышками в течение 3 секунд.
6. Через 3 секунды светодиод начнет мигать медленными вспышками. Каждую вспышку будет сопровож
дать звуковой сигнал.
7. Отсчитайте количество вспышек (звуковых сигналов), равное требуемому значению первой цифры PIN
кода, и выключите зажигание. Сразу же снова включите зажигание.
23
Охранная система для мотоциклов
Page 24
Примечание: Если Вы хотите установить “0”, выключите и включите зажигание сразу, как только закончит
ся серия быстрых вспышек, не дожидаясь первой медленной вспышки (звукового сигнала).
8. Светодиод снова замигает быстрыми вспышками. Через 3 секунды быстрые вспышки прекратятся, и
светодиод замигает медленными вспышками. Каждую вспышку будет сопровождать звуковой сигнал.
9. Отсчитайте количество вспышек (звуковых сигналов), равное требуемому значению второй цифры PIN
кода, и выключите, а затем снова включите зажигание.
10. Повторите процедуру установки для третьей и четвертой цифры.
11. Как только Вы введете четвертую цифру, Вы услышите длинный звуковой сигнал.
12. После звукового сигнала необходимо ввести установленный PIN код еще раз для подтверждения пра
вильности его установки, для чего включите зажигание и повторите описанную выше процедуру.
13. Повторив процедуру ввода PIN кода. Выключите зажигание для выхода из режима программирования.
Если при подтверждении введен правильный PIN код, сирена подаст два коротких сигнала. Если PIN код,
введенный при подтверждении, не соответствует установленному, Вы услышите три длинных сигнала
сирены.
Примечания:
a) После установки PIN кода Вы также можете снять сигнализацию с охраны с помощью пульта управления
в любое время.
b) Если при программировании PIN кода зажигание останется выключенным, и Вы не выполните никаких
действий в течение 3 минут, сигнализация автоматически выйдет из режима программирования.
c) Если при программировании PIN кода зажигание останется включенным более 10 секунд, сигнализация
автоматически выйдет из режима программирования.
d) Так как заводская установка PIN кода отсутствует, обязательно установите свой PIN код для снятия сигна
лизации с охраны при отсутствии исправного пульта управления.
e) PIN код “0000”не может быть использован для снятия сигнализации с охраны, даже если такой PIN код
был установлен.
Чтобы не забыть установленный PIN код, пожалуйста, запишите его и храните в недоступном для других
месте
Охранная система для мотоциклов
24
Page 25

Пример процедуры первоначального программирования PIN кода
Нажать серую кнопку
Светодиод
быстро
мигает в
течение 3
секунд
1 длинный
звуковой
сигнал
Включить
зажигание
Включить
зажигание
Установка
1 цифры
1 звуковой сигнал/вспышка
Выключить зажигание
Подтверждение
1 цифры
включить зажигание
1 звуковой сигнал/вспышка
Выключить зажигание
Установка
2 цифры
включить зажигание
4 звуковых сигнала/вспышки
Выключить зажигание
Подтверждение
2 цифры
включить зажигание
4 звуковых сигнала/вспышки
Выключить зажигание
Повторить процедуру для подтверждения
Выключить
зажигание
Выключить
зажигание
Установка
3 цифры
включить зажигание
2 звуковых сигнала/вспышки
Выключить зажигание
Подтверждение
3 цифры
включить зажигание
2 звуковых сигнала/вспышки
Выключить зажигание
ДЛИННЫЙ ЗВУКОВОЙ СИГНАЛ
Включить
зажигание
не позднее
чем через
5 секунд
Не позднее чем через 10
секунд нажать и удерживать
обе кнопки одновременно до
звукового сигнала
Установка
4 цифры
включить зажигание
6 звуковых сигнала/вспышки
Выключить зажигание
Подтверждение
4 цифры
включить зажигание
6 звуковых сигнала/вспышки
Выключить зажигание
РУССКИЙ
Новый PIN код
2 КОРОТКИХ ЗВУКОВЫХ СИГНАЛА
(3 длинных звуковых сигнала, если код подтвержден неправильно)
Изменение PIN кода
Вы всегда можете изменить PIN код, повторив процедуру, описанную выше, и введя новый PIN код. PIN
код, введенный ранее при этом будет отменен.
Примечания:
1. PIN код “0000” не может быть использован для снятия сигнализации с охраны.
2. Нельзя установить или изменить PIN код, при отсутствии пульта управления, известного системе.
3. Если Вы не установили PIN код, Вы не сможете снять сигнализацию с охраны при отсутствии исправного
пульта управления.
4. Кроме случая аварийного отключения сигнализации PIN код необходим при программировании новых
пультов управления и изменении установок программируемых функций.
25
Охранная система для мотоциклов
Page 26

Снятие сигнализации с охраны с использованием PIN кода
Если отсутствует исправный пульт управления сигнализацией, снять сигнализацию с охраны можно введя
запрограммированный PIN код. Для ввода PIN кода:
1. Включите зажигание. Включится тревога (немедленно, если сигнализация находится в режиме охраны,
или через 10 секунд, если сигнализация находится в режиме иммобилайзера).
2. Сирена включится на 30 секунд, и индикаторные фонари будут мигать в течение 30 секунд. Не выключай
те зажигание до окончания 30 секундного режима тревоги!
3. По окончании тревоги светодиод загорится в постоянном режиме на 5 секунд. В течение этих 5 секунд
выключите и снова включите зажигание.
4. Светодиод в течение 3 секунд будет мигать быстрыми вспышками. По окончании 3 секунд быстрые
вспышки сменятся медленными, при этом каждую вспышку будет сопровождать звуковой сигнал.
5. Отсчитайте количество вспышек (звуковых сигналов) равное первой цифре PIN кода и выключите зажига
ние. Сразу включите зажигание снова. Примечание: Для ввода “0” выключите и включите зажигание
сразу после окончания серии быстрых вспышек.
6. Как только Вы включите зажигание, светодиод снова начнет мигать быстрыми вспышками. Через 3 секун
ды быстрые вспышки сменятся медленными, каждую из которых будет сопровождать звуковой сигнал.
Отсчитайте количество вспышек (звуковых сигналов) равное второй цифре PIN кода, выключите и вклю
чите зажигание.
7. Повторите процедуру для 3 и 4 цифры.
8. Если введен правильный PIN код, индикаторные фонари мигнут один раз и сигнализация снимется с
охраны.
Примечание: Как только сигнализация будет снята с охраны, включится режим автоматической постановки
на охрану. Не позднее чем через 45 секунд включите зажигание, иначе сигнализация вернется в режим охраны
(или иммобилайзера).
При вводе неправильного PIN кода включится тревога. Если неправильный PIN код введен три раза
подряд, дальнейший ввод PIN кода будет заблокирован на 1 минуту, считая от последней попытки.
Охранная система для мотоциклов
26
Page 27
Пример ввода PIN кода для снятия сигнализации с охраны
Включить зажигание и
оставить его включенным
Режим тревоги
30 секунд
Ввод 1 цифры
1 звуковой сигнал/
вспышка
Выключить зажигание
Ввод 2 цифры
включить зажигание
4 звуковых сигнала/
вспышки
Выключить зажигание
Через 30 секунд тревога
прекратится и светодиод
загорится на 5 секунд
Не позднее чем через
5 секунд выключите и
включите зажигание
Ввод 3 цифры
включить зажигание
2 звуковых сигнала/
вспышки
Выключить зажигание
В течение 3 секунд
светодиод мигает
быстрыми вспышка'
В течение 3 секунд
светодиод мигает
быстрыми
вспышками
Ввод 4 цифры
включить зажигание
6 звуковых сигнала/
вспышки
Выключить зажигание
ми
РУССКИЙ
27
Если PIN код введен правильно, индикатор'
ные фонари мигнут один раз, и сигнализация
снимется с охраны
Не позднее чем через 45 секунд включите зажигание
Охранная система для мотоциклов
Page 28

Программирование пультов управления
В комплекте сигнализации поставляется два пульта управления, однако сигнализация способна запомнить
до 6 пультов управления. При необходимости запрограммировать дополнительные пульты управления выпол
ните следующую процедуру:
1. Снимите сигнализацию с охраны с помощью пульта управления или PIN кодом.
2. Светодиод сериями вспышек покажет количество пультов управления записанных в память системы. По
окончании индикации три раза в течение 7 секунд включите зажигание и оставьте его вклю
ченным.
3. Светодиод загорится постоянным светом на 5 секунд, затем в течение 3 секунд будет мигать быстрыми
вспышками. По окончании серии быстрых вспышек светодиод начнет мигать медленными вспышками,
каждую из которых будет сопровождать звуковой сигнал.
4. Отсчитывая необходимое количество медленных вспышек, введите PIN код, как описано выше.
5. Если PIN код введен правильно, последует длинный звуковой сигнал.
6. Сразу после звукового сигнала включите зажигание.
7. Не позднее чем через 15 секунд нажмите серую кнопку программируемого пульта управления.
8. Светодиод мигнет столько раз, сколько пультов управления записано в память сигнализации.
9. При необходимости записать в память системы другие пульты управления, нажмите серую кнопку на
каждом из них. Пауза между нажатиями не должна превышать 15 секунд.
10. Помните, что при записи кода седьмого пульта, первый из записанных будет автоматически удален из
памяти системы, при записи восьмого – второй и.т.д.
11. По окончании программирования выключите зажигание и подождите 15 секунд. Сирена подаст
два длинных звуковых сигнала и сигнализация выйдет из режима программирования.
12. Если Вы хотите перейти к программированию функций, снова включите зажигание сразу после
звуковых сигналов.
Удаление кодов пультов управления из памяти сигнализации
Коды утерянных или неисправных пультов управления могут быть удалены из памяти системы с помощью
функции №1 в таблице установочного программирования.
Программирование пользовательских функций
Вход в программирование пользовательских функции возможен только после окончания процедуры про
граммирования пультов управления, причем в программировании можно использовать пульт уже известный
системе.
Если Вы выполнили процедуру программирования пультов управления как описано выше и включили за
жигание (в п. 12 процедуры программирования пультов управления), сигнализация перейдет в режим про
граммирования пользовательских функций. Войдя в режим программирования:
1. Нажимайте серую кнопку пульта управления для перехода к следующей функции или нажимайте черную
кнопку для перехода к предыдущей функции.
2. Соответствующее количество звуковых сигналов обозначит номер функции.
3. Для изменения состояния функции следуйте приведенным ниже рекомендациям.
Охранная система для мотоциклов
28
Page 29
Таблица пользовательских функций
№№ Функция Заводская Серая Черная
установка кнопка кнопка
1 Варианты звучания сирены Тоне 1 Увеличение Уменьшение
(всего 8 вариантов) номера номера
варианта варианта
2 Состояние после автоматической постановки Иммобилайзер Полная охрана Иммобилайзер
на охрану
3 Переход к установочному программированию
Функция 1 (1 сигнал сирены).
Выбор варианта звучания сирены.
1. Дойдя до функции 1 и услышав один звуковой сигнал, нажмите одновременно обе кнопки пульта управ
ления. Последует тройной звуковой сигнал, а затем установленный тон звучания сирены (приглушенный
по громкости).
2. Нажимайте серую кнопку для перехода к следующему тону или нажимайте черную кнопку для перехода к
предыдущему.
3. Выбрав подходящий тон нажмите одновременно обе кнопки, последует двойной звуковой сигнал и сиг
нализация выйдет из режима настройки тона сирены.
Функция 2 (2 сигнала сирены).
Выбор состояния сигнализации после автоматической поста'
новки на охрану.
1. Дойдя до функции 2 и услышав два звуковых сигнала, нажмите одновременно обе кнопки пульта управ
ления, последует тройной звуковой сигнал.
2. Заводская установка – «иммобилайзер». При необходимости включить режим «полной охраны», нажмите
серую кнопку пульта управления. В подтверждение включения режима загорится светодиод системы.
Если надо вернуться к режиму «иммобилайзера», нажмите черную кнопку, светодиод погаснет.
Для выхода из режима программирования пользовательских функций просто выключите за'
жигание.
Функция 3 (3 сигнала сирены).
Переход к установочному программированию.
Изменения установочных функций должно производиться квалифицированным персоналом
установочного центра. Пользователю категорически не рекомендуется изменять установки этих
функция, так как неквалифицированная настройка может привести к сбоям в работе охранной
системы.
Снятие аккумулятора
Вы можете отключить аккумулятор мотоцикла, когда сигнализация находится в режиме иммобилайзера
или в зимнем режиме, тревога при этом не включится.
Так как блок сигнализации имеет внутренний аккумулятор автономного питания, то снятие аккумулятора,
когда сигнализация находится в режиме полной охраны, приведет к включению тревоги.
Рекомендуется: Перед снятиеv аккумулятора перевести сигнализацию в зимний режим.
РУССКИЙ
Установочные функции (только для справки)
Заводские установки приведенных ниже функций выбраны с таким расчетом, что обеспечить оптимальный
режим эксплуатации охранной системы.
Изменения установочных функций должны проводится квалифицированным персоналом, чтобы не выз
вать сбой в работе охранной системы. При необходимости изменить установочные функции обратитесь к
Вашему установщику.
29
Охранная система для мотоциклов
Page 30

Таблица установочных функций
№№ Функция Установки
1 Удаление кодов пультов управления С помощью этой функции из памяти системы удаляются коды
из памяти системы всех пультов управления за исключением того, который
используется для удаления
2 Возврат к заводским установкам С помощью этой функции можно быстро вернуть все
функции (включая пользовательские) в заводские установки.
3 Память тревог Эта функция позволят посмотреть причины пяти последних
тревог.
4 Настройка датчика наклона Можно выбрать один из четырех углов отклонения от
положения, в котором транспортное средство находилось в
момент постановки на охрану: 20, 30, 40 или 50.
(Заводская установка 30).
5 Настройка датчика удара 10 уровней чувствительности (Заводская установка – уровень 8).
6 Звуковые сигналы подтверждения ВКЛ./ВЫКЛ. (Заводская установка – ВЫКЛ.)
7 Режим паники ВКЛ./ВЫКЛ. (Заводская установка – ВКЛ.)
8 Включение тревоги от датчика удара 1. При каждом ударе.
2. Предупреждение при первом ударе,
тревога – при втором. (Заводская установка)
3. Предупреждение при первых двух ударах,
тревога – при третьем.
4. Предупреждение при первых трех ударах,
тревога – при четвертом.
5. Предупреждение при первых четырех ударах,
тревога – при пятом.
6. Только предупреждение, тревога не включается.
7. Датчик выключен.
Дополнительное оборудование
Ваша сигнализация позволяет подключить дополнительно:
1. Дополнительную сирену или пейджер.
2. Дополнительный концевик или петлю охраны багажа.
Охранная система для мотоциклов
30
 Loading...