

Page 1

M60 Series
MODELS:
M60i, M60B, M60S, M60AU, M60AM
OPERATION & WIRING MANUAL
All models certified to:
-
AS/NZS4601 1999 amendment 1 2003
& AS/NZS3749.1 2003 Class B
.
These products should be installed according
to the
requirements of the AS/NZS 3749.2 Installation Standard
References to alarm functions and siren responses do not apply to model M60i
“That’s a name you can trust”
Page 2

BUTTON ‘TWO’ ONLY
CH2 OUTPUT
PRESS FOR 3 SECONDS FOR
‘AUXILIARY OUTP
UT’ (EG: BOOT
RELEASE)
BUTTON ‘TWO’
THEN
BUTTON ‘ONE’
SILENT ARM / DISARM
THIS SEQUENCE WILL SILENTLY
ARM OR DIS
-
ARM THE SYSTEM
WITHOUT SIREN CHIRPS.
ALARM MODELS ONLY
BUTTON ‘ONE’ AND ‘TWO’ TOGETHER
‘PANIC’
PRESS FOR 3 SECONDS TO SOUND
THE SIREN O
F THE ALARM. PRESS
BOTH AGAIN TO CANCEL
REMOTE
CONTROL
2 Supplied
BUTTON ‘ONE’ ONLY
ARM & DISARM
PRESS FOR 1.0 SECOND
TO ARM OR DISARM THE
SECURITY SYSTEM
-
(DOORS WILL ALSO LOCK OR
UNLOCK IF THE CENTRAL
LOCKING HAS BEEN
CONNECTED)
BUTTON ‘ONE’ THEN
BUTTON ‘TWO’
‘SENSOR BYPASS’
THIS SEQUENCE DEACTIVATES
SENSOR
S SUCH AS THE IMPACT SENSOR, ULTRASONIC’S OR MICROWAVE (DEPENDING ON
MODEL). DOORS, BONNET & BOOT REMAIN PROTECTED.
ONLY DEACTIVATE SENSORS TO
REDUCE THE POSSIBILITY OF FALSE ALARMS.
BATTERY REPLACEMENT
YOUR REMOTE CONTROL USES ONE 12v 23amp BATTERY WHICH
IS AVAILABLE FROM YOUR MONGOOSE AGENT OR ELECTRONIC SHOP.
CHANGE AT LEAST ONCE A YEAR.
Page 3

CONTENTS
Automatic engine immobilisation..
4
Indicator flashing………………
10
Arming………… ……........
............
5
Dash mounted warning light…
10
Open circuit bypass….……………
5
Chirp confirmation…...............
10
Central locking........…............…
..5Panic………….. ........….....…..
11
Disarming………………………….
6
Boot release………….......…...
11
Security r
e-arm……………….…..
6
Programme options..…...........
11/12
Silent arm/disarm ……………….…
6
* Siren or horn output
Bonnet, boot & doors………………
6
* Automatic arming
2 stage impact sensor (M60B) 7
* Ignition safety door lock
Ultrasonic sensors (
M60AU)......... 7
* Siren chirps
Microwave sensor (M60AM)…….. 8
* NSW siren timing
Sensor disable……………………. 8
Remote controls………...........
13
Intrusion alert............................... 8
Remote code learning...
.........
13/14
Battery back
-
up siren (M60AU/AM)
8
EMERGENCY OVERRIDE..…
15
Automatic re
-
set……….................
9
Testing your alarm…..……….
16
Arm condition memory..................
9
Wiring & programming
Noise pollution control......……….
9
Warranty terms & conditions
Page 4

O
PERATING YOUR VEHICLE SECURITY SYSTEM
AUTOMATIC ‘DUAL CIRCUIT’ ENGINE IMMOBILISATION
The engine will always be automatically immobilised 30 seconds
after the ignition
has been turned off.
This feature cannot be turned off or defeated as it is a Standards
mandatory feature.
When the ignition is turned OFF, the dashboard LED will start to fast flash for 30 seconds to indicate
the automatic sequence has commenced. At th
e end of the 30 seconds, the siren will chirp once, the
indicators will flash once and the dashboard LED will slow flash as confirmation of immobilisation. Only
the engine is immobilised
-
the alarm system is not yet armed.
If an attempt is then made to st
art the engine whilst immobilised, the siren will chirp.
ONCE IMMOBILISED, PRESS BUTTON ONE TO PERMIT ENGINE STARTING
NOTE: If the system is fully armed by pressing the remote button, the engine is immobilised
immediately and any attempt to start the en
gine will cause the siren to sound fully.
The installer of this system will immobilise two of the following possible circuits to prevent engine
starting (a third immobiliser may be added as an option extra);
Starter motor
Ignition system
Electric fuel pum
pOther engine controlling circuit
4
Page 5

ARMING
NORMAL OPERATION
Turn the engine off, close all windows and remove the keys from the ignition
Exit the vehicle and close all the doors (& bonnet & boot).
Press button
one
on the remote control.
The indicator
s flash once and the siren will chirp once to indicate that the system is armed.
The dash board warning light, LED, will slow flash to indicate the system is armed.
If your vehicle has central locking and it has been connected to this security system, the
doors will lock at the same time as arming.
NOTE: If the engine is automatically immobilised (occurs 30 seconds after ignition OFF) before you
had a chance to arm the system, press button one twice
–
once to turn off just the immobiliser
and
the second time to fully arm and immobilise the system. The system can be programmed to arm
automatically 30 seconds after the last door is closed. See page 12.
OPEN CIRCUIT BYPASS
If any door, the bonnet or boot is left open upon arming,
the siren will chirp once to signify the
system is armed and then sound briefly to inform you a circuit is still open. If ignored, that circuit will
not be protected. The open circuit (a door, the bonnet or boot) will automatically arm itself upon
closure.
CENTRAL LOCKING
-
additional parts, at extra cost, may be required depending on vehicle equipment level.
This security system has built
-
in relays to operate a vehicles’ existing central locking system by remote
control. When connected, the doors will loc
k or unlock at the same time as arming or disarming.
SENSOR DISABLE
To turn off any sensors fitted, but arm the bonnet, boot and doors and immobilise the engine,
press button one followed by button t
wo. See page 8 for full description.
5
Page 6

DISARMING
Press button
one
on the remote control to disarm the system.
The siren will chirp twice and the indicators will flash twice to indicate disarming.
The doors will unlock if the vehicles’ central locking is
connected to the security system.
If a door is not opened within 30 seconds, the system will automatically
re-arm (& re
-
lock
if connected to your central locking) . See below.
AUTOMATIC SECURITY RE
-
ARM
The alarm will automatically fully re
-
arm (and
re-lock the doors if connected) if it has been disarmed
by remote but a door has not been opened within 30 seconds. The lights flash once as confirmation
of re
-
arming.
This feature cannot be turned off
.
If a door, bonnet or boot is opened after disarmin
g, the alarm will not re
-
arm and the doors will not
re-lock. However, the engine will re
-
immobilise if the ignition is not turned ON within 30 seconds.
SILENT ARM / DISARM (no siren chirps)
Press button
two
followed by button
one
within 2 seconds to sile
ntly arm or disarm the system.
The chirps may be permanently turned off via the programming options
–
see your installer.
SECURITY PROTECTION
IGNITION, BONNET, BOOT & DOORS
When armed, the siren will sound and the indicators will flash for 30
seconds when any of these are
triggered. If a door, the bonnet or boot is left open, the siren will cycle 90 seconds (3 x 30 seconds)
and the indicators will flash.
(If programmed for NSW, the siren will sound for 30 seconds once only)
The system does req
uire your vehicle to be fitted with courtesy light door switches for these to
trigger the alarm. Fitting or replacing door switches will incur additional charges.
6
Page 7

2 STAGE IMPACT SENSOR (MODEL M60B/M60S
–
optional on other models)
This sensor is desi
gned to detect impact to the vehicle such as to the bodywork or glass. It should
not be triggered by normal wind, or rocking motions.
If the sensor detects a light impact, the siren will sound a few warning chirps.
If the sensor detects a heavier impact, t
he analyser circuit will determine this and sound
the siren for 30 seconds and flash the lights.
The sensitivity level is set by the installer and should be at its optimum. Avoid over sensitivity as
people nearby may not respond due to too many false alar
ms. (This type of sensor may not prevent
wheel theft, we therefore advise the fitment of locking wheel nuts)
There may be times when you wish to deactivate the impact sensor to avoid false alarms, follow the
instructions for ‘sensor disable by remote’ on p
age 8.
ULTRASONIC SENSOR (M60AU MODEL
–
optional on other models)
The ultrasonic sensor fill the interior of your vehicle with high frequency sound and is designed to
trigger the alarm when the interior environment changes. Possible changes are the breaki
ng or
removal of glass, a door being opened, or even strong wind through a slightly open window.
For the ultrasonic sensor to operate correctly ensure all doors and windows are closed when
arming the alarm system. (False alarms are generally created by ope
n windows or even strong
wind through the air vents)
Due to the efficiency of this type of sensor, we advise that you do not leave people or animals
inside the vehicle as any movement will trigger the alarm. Should you need to leave people or
animals insid
e, follow the instructions for ‘sensor disable by remote’ to avoid the alarm being
triggered.
Ultrasonic’s are not recommended for soft top vehicles or vehicles where air movement is likely
within the vehicle.
7
Page 8

MICROWAVE SENSOR (M60AM MODEL
–
optional
on other models)
The microwave sensor is designed to trigger the alarm when a microwave field
registers physical movement. 2 fields are generated, one outside the vehicle to give
perimeter protection, and one inside to give interior protection.
Intrusio
n into the perimeter area chirps the siren as a warning, whilst intrusion into
the interior fully sounds the siren. The fields are adjustable for size and should have
been set by the installer at their optimum. It is advisable to limit the exterior field
to
about the width of the door mirrors and the interior to approximately ¾ of the vehicle
width. Do not leave people or animals inside the vehicle as any movement will trigger
the alarm. Should you need to leave people or animals inside when arming, foll
ow the
instructions for ‘sensor disable by remote’.
Note: As the microwave produces circular protective fields, some areas of the vehicle may not be protected.
SENSOR DISABLE BY REMOTE (ALARM MODELS ONLY)
There are times when you may wish to deactivate t
he supplied sensors (impact, ultrasonic or
microwave
–
depending on model of alarm or fitted accessories) to prevent false alarms.
To turn these sensors off, but arm the bonnet, boot and doors and immobilise the engine, press
button one to arm the system a
nd within 3 seconds, button two. You will hear the siren chirp for
arming followed by three tones indicating the sensors are turned off for this time only.
To disable the sensors at some later time after arming, press the 2
nd
button three times quickly.
If
the alarm is sounding and has been triggered by a sensor, pressing the 2
nd
button disables the
sensor from further detections.
INTRUSION ALERT
When disarming, if the siren chirps 4 times and the indicators flash 3 times you know the system
has been trigg
ered. Refer to the LED flash codes on page 10 to show which circuit has been
triggered.
8
Page 9

BATTERY BACK
-
UP SIREN (M60S/M60AU/M60AM
–
optional on other models)
Vehicle battery disconnection, or cutting the siren wires, will cause the battery back
-
up siren
to
sound independently of an alarm trigger. The siren can be turned off with the special keys
provided or whenever the car battery needs attention or changing.
Please check that the siren has been mounted in such a position so as to avoid water ingress o
r heat
damage. If washing the engine bay, cover the siren with a plastic bag to prevent water damage.
Heat or water damage is not covered by the warranty.
AUTOMATIC RE
-
SET
Upon an intrusion (ie; door opened and closed), the siren will sound for 30 secon
ds, after which it
will stop and reset to the armed position. It will then re
-
trigger on the next intrusion.
If a door is left open, the siren will sound for 3 x 30 seconds and then that circuit will be bypassed to
avoid unnecessary noise.
(If programmed
for NSW, only sounding occurs
-
must be manually re
-
set after first trigger)
ARM CONDITION MEMORY
Should the vehicle battery be disconnected, the system memorises the last set position of the alarm.
If the alarm was disarmed prior to battery disconnecti
on, reconnection does not cause the alarm to
sound. If the battery was disconnected whilst the system was armed, reconnection will return the
system to the armed state.
NOISE POLLUTION CONTROL
To reduce noise nuisance and possible false alarms, the syst
em will isolate an individual circuit if it
is triggered three times in succession or is left open.
(Eg: 3 x bonnet/boot, 3 x doors, 3 x ignition, 3 x sensor)
Reset by remote by disarming and then re
-
arming, or by turning the ignition ‘on’ then ‘off’.
9
Page 10

INDICATOR FLASHING (FUSE PROTECTED)
When the siren sounds, the indicators flash simultaneously.
The indicators will also flash on arming and disarming the system.
a)
1 Flash
-
Armed.
b)
2 Flash
-
Disarmed.
c)
3 Flash
-
Disarmed and previously triggered.
DASH MOUNTED WARNING LIGHT
–
LED
The LED shows the status of the alarm, intrusion and any open circuit when arming.
Turning the ignition ‘on’ resets the flash codes.
a)
Fast flashing
-
30 second countdown of automatic functions.
b)
Slow flashing
-
syste
m armed.
c)
LED off
-
system off.
d)
On permanently
-
in remote code learning mode
e)
1 flash
-
bonnet or boot has been opened.
f)
2 flash
-
sensor has been triggered.
g)
3 flash
-
a door has been opened.
h)
4 flash
-
an engine start was attempted.
C
HIRP CONFIRMATION & CODES
a)
1 Chirp
-
Armed.
b)
1 Chirp/short siren
-
indicates an open circuit when arming.
c)
2 Chirps
-
Disarmed.
d)
4 Chirps
-
Disarmed and indicates that the alarm has been triggered.
e)
Continual chirps
-
Ignition has been turned on when t
he engine is immobilised
10
Page 11

PANIC BY REMOTE
(in either armed or disarmed state)
In the event of personal attack, or you suspect that your vehicle is being tampered with, the alarm
can be ‘panicked’ by pressing buttons one and two at the same time on the
remote for more than 3
seconds. The siren will sound and the indicators will flash. Pressing the buttons again cancels panic.
BOOT RELEASE
(AUXILIARY OUTPUT)
–
OPTIONAL CONNECTION
The system provides an output which may be optionally connected to control
a vehicle’s electric
boot release (f the vehicle is equipped). This may incur additional charges depending on the vehicle
specification.
To activate;
Press button two on the remote for 3 seconds and the boot will unlock and open
The boot trigger circuit a
nd any interior sensor will be bypassed
Upon closing the boot the bypassed circuits will re
-
arm automatically
PROGRAMMABLE OPTIONS
The system can be programmed to enable or disable certain features.
These can only be changed by your installer:
-
FACTORY DEFAULT
Automatic (passive) arming
OFFIgnition safety door lock
OFFChirps on (can be momentarily turned off by remote)
ONNSW siren timing (mandatory in NSW)
OFFTurbo function
OFF
11
Page 12

PROGRAMME OPTIONS EXPLAINED
AUTOMATIC (LAST DOOR) ARMING
-
PROGRAMMABLE
This feature is factory set in the ‘off’ position. You may have this programmed ‘on’ for added
security. The alarm will arm automatic
ally 30 seconds after the last door is closed.
The doors will not lock so that keys cannot be locked inside
If the engine immobilises prior to the opening and closing of a door, this feature is
bypassed. Press button one to unset the immobiliser and press
again to arm the system.
The opening of a door, bonnet or boot during the 30 seconds will suspend the countdown
and recommence on closure.
IGNITION SAFETY DOOR LOCK
-
PROGRAMMABLE
If the system has been connected to a ve
hicles’ central locking, the doors will lock 3 seconds after
the ignition is switched ‘on’ and unlock when the ignition is turned ‘off’.
If a door is left open for more than 3 seconds after the ignition has been turned on the safety door
lock feature wil
l be inoperative.
SIREN CHIRPS
-
PROGRAMMABLE
The chirps can be permanently turned off. Only the indicators confirm the arming and disarming.
NSW SIREN TIMING
–
PROGRAMMABLE
It is a mandatory requirement in New South Wales, Australia, for vehicle alarm
systems to sound the
siren for one trigger cycle of 30 seconds only. With this feature turned on, the indicators will flash for
any subsequent trigger.
TURBO FUNCTION
–
PROGRAMMABLE (not applicable to all models)
This allows an engine to remain run
ning from a turbo timer so you can arm the bonnet, boot & doors
(and lock the doors if connected to central locking). When the turbo timer stops, the immobilisers
become active immediately and any connected sensor become active after a 10 second delay. An
intrusion through the doors whilst the engine is running will sound the alarm and immediately
immobilise the engine.
12
Page 13

ROLLING CODE REMOTE CONTROLS
Two remote controls are supplied with the system which enable you to arm and disarm your security
syste
m.
One remote control should be kept with your car keys and the other with your spare car keys in a
safe place. We do not recommend leaving the spare remote and car keys in the vehicle.
The remote security code of your alarm system changes each time you
press the remote button.
This coding system is referred to as Rolling Code and is completely random therefore eliminating
the possibility of anyone recording it (code grabbing).
As there are billions of code combinations the chances of duplication are lit
erally billions to one.
Additional remote controls may be added as the alarm module can memorise up to four remote
controls.
The batteries in the remote controls should be changed when you notice any of the following;
System does not respond to the remote
signal
Operation is intermittent
Reduced operating range
–
less than 5 metres
The LED fails to light
Replace with a 12v 23A alkaline battery.
REMOTE ‘CODE LEARNING’
The main alarm module has a learning capacity to memorise up to four remote controls.
If you wish to add further remotes, or a remote has to be replaced, the new remote needs to be
code learnt into the main module. If for instance you have lost a remote and are fearful that
someone may try to use it, the lost remote can be deleted from memo
ry so it cannot be used.
An irregular or interruption to the vehicle’s power supply may cause loss of remote memory. If your
alarm fails to respond to the remote try re
-
learning them or see your Mongoose dealer.
13
Page 14

REMOTE ‘CODE LEARNING’:
To learn a remo
te or additional remote:
Disarm the system
Open the drivers door and leave open
Turn the ignition ON/OFF 3 times (ignition remains off)
The siren will chirp 3 times, the indicators will flash 3 times and the dashboard LED will
light permanently to confirm
you have entered remote code learning mode.
Press button one on the first remote
–
siren will chirp once as confirmation of reception
Press button one on the second remote
–
siren will chirp twice as confirmation of reception
Repeat for up to four remotes
(siren will chirp 3 times for the third and 4 times for the
fourth)
Leave the system for 10 seconds and the learning mode is completed. This is confirmed
by three fast chirps and light flashes.
NOTE: When learning a new replacement or additional remote, th
e original remote(s) must be
re-learnt or they will be erased from memory and will not operate this system.
To delete a lost remote from memory:
Enter learning mode as detailed above. Memorise existing remote once. The lost remote is now
deleted. When a r
eplacement is obtained, learn both the existing and new remotes into memory as
detailed above.
14
Page 15

EMERGENCY OVERRIDE
–
4 DIGIT PIN CODED
The system can be disarmed by entering your the unique 4 digit PIN
code shown on the
‘
PIN Code Card
’
issued w
ith this product.
KEEP THE CARD IN A SAFE PLACE
–
NOT IN THE VEHICLE !
Following is an example using PIN code
4525
The code is entered by turning the ignition ON or OFF in sequence with the dash mounted LED.
1)
Ignition ON
-
LED will light permanentl
y to commence override
.
2)
Ignition OFF
-
LED will start flashing. Count the number of flashes for the first number.
3)
Ignition ON
-
after
4
flashes (1
st
number of the example)
. The LED will light.
4)
Ignition OFF
-
count the number of flashes
.
5)
Ignition ON
-
after
5
flashes (2
nd
number).The LED will light.
6)
Ignition OFF
-
count the number of flashes
.
7)
Ignition ON
-
after
2
flashes
(3rdnumber).
The LED will light.
8)
Ignition OFF
-
count the number of flashes
.
9)
I
gnition ON
-
after
5
flashes
(4thnumbe
r).
10)
The system will now disarm and the vehicle can be started
.
Note: If your PIN code contains a
“0”
, this equals
‘10’.Should you miss the LED flashes or enter a digit incorrectly, wait for 11 flashes and simply repeat
the procedure from step 1).
This system will always automatically immobilise the engine every time the ignition is turned off. This
override sequence will have to be used to start the engine if your remote controls are not available
or inoperative.
15
MONGOOSE
EMERGENCY
4 DIGIT PIN CODE OVERRIDE
PLEASE KEEP THIS CARD IN A SAFE PLACE
BUT BE READILY AVAILABLE SHOULD Y OU
NEED TO USE THE OVERRIDE PROCEDURE
DO NOT LOSE THIS CARD
PIN CODE:
Page 16

TESTING YOUR ALARM
We strongly recommend that you test your alarm frequently.
1)
Without disarming the system, unlock
and open
a door with the ignition key
-
the alarm should
sound, excluding model M60i. Check all other doors, bonnet and boot
by the same procedure.
2)
Check the impact sensor, M60B only unless fitted as an accessory, by giving the vehicle
varying degrees of impact
-
be careful to do this on areas of the vehicle not likely to be
damaged by impact. Light impacts should chirp the sir
en whilst heavier impacts should fully
sound the siren.
3)
Enter the vehicle and shut all doors, arm the system by remote and try to start the engine to
test the engine immobiliser
-
it should not start.
4)
To test the ultrasonic sensors, M60AU, enter the vehic
le, shut all doors and windows, arm the
system and allow it to stabilise for 10~20 seconds. Now wave or clap your hands
–
the alarm
should sound.
5)
To test the microwave sensor, M60AM, arm the system and wait at least 10~20 seconds for the
sensor to stabili
se. Moving a hand over the outside of side windows should chirp the siren.
To test the perimeter field size, repeat this movement on the outside of all glass areas.
To test the interior, leave a window open when arming and reach in and wave an arm around
-
the siren should fully sound.
16
Page 17

WIRING INFORMATION:
Installation to
be carried out by suitably qualified persons.
MAIN MODULE
The plugs are edge numbered & the
wires printed for the function;
1)–TRIG
(-) BONNET & BOOT
TRIGGER INPUT
2)
CH2(-
) CH 2 OUTPUT
–
EG: BOOT RELEASE
3)
IGN
(+) 12v IGNITION INPUT
4)
GND ARM
GROUND WHEN ARMED
5)
DOOR
(-) DOOR TRIGGER
–
jumper changes polarity
6)
NO CONNECTION
10) FLASHER
(+) INDICATOR OUTPUT
–
8 amp cont’ max
11) 12V
(+) CO
NSTANT 12v POWER SUPPLY
12)
FLASHER
(+) INDICATOR OUTPUT
–
8 amp cont’ max
13) & 14) GND
(-) 2 GROUNDS
–
DO NOT JOIN TOGETHER AT THE SAME POINT
15)
SIREN
(+) SIREN OR HORN OUTPUT
7)
WHITE
LOCK
-NC8)
ORANGE
UNLOCK
–NO9)
BLUE
UNLOCK
–
COMMON
16)
PURPLE
LOCK
–NO17)
BROWN
UNLOCK
-NC18)
GREEN
LOCK
-
COMMON NOT USED
IM01
IMMOBILISER CIRCUIT #1
–
PAIRED WIRES
–
max 20amp cont’
IM02
IMMOBILISER CIRCUIT #2
–
PAIRED WIRES
–
max 20 amp cont’
Page 18

WIR
ING
Page 19
TURBO INTERFACE
To enable, remove the cover from the main module and remove the jumper between the m
ain IC
and the receiver board.
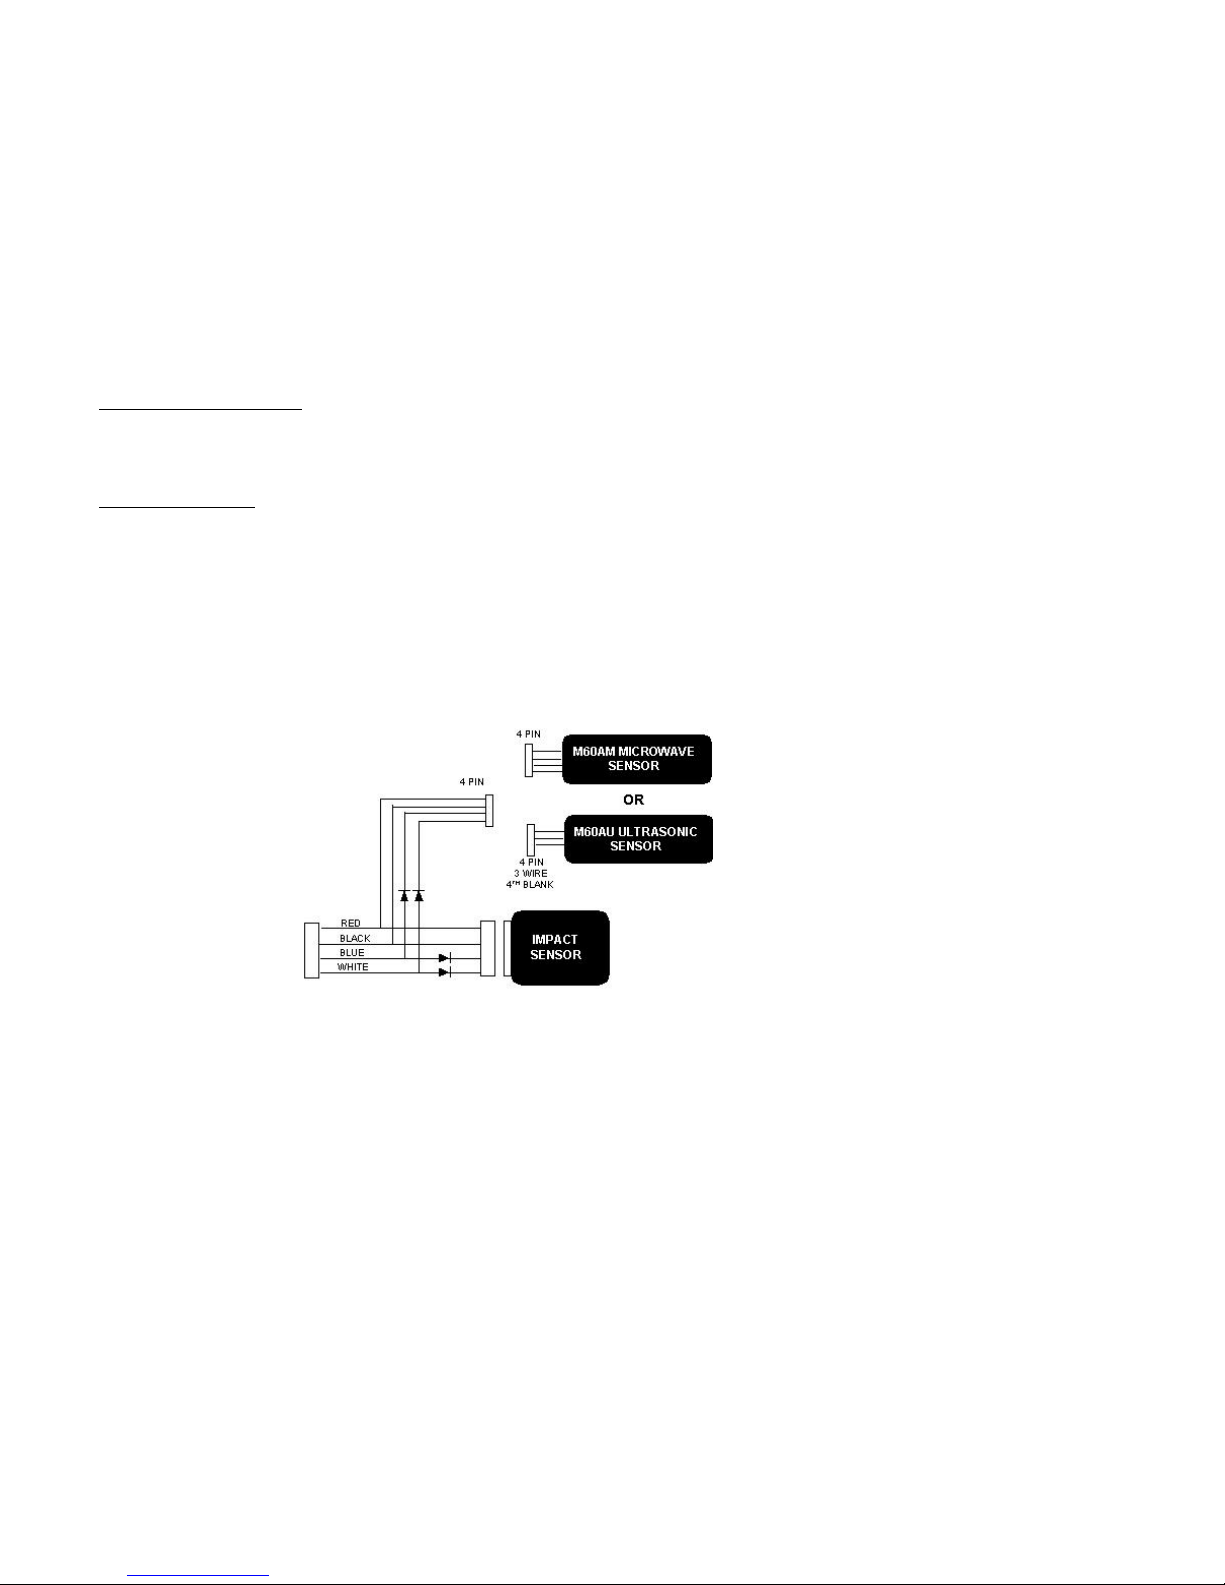
SENSOR PORT
The sensor port is a 4 pin input that accepts an impact sensor, ultrasonic sensor or microwave
sensor. A “Y” connector is available as an option where 2 sensors are required.
The M60B/M60S is supplied with a 2
stage impact sensor
–
other sensors optional.
The M60AU is supplied with an ultrasonic sensor.
The M60AM is supplied with a 2 stage microwave sensor.
Page 20

IMPACT SENSOR
–
Included in M60B/M60S
–
optional on other models.
The
impact sensor is 2 stage:
-
light impacts should chirp the siren, whilst heavier impacts should
fully sound the siren.
The sensor should not be mounted in the engine compartment. The ideal location for this sensor
is solidly mounted under the dashboard ne
ar the centre of the vehicle.
The sensor is fully adjustable from the potentiometer on the side of the sensor module.
Apply varying degrees of impact to the vehicle at various locations to ensure detection
is possible.
Turn clockwise for more sensitivity,
anticlockwise for less sensitivity.
ULTRASONIC SENSOR
–
M60AU (optional on other models)
Ultrasonic’s will detect any movement inside the car, including air movement. It is therefore
important that all windows, vents and sunroofs be fully closed before t
he sensor is activated.
Ultrasonic heads should be mounted at the top of the front windscreen pillars, facing
towards the centre of the rear window.
Always ensure that ultrasonic heads are connected correctly, match colours of leads
and plugs.
The sensit
ivity can be varied with the potentiometer on the module. Turn clockwise to
increase sensitivity, anticlockwise to decrease sensitivity.
Care should be taken to ensure that the ultrasonic leads are not crushed or damaged as this
may result in false alarmi
ng or failure to trigger.
It is inadvisable to attempt to extend or shorten the ultrasonic leads.
Page 21

2 STAGE
MICROWAVE SENSOR
–
M60AM (optional on other models)
The microwave should detect intrusions into the p
rotected areas. Two fields are generated, one
outside the vehicle and one inside. Intrusions into the exterior area will chirp the siren whilst
intrusions into the interior will fully sound the siren.
The microwave plugs in directly to the white sensor po
rt of the M80.
As the field shapes cannot be altered, the location and position of the sensor is critical.
Do not mount under metallic objects or where coins or CD’s are stored. Seat frames will
shield the sensor giving areas of non
-
coverage. It will pen
etrate non
-
metallic objects,
but will not penetrate metal. It will work with windows down, sunroofs open or even in a
convertible with the top down. Air movement, noise and temperature should not affect
the microwave.
The two field sizes are independently
adjustable from the potentiometers on the front of
the sensor.
1.
Exterior
: Green LED. Turn clockwise to increase sensitivity, anticlockwise to
decrease sensitivity (very fine adjustment
-
fraction of a turn only).
2.
Interior
: Red LED. Turn clockwise to incre
ase sensitivity, anticlockwise to
decrease sensitivity (very fine adjustment
-
fraction of a turn only).
Do not adjust interior field greater than exterior. The ‘noise pollution control’ feature will turn off
each trigger input after 3 intrusions into each
. Reset by remote to re
-
activate the sensor.
Full installation instructions are available on the Mongoose internet site:
www.mongoose.com.au
with access restricted to Mongoose authorised installers.
Page 22

WARRANTY CON
DITIONS
PRODUCT WARRANTY
Mongoose warrants for a period of 36 months that it will make good without charge at Mongoose’s discretion, by repair or replacement with a
reasonable equivalent, any defect in the product providing that;
(a) the defect has been n o
tified as soon as it is noticed to an authorised Mongoose installation centre, distributor or agent (in the f irst instance to
the original installation centre).
(b) the alarm is less than 3 years of age from the date of sale and was manufactured wit
hin the last 4 years.
(c) the alarm has been installed by an approved Mongoose installation agent
(d) it has been installed according to the AS/NZS 3749.2 Installation Standards and/or to our written instructions.
(d) provision of proof of purchase stating
where it was purchased and by whom it was installed.
(e)
if the alarm is installed by anyone other than an approved Mongoose installer a 12 month
parts only
warranty applies
(f) an authorised installation centre has determined that the defect complained o
f is a genuine product defect and not caused by;
(I) incorrect installation or any other consequential damage caused by the vehicle or other vehicle parts
(ii) operation of alarm after it is known to be defective
(iii)
alteration or modification of the
alarm or its components
(iv)
the fitment of additional security parts or accessories not supplied by or approved of by Mongoose
(vi) any work carried out on the alarm by someone other than an authorised Mongoose installation centre
(vii) misuse, accident,
deliberate act or abuse (eg: misdirected electrical current, ingress of water or fluid, vehicle damage)
Exclusions
;
(I) removal & refitting costs of parts
(ii) mobile service costs
(iii) batteries, i.e. remote controls
(iv) normal wear and te
ar
(v) alarms operated outside the original country of purchase
(vi) freight costs of parts to rectification centres
(vii) transport costs of getting a vehicle to a repair centre
(viii) consequential costs of vehicle non
-
operation where the rem
ote controls or PIN code card are l ost, not available, or an inability to use
INSTALLATION WARRANTY
Warranty for the installation is borne by the original installing agent only.
The period and terms of warranty are determined by the installation agent a
nd should be verified with them.
Rectification work r equired to correct an installation fault carried out by anyone other than the original installation agent will incur their charges.
Authorisation to have this work carried out and agreement to have any c
osts refunded should be obtained fr om the original installation agent prior
to work commencing.
Whilst every care is taken in fitting the security system, Mongoose accepts no responsibility for any damage caused to a vehicle in the installation
process. Re
sponsibility is borne by the installer.
THIS WARRANTY IS ONLY TRANSFERABLE AS PRESCRIBED AS BELOW
a)
If the vehicle is sold with this product, the new owner receives the balance of any warranty period remaining.
b)
If the original owner has the system re
-
inst
alled into an alternative vehicle by an authorise Mongoose i nstallation centre, the owner
receives the remaining period of warranty. If re
-
installed by an unauthorised person, this warranty ceases.
Page 23

This product is manufactured, tested and certified to t
he joint
Australian and New Zealand Standards AS/NZS4601 1999 amendment 1 2003 &
AS/NZS3749.1 2003 Class B.
Manufactured for: Mongoose (Australia) Pty Ltd
Make & Model Number: Mongoose M60 Series
Country of manufacture: Taiwan R.O.C.
Supply voltag
e: 12v DC nominal
–
negative ground
Current consumption: 0.3amps (see alarm module label)
Suitability: All vehicles with 12v negative earth batteries
Date of manufacture: Refer date code on alarm module case
AS/NZS3749.1 2003
Class B definition: includes control equipment including setting and unsetting
facilities, all sensors, warning devices and provision for immobilisation of the vehicle.
Whilst this security system provides a deterrent, it may not prevent theft or damag
e through
wilful criminal intent. Mongoose does not by inference, intent or any other means guarantee that
a vehicle fitted with one of it’s security systems will not be stolen, broken into, tampered with, or
parts taken. Mongoose does not offer nor will p
ay compensation for any l oss. We recommend
adequate vehicle insurance and the fitment of other security devices as deemed necessary.
The loss and any associated costs of replacing the remote controls and/or PIN code card in
making the vehicle mobile are th
e responsibility of the vehicle owner/driver.
Page 24

Page 25

PROOF OF PURCHASE
DO NOT LEAVE THIS INFORMATION IN THE VEHICLE
OWNERS NAME:……………………………………..
VEHICLE MAKE:…………………………..
ADDRESS:……………………………………………..
VEHICLE MODEL:…………………………
……….……………………………………….
VEHICLE REG’ NO:……………………….
TELEPHONE NO:……………………………………..
ALARM MODEL NO:……………………….
ALARM PURCHASED FROM:……………..
Dealer
DATE PURCHASED:.……………………….
INSTALLED BY:..……………………………
DATE INSTALLED:………………………….
INSTALLER SIGNATURE:…………………
OWNERS SIGNATUR
E:……………………
Please complete the above details, detach from this m anual and keep in a safe place. These details should be presented to
your Mongoose dealer in the unlikely event that you require this product to be repaired under the terms of the ‘product
warranty’. Refer ‘Warranty Conditions’. Failure to provide this ‘Proof of Purchase’ may result in rectification charges being
made. If you sell the vehicle within the warranty term, please pass on this on to the new owner.
 Loading...