

Page 1
1
DC300
AUTOMOTIVE DVR DASHCAM
Vehicle windscreen mount digital video
recorder with GPS route/speed tracking
Installation & User Manual
Page 2

2
Notice
1. Important: Only use the supplied charger/pow er supply & USB lead.
2. Never disasse mble or att em pt repai r of this product.
3. Do not manuall y operate the d evice whilst driving.
4. Thi s camera is i ntended for non-commerci al use.
5. Mongoose is NOT respon sibl e for the loss of any data/ content dur ing
operation.
6. GPS location and speed accuracy may differ depending on weather and
location such as high buildings, tunnels, undergrounds, or forests.
GPS satellite signals cannot pass t hrough solid mater ial s (except plastic and
glass). Ti nted windscreen may affect the performance of the GPS satellite
reception.
7. The val ues displ ayed in this system, such as speed and position may be
inaccurate due to t he influence of surrounding envi ronment or user sett ings.
They are only a guide for your ref erence.
8. If pow eri ng up insi de a gar age or bui l di ng, GPS l ocation will take l onger due
to poor indoor reception.
9. Do not leave the DVR on the wi ndscreen when par ked, especially in
summ er, as it is a security risk and may get damaged by excessive heat.
Page 3

3
Product Overview
No.
Description
No.
Description
1
Suction cup connect
9
Power button
2
USB | Power
10
Card slot
3
HDMI output
11
LED indicator
4
Reset
12
2.4” screen
5
Speaker
13
Menu
6
Wide angle lens
14
Up
7
Serial No.
15
Down
8
Microphone
16
OK
Getting Started
Page 4
4
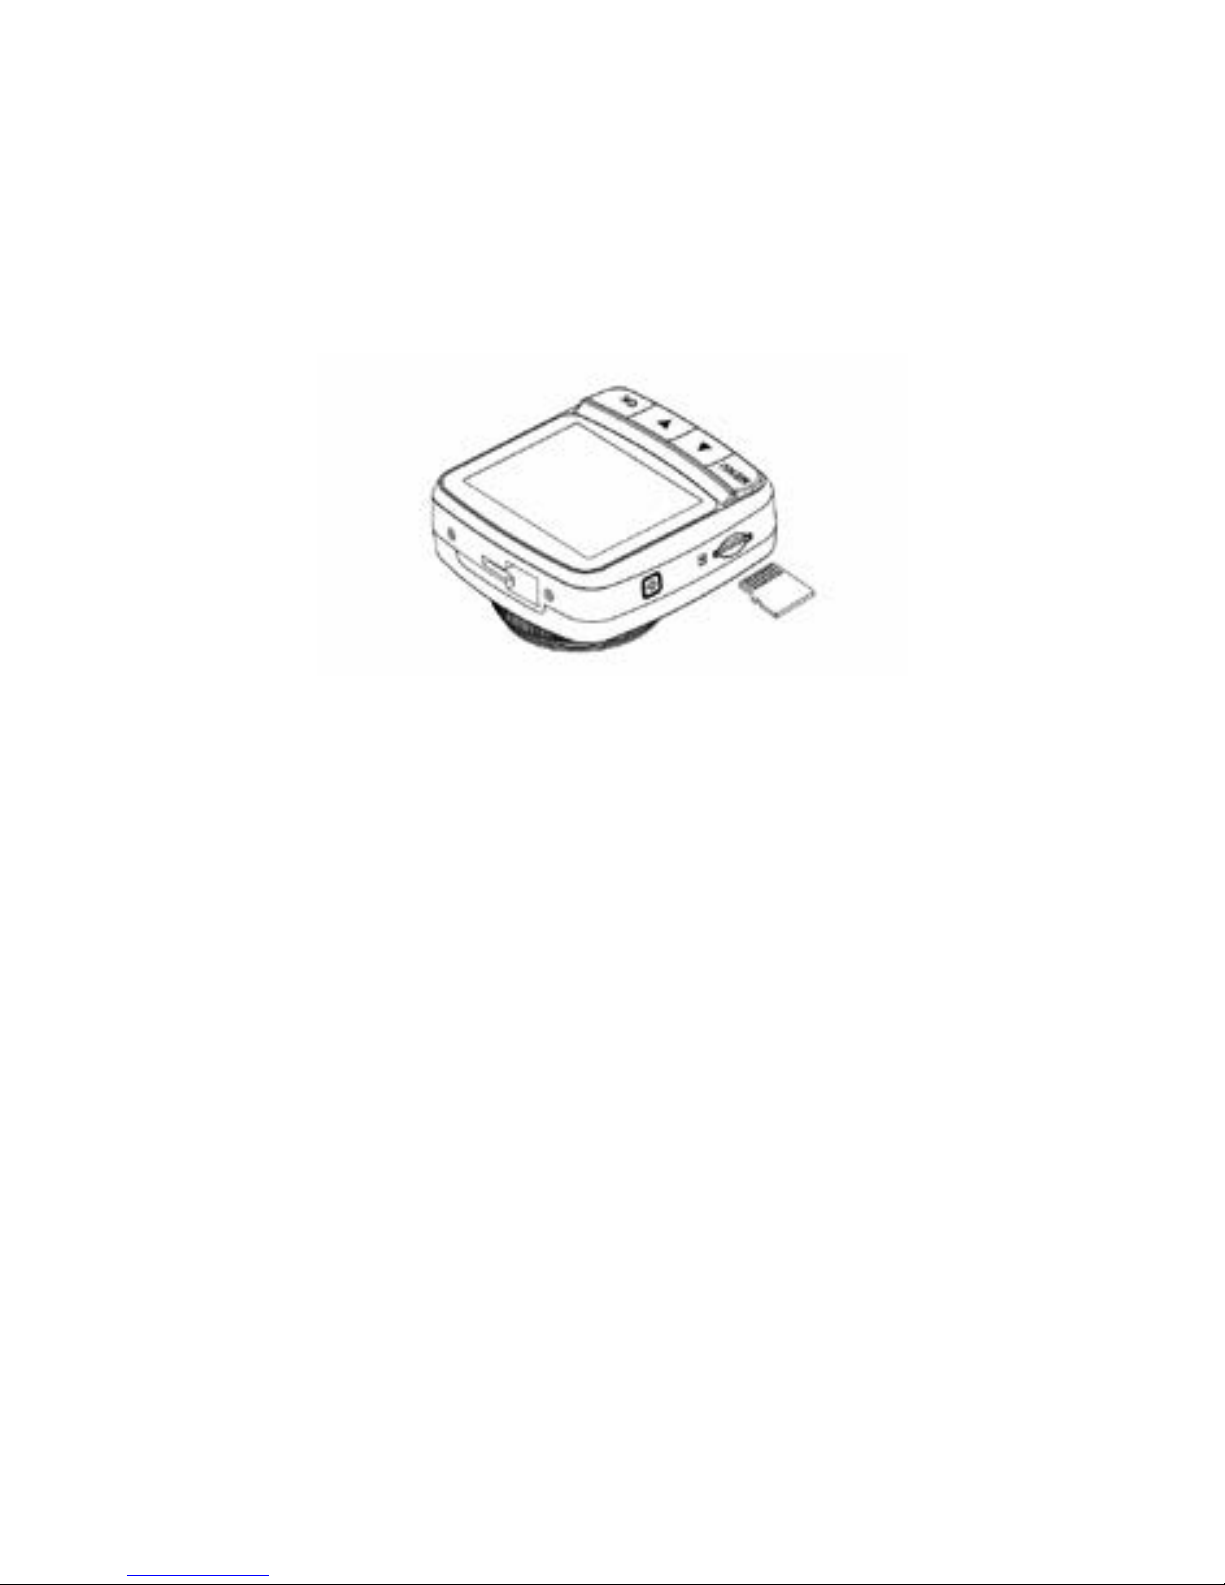
Inserting th e micro SD M emor y Card
Insert the memory card with the gold contacts facing the back of the DVR. Push
the memory card unt il it clicks into place. Do not force i t.
To remove t he memory card, push to eject t he card out of the slot.
Be caref ul not to drop it down any vehicle air vents or inaccessible gaps
1. DO NOT REMOVE O R INS E RT THE MEMO RY CARD W HE N THE DE V ICE IS P O WERED
OR SWITCHED ON AS THIS WILL DAM AGE THE MEMO RY CARD.
2. Use class 10 (UHS 1) or above micro SD card for this DVR.
Can accept up to 128 gb micro SD card.
3. IMPORTANT: For m at the micro SD car d from the D VR settings menu
before first use. This wil l also download the Windows PC view er progra mme
onto the micro SD – copy the file to your PC.
Page 5
5
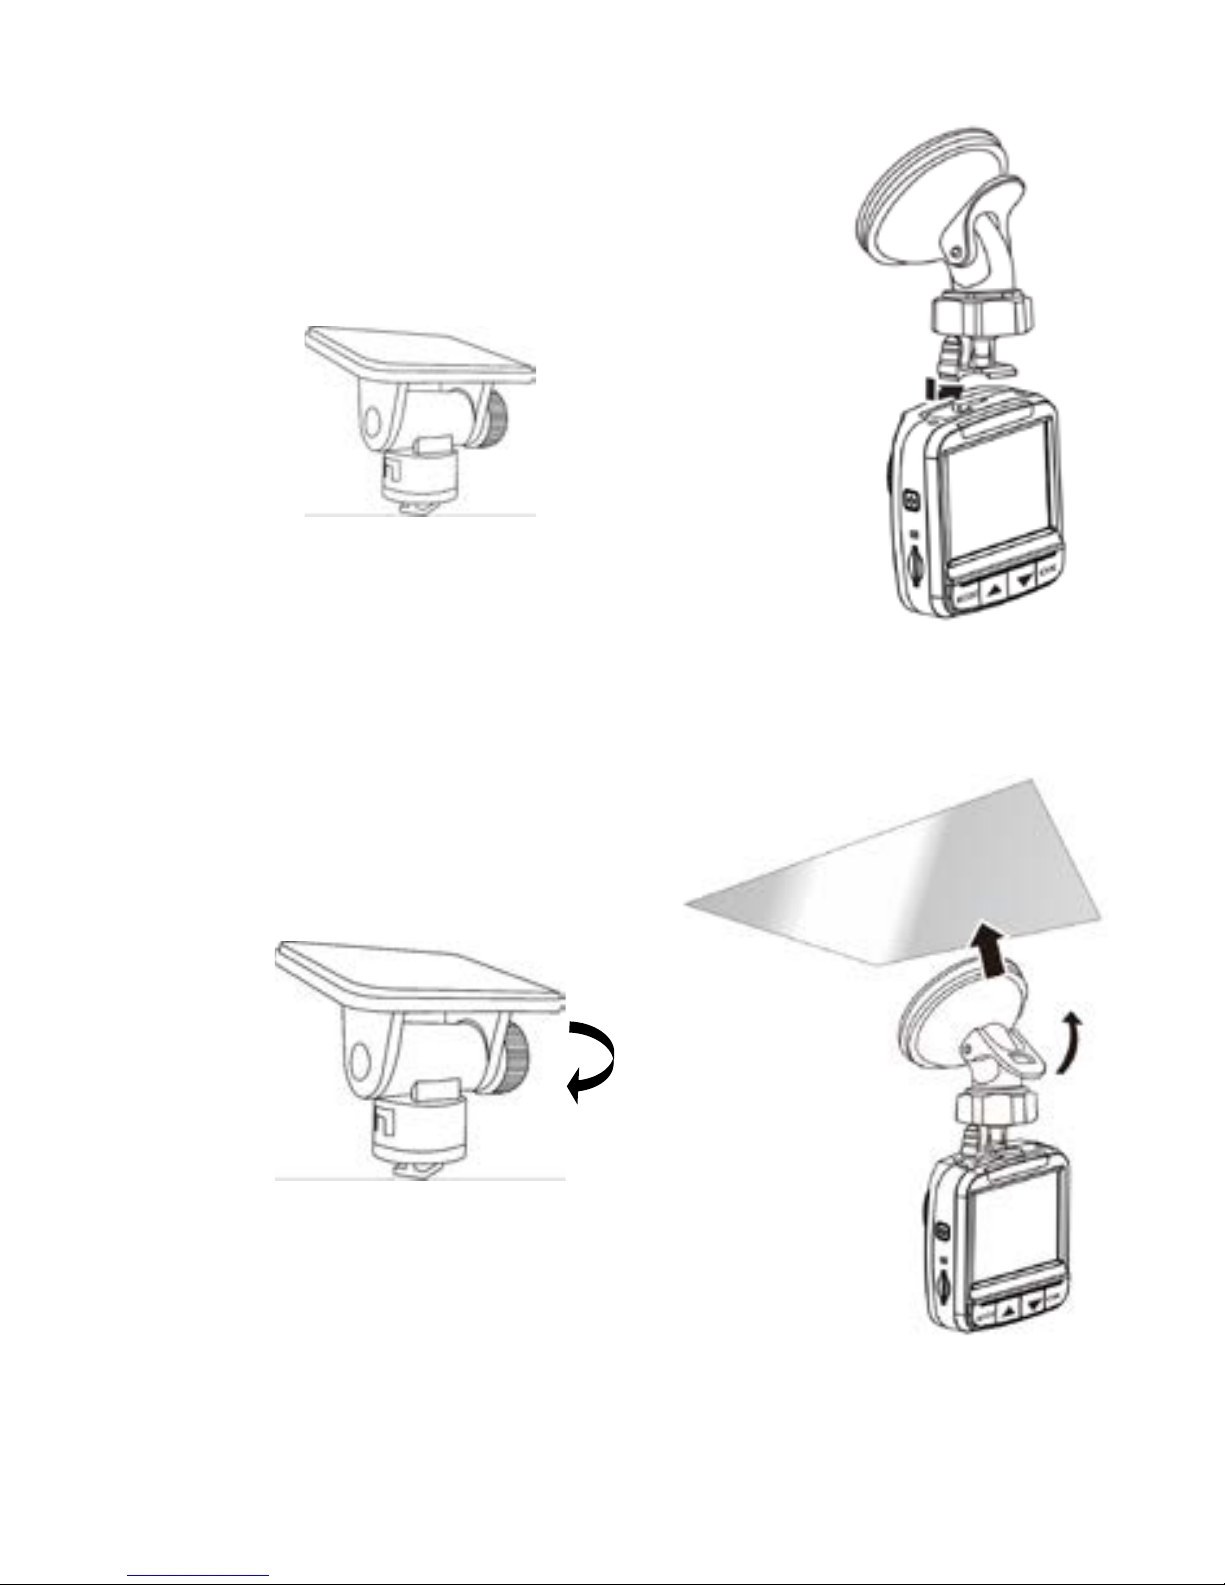
Mount to Windshield
1. Attach either of the brackets to the d evice. Sl ide it
into the bracket holder until you hear a click.
2. Clean the windscreen area first with isoprol alcohol
(or non-oi l based solvent – do not use met hol at ed spiri t s).
3. Use the suction mount or the 3M adhesive bracket.
4. Make sure the bracket is securely locked into place.
Page 6
6
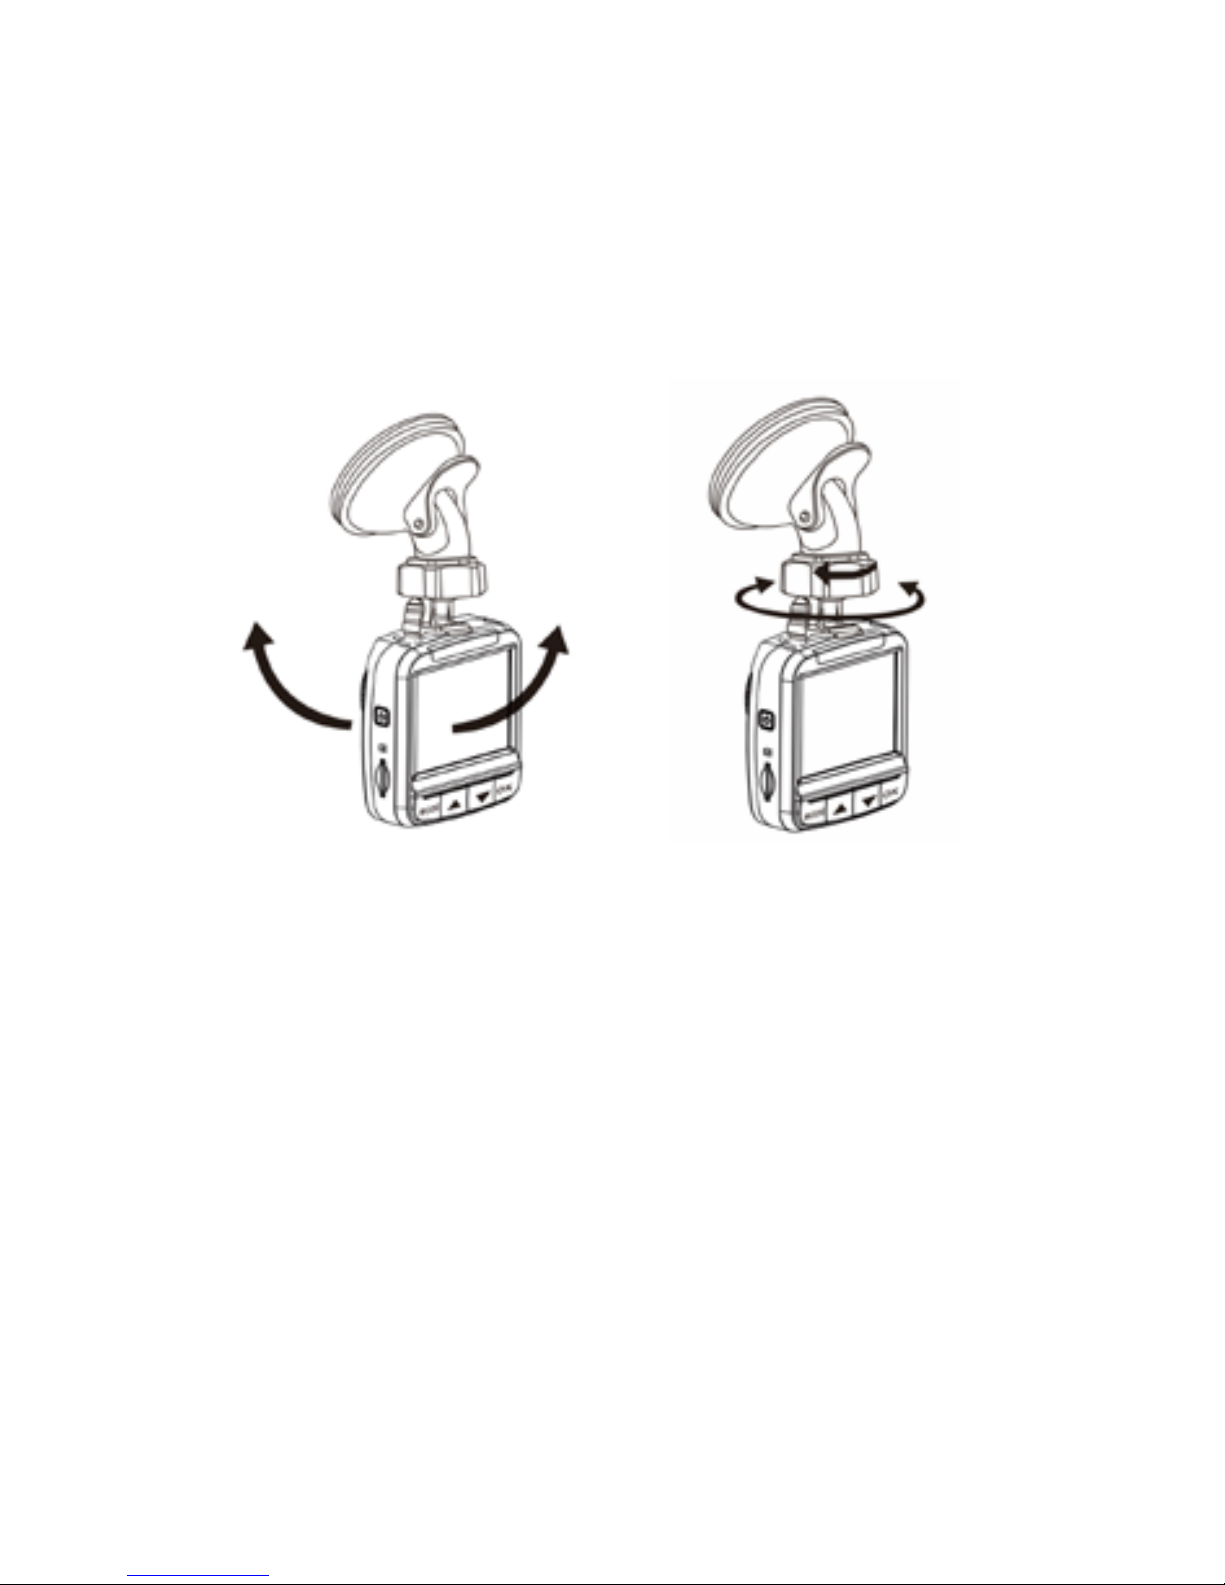
Adjust the device position
Loosen t he knob to adjust the device.
Tighten the knob to make sure the device is securely locked in pl ace.
SECURI TY ADVICE:
When parking your vehicl e, always remove the camera and suction bracket t o
avoid theft.
HEAT ADVICE:
The DVR an d i t’s micro SD card ar e sen si tive to heat. We a d vise r e moval f rom the
windscr een when p arking and protecting the DVR and micr o S D card fr om
excessive heat.
P.S. Your bracket(s) in the package may differ from the pictures.
Page 7
7
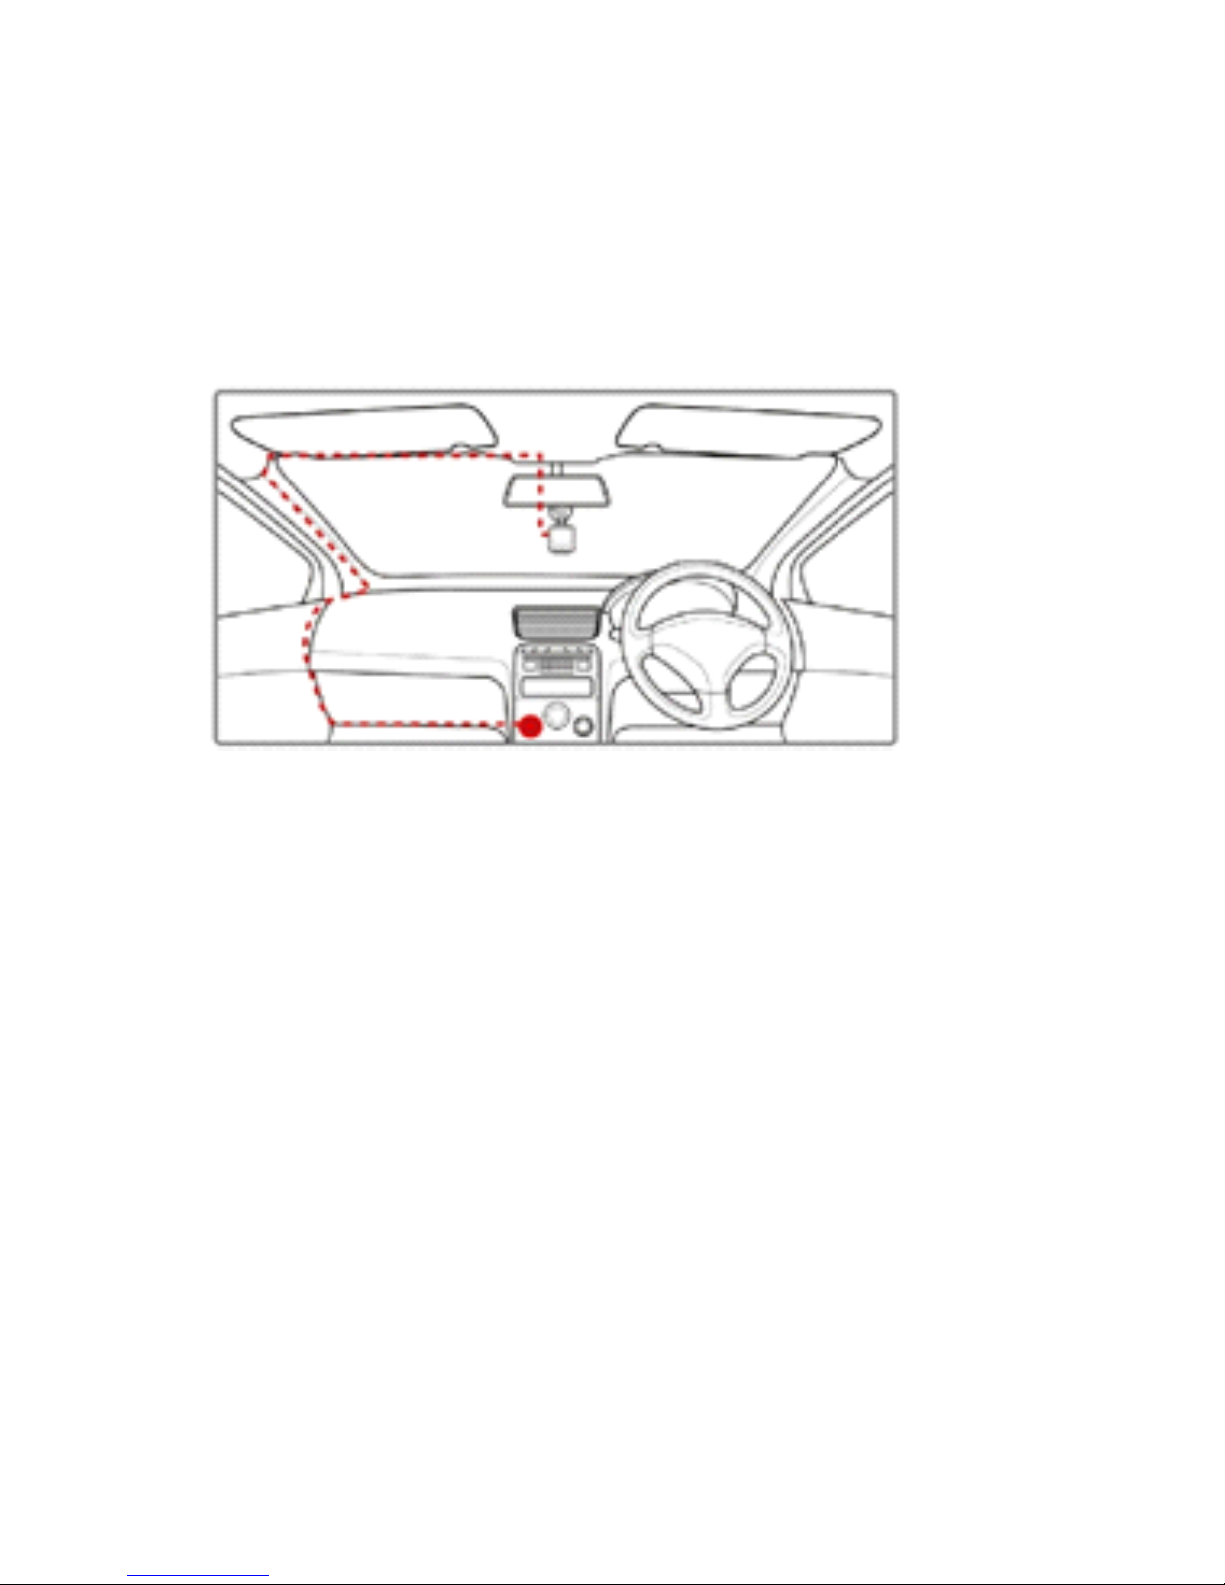
Connecting to Power
Use only the supplied car adapter and U SB lead to power the device an d charge
the built-in bat tery. Whilst USB leads have simil ar appearances, the wiring
configurati on may differ – only use the supplied lead.
1. Connect one end of the car adapter to the mini USB connect or of the DVR.
2. Run the lead as shown above. Plug the power adapter into the cigarette
lighter/power socket of your vehicl e. Once the vehi cle engine is started, the DVR
powers on and aut omatical ly starts recording.
Note:
1. The DVR’s yellow LED lights up whi le the battery is charging.
2. Pl ease take note if the environment temperature reaches 45°C or above, the
car adapt er still can supply pow er to DVR, but it will not charge the battery. This is
the characteristic of Lithium poly mer batter y and is not a malfunction.
Page 8

8
Turning the DVR On / Off
Automatic
When the vehicle engine is star ted (ACC on), the DVR automatical ly turns on and
starts recording. When the engine shuts down (ACC off), the DVR automatically
saves th e recordi ng and turns the power off within 5 seconds. A count down timer
appears on the scr een.
Manual Of f
To manually turn on or off, press the side POWER button for 2 seconds.
Initial Settings
Before u sing the device, we r ecommend you to set up the correct date and time.
Set the Date and Time
To set the correct date and time, do the foll owing in standby window:
1. Press [MENU] button to enter the OSD menu.
2. Press [▼] button 2 times, t o se lect system setups.
3. Press [OK ] to enter system setups. -Press[▼] to select Data and Time.
4.Pres s [OK] and use [▲] [▼] to chang e the digits. Pr ess [OK] again to move to
another digit.
5. Repeat step 4 until the date and ti me setting is complete.
Page 9

9
Recordi ng Videos
When the vehicle engine starts ( ACC on) , the DVR automati cally t urns on and
starts recording video and sound. Recordi ng will automaticall y stop when the
engine is switched off (ACC off).
Press the [OK] button to stop recording manual ly.
Note:
On some vehicles, the recording w ill conti nue when the engine is switched off
because t he power supply is not ignition controlled. If this happens, please
remove the car adapt er fro m the cigarette l ight er/pow er sock et or manual l y turn off
by the POWER button.
Manual recording
1. Press t he [OK] button to start recording. Red LED lights
2. Press the [OK] button to stop recording.
Note:
1. One video file is saved f or every 1, 2, 5, or 10 minut es of recor ding.
You can select the timing by using the Menu.
2. The device sa ves the rec ording in the memory card. If the memory card
capaci ty is full , the ol dest file in the memory card is overwritten (loop r ecording) .
See Using the Menu.
Page 10

10
Emergency Recordi ng
You can save t he current recording by not being erased by the loop recording by
pressing the [Menu] button to enter e m ergency recording mode. The [ ] icon
will be shown imme diately on the upper center of t he screen and the recorded file
will be protected. To stop the emer gency mode, press again the [Menu] button.
Note:
1. If the G-Sensor i s enabl ed and a collision to your vehi cl e is detect ed, t he de vice
will automati cally trigger emergency rec ording.
2. The emergency recor ding file is created as a n ew fil e in a different directory,
which will be protected t o avoid being overwritt en by normal cycling recordi ng. If
the space of emergency files exceed 25% of the card capacity, system w ill erase
the oldest emergency files.
The Recording Screen
Page 11

11
No.
Sign Description
1 1920×10 80 30P Indicates the video resoluti on.
2
Moti on detecti on
3
GPS. Blinking for searchi ng. Green for stable
4
Mute recording
5
Micro SD card
6
Battery
7 2014/05/27 Date(Year/Month/Date)
8 00:25:15 Remaining recording time
9 12:03:17 Current time
10 000:00:27 Recording time
11 Car ID Car ID. How to set, please check menu.
Taking Still Photographs
You can also use this DVR to take still photos.
1. Fro m the standby screen, hold the [MENU] button to ent er Photo Mode.
2. Press [OK] to button to take a photo.
Page 12

12
The Photograph Screen
No. Sign Description
1
Photo mode
2
Remaining possible photos
3
GPS
4
Mute – Press up/down buttons at same time to toggle on/off
5
Micro SD card
6
Battery
Page 13

13
Playback Videos and Phot os
If recording is in progres s, press th e [OK] butt on to stop r ecording. The standby
screen is displayed.
Playing videos
1. In the standby scr een.
2. Press[▼] to enter into video playback list.
3. Press the [▲] [▼] button to browse for the d esired video file and press the [OK]
button to play the video. Press the [OK] button to pause the play back. Press it
again to resume.
Page 14

14
4. Press [▲] [▼] to adjust t he video volume.
5. Hold [ ▲] [▼] to fast forward or backw ard, the spe ed is 2X/4X/8X/16X/32X/64X.
6. Press [MENU] button to stop play ing and return to video list.
Tips: you can play all videos continuously. After sel ect one video, hold menu
button a nd choose “Video play all”.
Viewi ng photos
1. Hold [MENU] button to enter i nto photo mode
2. Press [▼] button to enter int o photo li st
3. Press the [▲] [▼] but ton to select pict ure and press th e[OK] button.
4. During viewing, press [ ▲] [▼] button to view preview or the next photo.
5. Press [MENU] button to ret urn to phot o list.
Deleting Files
To delete or protect file(s), do the following
From the video standby or photo stand by window:
Page 15

15
1.Press[▼]button to enter into video or photo list
2.Press[▲] [▼] button to select fi le. Hold [Menu] button for 2 second.
3.Pres s [▲] [▼] button to Delet e fi le, and press OK.
4.Choose from “Delete this fil e” and “Delete all files”.
File str ucture
Video file names wil l be like 20140526-1432_0001.mp4
GPS PLAYER – ON WINDOWS PC’S.
When the micr o S D card is formatted by the DVR, there will be a PC player file
automatically saved on your SD card. Named: RegistratorViewer5.8.exe
Copy this fil e to your desktop.
Open the player on your Windows computer for DVR video and GPS playback.
Note: If you delete the play er, just format your micro SD card in the DVR and it will
appear again. Please do backup your import ant videos or data before formatting.
Page 16

16
How to use it:
Press th e “+” to add video to play li st. (5 of picture abo ve) or if DVR is connected
to computer, it will detect video fi les automatically. Hit play button in window 3.
Information explain:
1: Ti tle: here is the key information about this video.
2. Video
3. Here y ou can find the direction, G-Sensor and speed
4. GPS rout e. You can choose different built-in maps.
5. File tools and video list.
Page 17

17
Speed cam warnings
Thi s feature is currently not available i n Australia or New Zealand.
Adjusting the Settings
Recordi ng Setting
Press [Menu] to enter i nto setup. Here you can see 4 settings of video. For detail,
please c heck the menu tree of e ach settings.
Photo settings
Press the [▼] to swi t ch to Phot o sett i ngs. For detai l , pl ease r efer to t he men u t ree.
GPS reception
The DVR ne eds to be able to receive satellite signals t o determine its locat ion.
Turning on inside a garage or undercover area will most likely result in no GPS
reception until the vehicle is driven outdoors. Locating satellites whilst
Page 18

18
driving/moving can delay reception. Turning on outdoors will result in much faster
satellite reception. Heavy over cast cl ouds can also delay reception.
The DVR will say ‘GPS ready’ when signals are being received. The GPS icon
display will turn from white to green. Driving before ‘GPS ready’ is announced will
result in no GPS travel log being recorded prior to the announcement.
Moti on detection
As shippe d, the camera wil l automatically start recor ding when the engine is
started and stop recording when the engine is turned of f. This is assu ming your
vehicles power socket i s ignition controlled. Through ‘sett ings, you can select
‘motion detection’.
The camera starts recording when it detects movement and stops when no
moveme nt is det ected. When you start m oving again, recording recommences.
Security function – motion detection;
If the camera is connected to a vehicles permanent power source, the vehicle can
be parked with the camera still powered. If the camera ‘sees’ move me nt, say f rom
a possi ble car thief, it will start recording. It wil l stop when no movement is
detected.
Recordi ng sound on/of f;
The recor ding of sound can either be on o r off .
When the DVR is on, press both up/ down buttons at the same time to toggl e
sound on or off. The microphone icon wi ll show the cur rent set ting.
Page 19

19
System setti ngs
Press th e [▼] again to enter sy stem settings. For each of these 3 pages setting,
you can do t he following:
1. Press [▲] [▼] button to select settings an d press [OK] to enter.
2. Press [▲] [▼] button to select the right options and pr ess [OK].
3. Repeat step 1, 2 until finish all setups.
4. After finish, press [MENU] to quit menu setup.
Menu
Refer to the below tabl e for details on menu it ems a nd available men u options.
Menu Description Options
Resolution Set the video
resolution
2560 x1080 30P 21:9
2304 x1296 30P 16:9
1920x1080 45P 16:9
HDR1920x 108 0 30P 16: 9
1920x1080 30P 16:9
1280x720 60P 16: 9
1280x720 30P 16: 9
Video quality Set the video
quality
S. Fine (Super Fi ne)
Fine
Normal
Page 20

20
WDR Software video
boost
On/ Off
Stamp Turn on or off
stamps on video.
On/Off (cannot turn on
separately, for example only
showing time is not possible)
LDWS
+FCWS
Lane departure
and forward
collision warnings
On/Off
LDWS
Calibration
Calibrates the
camera to true
horizon
2 set-up l ines
Hori zon & top of dashboard
Still photo
resolution
Set photo
resolution
9M (4000*2250 16:9)
6M (3264*1836 16:9)
4M (2688*1512 16:9)
(Sensor origi nal is 4M)
Still photo
quality
Set photo quality
S.Fine (Super fi ne)
Fine
Normal
Stamp Turn on or off
stamps on photo
On/Off
(tips refer to video stamps)
White
balance
To set white
balance
AUTO Incandescent
D4000 D5000
Sunny Cloudy
Page 21

21
System Set the right TV
system
NTSC(recording 30fps)
PAL(rec ording 25fps)
Date/Time Set date and time Format: Year/Month/Dat e; Hour:
Minute
([Menu] to move right; [OK] to
confirm)
Car ID Set your car ID
number which
can show on the
video.
1. Press [OK] to choose
ENG/CHS/RUS characters;
2. Use [▲] [▼] to move left and
right;
3. Use [menu] to go down
4. Press [OK] button to input
each char acter
5. Choose backspace if to
replace old characters.
6. Finally select OK to quit .
P.S. support up to 9 digits.
Format Format the card Yes/No (deletes all data
including saved videos)
Default
setting
Restore the
factory settings
Yes/No
Page 22

22
Motion
detection
Will start
recording if
objects move in
front of the
camera.
1. After start, there will be a sign
on the screen.
2. Press OK t o start detection.
The si gn w ill bli nk.
3. After detected objects, it will
start recording.
LCD OFF
time
Set how long to
turn off the
screen
OFF/30sec/1min/3min
Split time Set how long will
be each video file
1,2,5,10min
Please note it i s cycle r ecording.
New files will replace the old
ones.
GPS Power Turn on or off the
GPS
ON/OFF
After off, the GPS sign wil l be off.
Time Zone Set the time zone Defaul t is +4
Use [▲] [▼] to move left and
right.
G-Sensor
Level
Set the G-Sensor
sensitivity
Use [▲] [▼] to move left and
right.
0 is turned OFF.
5 is the most sensitive.
Page 23

23
Scene Mode Set different
recording mode
OFF/Night/Night/Portrait/Sports/
Landscape/Portrait/Sunset/Sand
/Snow/Flower/Firework/Water
/Backlight/Tripod/BlueSky/Macro
/Arena
AE BIAS Set the EV
exposure
adjustment
Set from [-2.0] to [2.0]
Use [▲] [▼] to move left and
right.
Stamp
Speed OFF
The GPS speed
will hide on video
if meet the setting
speed.
Set from 2 0 – 170.
Defaul t is off.
For your safety, please obey
local laws and do not speed.
Speaker
volume
Set the speaker
output volume
Set from 0(mute) to 8.
Defaul t is 8.
Use [▲] [▼] to move left and
right.
Language Set the menu
language
ENG/简体中文/繁体中文/Pусски
й
EDOG
BEEP
Beep for speed
camera warning
Function not curr ently available
in Australia or New Zealand.
Progra m m e off to avoid false
warnings
Page 24

24
Notice
Thi s symbol on the product or on the packaging i ndicates that this
cannot be disposed of as a household waste. You must dispose of
your waste equipm ent and/or battery by handling it over t o the
applicable t ake-back scheme for the recycling of electrical and
electronic equipment and/or battery. For more information about
recycling of this equipment and/or bat tery, please contact your cit y
office, the shop where you purchased the equipment or your household waste
disposal ser vi ce. T he r e cycl i ng of materi al s w il l hel p to cons erve natural resour ces
and ensure that it is recycled in a manner that pr otects human health and
environment.
CE Regulatory Notice
Thi s equipment complies with the requirements set out in t he C ouncil Directives
on the Appr oximation on of the Laws of th e Member States relating
Electromagnetic Compatibility (2004/108/EC); the Low Voltage Directive
(2006/9 5/EC); t he Restriction of The Use of Certain Hazardous Substances in
Electrical And Electronic Equi pment Directive (2002/95/EC), Turki sh EE E
Dir ective; the Com mission Regulat ion (EC) No 1275/20 08 implementing Directi ve
2005/32/ EC of the European Parliam ent and of t he C ouncil with r egard to
eco-design requirements for stand by and off mode electric power consumption of
electrical and electronic household and office equipment, and the Directive
2009/125/EC.
Page 25

25
4. Specifications
Item
Description
Image sens or
1/3” CMOS Sensor
Effective pixels
2688 (H) x 1520 (V )
Storage media
Support s Micro SDHC up to 128GB
class 10 or above – 32GB supplied
LCD screen
2.4” LCD color TFT (262K pixels)
Lens 160°Wide Angle Fixed Foc us
lens F2.0, f=2.8mm
Focus rang e
1.5m~ Infinity
Max resolution 2560 x 1080 30fps
2304 x 1296 30fps
For all resol utions, please refer to menu.
Photo 4M (2304 x 1536) JPG format
For all definitions, please refer to menu.
Shutter Electronic shut ter
Auto:1/2 ~1/ 2000 se c.
GPS
Built-in Ublox chip
G-Sensor
3-Axis G-Force sensor
ISO Auto
Page 26

26
W hite balance Auto
Microphone Yes
Speaker
Yes
Interface
Mini USB, Mini C Type HDMI
Battery Built-in 400mAH Li-Po rechargeable
Operating Temperature
-10° ~ 60° C
Operating H umidit y
20 ~ 70% RH
Storage Temperature
-20° ~ 80° C
Dimensions
62.5( W) x 67(H) x 34.5(D) mm
Weight
100g
www.mongoose.com.au
www.mongoose.co.nz
 Loading...