

Page 1
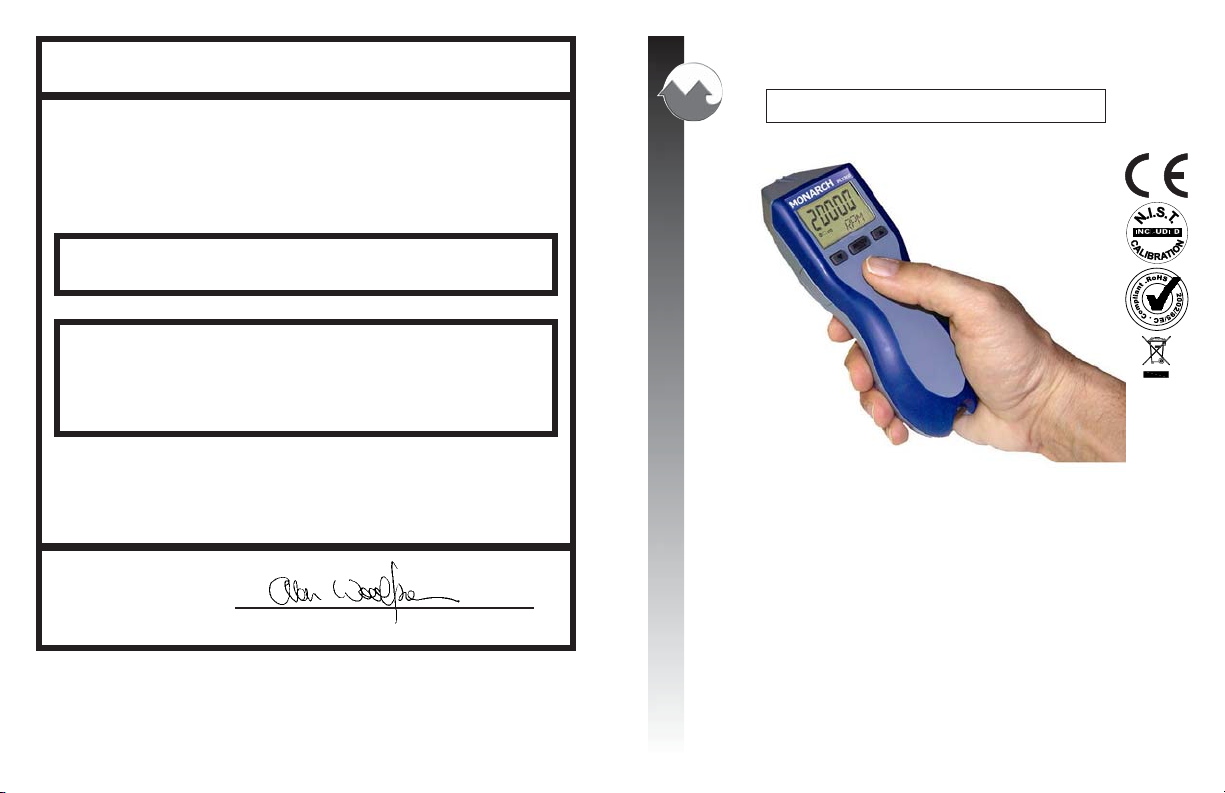
CE DECLARACION DE CONFORMIDAD
Como Manufacturero:
Monarch Instrument
Division of Monarch International Inc.
15 Columbia Drive, Amherst NH 03031 USA
declara bajo responsibilidad única de Monarch que este producto:
Pocket Laser Tach 200
a que esta declaración relaciona está en la conformidad con los estándares siguientes:
EMC: EN61326:1997 /A1:1998/A2:2001/A3:2003 Class A
Seguridad Láser: IEC60825-1
Seguridad eléctrico: IEC61010-1:2001-2
y por lo tanto se conforma con los requisitos de relacionar de Directriz 2004/108/EG de Concilio
a la compatibilidad electromagnéticos y 2006/95/EC que relacionan a la directriz baja del voltaje
Referencia: Retlif Testing Laboratories, (Report No. R-4283N)
15th de Enero del 2010
Manufacturero (Amherst,NH) Alan Woolfson, VP Ingenieria (Firma autorizada)
Copyright 2010 Monarch Instrument, todo derecho reservado
1071-4838-413R
cuando operado de acuerdo con la guía del usuario.
Technical Construction File PLT-0704 del Julio del 2004
Impreso en EE.UU.
1071-4838-615R-0310
MONARCH INSTRUMENT
Instruction Manual
Pocket Laser Tach 200
(PLT200)
Tachometer / Rate Meter / Totalizer / Timer
Tachymètre / Rate Meter (compteur) / Totalisateur /
Minuterie
Tachómetro / Rate Meter (Medidor de Velocidad) /
Totalizer / Timer (Reloj)
15 Columbia Drive
Amherst, NH 03031 USA
Phone: (603) 883-3390
Fax: (603) 886-3300
E-mail: support@monarchinstrument.com
Website: www.monarchinstrument.com
Page 2

SAFEGUARDS AND PRECAUTIONS
LASER RADIATION
AVOID DIRECT EYE EXPOSURE
CLASS 2 LASER PRODUCT
MAX OUTPUT POWER: 1mW
EMITTED WAVELENGTH: 650nm
CLASSIFIED TO IEC 60825-1:2001
WARNING - This product emits a visible beam of laser light.
Avoid exposure to the laser radiation. The use of optical viewing
aids (binoculars, for example) may increase the ocular hazard.
CAUTION - The laser beam should not be intentionally aimed at
people or animals.
CAUTION - Use of controls or adjustments or performance of
procedures other than those specified herein may result in
hazardous radiation exposure.
Read and follow all instructions in this manual carefully, and
retain this manual for future reference.
Do not use this instrument in any manner inconsistent with
these operating instructions or under any conditions that exceed
the environmental specifications stated.
This instrument is not user serviceable. For technical
assistance, contact the sales organization from which you
purchased the product.
In order to comply with EU Directive 2002/96/EC on Waste Electrical
and Electronic Equipment (WEEE): This product may contain material
which could be hazardous to human health and the environment. DO NOT
DISPOSE of this product as unsorted municipal waste. This product
needs to be RECYCLED in accordance with local regulations, contact
your local authorities for more information. This product may be returnable to your distributor for recycling - contact the distributor for details.
Monarch Instrument’s Limited Warranty applies. See
www.monarchinstrument.com for details.
Warranty Registration and Extended Warranty coverage available online at
www.monarchinstrument.com.
14.0 OPCIONES /ACCESORIOS
T- 5 Rollo de Cinta Reflectiva de 5 pies [1.5 m] roll, ½
pulgada [13 mm] de ancho
RCA Dispositivo de contacto remoto con rueda de 10
cm, puntos cóncavos y convexos
CTE Puntos cóncavos y convexos, y rueda de contacto
linear de 10 cm
Rueda de 12 pulgadas Rueda de circunferencía de 12 pulgadas para uso
con el RCA
CA-4044-6 Cable de 6 pies de Entrada/Salida, conector de 1/
8” fono monaural al conector BNC
ROS-P Sensor Optico Remoto
ROS-P-25 Sensor Optico Remoto con cable de 25 pies
ROSM-5P Sensor Optico Remoto, modulado
MT-190-P Sensor Magnético amplificado
IRS-P Sensor Infrarrojo
EC-25P Cable de extension de 25 pies para todos los
sensores
CC-10 Estuche de nailon protector
CC-11 Estuche con cerradura para Pocket Tach y
accesorios
CAL-N.I.S.T. N.I.S.T. Certificado de Calibración verificable
S-24
Page 3
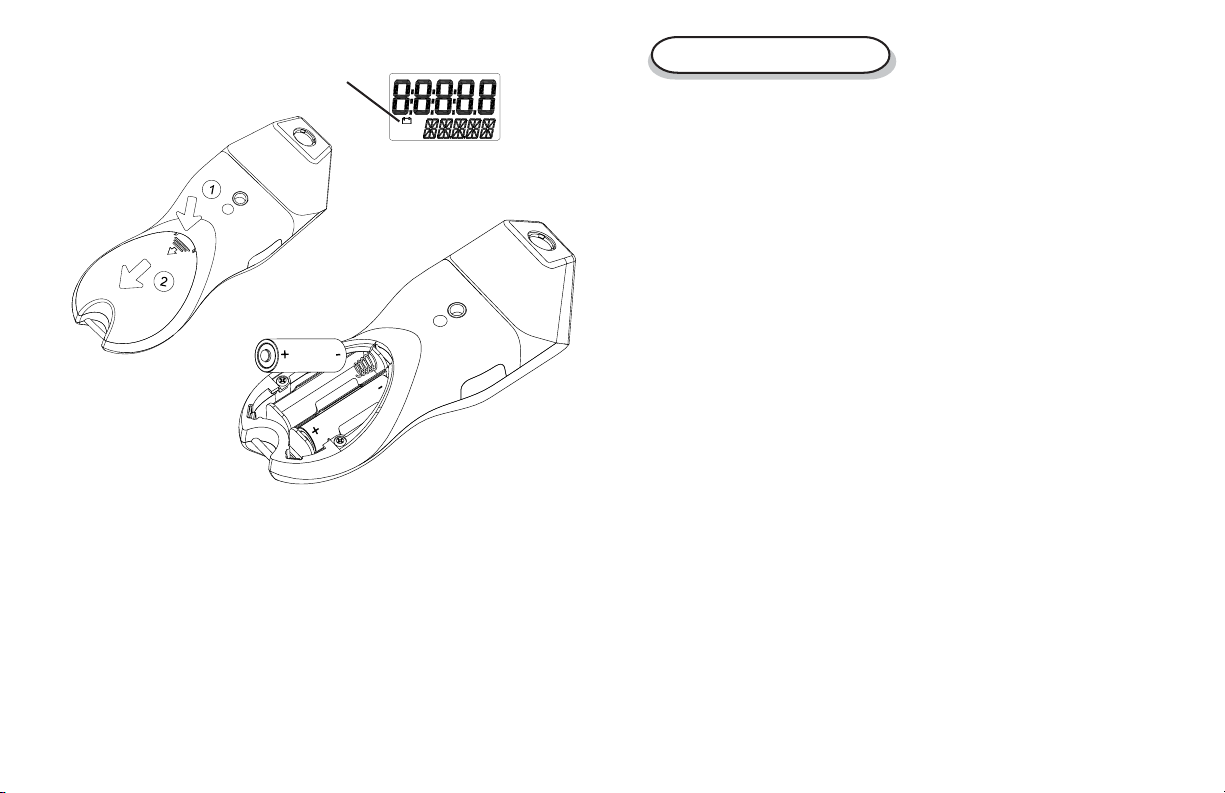
12.0 BATERÍAS
Cuando se indica, cambie las baterías.
Remueve la tapa
del compartimiento
de batería
Instale dos
baterías alcalinas
AA de 1.5V
NOTESE: Ambas
baterías se colocan
en el mismo sentido.
13.0 LIMPIEZA
Para limpiar el instrumento, pase un trapo húmedo usando una solución
suave de jabón.
TABLE OF CONTENTS
TABLE OF CONTENTS
1.0 OVERVIEW .......................................................................... E-1
2. 0 FEATURE LOCATIONS ......................................................... E-1
3.0 LCD DISPLAY SYMBOLS .................................................... E-2
4.0 PLT200 SPECIFICATIONS ................................................... E-3
5.0 INPUT / OUTPUT ................................................................. E-7
6. 0 PREPARATION FOR MEASUREMENT ................................. E-8
6.1 Non-Contact Preparation .......................................... E-8
6.2 Direct Contact Preparation....................................... E-8
6.3 Connecting External Sensors .................................. E-9
7. 0 TAKING MEASUREMENTS ................................................E-10
7.1 Non-Contact Measurements .................................. E-10
7.2 Direct Contact Measurements ............................... E-10
8.0 TACHometer Mode........................................................... E-11
8.1 TACHometer Setup.................................................. E-11
8.2 TACHometer Operation ...........................................E-13
9.0 RATE Mode........................................................................ E-13
9.1 RATE Setup .............................................................. E-14
9.2 RATE Operation .......................................................E-16
10.0 TOTALizer Mode ............................................................... E-17
10.1 TOTALizer Setup......................................................E-17
10.2 TOTALizer Operation ...............................................E-20
11.0 TIMER Mode ......................................................................E-21
11.1 TIMER Setup .............................................................E-21
11.2 TIMER Operation ...................................................... E-22
12.0 BATTERIES ........................................................................E-23
13.0 CLEANING .........................................................................E-24
14.0 OPTIONS /ACCESSORIES ................................................E-24
S-23
Page 4
1.0 OVERVIEW
The Pocket Laser Tach 200 is a multifunction Tachometer, Ratemeter,
Totalizer and Timer. It is programmable to read in English or Metric units.
An input socket accepts remote sensing devices and an output socket allows
for pulse output to external indicating devices. The PLT200 can be tripod
mounted and “Locked-On” for accurate and continuous operation. This
tachometer also stores minimum, maximum and last measurement in memory.
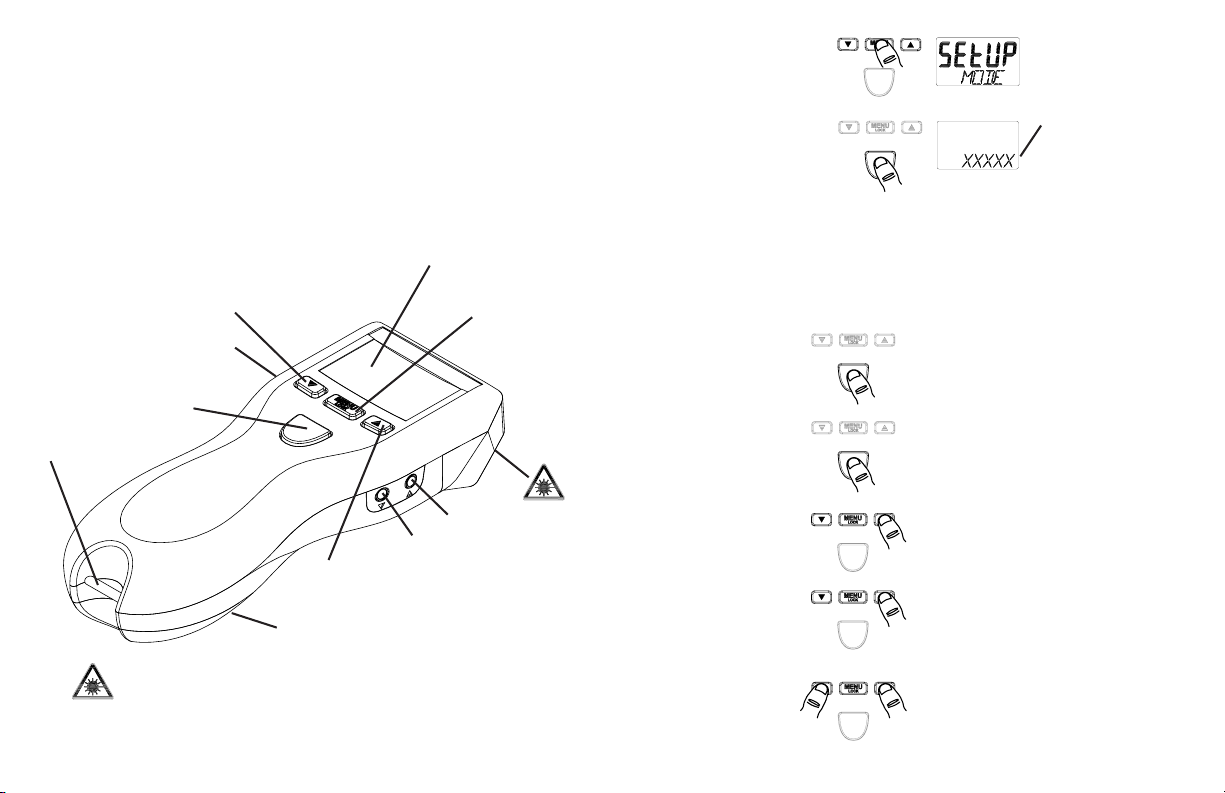
2.0 FEATURE LOCATIONS
LCD display
Min / Scroll
Down arrow
Tripod mounting bushing
(underside)
Menu / Select
and Lock-on
button
8. Guardar y
avanzar
9. Salir de modo
Setup –
Listo para
medir
Terminado (DONE),
luego indica
Unidades
seleccionadas
La unidad guardará estos parametros para uso futuro (incluyendo Fijar
modo continuo, Lock on/off) aún si se apaga y se vuelve a prender.
11.2 Operación de Modo Reloj
Medir:
Manual
Cada vez que se presiona cambia
entre arrancar y parar
Start / Reset button
Belt clip
AVOID EXPOSURE - LASER RADIATION IS
EMITTED FROM THIS APERTURE
E-1
Output socket
Max / Scroll Up
arrow
Battery compartment
Input socket
Auto
Reinicia
Lap (vuelta)
Power Off
Arrancar y parar iniciado por el
O
Sensor Optico Remoto (ROS)
Con reloj parado Reinicia reloj a 00:00.0
Con reloj corriendo - Hace paro al
tiempo transcurrido hasta el
momento. Para que el reloj continue,
presione nuevamente.
Se apaga automáticamente después
O
de 90 segundos si la unidad no esta
fijada en modo continuo
S-22
Page 5
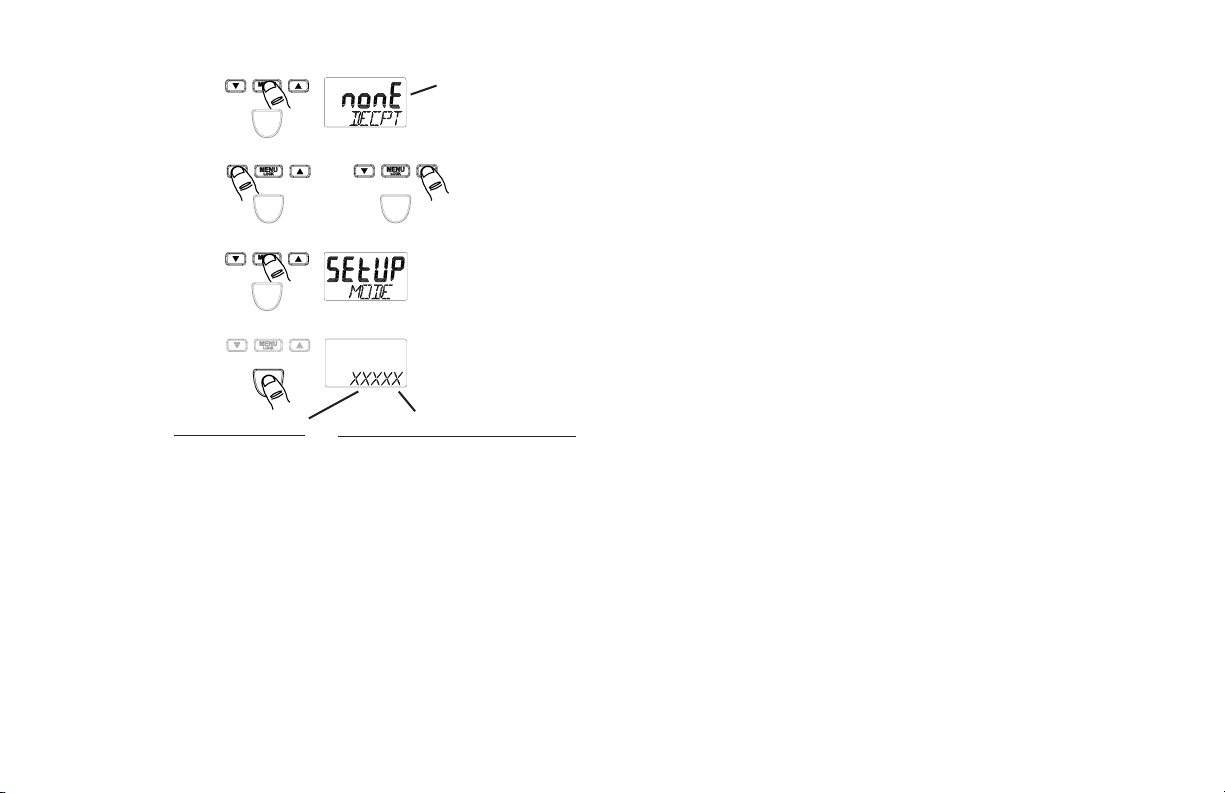
11.0 Modo RELOJ (TIMER Mode)
11.1 Arreglo Para Modo Reloj
1. Encender la
unidad
1a. Para cambiar entre
modo Fijo y no Fijo
Mantenga presionado el boton
2. Entre modo
Setup
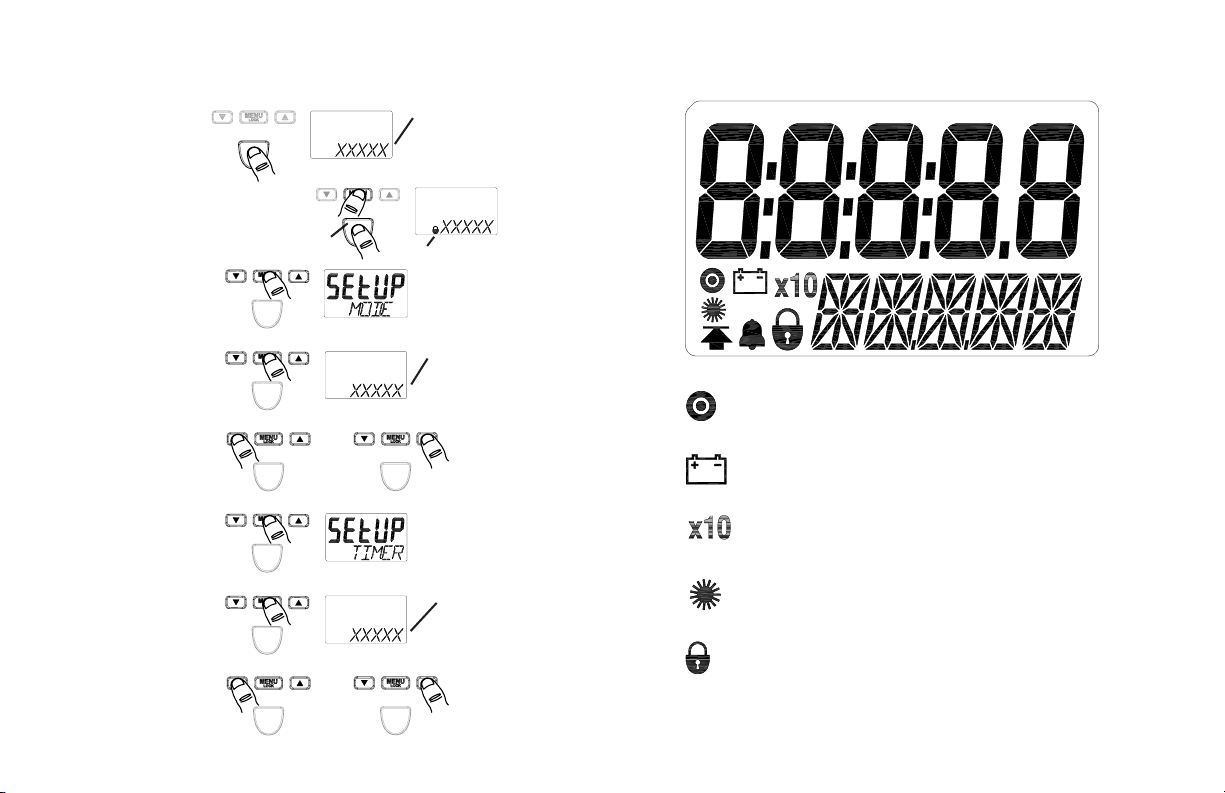
3.0 LCD DISPLAY SYMBOLS
Las últimaas unidades
seleccionadas se
despliegan
Locked On
3. Entre selección
de modo
4. Seleccione
Modo TIMER
5. Guardar y
avanzar
6. Entre selección
de función de
reloj
7. Seleccione
función de reloj
S-21
El último modo
seleccionado se
despliega
O
O Cambia entre
Repita hasta se
indica TIMER
MAN o AUTO
Manual y Auto
On Target Indicator. Blinks on whenever there is an input
signal. Will appear to be solid on at higher frequencies.
Low Battery icon. Indicates that the batteries are low and
need to be replaced.
Times Ten icon. Indicates that the value shown is ten times
that which is displayed.
Laser Indicator. Red laser is on when this indicator is
illuminated.
Lock icon. Indicates that the unit is “Locked” on and making
continuous measurements (Lock mode).
E-2
Page 6

4.0 PLT200 SPECIFICATIONS
10.2 Operación de Modo TOTALizer
Laser Specifications:
Classification: Class 2 (per IEC 60825-1 Ed 1.2 2001-8)
Complies with FDA performance standards for laser products except
for deviations pursuant to Laser Notice No. 50, dated July 26, 2001.
Maximum Laser Output: 1mW
Pulse Duration: Continuous
Laser Wavelength: 650 nm
Beam Divergence: < 1.5 mrad
Beam Diameter: 4 x 7 mm typical at 2 meters
Laser Diode Life: 8,000 operating hours MTBF (1 year
warranty)
Non-Contact Specifications:
Ranges: RPM 5 – 200,000
RPS 0.084 – 3,333.3
RPH 300-999,990
Resolution: Fixed: 1 (10 above 99,999)
Auto-ranging: 0.001 to 1.0 (10 above 99,999)
Accuracy: ±0.01% of reading or resolution limit
Operating Range: up to 25 feet (7.62 m) or up to 70 degrees off
perpendicular to T-5 tape target
Contact Specifications using optional Remote Contact Assembly:
Range: Contact Tips: 0.5 to 20,000 RPM
10 cm / 12-inch Wheel: 0.5 to 12,000 RPM
Resolution: Fixed: 1 (10 above 99,999)
Auto-ranging: 0.001 to 1.0 (10 above 99,999)
E-3
Medir
Mantenga presionado Fijar (Lock-on)
Llamar Máximo
o Minimo valor
guardado
Llamar Tiempo
en segundos
Si la unidad esta
fijada en modo
continuo:
Apagar
NOTESE:
Apretar
O
Velocidad Máximo o
Minima (en el último
seleccionado Tach o
Rate modo unidades)
Mostrar el tiempo en
segundos de cuando
es apretado
hasta que la
última señal
de entrada
Reinicia Max/Min, Total y Tiempo de
Medida
Se apaga automáticamente después
O
de 90 segundos si la unidad no esta
fijada en modo continuo
O
una vez que antes
de 90 segundos
mantendrá las
medidas en la
memoria y el
despliegue prendió
más largo.
medido
S-20
Page 7
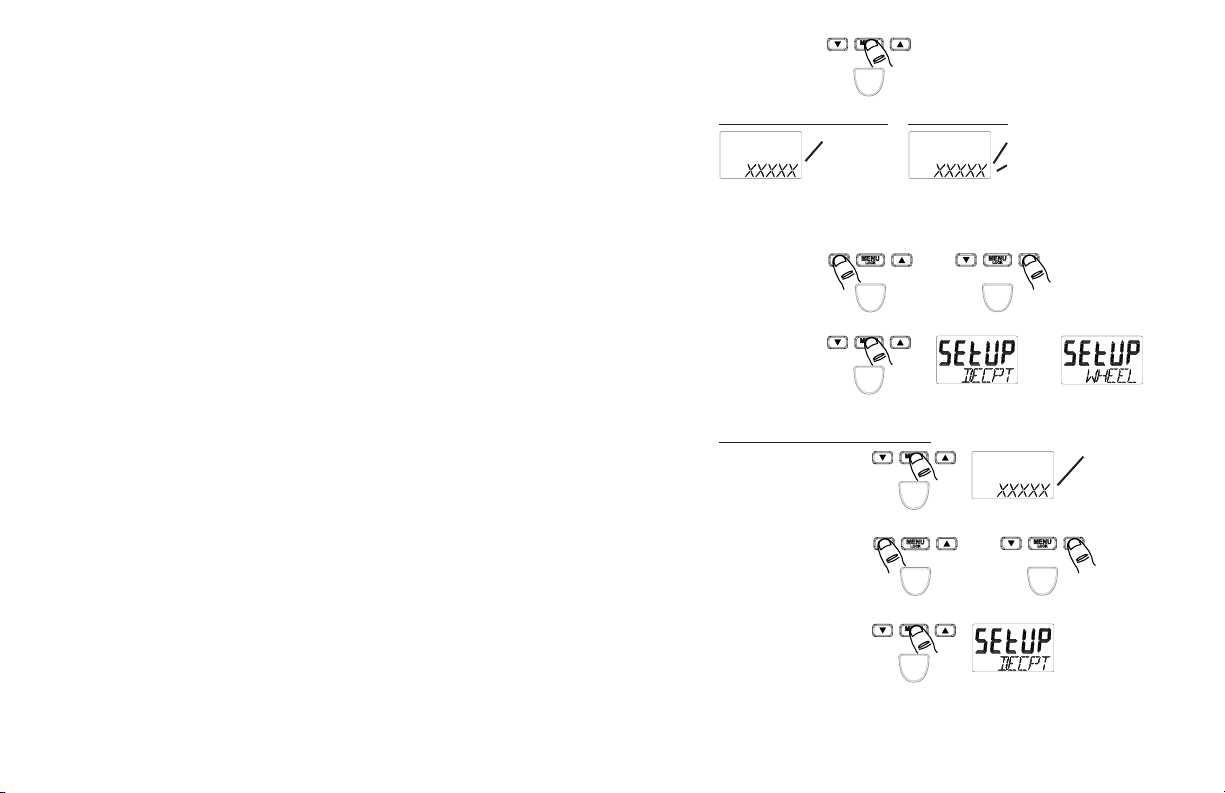
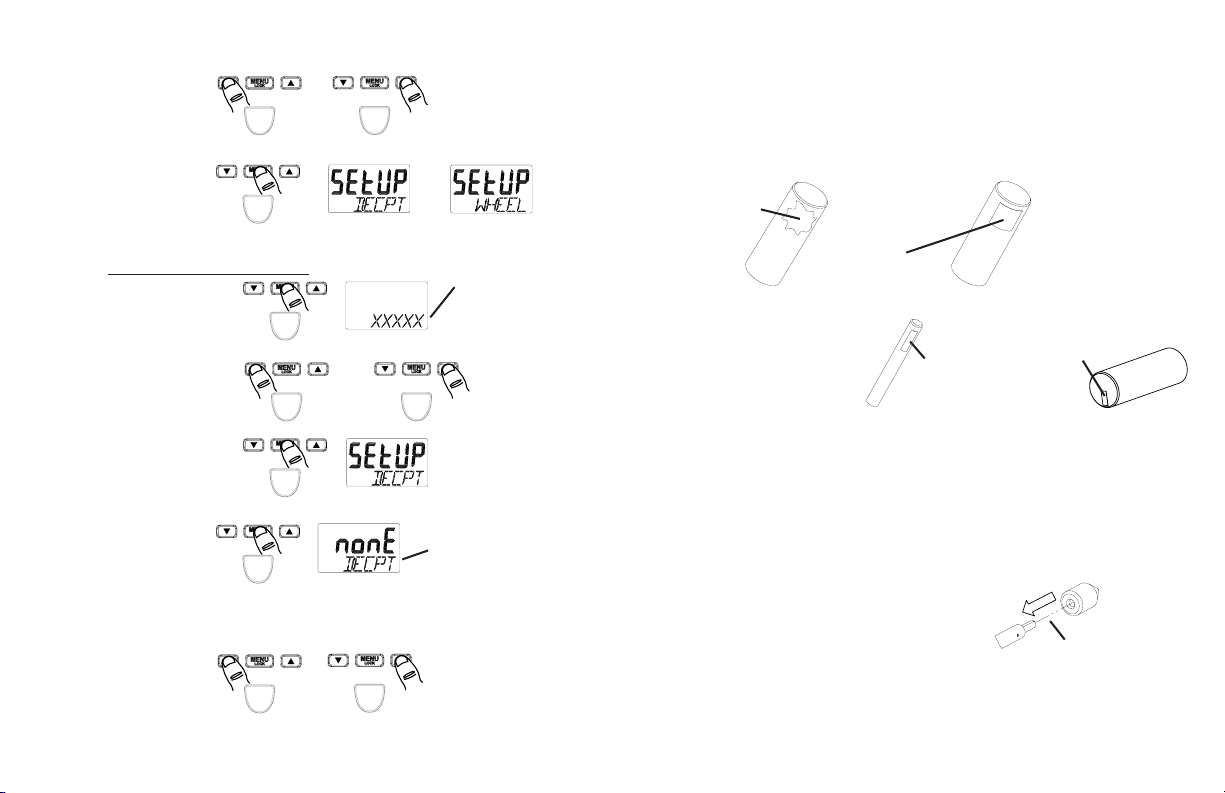
Arreglo Para Modo TOTALizer (continuación):
9. Entre selección
del número de
NONE (Ninguno), 1,
2 o 3
posiciones
decimales
10. Seleccione
posiciones
decimales
O
Repita hasta el
número de
posiciones
decimales se
11. Guardar y
despliega
avanzar
12. Salir de modo
Setup –
Listo para
medir
Unidades= COUNT: Unidades Rotacionales/Lineares:
DONE (Terminado),
luego unidades
seleccionadas
DONE (Terminado),
USE CONTACT TIP (use punto de
contacto) o [rueda seleccionada],
luego unidades seleccionadas
La unidad guardará estos parametros para uso futuro (incluyendo Fijar
modo continuo, Lock on/off) aún si se apaga y se vuelve a prender.
S-19
Contact Specifications (continued):
Accuracy: Revs: ±0.05% of reading (RPM) or resolution limit
(with no slippage)
Linear: ±0.5% of reading or resolution limit (with no
slippage)
Contact Measurements Ranges:
TACHOMETER:
Revolutions per Minute (RPM) 0.5 to 20,000 RPM
Revolutions per Second (RPS) 0.0833 to 333.33 RPS
Revolution per Hour (RPH) 30 to 999,990 RPH
RATES: Wheel Circumference:
Inches per Second 10 cm: 0.033 to 1312.3 IPS
12 in: 0.100 to 2,400.0 IPS
Inches per Minute 10 cm: 1.969 to 78,740 IPM
12 in: 6.000 to 144,000 IPM
Inches per Hour 10 cm: 118.11 to 999,990 IPH
12 in: 360.00 to 999,990 IPH
Feet per Second 10 cm: 0.003 to 109.36 FT/S
12 in: 0.009 to 200.00 FT/S
Feet per Minute 10 cm: 0.164 to 6,561.7 FT/M
12 in: 0.500 to 12,000 FT/M
Feet per Hour 10 cm: 9.843 to 393,700 FT/H
12 in: 30.000 to 720,000 FT/H
Yards per Second 10 cm: 0.001 to 36.453 YPS
12 in: 0.003 to 66.667 YPS
Yards per Minute 10 cm: 0.055 to 2,187.2 YPM
12 in: 0.167 to 4,000.0 YPM
E-4
Page 8
Contact Measurements Ranges (continued):
RATES: Wheel Circumference:
Yards per Hour 10cm: 3.281 to 131,233 YPH
12 in: 10.000 to 240,000 YPH
Miles per Hour 10 cm: 0.002 to 74.564 MPH
12 in: 0.006 to 136.36 MPH
Centimeters per Second 10 cm: 0.084 to 3,333.3 CM/S
12 in: 0.21 to 3,048.0 CM/S
Centimeters per Minute 10 cm: 5.000 to 200,000 CM/M
12 in: 15.240 to 365,760 CM/M
Centimeters per Hour 10 cm: 300.00 to 999,990 CM/H
12 in: 914.40 to 999,990 CM/H
Meters per Second 10 cm: 0.001 to 33.333 M/SEC
12 in: 0.003 to 60.960 M/SEC
Meters per Minute 10 cm: 0.050 to 2,000.0 M/MIN
12 in: 0.153 to 3,657.6 M/MIN
Meters per Hour 10 cm: 3.000 to 120,000 M/H
12 in: 9.144 to 219,460 M/H
TOTALIZER:
Counts: 0 to 999,999
Scale Totals in Inches, Feet, Yards, Centimeters or Meters
Input: Internal or External optics or linear contact wheel
Timer Specifications:
Minutes:Seconds.Tenths to 99:59.9
Accuracy: ±0.2 second
Resolution: 0.1 second
E-5
6. Entre
selección de
Unidades
ROS Interno o Externo: RCA Externo:
COUNT
(Conteo)
Solamente
7. Seleccione
Unidades
8. Guardar y
avanzar
Solo para Unidades Lineares:
8a. Entre
selección de
Rueda
8b. Seleccione
Rueda
8c. Guardar y
avanzar
Differentes opciones se despliegan
para operación Interna o Externa
Rotacional: REV
Linear: INCH (pulgadas),
FEET (pies), YARDS
(yardas), CM, METER
(metros)
O Repita hasta que
las unidades
deseadas se
despliegan
O
COUNT o REV Unidades
Lineares
La última
rueda
seleccionada
se despliega
O
Cambie
entre 10CM
y 12IN (12
pulgadas)
S-18
Page 9
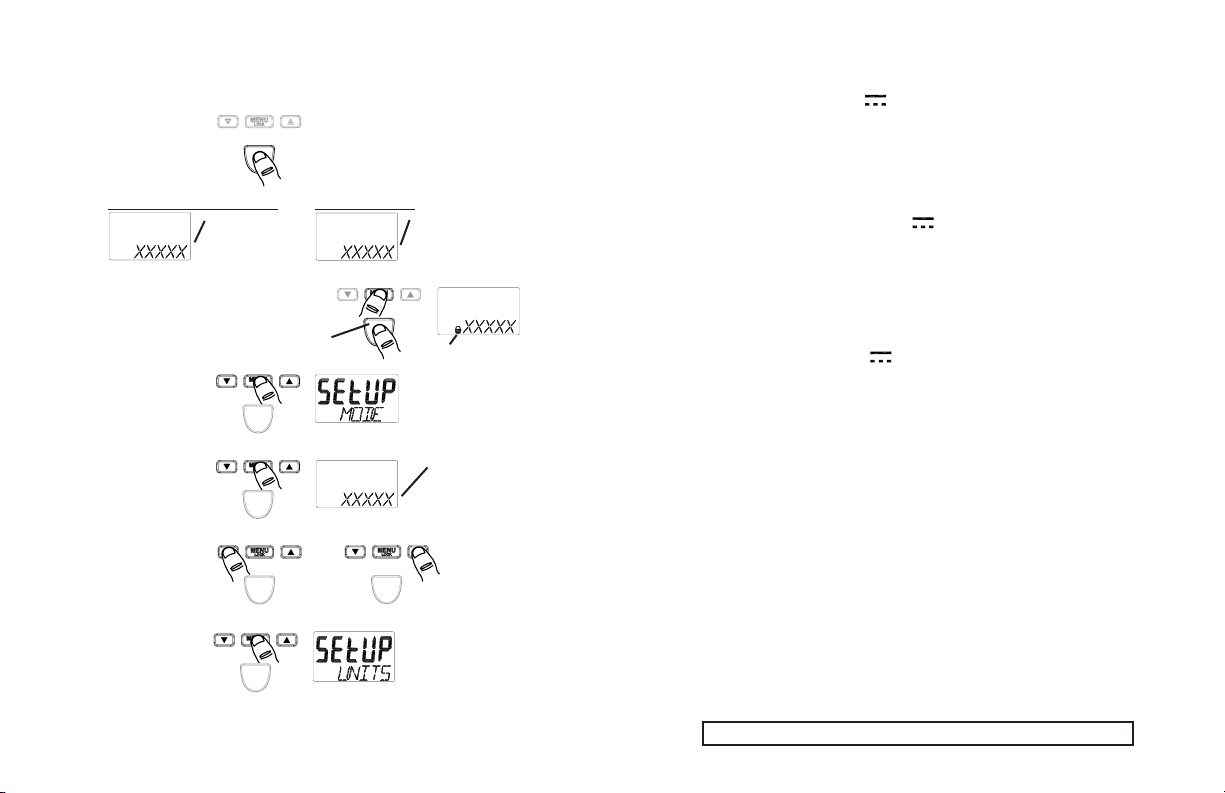
10.0 Modo TOTALizer
10.1 Arreglo Para Modo TOTALizer
1. Encender la
unidad
ROS Interno o Externo:
Ultimas
unidades
seleccionadas
1a. Para cambiar entre
modo Fijo y no Fijo
Mantenga presionado el boton
2. Entre modo
Setup
3. Entre
selección de
modo
4. Seleccione
Modo
TOTAL
5. Guardar y
avanzar
Differentes mensajes se despliegan
para operatión Interna o Externa
RCA Externo:
EXTRN, luego mensaje
avanza, luego últimas
unidades seleccionadas
Locked On
El último modo
seleccionado se
despliega
O Repita hasta
TOTAL es
despliegado
Display: Dual LCD Display (5-digit upper/scrolling, 5-digit
alphanumeric lower display)
Batteries: 2 “AA” 1.5 V (DC) alkaline included
(Note: Batteries are NOT rechargeable.)
Battery Life: 30 hours continuous typical with batteries provided
External Input:
Absolute max: -0.3 V to 5 V (DC)
Minimum: low below 1.2 V and high above 2 V (TTL compatible)
Edge: Triggers on Positive edge
Power Out: 3.0 V nominal, approx. 2.8 V @ 20 mA max
Pulse Output: 0 V to 3.3 V (DC) pulse
Same shape as External Input signal or high when internal
optics sees a reflection
Dimensions: 6.92” (17.58 cm) H x 2.4” (6.10 cm) W x 1.6” (4.06 cm) D
Weight: Approx. 7 oz. (210 g)
This product is designed to be safe for indoor use under the following
conditions (per IEC61010-1).
Installation Category II per IEC 664
Pollution Degree Level II per IEC 664
Temperature: 40 °F to 105 °F (5 °C to 40 °C)
Humidity: Maximum relative humidity of 80% for temperatures up
to 88 °F (31 °C) decreasing linearly to 50% relative
humidity at 100 °F (40 °C). Humidity non-condensing.
Specifications subject to change without notice.
E-6S-17
Page 10
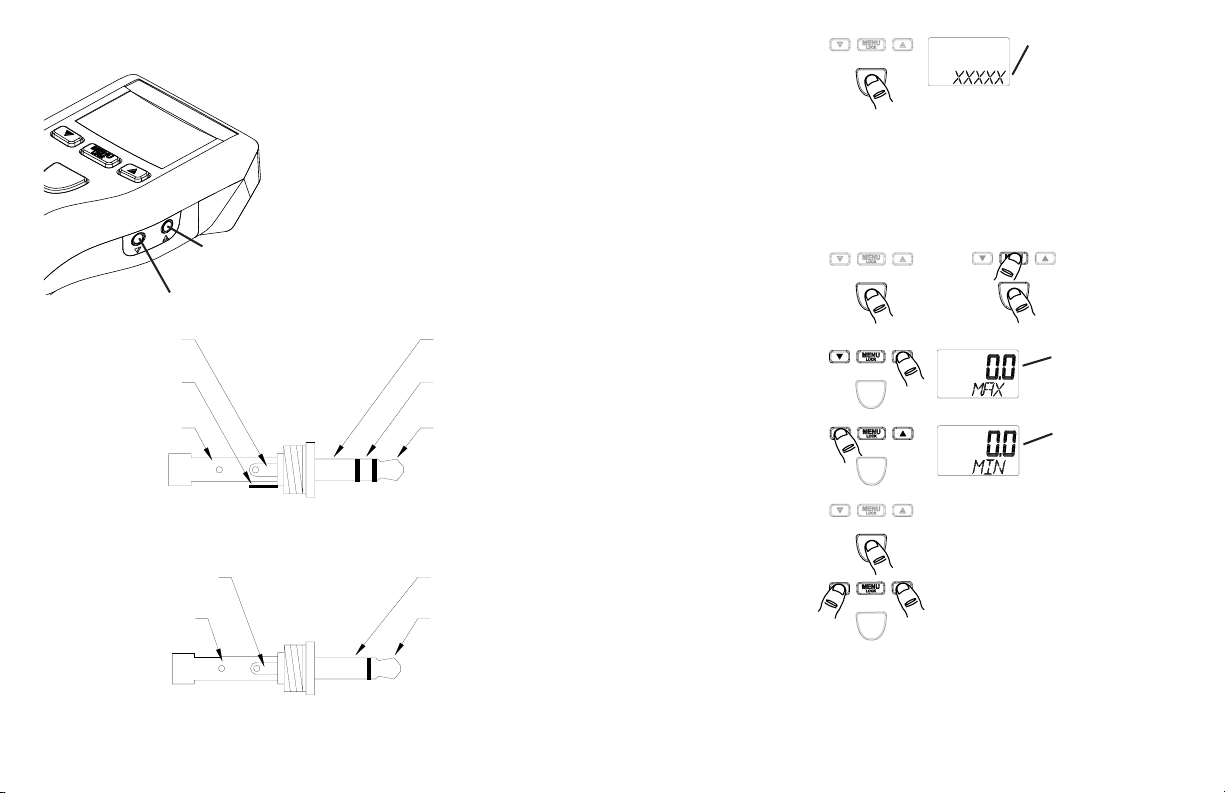
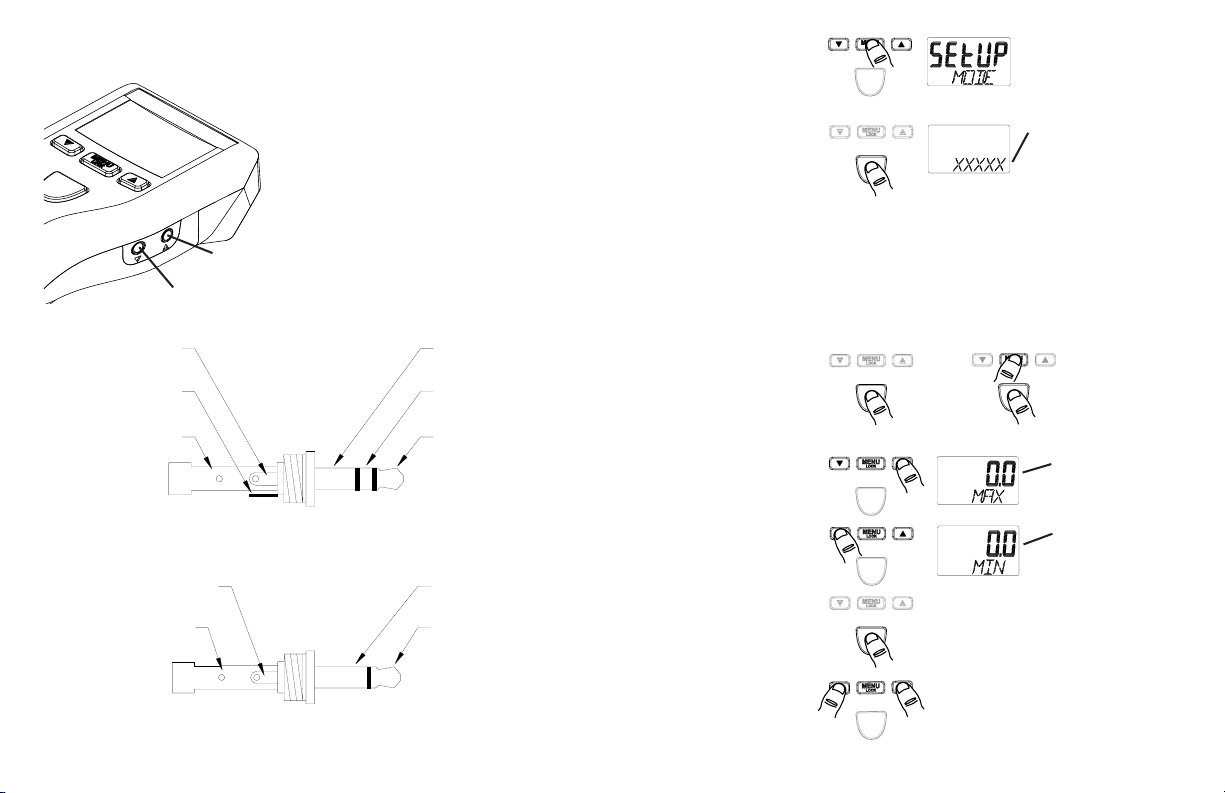
5.0 INPUT / OUTPUT
Input socket (
Output socket (
Input: Accepts remote sensor or
Remote Contact Assembly
(RCA). 1/8” (3.5mm) stereo
phone plug.
Output: 1 pulse per revolution TTL
output on internal operation.
Pulse repeater with external
sensors. 1/8” (3.5mm) mono
phone plug.
TT
T)
TT
SS
S)
SS
11. Guardar y
avanzar
12. Salir de modo
Setup –
Listo para
medir
DONE (Terminado),
USE CONTACT TIP (use
punto de contacto) o
[rueda seleccionada],
luego unidades
seleccionadas
La unidad guardará estos parametros para uso futuro (incluyendo Fijar modo
continuo, Lock on/off) aún si se apaga y se vuelve a prender.
9.2 Operación de Modo Velocidad
E-7
Signal Input
+3V Out to
Sensor
Common
(GND)
Input Connector Detail (Stereo plug)
Pulse Output
Common
(GND)
Output Connector Detail (Mono plug)
Common
(GND)
+3V Out to
Sensor
Signal Input
Common
(GND)
Pulse Output
Medir
Mantenga presionado Fijar (Lock-on)
Llamar valor
Máximo guardado
Llamar valor
Mínimo guardado
Si la unidad esta
fijada en modo
continuo:
Apagar
O
Velocidad
Máximo
Velocidad
Mínima
Reinicia Max/Min
Se apaga automáticamente después
O
de 90 segundos si la unidad no esta
fijada en modo continuo
S-16
Page 11
Arreglo Para Modo Velocidad (continuación):
7. Seleccione
O Repita hasta que las
Unidades
8. Guardar y
avanzar
Unidades
Rotacionales
Solo para unidades lineares:
8a. Entre
selección de
rueda
8b. Seleccione
O Cambie entre
rueda
8c. Guardar y
avanzar
9. Entre
selección del
número de
posiciones
decimales
10. Seleccione
O
posiciones
decimales
S-15
unidades deseadas
se despliegan
O
Unidades
Lineares
La última rueda
seleccionado se
despliega
10CM y 12IN
(12 pulgadas)
NONE (Ninguno),
1, 2 o 3
Repite hasta el
número de
posiciones decimales
se despliega
6.0 PREPARATION FOR MEASUREMENT
6.1 Non-Contact Preparation
For Internal operation (Red laser) or External operation
using optional Remote Optical Sensor (ROS-Red LED).
1. Clean
Shaft
6.2 Direct Contact Preparation
For External operation ONLY using optional Remote
Contact Assembly (RCA).
Select and install contact option:
1. Contact Tip (Convex tip shown.
Use Concave tip for small shafts.)
2. Apply 1/2”
square T-5
Reflective
tape
For Small Shafts:
As small as 1/8” wide
on side or radius edge
Align flats
E-8
Page 12
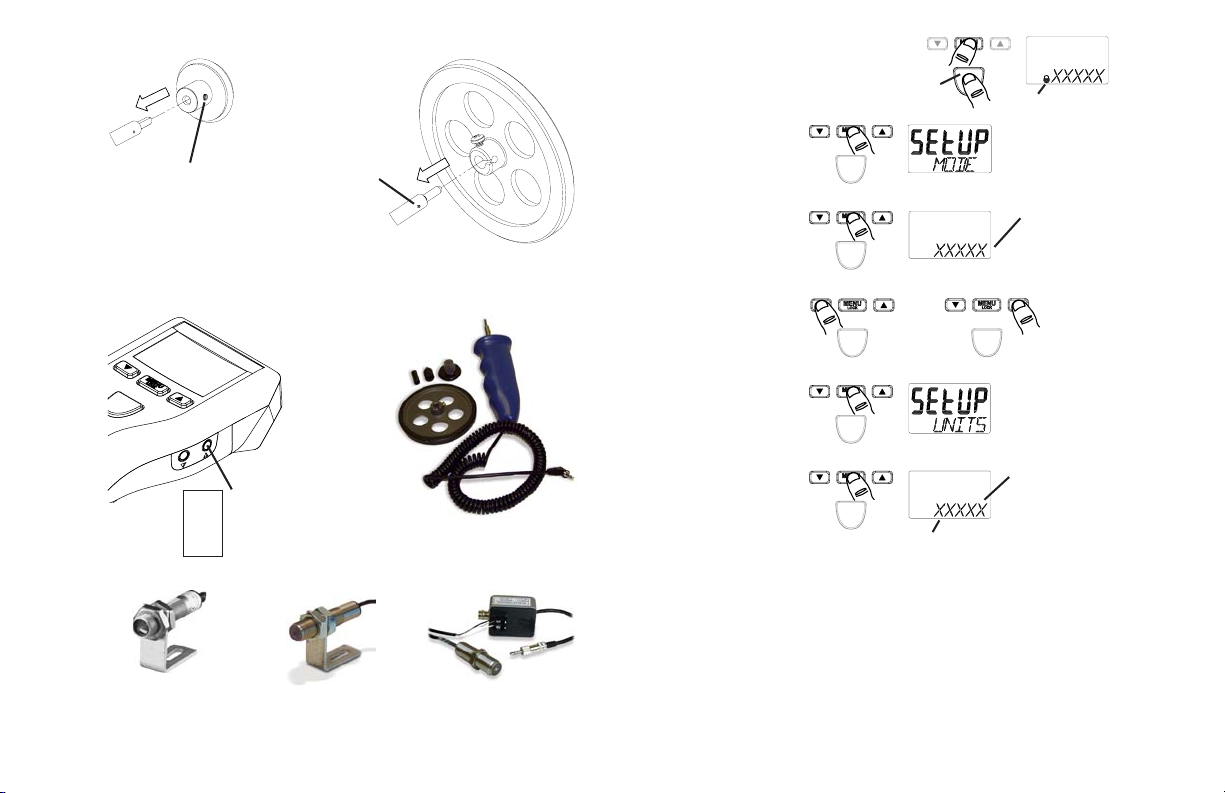
2. 10 cm Wheel 3. 12 inch Wheel
OR
Install with
pin in shaft
Tighten screw
securely into flat
on shaft.
fully seated
in slot.
Tighten
screw.
6.3 Connecting External Sensors
1a. Para cambiar entre
modo Fijo y no Fijo
Mantenga presionado el boton
2. Entre
modo
Setup
3. Entre
selección
de modo
4. Seleccione
Modo
RATE
5. Guardar y
avanzar
Locked On
El último modo
seleccionado se
despliega
O Cambie entre
RATE y TOTAL.
Seleccione RATE.
E-9
SS
S
SS
In
Remote Optical
Sensor (ROS-P)
Plug sensor into
Input socket
Infrared Sensor
(IRS-P)
Remote Contact
Assembly (RCA)
(shown with optional 12 inch wheel)
Magnetic Sensor
with Amplifier
(MT-190P)
6. Entre
selección
de
Unidades
Rotacional: C RPS,
C RPM o C RPH
Linear: pulgadas por segundo (IPS),
pulgadas por minuto (IPM), pulgadas
por hora (IPH), pies por segundo
(FT/S), pies por minuto (FT/M), pies
por hora (FT/H), YPS, YPM, YPH, MPH,
CM/S, CM/M, CM/H, M/SEC, M/MIN, M/H
S-14
Page 13
8.2 Operación de Modo TACHómetro
Medir
O
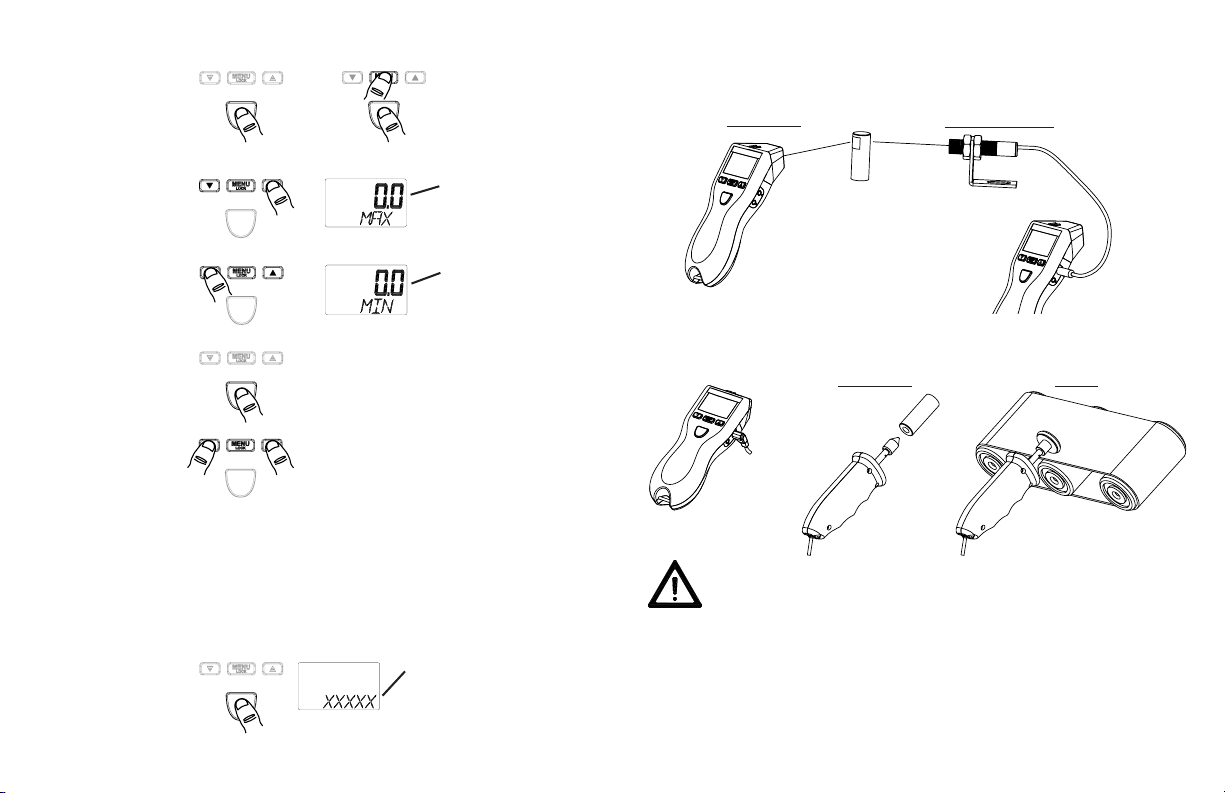
7.0 TAKING MEASUREMENTS
7.1 Non-Contact Measurements
Mantenga presionado
Llamar valor
Máximo
Fijar (Lock-on)
Velocidad
Máximo
guardado
Llamar valor
Mínimo
Velocidad
Mínima
guardado
Si la unidad esta
Reinicia Max/Min
fijada en modo
continuo:
Apagar
Se apaga automáticamente después
O
de 90 segundos si la unidad no esta
fijada en modo continuo
9.0 Modo VELOCIDAD (RATE Mode)
NOTESE: Dispositivo externo de contacto remoto (RCA) debe de ser
introducido al enchufle de entrada.
9.1 Arreglo Para Modo Velocidad
1. Encender
la unidad
S-13
EXTRN, luego mensaje
avanza, luego últimas
unidades seleccionadas
Hand-held
Laser
External Sensor (ROS shown)OR
Light
7.2 Direct Contact Measurements
Rotational Linear
(Use concave
tip for small
shafts)
to RCA
from PLT200 from PLT200
ONLY USE MODERATE PRESSURE
WARNING: Making measurements in direct contact with rotating
equipment can be dangerous. Keep all loose clothing and hair
away from exposed moving machinery. Keep the hand holding
the instrument well behind the back end of the Remote Contact
Assembly. Properly replace all machinery guards after completing
measurement. Do not use for rotation greater than 20,000 RPM.
E-10
Page 14

8.0 TACHometer Mode
Tachometer measures speed or linear rate with respect to time. Time intervals
are seconds, minutes, or hours. Rotational speed can be measured in Revolutions
(Revs) per second, per minute, or per hour. The most common measurement is
RPM or Revs per minute using the optical tachometer mode.
8.1 TACHometer Setup
7. Seleccione
Unidades
8. Guardar y
avanzar
O Repita hasta
que las
Unidades
deseadas se
despliegan
1. Turn
2. Enter
3. Enter
4. Select
5. Save and
E-11
Power
ON
1a. To toggle Lock
On/Off
Press and Hold
Setup
selection
of Mode
TACH
Mode
advance
OR
Last Units selected
are displayed
Locked On
Last Mode selected is
displayed
Repeat until TACH
displayed
9. Entre selección
del número de
posiciones
decimales
10. Seleccione
posiciones
decimales
11. Guardar y
avanzar
12. Salir de modo
Setup –
Listo para
medir
La unidad guardará estos parametros para uso futuro (incluyendo Fijar
modo continuo, Lock on/off) aún si se apaga y se vuelve a prender.
O
NONE, 1, 2 o 3
Repita hasta el
número de
posiciones
decimales se
despliega
Terminado (DONE),
luego indica
Unidades
seleccionadas
S-12
Page 15

8.0 Modo TACHómetro
8.1 Arreglo Para Modo TACHómetro
6. Enter selection
of Units
RPS, RPM or RPH
1. Encender
la unidad
1a. Para cambiar entre
modo Fijo y no Fijo
Mantenga presionado el boton
2. Entre
modo
Setup
3. Entre
selección
de modo
4. Seleccione
Modo
TACH
5. Guardar y
avanzar
6. Entre su
seleccion
de
Unidades
Las últimaas unidades
seleccionadas se
despliegan
Locked On
El último modo
seleccionado se
despliega
O
Repita hasta se
indica TACH
RPS, RPM o RPH
7. Select Units
8. Save and
advance
9. Enter selection
of number of
decimal places
10. Select decimal
places
11. Save and
advance
12. Exit Setup –
Ready to
measure
Unit will remember these settings (including lock on/off) even if turned off
and back on.
OR Repeat until
desired Units
displayed
NONE, 1, 2 or 3
OR Repeat until
desired decimal
places displayed
DONE, then Units
selected
S-11
E-12
Page 16

8.2 TACHometer Operation
Measure
Press and hold
Recall Max
OR
Lock on
Max Speed
7.0 TOMANDO MEDIDAS
7.1 Medidas Sin Contacto
Sensor de mano
Láser
O
Luz
Sensor Externo (ROS es mostrado)
(No mostrado:
IRS-P,
MT-190P)
Recall Min
If unit Locked
Resets Max/Min
Min Speed
on:
Power OFF
Automatic after 90 seconds
OR
if unit not Locked on
9.0 RATE Mode
Measurement of units in addition to Revs requires the attachment of the
Remote Contact Assembly and tips/wheels. With this attachment, the unit
can measure RATE inputs-revs, inches, feet, yards, centimeters and meters
either per second, per minute or per hour, as well as miles per hour.
NOTE: External Remote Contact Assembly (RCA) must be inserted into
input socket.
E-13
7.2 Medidas Contacto Directo
Rotacional Linear
(Use punto cóncavo
para barras
pequeñas)
hacia
RCA
del PLT200 del PLT200
USE SOLAMENTE PRESION MODERADA
AVISO: Tomando meididas en contacto directo con equipos en movimiento
rotacional puede ser peligroso. Mantega toda clase de ropa, tanto como el pelo
lejos de toda superficie de equipo en movimiento. Mantenga la mano que
sostiene el instrumento bien detrás del lado posterior del dispositivo de contacto
remoto (RCA). Vuelva a colocar nuevamente toda pieza con fin de seguridad
después de terminar las mediciones. No es para el uso con velocidades
rotacionales mayores de 20,000 RPM.
S-10
Page 17

2. Rueda de 10 cm 3. Rueda de 12 pulgadas
O
9.1 RATE Setup
Apriete bien el
tornillo en la
parte plana en la
barra.
6.3 Conectando Sensores Externos
Introducir el sensor
en el enchufle de
SS
S
SS
entrada
En
Sensor Optico
Sensor Infrarrojo
Remoto (ROS-P)
S-9
Instale con la
aguja en la
barra bien
puesta en el
la ranura.
Apriete el
tornillo.
(IRS-P)
Dispositivo de Control
Remoto (RCA)
(mostrado con rueda opcional de 12 pulgadas)
Sensor Magnético
con Amplificador
(MT-190P)
1. Turn
Power
ON
1a. To toggle Lock
On/Off
2. Enter
Setup
3. Enter
selection
of Mode
4. Select
RATE
Mode
5. Save and
advance
6. Enter
selection
of Units
Press and Hold
Linear: IPS, IPM, IPH, FT/S, FT/M, FT/H,
YPS, YPM, YPH, MPH, CM/S, CM/M, CM/H, M/SEC,
M/MIN, M/H
EXTRN, then scrolling
message, then last
Units selected
Locked On
Last Mode selected is
displayed
OR Toggles between
RATE and TOTAL.
Select RATE.
Rotational: C RPS,
C RPM or C RPH
E-14
Page 18

RATE Setup (continued):
7. Select Units
8. Save and
advance
Only for Linear Units:
8a. Enter
selection of
Wheel
8b. Select
Wheel
8c. Save and
Advance
OR Repeat until
desired Units
displayed
OR
Rotational Units
Linear Units
Last Wheel
selected is
displayed
OR Toggles
between 10CM
and 12IN
6.0 PREPARACION PARA LA MEDICION
6.1 Preparación No Contacto
Para uso interno (Láser rojo) o operación externo con el
uso del Sensor Optical Remoto (ROS-LED rojo).
1. Limpie
la barra
6.2 Preparación Contacto Directo
2. Aplique 1/2
pulgada de
cinta reflectiva
cuadrada T-5
Para barras pequeñas:
Tan pequeñas coms
1/8” de ancho en el
lado o borde radio
9. Enter selection
of number of
decimal places
10. Select decimal
places
11. Save and
advance
E-15
OR
NONE, 1, 2 or 3
Repeat until
desired decimal
places displayed
Para operación externa SOLAMENTE usando el dispositivo
de contacto remoto (RCA).
Seleccionar y instalar opción de contacto:
1. Punto de contacto (Punto
Convexo mostrado. Utilice Punto
Cóncavo para barras pequeñas.)
Alinee las
partes planas
S-8
Page 19
5.0 ENTRADA / SALIDA
Enchufle de
TT
T)
TT
SS
S)
SS
entrada (
Enchufle de
salida (
Señal de entrada
+3V Salida a
Sensor
Comun
(tierra, GND)
Entrada: Acepta sensor remoto o
dispositivo de contacto
remoto (RCA). Conector de
1/8” (3.5mm) fono estéreo.
Salida: 1 pulso por revolución salida
TTL en operación interna.
Repitidor de pulso con
sensores remotos. Conector
1/8” (3.5mm) fono monaural.
Comun
(tierra, GND)
+3V Salida a
Sensor
Señal de entrada
12. Exit Setup –
Ready to
measure
DONE,
USE CONTACT TIP or
[wheel selected],
then Units selected
Unit will remember these settings (including lock on/off) even if turned off
and back on.
9.2 RATE Operation
Measure
OR
Press and hold Lock on
Recall Max
Recall Min
Max Speed
Min Speed
S-7
Detalles de Conector de Entrada (estéreo)
Salida Pulso
Comun
(tierra, GND)
Detalles de Conector de Salida (monaural)
Comun
(tierra, GND)
Salida Pulso
If unit Locked
on:
Power Off
Resets Max/Min
Automatic after 90 seconds
OR
if unit not Locked on
E-16
Page 20

10.0 TOTALizer Mode
Totalizer accumulates input on an ongoing basis. In the simplest form the unit acts as
an optical counter, incrementing the display each time an input pulse is sensed. Using
the Remote Contact Assembly with various tips and wheels, the unit can totalize in
revs, inches, feet, yards, centimeters, and meters.
10.1 TOTALizer Setup
1. Turn Power
ON
Internal optics or External
optical sensor (i.e. ROS):
Last Units
selected
1a. To toggle Lock
On/Off
Press and Hold
2. Enter Setup
3. Enter
selection of
Mode
4. Select
TOTAL
Mode
E-17
Different messages displayed for
Internal or External operation.
External Remote Contact
Assembly:
EXTRN, then scrolling
message, then last
Units selected
Locked On
Last Mode selected
is displayed
OR Repeat until
TOTAL displayed.
Despliegue: 5 x 0.5” (12.7mm) dígitos numéricos más 5 alfanuméricos LCD
Baterías: 2 “AA” 1.5 V (CC) alcalinos incluidas
(Notese: Baterías NO se pueden volver a cargar.)
Vida de Batería: típicamentes 30 horas continuas con las baterías
suministrados
Entada externa:
Máximo absoluto: -0.3 V a 5 V (CC)
Mínimo: bajo a menos de 1.2 V y alto por encima de 2 V
(compatible con TTL)
Borde: Cambia en borde positivo
Potencia Salida: 3.0 V nominal, aprox. 2.8 V @ 20 mA max
Salida Pulso: 0 V a 3.3 V (CC) pulso, Misma forma que la señal de
entrada externa o alta cuanda la óptica interna ve una réfleccion
Dimensiones:6.92” (17.58 cm) de alto x 2.4” (6.10 cm) de ancho x 1.6”
(4.06 cm) de profundo
Peso: Aprox. 7 onzas. (210 g)
Este producto fue concebido para ser segura para uso interno bajo las
siguientes condiciones (según IEC61010-1).
Categoría de instalación II según IEC 664
Grado de nivel de contaminación II según IEC 664
Temperatura: 40 °F a 105 °F (5 °C a 40 °C)
Humedad: Humedad relativa maxima de 80% para temperatures hasta
88 °F (31 °C) disminuyendo linearmente hasta un 50% de
humedad relativa a una temperatura de 100 °F (40 °C).
Humedad sin condensar.
Especificaciones sujetos a cambios sin aviso previo.
S-6
Page 21

Medidas de Contacto (continuación):
VELOCIDADES (por Circunferencía de Rueda):
Yardas por Hora: 10cm: 3.281 a 131,233 YPH,
12 pulgadas: 10.000 a 240,000 YPH
Millas por Hora: 10 cm: 0.002 a 74.564 MPH,
12 pulgadas: 0.006 a 136.36 MPH
Centímetros por Segundo: 10 cm: 0.084 a 3,333.3 CM/S,
12 pulgadas: 0.21 a 3,048.0 CM/S
Centímetros por Minuto: 10 cm: 5.000 a 200,000 CM/M,
12 pulgadas: 15.240 a 365,760 CM/M
Centímetros por Hora: 10 cm: 300.00 a 999,990 CM/H,
12 pulgadas: 914.40 a 999,990 CM/H
Metros por Segundo: 10 cm: 0.001 a 33.333 M/SEC,
12 pulgadas: 0.003 a 60.960 M/SEC
Metros por Minuto: 10 cm: 0.050 a 2,000.0 M/MIN,
12 pulgadas: 0.153 a 3,657.6 M/MIN
Metros por Hora: 10 cm: 3.000 a 120,000 M/H,
12 pulgadas: 9.144 a 219,460 M/H
TOTALIZER:
Conteo: 0 a 999,999, Totales de escala en Pulgadas, Pies,
Yardas, Centímetros o Metros
Entrada: óptica Interna o Externa o rueda de contacto linear
Especificaciones de Reloj (Timer):
Minutos:Segundos.Decimos hasta 99:59.9
Exactitud: ±0.2 segundo
Resolución: 0.1 segundo
S-5
5. Save and
advance
6. Enter
selection of
Different options displayed for
Internal or External operation.
Units
Internal or External ROS: External Remote Contact Assembly:
COUNT
Only
Rotational: REV
Linear: INCH, FEET,
YARDS, CM, METER
7. Select Units
OR Repeat until
8. Save and
advance
OR
COUNT or REV Linear Units
Only for Linear Units:
8a. Enter selection
of Wheel
8b. Select Wheel
OR
8c. Save and
Advance
desired Units
displayed
Last Wheel
selected is
displayed
Toggles
between
10CM and
12IN
E-18
Page 22

TOTALizer Setup (continued):
9. Enter selection
NONE, 1, 2 or 3
of number of
decimal places
10. Select decimal
places
OR
Repeat until
desired decimal
places displayed
11. Save and
advance
12. Exit Setup –
Ready to
measure
Units = COUNT: Rotational/Linear Units:
DONE,
then COUNT
DONE,
USE CONTACT TIP or
[wheel selected],
then Units selected
Unit will remember these settings (including lock on/off) even if turned off
and back on.
E-19
Especificaciones de Contacto (continuación):
Exactitud: Revoluciones: ±0.05% de la lectura (RPM) o límite de
resolución (sin deslizar)
Linear: ±0.5% de la lectura o límite de resolución
(sin deslizar)
Rangos de Medidas de Contacto:
TACHOMETRO:
Revoluciones por Minuto (RPM) 0.5 a 20,000 RPM
Revoluciones por Segundo (RPS) 0.0833 a 333.33 RPS
Revoluciones por Hora (RPH) 30 a 999,990 RPH
VELOCIDADES (por Circunferencía de Rueda):
Pulgadas por Segundo: 10 cm: 0.033 a 1312.3 IPS (PPS),
12 pulgadas: 0.100 a 2,400.0 IPS (PPS)
Pulgadas por Minuto: 10 cm: 1.969 a 78,740 IPM (PPM),
12 pulgadas: 6.000 a 144,000 IPM (PPM)
Pulgadas por Hora: 10 cm: 118.11 a 999,990 IPH (PPH),
12 pulgadas: 360.00 a 999,990 IPH (PPH)
Pies por Segundo: 10 cm: 0.003 a 109.36 FT/S (PIES/S),
12 pulgadas: 0.009 a 200.00 FT/S (PIES/S)
Pies por Minuto: 10 cm: 0.164 a 6,561.7 FT/M (PIES/M),
12 pulgadas: 0.500 a 12,000 FT/M (PIES/M)
Pies por Hora: 10 cm: 9.843 a 393,700 FT/H (PIES/H),
12 pulgadas: 30.000 a 720,000 FT/H (PIES/H)
Yardas por Segundo: 10 cm: 0.001 a 36.453 YPS,
12 pulgadas: 0.003 a 66.667 YPS
Yardas por Minuto: 10 cm: 0.055 a 2,187.2 YPM,
12 pulgadas: 0.167 a 4,000.0 YPM
S-4
Page 23

4.0 ESPECIFICACIONES DEL PLT200
10.2 TOTALizer Operation
Especificaciones Láser:
Clasificación: Clase 2 (según IEC 60825-1 Ed 1.2 2001-8)
Conforme con estandares de rendimiento FDA para productos Láser
excepto lo indicado según Laser Notice No. 50, con fecha de Julio 26, 2001.
Salida Máxima Láser: 1mW
Duración de Pulso: Continua
Longitud de onda Láser: 650 nm
Divergencía de rayo: < 1.5 mrad
Diámetro de rayo: típicamente 4 x 7 mm a 2 metros
Vida de diodo de Láser: 8,000 horas operacionales MTBF (tiempo
medio de buen funcionamiento) (1 año de guarantía)
Especificaciones uso sin contacto:
Rangos: RPM 5 – 200,000
RPS 0.084 – 3,333.3
RPH 300-999,990
Resolución: Fija: 1 (10 por encima de 99,999), Auto-ranging (ajuste
automático de rango): 0.001 a 1.0 (10 por encima de 99,999)
Exactitud: ±0.01% de la lectura o límite de resolución
Rango de operación: hasta 25 pies (7.62 m) o hasta 70 grados del
perpendicular al blanco de cinta T-5
Especificaciones Contacto usando dispositivo remoto de contacto:
Rango: Puntos de contacto: 0.5 a 20,000 RPM
Rueda: 10 cm / 12 pulgadas: 0.5 a 12,000 RPM
Resolución: Fija: 1 (10 por encima de 99,999), Auto-ranging (ajuste
automático de rango): 0.001 a 1.0 (10 por encima de 99,999)
S-3
Measure
Recall Max or
Min
Recall Time
in seconds
If unit is
Locked on:
Power Off
NOTE:
Pressing
OR
Press and hold Lock on
Resets Max/Min, Total and Measurement Time
Automatic after 90 seconds
OR
if unit not Locked on
OR
Max or Min Speed (in
last selected Tach or
Rate mode units)
Shows time in seconds
from when the Start /
Reset button is pressed
until the last input
signal measured.
once before 90
seconds will keep
measurements in
memory and the
display turned on
longer.
E-20
Page 24

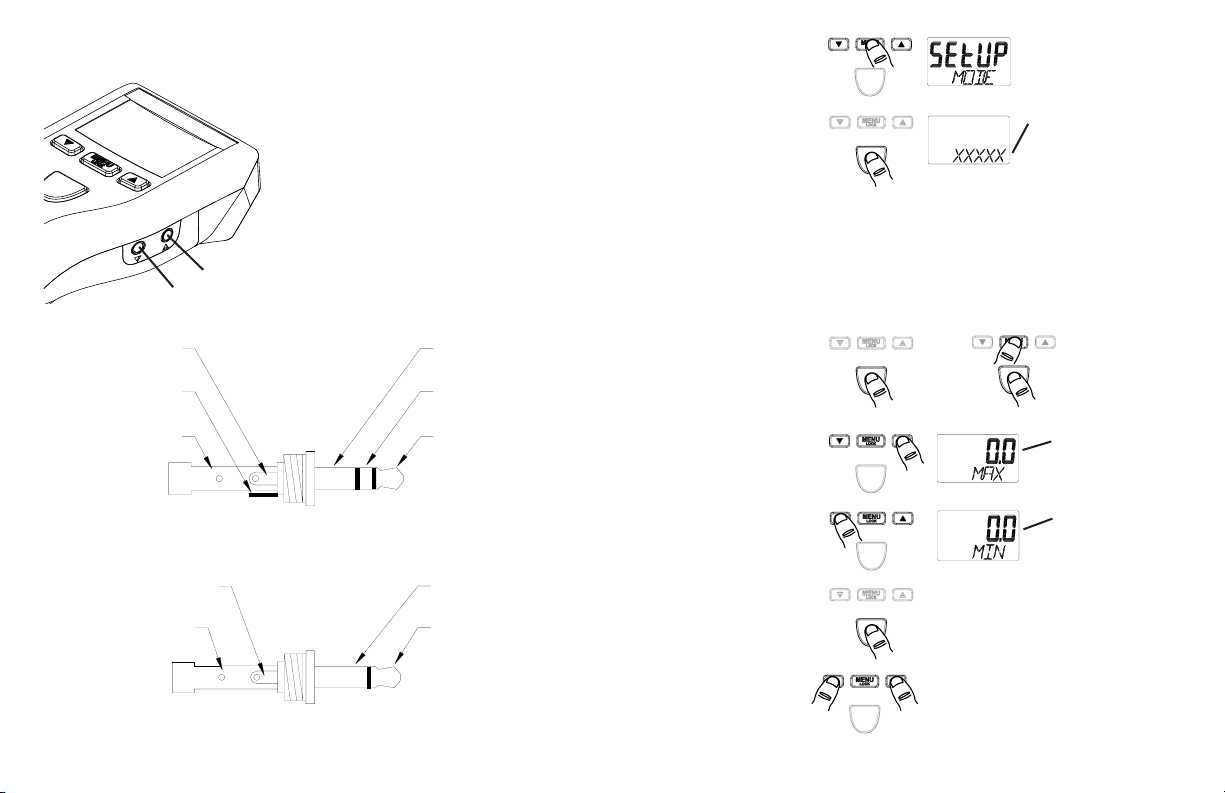
11.0 TIMER Mode
Accumulates time in minutes, seconds, and tenths of a second. There are two modes
of operation. The Manual mode operates like a stopwatch, the timing period being
started and stopped by the user. The Auto mode can be stopped and started by the
user or a piece of reflective tape on objects. The user can freeze the display-and view/
record a LAP time-at any time without affecting the count.
11.1 TIMER Setup
3.0 SIMBOLOS LCD DE DESPLIEGUE
1. Turn Power
ON
1a. To toggle Lock
2. Enter Setup
Mode
3. Enter selection
of Mode
4. Select TIMER
Mode
5. Save and
advance
E-21
On/Off
Press and Hold
OR
Last Units selected
are displayed
Locked On
Last Mode selected
is displayed
Repeat until
TIMER displayed
Indicador de posición correcta (On Target). Parpadea siempre
y cuando hay una señal de entrada. Aparenta ser solida en
frecuencias altas.
Indicador de batería baja. Indica que las baterías estan por
agotarse y tienen que ser cambiadas.
Indicador Por Diez. Indica que el valor medido es diez veces
el valor indicado.
Indicador Láser. El láser rojo esta prendido cuando este
indicador es iluminado.
Indicador Fijar modo continuo. Indica que la unidad esta en
modo Fijo y esta haciendo medidas continuas.
S-2
Page 25

1.0 VISTA GENERAL
El Pocket Laser Tach 200 es un instrumento de precisión multifunctional de
mano que provee los siguientes usos: Tachómetro, Ratemeter (Medidor de
velocidad), Totalizer, y Timer (Reloj). Se puede programar para indicar
directamente las siguientes unidades de medición, Revoluciones, pulgadas,
pies, yardas, millas, centímetros, y metros. También, funciona como
cronómetro o reloj de intervalo. Enchufles de entrada-salida permiten el uso
de sensores remotos y salida de pulso para el uso de aparatos externos de
indicación. Para facilitar la operacón, el instrumento puede ser fijado (Locked-
on) para operación continua.
2.0 UBICACION DE FUNCIONES
Min / Flecha de avanzar hacia abajo
(Scroll Down arrow)
Para Montura de Tripode
(lado inferior)
Botón de Arranque (Start) /
Reinicio (Reset)
Clip de cinturón
Max / Flecha avanzar hacia arriba
(Scroll Up arrow)
Compartimiento de batería
EVITE LA EXPOSICION - RADIACION LASER
SE EMITE DE ESTA ABERTURA
S-1
Despliegue de LCD
Botón Menú /
Seleccionar y
Fijar modo
continuo
(Lock-on)
Enchufle de entrada
Enchufle de salida
6. Enter selection
MAN or AUTO
of Timer
function
7. Select Timer
function
OR Toggles between
Manual and
Auto
8. Save and
advance
9. Exit Setup –
Ready to
DONE, then Units
selected
measure
Unit will remember these settings (including lock on/off) even if turned off
and back on.
11.2 TIMER Operation
Measure:
Manual
Each press toggles Start and
Stop
Auto
Start and Stop triggered by
OR
external remote optical sensor
(ROS) or internal optics
Reset
With Timer stopped Resets time to 00:00.0
E-22
Page 26

TIMER Operation (continued):
Lap
Power Off
12.0 BATTERIES
When displayed, replace batteries.
Remove battery
cover
E-23
With Timer running Stops at elapsed time to date.
To continue, press again.
OR
OR
Install two 1.5V
“AA” alkaline
batteries
If Timer stopped Automatic after 90 seconds
(if unit not Locked on)
Automatic after 99:59.9
NOTE: Both
batteries face the
same direction.
TABLA DE CONTENIDO
TABLA DE CONTENIDO
1. 0 VISTA GENERAL ................................................................. S-1
2. 0 UBICACION DE FUNCIONES ............................................... S-1
3.0 SIMBOLOS LCD DE DESPLIEGUE ..................................... S-2
4.0 ESPECIFICACIONES DEL PLT200 ...................................... S-3
5. 0 ENTRADA / SALIDA ............................................................ S-7
6.0 PREPARACION PARA LA MEDICION .................................. S-8
6.1 Preparación No Contacto ........................................ S-8
6.2 Preparación Contacto Directo ................................ S-8
6.3 Conectando Sensores Externos ............................. S-9
7.0 TOMANDO MEDIDAS ....................................................... S-10
7.1 Medidas Sin Contacto ............................................ S-10
7.2 Medidas Contacto Directo ..................................... S-10
8.0 Modo TACHómetro ........................................................... S-11
8.1 Arreglo Para Modo TACHómetro ............................S-11
8.2 Operación de Modo TACHómetro.......................... S-13
9.0 Modo Velocidad (RATE Mode) ....................................... S-13
9.1 Arreglo Para Modo Velocidad................................ S-14
9.2 Operación de Modo Velocidad .............................. S-16
10.0 Modo TOTALizer .............................................................. S-17
10.1 Arreglo Para Modo TOTALizer .............................. S-17
10.2 Operación de Modo TOTALizer ............................. S-20
11.0 Modo Reloj (TIMER Mode) .............................................. S-21
11.1 Arreglo Para Modo Reloj ........................................ S-21
11.2 Operación de Modo Reloj....................................... S-22
12.0 BATERÍAS ......................................................................... S-23
13.0 LIMPIEZA .......................................................................... S-23
14.0 OPCIONES / ACCESORIOS .............................................. S-24
Page 27

CUIDADOS Y PRECAUCIONES
RADIACION LASER
EVITE EXPONERSE DIRECTAMENTE AL OJO
PRODUCTO LASER CLASE 2
POTENCIA MAX DE SALIDA: 1mW
LONGITUD DE ONDA EMITIDA: 650nm
CLASIFICADA SEGUN IEC 60825-1:2001
AVISO - Este producto emito un rayo de luz rojo visible láser.
Evite exponserse a la radiación láser. El uso de aparatos para
peligro a los ojos.
PRECAUCION - El rayo láser no debe ser intencionalmente apuntado ni a las
personas ni a los animales.
PRECAUCION - El uso de controles o ajustes tanto como el uso de
procedimientos diferentes de los especificados en este documento puede
resultar en esponserse a la radiación peligrosa.
consistente con estas instrucciones de operación ni bajo cuaquier
condición que exceda las especificaciones ambientales estipuladas.
El usuario no puede dar sericio a este instrumento. Para asistencia
técnica, contacte la organización de venta donde compró el producto.
para SER RECICLADAS de acuerdo con las regulaciones locales, contactan
su administración local para más información. Este producto puede ser
retornable a su distribuidor para reciclar - contacta el distribuidor para detalles.
La Guarantía Limitado de Monarch Instrument se aplica. Vea
www.monarchinstrument.com para los detalles.
Registo de la cobertura de Guarantía Extendida es disponible a través del
internet al www.monarchinstrument.com.
ayudar a la vista (por ejemplo, binoculares) puede aumentar el
Lee y siga las instrucciones en este manual cuidadosamente, y
retenga este manual para referencia futura.
No use este instrumento de cualquier manera que no sea
Para obedecer con EU Directiva 2002/96/EC en el Desecho el
Equipo Eléctrico y Electrónico (WEEE): Este producto puede
contener la materia que podría ser la salud humana perjudicial
para y el ambiente. NO se DESHAGA de este producto el desecho
municipal como no clasificado. Estas necesidades del producto
13.0 CLEANING
To clean the instrument, wipe with a damp cloth using mild soapy solution.
14.0 OPTIONS /ACCESSORIES
T- 5 Reflective Tape, 5 foot [1.5 m] roll, ½ inch [13 mm] wide
RCA Remote Contact Assembly with 10 cm wheel, concave
and convex tips
CTE Concave/convex contact tips and 10 cm linear contact
wheel
12 inch Wheel 12 inch circumference wheel for use with RCA
CA-4044-6 6 foot Input/Output cable, 1/8” mono phone plug to
BNC connector
ROS-P Remote Optical Sensor
ROS-P-25 Remote Optical Sensor with 25 foot cable
ROSM-5P Remote Optical Sensor, modulated
MT-190-P Amplified Magnetic Sensor
IRS-P Infrared Sensor
EC-25P 25 foot extension cable for all sensors
CC-10 Padded Nylon Carrying Case
CC-11 Latching Carrying Case for Pocket Tach and accessories
CAL-N.I.S.T. N.I.S.T. Traceable Certificate of Calibration
E-24
Page 28

CE DECLARATION OF CONFORMITY
As Manufacturer:
Monarch Instrument
Division of Monarch International Inc.
15 Columbia Drive, Amherst NH 03031 USA
declares under Monarch’s sole responsibility that the product:
Pocket Laser Tach 200
to which this declaration relates is in conformity with the following standards:
EMC: EN61326:1997 /A1:1998/A2:2001/A3:2003 Class A
Laser Safety: IEC60825-1:2001
LVD: EN61010-1:2001-2
and therefore conforms with the requirements of Council Directive 2004/108/EG
relating to electromagnetic compatibility and 2006/95/EC relating to the low
voltage directive when operated in accordance with the user manual.
References: Retlif Testing Laboratories, (Report No. R-4283N)
Technical Construction File PLT-0704 of July 2004
15th January 2010
Manufacturer (Amherst,NH) Alan Woolfson, VP Engineering (Authorized Signature)
Printed in the U.S.A.
Copyright 2010 Monarch Instrument, all rights reserved
1071-4838-115R
0310
MONARCH INSTRUMENT
Manual de Instrucciones
Pocket Laser Tach 200
(PLT200)
Tachómetro / Rate Meter (Medidor de Velocidad) /
Totalizer / Timer (Reloj)
15 Columbia Drive
Amherst, NH 03031 USA
Tel: (603) 883-3390
Fax: (603) 886-3300
E-mail: support@monarchinstrument.com
Internet: www.monarchinstrument.com
Page 29

DÉCLARATION DE CONFORMITÉ CE
Comme manufacturier:
Monarch Instrument
Division of Monarch International Inc.
15 Columbia Drive, Amherst NH 03031 USA
déclares sous la responsabilité de Monarch seulement que le produits:
Pocket Laser Tach 200
à lequel cette déclaration relate est dans la conformité avec les normes suivantes:
EMC: EN61326:1997 /A1:1998/A2:2001/A3:2003 Class A
Laser Safety: IEC60825-1:2001
LVD: EN61010-1:2001-2
et par conséquent conforme aux exigences définies par la Directive du Conseil 2004/108/EG relative
à la compatibilité électromagnétique et à la Directive 2006/95/EC relative à la directive sur les faibles
tensions lorsqu’il est utilisé conformément aux conditions définies dans le manuel d’utilisation.
References: Retlif Testing Laboratories, (Report No. R-4283N)
Technical Construction File PLT-0704 of July 2004
15th January 2010
Manufacturier (Amherst,NH) Alan Woolfson, VP Engineering (Authorized Signature)
Imprimer aux États-Unis
Droits d’auteurs 2010 Monarch Instrument, tous droits réservés
1071-4838-313R
0310
MONARCH INSTRUMENT
Manuel d’instructions
Certificats
d’étalonnage
retraceable a
N.I.S.T. inclus
Pocket Laser Tach 200
(PLT200)
Tachymètre / Rate Meter (compteur) /
Totalisateur / Minuterie
15 Columbia Drive
Amherst, NH 03031 USA
Téléphone: (603) 883-3390
Facsimile: (603) 886-3300
Courriel: support@monarchinstrument.com
Site Web: www.monarchinstrument.com
Page 30

PRÉCAUTIONS ET SÉCURITÉS
RADIATION DE LASER
Éviter contact avec les yeux
Produits Laser Classe 2
Puissance de sortie maximale: 1mW
Longueur d’ondes émis: 650nm
Classifier a IEC 60825-1:2001
AVERTISSEMENT - L’appareil produits de la lumière laser visible
a l’œil. Éviter d’être exposer au radiation du laser. Si vous
utilisez des jumelles ou autre aides de vue vous augmenter le
danger a vos yeux.
PRÉCAUTION - Le laser ne devrait pas être visé intentionnellement au
gens ou animaux.
PRÉCAUTION - Cet instruments devrait être utilisez seulement sous les
conditions spécifier ou vous pouvez être exposer a la radiation.
Lie et suit toutes instructions dans ce manuel soigneusement,
et retiens ce manuel comme référence.
Utiliser cet instrument seulement sous les conditions spécifier
dans ce manuel.
Cet instrument n’est pas réparable par l’utilisateur. Pour assistance
technique, contacter le fournisseur du produits.
Afin de respecter la directive européenne 2002/96/EC sur
l’Equipement Electronique et les Déchets Electriques: Ce produit
pourrait contenir des matières qui peuvent être dangereuses pour
la santé de l’homme et de l’environnement. Ne pas jetter ce
être recyclé en accord avec les arrêtés locaux; contacter les autorités locales
pour plus de renseignements. Ce produit peut être renvoyé au distributeur
pour recyclage - Contacter votre distributeur pour plus de details.
La Garantie de Monarch Instrument s’applique. Voir
www.monarchinstrument.com pour les détails.
L’Enregistrement de Garantie et la couverture de Garantie Prolongée
disponible à www.monarchinstrument.com.
produit dans un container municipal inapproprié. Ce produit doit
14.0 OPTIONS / ACCESOIRES
T- 5 Ruban réfléchissant, rouleau de 5 pieds [1.5 m], 1/2
pouces [13 mm] de large
RCA Capteur a contact directe (RCA) fournis avec roue de
10 cm, et aussi bout convexe et concave
CTE Bouts contactes concave/convexe et roue linéaire a
contacte de 10 cm
Roue de 12 pouces Roue de 12 pouces pour être utiliser avec RCA
CA-4044-6 Câbles d’entrée/sortie, Raccordement de bout 1/8”
téléphone mono a BNC, 6 pieds
ROS-P Capteur optique
ROS-P-25 Capteur optique avec câble de 25 pieds
ROSM-5P Capteur optique, modulé
MT-190-P Capteurs magnétique avec amplificateur
IRS-P Capteur infrarouge
EC-25P Extension de 25 pieds pour toutes capteurs
CC-10 Étuis en Nylon
CC-11 Étuis pour Pocket Tach et accessoires
CAL-N.I.S.T. Certificats d’étalonnage retraceable a N.I.S.T
F-24
Page 31

12.0 PILES
Indique piles faibles.
Enlever le couvert
des piles
Installer 2 piles
alcaline 1.5V
“AA”
PRENDRE NOTE:
Les deux piles sont
orientées de la même
manière.
13.0 NETTOYAGE
Pour nettoyer l’instruments, essuyer avec un tissu humide utilisant une
solution savonneuse.
TABLE DES MATIÉRES
TABLE DES MATIÉRES
1.0 SURVOL .............................................................................. F-1
2. 0 EMPLACEMENTS DE CHARACTÉRISTIQUE ....................... F-1
3. 0 REPRÉSENTATION DES SYMBOLES .................................. F-2
4.0 SPÉCIFICATION DU PLT200 ................................................ F-3
5. 0 ENTRÉE / SORTIE ................................................................ F-7
6. 0 PRÉPARATION POUR LECTURE ......................................... F-8
6.1 Préparation pour lecture sans contact ................... F-8
6.2 Préparation pour lecture a contact directe ............ F-8
6.3 Installations de capteur externe .............................. F-9
7.0 Prendre des lectures ...................................................... F-10
7.1 Lectures sans contact ........................................... F-10
7.2 Lectures a contact directe ..................................... F-10
8.0 Mode TACHymètre ........................................................... F-11
8.1 Mise en marche du TACHymètre ............................ F-11
8.2 Opération du TACHymètre ...................................... F-13
9.0 Mode RATE (Compteur) ................................................... F-14
9.1 Mise en marche du mode RATE (compteur) .......... F-14
9.2 Opération du mode RATE (compteur) .................... F-16
10.0 Mode TOTALisateur ......................................................... F-17
10.1 Mise en marche du TOTALisateur ......................... F-17
10.2 Opération du TOTALisateur .................................... F-20
11.0 Mode TIMER (Minuterie)................................................... F-21
11.1 Mise en marche du mode TIMER (minuterie) ........ F-21
11.2 Opération du mode TIMER (minuterie)................... F-22
12.0 PILES ................................................................................. F-23
13.0 NETTOYAGE ...................................................................... F-23
14.0 OPTIONS / ACCESOIRES .................................................. F-24
F-23
Page 32

1.0 SURVOL
Le Pocket Laser Tach 200 est un appareil portatif de précision comprenant
les fonctions de Tachymètre, Compteur, Totalisateur, et Minuterie. Il est
programmable pour afficher en révolutions, pouces, pieds, verges, milles,
centimètres et mètres ou pour fonctionner comme compteur ou chronomètre.
L’appareil porte des borniers d’entrée et de sortie qui permet le raccordements
de capteurs externe ou de sortie pulsé. Pour l’aise d’usage, l’instrument
peut être le “LOCKED-on” pour l’opération continuelle.
2.0 EMPLACEMENTS DE CARACTÉRISTIQUE
Affichage LCD
Min / Flèche
descendante
Montage de trépied
(dessous)
Bouton de Mise en
Marche / Bouton de
réinitialisation
Boucle à
ceinture
Connexion de sortie
Max / Flèche
ascendante
Compartiment pour les piles
La radiation de laser est émis par ce produits.
F-1
Menu / Select
et bouton
Lock-on
Connexion
d’entrée
8. Sauve guarder et
continuer
9. Sortir de la mise
en marchePrêt a prendre
DONE (finis),
ensuite les unités
choisie
des lectures
L’appareil se rappelle de sont paramétrage (Lock On/Off incluses) même si
il pers son alimentation.
11.2 Opération du mode TIMER (minuterie)
Prend lecture:
Manuel
Chaque touch bascule entre
début et arrêt
Auto
Début et arrêt de l’appareil
OU
contrôler par capteur externe
optique (ROS)
Réinitialisation
Avec minuterie arrêter Réinitialise le temps a 00:00.0
Lap
Avec minuterie en marche Arrête le temps. Pour
continuer, appruyer a nouveau.
Arrêt de l’appareil
Arrêt automatique après
OU
90 secondes si l’appareil
n’est pas en mode Lock on
F-22
Page 33

11.0 Mode TIMER (Minuterie)
11.1 Mise en marche du mode TIMER (minuterie)
3.0 REPRÉSENTATION DES SYMBOLES
1. Alimenter
l’instrument
1a. Bascule entre
2. Entrée mode
SETUP
(Mise en marche)
3. Entrée votre
sélection de
Mode
4. Choisie Mode
TIMER
(minuterie)
5. Sauve guarder et
continuer
6. Entrée sélection
du fonction
TIMER
(minuterie)
7. Choisie fonction
TIMER
F-21
(minuterie)
Lock On/Off
Appuyer et retenir
Les dernières
unités de mesure
sont affiché
mode Lock On
La dernière mode
d’opération choisie
est affiché
OU
OU Bascule entre
Répète pour
afficher TIMER
(minuterie)
MAN ou AUTO
manuelle et
automatique
Indicateur de la cible. Clignote lorsqu’il detect un signal d’entré.
Apparaît à être toujours allumé à plus haute fréquence.
Indicateur de piles faibles. Indique que les piles sont faible et
devrait être remplacer.
Icon fois dix. Indique que la valeur est dix fois plus de ce qui
est affiché.
Indicateur du Laser. Le Laser rouge est allumé quand cet
indicateur est illuminé.
Lock Icon. Indique que l’uniter faits des measures continuelles
(mode Lock On).
F-2
Page 34

4.0 SPÉCIFICATIONS DU PLT200
Spécifications du Laser:
Classification: Classe 2 (IEC 60825-1 Ed 1.2 2001-8)
Conforme aux normes de performance du FDA pour les produits laser sauf
les déviations à la Notification Laser No 50, daté le 26 juillet, 2001.
Sortie laser maximale: 1mW
Durée de pulse: Continue
Longueur d’ondes laser: 650 nm
Divergence du rayon: < 1.5 mrad
Diamètre du rayon: 4 x 7 mm typique a 2 mètres
Vie du laser: 8,000 heures d’opérations MTBF
(garantie pour 1 ans)
Spécifications sans contact:
Gammes: RPM 5 - 200,000
RPS 0.084 - 3,333.3
RPH 300 - 999,990
Résolution:Fixer: 1 (10 au dessus de 99,999)
Sélection de gammes automatique: 0.001 à 1.0 (10 au dessus de 99,999)
Précision: +/- 0.01% de la lecture ou la limite de la résolution
Gammes d’opérations: jusqu’a 25 pieds (7.62m) ou jusqu’à 70 degrés
du perpendiculaire au ruban réfléchissant T-5
Spécifications contacte utilisant le capteur externe optionnel:
Gammes: Bout de contactes: 0.5 à 20,000 RPM
10cm / roue d’arpenteur 12 pouces: 0.05 à 12,000 RPM
Résolution:Fixe: 1 (10 au dessus de 99,999)
Sélection de gammes automatique: 0.001 à 1.0 (10 au dessus de 99,999)
F-3
10.2 Opération du TOTALisateur
Prend lecture
Appuyer et
retenir
Voir Max ou
Min
Voir le Temps
dans les
secondes
Si l’appareil
est en mode
Lock on:
Arrêt de
l’appareil
Prendre Note:
Appuyer
OU
Efface Max/Min, Total et Temps de
Mesure
OU
OU
Lock on
Vitesse maximale ou
minimale (dans dernier
choisi Tach ou Rate
mode unités de mesure)
Montrés le temps dans
les secondes de quand
est appuyé
jusqu' à le
dernier
signale d'entrée mesuré
Arrêt automatique après 90
secondes si l’appareil n’est pas
en mode Lock on
une fois avant de
90 seconde gardera
des mesures dans
la mémoire et le
affichage a allumé
plus long.
F-20
Page 35

Mise en marche du TOTALisateur (continue):
9. Entrée sélection
de nombre de
NONE (aucun), 1, 2
ou 3
place décimale
10. Choisie la place
décimale
OU Répète pour
choisir la place
décimale désiré
11. Sauve guarder
et continuer
12. Sortir de la
mise en marchePrêt a prendre
des lectures
Unité = COUNT
DONE (finis),
ensuite les unités
choisies
(compte): Unité Rotationelle / Linéaire:
DONE (finis),
USE CONTACT TIP (utiliser bout
de contact) ou [roue choisie],
ensuite les unités choisies
L’appareil se rappelle de sont paramétrage (Lock On/Off incluses) même si
il pers son alimentation.
F-19
Spécifications contacte (continue):
Précision: Révolutions: +/- 0.05% de la lecture (RPM) ou la limite
de la résolution (sans glissage)
Linéaire: +/- 0.5% de la lecture ou la limite de la
résolution (sans glissage)
Gammes pour lecture contacte:
TACHYMÈTRE:
Révolutions par minute (RPM) 0.5 à 20,000 RPM
Révolutions par seconde (RPS) 0.0833 à 333.33 RPS
Révolutions pas heure (RPH) 30 à 999,990 RPH
TAUX: Circonférence de la roue:
Pouces par seconde 10 cm: 0.033 à 1312.3 IPS
12 pouces: 0.100 à 2,400.0 IPS
Pouces par minute 10 cm: 1.969 à 78,740 IPM
12 pouces: 6.000 à 144,000 IPM
Pouces par heure 10 cm: 118.11 à 999,990 IPH
12 pouces: 360.00 à 999,990 IPH
Pieds par seconde 10 cm: 0.003 à 109.36 FT/S
12 pouces: 0.009 à 200.00 FT/S
Pieds par minute 10 cm: 0.164 à 6,561.7 FT/M
12 pouces: 0.500 à 12,000 FT/M
Pieds par heure 10 cm: 9.843 à 393,700 FT/H
12 pouces: 30.000 à 720,000 FT/H
Verges par seconde 10 cm: 0.001 à 36.453 YPS
12 pouces: 0.003 à 66.667 YPS
Verges par minute 10 cm: 0.055 à 2,187.2 YPM
12 pouces: 0.167 à 4,000.0 YPM
F-4
Page 36

Gammes pour lectures a contactes (continuer):
TAUX: Circomférence de la roue:
Verges par heures 10cm: 3.281 à 131,233 YPH
12 pouces:10.000 à 240,000 YPH
Milles par heure 10 cm: 0.002 à 74.564 MPH
12 pouces:0.006 à 136.36 MPH
Centimètres par seconde 10 cm: 0.084 à 3,333.3 CM/S
12 pouces:0.21 à 3,048.0 CM/S
Centimètres par minute 10 cm: 5.000 à 200,000 CM/M
12 pouces:15.24 à 365,760 CM/M
Centimètres par heure 10 cm: 300.00 à 999,990 CM/H
12 pouces:914.40 à 999,990 CM/H
Mètres par seconde 10 cm: 0.001 à 33.333 M/SEC
12 pouces:0.003 à 60.960 M/SEC
Mètres par minutes 10 cm: 0.050 à 2,000.0 M/MIN
12 pouces:0.153 à 3,657.6 M/MIN
Mètres par heure 10 cm: 3.000 à 120,000 M/H
12 pouces:9.144 à 219,460 M/H
TOTALISATEUR:
Comptes: 0 à 999,999
Échelles totales en pouces, pieds, verges, centimètres ou mètres
Entrée: Optique interne ou externe ou roue d’arpenteur
Spécifications de la minuterie:
Minutes: Secondes, dixième à 99:59.9
Précision: +/- 0.2 seconde
Résolution: 0.1 seconde
F-5
6. Entrée sélection
d’unités de
mesure
ROS Interne ou Externe:
7. Choisies les
unités de
mesure
8. Sauve guarder
et continuer
Pour unité linéaire seulement:
8a. Entrée la
sélection de
roue
8b. Choisie la
roue
8c. Sauve
guarder et
continuer
COUNT
(compte)
seulement
Les options seront différentes
dépendant si vous l’utilisez en
mode interne ou externe.
RCA Externe:
Rotationelle: REV
Linéaire: INCH, FEET,
YARDS, CM, METER
OU
Répète pour
afficher les
unités de
mesure désiré
OU
COUNT (compte)
Unité linéaire
ou REV
La dernière
roue choisie
est affiché
OU Bascule
entre 10CM
et 12IN
F-18
Page 37

10.0 Mode TOTALisateur
10.1 Mise en marche du TOTALisateur
1. Alimenter
l’instrument
ROS Interne ou Externe: RCA Externe:
Dernières
unités de
mesure choisie
1a. Bascule entre
Lock On/Off
Appuyer et retenir
2. Entrée mode
SETUP
(Mise en marche)
3. Entrée votre
sélection de
Mode
4. Choisie la
mode
TOTAL
5. Sauve
guarder et
continuer
OU Répète pour
Les messages afficher peuvent être
différent dépendants si vous
l’utilisez en mode interne ou externe
EXTRN, ensuite
message, ensuite
dernière unité choisie
mode Lock On
La dernière mode
d’opération choisie
est affiché
afficher TOTAL
Affichage: 5 x 0.5” (12.7mm) digits numérique plus LCD alphanumérique
Piles: 2 “AA” 1.5 V (CC) alkaline incluses
(Les piles ne sont pas rechargeable.)
Durée de vie de les piles: 30 heures d’usage continues
Entrée externe:
Maximum: -0.3 V à 5 V (CC)
Minimum: lecture basses sous 1.2V et haute au dessus de 2V
(compatible TTL)
Pulse: Trigger sur le bord positif de la pulse
Alimentation de la sortie: 3.0 V nominale, approximativement 2.8
V @ 200mA max
Sortie de pulse: pulse 0 V à 3.3 V (CC)
Même forme que l’entrée externe ou haut quand les
optiques internes vois une réflexion.
Dimensions: 6.92” (17.58 cm) H x 2.4” (6.10 cm) L x 1.6” (4.06 cm) L
Poids: 7 oz. (210 g) approximatif
Ce produits est fabriqué pour être utiliser a l’intérieur sous les conditions
suivants. (IEC61010-1).
Category d’installation II IEC 664
Niveaux de pollution II IEC 664
Température: 40 °F a 105 °F (5 °C a 40 °C)
Humidité: Humidité relative maximale de 80% pour température
jusqu’a 88 °F (31 °C) diminuant a 50% d’humidité relative
a 100 °F (40 °C). Humidité non condensé.
Spécifications peuvent être changer sans avertissement.
F-6F-17
Page 38
5.0 ENTRÉE / SORTIE
Connexion
d’entrée (
Connexion de
TT
sortie (
T)
TT
Signale d’entrée
+3V Sortie
pour capteur
Commune
(GND)
Entrée: Accepte les capteurs externes
ou Remote Contact Assembly
(RCA). 1/8” (3.5mm)
téléphone de stéréo.
Sortie: 1 pulse par révolution sortie
TTL en mode interne. Avec
capteur externe la pulse ce
répète. 1/8” (3.5mm)
SS
S)
SS
téléphone mono.
Commune
(GND)
+3V Sortie
pour capteur
Signale d’entrée
11. Sauve guarder
et continuer
12. Sortir de la
mise en
marchePrêt a prendre
des lectures
DONE (finis), USE
CONTACT TIP (utiliser
bout de contact) ou
[la roue a choisie],
ensuite les unités de
mesure choisie
L’appareil se rappelle de sont paramétrage (Lock On/Off incluses) même si
il pers son alimentation.
9.2 Opération du mode RATE (compteur)
Prend lecture
Appuyer et retenir
Voir Max
OU
Lock on
Vitesse maximale
F-7
Détail pour connexion d’entrée (stéréo)
Sortie de pulse
Commune
(GND)
Détail pour connexion de sortie (mono)
Commune
(GND)
Sortie de pulse
Voir Min
Si l’appareil est
en mode Lock on:
Arrêt de
l’appareil
Vitesse minimale
Efface Max/Min
Arrêt automatique après 90
OU
secondes si l’appareil n’est
pas en mode Lock on
F-16
Page 39

Mise en marche du mode RATE (compteur) (continuer):
6. Entrée sélection
d’unités de
Rotationelle: C RPS,
C RPM ou C RPH
mesure
Linéaire: IPS, IPM, IPH, FT/S, FT/M, FT/H, YPS,
YPM, YPH, MPH, CM/S, CM/M, CM/H, M/SEC, M/MIN, M/H
7. Choisies les
unités de
mesure
OU Répète pour
afficher les
unités de
mesure désiré
8. Sauve guarder
et continuer
OU
Unité rotationelle Unité linéaire
Pour unité linéaire seulement:
8a. Entrée la
sélection de
roue
La dernière roue
choisie est
affiché
6.0 PRÉPARATION POUR LECTURE
6.1 Préparation pour lecture sans contact
Pour opération interne (Laser rouge) ou opération externe
en utilisant le capteur externe (ROS-Red LED).
1. Nettoyer
l’arbre
(shaft)
2. Appliquer un 1/2
pounce (12.7 mm)
carré de ruban
refléchissant T-5
Pour arbre plus petit:
Aussi petit que 1/8 de
pounce (3.2 mm) de large
sur le côté ou bord du
rayon
8b. Choisie la
8c. Sauve
9. Entrée sélection
de nombre de
place décimale
10. Choisie la place
décimale
F-15
roue
guarder et
continuer
OU Bascule entre
10CM et 12IN
NONE (aucun),
1, 2 ou 3
OU
Répète pour
choisir la place
décimale désiré
6.2 Préparation pour lecture a contact directe
Pour opération externe seulement en utilisant le capteur
externe “Remote Contact Assembly“ (RCA).
Choisir et installer l’option de contact:
1. Bout de contact (Le bout convexe
montré. Utiliser le bout concave
pour les arbres plus petit.)
Enligner les
bouts
F-8
Page 40

2. Roue 10 cm 3. Roue 12 pouces
OU
Installe avec la
pin de l’arbre
Serrée la vis
solidement sur
l’arbre
totalement assis
dans le trou.
Serrée la vis.
6.3 Installations de capteur externe
Raccorder le
capteur sur la
SS
S
SS
Entrée
connexion d’entrée
Capteur a contact directe
(montrée avec roue optionnel de 12 pouces)
(RCA)
9.0 Mode RATE (Compteur)
Prendre Note: Le capteur externe (RCA) doits être connecter pour prendre
des lectures.
9.1 Mise en marche du mode RATE (compteur)
1. Alimenter
l’instrument
1a. Bascule entre
Lock On/Off
Appuyer et retenir
2. Entrée
mode
SETUP
(Mise en marche)
3. Entrée
votre
sélection
de Mode
4. Choisie
Mode
RATE
(compteur)
OU Bascule entre
EXTRN, ensuite message,
ensuite les dernières
unités de mesure
choisie
mode Lock On
La dernière mode
d’opération choisie
est affiché
RATE (compteur)
et TOTAL. Choisir
RATE (compteur).
F-9
Capteur optique
(ROS-P)
Capteur infrarouge
(IRS-P)
Capteurs magnétique
avec amplificateur
(MT-190P)
5. Sauve
guarder et
continuer
F-14
Page 41

8.2 Opération du TACHymètre
Prend lecture
OU
Appuyer et retenir
Voir Max
Lock on
Vitesse maximale
7.0 Prendre des lectures
7.1 Lectures sans contact
A main
Laser
Lumière
Capteur Externe (ROS montré)OU
(pas montré:
IRS-P,
MT-190P)
Voir Min
Si l’appareil
est en mode
Lock on:
Arrêt de
l’appareil
F-13
Vitesse minimale
Efface Max/Min
Arrêt automatique après 90
OU
secondes si l’appareil n’est
pas en mode Lock on
7.2 Lectures a contact directe
Rotationelle Linéaire
(Utiliser le bout
concave pour les
arbres plus petit)
au RCA
du PLT200 du PLT200
UTILISER UNE PRESSION LÉGÈRE.
Mise en guarde: Prendre des lectures de vitesse de rotation peut être
dangereux. Faits certains que les vêtements et cheveux ne sont pas
en contact avec la machinerie. Garder votre main en arrière du bout du
capteur externe (RCA). Remplacer tous les mesures de sécurités
lorsque les lectures sont complétées. N’utiliser pas pour vitesse de
rotation plus grosse que 20,000 RPM.
F-10
Page 42

8.0 Mode TACHymètre
8.1 Mise en marche du TACHymètre
1. Alimenter
l’instrument
Les dernières unités
de mesure sont affiché
7. Choisies les
unités de
mesure
8. Sauve guarder
et continuer
OU Répète pour
afficher les
unités de
mesure désiré
2. Entrée
3. Entrée
4. Choisie
5. Sauve
6. Entrée
F-11
1a. Bascule entre
Lock On/Off
Appuyer et retenir
mode
SETUP
(Mise en marche)
votre
sélection
de Mode
Mode
TACH
guarder et
continuer
sélection
d’unités de
mesure
OU
mode Lock On
La dernière mode
d’opération choisie
est affiché
Répète pour
afficher TACH
RPS, RPM ou RPH
9. Entrée sélection
de nombre de
place décimale
10. Choisie la place
décimale
11. Sauve guarder
et continuer
12. Sortir de la
mise en marchePrêt a prendre
des lectures
L’appareil se rappelle de sont paramétrage (Lock On/Off incluses) même si
il pers son alimentation.
OU
NONE(aucun), 1, 2
ou 3
Répète pour
choisir la place
décimale désiré
DONE (finis),
ensuite les unités
de mesure choisie
F-12
 Loading...