

Page 1
Monarch® 9450
®
RASCAL
Printer
Operator’s Handbook
TC9450OH Rev. DA 8/99 ©1994 Monarch Marking Systems, Inc. All Rights Reserved.
Page 2

Each product and program carries a respective written warranty, the only
warranty on which the customer can rely. Monarch reserves the right to make
changes in the product, the programs, and their availability at any time and
without notice. Although Monarch has made every effort to provide complete
and accurate information in this manual, Monarch shall not be liable for any
omissions or inaccuracies. Any update will be incorporated in a later edition of
this manual.
WARNING
This equipm ent ha s been teste d and fo und to comply with the limits for a Cl ass A digital
device, pursuant to Part 15 of the FCC Rules. These limits are designed to provide
reasonable protection against harmful interference when the equipment is operated in a
commercial environment. This equipment generates, uses, and can radiate radio frequency
energy and, if not installed and used in accordance with the instruction manual, may cause
harmful inte rference to radio com municati ons. Operat ion of this equi pment in a re sidentia l
area is likely to cause harmful interference in which case the user will be required to correct
the interfere nce at his ow n expense.
CANADIAN D.O.C. WARNING
This digita l appa ratus does not ex ceed the C lass A limits fo r radio noise e miss ions fr om
digital app aratus set ou t in t he Radi o Inte rferen ce Regu lation s of t he Cana dian De partm ent of
Communicatio ns.
Le présent appareil numérique n’émet pas de bruits radioélectriques dépassant les limites
applicables aux appareils numériques de la classe A prescrites dans le Réglement sur le
brouillage r adioéle ctriq ue édict e par l e mini stère d es Comm unicat ions d u Canad a.
Trademarks
Monarch and RASCAL are regis tered t rademar ks of Mo narch Ma rking Syst ems, I nc.
9450 and 9459 are trademarks of Monarch Marking Systems, Inc.
Paxar is a trademark of Paxar Corporation.
Page 3

Preface
This Operator’s Handbook describes how to
F
charge the battery.
F
load supplies.
F
set up communications.
F
send a print job.
F
care for and maintain the printer.
F
solve any problems that may occur.
It also contains product specification and accessories
information.
Audience –––––––––––––––––––––––––––––––––––––––––––––––––––
This manual has a dual-purpose audience. It is intended
primarily for Operator of the printer. However, the System
Administrator who sets up print jobs for the Operator should
be familiar with the following topics:
F
"About Sleep Mode" (Chapter 1)
F
"Loading Supplies" (Chapter 2)
F
"Printing" (Chapter 4)
F
"Care and Maintenance" (Chapter 5)
F
"Problems and Solutions" (Chapter 6)
Also, "Setting Communications Parameters" (Chapter 3) is
included, and is intended for the System Administrator only.
i
Page 4

9450 Operator’s Handbook
Terms to Know –––––––––––––––––––––––––––––––––––––––––––––
The following terms are used in this manual.
Communications
Parameters
Continuous Mode Default print mode in which the printer
Format The design of a printed label.
Host Any mainframe, minicomputer, data
Indexed supply Supplies that enable the printer to sense
Non-indexed
supply
Non-peel Mode Feed mode in which the printer does not
Settings that define how the printer and
host communicate with each other. The
parameters (baud rate, flow control, data
bits, and stop bits) must match on both
devices.
feeds one or more supplies without
operator intervention.
collection terminal, or personal computer
attached to the printer.
where a label begins or ends. One type of
indexed supplies have black marks on the
back to accomplish this task.
Supplies that do not enable the printer to
sense where a label begins or ends.
peel labels from the backing paper while
printing.
On-demand Mode Print mode in which the printer prints one
label each time you press [Feed].
Online Direct communication between host and
printer.
Peel Mode Feed mode in which the printer peels
labels from the backing paper while
printing.
ii
Page 5

Preface
Print Job A command or commands sent from the
host to the printer that results in one or
more labels being printed.
Sleep Mode Operation mode in which the printer
conserves energy while retaining the print
job.
Supplies The media (paper or synthetic) the printer
prints on.
Top-of-form Position where the supply stops before
printing the next label. You may adjust the
top of the form to compensate for supply
variations and the peel mode used.
iii
Page 6

9450 Operator’s Handbook
iv
Page 7

Table of Contents
Chapter 1. Getting Started . . . . . . . . . . . . . . . . . . . . . . . . . . . . . 1-1
Using the Buttons . . . . . . . . . . . . . . . . . . . . . . . . . . . . . . . . 1-2
Charging the Battery. . . . . . . . . . . . . . . . . . . . . . . . . . . . . . 1-3
Removing and Loading the Battery. . . . . . . . . . . . . . . . . . . 1-5
Removing the Battery . . . . . . . . . . . . . . . . . . . . . . . 1-5
Loading the Battery. . . . . . . . . . . . . . . . . . . . . . . . . 1-6
About Sleep Mode . . . . . . . . . . . . . . . . . . . . . . . . . . . . . . . 1-6
Attaching the Belt . . . . . . . . . . . . . . . . . . . . . . . . . . . . . . . . 1-7
Chapter 2. Loading Supplies . . . . . . . . . . . . . . . . . . . . . . . . . . . 2-1
Loading for Peel Mode . . . . . . . . . . . . . . . . . . . . . . . . . . . . 2-2
Loading for Non-Peel Mode . . . . . . . . . . . . . . . . . . . . . . . . 2-6
Removing Supplies. . . . . . . . . . . . . . . . . . . . . . . . . . . . . . . 2-8
Chapter 3. Printer Communications . . . . . . . . . . . . . . . . . . . . . 3-1
Setting Communications Parameters . . . . . . . . . . . . . . . . . 3-1
Connecting the Communications Cable . . . . . . . . . . . . . . . 3-3
Removing the Communications Cable . . . . . . . . . . . . . . . . 3-4
Chapter 4. Printing. . . . . . . . . . . . . . . . . . . . . . . . . . . . . . . . . . . . 4-1
Printing in On-demand Mode . . . . . . . . . . . . . . . . . . . . . . . 4-1
Removing Backing Paper . . . . . . . . . . . . . . . . . . . . . . . . . . 4-2
Printing in Continuous Mode. . . . . . . . . . . . . . . . . . . . . . . . 4-2
Pausing the Printer . . . . . . . . . . . . . . . . . . . . . . . . . . . . . . . 4-2
Clearing a Print Job . . . . . . . . . . . . . . . . . . . . . . . . . . . . . . 4-2
v
Page 8

9450 Operator’s Handbook
Chapter 5. Care and Maintenance . . . . . . . . . . . . . . . . . . . . . . . 5-1
Clearing Jams. . . . . . . . . . . . . . . . . . . . . . . . . . . . . . . . . . . 5-1
Cleaning the Printhead . . . . . . . . . . . . . . . . . . . . . . . . . . . . 5-4
Cleaning the Platen Roller and Peel Blade. . . . . . . . . . . . . 5-5
Chapter 6. Troubleshooting . . . . . . . . . . . . . . . . . . . . . . . . . . . . 6-1
Printing a Test Label . . . . . . . . . . . . . . . . . . . . . . . . . . . . . . 6-1
LED Indicator . . . . . . . . . . . . . . . . . . . . . . . . . . . . . . . . . . . 6-2
Problems and Solutions . . . . . . . . . . . . . . . . . . . . . . . . . . . 6-3
Chapter 7. Specifications . . . . . . . . . . . . . . . . . . . . . . . . . . . . . . 7-1
Printer Specifications . . . . . . . . . . . . . . . . . . . . . . . . . . . . . 7-1
Supply Sizes. . . . . . . . . . . . . . . . . . . . . . . . . . . . . . . . . . . . 7-2
Accessories. . . . . . . . . . . . . . . . . . . . . . . . . . . . . . . . . . . . . 7-2
Communications Cable Pin Definitions. . . . . . . . . . . . . . . . 7-3
Inserting the Supply Guide . . . . . . . . . . . . . . . . . . . 5-3
vi
Page 9

Chapter 1. Getting Started
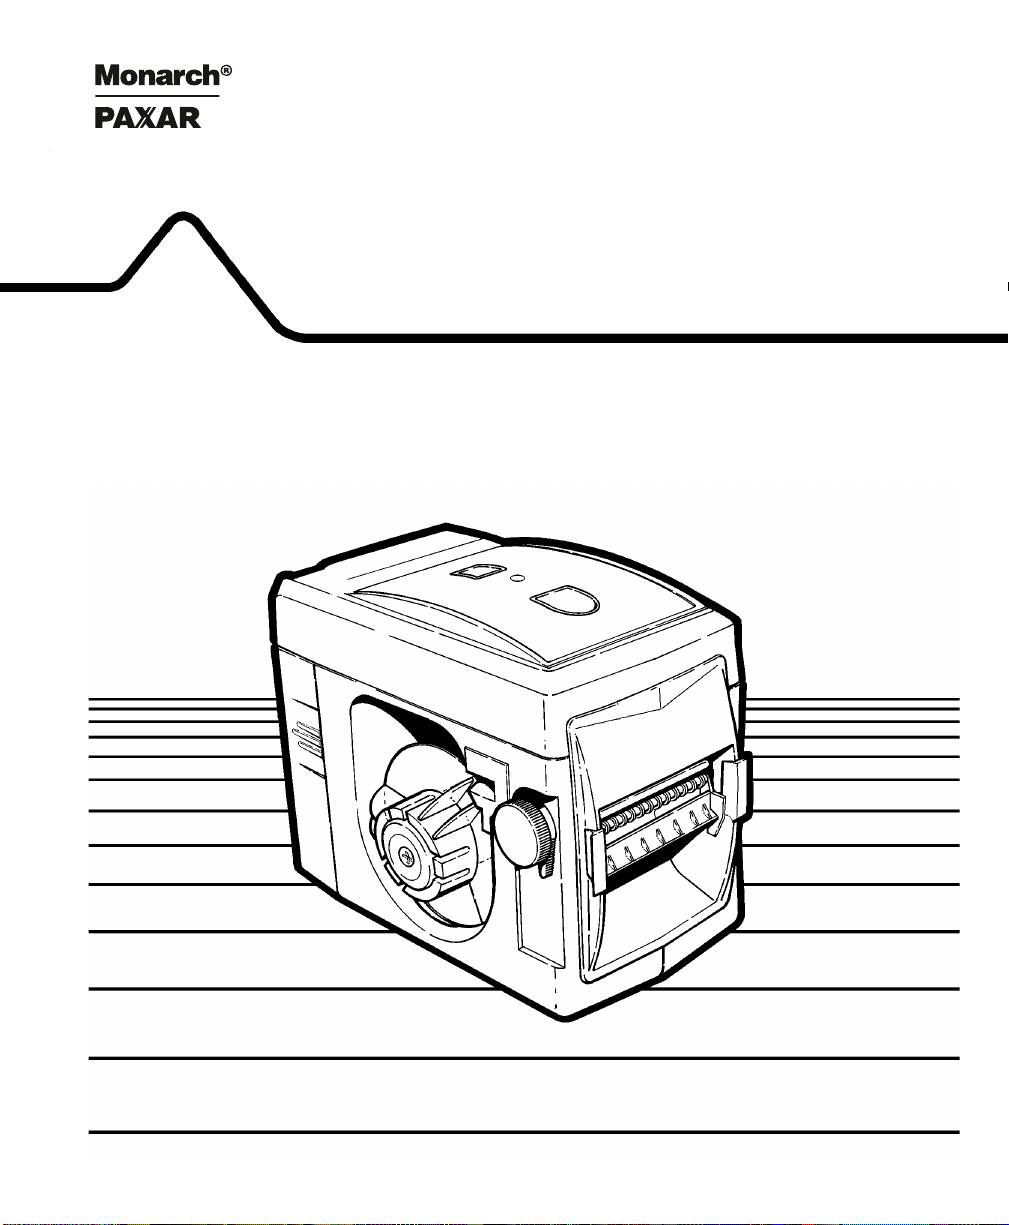
The 9450 RASCAL® printer is a portable, thermal-direct
printer. This chapter tells you how
F
to use the buttons on top of the printer.
F
to charge and use the battery.
F
sleep mode works.
F
to attach the belt.
1-1
Page 10
9450 Operator’s Handbook
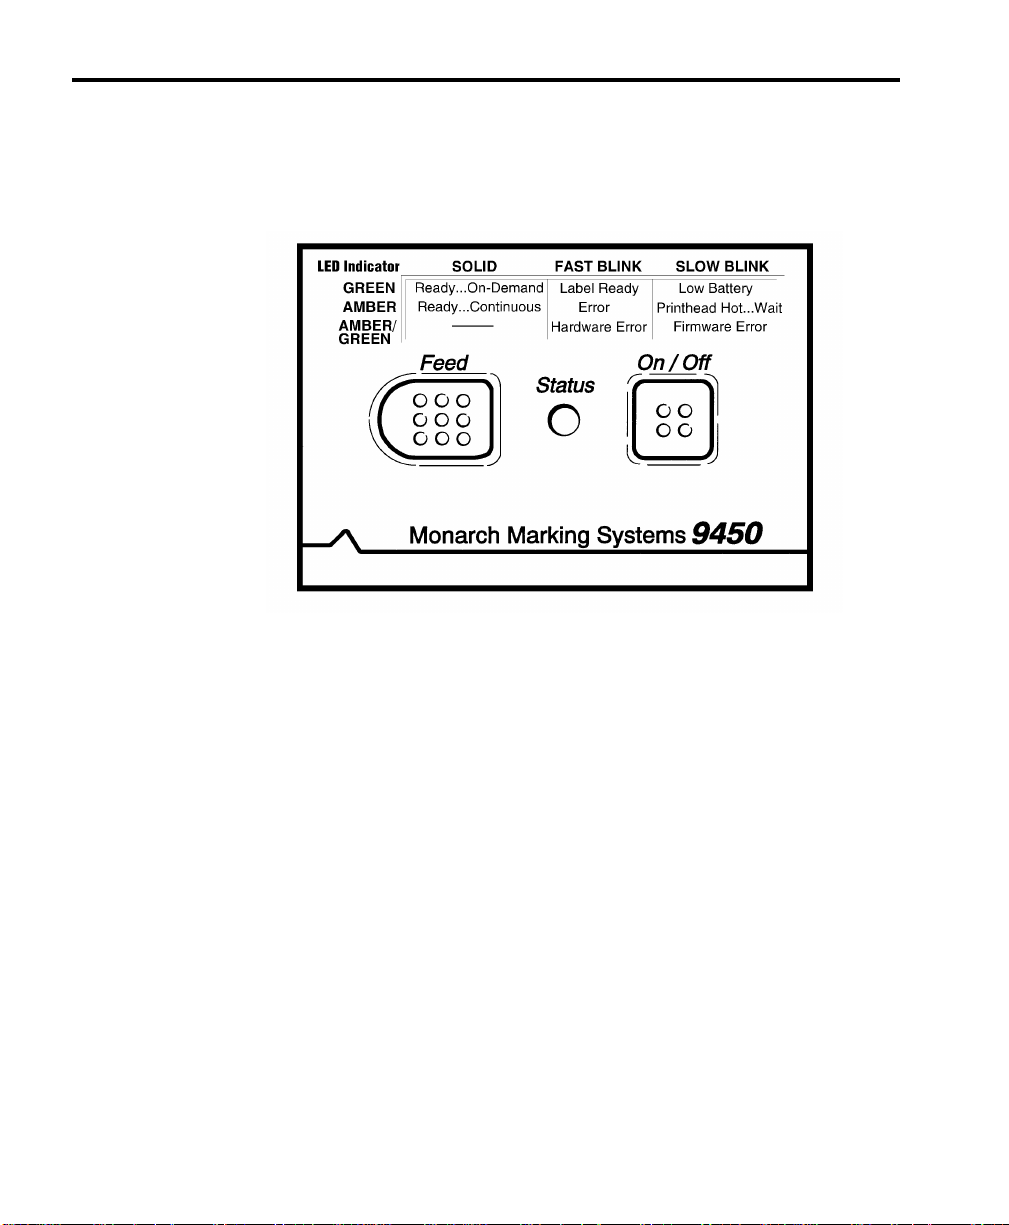
Using the Buttons ––––––––––––––––––––––––––––––––––––––––––
On the top of the printer, there are two buttons and an LED
indicator, as shown.
1-2
[Feed] Use to
F
feed or advance the supply for printing.
See Chapter 4, "Printing," for
information about the different print
modes.
F
pause the printer during printing.
F
set the communication parameters in
the printer to match your host. See
"Setting Communications Parameters"
in Chapter 3.
F
clear most error conditions.
F
print a test label. See Chapter 6,
"Troubleshooting," for information.
Page 11

Chapter 1. Getting Started
[On/Off] Use to
F
turn the printer on and off.
F
wake the printer from sleep mode. See
"About Sleep Mode," later in this
chapter.
F
reset the printer to normal operation
mode after printing a test label. See
Chapter 6, "Troubleshooting," for
information.
LED Indicator Indicates certain printer conditions or
communication problems. The LED
indicator can be amber, green, or alternate
between these colors. It can also blink or
be a solid color.
See Chapter 6, "Troubleshooting," for a
list of possible LED indicator conditions
and descriptions.
Charging the Battery ––––––––––––––––––––––––––––––––––––––––
A 6-volt NiCd battery powers the printer. Charge the battery
F
when you receive the printer.
F
when the LED indicator shows a battery condition (slow
blinking green or blank).
In general, NiCd batteries require 5-8 charge/deplete cycles to
reach full charge.
nWhen first charging a battery, charge it for 14 hours,
regardless of whether you’re using the fast or trickle charger.
When you’re not charging or using the battery, it loses 2-3% of
its charge daily. Extremely hot environments increase this
charge loss rate and extremely cold environments decrease
this charge loss rate.
1-3
Page 12

9450 Operator’s Handbook
If the battery loses power in the middle of a printing session,
replace or recharge the battery. The printer remembers the
print job.
When you use or store your charger, do not:
F
wrap the cord around the charger.
F
pull or put unusual stress on the cord.
w
Before using the charger, inspect the cord for bare wires. Do
Not use a charger with bare wires. Only use a charger
approved for use with this printer.
To charge the battery:
1. Remove the battery, as described in "Removing the
Battery."
2. Plug the small, round connector on the charger cord into
the socket on the battery, as shown. The charger’s LED
indicator is solid amber when the charger is fully
connected.
Socket
Small Round
Connector
3. Plug the charger into a 115V electrical outlet. A full initial
charge takes approximately 14 hours.
nAreas using 220V or 240V electrical outlets will receive a
charger designed for these voltages. See Chapter 7,
"Specifications," for information.
1-4
Page 13
Prongs
Bottom
Tabs
Chapter 1. Getting Started
4. When charging is complete, unplug the charger from the
battery.
5. Load the battery, as discribed in "Loading the Battery."
6. Press [On/Off] to resume printing.
For more information, see your Fast Charger Addendum.
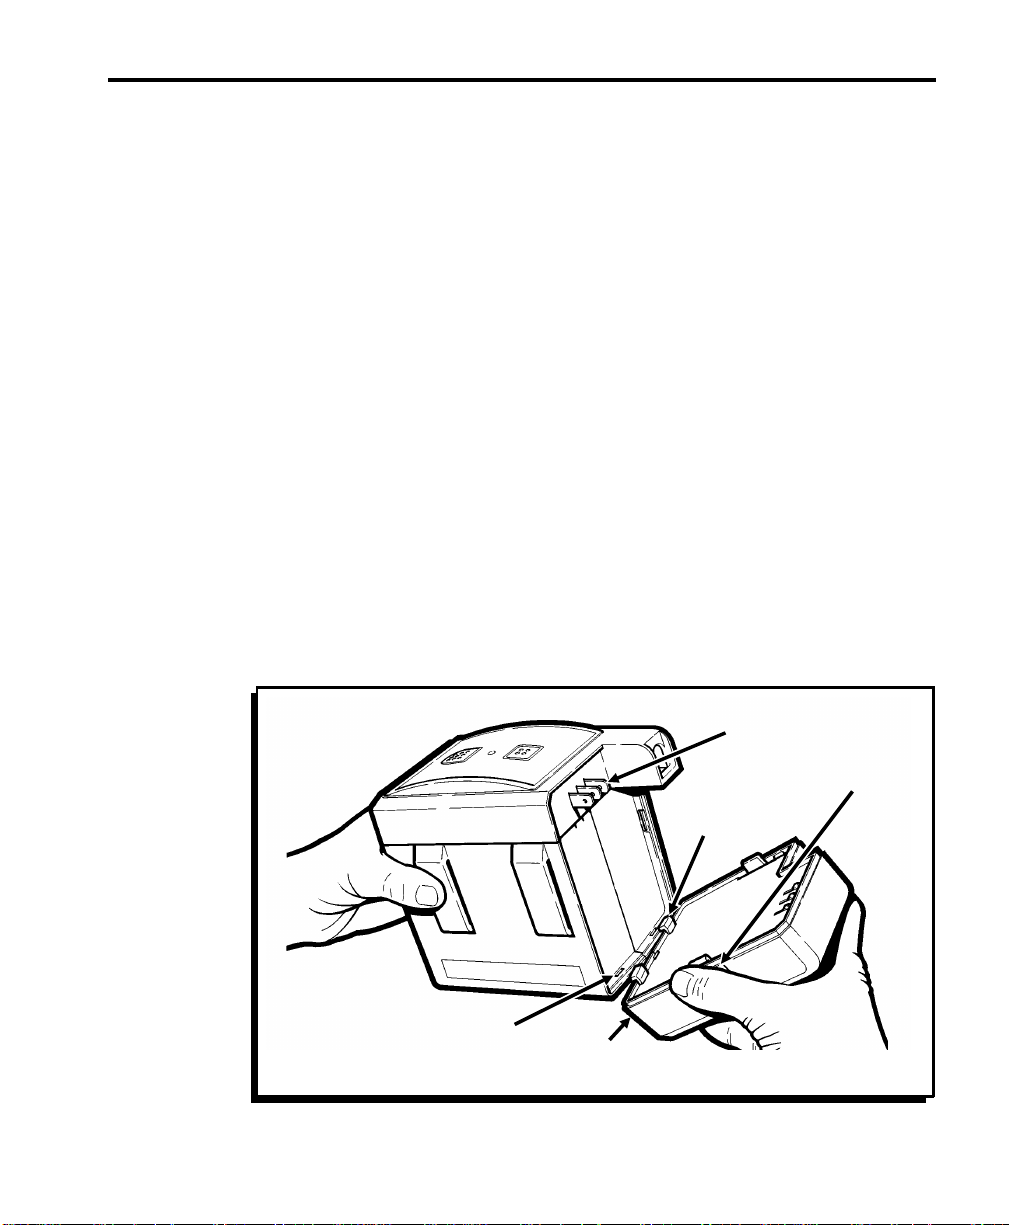
Removing and Loading the Battery––––––––––––––––––––––––––––
You don’t need to turn off the printer before removing or
loading a battery.
Removing the Battery
The battery side tabs are stiff and require more force to press
when new. After you remove the battery for charging a few
times, the tabs become easier to press, requiring less force to
remove.
To remove the battery:
1. Hold the printer as shown.
Slots
Side
Ta b s
Battery
1-5
Page 14

9450 Operator’s Handbook
2. Squeeze the side tabs on the battery and pull the battery
away from the printer.
Loading the Battery
To load the battery:
1. Insert the bottom tabs on the battery into the slots at the
bottom of the battery well.
2. Push the top of the battery onto the prongs until the
battery snaps into place.
About Sleep Mode ––––––––––––––––––––––––––––––––––––––––––
When the printer is inactive for a certain period, it goes into
sleep mode to conserve battery power. During sleep mode,
the printer retains all print jobs, but isn’t operational.
See your System Administrator to set the time the printer waits
before going into sleep mode. The default is 2 minutes, but it
can range from 10 seconds to 2.7 hours. Your System
Administrator can also disable sleep mode entirely. If sleep
mode is disabled, an F appears on the test label before the
delay time.
To recover from sleep mode, press [On/Off]. The printer takes
100 milliseconds to recover.
nDo Not send a print job during this interval. It will be lost.
1-6
Page 15
Chapter 1. Getting Started
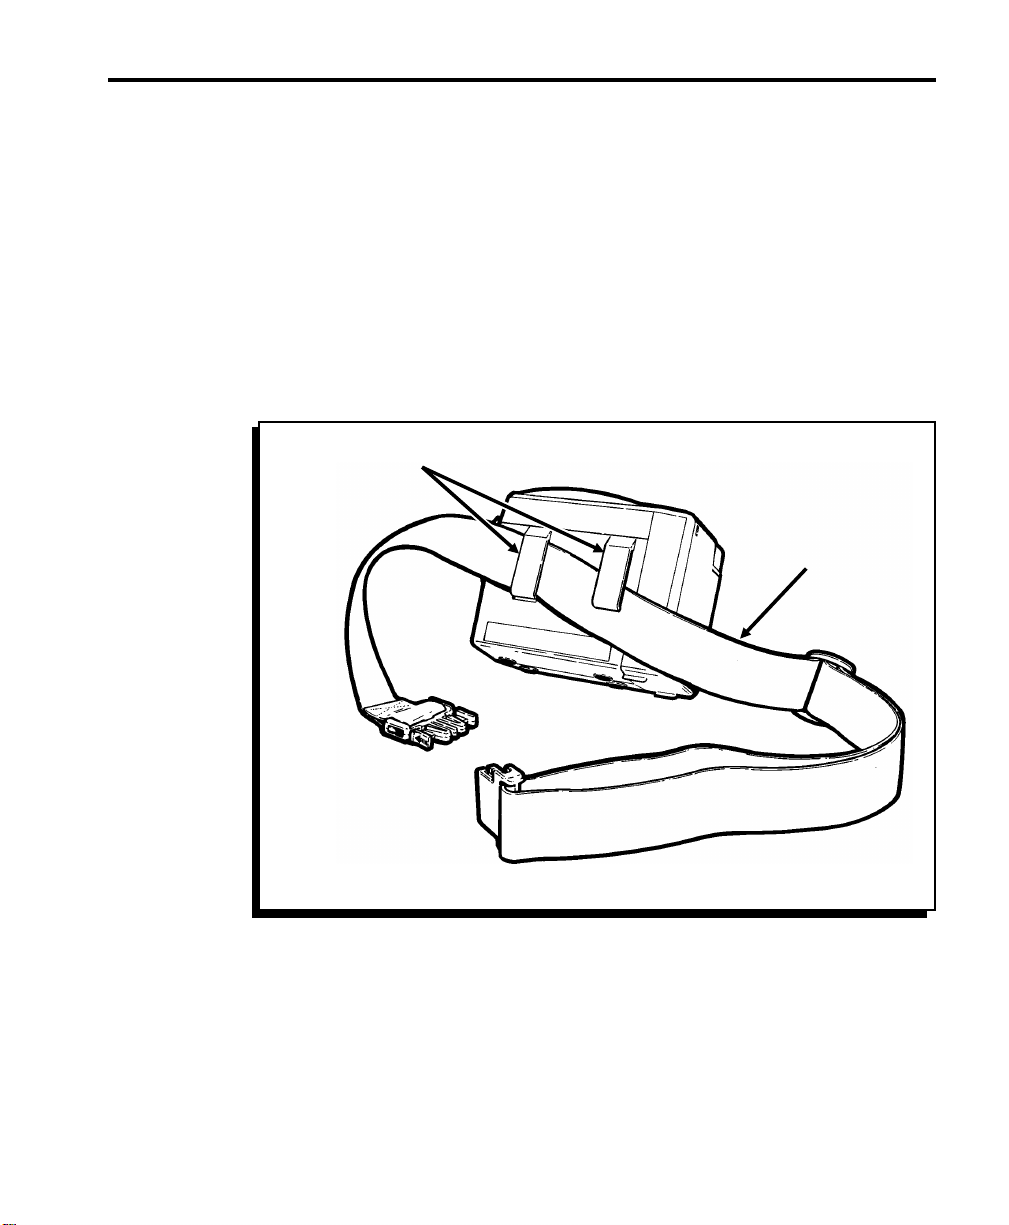
Attaching the Belt–––––––––––––––––––––––––––––––––––––––––––
Your printer comes with a belt for portable printing.
To attach the belt:
1. Lift one of the clips and slip the belt under it.
2. Release the clip.
3. Repeat these steps for the other clip.
nMake sure the belt is completely under the clips.
Clips
Belt
1-7
Page 16

9450 Operator’s Handbook
1-8
Page 17

Chapter 2. Loading Supplies
The printer accepts labels, tags, and thermal paper. Labels
can be indexed or non-indexed. They also can have a core or
be coreless. Use synthetic (non-paper) labels to print serial or
high-density bar codes.
You can load supplies two ways:
F
Peel mode peels the label from the backing paper while
it feeds through the printer. This mode requires
indexed labels. The printer must be in On-demand
mode. A solid green LED indicator implies On-demand
mode. Ask your System Administrator to set the mode,
if necessary.
F
Non-peel mode feeds without peeling labels from the
backing paper. Use this mode for printing label strips
or printing on tags or thermal paper. The printer must
be in Continuous mode. A solid amber LED indicator
implies Continuous mode. Ask your System
Administrator to set the mode, if necessary.
nBefore loading supplies, make sure the supply chute is clean.
Refer to Chapter 5, "Care and Maintenance."
2-1
Page 18

Supply
Well
9450 Operator’s Handbook
Loading for Peel Mode–––––––––––––––––––––––––––––––––––––––
In Peel mode, use die-cut labels only. Use supplies up to a
maximum of 2.05 inches. Contact Monarch at the number at
the back of this manual if you have special label requirements.
nIt doesn’t matter if the printer is off or on while you are loading
supplies.
To load supplies for Peel mode:
1. Remove the supply holder from the supply well as shown.
Supply
Holder
2-2
Support Frame
Ta b s
Printhead
Lever
2. Push the printhead lever up to open the printhead.
Page 19

Support
Frame
Supply
Well
Chapter 2. Loading Supplies
3. Squeeze the tabs on both sides of the support frame and
pull it open.
Tabs
4. Insert the leading edge of the supply into the supply guide
while dropping the supply roll into the supply well. Push
the supply against the back of the well. Use your finger to
push the supply through the supply chute.
Supply
Guide
Leading
Edge of
Supply
2-3
Page 20

Support
Frame
Printhead
Lever
On/Off
Button
Supply
9450 Operator’s Handbook
5. Place the supply holder against the supply roll in the
supply well. Make sure the supply turns freely in the well.
6. Feed the supply through the printer, as follows.
F
Push the printhead lever down to close the printhead.
If the printer is off, turn the knob clockwise to manually
feed the supply through the supply chute.
F
Push the printhead lever down to close the printhead.
If the printer is on, the printer feeds the supply
automatically.
7. Feed the supplies behind the support frame as shown.
Supply
Guide
nMake sure the supplies rest against the back wall of the
2-4
Supply
Holder
Knob
8. Remove labels from the backing paper.
printer as they exit the supply chute. If not, open the
printhead and realign the supplies. Close the printhead.
Page 21

Supply
Chute
Chapter 2. Loading Supplies
9. Snap the support frame back into place. Gently pull on
the backing paper to make sure it is tight.
Support
Frame
Backing
Paper
Label
2-5
Page 22

9450 Operator’s Handbook
Loading for Non-Peel Mode ––––––––––––––––––––––––––––––––––
In non-peel mode, supplies can be either die-cut or butt cut
with a maximum size of 2.2 inches.
nIf you have special label requirements, contact Monarch at the
number listed in the back of the handbook.
To load supplies for non-peel mode:
1. Remove the supply holder and any supply that remains.
Supply
Holder
2-6
2. Turn printer on.
3. Tilt the top of printer slightly back.
Page 23

Chapter 2. Loading Supplies
4. Drop the new supply roll into the supply well until it rests
on the back wall.
5. With thumb and forefinger, insert the leading edge of the
supply into the supply guide until the printer begins to feed
the supply. Make sure the supply roll is flush against the
back wall when you begin to insert the leading edge.
Supply
Guide
Knob
Leading
Edge of
Supply
Supply
Well
6. Replace the supply holder.
nTo manually load supplies with the printer turned off, you must
insert the leading edge of supply into the supply guide and
then turn the printhead knob clockwise. This will manually feed
the supply through.
2-7
Page 24

Supply
Chute
Printhead
Lever
Supply
Guide
9450 Operator’s Handbook
Removing Supplies –––––––––––––––––––––––––––––––––––––––––
To remove supplies:
1. Remove the supply holder as shown.
Supply
Holder
c
2-8
Knob
2. Cut or tear the supplies as close to the supply guide as
possible, and remove the supply roll.
3. Push the printhead lever up to open the printhead.
Do Not back the labels through the printhead or a supply jam
may occur.
4. Turn the knob clockwise to feed the supply out the supply
chute.
Page 25

Chapter 3. Printer Communications
System Administrators Only. Before the printer can receive
a print job from the host, you must:
1. Set the communications parameters.
2. Attach the communications cable.
3. Turn the printer on.
Setting Communications Parameters ––––––––––––––––––––––––––
Before sending a print job from the host, set the
communications parameters (flow control, baud rate, data bits,
and stop bits) in the printer to match the parameters set at the
host. You can set the printer’s communications parameters
manually or by using online commands.
To see the printer’s current communications parameters, print
a test label. See Chapter 6, "Troubleshooting," to learn how to
print a test label. The printer’s default parameters are
9600,N,8,1.
nF If the flow control parameter for the host and printer do not
match, the LED indicator blinks 1/4 second amber, and the
printer will not print. Press [Feed] to reset the printer.
F Follow these instructions exactly. Do Not omit any
parameters.
To set the communications parameters manually:
1. Turn the printer off and remove the battery.
2. Press [Feed] while re-connecting the battery. Continue to
press [Feed] until the LED indicator changes from amber
to green. Release the button.
3-1
Page 26

9450 Operator’s Handbook
3. Press [Feed] once. The LED indicator blinks once.
Press [Feed] ... To set the baud rate to ...
Once 38,400
Twice 19,200
Three times 9600
Four times 4800
Five times 2400
Six times 1200
The printer verifies your selection by flashing the LED
indicator once for each time you pressed [Feed].
4. Press [Feed] twice. The LED indicator blinks twice.
Press [Feed] ... To set ...
Once No parity, 8 data bits, 1 stop bit
Twice Even parity, 7 data bits, 1 stop bit
3-2
The printer verifies your selection by flashing the LED
indicator once for each time you pressed [Feed].
5. Press [Feed] three times. The LED indicator blinks three
times.
Press [Feed] ... To set flow control to ...
Once XON/XOFF
Twice DTR
The printer verifies your selection by flashing the LED
indicator once for each time you pressed [Feed].
6. Press [Feed] four times to exit the communications
parameter set mode. A test label prints automatically,
showing the new communications parameters. The LED
indicator goes off.
Page 27

Printer
Port
Chapter 3. Printer Communications
7. Remove the battery. Press [On/Off] while you re-connect
the battery to return to normal print operations.
Connecting the Communications Cable ––––––––––––––––––––––––
To attach the communications cable:
1. Grasp the cable holder and position the connector to
match the frame around the printer port.
Cable
Holder
2. Insert the connector into the printer port until the
connector locks into place. You may hear a click as the
latch snaps into place.
3. Pull the cable holder gently to make sure it is secure.
4. Plug the other end of the cable into the host.
nDo Not carry or drag the printer by the cable. Also, remove
the cable when not using the printer.
See Chapter 7, "Specifications," for cable pin definitions.
3-3
Page 28

Latch
9450 Operator’s Handbook
Removing the Communications Cable –––––––––––––––––––––––––
To remove the cable:
1. Hold the printer steady with one hand.
Cable Holder
2. Grasp the cable holder with your other hand and push it in
to unlock the latch.
3. Release the cable holder and grasp the release slide.
4. Pull the release slide gently to remove the cable.
Release
Slide
nDo Not yank the cable from the printer.
3-4
Page 29

Chapter 4. Printing
This chapter describes how to
F
print in On-demand mode.
F
remove backing paper.
F
print in Continuous mode.
F
clear a print job from the printer’s memory.
F
pause the printer while it prints.
nSee your System Administrator for a print job.
Printing in On-demand Mode–––––––––––––––––––––––––––––––––
In On-demand mode, the printer prints one label at a time
(when a label is ready to dispense, the LED indicator blinks).
After the printer dispenses the first label, it waits for you to
press [Feed] to print each successive label. You must load
your labels in Peel mode.
nThe LED indicator is solid green in On-demand mode. Ask the
System Administrator to set the mode, if necessary.
To print in On-demand mode:
1. Load supplies for Peel mode. See Chapter 2, "Loading
Supplies."
nMake sure the backing paper is pulled tight.
2. Send the print job.
3. Press [Feed] to dispense a label.
4. Remove each label after it prints.
Repeat steps 3 and 4 to continue printing the batch.
4-1
Page 30

9450 Operator’s Handbook
Removing Backing Paper ––––––––––––––––––––––––––––––––––––
To remove excess backing paper:
1. Tear the backing paper a few inches away from the
support frame.
nDo Not tear it against the support frame.
2. Gently pull the backing paper in the printer to make sure it
is tight.
Printing in Continuous Mode ––––––––––––––––––––––––––––––––
In Continuous mode (the default), the printer prints a strip of
supply. Supplies may be strips of labels, tags, or thermal
paper.
nThe LED indicator is solid amber in Continuous mode. Ask
your System Administrator to set the mode, if necessary.
To print in Continuous mode:
1. Load the supplies for Non-peel mode. See Chapter 2,
"Loading Supplies."
2. Send the print job.
3. Press [Feed]. When printing stops, press [Feed] again to
advance the supply.
4. Cut the supply and remove the strip.
Pausing the Printer –––––––––––––––––––––––––––––––––––––––––
To pause the printer while printing in Continuous mode, press
[Feed]. To resume printing the current print job, press [Feed]
again.
Clearing a Print Job–––––––––––––––––––––––––––––––––––––––––
To cancel the current print job manually, press and hold [Feed]
for 3 to 5 seconds.
4-2
Page 31

Chapter 5. Care and Maintenance
This chapter explains how to:
F
clear jams.
F
clean the printhead.
F
clean the peel blade and platen roller.
Clearing Jams ––––––––––––––––––––––––––––––––––––––––––––––
If the supplies jam during printing, the LED indicator blinks
rapidly, alternating between amber and green.
c
Do Not feed supplies with exposed adhesive through the
printer. Adhesive becomes exposed when you tear the
supplies, causing a jam. To avoid a jam:
F
when loading supplies, remove a few labels from the
beginning of the roll.
F
when removing a partial roll, tear the supplies carefully
and feed the last few labels through the printer.
To clear a jam:
1. Turn the printer off, and remove the supplies. See
"Removing Supplies" in Chapter 2 for more information.
nDo Not back labels through the printhead or a jam may occur.
5-1
Page 32

Supply
Guide
9450 Operator’s Handbook
2. If your printer has a removable supply guide, grab the
printer firmly with one hand. With the other hand, slide
out the supply guide as shown.
Jammed Label
in Supply Chute
5-2
nDo Not pull the supply guide completely out of the printer.
3. Use your fingers (no sharp objects) to remove any jammed
labels from the supply guide and supply chute.
4. Slide the supply guide back into the printer.
5. Use the cleaning card to clean the printhead and supply
chute. See "Cleaning the Printhead" later in this chapter
for more information.
c
Do Not use anything other than the cleaning card to clean the
supply path.
6. Reload the supplies and turn the printer on.
7. Press [Feed] to recalibrate the supply.
Page 33

Inserting the Supply Guide
Supply
Guide
Catch
If the supply guide does come out of the printer:
1. Tilt the supply guide in a downward slant, and insert the
catch into the top of the track.
Chapter 5. Care and Maintenance
Track
2. Tilt the supply guide so it lines up with the track, and then
gently slide it along the track, and into the printer.
Catch is behind
the track wall
Track
5-3
Page 34

9450 Operator’s Handbook
Cleaning the Printhead ––––––––––––––––––––––––––––––––––––––
Clean the printhead daily when using the printer in excessively
dirty, hot, or humid environments. Also clean it after every five
rolls of supplies, or when you see voids in the print as shown.
Voids Correct Print
To clean the printhead, use the cleaning card provided.
1. Remove the supplies as shown in Chapter 2.
c
c
Do Not back labels through the printhead or a jam may occur.
2. Feed the cleaning card through the supply guide and out
the supply chute to remove buildup. Repeat as needed.
Supply
Guide
Cleaning
Card
3. Let the printer dry briefly. Then, reload your supplies.
Do Not use sharp objects to clean the printhead. This may
damage the printer and require a service charge.
5-4
Page 35

Chapter 5. Care and Maintenance
Cleaning the Platen Roller and Peel Blade––––––––––––––––––––––
To clean the platen roller and peel blade:
1. Turn the printer off.
2. Remove the supplies, if you haven’t already. See
"Removing Supplies" in Chapter 2 for more information.
c
Do Not back labels through the printhead or jamming may
occur. See "Removing Supplies" in Chapter 2 for more
information.
Supply
Holder
Support
Frame
3. Open the support frame to better expose the platen roller
and peel blade.
4. Moisten a cotton swab with isopropyl alcohol.
5-5
Page 36

9450 Operator’s Handbook
5. Rub the cotton swab back and forth across the platen
roller and peel blade to remove any buildup.
Platen
Roller
6. Let the printer dry briefly. Then, reload your supplies.
Peel
Blade
5-6
Page 37

Chapter 6. Troubleshooting
Print Mode
This chapter explains how to
F
print a test label.
F
read the LED indicator.
F
clear errors.
F
solve any problems that may occur.
Printing a Test Label ––––––––––––––––––––––––––––––––––––––––
To print a test label, press [Feed] while you connect the
battery. Continue to press [Feed] until the LED indicator turns
amber. The LED indicator goes out. A test label prints
automatically and the printer goes into sleep mode.
Software
Version
Baud Rate
Communications
Parameters
Total # of
millimeters
printed on this
printer to date
Font ID’s
resident in
the printer
Flow
Control
Sleep Delay Timeout
(in seconds)
6-1
Page 38

9450 Operator’s Handbook
If the LED indicator does not come on when you print a test
label, press [On/Off] and [Feed] at the same time and
reattach the battery. Release [On/Off] and wait for the LED
indicator to turn amber before releasing [Feed]. The test label
prints automatically.
nFor resident Font IDs, the first number is the Font ID number,
and the second is the Monarch internal font number used for
internal use only. For example, 1:1000 indicates Font ID 1,
and Monarch internal font 1000. Font 16 is for Monarch
internal use only.
LED Indicator––––––––––––––––––––––––––––––––––––––––––––––
The LED indicator is located on top of the printer, between
[Feed] and [On/Off]. This LED indicator displays a variety of
printer states. To clear an error, press [Feed]. The table
below explains each state and its meaning.
LED Indicator Status
Solid green Operational; On-demand mode
Solid amber Operational; Continuous mode
1/4 second blinking green Label ready to dispense
1/4 second blinking amber Online error (e.g., syntax, printing out
of range)
1/4 second amber/green Hardware error (e.g., out of supply,
jam, printhead open)
2 second blinking green Low or dead battery
2 second blinking amber Printhead overheat
2 second amber/green Firmware failure
n Do Not ignore the low battery condition. If you continue to
print with a low battery, the printer will eventually lock up with
a solid green LED indicator and won’t respond to key presses.
If this occurs, put a new, fully charged battery on the printer.
6-2
Page 39

Chapter 6. Troubleshooting
Problems and Solutions––––––––––––––––––––––––––––––––––––––
Some common printer problems and their solutions are listed
below.
Problem Solution
Battery won’t charge. Make sure the battery is connected
correctly.
Make sure the charger is plugged into
a live outlet.
Always charge the battery when the
LED indicator is off or slowly blinks
green.
Label is jammed. Remove jammed supplies.
Clean the printhead.
Labels do not peel. Make sure the backing paper is tight.
Make sure the support frame is
locked into place.
LED indicator is off. Make sure the printer is on.
Turn the printer off and change to a
fully charged battery.
Make sure the printer is not in sleep
mode. Press [On/Off].
Printer doesn’t respond to
host.
Printer locks up with a solid
green LED indicator and will
not respond to key presses.
Make sure the communications cable
is attached and locked into place.
Make sure the communications
parameters at the printer match the
host.
Put a new, fully-charged battery on
the printer.
6-3
Page 40

9450 Operator’s Handbook
Problem Solution
Print has voids or is too light. Make sure the supplies are loaded
Printer does not feed. Turn the printer off and switch to a
correctly.
Check the supplies for damage or
defects. Reload supplies if necessary.
Check the peel roller for jammed
supplies.
Check the supply type (i.e., indexed
or non-indexed). Have the System
Administrator set the supply type.
Turn the printer off and switch to a
fully charged battery.
Clean the printhead.
charged battery.
Reload the supplies.
6-4
Verify that a label is not jammed in
the label path.
Make sure the printer is not in sleep
mode. Press [On/Off].
Make sure no foreign matter is in the
supply spool.
Make sure the supply turns freely in
the supply well.
Make sure the printhead is closed.
Page 41

Chapter 6. Troubleshooting
Problem Solution
Printer does not print. Charge the battery.
Make sure the print job was correct.
Make sure the supplies are loaded
correctly.
Make sure the printhead is closed.
Printer does not start. Make sure the battery is charged and
plugged into the printer.
Make sure the printhead is closed.
Slow or sluggish feeding. Make sure the supplies are loaded
correctly.
Make sure no foreign matter is in the
supply spool.
Make sure the supply turns freely in
the supply well.
Check for adhesive buildup in the
feed path and on the peel blade.
If you continue to have problems:
F
Remove the battery, wait a few seconds and re-connect
it while pressing [On/Off].
F
Make sure the battery is fully charged.
F
Call Monarch at the number at the back of this manual.
6-5
Page 42

9450 Operator’s Handbook
6-6
Page 43

Chapter 7. Specifications
This chapter includes information about:
F
printer specifications
F
supply sizes
F
accessories
F
cable pin definitions.
Printer Specifications––––––––––––––––––––––––––––––––––––––––
Height: 4.3 inches (108 mm)
Width: 3.3 inches (84 mm)
Depth: 5.4 inches (137 mm)
Weight:
(without supplies)
Storage Limits: 15°F to 120°F (1 year maximum)
Operating Limits: 40°F to 110°F dry bulb
Battery Power: 6-volt, 1400 mA-hr NiCd battery
Printing: Thermal direct
Supply Types: Paper and synthetic (non-paper) supplies
Memory: 128K bytes of RAM
27 oz. (765 g)
-10° C to 49° C
85°F (29°C) maximum wet bulb
5°C to 43°C dry bulb
(labels, tags, thermal paper)
256K bytes of RAM (optional)
7-1
Page 44

9450 Operator’s Handbook
Supply Sizes –––––––––––––––––––––––––––––––––––––––––––––––
F
Tag Widths:
1.0" to 1.4" (25 mm to 36 mm)
F
Label Widths:
Non-peel mode - 1.0" to 2.2" (25 mm to 56 mm)
Peel mode - 1.0" to 2.05" (25 mm to 55 mm)
F
Tag and Label Lengths:
.55" to 5.0" (14 mm to 127 mm)
Accessories ––––––––––––––––––––––––––––––––––––––––––––––––
F
RS-422 connection
F
256K memory
F
2-hour fast charger #116518
F
AC adapter #116949
F
Holster
F
Waist strap #116519
F
Cleaning card #116527
F
25-pin PC communications cable #11658715
F
9459 Programmer’s Kit, which includes:
-
9450 Label Design Software
-
9450 Label Design Software Manual
-
9450 Programmer’s Manual
-
9459 Interface Manual
-
9-pin PC communication cable
F
Communication cables for several data collection
terminals.
F
MONARCH® PLATFORM label design software for
use in a Windows® environment.
F
MONARCH PLATFORM Font Utility
7-2
Call your sales representative for details.
Page 45

Chapter 7. Specifications
Communications Cable Pin Definitions ––––––––––––––––––––––––
The printer has an 8 pin mini-DIN RS-232C locking connector
with the following pin definitions.
Pin Signal Direction
1 CTS from host
2 RTS from printer
3 TXD from printer
4 GND GND
5 RXD from host
6 DTR from printer
7 DSR from host
8 +5 Volts from printer
7-3
Page 46

9450 Operator’s Handbook
7-4
Page 47

Index
A –––––––––––––––––––––––––––––
Accessories 7-2
Attaching the belt 1-7
B –––––––––––––––––––––––––––––
Backing paper, removing 4-2
Battery
charging 1-3, 6-3
loading 1-6
removing 1-5
BAttery power 7-1
Baud rate 3-2
Belt, attaching 1-7
Buttons 1-2 - 1-3
C –––––––––––––––––––––––––––––
Cable, communications 3-3 - 3-4
Card, cleaning 5-4
Charger, trickle 1-4
Charging batteries 6-3
Charging the battery 1-3
Cleaning
peel blade 5-5
platen roller 5-5
printhead 5-3
Cleaning card 5-4
Clearing a print job 4-3
Clearing jams 5-2, 6-3
Communications cable
connecting 3-3
pin definitions 7-3
removing 3-4
Communications parameters
setting 3-1
values 3-2
Communications, establishing 3-1
Connecting the communications cable
3-3
Continuous mode, printing in 4-2
D ––––––––––––––––––––––––––––
Depth of printer 7-1
E–––––––––––––––––––––––––––––
Establishing communications 3-1
F–––––––––––––––––––––––––––––
Feeding, slow or sluggish 6-5
Flow control 3-2
H ––––––––––––––––––––––––––––
Height of printer 7-1
J –––––––––––––––––––––––––––––
Jammed labels 5-2, 6-3
Jams, clearing 5-2, 6-3
L–––––––––––––––––––––––––––––
Labels
jammed 5-2, 6-3
peeling 6-3
LED indicator 1-3, 6-2 - 6-3
Limits
operating 7-1
storage 7-1
Loading supplies 2-1
Loading the battery 1-6
Page 48

M–––––––––––––––––––––––––––––
Memory of printer 7-1
Modes
continuous 4-2
non-peel 2-1, 2-6
on-demand 4-1
peel 2-2
sleep 1-6
N –––––––––––––––––––––––––––––
Non-peel mode 2-1, 2-6
O –––––––––––––––––––––––––––––
On-demand mode, printing in 4-1
Operating limits 7-1
P –––––––––––––––––––––––––––––
Parameters, communications 3-1 - 3-2
Pausing the printer 4-3
Peel blade, cleaning 5-5
Peel mode 2-1 - 2-2
Peeling labels 6-3
Pin definitions of the communications
cable 7-3
Platen roller, cleaning 5-5
Power, of battery 7-1
Print jobs, clearing 4-3
Printer
depth 7-1
height 7-1
not feeding 6-4
not printing 6-5
not starting 6-5
response to host 6-3
specifications 7-1
weight 7-1
width 7-1
Printer, pausing 4-3
Printhead, cleaning 5-3
Printing a test label 6-1
Printing in Continuous mode 4-2
Printing in On-demand mode 4-1
Printing type 7-1
Printing, voids or too light 6-4
Problems
battery won’t charge 6-3
common 6-3
jammed label 6-3
labels do not peel 6-3
LED indicator is off 6-3
no response to host 6-3
print quality 6-4
printer does not feed 6-4
printer does not print 6-5
printer does not start 6-5
slow or sluggish feeding 6-5
R–––––––––––––––––––––––––––––
Removing backing paper 4-2
Removing supplies 2-8
Removing the battery 1-5
Removing the communications cable
3-4
Responses to host, from printer 6-3
S–––––––––––––––––––––––––––––
Setting communication parameters 3-1
Sizes, of supplies 7-2
Sleep mode 1-6
Solutions to common problems 6-3
Specifications, printer 7-1
Storage limits 7-1
Supplies
loading 2-1
removing 2-8
sizes 7-2
types 7-1
T–––––––––––––––––––––––––––––
Test labels, printing 6-1
Trickle charger 1-4
Type of printing 7-1
Types of supplies 7-1
Page 49

U –––––––––––––––––––––––––––––
Using the buttons 1-2
W–––––––––––––––––––––––––––––
Weight of printer 7-1
Width of printer 7-1
Page 50

Page 51

For supplies, service, or assistance call:
TOLL FREE:
1-800-543-66 50 (In the U.S.A. )
1-800-263-46 50 (In Ca nada )
www.monarch.com
Published by the Technical Communications Department.
Printed in the U.S.A.
Page 52

 Loading...