

Page 1
For Help Call
1.800.241.6264
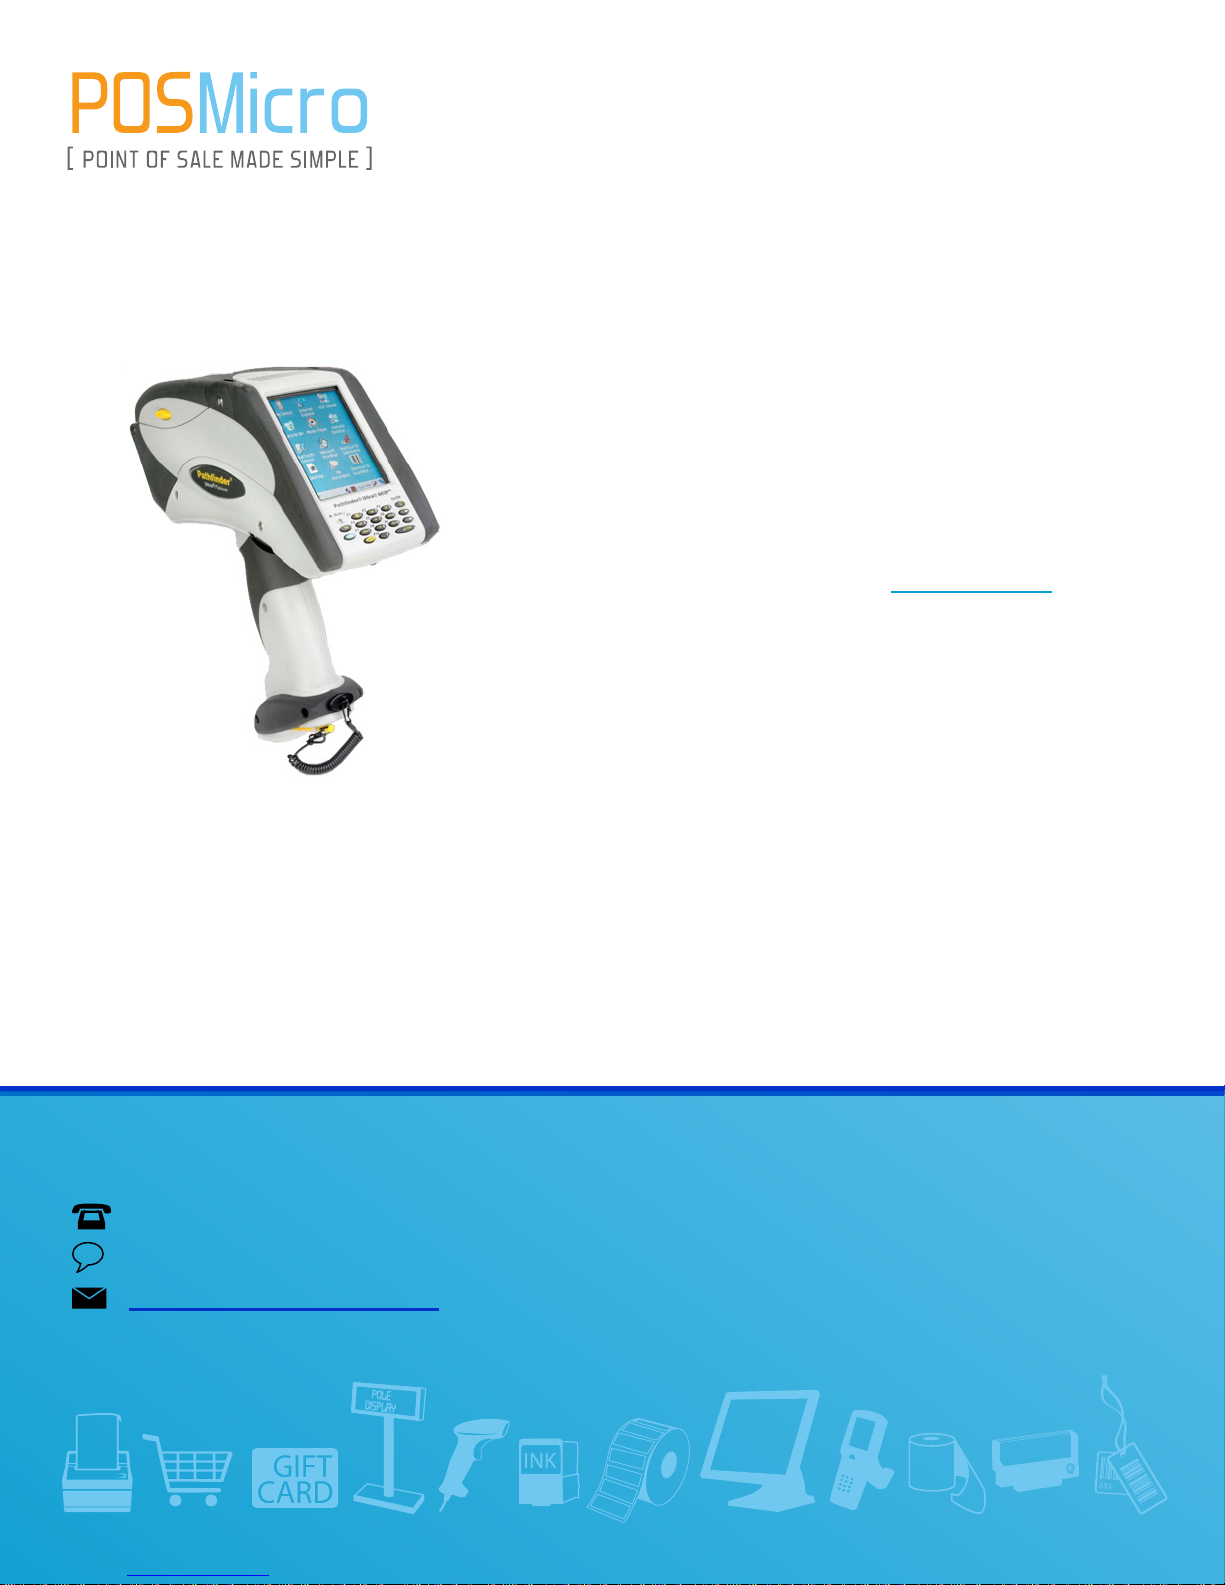
Monarch Pathfinder
6039 Quick Start
More information available at POSMicro.com
QUESTIONS?
Ask the experts at POSMicro.com.
1.800.241.6264
Live Chat Now
support@POSMicro.com
Monday - Friday 6 AM to 5 PM Pacic Time
BULK DISCOUNTS
FREE SHIPPING*
*Free ground shipping to the continental USA on orders over $100.
SE HABLA
ESPAñOL
Page 2

QUICK REFERENCE
This Quick Reference contains supply loading information
and general care and maintenance procedures for the
Monarch® Pathfinder® Ultra® Platinum 6039™ printer.
For more detailed information, refer to the Operator’s
Handbook available on our Web site (www.monarch.com).
Information in this document supercedes information in
previous versions. Check our Web site for the latest
documentation and release information.
Getting Started
1. Review the printer safety information in the Regulatory
Compliance document provided with your printer.
2. Charge the main battery. Use either the Monarch®
9462™ or 9465™ battery charger. Refer to the
documentation with those chargers for more
information.
Important: You must charge the main battery when you
receive the printer, even if you do not use it
right away. Refer to the Operator’s
Handbook for important battery safety
information.
3. Insert the main battery into the printer.
4. Attach the safety strap found in the documentation
package.
5. Load supplies in the printer.
6. Turn on the printer and wait 30 seconds for the desktop
to load.
Your System Administrator must have already loaded an
application in the printer before you can use it.
Monarch®, Pathfinder® Ultra®, 6039, 9462, and 9465 are trademarks of
Avery Dennison Retail Information Services, LLC..
Avery Dennison® is a trademark of Avery Dennison Corporation.
TC6039QR Rev. AG 5/09 ©2005 Avery Dennison Corp. All Rights Reserved.
Page 3
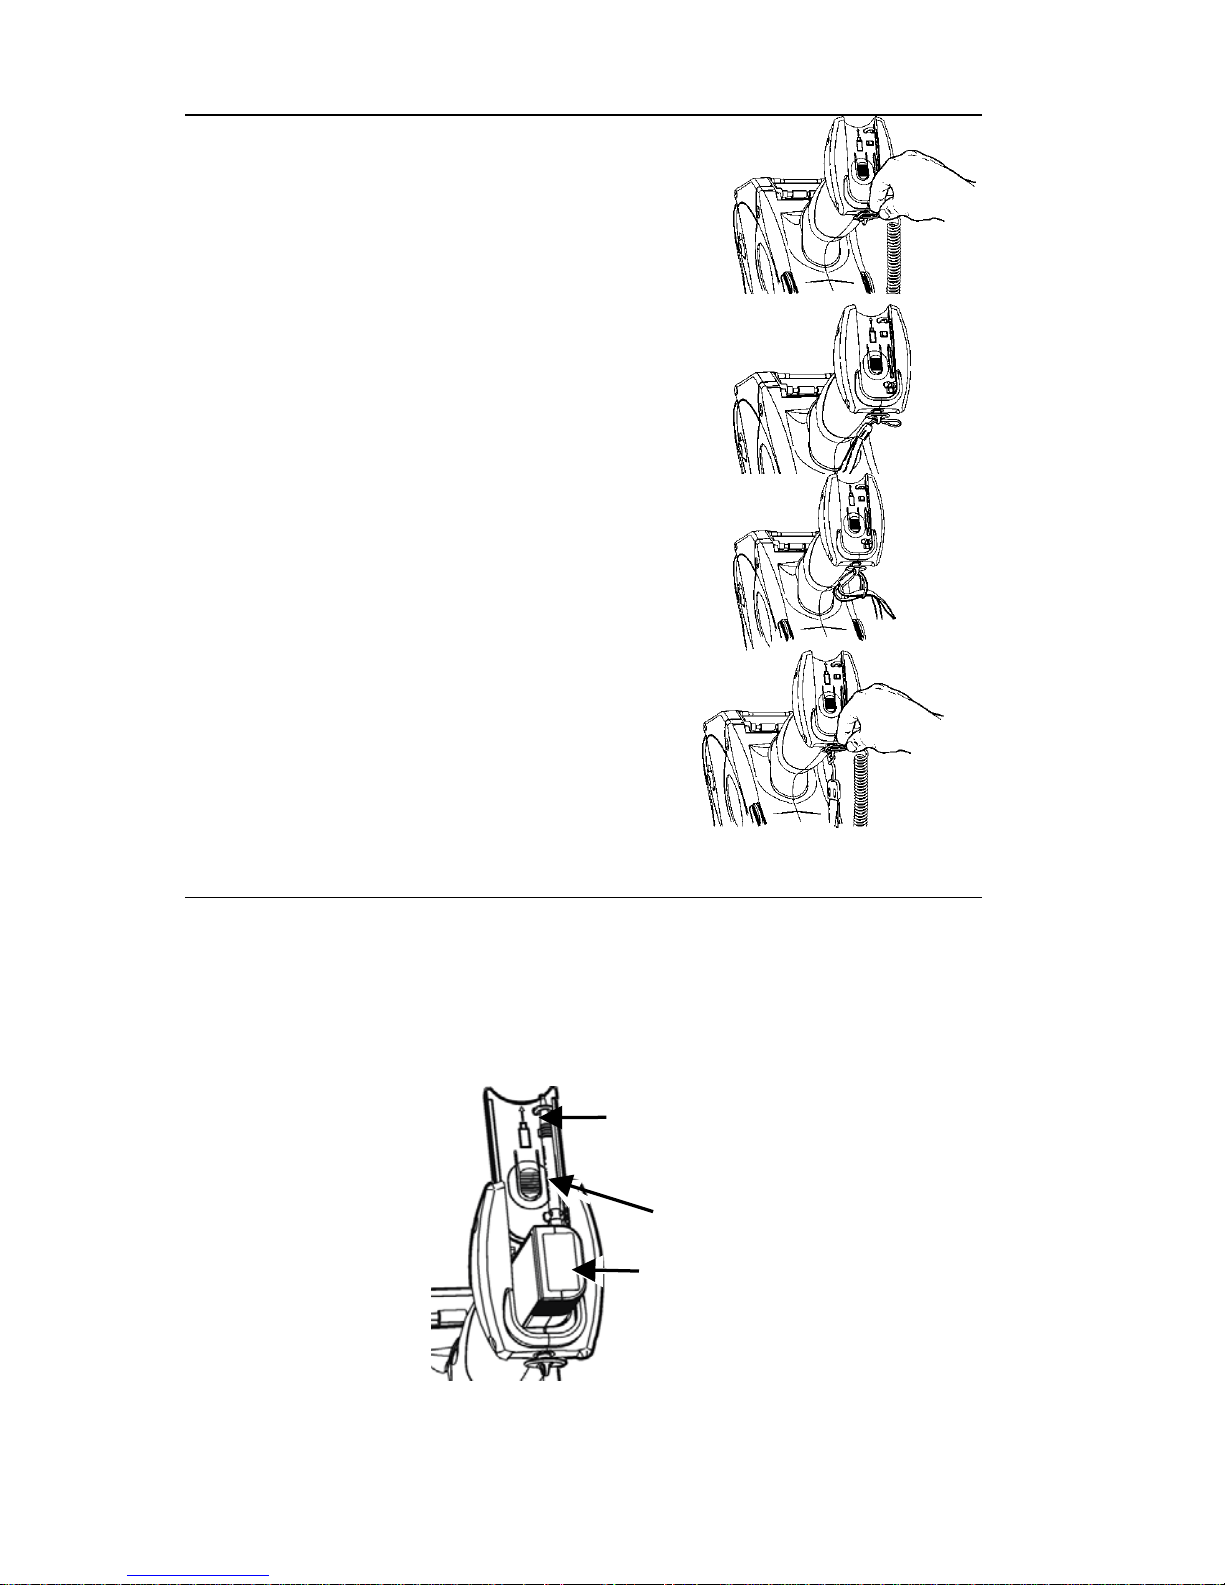
Attaching the Safety Strap
1. Turn the printer upside down,
resting its top in the table.
2. Remove the stylus strap from the
loop.
3. Take the thin end of the safety
strap, and push it through the loop
at the bottom of the printer handle
(near the battery compartment).
4. Push the thick end of the safety
strap through the thin end’s loop.
5. Pull the strap. It may be necessary
to help the thin end’s loop fit over
the plastic piece in the middle of
the strap. Pull the strap tight.
6. Attach the stylus strap to the loop
as shown.
Changing the Main Battery
Always take the main battery out of the printer when
storing the printer for a month or longer.
1. Turn the printer over and press the button on the
battery compartment door (at the bottom of the printer’s
handle) and slide it open.
Main
Battery
Button
Battery
Compartment
Door
2
Page 4
2. Turn the printer upright, holding your palm beneath the
open battery compartment. Hit the printer on your hand
and catch the battery as it slides out.
3. Insert a new battery into the compartment (connector
end first).
4. Slide the compartment door shut until it clicks into
place.
Charging the Backup Battery
Some printers support backup battery charging. Contact
your Service representative for more information.
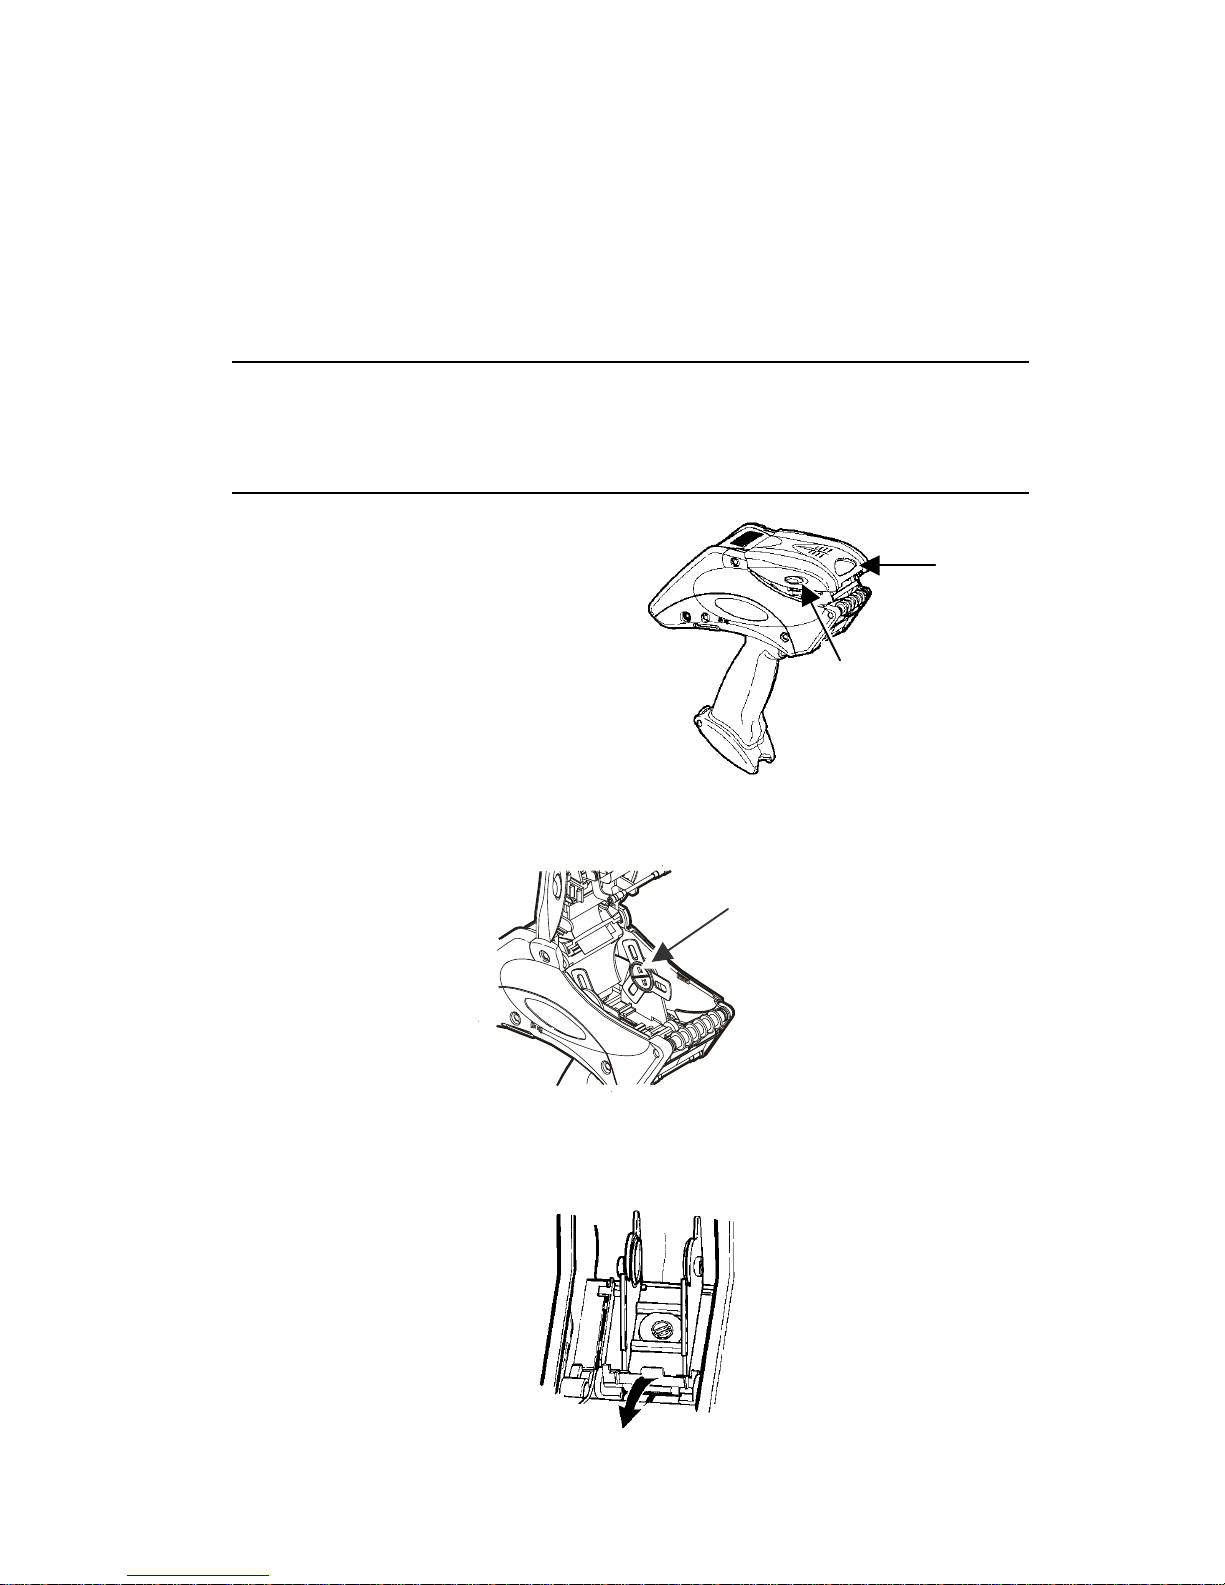
Loading Supplies
1. Turn on the printer.
2. Press the latch buttons
and open the supply
cover.
Supply
Cover
3. Pull back the supply
lock tab.
Latch Buttons
4. Open the spring-loaded
supply holder. Spread
the supply holder tabs
apart with one hand so it adjusts to the size of your
supply roll. You can set it at 1.2”, 1.5”, and 2.0”.
5. Press the supply lock tab down to lock the supply
holder in place.
Supply Holder
3
Page 5

6. Place a roll of supply in the
supply holder so it unrolls from
the bottom.
7. Load the supplies for the printing
mode you want: Peel or NonPeel.
Loading for Non-Peel Mode
1. Feed the supply under the
applicator roller and over the label deflector.
2. Close the supply cover.
3. Select Load Supply from the printer icon menu, choose
your supply type, and then select Calibrate.
Label
Deflector
Applicator Roller
Loading for Peel Mode
1. Peel and discard the first
four inches of labels from
the backing paper.
Label
Deflector
2. Hold the printer upright and
gently press down on the
label deflector. It may be
stiff.
3. Feed all four inches of the backing paper over the peel
bar and under the applicator roller and the label
deflector.
4. Push the label deflector up until it snaps into place.
5. Partially close the cover to the first position.
Peel Bar
Applicator Roller
4
Page 6

6. Pull the backing paper over the guide roller, down to
the pinch and feed rollers.
7. Hold the backing paper edge between the feed and
pinch rollers and press the trigger.
8. Close the cover completely.
9. Select Load Supply from the printer icon menu, choose
your supply type, and then select Calibrate.
Guide Roller
(behind supply)
Pinch Roller
Feed Roller
(behind
Pinch Roller)
Removing Supplies in Peel Mode
♦
♦
♦
♦
Tear the backing paper just above the pinch roller.
Open the supply cover completely.
Spread the supply holder tabs apart and remove the
supply roll.
Carefully pull out the supply backing paper still in place
between the pinch and feed rollers.
Changing the Display Settings
To change the backlight, sound (beep) and other standard
Windows options, from the Start Menu select Settings,
Control Panel.
5
Page 7

Using the Keypad
The printer’s keypad appears below.
Key(s) Description
Enter
Accepts data or a menu selection.
Tab
Tabs to the next tab stop or the next field.
Pressing Fct + Tab backspaces a tab stop or
returns to the previous field.
Fct
Performs an application-defined function
when pressed with a single-digit number.
Esc
Exits the current screen or application.
Alpha
Enters upper case or lower-case alphabetic
mode.
Right
Arrow
Moves the cursor to the right in a menu.
Pressing Fct + right arrow scrolls the cursor
down in a menu.
Left
Arrow
Moves the cursor to the left in a menu.
Pressing Fct + left arrow scrolls the cursor up
in a menu. Backspaces in Alpha mode.
On/Off Turns the printer on and off.
Numeric/
Alphabetic
Displays a numeric digit or letter.
See “Entering Special Characters/Symbols”
for more information.
6
Page 8

Entering Data
Entering data using the keypad is similar to entering data
on a cell phone. There are three data entry modes:
Normal (Numeric) mode – Default. Press the key to
display what appears on the face of the key (numbers).
Lower-Case Alphabetic mode – Press Alpha once to
display lower-case letters. Press the key several times
until you see the letter you need. For example, to select
lower-case c, press Alpha once and 2 three times.
Upper-Case Alphabetic mode – Press Alpha twice to
display upper-letters. Press the key several times until
you see the letter you need. For example, to select uppercase C, press Alpha twice and 2 three times.
Entering Special Characters/Symbols
The table shows how to enter special characters and
symbols when in Lower-case and Upper-case Alpha Mode.
Press
Key
Lower-case Alpha
Mode
Press Alpha Once
Upper-case Alpha
Mode
Press Alpha Twice
1 <space> : < ( ‘ <space> ; > ) “
0 . - + / * . = @ % $
Cleaning the Printer
Do not use sharp objects to clean the printer. Do not use
household cleaners to clean the printer. Use isopropyl
alcohol on the interior areas only (except where specified),
never on the exterior.
Cleaning the Printhead
1. Turn off the printer.
2. Open the supply cover and
remove the supplies.
3. Check the supply holder for
adhesive buildup and clean it if
necessary.
4. Ground yourself by touching a
metal object other than the
printer. Grounding prevents
electrostatic discharge, which may damage the printer.
7
Page 9

5. Clean the printhead area of all adhesive and label
particles using a Monarch Cleaning Pen (#114226) or a
soft cloth moistened with isopropyl alcohol. Allow the
printer to dry before reloading supplies.
Cleaning the Pinch and Feed Rollers
1. Turn off the printer and open the supply cover.
2. Remove the supplies.
3. Turn the platen roller with your fingers and run a dry,
lint-free cloth across the pinch and feed rollers as they
turn. Make sure the rollers are clean all the way
around. If that does not work, use a cloth dampened
slightly with distilled water.
4. Clean any adhesive buildup you see as the rollers turn.
5. Reload the supplies after the printer dries.
Cleaning the Black Mark
Sensor
Black
Mark
1. Turn off the printer and
open the supply cover.
2. Remove the supplies
3. Clean the black mark sensor with a dry cotton swab.
4. Reload the supplies and close the supply cover.
Cleaning the On-Demand Sensor
1. Turn off the printer and open the supply cover.
2. Remove the supplies.
3. Open the label deflector.
On-
Demand
Sensor
4. Clean the on-demand
sensor with a soft cloth
moistened with distilled
water.
5. Reload the supplies
and close the label deflector and supply cover.
8
Page 10

Platen
Roller
Cleaning the Platen
Roller
Clean the platen roller when
you see significant
adhesive build-up or when a
label is wrapped around the
platen roller.
1. Turn off the printer and open the supply cover.
2. Remove the supplies. See “Removing Supplies” in
Chapter 3 for more information.
3. Hold the printer upright and gently press down on the
label deflector. It may be stiff.
4. Use a dry, soft-bristle brush, such as a toothbrush, to
clean the platen roller.
5. Turn the platen roller with your finger and then continue
cleaning.
6. Reload the supplies, close the label deflector and
supply cover.
If the brush does not remove all the adhesive, moisten a
cotton swab with isopropyl alcohol and run the cotton swab
across the platen roller. Turn the platen roller with your
finger to make sure it is clean all the way around. After
cleaning, feed several inches of supply through without
printing to remove any remaining isopropyl alcohol.
Cleaning the Scanner Flex Cable
Occasionally, adhesive
buildup appears on the
scanner flex cable, as shown
below. To clean the cable:
Adhesive
Buildup
1. Turn off the printer and
open the supply cover.
2. Inspect the scanner flex
cable. At any place that
adhesive buildup appears,
clean the cable with 99%
isopropyl alcohol and a
cotton swab.
Scanner
Flex Cable
3. Close the supply cover.
9
Page 11

Cleaning the Scanner Window and Display
Screen
1. Moisten a soft cloth with distilled water.
2. Wipe the window and the display screen until they are
clean.
Clearing Supply Jams
1. Turn off the printer.
2. Open the supply cover completely.
3. Open the label deflector.
4. Remove the supplies.
5. Carefully remove any jammed supply and close the
deflector.
Do not pull the jammed supply out through the front of
the label deflector.
Do not use sharp objects to remove jammed supplies.
6. Remove the extra supply between the pinch and feed
rollers and clean any adhesive buildup.
7. Reload the supplies and close the label deflector.
Troubleshooting
This section lists some common problems and their
solutions.
Problem Solution
Printer does not print.
Switch to a fully-charged
battery.
Load the supply correctly.
Clean the printhead.
Printer does not feed.
Switch to a fully-charged
battery.
Close the supply cover
completely.
Load the supply correctly.
Check the platen roller for
jammed labels.
10
Page 12

Problem Solution
Print has voids or is too
light.
Load the supply correctly /
Check for damage.
Close the supply cover
completely.
Switch to a fully-charged
battery.
Clean the printhead.
Printer partially prints
and fails to respond to
the keypad or trigger.
Re-load the supply or load new
supplies. Clear any supply
jams.
Clean the printhead.
Switch to a fully-charged
battery.
Scanner will not scan a
bar code.
Alter the scan angle and
distance.
Clean the scanner window or
move to a more dimly lit area.
Scan a bar code you have
previously scanned correctly.
Check bar code for voids.
Run a scan test.
Display does not turn
on.
Switch batteries/Make sure
power is on.
Printer and display locks
up.
Push your stylus into the tiny
hole under the left side of
keypad and soft reset the
printer.
11
Page 13

Following are some common error codes you may receive.
See your System Administrator if you receive any codes
not listed here.
12
Code(s) Description
004 – 005
Supply size is incorrect. Reload the
correct supplies.
267 – 271
410 – 413
Communication error. See your System
Administrator.
703 – 704
Load supplies or make sure they are
loaded correctly.
750
Printhead is overheated. Turn off the
printer to let it cool.
751 – 753
Check the supplies to see if they are
loaded correctly.
756
The printer is out of supplies.
Load supplies.
757
The calibrated supply length differs by
plus or minus .25 inches from the format.
Load supplies.
758
Check supply. Either the supply is not
seen, or the on-demand sensor is broken
(purchase optional). Check for a label
jam. Clear the supply path or reload
supplies.
The printer does not recalibrate after this
error.
762 Low battery. Recharge the battery.
763 Waiting to dispense label. Press Enter.
768
Printhead error. See your System
Administrator.
790 – 791
Turn off the printer. Wait two seconds
and turn it back on.
904 – 911
System error. See your System
Administrator.
SYSTEM
ERROR
VECTOR ##
System error. See your System
Administrator.
Error Codes
 Loading...