

Page 1
Monarch Marking Systems
Operator's Handbook
MONARCH@ 9494 TM
THERMAL PRINTER
""'1:~ :;.cr-:""".,~o;r..~ 'tII;,.')(~~~~~
-:" "~~-_.~ ~~.~-,:;
. ."',:..,-.:O;;'-.,,,~~ __;o~_:':r ~~~-~~~';r...~ :v...:...~:'"~~~..~~"<~~~ iiIIIN~fi:.
TC94940HI 12/94
@1994 Monarch Marking Systems, Inc. All Rights Reserved.
~ ,..«;: ~ .
Page 2
Each product and program carries a respective written
warranty, the only warranty on which the customer can rely.
Monarch reserves the right to make changes in the product
and the programs and their availability at any time and without
notice. Although Monarch has made every effort to provide
complete and accurate information in this manual, Monarch
shall not be liable for any omissions or inaccuracies. Any
update will be incorporated in a later edition of this manual.
WARNING
This equipment has bee"ntested and found to comply with the limits for a
Class A digital device, pursuant to Part 15 of the FCC Rules. These
limits are designed to provide reasonable protection against harmful
interference when the equipment is operated in a commercial
environment. This equipment generates,uses, and can radiate radio
frequency energy and, if not installed and used in accordance with the
instruction manual, may cause harmful interference to radio
communications. Operation of this equipment in a residential area is
likely to cause harmful interference in which case the user will be
required to correct the interference at his own expense.
CANADIAN D.O.C. WARNING
This digital apparatus doe$ not exceed the Class A limits for radio noise
emissions from digital apparatus set out in the Radio Interference
Regulations of the Canadian Department of Communications.
Le present appareil numerique n'emet pas de bruits radioelectriques
depassant les limites applicables aux appareils numeriques de la classe
A prescrites dans Ie Reglement sur Ie brouillage radioelectrique edicte
par Ie ministere des Communications du Canada.
NICKEL - CADMIUM RECHARGEABLE
BATTERY. FOR PROPER RECYCLING
OR DISPOSAL, 1-800-231-7700
Ni-Cd
Trademarks
Monarch is a registered trademark of Monarch Marking Systems, Inc.
9494 is a trademark of Monarch Marking Systems, Inc.
Page 3

Preface
This ma nual cont ains i nform atio n abou t the pr inte r ’s
✦ fea tur es and f unct ions
✦ general operation
✦ pro cedur es f or main ten ance an d tro uble shoot ing.
You can pur cha se an op tion al doc ume ntatio n pac kage that
includes:
✦
MPCLII Packet Reference Manual
desig n labe ls, cr eate f ormat s, an d use on lin e com mands
to control the printer.
✦
MPCLII Graphics Manual
print graphics with the printer.
—explains how to create and
Audience–––––––––––––––––––––––––––––––––––––––––––––––––––
The
Operator’s Handbook
and applying labels.
is design ed fo r the per son pr intin g
—explains how to
i
Page 4

9494 Operator’s Handbook
Terms to Know –––––––––––––––––––––––––––––––––––––––––––––
continuous mode Print mode in which a format and data with a
specifi c quantity are sen t to the printer to be
printed in one continuous strip.
download (send) Transmission of data from the host to your
printer.
format Data stream that contains the speci fic label
design for printing data.
host Any mainframe, minicomputer, data collect
terminal or personal computer.
label da ta Data stream that contains the actual data
printed on a l abel.
non-peel mode Feed mode in which the printer prints and
dispenses labels without peeling them from the
backing paper.
on-demand mode Print mode in which the printer prints and
dispens es one label at a time.
peel mode Feed mode in which the printer prints and
dispenses one peeled label at a time.
online Direct communication between a computer and
the printer.
System
Administrator
trigger Button used to feed and print labels, clear
ii
Individual responsible for creating and
downloading data streams.
errors, and print a test label.
Page 5

Table of Contents
1. Installation . . . . . . . . . . . . . . . . . . . . . . . . . . . . . . . . . . . . . . . . . 1-1
Power Supply . . . . . . . . . . . . . . . . . . . . . . . . . . . . . . . . . . . . 1-1
Connecting the Power Cord . . . . . . . . . . . . . . . . . . . . . . . . . 1-2
Connecting the Communicati o ns Cab le . . . . . . . . . . . . . . . .1-3
Communication Value s . . . . . . . . . . . . . . . . . . . . . . . . . . . . 1-4
2. Loading Ribbon and Supplies . . . . . . . . . . . . . . . . . . . . . . . . . 2-1
Loading Ribbon . . . . . . . . . . . . . . . . . . . . . . . . . . . . . . . . . . . 2-3
Reloading a Ribbon Cassett e . . . . . . . . . . . . . . . . . . . . . . . . 2-4
Loading Supplies . . . . . . . . . . . . . . . . . . . . . . . . . . . . . . . . . .2-6
Loading for Peel Mode . . . . . . . . . . . . . . . . . . . . . . . 2-7
Loading for Non-Pee l Mode . . . . . . . . . . . . . . . . . . 2-11
3. Printing . . . . . . . . . . . . . . . . . . . . . . . . . . . . . . . . . . . . . . . . . . . .3-1
Printing in On-Demand Mode . . . . . . . . . . . . . . . . . . . . . . . . 3-1
Canceling a Print Job . . . . . . . . . . . . . . . . . . . . . . . . 3-2
Printing in Continuous Mode . . . . . . . . . . . . . . . . . . . . . . . . . 3-2
Interrupting a Print Job . . . . . . . . . . . . . . . . . . . . . . . 3-3
4. Care and Maintenance . . . . . . . . . . . . . . . . . . . . . . . . . . . . . . . . 4-1
Clearing Label Jams . . . . . . . . . . . . . . . . . . . . . . . . . . . . . . .4-2
Cleaning . . . . . . . . . . . . . . . . . . . . . . . . . . . . . . . . . . . . . . . . 4-3
5. Troubleshooting . . . . . . . . . . . . . . . . . . . . . . . . . . . . . . . . . . . . . 5-1
Printing a Test Label . . . . . . . . . . . . . . . . . . . . . . . . . . . . . . . 5-1
LED Indicator . . . . . . . . . . . . . . . . . . . . . . . . . . . . . . . . . . . . 5-3
Problems and Solution s . . . . . . . . . . . . . . . . . . . . . . . . . . . . 5-4
iii
Page 6

9494 Operator’s Handbook
6. Specifications and Accessories . . . . . . . . . . . . . . . . . . . . . . . . 6-1
Specifications . . . . . . . . . . . . . . . . . . . . . . . . . . . . . . . . . . . . 6-1
Label Sizes . . . . . . . . . . . . . . . . . . . . . . . . . . . . . . . . . . . . . . 6-2
Accessories . . . . . . . . . . . . . . . . . . . . . . . . . . . . . . . . . . . . . . 6-2
Cable Pin Outs . . . . . . . . . . . . . . . . . . . . . . . . . . . . . . . . . . . 6-3
iv
Page 7

Chapter 1. Installation
This printer is a tabletop, online-only unit used to print labels.
When you first receive the printer, you must:
✦ Conn ect t he pow er cord to the p rint er. See "Conne cti ng
the Power Cord."
✦ Load your labels. See Chapter 2, "Loading Ribbon and
Supplies."
✦ Print a test label to make sure the printer operates. See
Chapte r 5, "Trou blesh ooti ng."
✦ Co nnect the pri nter to a hos t to dow nload form ats an d
label data. See "Connecting the Communications
Cable."
✦ Make sure communication values at the printer and the
host are the sa me. D efault com munic ation valu es ar e
listed in "Communication Values." To change the default
values, contact your company’s host support person or
see the
MPCLII Packet Reference Manual
.
Power Supply ––––––––––––––––––––––––––––––––––––––––––––––
The printer is shipped with an internal power supply that is
universal for all input power sources.
✦ Voltage r ange : 90–2 60v
✦ Fr eque ncy r ange : 50–60H z
1-1
Page 8

9494 Operator’s Handbook
Connecting the Power Cord ––––––––––––––––––––––––––––––––––
Before you plug or unplug the power cord, turn the printer off.
To connect the power cord:
1. Turn the printer off. (I) indicates on and (O) indicates off.
2. Turn the printer as shown.
3. Insert the power cord into the socket as shown below.
1-2
Power Cord
Socket
4. Plug t he othe r end o f the po wer cor d into a grou nded
electrical outlet of the correct voltage.
WARNING: The power supply cord is intended to serve as the
disconnect device. The socket-outlet shall be
near the equipment and shall be easily accessible.
Page 9
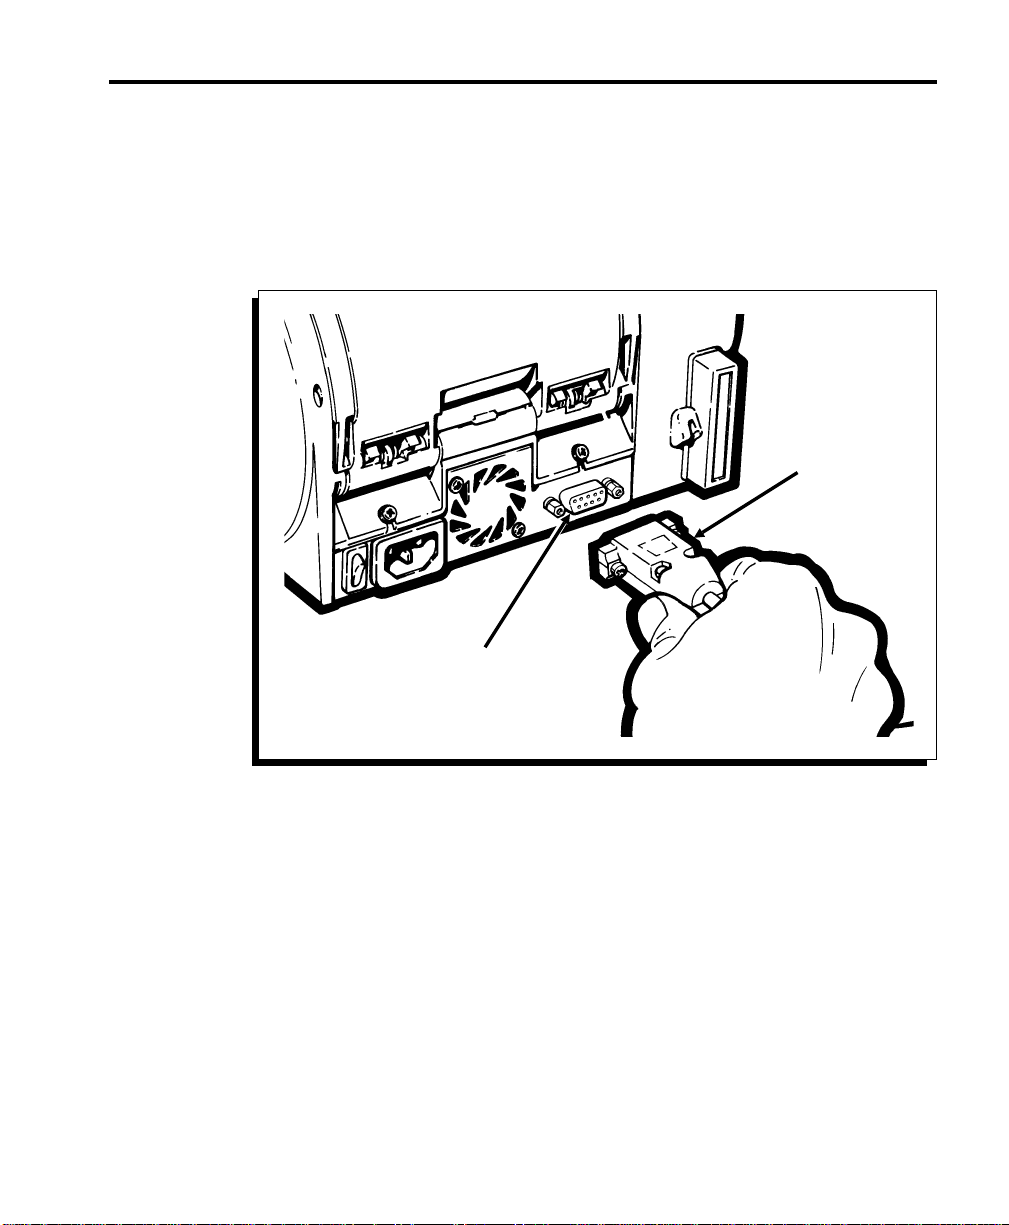
Chapter 1. Installation
Communications
Cable
Communications
Port
1-3
Page 10

9494 Operator’s Handbook
Connecting the Communications Cable –––––––––––––––––––––––
Before receiving data, you must connect the communications
cable to the host and to the printer. Connect the
communications cable to your communications port as shown
below.
1-4
Page 11

Chapter 1. Installation
Communication Values ––––––––––––––––––––––––––––––––––––––
In order for your printer to communicate with your host, you
must make sure the communication values are set to the same
values. Here are the default values with which the printer is
shipped:
✦ Baud: 9600
✦ Word Length: 8-bit data frame
✦ Stop Bits : 1-sto p bit
✦ Parity: none
✦ Fl ow Cont rol: DTR
To change the printer’s communication values, contact your
company’s host support person or see the
Refer ence M anu al
.
MPCLII Packet
1-5
Page 12

Page 13
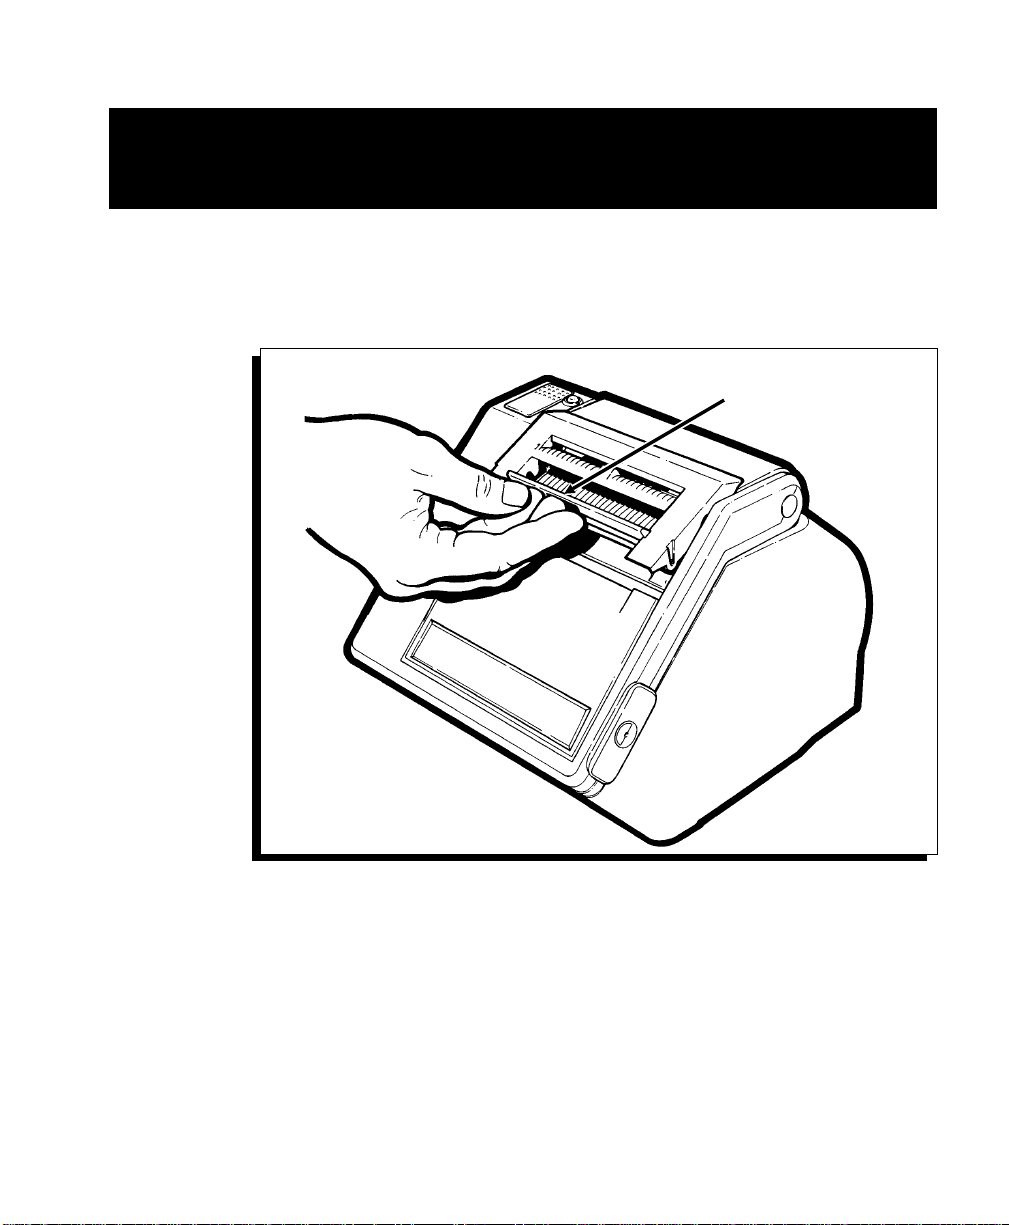
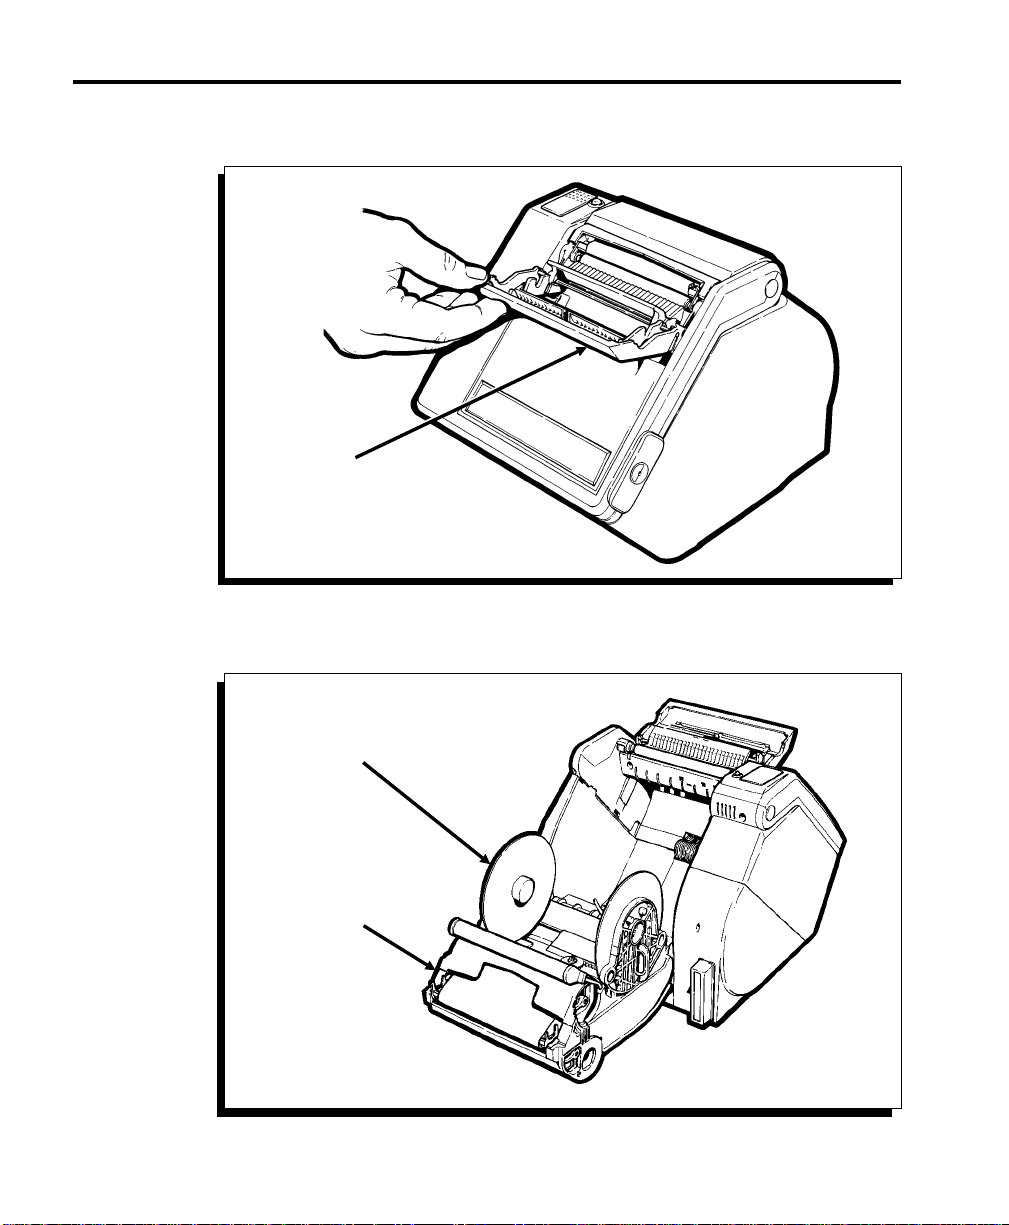
Chapter 2. Loading Ribbon and Supplies
Before loadin g ri bbon or label s, you must op en the p rin ter:
1. Insert your fingers into the depression beneath the face
plate and pull up.
Face Plate
2-1
Page 14
9494 Operator’s Handbook
2. Pull th e labe l gui de for war d and down as s hown .
Label Guide
Front View
2-2
3. Push the printhead assembly toward the rear of the printer
until it opens completely.
Supply Holder
Ribbon Cassette
Rear View
Page 15

Chapter 2. Loa ding Ribbon and S upplies
4. To close the printer, push the printhead assembly toward
the front of printer, close the label guide and latch the face
plate into place.
Loading Ribbon–––––––––––––––––––––––––––––––––––––––––––––
Use ribbon only when printing on thermal transfer labels.
To load the ribbon cassette into the printer:
1. Open the printer and remove the ribbon cassette.
2. Slide a new ribbon cassette onto the printhead assembly
until it slips into place.
Ribbon Cassette
Printhead Assembly
3. Close t he pr i nte r.
Make sure the ribbon is wound tightly inside the cassette
befor e you c lose t he pri nter. See " Reloa din g a Ribb on
Cassette" to wind the ribbon.
2-3
Page 16

9494 Operator’s Handbook
Reloading a Ribbon Cassette–––––––––––––––––––––––––––––––––
To reload your ribbon, remove the ribbon cassette from the
printer and follow these steps:
1. Locate the end of the cassette with the two latches.
Locate the International Symbols for opening and closing.
( )indicates the cassette is locked (closed). ( )indicates the
cassette is unlocked (open).
2. Rotate both latches until they snap into the unlocked
position.
3. Lift off the half of the cassette without the latches and set it
aside.
2-4
Take- up
Reel
Ridged End of
Take-up Reel
Latch
Gear
Ribbon
Roll
Spool
Foam
Washer
Latch
4. Remove the used ribbon and take-up reel and discard.
Open a package of new ribbon.
Page 17

Chapter 2. Loa ding Ribbon and S upplies
DO NOT wrinkle or crush the ribbon.
5. With the ridged end of the take-up reel facing down, place
the ribbon roll on the spool with the foam washer (on the
half of the cassette with the latches).
6. Feed th e ribb on ar ound the gu ides an d plac e the t ake -up
reel on to the s hor ter spoo l.
7. Twist the rib bon ro ll back and for th as y ou fi rmly pu sh it
down un ti l it i s s eat e d on th e sp oo l.
Do not force the ribbon roll down onto the spool; you could
damage the foam washer. Also, make sure the preprinted side
of the ribbon faces out. Make sure the latches are still in the
unlocked position ( ) before fitting the two halves of the
cassette together.
8. Replace the other half of the cassette. The two halves
should fit together completely.
9. Rotate the latches until they click into the locked
position ( ).
10. Check t o make s ure that the r ibbon is loa ded co rrec tly an d
that the ribbon is wound tightly inside the cassette. Turn
the gear coun ter clockw ise w ith your f inger s un til the b lack
portion of the ribbon is exposed.
11. If the ribbon does not advance, or if it is hard to turn the
gear, repeat the loading procedure.
2-5
Page 18

9494 Operator’s Handbook
Loading Supplies –––––––––––––––––––––––––––––––––––––––––––
We recommend synthetic labels when printing serial or
high-d ensit y bar c odes. Use only pap er lab els for peel mo de.
For label sizes, see Chapter 6, "Specifications and
Accessories."
You can load your supplies to
✦ peel
✦ feed without peeling.
Refer to the following sections for information on loading for
peel an d non- peel modes .
2-6
Page 19

Loading for Peel Mode
Use onl y pape r label s for pee l mode.
Peel mo de sepa rat es labe ls from the ba ckin g pape r. Make
sure th e appr opri ate co nfigur atio n recor d has been
downlo aded so the p rin ter pr ints in on- deman d mode . The
print er defa ult is on-dem and. For m ore in format ion, conta ct
your compan y’s hos t supp ort person or se e the
Refer ence M anu al
Before loading labels, make sure the label path is clean. See
Chapter 4, "Care and Maintenance."
To load your labels:
1. Open the printer.
2. Use th e handl es on the sid es of t he supp ly ho lder s to
spread the sup ply hol ders apar t to th e widt h of you r supp ly.
Chapter 2. Loa ding Ribbon and S upplies
MPCLII Packet
.
Supply
Holder
Supply
Holder
Handle
2-7
Page 20

9494 Operator’s Handbook
3. Insert the roll of labels between the supply holders inside
the printer.
4. Use the handles on the supply holders to press the supply
holders together unt il they lock into the label ro ll.
Supply
Holder
Handle
2-8
Make sure the supply holders are pressed against the supply
roll. Also, make sure the label roll turns freely in the supply
well.
Page 21

Chapter 2. Loa ding Ribbon and S upplies
5. Feed the label strip through the lower opening in the label
guide.
Label Guide
Rear View
Lower Opening
in Label Guide
6. Keep li ght ten sio n on the la bel s trip w hile li ftin g the ba ck of
the pr inth ead asse mbl y.
Printhead
Assembly
Front View
2-9
Page 22

9494 Operator’s Handbook
7. Close t he pr i nte r.
Make sure the ribbon is wound tightly inside the ribbon
cassette before you close the printer. See "Reloading a
Ribbon Cassette" to wind the ribbon.
Lower
Opening
Upper
Opening
Label
Guide
2-10
8. Turn the printer on.
9. Wait until the LED flashes one time (about five seconds)
and then press the trigger. The printer calibrates the label
strip for printing. When you print, labels peel automatically
through the upper opening in the label guide and the
backing paper exits out the lower opening.
Trigger
LED
The LED slowl y alt ernat es flas hin g ambe r and gr een to
indicate the printer is out of labels. When this happens, load a
new roll of labels and press the trigger to clear the error.
Page 23

Loading for Non-Peel Mode
Non-peel mode feeds the labels through the printer without
peelin g the m from the ba ckin g pape r.
Before loading labels, make sure the label path is clean. See
Chapter 4, "Care and Maintenance."
To load your supplies:
1. Open the printer.
2. Use th e handl es on the sid es of t he supp ly ho lder s to
spread the sup ply hol ders apar t to th e widt h of you r supp ly.
Supply
Holder
Chapter 2. Loa ding Ribbon and S upplies
Supply
Holder
Handle
2-11
Page 24

9494 Operator’s Handbook
3. Insert the roll of supply between the supply holders inside
the printer.
4. Use the handles on the supply holders to press the supply
holders together until they lock in to the supply roll.
Supply
Holder
Handle
2-12
Make sure the supply holders are pressed against the supply
roll. Also, make sure the supply roll turns freely in the supply
well.
Page 25

Chapter 2. Loa ding Ribbon and S upplies
5. Feed th e labe l strip thro ugh the uppe r openi ng in the labe l
guide.
Label Guide
Rear View
Upper Opening
in Label Guide
6. Keep li ght ten sio n on the la bel s trip w hile li ftin g the ba ck of
the pr inth ead asse mbl y.
Printhead
Assembly
Front View
2-13
Page 26

9494 Operator’s Handbook
7. Close t he pr i nte r.
Upper
Opening
Label
Guide
Lower
Opening
2-14
Make sure the ribbon is wound tightly inside the ribbon
cassette before you close the printer. See "Reloading a
Ribbon Cassette" to wind the ribbon.
8. Turn the printer on.
9. Wait until the LED flashes one time (about five seconds)
and then press the trigger. The printer calibrates the label
strip for printing.
Trigger
LED
The LED slowl y alt ernat es flas hin g ambe r and gr een to
indicate the printer is out of labels. When this happens, load a
new roll of labels and press the trigger to clear the error.
Page 27

Chapter 3. Printing
Data packets may be downloaded from a portable host device
or may be downloaded from another host.
You can print labels in these modes:
✦ On-demand (peel mode)
✦ Cont inuo us (no n-pe el mode ).
Printing in On-Demand Mode ––––––––––––––––––––––––––––––––
In on-demand mode, the printer prints and dispenses one label
at a time until the quantity downloaded is reached. To print
labels on de mand:
1. Load the labels for peel mo de. See Chapt er 2, "L oadi ng
Ribbon a nd Su ppl ie s. "
Use only paper labels in pee l mode.
2. Make su re a da ta pac ket con taini ng a for mat an d labe l dat a
record is download ed. For mo re info rmation , conta ct your
company’s host support person or see the
Refer ence M anu al
3. After the data packet is downloaded, the LED rapidly blinks
green (1/4 sec) to indicate the printer is ready to print. The
first la bel i n a batch pri nts abou t thre e seco nds af ter the
printer receives the data stream.
.
MPCLII Packet
3-1
Page 28

9494 Operator’s Handbook
4. Remove the printed label or press the trigger to print the
next label in the batch.
Trigger
LED
Canceling a Pri nt Job
To cancel the current print job, hold down the trigger until the
LED sto ps bl inki ng and displ ays so lid gr een. The bat ch is
canceled and the data is lost. To resume printing, you must
downlo ad th e batc h agai n.
Printing in Continuous Mode ––––––––––––––––––––––––––––––––
In this mode, a format and data packet with a specific quantity
of labels are sent to the print er. The labels print in one
contin uous s trip .
To print in Continuous Mode:
1. Load the supplies for non-peel mode. See Chapter 2,
"Loading Ribbon and Supplies."
2. Make su re a form at an d data pa cket are d ownlo aded . For
more information, conta ct your co mpany’s host su pport
person or see the
MPCLII Packet Reference Manual
.
3-2
3. After the data packet is downloaded, the LED is solid
amber t o indi cate the pri nter is ready to pri nt and la bels will
print auto matically.
4. After all the labels in the batch print, remove the label strip
from the printer.
DO NOT jerk or pull labels strongly against the printhead. This
may cause a label jam.
Page 29

Interrup ti ng a Print Job
You can pause or cancel the current print job:
✦ To pause the cur rent pr int jo b, pr ess the trig ger on ce.
The cur rent prin t job st ops te mpor ar ily. To resum e
printi ng, pr ess th e trig ger a gain.
✦ To cancel the current print job, hold down the trigger
until the printing stops. The batch is canceled and the
data is lost. To resume printing, you must download the
batch da ta ag ain.
You canno t cance l a pr int job w hen there is an er ror in the
printer until you press the trigger to acknowledge the error.
Chapter 3. Printing
Trigger
LED
3-3
Page 30

9494 Operator’s Handbook
3-4
Page 31

Chapter 4. Care and Maintenance
DO NOT use sharp objects to clean the printer. This may
damage the printer and void your warranty.
This chapter tells you how to:
✦ clear label jams
✦ clean the printhead, peel blade, and platen roller.
4-1
Page 32

9494 Operator’s Handbook
Clearing Label Jams–––––––––––––––––––––––––––––––––––––––––
When you are pr inti ng and a jam oc curs, the LED flas hes
amber and green.
To clear a label jam:
1. Turn the printer off and open the printer.
2. Remove the label roll .
4-2
3. Remove the jammed labels and reload the label roll.
4. Close the printer and turn it on.
5. Press the trigger to resynchronize the labels.
Page 33

Chapter 4. Care and Maintenan ce
Cleaning –––––––––––––––––––––––––––––––––––––––––––––––––––
You may need to clean the printhead, platen roller, and peel
blade:
✦ afte r 8 rolls of supplies
✦ daily if your printer is in an excessively dirty, hot, or
humid en viro nmen t
✦ when you see voids in the print.
To clean the print hea d, pla ten rol ler, and p eel bla de:
DO NOT touch the printhead with your hands. This may
damage the printhead.
1. Turn the po wer off and op en the p rin ter.
2. Remove the label roll and ribbon cassette (when cleaning
the pr inth ead) .
4-3
Page 34

9494 Operator’s Handbook
3. Moisten a cotton swab with alcohol. Rub it back and forth
acros s the pr inthea d, pl aten ro lle r, and peel bl ade to
remov e buil d-up . Mak e sure t he pr inth ead, pl aten roll er,
and peel blade are clean.
Printhead
Platen
Roller
4-4
Peel Blade
4. Let the printer dry and reload your supplies.
Page 35

Chapter 5. Troubleshooting
The pri nter uses a comb inat ion of light s to dis pla y a var iety of
printer states. See the "Problems and Solutions" section for
those requiring further actions.
When an erro r occurs that you ca nnot c lear, print a t est lab el
before calling Service or sending the printer in for repai r.
Printing a Test Label ––––––––––––––––––––––––––––––––––––––––
Turn the printer off and disconnect the host from the printer
before printing a test label. While printing the test label, the
printer sends a character string to the communications port.
This c ould cause prob lems at the ho st.
Before you call for service, print a test label. The label
contai ns in format ion t o help Service diagn ose mechan ical and
setup problems. To print a test label, hold the trigger down
and turn the printer on. The LED remains off for 1 second,
turns a mber f or ap proxim atel y 2 seco nds , and th en turn s off
again. Release the trigger as soon as the amber LED turns off.
Trigger
LED
5-1
Page 36

9494 Operator’s Handbook
If the printer is in on-demand mode, the LED rapidly blinks
green. Press the trigger to dispense the test label. If the
printer is in continuous mode, a test label prints automatically.
The tes t labe l disp lay s the f ollow ing infor mati on:
✦ Mode l number
✦ Software version
✦ Inches printed
✦ COMM port settings
✦ Printhead information
5-2
✦ Test pattern.
Turn the printer off and then back on to return to normal
printing.
Page 37

Chapter 5. Troubleshooting
LED Indicator ––––––––––––––––––––––––––––––––––––––––––––––
This t able e xpla ins th e mean ings of var ious LED st ates. Use
the colo r of the LED an d whet her it is so lid, bl inki ng slow ly, or
blinking rapidly to determine the meaning of the indicator.
LED States Solid Fast Blink
(1⁄4 second)
GREEN Ready...
On-Demand
AMBER
AMBER/
Ready...
Continuous
N/A Hardware
GREEN
Label Ready N/A
Error Printhead Hot...Wait
Error
Slow Blink
(2 seconds)
Firmware
Error
5-3
Page 38

9494 Operator’s Handbook
Problems and Solutions –––––––––––––––––––––––––––––––––––––
This section helps you correct some problems that may occur.
If you ca nnot fix a pr oblem , pl ease co ntac t Ser vice.
Problem Solution
Prints blank labels. (Thermal transfer models only) Check ribbon
and reload if necessary.
Printed supply has
voids or is too light.
Printer does not start. Make sure the power cord is connected to the
Make sure the supplies are loaded correctly.
Check the supplies for damage or defects.
Reload supplies or ribbon if necessary.
Check the roller for jammed labels.
Check the supply type. Download the correct
supply type command.
Check the contrast adjustment. Download
the correct contrast adjustment command.
Clean the printhead. See "Care and
Maintenance."
printer and plugged into a live outlet. Call
Service.
5-4
Page 39

Chapter 5. Troubleshooting
Problem Solution
Printer does not print. Make sure the power cord is connected to the
printer and plugged into a live outlet.
Make sure the printer is not paused.
Make sure the correct commands have been
downloaded.
Make sure the supplies are loaded correctly.
Make sure the communications cable is
connected.
Printer does not feed. Reload the supplies.
Verify that the ribbon is not out and that a
label is not jammed in the label path.
Slow or sluggish
feeding.
Label Jam. Remove jammed labels.
No LED. Make sure the power is on.
Make sure the supplies are loaded correctly.
Check for adhesive build-up in the feed path
and on the peel blade.
Clean the printer.
Make sure the power supply is connected to
the printer and plugged into a live outlet.
5-5
Page 40

9494 Operator’s Handbook
5-6
Page 41

Chapter 6. Specifications and Accessories
Specifications ––––––––––––––––––––––––––––––––––––––––––––––
Height: 8 inches (203 mm)
Width: 8.1 inches (206 mm)
Depth: 10.5 inches (267 mm)
Weight: 6. 3 l b. (2.86 kg.) without suppli es
S t o r a g e L i mi t s : 15˚F to 120˚F
(-9˚C to 49˚C)
O perat ing Limi ts: Thermal Direct: 40˚F to 110˚F
(4˚C to 43˚C)
Thermal Transfer: 40˚F to 95˚F
(4˚C to 35˚C)
P ower Source: Internal, universal power supply
(Voltage range: 90–260v. Frequency range:
50–60Hz)
P rinting: Thermal direc t
Thermal transfer
Supply Types: Paper and synthetic labels
Memory: 2K of EEROM
256K of ROM
Optional additional 256K of ROM
256K of RAM
2K Receive Buffer
Optional additional 256K of RAM
6-1
Page 42

9494 Operator’s Handbook
Label Sizes–––––––––––––––––––––––––––––––––––––––––––––––––
The printer lets you print labels 2.0 inches (50 mm) to 4.0 (102
mm) in ches w ide and up to 6. 0 inche s (152 mm) lo ng.
The standard stocked label lengths include:
1.0 inch (25 mm)
2.0 inch (51 mm)
4.0 inch (102 mm)
6.0 inch (152 mm)
Accessories ––––––––––––––––––––––––––––––––––––––––––––––––
✦ Cables - (to various host devices)
✦ Cl eanin g Sup plies
✦ Optional Fonts
6-2
For more information about these products, call your Sales
Repres e nta ti ve.
Page 43

Chapter 6. Specifications and Accessories
Cable Pin Outs –––––––––––––––––––––––––––––––––––––––––––––
The fol low ing ta ble de scri bes th e cabl e pin outs f or the pr in ter
connection. The printer uses a male 9-pin RS-232 connector.
Pin Description Direction
1 DTR or +5 vdc Output
2 RxD Input
3 TxD Output
4 DTR Output
5SGND 6 DSR Input
7 RTS Output
8 CTS Input
9N/C -
6-3
Page 44

9494 Operator’s Handbook
6-4
Page 45

Page 46

PrintedinU.S.A.
!
 Loading...