

Page 1

MONARCH 9493™
VEHICLE MOUNT INSTRUCTIONS
Using the vehicle mount, you can attach your Monarch Sierra Sport4™
9493 printer to a forklift or other vehicle.
This document describes how to install and use the vehicle mount with the
printer.
Installing the Battery
The printer has a battery for power; however, it uses the vehicle’s battery to
keep the printer’s battery charged. The input voltage range is 12-72V.
Refer to the printer’s Operator’s Handbook available on our Web site
(www.monarch.com) for important battery information.
1. Turn off the printer when you change batteries.
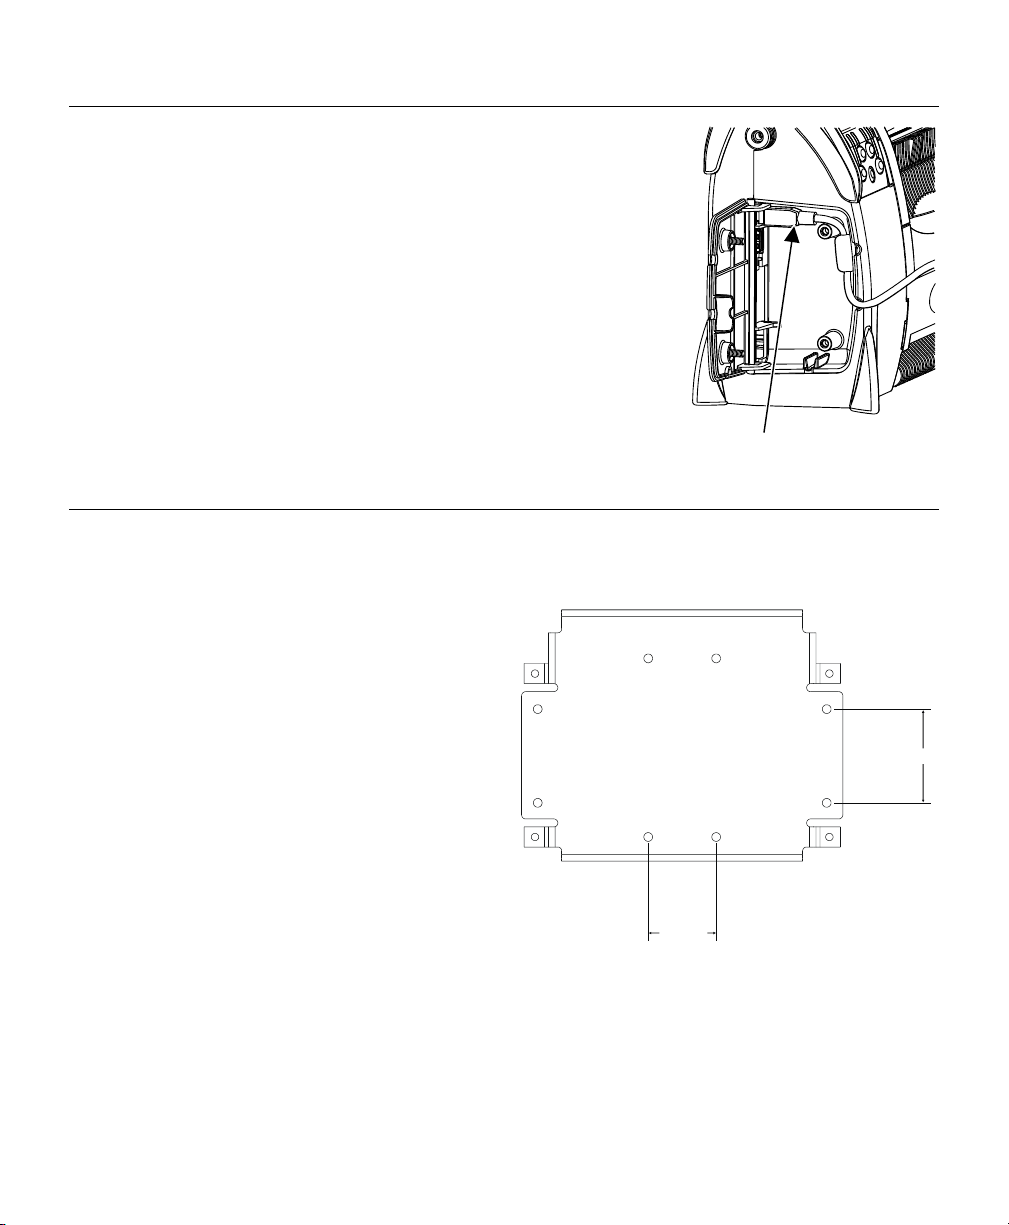
2. Lay the printer down so the back of the printer faces up.
3. Remove the plastic from a new battery.
4. Slide the battery into the battery well in the bottom of the printer until it
latches into place.
Latch
TC9493VMOI Rev AA 12/08 ©2008 Avery Dennison Corporation.
All Rights Reserved.
Page 2
Connecting the Communications Cables
m
The printer uses either 9-pin serial communications or
USB communications. For best results, use only
Monarch® cables.
1. Open the hinged cable door on the side of the
printer by loosening the two screws with a Phillips
screwdriver.
2. Plug the DB9 connector into the DB9 serial port,
or plug the type A or mini-B USB connector into
the appropriate USB port.
3. Place the cable in one of the cable cavities.
4. Close the cable door and tighten the screws.
USB cable
Installing the Mount
The vehicle mount is 9.5 inches (240 mm) wide and 7.5 inches (187.5 mm)
long.
Following is a list of the mounting
hardware included with the vehicle
mount:
♦ four M6 60x2¼-inch screws
(3/16-inch hex)
♦ four lock washers
♦ one mounting plate
♦ two aluminum strap buttons
♦ one M3 allen wrench
50.80 mm
Overhead view of mount showing location
and spacing of mounting holes.
70.0 m
2
Page 3
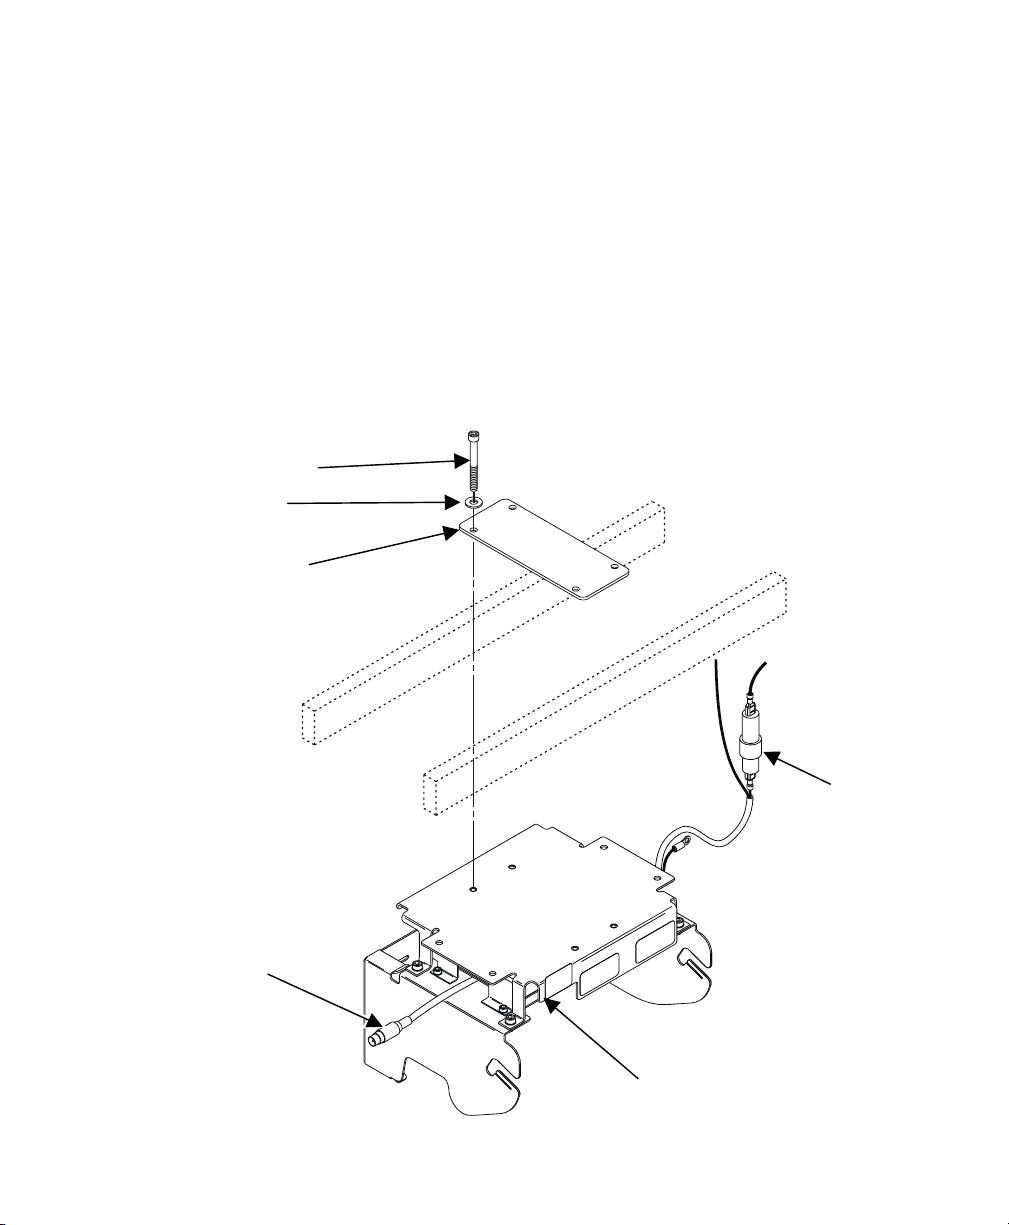
Installing Overhead (Recommended)
1. Select a suitable location for the mount on your vehicle.
2. If using the mounting plate, center the mounting plate on your vehicle’s
overhead rails.
3. Align the four holes in the vehicle mount with the holes in the mounting
plate.
4. Use the four mounting screws and lock washers to attach the vehicle
mount to your vehicle.
5. Wire the printer to your vehicle as needed. See “Electrical
Specifications” for input information.
Mounting screw
Lock washer
Mounting plate
Battery
charging cable
Fuse holder
LEDs
3
Page 4

Installing Vertically or on a Tabletop
1. Select a suitable location for the mount on your vehicle.
2. If using the mounting plate, align the four holes in the vehicle mount with
the holes in the mounting plate.
3. Use the four mounting screws and lock washers to attach the vehicle
mount to your vehicle.
4. Wire the printer to your vehicle as needed. See “Electrical
Specifications” for input information.
Note: If you install the vehicle mount on a tabletop, you need to rotate the
display. Refer to the printer’s Operator’s Handbook available on our
Web site for more information.
Battery
charging cable
Mounting plate
LEDs
Mounting
screw
Lock
washer
Vertical mounting position
4
Fuse holder
Page 5

Attaching the Printer
To attach the printer on the vehicle mount:
1. Use the M3 allen wrench to remove the plastic strap buttons on each
side of the printer and replace them with the aluminum buttons included
with the vehicle mount hardware.
2. Make sure the printer’s battery and communication cable are installed.
3. Insert the printer into the slots on the vehicle mount using the strap
buttons as a guide.
Printer slots
Aluminum strap
button
4. Push down firmly on the printer so it locks completely in place.
5
Page 6

5. Plug the battery charging cable into the battery socket on the back of
the printer.
Battery charging
Reading the LEDs
Three LEDs on the vehicle mount indicate the following activity:
LED Indicators Status
Blue
Green
Amber blinking error (call Service)
6
on power is on
off power is off
off no battery
one blink battery pre-charge
two blinks battery is charging
three blinks usable battery (80% capacity)
on battery charging is complete
Page 7

Printing
Refer to the printer’s documentation for information on loading supplies and
printing.
Replacing the Fuse
The vehicle mount uses a 10-amp, 125-volt fuse (order part 127983).
The fuse is located on the cable on the right side of the vehicle mount.
To replace it:
1. Push in and twist the fuse holder counterclockwise to open it.
2. Remove the fuse.
3. Insert a new fuse of equal rating. The replacement fuse must have a DC
voltage rating of at least 125 volts.
4. Place the two halves of the fuse holder together and push in and twist
clockwise to tighten it.
Fuse holder
7
Page 8

Electrical Specifications
Output is electrically isolated from the input. Output common is not
connected to the forklift module chassis. It can be jumpered internally to the
chassis. Call Service for more information.
For printer specifications, refer to the Operator’s Handbook.
Supported Input Voltages
12V, 24V, 36V, 48V, 60V, 72V
Input Power
36 watts max at 12 volts
50 watts max at 72 volts
Input Current
To determine the input current, divide the input power (watts) by the input
voltage.
Input Voltage Range
The printer accommodates 12-72 volt systems. The input is transient
protected.
Operating Temperature
32-104°F (0-40°C)
0-95% humidity (non-condensing)
8
 Loading...