

Page 1

Monarch 9400™ Series
Thermal Printe r
User’s Manual
TC9400UM Rev. C 4/95 ©1988 Monarch Marking Systems, Inc. All rights reserved.
Page 2

Each product and program carries a respective written
warranty, the only warranty on which the c ustomer can rel y.
Monarch reserves the rig ht to make changes in the product
and the programs and their availability at any time and without
notice. Although Monarch has made every effort to provide
comple te and accurate information in thi s manual, Monarch
shall not be liable for any omissions or inaccuracies. Any
update will be incorporated in a late edition of this manual.
CAUTION
This equipment can interfere with radio communication.
The equipment complies with limits for a Cla ss A
computi ng device pursuant to FCC Rules, Subpart J, Part
15, which pr ovide reasonable protection against such
interference when operated in a commercial environment.
Operation in a residenti al area can cause interference
which the user must correct at his own expense.
This digital apparatus does not exceed the Class A limits
for radio noise for digital apparatus set out in the Radio
Inter ference Regul ations of the C anadian Department of
Communications.
Page 3

Preface
When you firs t receive the 9400™ series printer, there are no
formats in memory. Therefore, you must enter formats before
printing tags or labels. This manual contains the information
you’ll need to design and enter your own customized formats.
It also prov i des general information about system
administration and configuring the printer.
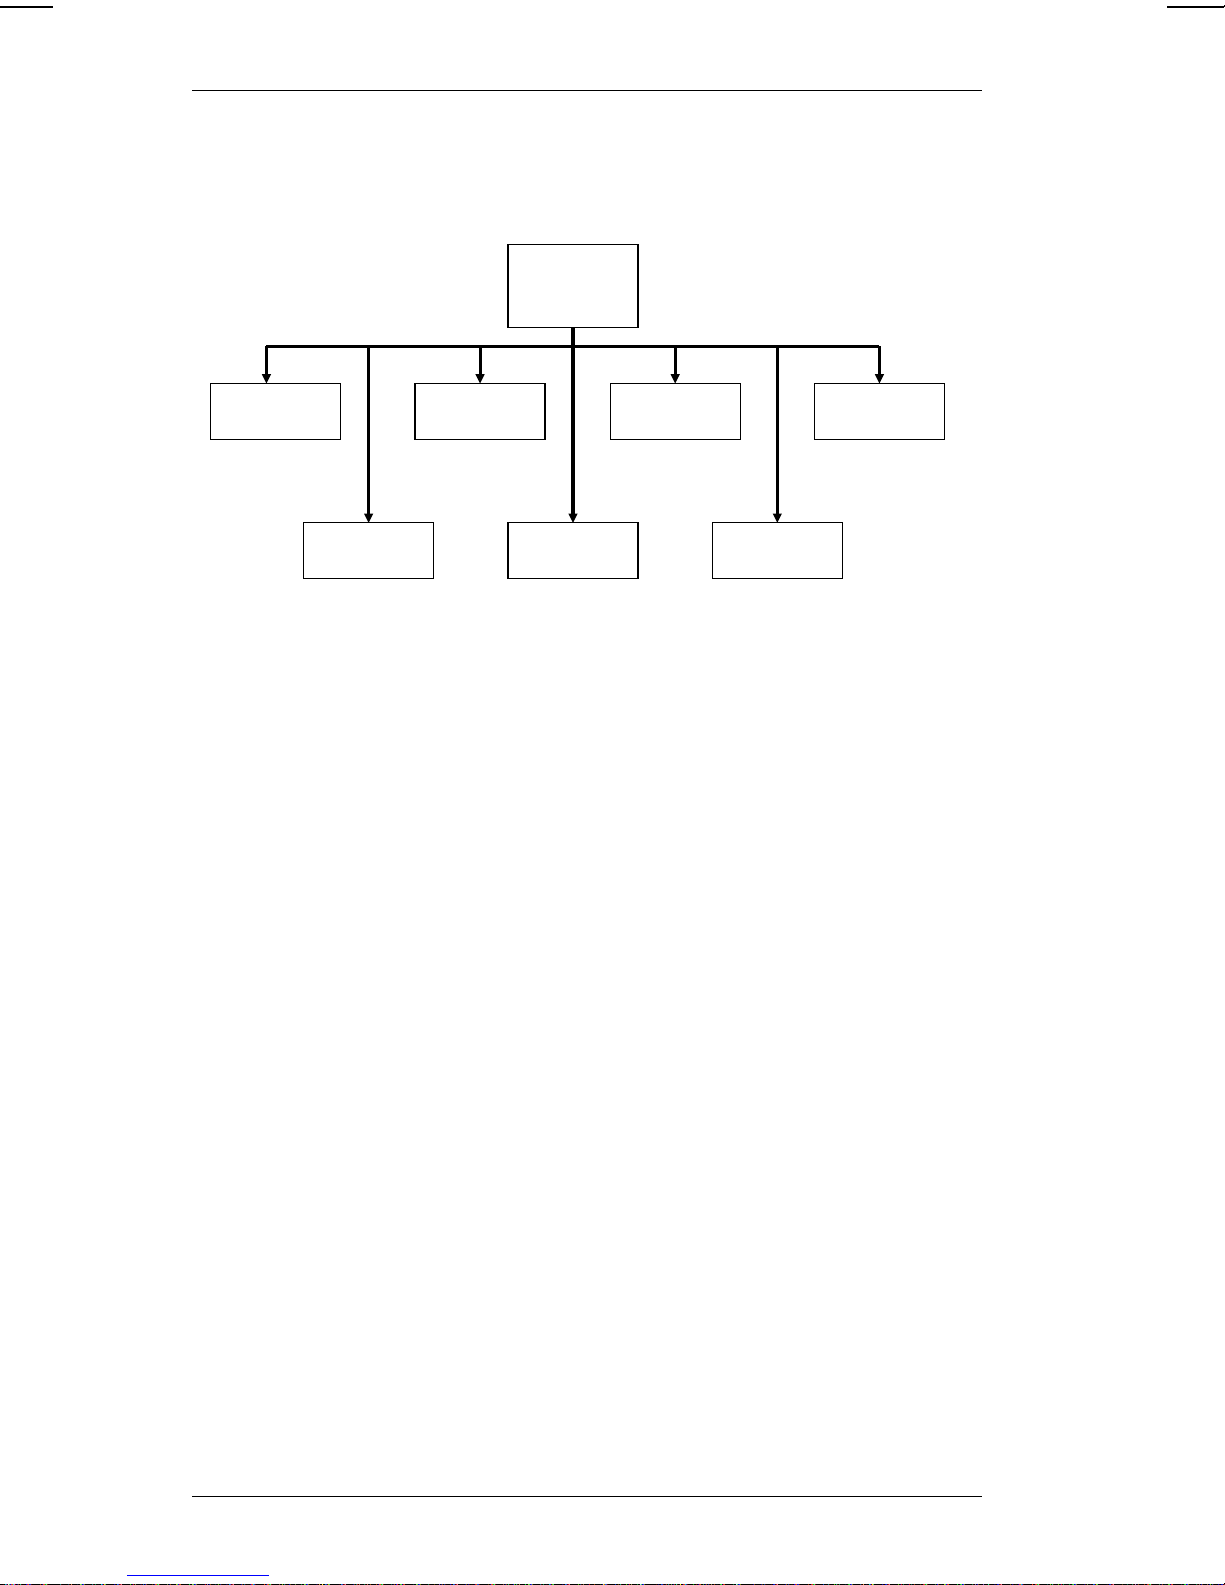
Preface
Getti ng Started
Design i ng a Fo rm at
Entering a Format
Using the Printer Online
Configuring th e Printer
Provi des an overview of the
features, operation modes,
defaults set, and initial startup
information.
Contains informati on for
designing tags and labels.
Discusses how Format Entry
works; how to copy, modi f y an d
delet e fi e ld s or formats. It also
gives tutorials for entering each
field ty pe availabl e.
Tells you how to use your
computer with the printer to print
batches.
Descri bes password protected
features for check digits, time
and date , and onl i ne print i ng.
Prompts Reference
Contains a list of prompts and
descriptions for Format Entry
mode.
i
Page 4

9400 Series User’s Manual
Other manuals you might need are:
Equipment Manual
Operator’s Handbook
Programmer’s Manual
Messages
Form at Design Tools
Manual
Contains set-up and
maintenance proced ures. How
to load suppli es and ribbons is
also incl uded.
Explains data entry and batch
control for printing. Also
includes options y ou can set for
supply requireme n ts.
Gives com m uni cations and
message structures for sending
formats and batch data online.
Lists and describes the offline
and online messages.
Contains the Format Record and
Data Entry Guide, along with
other information and tools to
help y o u d esign fo r m ats.
ii
Page 5

Table of Contents
1. Getting Started...............................................................1-1
Operating Modes........................................................1-3
Supply Options...........................................................1-4
Daily Startup...............................................................1-5
Auto-online Mode...........................................1 -6
2. Designing a Format .......................................................2-1
Checking the Supply Siz e..........................................2-1
Starting Your Format Design......................................2-2
Identifying the Top of Supply......................................2-3
Rotating a Field..........................................................2-3
Rotating Characters Within a Field............................2-4
Field and Character Rotation Exampl es........2-6
Preparing Your Supply Layout ...................................2-7
Fonts and Horizontal Field Location..............2-7
Planning the Field Cont ents.......................................2-9
Recording the Field Cont ent s ..................................2-12
Defining the Supply for a Format.............................2-16
Recording Stored Formats.......................................2-18
Table of Conte nt s
3. Entering a Format..........................................................3-1
Starting Format Entry.................................................3-4
Editing and Reviewing a Format.............................. 3-37
Entering Supply Information...........................3-5
Defining the Fields .........................................3-8
Entering a Sub-field......................................3-12
Enteri ng a C ost Code Field..........................3-15
Entering a Date Field...................................3-18
Entering a Fixed Data Field .........................3-21
Entering a Price Field...................................3-24
Entering a Line Field....................................3-26
Merging Fields..............................................3-30
Entering a Graphic Field..............................3-35
iii
Page 6

Table of Contents
Modifying a Format ..................................................3-38
Adding a Field..............................................3-4 0
Deleting a Field............................................3-40
Deleting a Format.........................................3-41
Renaming a Format .....................................3-41
Copying a Format.........................................3-42
Designing a Multiple Part Tag ..................................3-43
Sample Two-Part Tag...............................................3-4 4
3. Entering a Format..........................................................3-1
Kinds of Fields............................................................3-2
4. Printing Online ...............................................................4-1
Auto-online Mode.......................................................4-2
Online Errors..............................................................4-3
5. Configuring the Printer..................................................5- 1
Defining a Check Digit................................................ 5 -2
Changing Pass words.................................................5 -5
Displaying Password s................................................5-7
Setting the Time .........................................................5-8
Clearing the Time Prompt..........................................5-9
Setting the Date .......................................................5-10
Clearing the Date Prompt..........................................5-11
Selecting the Date Forma t.......................................5-11
Setting the Online Paramete rs.................................5-13
Adjusting the Print Contrast .....................................5-15
Clearing Batch Memory at Power-up.......................5-16
Clearing Batch Memory Immediately.......................5-17
Using 9420/9440 Compatible Mode.........................5-18
Using 9420/9440 Imaging Mode..............................5 -19
Using Auto -onlin e Mo d e...........................................5-21
Exiting Auto- online Mo de.........................................5-22
6. Prompts Reference........................................................6-1
Bar Code Type...........................................................6-1
iv
Page 7

9400 Series User’s Manual
Bar Code Densi ty.......................................................6-3
Bar Code Densities (Parall el Pri nt)................6-4
Bar Code Densities (Serial Print)...................6-5
Bar Code Heigh t.........................................................6-5
Bar Code - Human R eadable Char acters..................6-6
Check Digits...............................................................6-7
Check Digit Scheme...................................................6-8
Cost Code Field .........................................................6-9
Data Entry Prompt....................................................6-10
Date and T ime Field s...............................................6-1 1
Field Length..............................................................6-12
Field Location...........................................................6-13
Field T ypes...............................................................6-14
Fixed Characters......................................................6-15
Fixed Data Field.......................................................6 -16
Fonts ........................................................................6-17
Printable Characters ................................................6-18
Font Magni fication (Sizes ) ........................................6-19
9425/9445 Font Magnification..................................6-20
9420/9440 Font Magnification..................................6-20
Graphics...................................................................6-21
Include Price Check D igit.........................................6-22
Incrementin g or Decremen ting a Field.....................6-23
Lines.........................................................................6-24
Line Width Select ions...............................................6-25
Horizontal Line Widt hs.................................6-25
Vertical Line Widths..................................................6-26
Merged Fi eld ............................................................6 -27
Number of Characters..............................................6-29
Price Field................................................................6-30
Print Color................................................................6-31
Print Color Samples.....................................6-31
Stock Dimensions.................................................... 6-3 2
Sub-fields.................................................................6-32
Text Fields................................................................6-34
Time Fields...............................................................6-34
Top of Field...............................................................6-35
Top of Character.......................................................6-35
Type of Data.............................................................6-36
V e rify Fields..............................................................6-36
Table of Conte nt s
v
Page 8

Table of Contents
Appendix A - Code 128 I nfor mation...................................A-1
Bar Code Width..........................................................A-2
Quiet Zone..................................................................A-4
Function Codes..........................................................A-5
Table A-1. 128 Bar Code Cha racte r Se ts..................A-6
vi
Page 9

1. Getting Started
The 9400™ Series Thermal Printers let you enter your own
format image for printing batches of data. A format is the
arrang ement of fields on the supply. Each field is a group of
data that prints in a specific place on the tag or label. The
printer uses both thermal direct or ribbon printing on tags and
labels.
The number of formats you store depends on how many fields
you design into each form at. The number and size of yo ur
formats may reduce the number of batches you can enter at
one time.
You can operate this printer
computer). The Online feature communicates with your
computer system for transferring data batches and formats to
the printer. For more informa tion about Online see section 4,
"Printi ng Online."
The flexibility of this printer provides:
offline
(manually) or
online
(with a
• Six font styles (three with proportiona l spac i n g).
• The ability to print three of the font styles in ten different
sizes.
• Nine different bar codes (including expanded UPC and
EAN) with variable bar length, and special density
option.
• Incrementing or decrementing within a field.
• The ability to create sub-fields from a regular field (print
multipl e fi el ds from data entered once by the operator).
Getting Started
• A merged field for combining data from up to four other
fields.
• Fixed data for saving the operator time at data entry.
• Two print colors; blac k and reverse print i ng.
1-1
Page 10

9400 Series User’s Manual
• Graphi c li nes to underline or box-in a field.
• Graphic images (such as your company logo)
downloaded from your host computer.
• The ability to rotate individual fields, or characters within
a field.
• A
There are three password-protected modes: Format Entry
mode, Printer Configuration mode, and Auto-online mode.
One person should have access to these functions and should
serve as th e syste m ad mi n istrator. The syst e m ad mi n istr a to r
can custom i ze the printer to meet spe cific printi ng needs.
Here are some features to consider setting when you first
receive the printer.
Test
function that lets you test your format as you
design it.
• A daily startup routine for the operators. You can select
the time and dat e to appear for each startup.
• Security passwords for Format Entry mode, Printer
Configuration mode, and Auto-online mode. You can
enter unique passwords for your use.
• A special check digit calculation. You can enter check
digit calcul ations spec ific to your ope ration.
• Online usage. Y ou must set the parameters for
communication with your host computer before going
online.
Procedures for thes e features are in sec tion 5, "Configuri ng
the Printer."
1-2
Page 11

1. Getting Started
Operating Modes
The printer contains menus to show you the options available.
From the Select Operation Mode menu, also called the
menu
, you can select seven different operation modes.
Data Entry Lets the ope rator enter data for a sp ecific
format. Refer to the
Operator’s Handbook
for data entry instructions.
Format Entry Lets management add, modify, copy or
delete formats. This mode requires a
password.
Batch Control Lets the ope rator monitor the activity and
printing priority of batches in the print
queue. The
Operator’s Handbook
informa tion for using this mode.
main
has
Getting Started
Online Supports the transmi ssion of data batches
and formats for a host computer to the
printer.
Printer Opti o n s Lets you set the printer to meet specific
supply requirements. Refer to the
Printer
Configuration
Operator’s Handbook
Lets management define printer setups for
daily operation. This mode requires a
to set these options.
password.
Version Displays the identification number for the
printer’s software. Give this number to
Monarch Service when calling about
problems or questions. Refer to the
Messages
manual for more information.
1-3
Page 12
9400 Series User’s Manual
The chart below shows each operation mode, and its intended
user.
Select
Operation
Mode
Data
Entry
Format
Entry
Manager* Operator Manager*
* Password requi red for entr y
Batch
Control
OperatorOperator Operator/
Online Printer
Printer
Options
Manager
Version
Operator/
Manager
Config.
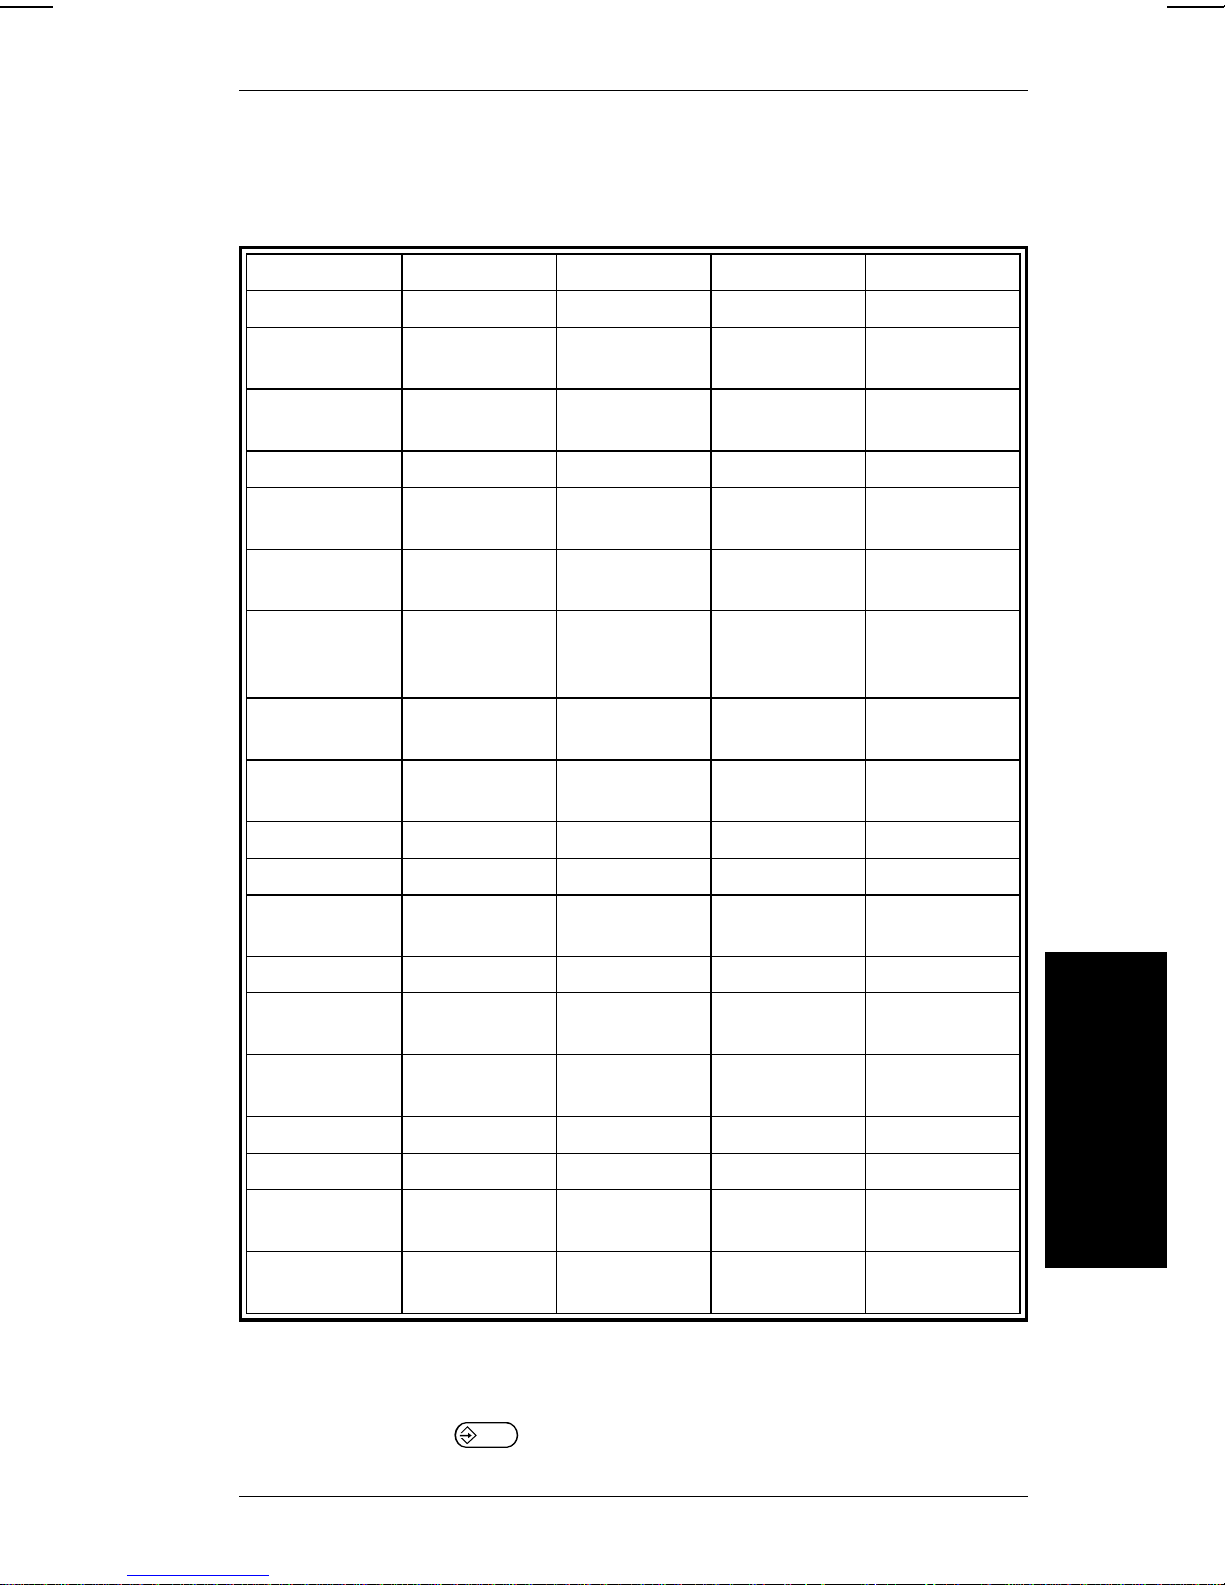
Supply Options
These are the printer options set at the factory:
Printer Option Default
1. Use Batch Separators No
2. Adjust Cut Po sit i on Increas e at 0
3. Adju st Pr i n t Po s ition Incre ase at 0
4. Define Cost Code None set
5. Define Supply Ty pe Black Mark/Aperture
6. Define Monetary Symbol Dollar ($)
7. Use Cent Si gn i n Pri ce Fields No
8. Define Numbering System English
9. Define Print Mode Continuous
10. Use Batch Names No
To change these options, refer to "Setting Printer Options" in
the
Operator’s Handbook
1-4
.
Page 13

1. Getting Started
Daily Startup
CAUTION
Turning the printer on and off rapidly can cause i t to
malfunction. If you have turned the print on (or off), wait 10
seconds before turning it back off (or on).
When you first turn the power on you’ll see:
• the copyri ght message
• the date and ti m e prompts if they are set
Then you’ll see
Select Sup p ly Type: B
A)lign, B)lack Mark or D)ie Cut
• Press
E
if you are using black mark or aperture
supplie s.
• Type D and press
E
if you are using die cut
supplies.
• Type A and press
E
to calibrate the printer.
Next you’ll see the main menu:
Select Operating Mode: ↓
Data Entry __
Press D to display the mode you want, then press
select the mode.
E
Getting Started
to
If you want to enter a time or a date at daily startup, go to
sectio n 5, "C onfiguring the Printer." You c an set the time and
date to display each time you turn the power on. The
procedure for daily startup is in the
Operator’ s Handbook
.
1-5
Page 14
9400 Series User’s Manual
Auto-online Mode
If your printer is set for Auto-online mode, daily startup is
different. The printer is online as soon as you turn it on. When
you turn the printer on, you’ll see:
• the copyri ght message
• the date and ti m e prompts if they are set.
Then you’ll see
Online Mode Ready:
For more information about Auto-online mode, see "Printing
Online."
1-6
Page 15

2. Designing a Format
Section 2 and 3 contain tutorials for planning and entering a
tag or label design (format). This section shows you how to
design a format using the four steps below.
1. Determine the basic elements and the fields for your design.
2. Prepare your supply layout for field locations.
3. Define the secondary elements of your design.
4. Record all design elements for format entry.
Section 3 shows samples of the different fields you can use in
a format.
Checking the Supply Size
It is important that you know the exact size of the suppl y you’re
using. The sensors in the printer check the supply length as it
feeds out of the printer. The size you enter in Format Ent r y
mode tells the printer what size to check for. In Format Entry,
the size is also used to determine whether the fields you enter
fit the width of the supply .
When measuring aperture supp l i es and black mark suppli es,
measure from top to top as shown.
Tag
Length
Tag
Length
Designing a Format
Black Sensor Mark
Measurement
Aperture
Measurement
2-1
Page 16

9400 Series User’s Manual
Starting Your Format Design
To prepare a layout of your format design, you must define its
basic elements. You must decide the:
• Size of the supply.
• Numb er of fields to be pr inted on this supply.
• Types of fields that will be printed (bar code, line,
graphics or text).
• Location of each field.
• Maxim um data length for each field.
• Font style and size for each field.
• Direction each field will be rotated for printing. See
"Rotati ng a Field."
Section 3 contains a tutorial for entering the sample format you
are about to des ign. The design for the sample format has:
• Supply size of 1.20 inches wide by 2.00 inches l ong.
• Field rotation of TOP (the top of each field poin ts toward
the top of the supply).
• Five regular fields, a sub-field, a merged field, and a
graphic box around the date field.
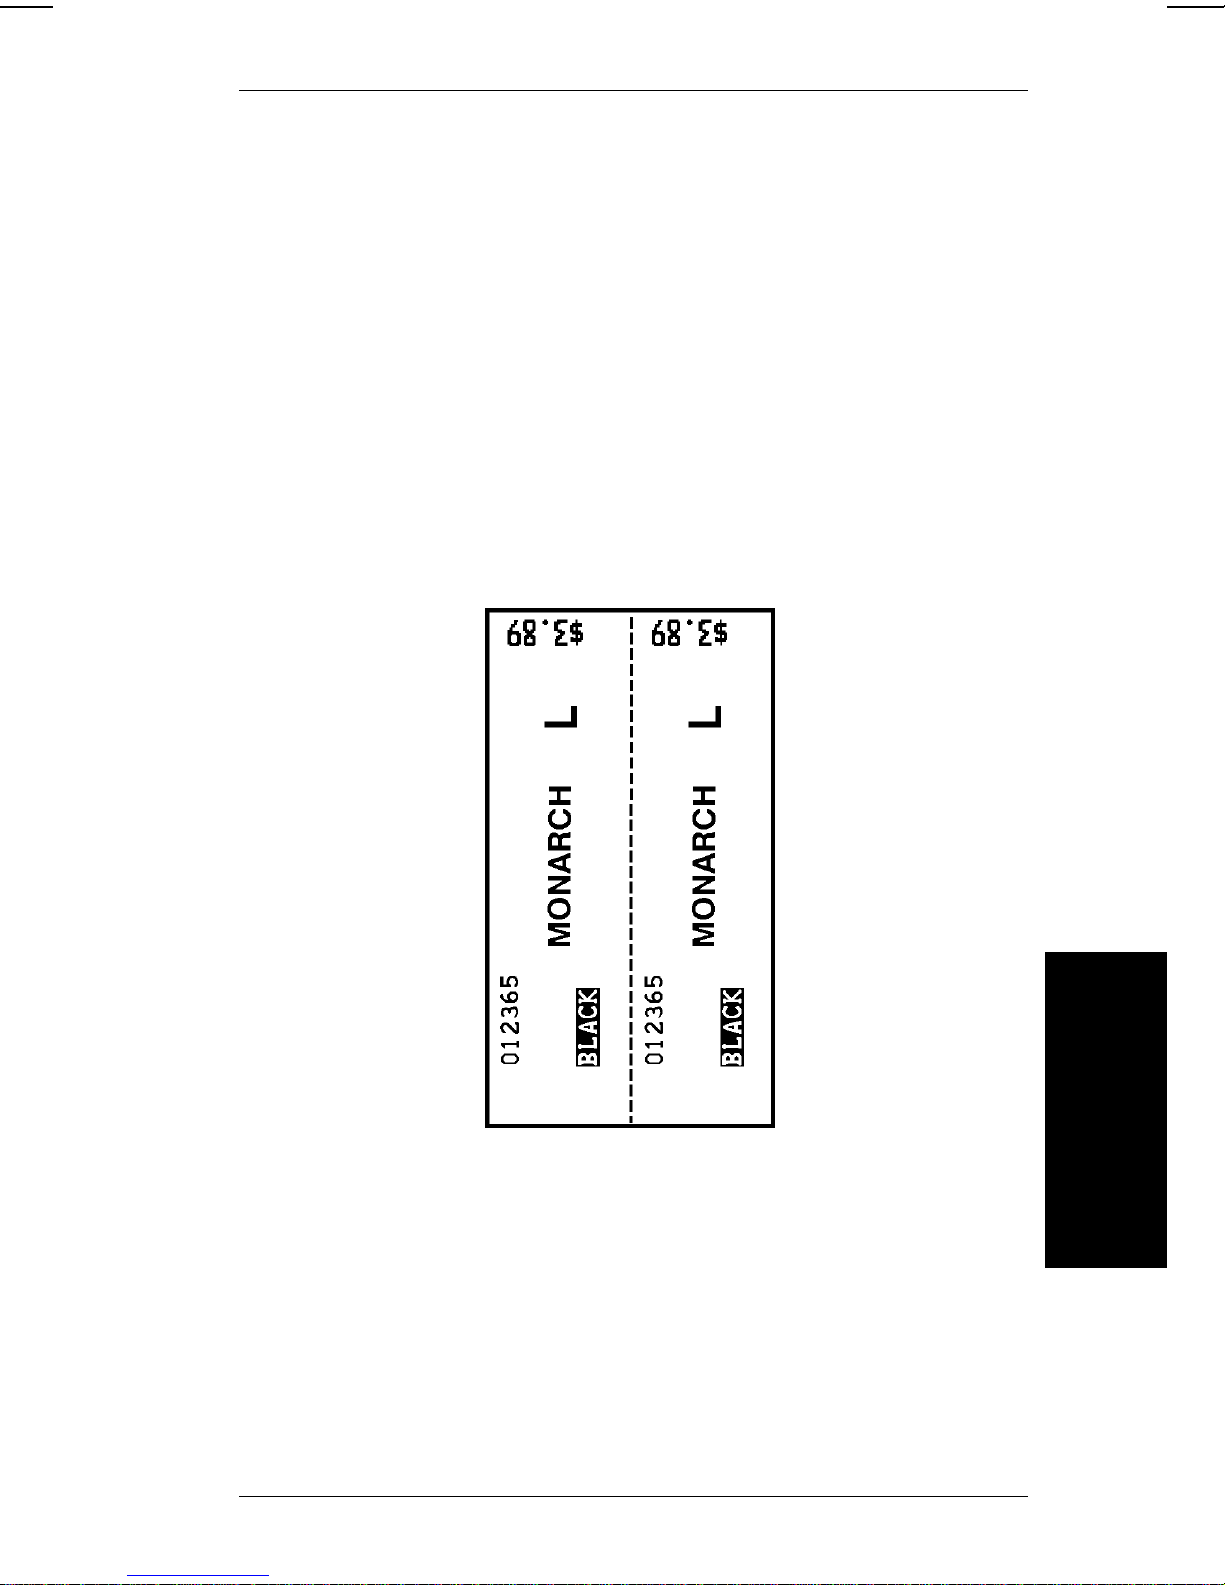
Here’s a print sample of
our design:
2-2
Page 17

2. Designing a Format
Identifying the Top of Supply
The
top
of the supply is the cut edge (the side that exits the
printer last). The
bottom
side that exits the pr int first ) . The figure below shows the top
edge and the b ottom edge of the suppl y.
Top
of the supply is the leading edge (the
Bottom
Rotating a Field
There are four directions you can print a field on the supply:
TOP The top of th e field points to the top edge of
the supply.
LEFT The top of the field points to the left edge of
the supply.
BOTTOM The top of the field points to the bottom
edge of the supply.
RIGHT The top of the field points to the right edge
of the supply.
Designing a Format
2-3
Page 18

9400 Series User’s Manual
The pivot point for the field is
the horizontal/vertical locat i on
you choose in Format Entr y.
It is possible to rotate the field
completely or partially off the
supply. Make sure you all ow
for the rotat i on you select
when you choose the field
location. The field and
character rotation examples
later in this section show how
a field moves when it is
rotated.
Rotating Characters Within a Field
There are tw o directions you can print a character with i n a field:
TOP The top of the character points to the top of
the field.
LEFT The top of the character points to the left
side of the field.
Notice that the characters shift. The pivot point is shown for
each rotation.
Left Top
In the examples the field uses TOP rotation as discussed in
"Rotating a Field." You specify both field and character
rotation in Format Entry mode. The field and character
rotation examples later in this section show how a character
moves when i t is rotated.
2-4
Page 19
2. Designing a Format
When rotating a field and its ch aracters, make sure the
rotations you select are compatible. The horizontal/vertical
location you choose in format entry is the pivot point for both
the field and the character rotation.
This sample is set up as follows:
Field Rot a tion: LEFT
(all fields except price)
Character Rotation: TOP
Price (field) Rotation: BOTTOM
2-5
Designing a Format
Page 20

9400 Series User’s Manual
Field and Character Rotation Examples
Field Rotations:
In the examples below, the
Character Rotations:
In the examples below, the
character
field
rotation is set at TOP.
rotati on i s se t a t TOP.
Top Left
2-6
Page 21

2. Designing a Format
Preparing Your Supply Layout
Once you know the basic elements you want for your format,
place them on a Supply Layout form. This helps you
determine the exact print location of each field. For your
convenience, blank Supply Layout forms for English and
Metric syst e ms ar e in Form a t Desi gn Tools. Inform at io n ab out
font sizes and magnification is also in the
Manual
and Section 6, "Prompts Re ference."
1. Mark off the supply size used with this format design on
the supply la yout form.
2. Pencil in the possible location of each field. As you place
the different fields, decide where you want the top of each
field and the top of the charact ers within each field.
Format Design Tools
3. Sketch in the bar code and the data for each field.
Fonts and Horizontal Field Location
You can choose whether you want to print using:
• 9425/ 9445/9465 fonts (character sets) and horizontal
field locations
• 9420/9440 fonts and horizontal field locations.
The alphabetic characters in the 9425, 9445, and 9465 printer
fonts (exc ept OCR) are pro portional. This means that each
letter uses only as much space as it needs (the letter I, for
instance, occupies much less s pace than the let ter M). All ten
numeric characters in each font take up the same amount of
space, whether the number is a 1 or, for instance, a 0. This
makes numbers line up correctly when you print them in
columns.
The char acters in the 9420 and 9440 printers are
monospaced. Every character takes up the same amount of
space.
Designing a Format
The horizontal field location on the 9425, 9445, and 9465
printers starts at the dot nearest to the location you enter
(nearest 0.0052 inch).
2-7
Page 22

9400 Series User’s Manual
On the 9420 and 9440 printers, the horizontal field location
starts at the nearest 8th dot (nearest 0.04 inch) to the location
you enter.
You’ll find more information about proportional and
monos paced fonts and horizontal field loc ati on in "Prompts
Reference" and in the
Form at Design Tools
manual.
The Supply Layout below shows our sample format design.
Supply Layout
(inches)
Box
Cost
Code
Fixed
Data
Date
Field
UPC-A
Bar Code
Price
Merged
Field
Sub-field
2-8
Page 23

2. Designing a Format
Planning the Field Contents
Now you are ready to decide on the contents of your fields.
For text fields such as: date, time, price, or cost code you
must decide:
• Which fields are regular fields and which are sub-fields?
(Sub-fiel ds are created from regular field data. )
• What prompt should the operator see at data entry?
• Is the field length fixed or variable?
• Is the print color black or whi te (reversed)?
• Should certain field position s increment or dec rement?
• Is there a check digit? If so , which calcul ation schem e
is used? How is the check digit generated (operator
entry or automatic)?
NOTE: If you want to use a check digit, you’ll need to
define the calculation scheme in Printer
Configuration mode
"Defining a Check Digit" in section 5.
before
format entry . See
• Is this a verify field ?
• Is the data at data entry to be numbers, letters, or
either?
• Which direction shoul d the c haracters print wit hi n the
field?
• Are there any fixed characters (characters that are
always the sam e) i n the format?
Section 6, "Prompts Reference" contains all the prompts for
Format Entry mode, and the permitted v al ues.
Designing a Format
2-9
Page 24

9400 Series User’s Manual
When you enter a bar code field you must decide on some
value s. Others are pre-set. The UPC- A, UPC-E, EAN-8, and
EAN-13 bar codes have some values that are pre-set and
can’t be changed. You don’t see prompts for them when you
define UPC or EAN bar code fields. These values are:
• Data Type (numeric)
• Field length (fixed)
• Numb er of characters (depends on bar code ty pe)
• Density (standard)
The following table shows the options for each bar code type.
2-10
Page 25

2. Designing a Format
Prompt UPCA/
UPCE
Barcode
height
Barcode
density
Human
Readable
Characters
Include
extended
characters
Cost code
field
Length of
UPC barco de
Field Lengt h ✔ ✔ ✔✔✔
Number of
characters
✔ ✔ ✔ ✔ ✔✔✔
✔✔
✔✔
✔ ✔ ✔ ✔ ✔✔✔
✔✔
EAN8/
EAN13
Code 39I 2 of 5 NW7 Code
128
✔✔ ✔✔
✔ ✔ ✔✔✔
*
MSI
Auto inc/dec
field
Check digi t ✔ ✔ ✔ ✔ ✔✔✔
CD scheme
number
Mark
positions
Includ e M od
43 CD
Verify field ✔ ✔ ✔ ✔ ✔✔✔
Select type
of data
Enter fixed
characters
* I 2 of 5 must have an
✔ ✔ ✔ ✔ ✔✔✔
even
✔ ✔ ✔✔✔
✔✔✔
✔✔✔
✔
✔✔✔✔
number of data digits.
For more information about these options, see section 6,
"Prompts Reference."
Designing a Format
2-11
Page 26
9400 Series User’s Manual
Recording the Field Contents
Using your format design, record the values you’ll be using to
enter the format. The following pages list the values used for
our samp l e design fields. Section 3 contains tutorials for
enter i ng each field in Format Entry mo de.
The options and values below are for fields 1 (bar code) and 2
(sub-field).
Option Field 1
Field 01 P
Data entry
prompt
Enter locat i on 0.1/1.0
Top of field T
Enter type of
field
Select barc ode UPCA
Barcode height 0.75
Human
readable
Include
extended char
Bar code
densit y
Cost code N
Length of U PC
barcode
UPCA
B
B
Y
1
S
Option Field 2
Field 02 S
Enter field
number to use
Enter locat i on 0.1/0.2
Top of field T
Enter type of
field
Select fiel d font S
Font
magnification
Top of
charact e rs
Enter the pr i nt
color
Formatti ng B
Mark
characters to
use
1
T
1
T
B
space, 4 X’s
Check digi t G
Price check
digit
Verify field N
Enter fixed
characters
ENTER = Pres s
E
2-12
N
ENTER
to skip this option.
Page 27
2. Designing a Format
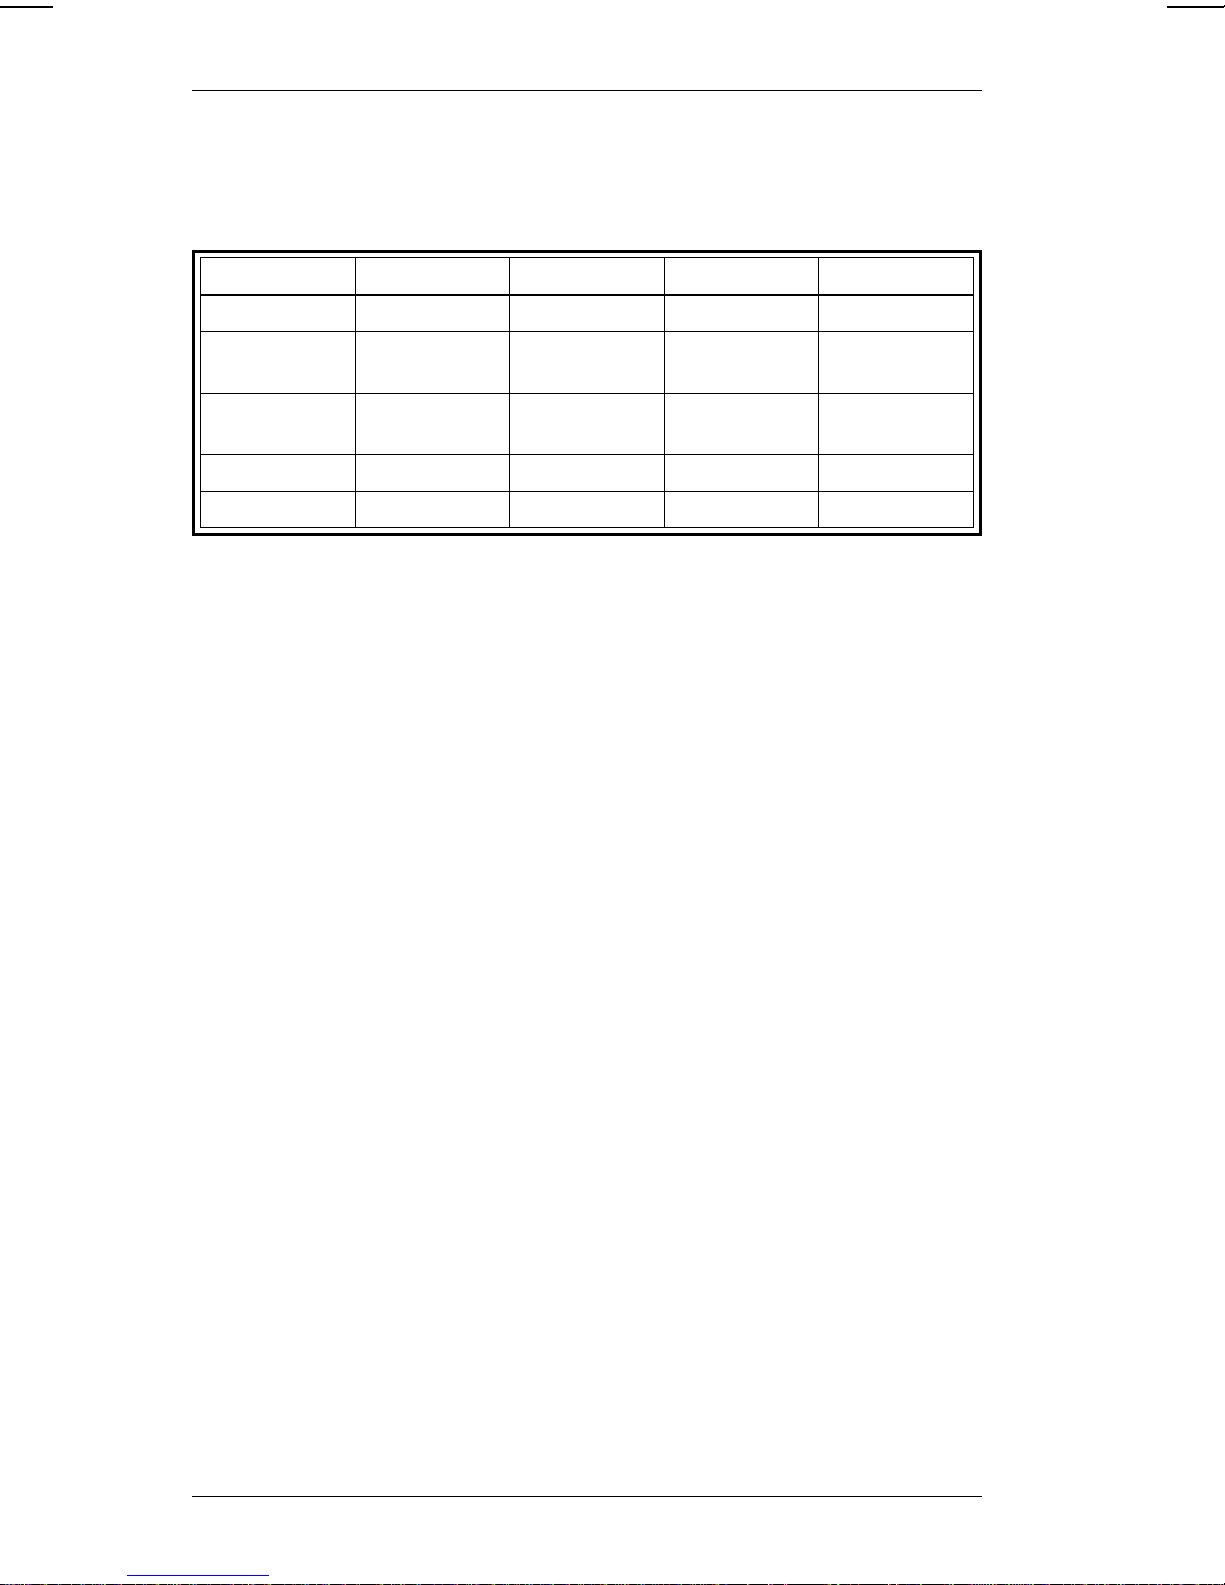
The options and values below are for field 3 (cost code), field 4
(date), field 5 (fixed data), and field 6 (price).
Option Field 3 Field 4 Field 5 Field 6
Field nn P P F P
Data entry
prompt
Enter
location
Top of field T T T T
Enter type
of field
Select field
font
Font
magnification
Top of
charact e rs
Enter the
print color
Cost code Y N N N
Price field N N - Y
Time or date
field
COST
CODE
0.1/1.89 0.75/1.89 0.1/0.6 0.6/0.6
TTTT
SRSR
1112
TTTT
BBBB
NDN-
DATE - PRICE
Field leng th V - - Number of
characters
Auto inc/dec
field
Check digi t N - N Verify field N - - N
Select type
of data
Enter fixed
characters
3-46*
--N-
N-- -
ENTER - SALE -
* Length includes the monetary symbols for price fields.
- Option is not avail able for this field type.
ENTER = Pres s
E
to skip this option.
Designing a Format
2-13
Page 28
9400 Series User’s Manual
The options and values below are for fields 7, 8, 9, and 10,
which make up the line box.
Option Field 7 Field 8 Field 9 Field 10
Field nn L L L L
Enter
location
Line
Horiz/Vert
Stop location 2.01 1.15 1.15 2.03
Width of line 4 4 4 4
0.64/1.85 0.64/1.85 0. 64/ 2. 01 1.14/1.85
VHHV
2-14
Page 29
2. Designing a Format
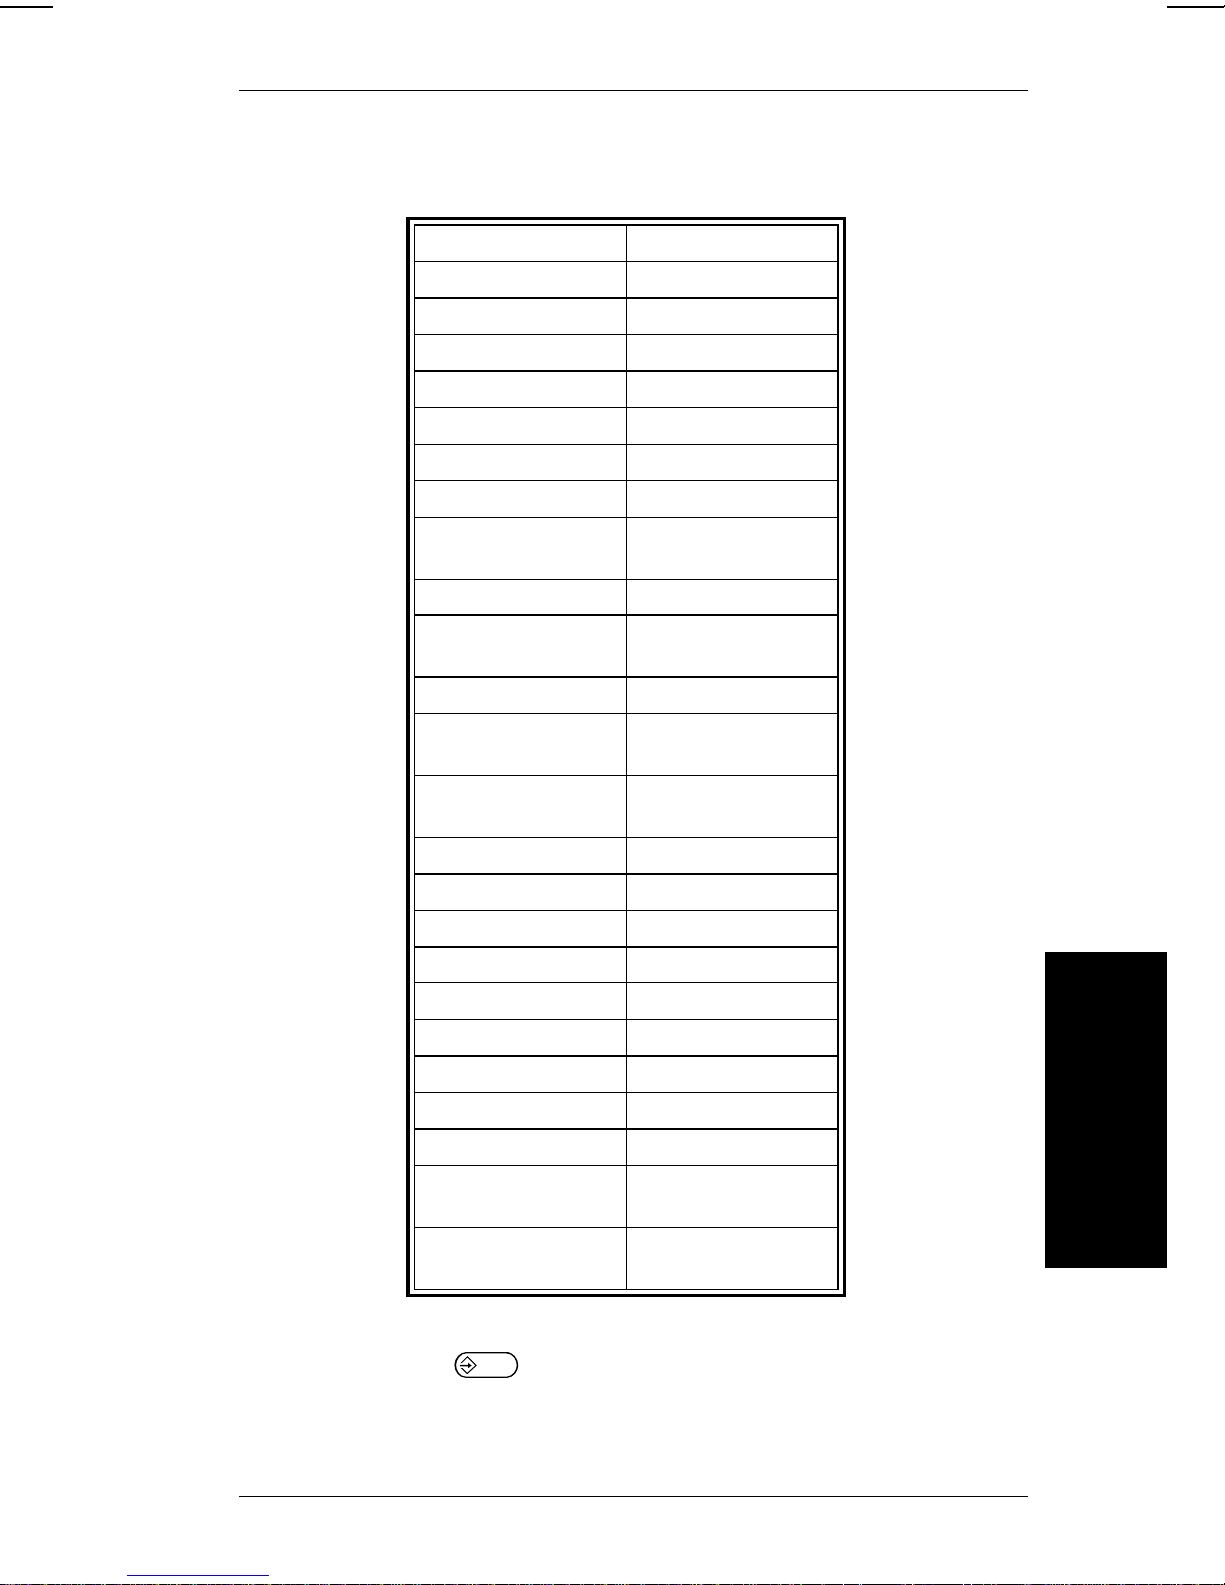
The values below are for field 1 1 (merged field).
Option Field 11
Field 11 M
Enter location 0.7/0.2
Top of field T
Enter type of field T
Select field f ont R
Font magnifi cat ion 1
Top of characters T
Enter the prin t
color
Field length V
Number of
characte rs
Che ck di git N
Enter fix e d
characters
Enter fiel d
number to use
Formatting B
DST: GHIJK
Padding L
Pad char 0
Merge another? Y
Field to use 6
Formatting B
DST: ABCD
B
9
ENTER
1
Designing a Format
ENTER = Pres s
Padding L
Enter pad
character
Merge another
field
E
to skip this option.
0
N
2-15
Page 30

9400 Series User’s Manual
Defining the Supply for a Format
You’ll also need to decide the following items.
Number of parts The number of times the dat a prints across
the tag width. The supply may or may not
be perforated. For example, if you want the
data to print only once on the tag, then
enter 1 for
one part
"Creating a Multiple Part T a g" tells you how
to create multiple part tags.
Values: 1-5
Cutting Whether yo u wa nt cuts between each tag
or set of tags. You can answ er "yes" to this
prompt only if your printer has a knife. A
"no" answer prints all the tag s in one s trip.
Values: Y (yes) or N (no)
supply. The section
Cut last ticket Do you want to cut the last tag or label in a
batch as soon as you print it? (Normally,
the last tag of label remains in the printer
until the next batch begins to print). Y ou
only see this prom pt if you answer "yes" to
the
Cutting
prompt.
NOTE: If you choose, Y the printing shift s
0.78 inch toward the top of the supply (the
edge of the supply that exits the printer
last). Ch oose N if your format has fields on
the first 0.78 inch.
Values: 1-9999
Cut multiple The number of tags or labels printed
between cuts as a set. For example, if you
want two copies of each tag, choose a cu t
multiple of 2. This prompt only appears if
you answered "yes" to the
Cutting
prompt.
Values: 1-9999
2-16
Page 31

2. Designing a Format
Cut between
batches
You’ll only see this prompt if you answer
"no" to cutting (between tags). Answer
"yes" to this prompt if you want the printer
to cut between batches.
Values: Y (yes) or N (no)
Print multiple The number of copies to print of each tag
set
as a
within a batch. For example, if you
want three copies of eac h tag, choose a
print multiple of 3. That is, there are three
tags per set. This prompt appears only if
you answered "no" to the
Cutting
prompt.
Values: 1-9999
Print quantity The number of tags, or sets of tags printed
in a batch. For example, if you specify a cut
or print m ultiple of 1 with a batch quant ity of
30, you’ll get 30 tags. If you specify a cut or
print multiple of 2 with a batch quant ity of
sets
30, you’ll print 60 tags (30
of tags with
2 tags per set) .
Values: 1-9999
For all s uppl y definitions, you can:
1. Fix (lock in) a value for any of these promp ts when you
enter the format.
2. Pre ss C , then
E
, to let the operator enter a value in
Data Entry mode.
NOTE: To let the operator enter a value for the Print
Quantity supply defi nition , j u st press
E
at the
prompt. You don’t need to press C first.
Designing a Format
2-17
Page 32
9400 Series User’s Manual
These are the values we used for our sample design (in
section 3).
Option Values
Supply size
Number of par ts
Cutting
Cut last ticket
Cut multiple
Print quality
1.20" widt h, 2.20" length
1
Y
1
1
Leave blank (Press
E
)
Recording Stored Formats
If you plan to use m ore than one format, you should prov ide a
list for the operator. The list lets the operator know which
format to use for an item, and the supply size needed. For
exampl e:
Store Formats
Print er # ___________________ Date ___/ ___/ ___
Format Name Used For Supply
Sample
Jewelry1
Jewelry2
1 pc garment
rings
watches
1.20 x 2.20
1.20 x 1.22
1.20 x 1.57
For each format, make a copy of the Operator Data Entry
Guide pro vided in the
prompt in the format and the data that the operator should
enter at the prompt. Attach a printed sample and give the
completed form to the operator to refer to during data entry.
The next section shows you how to enter a format.
2-18
Format Des i gn Tools Manual
. List each
Page 33

3. Entering a Format
Format Entry is the function you use to enter your new tag or
label design (format). You can also modify and delete existing
designs. The chart below shows an overview of the Format
Entry process.
Merged field
• Field location
• Top of field
• Text or Barcode
Screens Barcode
for screens
General
fields
• Field to use
• Before/after formatting
• Source _ _ _ _ _
Destination _ _ _ _ _
• Padding: Left, Right, None
• Merge another (Y/N)
Define Supply
Test field
• Prints a test tag
Graphic field
• Field location
• Graphic name
Prompt field
• Data entry prompt
• Field location
• Top of field
• Text or Barcode
Screens Barcode
for Time, screens
Date,
Price,
General
fields
Sub field
• Field to use
• Field location
• Top of field
• Text or Barcode
Screens Barcode
for screens
General
field
• Before/after formatting
• Characters to use
Line field
• Field location
• Vert. or Horiz.
• Stop location
• Line width
Fixed field
• Field location
• Top of field
• Text or Barcode
Screens Barcode
for Time, screens
Date,
Price,
General
fields
Format Name
• Supply size
• No. of parts
• Cutting or no cutting
• Print quantity
3-1
Page 34

This section also contains a tu torial with sample data, to show
you how to enter different field types. Section 6, "Prompts
Reference" contains detailed information about prompts.
Kinds of Fields
A
field
is a group of data you define to print at a specific
location on the tag or label. Some examples of fields are: bar
code field, price field, and date field.
Below is a print sample which contains all the kinds of fields
available, except a graphic field. (The sample may look
slightly different from the tags printed on your printer.) The
instructions for entering all the available fields are under
"Defining the Fields ," in the "Starting Forma t Ent r y" section
(you’ll also find a sample graphic field in the same section).
English measurements (inches) are used for the sample tags.
Cost Code
Bar Code
Fixed Data
Sub-field
Date
Lines
Price
Merge
9400 Series User’s Manual
3-2
Page 35

3. Entering a Format
Bar Code There are nine bar codes available:
UPC-A, UPC-E, EAN-8, EAN-13, NW7,
Code 39, Interleaved 2 of 5, Code 128, and
MSI. The printer also print s ex panded UPC
and EAN bar codes (+2 and +5). See
"Entering a Bar Code Field."
Cost Code Translates your actual cost data to a special
code for printing. See "Entering a Cost
Code F i el d ."
Date/Time Prints the month, day and year. See
"Entering a Date Field." You can also
select the date style for printing the date in
Printer Configuration mode. Refer to
section 5 "Configuring the Printer" to set the
date sty l e. The time field prints the hour s
and minutes. Refer to "Date and Time
Field s" for more information about th ese
fields.
Fixed Data Prints constant data. The operator is not
prompted to enter data for this field. The
data you ent er at Format Entr y
automatically prints on every batch of
supplies using that format. See "Entering a
Fixed D ata Field."
Lines Lets you draw a box around a field,
underline a field, or strike through a field.
See "Entering a Line Box."
Graphics Lets you print a graphics file downloaded
from a host co m puter.
Merged Lets you combine up to nine regular fields
to print as a single field. See "Merging
Fields."
Price Automatically generates the monetary
symbols for printing. For example: the
dollar sign and decimal. See "Entering a
Price."
Entering a Format
3-3
Page 36

9400 Series User’s Manual
Sub-field Lets you copy a group of data from a
regular field, and print it in a new location.
As with the regular field you specify the
location of the sub-field. See "Entering a
Sub-fiel d."
Starting Format Entry
Here are a few ti ps to help you enter your format s easi ly.
• Type responses for all prompt screens and press
E
• The first five prompts in format entry identify the format
and define the supply to be printed. The remaining
prompts define the fields.
, unless otherwise stated.
• Field definiti on begins wit h the F ield Definition screen:
Field 01 p)rompt, F)ix, L)ine
M)erge, S)ub, G)raph or T)est____
When you finish defining a fiel d, the screen returns to
the Field Definition screen and the field number (Field
#:) increas es by one.
• Y ou can test your format design any time during format
entry (if you have defined at least one field). To test
your design , se l ect Test from the Field Definition
screen. The format you are working on will print with
test data in the fields you defined.
• If you press
your first field, your entries for the new format are
saved.
!
before you have completely defined
not
• If you press
field, only the new field (the one you were working on)
won’t be sa ve d.
• If you press
field, the field you are modi fying won’ t be changed.
3-4
!
after you hav e defi ned at least one
!
while you are modifying an existing
Page 37

3. Entering a Format
Entering Supply Information
You can enter supply values when you define the format. Or
you can press C , then
value in Data Entry. (To let the operator enter a value for Print
Quality, just press
E
first).
The first steps in Format Entry include naming a format and
enter i ng i nformation about the supp l y you’re using.
E
, to let the operator enter a
at the prompt without pressing C
1. Begin Format Entr y from the main menus. Press U or
to dis pla y Format Entry and press
E
. You’ll see
Enter password:___ ___
2. Enter your 1-8 character security password and press
E
. See "Changing Pas swords" if you need to reset
the passw ord.
For example, type M9400 and press
E
. You’ll see
Format Entry Mode
Enter format name
3. Type a 1-8 character format name and press
E
. You’ll
see the message New Format (NAME)
D
For example, type SAMPLE and press
Stock dim ensions (inches)
Width = 0.00 Length = 0.00
E
. You’ll see
Entering a Format
3-5
Page 38

9400 Series User’s Manual
4. Enter up to 3 digits for inches (4 digits for millimeters or
dots) for the supply width and press
E
. Do not enter
a decimal point. Then enter up to 3 digit s for the supply
length and press
E
. Don’t enter zeros for whole
numbers.
NOTE: You can set the printer to accept English, metric,
or dot units. See section 5, "Configuring the
Print er." You must enter all dimensions using the
units you specified.
To print the sample tag shown on the following pages, you
must have supply loaded that is at least 1.20 inches wide
and 2.20 inches long. If our suppl y size is different, enter
the length and w i dth.
For supply that is 1.20 inches wide and 2.20 inches lo ng:
type 120 and press
E
, then type 220 and pr ess
E
5. Enter the number of parts for the supply.
Number of parts [1-5]: 1
CLEAR to define at Data Entry
Type 1 and press
E
.
6. Specify cutting or no cutting of the supply during printing.
Cutting [Y/N]: N
CLEAR to define at Data Entry
• If you want to cut between batches, type Y and
press
E
.
.
• If you do not want to cut betw een batches,
press
3-6
E
. Go to step 9.
Page 39

3. Entering a Format
7. Choose whether to cut the last tag in each batch.
Cut last ticket [Y/N]: N
CLEAR to enter at Data Entry
• To cut the last tag in the batch, type Y and press
• If you don’t want to cut the last tag in the batch,
press
NOTE: If you choose Y, the print i ng shifts 0.78 inch
8. Enter the number of tags to print between cuts.
Press
9. Specify cutting or no cutting betw een batches.
E
.
toward the top of the tag (the edge of the tag that
exits the printer last). Y ou cannot print on the first
0.78 inch of the tag. Choose N if your format has
fields on the first 0.78 inch of the tag.
Cut mul ti ple [1-9999]: 1
CLEAR to enter Data Entry
E
to print one tag betw een cuts.
E
.
• If you want to cut between batches, type Y and
press
E
• If you do not want to cut between bat ches, press
10. Enter the number of duplicates to print as a set, before
printing the next set.
Press
E
Cut between batches [Y/N]: N
CLEAR to define at Data Entry
.
to print one tag in ea ch set.
E
3-7
.
Entering a Format
Page 40

9400 Series User’s Manual
Print multiple [1-999]: 1____
CLEAR to enter at Data Entry
11. Enter the batch quantity for printing.
Quantity to pri n t [1-999]:____
ENTER to define at Data Entry
• Press
E
to enter the batch amount at data entry.
• Type a number for the number of tags you want to print
and press
tags, type 30 and pres s
E
. For example, to print a batch of 30
E
.
Defining the Fields
Now you can begin to enter the fields for the sample tag
format. In Format Entry, fields are grouped into six types:
• Prompt (includes text fields, bar code fields, price fields,
etc.)
• Fixed (contains data that remains constant)
• Line (d r aws lin es or bo x e s )
• Graphic (pr ints graphics downloade d from a host
computer)
• Merge (a single field with data from up to nine regular
fields)
• Sub-field (contains data copied from a field in a different
location)
3-8
Page 41

3. Entering a Format
Entering a Bar Code Field
To define the bar code fi el d on the sample tag, make the
selections below. These selections define a UPC-A bar code.
For certain bar codes, there are preset values. Refer to
sectio n 6, "Prompts Reference," fo r a lis t of preset values and
the selec tions you must make for each bar code .
UPC Bar
Code
Format Entry Prompt What You Do
Field 01: P)rompt, F)ix, L)ine
M)erge, S)ub, G)raph or T)est__
Data entry prompt:_______
For ’Field 01’ press ENTER
Enter location (inches) for
’Field #’ H = 0.00 V = 0.00
Top of field towards: T
T)op, L)eft, B)ottom or R)ight
Type P and press
Type UPCA and press
E
.
Type 01 for 0.10 and press
E
press
Press
; type 1 fo r 1. 00 and
E
E
.
to select Top.
E
.
Entering a Format
3-9
Page 42

9400 Series User’s Manual
Format Entry Prompt What You Do
Enter type of field: T
T)ext or B)arcode
Select barcode: ↓
UPCA __
Barcode height: 0.00 Type 075 for 0.75 inches
Human Readable Characters: N
A)bove, B)elow, or N)one
Include extended characters in
Human Readable [Y/N]: N
Type B and press
Press
and press
E
.
E
.
Type B and press
Type Y and press
E
E
E
.
.
.
Barcode density [1-2]: 1 Press
Cost code field: N
Y)es or N)o
Length of UPC bar code: S
S)tandard, 2 UPC+2 or 5)UPC+5
Check digit: N
G)enerate, V)erify or N)one
Press
Press
Press
E
E
E
E
.
.
.
.
3-10
Page 43

3. Entering a Format
Format Entry Prompt What You Do
Include price check digit: N
Y)es or N)o
Ver ify field: N
Y)es or N)o
Enter any fixed characters:
____________
Field 02: P)rompt, F)ix, L)ine
M)erge, S)ub, G)raph or T)est_
Press
Press
Press
E
E
E
.
.
to skip this
prompt .
Now you can:
• Type T and press
E
format.
• Press
definition.
to test your
!
to exit field
• Make the following
selections for Field 02.
Entering a Format
3-11
Page 44

9400 Series User’s Manual
Entering a Sub-field
A
sub-field
primary field. This sub-field is printed as a separate field on
the tag or label. You can specify the print location and the font
for printing.
During data entry , the operator enters the data for the primary
field only. The data for the sub-fiel d is automatica l ly copied
and printed. For more informati on about sub-fiel ds, see
"Sub-Fields" in section 6.
The foll owing prompts show how to ex tract a 5-digit code from
the UPC-A bar code in our format SAMPLE. Therefore, you’ll
need to enter the bar code field first. The sub-field will print in
the lower left corner of the ta g as s how n.
contains data which i s c opi ed from a porti on of a
Sub-field
Format Entry Prompt What You Do
Field 02: P)rompt, F)ix, L)ine
M)erge, S)ub, G)raph or T)est_
Enter field number to use:_ Type 1 and press
3-12
Type S and press
E
E
.
.
Page 45
3. Entering a Format
Format Entry Prompt What You Do
Enter location (inches) for
’Field 02’ H = 0.00 V = 0.00
Type 01 for 1.10 and pre ss
E
and press
Top of field towards: T
T)op, L)eft, B)ottom or R)ight
Enter type of field: T
T)ext or B)arcode
Select field font: S
S)td, R)educed, B)old or O)CR
Select font magnification [1-10]: 1 Press
Press
Press
Press
; type 02 for 0.20
E
E
E
E
E
.
.
.
.
.
Top of characters towards: T
T)op or L)eft
Enter the print color: B
B)lack or W)hite
Formatting: A
B)efore or A)fter
Press
Press
Type B and press
E
E
.
.
E
.
In this example we use the
first 4 digits of the bar
code (excluding the
number system character).
Entering a Format
3-13
Page 46

9400 Series User’s Manual
Format Entry Prompt What You Do
Mark characters to use
_________
Mark characters to use
XXXX_____________
Field 03: P)rompt, F)ix, L)ine
M)erge, S)ub, G)raph or T)est_
Blanks appear for the field
length of the primary field.
Press P , then type
XXXX so the screen looks
like:
This marks the data
positions to be copied.
Press
E
.
Now you can:
• Type T and press
E
format.
• Press
definition.
to test your
!
to exit field
• Make the following
selections for Field 03.
3-14
Page 47

3. Entering a Format
Entering a Cost Code Field
Cost code s let you enter information (such as a price) and
print it in a code that only you understand. Before defining a
cost code field, you mus t enter a translation table in Prin ter
Options mode. To enter a translation table, refer to "Defining a
Cost Code" in the
Operator’s Handbook
NOTE: You cannot use a cost in a merged field or in a
sub-field.
Cost Code
.
Format Entry Prompt What You Do
Field 03: P)rompt, F)ix, L)ine
M)erge, S)ub, G)raph or T)est_
Data entry prompt:_______
For ’Field 03’ press ENTER
Enter location (inches) for
’Field #’ H = 0.00 V = 0.00
Top of field towards: T
T)op, L)eft, B)ottom or R)ight
Type P and press
Type CO ST CODE and
press
E
.
Type 01 for 0.1 and press
E
and press
Press
; type 19 for 1.90
E
E
.
.
E
.
Entering a Format
3-15
Page 48

9400 Series User’s Manual
Format Entry Prompt What You Do
Enter type of field: T
T)ext or B)arcode
Select field font: S
S)td, R)educed, B)old or O)CR
Select font magnification [1-10]: 1 Press
Top of characters towards: T
T)op or L)eft
Enter the print color: B
B)lack or W)hite
Press
Type R and pres s
Press
Press
E
E
E
E
.
E
.
.
.
.
Cost code field: N
Y)es or N)o
Price field: N
Y)es or N)o
Time or date field: N
T)ime, D)ate or N)o
Field length: V
F)ixed, V)ariable or O)pt fixed
Type Y and press
Press
Press
Press
E
E
E
.
.
.
E
.
3-16
Page 49

3. Entering a Format
Format Entry Prompt What You Do
Number of characters in the
field:__(Max if variable)
Check digit: N
G)enerate, V)erify or N)one
Ver ify field: N
Y)es or N)o
Select type of data: E
A)lpha, N)umeric or E)ither
Type 3 and press
Press
Press
E
E
.
.
Type N and pres s
E
E
.
.
(NOTE: The data type
must be the same as in
the translation table. For
example, if your translation
table has numeric data as
the "Entered Data," y ou
must define the cost code
field as "numeri c" or
"either.")
Enter any fixed characters:
____
Field 04: P)rompt, F)ix, L)ine
M)erge, S)ub, G)raph or T)est__
Press
E
.
Now you can:
• Type T and press
E
format.
• Press
definition.
to test your
!
to exit field
• Make the following
selections for Field 04.
Entering a Format
3-17
Page 50

9400 Series User’s Manual
Entering a Date Field
There are tw o ways to ent er a date field:
• As a prompt field. If you do it thi s way, the date stored
in the printer is displayed at data entry. The operator
can accept that date or change it. (The exa m pl e below
uses a prompt field.)
• As a fixed fi eld. If you do it this way, the operator never
sees the field at data entry. The date stored in the
printer is automatically printed.
You can also select the order of printing the month, day and
year. Select the date style in Printer Configuration. For more
information, refer to section 5, "Configuring the Printer" later in
this manual.
For more information about time and date fields, see section 6,
"Prompts Reference."
Date Field
3-18
Page 51

3. Entering a Format
Format Entry Prompt What You Do
Field 04: P)rompt, F)ix, L)ine
M)erge, S)ub, G)raph or T)est_
Data entry prompt:_____
For ’Field 04’ press ENTER
Enter location (inches) for
’Field #’ H - 0.00 V = 0.00
Top of field towards: T
T)op L)eft,, B)ottom or R)ight
Enter type of field: T
T)ext or B)arcode
Type P and press
E
Type DATE and press
E
.
Type 075 for 0.75 and
press
1.90 and press
Press
Press
E
E
E
; type 19 for
E
.
.
.
Select field font: S
S)td, R)educed, B)old or O)CR
Select font magnification[1-10]: 1 Press
Top of characters towards: T
T)op or L)eft
Enter the print color: B
B)lack or W)hite
Type R and pres s
Press
Press
E
E
E
E
.
.
.
.
Entering a Format
3-19
Page 52

9400 Series User’s Manual
Format Entry Prompt What You Do
Cost code field: N
Y)es or N)o
Price field: N
Y)es or N)o
Time or date field: N
T)ime, D)ate or N)o
Field 05: P)rompt, F)ix, L)ine
M)erge, S)ub, G)raph or T)est_
Press
Press
Type D and pres s
E
E
.
.
E
Now you can:
• Type T and press
E
format.
• Press
definition.
to test your
!
to exit field
.
• Make the following
selections for Field 05.
3-20
Page 53
3. Entering a Format
Entering a Fixed Data Field
The data y ou enter for this field is stor ed in the format an d
automatically prints whenever the format is used. The
operator is not prompted to enter data for this field at Data
Entry.
For more information about fixed data, see section 6, "Prompts
Reference."
Fixed Data
Format Entry Prompt What You Do
Field 05: P)rompt, F)ix, L)ine
M)erge, S)ub, G)raph or T)est_
Enter location (inches) for
’Field #’ H = 0.00 V = 0.00
Top of field towards: T
T)op, L)eft, B)ottom or R)ight
Type F and press
Type 01 for 0.10 and pre ss
E
and press
Press
; type 06 for 0.60
E
E
.
.
E
.
Enter type of field: T
T)ext or B)arcode
Press
E
Entering a Format
.
3-21
Page 54

9400 Series User’s Manual
Format Entry Prompt What You Do
Select field font: S
S)td, R)educed, B)old or O)CR
Select font magnification [1-10]: 1 Press
Top of characters towards: T
T)op or L)eft
Enter the print color: B
B)lack or W)hite
Cost code field: N
Y)es or N)o
Press
Press
Type W and press
Press
E
E
E
E
.
.
.
E
.
.
Time or date field: N
T)ime, D)ate or N)o
Number of characters in the
field:__(Max if variable)
Auto inc/dec field: N
I)ncrement, D)ecrement or N)o
Check digit: N
G)enerate, V)erify or N)one
Press
E
.
Type 4 and press
Press
Press
E
E
.
.
E
.
3-22
Page 55

3. Entering a Format
Format Entry Prompt What You Do
Enter any fixed characters:
____
Field 06: P)rompt, F)ix, L)ine
M)erge, S)ub, G)raph or T)est_
Type SALE and press
E
.
Now you can:
• Type T and press
E
format.
• Press
definition.
to test your
!
to exit field
• Make the following
selections for Field 06.
Entering a Format
3-23
Page 56
9400 Series User’s Manual
Entering a Price Field
The pri nter autom ati cally generates the monetary symbols for
price fields (e.g., dollar sign and decimal) at data entry.
However , when you define the field length, you must allow for
these symbols.
Price
Format Entry Prompt What You Do
Field 06; P)rompt, F)ix, L)ine
M)erge, S)ub, G)raph or T)est_
Data entry prompt:__________
For ’Field 06’ press ENTER
Enter location (inches) for
’Field #’ H = 0.00 V = 0.00
Top of field towards: T
T)op, L)eft, B)ottom or R)ight
Type P and press
Type PRICE and press
E
.
Type 06 for .6 and press
E
press
Press
; type 06 for .6 and
E
E
.
.
E
.
Enter type of field: T
T)ext or B)arcode
3-24
Press
E
.
Page 57
3. Entering a Format
Format Entry Prompt What You Do
Select field font: S
S)td, R)educed, B)old or O)CR
Select font magnification [1-10]: 1 Type 2 and press
Top of characters towards: T
T)op or L)eft
Enter the print color: B
B)lack or W)hite
Cost code field: N
Y)es or N)o
Type R and pres s
Press
Press
Press
E
E
E
.
.
.
E
E
.
.
Price field: N
Y)es or N)o
Number of characters in the
field__(Max if variable)
Ver ify field: N
Y)es or N)o
Type Y and press
Type 6 and press
E
E
4 digits for price and 2
positi ons for the symbols
($.).
Press
E
.
.
;
Entering a Format
3-25
Page 58
9400 Series User’s Manual
Format Entry Prompt What You Do
Field 07: P)rompt, F)ix, L)ine
M)erge, S)ub, G)raph or T)est__
Now you can:
• Type T and press
E
format.
• Press
definition.
to test your
!
to exit field
• Make the following
selections for Field 07.
Entering a Line Field
The line drawing feature requires specific measurements. On
the sampl e tag, the line box s u rrounds the date fi eld. In the
sample,
• The date field has 8 characters.
• The font is 1x Reduced.
• The field location is horizontal = 0.75, vertical = 1.90.
The table below shows the start and stop locations for each
line of this sample box. The line width is 0.02 inches (selection
4).
Start Poi n ts
Line # Horz. Vert. H or V S top
Point
1 0.65 1.85 V 2.01 4
2 0.65 1.85 H 1.15 4
3 0.65 2.01 H 1.15 4
4 1.15 1.85 V 2.03 4
Width
3-26
Page 59

3. Entering a Format
For more instructions about using the line drawing feature,
refer to section 6, "Prompts Reference."
Lines
For this lesson, you must enter the sample date field first!
Refer to the information in "Entering a Date Field."
Format Entry Prompt What You Do
Field 07: P)rompt, F)ix, L)ine
M)erge, S)ub, G)raph or T)est__
Enter location (inches) for
’Field #’ H = 0.00 V=0.00
Type L and press
E
Type 065 and press
E
press
; type 18 5 and
E
. (For
locat i ons 0.65 and 1.85.)
Line: V
H)orizontal or V)ertical
Press
E
.
.
Stop location V = 0.00 Type 201 for 2.01 and
press
E
.
Entering a Format
3-27
Page 60
9400 Series User’s Manual
Format Entry Prompt What You Do
Width of line [1-15]:__ Type 4 and press
Field 08: P)rompt, F)ix, L)ine
M)erge, S)ub, G)raph or T)est__
Enter location (inches) for
’Field #’ H = 0.00 V = 0.00
Type L and press
Type 065 and
press
and press
E
; type 185
E
E
E
. (For
locat i ons 0.65 and 1.85.)
Line: V
H)orizontal or V)ertical
Stop location H = 0.00 Type 115 for 1.15 an d
Type H and pres s
press
E
.
E
.
.
.
Width of line [1-15]:__ Type 4 and press
Field 09: P)rompt, F)ix, L)ine
M)erge, S)ub, G)raph or T)est__
Enter location (inches) for
’Field #’ H = 0.00 V=0.00
Type L and press
Type 065 and
press
and press
E
; type 201
E
. (For
locat i ons 0.65 and 2.01.)
Line: V
H)orizontal or V)ertical
Type H and pres s
E
E
E
.
.
.
3-28
Page 61

3. Entering a Format
Format Entry Prompt What You Do
Stop location H = 0.00 Type 115 for 1.15 an d
press
E
.
Width of line [1-15]:__ Type 4 and press
Field 10: P)rompt, F)ix, L)ine
M)erge, S)ub, G)raph or T)est__
Enter location (inches) for
’Field #’ H = 0.00 V = 0.00
Type L and press
Type 115 and
press
and press
E
; type 185
E
E
E
. (For
locat i ons 1.15 and 1.85.)
Line: V
H)orizontal or V)ertical
Stop location V = 0.00 Type 203 for 2.03 and
Press
press
E
E
.
. (This line an
extra 0.02 inch long to
compensate for the width
of the top horizontal line.)
.
.
Width of line [1-15]: 1 Type 4 and press
E
.
Entering a Format
3-29
Page 62

9400 Series User’s Manual
Format Entry Prompt What You Do
Field 11: P)rompt, F)ix, L)ine
M)erge, S)ub, G)raph or T)est__
Now you can:
• Type T and press
E
format.
• Press
definition.
to test your
!
to exit field
• Make the following
selectio ns for Field 11.
Merging Fields
You can take data from up to 9 regular fields, the n pr i n t this
data as one field. In the example below, a 5 digit number is
extrac ted from th e UP C-A bar code. This number is combi ned
with the 4-d i gi t price data. The dat a from both fields then
prints as one field, as shown.
UPC-A Data
Price
Merge Data
To use thi s lesson, you must enter a bar code as field 1, and
the price as field 6. Refer to the previous sections "Entering a
Bar Code Field" and "Entering a Price Field."
3-30
Page 63

3. Entering a Format
Format Entry Prompt What You Do
Field 11: P)rompt, F)ix, L)ine
M)erge, S)ub, G)raph or T)est
Enter location (inches) for
’Field #’ H = 0.00 V = 0.00
Top of field towards: T
T)op, L)eft, B)ottom or R)ight
Enter type of field: T
T)ext or B)arcode
Select field font: S
S)td, R)educed, B)old or O)CR
Type M and pr ess
E
.
Type 07 for 0.7 and press
E
press
Press
Press
Type R and pres s
; type 02 for 0.2 and
E
E
E
.
.
.
E
.
Select font magnification [1-10]: 1 Press
Top of characters towards: T
T)op or L)eft
Enter the print color: B
B)lack or W)hite
Field length: V
F)ixed, V)ariable or O)pt fixed
Press
Press
Press
E
E
E
E
.
.
.
Entering a Format
.
3-31
Page 64
9400 Series User’s Manual
Format Entry Prompt What You Do
Number of characters in the
field:__(Max if variable)
Check digit: N
G)enerate, V)erify or N)one
Enter any fixed characters:
___________
Enter field number to use:__
Link: 1
Type 9 and press
Press
Press
E
E
.
.
E
.
Type 1 for the UPC-A bar
code field and press
E
(if you have defined the
fields in the same order as
in this manual).
Formatting: A
B)efore or A)fter
SRC: ABCDEFGHIJK
DST:____________
SRC: ABCDEFGHIJK
DST: GHIJK______
Type B and press
E
Type GHIJK in the first 5
positi ons of the field, so
the screen looks like:
This means :
• Y ou want to use digits
7-11 of the bar code, or
source (SRC) field
• You want to plac e the
bar code digits in the
first 5 po sitions of the
merged, or destination
(DST) field.
.
3-32
Page 65

3. Entering a Format
Format Entry Prompt What You Do
Padding: N
L)eft, R)ight or N)one
Enter pad character:_ Type O and press
Merge another field:_
Y)es or N)o
Enter field number to use:__
Link: 2
Type L and pres s
Type Y and press
Type 6 for the price fiel d
and press
E
(if you
have defined the fields in
the same or der as in this
manual).
E
E
E
.
.
.
Formatting: A
B)efore or A)fter
SRC: ABCD
DST:*****____
Type B and press
E
Type ABCD in the last 4
positions.
.
Entering a Format
3-33
Page 66

9400 Series User’s Manual
Format Entry Prompt What You Do
SRC: ABCD
DST:*****ABCD
Padding: N
L)eft, R)ight or N)one
This indicates:
• You want to use all of
the price data of the
source field
(excluding the price
symbols.
• You want to place the
data in the last 4
positions of the
merged, or destination
(DST) field. (The
asterisks indicate
that you already used
the first five positions
for data from Field 01).
Type L and pres s
E
.
Enter pad character:__ Type 0 and press
Merge another field:__
Y)es or N)o
Field 12: P)rompt, F)ix, L)ine
M)erge, S)ub, G)raph or T)est:__
Type N and pres s
You have completed the
format for the sample tag.
E
E
.
.
3-34
Page 67

Now you can:
3. Entering a Format
• Type T and press
• Press
!
until you see the main menu. Then go to
E
to print a tag with test data.
Data Entry mode to enter data and pri nt a batch using
the new format. The
Operator’ s Handbook
contains
instructions for printing a format.
Entering a Graphic Field
Graphic fields are different from the other kinds of fields in a
format because you can’t type the data for a graphic field from
the keyboard.
To print a graphic field (such as a company logo) on a tag or
label, you download a graphics file from a host computer.
Then you can enter a format that uses the graphics fi l e.
After you have downloaded th e graphics file, it will be stored in
the printer’s memory until you delete it. Y ou do not have to
download it each time you want to use it. For information
about downloading a graphics file, see the
Handbook
Programmer’s Manu al
the
. For information about cr eating a graphics file, see
.
Operator’s
The sample below shows a co m pany logo printed as a graphic
field.
▼
▼
▼
▼
▼
▼
▲
▲
▲
▲
▲
▲
▲
▲
▲
▲
▲
▲
◆
◆
▲
▲
▲
▲
▲
▲
▲
▲
▲
▲
▲
◆◆◆
▲
▲
◆◆◆
▲
▲
▲
▲
▲
▲
▲
▲
▲
▲
Kate’s Kennel
▼
▼
▼
▲
▲
▲
▲
▲
▲
▲
▲
▲
▲
▲
▲
◆
◆
▲
▲
▲
▲
▲
▲
▲
▲
▲
▲
▲
◆◆◆
▲
▲
▲▲
▲
◆◆◆
▲
▲
▲
▲
▲
▲
▲
▲
▲
▲
▲
▲
▲
▲
▼
▼
▼
Entering a Format
3-35
Page 68

9400 Series User’s Manual
To print a tag or label with a graphic fiel d:
1. Starting at the Format Entry menu, define your supply type.
2. When you see the Field Definition screen, use the
following steps to enter a graphic field.
Format Entry Prompt What You Do
Field 01: P)rompt, F)ix, L)ine
M)erge, S)ub, G)raph or T)est:__
Enter location (inches) for
’Field #’ H = 0.00 V = 0.00
Graphic Entry Mode ↓
Enter graphic name: GPH__ __
NOTE: The graphic name will be GPH##
(the number corresponds to an ID
contained in the graphic file).
Your programmer sho uld gi ve you
a list of graphic file names and
what they print.
Type G and press
E
.
Type the horizontal and
vertical starting location for
the graphic field.
Press U or D until you
see the name of the
graphics file you want and
press
E
.
Field 02: P)rompt, F)ix, L)ine
M)erge, S)ub, G)raph or T)est__
Now you can:
• Type T and press
• Continu e to define more fie l ds.
• Go to Data Entry mode and print the graphic field on
tags or labels.
3-36
E
You have entered the
sample graphic field.
to test your format.
Page 69

3. Entering a Format
Editing and R eviewing a Fo rmat
You can change any fi el d in either offline or online formats.
NOTE: Changes in online formats only affect the format
stored in the printer. The original format stored on
the host computer does not change.
You can change a format any time except when it is bei ng
used by a batch that is printing or ready to print. You can also
review the values set for a format without making any changes.
Editing also lets you:
• Copy a format.
• Add a field.
• Skip fields to get to the field you want to change.
• Delete a field.
To review or edi t a format:
1. Selec t F orm at Entry from the main menu and
press
2. Enter the 1-8 character security password and
press
E
. You’ll see
Enter password:___ __________
E
.
Format Entry Mode ↓
Enter format name:________ __
You’ll see a blank for the format name.
Entering a Format
3-37
Page 70
9400 Series User’s Manual
3. Press D until you see the name of the format you want to
review or edit, then press
E
.
NOTE: Formats that were cr eated onlin e di splay an ID
number on th e sc r een nest to the format name.
You’ll see the edit screen.
OLD format NAME: M
M)odify, D)elete or R)ename
M)odify Lets you edit or review the options of a
format. See "Modifying a Format."
D)elete Erases the entire format from memory. See
"Deleting a Format."
R)ename Lets you give the format a new name. See
"Renaming a Format."
Modifying a Format
To modify a format:
1. Start from the edit screen
OLD format NAME: M
M)odify, D)elete or R)ename
Press
2. You’ll see
E
.
Stock dim ensions (inches)
Width = 2.00 Length = 2.75
This is the first screen for defining the supp l y. You can change
any of the supply definitions, or press
definition screen to skip to the field definitions.
3-38
E
at each supply
Page 71

3. When you see the screen for the firs t field:
Field 01: P)rompt, F)ix, L)ine
M)erge, S)ub, G)raph or T)est_
You can:
3. Entering a Format
• Press
• Press
want to change, then press
E
D
to see the definit i ons for the firs t field.
until you see the number of the field that you
E
to see the definitions
for that field.
4. To c hange a field defini ti on, you can:
• Press
value and press
C
to delete the old value. Then enter a new
E
.
• Enter the new v al ue over the old one and press
• Press
without changing anything.
• Press
screen.
5. When you fini sh reviewing or edi ting, press ! . This
saves any changes and displays the Format Entry menu.
Press ! again to exit to the main menu.
E
D
after each field definition to review it
or U to go forward or back ward to a specific
E
.
Entering a Format
3-39
Page 72

9400 Series User’s Manual
Adding a Field
If you want to add a field to a format, you must add it after the
last field in the format.
To add a fie l d to a format
1. Start at the field definition sc reen:
Field 01: P)rompt, F)ix, L)ine
M)erge, S)ub, G)raph or T)est_
2. Press D until you see the field num ber for the last fi el d i n
the format.
3. Press D again. The screen shows a new field number.
4. Select the type of field you want to define and enter the
values.
Deleting a Field
To delete a field:
1. Start at the field you want to dele te:
Field ##: P)rompt, F)ix, L)ine
M)erge, S)ub, G)raph or T)est_
2. Press H , then press C (CLEAR). You’ll see
Delete field #.. .
Are you sure [Y/N] :
3. You can
N
• Press
E
• Type Y and press
4. The screen returns to the field definition screen for field 01.
3-40
to keep the field.
E
to delete the field.
Page 73

Delet ing a Format
To delete a format:
1. When you see the edit screen
OLD format NAME: M
M)odify, D)elete or R)ename
3. Entering a Format
Type D and pr ess
E
.
2. You’ll see
Delete format NAME
Are you sure [Y/N] :
• Press
E
to keep the format.
• Type Y and press
E
N
to delete the format.
3. The screen returns to the format entry screen. Select
another format to edit, or press ! to display the main
menu.
Renaming a Format
To rename a format:
1. Start from the edit screen
Type R and pr ess
OLD format NAME: M
M)odify, D)elete or R)ename
E
.
Entering a Format
3-41
Page 74

9400 Series User’s Manual
2. You’ll see
Old name: NAME
New name:___________
Type the new name for the format and press
E
. You’ll
see the Format Entry screen.
Copying a Format
To copy a format
1. Start from the format entry screen
Format Entry Mode ↓
Enter format name:_______ __
2. Press D until you see the name of the format you want to
copy.
3. Type the name for the new format and press
see
COPIED format NAME
E
. You’ll
Then the screen displays the first screen of the new format
with the v al ues from the old format.
4. Now you can
• Make any necessary changes for your new format.
Refer to "Editing and Rev i ewing Forma ts ."
• Press
!
again to return to the main menu.
3-42
!
to save the new format to edit later. Press
Page 75
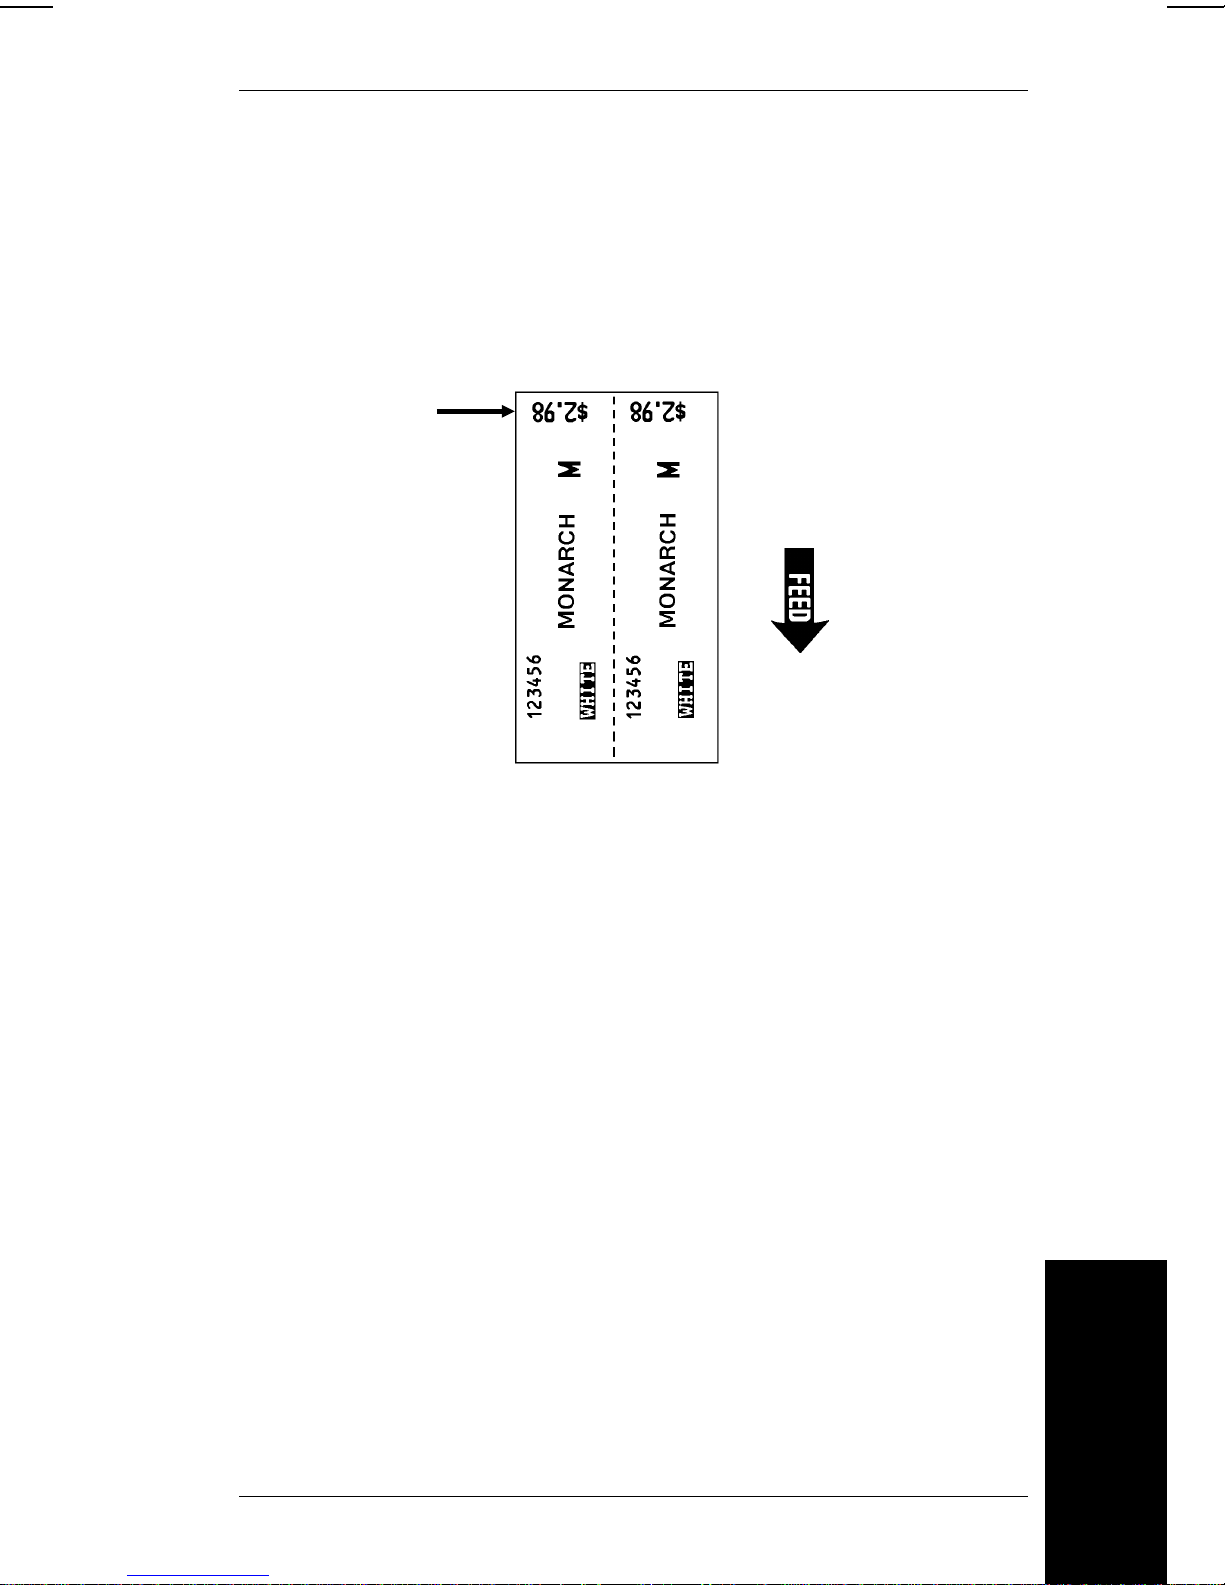
3. Entering a Format
Designing a Multiple Part Tag
You may want the same data to print more than once across
the width of a tag. You might use a two-or three-part tag when
a tag is divided in half or in th i r ds. This sec tio n uses a two-part
tag as an example.
Top of
Supply
When you design a multiple part tag, you lay out only the
left-most section. The printer repeats the design across the
tag automatically.
There are four steps in creating a multiple part tag on your
supply layout.
1. Prepare a Supply Layout, outlining the desired supply size.
Then divide the supply into an equal number of printable
parts.
Working on the left-most part of the tag:
2. Draw in the fields, showing font size, field length and
rotation.
3. Mark the start (horiz ontal/ver ti cal) locat i on poi nts of each
field.
4. Record the elemen ts of your design for each field.
Entering a Format
The following section uses these four steps in the design of a
sample two-part tag.
3-43
Page 76
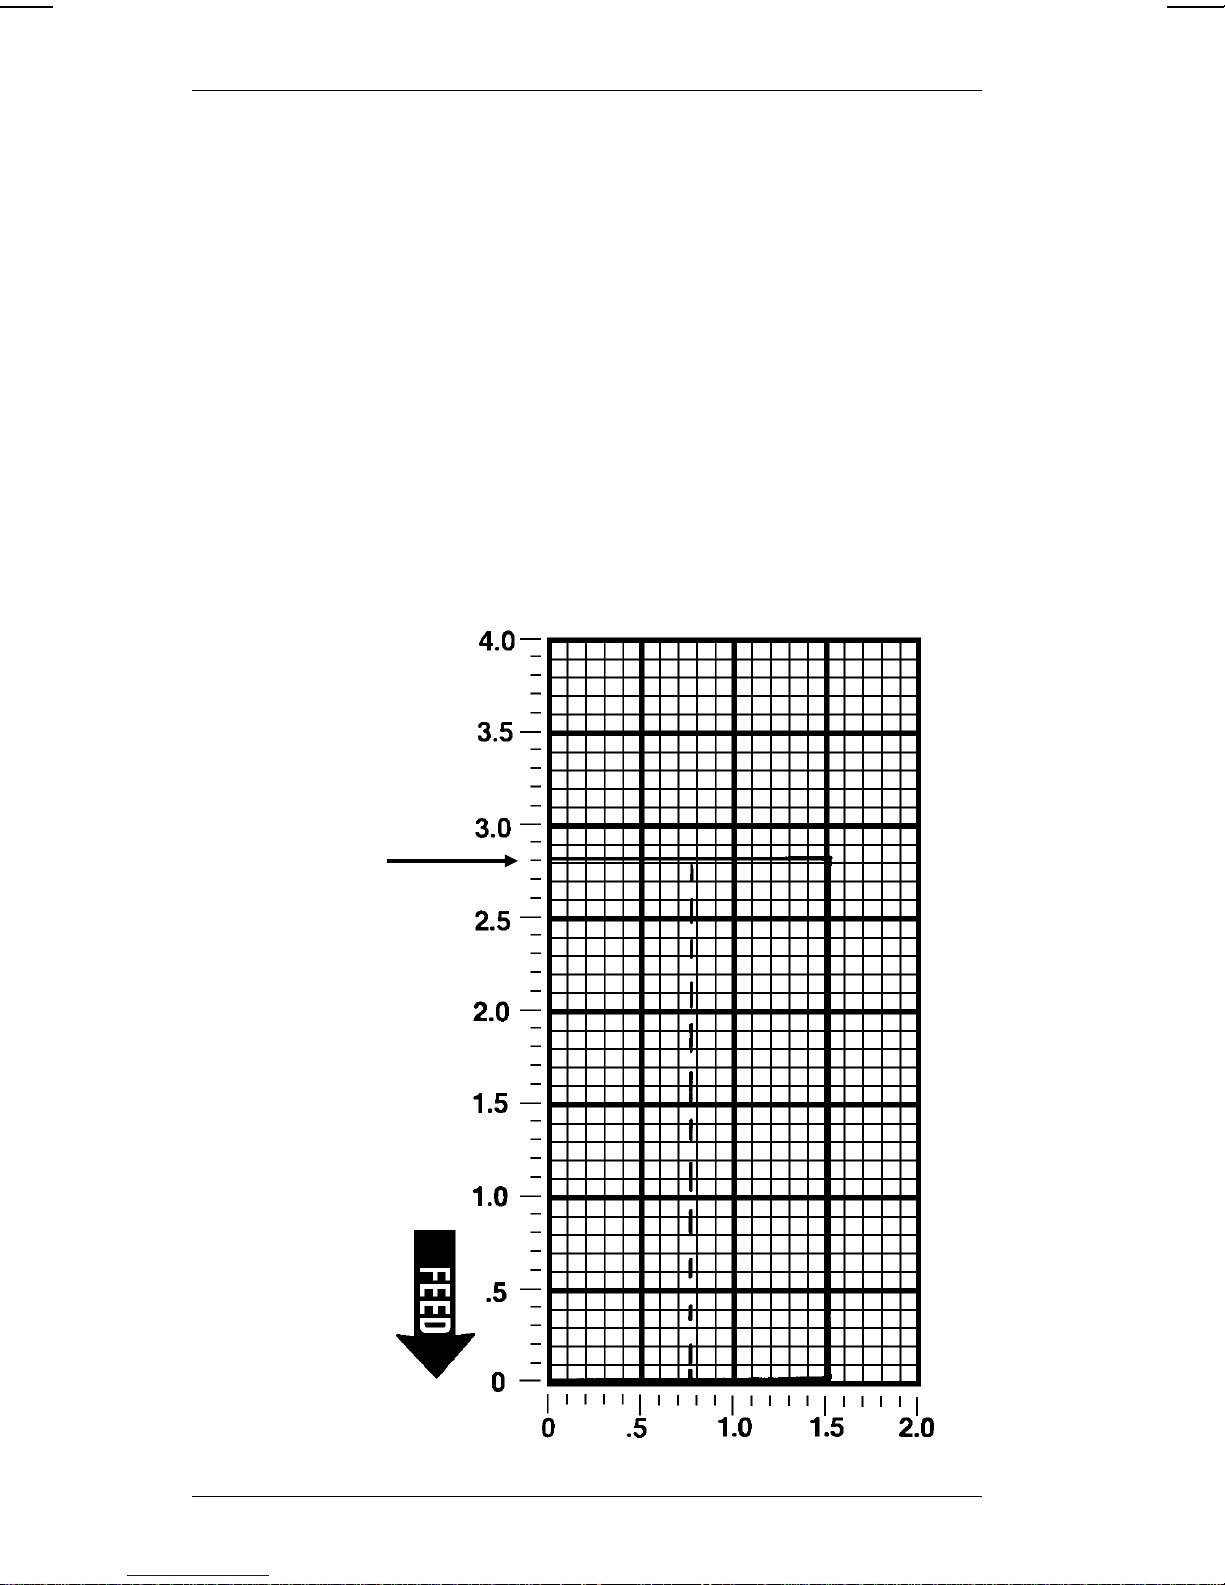
9400 Series User’s Manual
Sample Two-Part Tag
Here are the four steps for creating a two-part tag with four
fields.
1. Using a Supply Layout form:
• Outline the size of your supply.
• Draw a line down the middle of the supply, dividing it
into two equal parts. This represents the two-part
printing.
The sample layout shows 1.5 inches wide by 2.75 inches
long as the su pply siz e .
Supply Layout
(inches)
Top of
Supply
3-44
Page 77

3. Entering a Format
2. Draw fields for the left part of the supply.
The sample layout shows the position and approximate
size of the four fields. The top of characters is toward the
top of the field (TOP). The fonts and top of field for each
field are:
Field 1 Standard 1x font, 6 digits, top of field = Left.
Field 2 Bold 1x font, 1 character, top of field = Left.
Field 3 Standard 1x font, 5 characters (max.), top of
field = Left.
Field 4 Reduced 2x font, 5 digi ts; top of field = Bottom.
Supply Layout
(inches)
Entering a Format
3-45
Page 78

9400 Series User’s Manual
3. Mark the start locations (horizontal/vertical points) of each
field. The illustration below shows which coordinates to
use for eac h fiel d rotation.
If the field rotation is: Use the coordinates for the:
Top Lower left corner of the field
Left Lower right corner of the field
Bottom Upper right corner of the field
Right Upper left corner of the field
3-46
Page 79

3. Entering a Format
The foll owing layout shows the start location
(horizontal/vertical point) for each field.
Supply Layout
(inches)
Entering a Format
3-47
Page 80
9400 Series User’s Manual
4. For each field, record the elements of your design. You’ll
use thes e to enter your multip l e part tag format.
We used the following design elements for the sample
two-pa rt tag.
Option Value
Sup ply si ze
Number of par ts
Cutting
Cut multiple
Print quanti ty
1.5 x 2.75
2
Yes
1
Leave bl an k (Pr ess
E
)
The fields are defined as shown in the following table.
Option Field 1 Field 2 Field 3 Field 4
Field nn P P P P
Prompt SKU SIZE COLOR PRICE
H/V locati on 0.2/0.2 0.5/2 .0 0. 6/ 0. 2 0.5/2 .6
Top of field L L L B
Field Type T T T T
Font Type SBSR
Font magnification 1 1 1 2
Top of characters T T T T
Enter the pr in t color B B W B
Cost code N N N N
Price field N N N Y
Time /date f i eld N N N Field length F F V # of characters 6 1 5 5*
inc/dec field N N N Check digi t N N N Verify field N N N N
Data type N E A Fixed characters ENTER ENTER ENTER -
* Length includes the monetary symbols for price fields.
- Option is not available for this field type.
ENTER = Pres s
E
to skip this option.
3-48
Page 81

3. Entering a Format
If you want to print a test sample of the two-part tag:
• Enter the field definitions above.
• When you see the first Field Defi ni tion screen
Field 01: P)rompt, F)ix, L)ine
M)erge, S)ub, G)raph or T)est_
Type T and pres s
E
.
The two-part tag will print with test data in the fields.
Entering a Format
3-49
Page 82

9400 Series User’s Manual
3-50
Page 83
4. Printing Online
Online mode lets you tr ansmit form at, batch, and graphic data
to the printer from a host computer. Batch data is sent to the
print queue and printi ng then starts autom a ti cally.
Printing Online
Your
for sending formats and batch data. The list below shows
features that are available offline, but not available in online
mode.
Programmer’s Manual
contains the informat i on required
• Sub-fiel ds, merge fiel ds, and cost cod e fi el ds are not
availab l e.
• Date and time fields ar e treated as regular text fi el ds;
you must su ppl y the date or time in the batch data for
printing.
• All chec k digits mu st be sent onlin e for each field
requiring a check digit.
• Only certain font s i zes are availa ble online. Refer to the
Programmer’s Manual
To begin Online mode:
1. Make sure you set the onli ne options in the printer to
match the hos t computer. For setting these options, see
"Setting the Online Parameters."
for the font sizes.
2. Connect the RS-232 cable interface to the printer and your
terminal device.
3. Display Online on the main menu by pressing D until
you see
Select Operating Mode: ↕
Online __
4-1
Page 84

9400 Series User’s Manual
4. Press
E
to select Online. You’ll see
Online Mode Ready:
The printer remains online until transmission is complete.
Printing begins immediately. However, the printer ignores any
batch in error, or batches for which a format does not exist. To
interrupt transmission press ! . Press
E
to return to the
main menu.
During transmis si on, the prin t er may disp la y mess age s su ch
as:
Format in use.
Waiting to complete print...
Waiting to store format.
Waiting to store batch.
Waiting to store graphic.
These ar e status messages and do not affect prin ter operation.
Auto-online Mode
If your printer is set for Auto-online mode, the printer is online
as soon as you turn it on.
To print in Auto-online mode:
1. Make sure your host compu ter is ready to sent the data.
2. Turn the printer on. After the printer displays the copyright
message, you’ll see
Online Mode Ready:
4-2
Page 85

4. Printing Online
3. Batches begin to print as soon as they are sent from the
host computer .
When all batches have finished printing, you can
• turn the printer off
• exit Auto-online mode
To exit Auto-online:
4. With the display showing Online Mode Ready, press # .
You’ll see
Enter password:___ _________
Printing Online
5. Type the 1-8 character password and press
E
.
NOTE: When you first receive the printer, the password is
ONLINE. To change the password, refer to
"Changing Passwords."
You’ll see the Main Menu.
For more information about Auto-online mode, see section 5,
"Configuring the Printer."
Online Errors
If there are format or batch errors, an error message is
displayed for ten seconds. The format or batch in error is not
saved. Data reception then continues with the remaining
batches.
NOTE: Printer faults or syntax errors in format data will take
the printer offline if you are not using Auto-online
mode. If you are using Auto-online mode, the printer
remains online. Examples of printer faults are:
Check Supply, Check Ribbon, etc.
4-3
Page 86

9400 Series User’s Manual
4-4
Page 87

5. Configuring the Printer
You can set specific printer features to match your operation.
Check digits Lets you ent er var ious ch e ck dig it
calculation schemes to generate che ck
digits. See "Defining a Check Digit."
Passwords One password fu nction lets you change
passwords for Format Entry, Printer
Configuration, and Auto-online modes. The
other function lets you look at the
passwords. See "Changi ng Passwords" or
"Displaying Passwords."
Time Sets the time prompt to appear during daily
startup. See "Setti ng the Time."
Date One date function lets you set the date
prompt to appear during daily startup. The
other function lets you select the format for
entry and printing of the date. See "Setting
the Date" and "Selecting the Date Format."
Configur ing the Prin ter
Online Sets the online communicati on options to
match the host computer. See "Setting the
Online Parameters."
Clear Batch
Memory at
Power-up
Clear Batch
Memory
Immed iately
9420/9440
Imaging
Clears batches automatically at power up.
See "Clearing Batch Mem ory at Power-up."
Clears all batches in memory immediately.
See "Clearing Batch Mem ory Immediately."
Changes the format imaging to match the
9420 and 9440 pr i nters. See "Usi ng
9420/9440 Imaging Mode."
5-1
Page 88

9400 Series User’s Manual
9420/9440 Mode Changes the character spacing and field
locati ons to match the 9420 and 9440
printers. See "Using 9420/9440 Com patible
Mode."
Auto-online Sets the printer to automatically start online
each time the printer is turned on. See
"Using Auto-online Mode" (you’ll only see
this option if you use the Online password
to get int o Pr i nter Configuratio n).
While in a function, you can cancel your entries by
pressing ! . To exit to the main menu, press ! again.
Defining a Check Digit
This option lets you define up to 12 calculation methods for
check digits. If you use a check digit with incrementing or
decrementing fields, the check digit is recalculated each time
the field increases or decreases.
Two check digit calculation methods are al ready defined for
you. You can use one of these methods, or define and use
your own methods. You can also redefine the two calculation
methods that are already entered.
1. From the main menu, press D to display Printer
Configuration. Press
E
. You’ll see
Enter password:___ __________
Type the 1-8 character security password and
press
E
.
NOTE: When you first receive the printer, the password is
MANAGER or ONLINE.
5-2
Page 89

5. Configuring the Printer
2. You’ll see the Configuration Options menu.
Select Config Option: ↓
Define Check Digit Schemes __
Press
E
.
3. You’ll see
CD Scheme Number [1-12]: 1
You can:
• type 1 or 2 and pr ess
E
to redefine the existing
check digit schemes
• type a number from 3-12 and pres s
new check digit scheme.
4. You’ll see
CD Calc ul ation Method: A
Enter [A,B,C,D or E]
E
Configur ing the Prin ter
to define a
Press
E
another l etter for the calculation method and press
A = Sum of product digits
B = Sum of products
C = AIS Bookstore*
D = SBC Bookstore*
E = ISBN Bo o ks t or e
* These calculation methods have 2 check digits. The other
methods have 1 check digit. Be sure you allow for two
check dig its when you design your for mat if you are using
calculation method C or D.
NOTE: When you sele ct A, B, o r E, skip st ep 5 .
to use calculation method A. Or, type
E
.
5-3
Page 90

9400 Series User’s Manual
5. You’ll see
CD Algorithm Option [A/B]: A
Press
E
to use option A. Or, type B and press
A = Group A
B = Group B
6. You’ll see the modulus screen.
CD Modu l us [2-11]: 10
Press
E
to use a modulus of 10. Or, type a number
from 2-11 as the modulus and press
7. You’ll see
Number of data digits: 10
[1-30]
E
E
.
.
Press
1-30 and pre ss
E
for 10 data digits. Or, type a number from
E
.
8. You’ll see
Weights for each pos i tion:
7137137131
Press
weights for each position and press
E
to use the weights displayed. Or type the
E
.
You’ll see the Configuration Options menu. To exit to the main
menu, press ! .
5-4
Page 91
5. Configuring the Printer
Changing Passwords
You can use this function to change the password for Format
Entry mode, Printer Configuration mode, or Auto-online mode.
To change a passwor d you must know that level (or a higher
level) password. Y ou need the Printer Configuration password
to enter Printer Configuration.
• If you know the Printer Configurat i on m ode password ,
you can change the Format Entry password, and the
Printer Configuration password.
• If you know the Auto-online password, you can change
the Format Entry password, the Printer Configuration
password, and the Auto-online password.
Configur ing the Prin ter
If you change your password, REMEMBER:
• Note your new password!
• You cannot return to the Change Password
function without your new password.
1. From the main menu, press D to display Printer
Configuration. Press
Enter password:___ ___________
Type the 1-8 character security password and
press
NOTE: When you first receive the pr i nter,
E
.
E
. You’ll see
• the Printer Configuration password is MANAGER
• the Auto-online password is ONLINE (you must enter
the password ONLIN E i f you want to change the
Auto-online password).
5-5
Page 92

9400 Series User’s Manual
2. You’ll see
Select Config Option: ↓
Define Check Digit Schemes __
Press D until you see Change Password(s). Press
E
.
3. You’ll see
Enter old pas sword:___ _______
Enter the old password (1-8 characters), and press
E
NOTE: When you first receive the pr i nter,
• M9400 is the password for Format Entry mode
• MANAGER is the password for Printer Configuration
mode
• ONLINE is the password for Auto-online mode
4. You’ll see the old password (for example, MANAGER)
Enter old pas sword: MANAGER
Enter new password:_________
Type 1-8 characters for the new password and press
E
Recorded! then you’ll see the Configu ration Options menu.
. You’ll see the message New Password
.
Press ! to exit to the main menu.
5-6
Page 93

5. Configuring the Printer
Displaying Passwords
If you forget a password, you can display it if yo u know a
higher lev el password. You need the Pri nter Configur ation
password to enter Prin ter Configu r ation.
• If you know the Printer Configurat i on m ode password ,
you can display the Format Entry password and the
Printer Configuration password.
• If you know the Auto-online password, you can display
the Format Entry password, the Printer Configuration
password, and the Auto-online password.
1. From the main menu, press D to display Printer
Configuration and press
E
. You’ll see
Configur ing the Prin ter
Enter password:___ _________
NOTE: When you first receive the printer, the password is
MANAGER or ONLINE.
2. Type the password. You’ll see the Configuration Option
menu.
Select Config Option: ↓
Define Check Digit Schemes __
Press D until you see Display Password(s). Press
E
to select this option. You’ll see the Format Entry
password.
Password(s): ↓
M9400 __
5-7
Page 94

9400 Series User’s Manual
You can:
• pres s
D
to display the password for Printer
Configuration
• pres s
D
again to display the Auto-online password (if
you used the password ONLINE to enter Printer
Configuration)
• pres s
E
to return to the Configuration Options
menu.
Press ! to exit the main menu.
Setting the Time
The tim e s e tting op t i on l ets you se t the curr e nt time . It al so
causes a tim e prom pt to appear at dai ly start up. The operat or
can then enter a new time at each startup .
At each startup, the printer starts at 00:00:00. The time
advances only while the power is on. At the next daily start up,
the operator must update the time.
1. From the main menu, press D to display Printer
Configuration. Press
E
. You’ll see
Enter password:___ __________
Type the 1-8 character password and press
E
.
NOTE: When you first receive the printer, the password is
MANAGER or ONLINE.
2. You’ll see the Configuration Options menu.
Select Config Option: ↓
Define Check Digit Schemes __
5-8
Page 95
5. Configuring the Printer
Press D until you see Set Time. Press
this option and to display the time setting screen.
3. You’ll see
Enter new time: 03:29:25
(HH:MM:SS)
4. Press C . You’ll see
Enter new time: __:__:__
(HH:MM:SS)
5. Press
E
. You’ll return to the Configuration Options
menu.
Press ! to exit to the main menu.
E
to select
Configur ing the Prin ter
Clearing the Time Prompt
If you don’t want the time prompt to appear at startup:
When you see the tim e setting screen
Enter new time: 03:29:25
(HH:MM:SS)
1. Press C . You’ll see
Enter new time: __:__:__
(HH:MM:SS)
2. Press
menu.
E
. You’ll return to the Configuration Options
Press ! to exit to the main menu.
5-9
Page 96

9400 Series User’s Manual
Setting the Date
The date setting option lets you set the current date. It also
causes a date prompt to appear at daily startup. The operator
can then enter a date.
At each startup, the printer starts at 01/01/89. The advances
while the power is on. At the next daily startup, the operator
must enter the current date.
1. From the main menu, press D to display Printer
Configuration. Press
Enter password:___ __________
E
. You’ll see
Type the 1-8 character password and press
E
.
NOTE: When you first receive the printer, the password is
MANAGER or ONLINE.
2. You’ll see the Configuration Options menu.
Select Config Option: ↓
Define Check Digit Schemes __
Press D until you see Set Date. Press
E
to select
this option.
3. You’ll see
Enter new date: 08/09/89
(MM/DD/YY)
4. Enter the month, day, and year. Use leading zeros for
single digits, e.g. 021489 fo r 0 2/14/89. Press
You’ll return to the Configuration Options menu.
Press ! to exit to the main menu.
5-10
E
.
Page 97

5. Configuring the Printer
Clearing the Date Prompt
If you don’t want the date prompt to appear at startup:
When you see the dat e set ting screen
Enter new date: 08/09/89
(MM/DD/YY)
1. Press C . You’ll see
Enter new date: __/__/__
(MM/DD/YY)
Configur ing the Prin ter
2. Press
E
. You’ll return to the Configuration Options
menu.
Press ! to exit to the main menu.
Selecting the Date Format
When you set the printer to display the Date prompt, the date
format is pres et at MMDDYY. This option lets you select one
of five formats. The printer automatically inserts the slashes at
printing.
1. From the main menu, press D to display Printer
Configuration. Press
Enter password:___ ___________
E
. You’ll see
Type the 1-8 character password and press
NOTE: When you first receive the printer, the password is
MANAGER or ONLINE.
E
.
5-11
Page 98
9400 Series User’s Manual
2. You’ll see the Configuration Options menu.
Select Config Option: ↓
Define Check Digit Schemes __
Press D until you Select Date Format. Press
select th is opt i o n.
3. You’ll see the date format selection screen.
Select a Date Format:
MM/DD/YY
The selections are:
MM/DD/YY
MM/YY/DD
DD/MM/YY
DD/YY/MM
YY/MM/DD
YY/DD/MM
Press D until you see the date format you want, then
press
E
. You ’ll automatically return to the
Configuration Opt i ons menu.
E
to
Press ! to exit to the main menu.
5-12
Page 99
5. Configuring the Printer
Setting the Online Parameters
Before entering the online parameters for the printer, see your
progra mming consul tant. You must matc h the pri n ter
parameters to those of the host computer.
The online parameters to be set are:
Parameter Printer Default
Configur ing the Prin ter
Baud rate
Parity
Wordlength
Stop bits
Start (XON) character
Stop (XOFF) character
2400
NONE
8
1
17
19
1. From the main menu, press D to display Printer
Configuration. Press
E
. You’ll see
Enter password:___ ___________
Type the 1-8 character password and press
E
.
NOTE: When you first receive the printer, the password is
MANAGER or ONLINE.
2. You’ll see the Configuration Options menu.
Press D until you see Host Port Configuration. Press
E
to select this option. With each parameter, you can
enter a new sel ection, or jus t press
value that is displayed.
Select Config Option: ↓
Define Check Digit Schemes __
E
to keep the
5-13
Page 100
9400 Series User’s Manual
3. You’ll see the Host Option menu and the first online
parameter.
Select Baud Rate:
2400
Press D or U until you see the baud rate you need,
then press
E
. You’ll see
Ent e r Parity : N
N)one, O)dd or E)ven
4. Type the parity you need and press
E
Enter Word Length [7- 8]: 8
5. Type the word length you need and press
see
Enter Stop Bits [1-2]: 1
6. Type the stop bits you need and press
E
Enter St art (XON) char acter:
17
. You’ll see
E
. You’ll
. You’ll see
7. Enter a number from 1-127 for XON flow control, or 128 for
DTR flow control. Yo u’ll see
Enter St op (XOFF) character.
19
5-14
 Loading...